Warnings and Precautions FAILURE TO READ, UNDERSTAND AND FOLLOW THESE INSTRUCTIONS MAY LEAD TO SERIOUS INJURY OR DEATH!
|
|
|
- Tamsin Gibbs
- 5 years ago
- Views:
Transcription
1 Instruction Booklet 2006 Summit ATV Pak-Mule Single Axle Summit ATV Pak-Mule Tandem Axle 84002!! READ ME FIRST!!! Please read carefully BEFORE using you new Summit ATV Product. Congratulations! You have purchased the finest commercially available ATV implement on the market today. Summit ATV Products are designed and built to provide years of trouble-free, successful use. This booklet is provided to you to outline the recommended use, care and maintenance of your Summit ATV Product. Warnings and Precautions FAILURE TO READ, UNDERSTAND AND FOLLOW THESE INSTRUCTIONS MAY LEAD TO SERIOUS INJURY OR DEATH! READ, UNDERSTAND AND OBEY YOUR ATV S INSTRUCTION / SAFETY MANUAL BEFORE USING THIS PRODUCT! ALWAYS WEAR A HELMET! DO NOT EXCEED A SAFE SPEED FOR THE TERRAIN AND SOIL CONDITIONS ENCOUNTERED! NEVER USE ON STEEP SLOPES! NEVER EXCEED YOUR RIDING CAPABILITIES! DO NOT EXCEED YOUR ATV S MAXIMUM RATED TOWING CAPACITY! WEIGHT LIMIT SINGLE AXLE PN LBS. WEIGHT LIMIT TANDEM AXLE PN LBS. DO NOT OPERATE IF YOU HAVE BEEN USING DRUGS OR ALCOHOL! SUMMIT S LINE OF ATV TRAILERS ARE DESIGNED FOR USE WITH AN ATV OR GARDEN TRACTOR ONLY. DO NOT USE WITH A CAR, TRUCK OR ANY OTHER VEHICLE! SUMMIT S LINE OF ATV IMPLEMENTS ARE NOT DESIGNED FOR HIGH SPEED TRANSPORT ON PUBLIC ROADS! YOU MUST USE A 2 BALL TO CONNECT THE PAK MULE TO YOUR ATV! DO NOT USE THE PAK MULE FOR HUMAN TRANSPORTATION! CHECK AND RETIGHTEN ALL BOLTS PRIOR TO EACH USE! THOROUGHLY RINSE AFTER USE WITH FERTILIZERS OR OTHER CHEMICALS! LUBRICATE ALL GREASE FITTINGS BEFORE FIRST USE! LUBRICATE ALL MOVING PARTS AFTER EVERY USE!


, two nylon spacers and one center lock nut (the nut should have a hexagonal stamp) to secure as shown in Figure 6.")
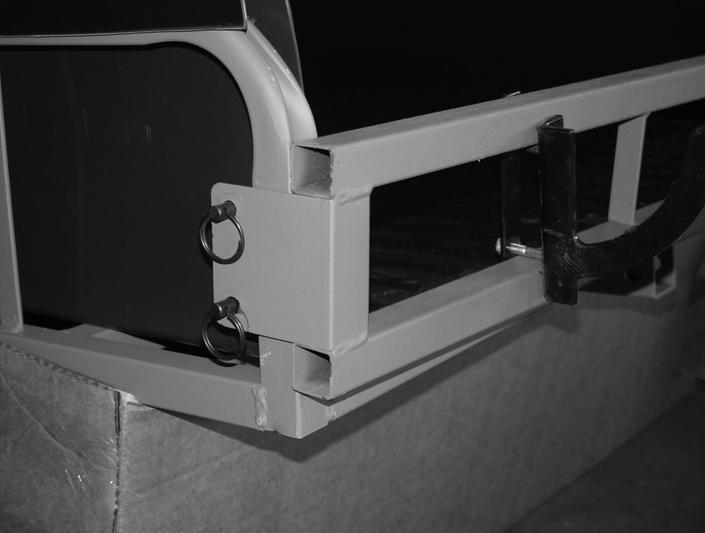
2 Section 1. Assembling Your New Pak Mule. Part 1. Suspension Assembly. Step 1. Attach one, 1 E-Style Snap Ring to the innermost slot on the trailing arm as shown in Figure 1. Step 2. Lubricate the 1 axle with grease and slid it into the axle boss from the inside out. Secure with one, 1 E-Style Snap Ring as shown in Figure 2. Step 3. Grease the 3/4 shaft and slide on the Wheel assembly as shown in Figure 3. The valve stem should face out. Step 4. Place the 3/4 I.D. washer on the wheel spindle and install the 3/4 E-Style Snap Ring in the groove of the spindle as shown in Figure 4. Step 5. Grease the shock mounting shaft and slide the rod end of the shock onto it. Install the smaller 12 mm washer and cotter pin as shown in Figure 5. Step 6. Position the spring end of the shock inside the shock bracket. Use one 12 mm x75 mm bolt (the head is marked 8.8 ), two nylon spacers and one center lock nut (the nut should have a hexagonal stamp) to secure as shown in Figure 6. NOTE: There are three different shock mounting points allowing for three different placements. The closer the shock comes to perpendicular with respect to the frame, the stiffer it becomes (See Figure 7). Always adjust both sides equally. Step 7. Repeat for other side (Single Axle Trailer). Repeat 3 more times for each trailing arm on the Tandem trailer. Step 8. Grease each Wheel assembly from the grease fitting on the inside of the wheel. Figure 1 Figure 4 Part 2. Frame Assembly. Step 1. Position the Hinge Plate Coupler as shown in Figure 8 and secure with one 1/2 x 3.5 bolt with lock nut. NOTE: Correct position is as shown with the notched corner facing the trailer. Step 2. Use one 4 clevis pin to secure the Coupler to the frame as shown in Figure 9. NOTE: On Pak Mule Tandem, the clevis pin is replaced by one 1/2 x 3.5 bolt with lock nut. Step 3. Position the Tongue Assembly with the coupler facing down and secure using one 1/2 x 3.5 bolt and lock nut through the first set of holes as shown in Figure 10. Step 4. Rotate the Tongue up and insert the remaining 4 clevis pin through the back hole to secure it as shown in Figure 11. Part 3. Tailgate Assembly Slide Tailgate over the frame and line up the pre-drilled holes as shown in Figure 12. Secure using two, 5/16 detent pins per side. Figure 7 Part 4. Tailgate Hanging Bracket Assembly - Pak Mule Single Axle only. Step 1. Using two 1/4 x 1.75 bolts and lock nuts - attach the rubber coated brackets to the tailgate as shown in Figure 13. Leave bolts loose so they can be adjusted. Step 2. Take the Tail Gate Assembly to your ATV. Spread the brackets so they are as far apart as possible and so that they rest over the cargo rack of the ATV as shown in Figure 14. Step 3. Tighten bracket hardware.


3 Figure 2 Figure 3 Figure 5 Figure 6 12 mm x 75 mm Bolt with Lock Nut and Spacers. Figure 8 Figure 9 1/2 x 3.5 Bolt with Lock Nut.
. WARNING: The rubber coated hooks must face forward. Step 3.")


4 Section 2. Use of Your Pak Mule Trailer. Part 1. Mounting the Single Axle Trailer to an ATV. Figure 10 Step 1. Position the tailgate near the pre-drilled holes as shown in Figure 15. Step 2. Lower the tailgate and secure using the four, 5/16 detent pins (Used in Part 3 to secure the tailgate to the back of the trailer). WARNING: The rubber coated hooks must face forward. Step 3. Hook your Pak Mule up to the 2 ball on your ATV and secure the coupler. Step 4. Remove the safety clip and the clevis pin from the tongue assembly as shown in Figure 16. Step 5. Lift up on the Pak Mule trailer from behind and set the Rubber Coated hooks down on your cargo rack as shown in the previous Figure 14. Step 6. Re-install the clevis pin through the tongue assembly. Step 7. Using the supplied utility straps, secure the trailer to the cargo rack as. 1/2 x 3.5 Bolt with Lock Nut. Part 2. Using the dump feature of the Single Axle Trailer. With the Pak Mule on the ground and attached to your ATV: Pull the safety clip and the clevis pin from under the frame as shown in Figure 17. Once this pin is removed, the bed can pivot. Figure 13 Section 3. Adjustments. WARNING: ALL SUSPENSION ADJUSTMENTS SHOULD BE MADE TO BOTH SIDES EQUALLY! The suspension on both the single axle and the tandem axle is adjustable for varying loads and terrain. The upper shock mounts can be moved to increase stiffness and ground clearance. See Section 1, Part 1, Step 6 for more information. The shocks on the Pak Mule are adjustable. Each shock has a collar in the middle of the shock just below the spring. Turning the collar clockwise increases the stiffness of the spring as shown in Figure 19. It is recommended that the shocks be stiffened for frequent heavy load use. Lighter loads require less stiffness. Figure 16 Figure 17


5 Figure 11 Figure 12 Figure 14 Figure 15 Figure 19
6 Parts List (single) (tandem) PN Description Qty Qty Pak Mule Trailer Chassis with Bedliner Pak Mule Trailing Arm Pak Mule Tailgate Assy Trailer Hinge Plate Coupler Tongue and 2 Ball Coupler Wheel and Tire Assy Hardware Packet Instructions E-Style Snap Clip /4 ID Washer /4 E-Style Snap Clip mm ID Washer Cotter Pin mm x 75 mm Bolt (8.8 on head) mm lock nut (hex stamp on side) Nylon Shock Spacer Shock /2 x 3.5 Bolt /2 Lock Nut Clevis pin with safety clip /16 detente pins Utility Strap /4 x 1.75 Bolt /4 Lock Nuts Pak Mule Hanging Attachment with backing plate 2 0 (STLLC 2006) Limited Warranty (A) Warranty Summit Treestands, LLC (Summit) warrants to the original retail purchaser that all products manufactured by it are free from defects in material and manufacture at the time of shipment for twelve (12) months from the date of purchase. Summit will repair or replace any part found defective if the unit claimed to be defective shall be returned to Summit, postage prepaid, within the warranty period. This warranty shall not apply to any product which has been subjected to misuse; misapplication; neglect (including but not limited to improper maintenance); accident; improper installation; modification (including but not limited to use of unauthorized parts or attachments); adjustment or repair. THE FOREGOING IS IN LIEU OF ALL OTHER WARRANTIES, WHETHER EXPRESS OR IMPLIED (INCLUD- ING THOSE OF MERCHANTABILITY AND FITNESS OF ANY PRODUCT FOR A PARTICULAR PURPOSE), AND OF ANY OTHER OBLIGATION OF LIABILITY ON THE PART OF THE COMPANY. (B) Limitation of Liability It is expressly understood that Summit s liability for its products, whether due to breach of warranty, negligence, strict liability, or otherwise, is limited to the repair of the product, as stated above, and Summit will not be liable for any other injury, loss, damage, or expense, whether direct or consequential, including but not limited to loss of use, income, profit, or damage to material, arising in connection with the sale, installation, use of, inability to use, or the repair or replacement of Summit s products. Summit reserves the right to make alterations or modifications in its products at any time, which in its opinion, may improve the performance and efficiency of the product. It shall not be obligated to make such alterations or modifications to products already in service. Please fill out the warranty card on the back of these instructions and return to: SUMMIT Treestands, LLC. 715 Summit Dr. Decatur, AL You can also register your warranty card on line at: r. Cut Along Line Cut Along Line Warranty Card for Summit ATV Product Item Purchased: Pak-Mule Single (PN 84000) Pak-Mule Tandem (PN 84002) Owners Name: Street Address: City: State: ZIP: Phone: ( ) Date Purchased: Purchased From (Dealer Name): Price $: Your heard about us through: Magazine Advertisement Video Friend Summit Catalog Other Please Explain:
CUB CART. S P E C I F I C A T I O N S: Model Number: 8449 Part Number: Load Capacity: 400 lbs.
 CUB CART S P E C I F I C A T I O N S: Model Number: 8449 Part Number: 108449 Load Capacity: 400 lbs. Load Size: 7 Cubic Feet Overall Dimensions: 50"L x 28"W x 29"H Overall Weight: 30 lbs. Tub Dimensions:
HD 1200 TA WARRANTY INFORMATION
 HD 1200 TA SPECIFICATION: Model Number 8261 Part Number 108385 Load Capacity: 1200 lbs Level Load Size: 15 Cubic Feet Overall Dimensions: 84" x 45" x 31" Overall Weight: 192 lbs. Body Dimensions: 62" x
NOTICE: Once used, this trailer cannot be returned to the store. If you have a warranty claim, please contact Polar Trailer directly.
 S P E C I F I C A T I O N S : 18-CF DUMP CART Item Number 9876 Load Capacity: 1000 lbs LevelLoad Size: 14 Cubic Feet Overall Dimensions: 81" x 44" x 30" Overall Weight: 90 lbs. Body Dimensions: 59" x 38"
LARGE SIDE RAIL KIT 8272 FITS 1500 SERIES TRAILERS PART NO INSTRUCTIONS NO
 LARGE SIDE RAIL KIT 8272 FITS 1500 SERIES TRAILERS PART NO. 108272 INSTRUCTIONS NO.-104873 THIS SIDE RACK KIT IS INTENDED FOR INSTALLATION ON POLAR TRAILERS WITH AN EMBOSSED POLAR TUB LOGO ONLY AND WILL
ASSEMBLY INSTRUCTIONS & OWNERS MANUAL. McCONKEY INC. P.O. Box 1362 Seeley Lake, MT Phone: (308)
") ASSEMBLY INSTRUCTIONS & OWNERS MANUAL McCONKEY INC. P.O. Box 1362 Seeley Lake, MT 59868 Phone: (308) 641 2058 www.atvbackpackercart.com 1 Do not operate your ATV on steep or uneven terrain while the cart
ASSEMBLY INSTRUCTIONS & OWNERS MANUAL McCONKEY INC. P.O. Box 1362 Seeley Lake, MT 59868 Phone: (308) 641 2058 www.atvbackpackercart.com 1 Do not operate your ATV on steep or uneven terrain while the cart
ASSEMBLY INSTRUCTIONS & OWNER S MANUAL
 Caution: For Safety Read and Follow Assembly and Operating Instructions Carefully ASSEMBLY INSTRUCTIONS & OWNER S MANUAL McCONKEY INC. P.O. Box 1362 Seeley Lake, MT 59868 1 of 7 NEED HELP? Please visit
HD S P E C IF I C AT I O N S Model Number: 8233 Part Number: Load Capacity: 1500 lbs.
 HD 1500 - S P E C IF I C AT I O N S Model Number: 8233 Part Number: 108384 Load Capacity: 1500 lbs. Load Size: 22 Cubic Feet Overall Dimensions: 98" x 54" x 31" Overall Weight: 127 lbs. Body Dimensions:
ASSEMBLY / OPERATION INSTRUCTIONS. Low Profile Motorcycle Dolly
 ASSEMBLY / OPERATION INSTRUCTIONS 1,500LB CAPACITY Low Profile Motorcycle Dolly Model: 03-CG1500-01(B1) WARNING BEFORE USE PLEASE READ ALL WARNINGS AND INSTRUCTIONS TO PREVENT SERIOUS INJURY Drop-Tail
Owner's Manual TX159 Four-Wheel ATV Trailer. Rated Capacity lb. P/N: REV2: 08/07/ RETI All Rights Reserved.
 TX159 Four-Wheel ATV Trailer Rated Capacity - 1250lb Get parts online at www.yutrax.com P/N: 22317 REV2: 08/07/17 2017 RETI All Rights Reserved. YUTRAX offers a full line of ATV accessories. We appreciate
MODEL EF Full Circle Tire Spreader
 MODEL EF Full Circle Tire Spreader Installation, Operation & Repair Parts Information Branick Industries, Inc. 4245 Main Avenue P.O. Box 1937 Fargo, North Dakota 58103 REV. 062917 P/N: 81-0050C CAUTION
MODEL L/R/EF Sectional Tire Spreader
 MODEL L/R/EF Sectional Tire Spreader Installation, Operation & Repair Parts Information Branick Industries, Inc. 4245 Main Avenue P.O. Box 1937 Fargo, North Dakota 58103 REV08032016 P/N: 81-0195E TABLE
Illustrated Parts List I HDC 1000 ( ) Repair Parts Manual
 Repair Parts Manual") Illustrated Parts List 2008-01 I0807212 531 03 10-07 HDC 1000 (45-01714-669) Repair Parts Manual owners manual Model No. 45-01714-669 10 CU. FT. CART CAUTION: Read Rules for Safe Operation and Instructions
Illustrated Parts List 2008-01 I0807212 531 03 10-07 HDC 1000 (45-01714-669) Repair Parts Manual owners manual Model No. 45-01714-669 10 CU. FT. CART CAUTION: Read Rules for Safe Operation and Instructions
Please visit for the latest version of these installation instructions.
 Please visit www.blueox.com for the latest version of these installation instructions. 2014-2017 Ram 2500 (All beds) Please read these in their entirety prior to installing or operating this equipment.
Owner s Instruction and Safety Manual. pet trailer. Burley Tail Wagon. Burley Tail Wagon model shown (Stroller Kit and Kickstand are Sold Separately)
") Owner s Instruction and Safety Manual pet trailer Burley Tail Wagon Burley Tail Wagon model shown (Stroller Kit and Kickstand are Sold Separately) Stroll Bike Contents Owner s Instruction and Safety Manual
Owner s Instruction and Safety Manual pet trailer Burley Tail Wagon Burley Tail Wagon model shown (Stroller Kit and Kickstand are Sold Separately) Stroll Bike Contents Owner s Instruction and Safety Manual
2019-ON RAM 1500 INSTALLATION INSTRUCTIONS
 2019-ON RAM 1500 INSTALLATION INSTRUCTIONS Thank you for purchasing ROCKSTARTM Splash Guard Mud Flaps. Agri-Cover, Inc. proudly manufactured these mud flaps using superior quality materials and workmanship.
Installation Precautions. Use Precautions. Specifications
 Important Safety Information Safety Setup Operation Maintenance Read all safety warnings and instructions. Failure to follow the warnings and instructions may result in serious injury. Save all warnings
Instruction Manual. ATV Plow Tube System
 Instruction Manual ATV Plow Tube System Manual Conventions This manual uses the following symbols to help differentiate between different kinds of information. The safety symbol is used with a key word
BX7322 Adventurer Tow Bar Operator Manual & Installation Instructions
 Please visit www.blueox.com for the latest version of these installation instructions. BX7322 Operator Manual & Installation Instructions Serial Number (5,000 lb) 2 Inch Coupler 292-1263 Rev J Page 1 of
ASSEMBLY / OPERATION INSTRUCTIONS. Low Profile / Stand-Up Motorcycle Dolly
 ASSEMBLY / OPERATION INSTRUCTIONS 1,500LB CAPACITY Low Profile / Stand-Up Motorcycle Dolly Model: 03-CGPR1500-01(C) WARNING BEFORE USE PLEASE READ ALL WARNINGS AND INSTRUCTIONS TO PREVENT SERIOUS INJURY
Installation Instructions
 Equipment Required: Fastener Kit: F Wrenches: 3/4, 15/16, 10mm, 18mm Drill Bits: 1/4 Other Tools: Drill, Reciprocating saw 9465/9475 HIDE-A-GOOSE HITCH INSTALLATION All Fasteners Typical, Both Sides WARNING:
MODEL 5500 Tire Repair Station
 MODEL 5500 Tire Repair Station Installation, Operation and Repair Parts Information Branick Industries, Inc. 4245 Main Ave P.O. Box 1937 Fargo, North Dakota 58103 P/N: 81-0047C TABLE OF CONTENTS SAFETY
OWNER S GUIDE 8A DURALIFT II 13,200 LB. CAPACITY. Link Mfg. Ltd th St. N.E. Sioux Center, IA USA
 OWNER S GUIDE 8A000715 DURALIFT II 13,200 LB. CAPACITY Link Mfg. Ltd. 223 15th St. N.E. Sioux Center, IA USA 51250-2120 www.linkmfg.com QUESTIONS? CALL CUSTOMER SERVICE 1-800-222-6283 DEALER / INSTALLER:
Please visit for the latest version of these installation instructions.
 Please visit www.blueox.com for the latest version of these installation instructions. DH2400 (Long & Standard Box) Please read these in their entirety prior to installing or operating this equipment.
Installation Instructions
 Equipment Required: Fastener Kit: F Wrenches: 3/4, 15/16 Drill Bits: 1/4 Other Tools: Drill Short & Long Bed All Megacabs 9464/9474 HIDE-A-GOOSE HITCH INSTALLATION WARNING: Under no circumstances do we
Installation manual. 2 front / 1 rear spacer kit Jeep Wrangler JK 2 & 4 door Part # 42005
 Part # 42005 2007-2015 Jeep Wrangler JK 2 & 4 door 2 front / 1 rear spacer kit Parts list: Part # Description Qty. 42005-01 Front coil spring spacers 2 42005-02 Rear coil spring spacers 2 42005INST Instruction
Dodge Ram 1500, Quad/Reg. Cab, w/6.4ft. & 8ft. Bed, 2 & 4 WD. For updates see PRODUCT SUPPORT tab at
 Assembly, Installation, Operation and Maintenance Instructions 2009-2016 Dodge Ram 1500, Quad/Reg. Cab, w/6.4ft. & 8ft. Bed, 2 & 4 WD. Part # 30665 Dealer / Installer: Provide a copy of these Instructions
Installation Instructions
 Equipment Required: Fastener Kit: F Wrenches: 15/16, 10 mm Drill Bits: 1/4 Other Tools: Drill, Reciprocating Saw 9464/9474 HIDE-A-GOOSE HITCH INSTALLATION All Fasteners Typical, Both Sides WARNING: Under
BX7322 Adventurer Tow Bar Operator Manual & Installation Instructions
 Please visit www.blueox.com for the latest version of these installation instructions. BX7322 Operator Manual & Installation Instructions Serial Number (5,000 lb) 2 Inch Coupler 292-1263 Rev J Page 1 of
INSTALLATION INSTRUCTIONS QA1 P/N x400, x500, x600, x400, x500, x F100 Front Coil-over Suspension System
 INSTALLATION INSTRUCTIONS QA1 P/N 52620-x400, 52620-x500, 52620-x600, 52621-x400, 52621-x500, 52621-x600 65-72 F100 Front Coil-over Suspension System TOOLS AND SUPPLIES REQUIRED Floor Jack Two (2) Jack
Installation / Owners Manual
 DEALER/INSTALLER: (1) Provide this Manual to end user END USER: Part Number: 94621 94622* *Packaged for Individual sale. (1) Read and follow this Manual for Reese Installation. (2) Save this Manual for
RAM 1500, 2019 CLASSIC & 2010-ON 2500/3500 INSTALLATION INSTRUCTIONS
 2009-18 RAM 1500, 2019 CLASSIC & 2010-ON 2500/3500 INSTALLATION INSTRUCTIONS Thank you for purchasing ROCKSTARTM Splash Guard Mud Flaps. Agri-Cover, Inc. proudly manufactured these mud flaps using superior
60in. Acreage Rake. Owner s Manual
 60in. Acreage Rake Owner s Manual WARNING: Read carefully and understand all ASSEMBLY AND OPERATION INSTRUCTIONS before operating. Failure to follow the safety rules and other basic safety precautions
Installation manual. 1.5 front leveling kit. Nissan Titan. Part # Part # Important customer information: Nissan Titan
 Installation manual 1.5 front leveling kit 2004-2015 Nissan Titan Part # 52008 sj071408rev.01 Part # 52008 2004-2015 Nissan Titan 1.5 front leveling kit Part # Description Qty. 52008-01 Front strut spacers
INSTALLATION MANUAL TOYOTA TUNDRA 5 SUSPENSION SYSTEM PART # 55905
 PART NUMBER : 55905 1999 2003 TOYOTA TUNDRA 5 SUSPENSION SYSTEM PARTS LIST: Part # Description Qty. 55900-01 Driver Side Spindle 1 55900-02 Passenger Side Spindle 1 55905-03 Rear brake proportioning valve
OWNER'S MANUAL L A W N R O L L E R PRT-481S BH. Safety Assembly Operation Repair Parts Maintenance. Visit us on the web!
 OWNER'S MANUAL L A W N R O L L E R ROLLER MODEL: PRC- BH PRT- BH PRT-S BH PRT-S BH Safety Assembly Operation Repair Parts Maintenance Recommended for use with Riding Mowers, Lawn or Garden Tractors, and
Operating Manual. 2012, 2024, and 2026 Soil Sampler th AVE N Fargo, ND Phone: (701) Web: farmqa.com
 Web: farmqa.com") Operating Manual 2012, 2024, and 2026 Soil Sampler 2800 7th AVE N Fargo, ND 58102 Phone: (701) 237-2167 Web: farmqa.com AMITY TECHNOLOGY, LLC PRODUCT WARRANTY Amity Technology, LLC warrants to the original
Operating Manual 2012, 2024, and 2026 Soil Sampler 2800 7th AVE N Fargo, ND 58102 Phone: (701) 237-2167 Web: farmqa.com AMITY TECHNOLOGY, LLC PRODUCT WARRANTY Amity Technology, LLC warrants to the original
Owner s Manual. Instructions for Assembly, Testing, Operation, and Servicing. Trailer Kit: High speed upgrade kit used with Item# WARNING
 M268176D.1 ITEM NUMBER: 268176 SERIAL NUMBER: Owner s Manual Instructions for Assembly, Testing, Operation, and Servicing Trailer Kit: High speed upgrade kit used with Item# 268175 WARNING READ and UNDERSTAND
Fifth Wheel Power Hitch Operations Manual
 Fifth Wheel Power Hitch Operations Manual ITD1253 Fifth Wheel Power Hitch 208 587 7960 www.intheditch.com This page is intentionally left blank. Operations Manual 1 TABLE OF CONTENTS TABLE OF CONTENTS...
20K - Fifth Wheel Hitch
 You can take it with you. INSTRUCTION & OPERATION MANUAL 20K - Fifth Wheel Hitch DEALER/INSTALLER: (1) Provide this Manual to end user. (2) Physically demonstrate hitching and unhitching procedures in
31068 INSTALLATION INSTRUCTIONS
 0 INSTALLATION INSTRUCTIONS Safety glasses should be worn at all times while installing this product. YEARS: 009-CURRENT MAKE: FORD MODEL: F-0 STYLE: ALL WARNING: NEVER EXCEED YOUR VEHICLE MANUFACTURER'S
Installation Instructions GOOSENECK MOUNTING KIT Chevrolet/GMC 1500/2500/3500 All except 4-door Crew-Cab
 GOOSENECK MOUNTING KIT Equipment Required: Fastener Kit: F Wrenches: 3/4, 7/8, 15/16 Drill Bits: 1/4 Other Tools: Drill WARNING: Under no circumstances do we recommend exceeding the towing vehicle manufacturers
Read the owner s manual completely before you use the trailer.
 OWNER S MANUAL Read the owner s manual completely before you use the trailer. MODEL MPT-581ATV IMPORTANT SAFETY CHECK LIST PLEASE NOTE: Trailers are not generally used every day. A trailer may sit for
Installation Instructions
 Equipment Required: Fastener Kit: F Wrenches: 3/4, 15/16 Drill Bits: 1/4 Other Tools: Drill, Reciprocating saw WARNING: Under no circumstances do we recommend exceeding the towing vehicle manufacturers
SwayPro. Owner s Manual THANK YOU
 SwayPro Owner s Manual It s from Blue Ox. So you know it s built tough. BXW0551 550 lbs. maximum tongue weight capacity BXW0751 750 lbs. maximum tongue weight capacity BXW1001 1000 lbs. maximum tongue
Installation Instructions
 Equipment Required: Installation Instructions Fastener Kit: F Wrenches: 8mm, 13mm, 3/4, 15/16 Drill Bits: 1/4 Other Tools: Drill, Reciprocating Saw, File WARNING: Under no circumstances do we recommend
INSTALLATION INSTRUCTIONS
 INSTALLATION INSTRUCTIONS Thank you for purchasing ROXTERTM Hitch Mounted Mud Flaps. Agri-Cover, Inc. proudly manufactured these mud flaps using superior quality materials and workmanship. With proper
VersaHitch Bike Rack
 VersaHitch Bike Rack Installation Manual: for Jeep Wrangler with VersaHitch # 92034.3000 PARTS LIST: Receiver Bases - QTY 2 Main Rack System - QTY 1 Installation Hardware - SEE PAGE 3 REQUIRED TOOLS: Safety
Stop! Read This Important Information.
 Stop! Read This Important Information. Stop, Do Not Proceed, Read This This door replacement kit is designed for the replacement of doors on a Supertop ONLY! This door will not work on any other style
ASSEMBLY INSTRUCTIONS Reese Elite Series FIFTH WHEEL SLIDER HITCH
 ASSEMBLY INSTRUCTIONS Reese Elite Series FIFTH WHEEL SLIDER HITCH DEALER/INSTALLER: (1) Provide this Manual to end user. (2) Physically demonstrate procedures in this Manual to end user. (3) Have end user
Installation manual 3 suspension system Toyota Tacoma 4 x 4 & PreRunner Part # sj rev.03
 Part #: 52904 1995-2004 Toyota Tacoma 4 x 4 & PreRunner 3 suspension system Parts list: Part # Description Qty. 52904-01 Rear brake proportioning valve bracket 1 52907-02 Front pre load spacer 2 52904-03
CUSTOM CARRIERS. Crane Carrier Company Standard Warranty
 CUSTOM CARRIERS Crane Carrier Company Standard Warranty CRANE CARRIER COMPANY ("Manufacturer") warrants each new Crane Carrier sold by it or any of its authorized distributors to be free from defects in
Installation Instructions SRC Over-Size Tire Carrier Jeep Wrangler/Unlimited Part # 2743
 NOTE: Carefully read instructions entirely before assembling/installing this product. Parts Included Qty Parts Included Qty Tire Carrier 1 8 x 70mm Hex Bolt 4 Brake Light Bracket 1 8mm Flat Washer 4 Tire
INSTRUCTION MANUAL TITAN 16K - Fifth Wheel Hitch Plymouth MI
 You can take it with you. INSTRUCTION MANUAL TITAN 16K - Fifth Wheel Hitch Plymouth MI Product No. 30866 DEALER/INSTALLER: END USER: (1) Provide this Manual to end user. (2) Physically demonstrate hitching
OWNER S MANUAL 40 LAWN AERATOR SAT-40 BH. Assembly Installation Operation Repair Parts. Visit us on the web! MODEL:
 OWNER S MANUAL 40 LAWN AERATOR MODEL: SAT-40 BH Assembly Installation Operation Repair Parts For the latest product updates & setup tips: Visit us on the web! www.brinly.com Important: This manual contains
31074 INSTALLATION INSTRUCTIONS
 3107 INSTALLATION INSTRUCTIONS Safety glasses should be worn at all times while installing this product. YEARS: 2015 MAKE: CHEVROLET MODEL: COLORADO & CANYON STYLE: TRUCK WARNING: NEVER EXCEED YOUR VEHICLE
Installation Instructions
 Equipment Required: Installation Instructions Fastener Kit: F Wrenches: 15/16, 10 mm Drill Bits: 1/4 Other Tools: Drill, Reciprocating Saw 9464/9474 HIDE-A-GOOSE HITCH All Fasteners Typical, Both Sides
2. Remove front wheels.
 1 PARTS DIAGRAM 2 Installation Instructions: (PASSENGER SIDE) 1. Place jack under center of RUV front end and lift until front wheels clear the ground. Be careful to support the RUV properly so that it
1250 LB. CAPACITY MECHANICAL WHEEL DOLLY
 1250 LB. CAPACITY MECHANICAL WHEEL DOLLY 67287 SET-UP AND OPERATING INSTRUCTIONS Visit our website at: http://www.harborfreight.com Read this material before using this product. Failure to do so can result
Fitting Instruction for EZI-GRIP Bike Rack
 Fitting Instruction for EZI-GRIP Bike Rack Congratulations on purchasing Ezi-Grip to carry your valued bicycles. We are sure you will get many years of enjoyable use from your Ezi-Grip Bike Rack. These
Owners Manual. Wheel Kaddy. Kage Innovation TM LLC 5302 Stagecoach Tr. Oak Park Heights, MN kageinnovation.
 Owners Manual Wheel Kaddy Kage Innovation TM LLC 5302 Stagecoach Tr. Oak Park Heights, MN 55082 kageinnovation.com (844) 314 KAGE Kage Limited Warranty Kage Innovation will repair or, at the option of
HEAVY-DUTY STEEL WAGON
 HEAVY-DUTY STEEL WAGON Owner s Manual WARNING: Read carefully and understand all ASSEMBLY AND OPERATION INSTRUCTIONS before operating. Failure to follow the safety rules and other basic safety precautions
11422 INSTALLATION INSTRUCTIONS
 11422 INSTALLATION INSTRUCTIONS Safety glasses should be worn at all times while installing this product. YEARS: 2015-PRESENT MAKE: VOLKSWAGEN MODEL: GOLF SPORTWAGEN STYLE: WAGON WARNING: NEVER EXCEED
Technical Support Line: (952) Hanover Ave. Lakeville, MN
 Hanover Ave. Lakeville, MN") Technical Support Line: (952) 985-5675 Email: Sales@QA1.net 21730 Hanover Ave. Lakeville, MN 55044 www.qa1.net INSTALLATION INSTRUCTIONS QA1 1967-1979 Mopar A-Body Rear 6 link Conversion System QA1 p/n
Technical Support Line: (952) 985-5675 Email: Sales@QA1.net 21730 Hanover Ave. Lakeville, MN 55044 www.qa1.net INSTALLATION INSTRUCTIONS QA1 1967-1979 Mopar A-Body Rear 6 link Conversion System QA1 p/n
Installation Instructions
 Equipment Required: Fastener Kit: F Wrenches: 3/4, 15/16, 13mm Drill Bits: 1/4, some older models a 1/2 Other Tools: Drill, Saber Saw 5/8 Fasteners From Hitch Fastener Kit Installation Instructions GOOSENECK
Installation Instructions
 Equipment Required: Fastener Kit: F Wrenches: 15/16, 15/16 Crowfoot Adaptor Drill Bits: 1/4 Other Tools: Drill, Reciprocating saw Optional, Raise Bed: 18mm socket, 15 extension As an option you can loosen
Installation Instructions
 Equipment Required: Fastener Kit: F Wrenches: 3/4, 15/16 Drill Bits: 1/4 Other Tools: Drill WARNING: Under no circumstances do we recommend exceeding the towing vehicle manufacturers recommended vehicle
AET48 Owner s Manual. TOW AERATOR Owner s Manual AET48 Beginning Serial #: Replacement Parts
 Tine Row Kit Complete tine row set for replacement of one complete row of tines. Includes mounting plates, spacer, and all hardware. TOW AERATOR Owner s Manual AET48 Beginning Serial #: 0206001 Tine Kit
MOUNTING RAILS ***DO NOT EXCEED VEHICLE MANUFACTURER'S RECOMMENDED TOWING CAPACITY.***
 10/30/2017 PAGE 1 OF 6 Parts List ITEM QTY PART NUMBER DESCRIPTION 1 2 CM-16150-MR MOUNTING RAILS 2 2 CM-16150-FB.375" FRONT BRACKET 3 1 CM-16150-PSRB.375" PASSENGER SIDE REAR BRACKET 4 1 CM-16150-DSRB.375"
IMPORTANT SAFETY INFORMATION
 Specifications Tricycle Height 26 Front Wheel 5/8 Axle Diameter, 13 Pneumatic Knobby Tire Back Wheels 5/8 Axle Diameter, 10 Pneumatic Knobby Tire Age Range 5 and up Weight Capacity 150 lb. IMPORTANT SAFETY
Operations Manual. Covering Models:
 Operations Manual Covering Models: ITD2490 XD Dolly Set ITD2478 Speed Dolly Set (5.70-8 Aluminum Wheels) (4.80-8 Aluminum Wheels) ITD2480 Speed Dolly Set (4.80-8 Steel Wheels) 208-587-7960 www.intheditch.com
INSTALLATION MANUAL TOYOTA TACOMA 5 SUSPENSION SYSTEM PART # 54900
 PART NUMBER : 54900 1996 2004 TOYOTA TACOMA 5 SUSPENSION SYSTEM PARTS LIST: Part # Description Qty. 55900-01 Driver Side Spindle 1 55900-02 Passenger Side Spindle 1 54900-01 Rear brake proportioning valve
MODEL 810 INTRUDER INSTALLATION, OPERATION, MAINTENANCE & PARTS
 OWNER'S MANUAL MODEL 810 INTRUDER INSTALLATION, OPERATION, MAINTENANCE & PARTS NOTE: MANUAL including SPECIFICATIONS, subject to change without notice All ratings specified are based on structural factors
Ultimate 5th Wheel Connection Rail Mount. Part #3200 Gooseneck Mount, 20,000 lbs GTWR - 4,500 lbs Tongue INSTALLATION MANUAL
 Ultimate 5th Wheel Connection Rail Mount Part #3200 Gooseneck Mount, 20,000 lbs GTWR - 4,500 lbs Tongue INSTALLATION MANUAL andersenhitches.com Table of Contents Table of Contents Important Safety Information...
Installation manual. Toyota Tundra 4WD & 2WD. 2.5 Suspension kit. Part # Part # Important customer information:
 Installation manual 2007-2016 Toyota Tundra 4WD & 2WD 2.5 Suspension kit Part # 53070 sj11082011rev.03 Part # 53070 2007-2016 Toyota Tundra 4WD & 2WD 2.5 Suspension kit Part # Description Qty. 53070-01
Installation Instructions
 85-3207 rev. 03 05-06 Installation Instructions Thank you for purchasing this anti-sway bar kit. Please read through these instructions before installation. Rear Anti-Sway Bar Kit for the Freightliner
INSTALLATION INSTRUCTIONS AND OWNER S MANUAL
 INSTALLATION INSTRUCTIONS AND OWNER S MANUAL Thank you for purchasing the AlloyCover from WeatherTech. Manufactured with pride using superior quality materials and workmanship. With proper care, your cover
11422 INSTALLATION INSTRUCTIONS
 1122 INSTALLATION INSTRUCTIONS Safety glasses should be worn at all times while installing this product. YEARS: 2015-PRESENT MAKE: VOLKSWAGEN MODEL: STYLE: WAGON YEARS: 2017-PRESENT MAKE: VOLKSWAGEN MODEL:
31015 INSTALLATION INSTRUCTIONS
 0 INSTALLATION INSTRUCTIONS Safety glasses should be worn at all times while installing this product. YEARS: 00-CURRENT MAKE: DODGE RAM MODEL: 00 STYLE: TRUCK WARNING: NEVER EXCEED YOUR VEHICLE MANUFACTURER'S
OPERATION AND MAINTENANCE MANUAL WASP, Inc. United Airlines Shock Mount Cargo Cart Model No. A03439D
 OPERATION AND MAINTENANCE MANUAL WASP, Inc. United Airlines Shock Mount Cargo Cart Model No. A03439D WASP RECORD OF REVISIONS REV. ISSUE DATE BY REV. ISSUE DATE BY NO. DATE INSERTED NO. DATE INSERTED Original
31025 INSTALLATION INSTRUCTIONS
 105 INSTALLATION INSTRUCTIONS Safety glasses should be worn at all times while installing this product. YEARS: 011 MAKE: FORD, MERCURY MODEL: ESCAPE, MARINER STYLE: SUV WARNING: NEVER EXCEED YOUR VEHICLE
SwayPro Owner s Manual & Installation Instructions
 SwayPro Owner s Manual & Installation Instructions Serial Number Underslung Hitch Head w/ Clamp-On Rotating Latches BXW0353 350 lbs. maximum tongue weight capacity BXW0553 550 lbs. maximum tongue weight
NOTE: IF RUNNING FACTORY RANGER 900 ALUMINUM WHEELS OR AFTERMARKET ALUMINUM WHEELS THEN SPACERS ARE NOT REQUIRED.
 780 Professional Dr. North, Shreveport, LA. 318-524-2270 Polaris 900 XP Ranger Lift Kit Installation Instructions Read before Installation This product is designed for use on ATVs and/or RUVs to increase
LIMITED WARRANTY DISCLAIMER OF IMPLIED WARRANTIES & CONSEQUENTIAL DAMAGES
 Published 08/15 LIMITED WARRANTY Bush Hog warrants to the original purchaser of any new Bush Hog equipment, purchased from an authorized Bush Hog dealer, that the equipment be free from defects in material
1014 SERIES INSTALLATION, OPERATION, MAINTENANCE & PARTS
 OWNER'S MANUAL 1014 SERIES INSTALLATION, OPERATION, MAINTENANCE & PARTS NOTE: MANUAL including SPECIFICATIONS, subject to change without notice. All ratings specified are based on structural factors only,
Installation manual. 2 Suspension System. Ford F150 4WD and 2WD. Part # Part # Ford F150 4WD and 2WD
 Installation manual 2 Suspension System 2009-2018 Ford F150 4WD and 2WD Part # 22929 sj12112013rev.03 Part # 22929 2009-2018 Ford F150 4WD and 2WD 2 Suspension System Part # Description Qty. 22909-01 Front
INSTALLATION INSTRUCTIONS QA1 P/N R , R , R R , R , R F100 Rear Coil-over Conversion System
 INSTALLATION INSTRUCTIONS QA1 P/N R120-170, R120-200, R120-250 R220-170, R220-200, R220-250 65-72 F100 Rear Coil-over Conversion System TOOLS AND SUPPLIES REQUIRED Floor Jack Two (2) Jack Stands Drill
SERIES 30 INSTALLATION, OPERATION, MAINTENANCE & PARTS
 OWNER'S MANUAL SERIES 30 INSTALLATION, OPERATION, MAINTENANCE & PARTS NOTE: MANUAL including SPECIFICATIONS, subject to change without notice. All ratings specified are based on structural factors only,
11309 INSTALLATION INSTRUCTIONS
 09 INSTALLATION INSTRUCTIONS Safety glasses should be worn at all times while installing this product. YEARS: 0-PRESENT MAKE: NISSAN MODEL: LEAF STYLE: -DOOR WARNING: NEVER EXCEED YOUR VEHICLE MANUFACTURER'S
INSTALLATION INSTRUCTIONS
 078 YEARS: 07-CURRENT Safety glasses should be worn at all times while installing this product. INSTALLATION INSTRUCTIONS MODEL: SUPER DUTY MAKE: FORD STYLE: TRUCK WARNING: NEVER EXCEED YOUR VEHICLE MANUFACTURER'S
INSTALLATION INSTRUCTIONS GM Lower Control Arms P/N 52337, 52437, 52364, 52464, 52319, 52419, 52320, 52420, 52366, 52466, 52368, 52468
 INSTALLATION INSTRUCTIONS GM Lower Control Arms P/N 52337, 52437, 52364, 52464, 52319, 52419, 52320, 52420, 52366, 52466, 52368, 52468 TOOLS AND SUPPLIES REQUIRED Floor Jack Jack Stands Wrench Set Hex
Honda 700 Pioneer Lift Kit
 780 Professional Drive N. Shreveport, LA 71105 Phone (318)-524-2270 Fax (318)-524-2297 www.highlifter.com Honda 700 Pioneer Lift Kit Read before Installation This product is designed for use on ATVs and/or
11077 INSTALLATION INSTRUCTIONS
 077 INSTALLATION INSTRUCTIONS Safety glasses should be worn at all times while installing this product. YEARS: 0 MAKE: HONDA MODEL: CR-Z STYLE: HATCHBACK WARNING: NEVER EXCEED YOUR VEHICLE MANUFACTURER'S
INSTALLATION INSTRUCTIONS AND OWNER S MANUAL
 INSTALLATION INSTRUCTIONS AND OWNER S MANUAL Thank you for purchasing ADARAC Truck Bed Rack. Agri-Cover, Inc. proudly manufactured this product using superior quality materials and workmanship. With proper
Air-Pin Detachable Gooseneck Operations Supplement
 Air-Pin Detachable Gooseneck Operations Supplement TOWMASTER WARRANTY SUMMARY This warranty effective on trailers manufactured after 01/01/2009. Towmaster, Inc. (herein referred to as Towmaster) offers
Rear Suspension System C-10 Pickup Truck
 Rear Suspension System 18390 67-72 C-10 Pickup Truck Thank you for your purchase from our new line of Chevy parts. Please call us at 877-4NO - ROLL if you have any questions regarding the service or installation
Installation Instructions GOOSENECK MOUNTING KIT Toyota Tundra
 GOOSENECK MOUNTING KIT Toyota Tundra 446 Equipment Required: Fastener Kit: 446F Wrenches: 10mm, 1mm, /4, 7/8, 15/16 Drill Bits: 1/4 Other Tools: Drill WARNING: Do not store hitch ball upside down in head.
NOTICE- THIS K-MEMBER REQUIRES THE USE OF COIL OVER SUSPENSION. K-MEMBER WILL NOT WORK WITH FACTORY STYLE SPRINGS.
 Technical Support Line: (952) 985-5675 Email: Info@QA1.net 21730 Hanover Ave. Lakeville, MN 55044 www.qa1.net INSTALLATION INSTRUCTIONS MUSTANG K-MEMBER P/N MUK11, MUK12, MUK13 NOTICE- THIS K-MEMBER REQUIRES
MODELS EWR820, EWR1023, EWR1227 PULL TYPE HAY RAKES PARTS MANUAL SECTION 19
 EWR MODELS EWR820, EWR1023, EWR1227 PULL TYPE HAY RAKES Published 04/11 PARTS MANUAL SECTION 19 MATERIAL HANDLING PARTS MANUAL PARTS ORDERING GUIDE The following instructions are offered to help eliminate
Model No EXPLORER POLY ATV CART. CAUTION: Read Rules for Safe Operation and Instructions Carefully
 owners manual Model No. 45-01753 EXPLORER POLY ATV CART CAUTION: Read Rules for Safe Operation and Instructions Carefully IMPORTANT! The wheel bearings are not prelubricated. The wheel hubs must be filled
INSTALLATION MANUAL 4.5 I.F.S. SUSPENSION CURR. FORD F150 W/4.2 OR 4.6 LITER PART # 24940
 INSTALLATION MANUAL 4.5 I.F.S. SUSPENSION 1997- CURR. FORD F150 W/4.2 OR 4.6 LITER PART # 24940 SJ101402 PART NUMBER : 24940 1997 CURR. FORD F150 W/4.2 OR 4.6 LITER 4.5 SUSPENSION SYSTEM WITH FRONT SPINDLES