Read the entire installation manual. There are several safety tips there that you need to know before you start
|
|
|
- Poppy Glenn
- 6 years ago
- Views:
Transcription
1 Installation Tips for RS4 + INTSL (2) TIP SHEET T0749 Buick Century: Buick LeSabre: Buick Park Avenue: Buick Ranier: Cadillac Escalade: Chevrolet Avalanche: Chevrolet Silverado: Chevrolet Silverado Classic: 2007 Chevrolet Suburban: Chevrolet Suburban Classic 2007 Chevrolet Tahoe: Chevrolet Trailblazer: GMC Envoy: GMC Sierra: GMC Sierra Classic: 2007 GMC Yukon: Hummer H2: Oldsmobile Aurora: Oldsmobile Bravada: Thank you for purchasing your remote start from MyPushcart.com - an industry leader in providing remote starts to doit-yourself installers since We ve put this tip sheet together to help you with your installation. The purpose of this sheet is to help you organize your installation - not to replace your installation manual. You will still need to refer to that. If you provided us with your vehicle model/year at the time of purchase, you will have a wiring chart for your particular vehicle. We re going to refer to that a lot. If you do not have the wiring chart, us at sales@mypushcart.com so we can send you a copy. Be sure to include the model/year of your vehicle, your name and your sales order number. Two very important things before you get started: Read the entire installation manual. There are several safety tips there that you need to know before you start Avoid using a test light to probe wires. Test lights can set off air bags if you probe the wrong wire. Your vehicle wiring chart will identify the correct wires that you ll be tapping on to in your car. If you must probe, use a digital multi-meter. They re inexpensive and won t set off air bags. Overview There are 4 basic steps to this remote start installation. We re going to address each of these: 1. Wiring 2. Programming 3. Testing 4. Close it up! Need to know where all the components go? See Installer s Tip #1 1 P a g e

2 Step 1 Wiring When you open up your remote start, you re going to see a whole bunch of wires. You re not going to use all of them. The remote starts are designed with wiring options for a variety of cars and no car is going to use all of them. We re going to break the wiring down into three parts your main power connections, what we ll call your secondary connections for your remote start, and connections for the bypass module. Your wiring chart will help you locate the wires that you re going to need in your car. Don t be intimidated by all the different wires listed on the chart you re only going to be using a few of them. You also have an antenna, a small pushbutton and a status LED. The antenna should be mounted near the top of the windshield, at least 1 away from metal. Route the antenna cable underneath the headliner, down the windshield pillar and around the end of the dash. Carefully tuck the cable in behind the trim panels. The pushbutton is typically mounted in the driver s kick panel (that s the area forward of the door), the driver s side of the center console, or the underside of the dash. Installation requires drilling a small hole in the plastic. The LED is not required for operation, but is helpful for programming or diagnostics. It also requires a hole and can be placed either near the pushbutton or on top of the dash. Reading your wiring chart Each line of the wiring chart contains 3 pieces of information that you will need: A) The Circuit or Wire/Function B) The color of the wire in the car C) The polarity of the wire in the car D) The location of the wire in the car Making your wiring connections The table on the following page will show you where to connect the wires from your remote start into the car. Any wires on your remote start that are NOT listed in the table are NOT USED. Helpful Hint: In most cases, the wires on the remote start are way longer than needed. Trim off excess wire when you make your connections, but leave some slack - this will allow you a little flexibility when it comes time to stow the remote start module after the installation is completed. See Installer s Tip # 2 for tips on how to make your wiring connections 2 P a g e
3 Remote Start Wire Red (6-pin harness, 2 wires) Pink (6-pin harness) Brown (6-pin harness) Grey (6-pin harness) Pink/White (6-pin harness) Connect to the wire for the circuit on the vehicle chart labeled: Constant 12 Volts Ignition 12-Volts Starter Accessory Ignition # 2 (not present on all vehicles) Black (12-pin harness) System Ground connect this to a solid metal ground in the car Red/Black (12-pin harness) Connect to +12volts *or* Ground. *OPTIONAL (See NOTE 1) White (12-pin harness) Parking Lamp *OPTIONAL (See NOTE 1) Purple (12-pin harness) Brake Light (also called Brake Switch ) Grey (12-pin harness) Hood Input (See NOTE 2) Red/White (12-pin harness) Tach (to INTSL NOT to the vehicle)(programming required) NOTE 1 Some vehicles will call for a + polarity connection to the parking light circuit and some will call for a - connection. The red/black wire on the remote start is used to select the polarity of the remote start s parking light output. If your vehicle s parking light wire is shown with a + on your wiring chart, connect the red/black wire to a constant +12v power source (you can tap it right on to one of the large red power input wires on the remote start s 6-pin harness). If your vehicle s parking light wire is shown with a - on your wiring chart, connect the red/black wire to ground. The white wire in the remote start 12-pin harness is the actual parking light output wire. After you ve properly selected it s polarity using the red/black wire, connect the white wire to the parking light wire in your vehicle, as indicated on your wiring chart. NOTE 2 The grey wire is used with a pin switch (included in your kit) to prohibit the remote start from activating while the hood is open. This is an important safety feature! Helpful Tip: Many GM Vehicles have a brown wire in the ignition harness that will show on the wiring chart as a 2 nd or 3 rd ignition or a 2 nd accessory. This wire is NOT used for remote start. The three wires that do need to be powered by the remote start s ignition and accessory outputs are white, pink and orange. Be sure to test! Wiring your bypass The following table will show you what wires on the Module need to be connected and where they connect. Any wires on your module that are NOT listed in the table are NOT USED. INTSL module Wire: Connect to: NOTE: Pink (14-pin plug) remote start -Pink (6-pin plug) Connects to main Vehicle ignition (ignition) (ignition) Orange/Black (14-pin plug) remote start -Red/White (12-pin plug) Remote start tach programming (tach) Purple (14-pin plug) (data) (tach) back of Pin 2 on your ODB2 plug (data) required- see programming section. Do not use tap connectors here. Wire wrap or solder connection. 4-pin data link connector Data port of remote starter Plug into both INTSL and remote start The following diagram illustrates all of your needed connections. As always, it is the responsibility of the installer to verify all vehicle wiring using the vehicle wiring chart and a multi-meter prior to making any connections: 3 P a g e
4 4 P a g e


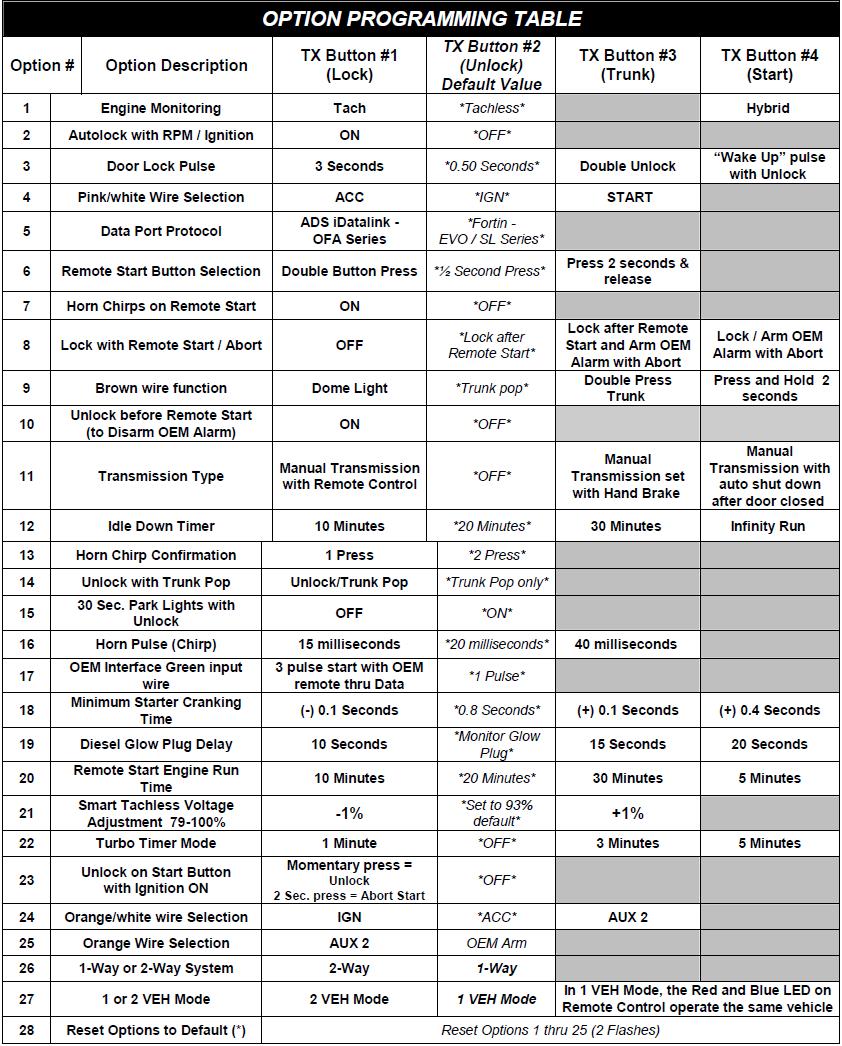
5 Step 2 Programming: INTSL Programming: RS4 remote starter programming: The remote starter will need to have the tach signal of the vehicle programmed. Using your key, the valet button, and either the RS4 remote, follow the procedure below to program the tach: Aside from tach learning above, the RS4 should work with the default options set as they are, so no programming is required for basic remote start operation. If you wish to change any options to customize the functionality of the remote starter, a matrix of all programmable features and their options are on the following page. Use the procedure below to make any desired changes: 1. Turn Ignition Key to the ON position. Do not start vehicle. 2. Press the Program / Valet button 5 times. Wait for the unit to flash the lights and/or horn honk 5 times. 3. Push the valet program button the number of times that corresponds to the option number desired (1-28X). You must get a light flash and/or honk after each button press. If the system did not flash the lights and/or honk, then it did not register your press. Press carefully and do not lose count. 4. For RS4-7 & PS4-7: When you reach the desired option #, to change the option: Press button #1 Lock, #2 Unlock, #3 Trunk, #4 Start. (Some option numbers use ALL 4 remote buttons to select settings)5. When finished, turn Ignition OFF, and check for changed features. 5 P a g e
6 6 P a g e
7 Step 3 - Test the System Once all programming is done, you should test the system to make sure everything is working properly before you connect the activation wire and close up the installation. Make sure the vehicle stays running, and that the climate controls are working. Press the brake pedal > The engine should shut down. If your remotes have keyless entry functions, test them for operation. If your tests are successful proceed to step 4 - close it up below. If your tests were unsuccessful, go back and re-check your wiring and programming. Step 4 Close it Up! Now gather up all your wiring and neatly bundle it together using zip ties or electrical tape. Find a secure place to put the remote start module and use zip ties to secure it. Make sure that the remote start wires are not near any moving parts on the steering wheel, pedals or emergency brake! Replace all interior vehicle panels that were removed to gain access to the needed wires, in reverse order they were removed. Installer s Tips Tip #1 Where Everything Goes There are 4 parts to your system: 1. Remote start module the wiring for the module is done under the dash on the driver s side, so you ll want to install the module in that general area. Before you start wiring, look for a location where there s some open space that will fit the module. Pay attention to moving parts like the pedals, e-brake and steering column. Be sure to route your wiring away from those areas. 2. Bypass module can be stowed along with the remote start. 3. Valet Switch Requires a small screw hole. Usually put in the driver s kick panel (that s the area forward of the door), the driver s side of the center console, or the underside of the dash. 4. Hood Pin Switch An important safety component! Requires a 3/8 hole. Find a location in the engine compartment to mount the switch where the closed hood will keep the plunger in the switch depressed. This is what prevents the car from starting when the hood is open. 7 P a g e
8 Tip #2 How to make your wiring connections It s very important that all your wiring connections be solid and secure. All remote start connections are tap on connections. This means that you do not need to cut the wires in the car. You simply need to tap on to the wires in the car to make your connections. Here are three different ways to do this: Method 1 Solder and tape This is the method preferred by the best professional installers. It makes for the most reliable connections, but it is also the most difficult to do. Sometimes there isn t enough room in the wiring harness to safely solder a wire without damaging adjacent wires, but if you have the soldering skills, go for it. To make a connection, strip back a section of the insulation on the wire in the car. On heavy gauge wires, 1 is about the right amount. On lighter gauge wires, ½ is fine. Strip 1 of insulation off the end of the remote start wire. Tin the bare section of wire in the car. Wrap the remote start wire around the tinned section and then carefully solder it in place. Wrap the splice tightly with electrical tape. Method 2 Wrap and tape This is the most popular method and is also very reliable. Strip back a section of the insulation on the wire in the car. On heavy gauge wires, 1 is about the right amount. On lighter gauge wires, ½ is fine. Strip 1 of insulation off the end of the remote start wire. Separate the strands of the wire like this: Pass the wire from the remote through the opening as shown below Wrap the remote start wire around both sides of the car wire, then back around itself as shown below Use electrical tape to wrap the connection and secure the wires together. A wire tie will help prevent the tape from unraveling in the future. Method #3 T-Taps T-taps are plastic clips that are squeezed onto the wires in the car. The wire from the remote start goes into the tap and the whole thing is crimped together. T-taps come in different sizes for different size wires. Use yellow t-taps for the larger wires in your main power harness. Red t-taps are good for the smaller wires. Tape and wire tie the connections as shown in the wrap and tape section above that will prevent the t-taps from ever opening up. We now have a tap kit available for purchase for those who prefer to use this method. The kit consists of two types of connectors - The taps and insulated male spade connectors that plug into them. The taps attach to the wires in the car and the spade connectors attach to the wires on the remote start. The spades then plug in to the taps. A crimping tool is required. Copyright 2015 Digitel LLC 8 P a g e
Installation Tips for your Add-on Remote Start (for GM vehicles with INTSL Install 2) v3.2 Updated 11/12/2012
 v3.2 Updated 11/12/2012") Installation Tips for your Add-on Remote Start (for GM vehicles with INTSL Install 2) v3.2 Updated 11/12/2012 Thank you for purchasing your remote start from MyPushcart.com - an industry leader in providing
Installation Tips for your Add-on Remote Start (for GM vehicles with INTSL Install 2) v3.2 Updated 11/12/2012 Thank you for purchasing your remote start from MyPushcart.com - an industry leader in providing
Installation Tips for RS1 + EVO-RIDE + SPDT. *(reglar key, automatic transmission vehicles ONLY)*
*") Installation Tips for RS1 + EVO-RIDE + SPDT TIP SHEET T1235 *(reglar key, automatic transmission vehicles ONLY)* Thank you for purchasing your remote start from MyPushcart.com - an industry leader in providing
Installation Tips for RS1 + EVO-RIDE + SPDT TIP SHEET T1235 *(reglar key, automatic transmission vehicles ONLY)* Thank you for purchasing your remote start from MyPushcart.com - an industry leader in providing
Installation Tips for your Remote Start/Keyless Entry (for Ford Vehicles) v3.3 Updated 1/13/2013
 v3.3 Updated 1/13/2013") Installation Tips for your Remote Start/Keyless Entry (for Ford Vehicles) v3.3 Updated 1/13/2013 Thank you for purchasing your remote start from MyPushcart.com - an industry leader in providing remote
Installation Tips for your Remote Start/Keyless Entry (for Ford Vehicles) v3.3 Updated 1/13/2013 Thank you for purchasing your remote start from MyPushcart.com - an industry leader in providing remote
Installation Tips for your Remote Start/Keyless Entry (for Mazda Vehicles) v3.1 Updated 9/22/2012
 v3.1 Updated 9/22/2012") Installation Tips for your Remote Start/Keyless Entry (for Mazda Vehicles) v3.1 Updated 9/22/2012 Thank you for purchasing your remote start from MyPushcart.com - an industry leader in providing remote
Installation Tips for your Remote Start/Keyless Entry (for Mazda Vehicles) v3.1 Updated 9/22/2012 Thank you for purchasing your remote start from MyPushcart.com - an industry leader in providing remote
TIP SHEET T0937. Installation Tips for RS00 + Passlock-sl2(4) + SPDT
 + SPDT") Installation Tips for RS00 + Passlock-sl2(4) + SPDT TIP SHEET T0937 Chevrolet (Astro 1998-2005) (Avalanche 2002-2006) (Blazer 1998-2005) (Express Van 1998-2007) (Impala 2000-2005) (Monte Carlo 2000-2005)
Installation Tips for RS00 + Passlock-sl2(4) + SPDT TIP SHEET T0937 Chevrolet (Astro 1998-2005) (Avalanche 2002-2006) (Blazer 1998-2005) (Express Van 1998-2007) (Impala 2000-2005) (Monte Carlo 2000-2005)
*(reglar key vehicles ONLY)* Read the entire installation manual. There are several safety tips in there to know before you start
* Read the entire installation manual. There are several safety tips in there to know before you start") Installation Tips for RS4 + EVO-RIDE + SPDT TIP SHEET T2519 2009-2011 Ford Crown Victoria 2009-2012 Ford E-150 2009 Ford E-150 Econoline Club Wagon 2008-2010 Ford E-250 2010 Ford E-250 Econoline 2010 Ford
Installation Tips for RS4 + EVO-RIDE + SPDT TIP SHEET T2519 2009-2011 Ford Crown Victoria 2009-2012 Ford E-150 2009 Ford E-150 Econoline Club Wagon 2008-2010 Ford E-250 2010 Ford E-250 Econoline 2010 Ford
TIP SHEET T2352, T3396. Installation Tips for RS1 + EVO-ALL 1-BUTTON REMOTE STARTER FOR: Acura RDX PUSH-TO-START / AUTOMATIC
 Installation Tips for RS1 + EVO-ALL 1-BUTTON REMOTE STARTER FOR: Acura RDX 2013-2015 PUSH-TO-START / AUTOMATIC TIP SHEET T2352, T3396 Thank you for purchasing your remote start from MyPushcart.com - an
Installation Tips for your Crimestopper/ProStart Remote Start system (add-on for GM vehicles) v1.02 updated 1/16/2013
 v1.02 updated 1/16/2013") Installation Tips for your Crimestopper/ProStart Remote Start system (add-on for GM vehicles) v1.02 updated 1/16/2013 Thank you for purchasing your remote start from MyPushcart.com - an industry leader
Installation Tips for your Crimestopper/ProStart Remote Start system (add-on for GM vehicles) v1.02 updated 1/16/2013 Thank you for purchasing your remote start from MyPushcart.com - an industry leader
Installation Tips for your Remote Start w/ Keyless Entry (Toyota Vehicles) v3.2 Updated 3/14/13
 v3.2 Updated 3/14/13") Installation Tips for your Remote Start w/ Keyless Entry (Toyota Vehicles) v3.2 Updated 3/14/13 Thank you for purchasing your remote start from MyPushcart.com an industry leader in providing remote starts
Installation Tips for your Remote Start w/ Keyless Entry (Toyota Vehicles) v3.2 Updated 3/14/13 Thank you for purchasing your remote start from MyPushcart.com an industry leader in providing remote starts
TIP SHEET. Installation Tips for SP-404/SP EVO-ALL + SPDT Remote Start/Alarm T1642
 TIP SHEET Installation Tips for SP-404/SP-502 + EVO-ALL + SPDT Remote Start/Alarm T1642 Nissan Armada: 2008-2012 Nissan Cube: 2009-2012 Nissan Frontier: 2008-2012 Nissan Pathfinder: 2009-2012 Nissan Quest:
Installation Tips for your Crimestopper/ProStart Remote Start system (for GM vehicles) v1.01 updated 2/27/2012
 v1.01 updated 2/27/2012") Installation Tips for your Crimestopper/ProStart Remote Start system (for GM vehicles) v1.01 updated 2/27/2012 Thank you for purchasing your remote start from MyPushcart.com - an industry leader in providing
Installation Tips for your Crimestopper/ProStart Remote Start system (for GM vehicles) v1.01 updated 2/27/2012 Thank you for purchasing your remote start from MyPushcart.com - an industry leader in providing
Installation Tips For Crimestopper RS7 + Passlock-sl2(4) + DLRM + SPDT
 + DLRM + SPDT") TIP SHEET T3628 Installation Tips For Crimestopper RS7 + Passlock-sl2(4) + DLRM + SPDT For Chevrolet: Astro 1998-2005, Avalanche 2002, Blazer 1998-2005, Cavalier 2000-2003, Express Van 1998-2005, S10 Pickup
TIP SHEET T3628 Installation Tips For Crimestopper RS7 + Passlock-sl2(4) + DLRM + SPDT For Chevrolet: Astro 1998-2005, Avalanche 2002, Blazer 1998-2005, Cavalier 2000-2003, Express Van 1998-2005, S10 Pickup
Installation Tips for your GMDLBP + Excalibur Remote Start system (for GM vehicles) v1.01 updated 10/09/13
 v1.01 updated 10/09/13") Installation Tips for your GMDLBP + Excalibur Remote Start system (for GM vehicles) v1.01 updated 10/09/13 Thank you for purchasing your remote start from MyPushcart.com - an industry leader in providing
Installation Tips for your GMDLBP + Excalibur Remote Start system (for GM vehicles) v1.01 updated 10/09/13 Thank you for purchasing your remote start from MyPushcart.com - an industry leader in providing
TIP SHEET. Installation Tips for your RS OL-MDB-CH6 (1) (for Jeep vehicles) T1227 v1.0 3/19/14
 (for Jeep vehicles) T1227 v1.0 3/19/14") TIP SHEET Installation Tips for your RS-360 + OL-MDB-CH6 (1) (for Jeep vehicles) T1227 v1.0 3/19/14 Thank you for purchasing your remote start from MyPushcart.com - an industry leader in providing remote
TIP SHEET Installation Tips for your RS-360 + OL-MDB-CH6 (1) (for Jeep vehicles) T1227 v1.0 3/19/14 Thank you for purchasing your remote start from MyPushcart.com - an industry leader in providing remote
Installation Tips for your Excalibur Remote Start (for Honda and Acura Vehicles) rev 11/28/2012
 rev 11/28/2012") Installation Tips for your Excalibur Remote Start (for Honda and Acura Vehicles) rev 11/28/2012 Thank you for purchasing your remote start from MyPushcart.com - an industry leader in providing remote starts
Installation Tips for your Excalibur Remote Start (for Honda and Acura Vehicles) rev 11/28/2012 Thank you for purchasing your remote start from MyPushcart.com - an industry leader in providing remote starts
RS OL-MDB-GM1 (GM1) (3) T3125
 (3) T3125") TIP SHEET Installation Tips for your RS-351 + OL-MDB-GM1 (GM1) (3) T3125 v1.1 3/13/14 For: (2005-2009 Buick Allure), (2005-2009 Buick LaCrosse), (2000-2005 Buick LeSabre), (2000-2005 Buick Ultra), (1997-2005
TIP SHEET Installation Tips for your RS-351 + OL-MDB-GM1 (GM1) (3) T3125 v1.1 3/13/14 For: (2005-2009 Buick Allure), (2005-2009 Buick LaCrosse), (2000-2005 Buick LeSabre), (2000-2005 Buick Ultra), (1997-2005
Installation Tips for your RS-1 + Honda-SL3 (1.b) Remote starter Honda: ( FIT), ( Pilot), ( Ridgeline) Acura: ( MDX)
 Remote starter Honda: ( FIT), ( Pilot), ( Ridgeline) Acura: ( MDX)") Installation Tips for your RS-1 + Honda-SL3 (1.b) Remote starter Honda: ( 06-08 FIT), ( 05-08 Pilot), ( 06-13 Ridgeline) Acura: ( 03-06 MDX) TIP SHEET T0777 Thank you for purchasing your remote start from
Installation Tips for your RS-1 + Honda-SL3 (1.b) Remote starter Honda: ( 06-08 FIT), ( 05-08 Pilot), ( 06-13 Ridgeline) Acura: ( 03-06 MDX) TIP SHEET T0777 Thank you for purchasing your remote start from
TIP SHEET T0937. Installation Tips For RS00/PS00 + ADS-TBSL-PL + SPDT
 Installation Tips For RS00/PS00 + ADS-TBSL-PL + SPDT TIP SHEET T0937 Thank you for purchasing your remote start from MyPushcart.com - an industry leader in providing remote starts to do-it-yourself installers
Installation Tips for your Remote Start/Keyless Entry (for Honda/Acura Vehicles) [EVO-ALL] v1.02 updated 9/13/2013
![Installation Tips for your Remote Start/Keyless Entry (for Honda/Acura Vehicles) [EVO-ALL] v1.02 updated 9/13/2013](/thumbs/87/96035180.jpg "Installation Tips for your Remote Start/Keyless Entry (for Honda/Acura Vehicles) [EVO-ALL] v1.02 updated 9/13/2013") Installation Tips for your Remote Start/Keyless Entry (for Honda/Acura Vehicles) [EVO-ALL] v1.02 updated 9/13/2013 Thank you for purchasing your remote start from MyPushcart.com - an industry leader in
Installation Tips for your Remote Start/Keyless Entry (for Honda/Acura Vehicles) [EVO-ALL] v1.02 updated 9/13/2013 Thank you for purchasing your remote start from MyPushcart.com - an industry leader in
Installation Tips for RS4/RS7 + EVO-ALL (NIS 3.c) + 2 diodes
 + 2 diodes") Installation Tips for RS4/RS7 + EVO-ALL (NIS 3.c) + 2 diodes TIP SHEET T3093 + T3103 FOR: NISSAN ( 09-14 Cube), ( 11-14 Juke), & ( 07-11 Versa) automatic, regular key vehicles Thank you for purchasing
Installation Tips for RS4/RS7 + EVO-ALL (NIS 3.c) + 2 diodes TIP SHEET T3093 + T3103 FOR: NISSAN ( 09-14 Cube), ( 11-14 Juke), & ( 07-11 Versa) automatic, regular key vehicles Thank you for purchasing
Installation Tips Crimestopper/ProStart Remote Start system + PLJX + DLRM + SPDT (for GM vehicles) T0760 v1.1 updated 2/5/14
 T0760 v1.1 updated 2/5/14") Installation Tips Crimestopper/ProStart Remote Start system + PLJX + DLRM + SPDT (for GM vehicles) T0760 v1.1 updated 2/5/14 Thank you for purchasing your remote start from MyPushcart.com - an industry
Installation Tips Crimestopper/ProStart Remote Start system + PLJX + DLRM + SPDT (for GM vehicles) T0760 v1.1 updated 2/5/14 Thank you for purchasing your remote start from MyPushcart.com - an industry
RS4-7/PS4-7 + (2) + SPDT T3015, T3053
 + SPDT T3015, T3053") TIP SHEET Installation Tips for your RS4-7/PS4-7 + Honda-SL3 (2) + SPDT T3015, T3053 v1.3 4/25/14 Honda: ( 98-02 Accord), ( 98-01 CRV), ( 98-04 Odyssey), ( 03-04 Pilot) Acura: ( 98-99 EL), ( 98-03 CL),
TIP SHEET Installation Tips for your RS4-7/PS4-7 + Honda-SL3 (2) + SPDT T3015, T3053 v1.3 4/25/14 Honda: ( 98-02 Accord), ( 98-01 CRV), ( 98-04 Odyssey), ( 03-04 Pilot) Acura: ( 98-99 EL), ( 98-03 CL),
RS4 / RS7 + (4) + SPDT
 + SPDT") TIP SHEET Installation Tips for RS4 / RS7 + Honda-SL3 (4) + SPDT + Diode x2 T0776, T0731 Honda: ( 08-12 Accord), ( 12-13 Civic), 12-13 CRV), ( 11-13 Odyssey), ( 09-13 Pilot) Acura: ( 09-13 TSX) Thank you
TIP SHEET Installation Tips for RS4 / RS7 + Honda-SL3 (4) + SPDT + Diode x2 T0776, T0731 Honda: ( 08-12 Accord), ( 12-13 Civic), 12-13 CRV), ( 11-13 Odyssey), ( 09-13 Pilot) Acura: ( 09-13 TSX) Thank you
Installation Tips for RS4/RS7 + EVO-ALL (NIS 3.b)
") Installation Tips for RS4/RS7 + EVO-ALL (NIS 3.b) TIP SHEET T3092 + T3102 FOR: NISSAN ( 08-14 Frontier), ( 08-12 Pathfinder), & ( 08-12 Xterra) Thank you for purchasing your remote start from MyPushcart.com
Installation Tips for RS4/RS7 + EVO-ALL (NIS 3.b) TIP SHEET T3092 + T3102 FOR: NISSAN ( 08-14 Frontier), ( 08-12 Pathfinder), & ( 08-12 Xterra) Thank you for purchasing your remote start from MyPushcart.com
Installation Tips for your Remote Start system (for Toyota Camry & Prius C, ) Crimestopper RS0+ EVO-ALL T3468 rev#1.
 Crimestopper RS0+ EVO-ALL T3468 rev#1.") Installation Tips for your Remote Start system (for Toyota Camry & Prius C, 2012-2014) Crimestopper RS0+ EVO-ALL T3468 rev#1.1 1/22/2015 Thank you for purchasing your remote start from MyPushcart.com -
Installation Tips for your Remote Start system (for Toyota Camry & Prius C, 2012-2014) Crimestopper RS0+ EVO-ALL T3468 rev#1.1 1/22/2015 Thank you for purchasing your remote start from MyPushcart.com -
TIP SHEET T0491. Installation Tips for your Excalibur RS Passlock-sl2(4) + DLRC + SPDT
 + DLRC + SPDT") TIP SHEET T0491 Installation Tips for your Excalibur RS-360 + Passlock-sl2(4) + DLRC + SPDT For Chevrolet: Astro 1998-2005, Avalanche 2002, Blazer 1998-2005, Cavalier 2000-2003, Express Van 1998-2005,
TIP SHEET T0491 Installation Tips for your Excalibur RS-360 + Passlock-sl2(4) + DLRC + SPDT For Chevrolet: Astro 1998-2005, Avalanche 2002, Blazer 1998-2005, Cavalier 2000-2003, Express Van 1998-2005,
Step 1 Wiring your remote start. Installation Tips for your Remote Start system (for GM vehicles) V3.3 revised 9/12/2013
 V3.3 revised 9/12/2013") Installation Tips for your Remote Start system (for GM vehicles) V3.3 revised 9/12/2013 Thank you for purchasing your remote start from MyPushcart.com - an industry leader in providing remote starts to
Installation Tips for your Remote Start system (for GM vehicles) V3.3 revised 9/12/2013 Thank you for purchasing your remote start from MyPushcart.com - an industry leader in providing remote starts to
RS4/RS7 + + SPDT T0776,T0731
 TIP SHEET Installation Tips for your RS4/RS7 + Honda-SL3 (1.a) + SPDT T0776,T0731 Honda: ( 03-07 Accord),( 01-05 Civic),( 02-06 CRV),( 03-10 Element),( 05-10 Odyssey) Acura: ( 01-03 EL),( 02-06 RSX),(
Remote Start Kit for GM Installation RS1/3/4/7 + ADS-DL Tip Sheet
 Remote Start Kit for GM Installation RS1/3/4/7 + ADS-DL Tip Sheet rev 1.4 12/16/2013 Thank you for purchasing your remote start from MyPushcart.com - an industry leader in providing remote starts to do-it-yourself
Installation Tips - (Crimestopper RS1/RS2) & (Fortin EVO-ALL 5): *regular key & automatic transmission only*
 & (Fortin EVO-ALL 5): *regular key & automatic transmission only*") Installation Tips - (Crimestopper RS1/RS2) & (Fortin EVO-ALL 5): TIP SHEET T3385f, T3413f *regular key & automatic transmission only* Thank you for purchasing your remote start from MyPushcart.com - an
Installation Tips - (Crimestopper RS1/RS2) & (Fortin EVO-ALL 5): TIP SHEET T3385f, T3413f *regular key & automatic transmission only* Thank you for purchasing your remote start from MyPushcart.com - an
Installation Tips for your Remote Start system (for RS4LX>GMBP for GM vehicles)
") Installation Tips for your Remote Start system (for RS4LX>GMBP for GM vehicles) Thank you for purchasing your remote start from MyPushcart.com - an industry leader in providing remote starts to doit-yourself
Installation Tips for your Remote Start system (for RS4LX>GMBP for GM vehicles) Thank you for purchasing your remote start from MyPushcart.com - an industry leader in providing remote starts to doit-yourself
TIP SHEET. Installation Tips for your RS IB-MUX / PKUMUX (D) + SPDT T1205 v1.2 4/3/14. 1 P a g e
 + SPDT T1205 v1.2 4/3/14. 1 P a g e") Installation Tips for your RS-150 + IB-MUX / PKUMUX (D) + SPDT T1205 v1.2 4/3/14 TIP SHEET Thank you for purchasing your remote start from MyPushcart.com - an industry leader in providing remote starts
Installation Tips for your RS-150 + IB-MUX / PKUMUX (D) + SPDT T1205 v1.2 4/3/14 TIP SHEET Thank you for purchasing your remote start from MyPushcart.com - an industry leader in providing remote starts
Installation Instructions for the Plug & Play Chrysler/Dodge/Jeep Remote Start Package w/mux T5
 v1.01 12/14/2102 Installation Instructions for the Plug & Play Chrysler/Dodge/Jeep Remote Start Package w/mux T5 Review the remote start installation manual for safety instructions! Overview Your kit consists
Installation Instructions for the Plug & Play Remote Start Package (EVOCHR5)
") T6018 v1.1 02/2013 Installation Instructions for the Plug & Play Remote Start Package (EVOCHR5) For DODGE Nitro 2007-2011 Review the remote start installation manual for safety instructions! Overview Your
T6018 v1.1 02/2013 Installation Instructions for the Plug & Play Remote Start Package (EVOCHR5) For DODGE Nitro 2007-2011 Review the remote start installation manual for safety instructions! Overview Your
Installation Instructions for the Plug & Play Remote Start Package (EVOCHR4)
") T6002 v1.1 02/2013 Installation Instructions for the Plug & Play Remote Start Package (EVOCHR4) For CHRYSLER Town & Country 2008-2012 Review the remote start installation manual for safety instructions!
T6002 v1.1 02/2013 Installation Instructions for the Plug & Play Remote Start Package (EVOCHR4) For CHRYSLER Town & Country 2008-2012 Review the remote start installation manual for safety instructions!
Installation Tips for your GM Plug and Play Remote Start Kit EVOGM1 STAND ALONE v1.0 11/27/2013
 Installation Tips for your GM Plug and Play Remote Start Kit EVOGM1 STAND ALONE v1.0 11/27/2013 Thank you for purchasing your remote start from MyPushcart.com - an industry leader in providing remote starts
RS4/RS7 + ADS-DL (GM2)
") Installation tips for RS4/RS7 + ADS-DL (GM2) Tip Sheet T2390, T3632 (Chevy Cobalt 2007-2010), (Chevy HHR 2007-2011), (Chevy Malibu 2007-2012), (Chevy Malibu Hybrid 2008-2012), (Chevy Malibu Maxx 2007-2009),
Installation tips for RS4/RS7 + ADS-DL (GM2) Tip Sheet T2390, T3632 (Chevy Cobalt 2007-2010), (Chevy HHR 2007-2011), (Chevy Malibu 2007-2012), (Chevy Malibu Hybrid 2008-2012), (Chevy Malibu Maxx 2007-2009),
Installation Tips for your Remote Start system (for Toyota vehicles) V3.3 revised 1/10/2013
 V3.3 revised 1/10/2013") Installation Tips for your Remote Start system (for Toyota vehicles) V3.3 revised 1/10/2013 Thank you for purchasing your remote start from MyPushcart.com - an industry leader in providing remote starts
Installation Tips for your Remote Start system (for Toyota vehicles) V3.3 revised 1/10/2013 Thank you for purchasing your remote start from MyPushcart.com - an industry leader in providing remote starts
TIP SHEET. Installation Tips for RS00 + FD-1 (T-harness) + PASS-3 + SPDT T3126 v1.0 5/13/14
 + PASS-3 + SPDT T3126 v1.0 5/13/14") TIP SHEET Installation Tips for RS00 + FD-1 (T-harness) + PASS-3 + SPDT T3126 v1.0 5/13/14 Ford: (2002 Crown Victoria), (2000-2002 Excursion), (1997-2002 Expedition), (1998-2001 Explorer), (1997-2003 F-150),
TIP SHEET Installation Tips for RS00 + FD-1 (T-harness) + PASS-3 + SPDT T3126 v1.0 5/13/14 Ford: (2002 Crown Victoria), (2000-2002 Excursion), (1997-2002 Expedition), (1998-2001 Explorer), (1997-2003 F-150),
Step 1 : Starting the installation
 Installation Instructions for GM Remote Start w/ INTSL Interface Pre-wired Review the remote start installation manual for safety instructions! Overview Your kit consists of two modules a remote start
Installation Instructions for Stand Alone Remote Starter (EVO-ALL-THAR-GM2) Firmware: 4.18, OPTION 15. T2362 Rev#1.2 last updated 10/15/13
 Firmware: 4.18, OPTION 15. T2362 Rev#1.2 last updated 10/15/13") Installation Instructions for Stand Alone Remote Starter (EVO-ALL-THAR-GM2) Firmware: 4.18, OPTION 15. T2362 Rev#1.2 last updated 10/15/13 -The new EVO-ALL interface module eliminates the need for a separate
Installation Instructions for Stand Alone Remote Starter (EVO-ALL-THAR-GM2) Firmware: 4.18, OPTION 15. T2362 Rev#1.2 last updated 10/15/13 -The new EVO-ALL interface module eliminates the need for a separate
TIP SHEET EVO-CHRT6(d) STAND-ALONE ADD-ON REMOTE STARTER
 STAND-ALONE ADD-ON REMOTE STARTER") TIP SHEET EVO-CHRT6(d) STAND-ALONE ADD-ON REMOTE STARTER Txxxx -The EVO-ALL data and bypass interface module eliminates the need for many wiring connections associated with traditional remote starter installations
TIP SHEET EVO-CHRT6(d) STAND-ALONE ADD-ON REMOTE STARTER Txxxx -The EVO-ALL data and bypass interface module eliminates the need for many wiring connections associated with traditional remote starter installations
TIP SHEET Installation instructions for EVO-NIST1 + LC1
 TIP SHEET Installation instructions for EVO-NIST1 + LC1 T3108 NISSAN INFINITY CUBE 2009-2014 M37 2010-2013 JUKE 2011-2016 M56 2011-2013 QUEST 2011-2016 Q70 2014-2015 SENTRA 2013-2016 Q70L 2015 VERSA SEDAN
Installation Tips - (Crimestopper RS00) & (Fortin EVO-ALL) For:
 & (Fortin EVO-ALL) For:") Installation Tips - (Crimestopper RS00) & (Fortin EVO-ALL) For: TIP SHEET T3612-1a Acura TL 2004-2006 Honda Accord (Gas) 2003-2007 Acura TSX 2004-2008 Honda Accord (Hybrid) 2005-2007 Honda Ridgeline 2006-2013
Installation Tips - (Crimestopper RS00) & (Fortin EVO-ALL) For: TIP SHEET T3612-1a Acura TL 2004-2006 Honda Accord (Gas) 2003-2007 Acura TSX 2004-2008 Honda Accord (Hybrid) 2005-2007 Honda Ridgeline 2006-2013
TIP SHEET (EVO-FORT1) 80-bit Add-On Stand-Alone Remote Starter
 80-bit Add-On Stand-Alone Remote Starter") TIP SHEET (EVO-FORT1) 80-bit Add-On Stand-Alone Remote Starter T2380 *AUTOMATIC TRANSMISSION VEHICLES ONLY* CLICK TO WATCH THE PREPPING HARNESS VIDEO -The EVO-ALL interface module eliminates the need for
TIP SHEET (EVO-FORT1) 80-bit Add-On Stand-Alone Remote Starter T2380 *AUTOMATIC TRANSMISSION VEHICLES ONLY* CLICK TO WATCH THE PREPPING HARNESS VIDEO -The EVO-ALL interface module eliminates the need for
SP EVO-CHR4 (A)
") TIP SHEET Installation Tips for SP-502 + EVO-CHR4 (A) Remote Start / Alarm T1630 Chrysler 300 (2008-2011) Dodge Magnum (2008) Chrysler Town and Country (2008-2015) Dodge RAM (2009-2012) Dodge Challenger
TIP SHEET Installation Tips for SP-502 + EVO-CHR4 (A) Remote Start / Alarm T1630 Chrysler 300 (2008-2011) Dodge Magnum (2008) Chrysler Town and Country (2008-2015) Dodge RAM (2009-2012) Dodge Challenger
TIP SHEET. Step 1: Prepare the Vehicle
 TIP SHEET Installation Tips for LC + EVO-CHR4 (C) Remote Start Kit Pre-wired Txxxx Chrysler 300 (2011) Chrysler Town and Country (2011-2015) Dodge RAM (2011-2012) Dodge Challenger (2011-2014) RAM CV (2011-2016)
TIP SHEET (EVO-FORT1) 80-bit Add-On Stand-Alone Remote Starter
 80-bit Add-On Stand-Alone Remote Starter") TIP SHEET (EVO-FORT1) 80-bit Add-On Stand-Alone Remote Starter T2380 *AUTOMATIC TRANSMISSION VEHICLES ONLY* PREPPING HARNESS VIDEO: https://www.youtube.com/watch?v=favdjn2gsxs INSTALL VIDEO: https://www.youtube.com/watch?v=9bp7ncnggya
TIP SHEET (EVO-FORT1) 80-bit Add-On Stand-Alone Remote Starter T2380 *AUTOMATIC TRANSMISSION VEHICLES ONLY* PREPPING HARNESS VIDEO: https://www.youtube.com/watch?v=favdjn2gsxs INSTALL VIDEO: https://www.youtube.com/watch?v=9bp7ncnggya
TIP SHEET. STEP 1: Starting the installation
 TIP SHEET Add on Remote Start Kit for Push to Start CRV 2015-2016 Txxxx Thank you for purchasing your remote start from MPC - an industry leader in providing remote starts to do-it-yourself installers
TIP SHEET RS + EVO ALL + T Harness Remote Starter for Kia Optima 2016
 TIP SHEET RS + EVO ALL + T Harness Remote Starter for Kia Optima 2016 Thank you for purchasing your remote start from MPC - an industry leader in providing remote starts to do-it-yourself installers since
OEM Lip Mount Camera with Harness and OnStar Mirror for GM Vehicles with 16-pin Mirror Connector (Kit part number )
") OEM Lip Mount Camera with Harness and OnStar Mirror for GM Vehicles with 16-pin Mirror Connector (Kit part number 9002-8722) Please read thoroughly before starting installation and check that kit contents
OEM Lip Mount Camera with Harness and OnStar Mirror for GM Vehicles with 16-pin Mirror Connector (Kit part number 9002-8722) Please read thoroughly before starting installation and check that kit contents
INSTALLATION GUIDE OWNER S GUIDE
 INSTALLATION GUIDE OWNER S GUIDE REMOTE STARTER MODELS RS92 / RS92E CONTENTS System Features... 1 System Components... 1 Required Tools... 1 Technical Assistance... 1 Before You Begin... 1-2 Precautions...
COMMANDO REMOTE CONTROL ENGINE STARTER. Limited Warranty Statement MADE IN THE U.S.A. IMPORTANT KEEP YOUR INVOICE WITH THIS WARRANTY STATEMENT!
 Limited Warranty Statement GNU COMMANDO LINE WARRANTY STATEMENT GNU warrants this product to be free from defects in material and workmanship for a period of one (1) year from the date of sale to the original
INSTALLATION GUIDE. FCC ID NOTICE
 REV.5 RS. ADVANCED REMOTE STARTER INSTALLATION GUIDE www.security.soundstream.com FCC ID NOTICE This device complies with Part 5 of the FCC rules. Operation is subject to the following conditions:. This
INSTALL GUIDE OEM-GM(RS)-GM10-[OL-RS-GM10]-EN
![INSTALL GUIDE OEM-GM(RS)-GM10-[OL-RS-GM10]-EN](/thumbs/88/114787346.jpg "INSTALL GUIDE OEM-GM(RS)-GM10-[OL-RS-GM10]-EN") INSTALL GUIDE OEM-GM(RS)-GM0-[OL-RS-GM0]-EN DOCUMENT NUMBER 555 REVISION DATE 05 FIRMWARE OEM-GM(RS)-GM0-[OL-RS-GM0] HARDWARE OL-RS-GM0 ACCESSORIES OL-LOADER (REQUIRED) NOTICE The manufacturer will accept
INSTALL GUIDE OEM-GM(RS)-GM0-[OL-RS-GM0]-EN DOCUMENT NUMBER 555 REVISION DATE 05 FIRMWARE OEM-GM(RS)-GM0-[OL-RS-GM0] HARDWARE OL-RS-GM0 ACCESSORIES OL-LOADER (REQUIRED) NOTICE The manufacturer will accept
INSTALLATION GUIDE OWNER S GUIDE
 INSTALLATION GUIDE OWNER S GUIDE REMOTE STARTER MODELS DELUXE 12 and DELUXE 22 CONTENTS System Features... 1 System Components... 1 Tools Required... 1 Technical Assistance... 1 Before You Begin... 2 Precautions...
INSTALLATION GUIDE OWNER S GUIDE
 INSTALLATION GUIDE OWNER S GUIDE REMOTE STARTER MODELS RS202/RS202E CONTENTS System Features...1 System Components...1 Required Tools...1 Technical Assistance...1 Before You Begin...2 Precautions...2 Testing
INSTALLATION GUIDE OWNER S GUIDE
 INSTALLATION GUIDE OWNER S GUIDE REMOTE STARTER MODEL RS82 CONTENTS System Features... 1 System Components... 1 Required Tools... 1 Technical Assistance... 1 Before You Begin... 1-2 Precautions... 2 Making
INSTALL GUIDE FLC-GM(RS)-GM10-[FLRSGM10]-EN
![INSTALL GUIDE FLC-GM(RS)-GM10-[FLRSGM10]-EN](/thumbs/81/84380104.jpg "INSTALL GUIDE FLC-GM(RS)-GM10-[FLRSGM10]-EN") INSTALL GUIDE DOCUMENT NUMBER 9 REVISION DATE FIRMWARE FLC-GM(RS)-GM0-[FLRSGM0] HARDWARE FLRSGM0 ACCESSORIES FLPROG (REQUIRED) FLRF// (OPTIONAL) CARLINK ASCL (OPTIONAL) NOTICE The manufacturer will accept
INSTALL GUIDE DOCUMENT NUMBER 9 REVISION DATE FIRMWARE FLC-GM(RS)-GM0-[FLRSGM0] HARDWARE FLRSGM0 ACCESSORIES FLPROG (REQUIRED) FLRF// (OPTIONAL) CARLINK ASCL (OPTIONAL) NOTICE The manufacturer will accept
INSTALLATION GUIDE OWNER S GUIDE
 INSTALLATION GUIDE OWNER S GUIDE ALARM AND REMOTE STARTER MODEL RS602E CONTENTS System Features... 1 System Components... 1 Tools Required... 1 Technical Assistance... 2 Before You Begin... 2 Precautions...
AviStart 6500 Installation Manual
 Table of Contents Important Information... 1 Recommended Installation Tools... 1 Recommended Procedures... 1 Main Wiring Diagrams.... 2 Pin Connectors... 5 Installation Procedures...7 Control Unit... 7
Interface 2000-up. GMOS-04 GM amplified OnStar Class II Data Bus
 INSTALLATION INSTRUCTIONS FOR PART GMOS-04 GMOS-04 GM amplified OnStar Class II Data Bus Interface 2000-up INTERFACE COMPONENTS GMOS-04 interface 16-pin harness with stripped leads 18-pin harness to 12-
INSTALLATION GUIDE. Directed Digital Solutions GM5. Designed by Installers for Installers
 INSTALLATION GUIDE Directed Digital Solutions GM5 Designed by Installers for Installers 2017 Directed, Vista CA This product is intended for installation by a professional installer only! Attempts to install
Remote Start with Keyless Entry Installation Guide CA 5051
 PROFESSIONAL SERIES Remote Start with Keyless Entry Installation Guide CA 5051 2010 Audiovox Electronics Corporation. All rights reserved. 1 Table of Contents Before You Begin... 3 Wire Connection Guide...
Automotive Data Solutions Inc. AVAILABLE FOR : ADS-AL CA. Rev. Date: May 16, 2017 Doc. No.: ##39298##
 Automotive Data Solutions Inc. INSTALL GUIDE ADS-AL(DL)-GM1-EN AVAILABLE FOR : ADS-AL CA Rev. Date: May 16, 2017 Doc. No.: ##39298## GM1 U.S. PATENT NO. 8,856,780 PLEASE VISIT WWW.IDATALINK.COM FOR COMPLETE
INSTALL GUIDE OL-GM(RS)-GM10-[OL-RS-GM10]-EN
![INSTALL GUIDE OL-GM(RS)-GM10-[OL-RS-GM10]-EN](/thumbs/92/108575067.jpg "INSTALL GUIDE OL-GM(RS)-GM10-[OL-RS-GM10]-EN") INSTALL GUIDE DOCUMENT NUMBER 54253 REVISION DATE 20180918 FIRMWARE OL-GM(RS)-GM10-[OL-RS-GM10] HARDWARE OL-RS-GM10 ACCESSORIES OL-LOADER (REQUIRED) RF-10/30/50-EDP (OPTIONAL) LINKR (OPTIONAL) TERMS OF
INSTALL GUIDE DOCUMENT NUMBER 54253 REVISION DATE 20180918 FIRMWARE OL-GM(RS)-GM10-[OL-RS-GM10] HARDWARE OL-RS-GM10 ACCESSORIES OL-LOADER (REQUIRED) RF-10/30/50-EDP (OPTIONAL) LINKR (OPTIONAL) TERMS OF
Signal Mirror Installation Instructions
 Signal Mirror Installation Instructions Chevy Blazer 1992-1994, Chevy Suburban 1992-1999, Chevy Tahoe 1995-1999, Chevy Tahoe Limited 2000, GMC Suburban 1992-1999, GMC Yukon 1992-1999, GMC Yukon Denali
INSTALL GUIDE FLC-GM(RS)-GM10-[FLRSGM10]-EN
![INSTALL GUIDE FLC-GM(RS)-GM10-[FLRSGM10]-EN](/thumbs/90/103073676.jpg "INSTALL GUIDE FLC-GM(RS)-GM10-[FLRSGM10]-EN") INSTALL GUIDE DOCUMENT NUMBER 498 REVISION DATE 0804 FIRMWARE FLC-GM(RS)-GM0-[FLRSGM0] HARDWARE FLRSGM0 ACCESSORIES FLPROG (REQUIRED) FLRF//4 (OPTIONAL) CARLINK ASCL (OPTIONAL) TERMS OF USE: Automotive
INSTALL GUIDE DOCUMENT NUMBER 498 REVISION DATE 0804 FIRMWARE FLC-GM(RS)-GM0-[FLRSGM0] HARDWARE FLRSGM0 ACCESSORIES FLPROG (REQUIRED) FLRF//4 (OPTIONAL) CARLINK ASCL (OPTIONAL) TERMS OF USE: Automotive
U.S. Patent No. 8,856,780 INSTALL TYPE SELECTION. features. PoWer SlIDInG Door (r) rap SHUtDoWn ctrl rear DefroSt ctrl* PoWer SlIDInG Door (l)
 rap SHUtDoWn ctrl rear DefroSt ctrl* PoWer SlIDInG Door (l)") Automotive Data Solutions Inc. INSTALL GUIDE ADS-DL-1-EN AVAILABLE FOR : ADS-DL Rev. Date: May 16, 2017 Doc. No.: ##39300## 1 U.S. PATENT NO. 8,856,780 PLEASE VISIT WWW.IDATALINK.COM FOR COMPLETE PRODUCT
Automotive Data Solutions Inc. INSTALL GUIDE ADS-DL-1-EN AVAILABLE FOR : ADS-DL Rev. Date: May 16, 2017 Doc. No.: ##39300## 1 U.S. PATENT NO. 8,856,780 PLEASE VISIT WWW.IDATALINK.COM FOR COMPLETE PRODUCT
Remote Start with Keyless Entry Installation Guide ca5054
 PROFESSIONAL SERIES Remote Start with Keyless Entry Installation Guide ca5054 2014 Voxx Electronics Corporation. All rights reserved. 1 Table of Contents Before You Begin...3 Wire Connection Guide...4
Automatic / Manual Transmission Remote Start with Keyless Entry Installation Guide for models: ca5153 ca5153sst
 PROFESSIONAL SERIES Automatic / Manual Transmission Remote Start with Keyless Entry Installation Guide for models: ca5153 ca5153sst 2012 Audiovox Electronics Corporation. All rights reserved. 1 Table of
GM1 OL-MDB-GM1. Audio & Electronics
 Omega R&D Inc. INSTALL GUIDE OL-MDB- AvAiLABLe for : OL-MDB Doc. No.: ##6635## 0004 NOTICE: The manufacturer will accept no responsibility for any electrical damage resulting from improper installation
AviStart 3000 Installation Manual
 Table of Contents Important Information... 2 Recommended Installation Tools... 2 Recommended Procedures... 2 Main Wiring Diagram... 3 12 Pin Connector... 4 6 Pin Connector... 4 Installation Procedures...5
Automotive Data Solutions Inc. Rev. Date: October 04, 2011 Doc. No.: ##6617##
 Automotive Data Solutions Inc. INSTALL GUIDE DBI-AL(DL)-GM GM Available for : DBI-AL CA Rev. Date: October 04, 0 Doc. No.: ##667## 0004 Version FRançaise disponible en ligne au www.idatalink.com please
2 WAY REMOTE STARTER & ALARM SYSTEM INSTALLATION GUIDE FCC ID NOTICE
 REV. ARS. WAY REMOTE STARTER & ALARM SYSTEM INSTALLATION GUIDE FCC ID NOTICE This device complies with Part 5 of the FCC rules. Operation is subject to the following conditions:. This device may not cause
TOYOTA YARIS KEYLESS ENTRY SYSTEM
 TOYOTA YARIS 2011 - KEYLESS ENTRY SYSTEM Part Number: 00016-32901 Accessory Code: KE1 Conflicts Not for installation in vehicles equipped with factory installed keyless entry. Kit Contents Item # Quantity
INSTALLATION INSTRUCTIONS FOR PART APPLICATIONS GM/SUZUKI MULTI KIT
 INSTALLATION INSTRUCTIONS FOR PART 99-2003 APPLICATIONS GM/SUZUKI MULTI KIT 99-2003 KIT FEATURES DIN Head Unit Provisions with Pocket ISO DIN Head Unit Provisions with Pocket Double DIN head unit provision
INSTALLATION INSTRUCTIONS
 OEM Recessed Lip Camera with Harness and OnStar Mirror for GM Vehicles with 10-pin Mirror Connector (Kit part number 9002-8722) Please read thoroughly before starting installation and check that kit contents
INSTALLATION INSTRUCTIONS FOR PART APPLICATIONS GM/SUZUKI MULTI KIT
 INSTALLATION INSTRUCTIONS FOR PART 99-2003 APPLICATIONS GM/SUZUKI MULTI KIT 99-2003 KIT FEATURES DIN Head Unit Provisions with Pocket ISO DIN Head Unit Provisions with Pocket Double DIN head unit provision
2 Way Security and Keyless Entry Installation Guide ca 1553
 PROFESSIONAL SERIES 2 Way Security and Keyless Entry Installation Guide ca 1553 2012 Audiovox Electronics Corporation. All rights reserved. 1 Table of Contents Before You Begin... 3 Wire Connection Guide...
Automotive Data Solutions Inc. AVAILABLE FOR : ADS-AL CA. Rev. Date: March 6, 2019 Doc. No.: ##59564##
 Automotive Data Solutions Inc. ADS-AL(DL)-GM1-EN AVAILABLE FOR : ADS-AL CA Rev. Date: March 6, 2019 Doc. No.: ##59564## GM1 PATENT NO. US 8,856,780 CA 2759622 PLEASE VISIT WWW.IDATALINK.COM FOR COMPLETE
GM Class-2 data interface
 GMOS-014 INSTALLATION INSTRUCTIONS INTERFACE FEATURES Provides accessory power (12-volt 10-amp) Maintains the retained accessory power (R.A.P.) feature Can be used in non-amplified, or analog/digital amplified
Security and Keyless Entry Installation Guide ca 1051
 PROFESSIONAL SERIES Security and Keyless Entry Installation Guide ca 1051 ca1051 rev B. 2011 Audiovox Electronics Corporation. All rights reserved. 1 Table of Contents Before You Begin... 3 Wire Connection
GM ONSTAR CLASS II DATA BUS INTERFACE GMOS-04. Installation Instructions SEE APPLICATIONS LIST INSIDE TOOLS REQUIRED FOR INSTALLATION
 GM ONSTAR CLASS II DATA BUS INTERFACE GMOS-04 Installation Instructions * READ IMPORTANT WARNING ON PAGE 2 BEFORE ATTEMPTING ANY INSTALLATION THE GMOS-04 IS DESIGNED TO BE USED WITH VEHICLES THAT HAVE
CA 421 Installation Instructions
 CA 421 Installation Instructions PROFESSIONAL INSTALLATION STRONGLY RECOMMENDED Installation Precautions: Roll down window to avoid locking keys in vehicle during installation Avoid mounting components
GM1 INSTALL GUIDE OL-DB-GM1+ Omega R&D Inc.
 Omega R&D Inc. INSTALL GUIDE OL-DB-GM+ GM Available for : OL-DB-GM Rev. Date: November, 0 Doc. No.: ##6637## 0004 please visit www.caralarm.com for complete product details The brand names and logos found
Automatic / Manual Transmission Remote Start with Keyless Entry Installation Guide. ca 5152
 PROFESSIONAL SERIES Automatic / Manual Transmission Remote Start with Keyless Entry Installation Guide ca 5152 1 Table of Contents Before You Begin... 3 Wire Connection Guide... 4 11 Pin Main Harness...
RS-351-EDP. Installation Guide
 RS-351-EDP Keyless Entry & Remote Start Installation Guide June 25, 2013 Temporary cover. Color cover is in a separate file. Table Of Contents Installation Considerations... 3 6 Pin Main Wire Harness...
MM1 Installation Instructions
 MM1 Installation Instructions PROFESSIONAL INSTALLATION STRONGLY RECOMMENDED Installation Precautions: Roll down window to avoid locking keys in vehicle during installation Avoid mounting components or
INSTALLATION INSTRUCTIONS
 OEM Lip Mount Camera with Harness and OnStar Mirror for GM Vehicles with 10-pin Mirror Connector (Kit part number 9002-8723) Items Included in the Kit: Bubble bag containing: Camera with Mount Mirror Mirror
GMOS-04 GM amplified OnStar Class II Data Bus Interface 2000-up
 M4 M3 M5 ISO 6 2.5 1.5 INSTALLATION INSTRUCTIONS FOR PART INSTGMOS-04 GMOS-04 GM amplified OnStar Class II Data Bus Interface 2000-up APPLICATIONS See inside front cover KIT FEATURES Provides accessory
Manual - Inside Front Cover (Blank)
") FRONT COVER Manual - Inside Front Cover (Blank) Table of Contents Important Information... 2 Recommended Installation Tools... 2 Recommended Procecures... 2 Wiring Diagram... 3 14 Pin Connector...4 Installation
FRONT COVER Manual - Inside Front Cover (Blank) Table of Contents Important Information... 2 Recommended Installation Tools... 2 Recommended Procecures... 2 Wiring Diagram... 3 14 Pin Connector...4 Installation
# B: Information on Auxiliary Power Wire at Trailer and Installation of Aftermarket Trailer Brake Controller - Towing, Tow - (Aug 19, 2008)
") Page 1 of 6 #06-08-45-008B: Information on Auxiliary Power Wire at Trailer and Installation of Aftermarket Trailer Brake Controller - Towing, Tow - (Aug 19, 2008) Subject: Models: Information on Auxiliary
Page 1 of 6 #06-08-45-008B: Information on Auxiliary Power Wire at Trailer and Installation of Aftermarket Trailer Brake Controller - Towing, Tow - (Aug 19, 2008) Subject: Models: Information on Auxiliary
CP 634 DELUXE 4-CHANNEL KEYLESS ENTRY SYSTEM
 CP 634 DELUXE 4-CHANNEL KEYLESS ENTRY SYSTEM Installation And Operation Manual MEGATRONIX VAN NUYS, CA U.S.A. CP634 1 REMOTE CONTROL CONVENIENT SYSTEM INSTALLATION & OPERATION INSTRUCTIONS INTRODUCTION
AviStart 3001 Installation Manual, Revision B
 Table of Contents Important Information........................... 1 Recommended Installation Tools.................... 1 Recommended Procedures....................... 1 14 Pin Connector............................
Installation Instructions
 Installation Instructions Jeep JK Unlimited (2007 Present) Mounting Bracket and Air Line System Kit for ARB On-Board Twin Air Compressor (CKMTA12) Made in the USA Kit Contents: 1 Bracket for ARB Compressor
FM SECURITY AND REMOTE START SYSTEM
 FM SECURITY AND REMOTE START SYSTEM INSTALLATION MANUAL BEFORE INSTALLING THIS PRODUCT PLEASE READ THIS INSTALLATION MANUAL THOROUGHLY!! This system is intended for installation on vehicles equipped with
FEB/20/2003 COMMANDO EZ-2500 REMOTE ENGINE STARTER WITH KEYLESS ENTRY SYSTEM INSTALLATION MANUAL 550A 1
 COMMANDO EZ-2500 REMOTE ENGINE STARTER WITH KEYLESS ENTRY SYSTEM INSTALLATION MANUAL 550A 1 INTRODUCTION FEB/20/2003 INSTALLER WARNINGS This Remote Starter with Alarm System is designed to be installed
Vehicle Security System
 Installation Instructions Vehicle Security System PROFESSIONAL INSTALLATION STRONGLY RECOMMENDED Installation Precautions: Roll down window to avoid locking keys in vehicle during installation Avoid mounting
INSTALLATION GUIDE OWNER S GUIDE
 INSTALLATION GUIDE OWNER S GUIDE CONTENTS REMOTE STARTER MODELS RS1200/RS1200E System Features... 1 System Components... 1 Required Tools... 1 Technical Assistance... 1 Before You Begin... 2 Precautions...