Use subject to terms and conditions posted at
|
|
|
- Dominic Atkinson
- 6 years ago
- Views:
Transcription
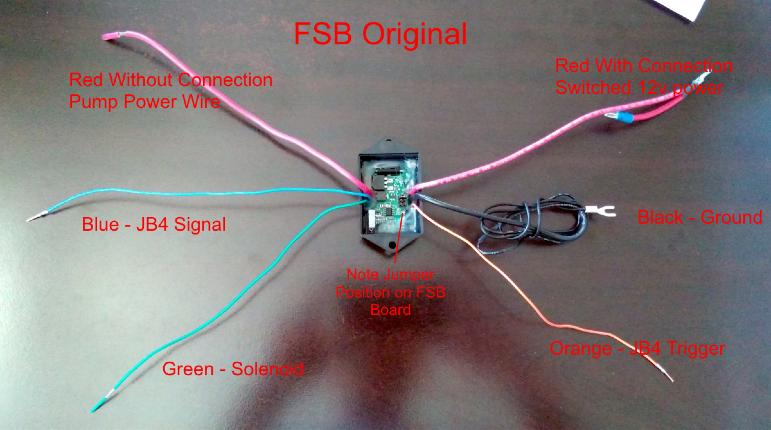
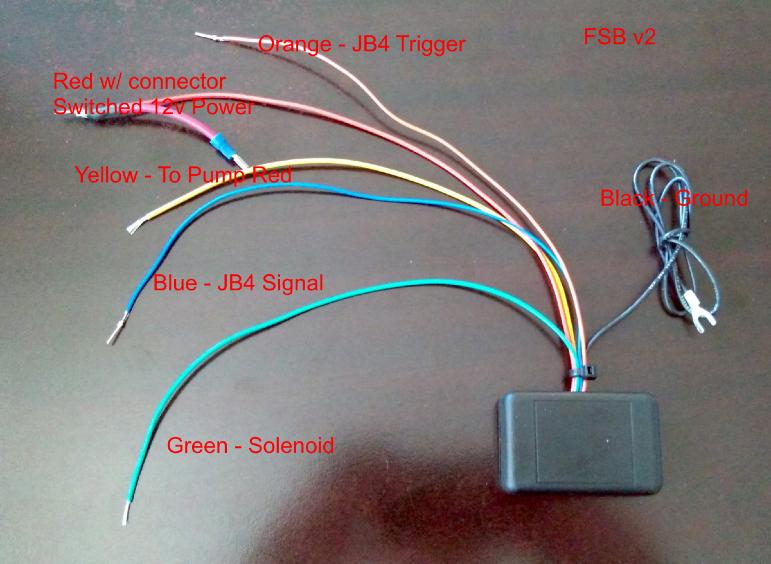
1 BMS Water/Methanol/Alcohol WMI Kit Install Guide Last updated 9/11/2017 Use subject to terms and conditions posted at THIS PART IS LEGAL FOR USE ONLY IN COMPETITION RACING VEHICLES AS DEFINED UNDER CALIFORNIA LAW, AND IS NOT LEGAL FOR USE IN ANY OTHER MOTOR VEHICLE. California law defines a "racing vehicle" as "a competition vehicle not used on public highways." (Calif. Health & Safety Code 39048) This part may only be used on competition racing vehicles operated exclusively on a closed course in conjunction with a sanctioned racing event. Competition-only motor vehicles may not be driven to a racing event on a public highway and must be transported on a trailer or other carrier. USE OF THIS PART IN ANY OTHER VEHICLE MAY SUBJECT YOU TO FINES AND PENALTIES FOR VIOLATION OF FEDERAL AND/OR STATE LAW, WILL VOID YOUR WARRANTY FROM BURGER MOTORSPORTS, INC, AND CAN VOID YOUR VEHICLE'S WARRANTY. It is your responsibility to comply with all applicable federal and state laws relating to use of this part, and Burger Motorsports, Inc hereby disclaims any liability resulting from the failure to use this part in compliance with all applicable federal and state laws. Always be aware that using water/methanol/alcohol injection involves risk of fire and care should be taken to reduce these risks. Remove the cowl covers for the model to expose the JB4 control box, and remove the negative battery terminal. The FSB serves as both the pump controller and the flow sensor. It comes with plug and play connectors ready to install in the JB4 large 25pin connector. Note there are two version FSB systems. The original version has one side of the box open so you can see the circuit board while version 2 sits completely inside a closed enclosure. The original version has a red wire for the pump power while version 2 has a yellow wire for pump power. Note reference photos below. The main difference in installation between the two will be whether the 2 nd solenoid wire is connected to the pump red (original) or ground (version 2).

2

3 FSB Wiring: 1) Orange/Blue wires. Same for original and rev2: N54: Remove the JB4 control box from the AMP connector and remove the two screws holding the AMP connector together. Upon removing the case you'll insert the FSB orange wire in to position #2 and the blue wire in to position #15. These will be the only open slots in the connector. They are numbered on both the front and back so check before pushing the pin in. If you lock the pin in the wrong spot by mistake you will need to go to Radio Shack or an electronics store to get an inexpensive tool called a "DSUB pin removal tool" to extract the pin and place it in the right slot. If you manage to damage a pin you can replace it with any male DSUB pin. All other engines: All N20, N55, N63, S55, S63, B48, B58, VW, etc, applications use spot #3 for the orange wire. Blue Wire: #16: pneumatic wastegate board vehicles (E series N55 and 2013 F series N20/N55) #16: VW, N63, S55, S63TU #14: F series N20/N55/B48/B58 If the blue wire is placed in the wrong spot the pump will still turn on but the JB4 will not properly read flow data. 2) Ground: Route the black ground out of the DME box to a chassis ground. A bad ground can damage the FSB so try to find a grounding point that has OEM ground (normally brown) wires going to it. While the shock tower can be used for E series applications for F series find a ground that has OEM ground wires going to it. N54 Ground Reference:
 piggybacks with the JB4 red power wire.")


4 3) FSB Red Wire +12v. Same for original and rev2: N54: For N54 installs the FSB power wire with the connector attached to it (the one on the same side as the black ground wire) piggybacks with the JB4 red power wire. The one that is attached to the green connector in the DME box. Unplug the OEM orange wire from the JB4 power wire, connect the FSB female pin to it, and connect the FSB male pin to the JB4 power wire completing the loop. Now, both the JB4 and the FSB control box will have switched 12v power. For the N54 the fuse will go between the FSB red wire to the pump and the pump. N55 E Series: Cut off the FSB power connector, attach the FSB red wire to the included inline fuse with a wire nut, strip back the insulation round 1 on the other side of the inline fuse holder, and attach the wire to the large 50amp fuse location that the JB4 takes its power from by removing the 50amp fuse, putting the wire in the 50amp fuse holder, and pushing the 50amp fuse back down securing it in place. All F Series: Cut off the 12v pnp connector from the FSB red wire and attach it to one side of the inline fuse holder. Crimp a fork on the other side of the inline fuse holder and plug that in to an unused fused location in the primary fuse box shown below. Note many unused spots DO NOT have a fuse receptacle and won t work so be sure to locate one that has an actual power feed below it.
 SOLENOID WIRING. Original FSB: Both solenoid wires are interchangeable.")
5 4) PUMP POWER Original FSB: Extend the red wire to the WMI pump located in the trunk and attach with a wirenut. V2 FSB: Extend the yellow wire to the WMI pump located in the trunk and attach with a wirenut. 5) SOLENOID WIRING. Original FSB: Both solenoid wires are interchangeable. Attach one to the FSB green connection using spare wire as needed to extend it. Attach the other solenoid wire to the RED wire going to the WMI pump from step4. V2 FSB: Both solenoid wires are interchangeable. Attach one to the FSB green connection using spare wire as needed to extend it. Attach the other solenoid wire to a suitable ground location by the solenoid. 6) Pump ground: The pump black wire will be connected to a chassis ground in the trunk. You can use the battery directly or one of the many exposed grounds under the trunk liner. Fittings: We've updated the BMS WMI kits with new compression style fittings. The solenoid will go together as shown below. Note the direction of flow on the solenoid and filter fitting during assembly. Line will run from the PUMP, to the filter, to the solenoid, and finally out the solenoid to the nozzles (or nozzle tee if a twin nozzle kit). To install these fittings apply a small amount of Teflon paste to the threads and tighten them. Then insert the nylon line in to the fitting and turn the compression nut with a wrench until snug. F Series Stealth Tank: 1) Screw the angle compression fitting in to the tank using Teflon paste. 2) Attach the included 1 line to the tank fitting as shown below.


6 3) Insert the line in to the WMI pump maneuvering it in to place. 4) Attach the 4 mounting screws securing the pump to the tank. Note these go through rubber isolators and you will need to position the isolators while starting the screw for proper alignment. Add a bit of fluid to check for leaks and then drop the tank assembly in as shown. There is a ground point/10mm bolt for the pump ground by the fuse area. Routing lines: We suggest running the lines and wires through the interior as we've found this the most convenient method of install. But you also have the option to route the lines/wires under the car, or any way you'd like, so rely on your own judgement here. Included are some photos demonstrating how you may choose to route the lines: Remove the plastic panel under the steering wheel for easy access through the firewall in to the engine bay.


7 Run the WMI line and red power wire from the tank in the trunk working backwards towards the engine bay. It will tuck behind the rear seat and along the driver site interior panels up around the hood-latch mechanism towards the firewall. There is a rubber grommet you can poke a hole in to extend meth line and power wire in to the engine bay by the brake booster. JB4 setup: Using your BMS DATA cable or JB4 Connect Kit you'll have to enter a few settings to enable the meth integration. Under the meth tab set Signal Scaling to 60. Then set Boost Additive to 40. The Boost Additive determines how aggressive the JB4 will be with boost when WMI is at full flow. We suggest the 40 setting for pump gas as a starting point. If you happen to run higher octane fuel such as race gas or E85 then this value can be increased. The maximum
8 suggested setting for factory turbos is 75. Note the WMI maps are application specific so refer to the JB4 thread for your application for additional information. For the N54/N55/N20 the WMI map is map3 while with the S55/S63/B58 the WMI map is map8. WMI can be used on other maps with reduced safety function so refer to the application specific JB4 thread for additional settings. WMI flow: Note when the system is operating normally you will see a WMI flow reading of 60% to 100%. It's normal for the flow reading to vary between % based on weather, fluid injected, nozzle size, etc. Readings below 60% indicate a flow issue. If you run out of meth the reading will drop to 10% or less. If you have a wiring or electrical issue the reading will drop to 0%. Priming system: The first time you install and any time you run the system dry you will need to prime the pump to get all of the air out of the pump and lines. If you see air bubbles in the line feeding the pump you will need to resolve that issue first and then prime to remove air from the pump after. Any time air is detected in the pump or lines leading in to the pump the JB4 will give a lower meth reading. Note it is normal to see air pockets in the short line between the solenoid and the nozzle when the system is off. It is also normal to see an occasional air bubble in the line feeding the pump. But many bubbles combined with a consistent low flow reading indicate air is leaking in to the system. N54 Purge Directions: Disconnect the line from the nozzle and place it in a water bottle or bucket to catch the fluid. Turn the ignition on and enter JB4 command mode. Go to option 7/5 (meth on oil temp) and while in command mode press the gas pedal to the floor to activate the pump and push the air out of the system. This generally takes 5-10 seconds and you can visually confirm the inlet and outlet lines are free of air bubbles. If you see air bubbles appearing in the line going towards the pump double check all fittings and lines to ensure they are tight. All others: Select the JB4 WMI map. With ignition on and JB4 software connected press the small purge button in the upper right hand corner repeatedly to activate/test the pump. Each press will activate the pump for around a second and it should take 6-8 seconds to push all the air from the pump and get it properly primed. If you are unable to get fluid to come out using the methods above you have a wiring or installation issue and will need to further troubleshoot. Assuming fluid comes out everything should be working properly. Troubleshooting: Pump isn't turning on using 7/5 option + gas pedal push in dash:

9 1) Above technique works for N54 only 2) Orange and blue wires in JB4 might be crossed 3) Inline fuse installed may be missing or blown FSB Mounting in F Series: Although the FSB will be placed under a plastic engine cover it is still susceptible to water damage if left floating. We suggest either mounting the FSB face down against the chassis and/or covering the open face with a piece of cloth or duct tape to improve is water resistance.
JB N20/N26 Stage 1 & JB4 Install Guide Last Updated: 10/31/2017
 JB N20/N26 Stage 1 & JB4 Install Guide Last Updated: 10/31/2017 Use subject to terms and conditions posted at http://www.burgertuning.com/terms.html THIS PART IS LEGAL FOR USE ONLY IN COMPETITION RACING
BMS S63TU Stage1 and JB4 Install Guide
 BMS S63TU Stage1 and JB4 Install Guide Last updated 3/23/2018 Use subject to terms and conditions posted at http://www.burgertuning.com/terms.htm THIS PART IS LEGAL FOR USE ONLY IN COMPETITION RACING VEHICLES
BMS S55 JB4 Install Guide
 BMS S55 JB4 Install Guide Last updated 2/24/2016 Use subject to terms and conditions posted at http://www.burgertuning.com/terms.htm THIS PART IS LEGAL FOR USE ONLY IN COMPETITION RACING VEHICLES AS DEFINED
JB N55 E Series Stage 1 and JB4 Install Guide Last Updated: 6/8/2017
 JB N55 E Series Stage 1 and JB4 Install Guide Last Updated: 6/8/2017 Use subject to terms and conditions posted at http://www.burgertuning.com/terms.html THIS PART IS LEGAL FOR USE ONLY IN COMPETITION
Use subject to terms and conditions posted at
 Use subject to terms and conditions posted at http://www.burgertuning.com/terms THIS PART IS LEGAL FOR USE ONLY IN COMPETITION RACING VEHICLES AS DEFINED UNDER CALIFORNIA LAW, AND IS NOT LEGAL FOR USE
BMS B48/B58 JB4 BETA Install Guide Last Updated: 8/1/2016 Use subject to terms and conditions posted at
 BMS B48/B58 JB4 BETA Install Guide Last Updated: 8/1/2016 Use subject to terms and conditions posted at http://www.burgertuning.com/terms.html THIS PART IS LEGAL FOR USE ONLY IN COMPETITION RACING VEHICLES
VW JB1 to JB4 Beta Upgrade
 VW JB1 to JB4 Beta Upgrade Last updated: 3/2/2017 Use subject to terms and conditions posted at http://www.burgertuning.com/terms.html THIS PART IS LEGAL FOR USE ONLY IN COMPETITION RACING VEHICLES AS
Q50/Q60 Stage1 to JB4 Beta Upgrade
 Q50/Q60 Stage1 to JB4 Beta Upgrade Last updated: 9/7/2017 Use subject to terms and conditions posted at http://www.burgertuning.com/terms.html THIS PART IS LEGAL FOR USE ONLY IN COMPETITION RACING VEHICLES
JBD Quick Install. Install Guide Last Updated: 3/25/14. Use subject to terms and conditions posted at
 JBD Quick Install Install Guide Last Updated: 3/25/14 Use subject to terms and conditions posted at http://www.burgertuning.com/terms.html THIS PART IS LEGAL FOR USE ONLY IN COMPETITION RACING VEHICLES
BMS JB Stage1 n63/n63tu/s63/s63tu Install Guide
 BMS JB Stage1 n63/n63tu/s63/s63tu Install Guide Last updated 11/20/2017 Use subject to terms and conditions posted at http://www.burgertuning.com/terms.htm THIS PART IS LEGAL FOR USE ONLY IN COMPETITION
BMS F90 M5/M6 BETA Install Guide
 BMS 2018+ F90 M5/M6 BETA Install Guide Last Updated: 7/28/2018 Use subject to terms and conditions posted at http://www.burgertuning.com/terms.html THIS PART IS LEGAL FOR USE ONLY IN COMPETITION RACING
Alfa Romeo Giulia BMS JB4 Beta Install Guide Last updated 10/9/2018
 Alfa Romeo Giulia 2017+ BMS JB4 Beta Install Guide Last updated 10/9/2018 Use subject to terms and conditions posted at http://www.burgertuning.com/terms.html THIS PART IS LEGAL FOR USE ONLY IN COMPETITION
BMS JB Stage1 n63/n63tu/s63/s63tu Install Guide
 BMS JB Stage1 n63/n63tu/s63/s63tu Install Guide Last updated 6/25/2014 Use subject to terms and conditions posted at http://www.burgertuning.com/terms.htm THIS PART IS LEGAL FOR USE ONLY IN COMPETITION
JB1 for VAG EA888 Gen 3 engines found in Jetta GLI, Turbo Beetle from and on and 2014 and on Jetta/Passat/Beetle 1.8T
 JB1 for VAG EA888 Gen 3 engines found in Jetta GLI, Turbo Beetle from 2013.5 and on and 2014 and on Jetta/Passat/Beetle 1.8T Install Guide Last Updated: 28/08/2016 Use subject to terms and conditions posted
JB1 for VAG EA888 Gen 3 engines Install Guide Last Updated: /201
 JB1 for VAG EA888 Gen 3 engines Install Guide Last Updated: /201 Use subject to terms and conditions posted at http://www.burgertuning.com/terms.htm THIS PART IS LEGAL FOR USE ONLY IN COMPETITION RACING
BMS F1X M5/M6 S63TU Stage1 Install Guide
 BMS F1X M5/M6 S63TU Stage1 Install Guide Last updated 10/22/2018 Use subject to terms and conditions posted at http://www.burgertuning.com/terms.htm THIS PART IS LEGAL FOR USE ONLY IN COMPETITION RACING
JB1 and JB4 Install Guide for VAG EA888 Gen 3 engines 252hp version
 JB1 and JB4 Install Guide for VAG EA888 Gen 3 engines 252hp version Use subject to terms and conditions posted at http://www.burgertuning.com/terms.htm THIS PART IS LEGAL FOR USE ONLY IN COMPETITION RACING
BMS S63TU JB4 Install Guide
 BMS S63TU JB4 Install Guide Last updated 10/22/2018 Use subject to terms and conditions posted at http://www.burgertuning.com/terms.htm THIS PART IS LEGAL FOR USE ONLY IN COMPETITION RACING VEHICLES AS
Ford Mustang V6 OEM-Style Fog Light Kit Parts List: Quantity: Tool List:
 2015-2017 Ford Mustang V6 OEM-Style Fog Light Kit Parts List: Quantity: Tool List: LED Foglights/ Bezels 2 Flat head & Phillips screwdriver (if you ordered part#3600) Ratchet & Socket set OR Wiring harness
Shotgun Double Barrel HPFP install guide
 Shotgun Double Barrel HPFP install guide Thank you for your purchase of the VTT Shotgun Double Barrel HPFP upgrade! First thing to do when you open your box is to make sure all parts are in their respective
1200 Southeast Ave Tallmadge, Ohio to 2015 Camaro (V6 & V8) Summit Racing Roll Stop Install Instructions.
 Summit Racing Roll Stop Install Instructions.") 1200 Southeast Ave Tallmadge, Ohio 44278 2010 to 2015 Camaro (V6 & V8) Summit Racing Roll Stop Install Instructions Part # SUM-760006 Parts Included in System: Qty Description Qty Description 2 Stainless
1200 Southeast Ave Tallmadge, Ohio 44278 2010 to 2015 Camaro (V6 & V8) Summit Racing Roll Stop Install Instructions Part # SUM-760006 Parts Included in System: Qty Description Qty Description 2 Stainless
HP10134 & HP10135 KITS BASIC SIMULTANEOUS AIR SPRING ACTIVATION KIT
 HP10134 & HP10135 KITS BASIC SIMULTANEOUS AIR SPRING ACTIVATION KIT Thank you and congratulations on the purchase of a Pacbrake simultaneous air spring activation kit. This kit was designed to add in-cab
2015+ HELLCAT 6.2L HEMI System vehicle specific plate system xx
 These installation instructions will guide you through installing the Nitrous Outlet 2015+ Hellcat 6.2L Hemi Vehicle Specific Plate System on your vehicle. Before you get started, remember to never use
CHEVY CAMARO Four panel Sequential LED Taillight kit installation guide
 1978-81 CHEVY CAMARO Four panel Sequential LED Taillight kit installation guide Kit Contents: 4 LED panels 1 power wire with t-tap 2 driver side LED harnesses, 24 2 passenger side LED harnesses, 48 4 LED
Depress each tab as you pull the bezel off. The bezels are tight. L.H. shown.
 2013-2014 Ford Mustang V6 & Boss 302 Lower Valance Fog Light Kit Parts List: Quantity: Tool List: Fog light & bulb with bracket 2 Flat head & Phillips screwdriver Black bezels 2 Ratchet & Socket set OR
INSTALLATION INSTRUCTIONS
 INSTALLATION INSTRUCTIONS FUEL SURGE TANK INSTALL KIT Honda S2000 Document# 19-0063 Support: info@radiumauto.com WARNING: DO NOT SMOKE WHILE WORKING ON FUEL SYSTEMS. KEEP SPARKS AND OPEN FLAMES AWAY FROM
HP10098 BASIC INDEPENDENT AIR SPRING ACTIVATION KIT
 HP10098 BASIC INDEPENDENT AIR SPRING ACTIVATION KIT Thank you and congratulations on the purchase of a Pacbrake basic independent air spring activation kit. Please read the entire installation manual prior
Turn Signal Kit Installation Instructions for Model A Fords & Other Antique Vehicles
 Turn Signal Kit Installation Instructions for Model A Fords & Other Antique Vehicles Lifetime Technical Support support@logolites.com 770-476-7322 www.logolites.com Manual 100-0005N Thank you for purchasing
C WD 2 WHEEL LOW KIT FOR DODGE RAM 4WD VEHICLES
 C18056-4WD 2 WHEEL LOW KIT FOR 1994-2002 DODGE RAM 4WD VEHICLES Pacbrake s 4WD 2 Wheel Low Kit allows the vehicle operator to engage the transfer case into 4WD low range without engaging the front wheel
Thank you for purchasing the Craven Speed FlexPod Complete Gauge Pod Kit For R56, R58, R59, R60 with Refresh Engines (2011+)
") Thank you for purchasing the Craven Speed FlexPod Complete Gauge Pod Kit For R56, R58, R59, R60 with Refresh Engines (2011+) Before You Start Please read instructions completely before installing. These
Thank you for purchasing the Craven Speed FlexPod Complete Gauge Pod Kit For R56, R58, R59, R60 with Refresh Engines (2011+) Before You Start Please read instructions completely before installing. These
Thank you for purchasing the Craven Speed FlexPod Complete Gauge Pod Kit
 Thank you for purchasing the Craven Speed FlexPod Complete Gauge Pod Kit Before You Start Please read instructions completely before installing. These instructions contain the information required to install
Detroit Speed, Inc. Selecta-Speed Wiper Kit Corvette P/N:
 Detroit Speed, Inc. Selecta-Speed Wiper Kit 1963-67 Corvette P/N: 121620 A downpour of rain will no longer hinder your ability to clearly see the road. The Detroit Speed Selecta-Speed Wiper Kit provides
LED PURGE VALVE KITS P/N 16028NOS (5 lb. bottle) & 16029NOS (10 lb. bottle) Instruction Sheet P/N 199R10412
 & 16029NOS (10 lb. bottle) Instruction Sheet P/N 199R10412") 1.0 INTRODUCTION: LED PURGE VALVE KITS P/N 16028NOS (5 lb. bottle) & 16029NOS (10 lb. bottle) Instruction Sheet P/N 199R10412 Purge Valve Kits, P/N 16028NOS & 16029NOS are intended for use on competition
1.0 INTRODUCTION: LED PURGE VALVE KITS P/N 16028NOS (5 lb. bottle) & 16029NOS (10 lb. bottle) Instruction Sheet P/N 199R10412 Purge Valve Kits, P/N 16028NOS & 16029NOS are intended for use on competition
Weistec M177 WMI System
 Weistec M177 WMI System Installation Guide 2015+ C63(S) Sedan 2016+ C63(S) Coupe This product is legal in California for racing vehicles only and should never be used upon a highway. This product is legal
Remove black panel shown. Save 6 retaining pins for re-install later. Pry up on center part of pin first. Then pry out entire retaining pin.
 2005-2009 Ford Mustang V6 Fog Light Wiring Kit Parts List: Quantity: Tools Required: Wiring harness 1 Flat head screwdriver Supplemental wire leads 2 Ratchet & Socket set OR Wire tap red 2 Adjustable Wrench
Weistec M157 WMI System
 Weistec M157 WMI System Installation Guide 2012-2013 E63 2014+ E63 4matic(S) 2011-2013 CLS63 2014+ CLS63 4matic(S) 2015+ S63 AMG (Without ABC Suspension) This product is legal in California for racing
KIT # MC-2992, MC-2993 INDIAN SCOUT SERIES W/ ABS 2014-PRESENT
 Congratulations on your purchase of an Arnott Motorcycle Air Suspension system. This system provides you with the ability to maintain your bike at a constant level regardless of load, resulting in enhanced
Flex Fuel Bluetooth Kit BRZ / FRS / GT86 install instructions
 Delicious Tuning 1250 Activity Dr. Ste A Vista, CA 92081 408-480-0995 Rev: 1.0 Date: 8/20/18 FFBT parts: (1) Ethanol Content Analyzer Module (1) Ethanol Content Analyzer Sensor (1) Sensor Bracket (1) Velcro
ONBOARD AIR SYSTEM FOR ALL VEHICLES APPLICATIONS
 ONBOARD SYSTEM FOR ALL VEHICLES APPLICATIONS Thank you and congratulations on the purchase of a Pacbrake onboard air system. Please read the manual prior to starting to ensure you can complete the installation
Use subject to terms and conditions posted at
 BMS B48/B58 JB4 Install Guide Last Updated: 11/8/2017 Applicable year/model vehicles listed at end of install guide Use subject to terms and conditions posted at http://www.burgertuning.com/terms.html
BMS JB Stage1 n63/n63tu/s63/s63tu Install Guide
 BMS JB Stage1 n63/n63tu/s63/s63tu Install Guide Last updated 1/30/2013 Use subject to terms and conditions posted at burgertuning.com/terms Please note there are 4 variations of BMW's twin turbo V8 motor
Small knife. Remove black panel shown. Save 6 retaining pins for re-install later.
 2005-2009 Ford Mustang V6 Fog Light Wiring Kit Parts List: Quantity: Tools Required: Wiring harness 1 Flat head screwdriver PB-3425 Parts Bag 1 Ratchet & Socket set OR Ford OEM Switch (if you 1 Adjustable
KIT # MC-2990, MC-2991 INDIAN SCOUT SERIES W/O ABS 2014-PRESENT
 Congratulations on your purchase of an Arnott Motorcycle Air Suspension system. This system provides you with the ability to maintain your bike at a constant level regardless of load, resulting in enhanced
STEALTH. The MOST Versatile and Easiest To Use Towed Vehicle Braking System available! NEED HELP? Call WARNING
 0 STEALTH The MOST Versatile and Easiest To Use Towed Vehicle Braking System available! INSTALLATION manual NEED HELP? Call - -00-0- Read all instructions before installing or operating the Stealth. Failure
JEEP JL INSTALL GUIDE
 JEEP JL INSTALL GUIDE S-TECH Switch Systems DEVELOPED, DESIGNED, MANUFACTURED and Assembled in the Rocky Mountains of Colorado, known to many as JEEP COUNTRY. Trail riding at 10,000 feet at night requires
Installation MKIV Headlight Housings with Fog Lamps (Procedures apply to both MKIV Jetta and Golf)
") Page 1 This tutorial is provided as a courtesy by ECS Tuning. Service Procedure Installation Proper service and repair procedures are vital to the safe, reliable operation of all motor vehicles as well
Page 1 This tutorial is provided as a courtesy by ECS Tuning. Service Procedure Installation Proper service and repair procedures are vital to the safe, reliable operation of all motor vehicles as well
PONTIAC FIREBIRD
 1974-78 PONTIAC FIREBIRD Two Panel Sequential LED Tail Light Kit Installation Guide Kit Contents: 2 LED panels 2 LED panel mount kits 6 rubber grommets 1 power wire 1 pigtail harness Kit 1 crimp terminal
08-18 STI Flex Fuel Bluetooth Mk2 Kit Install Instructions For Cobb Tuning Access Port
 For Cobb Tuning Access Port Delicious Tuning 1948 Don Lee Place Suite #7 Escondido, CA 92029 408-480-0995 Rough Draft BJP Rev: 2.0 Date: 2/1/17 FFBT parts: (1) Ethanol Content Analyzer Module (1) Ethanol
PN R CHEVY CAMARO w/reverse Two panel Sequential LED Taillight kit installation guide. Kit Contents:
 Two panel Sequential LED Taillight kit installation guide Kit Contents: 2 LED panels 4 rubber grommets 1 power wire with t-tap 1 driver side LED harness, 24 1 passenger side LED harness, 48 2 LED extension
USB Charge Port Installation Instructions
 USB Charge Port Installation Instructions Lifetime Technical Support support@logolites.com 770-476-7322 www.logolites.com Manual 100-0014C Thank you for purchasing a Logo Lites USB Charge Port! USB Charge
Thank You For Choosing. INSTALLATION INSTRUCTIONS Deluxe Plug and Play Turn Signal Kit Polaris General. Need help with your installation?
 2753 Michigan Road Madison, Indiana 47250 855-743-3427 INSTALLATION INSTRUCTIONS Deluxe Plug and Play Turn Signal Kit Polaris General Flasher Wiring Harness Horn Hose Clamp 1x Indicator Light 6x 10x Wire
Lethal Performance Dual FPDM Harness Kit Installation
 Lethal Performance Dual FPDM Harness Kit Installation The Lethal Performance Dual FPDM Harness Kit is a plug-and-play modification. Depending on whether you are using the Lethal Performance wire upgrade
KIT # MC-2911, MC-2923 FOR ALL YEAR SUZUKI M-109R SERIES
 Congratulations on your purchase of an Arnott Motorcycle Air Suspension system. This system provides you with the ability to maintain your bike at a constant level regardless of load, resulting in enhanced
1200 Southeast Ave Tallmadge, Ohio to 2014 Mustang (V6 & V8) Summit Racing Roll Stop Install Instructions.
 Summit Racing Roll Stop Install Instructions.") 1200 Southeast Ave Tallmadge, Ohio 44278 2010 to 2014 Mustang (V6 & V8) Summit Racing Roll Stop Install Instructions Part # SUM-760005 Thank you for considering the Summit Racing Roll Stop. Summit Racing
1200 Southeast Ave Tallmadge, Ohio 44278 2010 to 2014 Mustang (V6 & V8) Summit Racing Roll Stop Install Instructions Part # SUM-760005 Thank you for considering the Summit Racing Roll Stop. Summit Racing
Part #82064 Add-A-Stage EFI Nitrous System
 1 INSTRUCTIONS Part #82064 Add-A-Stage EFI Nitrous System Thank you for choosing products; we are proud to be your manufacturer of choice. Please read this instruction sheet carefully before beginning
Chevy Colorado / GMC Canyon INSTALL GUIDE
 Chevy Colorado / GMC Canyon INSTALL GUIDE S-TECH Switch Systems DEVELOPED, DESIGNED, MANUFACTURED and Assembled in the Rocky Mountains of Colorado, known to many as JEEP COUNTRY. Trail riding at 10,000
PRAMCQ13. Designed for Dodge Ram vehicles with base audio Not Compatible with 2018 and newer Dodge Ram vehicles
 PRAMCQ13 Designed for 2013 2017 Dodge Ram vehicles with base audio Not Compatible with 2018 and newer Dodge Ram vehicles Subwoofer Alternate Amplifier Bracket Amplifier Subwoofer Harness Subwoofer Amplifier
Porsche L and 3.6L Unichip PnP Installation Instructions
 Porsche 996 3.4L and 3.6L Unichip PnP Installation Instructions and Warranty Information v1.0, 1 June 2007 Tools Required 10mm socket, ¼-inch or 3/8-inch ratchet, 6-inch ratchet extension, and a 10mm combination
Congratulations on purchasing the Edge Juice/Attitude system for the Dodge Cummins Diesel.
 Getting Started About the Juice Congratulations on purchasing the Edge Juice/Attitude system for the Dodge Cummins Diesel. The Juice/Attitude system features an intelligent module (Juice) that acts as
Wire Harness Installation Instructions
 Wire Harness Installation Instructions For Installing: Part #50001 Race Car Kit/8 Circuit Part #50201 8 Switch Dash Mounted Panel Part #50202 8 Switch Roll Bar Mounted Panel Manual #90502 Painless Performance
Ford 6.0L Powerstoke Regulated Fuel Return
 Ford 6.0L Powerstoke Regulated Fuel Return ! WARNING REGARDING EMISSIONS LAWS Not legal for sale or use on pollution-controlled motor vehicles anywhere in the United States. Legal ONLY for off-road competition
Shotgun Single Barrel HPFP install guide
 Shotgun Single Barrel HPFP install guide Thank you for your purchase of the VTT Shotgun Single Barrel HPFP upgrade! First thing to do when you open your box is to make sure all parts are in their respective
Connecting the rear fog light on the A4 Jetta, while keeping the 5 Light Mod
 Connecting the rear fog light on the A4 Jetta, while keeping the 5 Light Mod DISCLAIMER: I'm human and make mistakes. If you spot one in this how to, tell me and I'll fix it This was done on my 99.5 Jetta.
Contents. TCS/ Driver Mod Installation Manual
 Contents Introduction... 1 TCS Packing List... 3 Tools Needed for Installation... 4 How to Properly Solder... 5 Soldering Standard Butt Connection... 5 Soldering T Connection... 6 How to Properly Crimp...
Water in Fuel Sensor Kit
 03/08/2016 1050355-1050356 Water in Fuel Sensor Kit (I-00369) 1 Water in Fuel Sensor Kit Fast and Accurate Detection of Water in Diesel Fuel 1050355 Universal Kit For use with BD FlowMax water separator
Two panel Sequential LED Taillight kit installation guide
 1970 CHEVELLE Two panel Sequential LED Taillight kit installation guide Kit Contents: 2 LED panels 2 rubber grommets 1 power wire with t-tap 1 driver side LED harness, 24 1 passenger side LED harness,
JEEP JL INSTALL GUIDE
 JEEP JL INSTALL GUIDE S-TECH Switch Systems DEVELOPED, DESIGNED, MANUFACTURED and Assembled in the Rocky Mountains of Colorado, known to many as JEEP COUNTRY. Trail riding at 10,000 feet at night requires
On all settings above 100 horsepower the following precautions should be observed:
 ELECTRONIC FUEL INJECTED 5.0 COYOTE PLATE SYSTEM INSTALLATION INSTRUCTIONS Congratulations on the purchase of your Nitrous Express Coyote Plate system. Nitrous Express utilizes only the highest quality
INSTRUCTIONS 12 Circuit Wiring Kit Instructions
 Fan 47 9 56 4 7 6 72 40 45 48 5 8 6 Gauge Power Temp Sender Headlight Power Power Radio Constant Power Instruments and Dash Rear of Vehicle Ignition and Lights Fuse Panel & Front of Vehicle Horn Alt Excitor
FREEDOM FILL AUXILIARY SYSTEM Gauge & Switch Console
 2018 Aluminum Tank & Tank Accessories, Inc. 2702-B N. Nichols, Fort Worth, TX 76106 800-773-3047 * 817-378-8455 www.attatank.com attatank@gmail.com FREEDOM FILL AUXILIARY SYSTEM Gauge & Switch Console
Spectra C3 Light Bar Installation Instructions
 Light Bar Hardware Tools Required Universal Clamp Inserts 1.9, 2 3/8 - OD 5 Amp Fuse 1.25 Hole Saw Philips Screw Driver 7/64 Drill Bit Fish Tape Countersink Pencil Pigtail Wiring Harness Clamp Washer Wire
TurfDefender Electronic Leak Detector Kit Reelmaster 5000, 6000 and 5010 Series Traction Units
 Form No. 56 586 Rev A TurfDefender Electronic Leak Detector Kit Reelmaster 5000, 6000 and 500 Series Traction Units Model No. 05 Installation Instructions The Installation Instructions for Reelmaster 5000/6000
BX8848 Installation Instructions 4 Diode Wiring Kit For Motorhomes With Red Tail Lights
 For Motorhomes With Red Tail Lights WARNG: Incorrect wiring may result in blown fuses, damaged wiring, fire, or bodily injury. Blue Ox recommends installation of this kit by a trained professional. Blue
Automotive Application ET01 Software Revision A 12/06
 Automotive Application ET01 Software Revision A 12/06 INTRODUCTION... 2 FUNCTIONAL DESCRIPTION... 3 INSTALLATION... 4 COMPONENT PLACEMENT... 4 PLUMBING AND WIRING... 5 MSBC OPERATION (ET-01)... 14 TIMED
2010+ Camaro Triple-Threat Wet Nitrous System
 2010+ Camaro Triple-Threat Wet Nitrous System This Installation Guide is to be used with the Ny-Trex Owner s Manual. (Refer to the Owner s Manual for installation tips, safety tips, and precautions) 1.
Model A Turn Signal Kit Installation Guide
 Model A Turn Signal Kit Installation Guide Creative Connections, Inc. Consumer Hot Line: 888-471-LOGO 770-476-7322 In Atlanta, GA http://www.logolites.com P/N: 100-005/K 2008 Creative Connections, Inc.
INSTALLATION INSTRUCTIONS
 INSTALLATION INSTRUCTIONS Part# 69-0717 AIR IT UP 4 Tire On Board Installed Air Delivery System with Rear Mounted Controller (Requires External Air Source) For the most up-to-date instructions please visit
Disconnect the battery power from the car.
 Adding a safety fuse to the ignition circuit of 1956 to 1962 Corvettes Part 1 is for 1958 to 1962. Part 2 is for 1956 to 1957 Rich Mozzetta and Dave Zuberer Part 1-1958 to 1962 Here is a way to add a fuse
30140 F5 Dual Fan Controller
 30140 F5 Dual Fan Controller 1 2501 Ludelle Street Fort Worth, Texas 76105 817-244-6212 Phone 817-244-4024 Fax 888-350-6588 Sales 800-423-9696 Tech E-mail: painless@painlessperformance.com Web: www.painlessperformance.com
Single Nozzle Systems UNIVERSAL NOZZLE SYSTEM INSTRUCTIONS Part #'S 00-1XXXXX
 INTRODUCTION Thank you for purchasing the highest quality nitrous system on the market. Nitrous Outlet strives to offer the best product with the best price and customer service available. Nitrous Outlet
ELECTRICAL SYSTEM UPGRADE
 NEW CONTROLLER & ELECTRICAL SYSTEM UPGRADE FOR DAIRY TECH, INCORPORATED 10, 30 & 60G PASTEURIZERS Parts to Include 2 Wire ties (Nuts) 2 sticky wire mount pads Large Rubber Grommet (for bottom of electric
GN-3A Polaris General SSV Works 3 Speaker Audio Kit
 GN-3A Polaris General SSV Works 3 Speaker Audio Kit pg 2 Disassembly, Wire and Amplifier Plate Installation pg 9 Glovebox Subwoofer Installation pg 17 Kick Panel Speakers Installation pg 21 MRB3 and Dash
PWRA215. Designed for 2015 and newer Jeep Wrangler two door with base audio. T-TAP x2 10MM BOLT FUSE WIRE TIES x6 SUBWOOFER ASSEMBLY
 PWRA215 Designed for 2015 and newer Jeep Wrangler two door with base audio T-TAP x2 10MM BOLT FUSE WIRE TIES x6 SUBWOOFER ASSEMBLY 200 WATT AMP BRACKET ASSEMBLY POWER HARNESS 2015 Stillwater Designs PWRA215
Honda Pioneer 1000 Turn Indicator Kit
 Honda Pioneer 1000 Turn Indicator Kit Thank you for purchasing XTC Power Products Turn Signal System. Our Turn System is unique from the other kits on the market. Our Kit is plug and play with only power
Forbidden Diesel Performance Ford 6.7L Powerstroke EGR Delete Instructions 6.7L EGR DELETE BY FORBIDDEN DIESEL PERFORMANCE. Page 1
 6.7L EGR DELETE BY FORBIDDEN DIESEL PERFORMANCE Page 1 WARNING REGARDING EMISSIONS LAWS Not legal for sale or use on pollution-controlled motor vehicles anywhere in the United States. Legal ONLY for off-road
PRXB EXHAUST BRAKE MAXIMUM EXHAUST FLOW DESIGN
 MAXIMUM EXHAUST FLOW DESIGN PRXB EXHAUST BRAKE C44072/C44073/C44074/C44075/C44076 APPLICATION: 994-2002 DODGE RAM TRUCKS W/5.9L CUMMINS DIESEL ENGINES WITH MANUAL & AUTOMATIC TRANSMISSIONS STOCK DODGE
RAINGEAR 1953/ 54 Chevrolet
 RAINGEAR 1953/ 54 Chevrolet GETTING STARTED: SOME RECOMMENDATIONS PLEASE TRY OUR WAY FIRST! Note: This system is designed with built in adjustments to fit in your car. If, as you are installing it, you
SP EVO-CHR4 (A)
") TIP SHEET Installation Tips for SP-502 + EVO-CHR4 (A) Remote Start / Alarm T1630 Chrysler 300 (2008-2011) Dodge Magnum (2008) Chrysler Town and Country (2008-2015) Dodge RAM (2009-2012) Dodge Challenger
TIP SHEET Installation Tips for SP-502 + EVO-CHR4 (A) Remote Start / Alarm T1630 Chrysler 300 (2008-2011) Dodge Magnum (2008) Chrysler Town and Country (2008-2015) Dodge RAM (2009-2012) Dodge Challenger
advanced FLOW engineering Instruction Manual P/N:
 advanced FLOW engineering Instruction Manual P/N: 77-84010 Make: Chevrolet Model: Silverado HD Year: 2017-2018 Engine: V8-6.6L (td) Duramax (L5P) Make: GMC Model: Sierra HD Year: 2017-2018 Engine: V8-6.6L
Idle Timer Controller - A-ITC520-A Ford E Series Ford F250 - F Ford F250 - F550 (*B-ITC520-A) F650/F750
 F650/F750") An ISO 9001:2008 Registered Company Idle Timer Controller - A-ITC520-A 2009-2018 Ford E Series 2008-2016 Ford F250 - F550 2017-2018 Ford F250 - F550 (*B-ITC520-A) 2016-2018 F650/F750 *Uses the Ford 24-Pin
An ISO 9001:2008 Registered Company Idle Timer Controller - A-ITC520-A 2009-2018 Ford E Series 2008-2016 Ford F250 - F550 2017-2018 Ford F250 - F550 (*B-ITC520-A) 2016-2018 F650/F750 *Uses the Ford 24-Pin
PONTIAC FIREBIRD. Four Panel Sequential LED Tail Light Kit Installation Guide
 1967-68 PONTIAC FIREBIRD Four Panel Sequential LED Tail Light Kit Installation Guide Kit Contents: 4 LED panels 4 rubber grommets 1 power wire 2 pigtail harness kits 2 crimp terminal kits PN 1100567 Please
PHASE 3 POWERSPORTS AUDIO KIT RZR POLARIS. pg 2 Disassembly, Wire and Amplifier Plate Installation. pg 9 Glovebox Subwoofer Installation
 POLARIS RZR PHASE 3 POWERSPORTS AUDIO KIT pg 2 Disassembly, Wire and Amplifier Plate Installation pg 9 Glovebox Subwoofer Installation pg 13 Kick Panel Speakers Installation pg 25 MRB3 and Dash Kit Installation
BUICK SKYLARK/GS
 Sequential LED Tail Light Kit Installation Guide 1970-72 BUICK SKYLARK/GS PN 1101170 Please refer to Invoice for full warranty information DIGI-TAILS is not a licensed GM product Note The LED boards are
Idle Timer Controller - ITC515-A Ford Transit Contact InterMotive for additional vehicle applications
 An ISO 9001:2008 Registered Company Idle Timer Controller - ITC515-A 2015-2018 Ford Transit Contact InterMotive for additional vehicle applications Overview The ITC515-A system will shut off gas or diesel
PN PONTIAC FIREBIRD. Kit Contents: Four Panel Sequential LED Tail Light Kit Installation Guide
 1969 PONTIAC FIREBIRD Four Panel Sequential LED Tail Light Kit Installation Guide Kit Contents: 4 LED panels 4 rubber grommets 1 power wire 2 pigtail harness kits 2 crimp terminal kits PN 1100569 1969
Combine Cover Manual
 Combine Cover Manual Installation Instructions Page 26 Operating Instructions Page 7 Warranty Page 7 Trouble Shooting Page 8 10 For Big Top Extension Model s: Case I.H. 8010, 8120 Please forward onto Customer
RH INSTALL INSTRUCTIONS
 Tips for Installing Rhinogear Products The recommended sequence for installing our Rhinogear line of products on your Rhino. This sequence will help with ease of installation and help save time by eliminating
Photo below shows the yellow wire on the left and the black on the right.
 2000 pound lift installation photos and troubleshooting helps This photo shows a wired lift. Shown in this photo User will install: From the control cable: small blue wire on front solenoid terminal small
PF3100 TROUBLESHOOTING SOLUTIONS TO COMMON PROBLEMS. v1.1 Revised Nov 29, 2016
 PF3100 TROUBLESHOOTING SOLUTIONS TO COMMON PROBLEMS v1.1 Revised Table of Contents 1 Common Alarms and Warnings... 1 2 Common Issues... 6 2.1 Communication problems... 6 2.1.1 Controller communication
BX88175 Installation Instructions ToadStop II Vacuum Brake System
 BX88175 Installation Instructions ToadStop II Vacuum Brake System Serial No. Customer supplied tools & supplies Utility knife, 12VDC tester, drill & bits: (1/8", 1/4", 5/8 ), ¼ socket drive bit, punch,