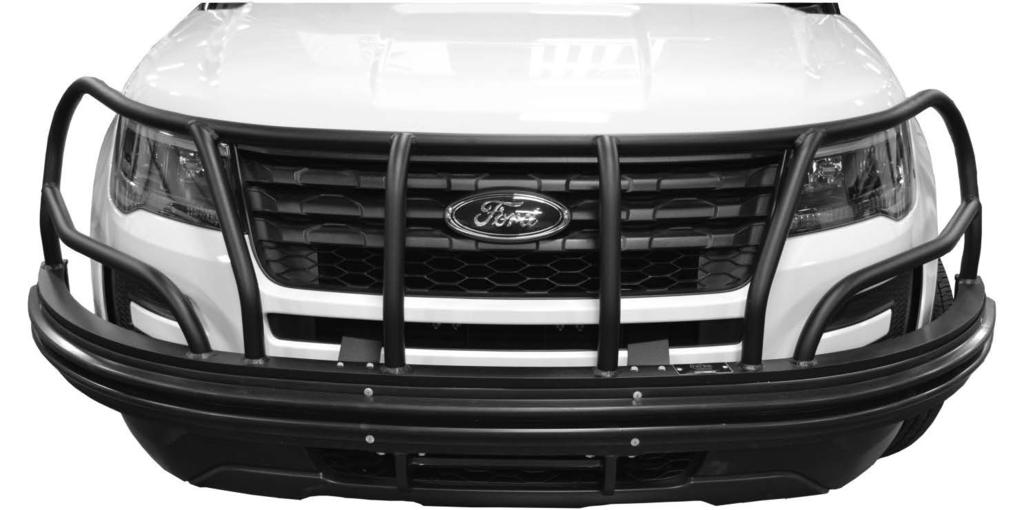
Box Contents. 1.) Bumper 2.) Side Bumper Brackets 3.) Vertical Bumper Plate 4.) Lower Bumper Weldment
|
|
|
- Violet Teresa Stanley
- 5 years ago
- Views:
Transcription


1

 1.) Bumper 2.")
 Vertical Bumper")
 Lower Bumper Weldment")

2 Installation Manual 2 Box Contents (Images not shown to scale) 1.) Bumper 2.) Side Bumper Brackets 3.) Vertical Bumper Plate 4.) Lower Bumper Weldment 5.) Side Bumper Weldments 6.) Side Strap Brackets 7.) Hat Brackets
 3/ LOCK WASHER (.35/.6/.094) 3/ SAE FLAT WASHER (.406/.13/.055-.")
3 Installation Manual 3 Hardware ITEM NO. DESCRIPTION MATERIAL QTY. IMAGE 1 5/16-1 SERRATED FLANGE NUT STEEL, ZINC 4 2 3/4" WEDGE WASHER IRON, GALVANIZED /-16 X 1 1/4 HHCS (FULLY THREADED) 3/ LOCK WASHER (.35/.6/.094) 3/ SAE FLAT WASHER (.406/.13/ ) /2-13 HEX NUT 7 1/2 SAE FLAT WASHER (.532/1.063/ ) 5/16-1 HEX NUT 4 9 1/2 LOCK WASHER (.512/.69/.125min) /16 SAE FLAT WASHER (.344/.6/ ) 5/16 LOCK WASHER, HD SPRING LOCK (.322/.53/.07 min) 1/2 USS FLAT WASHER (.563/1.375/ ) /16-1 X 1 1/4 HHCS (FULLY THREADED) 4 5/16-1 X 1 HHCS 4 1/2-13 X 1 3/4 HHCS (FULLY THREADED) 3/-16 SERRATED FLANGE NUT 17 3/-16 X 1 HHCS (FULLY THREADED) (Images not shown to scale)


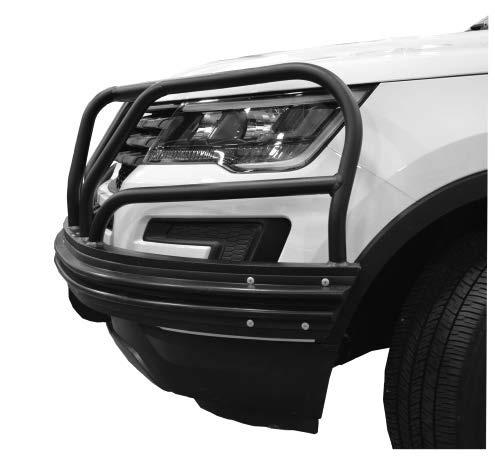
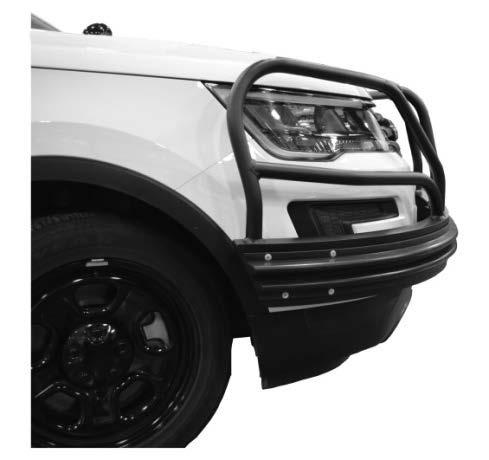
4 Installation Manual 4 Installation Steps 1.) Remove the front bumper fascia and pull it away from the vehicle: a. Remove the front license plate holder by drilling out the plastic rivets with a drillbit. b. Remove all external bolts and clips that hold the front bumper fascia to the vehicle. c. Using a 10mm extended socket & impact gun, remove the 3 hidden driver and passenger side inside wheel well bolts that hold the bumper fascia to the vehicle. i. Use impact for top 2 bolts, and a hand wrench for the last bottom bolt. d. Pull the fascia away from the vehicle and set it to the side on a soft surface. 2.) Cut the driver and passenger side bumper mounting holes in the front bumper fascia: a. From the inside of the bumper fascia, with a white paint marker, mark the following lines on both the driver and passenger side fog light covers: i. Mark area vertically from the inner lower edge of the fog light cover to the bottom edge of the fog light cover with a line roughly measuring 3 1/ long. ii. Continue a horizontal line from each edge of the first vertical line for roughly 1 3/4 towards the outside edge of the bumper.

5 Installation Manual 5 iii. Mark the final line connecting the two horizontal lines to form a skewed rectangle and repeat on the other side as seen in the example image. b. Drill a hole in each corner of the marked cutting area to prepare for cutting on both the driver and passenger sides of the bumper fascia, as shown below: c. With an air saw, using the 4 holes you previously drilled as a helpful guide, cut along the drawn lines to create the rectangular openings on the driver and passenger side. 3.) Cut away the lower bumper fascia grill to allow for lower weldment mounting: a. Using a pair of snips, cut away the following grill pieces to make way for the lower weldment to match the example below:


 Attach the vertical bumper plate to the bumper using the driver and passenger side")
6 Installation Manual 6 4.) Attach the driver and passenger side bumper brackets: a. Remove and save the factory bumper bolts on both the driver and passenger sides of the vehicle bumper. b. Using the factory bolts, install the driver and passenger side bumper brackets onto the vehicle bumper. Each side bumper bracket is marked with a D or P to designate the side in which to install. 5.) Attach the vertical bumper plate to the bumper using the driver and passenger side hat brackets: a. Slide the vertical bumper plate down from the top, behind the vehicle bumper and in front of the radiator, until the upper lip of the plate sits on the top of the bumper.
 3/-16 X 1 HHCS along with (4) 3/ SAE Flat Washer and (4) 3/-16 Serrated Flange Nut from the back of the plate, pushing out towards the front of the vehicle. d.")
7 Installation Manual 7 b. Center the plate by measuring 13-13/16 from the passenger side edge of the first factory bumper angle to the edge of the plate. c. Insert the top (4) 3/-16 X 1 HHCS along with (4) 3/ SAE Flat Washer and (4) 3/-16 Serrated Flange Nut from the back of the plate, pushing out towards the front of the vehicle. d. Place both the driver and passenger side hat brackets onto the factory bumper by lining up the top of the brackets with the top 4 bolts (some force may be required due to vehicle manufacturing variations). e. Once brackets are in place, hand-tighten the top 4 bolts. f. Insert the bottom (4) 3/-16 X 1 HHCS along with (4) 3/ SAE Flat Washers and (4) 3/- 16 Serrated Flange Nuts from the back, through the hat bracket and hand-tighten. g. Double check measurement from the passenger side edge of the factory bumper to the vertical plate to ensure that it still measures 13-13/16 and adjust as needed. h. Use a 9/16 socket and impact gun to tighten all () 3/-16 X 1 HHCS connecting the hat brackets to the vertical bumper plate to complete installation of the vertical plate. 6.) Attach both the driver and passenger side strap bracket to the top of the vertical plate by hand tightening (4) 5/16-1 X 1 1/4 HHCS () 5/16 SAE Flat Washers (4) 5/16 Lock Washers, HD Spring Lock (4) 5/16-1 Hex Nuts


8 Installation Manual 7.) Remove the factory splash guard: a. Remove the 3 factory mm bolts holding the splash guard in place and save them. b. Set the guard to the side as it will be reinstalled..) Re-attach fascia to vehicle: a. With the help of a second installer, re-attach the font bumper fascia to the vehicle taking care to allow the fascia to slide over and through the driver and passenger side strap brackets. b. Using a 10mm extended socket and impact gun, replace the 3-10mm bolts on both the driver and passenger wheel wells 9.) Attach the driver and passenger side bumper weldments: LEFT RIGHT


 3/-16 X 1 1/4 HHCS, (4) 3/ SAE Flat Washers, and (4) 3/ Lock Washers, and")
 3/-16 x 1 1/4 HHCS, (4) 3/ SAE Flat Washers, and (4) 3/ Lock Washers through the lower mounting")
9 Installation Manual 9 a. Slide the driver and passenger side bumper weldments through the precut front bumper fascia holes. b. Using a 9/16 socket and impact gun, hand tighten the driver and passenger side bumper weldments to the side bumper brackets using (4) 3/-16 X 1 1/4 HHCS, (4) 3/ SAE Flat Washers, and (4) 3/ Lock Washers, and then fully tighten with an impact gun. 10.) Attach the lower weldment to the vertical bumper plate: a. Insert (4) 3/-16 x 1 1/4 HHCS, (4) 3/ SAE Flat Washers, and (4) 3/ Lock Washers through the lower mounting holes of the vertical bumper plate from the back towards the front of the vehicle on each side. b. Slide the lower weldment though the precut holes in the bumper fascia grill. c. Attach the lower weldment to the vertical bumper plate by hand tightening the 4 bolts. d. Secure all 4 HHCS with a 9/16 th wrench.
10 Installation Manual ) Replace the factory splash guard: a. Place the factory splash guard in place under the vehicle. b. Using an mm socket and impact gun, replace the splash guard with the 3 factory mm bolts. 12.) Attach the front protective bumper to the vehicle: a. With the help of a second installer, team lift the front protective bumper and place it onto the front of the vehicle aligning as follows: i. Driver and passenger side strap brackets below the top bumper lip. ii. Lower weldment below the bottom bumper edge iii. Driver and passenger side bumper weldments on the top of the bottom bumper edge. b. With a 1/2" wrench, attach the front protective bumper to the driver and passenger side strap brackets using (4) 5/16-1 X 1 HHCS, (4) 5/16 SAE Flat Washers, and (4) 5/16-1 Serrated Flange Nuts.
 HCCS assemblies that contain the following: 1/2-13 HEX NUT 1/2 LOCK WASHER 1/2 USS FLAT WASHER 3/4 WEDGE")

11 Installation Manual 11 c. Using a 3/4" wrench, attach the front protective bumper to the lower weldment using (4) HCCS assemblies that contain the following: 1/2-13 HEX NUT 1/2 LOCK WASHER 1/2 USS FLAT WASHER 3/4 WEDGE WASHER (Short side faces away from front of vehicle) 1/2 SAE FLAT WASHER 1/2-13 X 1 3/4 HCCS d. Attach the front protective bumper to the driver and passenger side weldments using 4 of the HHCS assemblies shown above with a 3/4" wrench. 1/2-13 HEX NUT 1/2 LOCK WASHER 1/2 USS FLAT WASHER 3/4 WEDGE WASHER (Short side faces away from front of vehicle) 1/2 SAE FLAT WASHER 1/2-13 X 1 3/4 HCCS 13.) Go back and tighten all bolts to ensure that the bumper is securely attached. 14.) Finish attaching the front fascia to the vehicle by inserting all remaining clips and bolts.
12 Installation Manual 12 Installation Complete
INSTALLATION INSTRUCTIONS
 INSTALLATION INSTRUCTIONS 2011 Dodge Charger Road Defender 5000 Series Push Bumper Part Number 5076 Do not attempt to install this product on any vehicle other than the one it is designed for and listed
07-13 GM 1500 WINCH PLATE
 92108000 07-13 GM 1500 WINCH PLATE THANK YOU FOR CHOOSING ROUGH COUNTRY FOR YOUR OFF ROAD NEEDS. Rough Country recommends a certified technician install this kit. In addition to these instructions, professional
Bumper Removal PART NUMBER: F151MRDS PRODUCT: RDS FRNT BUMPER APPLICATION: F-150
 PARTS INCLUDED: QTY RDS BUMPER 1 SKID PLATE BRACKT 1 ADAPTIVE CRUISE 1 CONTROL BRACKET SKID PLATE 1 HARDWARE: QTY ½ X1 ½ Hex bolt 10 ½ hex nuts 10 ½ fender washer 20 3/8 x 1 Button head 6 3/8 hex nuts
INSTALLATION INSTRUCTIONS
 AUTOMOTIVE PRODUCTS, INC. INSTALLATION INSTRUCTIONS APPLICATION: DODGE CHARGER POLICE PUSH BAR (2011 & UP) APP PART # 36-2035 ITEM QUANTITY DESCRIPTION TOOLS NEEDED 1 1 PUSH BAR ASSEMBLY RATCHET 2,3 2
INSTALLATION INSTRUCTIONS ELEVATION FRONT BUMPER DODGE RAM
 INSTALLATION INSTRUCTIONS PARTS LIST: 1 Elevation Bumper Assembly 24 12mm x 37mm OD x 3mm Flat Washers 2 Frame Mounting Brackets 12 12mm Nylon Lock Nuts 8 12-1.75mm x 50mm Hex Bolts 2 License Plate Mounting
INSTALLATION INSTRUCTIONS
 AUTOMOTIVE PRODUCTS, INSTALLATION INSTRUCTIONS SPORTSMAN WINCH MOUNT GRILLE GUARD / HDX WINCH MOUNT GRILLE GUARD / MAX WINCH MOUNTING SYSTEM APPLICATION: 2016 Chevrolet Silverado 1500 PART NUMBER: 40-93875,
INSTALLATION INSTRUCTIONS
 AUTOMOTIVE PRODUCTS, INSTALLATION INSTRUCTIONS SPORTSMAN GRILLE GUARD / HDX GRILLE GUARD APPLICATION: 2016 Chevrolet Silverado 1500 PART NUMBER: 40-3875, 45-3870, 57-3870, 57-3875 ITEM QUANTITY DESCRIPTION
54531/ FORD FUSION
 54531/51531 54531/51531 13-15 FORD FUSION 13-15 FORD FUSION FORD FUSION Upper Class Grille w/ Bars TOOLS REQUIRED: Socket Set Flat/Phillips Screw Drivers Torx Bits Plastic Pry Bar 3/16 Drill Bit and Drill
INSTALLATION MANUAL P2068. Level of Difficulty. Parts List. Product Image. Notes and Maintenance. Tools Required. Easy
 INSTALLATION MANUAL P2068 Parts List 1 Grille guard 1 Driver / left frame mounting bracket 1 Passenger / right frame mounting bracket 1 Driver / left top mounting bracket 1 Passenger / right top mounting
INSTALLATION INSTRUCTIONS
 INSTALLATION INSTRUCTIONS OUTLAW FRONT BUMPER APPLICATION: 2013-2018 Dodge Ram 1500 PART NUMBER: 58-61025 ITEM QUANTITY DESCRIPTION TOOLS NEEDED 1 1 OUTLAW FRONT BUMPER 18MM WRENCH 2 1 UPPER SKID PLATE
INSTALLATION INSTRUCTIONS
 AUTOMOTIVE PRODUCTS, INSTALLATION INSTRUCTIONS POLICE PUSH BUMPER ELITE XD APPLICATION: 2016 Chevrolet Silverado 1500 PART NUMBER: 36-53875 ITEM QUANTITY DESCRIPTION TOOLS NEEDED 1 1 PUSH BUMPER ASSEMBLY
INSTALLATION MANUAL. Level of Difficulty. Parts List. Product Image. Tools Required. Notes and Maintenance. Torque Specifications.
 INSTALLATION MANUAL Parts List 1 Bull bar 2 Upper frame mounting bracket 1 Driver / left lower frame mounting bracket 1 Passenger / right lower frame mounting bracket 2 Button head bolt, 6mm 4 Flat washer,
There are different steps for GMC and Chevrolet trucks in this instruction sheet.
 07-13 GM 1500 WINCH PLATE THANK YOU FOR CHOOSING ROUGH COUNTRY FOR YOUR OFF ROAD NEEDS. Rough Country recommends a certified technician install this kit. In addition to these instructions, professional
INSTALLATION INSTRUCTIONS
 AUTOMOTIVE PRODUCTS, INSTALLATION INSTRUCTIONS SPORTSMAN WINCH MOUNT GRILLE GUARD / MAX WINCH TRAY HDX WINCH MOUNT GRILLE GUARD APPLICATION: 2017 Ford F250/350 Super Duty PART NUMBER: 40-93905, 45-93900,
54531/ FORD FUSION
 2014-2015 FORD Upper Class Grille w/ Bars TOOLS REQUIRED: Socket Set Flat/Phillips Screw Drivers Torx Bits Plastic Pry Bar 3/16 Drill Bit and Drill Motor PARTS LIST: (4) #8 u-nuts (2) seal brackets (driver
Expedition Front Bumper Instructions
 Expedition Front Bumper Instructions QTY 3D PN. FCS PART NUMBER DESCRIPTION 1 691256 A 8 E X D - 1 7 B 635-AAPLN FRONT BUMPER REPLACEMENT HARDWARE SUPPLIED 10 SELF TAPING SCREWS -10 for Front Bumper PLASTIC
INSTALLATION INSTRUCTIONS FOR MOUNTING
 INSTALLATION INSTRUCTIONS FOR MOUNTING LUVERNE GRILL GUARDS WITH THE FOLLOWING MODEL NOS.: 330714/330719 & 340714/340719 ON: 2007 AND NEWER CHEVROLET TAHOE, SUBURBAN & AVALANCHE 2007 AND NEWER GMC YUKON
GM (New Style) 1500 Truck & Tahoe / Yukon 1500 (4x4 With VYU ONLY) Vehicle Mounting Kit: 1FK50
 1500 Truck & Tahoe / Yukon 1500 (4x4 With VYU ONLY) Vehicle Mounting Kit: 1FK50") SNO-PRO 3000 2014 - GM (New Style) 1500 Truck & Tahoe / Yukon 1500 (4x4 With VYU ONLY) Vehicle Mounting Kit: 1FK50 Revised 17 September 2015 Curtis Industries LLC, 111 Higgins St., Worcester, MA 01606
SNO-PRO 3000 2014 - GM (New Style) 1500 Truck & Tahoe / Yukon 1500 (4x4 With VYU ONLY) Vehicle Mounting Kit: 1FK50 Revised 17 September 2015 Curtis Industries LLC, 111 Higgins St., Worcester, MA 01606
GMC Yukon
 Torch Series LED Grille TOOLS REQUIRED: Flat Head Screwdriver Long Flat Head Screwdriver Phillips Screwdriver 7mm Socket 10mm Socket Ratchet & Extensions 3/16 Drill Bit Power Drill Cutting Wheel or Saw
INSTALLATION INSTRUCTIONS HEAVY DUTY FRONT BUMPER CHEVY SILVERADO 1500
 INSTALLATION INSTRUCTIONS PARTS LIST: 1 Heavy Duty Bumper Assembly 16 12mm Nylon Lock Nuts 1 Driver Mounting Bracket 8 4mm x 10mm Socket Head Screws 1 Passenger Mounting Bracket 4 Sensor Plugs 4 Support
mm Hex Nuts. (2) 10mm x 35mm Bolt Plates
 10mm x 35mm Bolt Plates") PARTS LIST: SPORT BAR 1 Sport Bar 8 12mm x 24mm OD x 2.5mm STD Flat Washers 1 Driver/Left Frame 6 12mm Lock Washers 1 Passenger/Right Frame 4 12-1.75mm Hex Nuts 1 Driver/Left Tube 2 10-1.50mm x 30mm Hex
PARTS LIST: SPORT BAR 1 Sport Bar 8 12mm x 24mm OD x 2.5mm STD Flat Washers 1 Driver/Left Frame 6 12mm Lock Washers 1 Passenger/Right Frame 4 12-1.75mm Hex Nuts 1 Driver/Left Tube 2 10-1.50mm x 30mm Hex
11068 INSTALLATION INSTRUCTIONS
 11068 INSTALLATION INSTRUCTIONS Safety glasses should be worn at all times while installing this product. YEARS: 009-PRESENT MAKE: INFINITI MODEL: G37 & Q60 POWER RETRACTABLE HARD TOP STYLE: CONVERTIBLE
INSTALLATION INSTRUCTIONS FOR MOUNTING
 INSTALLATION INSTRUCTIONS FOR MOUNTING LUVERNE PROWLER MAX AND BAJA GUARD WITH THE FOLLOWING MODEL NO.: 320930/320933/350931 ON: 2009 AND NEWER DODGE RAM 1500 SERIES TRUCKS 1. READ THE INSTRUCTIONS COMPLETELY
GROSS LOAD CAPACITY WHEN USED AS A WEIGHT CARRYING HITCH: 2,000 LBS. TRAILER WEIGHT & 200 LBS. TONGUE WEIGHT.
 PAGE 1 0F 6 GROSS LOAD CAPACITY WHEN USED AS A WEIGHT CARRYING HITCH: 2,000 LBS. TRAILER WEIGHT & 200 LBS. TONGUE WEIGHT. WARNING: ALL NON-TRAILER LOADS APPLIED TO THIS PRODUCT MUST BE SUPPORTED BY 18050
MINI COOPER COUNTRYMAN
 2/19/2013 GROSS LOAD CAPACITY WHEN USED AS A WEIGHT CARRYING HITCH: 2000 LBS. TRAILER WEIGHT & 200 LBS. TONGUE WEIGHT. ***DO NOT EXCEED VEHICLE MANUFACTURER'S RECOMMENDED TOWING CAPACITY.*** WARNING: ALL
P3066 INSTALLATION MANUAL
 P3066 INSTALLATION MANUAL Parts List 1 Grille guard 1 Driver / left frame bracket Level of Difficulty Moderate Scan for helpful install tips 1 Passenger / right frame bracket 1 Driver / left top bracket
(2) License Plate Plugs
 License Plate Plugs") PARTS LIST: 1 HD Bull Nose Bumper Assembly 12 12-1.75mm x 50mm 1 Driver/left Frame Mounting Bracket 40 12mm x 37mm OD x 3mm Flat Washers 1 Passenger/right Frame Mounting Bracket 20 12mm Lock Washers 1
PARTS LIST: 1 HD Bull Nose Bumper Assembly 12 12-1.75mm x 50mm 1 Driver/left Frame Mounting Bracket 40 12mm x 37mm OD x 3mm Flat Washers 1 Passenger/right Frame Mounting Bracket 20 12mm Lock Washers 1
INSTALLATION INSTRUCTIONS
 INSTALLATION INSTRUCTIONS PART # Product: Vehicle: 074ST17A89B FRONT BUMPER T17 Toyota TACOMA 2016 / ON (Third Gen) WARNING Read instructions completely before commencing fitment. Always use personal safety
I-Sheet Number Rev.B 3-1/2 OVAL BULL BAR DODGE RAM 1500
 PARTS LIST: 1 Bull Bar 2 10-1.5mm x 35mm Hex Bolts 2 Tube Brackets (Bull Bar) passenger or driver side 2 10mm Lock Washers 2 Upper Frame Brackets (models w/o tow hooks only) 4 10mm x 27mm OD x 3mm Flat
Rev TOOLS & MATERIALS REQUIRED QTY 3D PART NO. DESCRIPTION
 Rev. 04-10 QTY 3D PART NO. DESCRIPTION 1 691609 FRONT BUMPER REPLACEMENT 1 691610 RIGHT SIDE SKIRT 1 691611 LEFT SIDE SKIRT 1 691612 REAR LOWER SKIRT 4 3M 94 3M ADHESION PROMOTER 16 #8 X ¾ SELF DRILLING
WARNING. BX HUMMER H 2 Installation Instructions. Serial Number
 BX4102 Please read BOTH these and the General Towing Instructions before attempting to install or operate this equipment. Serial Number 1. Blue Ox towing products and accessories are intended to be installed
FOG LAMPS INSTALL KIT
 FOG LAMPS INSTALL KIT PT CRUISER INSTALLATION INSTRUCTIONS Read entire instructions thoroughly before starting. For proper aiming of fog lamps, follow procedures in the service manual. NOTES: Left and
ASSEMBLY & INSTALLATION INSTRUCTIONS
 ASSEMBLY & INSTALLATION INSTRUCTIONS VEHICLE MOUNT KIT 99101087 AND VEHICLE CENTER MEMBER For 26 Series: 99100890 TO FIT 2009 & Later FORD F150 4x4 (without EcoBoost V6) 2011 & Later FORD F150 4x4 (with
INSTALLATION INSTRUCTIONS
 AUTOMOTIVE PRODUCTS, INC. INSTALLATION INSTRUCTIONS APPLICATION: 2015 CHEVY COLORADO/GMC CANYON APP PART# 31-5120 3 BULL BAR ITEM QUANTITY DESCRIPTION TOOLS NEEDED 1 1 BULL BAR/SKID PLATE ASSEMBLY 18MM
INSTALLATION INSTRUCTIONS
 AUTOMOTIVE PRODUCTS, INSTALLATION INSTRUCTIONS SPORTSMAN & HDX GRILLE GUARD APPLICATION: 2015 & UP Ford F-150 PART NUMBER: 40-3835, 45-3830, 57-3830, 57-3835 ITEM QUANTITY DESCRIPTION TOOLS NEEDED 1 1
20964/B 20964/B 2014 TOYOTA TUNDRA TUNDRA. Billet Grille. Fig 1. Fig 2
 Billet Grille TOOLS REQUIRED: PARTS LIST: Socket Set (6) U-Nuts Flat/Phillips Screw Drivers (8) #10 Screws Pliers (2) #8 Screws ¾ (2) 2 Flange Bracket (1) Top Plate Overlay Bracket - driver (1) Top Plate
INSTALLATION INSTRUCTIONS
 INSTALLATION INSTRUCTIONS APPLICATION: WINCH TRAY, SPORTSMAN GG WINCH TRAY KITS, & HDX GG WINCH TRAY KITS AUTOMOTIVE PRODUCTS, INC. 2015 & UP FORD F-150 APP PART #40-93835, 45-93830, 46-23835, 57-93830,
11333 INSTALLATION INSTRUCTIONS
 11333 INSTALLATION INSTRUCTIONS Safety glasses should be worn at all times while installing this product. YEARS: 2011-PRESENT MAKE: MINI COOPER MODEL: COUNTRYMAN STYLE: SEDAN WARNING: NEVER EXCEED YOUR
MK-101 w/jcs Stand TILE SAW OWNER S MANUAL & OPERATING INSTRUCTIONS SERIAL NUMBER:
 MK-0 w/jcs Stand TILE SAW OWNER S MANUAL & OPERATING INSTRUCTIONS CAUTION: Read all safety and operating instructions before using this equipment Enter the Serial Number of your new saw in the space below.
Passenger/Right Support Bracket Driver/Left Support Bracket
 PARTS LIST: 1 bumper 24 12mm x 37mm OD x 3mm Flat Washers 1 Driver/left Mounting Bracket 14 12mm Lock Washers 1 Passenger/right Mounting Bracket 14 12mm Hex Nuts 1 Driver/left Lower Support Bracket 2 Plastic
INSTALLATION GUIDE PREMIUM FRONT BUMPER FOR RAM AEV30304AA Last Updated: 09/18/17
 AEV30304AA Last Updated: 09/18/17 PREMIUM FRONT BUMPER FOR RAM 1500 INSTALLATION GUIDE PLEASE READ BEFORE YOU START To guarantee a quality installation, we recommend reading these instructions thoroughly
INSTALLATION INSTRUCTIONS BULL BAR DODGE RAM 1500 PART # B-D1091;B-D2091
 INSTALLATION INSTRUCTIONS PART # B-D1091;B-D2091 PARTS LIST: Qty Description Qty Description 1 Bull Bar 10 12mm Lock Washers 2 Upper Frame Brackets (for trucks without tow hooks only) 8 12-1.75mm Hex Nuts
INSTALLATION INSTRUCTIONS
 INSTALLATION INSTRUCTIONS OUTLAW FRONT BUMPER APPLICATION: 2014-2018 TOYOTA TUNDRA PART NUMBER: 58-61035 CONTENT ITEM QUANTITY DESCRIPTION TOOLS NEEDED 1 1 FRONT BUMPER ASSEMBLY 18MM WRENCH 2,3 2 MESHED
WARNING Jeep Grand Cherokee BX1121. Serial Number. Installation Instructions
 2004 Jeep Grand Cherokee Please read BOTH these and the General Towing Instructions before attempting to install or operate this equipment. 1. Blue Ox towing products and accessories are intended to be
INSTALLATION INSTRUCTIONS FRONT RUNNER GRILLE GUARD 2015 TRANSIT VAN (FULL SIZE)
") INSTALLATION INSTRUCTIONS FRONT RUNNER GRILLE GUARD PARTS LIST: 1 Runner Grille Guard Center 6 12mm Lock Washers 1 Driver/Left Modular Wing 6 12mm Hex Nuts 1 Passenger/Right Modular Wing 2 8-1.25mm x 40mm
INSTALLATION INSTRUCTIONS FRONT RUNNER GRILLE GUARD PARTS LIST: 1 Runner Grille Guard Center 6 12mm Lock Washers 1 Driver/Left Modular Wing 6 12mm Hex Nuts 1 Passenger/Right Modular Wing 2 8-1.25mm x 40mm
INSTALLATION INSTRUCTIONS
 AUTOMOTIVE PRODUCTS, INC. INSTALLATION INSTRUCTIONS APPLICATION: 2013-2015 DODGE RAM 1500 SSV PUSH BAR ELITE XD APP PART #: 36-53545 ITEM QUANTITY DESCRIPTION TOOLS NEEDED 1 1 PUSH BAR ASSEMBLY RATCHET
INSTALLATION INSTRUCTIONS
 Accessory Application Publication No. INSTALLATION INSTRUCTIONS HORN MOUNT P/N 08Z77-HL4-A00 SXS1000M3/M3P/M5D/M5P Honda Dealer: Please give a copy of these instructions to your customer. MII 15262 Issue
EVO-1130 EVO MFG Pro Series JK Front Bumper
 EVO-1130 EVO MFG Pro Series JK Front Bumper PART# DESCRIPTION QTY EVO-12071 EVO Pro Series Bumper w/ Hoop 1 EVO-12072 EVO Pro Series Bumper Winch Plate 1 EVO-12075 EVO Pro Series Bumper Winch Plate, Nut
INSTALLATION INSTRUCTIONS
 11485 YEARS: 2015-CURRENT Safety glasses should be worn at all times while installing this product. INSTALLATION INSTRUCTIONS MODEL: C300 MAKE: MERCEDES STYLE: SEDAN WARNING: NEVER EXCEED YOUR VEHICLE
INSTALLATION INSTRUCTIONS JEEP WRANGLER PART# 1050 /
 INSTALLATION INSTRUCTIONS 2007-12 JEEP WRANGLER PART# 1050 / 1050-2 PARTS LIST: Qty Description Qty Description 1 Aries Grill guard 10 12mm Lock washers 1 Driver/left mounting bracket 10 12mm Hex nuts
INSTALLATION INSTRUCTIONS PART NUMBER:21-729
 Equipped with AEM Dryflow Filter No Oil Required! INSTALLATION INSTRUCTIONS PART NUMBER:21-729 2010-2013 MAZDA MX-5 MIATA 2.0L I-4 PARTS LIST Description Qty. Part Number A Tube, Lower Intake, 2006-13
INSTALLATION INSTRUCTIONS FORD SUPER DUTY NOTE: (Vehicle Retains Tow Hook) PART # P3064
 PART # P3064") INSTALLATION INSTRUCTIONS 2011-14 FORD SUPER DUTY 250-550 NOTE: (Vehicle Retains Tow Hook) PART # P3064 PARTS LIST: Qty Description Qty Description 1 Grill Guard 2 10mm x mm Hex Bolts 1 Driver/Left Lower
INSTALLATION INSTRUCTIONS 2011-14 FORD SUPER DUTY 250-550 NOTE: (Vehicle Retains Tow Hook) PART # P3064 PARTS LIST: Qty Description Qty Description 1 Grill Guard 2 10mm x mm Hex Bolts 1 Driver/Left Lower
INSTALLATION INSTRUCTIONS
 AUTOMOTIVE PRODUCTS, INC. INSTALLATION INSTRUCTIONS APPLICATION: DODGE CHARGER POLICE PUSH BAR (2011 & UP) APP PART # 36-2035 ITEM QUANTITY DESCRIPTION TOOLS NEEDED 1 1 PUSH BAR ASSEMBLY RATCHET 2,3 2
Part Numbers: TTU-BGP14 & TTU-BGB14
 Date: 10.14.2015 TOYOTA TUNDRA 2014-17 Billet Grille Part Numbers: TTU-BGP14 & TTU-BGB14 Grille Hardware Bag Contents Item # Quantity. Description 1 6 U-Nuts 2 8 #10 Screws 3 2 #8 Screws 4 2 2 Flange Brackets
INSTALLATION INSTRUCTIONS
 INSTALLATION INSTRUCTIONS SPORTSMAN & HDX GRILLE GUARD AUTOMOTIVE PRODUCTS, APPLICATION: 05-07 Ford F-50 PART NUMBER: 0-3835, 5-3830, 57-3830, 57-3835 ITEM QUANTITY DESCRIPTION TOOLS NEEDED GRILLE GUARD
INSTALLATION INSTRUCTIONS
 INSTALLATION INSTRUCTIONS AUTOMOTIVE PRODUCTS, INC. APPLICATION: 2006-2008 FORD F-150 PART NUMBER: 45-92010, 40-92015 WINCH MOUNTED SPORTSMAN GRILLE GUARD ITEM QUANTITY ITEM DESCRIPTION TOOLS NEEDED 1
QTY 3D PART NO. DESCRIPTION
 QTY 3D PART NO. DESCRIPTION 1 691032 V6 FRONT AIR DAM 1 691023 SIDE SKIRT RIGHT 1 691024 SIDE SKIRT LEFT 1 691566 V6 DUAL EXHAUST REAR LOWER SKIRT- 8 3M 94 3M ADHESION PROMOTER 24 #8 X ¾ SELF DRILLING
WARNING. BX Jeep Liberty Installation Instructions. Serial Number
 Please read BOTH these and the General Towing Instructions before attempting to install or operate this equipment. 1. Blue Ox towing products and accessories are intended to be installed by Blue Ox Dealers
CAUTION. INSTALLATION INSTRUCTIONS Part Number Hidden Winch Kit with special XD 9000 Short Drum Winch For Ford F-150 Truck
 INSTALLATION INSTRUCTIONS Part Number 69110 Hidden Winch Kit with special XD 9000 Short Drum Winch For Ford F-150 Truck As you read these instructions, you will see NOTES, CAUTIONS and WARNINGS. Each message
Installation instructions, accessories - Electric engine block heater
 S60 / V70 (00-08) / S80 (-06) / V70 XC (01-) / XC70 (-07) / XC90 Section Group Weight Year Month (Kg/Pounds) 8 876 2/4.4 2006 09 S60 2001 D5244T, S60 2002 D5244T, S60 2002 D5244T2, S60 2003 D5244T, S60
(W) INSTALLATION INSTRUCTIONS GRILLE GUARD 2014 GMC SIERRA 1500 EXCLUDES DENALI PART # /
 INSTALLATION INSTRUCTIONS GRILLE GUARD 2014 GMC SIERRA 1500 EXCLUDES DENALI PART # /") (W) INSTALLATION INSTRUCTIONS GRILLE GUARD PART # 508514/ 508515 PARTS LIST: GRILLE GUARD Qty Description Qty Description 1 Grille Guard Assembly 6 12-1.75mm Hex Nuts 2 Frame Brackets 4 10-1.50mm x 30mm
(W) INSTALLATION INSTRUCTIONS GRILLE GUARD PART # 508514/ 508515 PARTS LIST: GRILLE GUARD Qty Description Qty Description 1 Grille Guard Assembly 6 12-1.75mm Hex Nuts 2 Frame Brackets 4 10-1.50mm x 30mm
»Product» Safety Warning
 C9151 Installation Instructions 2014-15 Chevy/GMC 1/2 Ton 2WD & 4WD 1.5" Body Lift Read and understand all instructions and warnings prior to installation of product and operation of vehicle. Zone Offroad
Driver Side Support Bracket pictured in "no-tow hook" direction. Reverse direction for tow hook equipped vehicles
 PARTS LIST: 1 Bull Bar 2 10-1.5mm x 35mm Hex Bolts 2 Tube Brackets (Bull Bar) passenger or driver side 2 10mm Lock Washers 2 Upper Frame Brackets (models w/o tow hooks only) 4 10mm x 27mm OD x 3mm Flat
HAVING INSTALLATION QUESTIONS? CALL TECHNICAL SUPPORT AT
 9/23/2009 1 of 6 ITEM 1 QTY 8 Parts List PART NUMBER DESCRIPTION 3/8" CONICAL TOOTHED WASHER TOOLS REQUIRED #2 PHILLIPS SCREWDRIVER #2 STUBBY SCREWDRIVER 8mm SOCKET 13mm SOCKET RATCHET 12" EXTENSION TORQUE
Subaru Front Mount Intercooler Kit STI Subaru Front Mount Intercooler Kit STI
 Subaru Front Mount Intercooler Kit STI 2008-2014 715500 Subaru Front Mount Intercooler Kit STI 2008-2014 Congratulations on your purchase of the Subaru Front Mount Intercooler Kit STI 2008-2014. The following
Upper Class Grille. Main Grille - # / # Dodge Charger. GRILLE Installation Guide. Parts included (1) Main Grille.
 Main Grille.") Main Grille - # 51480 / #54480 Parts included (1) Main Grille Polished - Part #51480 OR Black - Part #54480 Hardware included (8) - 3/4 x 5/8 L Brackets (8) - #6-32 Nylon Nuts (8) - 3/16 x 1 x 1/32 Black
Main Grille - # 51480 / #54480 Parts included (1) Main Grille Polished - Part #51480 OR Black - Part #54480 Hardware included (8) - 3/4 x 5/8 L Brackets (8) - #6-32 Nylon Nuts (8) - 3/16 x 1 x 1/32 Black
MINI COOPER HAVING INSTALLATION QUESTIONS? CALL TECHNICAL SUPPORT AT DESIGNED FOR USE WITH BALL MOUNT # D-19 / 45519
 10/8/2012 PAGE 1 of 6 ITEM 1 QTY 8 Parts List PART NUMBER DESCRIPTION 3/8" CONICAL TOOTHED WASHER TOOLS REQUIRED RATCHET TORQUE WRENCH 12" EXTENSION 12mm SOCKET 8mm SOCKET OFFSET SCREWDRIVER FLAT BLADE
INSTALLATION INSTRUCTIONS ARMOUR FRONT BUMPER W/O LED LIGHTS FOR CHEVY COLORADO PART # AFB-CO15
 INSTALLATION INSTRUCTIONS ARMOUR FRONT BUMPER W/O LED LIGHTS FOR CHEVY COLORADO 15-17 PART # AFB-CO15 ARMOUR FRONT BUMPER PARTS LIST: 1 ARMOUR Bumper Assembly 2 8mm x 25mm Hex Bolts 1 Driver/left Frame
Parts List ILLUSTRATION #1
 Installation Instructions BR10 Front Bumper Replacement Part Number 24219T 2010-2016 Ram HD 2500 & 3500 2/4WD Do not attempt to install this product on any vehicle other than the one listed above! Parts
WINDSHIELD WIPER KIT P/N APPLICATION BEFORE YOU BEGIN KIT CONTENTS NOTE. Instr Rev 02 06/15 Page 1 of 7
 WINDSHIELD WIPER KIT P/N 2879968 APPLICATION RANGER 570, RANGER ETX AND RANGER EV Polaris does not recommend use of this kit with Tip-Out Windshield PN 2880442. BEFORE YOU BEGIN Read these instructions
Installation instructions, accessories. Electric engine block heater, 230V, 5 cyl diesel
 Installation instructions, accessories Instruction No 30795311 Version 1.2 Part. No. 31373138 Electric engine block heater, 230V, 5 cyl diesel IMG-256423 Volvo Car Corporation Electric engine block heater,
Blowfish Racing, LLC 200 Old Love Point Road Stevensville, MD
 Blowfish Racing, LLC 200 Old Love Point Road Stevensville, MD 21666 steve@blowfishracing.com 410-643-1127 Next Gen Rear Tow Hook Kit, 2005-2014 Mustang - ALL Congratulations on the purchase of your Blowfish
LD1 FRONT BUMPER GMC SIERRA 1500
 LDB-GSIE52-FB PARTS LIST: 1 LD1 Bumper Assembly 6 12mm Lock Washers 1 Driver/left Frame Mounting Bracket 6 12mm Hex Nuts 1 Passenger/right Frame Mounting Bracket 6 10-1.5mm x 35mm Hex Bolts 2 Tow Hook
2015 Ford F150 Rear Bumper w/ LED
 2015 Ford F150 Bumper w/ LED T527990 T527991 PARTS LIST: 1 Bumper Assembly 4 12mm Lock Washers 2 Mounting Brackets 6 12 mm Nylon Lock Nuts 4 Sensor Hole Plugs 8 4mm x 10mm Button Head Bolts 2 Plastic Plugs
Level of Difficulty Easy. Product Image. Front Mounting Bracket (553204) AC Mounting Bracket (553211) Tools Required Socket, 1/2"
 AC Mounting Bracket (553211) Tools Required Socket, 1/2") INSTALLATION MANUAL Parts List 3 2 1 1 1 3 2 4 13 16 13 16 2 2 14 Front Mounting Bracket Middle Mounting Bracket Rear Mounting Bracket AC Mounting Bracket AC Top Mounting Bracket U-Bolt 3" U-Bolt 3.75"
INSTALLATION MANUAL Parts List 3 2 1 1 1 3 2 4 13 16 13 16 2 2 14 Front Mounting Bracket Middle Mounting Bracket Rear Mounting Bracket AC Mounting Bracket AC Top Mounting Bracket U-Bolt 3" U-Bolt 3.75"
INSTALLATION INSTRUCTIONS SEMI Hidden Kit Part Number: Application: 2017 Toyota 4Runner
 INSTALLATION INSTRUCTIONS SEMI Hidden Kit Part Number: 100022 Application: 2017 Toyota 4Runner GENERAL SAFETY PRECAUTIONS Your safety, and the safety of others, is very important. To help you make informed
FRONT STABILIZER BAR KIT
 FRONT STABILIZER BAR KIT P/N 2881205 APPLICATION RZR XP 1000 MY16 and Newer, RZR XP 4 1000 MY16 and Newer BEFORE YOU BEGIN Read these instructions and check to be sure all parts and tools are accounted
QTY 3D PART NO. FORD SERVICE PN DESCRIPTION VAA6Z A FIESTA 5 DOOR (4) PC. KIT
 PC. KIT") Rev. 08-4 - 2010 QTY 3D PART NO. FORD SERVICE PN DESCRIPTION 1 691620 VAA6Z-5820049-A 2011- FIESTA 5 DOOR (4) PC. KIT HARDWARE SUPPLIED 12 #8 X ¾ SELF DRILLING SCREWS 220 / 18.5 3M VHB DOUBLE FACE TAPE
Rev. 08-4 - 2010 QTY 3D PART NO. FORD SERVICE PN DESCRIPTION 1 691620 VAA6Z-5820049-A 2011- FIESTA 5 DOOR (4) PC. KIT HARDWARE SUPPLIED 12 #8 X ¾ SELF DRILLING SCREWS 220 / 18.5 3M VHB DOUBLE FACE TAPE
INSTALLATION INSTRUCTIONS FRONT PARTITION W/FILLER PANEL MOUNTING KIT
 INSTALLATION INSTRUCTIONS FRONT PARTITION W/FILLER PANEL MOUNTING KIT P FRONT 1 with MFK 4 for 2008 2019 CHEVROLET PASSENGER VANS W/DUAL SIDE SWING OUT DOORS P FRONT 2 with MFK 8 for 2008 2019 CHEVROLET
Left and Right Bar Light L Brackets. Driver/Left Frame Bracket
 PARTS LIST: 1 Bumper 14 12mm Nylon Lock Nuts 1 Bull Nose Hoop 2 10mm Double Bolt Plates 1 Winch Tray 4 10-1.5mm x 25mm Hex Bolts 1 Driver/left Frame Mounting Bracket 8 10mm x 30mm x 2.5mm Flat Washers
BX2186. Please read BOTH these Installation Instructions and the General Towing Instructions before attempting to install or operate this equipment.
 Serial Number Please read BOTH these and the General Towing Instructions before attempting to install or operate this equipment. 1. Blue Ox towing products and accessories Attachment Tab Height: 11 1 /2
INSTALLATION INSTRUCTIONS FOR MOUNTING
 INSTALLATION INSTRUCTIONS FOR MOUNTING FRONT PARKING SENSOR RELOCATION BRACKETS ON THE FOLLOWING PROWLER MAX MODEL NOS.: 320713/321610, 310713/321610, 320713/321512 & 310713/321512 ON: (NOTE: TWO 390210
INSTALLATION INSTRUCTIONS GRILLE GUARD GMC SIERRA 1500 EXCLUDES DENALI PART # 4084/
 INSTALLATION INSTRUCTIONS GRILLE GUARD 14-15 GMC SIERRA 1500 PART # 4084/ 4084-2 PARTS LIST: GRILLE GUARD Qty Description Qty Description 1 Grille Guard Assembly 6 12-1.75mm Hex Nuts 2 Frame Brackets 4
Fig A ADDICTIVE DESERT DESIGNS. Preparation: Removal:
 Preparation: Disconnect the negative battery terminal. Park the vehicle on level ground and set the emergency brake. We recommend reading through the installation instructions in whole before performing
Right Bar Light L Bracket Left Bar Light L Bracket. License Plate Bracket
 LD1 FRONT BUMPER PART#R102616 R102619 PARTS LIST: 1 LD1 Bumper Assembly 16 10mm x 27mm OD x 3mm Flat Washers 1 Driver/left Frame Mounting Bracket 8 10mm Lock Washers 1 Passenger/right Frame Mounting Bracket
INSTALLATION INSTRUCTIONS
 Hardware: 12M x 40M hex head bolts Qty: 4 12M flat washers Qty: 8 12M lock washers Qty: 4 12M Ny-lock hex nuts Qty: 4 Extension bracket with bolt Qty: 2 8M Ny-lock hex nuts Qty: 2 8M Lock washer Qty: 2
WARNING Acura MDX Installation Instructions BX1015. Serial Number
 Please read BOTH these and the General Instructions before attempting to install or operate this equipment. 1. Blue Ox towing products and accessories are intended to be installed by Blue Ox Dealers who
ECO-SERIES FRONT BUMPER FOR GM SIERRA #GM-19337
 #GM-19337 Body Armor 4x4 272 Corporate Terrace St. Corona, CA 92879 951-808-0750 Customer Service hours: M-TH: 7:30am to 4:30 PM Pacific Time Friday: 8 AM Noon Pacific Time PARTS LIST: 1 LD1 Bumper Assembly
INSTALLATION INSTRUCTIONS
 AUTOMOTIVE PRODUCTS, INSTALLATION INSTRUCTIONS HDX AND SPORTSMAN GRILLE GUARD APPLICATION: 2015-2017 Chevrolet Silverado 2500/3500 PART NUMBER: 45-3780, 40-3785, 57-3780, 57-3785 ITEM QUANTITY DESCRIPTION
APPROXIMATE ASSEMBLY TIME (R&R): 45 minutes -1-
: 45 minutes -1-") PLOW ANGLE CONTROL KIT P/N 2879224 Application For use with the Glacier Pro Plow System P/N 2879103 on the below listed models MY09 and newer full size Ranger 500, 700 & 800 models MY13 and newer Ranger
PLOW ANGLE CONTROL KIT P/N 2879224 Application For use with the Glacier Pro Plow System P/N 2879103 on the below listed models MY09 and newer full size Ranger 500, 700 & 800 models MY13 and newer Ranger
Installing the PBX04 Push Bumper on the 2015 Chevrolet Suburban/Tahoe
 25500241 Rev. A0 0915 Safety Message to Installers and Service Personnel of Emergency Vehicle Safety Equipment Installing the PBX04 Push Bumper on the 2015 Chevrolet Suburban/Tahoe The lives of people
INSTALLATION INSTRUCTIONS FORD F-150 2WD & 4WD RETAINS FACTORY TOW HOOKS PART #P3063
 INSTALLATION INSTRUCTIONS FORD F-150 2WD & 4WD RETAINS FACTORY TOW HOOKS PART #P3063 PARTS LIST: 1 Grille Guard 2 10-1.5mm Nylon Lock Nuts 1 Driver/Left Frame Mounting Bracket 4 12mm Plastic Washers 1
Please read BOTH these Installation Instructions and the General Towing Instructions before attempting to install or operate this equipment.
 Serial Number (No S, Clubman or Convertible) (Manual Transmission Only) Please read BOTH these and the General Towing Instructions before attempting to install or operate this equipment. 1. Blue Ox towing
Blowfish Racing, LLC 200 Old Love Point Road Stevensville, MD
 Blowfish Racing, LLC 200 Old Love Point Road Stevensville, MD 21666 steve@blowfishracing.com 410-643-1127 Next Gen Front Tow Hook Kit, 2005-2014 Mustang - ALL Congratulations on the purchase of your Blowfish
BX Honda CR-V Installation Instructions
 Attachment Tab Height: 15.5 Attachment Tab Width: 24 Serial Number Please read BOTH these and the General Instructions prior to installing or operating this equipment. 1. Blue Ox towing products and accessories
Difficulty Level: 3-4. This is very intensive for an intercooler installation. Experienced mechanical skills recommended. Wrenches Sockets Specialty
 Nissan GT-R FMIC The goal of AMS is to provide the highest quality, best performing products available. By utilizing research and development, and rigorous testing programs AMS will never compromise the
SAFETY THIS PRODUCT IS FOR OFFROAD USE ONLY. ALL LIABILITY FOR INSTALLATION AND USE RESTS WITH THE OWNER.
 SAFETY Your safety and the safety of others is very important. In order to help you make informed decisions about safety, we have provided installation instructions and other information. These instructions
»Product» Safety Warning
 C1351 Installation Instructions 2014 Chevy/GMC, ½ Ton, 2/4wd 3.5" Combo Kit Read and understand all instructions and warnings prior to installation of product and operation of vehicle. Zone Offroad Products
Please read BOTH these Installation Instructions and the General Towing Instructions before attempting to install or operate this equipment.
 Serial Number Please read BOTH these and the General Towing Instructions before attempting to install or operate this equipment. 1. Blue Ox towing products and accessories are intended to be installed
13387 INSTALLATION INSTRUCTIONS
 13387 INSTALLATION INSTRUCTIONS Safety glasses should be worn at all times while installing this product. YEARS: 2018-PRESENT MAKE: BMW MODEL: X3 STYLE: SUV WARNING: NEVER EXCEED YOUR VEHICLE MANUFACTURER'S