Brandon Coolview XM Models Installation & Instructions for Use
|
|
|
- Oscar Golden
- 5 years ago
- Views:
Transcription
113 277 7393 Fax. +44 (0)113 272 8844 E-mail enquires@brandon-medical.com Web WWW.brandon-medical.com Issue: A1 Print Date: 24-Sep-04")
1 Brandon Coolview XM Models Installation & Instructions for Use Brandon Medical Company Ltd Holme Well Road Leeds LS10 4TQ England Tel. +44 (0) Fax. +44 (0) Web Issue: A1 Print Date: 24-Sep-04


2 CVXM-C Ceiling Mounted Coolview XM. Caution: Only to be installed by qualified personnel. Check that the supply voltage matches the voltage shown on the rating plate. Ensure that the building mounting is secure and rigid. 1. Drill 4 x 10mm holes to match the attached template. Where fixing to the concrete sofit, drill the holes to a depth of 75mm and blow out the dust. Attach the ceiling base plate assembly to the building using the four anchor bolts or suitable alternative. 2. On a flat and level surface prepare to fit the horizontal arm to the end of the stem column as shown in Fig 2. Pull the cable through the stem column. Insert the sliding key into the groove (see detailed view Fig 2.1). Slide the horizontal arm into the end of the stem column and lock the sliding key in place with the grub screw provided. Fully tighten the grub screw and then slacken it by quarter of a turn. 3. Place the O ring and the ceiling cover over the other end of the ceiling stem. Insert the stem tube into the ceiling base plate assembly and fix


3 it temporarily by tightening the four bolts. Align the stem column to ensure that the stop points away from the main direction of usage. Tighten the four bolts to secure the stem column into the ceiling base plate assembly. Connect the mains supply in accordance with the wiring diagram. Push the cover and O ring up to cover the ceiling base plate assembly. 4. Now complete the head assembly section. CVXM-W Wall Mounted Coolview XM. Same procedure as above apart from section 3:
4 3. Place the O ring and cover over the wall mounting tube. Insert the tube into the wall base plate assembly and fit the locking screw (Figure 3 - Part 5) from below. Tighten the four bolts to secure the wall mounting tube into the wall base plate assembly. Connect the mains supply in accordance with the wiring diagram. Push the cover and O ring up to cover the ceiling base plate assembly. 4. Now complete the head assembly section. CVXM-M Mobile Coolview XM.
5 1. Insert the column 1 st section into the castor base and align it so that the hole for the cable holder faces backwards (See Figure 4). Tighten the four bolts to secure the column 1 st section into the castor base assembly. 2. Fit the spring mounted arm and column 2 nd section onto the column 1 st section. Fit the cable holder and tighten the fixing screw to secure the cable holder and column. 3. Now complete the head assembly section. Coolview XM Head Assembly.


6 1. Connect the spade terminals, as shown in Figure 5. Align the lamp head interface with the end of the spring arm as shown in Figure 6. Tighten the srews to secure the lamp head to the end of the spring arm.


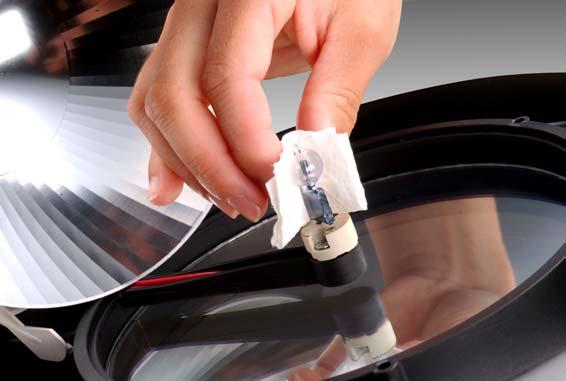
7 Coolview XM Care and Maintenance. Changing the Bulb. The Coolview XM uses a specialist bulb only replace with original parts to prevent damage to the luminaire. Let the luminaire cool before attempting to change the bulb. Lift the protective cover and remove the allen key which is stored under the cover near the hinge. Remove the 3 screws that secure the cover ring and reflector. Remove the reflector to allow access to the bulb. Pull the old bulb out and discard. Fit a replacement bulb, using a soft cloth to ensure that you do not touch the glass envelope. Ensure that the bulb is pushed securely home into the bulb holder and re-assemble.

8

9 Adjustment of spring arm balance. The weight compensation of the spring arm will have been factory set. However transportation, use and the passage of time can allow the spring to settle in which case it will require the spring balance to be adjusted. Should this become necessary, fist remove the access cover on the underside of the spring arm. See Figure 6. Move the arm until the capstan wheel (round nut with holes in its periphery) appears in the window. Use a 4mm bar, screw or hex driver to turn the capstan wheel to increase or decrease the spring tension. Cleaning and Disinfection. The Coolview XM should be cleaned with a moistened cloth using one of the following cleansers: Dismozon, Lysoformin, Hexaquart plus or Sagrotan rapid disinfectant cleanser.
RIGID PENDANT. Phoenix Pipeline Products Limited. Installation, Operation and Maintenance Manual
 RIGID PENDANT Phoenix Pipeline Products Limited. Unit 8, McKenzie Industrial Park, Tel No.: 44 (0) 161 428 7200 Bird Hall Lane, Fax No.: 44 (0) 161 428 7010 Stockport, Email: info@p3-phoenix.com U.K.,
Quasar elite Duo Single Cardanic
 Quasar elite Duo Single Cardanic LED Lighting Watch the Video Quasar elite Unique Benefits British Design & Technology Quasar elite has been designed in Great Britain with inputs from leading product designers
150 PSI ILLUMINATED DASH PANEL GAUGE KIT
 150 PSI ILLUMINATED DASH PANEL GAUGE KIT PART NO. 10061 (For Use with 20/30 Amp Systems) PART NO. 20062 (For Use with 30/40 Amp Systems) IMPORTANT: It is essential that you and any other operator of this
Installation Kitchen Faucet Filtration System Instructions GXK285JBL
 Installation Kitchen Faucet Filtration System Instructions GXK285JBL BEFORE YOU BEGIN Read these instructions completely and carefully. IMPORTANT Save these instructions for local inspector s use. IMPORTANT
PROJECTOR LIFT MODEL SIH-300 INSTALLATION MANUAL
 PROJECTOR LIFT MODEL SIH-300 INSTALLATION MANUAL Thank you for purchasing the new SI-H 300 Projector Lift. The SI-H 300 is supplied with a set of components and accessories that make it suitable for installation
ASSEMBLY INSTRUCTIONS
 6.5' McKinley Pine ASSEMBLY INSTRUCTIONS MODEL NO: U11G681A-024-01 (WL-018) PRODUCT CODE: 140-034066-910 CAUTION: Carefully Read Instructions and Procedures for Safe Operation Receipt of Purchase: Questions,
D-LUX DENTAL LIGHT INSTALLATION AND OPERATION INSTRUCTIONS. Model AL-711M Model AL-712M Model AL-715M
 DENTAL LIGHT D-LUX TM Model AL-711M Model AL-712M Model AL-715M INSTALLATION AND OPERATION INSTRUCTIONS IMPORTANT After installation is completed, check all the bolts, screws and fasteners to confirm that
FLEXIBLE PENDANTS with Axis MEDICAL GAS TERMINAL UNITS
 FLEXIBLE PENDANTS with Axis MEDICAL GAS TERMINAL UNITS Phoenix Pipeline Products Limited. Unit 8, McKenzie Industrial Park, Tel No.: 44 (0) 161 428 7200 Bird Hall Lane, Fax No.: 44 (0) 161 428 7010 Stockport,
Follow product label information and instructions. Qualified Personnel must perform all servicing or relamping of this product.
 & Low Voltage Halogen CS Warning Flammable Hot Surface INSTRUCTIONS PERTAINING TO A RISK OF FIRE, OR INJURY TO PERSONS IMPORTANT SAFETY INSTRUCTIONS Lighted lamp is HOT! WARNING - To reduce the risk of
PIL0478 ISSUE 01/ 07/16
 ISSUE 01/ 07/16 PIL0478 ZAFIR G9 CEILING FITTING PIL0478 ISSUE 01/ 07/16 PART C PART E PART 21 SELV 1 1.B 1 3.1 3.3 3.4 3.5 3.6, 3.8 3.10 3.12 3.14 3.16 3.17 3.18 3.19 3.19 ATTENTION! THE TABLE BELOW
Homecraft Deluxe Mobile Shower Commodes
 Homecraft Deluxe Mobile Shower Commodes Owner s Manual 71247 Is2_Deluxe Shower Commode User Guide.indd 1 02/06/2017 14:24 Intended Uses The Homecraft Deluxe Mobile Shower Commode Chairs have been specifically
LED 2/3/4ft T8 Tube 120V
 E-T8-1200-YR LED 2/3/4ft T8 Tube 120 Our LED Tubes utilize the latest LED chips as the light source, whilst using the standard T8 end caps, which makes it easy to install and replace traditional fluorescent
Instruction/Installation Manual
 Instruction/Installation Manual Retrofit:LED Tube Lamp 4ft. Fluorescent T8/T10 Replacement 1 SECTION 1 - General Information Kit components:1-led Tube, 1-Label and 1-Set of Instructions Models were only
Predator Medium Floodlight Wet Location
 Predator Medium Floodlight Wet Location Installation and Maintenance Manual AFTER INSTALLATION DELIVER THIS MANUAL TO OWNER IMPORTANT SAFETY INSTRUCTIONS -READ THESE INSTRUCTIONS CAREFULLY BEFORE ATTEMPTING
Model G14SD Vapor Management System
 Instruction Manual Model G14SD Vapor Management System (For Models: DSD and SSD 110/115v) Manufactured in USA for Medivators Reprocessing Systems by: PCI Medical Inc. 12 Bridge Street, PO Box 188 Deep
16in. WAREHOUSE BARN LIGHT
 16in. WAREHOUSE BARN LIGHT OWNER S MANUAL WARNING: Read carefully and understand all ASSEMBLY AND OPERATION INSTRUCTIONS before operating. Failure to follow the safety rules and other basic safety precautions
IMPORTANT SAFETY INSTRUCTIONS
 IMPORTANT SAFETY INSTRUCTIONS READ AND FOLLOW ALL SAFETY INSTRUCTIONS! SAVE THESE INSTRUCTIONS AND DELIVER TO OWNER AFTER INSTALLATION To reduce the risk of death, personal injury or property damage from
Mounting instructions Directions for use MAKROLUX. Halogen-spot lamp for consulting room and hospital
 Mounting instructions Directions for use MAKROLUX Halogen-spot lamp for consulting room and hospital Stand model with five-feet base, design without heat protection filter 1100 1012 00 Stand model with
18W Low Energy. instructions. Instructions
 18W Low Energy Dusk-Dawn Bulkhead Cat No. ECO18B instructions Instructions A Reflector screw B Wall fixing screw x 2 cover fixing screw x 2 C Lamp Cable Clamp Grommet SECTION ONE GENERAL INFORMATION This
Introduction. The words WARNING, CAUTION and NOTE carry special meanings and should be carefully reviewed.
 Operations/ Maintenance Manual Important Information File in your maintenance records Medical Visum Exam Light Model LL305 For parts or technical assistance call 800 327 0770 (option 2) Table of Contents
AIM LED LIGHT (wall mount)
") AIM LED LIGHT (wall mount) Installation Manual AIM LED LIGHT (wall mount) INTRODUCTION Lights in the AIM Series are designed to give the professional health care market superior performance, reliability
AIM LED LIGHT (wall mount) Installation Manual AIM LED LIGHT (wall mount) INTRODUCTION Lights in the AIM Series are designed to give the professional health care market superior performance, reliability
INSTALLATION INSTRUCTIONS
 INSTALLATION INSTRUCTIONS VOLT Low Voltage Landscape Lighting VOLT Deck Light Cast Brass VDL-600 and VDL-6000 Series Help Hotline: 1-813-978-3700 Mon-Fri 8am-8pm Sat-Sun 10am - 6pm (EST) Specifications
E4-WM5-Y530A00 MOUNTING INSTRUCTION
 IMPORTANT! READ THIS FIRST! Installation of shock absorbers requires special tools and expert knowledge. Accordingly, installation of all BILSTEIN products must be performed by a qualified suspension specialist.
TECTONIC LED CORP. ISO
 TECTONIC TECTONIC LED CORP. ISO 9001:2000 Products RoHs Compliance Instruction Menu Retrofit:LED Tube Lamps SECTION 1 - General Information Kit components: 1-LED Tube, 1-Label and 1-Set of Instructions
Compensation unit AGE-XY 50-80
 Translation of the origninal manual Compensation unit AGE-XY 50-80 Assembly and operating manual Superior Clamping and Gripping Imprint Imprint Copyright: This manual remains the copyrighted property of
E-200 O-rings Service Kit
 Instruction Sheet E-00 O-rings Service Kit. Introduction These instructions describe how to replace the o-rings in the E-00 gun module. It is necessary to remove and disassemble the module when replacing
ASSEMBLY AND INSTALLATION INSTRUCTIONS
 ASSEMBLY AND INSTALLATION INSTRUCTIONS 348-0035 / 348-0036 WARNING: TO AVOID RISK OF ELECTRICAL SHOCK, BE SURE TO SHUT OFF POWER BEFORE INSTALLING OR SERVICING THIS FIXTURE. NOTES: 1. Before installing,
Temperature Sensor Series
 GENERAL DESCRIPTION The patented* No. 85026-Series Temperature Sensor contains a two-position valve operated by temperature variations around the integral sensing bulb. It is used to vent or block a pneumatic
HALOGEN FLOODLIGHTS Models CHL1260C & 1260T Part Nos: &
 HALOGEN FLOODLIGHTS Models CHL1260C & 1260T Part Nos: 5460600 & 5460595 OPERATING & MAINTENANCE INSTRUCTIONS GC0610 INTRODUCTION Thank you for purchasing this CLARKE Halogen Floodlight. Before attempting
ASSEMBLY INSTRUCTIONS PRODUCT CODE: CAUTION: Carefully Read Instructions and Procedures for Safe Operation. 7' Diamond Peak LED Tree
 7' Diamond Peak LED Tree ASSEMBLY INSTRUCTIONS MODEL NO: U11G684A-024-01 (WL-019) PRODUCT CODE: 140-034067-090 CAUTION: Carefully Read Instructions and Procedures for Safe Operation. Receipt of Purchase:
The EFL 2000/1 & 2 User Guide Test Sieve Shaker. Contents
 The EFL 2000/1 & 2 User Guide Test Sieve Shaker ISSUE 04-02 Contents Description Page 1 Setting Up: 2-8 Unpacking 2 Assembly 3 Clamping Assembly 4 Electrical Connections 5 Sieve Stacking 6 8 Operating
FOR INDOOR/SEASONAL USE ONLY
 9' Warm White /Multi LED Color Changing One Plug Tree V66362-60 INSTRUCTION MANUAL Thank you for purchasing a SYLVANIA Pre-lighted Tree. This tree assembles in minutes and is decorated with energy saving
Installation Instructions BLTR and 2BLTR Relight Assembly
 UT4540 Rev. B Installation Instructions BLTR and 2BLTR Relight Assembly This Relight assembly was engineered to upgrade most recessed fixtures mounted in T-grid ceiling installations, including most parabolic
Prismpack V, Prismalume V, Large Prismpack, Large Prismalume
 AFTER INSTALLATION DELIVER THIS MANUAL TO OWNER Holophane Company Inc. Field Service Department IMPORTANT SAFETY INSTRUCTIONS -READ THESE INSTRUCTIONS CAREFULLY BEFORE ATTEMPTING TO INSTALL OR MAINTAIN
Top Down Rollstar Shade Installation Instructions
 Top Down Rollstar Shade Installation Instructions Thank you for purchasing your new Rollstar shade. It has been custom-made from the highest quality materials to the dimensions you specified. With proper
I1 7.5 Pre-Lit Clear Christmas Tree
 I1 7.5 Pre-Lit Clear Christmas Tree 62432-13 INSTRUCTION MANUAL Thank you for purchasing this Pre-lighted Tree. This tree assembles in minutes and is decorated with UL listed miniature light sets. Please
HLC CEILING MOUNTED DENTAL LIGHT. INSTALLATION and OPERATING INSTRUCTIONS. Rev.3
 HLC CEILING MOUNTED DENTAL LIGHT INSTALLATION and OPERATING INSTRUCTIONS Rev.3 PRE-INSTALLATION REQUIREMENTS: HLC CEILING MOUNTED LIGHT To insure a safe and proper installation of HLC ceiling mounted light,
Sylvania 9 Color Changing One Plug Tree Tree ID # T5, Item # V
 Sylvania 9 Color Changing One Plug Tree Tree ID # T5, Item # V66354-13 Thank you for purchasing this tree. This tree assembles in minutes and is decorated with 600 LED lights. This tree has 8 lighting
Do not dispose of packaging until the shades are operating to your satisfaction.
 for purchasing from smith+noble. Your new shade has been custom-crafted to your exact window dimensions from the highest quality materials. Once in your windows, they will provide you with a lifetime of
CONTENTS. Product Features and Specifications Installation Requirement Installation Exploded View Operation Instruction...
 1 CONTENTS Product Features and Specifications... 3 Installation Requirement... 5 Installation... 6 Exploded View... 20 Test... 22 Operation Instruction... 25 Maintenance... 26 Trouble Shooting... 27 Parts
tyre changer - automatic
 instructions for tyre changer - automatic model no: TC10 Thank you for purchasing a Sealey product. Manufactured to a high standard, this product will, if used according to these instructions, and properly
WARNING: To reduce the risk of SAVE THIS MANUAL FOR FUTURE REFERENCE
 ' ($ 0$$/,&+)/ 0'(/',//( WARNING: To reduce the risk of injury, the user must read and understand the operator's manual before using this product. Part SP0 SAVE THIS MANUAL FOR FUTURE REFERENCE Printed
TECHNICAL INFORMATION
 TECHNICAL INFORMATION Model No. Description HR3200C, HR3210C, HR3210FCT Rotary Hammer 32mm (1-1/4") CONCEPT AND MAIN APPLICATIONS HR3200C series models have been developed as successor models of HR3000C,
7.5' LED Silver Glitter with Pinecones One Plug Tree V INSTRUCTION MANUAL
 7.5' LED Silver Glitter with Pinecones One Plug Tree V70065-60 INSTRUCTION MANUAL Thank you for purchasing a SYLVANIA Pre-lighted Tree. This tree assembles in minutes and is decorated with energy saving
READ AND FOLLOW ALL SAFETY INSTRUCTIONS! SAVE THESE INSTRUCTIONS AND DELIVER TO OWNER AFTER INSTALLATION.
 Installation Instructions 2RTLEDR/2RTLEDRT Relight Assembly READ AND FOLLOW ALL SAFETY INSTRUCTIONS! SAVE THESE INSTRUCTIONS AND DELIVER TO OWNER AFTER INSTALLATION. IMPORTANT SAFETY INSTRUCTIONS WARNING:
GECKO UPRIGHT STANDER USER MANUAL
 GECKO UPRIGHT STANDER USER MANUAL IMPORTANT! Do not use the Gecko without reading and understanding these instructions. Failure to understand these instructions could result in a serious injury to your
9' Warm White /Multi LED Color Changing M5 One Plug tree V INSTRUCTION MANUAL
 9' Warm White /Multi LED Color Changing M5 One Plug tree V64886-60 INSTRUCTION MANUAL Thank you for purchasing a SYLVANIA Pre-lighted Tree. This tree assembles in minutes and is decorated with energy saving
QJY245DS~DA. Two Post Lift Installation & Adjustment Manual
 QJY245DS~DA Two Post Lift Installation & Adjustment Manual Table of Contents 1. Warning 2 2. Summary 2 3. Use 2 4. Mainly technology parameter 2 5. Basic structure of the production 3 6. Safety device
ONBOARD AIR HOOKUP KIT
 ONBOARD AIR HOOKUP KIT PART NO. 20052 (30 amp - 110PSI on, 150PSI off) PART NO. 20053 (30 amp - 85PSI on, 105 PSI off) PART NO. 20055 (30 amp - 90 PSI on, 120 PSI off) IMPORTANT: It is essential that you
VEHICLE SUPPORT STANDS K Distributed by Kincrome Tools & Equipment.
 VEHICLE SUPPORT STANDS K12070 Distributed by Kincrome Tools & Equipment www.kincrome.com.au Owner s Assembly and Operating Manual SPECIFICATIONS... 2 IMPORTANT SAFETY INFORMATION... 3 UNPACKING AND ASSEMBLING
Distributed by Kincrome Group
 ALUMINIUM HYDRAULIC TROLLEY JACK Distributed by Kincrome Group www.kincromegroup.com Owner s Assembly and Operating Manual SPECIFICATIONS...2 IMPORTANT SAFETY INFORMATION...3 UNPACKING AND ASSEMBLING JACK...3
Discount-Equipment.com
 REQUIRED TOOLS LS Series Remix Shaft Installation Instructions /8", /6", /2" Allen Wrenches Snap Ring Pliers (Light Duty) /" Combination Wrench Loctite #22 Blue /" Socket w/ /8" Ratchet Electric Drill
insulated sectional 2180mm (h) x 2550mm (w) Opening Size: 2140mm (h) x 2500mm (w) suits single car garage
 x 2550mm (w) Opening Size: 2140mm (h) x 2500mm (w) suits single car garage") insulated sectional Garage Door 2180mm (h) x 2550mm (w) Opening Size: 2140mm (h) x 2500mm (w) suits single car garage Disclaimer This product should be installed by a competent person or suitably qualified
insulated sectional Garage Door 2180mm (h) x 2550mm (w) Opening Size: 2140mm (h) x 2500mm (w) suits single car garage Disclaimer This product should be installed by a competent person or suitably qualified
record DFA 127 > Your platform for all automatic swing door applications your global partner for entrance solutions
 Drive technology for pedestrian entrances and industrial applications security centralised monitoring maintenance special solutions record DFA 127 > Your platform for all automatic swing door applications
Sylvania 7.5 Pre-Lit Lindberg Pine Tree 500 Clear Incandescent Lights-One Plug Tree Tree ID #C15, Item # V
 Sylvania 7.5 Pre-Lit Lindberg Pine Tree 500 Clear Incandescent Lights-One Plug Tree Tree ID #C15, Item # V67658-13 Thank you for purchasing this tree. This tree assembles in minutes and is decorated with
18W Round LED Slimline Emergency Light
 18W Round LED Slimline Emergency Light Model: LEDMRQ18WHEM Installation & Operating Instructions 1 1. General Information These instructions should be read carefully and retained for further reference
Troubleshooting Guide: 355 Lights (12V)
") Troubleshooting Guide: 355 Lights (12V) Contents Description Refer To: Troubleshooting - Troubleshooting Chart Adjustments / Repair Procedures Bulb Replacing the Bulb Fuse(s) Replacing the Fuse (Ceiling)
Troubleshooting Guide: 355 Lights (12V) Contents Description Refer To: Troubleshooting - Troubleshooting Chart Adjustments / Repair Procedures Bulb Replacing the Bulb Fuse(s) Replacing the Fuse (Ceiling)
Troubleshooting Guide: 355 Lights (24V)
") Troubleshooting Guide: 355 Lights (24V) Contents Description Refer To: Troubleshooting - Troubleshooting Chart Adjustments / Repair Procedures Bulb Replacing the Bulb Fuse(s) Replacing the Fuse (Ceiling)
Troubleshooting Guide: 355 Lights (24V) Contents Description Refer To: Troubleshooting - Troubleshooting Chart Adjustments / Repair Procedures Bulb Replacing the Bulb Fuse(s) Replacing the Fuse (Ceiling)
ESSENTIAL TIPS. Official Guide MAINTENANCE GUIDE XM-PRO II & XM-PRO III XM-PRO II & III. LIVE LONGER! LOOK AFTER YOUR TREADMILL & SAVE s
 TREADMILL MAINTENANCE GUIDE ESSENTIAL TIPS XM-PRO II & XM-PRO III Official Guide TREADMILL COMPONENTS? UNDERSTAND YOUR TREADMILL XM-PRO II & III MAINTENANCE SCHEDULE LIVE LONGER! LOOK AFTER YOUR TREADMILL
Product Installation Instruction LED Tube Lamp Retrofit Kits
 Regular T8 internal driver single end Product Installation Instruction LED Tube Lamp Retrofit Kits 1 General Description LED Tube Light adopts the new type LED as the light source, using the standard T8
The Walkstation. Care & Maintenance. FitWork Walkstation
 The Walkstation Care & Maintenance FitWork Walkstation Treadbelt Adjustment: Your treadmill s running belt has been properly aligned at the factory. However, when the treadmill is used on an uneven surface,
INSTALLATION INSTRUCTIONS
 LED LIGHT ENGINE APPLICATION PROGRAM INSTALLATION INSTRUCTIONS LED Light Engine Kit Model: 9 Round Engine 120V: TRIAC DIMMING TKT120025RDxx-01 TKT120025RDxx-11 TKT120021RDxx-01 TKT120021RDxx-11 TKT120025RDxx-02
Servicing the APU Generator Belt. Determining if a belt adjustment or replacement is required
 Affected Parts: 40-S31-31K Generator Belt Kit, PG1040 Tool, 30-S70-82K Servicing the APU Generator Belt UNIT ONLY TO BE SERVICED BY QUALIFIED PERSONNEL Determining if a belt adjustment or replacement is
MODEL WC2500 Installation and Operation Manual Important:
 MODEL WC2500 Installation and Operation Manual Important: This manual contains specific cautionary statements relative to worker safety. Read this manual thoroughly and follow as directed. It is impossible
READ AND FOLLOW ALL SAFETY INSTRUCTIONS! SAVE THESE INSTRUCTIONS AND DELIVER TO OWNER AFTER INSTALLATION.
 Installation Instructions RT8RT/RT5RT Relight Assembly READ AND FOLLOW ALL SAFETY INSTRUCTIONS! SAVE THESE INSTRUCTIONS AND DELIVER TO OWNER AFTER INSTALLATION. IMPORTANT SAFETY INSTRUCTIONS WARNING: FAILURE
Eazipole Cordless. Installation & Set Up Instructions. Electric Blinds & Curtains
 Eazipole Cordless Installation & Set Up Instructions Electric Blinds & Curtains Pole Installation - Deciding The Best Position Points to consider when planning the installation of your pole It may be easiest
HYDRAULIC TROLLEY JACK K Distributed by Kincrome Tools and Equipment:
 HYDRAULIC TROLLEY JACK K12076 Distributed by Kincrome Tools and Equipment: www.kincrome.com.au Owner s Assembly and Operating Manual SPECIFICATIONS... 2 IMPORTANT SAFETY INFORMATION... 3 UNPACKING AND
NEW GEN OWNER S MANUAL
 NEW GEN OWNER S MANUAL For Models: LT-ELP223Q LT-ELP116Q 1 2! Turn off the light when not in use to conserve battery power. CAUTION! If you need to mount the flashlight onto a firearm, make sure firearm
A. Adapter A metal component that fastens the caliper to the knuckle. Some brake systems do not use adapters.
 BRAKES UNIT 5: DISC BRAKE DIAGNOSIS AND REPAIR LESSON 3: SERVICE DISC BRAKE CALIPERS I. Terms and definitions A. Adapter A metal component that fastens the caliper to the knuckle. Some brake systems do
Stuff-Your-Stuff Platform Bed (Twin and Full)
") Stuff-Your-Stuff Platform Bed (Twin and Full) Pre-Assembly: Please read all instructions before beginning assembly. Assembly by two people is a must. Save all packing materials until assembly is complete
Stuff-Your-Stuff Platform Bed (Twin and Full) Pre-Assembly: Please read all instructions before beginning assembly. Assembly by two people is a must. Save all packing materials until assembly is complete
Installation Instructions
 Roller & Roman Shades Lifting Systems Cassette and Sure-Lift EZ Lift Cordless EZ Pull Standard and Cassette R-Series Clutch SL-Series Clutch Spring Roller Fascias and Valances 3, 4 Flat and 4 Curved Fascia
RAPID ROLLER OPERATOR S MANUAL. L&C ENTERPRISES - U.S.A, Inc N.75 Drive, Escanaba, MI OWNER S NAME MODEL
 RAPID ROLLER OPERATOR S MANUAL OWNER S NAME MODEL SERIAL NUMBER DATE OF PURCHASE L&C ENTERPRISES - U.S.A, Inc. 6652 N.75 Drive, Escanaba, MI 49829 906-786-1008 1-866-786-1009 LIMITED WARRANTY L&C Enterprises-USA,
Halogen NiMH. Evolution USER GUIDE
 Halogen NiMH Evolution USER GUIDE DISCOVER THE NIGHT! Thank you for choosing the Evolution system from NiteRider, the innovator in technical lighting systems. The Evolution is an easy-to-use, high-intensity
Rear Roll-up Door. W-Series
 Door, W-Series Rear Roll-up Rear Roll-up Door W-Series Service Guide Do NOT use the rear door pull strap to support yourself when entering or exiting the rear. The strap can break or pull the door down
DUETTE POWERRISE SHADES
 DUETTE POWERRISE SHADES A B OPEN CLOSE INSTALLATION OPERATION CARE PRODUCT VIEW Spacer Blocks Installation Brackets End Cap Sensor Eye and Manual Button Fabric-Covered Valance PowerRise with Platinum Technology
Assembling a Wall-Mounted CTS
 CHAPTER 3 Revised: February 4, 2010, This chapter provides you with the information you need to assemble a wall-mounted CTS-500-37 and includes the following sections:, page 3-1 Installing the External
Mandatory X Information Recommended Change. Series/Parts Affected: LS40D, LS40TD, LS50TD and LS60TD Concrete Pumps
 Service Bulletin No. CP20060428 Subject: Remix Shaft Coupler Retrofit Kit Model: LS40D, LS40TD, LS50TD & LS60TD Product Group: Concrete Pump Date: April 28, 2006 SERVICE BULLETIN Group: CP Mandatory X
Installation AC B22 Install the ignition switch in the bearing housing
 Installation AC B22 Install the ignition switch in the bearing housing Lubricate contact areas of bearing housing with bearing grease. AC B23 Installing as applies to cars with ignition switch interlock
NOKOMMS. kéï=~ë=çñw= pfoliru c^kq^pqf` fåëí~ää~íáçå=fåëíêìåíáçåë=iáöüí=qê~åâ=póëíéã. båöäáëü
 kéï=~ë=çñw= NOKOMMS pfoliru c^kq^pqf` fåëí~ää~íáçå=fåëíêìåíáçåë=iáöüí=qê~åâ=póëíéã båöäáëü General information Sirona Dental Systems GmbH General information About this document This document describes
1. Cotter pin 2. AXIP nut
 below with care: a. Make sure there is an enough gap between the disc pads. b. Make sure the projecting portion (torque stopper) of the speedometer housing is positioned correctly. 1. Cotter pin 2. AXIP
ATTACH YOUR RECEIPT HERE ITEM # FT. PRE-LIT DOUGLAS FIR TREE. MODEL #DF-75C85 Español p. 8
 ITEM #0776 7. FT. PRE-LIT DOUGLAS FIR TREE MODEL #DF-7C8 Español p. 8 ATTACH YOUR RECEIPT HERE Serial Number Purchase Date Questions, problems, missing parts? Before returning to your retailer, call our
Mini slide EGSC-BS-KF. Operating instructions b [ ]
![Mini slide EGSC-BS-KF. Operating instructions b [ ]](/thumbs/87/95253800.jpg "Mini slide EGSC-BS-KF. Operating instructions b [ ]") Mini slide EGSC-BS-KF en Operating instructions 8081968 2017-11b [8081970] Translation of the original instructions EGSC-BS-KF-EN Identification of hazards and instructions on how to prevent them: Danger
Mini slide EGSC-BS-KF en Operating instructions 8081968 2017-11b [8081970] Translation of the original instructions EGSC-BS-KF-EN Identification of hazards and instructions on how to prevent them: Danger
HEAVY DUTY ONBOARD AIR SYSTEM PART NO
 IMPORTANT: It is essential that you and any other operator of this product read and understand the contents of this manual before installing and using this product. SAVE THIS MANUAL FOR FUTURE REFERENCE
E4-WM5-Y556A00 MOUNTING INSTRUCTION
 IMPORTANT! READ THIS FIRST! Installation of shock absorbers requires special tools and expert knowledge. Accordingly, installation of all BILSTEIN products must be performed by a qualified suspension specialist.
LED Area Light. This is the fixture of choice for all of our dealerships. Contact Us:
 LED Area Light This is the fixture of choice for all of our dealerships. Contact Us: 7057 Marcelle St, Paramount, CA 90723 800-640-0386 www.altechefficiency.com sales@altechefficiency.com Specifications
SZ2-ILA INSTRUCTIONS TRANSMITTED ILLUMINATION ATTACHMENT SZ-ADD SZ-POL-2 SZH-CLJ. Optional Modules
 Optional Modules SZ-ADD SZ-POL-2 SZH-CLJ INSTRUCTIONS TRANSMITTED ILLUMINATION ATTACHMENT This instruction manual is for the Olympus Transmitted Illumination Attachment. To ensure the safety, obtain optimum
PRIMA DNT User Manual
 R PRIMA DNT User Manual Operating Surgical Microscopy To ensure proper use of this instrument as well as to avoid injury while operating instrument, understanding this manual completely before use is highly
NOVO LIGHTED MIRROR. Installation Instructions
 NOVO LIGHTED MIRROR Installation Instructions IMPORTANT SAFETY INSTRUCTIONS Must be installed by a qualified technician. Read these installation instructions. Keep these instructions for future use. Follow
MC2500. Installation and Operation Manual
 MC2500 Installation and Operation Manual Important: This manual contains specific cautionary statements relative to worker safety. Read this manual thoroughly and follow as directed. It is impossible to
Operation Manual. 355 Lighting System. Safety 2. Features 4. Component Overview 5. Controls & Indicators 6. Operation 7.
 Operation Manual 355 Lighting System Safety 2 Features 4 Component Overview 5 Controls & Indicators 6 Operation 7 Troubleshooting 7 Operator Maintenance 8 Calling for Service 14 Specifications 15 MA326100
R. STAHL Schaltgeräte GmbH Geschäftsbereich Leuchten Nordstraße Weimar, Germany
 ECOLUX 6608 Series 6608/5 Explosion Protected Fluorescent Emergency Light Fixtures for Hazardous and Corrosive Applications Please read this entire document before beginning any work. 1. Safety Instructions
Nimbo Lightweight Posterior Posture Walker
 Nimbo Lightweight Posterior Posture Walker Assembly & Operating Instructions with optional Forearm Platforms with optional Pelvic Stabiliser Please read these instructions carefully before assembling or
JOINT INSTALLATION MANUALS AND SAFETY INFORMATION
 INSTALLATION MANUALS AND SAFETY INFORMATION SEA S.p.A. Zona industriale 64020 S.ATTO Teramo - (ITALY) Tel. +39 0861 588341 r.a. Fax +39 0861 588344 www.seateam.com seacom@seateam.com REV.00-06/2016 1 TABLE
GENUINE PARTS INSTALLATION INSTRUCTIONS
 GENUINE PARTS INSTALLATION INSTRUCTIONS 1. 2. 3. 4. DESCRIPTION: APPLICATION: PART NUMBER: KIT CONTENTS: Fog Lamp Kit Versa Note (SV Only) 999L1 4Z000 - Fog Lamp Kit Item QTY Description Service Part Number
MODEL NUMBER: MEDIUM DUTY ONBOARD AIR SYSTEM
 MODEL NUMBER: 10003 MEDIUM DUTY ONBOARD AIR SYSTEM IMPORTANT: It is essential that you and any other operator of this product read and understand the contents of this manual before installing and using
Service Bulletin #125 SJ 40T/45T/61T/66T/63AJ System Pump Replacement
 Service Bulletin #125 SJ 40T/45T/61T/66T/63AJ April 16, 2014 Models Affected: SJ40T, SJ45 T, SJ 61T, SJ66T, SJ63 AJ SJ40T 98001175, 98001176, 98001177, 98001178, 98001179, 98001181, 98001187, 98001201,
INSTRUCTION MANUAL SINKER. By HAY
 INSTRUCTION MANUAL SINKER By HAY INTRODUCTION An elemental looking light available as either a small or large pendant. The fabric cord comes with a magnetic moulded ceiling cap in a textured finish. The
2015 Mustang Lightbar (All Models) CDC#
 CDC#") 2015 Mustang Lightbar (All Models) CDC# 1511-7000-01 Components: 1 CDC Lightbar Note: READ instructions before starting installation!!! CDC Part# Driver side bracket 0511-6001-05 Passenger side bracket
2015 Mustang Lightbar (All Models) CDC# 1511-7000-01 Components: 1 CDC Lightbar Note: READ instructions before starting installation!!! CDC Part# Driver side bracket 0511-6001-05 Passenger side bracket
MODEL WC1200 Installation and Operation Manual Important:
 MODEL WC1200 Installation and Operation Manual Important: This manual contains specific cautionary statements relative to worker safety. Read this manual thoroughly and follow as directed. It is impossible
A195DE FIXED TV MOUNTING BRACKET Vesa Size : 600 x 400mm User Manual Notice d Utilisation
 A195DE FIXED TV MOUNTING BRACKET Vesa Size : 600 x 400mm User Manual Notice d Utilisation Thank you for purchasing an Electrovision bracket, please read these instructions carefully and leave with the