Owner s Manual M750144B
|
|
|
- Barnard Carter
- 5 years ago
- Views:
Transcription
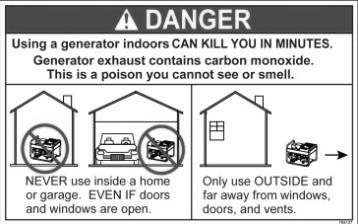
1 Owner s Manual M750144B ITEM NUMBER: SERIAL NUMBER: Instructions for Installation/Set-up, Operation, Servicing, & Storage Portable, Outdoor Use-Only, Gasoline Generator ,400 Watt Continuous (11,000 Watt Surge) Capacity Can be used to power individual appliances plugged directly into the generator s outlets, or as a back-up connection to a building s power supply (via a professionally installed UL-listed transfer switch). WARNING READ and UNDERSTAND this manual completely before using the generator! Failure to properly set up, operate, and maintain this generator could result in serious injury or death from carbon monoxide poisoning, electric shock, fire/explosion, or burns. In particular, be aware of the following hazards: CO Poisoning Generators give off carbon monoxide, a poisonous gas that can kill you. You CANNOT smell it, see it, or taste it. ONLY run generator OUTDOORS and AWAY from building air intakes. NEVER run generator inside any enclosed or semi-enclosed spaces, including homes, basements, garages, sheds, boxes, RVs, boats or pick-up truck beds. These spaces can trap poisonous gases, EVEN if you run a fan or open windows. Install carbon monoxide alarms inside nearby structures/buildings (battery-operated, or plug-in with battery backup). Electric shock / Electrocution High voltage electricity from generator can kill. DO NOT operate in wet locations. Be sure generator is properly grounded. Use only UL-listed, outdoor-rated grounded extension cords of proper size. NEVER plug the generator directly into a wall outlet. ANY connection to a building s electrical system MUST ISOLATE THE GENERATOR FROM UTILITY POWER via a UL-listed transfer switch installed by a licensed electrician. Otherwise, back feed from the generator into the power grid could kill utility workers. Fire / Explosion DO NOT overload generator (per rated capacity), and OPERATE ONLY in an area with adequate cooling ventilation so engine does not overheat. Exhaust can be extremely hot. Keep muffler at least 7 feet from all combustible objects. All fuels are flammable. Never fuel a running or hot engine. Never pump fuel directly into generator at gas station use approved container to transfer fuel. Ensure there are no fuel leaks, and keep sources of sparks and flames away. ALWAYS keep a fire extinguisher rated ABC nearby. STOP! CHOOSE THE RIGHT GENERATOR FOR YOUR NEEDS. See the Power Load Planning & Management section of this manual to determine your power load requirements and then compare to the generator s rated capacity. INSPECT COMPONENTS: Closely inspect to make sure no components are missing or damaged. See the Unpacking & Delivery Inspection section for instructions on whom to contact to report missing or damaged parts. ARRANGE FOR PROFESSIONAL INSTALLATION of a transfer switch if you will be connecting the generator to your building s electrical system. See the Installation/Initial Set-Up section for more information about this requirement. ADD ENGINE OIL: Engine is shipped without oil. See engine section of this manual for instructions on capacity and viscosity recommendations. Any Questions, Comments, Problems, or Parts Orders Call Powerhorse Product Support
2 Hazard Signal Word Definitions 2
3 Table of Contents Hazard Signal Word Definitions....2 About Your Generator....4 Specifications....6 Safety Label Locations....7 Machine Component Identification....9 Installation / Initial Set-Up: 1. Unpacking & Delivery Inspection Planning the Power Load Set-up as a BUILDING BACK-UP or PORTABLE Power Source Selecting a Suitable Site Grounding the Generator Battery Installation Wheel Kit Assembly Operation: 1. General Safety Rules for Operation Preparing for Operation Starting the Engine Checking Generator Output Connecting Loads Stopping the Engine Storage & Exercise Maintenance & Repair Troubleshooting Summary of Important Safety Information for Operation Engine Operation Exploded Views Warranty
4 About Your Generator Thank you for purchasing your Powerhorse portable generator! About Your Generator This engine-driven, portable generator is designed to provide up to 11,000 Watts of electrical power (8,400 watts continuous, 11,000 watts surge). It can supply power: 1. As a portable power source. You can plug appliances directly into the generator s electrical outlets. 2. As a back-up, standby power source for a building. A licensed electrician can connect the generator to your building s electrical system via the installation of an UL-listed transfer switch. (See the Installation & Initial Set-up section of this manual to learn more about specific requirements and precautions relating to wiring the generator to your building s electrical system.) You must select a generator adequately sized for your power needs. You need to determine the power needs of all the appliances/tools you wish to power at the same time and choose a generator rated to provide at least that power level. See the Planning the Power Load section of this manual to determine your specific power load requirements and then compare them to this generator s rated capacity. You must not overload the generator. Overloading will cause damage to the generator and attached electrical devices, and may also result in fire. Be sure to read about site selection and grounding requirements for running this generator. More detailed information can be found in the Installation & Initial Set-up, Steps 4 & 5 of this manual. Contact Powerhorse Product Support at with questions about optional accessories or to order parts. Read this Manual WARNING Improper use or maintenance of this generator can result in serious injury or death from carbon monoxide poisoning, electric shock/electrocution, fire/explosion, or burns. Read this manual completely before using the generator and follow all instructions and safety rules. You must follow all instructions and safety precautions presented throughout this manual. A summary of important safety information can be found at the end of the manual. Keep this manual for reference and review. 4
5 About Your Generator (cont d) Proper preparation, operation, and maintenance will result in operator safety, as well as best performance and long life of the generator. For detailed engine operation and maintenance information, always refer to the engine section of this manual. Powerhorse is constantly improving its products. The specifications outlined herein are subject to change without prior notice or obligation. The purchaser and/or user shall assume liability for any modification and/or alterations of this equipment from original design and manufacture. Before using, the user shall determine the suitability of this product for its intended use and assumes liability therein. Contact Powerhorse Product Support at for any questions about the appropriate use of this generator. Warranty Registration Please fill in the warranty registration information and have it on hand when you call in on a warranty claim or replacement parts. ATTENTION: All Rental Companies and Private Owners who loan this equipment to others! All persons to whom you rent/loan this generator must have access to and read this manual. Keep this owner s manual with the generator at all times and advise all persons who will operate the machine to read it. You must also provide personal instruction on how to safely operate the generator and remain available to answer any questions a renter/borrower might have. 5
6 Specifications Item Number # Maximum Output 10,050 Watts (W) Continuous Output 8,400 Watts (W) Voltage 120/240 Volt (V) Phase Single phase (4-wire) Frequency Hertz (Hz) Power Factor 1.0 p.f. Total Harmonic Distortion less than 5% Run Time at 50% Load 8.5 Hours Engine 457cc Engine Speed 3600 RPM Fuel Type Unleaded gasoline Fuel Capacity 6.6 gallons (25 L) Oil Capacity 1.27 US quarts (1.2 L) Starting Method Recoil Start/Electric Start 120/240 Volt Receptacles 4-20 Amp 120V duplex (NEMA 5-20R) 1 30 Amp 120V locking (NEMA L5-30R) 1 35 Amp 120/240V straight blade (NEMA 14-50R) 12 Volt DC Receptacle 1 8 Amp 12V AC Circuit Breakers 4-20 Amp (A) thermal, push to reset 1-30 Amp (A) thermal, push to reset 2-35 Amp (A) thermal, push to reset DC Circuit Breaker 1 8 Amp (A) thermal, push to reset Dimensions Length in. Width in. Height in. Dry Weight 200 lbs. Battery Specs 12 Volt DC (Battery Not Included) Sealed Lead Acid 9.0Ah or greater rating Terminal Type Nut and Bolt 5.94 (L) x 2.56 (W) x 3.66 (H) or 4.18 (H w/terminals) 6

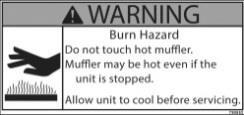
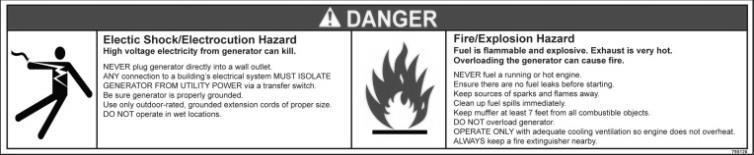
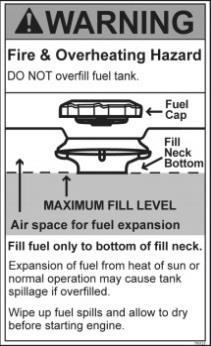
7 Safety Label Locations Ref. # Part # Description Qty Recoil Decal Air Filter Decal Choke Decal Starting Instruction Decal Handle Decal Shock/Fire Decal Ethanol Decal CPSC Decal Fire & Overheating Warning Low Oil Decal W-ES Nameplate Burn Warning Decal Battery Warning Decal Powerhorse Tank Decal Oil Level Decal Control Panel Decal 1 17 N/A EPA Decal Fuel On/Off Decal Always make sure safety labels are in place and in good condition. If a safety label is missing or not legible, order new labels or unsafe operation could result. To order replacement safety labels, call Powerhorse Product Support at


8 Safety Label Locations
9 5 Machine Component Identification Reference Description Reference Description 1 Handle 9 Muffler 2 Air Cleaner 10 Generator Head 3 Recoil Starter Grip 11 Control Panel 4 Fuel Valve 12 Battery Location (Battery Not Included) 5 Gas Tank 13 Oil Fill 6 Fuel Gauge 14 Oil Drain Plug 7 Gas Cap 15 ON / OFF / START Switch 8 Vibration Isolation Mount 16 Roll Cage Frame Reference 1 - Handle Reference 2 Air Cleaner Reference 3 Recoil Starter Grip Reference 4 Fuel Valve Reference 5 Gas Tank Reference 6 Fuel Gauge Reference 7 Gas Cap Reference 8 Vibration Isolation Mount Reference 9 - Muffler Reference 10 - Generator Head Reference 11 Control Panel Reference 12 Battery Location Reference 13 Oil Fill Reference 14 Oil Drain Plug Reference 15 Engine Switch Reference 16 Roll Cage Frame REFERENCE GUIDE Provides a means for moving the generator. To move generator, pivot handle up and secure using the handle pin. Filter element that removes particles from incoming air. See the engine section of this manual for maintenance and replacement. Grasp firmly when manually starting engine to engage the engine cranking. ON / OFF valve to control the fuel flow into the engine. Located on the left side of the recoil. ALWAYS keep valve closed when the generator is not in use. A large tank that allows for extended run capabilities. ALWAYS allow room for gasoline expansion by not filling the gas tank completely. Fuel level indicator for gas tank. The gas cap is extra-large, creating a large hole for refilling and has a comfortable grip. The engine and generator head are mounted on rubber mounts that absorb most of the engine vibration. This feature eliminates the tendency of the machine to walk while engine is running. An acoustic device installed onto the exhaust system that is designed to reduce noise. The outlet also includes a spark arrester. The electricity producing part of the generator. An electrical device that contains receptacles, switches and other electrical devices. Storage location for the battery (battery not included). Cap with dipstick for checking oil level. Also provides access port to fill oil. Bolt located on the engine crankcase that allows oil to be drained. ON / OFF / START switch for power to engine for starting. Provides protection for the generator 9
10 Machine Component Identification Ref. # Description Qty V, 30A Locking Receptacle (NEMA L5-30R) V, 20A Duplex Receptacle (NEMA 5-20R) 8 3 Circuit Breaker, 20A 4 4 Grounding Post /240V, 35A Straight Blade Receptacle (NEMA 14-50R) 1 6 Circuit Breaker, 35A 2 7 Volt Meter V DC, 8A Receptacle 1 9 Circuit Breaker, 8A, 12V DC 1 10 Engine Switch 1 11 Low Oil Warning Light 1 10
11 Installation / Initial Set-Up (cont d) There are a number of important steps required to set up your generator for initial use. These steps are: Steps for Installation / Initial Set-Up 1. Unpacking & delivery inspection. 2. Planning the power load to stay within the generator s rated capacity. 3. Setting up generator for the type of power generation you need: a. portable power source, or b. connect to a building as a back-up power source. 4. Selecting a site for using the generator. 5. Grounding the generator. 6. Battery installation (electric start models only). 7. Wheel kit assembly. Each of these steps is discussed in detail below: 1. Unpacking & Delivery Inspection You should inspect the generator immediately after you receive delivery. See the Machine Component Identification section of this manual for a diagram of the generator and its components. If you are missing or have damaged components, contact Product Support at
12 Installation / Initial Set-Up (cont d) 2. Planning the Power Load Plan your power load so that you do not exceed the generator s rated capacity. WARNING NEVER exceed the rated wattage capacity of your generator. OVERLOADING may cause SERIOUS DAMAGE to the generator and attached electrical devices, and may result in fire. Your generator MUST BE SIZED PROPERLY to provide both the running and starting (surge) wattage of the devices you will be powering. Before using your generator, determine the running and starting wattage requirements of all the electrical devices you will be powering simultaneously. The sum of the running and starting wattages of the devices being powered must not exceed the continuous output rating of your generator. (The continuous output rating of your generator is listed in the Specifications section of this manual.) Note that: Devices without electric motors such as light bulbs, radios, and televisions have the same running and starting wattage. Devices with electric motors such as refrigerators, compressors, and hand tools typically require a starting wattage that is 3 to 5 times greater than the running wattage. The running and starting wattage requirements are often listed on a device s nameplate. If wattage is not given on the device s nameplate, the wattage may be calculated by multiplying the nameplate voltage by nameplate amperage, Watts = Volts X Amps. Example conversion to watts: 120 Volts X 5 Amps = 600 Watts If only the running voltage is given on the nameplate for a device with an electric motor, the starting wattage can be approximated to be three to five times the running wattage. Estimates for the running wattage requirements for common devices are listed in Table 1 below. Guidance for starting wattages is provided in the table s footnotes. Table 1 Device Running Watts Device Running Watts Air conditioner ( BTU) 1700 (a,b) Jet pump 800 (a) Battery charger (20 Amp) 500 Lawn mower 1200 Belt sander (3 ) 1000 Light bulb (100 Watt) 100 Chain saw 1200 Microwave oven 700 Circular saw (6½ ) 2000 (a,b) Milk cooler 1100 (a) Coffee maker 1800 (a,b) Oil burner on furnace 300 Compressor (1 HP) 1400 (a,b) Oil-fired space heater (140,000 Btu) 400 Compressor (3/4 HP) 1800 (a) Oil-fired space heater (85,000 Btu) 225 Compressor (1/2 HP) 1400 (a) Oil-fired space heater (30,000 Btu) 150 Curling iron 700 Oven 4500 Dishwasher 1200 Paint sprayer, airless (1/3 HP) 600 (a) Edge trimmer 500 Paint sprayer, airless (handheld)
13 Installation / Initial Set-Up (cont d) Device Running Watts Device Running Watts Electric nail gun 1200 Radio 200 Electric range (1 element) 1500 Refrigerator 600 (b) Electric skillet 1250 Slow cooker 200 Furnace fan (1/3 HP) 1200 (a) Submersible pump (1-1/2 HP) 2800 (a) Freezer 800 (b) Submersible pump (1 HP) 2000 (a) Hair dryer 1200 Submersible pump (1/2 HP) 1500 (a) Hand drill (1 ) 1100 Sump pump 600 (a) Hand drill (1/2 ) 875 Table saw 2000 (a) Hand drill (3/8 ) 500 Television 500 Hand drill (1/4 ) 250 Toaster 1000 Hedge trimmer 450 Vacuum cleaner 250 Home computer 150 VCR 70 Impact wrench 500 Water heater 3000 Weed trimmer 500 (a) Hard-starting motors require 3-5 times the rated running watts (b) For extremely hard to start loads such as air conditioners and air compressors, consult the equipment dealer to determine maximum wattage To calculate the running and starting wattage requirements for the devices you will be powering, follow these steps: 1. Make a list of all electrical devices you will be powering at the same time with the generator. 2. List the greater of the running or starting wattage next to each device as obtained from the devices nameplate or Table 1. If only the running wattage for a device with an electric motor is known, the starting wattage can be estimated to be at least 3 times the running wattage. 3. Add the wattages for all devices on your list. This total must be lower than the continuous output rating of your generator. Example: Device to be Powered Light bulb Refrigerator 18 cu. ft. Microwave Window AC Sump pump (1/3 hp) Total Greater of Starting/Running Wattage 75 W 1600 W 700 W 1800 W 2100 W 6275W In this example, the generator must have a continuous output of at least 6275 W in order to power all of the devices simultaneously. STAGGERING LOADS You can increase the number of devices your generator can power by staggering the load on the generator. For example, you could alternately power your refrigerator and air conditioner for limited periods of time -- powering only one of the devices at a time and never powering both at the same time. 13
14 Installation / Initial Set-Up (cont d) 3. Set-up either as a BUILDING BACK-UP or PORTABLE Power Source This generator is designed to provide up to 11,000 watts of electrical power. It can supply electricity in two ways: 1. As a back-up, standby power source for a building. For this application, you must arrange for a licensed electrician to connect the generator to your building s electrical system via the installation of an UL-listed transfer switch. The transfer switch must be installed in accordance with building electrical code and guidelines supplied by your power company. 2. As a portable power source. You can plug appliances or tools directly into the generator s electrical outlets. Specific requirements for each are given below. Note: Regardless of whether you use your generator as a back-up power source connected to a building or as a portable power source, you must not overload the generator. Overloading may cause serious damage to the generator and attached electrical devices. Using as a back-up power source for a building Contact a licensed electrician to install a UL-listed transfer switch if you want to use your generator as a back-up power source for a building. What does a transfer switch do? It: a) Safely connects the generator to your building s electrical system by isolating your generator from your utility company s power lines, AND b) Connects your generator to a critical subset of your building s circuits that are needed for emergency power needs. If your generator will be connected to your building s electrical system, it MUST ALWAYS be isolated from the utility power grid with a UL-listed transfer switch installed by a licensed electrician in compliance with all applicable building and electrical codes, and in accordance with guidelines supplied by your power company. DANGER: A transfer switch must be installed in order to isolate your generator from the utility power grid. If your generator is NOT properly isolated from the utility system, serious hazards will arise: When your generator is running, its output will back feed into the utility power line and transformer that are normally used to provide you with power. The transformer will step up the current to the normal line voltage. An unsuspecting utility line worker working on what he thinks is a deactivated line could be electrocuted. If your generator is connected (running or not) when utility power is restored, your generator will be destroyed. It could also explode or cause fire. In addition to isolating your generator from the utility system, the transfer switch connects your generator to a limited set of circuits in your building that have been chosen as critical to operate during a power outage. The generator cannot power your entire home -- you must work with the installing electrician to determine which devices/appliances you wish to power during an outage. The electrician can help you determine which circuits and devices can be powered simultaneously without overloading the generator. (See the previous section of this manual entitled Planning the Power Load for more information on load application and selection.) 14
15 Installation / Initial Set-Up (cont d) Using as a portable power source When using the generator as a portable power source, you can plug electric devices and appliances directly into the generator s electrical outlets. There are eleven different electrical outlets on the generator: 1. One 120 Volt, 30 Amp Locking receptacle (NEMA L5-30R compatible with NEMA L5-30P mating plugs). 2. Eight 120 Volt, 20 Amp Duplex Straight-Blade receptacles (NEMA 5-20R duplex receptacles compatible with NEMA 5-20P or 5-15P mating plugs). 3. One 120/240 Volt, 40 Amp Straight Blade receptacle (NEMA 14-50R compatible with NEMA 14-50P mating plugs). 4. One 12 Volt DC receptacle Make sure you plug each electrical device/appliance into the correct generator outlet based on the device s plug configuration and voltage/amperage rating. Never exceed the amperage rating of an outlet. Extension cords may be used to power devices that are located at a distance from the generator. However, use only UL-listed, outdoor-rated, grounded extension cords of the proper size. Use Table 2 below to choose an adequately sized extension cord according to the amperage of the device being used and the length of the cord. Table 2 Current/Power Amps at Load 240V (watts) Maximum Extension Cord Length #10 Ga. #12 Ga. #14 Ga. Cord Cord Cord * * * * WARNING: Use of undersized extension cords can cause electric shock, fire, or damage to connected devices. 15 #16 Ga. Cord All extension and appliance cords must be in good condition and not worn, bare, frayed, or otherwise damaged. WARNING: Use of damaged electric cords can cause electric shock or fire. Note: If an extension cord becomes hot to the touch, it is overloaded or damaged and
16 Installation / Initial Set-Up (cont d) must be replaced. Northern Tool is NOT responsible for damage or injury resulting from customer use of inadequate extension cords. 4. Select a Suitable Site Before using the generator, you must select a suitable OUTDOOR location for installation and operation. This location should meet all of the criteria listed below. WARNING: You must choose a suitable site for operating your generator to avoid equipment damage and/or injury and possible death from carbon monoxide poisoning, electric shock, or fire. Choose a site that meets all of the criteria specified. Dry, level surface The generator should be positioned on a dry, firm, level surface. Ensure that the generator sits level and will not slide or shift during operation. If Outdoors only dangerous carbon monoxide exhaust applicable, block the generator s wheels to prevent sliding and shifting. WARNING: Carbon monoxide poisoning hazard The exhaust from your generator contains carbon monoxide (CO), a poisonous gas that can kill. You cannot smell it, see it, or taste it. Carbon monoxide exhaust is given off whether you are using gasoline, natural gas, or propane as the fuel source to power the generator. Follow the directions below for choosing a location to operate your generator in order to avoid carbon monoxide poisoning. The location you choose to operate the generator must be OUTDOORS and away from all air intakes: Never run the generator inside any closed or semi-enclosed spaces (even if outdoors), including homes, garages, basements, sheds, or boxes. These spaces can trap poisonous gases, even if you run a fan or open windows. Place the generator so that the exhaust fumes will not be directed towards people or building air intakes. Ensure that working, battery-operated or battery back-up carbon monoxide alarms are used in any dwelling/structure that is in close proximity to the running generator. Note that this generator is NOT designed or approved for use in vehicles or marine applications. Never run the generator inside RVs or other vehicles, on boats, or on pick-up truck beds. Adequate cooling ventilation WARNING: Never attempt to attach ductwork to the muffler system to allow for installation inside an enclosure. This could cause hot air deflection, heat build-up, and increased exhaust back-pressure, resulting in possible exhaust leakage or damage to the generator. The generator needs adequate, unobstructed flow of air to allow for proper cooling of engine and generator head. WARNING: Heat build-up from inadequate ventilation can result in fire, posing a serious risk to nearby persons and structures. Situate so there is adequate clearance around generator to allow for cooling airflow so that heat does not build up. Never place the generator immediately adjacent to a building or other structure 16
17 Installation / Initial Set-Up (cont d) allow at least 7 feet clearance. DO NOT run the generator in close proximity to other heat-generating equipment, such as another generator. The combined heat that is generated may raise air temperature in the immediate area and there will not be adequate cooling ventilation. DO NOT allow debris to accumulate and block airflow. DO NOT operate with a tarp, blanket, or cover surrounding the generator. No wet conditions Hot exhaust clearance Away from dust/dirt Hearing protection Choose a location where the generator will NOT be exposed to rain, snow, or direct sunlight. Exposure to water can cause electric shock. You may operate the generator under an outdoor, canopy-like structure of heatresistant material that is open on all sides. Make sure that all parts of canopy are at least 7 feet from exhaust, and allow for adequate clearance above generator so that heat does not build up. The exhaust gas from your generator is extremely hot and can cause combustible materials to catch on fire. Make sure your generator s exhaust system is at least 7 feet from all combustible materials and buildings/structures. The engine is equipped with a spark arrester if the generator will be used near any ignitable forest, brush, or grassy land. Make sure you comply with applicable local, state, and federal codes. Keep a fire extinguisher rated ABC nearby. Keep it properly charged and be familiar with its use. DO NOT use the generator in extremely dusty or dirty conditions. Excessive dust and dirt can cause premature failure of the machine. Generators can produce noise levels in excess of 95 db in close proximity, which can be dangerous to human hearing with prolonged exposure. Hearing protection may be required for persons working within feet of the running generator for an extended period of time. WARNING: Never attempt to attach ductwork to the muffler system to lower noise levels. This could cause hot air deflection, heat build-up, and increased exhaust backpressure, resulting in possible exhaust leakage or damage to the generator. 17
18 Installation / Initial Set-Up (cont d) 5. Grounding the generator Always ensure the generator is properly grounded to prevent electrical shock. You must always ground the generator by the following method when using the generator as a portable electrical source: 1. Drive a ¾ or 1 copper pipe or rod into the ground close to the generator. The pipe/rod must penetrate moist earth the depth required will be dictated by local soil conditions. Consult with an electrician. 2. Connect an approved ground clamp to the pipe. 3. Run a 8 gauge wire from the clamp to the generator grounding post which is located on the base of the generator frame to the right of the battery location. 4. DO NOT connect the generator grounding post to a water pipe or a ground used by a radio system. Control Panel Face Grounding Post 8 Ga. wire Copper Pipe/Rod Ground If a licensed electrician installs the generator with a connection to your building s electrical circuit for use as a back-up power system, grounding may alternatively be completed through the building s grounding system. Ask your electrician. If the generator is not grounded through your building s electrical system, follow the procedure above. WARNING: Operating the generator when it is not properly grounded can result in electrical shock. 18

19 Installation / Initial Set-Up (cont d) 6. Battery Installation Your generator s engine is equipped with an electric starter which requires the installation of a 12 volt DC battery. See the Specifications section of this manual for more specific battery requirements for this generator model, such as minimum amperage or CCA rating. The battery is to be supplied by the customer and should be installed in the protective battery tray located near the engine. The orientation of the battery should be with the tabs to the front. Follow the instructions detailed below for connecting and disconnecting the battery. See Specification section of the manual for battery information. Battery tabs Battery tray WARNING: Battery hazards Batteries are hazardous because they contain caustic acid, can emit explosive gases, and can cause electric shock. Caution must be exercised when making connections to a battery to avoid shock and contact with the acid, and to prevent any sparking that could lead to an explosion. ALWAYS follow the general battery safety rules and instructions listed below. General battery safety rules Connecting the battery Disconnecting the battery ALWAYS use eye protection when handling batteries. NEVER smoke or work near sparks or other sources of ignition. NEVER touch both battery terminals at the same time with your hand or any noninsulated tools. If battery acid contacts skin or clothing, flush immediately with water and neutralize with baking soda. Always connect the cables in the following sequence to avoid possible shock: 1. Find the battery cables located near the battery tray. 2. Connect the red cable to the positive(+) terminal of the battery. 3. Then connect the black cable to the negative(-) terminal of the battery. Always disconnect cables in the following sequence to avoid possible shock. 1. First, disconnect the black cable from the negative(-) terminal of the battery. 2. Next, disconnect the red cable from the positive(+) terminal of the battery. 19
20 Installation / Initial Set-Up (cont d) 7. Wheel Kit Assembly Your generator is equipped with a free wheel kit to provide easy portability. Secure the generator on blocks at least 7 off the ground or work table. Make sure the holes in the base of the generator are not obstructed to allow for installation of axle and vibration brackets. Installing the axle and wheels 1. Slide (1) Axle into the end of the Wheel (1). 2. Slide (1) Axle Washer onto the axle. 3. Slide the Axle, Wheel, and Washer assembly into the Frame. 4. Insert (1) Hairpin in the holes on that end of the Axle to secure the Wheel. 5. Repeat for the opposite Wheel. Axle Washer Hairpin Wheel Installing the legs 1. Attach (1) Rubber Foot to (1) Leg Bracket. Secure using (1) M6 x 20mm Flange Bolt and (1) M6 Flange Nut. 2. Repeat Step 1 to assemble the second Leg Bracket assembly. 3. Align (1) Leg Bracket assembly to the holes in the generator base. Attach using (4) M8 X 12 Bolts and (4) M6 Flange Nuts. 4. Repeat Step 3 to attach the remaining Leg Bracket assembly to the generator base. M8 x 16mm Flange Bolt Generator Base M8 Flange Nut Leg Bracket M6 Flange Nut Rubber Foot M6 x 25mm Flange Bolt 20
21 Installation / Initial Set-Up (cont d) Installing Bushings into handle 1. Insert (4) Bushings into handle. Bushing Handle Installing the handle 2. Attach (1) Handle to (1) Generator Frame. Secure using (2) M8 x 50mm Flange Bolt and (2) M8 Flange Nut. M8 Flange Nut M8 x 50mm Flange Bolt 21
22 Installation / Initial Set-Up (cont d) Attach Handle Pin to Generator Frame 1. Attach lanyard to pin. 2. Attach lanyard and pin to generator frame by looping the rope around the tube and inserting the pin through the loop. Lanyard Pin 22
23 Operation Once you have set up your generator for use, it is time to start your generator. The following are the procedures necessary for safe, successful operation of your generator. Operation Procedures 1. General Safety Rules for Operation 2. Preparing for Operation 3. Starting the Engine 4. Checking Generator Output 5. Connecting Electrical Loads (Portable Power Generation) 6. Stopping the Engine 7. Storage & Exercise of Generator Each of these procedures is discussed in detail below: 1. General safety rules for operation Before starting the generator, review the following general safety rules for operation: WARNING: Failure to follow safety rules may result in serious injury or death to the operator or bystanders. Know proper use/how to stop. Be thoroughly familiar with proper use of the equipment and all generator controls, output receptacles, and connections. Know how to stop the generator quickly if needed (see Operation, Step 6 - Stopping the Engine ). Instruct operators. The generator owner must instruct all operators in safe generator set-up and operation. Only trained adults should set up and operate the generator DO NOT let children operate. Intended use. Carefully read about and understand the intended use of this generator. DO NOT use for other purposes, as unforeseen hazards or equipment damage may result. Under the influence. Never operate, or let anyone else operate, the generator while under the influence of alcohol, drugs, or medication. Safety equipment / controls. DO NOT operate the generator unless all safety covers, guards, and barriers are in place and in good working order, and all controls are properly adjusted for safe operation. Damaged. DO NOT operate the generator with damaged, missing, or broken parts. Modifications. DO NOT modify the generator in any way. Modifications can create serious safety hazards and will also void the warranty. Engine speed. Never attempt to modify the engine speed setting. The engine speed is preset at 3600 RPM for safe and optimal performance of the generator. If speed needs adjusting, it must be done by factory-authorized personnel. External fuel sources. Never attempt to connect external gasoline/diesel sources in order to increase engine run time. Larger tank at pressure or higher elevation will cause gasoline to leak from carburetor during operation. Fire or explosion could result. 23
24 Operation (cont d) Malfunction during operation. Immediately turn off the generator if any of the following conditions arise during operation: o Excessive change in engine speed, slow or fast o Overheating in load connecting devices o Sparking or arcs from generator o Loss of electrical output o Receptacle damage o Engine misfire o Excessive vibration o Flame or smoke o Abnormal noise Adjusting / repairing. Always turn off generator and remove spark plug(s) or spark plug wire(s) before working on the generator to prevent accidental starting. Always discharge the capacitor before working on the generator head to prevent electrical shock. (See Maintenance & Repair section of this manual for instructions on how to do this.) Carbon monoxide poisoning. The running engine gives off carbon monoxide, a poisonous gas that can kill you. You CANNOT smell it, see it, or taste it. Follow all instructions for site selection and positioning the generator, and avoid inhaling the exhaust. If you start to feel sick, dizzy, or weak while using the generator, shut off the engine and get to fresh air RIGHT AWAY. See a doctor. You may have carbon monoxide poisoning. Other exhaust dangers. This product contains or emits chemicals known to the State of California to cause cancer, birth defects or other reproductive harm. Avoid inhalation of exhaust. Wet conditions. DO NOT operate the generator or handle any electrical equipment while standing in water, while barefoot, while hands are wet or while in the rain or snow. Electric shock may result. Ground fault circuit interrupter. Always use a ground fault circuit interrupter (GFCI) protected extension cord (or outlet, if generator is equipped) in damp or highly electrical conductive areas and on construction jobsites to prevent electrical shock. Avoid contact. Avoid contact with bare wires, terminals, connections, etc., while the unit is running. Electric shock accident. If an electric shock accident occurs, immediately shut down the source of electrical power. If this is not possible, attempt to free the victim from the live conductor. Avoid direct contact with victim. Use a nonconducting implement, such as a dry rope or board, to free the victim from the live conductor. Apply first aid and get immediate medical help. Smoking/sparks. Never smoke near the running generator, and never operate near sources of sparks or flames. Hot muffler. Never touch a hot muffler, hot exhaust manifold, or engine cooling fins. Exhaust and engine parts can be very hot and will burn you. Moving parts. Keep hands, feet, and apparel away from drive belts, fans, and other moving parts. Never remove any drive belt or fan guard while the unit is operating. Proper maintenance. Improper maintenance or failure to correct a problem before operation can cause a malfunction in which you can be seriously hurt or killed. ALWAYS perform a pre-operation inspection before each operation, and correct any problems. ALWAYS follow the inspection and maintenance recommendations and schedules in this owner s manual. 24
25 Operation (cont d) Static electricity and filling the gasoline tank: Static electricity can initiate from ungrounded gasoline tanks or containers, from flowing gasoline, and from persons carrying a static electric charge Static electricity can explosively ignite gasoline vapors that are present during the fueling process, resulting in serious burns to nearby persons. To avoid static electricity while fueling, certain steps must be followed before and during the fueling process in order to minimize and safely dissipate static charge build-up: Touch a grounded metal object before starting. Always dissipate static charge from your body before beginning the fueling process by touching a grounded metal object at a safe distance away from fuel sources. Use a portable container to fill tank. Never fill the generator s gas tank directly from the fuel pump the generator s tank is not grounded and the high velocity flow of gasoline from a fuel pump can cause static electric build-up. Use an approved portable container to transfer gasoline to the generator s tank. Fill container on the ground. Never fill the portable gas container while it is sitting inside a vehicle, trailer, trunk, or pick-up truck bed. ALWAYS place container on the ground to be filled. Keep nozzle in contact with container. Keep nozzle in contact with the portable container at all times while filling. Manually control the flow of gasoline; DO NOT use the nozzle s lock-open device. Use a portable container made of metal or conductive plastic. It will dissipate the charge to ground more readily. About static electricity and fueling Many common objects can accumulate and retain a static electric charge. Objects made of non-conductive materials (e.g. plastics) easily accumulate and retain static electric charge, as can objects made of conductive material (e.g. metal, water) if they are not electrically grounded. The static electric charge on an object, such as a human body or plastic fuel tank/container, can reach as high as several thousand volts! A static electric spark can be generated if the static electric charge stored on an object jumps to another, less charged object. Such a spark can ignite invisible gasoline vapors that are present during fueling situations. Typical sources of static electric hazards during fueling The following objects can accumulate a static electric charge and cause an ignition spark in typical fueling situations: 1. Ungrounded tanks/containers. Any ungrounded fuel tank or container can accumulate a static electric charge as a result of contact with other objects or friction during transportation. This static electricity can discharge as a spark to the grounded gasoline dispenser nozzle, as the nozzle is first brought close to the tank/container at the beginning of the fueling process. 2. Flowing gasoline. Most people are not aware that gasoline accumulates static electric charge while flowing through a hose or pipe. This charge then transfers to and accumulates in the gas tank or container that is being filled. The total amount of charge accumulation depends on the amount of gas pumped into the container, the speed with which it is pumped, and whether or not the tank/container is grounded. If sufficient static electric charge accumulates in the fuel tank or container during the fueling process, the tank/container may discharge a spark to the grounded gasoline dispenser nozzle. 3. Persons. A person dispensing the gasoline can carry a static electric charge on their body, typically resulting from contact with their car seat or electronics. The static electricity can discharge as a spark between that person s hand and either the grounded dispenser nozzle or the fuel tank opening. 25

26 Position generator Ground generator Operation (cont d) 2. Preparing for Operation Position generator in accordance with the instructions given in Installation & Initial Set-up, Step 4: Select a Suitable Site of this manual. Operate outside only, on dry, level ground with adequate clearance and ventilation. WARNING: Carbon monoxide poisoning hazard Generators give off carbon monoxide exhaust, a poisonous gas that can kill. You CANNOT smell it, see it, or taste it. ONLY run generator OUTDOORS and away from air intakes. NEVER run generator inside any enclosed or semi-enclosed spaces, including homes, garages, basements, sheds, boxes, pick-up truck beds, RVs, or boats. These spaces can trap poisonous gases, EVEN if you run a fan or open windows. Carbon monoxide exhaust is given off whether you are using gasoline, natural gas, or propane to power the generator. Make sure the generator is grounded in accordance with instruction given in Installation & Initial Set-up, Step 5: Grounding the Generator of this manual. WARNING: Electric shock hazard Always ensure generator is properly grounded to prevent electrical shock. Perform scheduled maintenance as needed Check/add oil Make sure that any regular maintenance has been performed as prescribed in this manual in the Maintenance & Repair section. 1. Refer to the engine section of this manual for engine maintenance instructions. 2. Make sure battery is charged. Charge as needed according to your battery manufacturer s instructions. Check the oil level and add oil as needed. Using a funnel, add oil up to the bottom lip of the oil fill neck with the recommended oil. (See engine section for oil type and capacity, and more detailed oil check/fill instructions.) WARNING: Burn hazard Never open oil port while engine is running. Hot oil can spray over face and body. Notes: Low oil shutdown feature prevents the generator from starting without sufficient oil. Engine is shipped without oil. You must add oil before first use. IMPORTANT: Under long, continuous-run operating conditions, be prepared to: Check engine oil level every time you refuel the engine. Change oil after the first 20 operating hours, and at least every 100 operating hours thereafter, or as directed in engine section of this manual. 26


27 Check/fill gasoline tank Operation (cont d) Check the gasoline level in the generator s tank using the fuel gauge. If needed, fill tank with fresh UNLEADED gasoline from a portable container, after first reading the warnings and instructions below. WARNING: Gasoline fire/explosion hazard Gasoline is highly flammable and explosive. Heat, sparks, and flames can ignite gasoline vapors, which can become widespread during fueling. A flash fire and/or explosion could result and cause serious injury or death. Use extreme care when handling gasoline. Carefully follow all the instructions in this section to avoid the following conditions which could result in gasoline ignition: gas vapor collection inside enclosures static electric sparks sparks from electric wiring, batteries, or running engines sources of heat (such as a hot engine or exhaust) open flames, including pilot lights 1. Before starting, review the following general safety precautions for fueling: a. Never pump gasoline directly into the generator s gas tank at a gas station high velocity flow from the pump could result in a static electric build-up in the generator s tank. Always use a portable container to fill the tank. See warning section about static electric spark hazards below. b. Fill gasoline tank OUTDOORS never indoors. c. Stay away from all sources of heat, sparks, and flames. DO NOT smoke. d. DO NOT use fuel containing more than 10% Ethanol. 2. Turn generator engine off and allow to cool for at least two minutes before removing gas cap. Note: A running or still-hot engine is hot enough to ignite fuel. 3. Remove generator gasoline cap. 4. Add gasoline through the fill opening: - Use only a UL-listed portable gasoline container to transfer the gasoline to the generator s tank. Follow the safety warning and instructions below to avoiding static electric sparking. - DO NOT overfill the gasoline tank. Allow at least 1/2 inch of empty space below the fill neck to allow for fuel expansion. Fuel Gauge 27
28 Operation (cont d) Inspect fuel system / check for leaks Personal protection WARNING: Static electric spark hazard A static electric spark can explosively ignite gasoline vapor, resulting in a flash fire that could cause serious injury or death. To avoid static electric sparking while filling the gasoline tank, the following steps must be followed to minimize and safely dissipate static electric charge buildup before and during the fueling process: Always dissipate static charge from your body before beginning the fueling process by touching a grounded metal object at a safe distance from fuel sources. Never fill the generator s gas tank directly from the fuel pump the generator s tank is not grounded and high velocity flow from the pump can cause static electricity build-up. Use an approved portable container to transfer gas to the generator s tank. Never fill the portable gas container while it is sitting inside a vehicle, trailer, trunk, or pick-up truck bed. ALWAYS place container on the ground to be filled. Keep nozzle in contact with portable container while filling. Manually control the flow of gasoline; DO NOT use the nozzle s lock-open device. A portable container made of metal or conductive plastic is preferred because it dissipates charge to ground more readily. 5. Clean up gasoline spills /splashes immediately. a) If possible, move the generator away from spilled gasoline on the ground. b) Wipe up spilled gasoline, and wait 5 minutes for excess gasoline to evaporate before starting engine. c) Gasoline soaked rags are flammable and should be disposed of properly. d) If gasoline is spilled on your skin or clothes, change clothes and wash skin immediately. 6. Replace gasoline cap securely before starting engine. 7. Store extra gasoline in a cool, dry place in an UL-listed, tightly sealed container. IMPORTANT: For continuous operation, be prepared to check and refuel the engine on a regular basis. A tank of gasoline should last about 8.5 hours under 50% load. Inspect fuel system & check for leaks BEFORE starting generator. DO NOT start generator until all needed repairs have been completed. 1. Hearing can be damaged from prolonged, close-range exposure to the type of noise produced by this generator. The use of ear plugs or other hearing protection device is recommended for persons working within feet of the running generator for an extended period of time. 2. Loose or dangling apparel can become entangled in moving parts. Metal jewelry can conduct electricity. Never wear jewelry or loose-fitting clothing when starting or operating the generator. 28
29 Operation (cont d) 3. Starting the Engine After you have completed the pre-start checklist procedures, you are ready to start the engine. To start the engine: 1) Disconnect all loads to the generator. 2) Turn the gasoline line valve to the ON position. 3) For cold engine, move choke lever to full choke position. To restart a warm engine, move choke lever to half choke or to RUN position. 4) Start the engine: a) Using electric start i) Turn the engine key switch to the START position and hold it there until the engine starts. NOTE: If the engine fails to start after 5 seconds, release key and wait 10 seconds before attempting to start again. Cranking the electric starter for more than 5 seconds continuously can overheat and damage the starter motor. ii) Release the key when the engine starts. b) Using recoil start i) Turn the engine key switch to the ON position. ii) Pull the starter grip lightly until you feel resistance, then pull the starter cord out briskly and rapidly. iii) Allow starter cord to return slowly. 5) When engine starts, move choke lever to RUN position. 6) Under long, continuous-run operating conditions, be prepared to: a) Check and refuel the engine on a regular basis. A tank of gas should last about 8.5 hours under 50% load. WARNING: A running engine is hot enough to ignite fuel. Never add fuel or remove gas cap if engine is running or still hot. Let cool at least 2 minutes. b) Check engine oil level each time you refuel. c) Change oil after the first 20 operating hours, and at least every 100 operating hours thereafter, as directed in the engine owner s manual. WARNING: Never open oil port while engine is running. Hot oil can spray over face and body. 29
30 Operation (cont d) 4. Checking Generator Output Although the speed of the engine was carefully adjusted at the factory so that the generator produces the proper voltage and frequency, output voltage should be checked periodically to ensure the generator is working properly before connecting loads to the generator. WARNING: The generator must be run at the correct speed in order to produce the proper electrical voltage and frequency. Failure to do so could result in damage to equipment powered by the generator and possible injury to the individual. Output voltage can be checked at the voltmeter on the control panel or can be checked with a portable voltage meter: 1. Start engine and allow to warm up for 5 minutes. DO NOT connect any loads. 2. Use data meter on control panel to check generator output or use a voltage meter to check output voltage at the generator s outlets/receptacles. 3. Measured voltage should be within the following ranges: a) 120V +/- 10% at 120V receptacles. b) 240V +/- 10% at 240V receptacles. 4. If measured voltage is not within the specified range, have generator adjusted by factory authorized personnel. DO NOT attempt to adjust the engine speed yourself. Note: Slight variation in voltage/speed with changing electrical loads All engines have a tendency to slow down when a load is applied. When electrical loads are connected to the generator, the engine is more heavily loaded and as a result the speed drops slightly. This slight decrease in speed, together with the voltage drop within the generator itself, results in a slightly lower voltage when the generator is loaded to its full capacity than when it is running with no load. Additionally, there may be small brief surges and drops in voltage as motors connected to the generator cycle on or off. The slight variation has no appreciable effect in the operation of motors, lights, and most appliances. 30
31 Operation (cont d) 5. Connecting Electrical Loads You will want to be careful when connecting loads so as not to overload the generator, especially if you are powering devices with motors that require a higher starting power load. Instructions are provided below for connecting loads when you are using the generator: As a portable power source Connected to a building as a back-up power source WARNING: DONOT overload generator. Make sure that combined starting and running loads do not exceed rated capacity of generator. Overloading the generator can cause damage to the generator and attached electrical devices, and may result in fire. Using as a portable power source Using as a back-up power source for a building Connect electrical loads one at a time according to the following instructions: 1. Allow engine to reach operating speed by allowing it to warm up for approximately 5 minutes before connecting electrical devices. 2. After engine is warmed up, begin by connecting the items that require the highest wattage first. The recommended sequence is as follows: a) Connect items with motors such as refrigerators, freezers, air conditioners, or small hand tools, one at a time. Let each motor stabilize before connecting the next device. b) Connect any lights you are planning on powering. Connect voltage sensitive equipment such as electronics via surge protectors. Plug devices such as TV s, computers, and microwaves into a UL listed voltage surge protector, then plug the surge protector into the generator. Each transfer switch installation will be unique. Proper instructions for how to safely bring the generator online with the building s electrical system should be provided by the installing electrician, who should also provide personal instruction to the owner/operator. Failure to follow the proper procedure as provided by the electrician could expose persons to the hazards noted above. 6. Stopping the Engine Stop the engine using the following steps: 1. Disconnect all loads to the generator. 2. Turn engine key switch to OFF position. 3. Turn gasoline line shut-off valve to OFF position. Remove key from starter to prevent accidental starting of engine. WARNING: Let generator cool for at least five minutes before moving or storing. A hot generator can be a fire hazard. Generator and engine surface temperature is still hot after shutdown. 31
32 Operation (cont d) 7. Storage & Exercise When you are finished using the generator, you must: Disconnect all loads Shut off fuel supply Store the generator properly Plan on exercising the engine regularly unless the generator is prepared for long-term storage Detailed instructions are provided below. Disconnect loads & turn off fuel valve Cool engine before storing Choose a storage location When you are finished using the generator, disconnect all loads and turn off fuel valve: 1. Make sure all devices that were connected to the generator s outlets have been disconnected. 2. Check to be sure fuel valve is in OFF position. Let engine cool for at least five minutes before storing. A hot engine can be a fire hazard. Store the generator in a location that is: Clean and dry Away from sources of heat, open flames, sparks, or pilot lights, even if the generator s fuel tank is empty. Residual fuel in the tank could ignite. Away from extreme high or low temperatures. Prevent accidental starting Exercise generator every 4 weeks Perform regular maintenance Note: DO NOT store with battery charger always connected. Batteries that are over-charged can boil themselves dry and produce excessive amounts of hydrogen, an explosive gas. Remove key from starter and secure key in a safe location, and/or remove spark plug(s) in order to ensure the generator cannot be started accidentally in a storage location or by untrained persons. The generator should be exercised regularly. At least every four weeks, start the engine and let it run for 10 to 15 minutes with a small load plugged in, such as a lamp or fan. Monthly exercising of the generator will: Dry out any moisture that has accumulated in the windings. If left, this moisture can cause corrosion in the winding. Ensure that the unit is operating properly should it be needed in an emergency. Perform periodic maintenance as directed in the Maintenance and Repair section of this manual to keep the generator in safe working condition. 32
33 Maintenance & Repair Inspect and maintain your generator as specified below in order to keep it in safe and optimal working order. Follow all safety rules and recommended maintenance steps. WARNING ALWAYS shut off the engine, disconnect the spark plug(s) and discharge the capacitor before cleaning, adjusting, or servicing the generator. Make sure all guards and shields are replaced before using. Note: The generator head is a brush style and requires maintenance. The bearing is a heavy-duty sealed ball bearing which requires no maintenance or lubrication. Follow safety rules Maintenance & Repair Read and follow these safety rules whenever you will be servicing the generator: Turn off generator. Always turn off generator and remove spark plug(s) or spark plug wire(s) before working on the engine or generator to prevent accidental starting. Replace guards. Make sure all guards and shields are replaced after servicing the generator. Repair. Major service, including the installation or replacement of parts, should be performed only by a qualified electrical service technician. Obtain factory approved parts from Powerhorse Product Support at Replacement parts. If a part needs replacement, only use factory approved repair parts. Replacement parts that do not meet specifications may result in a safety hazard or poor operation of the generator and will void the warranty. Transporting. Ensure the engine switch is OFF. Ensure the fuel valve is OFF. DO NOT leave generator inside an enclosed vehicle for an extended period of time and/or operate the generator while inside a vehicle. See moving and lifting instructions below. Perform engine maintenance Check receptacles Inspect fuel system / check for leaks Perform engine maintenance as specified in the Engine section of this manual. Engine maintenance items include: 1. Changing oil and oil filter 2. Air filter check/replacement 3. Spark plug cleaning and replacement 4. Fuel filter check/replacement 5. Fuel tank cleaning 6. Clean and inspect spark arrester Check receptacles before each use to make sure they are not cracked or broken. If a receptacle is cracked or otherwise damaged, DO NOT use until replaced with an authorized factory part. Using cracked or damaged receptacles can be both dangerous to the operator and destructive to the equipment. Inspect the fuel system and check for leaks on a regular basis. Inspect the entire fuel system. Look for: signs of leaks or deterioration, chafed or spongy fuel hose, loose connections, loose or missing fuel hose clamps, damaged gasoline tank, or defective gasoline shut-off valve. 33

34 Maintenance & Repair (cont d) Keep generator clean Recharge and maintain battery (if electric start) Moving and lifting generator Keep generator clean. If dust or debris accumulates on the generator, clean the generator with a damp cloth or soft bristle brush. DO NOT allow air intakes to become blocked. Note: DO NOT spray generator with a garden hose or pressure washer. Water may enter the generator and cause damage to the rotor, stator, or internal windings. Inspect, recharge, and maintain your battery according to your battery manufacturer s instructions. (Only for those models equipped with electric start.) DO NOT store with battery charger always connected. Batteries that are overcharged can boil themselves dry and produce excessive amounts of hydrogen, an explosive gas. Moving: The wheel kit and handle provide an easy method for moving the generator. Pivot the handle up and secure using the handle pin. Lift recoil end of generator to roll generator towards desired location. WARNING: The generator is heavy. You can be injured when trying to lift it without assistance. It can crush and cause serious injury if it drops on someone. Follow the instructions below for safely lifting the generator. Lifting: To reduce risk of injury, team lift or use a hoist to elevate/lower the generator. Secure appropriately sized lifting chains and/or tie straps to the generator. IMPORTANT: If a part needs replacement, only use parts that meet the manufacturer s specifications. Replacement parts that do not meet specifications may result in a safety hazard or poor operation of the generator. Contact Powerhorse Product Support at for any questions, problems, or parts orders. 34
35 Troubleshooting TROUBLESHOOTING Problem Possible Causes Possible Remedies Engine will not start. a) Low oil level. b) Fouled spark plug. c) Out of fuel. d) Engine switch in OFF position. e) Fuel valve in OFF position. f) Choke is in OPEN position. g) Battery not charged. h) Bad fuel. i) Fuel filter restricted. j) Carburetor malfunctioning. k) Ignition malfunctioning. l) Inlet and Outlet valves stuck. a) Fill crankcase to proper oil level. b) Clean or replace spark plug. c) Fill fuel tank. d) Place engine switch in ON position. e) Turn fuel valve to ON position. f) Move choke lever to CLOSED (cold engine only) g) Recharge battery. h) Drain fuel and refuel. i) Clean or replace filter. j) Clean or replace carburetor. k) Replace ignition switch. l) Check and adjust valve clearance. Voltage too low. a) Engine speed too slow. b) Generator is overloaded. a) Bring generator to a qualified technician for adjustment. b) Reduce the load.(see Power Load Planning & Mgt. section of this manual.) Circuit breaker trips. a) Defective load connected to generator. b) Defective receptacle. c) Generator overloaded. a) Disconnect load. b) Replace receptacle. c) Reduce the load.(see Power Load Planning & Mgt. section of this manual.) Voltage too high. a) Engine speed too high. a) Bring generator to a qualified technician for adjustment. Generator overheating. a) Generator is overloaded. b) Insufficient ventilation. a) Reduce the load.(see Power Load Planning & Mgt. section of this manual.) b) Make sure there is at least 7 feet of clearance on all sides of generator. No output voltage. Engine lacks power. Engine shuts down during operation. a) Defective load connected to generator. b) Broken or loose wire. c) Defective receptacle. d) Defective stator. e) Defective rotor. f) Circuit breaker tripped. a) Generator is overloaded. b) Dirty air filter. c) Bad fuel. d) Fuel filter restricted. e) Carburetor malfunctioning. f) Ignition malfunctioning. g) Inlet and Outlet valves stuck. h) Spark arrester clogged. a) Out of fuel. b) Low oil level. a) Disconnect load. b) Bring generator to a qualified technician for repair. c) Replace receptacle. d) Bring generator to a qualified technician for repair. e) Bring generator to a qualified technician for repair. f) Reset circuit breaker and reduce loads connected to the generator. a) Reduce the load.(see Power Load Planning & Mgt. section of this manual.) b) Clean or replace air filter. c) Drain fuel and refuel. d) Clean or replace filter. e) Clean or replace carburetor. f) Replace ignition switch. g) Check and adjust valve clearance. h) Clean screen or replace spark arrester. a) Fill fuel tank. b) Fill crankcase to proper oil level. 35
36 Summary of Important Safety Information for Operation This section provides a summary of the various safety procedures and measures that have been presented throughout the manual. Keep this summary handy and refer to it to refresh your memory about how to safely use your generator. WARNING Carefully read and make sure you understand the following safety information before using the generator. Improper use or maintenance of the generator can result in serious injury or death from carbon monoxide poisoning, electric shock, fire/explosion, or burns. General Read manual. Read this Owner s Manual and the engine Owner s Manual completely before attempting to set-up and use the generator. Serious injury or death can result if safety instructions are not followed. Instruct operators. The generator owner must instruct all operators in safe generator set-up and operation. DO NOT allow anyone to operate the generator who has not read the Owner s Manual and been instructed on its safe use. Adults only. Only trained adults should set up and operate the generator. DO NOT let children operate. Under the influence. Never operate, or let anyone else operate, the generator while under the influence of alcohol, drugs, or medication. Intended use. Carefully read about and understand the intended use of this generator. DO NOT use for other purposes, as unforeseen hazards or equipment damage may result. Prohibition Against Modifications Never modify or alter the generator in any way. Modifications can create serious safety hazards and will also void the warranty. Engine speed. Never attempt to modify the engine speed setting. The engine speed is preset at 3600 RPM for safe and optimal performance of the generator. If speed needs adjusting, it must be done by factory-authorized personnel. Fuel/exhaust system. Never modify the exhaust system, fuel tanks, or fuel lines. Carbon monoxide poisoning, fire, or explosion could result. Guards. DO NOT operate generator unless all guards and cover shields, which prevent access to moving parts and pinch points, are in place. Failure to guard the power transmission mechanisms may result in serious injury or death. Safety Installation & Set-up Installation / Initial Set-up Safety Dry, level surface. Situate generator on a dry, firm, level surface. Ensure generator sits level and will not slide or shift during operation. Block wheels if applicable. Operate OUTSIDE only dangerous carbon monoxide exhaust! Generators give off carbon monoxide exhaust, a poisonous gas that can kill. You CANNOT smell it, see it, or taste it. ONLY run generator OUTDOORS and away from building air intakes. NEVER run generator inside homes, garages, sheds, or other semi-enclosed spaces. These spaces can trap poisonous gases, EVEN if you run a fan or open windows. Carbon monoxide is given off whether you are using gasoline, natural gas, or propane to power the generator. No vehicle/marine use. This generator is NOT designed or approved for use in vehicles or marine applications. Never run the generator inside RVs or other vehicles, on boats, or on pick-up truck beds. Cooling ventilation. The generator needs adequate, unobstructed flow of air to allow for proper cooling of engine and generator head. Situate so there is adequate clearance around generator to allow for cooling airflow. DO NOT allow debris to accumulate and block airflow. Grounding. Always ensure generator is properly grounded to prevent electrical shock. This generator is equipped with a grounding post. Always complete the grounding path from the generator to a copper pipe/rod driven into moist earth to a sufficient depth. Check with an electrician for local grounding requirements. If a licensed electrician installs the generator with a connection to your building s electrical circuit for use as a standby power system, grounding will be complete through the building s grounding system. Isolate connection to building s electrical circuit. Never plug the generator directly into a wall outlet. ANY connection to a building s electrical system MUST ISOLATE THE GENERATOR FROM UTILITY POWER via an UL-listed transfer 36
37 Summary of Important Safety Information for Operation (cont d) switch installed by a licensed electrician in compliance with all applicable local building and electrical codes. If the generator is not isolated from the utility power system by such means, generator output will back feed into the utility power grid. This may result in injury or death to utility power workers or others who contact the lines during a power outage. It may also cause the generator to explode or cause fires when utility power is restored. Wet conditions. Water conducts electricity. DO NOT operate generator where it is wet. Operate on a dry surface under an open, canopy-like structure. CO alarms. Ensure that working, battery-operated or battery back-up carbon monoxide alarms are used in any dwelling/structure that is in close proximity to the running generator. Hot exhaust - fires. Exhaust from engine can be extremely hot and cause fire. Position muffler at least 7 feet from combustible objects during operation. Spark arrester. Equip engine with a spark arrester if generator will be used near any ignitable forest, brush, or grassy land. See the Specifications section of this manual to determine if your generator is already equipped. Make sure you comply with applicable local, state and federal codes. Fire extinguisher. Keep a fire extinguisher rated ABC by the National Fire Protection Association nearby. Keep it properly charged and be familiar with its use. Safety Before Use Know how to operate Review safety rules. Before each use of this generator, review the Rules for Safe Operation. Failure to follow these rules may result in serious injury or death. Know how to operate. Be thoroughly familiar with all controls and with the proper use of the equipment. Know how to stop the generator quickly if needed. Personal protective equipment Hearing protection. The use of ear plugs or other hearing protection device is recommended for those in close proximity to the generator while it is operating. Loose / dangling. Loose or dangling apparel can become entangled in moving parts. Metal jewelry can conduct electricity. Never wear jewelry or loose-fitting clothing when operating the generator. Gasoline Safety Gasoline is highly flammable and explosive. You can be burned or seriously injured when handling fuel. Use extreme care when handling: Fuel outdoors. Fill fuel tank outdoors never indoors. Gasoline vapors can ignite if they collect inside an enclosure. Explosion can result. Use approved container. Never pump fuel directly into engine at gas station. Static charge can build and ignite fuel. Use an UL approved fuel container to transfer gas to the engine. Running / hot engine. A running engine is hot enough to ignite fuel. Never add fuel or remove gas cap if engine is running or still hot. Stop the engine and allow to cool at least two minutes before adding fuel. Heat / flames / sparks. Stay away from sources of heat, flame, or sparks while adding fuel. Don t overfill. DO NOT overfill the gas tank. Allow at least 1/2 inch of empty space below the fill neck to allow for fuel expansion. Replace cap. Replace gas cap securely before starting engine. Spills. Clean up fuel spills immediately. Move generator away from spilled fuel on the ground. Wipe fuel off engine and wait 5 minutes for excess fuel to evaporate before starting engine. Gas soaked rags should be disposed of properly. On skin / clothes. If gasoline is spilled on your skin or clothes, change clothes and wash skin immediately. Inspect fuel system. Check fuel system on a regular basis. Look for signs of leaks, deterioration, chafed or spongy fuel hose, loose or missing fuel hose clamps, damaged fuel tank, or a defective fuel shut-off valve. DO NOT start generator until needed repairs have been completed. Gasoline storage. Store gasoline in a cool, dry place in an UL-listed, tightly sealed container. 37
38 Summary of Important Safety Information for Operation (cont d) Safety During Use Safety equipment / controls. Always operate the generator with all safety covers, guards, and barriers in place and in good working order, and all controls properly adjusted for safe operation. Know how to stop. Be thoroughly familiar with proper use of the equipment and all generator controls, output receptacles, and connections. Know how to stop the generator quickly if needed. Damaged. DO NOT operate the generator with damaged, missing, or broken parts. Carbon monoxide exhaust. The running engine gives off carbon monoxide, a poisonous gas that can kill you. You CANNOT smell it, see it, or taste it. If you start to feel sick, dizzy, or weak while using the generator, shut off the engine and get to fresh air RIGHT AWAY. See a doctor. You may have carbon monoxide poisoning. Smoking/sparks. Never smoke near the running generator, and never operate near sources of sparks or flames. Check output voltage. Check output voltage to ensure the generator is working properly before connecting loads to the generator. Failure to do so could result in damage to equipment powered by the generator and possible injury to the individual. DO NOT adjust output speed of engine to change voltage. If voltage is not within specified range, have generator repaired by factory-authorized personnel. Stabilize before connecting loads. Start generator and let engine stabilize before connecting electrical loads. DO NOT overload. DO NOT overload the generator. Make sure that combined starting and running loads do not exceed rated capacity of generator or damage will result. Protect sensitive electronics. Some electronic equipment, such as computers and audio/video equipment, can be damaged by small fluctuations in the flow of power. Use a surge suppressor for any voltage-sensitive electronic equipment you will be powering with the generator. Wet conditions. DO NOT operate the generator or handle any electrical equipment while standing in water, while barefoot, while hands are wet or while in the rain or snow. Electric shock may result. Ground fault circuit interrupter. Always use a ground fault circuit interrupter (GFCI) protected extension cord (or outlet, if generator is equipped) in damp or highly electrical conductive areas and on construction jobsites to prevent electrical shock. Electrical cords. Use only UL-listed, outdoor-rated, three prong extension cords of the proper size. All extension and appliance cords must be in good condition and not worn, bare, frayed, or otherwise damaged. Use of inadequate or damaged electric cords can cause electric shock or fire. Avoid contact. Avoid contact with bare wires, terminals, connections, etc. while the unit is running. Electric shock accident. If an electric shock accident occurs, immediately shut down the source of electrical power. If this is not possible, attempt to free the victim from the live conductor. Avoid direct contact with victim. Use a nonconducting implement, such as a dry rope or board, to free the victim from the live conductor. Apply first aid and get immediate medical help. Hot muffler. Never touch hot muffler, hot exhaust manifold, or engine cooling fins. Exhaust and engine parts can be very hot and will burn you. Moving parts. Keep hands, feet, and apparel away from drive belts, fans, and other moving parts. Never remove any drive belt or fan guard while the unit is operating. Refueling. DO NOT refuel the engine until it has cooled at least two minutes. Malfunction during operation. Immediately turn off the generator if any of the following conditions arise during operation: o Excessive change in engine speed, slow or fast o Overheating in load connecting devices o Sparking or arcs from generator o Loss of electrical output o Receptacle damage o Engine misfire o Excessive vibration o Flame or smoke o Abnormal noise Adjusting / repairing. Always turn off generator and remove spark plug(s) or spark plug wire(s) before working on the generator to prevent accidental starting. 38
39 Summary of Important Safety Information for Operation (cont d) Safety After use Cool engine before storing. Let engine cool for at least five minutes before storing. A hot engine can be a fire hazard. Shut off fuel supply. Make sure gasoline shut-off valve is in the OFF position. Prevent accidental starting. When generator is not in use, remove key from starter (key start engines) and secure in a safe location, or remove spark plug(s) in order to ensure that generator cannot be started in a storage location or by untrained persons. Storage location. Store the generator in a dry location away from sources of heat, open flames, sparks or pilot lights such as water heaters, space heaters, furnaces, clothes dryers, or other gas appliances EVEN IF the generator s gas tank is empty. Residual gasoline could ignite. Exercise regularly. Exercise generator every four weeks to dry out moisture that accumulates in the windings. If generator cannot be exercised on a regular basis, prepare generator for long term storage. Periodic maintenance. Perform periodic maintenance as directed in this manual to keep the generator in safe working condition. Safety - Inspection/Maintenance Inspect and maintain your generator on a regular basis and repair as needed to keep it in safe working condition: Turn off generator. Always turn off generator and remove spark plug(s) or spark plug wire(s) before working on the engine or generator to prevent accidental starting. Discharge capacitor. When the generator is shut down, the capacitor may maintain a charge. Always discharge the capacitor before working on the generator head to prevent electrical shock. Replace guards / shields. Make sure all guards and shields are replaced after servicing the generator. Replacement parts. If a part needs replacement, only use parts that meet the manufacturer s specifications. Replacement parts that do not meet specifications may result in a safety hazard or poor operation of the generator and will void the warranty. 39

40 Engine WARNING BEFORE operating the engine, be sure to read this section of the manual, otherwise injury to personnel or damage to equipment may occur. Engine starting components 1. Fuel Valve When the fuel valve is in the ON position, fuel is allowed to flow from the fuel tank to the carburetor. Be sure to return the fuel valve to the OFF position after stopping the engine. 2. Choke Lever The choke is used to provide an enriched fuel mixture when starting a cold engine. It can be opened and closed by operating the choke lever manually. Move choke lever to the left toward CLOSED to enrich the mixture for cold starting. 3. Engine Switch/Engine Key Switch (Electric Start Models Only) Turn the switch ON, and pull recoil or turn engine switch to START (for electric start models) to run the engine. To stop the engine, turn the switch OFF. 4. Recoil To start the engine, pull the starter rope lightly until resistance is felt, then pull briskly Displacement 457 Starting Type Electric Start Ignition Type Transistorized Magneto Ignition Lubricating Type Splash Model 457cc Spark Plug Gap 0.7 ~ 0.8mm (0.028 ~ 0.03in) Spark Plug Torque 20-30N.m Intake Valve Clearance 0.08 ~ 0.12mm (0.003 ~ 0.005in) Exhaust Valve Clearance 0.13 ~ 0.17mm (0.005 ~ 0.007in) WARNING: Improper maintenance or failure to correct a problem before operation can cause a malfunction in which you can be seriously hurt or killed. ALWAYS follow the inspection and maintenance recommendations and schedules in this manual. 40

41 Engine (cont d) Maintenance schedule Engine oil recommendations REGULAR SERVICE PERIOD Before each use First month or 20 Hrs. Every 3 months or 50 Hrs. Every 6 months or 100 Hrs. Every year or 300 Hrs. Engine oil Check level Change Check Air filter Clean (1) Replace Fuel Valve Sediment cup Clean Spark plug Check-adjust Replace Spark arrester Clean Idle speed Check-adjust (2) Valve (2) Check-adjust clearance Cylinder head Clean After every 500Hrs. (2) Fuel tank and filter Clean Every 2 years (Replace if necessary) (2) Fuel tube Check Every 2 years (Replace if necessary) (2) (1) Service more frequently when used in dusty areas. (2) These items should be serviced by an authorized generator service center, unless the owner has the proper tools and is mechanically proficient. CAUTION: Engine damage The generator has been shipped WITHOUT oil. Any attempt to start generator without oil may result in engine damage and failure. Engine oil is a key factor in deciding the engine s performance. DO NOT use engine oil with additives or 2-stroke gasoline oil, as they do not lubricate properly, which may shorten the engine s service life. Check the engine oil level with the generator stopped on a level ground. Due to viscosity variances with regions and temperatures select the correct type of oil using the chart below. Engine oil recommended: SAE10W-30 41

42 Oil draining, and checking oil level Engine (cont d) WARNING: Burn hazard Never open oil port while engine is running. Hot oil can spray over face and body. 1. Operate the generator for 3 to 5 minutes to thin oil for easier draining. 2. Ensure that the engine is stopped and on a level surface. 3. Remove the drain bolt and washer; drain the oil into an approved container. Drain Bolt Dipstick Spark plug removal, cleaning and replacement 4. Reinstall washer and drain bolt. 5. Remove the dipstick and clean it. 6. Fill crankcase with oil to the bottom lip of the oil filler neck. 7. Reinsert the dipstick into the oil filler without threading in, and check oil level. If the oil level is too low, add recommended engine oil to the oil filler neck. 8. Reinstall the dipstick. Proper spark plug clearance ensures the engine s normal running. a) Remove the spark plug cap. b) Remove the spark plug using the supplied spark plug wrench mm ( in) WARNING Be careful not to touch the muffler during or just after the engine has been running. c) Clean the spark plug with a steel brush. If the insulator is damaged, replace the spark plug. d) Measure the spark plug clearance with a feeler. The clearance should be mm. If adjustment is necessary, bend the side electrode carefully. e) Check if the spark plug gasket is in good conditions, or replace with a new one. Screw on the spark plug to the bottom first by hand and then tighten it up by a spark plug wrench. If a new spark plug is used, twist 1/2 more turns after impacting the gasket; if reinstall the original one, just twist 1/8-1/4 more turns. 42
Owner s Manual M750140B
 Owner s Manual M750140B ITEM NUMBER: 750140 SERIAL NUMBER: Instructions for Installation/Set-up, Operation, Servicing, & Storage Portable, Outdoor Use-Only, Gasoline Generator 750140 5,500 Watt Continuous
Owner s Manual M750134B
 Owner s Manual M750134B ITEM NUMBER: 750134 SERIAL NUMBER: Instructions for Installation/Set-up, Operation, Servicing, & Storage Portable, Outdoor Use-Only, Dual Fuel Generator Can be used to power individual
Owner s Manual M166112B.1
 Owner s Manual M166112B.1 ITEM NUMBER: 166112 SERIAL NUMBER: Instructions for Installation/Set-up, Operation, Servicing, & Storage Portable, Outdoor Use-Only, Gasoline Generator 166112-3100 Watt Continuous
Owner s Manual Instructions for Installation/Set-up, Operation, Servicing, and Storage
 M165165A.2 Owner s Manual Instructions for Installation/Set-up, Operation, Servicing, and Storage Portable, Outdoor Use-Only, Industrial Diesel Generator 6,120 Watt Continuous (6,500 Watt Surge) Capacity
CHOOSE THE RIGHT GENERATOR FOR YOUR NEEDS.
 M165925U Owner s Manual Instructions for Installation/Set-up, Operation, Servicing, & Storage Portable, Outdoor Use-Only, Gasoline Generator 13,500 Watt Continuous (15,000 Watt Surge) Capacity Can be used
Owner s Manual Instructions for Installation/Set-up, Operation, Servicing, & Storage
 M165957N Owner s Manual Instructions for Installation/Set-up, Operation, Servicing, & Storage Portable, Outdoor Use-Only, Gasoline Generator 6600 Watt Continuous (8000 Watt Surge) Capacity Can be used
Owner s Manual Instructions for Installation/Set-up, Operation, Servicing, & Storage Portable, Outdoor Use-Only, Gasoline Generator
 M165601P.6 Owner s Manual Instructions for Installation/Set-up, Operation, Servicing, & Storage Portable, Outdoor Use-Only, Gasoline Generator Can be used to power individual appliances plugged directly
CHOOSE THE RIGHT GENERATOR FOR YOUR NEEDS.
 M165914W Owner s Manual Instructions for Installation/Set-up, Operation, Servicing, & Storage Portable, Outdoor Use-Only, Gasoline Generator 6,600 Watt Continuous (8,000 Watt Surge) Capacity Can be used
Owner s Manual Instructions for Installation/Set-up, Operation, Servicing, & Storage
 Owner s Manual Instructions for Installation/Set-up, Operation, Servicing, & Storage Portable Outdoor Use-Only, Direct-Driven Replacement Generator 1659200-3,000 Watt Continuous (3,500 Watt Surge) Capacity
8500M INDUSTRIAL GASOLINE GENERATOR OPERATOR S MANUAL
 8500M INDUSTRIAL GASOLINE GENERATOR OPERATOR S MANUAL IT IS EXTREMELY IMPORTANT TO READ AND UNDERSTAND THE ENTIRE CONTENTS OF THIS OPERATOR S MANUAL BEFORE ATTEMPTING TO OPERATE THE PRODUCT. THIS EQUIPMENT
9000RC INDUSTRIAL GASOLINE GENERATOR OPERATOR S MANUAL
 9000RC INDUSTRIAL GASOLINE GENERATOR OPERATOR S MANUAL IT IS EXTREMELY IMPORTANT TO READ AND UNDERSTAND THE ENTIRE CONTENTS OF THIS OPERATOR S MANUAL BEFORE ATTEMPTING TO OPERATE THE PRODUCT. THIS EQUIPMENT
CHOOSE THE RIGHT GENERATOR FOR YOUR NEEDS.
 M165939M.2 Owner s Manual Instructions for Installation/Set-up, Operation, Servicing, & Storage Portable, Outdoor Use-Only, Triple Fuel Generator 10,500 Watt Continuous (13,000 Watt Surge) Capacity Can
9500M. WARNING American Fab of SC, LLC Travelers Rest, SC OPERATOR S MANUAL INDUSTRIAL GASOLINE GENERATOR
 9500M INDUSTRIAL GASOLINE GENERATOR OPERATOR S MANUAL WARNING American Fab of SC, LLC Travelers Rest, SC It is extremely important to read and understand the entire contents of this operator s manual before
OWNER S MANUAL Titan 6500 Industrial Generator
 P.O.Box 791, Travelers Rest, S.C. 29690 Phone 864-834-7212 Service/Replacement Parts 800-845-4141 OWNER S MANUAL Titan 6500 Industrial Generator The Emission Control System for this generator is warranted
Introduction INTRODUCTION READ THIS MANUAL THOROUGHLY GENERAL HAZARDS SAFETY RULES
 Introduction INTRODUCTION Thank you for purchasing this model by Generac Power Systems, Inc. This model is a compact, high performance, air-cooled, engine driven generator designed to supply electrical
Owner s Manual Instructions for Installation/Set-up, Operation, Servicing, & Storage
 M781692B.1 Item# 193030 Owner s Manual Instructions for Installation/Set-up, Operation, Servicing, & Storage ENGINE MUFFLER WARNING READ and UNDERSTAND this manual completely before using your muffler!
OWNER S MANUAL. MODEL IPG, ITEM # Industrial Portable Generator
 MODEL 10000 IPG, ITEM # 165922 Industrial Portable Generator Proven Performance OWNER S MANUAL M165922C Any Questions, Comments, or Problems? Call Customer Service at 1-800-270-0810 Hours: Monday - Friday
Reproduction. Not for. Wiring Diagram. Model / Modelo Mfg. No. Description / Descripción
 Wiring Diagram This generator is rated in accordance with CSA (Canadian Standards Association) standard C22.2 No. 100-94 (motor and generators). Questions? Help is just a moment away! Preguntas? La ayuda
SGB12000HX PORTABLE GENERATOR
 12KWG022004KOD PRINTED IN CANADA SGB12000HX PORTABLE GENERATOR OPERATING INSTRUCTIONS AND PARTS MANUAL John Brooks Company Limited Mississauga, Ontario L5N 7K5 12 1 Troubleshooting The majority of problems
TP300 INDUSTRIAL TRASH PUMP OPERATOR S MANUAL
 TP300 INDUSTRIAL TRASH PUMP OPERATOR S MANUAL IT IS EXTREMELY IMPORTANT TO READ AND UNDERSTAND THE ENTIRE CONTENTS OF THIS OPERATOR S MANUAL BEFORE ATTEMPTING TO OPERATE THE PRODUCT. THIS EQUIPMENT IS
Table of Contents. Safety symbols... 3 Assembly 6. Operation Maintenance Troubleshooting 11. Storage. 12. Notes. 13
 Table of Contents Safety symbols... 3 Assembly 6 Operation... 8 Maintenance... 10 Troubleshooting 11 Storage. 12 Notes. 13 2 Safety Information Attention; this machine can be dangerous! All operators should
1100W PORTABLE GENERATOR
 1100W PORTABLE GENERATOR MODEL NO: G1200 PART NO: 8010110 OPERATION & MAINTENANCE INSTRUCTIONS LS0312 INTRODUCTION Thank you for purchasing this CLARKE 1100W Portable Generator. Before attempting to use
Make/Type/Size/Model Honda Generator EB 3500X & EB5000X Operators Manual Open Well Ventilated Area to Start & Shut Down Machine
 HONDA GENERATORS ARE DESIGNED TO GIVE SAFE AND DEPENDABLE SERVICE IF OPERATED ACCORDING TO INSTRUCTIONS. YOU CAN HELP PREVENT ACCIDENTS BY BEING FAMILIAR WITH YOUR GENERATORS CONTROLS AND BY OBSERVING
operation manual Model Numbers MC3100PR MC6500ER MC9000ER
 operation manual Model Numbers MC3100PR MC6500ER MC9000ER table of contents Introduction 4 Using the Operators Manual Product Identification 5 Generator 5 Engine Safety 6 Safety Rules 6 Hazard Symbols
Model: SPTOGT01 TRACTOR PTO GENERATOR
 www.scintex.com.au sales@scintex.com.au Model: SPTOGT01 TRACTOR PTO GENERATOR SET UP, OPERATING, AND SERVICING INSTRUCTIONS Read this material before using this product. Failure to do so can result in
Owner s Manual. Original Instructions for Assembly, Testing, Operation, Servicing, and Storage
 M106470H ITEM NUMBER: 106470, 106471 SERIAL NUMBER: Owner s Manual Original Instructions for Assembly, Testing, Operation, Servicing, and Storage Water Pump: Outdoor agricultural product used for general
Owner s Manual WARNING
 Owner s Manual M750126B.2 ITEM NUMBER: 750126 SERIAL NUMBER: Instructions for Assembling, Testing, Operating, Servicing, and Storing Water Pump: Outdoor agricultural product used for general purpose water
PSJ-2212, PSJ-3612, PSJ-4424
 Model: PSJ-2212, PSJ-3612, PSJ-4424 Jump Starter and DC Power Source OWNER S MANUAL PSJ-2212 PLEASE SAVE THIS OWNER S MANUAL AND READ BEFORE EACH USE. This manual will explain how to use your jump starter
GENERAC. The Reliable Ones SE5000. Portable Generator Owner s Manual
 GENERAC The Reliable Ones SE5000 Portable Generator Owner s Manual DANGER! This generator is designed for outdoor use only. Never use this generator inside any building or enclosure including the generator
Owner s Manual M750129B.2
 Owner s Manual M750129B.2 ITEM NUMBER: 750129 SERIAL NUMBER: Instructions for Assembling, Testing, Operating, Servicing, and Storing Water Pump: Outdoor agricultural product used for general purpose water
PORTABLE INVERTER GENERATOR MODEL
 3200Watts PORTABLE INVERTER GENERATOR MODEL #104612 Operation Manual This safety alert symbol identifies important safety messages in this manual. Failure to follow this important safety information may
Owner s Manual. Original Instructions for Assembly, Testing, Operation, Servicing, and Storage
 M109161H.2 ITEM NUMBER: 109161, 109171 SERIAL NUMBER: Owner s Manual Original Instructions for Assembly, Testing, Operation, Servicing, and Storage Water Pump: Outdoor agricultural product used for general
1200W INVERTER GENERATOR
 1200W INVERTER GENERATOR MODEL NO: IG1200 PART NO: 8877070 OPERATION & MAINTENANCE INSTRUCTIONS LS0117 INTRODUCTION Thank you for purchasing this CLARKE 1200W Inverter Generator. Before attempting to use
GENERATOR MODEL NO: DG6000DVES OPERATION & MAINTENANCE INSTRUCTIONS PART NO: LS1216
 GENERATOR MODEL NO: DG6000DVES PART NO: 8675000 OPERATION & MAINTENANCE INSTRUCTIONS LS1216 INTRODUCTION Thank you for purchasing this CLARKE Generator. Before attempting to use this product, please read
PORTABLE GAS GENERATOR
 PORTABLE GAS GENERATOR User Manual BE-12000ER TABLE OF CONTENTS TABLE OF CONTENTS Introduction 4 Using the Operators Manual Product Identification 5 Generator 5 Engine Safety 6 Safety Rules 6 Hazard Symbols
PI1500X Power Inverter User s Manual
 PI1500X Power Inverter User s Manual featuring WARNING Failure to follow instructions may cause damage or explosion, always shield eyes. Read entire instruction manual before use. Warning: This product
AIR-COOLED DIESEL GENERATOR OWNERʼS MANUAL. This manual contains important safety information. TDG2500E TDGW7000E TDG7000SE TDG4500E
 AIR-COOLED DIESEL GENERATOR OWNERʼS MANUAL This manual contains important safety information. TDG2500E TDGW7000E TDG7000SE TDG4500E TDG8000-3 TDG7000SE-3 TDG7000E TDG8000E TDGW7000SE TDG7000E3 TDGW8000E
YK1900i DIGITAL INVERTER GASOLINE GENERATOR OWNER S MANUAL PLEASE READ THIS MANUAL CAREFULLY. IT CONTAINS IMPORTANT SAFETY INFORMATION.
 YK1900i DIGITAL INVERTER GASOLINE GENERATOR OWNER S MANUAL PLEASE READ THIS MANUAL CAREFULLY. IT CONTAINS IMPORTANT SAFETY INFORMATION. PREFACE Thank you for purchasing YANGKE generator. This manual covers
5625W GASOLINE GENERATOR WITH WHEEL KIT
 5625W GASOLINE GENERATOR WITH WHEEL KIT Read this manual. Do not attempt to operate this generator until you have read and understood the safety, operation, and maintenance instructions MODEL: KCG-5625G
950 Watts (104609) /1200Watts (104610) /2000Watts (104611) PORTABLE INVERTER GENERATORS. MODELS #104609, # and #
 /1200Watts (104610) /2000Watts (104611) PORTABLE INVERTER GENERATORS. MODELS #104609, # and #") 950 Watts (104609) /1200Watts (104610) /2000Watts (104611) PORTABLE INVERTER GENERATORS MODELS #104609, #104610 and #104611 Operation Manual This safety alert symbol identifies important safety messages
950 Watts (104609) /1200Watts (104610) /2000Watts (104611) PORTABLE INVERTER GENERATORS MODELS #104609, #104610 and #104611 Operation Manual This safety alert symbol identifies important safety messages
5.5KVA GENERATOR MODEL NO: PG6500DVES OPERATION & MAINTENANCE INSTRUCTIONS PART NO: LS0616
 5.5KVA GENERATOR MODEL NO: PG6500DVES PART NO: 8857810 OPERATION & MAINTENANCE INSTRUCTIONS LS0616 INTRODUCTION Thank you for purchasing this CLARKE 5.5KVA Generator. Before attempting to use this product,
PORTABLE GAS GENERATOR
 PORTABLE GAS GENERATOR User Manual BE-12000ER BEPOWEREQUIPMENT.COM TABLE OF CONTENTS Introduction 4 Using the Operators Manual Product Identification 5 Generator 5 Engine Safety 6 Safety Rules 6 Hazard
PORTABLE GAS GENERATOR
 PORTABLE GAS GENERATOR User Manual BE-12000ER BEPOWEREQUIPMENT.COM TABLE OF CONTENTS TABLE OF CONTENTS Introduction 4 Using the Operators Manual Product Identification 5 Generator 5 Engine Safety 6 Safety
4000W GASOLINE DIGITAL INvERTER GENERATOR
 04/2017 4000W GASOLINE DIGITAL INvERTER GENERATOR Read this manual. Do not attempt to operate this generator until you have read and understood the safety, operation, and maintenance instructions MODEL:
Log Splitter. Owner/Operator Manual. Models HCWP1-26
 Log Splitter Owner/Operator Manual Models HCWP1-26 SAFETY..........................2 SAFETY WARNING SYMBOL.........3 SAFETY RULES.................. 4-5 SPECIFICATIONS................. 6 CONTROLS AND FEATURES.......
Voltmaster Centrifugal Trash Pumps
 Voltmaster Centrifugal Trash Pumps Model TSP2, TSP3 and TSP4 Owner s Manual February 2011 Table of Contents 1 Introduction............................ 1 1.1 Read before using..................... 1 1.2
Propane torch. Model Assembly And Operation Instructions
 Propane torch Model 39953 Assembly And Operation Instructions Due to continuing improvements, actual product may differ slightly from the product described herein. 3491 Mission Oaks Blvd., Camarillo, CA
Operation Manual. 21 Inch Self-Propelled Lawn Mower MODEL #
 21 Inch Self-Propelled Lawn Mower MODEL # 106461 Operation Manual This safety alert symbol identifies important safety messages in this manual. Failure to follow this important safety information may result
PW2750 HOT WATER HI PRESSURE WASHER INSTRUCTION MANUAL
 4/10/2012 PW2750 HOT WATER HI PRESSURE WASHER INSTRUCTION MANUAL READ ALL INSTRUCTIONS AND WARNINGS BEFORE USING THIS PRODUCT. This manual provides important information on proper operation & maintenance.
Commercial Series Generator Operator Manual (with Kohler Command series engines)
") Commercial Series Generator Operator Manual (with Kohler Command series engines) PN: 220880 PREFACE Thank you for purchasing a Wanco Commercial Series portable generator set. This manual contains important
Commercial Series Generator Operator Manual (with Kohler Command series engines) PN: 220880 PREFACE Thank you for purchasing a Wanco Commercial Series portable generator set. This manual contains important
1/2 HP SUMP PUMP OWNER'S MANUAL
 TM 1/2 HP SUMP PUMP OWNER'S MANUAL WARNING: Read carefully and understand all INSTRUCTIONS before operating. Failure to follow the safety rules and other basic safety precautions may result in serious
GENERATOR MODEL NO: FG3000 OPERATION & MAINTENANCE INSTRUCTIONS PART NO: LS0609
 GENERATOR MODEL NO: FG3000 PART NO: 8857700 OPERATION & MAINTENANCE INSTRUCTIONS LS0609 INTRODUCTION Thank you for purchasing this CLARKE Generator. Before attempting to use this product, please read this
OPERATING AND MAINTENANCE INSTRUCTIONS. Generator Models SXA1900HX, SXA2800HX,SXB2800HX SXB4000HX, SXB5500HX(S), SXB7000HX(S)
, SXB7000HX(S)") GASOLINE POWERED PORTABLE GENERATORS OPERATING AND MAINTENANCE INSTRUCTIONS Generator Models SXA1900HX, SXA2800HX,SXB2800HX SXB4000HX, SXB5500HX(S), SXB7000HX(S) JOHN BROOKS COMPANY LIMITED TORONTO - MONTREAL
GASOLINE POWERED PORTABLE GENERATORS OPERATING AND MAINTENANCE INSTRUCTIONS Generator Models SXA1900HX, SXA2800HX,SXB2800HX SXB4000HX, SXB5500HX(S), SXB7000HX(S) JOHN BROOKS COMPANY LIMITED TORONTO - MONTREAL
KING CANADA 950W PORTABLE GENERATOR MODEL: KCG-951G INSTRUCTION MANUAL COPYRIGHT 2011 ALL RIGHTS RESERVED BY KING CANADA TOOLS INC.
 KING CANADA 950W PORTABLE GENERATOR MODEL: KCG-951G INSTRUCTION MANUAL COPYRIGHT 2011 ALL RIGHTS RESERVED BY KING CANADA TOOLS INC. WARRANTY & SERVICE INFORMATION 1-YEAR LIMITED WARRANTY FOR THIS 950W
GENERATOR MODEL NO: FG3005 OPERATION & MAINTENANCE INSTRUCTIONS PART NO: LS0413
 GENERATOR MODEL NO: FG3005 PART NO: 8857707 OPERATION & MAINTENANCE INSTRUCTIONS LS0413 INTRODUCTION Thank you for purchasing this CLARKE Generator. Before attempting to use this product, please read this
OWNERS MANUAL Models: XP400, XP500, XP750C INSTANT POWER Jump Starter and DC Power Source
 OWNERS MANUAL Models: XP400, XP500, XP750C INSTANT POWER Jump Starter and DC Power Source XP400 XP500 XP750C PLEASE SAVE THIS OWNER S MANUAL AND READ BEFORE EACH USE. This manual will explain how to use
GASOLINE GENERATOR SET SPG8000 PORTABLE GENERATOR INSTRUCTION MANUAL IMPORTANT!
 GASOLINE GENERATOR SET SPG8000 PORTABLE GENERATOR INSTRUCTION MANUAL IMPORTANT! Please make certain that persons who are to use this equipment thoroughly read and understand these instructions and any
Read instructions carefully and follow rules for safe operation. Failure to do so could result in serious injury. Fradan Manufacturing Corp.
 OPERATOR MANUAL FRADAN POWER BLOWERS Part No. 888-011-222-0 Read instructions carefully and follow rules for safe operation. Failure to do so could result in serious injury. Fradan Manufacturing Corp.
GENERATOR MODEL NO: FG2500 OPERATION & MAINTENANCE INSTRUCTIONS PART NO: LS0114
 GENERATOR MODEL NO: FG2500 PART NO: 8857727 OPERATION & MAINTENANCE INSTRUCTIONS LS0114 INTRODUCTION Thank you for purchasing this CLARKE Generator. Before attempting to use this product, please read this
Reproduction. Not for. Wiring Diagram. Model / Modelo. Manual Part No
 Wiring Diagram This generator is rated in accordance with CSA (Canadian Standards Association) standard C22.2 No. 100-94 (motor and generators). Questions? Help is just a moment away! Preguntas? La ayuda
Table of Contents. Safety Assembly Pre-operation / Starting. 7. Operation.. 8. Maintenance. 9. Storage 10
 Table of Contents Safety... 3 Assembly... 6 Pre-operation / Starting. 7 Operation.. 8 Maintenance. 9 Storage 10 Parts drawings..11 Parts list by number..12 Notes.13 2 Safety Information Attention; this
Owner s Manual. Water Pump: Outdoor agricultural product used for general purpose water pumping, field irrigation and trash applications.
 Owner s Manual MWPH ITEM NUMBER: 109270, 109280, 109290 SERIAL NUMBER: Instructions for Assembly, Testing, Operation, Servicing, and Storage Water Pump: Outdoor agricultural product used for general purpose
4 in 1 POWER STATION Model: 7226
 Please carefully read and save these instructions before attempting to assemble, maintain, install, or operate this product. Observe all safety information to protect yourself and others. Failure to observe
3KVA DUAL VOLTAGE GENERATOR MODEL NO: PG3800DV
 3KVA DUAL VOLTAGE GENERATOR MODEL NO: PG3800DV PART NO: 8857815 OPERATION & MAINTENANCE INSTRUCTIONS LS1016 INTRODUCTION Thank you for purchasing this CLARKE 3KVA Dual Voltage Generator. Before attempting
MODEL cc Generator
 MODEL 4750 223 cc Generator Item # 56475 Owner s Manual Manual del Propietario Questions? Problems? Please call our customer help line: (800) 232-1195 M-F 8-5 CST FEATURES 4750 Surge Watt Output 3750 Rated
7000 RATED WATTS/8750 MAXIMUM WATTS PORTABLE POWER GENERATOR
 30A 7000 RATED WATTS/8750 MAXIMUM WATTS PORTABLE POWER GENERATOR 8 7 5 0 W P O W E R G E N E R AT O R START MODEL # 101175 Operation Manual This safety alert symbol identifies important safety messages
LDG6000SA DIESEL GENERATOR OWNERS MANUAL
 LDG6000SA DIESEL GENERATOR OWNERS MANUAL BEFORE OPERATING THIS EQUIPMENT PLEASE READ THESE INSTRUCTIONS CAREFULLY Preface Thank-you for purchasing this generator. This operation manual contains information
ECSS. Electric Chain Saw Chain Sharpener Assembly & Operating Instructions
 ECSS Electric Chain Saw Chain Sharpener Assembly & Operating Instructions READ ALL INSTRUCTIONS AND WARNINGS BEFORE USING THIS PRODUCT. SAVE THESE INSTRUCTIONS FOR FUTURE REFERENCE. This manual provides
AUTOMOTIVE POWER INVERTERS INSTRUCTIONS. Item #31463, #31464, #31465
 AUTOMOTIVE POWER INVERTERS INSTRUCTIONS Item #31463, #31464, #31465 EASTWOOD AUTOMOTIVE POWER INVERTERS are heavy-duty professional grade pieces of equipment designed to bring 120 volt power to any automobile.
MODEL HD99 HYDRAULIC ONE MAN TOWABLE EARTHDRILL
 DO NOT THROW AWAY IMPORTANT MANUAL MODEL HD99 HYDRAULIC ONE MAN TOWABLE EARTHDRILL Operators Manual GROUND HOG, INC. P.O.BOX 290 San Bernardino, CA. 92402 Phone (909) 478-5700 Fax (909) 478-5710 E-mail:
Owner's Manual. XG Series 6,500-8,000 Watt Portable Generator. or
 MODELS: 005796-0 (XG6500), 005797-0 (XG7000), 005798-0 (XG7000E), 005800-0 (XG8000), 005747-0 (XG8000E) Owner's Manual XG Series 6,500-8,000 Watt Portable Generator www.generac.com or 1-888-436-3722 Table
Portable Generator. Operator s Manual
 Portable Generator Operator s Manual This generator is rated in accordance with CSA (Canadian Standards Association) standard C22.2 No. 100-04 (motors and generators) and PGMA (Portable Generator Manufacturers
PORTABLE TRASH PUMPS MDP200
 PORTABLE TRASH PUMPS MDP200 OPERATING & PARTS MANUAL INTRODUCTION This manual provides information and procedures to safely operate and maintain the engine and pump. For your own safety and protection
MODEL HP Generator
 MODEL 3500 7 HP Generator Item # 56352 Owner s Manual Manual del Propietario Questions? Problems? Please call our customer help line: (800) 232-1195 M-F 8-5 CST FEATURES 3500 Surge Watt Output 3000 Rated
OWNERS MANUAL. Product Support
 Product Support OWNERS MANUAL Product Information, Application, Service Info & Warranty Questions Please email us at support@duromaxgenerators.com or call (800) 629-3325 Monday Friday 6:00 am 6:00 pm (PST)
720W PORTABLE GENERATOR
 720W PORTABLE GENERATOR MODEL NO: G720 PART NO: 8857800 OPERATION & MAINTENANCE INSTRUCTIONS LS0214 INTRODUCTION Thank you for purchasing this CLARKE 720W Portable Generator Before attempting to use this
EZT715-EZT750 Owner's Manual
 EN EZT715-EZT750 Owner's Manual ESS FRC IMPORTANT: Read all safety precautions and instructions carefully before operating equipment. Refer to operating instruction of equipment that this engine powers.
INSTALLATION AND OPERATING INSTRUCTIONS
 INSTALLATION AND OPERATING INSTRUCTIONS MANUAL TRANSFER SWITCHES FROM 0 Residential Wattage Requirements Appliance Running Watts Add watts for starting Furnace blower, gas or fuel 1/8 hp 300 500 1/8 hp
Model: SE-4020-CA Automatic Battery Charger
 OWNERS MANUAL Model: SE-4020-CA Automatic Battery Charger PLEASE SAVE THIS OWNERS MANUAL AND READ BEFORE EACH USE. This manual will explain how to use the battery charger safely and effectively. Please
Owner s Manual Pressure Washer Pump: For high pressure cleaning machines.
 MA578F.2 TM ITEM NUMBERS: A57370, A57398, A57754, A578, A5787, A5783, A5788, A5785, A57820 A578203, A57873 Owner s Manual Pressure Washer Pump: For high pressure cleaning machines. WARNING Read this manual.
1000 RATED WATTS/1200 MAXIMUM WATTS PORTABLE POWER GENERATOR
 1000 RATED WATTS/1200 MAXIMUM WATTS PORTABLE POWER GENERATOR 1200 W P OW E R G E N E R ATO R MODEL # 101174 Operation Manual This safety alert symbol identifies important safety messages in this manual.
PORTABLE TRASH PUMPS MTP200 MTP300 MTP400
 PORTABLE TRASH PUMPS MTP200 MTP300 MTP400 OPERATING & PARTS MANUAL INTRODUCTION This manual provides information and procedures to safely operate and maintain the engine and pump. For your own safety and
Owner s Manual ST-GP2300. WARNING! To Reduce Risk of Injury, User Must Read and Understand Owner s Manual Prior to Use.
 ST-GP2300 Owner s Manual WARNING! To Reduce Risk of Injury, User Must Read and Understand Owner s Manual Prior to Use. NOTE: Retain Original Sales Receipt as Proof of Purchase! ST-GP2300 2300W Generator
Portable Generator. Operator s Manual
 Portable Generator Operator s Manual This generator is rated in accordance with CSA (Canadian Standards Association) standard C22.2 No. 100-04 (motors and generators). BRIGGS & STRATTON POWER PRODUCTS
Airless Spray Gun INSTRUCTIONS DP psi (345 bar) Maximum Working Pressure
 Maximum Working Pressure") INSTRUCTIONS DP-6376 Airless Spray Gun 5000 psi (345 bar) Maximum Working Pressure INSTRUCTIONS This manual contains important warnings and information. READ AND KEEP FOR REFERENCE. Table of Contents Warnings......................................
INSTRUCTIONS DP-6376 Airless Spray Gun 5000 psi (345 bar) Maximum Working Pressure INSTRUCTIONS This manual contains important warnings and information. READ AND KEEP FOR REFERENCE. Table of Contents Warnings......................................
OPERATOR S MANUAL JUMP STARTER. and DC Power Source. Model No CAUTION: Sears, Roebuck and Co., Hoffman Estates, IL U.S.A.
 OPERATOR S MANUAL JUMP STARTER and DC Power Source Model No. 71489 CAUTION: Read and follow all Safety Rules and Operating Instructions before Every Use of this Product. SAVE THESE INSTRUCTIONS. Sears,
MASTERsine Inverter PXA Series Installation Guide
 Backup Power System Expert TM MASTERsine Inverter PXA Series Installation Guide Important Safety Instructions IMPORTANT: Read and save this Installation Guide for future reference. This chapter contains
JOHN DEERE WORLDWIDE COMMERCIAL & CONSUMER EQUIPMENT DIVISION. Lawn Tractors L100, L110, L120, and L130 TM2026 DECEMBER 2002 TECHNICAL MANUAL
 2026 December 2002 JOHN DEERE WORLDWIDE COMMERCIAL & CONSUMER EQUIPMENT DIVISION Lawn Tractors L100, L110, L120, and L130 TM2026 DECEMBER 2002 TECHNICAL MANUAL North American Version Litho in U.S.A. Safety
Operator s Manual. Inverter Generator. GPi 1700
 Operator s Manual Inverter Generator GPi 1700 EN 5000186370 05 0813 5 0 0 0 1 8 6 3 7 0 Copyright notice Copyright 2013 by Wacker Neuson Production Americas LLC All rights, including copying and distribution
North Dakota State University Grounds Maintenance Equipment
 North Dakota State University Grounds Maintenance Equipment I. Introduction Grounds maintenance equipment is an important part of the work activities on NDSU campus. They can make grounds maintenance jobs
POWER INVERTER 1,000 WATT / 2,000 WATT PEAK
 POWER INVERTER 1,000 WATT / 2,000 WATT PEAK 94009 ASSEMBLY AND OPERATING INSTRUCTIONS 3491 Mission Oaks Blvd., Camarillo, CA 93011 Visit our Web site at http://www.harborfreight.com TO PREVENT SERIOUS
INSTALLATION & OPERATION MANUAL
 INSTALLATION & OPERATION MANUAL PRE-ASSEMBLED PRIMARY & BATTERY BACK-UP SUMP PUMP SYSTEM 5030CVSPBUSS, 5033CVSPBUSS www.aymcdonald.com A.Y. McDonald BBU Manual Revised 8-13 3210-479 Rev. A 12 This pump
OPERATOR S MANUAL. Portable Power 950. Model No
 OPERATOR S MANUAL Portable Power 950 Model No. 28.71987 Read and follow all Safety Rules and Operating Instructions before Every Use of this Product. Save these instructions. Sears Brands Management Corporation,
SP6. Automatic Battery Charger. Model
 Model SP6 Automatic Battery Charger OWNERS MANUAL PLEASE SAVE THIS OWNERS MANUAL AND READ BEFORE EACH USE. This manual will explain how to use the charger safely and effectively. Please read and follow
2-Stroke 900 Rated Watt Generator
 2-Stroke 900 Rated Watt Generator Item # 56100 Owner s Manual Manual del Propietario FEATURES: 1000 Surge Watt Output 900 Rated Watt Output (7.5Amps at 120Volts) 2 HP Single Cylinder 2-Stroke Engine One
en 003 Generator GV 5600A OPERATOR S MANUAL
 www.wackergroup.com 0170813en 003 0108 Generator OPERATOR S MANUAL 0 1 7 0 8 1 3 E N DANGER CARBON MONOXIDE Using a generator indoors CAN KILL YOU IN MINUTES. Generator exhaust contains carbon monoxide
400 Watt Backup Power System Owner s Manual
 400 Watt Backup Power System Owner s Manual WARNING: Read carefully and understand all ASSEMBLY AND OPERATION INSTRUCTIONS before operating. Failure to follow the safety rules and other basic safety precautions
1-1/2 DIAMETER WATER PUMP
 1-1/2 DIAMETER WATER PUMP 2.2HP/79.8cc Engine MODEL # 101099 Operation Manual This safety alert symbol identifies important safety messages in this manual. Failure to follow this important safety information
WARNING: Read these instructions before using the machine GENERATOR MODEL NO: IG3500F PART NO: OPERATION & MAINTENANCE INSTRUCTIONS
 WARNING: Read these instructions before using the machine GENERATOR MODEL NO: IG3500F PART NO: 8877100 OPERATION & MAINTENANCE INSTRUCTIONS ORIGINAL INSTRUCTIONS LS0217 INTRODUCTION Thank you for purchasing
Operation Manual. 10 Mini-Cultivator MODEL #
 10 Mini-Cultivator MODEL # 103350 Operation Manual This safety alert symbol identifies important safety messages in this manual. Failure to follow this important safety information may result in serious