Owner s Manual WARNING
|
|
|
- Logan Stevens
- 5 years ago
- Views:
Transcription

1 Owner s Manual M750126B.2 ITEM NUMBER: SERIAL NUMBER: Instructions for Assembling, Testing, Operating, Servicing, and Storing Water Pump: Outdoor agricultural product used for general purpose water pumping, field irrigation, and trash applications. WARNING READ and UNDERSTAND this manual completely before using the water pump! Failure to properly set up, operate, and maintain this water pump could result in serious injury or death from carbon monoxide poisoning, electric shock, fire/explosion, or burns. In particular, be aware of the following hazards: CO Poisoning Water pumps give off carbon monoxide, a poisonous gas that can kill you. You CANNOT smell it, see it, or taste it. ONLY run water pump OUTDOORS and at least 20 feet from the home, away from windows, vents and air intakes, to allow proper ventilation. If you start to feel sick, dizzy, or weak while using the water pump, shut off the engine and get to fresh air RIGHT AWAY. NEVER run water pump inside any enclosed or semi-enclosed spaces, including homes, basements, garages, sheds, boxes, RVs, boats or pick-up truck beds. These spaces can trap poisonous gases, EVEN if you run a fan or open windows. Install carbon monoxide alarms inside nearby structures/buildings (battery-operated, or plug-in with battery backup). Fire / Explosion DO NOT overload water pump (per rated capacity), and OPERATE ONLY in an area with adequate cooling ventilation so engine does not overheat. Exhaust can be extremely hot. Keep muffler at least 7 feet from all combustible objects. All fuels are flammable. Never fuel a running or hot engine. Never pump fuel directly into water pump at gas station use approved container to transfer fuel. Ensure there are no fuel leaks, and keep sources of sparks and flames away. ALWAYS keep a fire extinguisher rated ABC nearby. NEVER pump flammable liquids. STOP! INSPECT COMPONENTS: Closely inspect to make sure no components are missing or damaged. See the Unpacking & Delivery Inspection section for instructions on whom to contact to report missing or damaged parts. ADD ENGINE OIL: Engine is shipped without oil. See engine section of this manual for instructions on capacity and viscosity recommendations. Any Questions, Comments, Problems, or Parts Orders Call Powerhorse Product Support
2 Hazard Signal Word Definitions 2
3 Table of Contents About Your Water Pump... 4 Summary of Important Safety Information...5 During Assembly During Operation During Storage / Troubleshooting Warning Label Locations...6 Unpacking... 8 Assembly... 9 Machine Components...10 Operation Operation - Preparing the Water Pump for Each Use Step One: Inspect/Repair Step Two: Select a suitable site Step Three: Fueling Step Four: Attach a suction strainer Step Five: Place the water pump Operation - Using the Water Pump Storage...20 Troubleshooting...21 Specifications...22 Water Pump Exploded View Pump Exploded View...24 Engine Exploded View...25 Engine Operation/Specs...28 Engine Maintenance...29 Engine Storage...32 Limited Warranty...33 California Proposition 65 Information
4 About Your Water Pump Thank you for purchasing your Powerhorse water pump! About Your Water Pump This water pump is a machine designed for outdoor, agricultural, general purpose water pumping, field irrigation and trash pumping applications. This water pump is capable of handling suspended soft solids, up to a capacity determined by the model. Up to 5/8 solids. This water pump has an optional wheel kit (Part #109292), which includes: Axles Wheels Handle and Handle Mount The technical specifications for your water pump are provided in the Specifications section of this manual. Follow all safety precautions presented throughout this manual. A summary of important safety information can be found at the end of the manual. Contact Powerhorse Product Support at for any questions about the appropriate use of this water pump and/or optional accessories. Warranty Registration: Please fill in the warranty registration information found in the back of this manual and have it on hand when you call in on a warranty claim. Attention: All Rental Companies and Private Owners who loan this equipment to others! All persons to whom you rent/loan this water pump must have access to and read this manual. Keep this owner s manual with the water pump at all times and advise all persons who will operate the machine to read it. You must also provide personal instruction on how to safely operate the water pump and be available to answer any questions a renter/borrower might have. 4
5 Summary of Important Safety Information WARNING Read and understand this owner s manual completely before using the water pump. Improper use of the water pump could result in serious injury or illness for the operator or nearby persons/animals, or cause damage to the environment. LISTED BELOW is a summary of safety information of particular importance. See individual sections of this owner s manual for more details DURING ASSEMBLY CHECK and TEST completed assembly as directed in this manual. Serious injury could result from water leaks if water pump is improperly assembled. DO NOT MODIFY water pump design DURING OPERATION INSPECT and PREPARE water pump before each use as directed in this manual. DO NOT USE flammable or corrosive chemicals in the water pump. FOLLOW INSTRUCTIONS for SAFELY FUELING the engine. Gasoline is flammable and can explode. Always use caution when handling gasoline. Keep a fire extinguisher rated ABC nearby. DO NOT START water pump until ready to spray in order to avoid unintentional release. SEE Troubleshooting section of this manual before attempting any repairs. Wear personal protective equipment and follow safety instructions DURING STORAGE / TROUBLESHOOTING PREPARE THE WATER PUMP FOR STORAGE according to the instructions in this manual. SELECT a well-ventilated STORAGE AREA away from sources of heat, flame, or sparks. Gasoline vapors can ignite and cause a fire. READ and FOLLOW the safety rules for troubleshooting / servicing the water pump to avoid accidental exposure to chemical and risk of electric shock. 5
6 Warning Label Location Ref. # Part # Description Qty CPSC Decal Burn Hazard Decal Priming Warning Warning Decal Oil Fill Decal Fuel Overfill Decal Air Filter Decal 1 8 N/A EPA Decal Choke / Run Decal Ethanol Decal Name Plate On/Off Fuel Shut Off Decal Powerhorse Recoil Decal Powerhorse decal Semi-Trash Pump Decal Throttle 1 6


7 Warning Label Location
8 FIG05940 Unpacking Closely inspect all contents in the shipping carton. Note that some parts are shipped inside the manual bag. If you are missing or have damaged components: Contact Product Support at The following items are found in the manual bag. Funnel (1) Nut (2) Gasket (2) Hose Barb (2) Hose Clamp (3) Strainer (1) Spark Plug Wrench (1) 8
9 Assembly Attach Hoses to discharge fitting and suction fitting. Connect hoses (not supplied) to the discharge and suction hose barbs. Nut Hose Barb Rubber Gasket Discharge Hose Barb Discharge Fitting Suction Fitting Suction Hose Barb 9
10 Machine Components 1. Prime Port: Fill the priming port to prime the pump. 2. Discharge Fitting: Connect the discharge hose to the discharge fitting. 3. Pump: The pump moves the liquid. 4. Suction Fitting: Connect the suction hose to the suction fitting. 5. Drain Port: Drain the liquid in the pump through the drain port. 6. Engine: The air-cooled engine powers the pump. 10
11 Operation Preparing the Water Pump for Each Use Step One: Inspect/Repair If the water pump has been used previously, it must be prepared BEFORE EACH SUBSEQUENT USE. WARNING Read instructions below carefully for inspecting and preparing the water pump. Damaged or clogged equipment could result in leaks or uncontrolled spray. Important safety rules: Turn off engine. Turn off engine and remove spark plug cap before cleaning, inspecting, or servicing the water pump. Guards / shields. Make sure all guards and shields are replaced after servicing the water pump. Replacement parts. If a part needs replacement, only use parts that meet the manufacturer s specifications. Replacement parts that do not meet specifications may result in a safety hazard or poor operation of the water pump. 1. Ensure water pump casing is empty Ensure the water pump has been thoroughly flushed with fresh water and drained from prior use. 2. Clean suction strainer Clean the suction strainer of any material residue. It is important to clean the suction strainer of debris before each use, to ensure it is not clogged. 3. Inspect & repair Inspect and test the water pump thoroughly. a. Inspect fittings for cracks and leaks. Replace all damaged fittings with original Powerhorse parts. b. Check to be sure all nuts, bolts, and screws are tight. c. Check oil level in engine. See engine section of this manual. d. Check for fuel leaks. Any fuel leak is a fire hazard. Fix any fuel leaks before starting engine. 11
12 Operation Preparing the Water Pump for Each Use Step Two: Select a Suitable Site WARNING Choose a suitable site for operating your water pump to avoid equipment damage and/or injury and possible death from carbon monoxide poisoning, electric shock, or fire. Choose a site that meets all of the criteria specified. Important safety rules: Select a suitable site. Before using the water pump, you must select a suitable OUTDOOR location for installation and operation. This location should meet all of the criteria listed below. 1. Level surface The water pump should be positioned on a firm and level surface. Ensure that the water pump sits level and will not slide or shift during operation. If applicable, block the water pump s wheels to prevent sliding and shifting. Uneven ground can cause the engine oil level sensor to detect a low oil condition and stop the engine. 2. Outdoors only Follow the directions below for choosing a location to operate your water pump in order to avoid carbon monoxide poisoning: a. The location you choose to operate the water pump must be OUTDOORS and at least 20 feet from the home, away from windows, vents and air intakes, to allow proper ventilation. If you start to feel sick, dizzy, or weak while using the water pump, shut off the engine and get to fresh air RIGHT AWAY. b. Never run the water pump inside any closed or semi-enclosed spaces (even if outdoors), including homes, garages, basements, sheds, or boxes. These spaces can trap poisonous gases, even if you run a fan or open windows. c. Never place the water pump immediately adjacent to a building or other structures allow at least 20 feet clearance. WARNING: Carbon monoxide poisoning hazard The exhaust from your water pump contains carbon monoxide (CO), a poisonous gas that can kill. You cannot smell it, see it, or taste it. Carbon monoxide exhaust is given off whether you are using gasoline, natural gas, or propane as the fuel source to power the water pump. 12
13 Operation Preparing the Water Pump for Each Use 2. Outdoors only d. Place the water pump so that the muffler exhaust fumes will not be directed towards people or building air intakes. e. Ensure that working, battery-operated or battery back-up carbon monoxide alarms are used in any dwelling/structure that is in close proximity to the running water pump. WARNING: Never attempt to attach ductwork to the muffler system to allow for installation inside an enclosure. This could cause hot air deflection, heat build-up, and increased exhaust back-pressure, resulting in possible exhaust leakage or damage to the water pump. 3. Adequate cooling The water pump needs adequate, unobstructed flow of air to allow for proper cooling of the engine and fuel tank. Follow the directions below: a. Position so there is adequate clearance around water pump to allow for cooling airflow so that heat does not build up. b. Never place the water pump immediately adjacent to large objects or structures allow at least a 7 clearance. c. Do not run the water pump in close proximity to other heatgenerating equipment, such as generators or other engine powered equipment. The combined heat that is generated may raise air temperature in the immediate area and there will not be adequate cooling ventilation. d. Do not allow debris to accumulate and block airflow to engine. e. Do not operate with a tarp, blanket, or cover surrounding the water pump. 4. Hot exhaust clearance The exhaust gas from your water pump is extremely hot and can cause combustible materials to catch on fire. a. Make sure your water pump s exhaust system is at least 7 feet from all combustible materials and structures. b. Keep a fire extinguisher rated ABC nearby. Keep it properly charged and be familiar with its use. 13
14 Operation Preparing the Water Pump for Each Use 5. Hearing protection The water pump can produce noise levels in excess of up to 95 db in close proximity, which can be dangerous to human hearing with prolonged exposure. WARNING: Never attempt to attach ductwork to the muffler system to lower noise levels. This could cause hot air deflection, heat build-up, and increased exhaust back-pressure, resulting in possible exhaust leakage or damage to the water pump engine. 14

15 Operation Preparing the Water Pump for Each Use Step Three: Fueling WARNING Gasoline is highly flammable and explosive. You can be burned or seriously injured when handling fuel. Use extreme care when handling gasoline. 1. Engine off / cool The engine must be off and allowed to cool at least two minutes before adding fuel. WARNING: A running engine is hot enough to ignite fuel. Never add fuel or remove gas cap if engine is running or still hot. 2. Outdoor location Fill fuel tank outdoors never indoors. 3. Check engine oil level WARNING: Gasoline vapors can ignite if they collect inside an enclosure. Explosion can result. Check engine oil level as specified in the engine section of this manual. 4. Remove gas cap Remove engine gas cap. 5. Add gasoline Add gasoline through fill opening from a UL-approved container. Important Safety Instructions: Use approved container. NEVER pump fuel directly into engine at gas station. Static charge can build and ignite fuel. Use a UL approved fuel container to transfer gas to the engine. Don t overfill. DO NOT overfill the gas tank. Allow at least 1/2 of empty space below the fill neck to allow for fuel expansion Heat / flames / sparks. Stay away from sources of heat, flame, or sparks while adding fuel. 6. Spills / splashes Clean up fuel spills /splashes immediately. Move water pump away from spilled fuel on the ground. 1. Wipe fuel off engine and wait 5 minutes for excess fuel to evaporate before starting engine. 2. Gas soaked rags are flammable and should be disposed of properly. 3. If gasoline is spilled on your skin or clothes, change clothes and wash skin immediately. 7. Replace gas cap Replace gas cap securely before starting engine. 8. Gasoline storage Store gasoline in a cool, dry place in a UL approved, tightly sealed container. 15
16 Operation Preparing the Water Pump for Each Use Static electricity and filling the gasoline tank: Static electricity can initiate from ungrounded gasoline tanks or containers, from flowing gasoline, and from persons carrying a static electric charge Static electricity can explosively ignite gasoline vapors that are present during the fueling process, resulting in serious burns to nearby persons. To avoid static electricity while fueling, certain steps must be followed before and during the fueling process in order to minimize and safely dissipate static charge build-up: Touch a grounded metal object before starting. Always dissipate static charge from your body before beginning the fueling process by touching a grounded metal object at a safe distance away from fuel sources. Use a portable container to fill tank. Never fill the water pumps gas tank directly from the fuel pump the water pumps tank is not grounded and the high velocity flow of gasoline from a fuel pump can cause static electric build-up. Use an approved portable container to transfer gasoline to the water pumps tank. Fill container on the ground. Never fill the portable gas container while it is sitting inside a vehicle, trailer, trunk, or pick-up truck bed. ALWAYS place container on the ground to be filled. Keep nozzle in contact with container. Keep nozzle in contact with the portable container at all times while filling. Manually control the flow of gasoline; do NOT use the nozzle s lock-open device. Use a portable container made of metal or conductive plastic. It will dissipate charge to ground more readily. About static electricity and fueling Many common objects can accumulate and retain a static electric charge. Objects made of nonconductive materials (e.g. plastics) easily accumulate and retain static electric charge, as can objects made of conductive material (e.g. metal, water) if they are not electrically grounded. The static electric charge on an object, such as a human body or plastic fuel tank/container, can reach as high as several thousand volts! A static electric spark can be generated if the static electric charge stored on an object jumps to another, less charged object. Such a spark can ignite invisible gasoline vapors that are present during fueling situations. Typical sources of static electric hazards during fueling The following objects can accumulate a static electric charge and cause an ignition spark in typical fueling situations: 1) Ungrounded tanks/containers. Any ungrounded fuel tank or container can accumulate a static electric charge as a result of contact with other objects or friction during transportation. This static electricity can discharge as a spark to the grounded gasoline dispenser nozzle, as the nozzle is first brought close to the tank/container at the beginning of the fueling process. 2) Flowing gasoline. Most people are not aware that gasoline accumulates static electric charge while flowing through a hose or pipe. This charge then transfers to and accumulates in the gas tank or container that is being filled. The total amount of charge accumulation depends on the amount of gas pumped into the container, the speed with which it is pumped, and whether or not the tank/container is grounded. If sufficient static electric charge accumulates in the fuel tank or container during the fueling process, the tank/container may discharge a spark to the grounded gasoline dispenser nozzle. 3) Persons. A person dispensing the gasoline can carry a static electric charge on their body, typically resulting from contact with their car seat or electronics. The static electricity can discharge as a spark between that person s hand and either the grounded dispenser nozzle or the fuel tank opening. 16
17 Operation Preparing the Water Pump for Each Use Step Four: Attach a suction strainer WARNING This pump is design to pump water only. Never use the water pump to pump flammable liquids. 1. Attach suction strainer 2. Keep the strainer clean Step Five: Place the water pump 1. Place the water pump near liquid surface A suction strainer should be attached to the suction hose. A suction strainer has holes or slots small enough to prevent large debris from working through and damaging the pump. Keep the strainer clean. If possible, suspend the strainer to keep it from working into sediment. -OR- A) Prepare a bed of large stones on which the strainer will rest. B) Tie the strainer inside a basket or pail. Place the water pump in a location as near to the liquid surface as possible, this will ensure proper pump suction. All hoses must be kept as straight as possible, avoid sharp bends. NOTE: 23ft is the maximum height of suction head. 2. Use flexible hose Use at least 12 of flexible hose to make plumbing connections to the pump body. Rigid piping may put stresses on the pump, causing damage. 3. Place unit on secure footing 4. Do not run the pump dry 5. Fill the pump with water Always be sure the unit is on a secure footing. Keep the immediate pump area free of all unauthorized personnel. If the water pump is sitting beside a pit, be sure it is well anchored so that it does not fall in. Do not run the pump dry. Always fill the pump body with water before starting. It is not necessary to drain the pump body after each use, unless there is danger of freezing, settling of solids, or crystallization. Fill the pump with water utilizing the priming port on the top of the pump. (The pump self primes only when it is first filled with priming water.) All hoses and pipe connections must be airtight. 17
18 Operate the water pump Operation Using the Water Pump 1. Review safety information Review the Operation Important Safety Information provided in this manual. 2. Priming Using the priming port on the top of the pump, completely fill the pump chamber with water before starting the engine. 3. Engine operation precautions Heed the following safety rules with regard to running the water pump engine: Hot muffler. If you are starting a warm engine, stay clear of muffler. It may still be hot enough to burn you. Hot exhaust. Hot exhaust fumes from engine can cause fire. Position muffler at least 7 from combustible objects during operation. Fire extinguisher. Have a Class ABC fire extinguisher available as a precautionary measure when operating the water pump engine in dry areas. Carbon monoxide. The running engine gives off carbon monoxide, a poisonous gas that can kill you. You CANNOT smell it, see it, or taste it. ONLY run the water pump engine OUTDOORS and away from air intakes. NEVER run the water pump engine inside homes, garages, sheds, or other semi-enclosed spaces. These spaces can trap poisonous gases, EVEN if you run a fan or open windows. If you start to feel sick, dizzy, or weak while using the water pump, shut off the engine and get to fresh air RIGHT AWAY. See a doctor. You may have carbon monoxide poisoning. 18
19 4. Start engine To start the engine: Operation Using the Water Pump 1) Turn the gasoline line valve to the ON position. 2) For cold engine, move choke lever to full choke position. To restart a warm engine, move choke lever to half choke or to RUN position. 3) Start the engine: a) Using recoil start i) Turn the engine switch to the ON position. ii) Pull the starter grip lightly until you feel resistance, then pull the starter cord out briskly and rapidly. iii) Allow starter cord to return slowly. 5) When engine starts, move choke lever to RUN position. 6) Under long, continuous-run operating conditions, be prepared to: a) Check and refuel the engine on a regular basis. WARNING: A running engine is hot enough to ignite fuel. Never add fuel or remove gas cap if engine is running or still hot. Let cool at least 2 minutes. b) Check engine oil level each time you refuel. c) Change oil after the first 20 operating hours, and at least every 100 operating hours thereafter, as directed in the engine section of this manual. WARNING: Never open oil port while engine is running. Hot oil can spray over face and body. 5. Throttle control When operating the water pump much higher than the water surface, you may need to speed up the engine, using the throttle. When the pump is near the water surface, a slower engine speed can be used. This will save engine fuel and life. 6. Secure flexible hose Never allow a vehicle to run over the flexible hose. This sudden shut off pressure can cause hydraulic shock. If your flexible hose must be laid across a high traffic area, it is advised to protect the flexible hose with planking. 7. Keep pump from freezing Never allow water to freeze in the pump. Freezing water can be extremely dangerous to the pump, always drain the water from the pump if freezing temperatures are a factor. 8. Flush the pump Flush the pump with fresh water after each use is advised. Some liquids being pumped may leave a solid or sticky residue. This may shorten the life of your pump. 19
20 Storage Prepare the water pump for end-of-season storage by running pure water through the system. This will flush out any contaminants and clean the water pump internals. After the water pump has been flushed with pure water, completely drain the water pump of all water to protect from freezing. WARNING Gasoline vapors can ignite and cause a fire. Select a well-ventilated storage area away from sources of heat, flame, or sparks. CAUTION The water pump will be damaged if it freezes. Protect the water pump from freezing during storage by following the instructions below. Preparing for storage: 1. Pump pure water 2. Drain the water pump 3. Engine storage 4. Water pump storage location 5. Gasoline storage Briefly run the water pump while pumping pure water. Using the water pump drain plug, drain the water pump completely of water to prevent freezing. Refer to the engine section of this manual for proper engine storage instructions. - Always disable the engine for storage by unplugging the spark plug wire. CAUTION: Gasoline will oxidize and deteriorate in storage. Old gasoline in the engine will cause hard starting and leave gum deposits that can clog the fuel system. Deterioration problems may occur within a few months, or even less if gasoline was not fresh when you filled the fuel tank. Short-Term Storage: Consider adding a fuel stabilizer to extend fuel storage life. Long Term Storage: (between infrequent uses and at end of season) Drain the fuel tank and carburetor as instructed in the engine section of this manual. Important Safety Instructions: Always drain fuel from tank in outdoor, well-ventilated area. Stay away from sources of heat, flame, or sparks while handling fuel. Clean up fuel spills/splashes immediately. Store the water pump in a location away from corrosive material, sources of heat, open flames, sparks or pilot lights. WARNING: Never store water pump inside where there is a source of heat or an open flame, spark, or pilot light as on water heaters, space heaters, furnaces, clothes dryers, or other gas appliances EVEN IF the water pump s gas tank is empty. Store gasoline in a cool, dry place in a UL approved, tightly sealed container. WARNING: Gasoline vapors can ignite if they collect inside an enclosure and an explosion can result. 20
21 Troubleshooting WARNING Before troubleshooting or attempting to service, read the following safety rules. Before attempting to service the water pump: 1. Review troubleshooting table Review the Troubleshooting Table below for the type of problem you are experiencing. However, DO NOT attempt to repair until the steps listed below are followed. 2. Flush the pump Pump pure water briefly to clean out the pump. 3. Drain the water Drain the water pump completely of water using the water pump drain plug, to pump prevent freezing. 4. Disconnect Switch off the engine and unplug the spark plug wire. power 5. Perform repairs Follow the directions provided in the troubleshooting table to repair the water pump. PROBLEM CAUSE SOLUTION Pump doesn t revolve 1. Engine will not turn over See engine section of this manual 2. Rusting/Sticking of impeller Disassemble and clean 1. Priming chamber not full enough Add more water to priming chamber 2. Air leaks on suction line joints Check for loose screws or broken hoses 3. Quick coupling gaskets worn Replace gaskets 4. Loose or broken hose clamps Tighten or replace hose clamps Pump fails to prime 5. Priming chamber is over heated Pour cold water in chamber or let cool 6. Engine speed is too slow Increase engine speed 7. Worn or broken volute or impeller Replace worn or broken component 8. Worn or broken mechanical seal Replace mechanical seal 9. Worn or broken check valve Replace check valve 1. Clogged suction hose Clear obstruction 2. Dirty suction strainer Clear suction strainer 3. Flow restriction due to hose kinks Straighten suction and discharge hoses 4. Suction lift too high Move pump closer to water surface Low capacity 5. Engine speed too low Increase engine speed 6. Worn or broken mechanical seal Replace mechanical seal 7. Reduced engine performance See engine section of this manual 8. Clogged impeller Remove clog 9. Worn impeller Replace impeller 21
 21\" x 19.1\" x 20.")
22 Specifications Full Trash Engine Powerhorse 212cc Suction & Discharge Size 2 NPT Maximum Flow 11,000 GPH Maximum Suction Head 26 FT Maximum Total Head 98 FT Maximum Pressure 42 PSI Passable Solid Size 3/4 Mechanical Seal Silicon Carbide Overall Dimensions (L x W x H) 21" x 19.1" x 20.25" Dry Weight 84 lbs The manufacturer reserves the right to make improvements in design and/or changes in specifications at any time without incurring any obligation to install them on units previously sold. Any Questions, Comments, Problems or Parts Orders Call Powerhorse Product Support
23 Exploded View Rev B.2 23
24 Exploded View Rev B.2 Ref# Part # Description Qty Ref# Part # Description Qty FRAME 1 12 N/A TANK VENT FITTING RUBBER FOOT 4 13 N/A TANK VENT GROMMET BOLT, M6X FUEL LINE WATER PUMP ASSY BOLT, M6X PUMP COVER HOSE CLAMP SPRING PIN FUEL VENT HOSE LARGE O-RING FUEL VALVE MECHANICAL SEAL FUEL VALVE HANDLE IMPELLER CONTROL PANEL SMALL O-RING BOLT, M6X VOLUTE WASHER INLET CHECK VALVE BRACKET,AIR CLEANER PUMP BODY MUFFLER HOSE BARB SEAL FUEL LINE HOSE BARB FUEL LINE CLIP HOSE COLLAR FUEL LINE CLIP HOSE CLAMP NUT, M T BOLT RUBBER ISOLATOR DRAIN / PRIME PLUG FUEL LINE SLEEVE PLUG O-RING BOLT, M8x STRAINER FLAT WASHER NUT, M BOLT, M8X ENGINE RUBBER MOUNT SHAFT KEY SWITCH ASSEMBLY FLAT WASHER WIRE ASSEMBLY FUEL CAP KIT BOLT, M6X FUEL TANK KIT TANK MOUNT GROMMET 4 * ENGINE ASSY (212CC RECOIL) 1 11 N/A FUEL TANK 1 24
25 Engine Exploded View 25
26 Engine Exploded View Ref# Part # Description Qty. Ref# Part # Description Qty. 1 N/A Crankshaft 1 40 Kit #11 Packing, case cover 1 2 Kit #11 Ball bearing 2 41 N/A Camshaft assembly 1 3 Kit #11 Oil seal 2 42 N/A Pin, dowel 2 4 N/A Governor assembly 1 43 Kit #11 Bolt, M8X Shaft, governor arm 1 44 N/A Cylinder head gasket 1 Kit #2 6 Washer, gov. arm shaft 1 45 N/A Bolt, M8X Pin, lock Spark Plug 1 8 Bolt, drain plug 2 47 N/A Rod, push 2 Kit #4 9 Washer, drain plug 2 48 N/A Shroud 1 Kit #1, 10 N/A Clip 1 49 Kit #3 & Kit #5 Bolt, M6X N/A Adjuster rocker arm 2 50 Packing, head cover 1 Kit #1 12 Kit #11 Dowel pin, case cover 2 51 Cover comp, cylinder head 1 13 N/A Piston 1 52 N/A Wind shield comp N/A Scraper ring set, piston 1 53 Kit #5 Speed regulating handle 1 15 N/A Rod assembly, connecting 1 54 N/A Flywheel assembly 1 16 N/A Pin, piston 1 55 Fan, recoil starter 1 17 N/A Clip, piston 2 56 Kit #9 Pulley, starter 1 18 Kit #11 Cover assem., crankcase 1 57 Nut Oil plug 1 58 Ignition coil assem. 1 Kit #8 20 N/A Cylinder head 1 59 Bolt, M6X N/A Valve, In 1 60 Packing, intake 1 22 N/A Valve exhaust 1 61 Kit #10 Insulator, carburetor 1 23 N/A Returner, intake valve 1 62 Packing, carburetor 1 24 N/A Spring, valve 2 63 Kit #6 & Kit #10 Spacer, carburetor 1 25 N/A Seat, valve spring, in 1 64 Rod, governor 1 Kit #2 26 N/A Seat, valve spring, ex 1 65 Spring, throttle return 1 27 N/A Plate, push rod guide 1 66 Kit #3 Recoil starter assem N/A Rocker assem N/A Clip 1 29 N/A Rotator 1 68 Kit #5 Shroud assy, upper 1 30 Kit #10 Bolt, stud 2 69 Kit #6 Air cleaner assembly 1 31 N/A Bolt, stud 2 69a & Air filter element 1 Kit #6 32 Kit #10 Carburetor components 1 70 Kit #2 Spring, governor 1 33 Kit #6 Tube, breather 1 71 Kit #7 Switch assem, oil level 1 34 Kit #7 Bolt, M6X N/A Packing, exhaust 1 35 Governor arm 1 73 Kit #7 Amplifier 1 Kit #2 36 Bolt, governor arm 1 74 N/A Nut, M8 2 Kit #2 37 & Nut, M N/A Spring washer 2 Kit #6 38 N/A Crankshaft, assembly Dipstick 1 39 N/A Lifter, valve 2 77 Kit #7 Bolt, M6x
27 Engine Kit Exploded Views Kit #1 Kit #2 Kit #4 Kit #5 Kit #3 Kit #6 Kit #7 Kit #8 Kit #9 Kit #10 Kit #11 Kit Ref # Kit Part # Description Qty Valve cover kit Governor and spring kit Recoil kit Drain bolt kit Throttle kit Air cleaner kit Oil level kit Ignition coil kit Recoil starter fan kit Carburetor kit Crankcase cover kit 1 27

28 Engine Operation WARNING BEFORE operating the engine, be sure to read this section of the manual, otherwise injury to personnel or damage to equipment may occur. Engine starting components 1. Fuel Valve When the fuel valve is in the ON position, fuel is allowed to flow from the fuel tank to the carburetor. Be sure to return the fuel valve to the OFF position after stopping the engine Choke Lever The choke is used to provide an enriched fuel mixture when starting a cold engine. It can be opened and closed by operating the choke lever manually. Move choke lever to the left toward CLOSED to enrich the mixture for cold starting. 3. Engine Switch Turn the switch ON, and pull recoil to START. To stop the engine, turn the switch OFF Recoil To start the engine, pull the starter rope lightly until resistance is felt, then pull briskly. 5. Throttle Lever The throttle lever controls the engine speed. Pump output is controlled by adjusting the throttle lever. Displacement 212 Starting Type Recoil/Electric Start Ignition Type Transistorized Magneto Ignition Lubricating Type Splash Model 212cc Spark Plug Gap 0.7 ~ 0.8mm (0.028 ~ 0.03in) Spark Plug Torque 20-30N.m Intake Valve Clearance 0.08 ~ 0.12mm (0.003 ~ 0.005in) Exhaust Valve Clearance 0.13 ~ 0.17mm (0.005 ~ 0.007in) WARNING: Improper maintenance or failure to correct a problem before operation can cause a malfunction in which you can be seriously hurt or killed. ALWAYS follow the inspection and maintenance recommendations and schedules in this manual. 28

29 Engine Operation Maintenance schedule Engine oil recommendations REGULAR SERVICE PERIOD Engine oil Air filter Fuel Valve Sediment Cup Spark plug Spark arrester Idle speed Valve clearance Cylinder Before each use First month or 20 Hrs. Every 3 months or 50 Hrs. Every 6 months or 100 Hrs. Check level Change Check Clean (1) Replace Clean Clean Checkadjust Replace Checkadjust Checkadjust Every year or 300 Hrs. head Clean After every 500Hrs. (2) Fuel tank and filter Clean Every 2 years (Replace if necessary) (2) Fuel tube Check Every 2 years (Replace if necessary) (2) 1. Service more frequently when used in dusty areas. 2. These items should be serviced by an authorized service center, unless the owner has the proper tools and is mechanically proficient. CAUTION: Engine damage (2) (2) The water pump has been shipped WITHOUT oil. Any attempt to start water pump without oil may result in engine damage and failure. Engine oil is a key factor in deciding the engine s performance. DO NOT use engine oil with additives or 2-stroke gasoline oil, as they do not lubricate properly, which may shorten the engine s service life. Check the engine oil level with the water pump stopped on a level ground. Due to viscosity variances with regions and temperatures select the correct type of oil using the chart below. Engine oil recommended: SAE10W-30 Capacity: 0.63 Quarts (0.6L) 29

30 Engine Operation Oil draining, and checking oil level WARNING: Burn hazard Never open oil port while engine is running. Hot oil can spray over face and body. 1. Operate the water pump for 3 to 5 minutes to thin oil for easier draining. 2. Ensure that the engine is stopped and on a level surface. 3. Remove the drain bolt and washer; drain the oil into an approved container. Drain Bolt Dipstick Spark plug removal, cleaning and replacement 4. Reinstall washer and drain bolt. 5. Remove the dipstick and clean it. 6. Fill crankcase with oil to the bottom lip of the oil filler neck. 7. Reinsert the dipstick into the oil filler without threading in, and check oil level. If the oil level is too low, add recommended engine oil to the oil filler neck. 8. Reinstall the dipstick. Proper spark plug clearance ensures the engine s normal running. a) Remove the spark plug cap. b) Remove the spark plug using the supplied spark plug wrench mm ( in) WARNING Be careful not to touch the muffler during or just after the engine has been running. c) Clean the spark plug with a steel brush. If the insulator is damaged, replace the spark plug. d) Measure the spark plug clearance with a feeler. The clearance should be mm. If adjustment is necessary, bend the side electrode carefully. e) Check if the spark plug gasket is in good conditions, or replace with a new one. Screw on the spark plug to the bottom first by hand and then tighten it up by a spark plug wrench. If a new spark plug is used, twist 1/2 more turns after impacting the gasket; if reinstall the original one, just twist 1/8-1/4 more turns. 30
31 Engine Operation Clean air filter WARNING Never run the water pump without the air filter. Rapid engine wear will result. 1. Unsnap or unscrew the air cleaner cover clips, remove the air cleaner cover, and remove the element. 2. Wash the air cleaner element in a solution of household detergent and warm water, then rinse thoroughly, or wash in nonflammable or high flashpoint solvent. Allow the air cleaner element to dry thoroughly. 3. Soak the air cleaner element in clean engine oil and squeeze out the excess oil. The engine will smoke during initial startup it too much oil is left in the air cleaner element. 4. Reinstall the air cleaner element and the cover. Prepare engine for long term storage if needed Note: Do not use pressurized air or solvents to clean the filter. Pressurized air can damage the filter and solvents will dissolve the filter. If you will not be able to exercise the water pump regularly, you must prepare the engine for long term storage to prevent gum deposits from forming and causing malfunction of the engine. Prepare engine for long term storage by: Removing all gasoline from the tank and carburetor. Draining steps: 1. Position a UL approved fuel container below the carburetor drain bolt. 2. Turn fuel valve to the OFF position. 3. Remove the drain bolt and gasket. 4. Turn fuel valve to the ON position and drain fuel from carburetor and tank. 5. Reinstall and tighten the drain bolt and gasket. OR Adding fuel stabilizer to the gasoline (following manufacturer s instructions). Fuel stabilizer steps: 1. Ensure gasoline tank is full. 2. Add fuel stabilizer to fuel tank. 3. Run engine at least 10 minutes after adding stabilizer to allow it to enter the fuel system. 4. Shut off engine. 31
32 Engine Operation 5. Disconnect spark plug wire and remove spark plug using provided spark plug wrench. 6. Add one teaspoon oil through spark plug hole. 7. Place rag over spark plug hole and turn starter (or pull the recoil) a few times to lubricate the combustion chamber. 8. Replace spark plug, but do NOT reconnect the spark plug wire. Removal from storage High Altitude Operation WARNING Gasoline is highly flammable and explosive, and you can be burned or seriously injured when handling fuel. Storage time Within one month One-two months Two months - one year Service item Use Drain original fuel and refuel. Drain original fuel and refuel; Empty and clean the fuel valve sediment cup. Empty and clean the carburetor bowl. Drain original fuel and refuel; One year or longer Empty and clean the fuel valve sediment cup; Empty and clean the carburetor bowl. Draining fuel: 1. Turn the fuel valve to the OFF position. 2. Place a UL approved container below the carburetor; use a funnel to avoid spillage. 3. Remove the carburetor drain bolt and gasket. 4. Turn the fuel valve to the ON position to drain fuel into a UL approved container. 5. Reinstall and tighten the drain bolt and gasket. CAUTION: Operating at an altitude of greater than 2000 feet (610 meters) may affect your engines performance, fuel consumption, and emissions. To remain emissions compliant and improve engine performance at higher altitudes, a highaltitude kit is required. A high altitude kit includes a carburetor jet resized to help correct air / fuel mixture at altitude. To order a high altitude kit or if you have additional questions, go to or contact us at Powerhorse. Please note, engines with the high-altitude kit installed operated at lower altitudes could cause severe engine damage and affect emissions compliance. When modified, a tag or decal should be added to the product stating that a high-altitude kit was installed and to remind you to re-service the carburetor (re-jet) when operating in lower altitude environments. 32
33 Limited Warranty Dear Valued Customer: The Powerhorse Product you just purchased is built with the finest material and craftsmanship. Use this product properly and enjoy the benefits from its high performance. By purchasing a Powerhorse product, you show a desire for quality and durability. Like all mechanical equipment this unit requires a due amount of care. Treat this unit like the high quality piece of machinery it is. Neglect and improper handling may impair its performance. Please thoroughly read the instructions and understand the operation before using your product. Always contact Powerhorse Product Support at prior to having any service or warranty work performed, as some services performed by parties other than Powerhorse approved service centers may void this warranty. This warranty is in lieu of any other warranty expressed or implied and Powerhorse assumes no other responsibility or liability outside that expressed within this warranty. Limited Warranty Powerhorse shall warranty any piece of equipment manufactured, or parts of equipment manufactured, to be free from defects in material or workmanship for a period of: Powerhorse Warranty Item # Consumer Warranty Period Commercial Warranty Period years from date of purchase by user 90 days from date of purchase by user Consumer use means personal residential household use by a consumer. Commercial use means all other uses, including use for commercial, income producing or rental purposes or when purchased by a business. This warranty applies to the original purchaser of the equipment (verification of purchase, in the form of a receipt, is the responsibility of the buyer), is non-transferable, and covers parts and labor. Parts will be replaced or repaired at no charge, except when the equipment has failed due to lack of proper maintenance. If a part is no longer available, the part may be replaced with a similar part of equal function. Any misuse, abuse, alteration or improper installation or operations will void warranty. Determining whether a part is to be replaced or repaired is the sole decision of Powerhorse. Powerhorse will not provide for replacement of complete products due to defective parts. Any costs incurred due to replacement or repair of items outside of a Powerhorse approved facility is the responsibility of the buyer and not covered under warranty. Transportation costs to and from service center is the responsibility of the customer. In addition to the normal warranty, Powerhorse shall warrant any normal wear item from defects in material or workmanship for a period of 90 days from the date of purchase by user. Normal wear items include, but are not limited to, valves, seals, hoses, springs, O-rings, and strainers. This warranty specifically excludes the following; failure of parts due to damage caused by accident, fire, flood, windstorm, freeze damage caused by improper storage, acts of God, applications not approved by Powerhorse in writing, corrosion caused by chemicals, premature seal failure caused by abrasive materials, use of replacement parts which do not conform to manufacturer s specifications, damage related to rodent and/or insect infestation and damage caused by vandalism. Additional exclusions: loss of running time, inconvenience, loss of income, or loss of use, including any implied warranty of merchantability of fitness for a specific use. Also, Outdoor Power Equipment needs periodic parts and service to perform well, and this warranty does not cover instances when normal use has exhausted the life of a component or the engine. This warranty does not cover any personal injury or damage to surrounding property caused by failure of any part. Repair or replacement of parts does not extend the warranty period. The engine warranty is covered under the same terms and conditions as outlined above. Normal engine maintenance such as spark plugs, air filters, adjustments, fuel system cleaning and obstruction due to build up is not covered by this Powerhorse warranty. Please fill in the following information and have it on hand when you call in on a warranty claim. Tel: Website: Please fill in the following information and have it on hand when you call in on a warranty claim. Customer Number: Date of Purchase: Powerhorse Serial Number: Item Number: 33
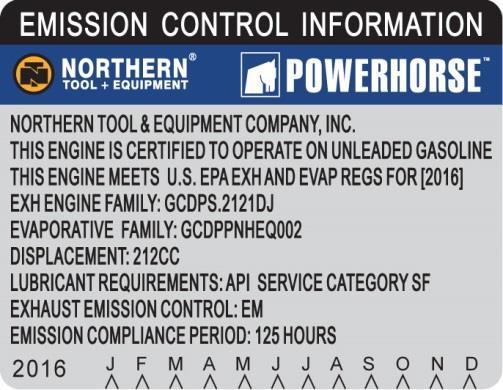
34 WARNING: This product can expose you to chemicals including gasoline engine exhaust, which is known to the State of California to cause cancer, and carbon monoxide, which is known to the State of California to cause birth defects or other reproductive harm. For more information go to Distributed by Northern Tool & Equipment Company, Inc. Burnsville, Minnesota Made in China 34
Owner s Manual. Water Pump: Outdoor agricultural product used for general purpose water pumping, field irrigation and trash applications.
 Owner s Manual MWPH ITEM NUMBER: 109270, 109280, 109290 SERIAL NUMBER: Instructions for Assembly, Testing, Operation, Servicing, and Storage Water Pump: Outdoor agricultural product used for general purpose
Owner s Manual. Original Instructions for Assembly, Testing, Operation, Servicing, and Storage
 M106470H ITEM NUMBER: 106470, 106471 SERIAL NUMBER: Owner s Manual Original Instructions for Assembly, Testing, Operation, Servicing, and Storage Water Pump: Outdoor agricultural product used for general
Owner s Manual. Original Instructions for Assembly, Testing, Operation, Servicing, and Storage
 M109161H.2 ITEM NUMBER: 109161, 109171 SERIAL NUMBER: Owner s Manual Original Instructions for Assembly, Testing, Operation, Servicing, and Storage Water Pump: Outdoor agricultural product used for general
Owner s Manual Instructions for Installation/Set-up, Operation, Servicing, & Storage
 M781692B.1 Item# 193030 Owner s Manual Instructions for Installation/Set-up, Operation, Servicing, & Storage ENGINE MUFFLER WARNING READ and UNDERSTAND this manual completely before using your muffler!
Owner s Manual M750129B.2
 Owner s Manual M750129B.2 ITEM NUMBER: 750129 SERIAL NUMBER: Instructions for Assembling, Testing, Operating, Servicing, and Storing Water Pump: Outdoor agricultural product used for general purpose water
Voltmaster Centrifugal Trash Pumps
 Voltmaster Centrifugal Trash Pumps Model TSP2, TSP3 and TSP4 Owner s Manual February 2011 Table of Contents 1 Introduction............................ 1 1.1 Read before using..................... 1 1.2
TP300 INDUSTRIAL TRASH PUMP OPERATOR S MANUAL
 TP300 INDUSTRIAL TRASH PUMP OPERATOR S MANUAL IT IS EXTREMELY IMPORTANT TO READ AND UNDERSTAND THE ENTIRE CONTENTS OF THIS OPERATOR S MANUAL BEFORE ATTEMPTING TO OPERATE THE PRODUCT. THIS EQUIPMENT IS
ENGINE DRIVEN 3 FULL TRASH PUMP
 ENGINE DRIVEN 3 FULL TRASH PUMP MODEL NO: PF75 PART NO: 7230165 OPERATION & MAINTENANCE INSTRUCTIONS ORIGINAL INSTRUCTIONS LS0117 ISS 2 INTRODUCTION Thank you for choosing this Clarke Pump. The function
5.5KVA GENERATOR MODEL NO: PG6500DVES OPERATION & MAINTENANCE INSTRUCTIONS PART NO: LS0616
 5.5KVA GENERATOR MODEL NO: PG6500DVES PART NO: 8857810 OPERATION & MAINTENANCE INSTRUCTIONS LS0616 INTRODUCTION Thank you for purchasing this CLARKE 5.5KVA Generator. Before attempting to use this product,
1100W PORTABLE GENERATOR
 1100W PORTABLE GENERATOR MODEL NO: G1200 PART NO: 8010110 OPERATION & MAINTENANCE INSTRUCTIONS LS0312 INTRODUCTION Thank you for purchasing this CLARKE 1100W Portable Generator. Before attempting to use
720W PORTABLE GENERATOR
 720W PORTABLE GENERATOR MODEL NO: G720 PART NO: 8857800 OPERATION & MAINTENANCE INSTRUCTIONS LS0214 INTRODUCTION Thank you for purchasing this CLARKE 720W Portable Generator Before attempting to use this
8500M INDUSTRIAL GASOLINE GENERATOR OPERATOR S MANUAL
 8500M INDUSTRIAL GASOLINE GENERATOR OPERATOR S MANUAL IT IS EXTREMELY IMPORTANT TO READ AND UNDERSTAND THE ENTIRE CONTENTS OF THIS OPERATOR S MANUAL BEFORE ATTEMPTING TO OPERATE THE PRODUCT. THIS EQUIPMENT
3KVA DUAL VOLTAGE GENERATOR MODEL NO: PG3800DV
 3KVA DUAL VOLTAGE GENERATOR MODEL NO: PG3800DV PART NO: 8857815 OPERATION & MAINTENANCE INSTRUCTIONS LS1016 INTRODUCTION Thank you for purchasing this CLARKE 3KVA Dual Voltage Generator. Before attempting
AG-HA-2500N GASOLINE GENERATOR
 AG-HA-2500N GASOLINE GENERATOR OWNER S MANUAL BEFORE OPERATING THIS EQUIPMENT PLEASE READ THESE INSTRUCTIONS CAREFULLY (I)WARNING 1. Read the operator s instruction manual. 2. Attention! Exhaust gases
GENERATOR MODEL NO: FG3005 OPERATION & MAINTENANCE INSTRUCTIONS PART NO: LS0413
 GENERATOR MODEL NO: FG3005 PART NO: 8857707 OPERATION & MAINTENANCE INSTRUCTIONS LS0413 INTRODUCTION Thank you for purchasing this CLARKE Generator. Before attempting to use this product, please read this
GENERATOR MODEL NO: FG2500 OPERATION & MAINTENANCE INSTRUCTIONS PART NO: LS0114
 GENERATOR MODEL NO: FG2500 PART NO: 8857727 OPERATION & MAINTENANCE INSTRUCTIONS LS0114 INTRODUCTION Thank you for purchasing this CLARKE Generator. Before attempting to use this product, please read this
1-1/2 DIAMETER WATER PUMP
 1-1/2 DIAMETER WATER PUMP 2.2HP/79.8cc Engine MODEL # 101099 Operation Manual This safety alert symbol identifies important safety messages in this manual. Failure to follow this important safety information
Owner s Manual ELECTRIC GENERADORS R7100DP / G7100G
 Owner s Manual ELECTRIC GENERADORS R7100DP / G7100G Thank you for choosing a generator set of our company. This manual contains the information on how to do that. Please read it carefully before operating.
PORTABLE TRASH PUMPS MDP200
 PORTABLE TRASH PUMPS MDP200 OPERATING & PARTS MANUAL INTRODUCTION This manual provides information and procedures to safely operate and maintain the engine and pump. For your own safety and protection
GENERATOR MODEL NO: FG4050ES / FG5100ES OPERATION & MAINTENANCE INSTRUCTIONS PART NO: , LS0310
 GENERATOR MODEL NO: FG4050ES / FG5100ES PART NO: 8857715, 8857720 OPERATION & MAINTENANCE INSTRUCTIONS LS0310 INTRODUCTION Thank you for purchasing this CLARKE Generator. Before attempting to use this
PORTABLE TRASH PUMPS MTP200 MTP300 MTP400
 PORTABLE TRASH PUMPS MTP200 MTP300 MTP400 OPERATING & PARTS MANUAL INTRODUCTION This manual provides information and procedures to safely operate and maintain the engine and pump. For your own safety and
9500M. WARNING American Fab of SC, LLC Travelers Rest, SC OPERATOR S MANUAL INDUSTRIAL GASOLINE GENERATOR
 9500M INDUSTRIAL GASOLINE GENERATOR OPERATOR S MANUAL WARNING American Fab of SC, LLC Travelers Rest, SC It is extremely important to read and understand the entire contents of this operator s manual before
GENERATOR MODEL NO: FG3000 OPERATION & MAINTENANCE INSTRUCTIONS PART NO: LS0609
 GENERATOR MODEL NO: FG3000 PART NO: 8857700 OPERATION & MAINTENANCE INSTRUCTIONS LS0609 INTRODUCTION Thank you for purchasing this CLARKE Generator. Before attempting to use this product, please read this
PW2750 HOT WATER HI PRESSURE WASHER INSTRUCTION MANUAL
 4/10/2012 PW2750 HOT WATER HI PRESSURE WASHER INSTRUCTION MANUAL READ ALL INSTRUCTIONS AND WARNINGS BEFORE USING THIS PRODUCT. This manual provides important information on proper operation & maintenance.
GASOLINE GENERATOR SET SPG8000 PORTABLE GENERATOR INSTRUCTION MANUAL IMPORTANT!
 GASOLINE GENERATOR SET SPG8000 PORTABLE GENERATOR INSTRUCTION MANUAL IMPORTANT! Please make certain that persons who are to use this equipment thoroughly read and understand these instructions and any
OWNER S MANUAL MODEL TTP-300 3X3 Commercial Trash Pump
 OWNER S MANUAL MODEL TTP-300 3X3 Commercial Trash Pump P. O.Box 791, Travelers Rest, S.C. 29690 Phone 864-834-7212 Service/Replacement Parts 800-845-4141 WWW.TITANINDUSTRIAL.NET WARNING! Do Not Operate
9000RC INDUSTRIAL GASOLINE GENERATOR OPERATOR S MANUAL
 9000RC INDUSTRIAL GASOLINE GENERATOR OPERATOR S MANUAL IT IS EXTREMELY IMPORTANT TO READ AND UNDERSTAND THE ENTIRE CONTENTS OF THIS OPERATOR S MANUAL BEFORE ATTEMPTING TO OPERATE THE PRODUCT. THIS EQUIPMENT
KING CANADA 950W PORTABLE GENERATOR MODEL: KCG-951G INSTRUCTION MANUAL COPYRIGHT 2011 ALL RIGHTS RESERVED BY KING CANADA TOOLS INC.
 KING CANADA 950W PORTABLE GENERATOR MODEL: KCG-951G INSTRUCTION MANUAL COPYRIGHT 2011 ALL RIGHTS RESERVED BY KING CANADA TOOLS INC. WARRANTY & SERVICE INFORMATION 1-YEAR LIMITED WARRANTY FOR THIS 950W
Owner s Manual. Instructions for Assembly, Testing, Operation, and Servicing. Trailer Kit: High speed upgrade kit used with Item# WARNING
 M268176D.1 ITEM NUMBER: 268176 SERIAL NUMBER: Owner s Manual Instructions for Assembly, Testing, Operation, and Servicing Trailer Kit: High speed upgrade kit used with Item# 268175 WARNING READ and UNDERSTAND
ENGINE DRIVEN SEMI TRASH 3 PUMP MODEL NO: PS75
 ENGINE DRIVEN SEMI TRASH 3 PUMP MODEL NO: PS75 PART NO: 7230160 OPERATION & MAINTENANCE INSTRUCTIONS LS0817 - ISS 1 INTRODUCTION Thank you for choosing this Clarke Pump. The function of this pump is to
Owner s Manual Pressure Washer Pump: For high pressure cleaning machines.
 MA578F.2 TM ITEM NUMBERS: A57370, A57398, A57754, A578, A5787, A5783, A5788, A5785, A57820 A578203, A57873 Owner s Manual Pressure Washer Pump: For high pressure cleaning machines. WARNING Read this manual.
1200W INVERTER GENERATOR
 1200W INVERTER GENERATOR MODEL NO: IG1200 PART NO: 8877070 OPERATION & MAINTENANCE INSTRUCTIONS LS0117 INTRODUCTION Thank you for purchasing this CLARKE 1200W Inverter Generator. Before attempting to use
No part of this publication may be reproduced without written permission.
 Thank you for purchasing a Honda generator. This manual covers operation and maintenance of the EB3000 and EB4000 generators. All information in this publication is based on the latest product information
WARNING: Read these instructions before using the machine GENERATOR MODEL NO: IG3500F PART NO: OPERATION & MAINTENANCE INSTRUCTIONS
 WARNING: Read these instructions before using the machine GENERATOR MODEL NO: IG3500F PART NO: 8877100 OPERATION & MAINTENANCE INSTRUCTIONS ORIGINAL INSTRUCTIONS LS0217 INTRODUCTION Thank you for purchasing
Item # Owner s Manual Manual del Propietario
 Plate Compactor Item # 56035 Owner s Manual Manual del Propietario Questions? Problems? Please call our customer help line: (888) 315-3080 M-F 8-5 CST FEATURES Heavy Duty 24"x18" Compacting Plate Swing-over
Table of Contents. Safety symbols... 3 Assembly 6. Operation Maintenance Troubleshooting 11. Storage. 12. Notes. 13
 Table of Contents Safety symbols... 3 Assembly 6 Operation... 8 Maintenance... 10 Troubleshooting 11 Storage. 12 Notes. 13 2 Safety Information Attention; this machine can be dangerous! All operators should
This manual covers the operation and maintenance of water pump: 25ZB21-1.2Q
 Thank you for purchasing a water pump. This manual covers the operation and maintenance of water pump: 25ZB21-1.2Q The information and specifications included in this publication were in effect at the
General Power Products
 Portable Electric Generator Owners Manual MODEL: APP 6000 General Power Products IMPORTANT Please make certain the person who uses this Generator thoroughly reads these instructions and all other instructions
Owner s/operator s Manual
 Water Pump MP2533E2 Owner s/operator s Manual Completely read and understand this manual before using this product. Foreword This Owner s/ Operator s Manual is designed to familiarize the operator with
Owner s Manual. GENERATOR EU2000i. o Honda Motor Co., Ltd. -All Rights Reserved. See page 82 for Initial Use Instructions
 Owner s Manual GENERATOR EU2000i o2001-2009 Honda Motor Co., Ltd. -All Rights Reserved See page 82 for Initial Use Instructions The engine exhaust from this product contains chemicals known to the State
D Instructions/Parts. Siphon Feed Detail Spray Gun D
 Instructions/Parts D-5-55 Siphon Feed Detail Spray Gun FOR PRODUCT INFORMATION CALL: 1-800-742-7731 309991D Important Safety Instructions Read all warnings and instructions in this manual. Save these instructions.
GARDEN HOSE UTILITY PUMP
 GARDEN HOSE UTILITY PUMP MODEL #HPP360, HPP12V, 473707 MODEL #HPP360, 473707 MODEL #HPP12V ATTACH YOUR RECEIPT HERE Purchase Date SAFETY INFORMATION Please read and understand this entire manual before
Instruction Model 18537
 Instruction 738-556 Model 18537 LIMITED WARRANTY H. D. Hudson Manufacturing Company warrants to the original purchaser only that this product will continue to function as intended if used in accordance
AC2T & AC2T-ES INDUSTRIAL GASOLINE AIR COMPRESSOR
 AC2T & AC2T-ES INDUSTRIAL GASOLINE AIR COMPRESSOR INDUSTRIAL GAS AIR COMPRESSOR OPERATOR S MANUAL IT IS ETREMELY IMPORTANT TO READ AND UNDERSTAND THE ENTIRE CONTENTS OF THIS OPERATOR S MANUAL BEFORE ATTEMPTING
INTRODUCTION SAFETY MESSAGES CONTENTS OWNER S MANUAL WDP30X WARNING WARNING CAUTION
 INTRODUCTION Congratulations on your selection of a Honda diaphragm pump! We are certain you will be pleased with your purchase of one of the finest pumps on the market. We want to help you get the best
Owner s Manual Pressure Washer: Machine that cleans dirty surfaces with high pressure water.
 M1577541A TM ITEM NUMBERS: 1577541, 1577542 Owner s Manual Pressure Washer: Machine that cleans dirty surfaces with high pressure water. WARNING Read this manual. Serious injury or death can result if
Owner s Manual Trencher/Edger: Cuts trenches in dirt.
 M191185C.7 ITEM NUMBER: 191185 SERIAL NUMBER: Owner s Manual Trencher/Edger: Cuts trenches in dirt. Any Questions, Comments, Problems or Parts Orders Call NorthStar Product Support 1-800-270-0810 Table
PORTABLE INVERTER GENERATOR MODEL
 3200Watts PORTABLE INVERTER GENERATOR MODEL #104612 Operation Manual This safety alert symbol identifies important safety messages in this manual. Failure to follow this important safety information may
Owner s Manual PORTABLE GENERATOR. Model: PR2800 PR6500
 PORTABLE GENERATOR Owner s Manual Model: PR2800 PR6500 ALLPOWER INDUSTRIES AUSTRALIA A.B.N 46 650 681 742 Unit 5, 102-128 Bridge Road, Keysborough, VIC 3173, Australia Telephone: +61 38726 1444 / 1800
MGFHVLP. Instructions/Parts. Mini Gravity Feed System E. Part No Includes MGFHVLP Mini Gravity Feed Spray Gun and MGC 125 Gravity Cup.
 Instructions/Parts MGFHVLP Mini Gravity Feed System FOR PRODUCT INFORMATION CALL: 1-800-742-7731 309989E For gravity feed spraying of automotive colors and clears. Ideal for touch-up and detail work. Important
Owner, s Manual WATER PUMP WX10T. Includes US and Canadian Models. C 2014 Honda Motor Co., Ltd. -All Rights Reserved
 Owner, s Manual WATER PUMP WX10T Includes US and Canadian Models C 2014 Honda Motor Co., Ltd. -All Rights Reserved The engine exhaust from this product contains chemicals known to the State of California
Owner s Manual. GENERATOR EU1000i. o2013 Honda Motor Co., Ltd. -All Rights Reserved. See page 84 for Initial Use Instructions
 Owner s Manual GENERATOR EU1000i o2013 Honda Motor Co., Ltd. -All Rights Reserved See page 84 for Initial Use Instructions The engine exhaust from this product contains chemicals known to the State of
Owner, s Manual WATER PUMP WT20X WT30X WT40X. C 2012 Honda Motor Co., Ltd. -All Rights Reserved
 Owner, s Manual WATER PUMP WT20X WT30X WT40X C 2012 Honda Motor Co., Ltd. -All Rights Reserved The engine exhaust from this product contains chemicals known to the State of California to cause cancer,
Engines Original Instructions Model: DG350
 Engines Original Instructions Model: DG350 Henton and Chattell Ltd: London Road, Nottingham NG2 3HW. UK. CONTENTS SECTION 1 INTRODUCTION......3 SECTION 2 SAFETY MESSAGES...3 SECTION 3 SAFETY INFORMATION...3
Commercial Series Generator Operator Manual (with Kohler Command series engines)
") Commercial Series Generator Operator Manual (with Kohler Command series engines) PN: 220880 PREFACE Thank you for purchasing a Wanco Commercial Series portable generator set. This manual contains important
Commercial Series Generator Operator Manual (with Kohler Command series engines) PN: 220880 PREFACE Thank you for purchasing a Wanco Commercial Series portable generator set. This manual contains important
Owner s Manual PUMP WB20XT/WB30XT. 201 Honda Motor Co., Ltd. All Rights Reserved
 Owner s Manual PUMP WB20XT/WB30XT 201 Honda Motor Co., Ltd. All Rights Reserved The engine exhaust from this product contains chemicals known to the State of California to cause cancer, birth defects or
RedGum GP160 Splitter. Owner s Manual
 RedGum GP160 Splitter Owner s Manual Product Description & Intended Purpose: This Log Splitter / Wood Splitter is an outdoor product that splits wood logs for use as fuel in a fireplace or a woodstove.
UNPACKING SAFETY GUIDELINES GENERAL SAFETY INFORMATION. Operating Instructions & Maintenance Manual
 Please read and save this Repair Parts Manual. Read this manual and the General Operating Instructions carefully before attempting to assemble, install, operate or maintain the product described. Protect
YK1900i DIGITAL INVERTER GASOLINE GENERATOR OWNER S MANUAL PLEASE READ THIS MANUAL CAREFULLY. IT CONTAINS IMPORTANT SAFETY INFORMATION.
 YK1900i DIGITAL INVERTER GASOLINE GENERATOR OWNER S MANUAL PLEASE READ THIS MANUAL CAREFULLY. IT CONTAINS IMPORTANT SAFETY INFORMATION. PREFACE Thank you for purchasing YANGKE generator. This manual covers
Water pump Owner's Manual
 Water pump Owner's Manual Safety Precautions I. General Safeguards Please read this operation manual to have a thorough understanding of the content there before use the product. Failure to do so may lead
OWNER S MANUAL. 2 Axle
 OWNER S MANUAL Generator Wheel Kit Item # 165620, 165621 For use on: 165601, 165603, 165604, 165605, 165606, 165607 M165620E.3 165621 165620 Used on Qty Used On Qty 1 82021 5/16 washer (reuse from gen.)
LDG6000SA DIESEL GENERATOR OWNERS MANUAL
 LDG6000SA DIESEL GENERATOR OWNERS MANUAL BEFORE OPERATING THIS EQUIPMENT PLEASE READ THESE INSTRUCTIONS CAREFULLY Preface Thank-you for purchasing this generator. This operation manual contains information
Pump Owner s Manual. PLEASE! Read All Instructions Carefully Before Installing Pump
 Pump Owner s Manual PLEASE! Read All Instructions Carefully Before Installing Pump Guarantee Associate Engineering Corporation warrants that pumps purchased from them will be free of defects in material
Owner s Manual. GENERATOR EB2000i. o2013 Honda Motor Co., Ltd. -All Rights Reserved. See page 78 for Initial Use Instructions
 Owner s Manual GENERATOR EB2000i o2013 Honda Motor Co., Ltd. -All Rights Reserved See page 78 for Initial Use Instructions The engine exhaust from this product contains chemicals known to the State of
Operator s Manual Water Pumps WP201, WP30, WP40
 Operator s Manual Water Pumps WP201, WP30, WP40 WARNING: Do not assemble, install or operate this equipment without reading ALL of this manual and the safety precautions and warning illustrated in this
T1-Titanium Non-HVLP Spray Gun
 T1-Titanium Non-HVLP Spray Gun THE SPRAY GUN PEOPLE FOR PRODUCT INFORMATION CALL: 1-800-742-7731 Important Safety Instructions Read all warnings and instructions in this manual. Save these instructions.
Airless Spray Gun INSTRUCTIONS DP psi (345 bar) Maximum Working Pressure
 Maximum Working Pressure") INSTRUCTIONS DP-6376 Airless Spray Gun 5000 psi (345 bar) Maximum Working Pressure INSTRUCTIONS This manual contains important warnings and information. READ AND KEEP FOR REFERENCE. Table of Contents Warnings......................................
INSTRUCTIONS DP-6376 Airless Spray Gun 5000 psi (345 bar) Maximum Working Pressure INSTRUCTIONS This manual contains important warnings and information. READ AND KEEP FOR REFERENCE. Table of Contents Warnings......................................
Gasoline Engine GE208 OWNER S MANUAL MODEL NO.
 Gasoline Engine OWNER S MANUAL MODEL NO. GE208 2 ALL POWER GE208 GASOLINE ENGINE Congratulations on your purchase of an All Power GE208 Gasoline Engine! Thank you for purchasing a All Power engine. We
PF-4000, PF-4010, PF-4210 MULTI-PURPOSE ENGINE
 PF-4000, PF-4010, PF-4210 MULTI-PURPOSE ENGINE Date 09-26-01 Supplier To The Outdoor Power Equipment Industry ISM, Inc. 1028 4 th Street SW Auburn, WA 98001 Phone: (253) 333-1200 Fax: (253) 333-1212 WWW.TANAKA-USA.COM
Owner, s Manual WATER PUMP WX15T. Includes US and Canadian Models. C 2014 Honda Motor Co., Ltd. -All Rights Reserved
 Owner, s Manual WATER PUMP WX15T Includes US and Canadian Models C 2014 Honda Motor Co., Ltd. -All Rights Reserved The engine exhaust from this product contains chemicals known to the State of California
950 Watts (104609) /1200Watts (104610) /2000Watts (104611) PORTABLE INVERTER GENERATORS. MODELS #104609, # and #
 /1200Watts (104610) /2000Watts (104611) PORTABLE INVERTER GENERATORS. MODELS #104609, # and #") 950 Watts (104609) /1200Watts (104610) /2000Watts (104611) PORTABLE INVERTER GENERATORS MODELS #104609, #104610 and #104611 Operation Manual This safety alert symbol identifies important safety messages
950 Watts (104609) /1200Watts (104610) /2000Watts (104611) PORTABLE INVERTER GENERATORS MODELS #104609, #104610 and #104611 Operation Manual This safety alert symbol identifies important safety messages
TWPUMP. 2-Inch (50mm) Semi Trash / Water Pump Assembly & Operating Instructions READ ALL INSTRUCTIONS AND WARNINGS BEFORE USING THIS PRODUCT.
 Semi Trash / Water Pump Assembly & Operating Instructions READ ALL INSTRUCTIONS AND WARNINGS BEFORE USING THIS PRODUCT.") TWPUMP 2-Inch (50mm) Semi Trash / Water Pump Assembly & Operating Instructions READ ALL INSTRUCTIONS AND WARNINGS BEFORE USING THIS PRODUCT. This manual provides important information on proper operation
TWPUMP 2-Inch (50mm) Semi Trash / Water Pump Assembly & Operating Instructions READ ALL INSTRUCTIONS AND WARNINGS BEFORE USING THIS PRODUCT. This manual provides important information on proper operation
142F 144F GASOLINE ENGINE SM-142F-01A INSTRUCTION MANUAL
 142F 144F GASOLINE ENGINE SM-142F-01A INSTRUCTION MANUAL Thank you for purchasing our engine. This manual covers the operation and maintenance of your engine. All information in this publication is base
Reproduction. Not for. Wiring Diagram. Model / Modelo Mfg. No. Description / Descripción
 Wiring Diagram This generator is rated in accordance with CSA (Canadian Standards Association) standard C22.2 No. 100-94 (motor and generators). Questions? Help is just a moment away! Preguntas? La ayuda
Make/Type/Size/Model Honda Generator EB 3500X & EB5000X Operators Manual Open Well Ventilated Area to Start & Shut Down Machine
 HONDA GENERATORS ARE DESIGNED TO GIVE SAFE AND DEPENDABLE SERVICE IF OPERATED ACCORDING TO INSTRUCTIONS. YOU CAN HELP PREVENT ACCIDENTS BY BEING FAMILIAR WITH YOUR GENERATORS CONTROLS AND BY OBSERVING
G8 Portable Fuel Transfer Pump Owner s Manual
 G8 Portable Fuel Transfer Pump Owner s Manual GENERAL INFORMATION This pump is designed for use only with gasoline (up to 15% alcohol blends such as E15), diesel fuel (up to 20% biodiesel blends such as
DIRECT-DRIVE PRESSURE WASHERS
 DIRECT-DRIVE PRESSURE WASHERS PJG SERIES PRESSURE WASHER MANUFACTURED BY: PJG-2002B PJG-2502-6.5B PJG-3002B PJG-4002B INTRODUCTION Thank you for purchasing a Mancorp Pressure Washer. This manual covers
EZT715-EZT750 Owner's Manual
 EN EZT715-EZT750 Owner's Manual ESS FRC IMPORTANT: Read all safety precautions and instructions carefully before operating equipment. Refer to operating instruction of equipment that this engine powers.
SMQGZ F-02 PORTABLE WATER PUMP QGZ F INSTRUCTION MANUAL
 SMQGZ40-35-144F-02 PORTABLE WATER PUMP QGZ40-35-144F INSTRUCTION MANUAL The following information relates to protecting YOUR SAFETY and PREVENTING EQUIPMENT PROBLEMS. To help you recognize this information.
Engine Owner s Manual. Models sx4000, i4000, i4500, i5000, i5500, i7000 & i7000xt. Operating & Maintenance Instructions
 Engine Owner s Manual Models sx4000, i4000, i4500, i5000, i5500, i7000 & i7000xt Operating & Maintenance Instructions BEFORE OPERATING ENGINE Read entire Operating & Maintenance Instructions AND the instructions
2-in-1 Air Operated Waste Oil Drainer
 2-in-1 Air Operated Waste Oil Drainer 24-Gallon Tank Owner s Manual WARNING: Read carefully and understand all ASSEMBLY AND OPERATION INSTRUCTIONS before operating. Failure to follow the safety rules and
3 Inch Water Pump. SP-UG300. Owner s Manual
 Owner s Manual 3 Inch Water Pump SP-UG300 WARNING! To Reduce The Risk Of Injury, User Must Read And Understand Instruction Manual. www.steele-products.com CONTENTS SPECIFICATIONS... IMPORTANT SAFETY INFORMATION...
ZT710-ZT740 Owner's Manual
 EN ZT710-ZT740 Owner's Manual ESS FRC IMPORTANT: Read all safety precautions and instructions carefully before operating equipment. Refer to operating instruction of equipment that this engine powers.
Owner s Manual. GENERATOR EU3000i. o2009 Honda Motor Co., Ltd. -All Rights Reserved. See page 83 for Initial Use Instructions
 Owner s Manual GENERATOR EU3000i o2009 Honda Motor Co., Ltd. -All Rights Reserved See page 83 for Initial Use Instructions The engine exhaust from this product contains chemicals known to the State of
ILLUSTRATED PARTS BOOK. 196cc Rear Tine Tiller MODEL#: P-RTT-196MD-[E] MODEL#: P-RTT-196MD
![ILLUSTRATED PARTS BOOK. 196cc Rear Tine Tiller MODEL#: P-RTT-196MD-[E] MODEL#: P-RTT-196MD](/thumbs/73/69164090.jpg "ILLUSTRATED PARTS BOOK. 196cc Rear Tine Tiller MODEL#: P-RTT-196MD-[E] MODEL#: P-RTT-196MD") ILLUSTRATED PARTS BOOK 196cc Rear Tine Tiller MODEL#: P-RTT-196MD-[E] MODEL#: P-RTT-196MD 1 Table of Contents Upper Handle Assembly... 3 Base Assembly... 4 Parts List... 5-6 Tines &Tine Shield... 7-8 Transmission...
ILLUSTRATED PARTS BOOK 196cc Rear Tine Tiller MODEL#: P-RTT-196MD-[E] MODEL#: P-RTT-196MD 1 Table of Contents Upper Handle Assembly... 3 Base Assembly... 4 Parts List... 5-6 Tines &Tine Shield... 7-8 Transmission...
2800 PSI PRESSURE WASHER
 2800 PSI PRESSURE WASHER IMPORTANT: Model # PW28 bit.ly/wenvideo Your new tool has been engineered and manufactured to WEN s highest standards for dependability, ease of operation, and operator safety.
IMPORTANT: Read this manual fully before assembly and use and observe all safety rules and operating instructions
 PETROL ENGINE Model: MLR52 IMPORTANT: Read this manual fully before assembly and use and observe all safety rules and operating instructions Contents Technical Specification 2 Safety 3 Starting 5 Running
Viscount I Hydraulic Motor and Displacement Pump
 INSTRUCTIONS-PARTS LIST 308 674 INSTRUCTIONS This manual contains important warnings and information. READ AND KEEP FOR REFERENCE. Rev. C Supersedes Rev. B Viscount I Hydraulic Motor and Displacement Pump
INTRODUCTION SAFETY MESSAGES CONTENTS OWNER S MANUAL WDP30X WARNING: WARNING CAUTION
 INTRODUCTION Congratulations on your selection of a Honda diaphragm pump! We are certain you will be pleased with your purchase of one of the finest pumps on the market. We want to help you get the best
Introduction WISCONSIN ROBIN WR-WOI-21 OPM REV DATE: This catalog is designed to identify Wisconsin Robin parts.
 WISCONSIN ROBIN WR-WOI- OPM REV DATE: 0- Introduction This catalog is designed to identify Wisconsin Robin parts. When ordering parts, it is always advisable to list the engine model, specification number
AIR-COOLED DIESEL GENERATOR OWNERʼS MANUAL. This manual contains important safety information. TDG2500E TDGW7000E TDG7000SE TDG4500E
 AIR-COOLED DIESEL GENERATOR OWNERʼS MANUAL This manual contains important safety information. TDG2500E TDGW7000E TDG7000SE TDG4500E TDG8000-3 TDG7000SE-3 TDG7000E TDG8000E TDGW7000SE TDG7000E3 TDGW8000E
Part No FJ180V KAI. 4-stroke air-cooled gasoline engine OWNER, S MANUAL
 Part No. 99920-2280-02 FJ180V KAI 4-stroke air-cooled gasoline engine OWNER, S MANUAL SAFETY AWARENESS FOREWORD TABLE OF CONTENTS Whenever you see the symbols shown below, heed their instructions! Always
DISPLACEMENT PUMP INSTRUCTIONS-PARTS LIST Rev. K. Model , Series A Model , Series B Model , Series A
 INSTRUCTIONS-PARTS LIST INSTRUCTIONS This manual contains important warnings and information. READ AND KEEP FOR REFERENCE. DISPLACEMENT PUMP 308190 Rev. K 3000 psi (210 bar) MAXIMUM WORKING PRESSURE Model
GENERATOR MODEL NO: DG6000DVES OPERATION & MAINTENANCE INSTRUCTIONS PART NO: LS1216
 GENERATOR MODEL NO: DG6000DVES PART NO: 8675000 OPERATION & MAINTENANCE INSTRUCTIONS LS1216 INTRODUCTION Thank you for purchasing this CLARKE Generator. Before attempting to use this product, please read
Honda WX10T OWNER S MANUAL
 Honda WX10T OWNER S MANUAL Original instructions MANUEL DE L UTILISATEUR Notice originale BEDIENUNGSANLEITUNG Originalbetriebsanleitung MANUAL DE EXPLICACIONES Manual original Thank you for purchasing
This owner's manual is considered a permanent part of the engine and should remain with the engine if resold.
 Thank you for purchasing a water pump. Please reliably keep this Manual for your reference at any time. This owner's manual is considered a permanent part of the engine and should remain with the engine
LAWN MOWER OWNER S MANUAL
 LAWN MOWER OWNER S MANUAL Woodies SKU: 1153279 & 1153280 CAUTION: Read and follow all Safety Rules and Instructions before operating this equipment Thank you for choosing our Gasoline Lawnmower. 1 To ensure
Engine Parts Rev G.1
 664 Engine Parts Rev G. 48 664 Engine Parts Rev G. N/A Crankcase 2 Ball Bearing 2 3 Oil Seal 2 4 N/A Seal, Govern Arm Shaft 5 N/A Shaft, Govern Arm 6 N/A Washer, Govern Arm Shaft 7 N/A Pin, Lock 8 Bolt,
Table of Contents. Safety Assembly Pre-operation / Starting. 7. Operation.. 8. Maintenance. 9. Storage 10
 Table of Contents Safety... 3 Assembly... 6 Pre-operation / Starting. 7 Operation.. 8 Maintenance. 9 Storage 10 Parts drawings..11 Parts list by number..12 Notes.13 2 Safety Information Attention; this
OWNER S MANUAL EVOLUTION 3500, 4500, 5500, & 8500 SERIES PUMPS
 OWNER S MANUAL EVOLUTION 3500, 4500, 5500, & 8500 SERIES PUMPS IMPORTANT SAFETY INSTRUCTIONS When installing and using this electrical equipment, basic safety precautions should always be followed, including