kelderman air ride 2003 & Newer Dodge Front 8-10 Lift Kit Warranty Disclaimer Notice Read Before Beginning Installation
|
|
|
- Joel Junior Jordan
- 5 years ago
- Views:
Transcription


1 Air Ride Conversion System Installation Instructions kelderman air ride The difference in the ride is like night and day Inside this manual: 2003 & Newer Dodge Front 8-10 Lift Kit Tools required for installation Preliminary and safety instructions, installation steps 1-2 Parts location, installation steps 3 Installation steps 4-7 Installation steps 8-10 Installation steps Installation steps Steering box stabilizer instructions Warranty Disclaimer Notice Read Before Beginning Installation Revised 4/14/06 Some Kelderman Air Ride kits contain both fine thread and course thread fasteners, fittings and air bag mountings. Before attempting to tighten any threaded portion of the Air Ride, check to be sure the threads are the same size and thread count before attempting to tighten. Damaged or crossthreaded fasteners, fittings and air bags caused by improper size. Thread count or misalignment are not covered by warranty.
 Socket Set Hammer Torch or Grinder Welder Pinion Angle Finder Installing the Front Air Ride Before installation of the Air Ride unit, prepare a smooth, flat, hard surface and have all")
 figure A G3 Dodge **When raising or lowering the truck, keep jack stands in place to prevent the truck from falling, which could cause severe personal injury or death** DANGER jack stand")
2 Page 2 kelderman air ride Tools Required for Installation of the Air Ride Unit Tools and equipment required: (2) Floor Jacks or Hydraulic Jacks (2) Jack Stands Wheel Chocks Combination Wrench Set (up to 1 1/2 ) Socket Set Hammer Torch or Grinder Welder Pinion Angle Finder Installing the Front Air Ride Before installation of the Air Ride unit, prepare a smooth, flat, hard surface and have all tools and equipment needed for the job. Chock the rear wheels of the truck, to prevent it from rolling forward or rearward. **NOTE: Measure pinion angle before beginning installation. (figure A) figure A G3 Dodge **When raising or lowering the truck, keep jack stands in place to prevent the truck from falling, which could cause severe personal injury or death** DANGER jack stand driver s side differential floor jack 1.1

3 Page 3 Installation Instructions (continued) Step 1. Before installation, measure coil height and pinion angle. Record these measurements for future use. This will gauge how much air pressure is needed in the bags when installation is complete. It is also acceptable to measure the distance between the bottom of the fender and the ground. Add the amount of inches of the lift kit to this number to arrive at the final truck height. (ie. If the original measurement is 13 1/4 and a 10 lift kit was purchased, the new height will be 23 1/4 ). (1.2) 1.2 Step 2. After measuring pinion angle (figure A), place a jack under driver s side differential and jack up until the tire is off the ground. Place a jack stand under the frame of the truck. (1.1) sway bar nut Step 3. Remove tires Step 4. Remove top shock nut, bottom shock bolt, shock tower bolts and nut that holds sway bar. (1.3) 1.3


4 Page 4 kelderman air ride Step 4. Remove coil springs, driveshaft, sway bar, and trailing arms. (1.3) THE FRONT DRIVESHAFT NEEDS TO BE LENGHTENED 1 1/2. **NOTE: The shocks, shock tower, trailing arms and coil springs will not be reused Step 5. Locate the panhard bar relocation bracket. (1.6) Use the 1/2 x 5 and 9/16 x 3 1/2 bolts provided to fasten in place and reuse factory bolt in the end of the pitman arm. The 3/8 thick square washer goes on top of the engine cross member. Place a 2 long weld on the inside of the bracket where it fits along the engine cross member as well as on the front gusset. Reattach the panhard bar to the relocation bracket utilizing the factory bolt. (1.7 & 1.8) Step 6. Remove the factory pitman arm. Install the new drop pitman arm. Reattach the steering linkage. It will be required to turn the ball joint over 180 degrees. (1.8) The tow-in will have to be adjusted once the install is complete. Use the factory nut and torque the pitman arm to 250 lb/ft. It will be required to cut about 3/8 off the bottom of the passenger side sway bar end link mount otherwise the steering linkage will catch on the mount and not let the truck turn all the way. (1.9) Step 7. Place a jack under the transmission transfer case. Remove the skid plate. It will not be used. Remove the 14mm bolts that hold the factory transmission cross member in place, remove the nuts holding the transmission and take out the cross member. Locate the new cross member and fasten into place using the 9/16 x 7 1/2 bolts and flat washers. Insert the bolts from the rear forward but do not put the nuts on yet. Use the factory bolts to fasten the transmission to the new cross member. (2.0 & 2.1)


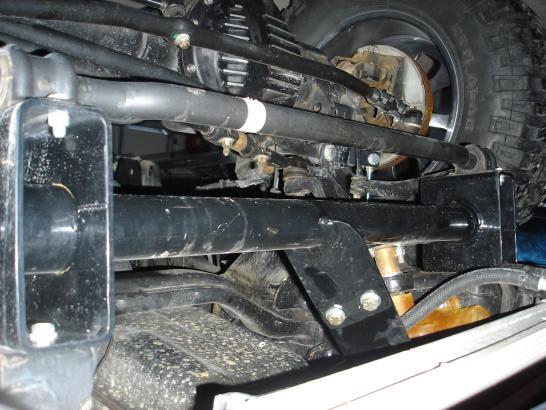
5 kelderman air ride Page 5 G3 Dodge weld weld


6 Page 6 Step 8. Locate the upper trailing arm mounts. Look for the oblong hole in the bottom of the frame just forward of the transmission cross member. Slide the brackets over the frame and insert the 5/8 x 9 bolt up from the bottom up. Locate the gusset brackets that fasten between the cross member mounting bolts (9/16 x 7 1/2 ) and the upper trailing arm bracket. (2.1 & 2.2) Step 9. Remove the bolt that holds the brake lines under the lower trailing arms. Reroute the brake lines so that they will be on top of the upper trailing arm mount. Either weld or bolt the bracket on the top side of the axle. Locate the upper trailing arms. One knuckle of the trailing arm is 3/8 narrower than the other knuckle. The narrow knuckle goes into the axle. Mount in place using the factory bolt in the axle and use the 5/8 x 5 bolt on the relocation bracket and support gusset. (2.1 & 2.2) Once the trailing arm is installed and tightened, use a welder to put a 2 weld on the inside of the trailing arm bracket and frame. Step 10. Locate the lower trailing arms. Fasten into place using the factory bolt on the axle end and use the 5/8 x 5 bolts on the cross member end. (2.1 & 2.2) driver s side

7 kelderman air ride Page 7 G3 Dodge Step 11. Locate the 8979 airbag, upper 6 tower, lower 3 spacer and the bottom airbag mount. Fasten the upper bag spacer to the top of the airbag with the 1/2 and 3/4 lock washers and nuts. Fasten the lower 3 bag spacer to the bottom of the air bag with the 1/2 x 4 1/2 bolt, flat washer and lock washer. Next, fasten the lower bag plate to the 3 spacer with the 1/2 x 1 1/2 bolt. Make sure to have the top tower bolts and the bottom air bag 2.3 mounting points compatible with the factory mounting points. On the passenger s side, slide the bottom 3 spacer out so it lines up with the outside of the bottom mount.(2.3) **NOTE: The air inlet should face the front of the truck. (2.3) When assembling unit, it is critical that the outside bolts on top of unit are parallel with the bottom tabs. Use the factory holes in the original upper spring perch as a reference point so that the lower bag tabs will fit into the axle. Step 12. Use the factory lower shock bolt to fasten the bottom bracket into the axle. Use the 3/8 nuts and lock washers to fasten the upper air bag spacer into the factory coil perch as well as the upper shock mount on top of the coil perch. Step 13. Locate the shocks. Use the 1/2 x 4 1/2 bolts on the upper bracket with the supplied spacers to center up the shock in the bracket. Use the 1/2 x 3 bolts on the bottom shock mounts. Just like the top, use the supplied shorter spacers to center the shock in the bottom mounts. It will be necessary to grind on the factory coil mount on each side just behind the front shock. Make sure you have about 1/4 between the shock body and the frame. (2.4) Step 14. Indexing ring installation. When lifting the G3 Dodge trucks it is required to index the transfer case. Failure to do so will result in premature driveshaft failure and driveline vibration. (The Dodge front driveshaft turns all the time). Use the supplied instructions for the indexing ring.)


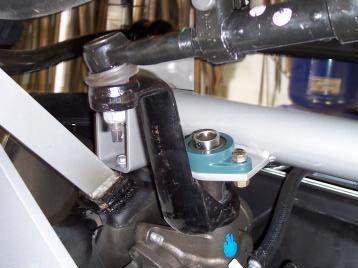
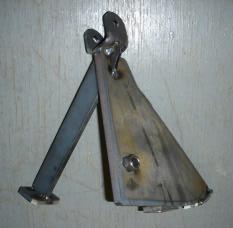
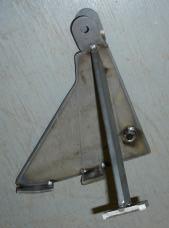
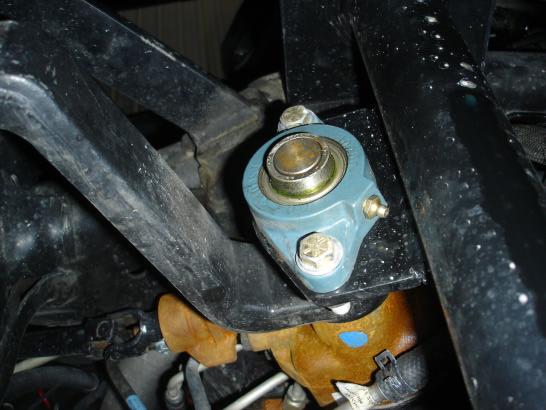
8 Page 8 Step 15. Locate the sway bar drop bracket. This bracket also serves as the steering box stabilizer system. Use the factory bolts to mount the top of the bracket into the frame. Use the 3/8 x 1 1/2 bolts to fasten the sway bar mounting brackets to the sway bar drop bracket. Do not install the machined nut and pillow block bearing on the steering box until the truck is driven and the pitman arm is fully seated. See page 9 for further instructions. Step 16. Alignment to run the kit as a 10 lift, inflate the bags to 12. Measure the bag from between the air bag mounting brackets. Go back to page 3 and compare this to your measurement. You should be around 23 of overall height in between the factory spring buckets. Once you are at ride height, place a jack stand under the front frame rails. Let all the air out of the bags. Go back to step one and find your original pinion angle. Keep this angle in mind while adjusting the upper and lower trailing arms. Center up the axle in the wheel well. Once you think the axle is centered, take a measurement from the front axle to the rear axle. This measurement should be within 1/8. If you set the pinion angle back to original and the axles are parallel with each other, you will not have to take the truck to an alignment shop. Double check to make sure all the bolts are tight. Loosen the steering wheel adjustment lock on the steering arm coming off the pitman arm. Try and get the steering wheel straight. It will have to be fine tuned after a test drive. You will also need to check the tow in on the tires. Step 17. Test Drive. Take the truck out on a test drive. Try and find a smooth road with no ruts and minimal wind. You should be able to take your hands off the wheel at mph and the truck should drive straight. If the truck pulls to one side, you will want to lengthen the front bars on the side that pulls. When you adjust, just do 1/4 turn at a time. Re-torque the pitman arm. It will need to be re-torqued about 2-3 times until the pitman arm finally bottoms out on the splines. Once the pitman arm seats, remove the factory lock washer and nut and install the machined nut and pillow block bearing on the steering box stabilizer kit. driver s side passenger s side 2.4 Make sure you have at least 1/4 between shock and OEM spring tower. grind here grind here

9 Steering box stabilizer kit installation instructions 1. If a Kelderman 10 kit is already installed, remove the sway bar lowering blocks. 2. Remove the nut and lock washer from the pitman arm. 3. Fasten the new sway bar lowering block/stabilizer kit in place. 4. Using the machined nut, apply red loctite to the threads, put on the flat washer and then tighten the machine nut to at least 150 lb/ft. 5. Slide the pillow block bearing over the 1 shaft and fasten into place with the 7/16 bolts and lock nuts. 6. Locate the upper steering box brace. Remove the two bolts on the left side of the steering box and fasten the steering box brace to the steering box with the provided 10mm bolts. Do not tighten yet. Next, fasten the steering box brace to the tab that is welded to the tube using the ½ x 1 1/2 bolts provided. Go ahead and tighten all 4 bolts. NOTE: If the truck is 2005 & newer, it will be required to modify the radiator fan shroud mounting bracket on the driver s side. Remove the 4 bolts that hold the mounting shroud (2 bolts are on the engine and the other 2 are on the plastic fan shroud). First, cut the stud off that went through the fan shroud on the driver s side. Next, measure 3 1/4 from the bend and cut off the remaining material. Now, reinstall the bracket to the engine block and to the passenger s side fan shroud. Take the stud that was cut off and fasten to the driver s side fan shroud. Lastly, use the provided bracket to weld the original bracket and stud together. See picture below. Factory stud Cut and weld here Cut and weld here

10 Driver s side Bolt hidden by belt 7. If you are installing the pitman arm for the first time do the following step before the sway bar lowering block/steering stabilizer kit is installed. Use the factory nut and lock washer to seat the pitman arm on the steering shaft. It will require upward of 300 lb/ft of torque to do this. Once the pitman arm is installed, start the truck and turn the wheel back and forth, lock to lock. This will help seat the pitman arm. It will take 3 or 4 times doing this to get the pitman arm to fully seat up on the steering shaft. Once the pitman arm is seated, then install the sway bar lowering block/steering stabilizer kit, machined nut and pillow block. See following page for additional pictures. Parts list Sway bar lowering block/steering stabilizer mount Pillow block bearing Machined nut 7/8 Flat washer 2) 7/16 x 2 bolts with lock nuts 2) m10 x 1.5 x 30 bolts with flat washers 2) 1/2 x 1 1/2 bolts with flat washers and lock nuts
11
12 Page 12 kelderman air ride Contact Information Kelderman Air Ride appreciates your business. We strive to meet the needs of our customers by providing the highest quality products. If you have any questions concerning this system, please call or us at the following: 2686 Highway 92 Oskaloosa, Iowa Phone: Fax: (641) The difference in the ride is like night and day
13 Page 13 Parts List A) (1) Steering box stabilizer kit w/ 4 3/8 x 1 1/2 bolts, lock washers and nuts Pillow block bearing with 7/16 x 2 bolt with flat washers and lock nuts Machined nut with 7/8 flat washer B) (1) Panhard bar relocation bracket 1) 1/2 x 5 bolt with flat washers, lock nut and 3/8 block 1) 9/16 x 3 1/2 bolt with flat washers and lock nut C) (2) Lower airbag mounts (R and L Side) (4) 1/2 x 3 bolts (2) 1/2 x 1 1/2 bolts with lock washers, flat washers and nuts D) (2) Upper shock mounts (4) 1/2 x 4 1/2 bolts with flat washers, lock washer and nuts E) (2) Upper bag mounts (6 risers) (6) 3/8 nuts and lock washers F) (1) Transmission cross member (4) 9/16 x 7 1/2 bolts with flat washers and lock nuts (2) 5/8 x 5 bolts with flat washers and lock nuts G) (2) Upper trailing arm brackets (R and L side) (2) 5/8 x 4 bolts with flat washers and lock nuts (2) 5/8 x 9 bolts with flat washer, lock washer and nut H) (2) Upper trailing arms 20 (one narrow knuckle, one wide knuckle) I) (2) Lower trailing arms 33 1/4 (both wide knuckles)
14 Page 14 Parts List (Continued) J) (2) Gusset brackets (R and L) goes between upper trailing arm mount and cross member K) (2) 3 risers (bottom air bag spacer) L) (2) 8979 air bags (2) 1/2 x 4 1/2 bolts with flat washer and lock nut (2) 1/2 lock washers and nuts (2) 3/4 lock washers and nuts M) (8) Upper shock bushings 7100 s use 1 1/8 spacers 5150 s use 3/4 spacers N) Indexing ring kit
15
kelderman air ride 2003 & Newer Dodge Rear 8-10 Lift Kit Warranty Disclaimer Notice Read Before Beginning Installation
 Air Ride Conversion System Installation Instructions 800 334-6150 www.keldermanairride.com kelderman air ride The difference in the ride is like night and day Inside this manual: 2003 & Newer Dodge Rear
kelderman air ride 2001 & Newer Chevy / GM 2500 Rear Lift Warranty Disclaimer Notice Read Before Beginning Installation
 Air Ride Conversion System Installation Instructions 800 334-6150 www.keldermanairride.com kelderman air ride The difference in the ride is like night and day Inside this manual: Tools required 2 for installation
kelderman air ride 2003 & Newer Dodge Rear 5-6 Lift Kit Warranty Disclaimer Notice Read Before Beginning Installation
 Air Ride Conversion System Installation Instructions kelderman air ride The difference in the ride is like night and day Inside this manual: 2003 & Newer Dodge Rear 5-6 Lift Kit Tools required for installation
kelderman air suspension BIGGER. BOLDER. BETTER.
 A i r S u s p e n s i o n S y s t e m I n s t a l l a t i o n I n s t r u c t i o n s D4R42/3X1010 800 334-6150 www.kelderman.com kelderman air suspension BIGGER. BOLDER. BETTER. Inside this manual: 2010
kelderman air ride The difference in the ride is like night and day
 KLM11152, KLM15756 A i r R i d e C o n v e r s i o n S y s t e m 800 334-6150 www.keldermanairride.com kelderman air ride The difference in the ride is like night and day Inside this manual: 2005 & Newer
A i r R i d e C o n v e r s i o n S y s t e m I n s t a l l a t i o n I n s t r u c t i o n s. kelderman air ride
 A i r R i d e C o n v e r s i o n S y s t e m I n s t a l l a t i o n I n s t r u c t i o n s 800 334-6150 www.keldermanairride.com kelderman air ride The difference in the ride is like night and day Inside
kelderman air ride The difference in the ride is like night and day Improves the ride of the truck Automatic leveling is available
 Air Ride Conversion System Installation Instructions 800 334-6150 www.keldermanairride.com The difference in the ride is like night and day Inside this manual: 2003 & Newer Dodge 2-bag Rear System Tools
2008 & Newer Ford F-350 Chassis Cab 4-Link Rear Installation Instructions
 KLM18100 2686 Highway 92 - Oskaloosa, IA 52577 phone: 641.673.0468 - fax: 641.673.4168 2008 & Newer Ford F-350 Chassis Cab 4-Link Rear Installation Instructions Installation 1. Before doing anything, measure
2017+ Ford F-250/350 4X4 Rear Lift Kit Installation Instructions
 A 13/64 drill bit and 1/4-20 tap is required. 7/8 drill bit is required 2017+ Ford F-250/350 4X4 Rear 10-12 Lift Kit Installation Instructions 1 1. Before you remove anything off the truck, measure the
Carli Suspension Front Instructions
 Carli Suspension Front Instructions 94-08 DODGE 2500-3500 4X4 SUSPENSION SYSTEM Note: Prior to installation, carefully inspect the vehicle=s steering and drive train components. Be sure to check ball joints,
PRE-INSTALLATION. INSTALLATION INSTRUCTIONS STEP 1: Park vehicle on level surface and chock rear wheels.
 2007-2013 7.5" GMC/Chevrolet 1500 4WD Suspension Lift kit PRE-INSTALLATION 15004 2 - Cross-member (Fr/Rr) 2 - Sway Bar Drop Bracket 2 - Knuckle (Dr/Pass) 1 - Driver Diff. Bracket 1 - Passenger Diff. Bracket
SYNERGY SUSPENSION UNIVERSAL FRONT 3-LINK KIT Version 1.0
 5051 - SYNERGY SUSPENSION UNIVERSAL FRONT 3-LINK KIT Version 1.0 GENERAL NOTES: These instructions are also available on our website; www.synergymfg.com. Check the website before you begin for any updated
2013+ DODGE RAM " Kit PART# STOP! READ THIS FIRST!
 NOTE: 2013+ DODGE RAM 3500 4" Kit PART# 54346 STOP! READ THIS FIRST! **READ THESE ENTIRE INSTRUCTIONS BEFORE STARTING ANYTHING** or chroming, which can damage the strength and structure of the metal, any
2013+ DODGE RAM LIFT KIT PART# STOP! READ THIS FIRST!
 NOTE: 2013+ DODGE RAM 3500 8 LIFT KIT PART# 54324 STOP! READ THIS FIRST! **READ THESE ENTIRE INSTRUCTIONS BEFORE STARTING ANYTHING** or chroming, which can damage the strength and structure of the metal,
09-12 Dodge 4WD Leveling Kit
 9235900 09-12 Dodge 4WD 1500 2.5 Leveling Kit Thank you for choosing Rough Country for all your suspension needs. DOES NOT FIT TRX PACKAGE VEHICLES!! Rough Country recommends a certified technician install
Super Duty Front Air Bag Installation Instructions
 2005-2010 Super Duty Front Air Bag Installation Instructions Congratulations! You have just purchased the best engineered, highest quality front air suspension kit available on the market for your 2005-2010
Installation Instructions
 Instructions Created by an: 2005+ Toyota Tacoma BTB Front Coilovers by Low Range Off Road SKU# TAC-SP-05CO-BTB-650 Diff Drop Kit (SKU# LR-2GDDK) Instructions included Installation Instructions Revised
PPM-8022 / PPM-8042 JEEP JK STAGE 2 SYNERGY SUSPENSION SYSTEM Version 1
 POLY PERFORMANCE MFG. 870 INDUSTRIAL WAY, SAN LUIS OBISPO, CA (805) 242-0397 PPM-8022 / PPM-8042 JEEP JK STAGE 2 SYNERGY SUSPENSION SYSTEM Version 1 GENERAL NOTES: These instructions are also available
'99-03 CHEVROLET/GMC IFS 4WD 6" SUSPENSION SYSTEM P/N INSTALLATION INSTRUCTIONS
 1/16/04 '99-03 CHEVROLET/GMC IFS 4WD 6" SUSPENSION SYSTEM P/N. 10-41099 INSTALLATION INSTRUCTIONS NOTE: Each Lift Kit and options to Lift Kits are packaged separately. Therefore, installation procedures
2014+ DODGE RAM LIFT KIT PART# STOP! READ THIS FIRST!
 NOTE: 2014+ DODGE RAM 2500 8 LIFT KIT PART# 54320 STOP! READ THIS FIRST! **READ THESE ENTIRE INSTRUCTIONS BEFORE STARTING ANYTHING** or chroming, which can damage the strength and structure of the metal,
6 Suspension System. Dodge wd Part#:
 Part#: 012622 6 Suspension System Dodge 2500 4wd 2009-2013 Rev. 010218 491 W. Garfield Ave., Coldwater, MI 49036. Phone: 517-279-2135 E-mail: tech-bds@sporttruckusainc.com Read And Understand All Instructions
6 Suspension System. Dodge wd Part#: &
 Part#: 012621 & 012631 6 Suspension System Dodge 2500 4wd 2008-2009 Rev. 010218 491 W. Garfield Ave., Coldwater, MI 49036. Phone: 517-279-2135 E-mail: tech-bds@sporttruckusainc.com Read And Understand
PPM-8023 / PPM-8043 JEEP JK SYNERGY STAGE 3 SUSPENSION SYSTEM Version 1
 SYNERGY MFG. 870 INDUSTRIAL WAY, SAN LUIS OBISPO, CA (805) 242-0397 PPM-8023 / PPM-8043 JEEP JK SYNERGY STAGE 3 SUSPENSION SYSTEM Version 1 GENERAL NOTES: These instructions are also available on our website;
INSTALLATION INSTRUCTIONS 88518
 INSTALLATION INSTRUCTIONS 88518 For Rancho Suspension Systems RS6518: 2009 FORD F-150 4WD READ ALL INSTRUCTIONS THOROUGHLY FROM START TO FINISH BEFORE BEGINNING INSTALLATION Rev A IMPORTANT NOTES! WARNING:
RAM LIFT KIT PART# STOP! READ THIS FIRST!
 NOTE: 2014-2016 RAM 2500 4 LIFT KIT PART# 54340 STOP! READ THIS FIRST! **READ THESE ENTIRE INSTRUCTIONS BEFORE STARTING ANYTHING** or chroming, which can damage the strength and structure of the metal,
I. Before starting installation
 5. Park the vehicle on a clean, dry, flat, level surface and block the tires so the vehicle cannot roll in either direction. A. Disconnect battery cables 1. Disconnect the negative cable first, then the
INSTALLATION INSTRUCTION 88088
 INSTALLATION INSTRUCTION 88088 For Rancho Suspension Systems RS6588 & RS6589: FORD F-150 READ ALL INSTRUCTIONS THOROUGHLY FROM START TO FINISH BEFORE BEGINNING INSTALLATION Rev B IMPORTANT NOTES! WARNING:
2.5" & 3.5" SUSPENSION SYSTEM JEEP JK WRANGLER 2 & 4 DOOR MODELS
 2.5" & 3.5" SUSPENSION SYSTEM 2007-2018 JEEP JK WRANGLER 2 & 4 DOOR MODELS JSPEC2352 www.jksmfg.com jks@ridefox.com 517-278-1226 RV. 100818 GETTING STARTED Read all warnings, instructions, notes and cautions
6 and 8 Long Travel Suspension System. Dodge Ram Part#:
 Part#: 012801 6 and 8 Long Travel Suspension System Dodge Ram 2500 2003-2012 Rev. 092617 491 W. Garfield Ave., Coldwater, MI 49036. Phone: 517-279-2135 E-mail: tech-bds@sporttruckusainc.com Read And Understand
IFS Eliminator Kit,
 IFS Eliminator Kit, 110001-1 IFS Eliminator Kit Contents: Front Leaf Springs (choice 3", 4", or 5") 1.0 High Steer Crossover Steering Kit 1.0 Frame Tube Jig Kit 1.0 Steering Stabilizer Kit 1.0 U-bolt Flip
04-08 FORD F150 4 KIT
 9257700 04-08 FORD F50 4 KIT THANK YOU FOR CHOOSING ROUGH COUNTRY FOR YOUR SUSPENSION NEEDS. Rough Country recommends a certified technician install this system. In addition to these instructions, professional
AEV30213AH Last Updated: 04/28/17. jk wrangler dualsport sc suspension INSTALLATION GUIDE
 AEV30213AH Last Updated: 04/28/17 jk wrangler 3.5 4.5 dualsport sc suspension INSTALLATION GUIDE PLEASE READ BEFORE YOU START TO GUARANTEE A QUALITY INSTALLATION, WE RECOMMEND READING THESE INSTRUCTIONS
97-06 JEEP TJ/LJ LONG ARM UPGRADE KIT
 921663U00 97-06 JEEP TJ/LJ LONG ARM UPGRADE KIT Thank you for choosing Rough Country for your suspension needs. This kit is an upgrade kit only. This kit includes frame mounting points and adjustable long
INSTALLATION INSTRUCTION 88578
 INSTALLATION INSTRUCTION 88578 For Rancho Suspension System RS6579B: 4WD Dodge 1500 & 2500 READ ALL INSTRUCTIONS THOROUGHLY FROM START TO FINISH BEFORE BEGINNING INSTALLATION Rev E IMPORTANT NOTES! WARNING:
General Medium Duty KLM C&C 2-Stage Rear Air Suspension Installation Instructions
 2686 Highway 92 - Oskaloosa, IA 52577 Phone: 641.673.0468 - Fax: 641.673.4168 www.kelderman.com General Medium Duty KLM 10745 C&C 2-Stage Rear Air Suspension Installation Instructions Class 6 & 7 Trucks
80-96 Ford F150 / Bronco 4WD Class II 4"- 6" Suspension Lift Installation Instructions
 www.skyjacker.com Required Tool List: 80-96 Ford F150 / Bronco 4WD Class II 4"- 6" Suspension Lift Installation Instructions Safety Glasses Metric / Standard Wrenches & Sockets Floor Jack Jack Stands Measuring
PRE-INSTALLATION. INSTALLATION INSTRUCTIONS Front Ford F150 4WD 4" Suspension Lift Kit
 2015 Ford F150 4WD 4" Suspension Lift Kit PRE-INSTALLATION 2 - Knuckle (Driv/Pass) 2 - Crossmember (Front/Rear) 2 - Differential Bracket (Driv/Pass) 1 - Diff. Brace Bracket (Pass) 2 - Front Brake Line
PRE-INSTALLATION. INSTALLATION INSTRUCTIONS Front Dodge Ram WD 6" Suspension Lift Kit
 2012-2015 Dodge Ram 1500 4WD 6" Suspension Lift Kit PRE-INSTALLATION 35015 2 - Knuckle (Driv/Pass) 2 - Crossmember (Front/Rear) 2 - Differential Bracket (Driv/Pass) 1 - Diff. Brace Bracket (Pass) 2 - Front
07-UP AVALANCHE 7.5 KIT
 92120900R1 07-UP AVALANCHE 7.5 KIT Thank you for choosing Rough Country for your suspension needs. We appreciate your business!! This kit will not fit vehicles equipped with electric steering or trucks
Read and understand all instructions and warnings prior to installation of system and operation of vehicle.
 102 S. Michigan Ave., Coldwater, MI 49036 Phone: 517-279-2135 Web/live chat: www.bds-suspension.com E-mail: tech@bds-suspension.com Part#: 023620 Product: 6" Suspension System Application: 2009-2012 Ford
4 & 6 High Clearance Suspension System. Dodge Ram WD Part#: ,
 Part#: 022624, 022402 4 & 6 High Clearance Suspension System Dodge Ram 1500 4WD 2012-2017 Rev. 020918 491 W. Garfield Ave., Coldwater, MI 49036. Phone: 517-279-2135 E-mail: tech-bds@sporttruckusainc.com
Nissan Titan 4 Front & 2 Rear Suspension Kit
 92187400 Nissan Titan 4 Front & 2 Rear Suspension Kit Thank you for choosing Rough Country for all your suspension needs. Rough Country recommends a certified technician install this system. In addition
EVO-1085 JK DoubleD Long Arm Upgrade. EVO /37 JK DoubleD LongArm Kit
 EVO-1085 JK DoubleD Long Arm Upgrade EVO-1084-35/37 JK DoubleD LongArm Kit (EVO-1084 pictured above with Bilstein 5100 Shocks and optional EVO HD Swaybar Endlinks) NOTES: Cutting and grinding is required
2.5" & 3.5" SUSPENSION SYSTEM 2018 JEEP JL WRANGLER 4 DOOR MODELS
 2.5" & 3.5" SUSPENSION SYSTEM 2018 JEEP JL WRANGLER 4 DOOR MODELS JSPEC1202/JSPEC1203 www.jksmfg.com jks@sporttruckusainc.com 517-278-1226 RV. 050318 GETTING STARTED Read all warnings, instructions, notes
'88-'00 CHEVROLET/GMC IFS 4WD(8LUG) OLD BODY STYLE 6" SUSPENSION SYSTEM P/N
 OLD BODY STYLE 6 SUSPENSION SYSTEM P/N") 4/10/13 '88-'00 CHEVROLET/GMC IFS 4WD(8LUG) OLD BODY STYLE 6" SUSPENSION SYSTEM P/N. 10-41888 INSTALLATION INSTRUCTIONS APPLICATION WARNING: Applicable for hub mounted ABS sensor models only. Not for 1992-94
4/10/13 '88-'00 CHEVROLET/GMC IFS 4WD(8LUG) OLD BODY STYLE 6" SUSPENSION SYSTEM P/N. 10-41888 INSTALLATION INSTRUCTIONS APPLICATION WARNING: Applicable for hub mounted ABS sensor models only. Not for 1992-94
OVER THE KNUCKLE 1-TON STEERING INSTALLATION INSTRUCTIONS
 OVER THE KNUCKLE 1-TON STEERING INSTALLATION INSTRUCTIONS TOOLS NEEDED Grinder with cutoff wheel, sawzall, cutting torches, or a plasma cutter Welder (for optional sway bar mounts) Hand drill with a ½
INSTALLATION INSTRUCTIONS DODGE DAKOTA 2 KIT # 682 (2WD), 692 (4WD) 3 KIT # 683 (2WD), 693 (4WD)
, 692 (4WD) 3 KIT # 683 (2WD), 693 (4WD)") INSTALLATION INSTRUCTIONS 1997-1999 DODGE DAKOTA 2 KIT # 682 (2WD), 692 (4WD) 3 KIT # 683 (2WD), 693 (4WD) Installation of a Performance Accessories body lift kit will change the vehicle s center of gravity
INSTALLATION INSTRUCTIONS 1997-1999 DODGE DAKOTA 2 KIT # 682 (2WD), 692 (4WD) 3 KIT # 683 (2WD), 693 (4WD) Installation of a Performance Accessories body lift kit will change the vehicle s center of gravity
STOP---READ THIS FIRST!
 STOP---READ THIS FIRST! **Read These Entire Instructions Before Starting Anything** 2003-2013 DODGE Ram 2500/3500, 8 LIFT KIT NOTE: * The factory wheels and tires WILL fit on the front of the vehicle once
WRANGLER TJ INSTALLATION INSTRUCTIONS Kit #: TJ251K/KN/KST/KSTN TJ401K/KN/KST/KSTN
 WRANGLER TJ INSTALLATION INSTRUCTIONS Kit #: TJ251K/KN/KST/KSTN TJ401K/KN/KST/KSTN Before beginning the installation, read these instructions and the enclosed driver s WARNING NOTICE thoroughly and completely.
AEV30243AK Last Updated: 05/01/18. 3 Dualsport front suspension ram truck 2500/3500 INSTALLATION GUIDE
 AEV30243AK Last Updated: 05/01/18 3 Dualsport front suspension ram truck 2500/3500 INSTALLATION GUIDE PLEASE READ BEFORE YOU START TO GUARANTEE A QUALITY INSTALLATION, WE RECOMMEND READING THESE INSTRUCTIONS
INSTALLATION INSTRUCTIONS FOR: RE DOOR JK WRANGLER RE DOOR JK WRANGLER 3.5 STANDARD SUSPENSION SYSTEM
 RUBICON MANUFACTURING INC. 3290 MONIER CIR., RANCHO CORDOVA, CA. 95742 916-473-4600 INSTALLATION INSTRUCTIONS FOR: RE7122 2 DOOR JK WRANGLER RE7142 4 DOOR JK WRANGLER 3.5 STANDARD SUSPENSION SYSTEM Safety
*1576BAG9* 1576BAG FORD F KIT C THANK YOU FOR CHOOSING ROUGH COUNTRY FOR YOUR SUSPENSION NEEDS.
 957600C THANK YOU FOR CHOOSING ROUGH COUNTRY FOR YOUR SUSPENSION NEEDS. 0-08 FORD F50-6 KIT Rough Country recommends a certified technician install this system. In addition to these instructions, professional
4WD RANGER/BRONCO II WD EXPLORER CLASS II INSTALLATION INSTRUCTIONS
 4WD RANGER/BRONCO II 8-97 4WD EXPLORER 90-94 CLASS II INSTALLATION INSTRUCTIONS Before beginning the installation, read these instructions and the enclosed driver s WARNING NOTICE thoroughly and completely.
04-08 FORD F150 6 KIT
 957600 THANK YOU FOR CHOOSING ROUGH COUNTRY FOR YOUR SUSPENSION NEEDS. 0-08 FORD F50 6 KIT Rough Country recommends a certified technician install this system. In addition to these instructions, professional
AEV30213AF Last Updated: 05/24/18. jk wrangler dualsport sc suspension right hand drive INSTALLATION GUIDE
 AEV30213AF Last Updated: 05/24/18 jk wrangler 3.5 4.5 dualsport sc suspension right hand drive INSTALLATION GUIDE PLEASE READ BEFORE YOU START TO GUARANTEE A QUALITY INSTALLATION, WE RECOMMEND READING
8" 4-LINK SUSPENSION SYSTEM. Ford Super Duty 4WD Part#:
 Part#: 013813 8" 4-LINK SUSPENSION SYSTEM Ford Super Duty 4WD 2011-2016 Rev. 051817 491 W. Garfield Ave., Coldwater, MI 49036. Phone: 517-279-2135 E-mail: tech-bds@sporttruckusainc.com Read And Understand
Toyota Tundra Tow Kit Installation Instructions
 2007-2013 Toyota Tundra Tow Kit Installation Instructions Congratulations! You have just purchased the best engineered, highest quality air suspension kit available on the market for your 07-14 Toyota
INSTALLATION INSTRUCTION 88148
 INSTALLATION INSTRUCTION 88148 Rev C For Rancho Suspension Systems RS6548, RS6549 & RS6550: GM 2500HD, 2500, and 1500HD Trucks READ ALL INSTRUCTIONS THOROUGHLY FROM START TO FINISH BEFORE BEGINNING INSTALLATION
05-07 F250 6 SUSPENSION KIT
 92159300 Stabilizer Drop Brackets Track Bar Bracket Control Arm Bracket Brake Line Drop Bracket Sway Bar Link Ext. Hardware Bags Pitman Arm 6111 Add-a-leaf 6578 3 Block and U-Bolt Kit 05-07 F250 6 SUSPENSION
Installation Instructions
 Instructions Created by an: Revised 7-11-17 LRT 2005-2017 3/1 Leveling/ Lift Kit for Toyota Tacoma by Low Range Off-Road (SKU# LR-LRTACO) Installation Instructions Suggested Tools: CAUTION: Safety glasses
Nissan Titan 6 Front & 4 Rear Suspension Kit
 92187500 Thank you for choosing Rough Country for all your suspension needs. Nissan Titan 6 Front & 4 Rear Suspension Kit Rough Country recommends a certified technician install this system. In addition
Step 5 Install the frame rail insert into the frame.
 COR-6372S, COR-6372D 63-72 C-10 Rear Coil-over KIT Tool s for the job Car Lift Floor Jack Chalks Jack Stands Standard Wrench set Standard Socket set Spring Compressor Phneumatic/ Electric Grinder Phneumatic/
97-06 JEEP TJ 3 1/4 PROGRESSIVE COIL/SPACER KIT
 92PERF1641 97-06 JEEP TJ 3 1/4 PROGRESSIVE COIL/SPACER KIT Thank you for choosing Rough Country for your suspension needs. Rough Country recommends a certified technician installs this system. In addition
INSTALLATION INSTRUCTIONS QA1 P/N R , R , R R , R , R F100 Rear Coil-over Conversion System
 INSTALLATION INSTRUCTIONS QA1 P/N R120-170, R120-200, R120-250 R220-170, R220-200, R220-250 65-72 F100 Rear Coil-over Conversion System TOOLS AND SUPPLIES REQUIRED Floor Jack Two (2) Jack Stands Drill
»Product» Safety Warning
 #F2402 & F2602 Installation Instructions 2004-2008 Ford F-150 4wd 4-6" Lift System Read and understand all instructions and warnings prior to installation of product and operation of vehicle. Zone Offroad
2.5" & 3.5" SUSPENSION SYSTEM
 2.5" & 3.5" SUSPENSION SYSTEM 2007-2014 JEEP JK WRANGLER 2 & 4 DOOR MODELS JSPEC2352 www.jksmfg.com jks@sporttruckusainc.com 517-278-1226 Rv. 071814 Getting Started Read all warnings, instructions, notes
Tools Needed: Class 8.8 Class MM 55ft/lbs 75ft/lbs 14MM 85ft/lbs 120ft/lbs 16MM 130ft/lbs 165ft/lbs 18MM 170ft/lbs 240ft/lbs
 921788000 JEEP JK 6 LONGARM Rough Country recommends a certified technician install this system. In addition to these instructions, professional knowledge of disassemble/reassembly procedures as well as
Technical Support Line: (952) Hanover Ave. Lakeville, MN
 Hanover Ave. Lakeville, MN") Technical Support Line: (952) 985-5675 Email: Sales@QA1.net 21730 Hanover Ave. Lakeville, MN 55044 www.qa1.net INSTALLATION INSTRUCTIONS QA1 1967-1979 Mopar A-Body Rear 6 link Conversion System QA1 p/n
Technical Support Line: (952) 985-5675 Email: Sales@QA1.net 21730 Hanover Ave. Lakeville, MN 55044 www.qa1.net INSTALLATION INSTRUCTIONS QA1 1967-1979 Mopar A-Body Rear 6 link Conversion System QA1 p/n
INSTALLATION GUIDE. 3 Dualsport suspension. ram truck 2500/3500. AEV30243AA Last Updated: 04/10/15
 3 Dualsport suspension AEV30243AA Last Updated: 04/10/15 ram truck 2500/3500 INSTALLATION GUIDE PLEASE READ BEFORE YOU START TO GUARANTEE A QUALITY INSTALLATION, WE RECOMMEND READING THESE INSTRUCTIONS
INSTALLATION MANUAL FOR ROCK KRAWLER SUSPENSION, INC. WJ SHORT ARM SYSTEMS
 INSTALLATION MANUAL FOR ROCK KRAWLER SUSPENSION, INC. WJ SHORT ARM SYSTEMS FIRST EDITION 8/24/09 Dear customer: Thank you for purchasing the best system on the market for your Jeep Vehicle. We are sure
Sport Sway Bar Kit Mustang
 Sport Sway Bar Kit 22102 2005 Mustang Installation of Hotchkis Front Sway Bar 1F Raising Vehicle Securely block the rear wheels of the vehicle. Use a jack to lift up the front of the vehicle and use jack
Installation Notes: #86000-R Race Series +3.5 L/T Kit
 159 North Maple St. Unit J, CORONA CA 92880 P. 951-737-9682 F. 951-737-9006 WWW.CHAOSFAB.COM Installation Notes: #86000-R Race Series +3.5 L/T Kit Factory manual is recommended for removal and re-installation
FORD F150/BRONCO CLASS II INSTALLATION INSTRUCTIONS
 FORD F50/BRONCO 80-96 CLASS II INSTALLATION INSTRUCTIONS Before beginning the installation, read these instructions and the enclosed driver s WARNING NOTICE thoroughly and completely. Also affix the WARNING
»Product» Safety Warning
 D2612 Installation Instructions 2012-2017 Dodge 1500 4wd 4" and 6" Suspension Systems Read and understand all instructions and warnings prior to installation of product and operation of vehicle. Zone Offroad
Rusty s JK Wrangler 3.25 Basic Kit RK-325B-JK INSTALLATION INSTRUCTIONS
 Rusty s JK Wrangler 3.25 Basic Kit RK-325B-JK INSTALLATION INSTRUCTIONS Last Revised: 5/31/2017 Introduction: Rusty s recommends that this installation is performed by a certified automotive technician
INSTALLATION INSTRUCTIONS FOR: RE7500 SERIES TJ EXTREME DUTY LONG ARM TRI-LINK SYSTEM INCLUDING TJ UNLIMITED
 RUBICON EXPRESS 3290 MONIER CIR., RANCHO CORDOVA, CA. 95742 916-473-4600 INSTALLATION INSTRUCTIONS FOR: RE7500 SERIES TJ EXTREME DUTY LONG ARM TRI-LINK SYSTEM INCLUDING TJ UNLIMITED Congratulations on
Dodge 5 Lift Kit Thank you for choosing Rough Country Suspension for your Off Road needs.
 *1368BAG4* 1368BAG4 921368200 2014-16 2500 Dodge 5 Lift Kit Thank you for choosing Rough Country Suspension for your Off Road needs. Rough Country recommends a certified technician installs this system.
INSTALLATION INSTRUCTIONS Cherokee / Grand Cherokee 3" Value Flex Lifts
 INSTALLATION INSTRUCTIONS Cherokee / Grand Cherokee 3" Value Flex Lifts Before beginning the installation, read these instructions and the enclosed driver s WARNING NOTICE thoroughly and completely. Also
Installation Instructions
 2003-Present Toyota 4Runner 2007-2014 FJ Cruiser LRT 3" Lift Kit by Low Range Off-Road (SKU# LR-LRFJ4RU) Installation Instructions Suggested Tools: CAUTION: Safety glasses should be worn at all times when
Suspension System RS6582B
 Suspension System RS6582B Tahoe/Yukon READ ALL INSTRUCTIONS THOROUGHLY FROM START TO FINISH BEFORE BEGINNING INSTALLATION IMPORTANT NOTES! WARNING: This suspension system will enhance the off-road performance
4.5 Suspension System. Jeep Wrangler JK Part#:
 Part#: 014454-014456 4.5 Suspension System Jeep Wrangler JK 2007-2018 Rev. 011018 491 W. Garfield Ave., Coldwater, MI 49036. Phone: 517-279-2135 E-mail: tech-bds@sporttruckusainc.com Read And Understand
KLM and up Ford F-53 Chassis Motorhome Front Installation Instructions
 KLM15757 2006 and up Ford F-53 Chassis Motorhome Front Installation Instructions Installation 1. Place the coach on a level concrete surface. 2. Place a jack under each side of the frame just behind the
09-12 Dodge 4WD /4 Body Lift
 92RC80000 09-12 Dodge 4WD 1500 1 1/4 Body Lift Thank you for choosing Rough Country for all your suspension needs. Rough Country recommends a certified technician install this kit. Attempts to install
»Product» Safety Warning
 #F1420 Installation Instructions 2011 Ford Super Duty F250/350 4wd 4" Suspension Lift Read and understand all instructions and warnings prior to installation of product and operation of vehicle. Zone Offroad
Dodge Ram 2500/3500 Tow Kit Installation Instructions
 2003-2010 Dodge Ram 2500/3500 Tow Kit Installation Instructions Congratulations! You have just purchased the best engineered, highest quality air suspension kit available on the market for your 2003-2010
This 6 suspension system was developed for 37x12.50x17 tire on an after market wheel w/ 4.5 back spacing.
 Thank you for choosing Rough Country for your suspension needs. 921560200C *1560BAG4* 1560BAG4 2017 F250 6 4-LINK SUSPENSION KIT Rough Country recommends a certified technician installs this system. In
Dodge Ram Kit
 92138000 Thank you for choosing Rough Country for your suspension needs. 2002-05 Dodge Ram 1500 4-5.5 Kit Rough Country recommends a certified technician install this system. In addition to these instructions,
INSTALLATION MANUAL FOR ROCK KRAWLER SUSPENSION, INC. TJ/LJ LONG ARM SYSTEMS
 INSTALLATION MANUAL FOR ROCK KRAWLER SUSPENSION, INC. TJ/LJ LONG ARM SYSTEMS EIGHTH EDITION 4/01/13 Dear customer: Thank you for purchasing the best system on the market for your TJ/LJ. We are sure you
*1224BAG1* WD GM KNUCKLE KIT
 92122400A *1224BAG1* Thank you for choosing Rough Country for your suspension needs. 2014-15 4WD GM 1500 5 KNUCKLE KIT Rough Country recommends a certified technician install this system. In addition to
Alpha Series Front Bumper Installation Manual
 1 K Alpha Series Front Bumper Installation Manual - 2017 Ford Super Duty 2 Kelderman Alpha Series Front Bumper Light Winch - Contents - Kit Numbers. (3) - Introduction. (4) - Safety... (5) - Bumper Removal......
»Product» Safety Warning
 RBP-LK215-60, RBP-LK215-60FS RBP-LK215-40, RBP-LK215-40FS RBP-LK216-60, RBP-LK216-60FS RBP-LK216-40, RBP-LK216-40FS Read and understand all instructions and warnings prior to installation of product and
Alpha Series Front Bumper Installation Manual
 1 K Alpha Series Front Bumper Installation Manual - 2003-2009 GM 4500-5500 2 Kelderman Alpha Series Front Bumper Winch Pre-Runner Bar Not Available - Contents - Kit Numbers. (3) - Introduction. (4) - Safety...
Installation Instructions
 Installation Instructions Jeep TJ Long Arm Suspension System 1997-2002 JEEP TJ 4WD 6 1997-2002 JEEP TJ 4WD FTS24002 & BK / FTS24003 & BK / FTS44002 & BK PARTS LIST FTS24002BK Jeep TJ 6' Box Kit 1 FTS24003BK
INSTALLATION INSTRUCTION 88051
 INSTALLATION INSTRUCTION 88051 For Rancho Suspension System RS6551: Chevrolet 2500 Suburban & 2500 Avalanche READ ALL INSTRUCTIONS THOROUGHLY FROM START TO FINISH BEFORE BEGINNING INSTALLATION Rev C IMPORTANT
Installation Instructions for Teraflex 2.5 Inch Lift Kit with Shocks (2010 Jeep Wrangler Unlimited)
") Installation Instructions for Teraflex 2.5 Inch Lift Kit with Shocks (2010 Jeep Wrangler Unlimited) Installation Time: 6 Hours Tools Required: Floor Jack Jack Stands Ratchet Torque Wrench 15mm Socket 15mm
Installation Instructions for Teraflex 2.5 Inch Lift Kit with Shocks (2010 Jeep Wrangler Unlimited) Installation Time: 6 Hours Tools Required: Floor Jack Jack Stands Ratchet Torque Wrench 15mm Socket 15mm
STOP---READ THIS FIRST!
 STOP---READ THIS FIRST! **Read These Entire Instructions Before Starting Anything** 2011-13 FORD F-250 & F350 6 & 8 LIFT KITS 5680 W. Barstow, Fresno, CA 93722 PH: (559) 226-8196 (559) 277-0457 FAX www.mcgaughys.com
DODGE RAM PICKUP INSTALLATION INSTRUCTIONS
 DODGE RAM PICKUP INSTALLATION INSTRUCTIONS Kit #: D501K/KN/KS/KSN D451K/KN/KS/KSN D551K/KN/KS/KSN D502K/KN/KS/KSN D452K/KN/KS/KSN D552K/KN/KS/KSN February 9, 1994 and Newer Models Before beginning the
97-06 Jeep TJ Wrangler Installation Instructions Models Kit# TJ251K/TJ401K-SX -DX 03 Models Kit# TJ253K/TJ403K-SX -DX
 97-06 Jeep TJ Wrangler Installation Instructions 97-02 Models Kit# TJ251K/TJ401K-SX -DX 03 Models Kit# TJ253K/TJ403K-SX -DX Before beginning the installation, read these instructions and the enclosed driver
OVERVIEW: KIT INCLUDES:
 Please visit www.fordracingparts.com for the most current instruction information!!! PLEASE READ ALL OF THE FOLLOWING INSTRUCTIONS CAREFULLY PRIOR TO INSTALLATION. AT ANY TIME YOU DO NOT UNDERSTAND THE
2014 F /6 LIFT KIT
 92157500 2014 F-150 4 /6 LIFT KIT THANK YOU FOR CHOOSING ROUGH COUNTRY FOR YOUR SUSPENSION NEEDS. Rough Country recommends a certified technician install this system. In addition to these instructions,