Rescue Hoist Ground Support Equipment Electric Version
|
|
|
- Alvin Wilfrid Parker
- 5 years ago
- Views:
Transcription

1 Rescue Hoist Ground Support Equipment Electric Version Introduction and Training Information
2 Overview of Training Program Introduction of system Benefits to the Users Theory of Operation When to use the GSE How to use the GSE General Maintenance 2
3 Introduction ZGS Mobile Electric Rescue Hoist Ground Support Equipment (RHGSE) 3
4 RHGSE Purpose The equipment is designed to assist in inspecting and maintaining the rescue hoist and the wire rope on the ground It is not intended to perform repetitive tests of the hoist system without in-flight hoist operations inbetween RHGSE operations repetitive extension and retraction of the cable without using the hoist in flight is not recommended the hoist cable may start to exhibit looseness near the ball end after excessive repetitive operations on the ground Extending the cable in flight redistributes the strain in the outer layers of the hoist cable and tends to tighten the cable up in a cable with loose outer strands 4
5 RHGSE Purpose Tension the RH wire rope on the hoist at all times during maintenance Protect the RH wire rope from damage due to improper ground handling or lack of space Clean, dry and lubricate the RH wire rope easily and quickly Provide RH wire rope objective inspection data and records Save the user time and money!!
6 Cable Construction Let s digress here and talk about the cable and how it is made for a minute 6

7 Wire Rope Construction Copyright
8 Wire Rope Balance Inner and outer strands are wrapped around the inner wire rope core. Inner and outer strands oppose each others tendency to twist. Proper balance insures equal load sharing between the inner and outer strands. Unbalanced rope tends to loosen up. 8
9 What s the point? Repeated running the hoist under no load on the ground The hoist s tension rollers tend to milk all the inherent looseness in the cable s outer strands down to the ball end Repetitive operation of the hoist with the RHGSE does not make the situation any better or worse 9
10 Why Cables get loose Manufacturing effects Outer layer must be tight and remain tight over its installed life Premature loosening is the result of the way the cable has been made Operational Effects The rescue hoist tension rollers have an effect The operational spectrum has an effect 10
11 No Load Lowering Effects of rescue hoist tension rollers Cable is being driven by the tension rollers Max load rollers can exert is approximately 22 lbs Inner strands lag behind the outer strands unless the outer strands are very tightly made Load =Zero Outer strands are pulled down by the compression of the tension rollers and the coefficient of friction at the interface Any looseness is pushed towards ball end 11
12 Loaded Cable Lowering Effects of rescue hoist tension rollers Tension rollers are idling Inner strands are pulled down by the load via the compression of the ball end fitting Outer strands are pulled down by the load via compression of the ball end fitting Load =Greater then 22 lbs 12
13 No load Raising Effects of rescue hoist tension rollers Tension rollers retard the outer strands while the cable is wrapped on the drum with approximately lbs depending on how far out the cable is Inner and outer strands are tensioned above the rollers by the capstan effect of wrapping the cable around the drum Load = less then 22 lbs Any looseness of the outer strands are pulled toward the ball end by the tension rollers 13
14 Loaded Cable Raising Effects of rescue hoist tension rollers Inner and outer strands are tensioned above the rollers by the capstan effect of wrapping the cable around the drum Tension rollers are effectively idling Load = greater than 22 lbs Equal tension of the inner and outer strands is generated by the compression of the ball end and the load 14
15 Back to the RHGSE When electricity is available you can use the electric mode. When it is not you can use the manual mode. 15
16 Back to the RHGSE The point is when extending, crank the handle so as not to let the cable become slack between and the top of the GSE and the hoist 16
17 RHGSE Design Attributes Portable to and from the helicopter in order to perform pre and post flight checks of the wire rope and rescue hoist system. Allows one person to perform all inspections and maintenance operations in a minimum amount of time. Maintains positive manual tension on the wire rope as it extends and applies a heavy load over the length as it retracts, while protecting the wire rope in a rotating tub during hoist maintenance. Accommodates the rescue hook and bumper. Cleans and dries the wire rope during post flight inspections after salt water use. Lubricates the wire rope. Conditions and tensions a new wire rope before having to fly the helicopter. 17
18 RHGSE Usage Benefits Operate the rescue hoist under load without flying the aircraft To check the hoist To check the cable To check the hoist / aircraft system Check the cable quickly and thoroughly Obtain increased knowledge of the condition of the cable Prevents cable loosening on drum and protects the cable at all time
19 Theory of Operation The overall system is comprised of the following subsystems Tensioning system Load indicating System Cleaning and lubricating system Cable storage system 19
20 Technical Details Subsystem components Hand crank Capstans and pressure rollers Load Clutch Load Indication system Load cell Display Wire rope storage Rotatub Spooler Lubrication and drying 20
21 Load Indication Hand Crank Load Clutch Lubridryer Capstans and Pressure Rollers Wire Rope Storage Cable Reel Adapter 21

22 Tensioning Prevents wire rope fouling on the rescue hoist when extending or retracting by applying tension to the wire rope via the dual capstans and hand crank or load clutch The tension is adjustable while retracting The tension is displayed to allow adjustment 22


23 Hand crank is used to extend Load clutch is used to retract 23

24 Capstan Principle 24
25 Tensioning 3 complete revolutions provides a high angle of wrap= beta High coefficient of friction= mew Affected by oil or water Therefore with 1-2 lbs as T1, T2 can be as high as 600 lbs Slipping is function of load, i.e. the higher the load the more slip 25

26 Exit and Pressure Rollers The Exit and Pressure roller function is to keep the cable tight on the capstans at all times 26

27 Extending the cable Rotate handle clockwise to take up wire rope in down direction as the pendant is actuated to extend the hoist cable Engage and rotate handle clockwise to take up wire rope in down direction. 27
28 Retracting cable under load Load adjuster Apply load lever after actuating the pendant to retract the cable onto the hoist then turn load adjuster clockwise to increase load 28


29 Load Indication System Load adjuster Load cell Load indicator display 29
30 RHGSE Prevents Ground Handling Damage Can be operated in confined spaces Prevents many risks of damage such as kinking and dirt and grit entrainment Prevents fouling of the wire rope on the hoist resulting from mishandling Prevents fouling of new wire rope by conditioning it 30

31 Wire Rope Storage &Protection Wire rope is stored neatly and evenly on a rotating drum that is timed exactly to match the rotation of the capstans 31

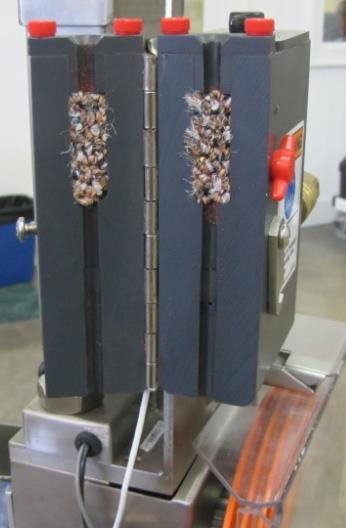
32 Cable Guide Rollers Guide rollers are intended to keep cable down inside the rotatub Warning: Do not continue to operate the system if the cable rides to the top of the spooler, The Rotatub Clutch needs to be adjusted 32

33 Rotatub and Spooler 33
34 Rotatub Clutch Slip V2 R2*V2=R2*V1=R3*V3*slip R2 V2 V1 R3 V3 34
 screws to obtain 5-6 lbs force with scale Approx 6")
35 Rotatub Position Compensation Rotatub and spooler are both independently adjustable Rotatub has a clutch to compensate for slip on the capstans Clutch is adjusted via (4) screws to obtain 5-6 lbs force with scale Approx 6 lbs 35

36 Rotatub Slip Check 3-4 lb. max 36
37 Cable diameter and condition The cable s diameter will affect the way the cable lays up in the Rotatub and Spooler As the cable wears its diameter is reduced The smaller the diameter of the cable the more it will slip on the capstans The more it slips on the capstans the more it will ride to the top of the Spooler The Spooler speed can be slowed to allow the cable to fall to the bottom of the Rotatub Never let the cable ride to the top of the spooler and escape the Rotatub 37
38 When retracting close to full up Always watch the cable inside the rotatub to slow down and stop the hoist before the cable comes out of the spooler and hits the pressure roller Caution: Failure to stop the hoist before the hook comes out of the Rotatub may cause damage to the RHGSE and the wire rope. Pay close attention to the number of turns in the Rotatub as the hook approaches the up limit position. 38
39 Cleaning, Drying, Lubricating the Cable Lubridryer uses pads to wipe debris, or salt off of the cable Pads are easily replaced after every use or as required Replace the pads after extending and before retracting to remove all saline residuals Rotatub can be filled with water to rinse off saline residuals Use of compressed air can blow water off of the cable as it is retracted 39

40 Cleaning and Desalinating 40

41 Lubridryer Thumbscrews Lubridryer bushings Cleaning pads Latch Air path and chamber 41

42 RHGSE Provides Wire Rope Accomplished by a combination of water washing and pulling the wire rope through a set of cable pads The pads can be fed oil if required by the hoist OEM Wire Rope is dried by compressed air to remove the majority of the water entrained by the wire rope during desalinization Cleaning 42

43 Wire Rope Cleaning and Drying Oil Reservoir Oil Shut Off Compressed Air inlet 43

44 Capstan Cover Always close cover to prevent entanglement Cover Opens to the side 44


45 Cable Reel Adapter Allows unwinding and reeling on a new cable 45
46 When to use the GSE For Post Flight inspection when rescue hoist has been used To perform a 30 Day cable inspection if the hoist has been in use When changing a cable Whenever a cable is reeled out beyond the top layer to re-tension the cable To check hoist functions 46
47 Post Flight when hoist has been used To inspect the length of cable that was used Verify no new damage Provide a record To wash off saline residuals To restore tension on the lower layers To verify hoist functions 47
48 30 Day inspection To perform a full length cable inspection and document the results To verify hoist functions To restore tension in the cable on the lower layers Only required if the hoist has been in use over the last thirty days 48
49 When changing a cable Remove old cable Install new cable Condition new cable Tension new cable on the lower layers 49

50 Installing a new cable Cable Reel Adapter 50
51 Conditioning a New Cable Run the cable slowly off and on the hoist drum 3 times under increasing load and observe the cable wrapping and the limit switch actuation points This acclimates the cable to the smaller drum diameter compared to the reel it was stored on Set limit switches and adjust levelwind if required Increase the load while retracting during each evolution until 300 lbs. load is reached on the last retraction An in-flight hoist evolution cable afterwards provides optimum conditioning of the cable 51
52 Whenever a cable is reeled out beyond the top layer In flight during a mission On the ground during an inspection To restore the tension in the cable on the lower layers 52


53 Pretensioning a cable Restores tension to the lower layers of cable to prevent crushing and abrasion when a heavy load is lifted The first 4 layers have lost their tension and begin to deform and get crushed by the hard wound top layers. Regular pretensioning of ALL layers will minimize the crushing effect. Rope is installed with proper pretension onto the drum. All layers are hard wound and retain their round shape. Also referred to as Reseating the cable 53
54 To check hoist functions Slow down / intermediate speed activation verification Full out limit switch verification Cable attachment verification Levelwind / drum adjustment verification 54
55 How to use GSE while extending Position the tool directly under hoist cable exit point Run out approximately feet of cable Insert the hook and cable into the rotatub hook facing down to allow twist to be removed Wrap the cable around the capstans tightly Remove the pins from the tension rollers arms Turn the hook upside down and place the remaining cable into the Rotatub assembly so that there is no tension on the cable and the cable is between the guide rollers Caution: Cable must be at the bottom of slot in Spooler Use the pendant to activate the hoist to extend Crank the handle to stay ahead of the rescue hoist Extend the cable until the full out limit switch stops the hoist 55
56 Notes and Cautions for Extending Never operate the system without the clear cover closed Always insure both pressure rollers are engaged Always watch the first three turns of the capstans to insure the cable is wrapped properly and tightly When starting cable must be at the bottom of slot in Spooler Never let the cable ride to the top of the spooler and escape the Rotatub 56
57 How to use it while retracting Remove the crank handle Turn on the load indicator switch Activate the hoist using the pendant retract switch Apply the load lever and adjust the load as desired while running the hoist at a steady speed Run the cable back to near the starting position and stop before the hook starts to come out of the rotatub Turn off the load indicator Open the cover Install the pins in the tension roller arms Remove the hook from the rotatub and turn it hook side down Unwrap the cable from the capstans while removing twist in the cable Run the cable to full in and verify the slow down up limit switch functions, the full in switch functions and the homing load is proper Reposition the tool away from the helicopter 57
58 Notes and Cautions for Retracting Start retracting first then apply the load handle Do not adjust the load so high that the GSE lifts off the ground Do not adjust the GSE at a very slow speed Always pay attention to the end of the cable as it approaches full in and be prepared to stop before the hook exits the Rotatub When washing the cable apply 100 lbs. or less to prevent slipping on the capstans The cable will slip on the capstans at high loads, only apply high loads as required to condition cable or check hoist operation 58
59 Questions? Next perform setup and usage of the GSE in order to run the hoist on the aircraft Next vary the loads 59
60 General Maintenance Keep RHGSE clean and dry when not in use Change the pads every time the GSE is used to desalinate the cable After extending the cable into the tub full of water and before retracting the cable Check the Rotatub Slip Check the Capstan Wear 60
61 Preventative Maintenance Wash salt water off of RHGSE after use Do not spray water on indication system Oil the capstan drive chain once a month Adjust the Rotatub compensation clutch if it starts to slip too easily Re-lubricate it once a year under heavy use 61
62 Periodic Maintenance Change wire rope cleaning pads Check Rotatub Slip Torque Lubricate the wheels Lubricate the chain Measure the Capstans 62


63 Change Wire Rope Pads Used New 63

64 Tighten Rotatub 5-6 lbs Adjust these 4 screws and nuts evenly 64
65 Lubricating Rotatub Clutch Grease used Mil-G Clean off old grease Apply a thin film to both sides of the center Bronze plate and the upper surface of the Lower plate and the lower surface of the Top plate Reassemble and readjust the screws and Bellevile washers 65
66 66

67 Checking the Capstans Cable Diameter Lower Capstan Part number Measurement Pin diameter Minimum dimension over pin 3/16 inch ZGS in 4.5 mm ZGS in 5/32 inch ZGS in 3.5 mm ZGS in 1/8 inch ZGS in 67


68 Lubricate the wheels Grease fittings 68

69 Lubricate the Capstan Chain Depending on usage lubricate on monthly basis 69
70 Repairs Chain adjust Belt adjust Heads adjust 70

71 Capstan Chain Tighten such that chain deflects about 1 mm with.5 kg force at the midpoint Align sprockets with straight edge 71

72 Vertical Drive Belt Tighten such that the belt deflects about 2mm with.5 kg force at the midpoint *Shown is a Hydraulic GSE, belts are the same in both. 72

73 Drum Drive Belt Adjustment Screw 73

74 Head Adjustment Loosen nuts from bottom to top Tighten from bottom to top Insure heads are aligned with each other and with the base 74
75 Conclusion Read through the operators manual Contact as required Comments and suggestions are always welcome 75
Rescue Hoist Ground Support Equipment. Manually Operated. ZGS v2. Operation and Maintenance Manual
 Rescue Hoist Ground Support Equipment Manually Operated ZGS-11000-2 v2 Operation and Maintenance Manual United States Patent # 7,429,031 B1 Copyright 2002-2015 Page 1 of 28 Table of Contents 1.0) Introduction...
ZGS Electric Rescue Hoist Ground Support Equipment Operation and Maintenance Manual
 ZGS-11300-1 Electric Rescue Hoist Ground Support Equipment Operation and Maintenance Manual Electrically and Manually Operated United States Patent # 7,429,031 B1 Copyright 2012-2013 Zephyr International
Rescue Hoist Ground Support Equipment
 Rescue Hoist Ground Support Equipment Zephyr International LLC 120 Royal Manor Rd. Easton, PA 18042 USA zephyrintl@rcn.com Page 1 of 6 Introduction: Helicopter rescue hoists use tension rollers to keep
ZGS Electric Rescue Hoist Ground Support Equipment Operation and Maintenance Manual
 ZGS-11300-1 Electric Rescue Hoist Ground Support Equipment Operation and Maintenance Manual Electrically and Manually Operated Does not include the Magnetic Inspection System can be purchased separately
Hydraulic Rescue Hoist Ground Support Equipment ZGS Operation and Maintenance Manual
 Hydraulic Rescue Hoist Ground Support Equipment ZGS-10000-5-1 Operation and Maintenance Manual United States Patent # 7,429,031 B1 ZGS-10000-5-1 Mobile Hydraulic RHGSE (shown with Optional MagSens Head
Rescue Hoist Ground Support Equipment Operation and Maintenance Manual
 Rescue Hoist Ground Support Equipment ZGS-10000-2 Operation and Maintenance Manual Copyright 3-22-2005 Zephyr International LLC Page 1 of 93 TABLE OF CONTENTS PAGE...ERROR! BOOKMARK NOT DEFINED. 2) PURPOSE
Batteries, Cables, and Receptacle
 Batteries, Cables, and Receptacle ZGS-10056-1 Battery 12V (Main) 8A31DT 6140-01-629-2973 1 3-4 Weeks ZGS-10078-1/2 Battery Box with Lid Not available 1 2-3 Weeks ZGS-10311-1 Main Negative Wire Assembly
Instructions for INSTALLATION -- OPERATION -- MAINTENANCE of the SELAS AIR/GAS BLENDER VALVE. (for PROPANE/AIR, BUTANE/AIR AND OTHER BLENDS)
") DESCRIPTION The SELAS Blender Valve is a three-port, adjustable area valve which accurately mixes any two of a wide variety of gases. Air and Gas ports in a movable piston are matched to complimentary
DESCRIPTION The SELAS Blender Valve is a three-port, adjustable area valve which accurately mixes any two of a wide variety of gases. Air and Gas ports in a movable piston are matched to complimentary
Recommended Maintenance Procedures for the Cutters Edge MULTI-CUT 2100 Series Fire Rescue Saw
 Recommended Maintenance Procedures for the Cutters Edge MULTI-CUT 2100 Series Fire Rescue Saw 2 Outer section Adjustment Knob Remove and Clean ToolLess Guard/Depth Gauge Unscrew Adjustment Knob, remove
Serving Rescue Hoist Users Worldwide When the right tool for the job is needed
 Serving Rescue Hoist Users Worldwide When the right tool for the job is needed 1-843-365-2675 E-mail: info@zephyrintl.com Website: www.zephyrintl.com Part # ZRG-7000-1 DarkLight G2G (For use with most
OWNERS GUIDE 12V / 24V DC ELECTRIC WINCH. 12,000lb (6124kg) TWO SPEED VERY IMPORTANT
 TWO SPEED VERY IMPORTANT") OWNERS GUIDE 12V / 24V DC ELECTRIC WINCH. 12,000lb (6124kg) TWO SPEED VERY IMPORTANT IT IS ESSENTIAL THAT YOU READ AND UNDERSTAND THIS GUIDE BEFORE INSTALLING AND OPERATING YOUR WINCH WINCHMAX UK WWW.WINCHMAX.CO.UK
OWNERS GUIDE 12V / 24V DC ELECTRIC WINCH. 12,000lb (6124kg) TWO SPEED VERY IMPORTANT IT IS ESSENTIAL THAT YOU READ AND UNDERSTAND THIS GUIDE BEFORE INSTALLING AND OPERATING YOUR WINCH WINCHMAX UK WWW.WINCHMAX.CO.UK
TWO-STAGE HYDRAULIC PUMP. RWP55-IBT-Air
 ORIGINAL INSTRUCTIONS Form No.1000458 5 SPX Corporation 5885 11th Street Rockford, IL 61109-3699 USA Tech. Services: (800) 477-8326 Fax: (800) 765-8326 Order Entry: (800) 541-1418 Fax: (800) 288-7031 Internet
SECTION G2: CABLE PROCESSOR MODULE MAINTENANCE
 SECTION G2: CABLE PROCESSOR MODULE MAINTENANCE Cable Processor Module overview WARNING! When tipping the Cable Processor Module back, (after removing the toggle arm pin), use extreme caution not to drop
 DRUM BRAKE RIMS Periodic inspection of drum brake rims is necessary to determine indications of uneven or excessive wear. In general, brake rim failures other that regular wear are caused by brake linings
WINCHMAX. Hydraulic Winch Instructions b b b
 WINCHMAX Hydraulic Winch Instructions 1010001b 1510001b 2010001b Safety warnings and precautions WARNING: When using the tool, basic safety precautions should always be followed to reduce the risk of personal
MICROGUARD 500 EXTENSION REEL TRAINING MANUAL. Greer Company. Greer Company Crane Systems 1 OF18
 MICROGUARD 500 EXTENSION REEL TRAINING MANUAL 1 OF18 TABLE OF CONTENTS MICROGUARD 500 SERIES EXTENSION REEL TRAINING MANUAL EXTENSION REEL OVERVIEW...3 REEL-OFF CABLE LAYERING...3 CHECKING THE REEL-OFF
Vertical Belt Alignment
 Vertical Belt Alignment Zephyr International LL 505 Enoch Rd, onway S 956 USA Phone 843-365-675 * Fax 843-365-677 Email: info@zephyrintl.com Web: www.zephyrintl.com Prepared by Michael R Mitchell mmitchell@zephyrintl.com
AIR BRAKES THIS SECTION IS FOR DRIVERS WHO DRIVE VEHICLES WITH AIR BRAKES
 Section 5 AIR BRAKES THIS SECTION IS FOR DRIVERS WHO DRIVE VEHICLES WITH AIR BRAKES AIR BRAKES/Section 5 SECTION 5: AIR BRAKES THIS SECTION COVERS Air Brake System Parts Dual Air Brake Systems Inspecting
KWSL2000RM ! CAUTION!! READ AND UNDERSTAND THIS MANUAL BEFORE INSTALLATION AND OPERATION OF THIS PRODUCT. DO NOT RETURN THIS PRODUCT TO SELLER.
 Assembly & Operating Instructions KWSL2000RM 2000 Lb. 12VDC Electric Winch! CAUTION!! READ AND UNDERSTAND THIS MANUAL BEFORE INSTALLATION AND OPERATION OF THIS PRODUCT. DO NOT RETURN THIS PRODUCT TO SELLER.
MX WINCH AND CONTROLLER
 MX WINCH AND CONTROLLER Mount Sopris Instrument Co., Inc. Denver, CO. U. S. A. May 17, 2012 Table of Contents General Information... 3 AC supply Warning... 3 Inverter Warning... 3 Winch Setup... 4 Operation...
IMPORTANT INFORMATION BEFORE USING YOUR 12V ELECTRIC WINCH
 IMPORTANT INFORMATION BEFORE USING YOUR 12V ELECTRIC WINCH The responsibility for safe operation of this winch ultimately rests with the operator. Please read all operating instructions carefully before
Wheel Horse. 44 Snowthrower. for 5xi Lawn and Garden Tractors. Model No & Up. Operator s Manual
 FORM NO. 8 Rev A Wheel Horse Snowthrower for 5xi Lawn and Garden Tractors Model No. 7966 890050 & Up Operator s Manual IMPORTANT: Read this manual, and your tractor manual, carefully. They contain information
AUTO REWIND AIR HOSE REEL
 Model #s 46845, 46848 AUTO REWIND AIR HOSE REEL OPERATOR S MANUAL STORE THIS MANUAL IN A SAFE PLACE FOR FUTURE REFERENCE!? NEED HELP? Save time, contact us first. 888-648-8665 support@tekton.com WARNING:
Fisher 657 Diaphragm Actuator Sizes and 87
 Instruction Manual 657 Actuator (30-70 and 87) Fisher 657 Diaphragm Actuator Sizes 30 70 and 87 Contents Introduction... 1 Scope of Manual... 1 Description... 2 Specifications... 2 Installation... 3 Mounting
CALIFORNIA TRIMMER MOWER MAINTENANCE MANUAL
 CALIFORNIA TRIMMER MOWER MAINTENANCE MANUAL 2 Table of Contents Section 1: General Information Page Handle Assembly Instructions 4 Maintenance All Models 6 Oil Change Procedures All Models 9 Height Adjustment
Quick Install Lift AL065 Installation Guide & Owners Manual
 Quick Install Lift AL065 Installation Guide & Owners Manual Congratulations on your new lift purchase. The Quick Install Lift line is one of the easiest and most trouble free ways to transport your scooter
2 TON CAPACITY PROFESSIONAL SERIES ALUMINUM JACK OWNER'S MANUAL SPECIFICATIONS
 80006 OWNER'S MANUAL CONTENTS: Page 1 Specifications 2 Warning Information 3 Setup, Operating and Preventative Maintenance 4 Troubleshooting 5 Maintenance 6 Exploded View Drawing and Replacement Parts
CAUTION. Fuel Injection Pump, In-Line, Spill Port Timing
 Page 4 of 22 Rotate the crankshaft counterclockwise, as viewed from the front of the engine, to approximately 40 degrees before TDC. Both the RQV and RQV-K governor require the shutdown lever to be in
NOTE: DISCONNECT MAIN POWER LOCK OUT AND TAG BEFORE PERFORMING ANY PROCEDURES IN THIS SECTION.
 M E C H A N I C A L S E T U P & A D J U S T M E N T S NOTE: DISCONNECT MAIN POWER LOCK OUT AND TAG BEFORE PERFORMING ANY PROCEDURES IN THIS SECTION. NOTE: All adjustments should be made with the sealer
MAINTENANCE - LPX PORTABLE TREATER
 MAINTENANCE - LPX PORTABLE TREATER Proper maintenance of the Portable LPV Treater is critical for peak performance, reliability and accuracy of this system. The following is a guideline for the type of
Hydraulic Hand Pallet Trucks
 Operating Instructions & Parts Manual 12U124 Please read and save these instructions. Read carefully before attempting to assemble, install, operate, or maintain the product described. Protect yourself
Self-Recovery Winch WARNING. General Safety Precautions
 1 Self-Recovery Winch Thank you for purchasing a Winch. This manual covers operation and maintenance of the winch. All information in this publication is based on the latest production information available
SECTION 1 LUBRICATION
 SECTION 1 LUBRICATION Model M2500 OMPS1 M2500 10-2002 Avoid injury! Bring all crane functions to complete stop and turn off engine before lubricating crane. If necessary, spot grease fittings at access
Convertible - Rated 3 4-Ton /2-Ton Nylon Strap Hoists Refer to any questions about the use, application, repair or testing of this hoist to:
 Operating and Servicing Instructions for Convertible - Rated 3 4-Ton - 1 1 /2-Ton Nylon Strap Hoists Refer to any questions about the use, application, repair or testing of this hoist to: Hubbell / Chance
COME.UP DV-15. Instruction manual.
 COME.UP DV-15 Instruction manual www.bigfoottrade.kz Automotive Winch Thank you for purchasing a Winch. This manual covers operation and maintenance of the winch. All information in this publication is
Ground Fault Cable Retractor GR900 Series Service Manual
 AERO-MOTIVE COMPANY A Woodhead Industries, Inc. Subsidiary Ground Fault Cable Retractor GR900 Series Service Manual IMPORTANT SAFETY INSTRUCTIONS Please read this manual carefully and follow its instructions.
INSTALLATION & USER S GUIDE
 REKLUSE MOTOR SPORTS The Rekluse Core EXP Kit with Adjustable Slave Cylinder INSTALLATION & USER S GUIDE Doc ID: 191-7704A Doc Rev: 102915 OVERVIEW This kit replaces the OEM core clutch components including
Overload Warning System DS 50
 Overload Warning System DS 50 Grove - FMTV Trouble Shooting Manual Level 1 - Basics - 1 Table of contents Troubleshooting Manual PAT Overload Warning system DS 50 Level 1 -Basics- Item Content Page 1.
INSTALLATION GUIDE. Doc ID: A Doc Rev:
 REKLUSE MOTOR SPORTS EXP Kit for Harley-Davidson Big Twin Hydraulic-Actuated OVERVIEW INSTALLATION GUIDE Doc ID: 191-6200A Doc Rev: 061215 This kit replaces the OEM clutch pack (friction disks and drive
Operating instructions Form no safety definitions
 Operating instructions Form no. 1000437 safety definitions safety symbols are used to identify any action or lack of action that can cause personal injury. Your reading and understanding of these safety
Blue Jay Rodless Cylinder BC MS. Track Repair Manual 1996 & 2012 THE EASTMAN EASTMAN. All End Caps Black for Models
 EASTMAN 1996 & 2012 THE EASTMAN Blue Jay Rodless Cylinder BC-40224-MS Track Repair Manual All End Caps Black for 1996-2012 Models IMPORTANT Disconnect this equipment from pneumatic pressure lines before
SERVICE PROCEDURES FOR CLUTCH HYDRAULIC UNITS
 SERVICE PROCEDURES FOR CLUTCH HYDRAULIC UNITS SAFETY PROCEDURES Always follow the vehicle manufacturer's recommended safety procedures in your Shop and Owners Manual. REQUIRED TOOLS Flat blade screwdriver,
Distributed by Kincrome Group
 CHAIN BLOCK Distributed by Kincrome Group www.kincromegroup.com Owner s Assembly and Operating Manual SPECIFICATIONS...2 IMPORTANT SAFETY INFORMATION...3 GETTING STARTED...3 Unpacking Carton...3 Positioning
Operating instructions ATLAS Climber - 700
 Operating instructions ATLAS Climber - 700 Model: Three phase: ATLAS Climber - 700 hoist WARNING: All persons operating this equipment must read and completely understand this manual. All persons must
Small Block Chevy. S-Drive Pulley Kit INSTALLATION INSTRUCTIONS
 Small Block Chevy S-Drive Pulley Kit INSTALLATION INSTRUCTIONS Before beginning the installation, please note: Please read all of the instructions thoroughly before beginning the installation. If you do
ELECTRICAL WINCH 60SPS12 60SPS24
 ELECTRICAL WINCH 60SPS12 60SPS24 Assembly & Operating Instructions INTRODUCTION Congratulations on your purchase of a winch. We design and build winches to strict specifications and with proper use and
Maintenance and Repair
 Maintenance and Repair WARNING ALWAYS shut off the engine, remove key from ignition, make sure the engine is cool, and disconnect the spark plug and positive battery terminal from the battery before cleaning,
Installation Instructions
 Suzuki Samurai 1 Inch and 2 Inch Body Lift Kit (SKU# SSP-BL) Installation Instructions Background: These instructions are designed for installing the 2 body lift. Our approach is to raise the entire body
Differential Rewind Shafts
 Differential Rewind Shafts More accurate tension control for light tension applications. Dynamically balanced central shaft. Suitable for cardboard and all types of plastic cores. Easier loading of cores
6602LP CAPACITY: 2 TON LOW RIDER SERVICE JACK
 CONTENTS: Page 1 Specifications 2 Warning Information 3 Setup Instructions 4 Operating Instructions, Preventative Maintenance, Inspection and Proper Storage 5 Hydraulic Jack Maintenance Guide and Regular
ELECTRICAL WINCH S9500SD
 ELECTRICAL WINCH S9500SD Assembly & Operating Instructions CONTENTS INTRODUCTION... 1 GETTING TO KNOW YOUR WINCH... 2 SAFETY PRECAUTIONS... 3 GENERAL TIPS FOR SAFE OPERATION... 5 WINCHING TECHNIQUES A-Z...
SCAMP AND UTILITY MODELS SELF-PROPELLED BELT DRIVE SERVICING 4502, 4503, 8602, 8603 WITH F SERIES ENGINES
 4502, 4503, 8602, 8603 WITH F SERIES ENGINES Adjustments and servicing of the Scamp and Utility self-propelled mowers are very different from all previous models of self-propelled mowers. BEFORE ANY ADJUSTMENTS
CAUTION MAINTENANCE INFORMATION CONNECTING AND DISCONNECTING CHAIN
 CONNECTING AND DISCONNECTING CHAIN Introduction Chains are manufactured with connectors, either pins or rivets of various constructions depending upon the chain type, i.e., offset or straight sidebar,
1335X WINCH & 1356X POWER WINCH ATTACHMENT
 1335X WINCH & 1356X POWER WINCH ATTACHMENT OPERATING INSTRUCTIONS & PARTS MANUAL Valesco Manufacturing, Inc. 7857 N 1100 E Loogootee, IN 47553 (812) 636-6002 1 WINCH OPERATION The silo unloader is raised
FLEETWOOD TRAVEL TRAILER SLIDEOUT SYSTEM OWNER S MANUAL
 FLEETWOOD TRAVEL TRAILER SLIDEOUT SYSTEM OWNER S MANUAL 82 S0150 01 REV. 1 April, 2002 TABLE OF CONTENTS PAGE # OPERATIONS MANUAL... 1 1. SYSTEM DESCRIPTION... 1 1.1 MAJOR COMPONENTS... 1 2. HOW TO OPERATE
COUNTER SHAFT NUT LOCKING PLATE 1 $ HOIST DRUM CLUTCH EYE BOLTS 1 $ LEFT DRUM CLUTCH THREADED PIN 2 $ 138.
 1 2184 PULLEY FOR RADIATOR FAN 1 $ 326.25 2 2184 PULLEY FOR RADIATOR FAN 1 $ 326.25 3 3331 REAR DRUM BRAKE RETURN SPRING 5 $ 51.31 5 10285 LEFT REAR DRUM BRAKE AIR CAN REACH ROD ( LONG ROD ) 1 $ 85.12
E.P. (Extreme Pressure) & LUBRICITY TESTER OFI Part No
 & LUBRICITY TESTER OFI Part No") OFI Testing Equipment E.P. & Lubricity Tester Instructions Part # 111-00 Page 1 of 8 E.P. (Extreme Pressure) & LUBRICITY TESTER OFI Part No. 111-00 The OFI combination EP and Lubricity Tester is a high-quality
OFI Testing Equipment E.P. & Lubricity Tester Instructions Part # 111-00 Page 1 of 8 E.P. (Extreme Pressure) & LUBRICITY TESTER OFI Part No. 111-00 The OFI combination EP and Lubricity Tester is a high-quality
Operating Instructions For Your LUG-ALL Cable Winch-Hoist
 LAC-0108 Rev. 5/08 Operating Instructions For Your LUG-ALL Cable Winch-Hoist 604 Hemlock Road, Morgantown, PA 19543 Phone: (877) 658-4255 / Fax: (610) 286-9661 / Web: www.lug-all.com Copyright 2008 LUG-ALL
AC Electric Capstan Owner s Manual Installation and Operating Instructions
 AC Electric Capstan Owner s Manual Installation and Operating Instructions Model: HD2000-1A34-F-01 Serial Number: 123456 VAC _ Ø Hz Line Size: 1/2 CAUTION The final determination as to the suitability
945 SERIES SERVICE MANUAL
 Daniel Woodhead Company A Woodhead Industries, Inc. Subsidiary 945 SERIES SERVICE MANUAL IMPORTANT SAFETY INSTRUCTIONS Please read this manual carefully and follow its instructions. Improper use or failure
Chapter 3 Lubrication
 Chapter 3 Lubrication Avoid injury! Bring all crane functions to complete stop and turn engine OFF before lubricating crane. If necessary, spot grease fittings at access points, then stop engine. Attach
OVERLOAD CLUTCHES FOR INDEX DRIVES
 The Driving Force in Automation OVERLOAD CLUTCHES FOR INDEX DRIVES WARNING WARNING This is a controlled document. It is your responsibility to deliver this information to the end user of the CAMCO indexer.
MODELS 3100,3130,3160, 1300, 1330,1360 EXHAUST SYSTEM
 MODELS 3100,3130,3160, 1300, 1330,1360 EXHAUST SYSTEM WALBRO CARBURETOR "WA" SERIES MUFFLER REMOVAL CARBURETOR REMOVAL The muffler assembly should beremoved periodically to inspect for excessive carbon
OPERATIONS MANUAL LEVER CHAIN HOIST
 OPERATIONS MANUAL LEVER CHAIN HOIST IMPORTANT SAFETY INFORMATION Please read, understand and follow all safety information contained in these instructions prior to the use of this hoist. Retain these instructions
MAINTENANCE INSTRUCTIONS
 MAINTENANCE INSTRUCTIONS ECOMAT EASY / GIROTEC WRS Version G0101 ECOMAT EASY H / GIROTEC WRS H Version G0301 ECOMAT PLUS / ECOMAT PLUS H Versions G0503 / G0603 V 2.0 Table of contents 1/3 1.0 Maintenance
US208S Scooter / Power Chair Carrier Lift N Go 117 Mini Electric Lift Electric Tote & 130 Swing Away Installation Guide & Owners Manual
 7325 Douglas Rd. Lambertville, MI 48144 Phone: 1-800-541-3213 Fax: (734) 568-6705 www.wheelchaircarrier.com E-mail: admin@wheelchaircarrier.com US208S Scooter / Power Chair Carrier - 210 Lift N Go 117
OPERATING & INSTRUCTION MANUAL
 251 Welsh Pool Rd Exton, PA 19341 610-941- 4333 www.safetyhoistcompany.com OPERATING & INSTRUCTION MANUAL VH-300 BRIGGS & STRATTON VH-300 HONDA IMPORTANT RETAIN THIS MANUAL For instruction on assembly
SECTION steering mechanism
 07-302.01/ 1 2011MR17 SECTION 07-302.01 GENERAL Description See Figure 1. The includes the steering wheel (1), the steering column, the miter box (3), the steering shafts (2 and 4), and the drag link (7).
Tooling Assistance Center
 Safeguards are designed into this application equipment to protect operators and maintenance personnel from most hazards during equipment operation. However, certain safety precautions must be taken by
Heavy Duty Hoist WARNING. General Safety Precautions. Thank you for purchasing a
 Heavy Duty Hoist Thank you for purchasing a Hoist. This manual covers operation and maintenance of the hoist. All information in this publication is based on the latest production information available
Rating when used as a weight distributing hitch with spring bars:
 May 2004 APPLICATION: INSTALLATION INSTRUCTIONS MODEL NO. 70201 Bolt Together Weight Distributing Hitch System Without Shank Rating when used as a weight distributing hitch with spring bars: Part Number
Grooming Reel Kit Greensmaster 1000
 Grooming Reel Kit Greensmaster 1000 Model No. 04125 Form No. 3315 139 Operator s Manual Loose Parts Chart DESCRIPTION QTY. USE Frame Assembly R.H. 1 Attaches to right frame Frame Assembly L.H. 1 Attaches
1/2" AIR DRIVEN DIAPHRAGM PUMP
 1/2" DRIVEN DIAPHRAGM PUMP OPERATION AND SERVICE GUIDE O-1225D NOV. 2008 Page 1 of 6 Refer to Bulletin P-605, Parts List P-9151 DRIVEN, DOUBLE DIAPHRAGM PUMP MANUAL Congratulations on purchasing one of
Installation Manual. Model T675A Engine Brakes. For Mack 6 Cylinder, 2 valve Head ENDT-673, 675, 676 & E6 Series Engines.
 Engine Brakes Installation Manual Model T675A Engine Brakes For Mack 6 Cylinder, 2 valve Head ENDT-673, 675, 676 & E6 Series Engines TecBrake P.O. Box 27822 Houston, Texas 77227 INSTALLATION MANUAL TECBRAKE
SPRING MAX. TONGUE MAX. GROSS TRAILER BAR WEIGHT(LB) WEIGHT (LB)
 WEIGHT (LB)") INSTALLATION / OPERATION INSTRUCTIONS WEIGHT DISTRIBUTING HITCH SYSTEMS 7901, 7902, 7903, 7979 (DUAL SWAY CONTROL ATTACHMENT) 7901=600LB WDH KIT, 7902=800LB WDH KIT, 7903=1200LB WDH KIT, 7979=HEAD KIT
INSTALLATION / OPERATION INSTRUCTIONS WEIGHT DISTRIBUTING HITCH SYSTEMS 7901, 7902, 7903, 7979 (DUAL SWAY CONTROL ATTACHMENT) 7901=600LB WDH KIT, 7902=800LB WDH KIT, 7903=1200LB WDH KIT, 7979=HEAD KIT
BX7460P Allure Tow Bar Operator Manual & Installation Instructions. ALLURE Tow Bar (10,000 lb) Pintle Coupler
 Pintle Coupler") Operator Manual & Installation Instructions ALLURE Tow Bar (10,000 lb) Pintle Coupler Hooking Up to Towed Vehicle 1. Position the towing vehicle on a level surface with a straight driveway ahead and engage
Operator Manual & Installation Instructions ALLURE Tow Bar (10,000 lb) Pintle Coupler Hooking Up to Towed Vehicle 1. Position the towing vehicle on a level surface with a straight driveway ahead and engage
LS Chevy With Variable Valve Timing (VVT)
") LS Chevy With Variable Valve Timing (VVT) S-Drive Pulley Kit INSTALLATION INSTRUCTIONS Before beginning the installation, please note: Please read all of the instructions thoroughly before beginning the
LS Chevy With Variable Valve Timing (VVT) S-Drive Pulley Kit INSTALLATION INSTRUCTIONS Before beginning the installation, please note: Please read all of the instructions thoroughly before beginning the
NSGV EVE-ER I, O, & M MANUAL
 TABLE OF CONTENTS Rail Layout.. Page 1 Support Placement...Page 1 Rail Assembly.Page 1 Rail Duct Connections.. Page 2 Rubber Lip Installation.. Page 3 Pneumatic End Stop. Page 4 End Stop. Page 4 End Cap..
K-SERIES SERVICE MANUAL
 MARCH 2011 III. R MAINTENANCE AND REPAIR MAINTENANCE egular maintenance of the Ricon KlearVue Series platform wheelchair lift is required to help optimize its performance and reduce the need for repairs.
RUFNEK 80 DESIGN SERIES 001 SERVICE MANUAL INTRODUCTION AND THEORY OF OPERATION...2 ASSEMBLY NUMBER EXPLANATION...2 WINCH MODEL CODES...
 RUFNEK 80 DESIGN SERIES 001 SERVICE MANUAL INTRODUCTION AND THEORY OF OPERATION...2 ASSEMBLY NUMBER EXPLANATION...2 WINCH MODEL CODES...2!WARNING!...3 MAINTENANCE...4 GENERAL DISASSEMBLY...5 A. MOTOR DISASSEMBLY...5
Electric Winch Installation & Operation Manual Permanent Magnet 12 V DC EMD2000SS STAINLESS STEEL WINCH
 Endurance Marine Products Ltd 210 19138 26 Ave Surrey, BC V3S 3V7 T 604 535 0669 TOLL FREE 1 877 535 0669 Info@endurance-marine.com www.endurance-marine.com Electric Winch Installation & Operation Manual
ELECTRICAL WINCH 6000EN
 ELECTRICAL WINCH 6000EN Assembly & Operating Instructions CONTENTS INTRODUCTION... 1 GETTING TO KNOW YOUR WINCH... 2 SAFETY PRECAUTIONS... 3 GENERAL TIPS FOR SAFE OPERATION... 5 WINCHING TECHNIQUES A-Z...
Interlocks 200 Series
 rd 12070 43 St. NE, St. Michael, MN 55376 763-497-7000 www.tcamerican.com sales@tcamerican.com Installation Instructions Interlocks 200 Series 2I-515; 2I-930 2I-513; 2I-850 Crane Interlock and Operating
Rating when used as a weight distributing hitch with spring bars:
 January 2007 INSTALLATION INSTRUCTIONS 70210 70220 70230 Bolt Together Weight Distributing Hitch System Rating when used as a weight distributing hitch with spring bars: Part Number Max. Tongue Wt. Max
Valtek Auxiliary Handwheels and Limit Stops
 Valtek Auxiliary s and Limit Stops Table of Contents Page 1 General information 2 Installation 2 Side-mounted handwheels, size 25 and 50 (linear actuators) 3 Side-mounted handwheels, size 100 and 200 (linear
Ground Fault Cable Retractor GR1000L Service Manual
 AERO-MOTIVE COMPANY A Woodhead Industries, Inc. Subsidiary Ground Fault Cable Retractor GR1000L Service Manual IMPORTANT SAFETY INSTRUCTIONS Please read this manual carefully and follow its instructions.
AccuGlide. HST 3-Inch HST 3-Inch Taping Heads. Instructions and Parts List. Important Safeguards. Important. Type 29100
 Instructions and Parts List AccuGlide TM HST 3-Inch HST 3-Inch Taping Heads (Upper) (Lower) Important Safeguards Turn to page four for operating safety information. Type 29100 Important It is recommended
SERVICE PARTS LIST. M18 FUEL ONE KEY SAWZALL Reciprocating Saw H31A BULLETIN NO
 00 FIG. PART NO. DESCRIPTION OF PART NO. REQ. 1 45-12-0040 Gearcase Insulator 1 2 40-50-8805 Extension Spring 1 3 31-11-0105 Barrel Cam 1 4 34-60-3700 Retaining Ring 1 5 --------------- Front Cam 1 6 ---------------
1 2 3a 3b THREADING CARD 9 10 ABC Office
 1 2 3a 3b 4 5 6 7 8 9 10 THREADING CARD Important Safety instructions YOUR SAFETY AS WELL AS THE SAFETY OF OTHERS IS IMPORTANT TO GBC. IN THIS INSTRUCTION MANUAL AND ON THE PRODUCT ARE IMPORTANT SAFETY
INSTRUCTION MANUAL INTERNAL GEAR PUMP TITAN G-4124A SERIES=> FLANGED TITAN G-124A SERIES => FLANGED MODELS:
 INSTRUCTION MANUAL INTERNAL GEAR PUMP TITAN G-4124A SERIES=> FLANGED TITAN G-124A SERIES => FLANGED MODELS: G-H, G-HL, G-K, G-KK, G-L, G-LQ, G-LL, GLS, G-Q, G-QS 1 Contents Maintenance Thrust bearing adjustment
Operator's Manual. VC-60 & VC-60 Plus Harper Industries, Inc. 7/03 Part No
 Operator's Manual VC-60 & VC-60 Plus 2003 Harper Industries, Inc. 7/03 Part No. 970066 Thank you for purchasing a Harper/Goossen Verti-Cutter. As with all Harper/Goossen products, the Harper/Goossen Verti-Cutter
Self-Adjust Clutch Installation Guide
 Self-Adjust Clutch Installation Guide 0 STOP! READ CAREFULLY BEFORE INSTALLING CLUTCH This clutch must be installed by a qualified installer. Improper installation or failure to replace or resurface the
Tech Note Truck 14 & 15.5 Twin Plate Cast Iron Type Installation Guidelines
 1. (14 & 15.5 ) Check condition of the flywheel. Grind to resurface or replace flywheel. Surface MUST BE machined or premature clutch failure can occur. Flywheel depth must be 2.938 (74.62mm) for 14 (350mm)
Owner s Manual: PS4000 4,000 LB. WINCH
 Owner s Manual: PS4000 4,000 LB. WINCH PIERCE ARROW INC. 549 U.S. HWY 287 S. HENRIETTA, TEXAS 76365 ---------------------------------------------------- TOLL FREE 800-658-6301 FAX 940-538-4382 ----------------------------------------------------
INDUSTRIAL XL WINCH INSTALLATION AND OPERATOR S GUIDE GUIDE D INSTALLATION ET OPERATEUR. of Warn Industries, Inc.
 Warn Industries, Inc. 12900 S.E. Capps Road Clackamas, OR USA 97015-8903 1-503-722-1200 FAX: 1-503-722-3000 www.warn.com Customer Service / Service Clients: 1-800-543-9276 2017 Warn Industries, Inc. WARN,
Maximum Flow: 600 GPM (3800 LPM) Portable Base 1250 GPM (4800 LPM) Direct Mount. Maximum Pressure: 200 PSI (1380 Kpa, 13.8 BARS)
 Portable Base 1250 GPM (4800 LPM) Direct Mount. Maximum Pressure: 200 PSI (1380 Kpa, 13.8 BARS)") STYLE 3414 Apollo S.I. Monitor with FoldING Legs OPERATING & MAINTENANCE INSTRUCTIONS WITH SPECIAL L.A. COUNTY SPECIFICATIONS The Akron Style 3414 Apollo Monitor is designed to provide efficient trouble-free
STYLE 3414 Apollo S.I. Monitor with FoldING Legs OPERATING & MAINTENANCE INSTRUCTIONS WITH SPECIAL L.A. COUNTY SPECIFICATIONS The Akron Style 3414 Apollo Monitor is designed to provide efficient trouble-free
Electric Winch PLEASE READ CAREFULLY BEFORE OPERATE THE WINCH
 Electric Winch Installation Instructions & Operating s Manual PLEASE READ CAREFULLY BEFORE OPERATE THE WINCH Dead Weight Capacity(Lbs.)* Operating Instructions &s Manual Please read and save these instructions.
CHESTER HOIST AIR LOW HEADROOM CHAIN HOISTS AL-680 SECTION A
 CHESTER HOIST AIR LOW HEADROOM CHAIN HOISTS AL-680 SECTION A OPERATING and MAINTENANCE INSTRUCTIONS FOR AL SERIES HOISTS Users should refer to the ANSI B30.16 American National Standard and ASME HST-5M
ArmorGuard Barrier Portable Longitudinal Barrier
 ArmorGuard Barrier Portable Longitudinal Barrier Installation & Maintenance Manual AGB I&M 112811 Page 1 of 13 ArmorGuard Barrier Table of contents Preface... 2 Applications and System Characteristics
INSTALLATION INSTRUCTIONS
 INSTALLATION INSTRUCTIONS WARNING: NEVER EXCEED YOUR VEHICLE MANUFACTURER'S RECOMMENDED TOWING CAPACITY PIN-STYLE TRUNNION BAR WEIGHT DISTRIBUTION KIT MAINTENANCE Keep the socket-mounted ends of the spring