Congratulations to your new Blix bike! We re sure you will enjoy your cycling experience in a completely new way with the purchase of your new Blix
|
|
|
- Rudolph Garrison
- 5 years ago
- Views:
Transcription
1 Owner s Manual
2 Congratulations to your new Blix bike! We re sure you will enjoy your cycling experience in a completely new way with the purchase of your new Blix bike. Before your first ride, read this manual thoroughly for operating guidelines, maintenance instructions, and other useful information to ensure that you get the most out of your Blix.

3 Important Information About this manual This manual explains how to operate and ride your Blix bike. While we do not claim nor intend to include instructions and tips for every combination of rider and bike, rider and environment, and bike and environment, this manual is intended to explain how to operate a Blix bike. This manual includes instructions for performing basic maintenance tasks that will benefit the performance and lifespan of your bike. Some maintenance should only be performed by your dealer, and you can refer to this manual to check which maintenance needs to be performed by a Blix dealer. By following the instructions in this manual, you and your Blix bike should have many miles together. Activate your warranty To activate the limited warranty of your bike, register online at You will be asked to identify the frame number of your bike. It is important that you keep the frame number for your records as it is specific to only your bike. The frame number is located on the front of the frame head tube. Your Frame number: My bicycle model: My dealer: Blix Owner s Manual, version 3.0 i
4 Assembly of your new bicycle The first adjustments and final assembly of your bicycle require special handling and skills, and this should only be done by a Blix authorized dealer or professional bicycle shop. Your bike will be ready to ride upon assembly, but should you have any questions about the bike before operating it, please contact your authorized dealer. Blix models Each model s component setup is customized for different customer needs and tastes. However, all Blix bikes are equipped with: - Rust free screws and nuts - Portable lithium-ion battery - Battery charger - LCD display - LED light If you have questions There are different models of Blix bicycles, and this manual may contain information and illustrations that don t apply to your bicycle. If you have any questions after reading this manual, we recommend to contact your dealer. If you still have any questions we encourage you to contact our customer service department: support@blixbike.com Call: BLIX ( ) ii Blix Bicycle LLC 2877 Mission street Santa Cruz, CA-95060
5 Table of Content Guide to Safe Operations Before Riding Safety Regulations... 1 Battery Safety... 1 Using a Blix bike... 2 Make sure the bike fits you... 2 Know how your Blix bike performs... 2 Unique Components... 3 Check Your Bike... 7 Safe Riding Lighting and reflectors... 8 Where a helmet... 8 Hub-motor System - SpinTech Let s Go - Quick Guide... 9 Foldable model - Quick Guide The Display Introduction Navigate the Display LED Lights Battery Indicator Error Codes Change Display Settings The Electric System The Pedal Assist System (PAS) Throttle The Battery Overview Charging the Battery Storing the Battery Range and Influencing Factors The Wheels and Motor Mid-motor System - Shimano Steps Let s Go - Quick Guide The Display Introduction Navigate the Display The Electric System The Pedal Assist LED Lights The Battery Charging the Battery Maintenance General Maintenance Storing Adjusting the Brakes Disc brakes V-brake (rim brake) Adjusting the Gears Adjusting Nexus Adjusting Acera / Deore For more Information Limited Warranty Technical Specifications iii
6 Before Riding Safety Regulations - Carefully read this manual before your first bike ride. Recommended total max weight is 220 lbs (rider and cargo) - Before each ride, check your bike to ensure that there are no visible damaged components. - Unfastened or damage parts should be secured appropriately or replaced. - Your Blix bike is intended for recreation and transportation. It is solely designed for cycling on paved roads and bike paths. - You should not make any alterations or changes to your Blix bike. This may affect the ride ability and safety of the bike. Battery Safety - For specified safety regulations for charging the battery, see section The Battery Charging the Battery. Keep the battery out of the reach of children. - Only use the charger provided with your Blix bike. - Use the charger only in a dry indoor environment. Do not connect the charger with wet hands. - Do not charge the battery under direct sunlight. - Do not charge the charger during lightning storms. - Charge the battery where there is plenty of ventilation. - Discontinue charging if you hear unusual noises or notice leakage from the battery. - Do not disassemble the battery - this will void your warranty. - Do not heat or hit the battery, this will damage your battery and possibly cause injury. - Do not immerse the battery in water or other liquid. - Disconnect the charger from the electrical outlet when not charging. 1
7 Using a Blix bike A Blix bike is a fast, smart and efficient solution for personal transportation. If you don t want to use the electrical assist system, your Blix bike will function as a normal traditional bicycle. The motor rotates without noticeable friction when you pedal. You re in control of the level of assistance you want during your ride. Make sure the bike fits you Your dealer should fit you with the proper size of bicycle. There should be at least 1 (25 mm) clearance between the top tube and the rider when standing over the bicycle. The seat may be adjusted to offer the best comfort and performance. Know how the bike performs A Blix bike is an electric bicycle and functions differently than a non-electric traditional bicycle. It has an electric motor located where the crank is or, depending on the model, rear or front wheel-hub that can give you extra assistance and speed when riding the bike. It is important that you read this manual carefully and know how to operate the bicycle and its functions before you ride the bike for the first time. 2
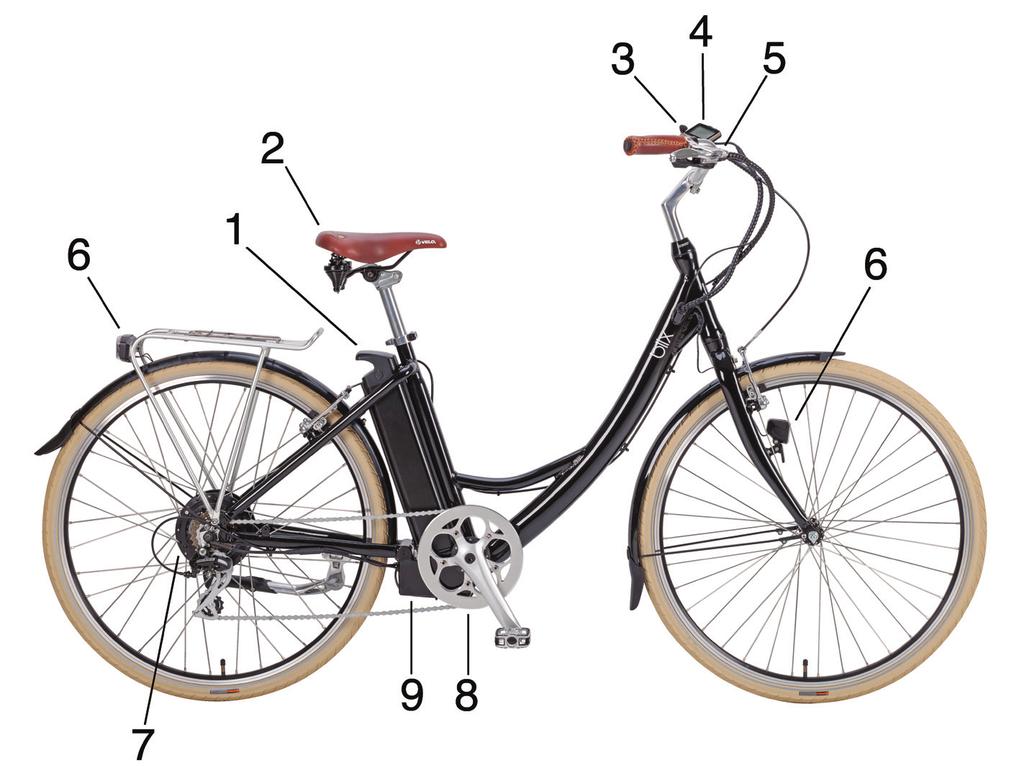

8 Unique Components 3


9 1 Battery with charger connector 2 Seat post with tilting function 3 Throttle 4


10 4 Display 5 Brake levers with automatic power cut-off switch 6 LED-lighting 5


11 7 Hub-motor 8 Crank with pedaling sensor 9 Control-box compartment under battery 6
12 Check Your Bike There are several simple guidelines that we recommend in order to keep your Blix bike in a good working condition. Here are a few steps for a long and trouble-free relationship with your new commuter friend. Keep it clean We encourage you to keep your Blix bike nice and clean. A clean bike lasts longer and is more enjoyable and safer to ride. Use a damp cloth to wipe off the bike. Do not use high-pressure water systems, this can damage parts of the bike. Tighten the screws Regularly check that screws and nuts are securely attached. Unfastened parts may cause the bike to not function properly and can cause accidents. Brake Make sure to maintain and service the brake system. Well functioning brakes are essential to operate the bike in a safe manner. Lubricate Keep the chain well lubricated with bicycle chain lube. Make sure to wipe off the chain with a cloth before and after lubrication in order to prevent accumulation of dirt and any excess oil. Charge Charge the battery regularly. Do not allow your battery to remain in a discharged state for a long period of time. Doing so will negatively affect the life of the battery. Pump Keep the bicycle tires sufficiently inflated. A properly inflated tire has lower rolling resistance and lasts longer. The recommended tire pressure is found on the side of the tire. Maintain the tires at this recommended pressure. 7


13 Safe Riding Lights and reflectors In order to improve the visibility of you and your bike, LED lights are powered by the battery and can be switched on and off from the display. A Blix bike is also equipped with reflectors. Remember to keep the lights and reflectors clean for best visibility. Use your helmet Remember to use your helmet. Even if you feel confident on the road, you will share the road with others and accidents can happen. Be in control Make sure you can control your riding, and understand how the electric assist system functions. Ask your dealer to instruct you and read this manual before riding the first time. 8


14 Let s Go! Quick Guide Step 1 Turn the battery on by pressing the ON/OFF-button on the battery. Step 2 Push and hold the ON/OFFbutton on top of the display on the handlebar for 2-3 seconds. This will activate the pedal assist system (PAS). Ready! - Ride your Blix bike in a similar manner as on a traditional non-electric bicycle. The electric motor will automatically provide assistance based on your pedaling speed. Don t forget your helmet! 9


 Turn the right pedal-arm")
15 Foldable Model - Quick Guide This guide shows how to fold a foldable Blix bike. Contact your dealer if you need further instructions. Step 1 - Handlebar 1) Twist the knob counter clockwise to loosen the handlebar and fold it down. Step 2 - Pedals 1) Fold the pedal by pushing it in and to the side (2). 3) Turn the right pedal-arm so that it s pointing towards the rear wheel. 10


16 Step 3 - Frame 1) Turn the top locking mechanism upwards. 2) Open the latch and fold the frame towards yourself. Align the two magnets in both wheel hubs to keep the bike together when folded. You can let the bike stand on its own on the ground. Make sure it rests on the support stand located directly under the bike, and not on the crank or the pedals. Tips! Get a Blix carrying bag for smart and convenient transportation of your folded bike! 11


17 The Display - Introduction MODE button UP button DOWN button Every Blix bike with a hub-motor uses the SpinTech pedal assist system. The LCD display will show you riding information and you can control the level of assistance you want when pedaling. The display is water resistant and you can ride your Blix bike in rain with the pedal assist on. To minimize risk of water damage, wipe off the display after it has been in contact with rain or water. Navigate the Display 1) Press and hold the MODE button for 2-3 seconds to turn the display on or off. Assist level 1 will automatically be activated when the display is turned on. 2) Press the MODE button to navigate between the below functions: - SPEED (mph) - AVG SPEED = Average speed (mph) - MAX SPEED = Top speed reached - ODO = Odometer - TRP = Trip distance - TIME = Trip time 12
 - Trip time and distance - Odometer - Background lighting of display - Error code")
18 Display symbols: Battery life LED Light Error code Motor effect Pedal assist level Speed / Distance / Time Below is a list of the different functions that you can access and manage on the display: - Battery life - Motor effect - 5 levels of Pedal Assist - LED lights Off/On - Speed (current, average, and max speed) - Trip time and distance - Odometer - Background lighting of display - Error code indication 13

19 LED Lights Press the UP button for 2-3 seconds to turn the front and rear LED lights on and off. A background light on the LCD display will automatically be turned on when the LED lights are turned on. Battery Indicator When the battery is fully charged, all 5 bars will show in the battery indicator. The bars will change along with the usage of the battery. When the battery is empty, the battery indicator will flash. You can charge the battery frequently, a fully charged battery improves the performance! Error Codes The display will show an error code if the electric system does not work as it should. If you see an error code, contact your dealer. Error code 25 will show up if the brake levers are pulled when turning on the display. Release the brakes to remove the error code (when braking, power is automatically shut off for safety reason). 14

 N (no) SET")

20 Change Display Settings Change the display settings Press and hold the UP and DOWN button at the same time for 2-3 seconds to activate the settings menu. Use the UP or DOWN button to change the settings option and the MODE button to select the setting you want: SET CODE 1 - tc: Reset trip meter: Y (yes) N (no) SET CODE 2 - bl: Background light: level 1,2,3 SET CODE 3 - Unit: mph or km/h Press and hold the MODE button for 2-3 seconds to save the settings and exit the settings menu. SET CODE 2 SET CODE 3 15

21 The Electric System The Pedal Assist System (PAS) Press the UP or DOWN button to shift between level 0 to 4. The amount of pedal assistance is automatically provided based on your pedaling speed. A lower gear gives higher pedaling speed and more assist. So when going uphill, switch to a lower gear and enjoy! A higher assist level enables the motor to assist you at higher speeds - level 4 can take you up to 20 mph depending on bike model. The pedal assist level is indicated in the lower left corner of the display: Throttle If you don t want to pedal at all, you can use the throttle to receive electric assistance up to 20 mph as long as the display is turned on. To turn the pedal assist off but keeping the throttle function on, switch to pedal assist 0. Using the throttle function will cause the battery to run out faster than when using pedal assist. 16
22 The Battery - Overview Battery position The battery is located under the saddle of your Blix bike. This allows for a low center of gravity and better stability when cycling. Battery type The battery consists of Panasonic Lithium-ion cells and is suitable for regular use and recharge. The ON/OFF button and battery lock The battery has a button for turning it on and off, and a battery lock for securing the battery to the bicycle. Charging You may charge the battery when it is mounted in its position under the saddle of the bike. You may also remove the battery and charge it from a regular wall outlet. Complete charging time of a fully discharged battery is about 3 hours. You may also charge the battery even if it is not fully discharged, it will not damage the battery. Fuses The battery is equipped with a fuse. If the main fuse blows, the battery will not provide power to the motor. Contact your dealer to replace the fuse. 17


23 Charging the Battery Removing the battery The battery can be charged in its fixed position under the saddle or removed and charged elsewhere. Remove the battery by tilting the seat post, unlock the batterylock, remove the key, and pull the battery upward. Make sure to take out the key before pulling the battery up. Charge the battery Only charge the battery with the charger provided with your Blix bike. For charging, connect the charger to a wall outlet and to the battery. When charging is completed, disconnect the charger. Charger The charger has two LED lights: POWER and CHARGE. The POWER light turns red when the charger is plugged into an outlet. The CHARGE light turns red while battery is charging. When the charger is not connected to battery or when the battery is fully charged, the CHARGE light turns green. 18

24 Reattaching battery Slide the battery down through the fixed tracks on the bike. Lock the battery to prevent from theft. Check battery status You can check the battery status directly on the battery when it s turned on. The battery status is also displayed on the top left corner on the display. During operation, the displayed battery status is based on the current biking condition. A lower battery status might be displayed when biking uphill, during acceleration and when switching to a higher level of electric assistance. 19
25 Storing the Battery The battery status and durability is maintained by regularly using and charging the battery. When storing the battery, make sure to perform regular maintenance by charging the battery according to the specifications found in this manual and on the battery. Store the battery indoors and in normal roomtemperature. When storing the battery it is recommended that you charge the battery for two hours each month.! - Do not leave the battery uncharged for longer time periods. It will alter the battery life.!! - The battery charger is exclusively designed for use in a dry indoor environment with good ventilation.!!! - When charging, only use the charger provided with your Blix bike. 20
26 Range and Influencing Factors Battery Range There are many factors that affect the range of the battery. In the list below you will find some examples of factors and conditions that have negative impact on the range. Factors having negative influence on range: - Headwind - Hilly terrain - Soft ground - Low tire pressure - High assistance level - Throttle usage - No or poor maintenance - Acceleration - Low manual pedaling force - High weight, the bike is heavily loaded. Technical Description The battery consists of a series of interconnected Panasonic Lithium-ion cells. The battery also contains a control unit (BMS) that monitors the cells during use and during charging of the battery. The control unit (BMS) turns off the battery at a given voltage level to prevent damage to the battery cells. This means the battery is empty and needs recharging. The control unit also contains a balancing circuit that controls charging so that the individual cells are charged evenly. This improves the performance of battery. Should there arise an unbalance between the cells, the battery range may be affected. In order to improve the balance between the cells, it is recommended to fully discharge and charge the battery 2-3 times monthly (complete discharge and charge cycles). 21


27 The Wheels and Motor Unmount the wheel The power cable to the hub-motor is provided with a connector and can be unplugged by pulling it apart. When the connector is unplugged, the wheel can be unmounted in a similar manner as a traditional bike wheel. The connector plug is provided with two arrows which align to indicate the correct position. 22


28 Let s Go! Quick Guide Step 1 Turn the battery on by pressing the ON/OFF-button on the battery. Step 2 Use the up and down buttons to choose your level of assist; Eco, Normal, or High. Ready! - Ride your Blix bike in a similar manner as on a traditional non-electric bicycle. The electric motor will automatically provide assistance based on your pedaling speed. Don t forget your helmet! 23
 - AVG = Average speed (mph) - MAX (speed) = Top speed reached - DST =")

29 The Display - Introduction X - Function Y - Up Z - Down Navigate the Display Press the Function button to navigate between the below functions: - TIME = Time cycling - Speed = current speed (mph) - AVG = Average speed (mph) - MAX (speed) = Top speed reached - DST = Trip Distance - ODO = Odometer - Range = Estimated range per assist level Take the display with you You can take the display with you by pressing down the plastic piece below the display and slide the display upwards. 24 Read separate Shimano Steps manual or go to
 button to select the level of pedal assist you want. You can choose between 4 modes: Off - The pedal assist is turned off, you can still ride your bike without power!")
30 The Electric System The Pedal Assist System (PAS) The Shimano Steps system is a pedal assist system only, which means that you always need to pedal to activate the electric motor. Use the Y (Up) button to select the level of pedal assist you want. You can choose between 4 modes: Off - The pedal assist is turned off, you can still ride your bike without power! ECO - Low level of pedal assist. NORM - Medium level of pedal assist HIGH - High level of pedal assist LED Lights Press the light button on the display to turn the front and rear LED lights on and off. Read separate Shimano Steps manual or go to 25
31 Charging the Battery Removing the battery Turn the key counterclockwise and pull the upper part of the battery sideways towards the key side. Charge the battery - when taken off the bicycle 1. Attach the adapter to the charging plug and connect the charger s power plug to an outlet. Charger plug Adapter 2. Plug the adapter into the battery s charging port. Charging plug Battery *Charge the battery on a flat surface indoors. Adapter Charging port Charging plug Battery mount Charging port Charge the battery - when installed onto the bicycle 1. Connect the charger s power plug to an outlet. 2. Insert the charging plug into the charging port on the battery mount. 26 Read separate Shimano Steps manual or go to
 Battery LED lamp - you can check current charging status on the LED lamp on the battery.")
32 The charger A) Charger LED lamp - after charging has started, the LED lamp on the charger lights up. B) Battery LED lamp - you can check current charging status on the LED lamp on the battery. A) Charger LED lamp B) Battery LED lamp Charing in progress indicators Read separate Shimano Steps manual or go to 27


33 Maintenance General Maintenance It is not just nice to have a clean bike, it s smart too. A clean bike lasts longer and performs better than a dirty bike. Wash your bike gently with a damp cloth. Do not use pressure washer systems! Periodically check through the nuts and bolts on the bike to make sure they are tightened and secure. It is also recommended to do periodic servicing of your bike by a professional. Storing Your Blix bike is best stored indoors when not in use to protect from wearing from weather conditions. Take proper care of your battery and do not expose it to extreme temperatures. Preferably, store the battery inside when not in use. Do not forget to recharge the battery during periods between use. Refer to the Storing the battery section of this manual. Recycling The battery s capacity and performance will decrease over time. The life cycle of the battery depends on many factors including usage, storage, maintenance and environment. Lithium-Ion batteries can be recycled. If you are unsure where to recycle the battery in your area, contact your dealer. 28
34 Adjusting the Brakes Different models have different types of brake systems, these are explained below. Ask your dealer if you are not sure which brake system your model has. For safety reasons, the brake lever on the handlebar is equipped with a cut-off sensor that automatically turns off the power assistance when braking. Disc brakes Hydraulic or mechanical disc brakes provide great braking performance. Adjustments and service of this brake should be made by a professional. V-brake (rim brake) Some Blix bike models are also equipped with V-brakes, or rim-brakes, having brake pads gripping the front wheel rim during braking. These brakes provide good and effective braking, but wear out over time. You need to regularly check the brake pads, tighten the braking wire and/or replace the pads when worn out.! - If you hear a scraping metallic sound when you brake with the rim brake, the brake pads may be completely worn out and need to be replaced immediately. Worn out brake pads cause unnecessary wear on the bicycle rim and will lead to reduced braking performance and accidents. 29


35 Quick adjustment of V-brake Adjustment screw (j) is located at the brake lever. To tighten the braking wire, screw the adjustment screw outwards. Secure its position with the locking-nut. Adjusting the V-brakes If the brake pads are worn, you may need to tighten the braking wire. 1. Loosen the bolt on the brake arm using a hex key. 2. Tighten the wire 1-3 mm and lock the position by tightening the screw. Check the brake pads Adjust the brake arm with adjustment screw (J). Tightening the adjustment screw increases the spring tension and turns the brake arm away from the rim. The brake pads should not be in contact with the rim when not braking. Adjusting the tension for one brake arm will influence the other arm. Adjust the tension for each arm until they move symmetrically. 30

36 Adjusting the Gears Different models have different types of gear systems, these are explained below. Ask your dealer if you re not sure which gear system your model has. The gears are pre-adjusted before purchase, but after some time of use the gears may need some adjustments. Instructions for how to adjust each gear system are described on the following pages. Internal-gear hub, Nexus For Blix bike models equipped with an internal Nexus hub-gear, the gear mechanism is located inside the back wheel hub. Internal-gear hubs are more reliable and require less maintenance than derailleur systems. You can shift gear at a stop. You shift gear by turning the gear-shifter on the handlebar. External gears (derailleur) Acera/Deore External gears provides efficient operation and drivetrain of your Blix bike. The derailleur arranged below the cassette guides the chain to correct rear sprockets during shifting. You shift gear by pressing the respective gear-shift buttons (+ or -). Adjusting the gears You may adjust the gears yourself. To fine tune the gears is easy and may be done as soon as you experience any trouble. Gears that are not adjusted correctly may cause unnecessary wearing of the gear system. 31

. 3.")
37 Adjusting Nexus 3 The gear hub has a display with a yellow mark. The gear has the correct setting when the yellow mark is located between two white lines when set to the second gear. To adjust the gear: 1. Turn the gear-shifter to the second gear. 2. Loosen the inner bolt (ii). 3. Turn the adjustment bolt (iii) until the yellow mark is located between the two white lines. 4. Tighten the inner bolt (ii) again. 32


38 Adjustment - Acera / Deore Adjusting the gears For adjusting the gear, turn the adjustment screw (J). The gear wire runs through this bolt. By tightening the wire, the derailleur will change to a lower gear more easily. Tighten the wire by turning the adjustment screw (J) one step at a time in a counterclockwise direction. One step makes a big difference check after each step. In order to loosen the wire, turn the adjustment screw in a clockwise direction, one step at a time. 33
39 For more Information If you would like additional information about your new Blix bike, contact your local dealer or Blix bicycle directly. If you want additional information about electric bicycles or cycling in general, there are also a lot of available information to be found in your public library or online. If you have any questions or if there is something you think we should know - tell us about it! We continually strive to improve our products and services and we love to hear your opinion! Thank you for choosing Blix! - The Blix Team support@blixbike.com Call: BLIX ( Blix Bicycle LLC 2877 Mission street Santa Cruz, CA
40 Limited Warranty Go to to activate this warranty. 3 years Frame and rigid front forks, excluding suspension forks. 2 years Motor, battery, display, controller box. 1 year Paint finish and decals. Suspension forks. All other electrical components and parts. (a) Remedies: The sole remedy is limited to repair or replacement of defective parts and components of those with equal or greater value at the sole discretion of Blix. Seller s liability under any limited warranty is discharged, in Seller s sole discretion and at its expense, by: repairing or replacing the affected goods; or crediting or refunding the end user s purchase price of the affected goods, less any applicable discounts, rebates or credits. Seller s limited warranty is extended to the first end user purchaser only and such end user must register their product at to claim warranty coverage. Affected products may not be submitted to Seller for warranty repair or replacement except with written authorization from Seller after confirmation of coverage. Notice for replacement must be given within 60 days of the discovery of the defect. (b) Exclusions: The above warranty or any implied warranty does not cover normal wear and tear, improper assembly, damage or failure due to accident, misuse, abuse, or neglect, improper follow-up maintenance, installation of third party components, parts, or accessories, or any products that have been modified from manufacturer s specifications. (c) Delivery Costs: The end user is responsible for all costs and risk of loss associated with the delivery of warranted goods to Seller or its agent for warranty repair or replacement, and Seller is responsible for all costs and risk of loss associated with the return delivery of repaired or replaced products to the end user. (d) Warranty claims: Warranty claims must be made through the dealer/store that the bicycle was purchased from. All Warranty decisions will be made by Blix Bicycle LLC. (e) THIS SECTION SETS FORTH PURCHASER AND END USER S SOLE REMEDY AND SELL- ER S ENTIRE LIABILITY FOR ANY WARRANTY RELATING TO THE PRODUCTS. EXCEPT FOR THE LIMITED EXPRESS WARRANTIES DESCRIBED IN THIS SECTION (A) NEITHER SELLER NOR MANUFACTURER HAS MADE OR MAKES ANY EXPRESS OR IMPLIED REPRESENTA- TION OR WARRANTY WHATSOEVER, INCLUDING ANY WARRANTIES OF: (i) MERCHANT- ABILITY; (ii) FITNESS FOR A PARTICULAR PURPOSE; (iii) TITLE; (iv) NON-INFRINGEMENT; OR (v) PERFORMANCE OF PRODUCTS TO STANDARDS SPECIFIC TO THE COUNTRY OF IMPORT, WHETHER ARISING BY LAW, COURSE OF DEALING, COURSE OF PERFORMANCE, USAGE OF TRADE OR OTHERWISE, ALL OF WHICH ARE EXPRESSLY DISCLAIMED AND (B) PURCHASER ACKNOWLEDGES THAT IT HAS NOT RELIED ON ANY REPRESENTATION OR WARRANTY MADE BY SELLER, EXCEPT AS SPECIFICALLY DESCRIBED IN THIS SECTION. 35
41 Technical Specification Battery: 36 Volt 11Ah / 17,5Ah 396Wh / 630Wh Cell: Panasonic, Lithium-Ion (2200mAh / 2900mAh per cell) Temperature range: Usage: 5 F F Charging: 50 F - 86 F Charing time: 3 hours Weight 7 lbs Main fuse: 30A Charger fuse: 5A Charger: Input: 110V - 120V Output: 42V (for 36V-battery) Hub motor: Brushless 36V 250 / 350 / 500 Watt Max speed: up to 20 mph Bicycle: Frame: Aluminum Recommended maximum weight: 220 lbs (rider and cargo) Shimano Steps : See separate manual for technical specifications for the Shimano Steps system. 36
42 Experience Freedom
Important Information
 Owner s Manual Important Information Congratulations to your new Blix bike! We re sure you will enjoy your cycling experience in a completely new way with the purchase of your new Blix bike. Before your
Assembly Instructions
 1/12 BEAST MANUAL Table of Contents Bike Specs - pg. 3 Bike Assembly: Assembling the Wheels- pg. 4 Assembling the Stem- pg. 5 Assembling the Handlebar- pg.6 Attaching the Seat- pg. 6 Attaching the Pedals-
KODA USER MANUAL. Please read before operating your new bicycle.
 KODA USER MANUAL Please read before operating your new bicycle. INTRODUCTION Congratulations on the purchase of your new e-bike! We want to make you happy and believe your new e-bike will bring you lots
User Manual of Bagibike Electric Bicycles
 User Manual of Bagibike Electric Bicycles Model: Bagibike B16. http://www.bagibike.com Page 1 FOREWORD The following operation manual is a guide to assist you. This manual is not a complete document on
ELECTRIC FOLDING BIKE OWNERS MANUAL. e-power 36v. Go City-Lite
 P o w e r ELECTRIC FOLDING BIKE OWNERS MANUAL e-power 36v Go City-Lite Thank you for purchasing a Seago electric folding bike. In order to get the best out of your new bike you must read and fully understand
ELECTRIC BICYCLE OWNER S MANUAL
 ELECTRIC BICYCLE OWNER S MANUAL For Owners of EG Zurich 350 IX and 350 IX Step-thru Electric Bicycle Table of Contents Descriptions: Page Installation Instructions 2 How to install the bicycle out of the
ODK U500 (V2) Electric Bicycle
 Electric Bicycle") ODK U500 (V2) Electric Bicycle Ownerʼs Manual (English) Juiced Riders Inc. R130101 8724 Approach Road, San Diego, CA 92154, U.S.A. mail@juicedriders.com Tel: +1 (619) 746-8877 www.juicedriders.com How
ODK U500 (V2) Electric Bicycle Ownerʼs Manual (English) Juiced Riders Inc. R130101 8724 Approach Road, San Diego, CA 92154, U.S.A. mail@juicedriders.com Tel: +1 (619) 746-8877 www.juicedriders.com How
Table of Contents. Technical Information Warning Statement
 Table of Contents Technical Information-----------------------------------1 Warning Statement--------------------------------------2 Read Before Riding-------------------------------------3 List of Parts-----------------------------------------------4
ELECTRIC BICYCLE OWNER S MANUAL
 ELECTRIC BICYCLE OWNER S MANUAL For Owners of EG Kyoto 350 Electric Bicycle Table of Contents Descriptions: Page Installation Instructions 2 How to install the bicycle out of the box 2 Operation Instructions
Thank you for making our e-cycle your product of choice! Your purchase has helped us get one step closer to a greener environment.
 Hello and a hearty welcome to the Being Human e-cycle community! Thank you for making our e-cycle your product of choice! Your purchase has helped us get one step closer to a greener environment. With
SANTA CRUZ BICYCLES MY18 Hightower Suspension Setup
 SANTA CRUZ BICYCLES MY18 Hightower Suspension Setup Copyright Santa Cruz Bicycles 2017 TABLE OF CONTENTS SAFETY INSTRUCTIONS... 3 SAG SETUP...3 AIR SPRING FORKS...3 AIR SHOCKS...3 FORK SETUP... 4 FOX 36
PACE 500 OWNER S MANUAL
 PACE 500 OWNER S MANUAL AVENTON PACE 500 OWNER S MANUAL Thank you for purchasing an Aventon Pace 500 E-Bike! Before riding, please take a moment to review these instructions. Need service or support? Visit
SANTA CRUZ BICYCLES MY18 Nomad Suspension Setup
 SANTA CRUZ BICYCLES MY18 Nomad Suspension Setup Copyright Santa Cruz Bicycles 2017 TABLE OF CONTENTS SAFETY INSTRUCTIONS... 3 SAG SETUP...3 AIR SPRING FORKS...3 AIR SHOCKS...3 COIL SHOCKS...4 FORK SETUP...
QiCycle Electric Folding Bike
 QiCycle Electric Folding Bike Overview Shifter Brake Handlebar Steering tube Steering tube fixer Steering tube fixer Headlight Front brake Motor Clip of saddle pin Backlight Saddle pin Saddle Schematic
Power Assisted Bikes. Owner s Manual
 Power Assisted Bikes Owner s Manual Version 2 April 2016 Introduction Thank you for buying a PowaCycle Windsor electric bike. We hope it brings you many hours of enjoyment. For safe and compact shipping,
GADIS USER MANUAL. Please, read before operating your new bicycle
 GADIS USER MANUAL Please, read before operating your new bicycle INTRODUCTION Congratulations on the purchase of your new electric bicycle! We want to make you happy and believe your new bicycle will bring
ELECTRIC ROSE USER MANUAL ELECTRIC BICYCLE MODEL #: JERO16 VERSION #: 1
 USER MANUAL ELECTRIC ROSE ELECTRIC BICYCLE MODEL #: JERO16 VERSION #: 1 Congratulations on your new Jetson Electric Rose Electric Bicycle! Before your first ride, please check whether the wheels are damaged,
SANTA CRUZ BICYCLES MY17 Nomad Suspension Setup
 SANTA CRUZ BICYCLES MY17 Nomad Suspension Setup Copyright Santa Cruz Bicycles 2017 TABLE OF CONTENTS SAFETY INSTRUCTIONS... 3 SAG SETUP...3 AIR SPRING FORKS...3 AIR SHOCKS...3 FORK SETUP... 4 LYRIK SOLO
EW-09. Owner s Manual. (888) Customer Service. (888) Service
 Customer Service. (888) Service") EW-09 Owner s Manual www.ewheelsdealers.com (888) 305-0881 Customer Service (888) 571-2845 0 Service Table of Contents Page 2 - Feature Guide Page 3 - Product Specifications Page 4 - Operation of Scooter
EW-09 Owner s Manual www.ewheelsdealers.com (888) 305-0881 Customer Service (888) 571-2845 0 Service Table of Contents Page 2 - Feature Guide Page 3 - Product Specifications Page 4 - Operation of Scooter
ELECTRIC BICYCLE OWNER S MANUAL
 ELECTRIC BICYCLE OWNER S MANUAL For Owners of EG Oahu 500EX and EG Maui 500EX Electric Bicycle Table of Contents Descriptions: Page Installation Instructions 2 How to install the bicycle out of the box
US Patent 0540, 400 Other Patents Pending. Read this manual completely before assembling and riding our PET PRO-FLEX 500. Always wear a Helmet!
 US Patent 0540, 400 Other Patents Pending Read this manual completely before assembling and riding our 500 Always wear a Helmet! Priority Electric Transportation, LLC. 1007 West College Ave. #293 Santa
Electrically Assisted Pedal Cycles. Assembly Instructions
 Electrically Assisted Pedal Cycles Assembly Instructions Version 1 December 2005 Introduction Thank you for buying a PowaCycle Edinburgh electric bike. We hope it brings you many hours of enjoyment. For
FUZION V1000 LITHIUM POWERED owner s manual. 500 W of Power 18 MPH Full Suspension Disc Brake
 FUZION V1000 LITHIUM POWERED 500 W of Power 18 MPH Full Suspension Disc Brake Maximum Weight: 220 lbs (100 kilograms) Manual Version 1A-2015 CONTENTS WELCOME / Before You Start page 1 Components & Parts
EW-04. Owner s Manual. ewheels Service (888)
") EW-04 Owner s Manual ewheels Service (888) 571-2845 0 Table of Contents Page 2 - Feature Guide Page 3 - Technical Specifications Page 4 - Operation of Scooter Page 8 - Folding Instructions Page 9 - Charging
EW-04 Owner s Manual ewheels Service (888) 571-2845 0 Table of Contents Page 2 - Feature Guide Page 3 - Technical Specifications Page 4 - Operation of Scooter Page 8 - Folding Instructions Page 9 - Charging
Electrically Assisted Pedal Cycles. Assembly Instructions
 Electrically Assisted Pedal Cycles Assembly Instructions Version 4 23 Sept 2005 Introduction Thank you for buying a PowaCycle Freeway electric bike. We hope it brings you many hours of enjoyment. For safe
ekit User Manual Rear Kit Cyclotricity Electric Bike Conversion Kit EBC 2018 edition
 ekit User Manual Rear Kit Cyclotricity Electric Bike Conversion Kit EBC 2018 edition 1 Contents Part 1 Before Installation - Disclaimer - Battery care - Charger - Water - Specifications - Warranty - Exceptions
USER MANUAL QFT-7. Folding Bicycle. RILU Trading Pty
 P a g e 1 USER MANUAL QFT-7 Folding Bicycle RILU Trading Pty Unit 2, No 2 Caulson Close Maribyrnong 3032 Melbourne, Victoria Australia (03) 8395 2616 info@rilu-e-bike.com.au Rev.18.5409.QF7-UM P a g e
Warning Statement Read Before Riding
 Table of Contents Technical Information-----------------------------------1 Warning Statement--------------------------------------2 Read Before Riding------------------------------------- List Of Parts-----------------------------------------------4
Electric Assist System Manual
 Electric Assist System Manual evobicycle.com // promovec.com // 1 ELECTRIC ASSIST SYSTEM MANUAL Activate your warranty Within 8 days of purchase, you must register your EVO Pro-Movec ebike battery to receive
EW-27 Crossover Pre-Mobility Scooter
 EW-27 Crossover Pre-Mobility Scooter Owner s Manual www.ewheelsdealers.com Before (888) 305-0881 you operate Customer the Service scooter (888) 571-2845 Service 0 Locate the below listed materials in rear
THANK YOU FOR CHOOSING ATOM ELECTRIC.
 THANK YOU FOR CHOOSING ATOM ELECTRIC. We have worked hard to make sure your board meets or exceeds your expectations. If for any reason it doesn t, or if you have any suggestions for improvements please
Electric Bike User Manual
 Electric Bike User Manual HAVE A QUESTION? NEED HELP? Contact us on Facebook for a quick reply. westhillbikes.com CLASSIC / ENERGISE / VOGUE WARRANTY Westhill bikes are covered by a limited 3-year warranty.
Owner s Manual. CycloTricity Electric Bicycles. June 2016, 4 th edition. We strongly recommend you read this entire manual before using your bike.
 Owner s Manual CycloTricity Electric Bicycles June 2016, 4 th edition We strongly recommend you read this entire manual before using your bike. 1 Contents Part 1 Before use Page - Before first time use
Direct Drive EVBIKE-SET-36V - (26R, 26F, 28F)
") INSTALLATION MANUAL Direct Drive EVBIKE-SET-36V - (26R, 26F, 28F) Dear Customer, Congratulations on purchasing your EVBIKE. We believe that you will be fully satisfied with its operation. The electric
INSTALLATION MANUAL Direct Drive EVBIKE-SET-36V - (26R, 26F, 28F) Dear Customer, Congratulations on purchasing your EVBIKE. We believe that you will be fully satisfied with its operation. The electric
User Manual. MB-6000-UD Rev. 1.03
 User Manual MB-6000-UD Rev. 1.03 Table of Contents I. The Controls II. III. IV. Unit Operations A. Folding the Unit B. Folding the Handlebars C. Unlocking and Unfolding D. Precautions and Starting E. Power
Owner e s Manual Raven
 Owner s Manual Raven Marketed in Australia and New Zealand by Bzooma Pty Ltd ABN 37 640 907 507 TABLE OF CONTENTS Table of Contents... 1 BZOOMA PTY LTD... 2 Manufacturing Company Profile... 2 General Cautions
P R E M I U M E L E C T R I C B I C Y C L E S INSTRUCTION MANUAL
 WWW.BIGCATUSA.COM 631 285 2298 P R E M I U M E L E C T R I C B I C Y C L E S INSTRUCTION MANUAL Congratulations On Your Purchase & Thank You For Choosing Big Cat Warning: This manual is only a guide to
EW-52. Owner s Manual. (888) Customer Service (888) Service
 Customer Service (888) Service") EW-52 Owner s Manual www.ewheelsdealers.com (888) 305-0881 Customer Service (888) 571-2845 Service 0 Table of Contents 1. Instrument Panel. 2 2. Music system operation. 3 3. Before you operate your scooter....
EW-52 Owner s Manual www.ewheelsdealers.com (888) 305-0881 Customer Service (888) 571-2845 Service 0 Table of Contents 1. Instrument Panel. 2 2. Music system operation. 3 3. Before you operate your scooter....
INSTRUCTION MANUAL
 WWW.BIGCATUSA.COM 631 285 2298 INSTRUCTION MANUAL Congratulations On Your Purchase & Thank You For Choosing Big Cat Warning: This manual is only a guide to assist you. This Guide is not a complete or comprehensive
Mid-Drive Electric Bicycle Kit EVBIKE-SET-CMS-48 EVBIKE-SET-CMS-36
 INSTALLATION MANUAL Mid-Drive Electric Bicycle Kit EVBIKE-SET-CMS-48 EVBIKE-SET-CMS-36 Thank you for purchasing EVBIKE product and we hope that you will become a happy user. Carefully read the entire manual
USER GUIDE MANUAL MODEL#: JMY3000-BLK VERSION:
 USER GUIDE MANUAL MODEL#: JMY3000-BLK VERSION: 042016 Congratulations on purchasing your brand new Jetson Breeze Electric Scooter. The Jetson Breeze is a stylish and reliable folding electric scooter.
EW-20 Black. Owner s Manual. (888) Sales (888) Service
 Sales (888) Service") EW-20 Black Owner s Manual www.ewheelsdealers.com (888) 305-0881 Sales 0 (888) 571-2845 Service Table of Contents Page 2 - Feature Guide Page 3 - Product Specifications Page 4 - Operation of Scooter Page
EW-20 Black Owner s Manual www.ewheelsdealers.com (888) 305-0881 Sales 0 (888) 571-2845 Service Table of Contents Page 2 - Feature Guide Page 3 - Product Specifications Page 4 - Operation of Scooter Page
A. Control Panel/Dash board buttons
 CONTENT I. Specifications II. Important Information III. Bike Overview IV. Safety guidelines V. Charging A. Indoor Charging B. Outdoor Charging VI. How to start the e-bike A. Key start B. Remote Start
User Manual Journey Onward
 User Manual 2018 Journey Onward Introduction & Disclaimer First of all we would like to thank you for buying our X1 Explorer electric bike. Our ebike has been refined and perfected for almost 2 years by
ELECTRIC BICYCLE OWNER S MANUAL.
 ELECTRIC BICYCLE OWNER S MANUAL www.gowattson.com Hello. 1 Assembly. 2 Overview. 2 Step One: Removing the Front Basket. 3 Step Two: Mounting the Handlebars & Display. 4 Step Three: Replacing the Front
Owner s Manual for. Puma LPX & Lynx LPX. Lithium Polymer Powered Electric Folding Bikes
 Owner s Manual for Puma LPX & Lynx LPX Lithium Polymer Powered Electric Folding Bikes Model Shown PowaCycle Puma LPX Main Technical Specification Summary Bicycle Motor Weight: 17.8 kg Puma 20kg Lynx Type:
ENGLISH FRANÇAIS ITALIANO DEUTSCH ESPAÑOL OWNER S MANUAL & SET UP GUIDE 日本語
 DEUTSCH ITALIANO FRANÇAIS ESPAÑOL 日本語 ENGLISH OWNER S MANUAL & SET UP GUIDE 中文 CONGRATULATIONS! Thank you for purchasing a DVO Suspension product for your mountain bike. DVO Suspension products are designed
e-bikes BY: technologies
 e-bikes USER MANUAL BY: technologies by: Wise Innovation Technologies INSTRUCTION MANUAL Maintenance and Warranty Welcome to Platinum e-bikes Maintenance and Warranty Brought to you by Wise Innovation
Daymak warranties, services, and stocks parts for everything it sells. We support our products.
 EC1 User Manual About Daymak Daymak is one of Canada s largest Alternative Vehicle providers. We design, engineer, manufacture, import and repair everything from recreational dirt bikes, go-karts and electric
EW-66. Owner s Manual. (888) Customer Service Table of Contents (888) Service
 Customer Service Table of Contents (888) Service") EW-66 Owner s Manual www.ewheelsdealers.com (888) 305-0881 Customer Service Table of Contents (888) 571-2845 Service 0 Table of Contents 1. Before you operate your scooter...... 2 2. Scooter initial operation......
EW-66 Owner s Manual www.ewheelsdealers.com (888) 305-0881 Customer Service Table of Contents (888) 571-2845 Service 0 Table of Contents 1. Before you operate your scooter...... 2 2. Scooter initial operation......
Operating Instructions. Page 12 eazi-rider - Mountain eazi-rider - Mountain Page 1
 Operating Instructions Page 12 Page 1 Registration Your Durabike is guaranteed for 1 year. Please fill in the following details and return to the address below. Your Details Name: Address: Contact Number:
evinci ELECTRIC BICYCLE USER MANUAL infinity Series PLEASE READ CAREFULLY
 evinci ELECTRIC BICYCLE USER MANUAL infinity Series PLEASE READ CAREFULLY Table of Contents Safety Instructions...3 Symbols...3 Introduction...4 Mode of operation and extent of electronic power assistance...4
GT MAGNETIC POWER BICYCLES (SMART CYCLE)
") GT MAGNETIC POWER BICYCLES (SMART CYCLE) Congratulations on selecting the GT Magnetic Power Bicycle (Smart Cycle in short). In order to use and enjoy your Smart Cycle safely and to get the best performance
GT MAGNETIC POWER BICYCLES (SMART CYCLE) Congratulations on selecting the GT Magnetic Power Bicycle (Smart Cycle in short). In order to use and enjoy your Smart Cycle safely and to get the best performance
Specifications Page 3. User Guide Page 4. Riding Precautions Page 5. Assembling Your E-Bike Page 6. Maintenance Page 9
 Thank you for purchasing the Z1. Your new Zipper e-bike is made with a strong aluminium alloy frame, making it light yet durable, and comes with a lithium battery pre-installed, which has a range of up
2017 FATKAT ELECTRIC MOUNTAIN BIKE OWNER S MANUAL
 2017 FATKAT ELECTRIC MOUNTAIN BIKE OWNER S MANUAL This manual contains important safety, performance and service information. Read it before you take the first ride on your new QuietKat, and keep it for
Assembly & Usage Guide - IZIP E3Metro
 Assembly & Usage Guide - IZIP E3Metro This guide is intended to be followed by an experienced bicycle mechanic. If you have any doubts about your ability to safely assemble a bicycle, please let a professional
Table of Contents. Technical Information Warning Statement
 Table of Contents Technical Information-----------------------------------1 Warning Statement--------------------------------------2 Read Before Riding-------------------------------------3 List of Parts-----------------------------------------------4
Owner s Manual. Operation and Maintenance Instructions. Wisper 806fe. April st edition
 Owner s Manual Operation and Maintenance Instructions Wisper 806fe April 2009 1 st edition We strongly recommend that you read this entire manual before using your Wisper bike Wisper Limited - 1 - User
Vermont 48V User Manual
 Vermont 48V User Manual About Daymak Daymak is one of Canada s largest Alternative Vehicle providers. We design, engineer, manufacture, import and repair everything from recreational dirt bikes, go-karts
SEAT POST AND SEAT. Seat clamp handle
 USER MANUAL WARNING Electric Bikes can be dangerous to use. The user or consumer assumes all risk of personal injuries, damage, or failure of the bicycle or system and all other losses or damages to themselves
MODEL : QUICK 3 USER GUIDE MANUAL
 MODEL : QUICK 3 USER GUIDE MANUAL EN 6100-6-3:2007 + A1 EN 6100-6-1:2007 3 Table of Contents: QUICK 3 Features........... 3 QUICK 3 Main Parts...4-5 Warnings & General information............ 6-7 Serial
Electric Bike Supplement
 Electric Bike Supplement Electric Bike Instruction. Congratulations on your purchase of a pedal assisted bicycle. This is a supplement to the general bicycle user manual. Please make sure that your new
User s Manual. Table of Contents CAUTION. Model No. MTSC20000
 Model No. MTSC20000 Table of Contents Important Precautions..........2 Limited Warranty..............2 Before You Begin.............3 How to Set Up and Fold the Scooter...............4 How to Operate the
CITY COMMUTER MID-DRIVE EDITION
 CITY COMMUTER MID-DRIVE EDITION ($,9. 00 to $,9. 00 ) The Mid Drive Edition is a new spin on the popular City Commuter. It sports a supercharged, 00 watt mid-drive motor featuring a twistand-go throttle.
Duo Charger. for BP-U Series Batteries. Owner's Manual. Please read before using this equipment.
 Duo Charger for BP-U Series Batteries Owner's Manual Please read before using this equipment. Thank you for purchasing the Watson Duo Charger. Browse through this manual for instructions and useful tips
Ebike Operating Instructions
 Ebike Operating Instructions This is an important instruction, please make sure you read this carefully before you try your first ride. If you are in doubt about any information inside this instruction,please
User Manual.
 User Manual E- www.kangaroobike.com Version 1.3 2014 We wish you every success with your investment in a Winther E- Kangaroo, which has set new standards in comfort and userfriendliness. Read through this
Foldable Electric E-bike Instruction Manual
 Foldable Electric E-bike Instruction Manual This manual contains important safety, assembly, operation and maintenance information. Please read this manual before operation and save this manual for future
PLEASE BE SAFE WHEN RIDING... ALWAYS WEAR A HELMET AND OBEY ALL LAWS!
 Powered Personal Transportation Electric Power Board Product Handbook FOR THE BLADEZ XTR Street ELECTRIC POWER BOARD Model: PB-SM1806 PLEASE BE SAFE WHEN RIDING... ALWAYS WEAR A HELMET AND OBEY ALL LAWS!
MAGNUM PEAK USER MANUAL Please read before use!
 MAGNUM PEAK USER MANUAL Please read before use! www.magnumbikes.com 1 Foreword These operating instructions must be carefully read in order to quickly familiarize yourself with your bicycle. The knowledgeable
Duo Charger. for Digital Camera and Camcorder Batteries. Owner's Manual. Please read before using this equipment.
 Duo Charger for Digital Camera and Camcorder Batteries Owner's Manual Please read before using this equipment. Thank you for purchasing the Watson Duo Charger. Browse through this manual for instructions
Mid-Drive Electric Bicycle Kit EVBIKE-SET-CMS-36 EVBIKE-SET-CMS-48 EVBIKE-SET-CMS-68 EVBIKE-SET-CMS-100
 INSTALLATION MANUAL Mid-Drive Electric Bicycle Kit EVBIKE-SET-CMS-36 EVBIKE-SET-CMS-48 EVBIKE-SET-CMS-68 EVBIKE-SET-CMS-100 Thank you for purchasing EVBIKE product and we hope that you will become a happy
OPERATIONS MANUAL LEVER CHAIN HOIST
 OPERATIONS MANUAL LEVER CHAIN HOIST IMPORTANT SAFETY INFORMATION Please read, understand and follow all safety information contained in these instructions prior to the use of this hoist. Retain these instructions
Fifield Seaside 3.0. Electric Bicycle Owner s Manual
 Fifield Seaside 3.0 INTRODUCTION Electric Bicycle Owner s Manual THIS MANUAL CONTAINS IMPORTANT SAFETY, PERFORMANCE, AND MAINTENANCE INFORMATION. READ THE MANUAL BEFORE TAKING YOUR FIRST RIDE ON YOUR NEW
Pedelec Operating Instructions Pedelec handleiding Pédélec manuel
 Pedelec Operating Instructions Pedelec handleiding Pédélec manuel Introduction ( GB ) Dear Customer, congratulations on the purchase of your new KETTLER Pedelec Cycle. These instructions will help you
Mobility Scooters. Owners Manual
 Mobility Scooters Owners Manual 1 Electromagnetic Interference ( EMI ) It is very important that you read this manual before using the scooter for the first time including the following information regarding
Operation and Maintenance Instructions
 X-Treme TM Electric Moped Operation and Maintenance Instructions Electric Moped XM-3100 Revised 11/6/08 Operation and Maintenance Instructions We strongly recommend that you read this entire manual before
Table of contents. Safety instructions...2. Diagram with e-bike specific components...3. Control panel...4
 E-RIDE User s Guide Table of contents Safety instructions... Diagram with e-bike specific components...... Control panel... Important safety notes regarding battery charger...5 Charger function...6 Battery
LATCH. When you buy a Pedego, you re investing in: ($2, to $3, ) Notes
 Notes") LATCH ($2,795. 00 to $3,095. 00 ) The Pedego Latch rides like a dream and easily folds in seconds. It gives you the freedom to travel in comfort and style, wherever you may roam. FRAME OPTIONS AND COLORS
LATCH ($2,795. 00 to $3,095. 00 ) The Pedego Latch rides like a dream and easily folds in seconds. It gives you the freedom to travel in comfort and style, wherever you may roam. FRAME OPTIONS AND COLORS
Electric Bike D9908, D9909, D9979, D9980, D9981, D9982, D9983 and D9984
 Electric Bike D9908, D9909, D9979, D9980, D9981, D9982, D9983 and D9984 Thank you for purchasing this product, which has been made to demanding high quality standards and is guaranteed for domestic use
ASSEMBLY INSTRUCTIONS & OWNERS MANUAL
 ASSEMBLY INSTRUCTIONS & OWNERS MANUAL Ridge Rider Ver. 2.0 TABLE OF CONTENTS Introduction Warning Carton Contents Assembly Instructions Safety Operating Procedures Front Suspension Fork Pedal Assist Meter
swagger 3 USER MANUAL Ver /18/18
 USER MANUAL Ver. 1.0 7/18/18 In order to continue serving our customers and providing the best products, our product information including our user manuals may receive updates from time to time. Please
NEW GEN OWNER S MANUAL
 NEW GEN OWNER S MANUAL For Models: LT-ELP223Q LT-ELP116Q 1 2! Turn off the light when not in use to conserve battery power. CAUTION! If you need to mount the flashlight onto a firearm, make sure firearm
20 Trail Tracker VISIT TO FIND YOUR LOCAL DEALER
 20 Trail Tracker The monster truck of electric bikes It can go places and do things that no other bike can. TIRE PACKAGE 36v 11ah $2,495.00 SPECIAL FEATURES 4 wide tires allow you to effortlessly float
TERRAIN. Electric Bike User Manual. westhillbikes.com. HAVE A QUESTION? NEED HELP? Contact us on Facebook for a quick reply.
 TERRAIN Electric Bike User Manual HAVE A QUESTION? NEED HELP? Contact us on Facebook for a quick reply. westhillbikes.com Warranty Westhill bikes are covered by a limited 3-year warranty. Aside from general
ASSEMBLY INSTRUCTIONS AND OWNER S MANUAL
 ELECTRIC BIKES ASSEMBLY INSTRUCTIONS AND OWNER S MANUAL Table of Contents Carton Contents 2 Warning 4 Assembly Instructions 6 Safety 8 Operating Procedures 9 Battery 11 Battery & Charger Care 12 Brakes
POWER ASSISTED BICYCLES OWNERS MANUAL
 OWNERS MANUAL Simply explained this is how your e.life bike basically works. Firstly may we congratulate you on purchasing your new electric power assisted e.bike. Please take time to read your manual.
Assembly Instructions
 www.rockymounts.com TandemMount R4 Installation Manual Guidelines/Restrictions: - This carrier is intended for Thule rectangular and Yakima round bars only. - Bicycles must be equipped with quick release
40 V LITHIUM-ION BATTERY ATTACH YOUR RECEIPT HERE AB13786C 1. kobalttools.com ITEM # /
 ITEM #0506882 / 0506883 40 V LITHIUM-ION BATTERY MODEL #KB 240-06 / KB 440-06 Français p. 7 Español p. 13 ATTACH YOUR RECEIPT HERE Serial Number Purchase Date AB13786C 1 PRODUCT SPECIFICATIONS Battery
There are many generic and copycat brands out there, but don t be fooled. If you want real swag, you re in the right place.
 USER MANUAL IN ORDER TO CONTINUE SERVING OUR CUSTOMERS AND PROVIDING THE BEST PRODUCTS, OUR PRODUCT INFORMATION INCLUDING OUR USER MANUALS MAY RECEIVE UPDATES FROM TIME TO TIME. PLEASE CHECK OUR WEBSITE
Instruction Manual for E-bikes MD5
 Instruction Manual for E-bikes MD5 Table of contents 1. Your E-Bike..3 5 1.1 Introduction 1.2 General presentation of the vehicle 2. Function Display...6 13 2.1 Normal operation 2.2 Error code table 3.
child trailer Burley Bee and Honey Bee Owner s Instruction and Safety Manual Designed For One Or Two Children Burley Bee model shown Honey Bee
 child trailer Burley Bee and Honey Bee Owner s Instruction and Safety Manual Designed For One Or Two Children Honey Bee Burley Bee model shown child trailer Burley Bee and Honey Bee Owner s Instruction
There are many generic and copycat brands out there, but don t be fooled. If you want real swag, you re in the right place.
 USER MANUAL IN ORDER TO CONTINUE SERVING OUR CUSTOMERS AND PROVIDING THE BEST PRODUCTS, OUR PRODUCT INFORMATION INCLUDING OUR USER MANUALS MAY RECEIVE UPDATES FROM TIME TO TIME. PLEASE CHECK OUR WEBSITE
DO NOT RETURN TO STORE! ROSSO MOTORS ELECTRIC ATV OWNERS MANUAL. Read and understand this manual Prior to Riding!
 ROSSO MOTORS ELECTRIC ATV OWNERS MANUAL Read and understand this manual Prior to Riding! DO NOT RETURN TO STORE! Illustrations may not be exact appearance of actual product. Table of Contents General information:...3
ELECTRIC BICYCLE USER MANUAL
 ELECTRIC BICYCLE USER MANUAL 1 Main Technical Parameters and Specification Weight: 23 kg Wheel size: 20 Maximum speed: 25 km/h E BIKE URBAN Range: Up to 45km (with pedal assist) Type: lithium Voltage:
Owner s Instruction and Safety Manual. pet trailer. Burley Tail Wagon. Burley Tail Wagon model shown (Stroller Kit and Kickstand are Sold Separately)
") Owner s Instruction and Safety Manual pet trailer Burley Tail Wagon Burley Tail Wagon model shown (Stroller Kit and Kickstand are Sold Separately) Stroll Bike Contents Owner s Instruction and Safety Manual
Owner s Instruction and Safety Manual pet trailer Burley Tail Wagon Burley Tail Wagon model shown (Stroller Kit and Kickstand are Sold Separately) Stroll Bike Contents Owner s Instruction and Safety Manual
LED-6200T 144 LED VARIABLE COLOR ON-CAMERA LIGHT USER MANUAL
 LED-6200T 144 LED VARIABLE COLOR ON-CAMERA LIGHT USER MANUAL LED-6200T INTRODUCTION Thank you for choosing the Genaray LED-6200T On-Camera Light. This product will provide you with powerful, portable and
8-Bay Rapid Charger. for AA/AAA NiMH & NiCd Rechargeable Batteries. Owner's Manual. Please read before using this equipment.
 8-Bay Rapid Charger for AA/AAA NiMH & NiCd Rechargeable Batteries Owner's Manual Please read before using this equipment. Thank you for purchasing the Watson 8-Bay Rapid Charger. Browse through this manual
User Manual. Liberty 123 Electric Bike 24 Volt Lead Acid. Liberty 123 Liberty 24v FoldNGo. Thank you for your decision to buy this product.
 Liberty 123 Liberty 24v FoldNGo User Manual Thank you for your decision to buy this product Please use this product according to the instructions Please keep the instructions in a handy place Liberty 123
Product Handbook. Electric Power Board. Powered Personal Transportation FOR THE BLADEZ ION 350 ELECTRIC POWER BOARD
 Powered Personal Transportation Electric Power Board Product Handbook FOR THE BLADEZ ION 350 ELECTRIC POWER BOARD PLEASE BE SAFE WHEN RIDING... ALWAYS WEAR A HELMET AND OBEY ALL LAWS! IMPORTANT BATTERY