User Manual. Manual del usuario WIFI RANGE EXTENDER AMPLIFICADOR WIFI. English...01 Español... 49
|
|
|
- Bertha Jefferson
- 5 years ago
- Views:
Transcription

1 User Manual Manual del usuario WIFI RANGE EXTENDER AMPLIFICADOR WIFI English...01 Español... 49
2
3 Contents Contents Overview... 3 Device parts... 4 Product contents/device parts... 5 Getting started... 6 Initial setup... 7 Set up your WiFi range extender wirelessly...8 Wired setup...11 Getting to know your dual-band WiFi range extender System requirements Install the range extender using the installation wizard...16 Connecting to the web interface of the range extender...22 Advanced settings...22 Installation via app Set up using the WPS button...32 Troubleshooting I cannot log into the web interface
4 Contents The range extender is having trouble connecting to your wireless network...33 Storing Cleaning Technical specification Safety...37 Correct use...37 Safety information After sales support FCC compliance statement Disposal License and Sourcecode information
5 Overview A Overview 2 1 3
6 Device parts Device parts B
7 Product contents/device parts Product contents/device parts 1 WiFi Range Extender 7 WPS-LED 2 Ethernet cable 8 WAN/LAN LED 3 Reset button 9 LAN LED 4 On/Off switch 10 Power-LED 5 WPS button 11 Mode switch 6 WiFi LEDs 12 2x Ethernet ports VI.1.0.us 5
8 Getting started Getting started This WiFi Range Extender quickly and effectively helps to eliminate dead spots in your existing WiFi-Network. The WiFi Range Extender extends your 2.4 and 5.0 GHz networks. It supports WLAN standards b/g/n in the 2.4 GHz- range and WLAN standards a/n in the 5.0 GHz range. Transmission speed is up to 733 Mbit/s. The WPS button allows simple configuration with the touch of a button. You can also use the fast-ethernet port to connect to network devices by cable (such as network cameras) with up to 100 Mbit/s, with the configuration described here. The device has a compact design with 3 integrated antennas for optimum and fault-free data transmission. 6
9 Initial setup To get started you will need: Getting started Your wireless router, the network name of your WiFi Network and the password. A personal computer with any web browser. 7
10 Getting started Set up your WiFi range extender wirelessly 1. Use an outlet near the edge of the coverage area of your network. 2. Plug in the WiFi Range Extender. Make sure that the power switch is on ON and the Mode Selector is on Repeater. 8
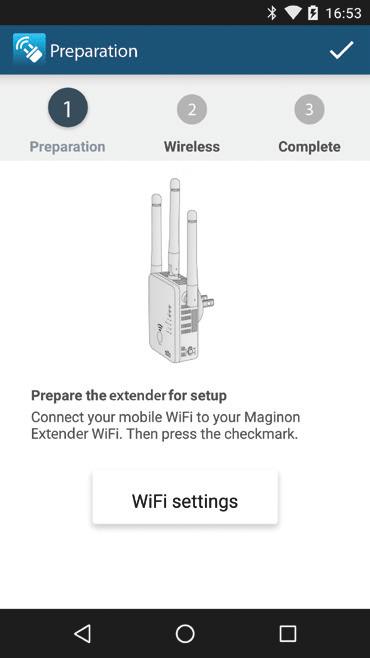
11 Getting started 3. Use a WiFi device like a laptop, tablet or mobile phone. Connect your WiFi device to the WiFi-Network WiFi-Extender. WiFi-Extender Test Cisco Connect 4. Open your browser and enter The Setupinterface of the WiFi Range Extender appears. Enter the password admin and select your language. 9
12 Getting started When your computer is connected to the WiFi Range Extender for the first time, the Installation Wizard appears on your screen after you logged into the Web Interface. Please follow the On-Screen instructions to set up the WiFi Range Extender. 10
13 Getting started Wired setup 1. Connect the WiFi Range Extender to your laptop or personal computer using the included ethernet cable. 2. Plug the WiFi Range extender into a wall socket. 3. Turn off the WiFi-function on your computer. 4. Open a browser and enter The Login password is admin. Follow the On-Screen instructions to install the WiFi Range Extender. 5. After you have completed the setup, turn on the WiFi-function on your computer again. 11
14 Getting started Getting to know your dual-band WiFi range extender WiFi-LEDs 6 : Flashing Green light - The Wifi Range Extender is not connected to the Wifi-Network. WPS-LED 7 : Flashing green light - The WiFi Range Extender is listening for a WPS enabled computer or other device. 12
15 Getting started WAN/LAN LED 8 : Solid green light - The WiFi Range Extender is connected to a broadband modem with the included Ethernet cable. LAN LED 9 : Solid green light - The WiFi Range Extender is connected to a Computer with the included ethernet cable. Power LED 10 : Off - The WiFi Range Extender is switched off or not plugged into a power source. 13
16 Getting started Reset Button 3 : To reset the WiFi Range Extender to the default settings if you change your router s network name or password. WPS Button 5 : Establishes secure connection between your WiFi Range Extender and a WPC enabled WiFi device, such as a router or computer. Mode Button 11 : Select the usage of the WiFi Range Extender as a Router or a Range Extender. 14
17 Getting started LAN & WAN/LAN Connector 12 : To connect a device like a Computer, TV, Gaming Console or other wired devices using the included Ethernet cable you can use both connectors. To connect the WiFi Range Extender to a broadband modem when the WiFi Range Extender is used as a router, use the WAN/LAN connector. System requirements A wireless router with 2.4 GHz and/or 5 GHz with a broadband internet connection with WiFi Standart a/b/g/n A computer with A 1.8 GHz Processor or faster 512 MB RAM or more An installed wireless network interface and TCP/IP protocol. Windows 7 (32/64 bit) or Mac OS X v 10.5 or above Internet Explorer (Version 7 or above), Firefox, Google Chrome or Safari 15
18 Install the range extender using the installation wizard Install the range extender using the installation wizard When entering the Web-Interface wirelessly or wired the first time, the Installation Wizard appears on your screen. Select the desired option to install the WiFi Range Extender as an AP (Access point) to convert a wired network into a wireless network or as an Extender to extend the range of your existing wireless network. 1. AP (Access point) Log into the Web-Interface as per Step 1-4 of the chapter Getting started. Select the Option AP (Access point). The AP Wizard appears on your screen. 16

19 Install the range extender using the installation wizard 17
20 Install the range extender using the installation wizard Enter the data for the Access Point: WIFI SSID: Enter a name for your WiFI Network Security type: Enter encryption type Static IP: Chose if the Range Extender should obtain a static IP address Click on Apply to accept the settings. Once restarted the WiFi Range Extender can be used as an Access Point. After the WiFi Range Extender has been set up, you can connect a computer to the WiFi Range Extender using the wireless option or an ethernet cable. 2. Extender To extend the range of an existing wireless network chose the option Extender.The device will search automatically for all available networks in your local area. 18

21 Install the range extender using the installation wizard Select the network which should be extended and click Next. 19

22 Install the range extender using the installation wizard 20
23 Install the range extender using the installation wizard Enter the password of the selected network to join this network. You can edit the SSID WIFI-Extender to a desired network name. Select Connect to transmit the entered data to the WiFi Range Extender. After the restart of the WiFi Range Extender you need to connect your computer to the network of the WiFi Range Extender again. 21
24 Install the range extender using the installation wizard Connecting to the web interface of the range extender When you connect to your WiFi Range Extender you can access the User Interface. Open your internet browser, enter the address and press enter. The Login password is admin. Advanced settings When you connect to the WiFi Range Extender you can access the Web-Interface with your Internet browser. Enter the address Maginon.extender in your browser and press enter. Login to the Web-Interface and select the option Advanced settings in the bottom line of the interface. Here several advanced settings can be found. 22

25 Install the range extender using the installation wizard 23
26 Install the range extender using the installation wizard Internet settings Set a static or dynamic IP address LAN settings Set the DHCP settings Time settings Synchronize the time settings LED on/off Switch the LEDs On or Off Login password Change the Login Password of the Web-Interface Backup/restore Backup or Restore the configuration of your Range Extender or reset to the default settings. 24
27 Upgrade firmware Install the range extender using the installation wizard Upgrade the Firmware Version of your Range Extender. If there is a new Firmware available we will announce this on our homepage. Device status See the actual status of your Range Extender Device reboot Reboots the Range Extender. Please note, changes of the advanced settings can cause malfunction of the Range Extender. 25
28 Installation via app Installation via app The below instructions refer to an installation using the Android App. The display on the ios App can differ from the shown screen shots. 1. Install the free App Maginon WIFI Extender on your Smartphone. 2. Plug the WiFi Range Extender into a socket close to the router. Ensure that the mode switch of the Extender is set to Repeater. Switch on the extender and open the App. 3. Select WiFi Range Extender model (Fig. 1) to be installed and click on. 26

29 Installation via app (Fig.1) (Fig.2) 27
30 Installation via app 4. Connect your Smartphone to the open WiFi network of the WiFi Range Extender. Select option WiFi settings (Fig. 2). It can take a few seconds to establish the connection. Then return to the App and confirm connection by selecting. 5. The extender now scans all WiFi networks available in the vicinity, listing them after a few seconds (Fig. 3). Select the network to be connected to the extender, by selecting the shown network. 28 (Fig.3)
 for the network which will be generated by your")

31 Installation via app 6. Next enter a name (SSID) for the network which will be generated by your extender after installation for amplification (Fig. 4). Also enter the WiFi key of your home network to be amplified by the extender. Ensure that you enter the WiFi key correctly. (Fig.4) (Fig.5) 29
 (Fig.")
32 Installation via app 7. Confirm input by clicking on. (Fig.5) 8. Your entry is transmitted to the extender. (Fig.6) 9. The extender now connects to the Home network. Please wait until the extender has carried out a restart. (Fig.7) (Fig.6) 30

33 Installation via app 10. Open the WiFi settings of your Smartphone and connect to the WiFi network created in section 5. Check that you can access the Internet from your mobile phone using the new WiFi connection. 11. If no Internet reception is available, please use the reset button of the extender and restart the installation. Recheck the WiFi key of your home network. Fig. 7 31
34 Set up using the WPS button Set up using the WPS button If your router contains a Push Button Configuration or WPS button (PBC/WPS) it is possible to carry out a quick configuration for new devices in the network and to also connect the WiFi Range Extender to the WLAN Plug the WiFi Range Extender into a socket. 2. Switch on the extender using the ON/OFF switch. The Power-LED is on. 3. Press PBC/WPS key on the router. (Further information for activating the router can also be found in the Operating Instructions of your router). 4. Hold down the WPS button on the WiFi Range Extender for at least 6 seconds. 5. The connection is set up after a few seconds.
35 Troubleshooting Troubleshooting I cannot log into the web interface Please make sure the WiFi Range Extender is switched on and plugged into a power outlet. Reset the device with the Reset button and connect your WiFi device like a laptop, tablet or mobile phone with the network of the extender again. The range extender is having trouble connecting to your wireless network Reset the device with the Reset button and connect your WiFi device like a laptop, tablet or mobile phone with the network of the extender again. Follow the installation instructions on Page 16 and make sure to use the correct password of your network. 33
36 Storing Storing When not in use please disconnect the WiFi Range Extender from the power supply and store it in a clean and dry place outside of the reach of children. Cleaning Let the WiFi Range Extender cool down completely before cleaning. Never immerse the WiFi Range Extender or the plug in water or other fluids. Ensure that no water enters the housing. Do not use any aggressive cleaners, brushes with metal or nylon bristles or sharp or metallic cleaning objects, such as knives, hard spatulas and similar. These can damage the surface. 34
37 Cleaning Never place the WiFi Range Extender in a dishwasher. This would destroy the device. 1. Prior to cleaning, switch off the WiFi Range Extender and pull the plug out of the socket. 2. Let the WiFi Range Extender cool down completely! 3. Wipe the extender with a slightly damp cloth. Let all parts dry completely. 35
38 Technical specification Technical specification Model: Connection: Data transmission rate: Wireless standard: Operating modes: Encoding: Aerial: 36 MAGINON WLR-753 AC Wireless & Network cable Up to 733 Mbps IEEE ac/a/b/g/n Access point extender and router WEP (64/152 Bit), WPA-PSK, WPA2-PSK and WPA/WPA2 mixed 3 x integrated aerials Power supply: Internal ( V~, 50/60Hz, 0.3 A) Operating temperature: 0 C to +40 C LED display: Power, LAN, WAN/LAN, WPS, WiFi
39 Safety Safety Correct use The WiFi Range Extender is designed to only be used as WiFi Range Extender. The WiFi Range Extender is only suitable for private and not for commercial use. Only use the WiFi Range Extender as described in the operating instructions. Any other use is deemed to be incorrect and can cause material damage. The manufacturers or dealers do not accept any liability for damage resulting from improper or incorrect use. 37
40 Safety Safety information This equipment complies with FCC radiation exposure limits set forth for an uncontrolled environment. This equipment should be installed and operated with minimum distance of 7.9 inches (20cm) between the radiator and your body. This transmitter must not be co-located or operating in conjunction with any other antenna or transmitter Faulty electrical installations or excessive mains voltage can cause electrocution. Only connect the WiFi Range Extender if the mains voltage of the power point matches the voltage specified on the rating plate. The 110 V socket used or the WiFi Range Extender must be freely accessible at all times, so that it can be quickly disconnected from the mains when necessary. Do not operate the WiFi Range Extender if it is visibly damaged. 38
41 Safety Ensure adequate ventilation and do not cover the WiFi Range Extender to prevent overheating. Do not open housing and have repairs carried out by an expert. Contact a specialist workshop. All liability and warranty claims shall be void in case of repairs carried out by users, incorrect connection or improper use. This equipment contains electric and mechanical parts required for protection against hazard sources. The ON/OFF switch should not be used to separate the WiFi Range Extender from the AC mains. The WiFi Range Extender may not be operated with an external timer or separate remote control system. Never immerse the WiFi Range Extender or plug in water or other fluids. Never touch the WiFi Range Extender with wet hands. 39
42 Safety Install the LAN cable in such a way that it does not become a trip hazard. Do not kink the LAN cable and do not install it over sharp edges. Keep the WiFi Range Extender away from open flames and hot surfaces. Only use the WiFi Range Extender as described in the operating instructions. Never operate the WiFi Range Extender in wet rooms or in the rain. If the WiFi Range Extender shows signs of smoke, smells like it is burning or makes unusual noises, disconnect from outlet immediately and do not operate. Do not push objects into the WiFi Range Extender. 40
43 Safety When not using or cleaning the WiFi Range Extender or in case of a fault, always switch off the WiFi Range Extender and pull the connector out of the socket. Do not use the WiFi Range Extender if plastic or metal parts of the device show cracks or tears or are deformed. Replace damaged parts only with original spare parts. Hazard for children and persons with reduced physical, sensory or mental abilities (such as partially disabled, older persons with limited physical and mental abilities) or lack of experience and know-how (such as older children). This WiFi Range Extender may be used by children 8 years or older and persons with reduced physical, sensory or mental abilities or lack of experience or know-how provided they are supervised or have been instructed on how to safely use the range extender and understand hazards resulting therefrom. 41
44 Safety Keep packaging foil away from children. There is a suffocotion risk. When cleaning the WiFi Range Extender, never immerse in water and do not use a steam cleaner. The WiFi Range Extender could otherwise be damaged. Please handle the WiFi Range Extender with care to avoid damages. This Device is for indoor use only! 42
45 After sales support Hegele Logistic, 1001 Mittel Drive, Wood Dale, IL 60191, USA Phone: maginon@protel-service.com After sales support FCC compliance statement This device complies with Part 15 of the FCC Rules. Operation is subject to the following two conditions: (1)This device may not cause harmful interference, and (2)This device must accept any interference received,including interference that may cause undesired operation Warning: Changes or modifications to this unit not expressly approved by the party responsible for compliance could void the 43
46 FCC compliance statement user s authority to operate the equipment. NOTE: This equipment has been tested and found to comply with the limits for a Class B digital device, pursuant to Part 15 of the FCC Rules. These limits are designed to provide reasonable protection against harmful interference in a residential installation. This equipment generates, uses and can radiate radio frequency energy and, if not installed and used in accordance with the instructions, may cause harmful interference to radio communications. However, there is no guarantee that interference will not occur in a particular installation. If this equipment does cause harmful interference to radio or television reception, which can be determined by turning the equipment off and on, the user is encouraged to try to correct the interference by one or more of the following measures: Reorient or relocate the receiving antenna. 44
47 Increase the separation between the equipment and receiver. Disposal Connect the equipment into an outlet on a circuit different from that to which the receiver is connected. Consult the dealer or an experienced radio/tv technician for help. Disposal Dispose of packaging For disposal, separate packaging into different types. Cardboard and board must be disposed of as paper and foil must be recycled. 45
48 Disposal Disposal of used device Do not dispose of used devices in household waste! If the device can no longer be used each consumer is legally obliged to dispose of used head sets separately from domestic waste, e.g. at a collecting point of the municipality/district. This ensures that used equipment is recycled correctly and that negative effects on the environment are avoided. Electrical equipment is consequently marked with the adjacent symbol. 46
49 License and Sourcecode information License and Sourcecode information The product includes software components, which have been licensed by the rights holders as free software or open source software. You ll find the copyright notes and license texts here: You can obtain the source code of these software components on a data carrier from us by sending a request to our customer support department at the address below within three years after sale of the product and for at least as long as we offer support and spare parts for the product: supra Foto-Elektronik-Vertriebs-GmbH Denisstrasse 28A, Kaiserslautern, Germany (or by to: maginon@protel-service.com) Subject: Source code, Maginon WLR-753 AC 47
50 License and Sourcecode information To the extent the product includes proprietary software components, which stem from us and are linked with a library under the GNU Reader or Library General Public License, we allow the reengineering of these proprietary software components for debugging of changes and for making changes for your own use. Passing on changes of proprietary software components, on the other hand, is not permitted. Liability and warranty information of the rights holders: This program comes with ABSOLUTELY NO WARRANTY; for details see Sec. 11 and 12 of the GNU General Public License, Version 2. This program comes with ABSOLUTELY NO WARRANTY; for details see Sec. 15 and 16 of the GNU General Public License, Version 3. This program comes with ABSOLUTELY NO WARRANTY; for details see Sec. 15 and 16 of the GNU Lesser General Public License, Version
User Manual TABLE MAGNIFIER TL-70. User-friendly Manual ID: #05007
 User Manual TABLE MAGNIFIER TL-70 MANUAL DEVELOPED IN GERMANY myhansecontrol.com User-friendly Manual ID: #05007 Contents Overview... 4 Device parts... 5 Scope of delivery/device parts...6 Preface... 7
AC / 65 W M PLEASE READ BEFORE OPERATING THIS EQUIPMENT.
 AC / 65 W M 5V AX 11 PLEASE READ BEFORE OPERATING THIS EQUIPMENT. TABLE OF CONTENTS 1 2-10 6-8 11 11 12 14-15 AC / 65 W M 5V AX 11 Included Items Operating Instructions Troubleshooting Guide Maintenance
Installer Guide smart connect
 Installer Guide smart connect TM 7490 Wireless Remote Outdoor Sensor Please read all instructions before proceeding. The wireless remote outdoor sensor monitors temperature at a remote outdoor location
Instruction Manual 03
 Instruction Manual 03 Nike HyperAdapt 1.0 Functionality When the wearer slips into the shoe, the Nike HyperAdapt 1.0's heel sensor will trigger the laces to auto-lace to a preset tightness. Two buttons
 N0246 Please keep this instruction sheet for future reference, as it contains important information. Requires nine AA (LR6) alkaline batteries (not included) for operation. Adult assembly is required for
PerfectTilt RF Motorized Shutter User Manual
 PerfectTilt RF Motorized Shutter User Manual Pictured: PerfectTilt RF Solar with auxiliary solar panels and auxiliary battery pack INTRODUCTION The PerfectTilt RF motorization system features a remote
OPERATING INSTRUCTIONS
 OPERATING INSTRUCTIONS HALO BOLT 57720 Powerful, compact and easy to use, the HALO BOLT can safely jump start your car. In addition, you can use it to charge your phone, tablet or other electronic devices!
WIRELESS SMART CHARGING PAD OPERATING INSTRUCTIONS PLEASE READ BEFORE OPERATING THIS EQUIPMENT
 WIRELESS SMART CHARGING PAD OPERATING INSTRUCTIONS PLEASE READ BEFORE OPERATING THIS EQUIPMENT HALO WIRELESS SMART CHARGING PAD Thank you for choosing HALO. The HALO WIRELESS SMART CHARGING PAD is the
Bounce & Spin ZebraTM
 K0317 Bounce & Spin ZebraTM Please keep this instruction sheet for future reference, as it contains important information. Requires three AAA (LR03) alkaline batteries (not included). Adult assembly is
Operating instructions. sonnenprotect for operators. KD-337 Part no Version X00.
 Operating instructions for operators sonnenprotect 1300 KD-337 Part no. 22010 Version X00 info@sonnenbatterie.de www.sonnenbatterie.de EN IMPORTANT Read this documentation carefully before operation. Retain
Attachment. M size (2 marks)
") Start Here Type: Model: MT500G II M-S751 2014 Seiko Epson Corporation All rights reserved. Printed in Japan, 12/14 Read these instructions before using your product. This information is subject to change
Start Here Type: Model: MT500G II M-S751 2014 Seiko Epson Corporation All rights reserved. Printed in Japan, 12/14 Read these instructions before using your product. This information is subject to change
Touchstone TB130 DC Output UPS
 Touchstone TB130 DC Output UPS User Guide Release 2.5 STANDARD 1.0 August 2017 August 2017 Touchstone TB130 DC Output UPS User Guide Release 2.5 STANDARD 1.0 ARRIS Copyrights and Trademarks 2017 ARRIS
Operating Instructions
 Operating Instructions Contents Introduction 1 Operating Instructions 2-7 Storing/Handling/Cleaning 7 Safety Precautions 7-8 Specifications 9 FCC Compliance Statement 9-10 Limited Warranty 10-11 Contact
Lots of Action in the Jungle!
 Lots of Action in the Jungle! Please keep this instruction sheet for future reference, as it contains important information. Requires three AA batteries (included). Adult assembly is required for battery
RIDESENSE User Manual
 RIDESENSE User Manual RIDESENSE overview: The GIANT RIDESENSE employs ANT+ and Bluetooth Smart (BLE 4.0) license certification technology. ANT+: ANT+ certification compliant meter. Bluetooth Smart (BLE
M1800.
 M1800 Please keep this instruction sheet for future reference, as it contains important information. Requires three AA (LR6) alkaline batteries (not included) for operation. Adult assembly is required.
Back-Up Sensor System
 Back-Up Sensor System Model No.: PKC0RE Owner s Manual and Warranty Information OFF ON 0.4m/1.3ft 0.6m/2.0ft 1.0m/3.3ft 1.2m/4.0ft 1.5m/5.0ft LEFT RIGHT Read these instructions completely before using
Monnit Wireless Range Extender Product Use Guide
 Monnit Wireless Range Extender Product Use Guide Information to Users This equipment has been tested and found to comply with the limits for a Class B digital devices, pursuant to Part 15 of the FCC Rules.
Owner's Manual. For latest instructions please go to
 mycharge name and logo are registered trademarks of RFA Brands. 2012-2013 RFA Brands. All Rights Reserved. Patent Pending. Made in China. IB-RFAM0237 Owner's Manual For latest instructions please go to
L
 L5105 www.imaginext.com Lots of Action in the Jungle! Please keep this instruction sheet for future reference, as it contains important information. Requires three AA batteries (included). Adult assembly
CAUTION-ELECTRICALLY OPERATED PRODUCT:
 CAUTION-ELECTRICALLY OPERATED PRODUCT: NOT RECOMMENDED FOR CHILDREN UNDER 8 YEARS OF AGE, AS WITH ALL ELECTRIC PRODUCTS, PRECAUTIONS SHOULD BE OBSERVED DURING HANDLING AND USE TO PREVENT ELECTRIC SHOCK,INPUT:120V
AC Level 2 Commercial Charging System. Owner s Manual. Simply Smart.
 AC Level 2 Commercial Charging System Owner s Manual Simply Smart. 2014 by Blink Network, LLC. All rights reserved. No part of the contents of this document may be reproduced or transmitted in any form
Owners Manual for TPMS plus GPS
 To ensure correct operation and service please read these instructions before installing and operating the TPMS feature of the TPMS/GPS unit. Owners Manual for TPMS plus GPS TABLE OF CONTENTS TIRE PRESSURE
TPMS (Tire Pressure Monitoring Systems)
") P458 App English manual V1.3 2016 TPMS (Tire Pressure Monitoring Systems) Tire Pressure Monitoring Systems (TPMS) improves safety while driving. Once installed in your vehicle, the system will automatically
P458 App English manual V1.3 2016 TPMS (Tire Pressure Monitoring Systems) Tire Pressure Monitoring Systems (TPMS) improves safety while driving. Once installed in your vehicle, the system will automatically
AC Level 2 Commercial Charging System. Owner s Manual. Simply Smart.
 AC Level 2 Commercial Charging System Owner s Manual Simply Smart. 2014 by Blink Network, LLC. All rights reserved. No part of the contents of this document may be reproduced or transmitted in any form
Instruction Manual. Blink HQ Charger. Charge on. a CarCharging Company
 Instruction Manual Blink HQ Charger a CarCharging Company 2014 by Blink Network, LLC No part of the contents of this document may be reproduced or transmitted in any form or by any means without the express
INSTRUCTIONS FOR OUTDOOR WALL LANTERN, MODEL LPT-1107
 INSTRUCTIONS FOR OUTDOOR WALL LANTERN, MODEL LPT-1107 Page 1 Thank you for purchasing this Langport Lighting outdoor wall lantern. This product has been manufactured with the highest standards of safety
MQ4C-24/6485 WIRELESS INDOOR/OUTDOOR QUAD-COPTER
 AGES 14+ MQ4C-24/6485 WIRELESS INDOOR/OUTDOOR QUAD-COPTER INSTRUCTION MANUAL PLEASE READ ALL INSTRUCTIONS CAREFULLY & RETAIN FOR FUTURE USE Welcome! Thank you for purchasing Wireless Indoor/Outdoor Quad-copter.
Owner's Manual. For latest instructions please go to
 mycharge name and logo are registered trademarks of RFA Brands. 2012-2013 RFA Brands. All Rights Reserved. Patent Pending. Made in China. IB-RFAM0232 Owner's Manual For latest instructions please go to
翔鑫科技股份有限公司. Oro Technology Co., LTD. 無線胎壓監測器 Tire Pressure Monitoring System 型號 : W410
 翔鑫科技股份有限公司 Oro Technology Co., LTD 無線胎壓監測器 Tire Pressure Monitoring System 型號 : W410 ORO TPMS User Manual To ensure correct operations and services please read these instructions before installing and
SOKAR FPV DRONE. Quick Start Manual SkyRC Technology Co., Ltd. All Rights Reserved. Version
 SOKAR FPV DRONE Quick Start Manual Manufactured by SKYRC TECHNOLOGY CO., LTD. www.skyrc.com 2015 SkyRC Technology Co., Ltd. All Rights Reserved. Version 1.0 7504-0694-01 RoHS TABLE OF CONTENTS INTRODUCTION
IRRIGATION 810-3T-PLUS TRANSMITTER GUIDE
 IRRIGATION 810-3T-PLUS TRANSMITTER GUIDE Pg. 2 HOT SHOT OVERVIEW 3 STANDARD OPERATION MODE 4 HOW TO CONTROL AND SHARE MULTIPLE S 5 TRANSMITTER FUNCTION SWITCH SETTINGS 6 OPERATING THE TEST BEACON 7 OPERATING
Thermometer models / 00831A
 Instruction Manual Thermometer models 00822 / 00831A CONTENTS Unpacking Instructions... 2 Package Contents... 2 Product Registration... 2 Features & Benefits... 3 Setup... 4 Install or Replace Batteries...
P OWER CUBE PLEASE READ BEFORE OPERATING THIS EQUIPMENT. Powerful Universal Portable Charger T M
 P OWER CUBE T M Powerful Universal Portable Charger PLEASE READ BEFORE OPERATING THIS EQUIPMENT HALO POWER CUBE Thank you for choosing HALO. The Power Cube is the best of both worlds. It combines the on-the-go
Please read and understand all precautions prior to use.
 INPUT: 120V AC 60Hz 8W. OUTPUT: 13V DC 440mA. OWNER S MANUAL Please read and understand all precautions prior to use. Thank you for choosing a premium New Bright product. L897121239/JN113-16 CONTENTS Component
DUAL WIRELESS CHARGING PAD, 10W X 2. Almohadilla de carga inalámbrica doble, 10W X2 USERS GUIDE
 DUAL WIRELESS CHARGING PAD, 10W X 2 Almohadilla de carga inalámbrica doble, 10W X2 USERS GUIDE Thank you for purchasing our Dual Wireless Charging Pad, 10W X 2 Included in this document are technical specifications
LIGHT & SOUND BATH VANITY LIGHT
 LIGHT & SOUND ATH VANITY LIGHT CONTEMPORARY SLAT 3L SWITCH/NL/T LACK CHROME ITM. / ART. 962793 Model #: 1301-030303-01 ASSEMLY, INSTALLATION, AND CARE INSTRUCTIONS IMPORTANT, RETAIN FOR FUTURE REFERENCE
SFA275 USER MANUAL PLEASE READ THIS USER MANUAL COMPLETELY BEFORE OPERATING THIS UNIT AND RETAIN THIS BOOKLET FOR FUTURE REFERENCE
 Parking Alert Sensor SFA275 USER MANUAL PLEASE READ THIS USER MANUAL COMPLETELY BEFORE OPERATING THIS UNIT AND RETAIN THIS BOOKLET FOR FUTURE REFERENCE COMPLIANCE WITH FCC REGULATIONS This device complies
Owner's Manual. mycharge name and logo are registered trademarks of RFA Brands RFA Brands. All Rights Reserved. Patent Pending.
 REGISTER Your Product At: www.mycharge.com Your valuable input regarding this product will help us create the products you will want in the future. PLEASE TAKE A MOMENT NOW mycharge name and logo are registered
Assembled Parts. Terminal Base. Barn Roof. Air Track with Tabs. 2 Barn Walls. Barn Base. 4 Air Tracks with Connectors. Air Track with Support
 www.fisher-price.com N9993 Assembled Parts Main Tower Terminal Base Traffic Control Top Barn Roof Loading Station with Tabs Security Gate 2 Barn Walls with Support 4 s with Connectors Barn Base Trestle
User s Manual. Deluxe Car Carrier TM VTech Printed in China
 User s Manual Deluxe Car Carrier TM 2015 VTech Printed in China 91-003179-006 INTRODUCTION Thank you for purchasing the VTech Go! Go! Smart Wheels Deluxe Car Carrier! The Deluxe Car Carrier is a big truck
User Guide. Digital Shipping Scale S150
 User Guide Digital Shipping Scale S150 2012 Sanford, L.P. All rights reserved. Revised 3/12. No part of this document or the software may be reproduced or transmitted in any form or by any means or translated
FLO Home TM X5 Model. Installation Manual FLO Services Inc. All rights reserved.
 FLO Home TM X5 Model Installation Manual 2016 FLO Services Inc. All rights reserved. v161130:2013 Table of Contents Specifications 3 Safety Instructions 4 Planning your Installation 5 Box Contents 6 Installing
LER Electronic Play Mat. Use and Care Guide. Ages. For 1 3 players
 LER 6949 Electronic Play Mat Use and Care Guide Ages 3+ For 1 3 players Learning to count is fun with the Counting Cookies Electronic Play Mat This interactive electronic mat teaches and reinforces number
7.5 FT PRE-LIT ENGLEWOOD PINE TREE
 ITEM #0243778 7.5 FT PRE-LIT ENGLEWOOD PINE TREE Holiday Living & Design is a registered trademark of LF, LLC. All Rights Reserved. MODEL #W14L030 Español p. 11 ATTACH YOUR RECEIPT HERE Serial Number Purchase
L
 L5066 Please keep this instruction sheet for future reference, as it contains important information. Requires three AA batteries (included). Adult assembly is required. Tool required for assembly: Phillips
User s Manual. Forest Adventure Playset TM VTech Printed in China US CA
 User s Manual Forest Adventure Playset TM 2014 VTech Printed in China 91-002922-000 US CA INTRODUCTION Thank you for purchasing the VTech Go! Go! Smart Animals Forest Adventure Playset learning toy! Go
Owner's Manual. For latest instructions please go to
 mycharge name and logo are registered trademarks of RFA Brands. 2012-2013 RFA Brands. All Rights Reserved. Patent Pending. Made in China. IB-MYC0600 Owner's Manual For latest instructions please go to
CFM96. fisher-price.com
 CFM96 Keep this instruction sheet for future reference, as it contains important information. Requires four C (LR14) alkaline batteries (not included) for operation. Adult assembly is required. Tool required:
AirVolt - P User s Manual. 3CH Mini Indoor Helicopter w/ Gyro. Ages 14+ and up
 AirVolt - P16-41459 3CH Mini Indoor Helicopter w/ Gyro User s Manual Ages 14+ and up TABLE OF CONTENTS What s in the Box... 3 Helicopter Part LIst... 4 Installing the Batteries... 5 Charging the Helicopter...
BATTERY CHARGER INSTRUCTION MANUAL. model no. ACG112CL
 model no. ACG112CL BATTERY CHARGER IMPORTANT: Please read this manual carefully before running this battery charger and save it for reference INSTRUCTION MANUAL 3 TABLE OF CONTENTS Technical specifications
User Manual POWERBANK. Contents. Spend a little Live a lot. Spend a little Live a lot.
 User Manual Contents Spend a little Live a lot. Great care has gone into the manufacture of this product and it should therefore provide you with years of good service when used properly. In the event
Solar Powered Wireless Temperature Station & Sensor
 Model: WS-6020U-IT Instruction Manual DC: 112116 Solar Powered Wireless Temperature Station & Sensor Outdoor Temp. Solar panels Indoor Temp. MIN & MAX Outdoor or Indoor Temp. Removable Stand Battery Switch
Step1: Battery and Speaker Assembly Step 2: Pump and Battery Installation Step 3: Setting Up Your Fountain 6 Troubleshooting and Maintenance
 Owner s Manual Contents Step1: Battery and Speaker Assembly 1 Step 2: Pump and Battery Installation 3 Step 3: Setting Up Your Fountain 6 Fill Your Fountain 7 Operating Your Fountain 7 Troubleshooting and
LIPSTICK CHARGER POWERFUL UNIVERSAL PORTABLE CHARGER OPERATING INSTRUCTIONS
 LIPSTICK CHARGER POWERFUL UNIVERSAL PORTABLE CHARGER OPERATING INSTRUCTIONS HALO LIPSTICK CHARGER From HALO, the LIPSTICK CHARGER is the definition of fashion meet function. This tiny lipstick is in fact
ASSEMBLY & USE INSTRUCTIONS
 ASSEMBLY & USE INSTRUCTIONS SKU# 1001777085 7FT to 10FT LED Pre-Lit Rising Artificial Spruce Tree IMPORTANT SAFETY WARNINGS 1.Read these instructions before using this product. 2.Save these instructions
4 WAY WIRELESS REMOTE CONTROL SYSTEM. User Manual
 4 WAY WIRELESS REMOTE CONTROL SYSTEM User Manual LED Indicator Control Button Remote Negative cable Positive cable Receiver Terminal Mounting Hole 1 of 7 INTENDED USE This product is a remote controlled,
FOR AGES 8 AND UP. 2.4GHz 3.5CH REMOTE CONTROL HELICOPTER ITEM NO
 8+ FOR AGES 8 AND UP 2.4GHz 3.5CH REMOTE CONTROL HELICOPTER ITEM NO. 35922 INTRODUCTION Thank you for purchasing this World Tech Toys product. Please make sure you carefully read the entire manual before
Apple, iphone and ipad are trademarks of Apple Inc., registered in the U.S. and other countries. Android is a trademark of Google Inc.
 1 UNITED STATES 1-800-432-5437 Fisher-Price, Inc. 636 Girard Avenue, East Aurora, NY 14052 Hearing-impaired consumers: 1-800-382-7470 CANADA 1-800-432-5437 Mattel Canada Inc. 6155 Freemont Blvd. Mississauga,
P231 User s Manual
 www.hiti.com English Safety Information Before you use, operate, dissemble the product, or change or remove any parts, components or materials of the product, please ensure that you carefully read this
User s Manual. Cruise & Learn CarTM VTech Printed in China US
 User s Manual Cruise & Learn CarTM 2015 VTech Printed in China 91-002992-000 US INTRODUCTION Thank you for purchasing the VTech Cruise & Learn Car! Hop in and learn with the Cruise & Learn Car. Your child
OWNER S MANUAL Please read and understand all precautions prior to use.
 INPUT: 120V AC 60Hz 250mA. OUTPUT: 14.4V DC 500mA. OWNER S MANUAL Please read and understand all precautions prior to use. Thank you for choosing a premium New Bright product. USA & Canada 30-Day Limited
Wireless Thermometer model 00380
 Instruction Manual Wireless Thermometer model 00380 CONTENTS Unpacking Instructions... 2 Package Contents... 2 Product Registration... 2 Features & Benefits... 3 Setup... 4 Install or Replace Batteries...
2800 OPERATING INSTRUCTIONS
 StarLight 2800 OPERATING INSTRUCTIONS 3 4 2 5 1 1. Input port: 5V/1000mA 2. Output port: 5V/1000mA 3. Power Switch 4. Indicator display 5. Flashlight Included items: -HALO StarLight 2800 charger unit -1
& Mattel and Smart Toy LLC. All Rights Reserved. and designate U.S. trademarks of Mattel, except as noted. DNV
 1 UNITED STATES 1-800-432-5437 Fisher-Price, Inc. 636 Girard Avenue, East Aurora, NY 14052 Hearing-impaired consumers: 1-800-382-7470 CANADA 1-800-432-5437 Mattel Canada Inc. 6155 Freemont Blvd. Mississauga,
8 Step Fully Automatic Intelligent BATTERY CHARGER 12V 5A USER S MANUAL. Charges & Maintains. Flooded (WET), MF, VRLA, AGM, GEL & Calcium batteries
, MF, VRLA, AGM, GEL & Calcium batteries") 8 Step Fully Automatic Intelligent BATTERY CHARGER 12V 5A Charges & Maintains Flooded (WET), MF, VRLA, AGM, GEL & Calcium batteries USER S MANUAL 5 User s Manual And Guide To Professional Battery Charging
8 Step Fully Automatic Intelligent BATTERY CHARGER 12V 5A Charges & Maintains Flooded (WET), MF, VRLA, AGM, GEL & Calcium batteries USER S MANUAL 5 User s Manual And Guide To Professional Battery Charging
Assembly. Care. Snap the third wheel into the socket into the back of this toy.
 DRN78 Keep this instruction sheet for future reference, as it contains important information. Adult assembly is required. No tools are needed for assembly. Requires four C (LR14) alkaline batteries (included)
1000-Watt Energy Center
 1000-Watt Energy Center OPERATING INSTRUCTIONS Patent Pending Sierra Wave 1000-Watt Energy Center #9675 The Sierra Wave 1000-Watt Energy Center is a heavy duty and efficient portable power center offering
D1.4.6_
 Makeblock Co., Ltd. Address: 4th Floor, Building C3, Nanshan ipark, No.1001 Xueyuan Avenue, Nanshan District, Shenzhen, Guangdong Province, China Technical support: support@makeblock.com www.makeblock.com
OPERATING INSTRUCTIONS
 RS2-G3 ONE BUTTON 2-WAY REMOTE START SYSTEM OPERATING INSTRUCTIONS CONGRATULATIONS on your choice of a Cool Start Remote Engine Starter and Keyless Entry with DP Technology by Crimestopper Security Products
MULTI-FUNCTION JUMP STARTER
 MULTI-FUNCTION JUMP STARTER FEATURES 1. Flashlight 2. Jump Start Port 3. LED Power indicator 4. USB Output 5. Power button 6. Charging port 7. Car battery clamp 8. Home charger&car charger 9. Portable
User Manual Industrial Power Storage System (ips) ips-m Series Battery System
 ips-m Series Battery System") User Manual Industrial Power Storage System (ips) ips-m Series Battery System Copyright The documentation and the software included with this product are copyrighted 2011 by Advantech Co., Ltd. All rights
User Manual Industrial Power Storage System (ips) ips-m Series Battery System Copyright The documentation and the software included with this product are copyrighted 2011 by Advantech Co., Ltd. All rights
Bluetooth Smart Speed/Cadence Sensor Instruction Manual
 Bluetooth Smart Speed/Cadence Sensor Instruction Manual Contents Before using this product... 3 Warranty... 4 List of Parts... 4 Battery... 6 Installation... 7 Pairing... 11 Technical Specs... 11 2 WARNINGS:
INSTALLATION INSTRUCTIONS
 CLASSIC EDITION WITH AUX-IN CHROME OR BLACK FINISH THANK YOU FOR CHOOSING STEEL HORSE AUDIO! Protect yourself and others from possible injury and property damage or loss. Pay close attention to all instructions,
Installation and service instructions, warranty terms & conditions. DeeGreen. User Guide. Version 2.6
 Installation and service instructions, warranty terms & conditions DeeGreen User Guide Version 2.6 - 2 - Contents 1. Contents...- 3-2. Technical parameters...- 4-3. Safety instructions...- 4-4. Package
Getting started with
 PART NO. CMA113 MADE IN CHINA 1. Measuring CAT II 2. Max. voltage 250V ~ 3. Max. current 71 Amp Getting started with Electricity consumption & Solar PV generation monitoring single phase, for homes fitted
Thermometer models 02023/02028/02053/02054
 Instruction Manual Thermometer models 02023/02028/02053/02054 CONTENTS Unpacking Instructions... 2 Package Contents... 2 Product Registration... 2 Features & Benefits... 3 Setup... 4 Set the Time & Units...
 www.fisher-price.com P6246 R2772 P6248 P6247 Each sold separately and subject to availability. Vehicles shown in illustrations may be different than the vehicle included with your toy. 1 Battery Installation
User s Manual. Spin & Learn Adventure Globe VTech Printed in China
 User s Manual Spin & Learn Adventure Globe 2010 VTech Printed in China 91-002595-000 INTRODUCTION Thank you for purchasing the VTech Spin & Learn Adventure Globe! The interactive globe features countries,
SHINE 3000 POWERFUL UNIVERSAL PORTABLE CHARGER OPERATING INSTRUCTIONS
 SHINE 3000 POWERFUL UNIVERSAL PORTABLE CHARGER OPERATING INSTRUCTIONS HALO SHINE 3000 Thank you for choosing HALO. Innovative, fashionable and easy to use, the HALO SHINE 3000 provides a powerful and universal
Thermometer models 02023, 02028, 02029
 Instruction Manual Thermometer models 02023, 02028, 02029 CONTENTS Unpacking Instructions... 2 Package Contents... 2 Product Registration... 2 Features & Benefits... 3 Setup... 4 Set the Time, Date & Units...
Model WS-6020U Solar Station QUICK SETUP GUIDE
 Model WS-6020U Solar Station QUICK SETUP GUIDE Solar-powered Transmitter: Remote transmission of outdoor temperature to the Solar Station by 915 MHz signals LCD displays the outdoor temperature data Recharge
5-Piece Grill Tool Set WITH DIGITAL THERMOMETER
 5-Piece Grill Tool Set WITH DIGITAL THERMOMETER TABLE OF CONTENTS Warnings and Cautions...1 Location of Fork Parts and Controls.... 3 Installing the Battery in the Fork... 3 Using the Thermometer.... 4
integra trim ltd. Holiday Home: EASTER/SPRING Try Me Hang Tag - Children s Product I Play or I Sing Goes Here Name of Song TRY ME! Product Name 2 in.
 - Children s Product I Play or I Sing PAGE 1 2 in. fold X in. (XX cm) High Name of Song Goes Here I Play / I Sing Small Parts. Not for children under 3 years OFFICIALLY LICENSED TO COMPANY NAME HERE "NAME
Understanding the Transmitter NO.S107H -1- ON/OFF Button Left Rotation Trimming. Right rotation trimming
 3 CHANNELS GYRO REMOTE CONTROL SERIES It is strongly recommended to read the manual carefully before flying. Inapropriate operations may lead to unitended crashes or injuries (of the pilot or third parties).
AS-1271/ AS-1272 AS-1271U/ AS-1272U
 MANUAL / AUTOMATIC TRANSMISSION MULTI-CHANNEL REMOTE STARTER SYSTEM AS-1271/ AS-1272 AS-1271U/ AS-1272U User Guide WARNING! It is the responsibility of the vehicle operator to ensure their vehicle is parked
Go! Go! Smart Friends
 Parent s Guide Go! Go! Smart Friends Character 91-003161-005 US INCLUDED IN THIS PACKAGE NOTE: This toy is not intended for teething. This toy is not intended for play in water. One VTech Go! Go! Smart
AS-RFK2315. User Guide. Two-Way FM LED Remote System. Available functionalities depend on vehicle. Consult your dealer for more information.
 Two-Way FM LED Remote System AS-RFK2315 User Guide Available functionalities depend on vehicle. Consult your dealer for more information. Designed & engineered in Canada INDUSTRY CANADA USER NOTICE: Operation
Thermometer model 00826
 Instruction Manual Thermometer model 00826 CONTENTS Unpacking Instructions... 2 Package Contents... 2 Product Registration... 2 Features & Benefits... 3 Setup... 4 Install or Replace Batteries... 4 Set
 Please keep this instruction sheet for future reference, as it contains important information. Requires three AA batteries (included). Adult assembly is required. Tool required for battery replacement:
READ AND FOLLOW ALL SAFETY INSTRUCTIONS SAVE THESE INSTRUCTIONS
 5 Swift Lock Ready Shape Tree (Patent Pending) Instructions IMPORTANT SAFETY INSTRUCTIONS When using electrical products, basic precautions should always be followed including the following: READ AND FOLLOW
AS-1774 / 1774U. User Guide 5-BUTTON AUTOMATIC / MANUAL TRANSMISSION REMOTE STARTER
 5-BUTTON AUTOMATIC / MANUAL TRANSMISSION REMOTE STARTER AS-1774 / 1774U User Guide WARNING! It is the responsibility of the vehicle operator to ensure that their vehicle is parked in a safe and responsible
User s Manual. Wave to Me Magic Wand. Years. Disney. Visit DisneyJunior.com VTech Printed in China US F.P.
 User s Manual Wave to Me Magic Wand Disney F.P.O Visit DisneyJunior.com 2-5 Years 2013 VTech Printed in China 91-009664-000 US INTRODUCTION Thank you for purchasing the VTech Wave to Me Magic Wand! Your
Wireless Thermometer model 00782W
 Instruction Manual Wireless Thermometer model 00782W CONTENTS Unpacking Instructions... 2 Package Contents... 2 Product Registration... 2 Features & Benefits... 3 Setup... 4 Install or Replace Batteries...
HERCULES ITEM NO UNBREAKABLE HELICOPTER AGES CHANNEL GYRO RC HELICOPTER FEATURES
 HERCULES UNBREAKABLE HELICOPTER 3.5 CHANNEL GYRO RC HELICOPTER FEATURES AGES 14+ ITEM NO. 35850 World s First Unbreakable Helicopter Super Strong Polymer Body 3.5 Channel Radio Control Built In Gyro LED
Owner s Manual and Assembly Instructions
 RollPlay 6V Mini Quad Owner s Manual and Assembly Instructions Model #: ACQUAD-P, ACQUAD-CAM, ACQUAD Read and understand the entire manual before assembly and operation. The vehicle must be assembled by
SBC450 SBC850 IMPORTANT SAFETY INSTRUCTIONS. 4- and 8-Bay Networked Charging. Stations. Download PDF. English. Table of Contents
 Publications User Guides SBC450-850 (English) Download PDF English Table of Contents IMPORTANT SAFETY INSTRUCTIONS SBC450 and SBC850 Networked Charging Stations Included Components Charger Controls and
Lionel G-Gauge Steam Set Owner's Manual
 71-0000-250 4/15 Lionel G-Gauge Steam Set Owner's Manual Adult assembly required Batteries not included Congratulations! Congratulations on your purchase of this Lionel G gauge set. This set features everything
STRX-9 100% TAKE CONTROL INSTRUCTION MANUAL READY-TO-RUN. w/ Adult Supervision
 STRX-9 w/ Adult Supervision INSTRUCTION MANUAL 18005 100% READY-TO-RUN TAKE CONTROL Index Included Items Important Notes Battery Installation Charging Instructions Transmitter/Receiver Binding Basic Controls
Multi Wheel Bluetooth Tire Pressure Monitoring System User Manual Model: External
 T P M S Multi Wheel Bluetooth Tire Pressure Monitoring System User Manual Model: External Table of Contents 1. PRODUCT INTRODUCTION... 2 2. NOTICE... 2 3. BLE TPMS SPECIFICATION... 3 4. BLE TPMS PACKAGE...