Instruction Manual. SMB Speed Box - 1
|
|
|
- Valentine Horn
- 5 years ago
- Views:
Transcription

1 Instruction Manual SMB Speed Box -
2

3 INTRODUCTION We appreciate your purchase and congratulate you for the excellent choice you just made because you have purchased a product manufactured with technology from BALDAN IMPLE- MENTOS AGRÍCOLAS S/A. This handbook will guide you through the procedures that are necessary since its acquisition up to the operating procedures of use, security and maintenance. The BALDAN ensures that have delivered this farming implement to the dealer in perfect conditions. The dealer is responsible for the custody and maintenance of this farming implement and also for the assemblage, retightening, lubrication and overhaul. In the technical delivery, the dealer must advise the user on its maintenance, security, its obligations under any technical assistance, the strict observance of the guarantee and reading the instruction handbook. Any request for technical assistance under warranty should be made to the dealer where it was purchased. We reiterate the need for careful reading of the guarantee certificate and observance of all items in this handbook, as doing so, the useful life of your farming implement will increase. Instruction Manual SMB Speed Box -
4 Instruction Manual PRODUCT PRESENTATION SMB Speed Box - The Múltipla Baldan - SMB Speed Box seeder was developed in models 4000, 5000 and 6000 with minimum spacing between lines of 65 mm. SMB meets both winter crops and summer crops. It is part of a multiple model in which instead of purchasing one machine for the planting of large grains (summer crop) and one machine for the planting of small grains (winter crop), the farmer purchases only this machine with two options. Its main difference is the versatility to meet all cultures. The fertilizer tank is provided in stainless steel or carbon steel with epoxy treatment and helical spring system for fertilizer distribution (Baldan unique floating spiral system). The Baldan sowing machines are the only equipped with gearbox with oil bath (Speed Box) with 6 quick-change adjustment options for fertilizer and seed distribution, with major advantages due to their easiness, accuracy and diversity of options for adjustment that added to their long autonomy, result in higher daily productivity. Its unique centralized lubrication system provides a reduction in time used to lubricate the machine due to the unification of the main points in the panels. It has side stairs for the supply of fertilizer and seed tanks, and non-slip platform with protective hand railing. Articulated wheel system to follow the ground irregularities, keeping the grip of the tire to the ground; this system is equipped with wide, low calibration and high fluctuation tires, which reduces the compaction rate and sliding on the soil. The fertilizer and seed tanks have been developed with great autonomy in accordance with the machine model, with grooved helical rotor system for winter crops. Baldan seed distribution system with distributing discs, rings, and Universal distribution box. The 0 cutting blades have independent pressure spring and individual depth adjustment for the planting of large grains. The double disc for fertilizer and seeds are off-center with individual internal cleaners and double hub of the spreader discs assembled with two conical bearings of permanent lubrication. The furrow openers for fertilizer application are sharp with replaceable tips and shutoff security system. The SMB is equipped with pantograph system, with front line marker, which can optionally be provided with tank for fine seed distribution.
5 INDEX 0 - Normas de segurança... 4 a Parts Technical specifications Assemblage... 9 Coupling head... 9 Assembling the compaction wheel... 0 Assembling the compaction and depth wheel cart... 0 Assemblage of the line marker... Assemblage of the small seed box - optional... Assemblage of the planting system Tractor coupling Adjustments and operations... 6 a Adjustments for seed distribution... a Adjustment for seed distribution - universal system Adjustment for the distribution of large seeds Adjustment for the distribution of small seeds... 7 a 30 - Adjustment for fertilizer distribution Practical calculation for fertilizer and seed distribution Practical test for measuring the amount of fertilizer and seed distribution Adjustment of the line marker disc Depth adjustment... 4 Furrow opening and fertilizer position on the ground... 4 Seeder system large seeds... 4 Furrower position... 4 Adjustment of the cutting disc depth... 4 Adjustment of the double disc cleaners... 4 Oscillating depth limiting wheel... 4 Epth and v compaction wheel... 4 Adjusting the v compaction wheel... 4 Adjustment of the pressure spring for conventional planting Adjusting the v compaction wheel Operations Maintenance a Oil replacement (speed box) a Cleaning a Optional equipment Planting carts Mixing set - optional Digital hectare meter - baldan a 57 - Identification Instruction Manual SMB Speed Box - 3


6 Instruction Manual 0 - NORMAS DE SEGURANÇA SMB Speed Box - 4 THIS SYMBOL INDICATES IMPORTANT SAFETY WARNING. WHENEVER YOU FIND IT IN THIS HANDBOOK, CAREFULLY READ THE MESSAGE THAT FOLLOWS AND BE AWARE OF THE POSSIBILITY OF PERSONAL INJURY. ATTENTION Do not operate the seeder if the transmission hoods are not properly fixed. Only remove the hoods to make the replacement of gears, put them back immediately. When doing any work in the machine transmission, turn the ratchets off. Do not make adjustments with the machine in motion. ATTENTION Keep yourself away from active elements of the machine (Discs) because they are sharp and can cause accidents. In doing any maintenance service on the discs, always use safety gloves. ATTENTION The hydraulic fluid is under pressure and can cause serious injuries in case of leaks. Periodically check the conservation condition of the hoses. If there is evidence of leaks, replace them immediately. Before connecting or disconnecting hydraulic hoses, relieve the pressure of the system, triggering the command with the tractor off. ATTENTION When operating the seeder, do not allow the permanence of people on the machine. Do not stay on the platforms with the machine in motion.

. Use only factory original fuse, because only this one has controlled hardness.")
7 ATTENTION ATTENTION Avoid accidents caused by the intermittent action of line markers. When operating the seeder, make sure there are no people on line markers or around their area of action. Check the oil level daily. Replace the oil in the gearbox (Speed Box) after the first 30 hours of work, then every 500 hours, always using ISO VG 50 mineral oil at 40 C (amount of oil used.8 liters). Use only factory original fuse, because only this one has controlled hardness. Fuse Oil level display Instruction Manual SMB Speed Box - 5


8 Instruction Manual SMB Speed Box - 6 he WARNING The mismanagement of this equipment can result in serious or fatal accidents. Before placing the equipment in operation, carefully read the instructions in this handbook. Make sure that the person responsible for the operation is instructed on the proper and safe handling, if has read and understood the handbook of this product. 0 - When operating the equipment, do not allow people to stay very close or on it. 0 - In making any assembling and disassembling service in the discs, always use safety gloves Before connecting or disconnecting hydraulic hoses, relieve the system pressure by moving the command with the tractor off Periodically check the conservation status of the hoses. If there is evidence of leaks, immediately replace them because the oil works under high pressure and can cause serious injury Do not wear loose clothing as they can become entangled in moving parts When turning the tractor engine on, be properly seated on the operator's seat and aware of the correct and safe management of both tractor and implement. Always put the selector lever in neutral, turn off the power take-off command and place the hydraulic commands in the neutral position Do not run the engine in indoor environments without adequate ventilation, as the exhaust fumes are harmful to health When maneuvering the tractor to the implement hitch, make sure that there is plenty of room and that there is nobody very close, always do the maneuvers in low gear and be prepared to brake in emergency situations Do not make adjustments with the implement in operation. 0 - When working on slopes, proceed with caution when trying to maintain the necessary stability. In case of early imbalance, reduce the acceleration, turn the tractor wheels to the side of the terrain slope. - Always drive the tractor at speeds compatible with safety, especially when working on uneven ground or slopes, always keep the tractor engaged. - When driving the tractor on roads, keep the brake pedals connected and use of safety signs. 3 - Do not operate the tractor if its front is light. If there is a tendency to rise, add weights on the front or front wheels. 4 - Leaving the tractor, put the selector lever in neutral and pull the parking brake.

9 SEMEADORA MÚLTIPLA BALDAN - SMB Speed Box 4000 / 5000 / 6000 (COM DEPÓSITO DE ADUBO / SEMENTE METÁLICO E INOX) Figure PARTS 0 - Chassis 0 - Speed Box system - seed 03 - Speed Box system - fertilizer 04 - Foot support 05 - Front line marker 06 - Coupling head 07 - Head adjustment 08 - Wheel set 09 - Coupling shackle 0 - Marker disc - Rear step - Handrail 3 - Fertilizer and seed tank 4 - Tank cap 5 - Protective cover of chains 6 - Hose Support 7 - Hydraulic Hoses 8 - Anti-slip platform 9 - Short hoses 0 - Planting cart - Ratchet lever Instruction Manual SMB Speed Box - 7
10 Instruction Manual 03 - TECHNICAL SPECIFICATIONS SMB Speed Box - 8 Table 0 Modelo Nr of rows Useful width (mm) Working width (mm) Row spacing (mm) Total width (mm) Hopper capacity (L) Seed Fertilizer Small Seed Approx. weighth (Kg) Tyres Total heigth (mm) Total lenght (mm) Required tractor power (Hp) x (4 Ply) 400 x (4 Ply) 400 x (4 Ply) The BALDAN reserves the right to change technical specifications of this product without previous notice. The technical specifications are approximate and informed under normal working conditions.
 in the working position by removing the lock () and pin (3) they were placed for")
 with the nut (8) in the head (). FIGURE 03.")
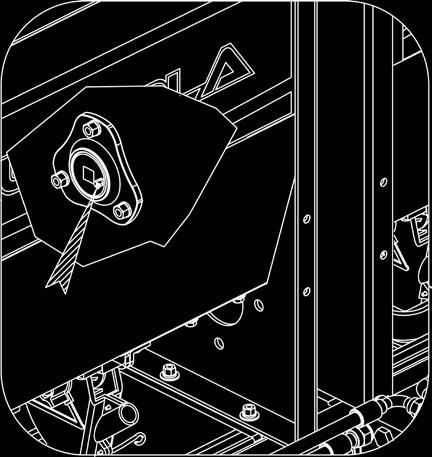
11 04 - ASSEMBLAGE COUPLING HEAD - The seeders are factory semi-assembled, and only a few components must be assembled according to directions below: - Place the head () in the working position by removing the lock () and pin (3) they were placed for transportation. FIGURE Introduce the regulator (4) into the head, fixing with the pin (5) and lock (6). 4- Next, place the hose support (7) with the nut (8) in the head (). FIGURE 03. Figure 0 Figure Instruction Manual SMB Speed Box - 9
 fully forward (position \"A\") and hook the spring (7) in the wheel support (). Figure 04.")
. Figure 05.")
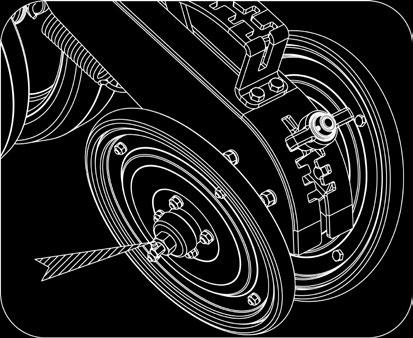
12 Instruction Manual ASSEMBLING THE COMPACTION WHEEL - Attach the wheel support () in the wheel cart (), fixing it with the sleeve (3), washer (4) and screw (5). Place the lever (6) fully forward (position "A") and hook the spring (7) in the wheel support (). Figure 04. SMB Speed Box - 0 ASSEMBLING THE COMPACTION AND DEPTH WHEEL CART - Introduce the complete wheel cart () between the planting line plates () by fixing it with screws (3), washers and nuts (4). Figure 05. Figure Figure IMPORTANT When finishing the assemblage, make a general review of the seeder, make sure that there are no objects (nuts, screws or others) inside the tanks. Retighten all screws and nuts, review all the pins, cotters, locks and hoses.
 to the support () with screw (6) washers and nuts (7) 4- Then, introduce the square bar of the marker (7) in the frame (5) and fix it with screws (8) washers and nuts (9).")
 with pins (4) washers and cotter (5). 8- Make the connection of hoses (6), make sure that the hoses do not become too stretched, damaging the equipment.")
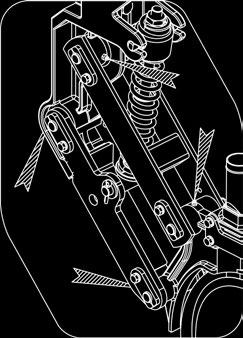
13 ASSEMBLAGE OF THE LINE MARKER - Assemble the line marker as follows; - Place the marker support () in the set () through the screw (3) washers and nuts (4). 3- Fix the frame (5) to the support () with screw (6) washers and nuts (7) 4- Then, introduce the square bar of the marker (7) in the frame (5) and fix it with screws (8) washers and nuts (9). 5- Assemble the maker disc (0) in the bar (7) and tighten it with nut and washer (). 6- Lock the marker with screw (). Figure Then, fix the hydraulic cylinder (3) with pins (4) washers and cotter (5). 8- Make the connection of hoses (6), make sure that the hoses do not become too stretched, damaging the equipment. Figure Figure Figure 07 IMPORTANT Make sure that the hoses do not become too stretched, damaging the equipment. Instruction Manual SMB Speed Box -
. - Introduce the gear (5) in the hub of the seed tank (6), fixing with screw (7), washers and nuts (8).")
 in the hub of the small seed box with screw () and nut (3). Then, place the latch (4). 5- Introduce the small seed hoses (5) in the spouts (6). Figures 08.")
14 Instruction Manual SMB Speed Box - ASSEMBLAGE OF THE SMALL SEED BOX - OPTIONAL - Fix the small seed tank () in the front part of the fertilizer and seed tank () with screws (3) washers and nuts (4). - Introduce the gear (5) in the hub of the seed tank (6), fixing with screw (7), washers and nuts (8). 3- Place the chain (9) between the gears of the small seed box and seed box shaft, stretch the chain through the chain tensioner (0). 4- Fix the wheel () in the hub of the small seed box with screw () and nut (3). Then, place the latch (4). 5- Introduce the small seed hoses (5) in the spouts (6). Figures Figures Warning Make sure that the hoses do not become too stretched, damaging the equipment. 5

. Fix the brackets (4) and clamp (5) in the life (6) of the set with")
 and gears () 4- With the bearings support already assembled,")
. Figure 09.")
 washers and nuts (5), clearing bearings (6), sleeve (7)")
, chain stretcher () with screw (3), washers and nuts (4).")

15 ASSEMBLAGE OF THE PLANTING SYSTEM - When working with the machine in the sowing of large seeds, assembly the planting system as follows; - Fix the bearings () to the chassis of the seeder with screw (), washers and nuts (3). Fix the brackets (4) and clamp (5) in the life (6) of the set with screw (7), washers and nuts (8) 3- Place the hexagonal shaft (9) with sleeve (0) and gears () 4- With the bearings support already assembled, touch them at the hexagonal shaft ends and lock them with the cotter pin (). Figure Then, assemble the other supports at the lower part of the seeder (3) with screw (4) washers and nuts (5), clearing bearings (6), sleeve (7) with screw (8), washers and nuts (9) ; 6- Then, fix the bracket (0), clamp (), chain stretcher () with screw (3), washers and nuts (4). Figure 0. Note: During assemblage, do not tighten the screws of the bearings and supports, leaving this to the end of operation Figures Figures Instruction Manual SMB Speed Box - 3
, tighten all screws and check the position and tension of the chains (9) in the chain stretchers (30). Figure.")
16 Instruction Manual SMB Speed Box Finally, pass the hexagonal shaft (5) through the clearing bearings (6) and planting lines (7); 8- Then, lock the shaft with cotter pin (8), tighten all screws and check the position and tension of the chains (9) in the chain stretchers (30). Figure Figure 7
 in the tractor coupling. 3 To this end, find a safe and easily accessible place, always use low gear with low acceleration.")
. FIGURE 3.")
 on the cylinder rod. Figure 4.")
17 05 - TRACTOR COUPLING - Level the seeder head in relation to the tractor coupling through the regulator (). - Couple the seeder to the tractor through the coupling pin () place the latch (4). Figure. 3- Couple the hoses (3) in the tractor coupling. 3 To this end, find a safe and easily accessible place, always use low gear with low acceleration. Before connecting or disconnecting the hydraulic hoses, turn off the engine and relieve the pressure of the hydraulic system by moving command levers completely. Make sure that, by relieving the pressure of the system, no one is near the area. Figure 4 SEEDER TRANSPORT - Lift the support bracket (). FIGURE 3. - With the seeder down, make sure it is at the same level as the tractor. Otherwise, level it through the head regulator (), Figure. 3- Raise the lines through the full activation of the hydraulic cylinder. Place the latch () on the cylinder rod. Figure 4. IMPORTANT Figure 4 Figure 3 Do not carry the seeder if it is loaded, which could damage the equipment. We recommend only load it in the workplace. If the machine is to remain in the field for any reason, we recommend covering it with tarp to prevent moisture. Instruction Manual SMB Speed Box - 5
 with the locking pin (3). Figure 5. Figure 6 6 3- Move the hydraulic cylinder again so that the planting lines remain suspended.")
, screw (7), remove the clamp (8).")
. 9- Reposition the latches (4) on the sides and retighten the screws. Figure 6.")
18 Instruction Manual 06 - ADJUSTMENTS AND OPERATIONS NEW SPACING SMB Speed Box To make a new spacing between lines, lift the seeder by pushing the piston. 7 - Place the support bracket () with the locking pin (3). Figure 5. Figure Move the hydraulic cylinder again so that the planting lines remain suspended. 8 9 Figure 5 4 Figure 7 - When making new spacing lines, if necessary remove some of them to increase spacing, proceed as follows; 4- Remove the latches (4) from the shaft end (5), on both sides of the machine. 5- Check the lines to be removed or displaced. Loosen the nuts and washers (6), screw (7), remove the clamp (8). 6- Finally, remove the complete planting lines by pulling them back; 7- Replace the shaft (5) and latches (4). Align the gear and retighten the screws. 8- Slide the lines for the selected spacing, retighten the nuts of clamps (8). 9- Reposition the latches (4) on the sides and retighten the screws. Figure To make additional spacing lines, proceed as follows: 0- Check the lines to be removed or displaced. Loosen the nuts and washers (0), screw (), remove the clamp (). - Slide the lines for the selected spacing. Tighten the nuts of clamps (9). Figure 7. 0
. Figure 8.")
 to the fertilizer spout. This will make the tank only for seeds, giving greater autonomy to the machine.")
19 - Remove the small hose that conducts the fertilizer (3) from the lines that were removed, close the outlet of the fertilizer tank with a cover (4). SINGLE SEED TANK 3- Close the input of fertilizer inside the tank by placing the cover (5). Figure To transform the single tank only for seeds, remove the plates (6), loosening the screws (7), washers and nuts (8) for the passage of seed between two deposits. Figure 8 5- Place the covers (5) to the fertilizer spout. This will make the tank only for seeds, giving greater autonomy to the machine. Figures Instruction Manual Figure 9 SMB Speed Box - 7
20 Instruction Manual SMB Speed Box - 8 SPACING BETWEEN LINES - - The seeders are provided of spacing between lines according to the number of lines, and new types of spacing can be made according to the selected culture. Table of spacing - Small seeds Table of spacing Large seeds Table 0 Table 03 Model Nr. of Rows Spacing (mm) Working width (mm) Model Nr. of Rows Spacing (mm) Working width (mm) / / / / / / / / / / / / / / / / / / / / / / / / / / / / / / / / / / / / / / / / / / / / / /
 Working width (mm) 5000 03 / 04 00 3030 / 4040 03 / 04 000 3000 / 4000 04 / 05 960 3840 / 4800 04 / 05 950 3800 / 4750 04 / 05 90 3640 / 4550 04 / 05 900 3600 / 4500 04 / 05 860")
21 Table of spacing Large seeds Model Nr. of Rows Spacing (mm) Working width (mm) / / / / / / / / / / / / / / / / / / / / / / / / / / / / / / / / / / / / / / / / 4000 / / 400 / / 3960 / / 4030 Model Nr. of Rows Spacing (mm) Working width (mm) / / / / / / / / / / / / / / / / / / / / / / / / / / / / / / / / / / / / / / / / 460 / / 4800 / / / / / / 500 Instruction Manual Table 04 Table Then, make the new adjustment to the desired spacing on the bar where the seed lines will be set as shown in Figure 0, observing and respecting the useful width of the bar. Machine with odd number of lines (seeder) Figure 0 SMB Speed Box - 9


22 Instruction Manual SMB Speed Box - 0 Machine with even number of lines (seeder) Figures Machine with odd number of lines (seeder)
 of Figure 4. 4- Adjust the lever () according to the size of each type of seed to be used.")
 in hole of the seed distributor for sowing cotton with no cotton linters, sorghum, soybeans, oats and similar seeds.")
 in a counterclockwise direction to open the adjustment")

23 7 - ADJUSTMENTS FOR SEED DISTRIBUTION ADJUSTMENT FOR SMALL SEEDS - Adjust the records of the seed distribution boxes for each type of seed and for not to break or cause an irregular seeding. Figure. 3- The amount of seed is regulated through the steering wheel (3) of Figure Adjust the lever () according to the size of each type of seed to be used. Reg Regulator : Place the record pin () in hole of the seed distributor for sowing wheat, sorghum, oats barley, rye and similar seeds. 3 Figure Reg Reg 3 Regulator : Place the record pin () in hole of the seed distributor for sowing cotton with no cotton linters, sorghum, soybeans, oats and similar seeds. Regulator 3: Place the record pin () in hole 3 of the seed distributor for sowing rice, oats, peas and similar seeds. Figure 3 4 Figures 4 5- To obtain the desired adjustment of desired seeds in the distribution boxes, turn the steering wheel (3) in a counterclockwise direction to open the adjustment on the scale (4). Figure 4. Instruction Manual - Pull the lever () down to open the hole () for the seed output. Figure 3. SEED QUIANTITY TABLE Table 06 Culture No. of seeds per Grams of seeds per Amount of seeds per linear meter linear meter hectare Spacing Upland rice 40-60,5 -, Irrigated rice 60, Soybeans Wheat Barley -, Oats -, -, Sunflower Sorghum Lupine SMB Speed Box -
 to reach the number of 3.5 of the scale as detail A.")

24 Instruction Manual SMB Speed Box - ADJUSTMENT OF THE SMALL SEED BOX (OPTIONAL) - To regulate the distribution of small seeds, do the following; - See the table of small seed distribution shown below in the amount of seed required per hectare. Example: To distribute 0 kg / ha seed of colonião grass spaced 70 mm, turn the steering wheel () to reach the number of 3.5 of the scale as detail A. Figure Turning the steering wheel to A closes the scale. 4- Turning the steering wheel to B opens the scale. 5- Table of approximate distribution of small seeds per hectare for spacing of 70 mm. Table of distribution of pasture seeds in kg / ha with 70 mm spacing NUMBER OF THE GROOVED ROTOR OF FIGURE 6 Culture Colonião grass -,,8 6,7 3,6 Brachiara decumbens - 4,3 4,3 53,4 34,0 Brachiara brizantha - 7,0 34,0 48,5 4,3 Millet 7,3 48,5 77,7 6,5 63, Soybeans 8,5 58, 99,5 43, 77,7 Table 07 Figures 5 A Detalhe A Alfalfa 9,7 70,4 4, 57,8 9, Birdsfoot trefoil 0,9 7,8,3 69,9 97, Desmodium 9, 63, 04,4 48,0 8,5 Clover 8,7 60,7 0,9 45,6 80, B
25 TABLE FOR DISTRIBUTION OF SMALL SEEDS Distribution of seeds in Grams per 00 meters Number of the scale in Figure Soybean: Average size of 80 seeds per 50 grams Rice: Average size of 950 seeds per 50 grams Table To obtain the result in Table 06, do the following: - Know the amount of seed per hectare by multiplying by the spacing and dividing by 00 linear meters. 3- Example: Let's consider 75 kg of wheat seed per hectare, assuming that the average size of the seed to be planted is 00 seeds equal to 50 grams with spacing of 65 mm at a distance of 00 linear meters Wheat: Average size of 00 seeds per 50 grams Formula: Q x E D where: Q = amount of seeds E = spacing between lines , D = 00 linear meters To use this table, keep the adjustment of the Speed Box in position F - 5-teeth gear and 0-teeth gear of the hexagonal shaft Figure 6 3 Reg. 75 x = 89 grams 3 3 Reg. Reg The lever () for seeds should be placed on the regulator () of the seed outlet. Figure See page 40 for performing the practical test for seeds and fertilizer. Instruction Manual SMB Speed Box - 3

26 Instruction Manual SMB Speed Box - 4 ADJUSTMENT OF THE LINE MARKERS - The adjustment of line markers is important to obtain a planting with uniform spacing, so that the line at the end of the seeder has the same spacing as the last line planted, facilitating future operations. Figure 7. - To adjust the line markers, one should know the spacing between lines, the number of lines to be used in the operation and the tractor s front gauge. Use the formula below, followed by an example. Example: For planting with 7 lines, spacing of 0.45 m and tractor s front gauge with.73 m, determine: Figure 7 B Formula: D = E x (N+) - B where: E = spacing between lines N = Number of lines B = Tractor s front gauge D = 0,45 x 8 -,73 D = Distance of the marker D = 0,935 meters 3- Adjust the disc with m up to the center of the first planting line. 4- Line Markers are alternative; they lower one after the other, so that if there is the need to stop work during planting before the end of the line, engage the piston so that the seeder goes up and down twice to continue working with the marker on the right side. N 0,935 D
 by pulling it back and lifting the seed box ().")


, remove the pin (3), the trigger (), place the spring")


27 08 - ADJUSTMENT FOR SEED DISTRIBUTION - UNIVERSAL SYSTEM ADJUSTMENT FOR LARGE SEE - To exchange or replace the distribution discs, release the latch () by pulling it back and lifting the seed box (). - Then, replace the disc (3) and the ring (4). Figures Select the desired distribution disc and assemble it on the seed box. Check the placement of the rings according to the distribution seed disc as follows; 4- To distribution disc of 4.00 mm, use a plastic ring of 4.50 mm. 5- To distribution disc of 5.50 mm, use a plastic ring of 3.00 mm. Figures 9. Distribution disc of 4.00 mm Distribution disc of 5.50 mm REPLACEMENT OF DOUBLE TRIGGER BY SINGLE TRIGGER 3- The seed distributor comes from the factory assembled with trigger of two dosing stars () on discs of double line of holes. To replace it for trigger of a single star (), remove the pin (3), the trigger (), place the spring (4) in the slot, insert the trigger () in the box (5) and lock with the pin (3). 4 Figures 9 Figure 3 Note: The sum of all seed discs and rings must be equal to 8.5 mm. Plastic ring of 4.50 mm Plastic ring of 3.00 mm 4 3 Figures 8 - The seed distributor comes from the factory assembled with trigger of two dosing stars on discs of double line of holes (). - Single line discs (3) use trigger of a single dosing star (4). In order to replace the triggers, see FIGURE 30. SEED DOSING STAR 4 3 Figures Instruction Manual SMB Speed Box - 5
.")
, pull the handle (3) and adjust them. At the end of the combination, return the handle (3) and replace the lock ().")
28 Instruction Manual SPEED BOX GEARBOX - The seeders are equipped with the Speed Box gearbox system that drives the distribution system with easy adjustments, ensuring exchange of fast rotations. - For seed regulation, select the desired quantity in the tables and check the corresponding combination of cursors (). Example: position F 6 indicates that the cursor of letters must be in position F and the cursor of numbers must be in position 6 as detailed in Figure To move the cursor, remove the lock (), pull the handle (3) and adjust them. At the end of the combination, return the handle (3) and replace the lock (). SMB Speed Box ADJUSTMENT FOR THE DISTRIBUTION OF LARGE SEEDS 4- The seed adjustment is performed through the Speed Box. For other adjustments, re-position the chain in motor gear a and moved gear b. 5- After repositioning, check the chain tension. 6-6 The chain tensioner () is provided of torsion spring for greater flexibility. In case of greater pressure on the stretcher, turn the rosette () through the spring coupler (3) to the other tooth of the rosette. Figure 33. Figure 3 Figure 33 3 a 3 b
 to position F, remove the lock (), pull the handle (3), and set them. At the end of the combination, return the handle (3) and replace the lock ().")
29 0 - ADJUSTMENT FOR THE DISTRIBUTION OF SMALL SEEDS - The seeders are equipped with the Speed Box system, which operates the distribution system with easy adjustments, ensuring quick exchange of rotations. - To put the levers () to position F, remove the lock (), pull the handle (3), and set them. At the end of the combination, return the handle (3) and replace the lock (). 3- The seed adjustment is done through the Speed Box. To do so, re-position the chain in the 0-teeth gear a of the ratchet shaft and 5-teeth moved gear b of the Speed Box. 4- After repositioning, check the chain tension. 5- The tensioner (4) is equipped with torsion spring to provide greater flexibility, if greater pressure on the tensioner is required, turn the rosette (5) through the spring coupler (6) to the other tooth of the rosette. Figure 34. Figure 34 b 3 a IMPORTANT When operating the SMB in the seeder system small seeds- the Speed Box levers must remain only in the working position F. Instruction Manual SMB Speed Box - 7
30 Instruction Manual SMB Speed Box - 8 Table for the distribution of large seeds per linear meter SMB seeder Speed Box 4000 / 5000 / 6000 Table 09 Outlet gear of the ratchet shaft 0 Inlet gear of the Speed Box 5 Combination Number of holes in the disc F -,5,6,7,7,,3,4,6 3,3 3,5 4, 4,4 5,4 5,6 6,3 7,9 8,7 F -,7,8,9,0,4,6,8,9 3,7 3,9 4,7 4,9 6, 6,3 7, 8,8 9,8 E -,9 0,,,6,8 3, 3,3 4, 4,4 5, 5,5 6,8 7,0 7,9 9,8 0,9 F - 3,9,0,,,7,9 3, 3,4 4,3 4,5 5,4 5,6 7,0 7, 8, 0,, E -,,,3,5,9 3, 3,4 3,7 4,7 4,9 5,9 6, 7,6 7,9 8,8,,3 D -,,4,5,6 3, 3,4 3,7 3,9 5,0 5, 6,3 6,6 8, 8,4 9,4,8 3, F - 4,,4,5,6 3, 3,4 3,7 3,9 5,0 5, 6,3 6,6 8, 8,4 9,4,8 3, E - 3,4,5,7,8 3,4 3,7 3,9 4, 5,3 5,6 6,7 7,0 8,7 9,0 0,,6 4,0 D -,5,7,8,9 3,5 3,8 4, 4,4 5,6 5,9 7, 7,4 9, 9,4 0,6 3,3 4,7 C -,6,8,9 3, 3,7 4,0 4,3 4,6 5,8 6, 7,3 7,6 9,5 9,8,0 3,8 5,3 F - 5,7,8 3,0 3, 3,8 4, 4,4 4,7 6,0 6,3 7,5 7,9 9,8 0,,3 4, 5,7 E - 4,8,9 3, 3,3 3,9 4,3 4,6 4,9 6, 6,6 7,9 8, 0, 0,5,8 4,7 6,4 D - 3,9 3,0 3, 3,4 4,0 4,4 4,7 5, 6,4 6,7 8, 8,4 0,4 0,8, 5, 6,9 C -,9 3, 3,3 3,4 4, 4,5 4,8 5, 6,5 6,9 8,3 8,6 0,7,0,4 5,5 7, B - 3,0 3, 3,3 3,5 4, 4,5 4,9 5, 6,6 7,0 8,4 8,7 0,8,,6 5,7 7,5 A - 3,3 3,5 3,7 3,9 4,7 5, 5,5 5,9 7,5 7,9 9,4 9,8,,6 4, 7,7 9,7 A - 3,8 4,0 4, 4,4 5,3 5,8 6, 6,6 8,4 8,8 0,6, 3,7 4, 5,9 9,9, B - 3 3,8 4,0 4,3 4,5 5,4 5,8 6,3 6,7 8,5 9,0 0,8, 3,9 4,4 6, 0,,5 C - 4 3,9 4, 4,4 4,6 5,5 6,0 6,4 6,9 8,7 9,,0,5 4, 4,7 6,5 0,6,9 D - 5 4,0 4, 4,5 4,7 5,7 6, 6,6 7, 9,0 9,4,3,8 4,6 5, 7,0, 3,6 E - 6 4, 4,4 4,7 4,9 5,9 6,4 6,9 7,4 9,3 9,8,8,3 5, 5,7 7,7, 4,6 A - 3 4,3 4,5 4,8 5, 6, 6,6 7, 7,6 9,6 0,,,6 5,7 6, 8,,7 5,3 B - 4 4,5 4,7 5,0 5, 6,3 6,8 7,3 7,9 0,0 0,5,6 3, 6,3 6,8 8,9 3,6 6, C - 5 4,7 5,0 5, 5,5 6,6 7, 7,7 8,3 0,5,0 3, 3,8 7, 7,6 9,8 4,8 7,5 D - 6 5,0 5,3 5,6 5,9 7, 7,7 8,3 8,8,,8 4, 4,7 8,3 8,9, 6,5 9,5 A - 4 5,0 5,3 5,6 5,9 7, 7,7 8,3 8,8,,8 4, 4,7 8,3 8,9, 6,5 9,5 B - 5 5,3 5,7 6,0 6,3 7,5 8, 8,8 9,4,0,6 5, 5,7 9,5 0,0,6 8,3 3,5 C - 6 5,8 6, 6,5 6,9 8,3 8,9 9,6 0,3 3, 3,8 6,5 7,,3,0 4,8 3,0 34,4 A - 5 6,0 6,4 6,7 7, 8,5 9, 9,9 0,6 3,4 4, 7,0 7,7,9,6 5,5 3,8 35,4 B - 6 6,7 7, 7,5 7,9 9,4 0,,0,8 4,9 5,7 8,9 9,7 4,4 5, 8,3 35,4 39,3 A - 6 7,5 8,0 8,4 8,8 0,6,5,4 3,3 6,8 7,7,, 7,4 8,3 3,8 39,8 44,
31 Table for the distribution of small seeds per linear meter SMB seeder Speed Box 4000 / 5000 / 6000 Table 0 Outlet gear of the ratchet shaft 5 Inlet gear of the Speed Box 0 Combination Number of holes in the disc F -,3,5,6,7 3,3 3,5 3,8 4, 5, 5,5 6,6 6,8 8,5 8,7 9,8,3 3,7 F -,6,8,9 3, 3,7 4,0 4,3 4,6 5,8 6, 7,4 7,7 9,5 9,8, 3,8 5,4 E -,9 3, 3, 3,4 4, 4,4 4,8 5, 6,5 6,8 8, 8,5 0,6 0,9,3 5,4 7, F - 3 3,0 3, 3,3 3,5 4, 4,6 4,9 5,3 6,7 7,0 8,4 8,8 0,9,,6 5,8 7,6 E - 3,3 3,5 3,6 3,8 4,6 5,0 5,4 5,8 7,3 7,7 9,3 9,6,9,3 3,8 7,3 9, D - 3,5 3,7 3,9 4, 4,9 5,3 5,7 6, 7,8 8, 9,8 0,,7 3, 4,7 8,4 0,5 F - 4 3,5 3,7 3,9 4, 4,9 5,3 5,7 6, 7,8 8, 9,8 0,,7 3, 4,7 8,4 0,5 E - 3 3,7 3,9 4, 4,4 5,3 5,7 6, 6,6 8,3 8,8 05,0 3,6 4,0 5,8 9,7,9 D - 3,9 4, 4,4 4,6 5,5 6,0 6,5 6,9 8,8 9,,,5 4,3 4,7 6,6 0,7 3,0 C - 4, 4,3 4,5 4,8 5,7 6, 6,7 7, 9, 9,6,5,9 4,8 5,3 7,,5 3,9 F - 5 4, 4,4 4,7 4,9 5,9 6,4 6,9 7,4 9,3 9,8,8,3 5, 5,7 7,7, 4,6 E - 4 4,4 4,6 4,9 5, 6, 6,7 7, 7,7 9,7 0,,3,8 5,9 6,4 8,4 3,0 5,6 D - 3 4,5 4,7 5,0 5,3 6,3 6,8 7,4 7,9 0,0 0,5,6 3, 6,3 6,9 9,0 3,7 6,3 C - 4,6 4,8 5, 5,4 6,5 7,0 7,5 8, 0, 0,8,9 3,4 6,7 7, 9,4 4, 6,9 B - 4,6 4,9 5, 5,5 6,6 7, 7,6 8, 0,4 0,9 3, 3,7 6,9 7,5 9,7 4,6 7,3 A - 5, 5,5 5,8 6, 7,4 8,0 8,6 9,,7,3 4,7 5,4 9,0 9,7, 7,6 30,7 A - 5,9 6, 6,6 6,9 8,3 9,0 9,7 0,4 3, 3,8 6,6 7,3,4, 4,9 3, 34,6 B - 3 6,0 6,3 6,7 7,0 8,4 9, 9,8 0,5 3,3 4,0 6,9 7,6,8,5 5,3 3,6 35, C - 4 6, 6,5 6,8 7, 8,6 9,3 0,0 0,8 3,6 4,3 7, 7,9,,9 5,8 3,3 35,8 D - 5 6,3 6,6 7,0 7,4 8,8 9,6 03, 4,0 4,7 7,7 8,4,9 3,6 6,5 33, 36,9 E - 6 6,5 6,9 7,3 7,7 9, 0,0 0,8,5 4,6 5,4 8,4 9, 3,8 4,6 7,6 34,6 38,4 A - 3 6,7 7, 7,5 7,9 9,5 0,3,,8 5,0 5,8 9,0 9,7 4,5 5,3 8,4 35,5 39,5 B - 4 7,0 7,4 7,8 8, 9,8 0,6,5,3 5,6 6,4 9,7 0,5 5,4 6, 9,5 36,9 4,0 C - 5 7,3 7,7 8, 8,6 0,3,,0,9 6,3 7, 0,6,5 6,7 7,5 3,0 38,7 43,0 D - 6 7,8 8,3 8,8 9,,,0,9 3,8 7,5 8,4, 3,0 8,6 9,5 33, 4,5 46, A - 4 7,8 8,3 8,8 9,,,0,9 3,8 7,5 8,4, 3,0 8,6 9,5 33, 4,5 46, B - 5 8,4 8,8 9,3 9,8,8,8 3,8 4,7 8,7 9,7 3,6 4,6 30,5 3,5 35,4 44, 49, C - 6 9, 9,7 0, 0,8,9 4,0 5, 6, 0,4,5 5,8 6,9 33,3 34,4 38,7 48,4 53,8 A - 5 9,4 0,0 0,5, 3,3 4,4 5,5 6,6,0, 6,5 7,6 34,3 35,4 39,8 49,8 55,3 B - 6 0,4,,7,3 4,7 6,0 7, 8,4 3,3 4,6 9,5 30,7 38, 39,3 44, 55,3 6,4 A - 6,7,4 3, 3,8 6,6 8,0 9,4 0,7 6,3 7,6 33, 34,6 4,8 44, 49,8 6, 69, Instruction Manual SMB Speed Box - 9

32 Instruction Manual FERTILIZER DISTRIBUTION SYSTEM METAL AND STAINLESS STEEL TANK Figure 35 SMB Speed Box The floating spiral fertilizer distribution system consists of a shaft arranged at the bottom of the fertilizer tank that when it starts turning, the fertilizer involves the shaft, which distributes it, avoiding the use of intermediate bearings. - In determining the number of lines and desired spacing, attach the small hoses () to the fertilizer spout (), making the connection of the hoses that are close to the lines, preventing them from becoming folded, as in Figure The outlets that will not be used must be sealed with lids (3) inside the tank and with the cap (4) in the external outlets; this will prevent fine fertilizer particles to fall on the seeder. 4- The floating spiral fertilizer dispenser system has several safety outputs, which, upon entering the fertilizer dosimeter and some output is blocked, it will begin leaking through the safety output A, thus ensuring operating the system without damaging it. If this occurs, clean the fertilizer dosimeter up to the spout located on the double disc or plow rod, since clogging can occur due to the presence of roots, plastic pieces and other objects. Safety output "A" 3 Entrance of fertilizer 4 IMPORTANT Remove the caps (4) periodically and clean their output. When the fertilizer is wet or has impurities, make the cleaning more often.
.")
, pull the handle (3) and set them. At the end of the combination, return the handle (3) and replace the lock ().")
33 Speed Box system - The seeders are equipped with the Speed Box system, which operates the distribution system, with simple adjustments, ensuring fast and practical exchange of rotations. - For fertilizer adjustments, select the desired quantity in tables and check the corresponding combination of cursors (). Example: position F indicates that the cursor with letters must be at position F and the cursor with numbers must be at position as shown in Figure To move the cursor, remove the lock (), pull the handle (3) and set them. At the end of the combination, return the handle (3) and replace the lock (). - ADJUSTMENT FOR FERTILIZER DISTRIBUTION 4- The fertilizer adjustment is made through the Speed Box. For other adjustments, re-position the chain in motor gear a and moved gear b. 5- After the repositioning of the gears, check the chain tension. 6- The tensioner () is provided with a tension spring for greater flexibility, and for greater pressure on the tensioner, turn the rosette () through the spring coupler (3) to the other tooth of the rosette. Figure Figure 37 Figure 36 b a 3 Instruction Manual SMB Speed Box - 3
34 Instruction Manual SMB Speed Box - 3 Table for fertilizer distribution SMB seeder Speed Box 4000 / 5000 / 6000 Table Outlet gear of the ratchet shaft 0 Inlet gear of the Speed Box 3 Combination Grams / 50m Spacing between lines F F E F E D F E D C F E D C B A A B C D E A B C D A B C A B A References: Table elaborated by using inch step spring for fertilizer distribution with density of liter equivalent to,00 g.
35 Table for fertilizer distribution SMB seeder Speed Box 4000 / 5000 / 6000 Table Outlet gear of the ratchet shaft 3 Inlet gear of the Speed Box 0 Combination Grams / 50m Spacing between lines F F E F E D F E D C F E D C B A A B C D E A B C D A B C A B A Instruction Manual References: Table elaborated by using inch step spring for fertilizer distribution with density of liter equivalent to,00 g. SMB Speed Box - 33
36 Instruction Manual SMB Speed Box - 34 Table for the fertilizer distribution SMB seeder Speed Box 4000 / 5000 / 6000 Table 3 Outlet gear of the ratchet shaft 0 Inlet gear of the Speed Box 3 Combination Grams / 50m Spacing between lines F F E F E D F E D C F E D C B A A B C D E A B C D A B C A B A References: Table elaborated by using inch step spring for fertilizer distribution with density of liter equivalent to,00 g.
37 Table for the fertilizer distribution SMB seeder Speed Box 4000 / 5000 / 6000 Table 4 Outlet gear of the ratchet shaft 3 Inlet gear of the Speed Box 0 Combination Grams / 50m Spacing between lines F F E F E D F E D C F E D C B A A B C D E A B C D A B C A B A Instruction Manual References: Table elaborated by using inch step spring for fertilizer distribution with density of liter equivalent to,00 g. SMB Speed Box - 35
38 Instruction Manual SMB Speed Box - 36 Table for the fertilizer distribution SMB seeder Speed Box 4000 / 5000 / 6000 Table 5 Outlet gear of the ratchet shaft 0 Inlet gear of the Speed Box 3 Combination Grams / 50m Spacing between lines F F E F E D F E D C F E D C B A A B C D E A B C D A B C A B A References: Table elaborated by using 5/8 inch step spring for fertilizer distribution with density of liter equivalent to,00 g.
39 Table for the fertilizer distribution SMB seeder Speed Box 4000 / 5000 / 6000 Table 6 Outlet gear of the ratchet shaft 3 Inlet gear of the Speed Box 0 Combination Grams / 50m Spacing between lines F F E F E D F E D C F E D C B A A B C D E A B C D A B C A B A Instruction Manual References: Table elaborated by using 5/8 inch step spring for fertilizer distribution with density of liter equivalent to,00 g. SMB Speed Box - 37
40 Instruction Manual SMB Speed Box - 38 Table for the fertilizer distribution SMB seeder Speed Box 4000 / 5000 / 6000 Table 7 Outlet gear of the ratchet shaft 0 Inlet gear of the Speed Box 3 Combination Grams / 50m Spacing between lines F F E F E D F E D C F E D C B A A B C D E A B C D A B C A B A References: Table elaborated by using 3/4 inch step spring for fertilizer distribution with density of liter equivalent to,00 g.
41 Table for the fertilizer distribution SMB seeder Speed Box 4000 / 5000 / 6000 Table 8 Outlet gear of the ratchet shaft 3 Inlet gear of the Speed Box 0 Combination Grams / 50m Spacing between lines F F E F E D F E D C F E D C B A A B C D E A B C D A B C A B A Instruction Manual References: Table elaborated by using 3/4 inch step spring for fertilizer distribution with density of liter equivalent to,00 g. SMB Speed Box - 39

42 Instruction Manual - PRACTICAL CALCULATION FOR FERTILIZER AND SEED DISTRIBUTION - Determine the spacing between lines and the amount of fertilizer to be distributed by Bushel (Aa) or Hectare (Ha). - Example: Seeder with spacing of 450 mm, to distribute 500 Kg of fertilizer per hectare, use the formula below: Formula: X = X = E x Q A x D 450 x x 50 where: E = spacing between lines (mm) Q = Amount of fertilizer to be distributed [kg] A = Area to be fertilized [m²] D = distance of 50 meters (test) X = grams of fertilizer in 50 meters SMB Speed Box After running the delimited space (fertilizer table) in the column (grams per line in 50 meters), remove the sealing of the seed spout and collect them for counting and weighing of the fertilizer collected. If it is necessary to increase or decrease the amount of fertilizer and seed, proceed through the Speed Box. ADJUSTMENT OF THE LINE MARKER DISC 9- The line marker disc () has angle adjustment to facilitate the work of ground markings. For this adjustment, loosen the nut () and rotate the disc to the desired position. Figure 38. X =.50 x 50 = 5 X = 5 grams in 50 meters per line PRACTICAL TEST FOR MEASURING THE AMOUNT OF FERTILIZER AND SEED DISTRIBUTION 3- To more precise distribution of both seeds and fertilizer, perform the test of the amount to be distributed on the planting site because for each land, there is a specific condition. 4- Check and keep the tires in adequate calibration with 60 lb / in each. 5- Find the test distance in the table, we have selected 50 linear meters. 6- Fill the seed tanks at least halfway. Run some meters outside the testing area, so that the seeds and fertilizer fill the dosimeters. 7- Seal the seed spout outlets and place containers for collection in the fertilizer outputs. Move the tractor in the testing area, always at the same speed that will be used in planting. Figure 38

 from the furrower () moving the spout (4) as 4- Adjust the spring pressure (5)")
, loosen the screws () and move the shaft (3) for the desired setting.")
 of the cutting disc by removing the lock and washer (5) positioning the pin (6) in the hole - detail b. Figure 4.")
43 3 - DEPTH ADJUSTMENT FURROW OPENING AND FERTILIZER POSITION ON THE GROUND SEEDER SYSTEM LARGE SEEDS - The furrow opening in the soil so that the fertilizer is deposited is done by or double discs or furrowers in the following systems: - Side fertilization and below the seed. - Fertilization on the same line and below the seed. FURROWER POSITION - The furrower has two working positions. Remove the screw (), position the furrower () through the bottom hole and replace the screw (). 3- If it is necessary to adjust the height of the fertilizer depth, loosen the screws (3) from the furrower () moving the spout (4) as 4- Adjust the spring pressure (5) of the furrower by removing the lock and washer (6) positioning the pin (7) in the hole - detail a. Figure 39. ADJUSTMENT OF THE CUTTING DISC DEPTH 5- To adjust the cutting disc depth (), loosen the screws () and move the shaft (3) for the desired setting. Then, retighten the screws (). Figures Adjust the spring pressure (4) of the cutting disc by removing the lock and washer (5) positioning the pin (6) in the hole - detail b. Figure 4. Figure 40 ADJUSTMENT OF THE DOUBLE DISC CLEANERS b 6 Figures The double discs have cleaners () that are flexible and adjustable throug screws (), to remove the soil adhering to them Figure 4 Instruction Manual SMB Speed Box - 4
 through the handle () and move the wheel (3) by pushing down or pulling up, leaving it to the desired setting. Make the same setting on all wheels.")

. For this, pull it back and move it, observing the wheel position and its use: - Position A (closed): less soil on the seed.")
44 Instruction Manual OSCILLATING DEPTH LIMITING WHEEL DEPTH AND V COMPACTION WHEEL 8- The seed depth is individually made by the depth limiting wheels. For this setting, pull the lock pin () through the handle () and move the wheel (3) by pushing down or pulling up, leaving it to the desired setting. Make the same setting on all wheels. Then, lock the handle. Figure 4 SMB Speed Box - 4 ADJUSTING THE V COMPACTION WHEEL 9- The V compaction wheels are intended to press the furrow laterally, causing the soil to be immediately placed on the seed, avoiding excess compression, facilitating germination and plant development. 0- The wheel pressure () is made through the lever (), which when shifted back, give more pressure on the wheels. - The wheels can be tilted by the lever (3). For this, pull it back and move it, observing the wheel position and its use: - Position A (closed): less soil on the seed. - Position B (open): more soil on the seed. A 3 B Figures 43 3 IMPORTANT Make the same adjustment for all compaction wheels and consider the type of soil, seed and planting depth in order not to affect the free emergence of plants.


45 - The wheels were developed with eccentric bushings (), and for horizontal displacement, loosen the screws () rotate the bushing (), with a key to performance and alignment of the wheels with the furrow, placing a greater or lesser amount of soil laterally to the seed. Figure This adjustment should be made according to the type of soil and culture. Figure 44 ADJUSTING THE V COMPACTION WHEEL 4- The depth adjustment of the fertilizer is made through the pressure of springs on the planting lines. This adjustment is done through the nut, as follows; 5- To increase the spring pressure, tighten the nut () to the rod (), and vice versa. Figure 45 IMPORTANT All lines must have the same adjustment. ADJUSTMENT OF THE PRESSURE SPRING FOR CONVENTIONAL PLANTING 6- For conventional planting, release the pressure and place the limiting rings () to the piston rod (). Figure 46. Figure 46 Instruction Manual SMB Speed Box - 43
46 4 - OPERATIONS Instruction Manual SMB Speed Box After the first day of work with the seeder, retighten all screws and nuts. Check the conditions of pins, cotter and locks. - Keep the tires with the same pressure (60 lbs / in) to prevent wear and maintain uniformity of planting. 3- Observe the lubrication intervals. 4- When filling the tanks, check for objects inside them such as nuts, screws, etc. Always use seeds and fertilizer free of impurities. 5- Always observe the correct functioning of seed and fertilizer distribution mechanisms and also the settings established at the beginning of operation. 6- Keep the seeder always leveled; the tractor drawbar must remain fixed and the working speed should remain constant. 7- Always check the seed and fertilizer depth, as well as the pressure of compaction wheel. 8- Observe the position of the fertilizer in relation to the seed in the soil. 9- The line markers must be adjusted according to the spacing of the crop to be planted.

47 5 - MAINTENANCE TIRE PRESSURE Excessive pressure Lack of pressure Correct pressure - Tires should always be properly calibrated to avoid premature wear due to excess or lack of pressure and ensuring accuracy in the distribution. - The tire pressure must be 60 lb / in ² each. MANUFACTURER TYPE OF RECOMMENDED GREASE Petrobrás Lubrax GMA Atlantic Litholine MP Ipiranga Super Graxa Ipiranga Ipíranga Super Graxa Ipiflex Castrol LM Mobil Mobilgrease MP 77 Texaco Shell Esso LUBRICATION 3- Lubrication is essential for good performance and durability of the seeder moving parts, helping to reduce maintenance costs. 4- Before starting operation, lubricate all grease fittings carefully always observing lubrication intervals in the following pages. Make sure the lubricant is of good quality; avoid using products contaminated by water, dirt and other agents. TABLE OF GREASE AND EQUIVALENT Marfak Agrotex Retinax A Alvania EP Multipurpose grease H Table 8 Figure The centralized lubrication system () makes maintenance faster and easier, allowing lubricating all lateral and central points of the machine. 6- Before starting the lubrication, clean all grease fittings with a soft, lint-free cloth and replace the damaged ones. 7- Lubricate all grease fittings every 0 hours. LUBRICATION Bardahl Maxlub APG EP If there are other lubricants and / or equivalent greases not listed in this table, refer to the manufacturer s technical handbook. Instruction Manual Figure 48 SMB Speed Box - 45


48 Instruction Manual SMB Speed Box - 46 LUBRICATION POINTS Figures 49 - Lubricate at every 0 hours of work.


49 - Lubricate at every 0 hours of work. Figure Lubricate at every 60 hours of work. a IMPORTANT Do not put too much grease in the seed distribution crown gear a, this could clog the seed conductor. b 3- Lubricate at every 30 hours of work. Figure 5 IMPORTANT Do not put too much grease in the ratchet, respect the interval of 60 hours for relubrication detail b. Figures 5 Instruction Manual SMB Speed Box - 47
 the hub ().")
 SMB Speed Box - 48 - Perform the oil exchange of the Speed Box () after the first 30 hours, then at every 500 hours. - The tank capacity is.8 liters.")
, replace the plug () place the oil and check through the viewfinder (4) if the desired level is reached.")
50 Instruction Manual 5- Lubricate at every 00 hours of work. - Periodically lubricate the hubs of double discs and depth wheels approximately every 00 hours and at the end of each harvest season as follows: - Remove the seal ring () the hub (). - Examine the bearing, if any clearances, fit through the castle nut (3). - Put some new grease in the cap (4). - Replace the cap on the hub and fix 3 it with the seal ring (). Figure 53. Figure OIL REPLACEMENT (Speed Box) SMB Speed Box Perform the oil exchange of the Speed Box () after the first 30 hours, then at every 500 hours. - The tank capacity is.8 liters. It is recommended to use of mineral oil ISO VG 50 at 40 C. 3- To make the oil depletion, remove the plug () located at the bottom of the gearbox. 4- For the oil replacement, remove the vent (3), replace the plug () place the oil and check through the viewfinder (4) if the desired level is reached. 5- Check the oil level daily through the viewfinder (4). Only use oil recommended by the manufacturer. OSCILLATING STRETCHER When replacing the oil, observe the initial positions of the vent and depletion plugs, so that they can be reassembled correctly. Make sure it is well sealed and that there are no leaks. 6- The Stretcher (5) is equipped with torsion spring for more flexibility. If more pressure on the stretcher is necessary, turn the rosette (6) coupling the spring (7) in the other tooth of the rosette Figure 54 Figure 55
51 PROBLEMS PROBABLE CAUSES SOLUTIONS During planting, fertilizer leaks through the safety outputs. Hub shaft of the fertilizer tank does not turn. Unable to make the coupling of quick couplers of hoses on the tractor. A planting line shows depth different from the other. The groove is opening up too much during planting. Pistons stop operating, raise the seeder and do not go down or vice versa. Strange noise when operating or riding with the seeder loaded. The seeder leaves the planting line, sometimes on one side, sometimes on the other. Hoses are clogged or there are pieces of plastic in the spiral hoses that conduct the fertilizer. Spiral blocked with wet fertilizer or excess fertilizer in closed line. The hoses were disengaged with pressure or it is bearing the weight of the seeder in the hydraulic system. Different settings of pressure on the depth limiting wheels or in the line springs. Soil that sticks to the discs or excessive working speed. Different quick coupler, ball-type male and needle-type female or vice - versa. Loose wheels or hub with clearance. Tractor drawbar loose. Too high planting speed. Unclog the hoses or remove the upper channel that gives access to coil, rotate the shaft to the opposite side until the foreign body is removed. Unclog the coils, check if there is loose gutter and if the fertilizer is coming in through their sides. Drain hoses or place the seeder on the support feet and finally release the pressure. Set all the depth wheels and the pressure of the springs evenly. Decrease the work speed. Replace the quick coupling, placing both of the same type. Retighten the nuts of the wheel. Adjust the bearings of the wheel hub. Use the pin that came with the seeder. Attach the tractor drawbar in the center hole. Decrease the work speed. Broken seeds Inadequate disc thickness. Disc improperly assembled. The seed sieve is not suitable for the disc selected Wet seed Use adequate disc (thickness and diameter of the holes). Place the disc properly (see the phrase: THIS SIDE DOWN). Use dry seeds Table 9 Instruction Manual SMB Speed Box - 49
, loosen nuts and washers () from the hub (3), only from the outside of the seeder, pull the hub with the full shaft (3), rotating it for easy removal.")

52 Instruction Manual SMB Speed Box CLEANING FERTILIZER SYSTEM - METAL AND STAINLESS STEEL TANK - After planting, do not let fertilizer in tanks, do their cleaning as follows; - Remove the transmission protective cover (), loosen nuts and washers () from the hub (3), only from the outside of the seeder, pull the hub with the full shaft (3), rotating it for easy removal. Check the PVC channels (4) that are arranged in the bottom of the tank, if they present wear, replace them. 5 - Make the cleaning in the tanks and also on the shafts and then wash them with running water. Reassemble the shafts observing the correct assemblage of the channel set, since the fertilizer outlet holes of both the channel and the spout must match as in detail "a" of Figure When assembling the shaft, it must turn freely, even with a full tank. SEED SYSTEM At the end of each work day, we recommend removing all the seeds from the distribution box and clean it. To clean the seed tank, proceed as follows: Remove the seed spouts (5); Figures Fully open the cover (6) of the seed distribution box; 6- Unlock the lever (7) of the regulator (8) leaving them loose; 4 7- Open wide the steering wheel (9) of the seed tank until the rotor output is fully open; 8- Turn the seed shaft (0) with a wrench to drop all seeds; 9- Do the cleaning of the seed tank; 0- After cleaning, reassemble the tank. a If the seeder is stored, also remove the hoses that conduct fertilizer and seeds, wash them with mild soap and water and replace them.

, it is necessary to clear the system twice a day. TABLE OF WORKING SPEEDS RECOMMENDED FOR MAIN CROPS CULTURE SPEED CORN SOY BEAN SORGHUM 4.5 to 6.0 km / h 6.0 to 7.0 km / h 5.5 to 6.5 km / h 6.")
53 SEED SYSTEM - UNIVERSAL - At the end of each working day, we recommend emptying the seed tanks, remove the distribution discs () and clean them, observe the operation of the seed dosimeter (), by verifying the spring pressure of the triggers, thus ensuring maximum precision in seed distribution. - When storing the seeder, make a general clean and wash it. Make sure the paint did not wear off, if so, give an overall coat, pass protective oil and completely lubricate the seeder. When using the products for seed treatment (inoculants, graphite, etc.), it is necessary to clear the system twice a day. TABLE OF WORKING SPEEDS RECOMMENDED FOR MAIN CROPS CULTURE SPEED CORN SOY BEAN SORGHUM 4.5 to 6.0 km / h 6.0 to 7.0 km / h 5.5 to 6.5 km / h 6.0 to 7.0 km / h Use graphite or industry talc during the planting opération, thus avoiding friction of the seed with the system (disc). Table 0 Figures 57 Do not use chemical cleaners to wash the seeder, as this may damage its paintwork. GENERAL CLEANING Instruction Manual 3- Remove the transmission chains, and keep them immersed in oil until the next use. 4- Lubricate the machine completely. Check all moving parts, if they show signs of wear and clearances, make the necessary adjustment or replacement of parts, leaving the machine ready for the next use. Use only original Baldan parts. 5- After all the maintenance procedures, store your seeder in a covered and dry place, properly supported. Avoid the discs to be in direct contact with the ground. 6- We recommend washing the machine at the beginning of the new planting. SMB Speed Box - 5
 and moving the lever (3). - The wheels are fixed on a shaft with the ends in degree (4), especially designed to enable compression, depth control and bury the seed.")
54 Instruction Manual 8 - OPTIONAL EQUIPMENT DEPTH LIMITING WHEEL WITH ANGULAR ADJUSTMENT SMB Speed Box The control of the seed depth is individually performed by convex compacting wheels (), unlocking the handle () and moving the lever (3). - The wheels are fixed on a shaft with the ends in degree (4), especially designed to enable compression, depth control and bury the seed. For these adjustments, release the latch (5) and rotate the shaft (4), watching the wheel movements: Figure Parallel Inclined: To compress the soil without accumulating land on the seed (dry land). - Closed Inclined: To remove land, preventing more land to fall on the seed The compacting wheels are regulated by the handle (5). For higher pressure, move it (6) according to the desired pressure. 4 5


 with angle adjustment, pressure and")

 for")


55 05 cart of the cutting disc 06 cart with fertilizer furrower 08 cart of the V wheel and depth control whell 9 - PLANTING CARTS DEPTH LIMITING WHEEL WITH ANGULAR ADJUSTMENT - The planting cart was developed in parallel or mismatched systems so that it can be assembled with various accessories such as: - Compaction wheel () with angle adjustment, pressure and alignment; - Eccentric depth control wheel () 09 eccentric wheel for planter and seeder 0 rear eccentric depth control whell 07 cart of the V wheel - - Mismatched double disc (3) for seed and fertilizer with individual cleaners; Figures 60 minor and major furrower depth control whell with support Figures seed distribution cart with V wheel and eccentric wheel for depth control 0 seed and fertilizer distribution cart - seeder Instruction Manual SMB Speed Box - 53
 the")
 among the mixers (8), bushing (9), fixing with screw (0),")
, Figure 6; 5 5- After assembling the shaft,")
, screw (4), washers and nuts (5).")
56 Instruction Manual 0 MIXING SET - OPTIONAL - - To assemble the mixing set, empty the seed box and do the following: - Place on the bottom of the seed box () the support () with screw (3), washer and nut (4), Figure 6; 3 SMB Speed Box Then, press the shaft (7) among the mixers (8), bushing (9), fixing with screw (0), Figure 63; Figure Figure 6 3- Fit the bearing (5) to the support and lock it with the cotter pin (6), Figure 6; 5 5- After assembling the shaft, place the gear () at the ends of the shaft with the lock (). Make the connection of the shafts with bushing (3), screw (4), washers and nuts (5). Figure 64. Figure Figure 6
.")


 on the front cover () with screw (3), washer")
57 6- Remove the cap (6) by loosening the screw (7), washer and nut (8) for the placement of the chain (9). Figures 65; 6 7- Finally place the protective cap (0) with the wing nut (). Tighten all screws completely. Figure Figures 66 Figures 65 - DIGITAL HECTARE METER - BALDAN The hectare meter leaves the factory semiassembled, and needs the assembly of a few components, which must be assembled according to directions below: - Assemble the rear bracket () on the front cover () with screw (3), washer and nut (4), Figure Instruction Manual Figures 67 SMB Speed Box - 55
, washer and nut (8), Figure 68.")
, Figure 69.")

, fixing with washer (7) and nut (8); 8- Then, place the")
58 Instruction Manual 3- With the front cover open, assemble the hectare meter (5) on the support (6) with screw (7), washer and nut (8), Figure 68. Figures Place the complete protection box (9) on the chassis (0) of the seeder with screw (), washer and nut (), Figure SMB Speed Box Finally, install the magnetic cable that feeds the hectare meter system in the seeder transmission. For this, proceed as follows: 6- Place the plate (3) with screw (4), washer and nut (5) on the seeder chassis; 7- Insert the magnetic cable (6), fixing with washer (7) and nut (8); 8- Then, place the magnetic pin (9) on the transmission shaft (0) with nut (); 9- Run a few meters with the seeder and make the test of reading the hectare meter, following instructions on next page. Figure Figures Figures 69
59 READING OF THE ATB DIGITAL HECTARE METER - BALDAN - - To operate the hectare meter, do the reading and interpretation of function keys, as follows: - To check HEC PARCIAL and HEC TOTAL By pressing the MENU key, the display is turned on, the manufacturer name and battery level are shown in five (05) seconds. After this time, the display shows the message HEC PARCIAL. If the MENU key has been pressed again, the display shows the message HEC TOTAL. If no key is pressed within twenty (0) seconds, the system turns off the display to save battery, automatically enters into standby. - To reset HEC PARCIAL By pressing the MENU key, the display is turned on, the manufacturer name and battery level are shown in five (05) seconds. After this time the display shows the message HEC PARCIAL. Hold the ENTER key pressed for (04) seconds and the system will offer the possibility to reset the HEC PARCIAL. Press MAIS to reset the HEC PARCIAL memory or press the MENOS key to maintain the HEC PARCIAL value recorded in the memory. If no key is pressed within twenty (0) seconds, the system automatically enters into standby. 3- Setting up the Hectare meter Press the MENU key for two (0) times so that the HEC TOTAL information is displayed. Then, press both MENOS and MAIS keys for five (05) seconds to access the configuration area. The first information presented is the NUM- BER OF REVOLUTIONS OF THE TRANSMISSION SHAFT. By pressing the MENU key, the user has access to the next screen: LINE ADJUSTMENT. Use MENOS or MAIS keys to adjust the desired value. Press the MENU key for SPACING ADJUSTMENT. Follow the same procedure as above: Use MENOS or MAIS keys to set the desired value. If no key is pressed within twenty (0) seconds, the system automatically enters into standby, already considering the new values set. Instruction Manual SMB Speed Box - 57
 of the seeder. 3 ALWAYS REQUIRE BALDAN ORIGINAL PARTS - - Look in your local, a reseller BALDAN, he will have in stock genuine parts.")
60 Instruction Manual - IDENTIFICATION - To view the parts catalog or request technical assistance from ATB, always indicate the model (), serial number () and date of manufacture (3), which are on the identification label (4) of the seeder. 3 ALWAYS REQUIRE BALDAN ORIGINAL PARTS - - Look in your local, a reseller BALDAN, he will have in stock genuine parts. Notes: DESCRIPTION OF PRODUCT SMB Speed Box Make the identification of the data below to always have correct information about the life of your Speed Box 4000, 5000 and Owner s name: Dealer: Farm: City: Warranty certificate Nr.: Model: Serial Nr.: Date of purchase: Invoice Nr.: State: Marketing Baldan Publishing of Catalogs and Manuals Code: Revision: 0 The drawings of this manual are merely illustrative. In case of doubt, do not operate or handle your SMB Speed Box, contact the Post Sales. Phone: posvenda@baldan.com.br
61 Notes Instruction Manual SMB Speed Box - 59
62 Notes Instruction Manual SMB Speed Box - 60
63

64 Instruction Manual SMB Speed Box - 6
We thank you for the preference and congratulate your excellent choice in acquiring an
 1 INTRODUCTION We thank you for the preference and congratulate your excellent choice in acquiring an implement of outstanding quality, manufactured in accordance with the advanced technology of BALDAN
AThank you for your preference and congratulations on the excellent choice you have just made,
 INTRODUCTION AThank you for your preference and congratulations on the excellent choice you have just made, because you have purchased a product manufactured with the BALDAN IMPLEMENTOS AGRICOLAS S/A technology.
Fabimag has been in operation for over 25 years.
 Fabimag has been in operation for over 25 years. Fabimag has been operating with the ISO 9001/ 9002 Quality Standards since July 2005, being at that time the first and only Argentinian factory of planters
INDEX 01. SAFETY RULES...
 TINTRODUCTION hank you for your preference and congratulations on the excellent choice you have just made, because you have purchased a product manufactured with the BALDAN IMPLEMENTOS AGRICOLAS S/A technology.
THE VERSA-DRILL 3-POINT MOUNTED NO-TILL DRILL; ATV-PULL TYPE DRILLS
 THE VERSA-DRILL 3-POINT MOUNTED NO-TILL DRILL; ATV-PULL TYPE DRILLS Models KVGT-489, KVGT-728, KVGA-489 170 West 600 North Shelbyville, Indiana 46176 800.458.9129 www.kascomfg.com THANK YOU! You have invested
We thank you for the preference and congratulate your excellent choice in acquiring an
 INTRODUCTION We thank you for the preference and congratulate your excellent choice in acquiring an implement of outstanding quality, manufactured in accordance with the advanced technology of BALDAN IMPLEMENTOS
Operator s Manual. Go Galvanized! YOU'RE ALWAYS AHEAD...WITH A MODERN BEHIND.
 SUMMER 2008 spreaderrr Operator s Manual YOU'RE ALWAYS AHEAD...WITH A MODERN BEHIND. P.O. Box 790 Beaumont, Tx 77704 409.833.2665 1.800.231.8198 Fax: 409.726.8333 www.modernusa.com Go Galvanized! Spreaderrr
Seed, Small Seeds and Fertilizer Rate Charts
 Manufacturing, Inc. www.greatplainsmfg.com Seed, Small Seeds and Fertilizer Rate Charts The following pages are to assist in the proper setting of seeding and fertilizer rates for the 1205NT End-Wheel,
We appreciate your purchase and congratulate you for the excellent choice you just
 PRESENTATION We appreciate your purchase and congratulate you for the excellent choice you just made because you have purchased a product manufactured with technology from This instruction manual will
ADJUSTMENTS BEFORE GOING TO THE FIELD
 FIELD ADJUSTMENTS PRECISION SEEDING SYSTEM THREE POINT 2025A & 2525A With Air-Pro meters DRILL MAINTENANCE Proper servicing and adjustment is the key to the long life of any farm implement. With careful
PRECISION SEEDING SYSTEM THREE POINT 2020P & 2520P
 PRECISION SEEDING SYSTEM THREE POINT 2020P & 2520P DRILL MAINTENANCE Proper servicing and adjustment is the key to the long life of any farm implement. With careful and systematic inspection of your grain
Operator s Manual 09PDMS (100 Lb.) & P45PDMS (45 Lb.) Poly Stainless MP +3 (Positive Displacement Metering System)
 & P45PDMS (45 Lb.) Poly Stainless MP +3 (Positive Displacement Metering System)") Operator s Manual 09PDMS (100 Lb.) & P45PDMS (45 Lb.) Poly Stainless MP +3 (Positive Displacement Metering System) Anertec & Gandy Company 815 Rice Lake Street Owatonna, MN 55060 Telephone: 507-451-5430
Operator s Manual 09PDMS (100 Lb.) & P45PDMS (45 Lb.) Poly Stainless MP +3 (Positive Displacement Metering System) Anertec & Gandy Company 815 Rice Lake Street Owatonna, MN 55060 Telephone: 507-451-5430
4745 Drill OWNER'S MANUAL (06-08) #
 #") 4745 Drill OWNER'S MANUAL (06-08) # 605865 Identification Your CrustBuster drill is identified by a Serial Number and Model Number. Record these numbers in the spaces provided in this manual and refer
4745 Drill OWNER'S MANUAL (06-08) # 605865 Identification Your CrustBuster drill is identified by a Serial Number and Model Number. Record these numbers in the spaces provided in this manual and refer
Field Operation. All Plant Drill
 Field Operation Recommended Operating Speed Operating speeds of 4-7 mph will provide optimum results from your Min-Till and All Plant drill. Conventional field conditions can warrant speeds in the upper
All Plant Drill. Field Operation. 1. Level the drill 2. Set toolbar rotation Set down pressure Set seed depth. Clevis Positions
 Field Operation Recommended Operating Speed Operating speeds of 4-7 mph will provide optimum results from your Min-Till and All Plant drill. Conventional field conditions can warrant speeds in the upper
BEFCO. Operator s Manual BABY HOP & HOP FERTILIZER SPREADERS ACCESSORIES SIDE ROW DISCHARGE. AA4-120 (fits models Hop 209 & 212) DEFLECTOR
 DEFLECTOR") BEFCO Operator s Manual BABY HOP & HOP FERTILIZER SPREADERS ACCESSORIES SIDE ROW DISCHARGE AA-0 (fits models Hop 09 & ) DEFLECTOR AA-0 (fits models Baby Hop 0 & 06) 009-95 (fits models Hop 0 & 06) 009-968
BEFCO Operator s Manual BABY HOP & HOP FERTILIZER SPREADERS ACCESSORIES SIDE ROW DISCHARGE AA-0 (fits models Hop 09 & ) DEFLECTOR AA-0 (fits models Baby Hop 0 & 06) 009-95 (fits models Hop 0 & 06) 009-968
TILLAGE AND SEEDING There's nothing like the smell of fresh turned dirt and the hope of newly planted seeds
 TILLAGE AND SEEDING There's nothing like the smell of fresh turned dirt and the hope of newly planted seeds TILLAGE AND SEEDING Contents Table of Contents Rotary Tillers...4 Woods line of forward and reverse
TWIN-ROW PLANTERS TWIN-ROW 825A3PM
 TWIN-ROW PLANTERS TWIN-ROW 4025A3PS TWIN-ROW 1225 & 1625AFF TWIN-ROW 825A3PM DOUBLE DOWN ON NEW TECHNOLOGY WITH CASE IH TWIN-ROW PLANTERS Farming is a gamble. But there are ways to cut your risk, improve
PRESTO. SPEED DISC Maximize productivity with the fastest one-pass residues management tool
 PRESTO SPEED DISC Maximize productivity with the fastest one-pass residues management tool 2 PRESTO MODERN STUBBLE CULTIVATION TODAY RESIDUES MANAGEMENT HAS THREE MAIN FUNCTIONS: Straw incorporation Residues
M3B ELECTRIC MODEL POWER SPREADER/SEEDER MOUNTING, SERVICE, AND SAFETY INFORMATION IMPORTANT NOTICE!
 SEEDER CO. M3B ELECTRIC MODEL POWER SPREADER/SEEDER MOUNTING, SERVICE, AND SAFETY INFORMATION IMPORTANT NOTICE! The Model M3B seeder is designed to be mounted to farm tractors, pickup trucks, the Herd
NO-TILL DISC SEEDERS LINKAGE & TRAILING
 NO-TILL DISC SEEDERS LINKAGE & TRAILING AUSTRALIAN DESIGNED & BUILT HIGH QUALITY SINGLE DISC SEEDERS NO-TILL SPECIALISTS www.serafinmachinery.com.au ULTISOW S RANGE Kadina SA Serafin Machinery s latest
Drill. Owner's Manual (01-08) #
 #") 5000 Drill Owner's Manual (01-08) # 608786 Identification Your CrustBuster drill is identified by a Serial Number and Model Number. Record these numbers in the spaces provided in this manual and refer
5000 Drill Owner's Manual (01-08) # 608786 Identification Your CrustBuster drill is identified by a Serial Number and Model Number. Record these numbers in the spaces provided in this manual and refer
FIELD ADJUSTMENTS THREE POINT 1510HDF, 2010HDF, & 2510HDF DRILL MAINTENANCE
 FIELD ADJUSTMENTS THREE POINT 1510HDF, 2010HDF, & 2510HDF DRILL MAINTENANCE Proper servicing and adjustment is the key to the long life of any farm implement. With careful and systematic inspection of
John Deere. MODEL: 400 Grinder-Mixer JD-O-OMC18621
 John Deere MODEL: 400 Grinder-Mixer THIS IS A MANUAL PRODUCED BY JENSALES INC. WITHOUT THE AUTHORIZATION OF JOHN DEERE OR IT'S SUCCESSORS. JOHN DEERE AND IT'S SUCCESSORS ARE NOT RESPONSIBLE FOR THE QUALITY
610 BUSHEL MANURE SPREADER
 610 BUSHEL MANURE SPREADER RODA MANUFACTURING 1008 LOCUST ST. HULL, IA. 51239 Art s-way Manufacturing 712-439-2366 Co., Inc. Hwy 9 West - PO Box 288 WWW.RODAMFG.COM Armstrong, IA. 50514 U.S.A 2 INTRODUCTION
DRILL 2300 SAFETY SECTION
 DRILL 2300 SAFETY SECTION RECOGNIZE SAFETY ALERT SYMBOL WARNING: KEEP RIDERS OFF UNIT Riding on any agricultural equipment is very dangerous. People can be killed or seriously injured when accidentally
+61 (0)
") +61 (0) 2 6340 0400 www.k-line.net.au CONFIGURATION OPTIONS 3 Point Linkage, non-folding 2925DD 2985DDT Trailing unit, folding wings 2940DDF Operating widths: 2m (5 6 ) to 13m (43 ) Power Requirements:
+61 (0) 2 6340 0400 www.k-line.net.au CONFIGURATION OPTIONS 3 Point Linkage, non-folding 2925DD 2985DDT Trailing unit, folding wings 2940DDF Operating widths: 2m (5 6 ) to 13m (43 ) Power Requirements:
SUMMERS SUPERCOULTER PLUS FIELD TESTED TOUGH!
 SUMMERS SUPERCOULTER PLUS Patented Hitch The Supercoulter Plus provides for even greater management of excessive field residue in no-till, minimum-till and conventional-till farming operations. Illustrations
W Point hitch planter Index
 PARTS MANUAL INDICE Index - - - - - - - - - 0- - - - - - - - - - 0- - - Frame Contact drive wheel Planting / fertilizing system and gearboxes Hydraulic circuit Seed hopper support Level wheel Seed hopper
Poly-Stainless MP+3 Multi-Purpose Applicator
 Poly-Stainless MP+3 Multi-Purpose Applicator Fertilize, seed or apply granular chemicals with just one applicator. Comes with three sets of Full-Rate metering wheels. Standard Equipment: 2.3 cu.ft (140
Operator s Manual. Manufacturing, Inc. End Wheel No Till Drill. EWNT7 and EWNT M-A. Copyright 1999 Printed 4/12/2005
 Operator s Manual EWNT7 and EWNT10 End Wheel No Till Drill Model EWNT7 EWNT10 Serial No. 1523Q - 1630Q 4142U - 4568U Manufacturing, Inc. www.greatplainsmfg.com! Read the operator s manual entirely. When
PRECISION SEEDERS. A range of professional solutions for all your sowing needs in market gardening and farming!
 PRECISION SEEDERS For manual seeding, Terradonis range of machines offers top end perforamances, with no equivalent on the market. Terradonis has chosen these particular seeders because of their outstanding
2. PREPARATION 1. SAFETY 3. FRAME 4. TRANSMISSION 5. DRIVE 6. ROW UNIT 7. OPTIONAL EQUIPMENT
 TABLE OF CONTENTS 1. SAFETY 2. PREPARATION 3. FRAME 4. TRANSMISSION 5. DRIVE 6. ROW UNIT 7. OPTIONAL EQUIPMENT For the initial preparation of the planter, lubricate the planter and row units. Make sure
PENDULUM FERTILIZER SPREADERS
 PENDULUM FERTILIZER SPREADERS INDEX 3 INDEX CHAP1 INTRODUCTION P5 CHAP2 EQUIPMENT IDENTIFICATION P7 CHAP3 WARRANTY P9 CHAP4 DESCRIPTION P11 CHAP5 TECHNICAL SPECIFICATIONS P15 CHAP6 PENDULUM ASSEMBLY P17
6000 and 7000Series Granular Applicator
 6000 and 7000Series Granular Applicator 6000 and 7000 Granular Applicator September 2002 1 Specifications 7030 Granular Specifications and Options Applicator Fits on Air Seeder Model 7130 7180 Ca pacity
Seed, Small Seeds and Fertilizer Rate Charts for the 3S-3000HD 30-Foot Folding Drill
 Manufacturing, Inc. www.greatplainsmfg.com Seed, Small Seeds and Fertilizer Rate Charts for the 3S-3000HD 30-Foot Folding Drill The following pages are to assist in the proper setting of seeding and fertilizer
VP 4600 EQUAL-WHEELED TRACTORS ISM - VRM - ARM ENGLISH
 VP 4600 EQUAL-WHEELED TRACTORS ISM - - ARM ENGLISH 6615801A1-09/2016 NEW 4600 SERIES The 4600 Series is a range of low-power equal-wheeled tractors designed to offer unique features and superior performance
Rotavator. R500, R600, R700 and R800
 Rotavator R500, R600, R700 and R800 Rotavator - Highly effective for optimal tillage Rotavator 500B-230M. Adjustable CE protections. Easy adaptation for front wheels, track looseners, etc. Rotavator is
H A R D E R D u m p B o x S p r e a d e r
 Serial Number: XXXXX O p e r a t o r s M a n u a l Model H A R D E R D u m p B o x S p r e a d e r Pg. 2 Pg. 2 Pg. 3 Pg. 4 Pg. 5 Pg. 6 Pg. 7 Pg. 9 Pg. 10 Pg. 10 INDEX Hydraulic Requirements Safety Safety
ADJUSTMENTS BEFORE GOING TO THE FIELD
 FIELD ADJUSTMENTS YIELD-PRO PLANTER with Air Pro Meters 2425A ADJUSTMENTS BEFORE GOING TO THE FIELD General Maintenance: 1). Refer to the operator s manual for proper lubrication intervals and maintenance
BALDAN IMPLEMENTOS AGRÍCOLAS S/A
 NINTRODUCTION Thank you for your preference and congratulations on the excellent choice you have just made because you have purchased a product manufactured with the BALDAN IMPLEMENTOS AGRÍCOLAS S/A technology.
SPINNER SPREADER. Operation, Service & Parts Manual For Models S203L, S273L & S503L. May Form: Spnsprdr.PM65
 SPINNER SPREADER Operation, Service & Parts Manual For Models S20L, S27L & S0L May 200 Form: Spnsprdr.PM TABLE OF CONTENTS Welcome/Introduction... 1 Training... 1 PreOperation... 1 Spreader Assembly...2
03-SERIES 4 & 6-ROW RIGID & FOLDING PEANUT VINE CONDITIONER OPERATOR S MANUAL THIS MANUAL TO ACCOMPANY MACHINE
 03-SERIES 4 & 6-ROW RIGID & FOLDING PEANUT VINE CONDITIONER OPERATOR S MANUAL THIS MANUAL TO ACCOMPANY MACHINE PART NO. 03-OM-03 Printing Date: SEPT 2012 WARRANTY POLICY KELLEY MANUFACTURING COMPANY (KMC)
ALL PLANT DRILL (2009) #605717
 #605717") 4600 SERIES ALL PLANT DRILL (2009) #605717 Identification Your CrustBuster drill is identified by a Serial Number and Model Number. Record these numbers in the spaces provided in this manual and refer
4600 SERIES ALL PLANT DRILL (2009) #605717 Identification Your CrustBuster drill is identified by a Serial Number and Model Number. Record these numbers in the spaces provided in this manual and refer
BOTTOM PLOW OWNERS MANUAL MOLDBOARD PLOWS
 1 BOTTOM PLOW OWNERS MANUAL MOLDBOARD PLOWS To The Owner: Read this manual before using your moldboard plow. The information presented will prepare you to do a safer, better job. Study this manual and
3200 Trash Shank OWNER'S MANUAL (01-10) #
 #") 3200 Trash Shank OWNER'S MANUAL (01-10) # 601401 Identification Your CrustBuster drill is identified by a Serial Number and Model Number. Record these numbers in the spaces provided in this manual and
3200 Trash Shank OWNER'S MANUAL (01-10) # 601401 Identification Your CrustBuster drill is identified by a Serial Number and Model Number. Record these numbers in the spaces provided in this manual and
Middle Buster, Sub Soiler, Middle Buster SC
 Middle Buster, Sub Soiler, Hardware Kit 8090000 THANK YOU FOR PURCHASING THIS PRODUCT Congratulations on your purchase. Behlen Country has been in the business of providing quality equipment to landowners
Operator s Manual. Manufacturing, Inc. P.O. Box 5060 l Salina, Kansas End Wheel No Till Drill. EWNT7 and EWNT M
 Operator s Manual EWNT7 and EWNT10 End Wheel No Till Drill Model EWNT7 EWNT10 Serial No. 1237Q to 1522Q 2333U to 4141U Manufacturing, Inc. P.O. Box 5060 l Salina, Kansas 67402-5060! Read the operator s
Yarway 7100 Series ARC Valve non-filtered design Installation and maintenance instructions
 Before installation these instructions must be fully read and understood either: 1. Keep the main body of valve below 300 F during preheat, welding and post weld heat treatment. OR 2. Disassemble the valve
BALENA. AIR DRILL Hoe drill
 AIR DRILL Hoe drill 2 Contents Benefits and applications 4 Tines - seed delivery and soil tillage 6 Hoe drill tines 8 Machine wheels 10 Seed and fert cart 12 Cart wheels 14 Commitment and experience 16
LELY Broadcast Spreaders
 LELY Broadcast Spreaders Accuracy and Dependability www.lelyturf.com partners in turfcare Unmatched in versatility and dependability Lely broadcast spreaders are the world s most popular machines used
HARROWS HARROW CARTS. HDL Series Forward Fold Cart. Features. Specifications. 8 bars for superior leveling. Fully flexible harrow sections.
 HARROWS HDL Series Forward Fold Cart Features 8 bars for superior leveling. Fully flexible harrow sections. Dual positive pitch settings - 50 or reverse harrow pull for 38. Easy forward folding wings for
2. PREPARATION 1. SAFETY 3. FRAME 4. TRANSMISSION 5. DRIVE 6. ROW UNIT 7. OPTIONAL EQUIPMENT Monosem Inc.
 TABLE OF CONTENTS 1. SAFETY 2. PREPARATION 3. FRAME 4. TRANSMISSION 5. DRIVE 6. ROW UNIT 7. OPTIONAL EQUIPMENT For the initial preparation of the planter, lubricate the planter and row units. Make sure
Operator s Manual 13-Foot End Wheel Drill
 Operator s Manual EWD13 13-Foot End Wheel Drill Model Serial No. EWD13 4109R+ Manufacturing, Inc. P.O. Box 5060 Salina, Kansas 67402-5060! Read the operator s manual entirely. When you see this symbol,
FIELD ADJUSTMENTS THREE POINT 2020F, 2520F, 2025F, 2525F DRILL MAINTENANCE
 FIELD ADJUSTMENTS THREE POINT 2020F, 2520F, 2025F, 2525F DRILL MAINTENANCE Proper servicing and adjustment is the key to the long life of any farm implement. With careful and systematic inspection of your
PNEUMATIC SEED DRILLS SOLITAIR
 PNEUMATIC SEED DRILLS SOLITAIR 2 Versatile Cultivation Methods Depending on the previous crop, crop rotation, weather and harvest conditions, switching over from conventional to conservation tillage methods
2960 SERIES II UNIT MOUNTED CONSERVATION COULTER
 2960 SERIES II UNIT MOUNTED CONSERVATION COULTER YETTER MANUFACTURING CO. FOUNDED 1930 Colchester, IL 62326-0358 Toll free: 800/447-5777 309/776-3222 (Fax) Website: www.yetterco.com E-mail: info@yetterco.com
END WHEEL NO- TILL 706NT & 1006NT
 END WHEEL NO- TILL 706NT & 1006NT DRILL MAINTENANCE Proper servicing and adjustment is the key to the long life of any farm implement. With careful and systematic inspection of your grain drill, you can
INSTRUCTIONS MANUAL AF
 INSTRUCTIONS MANUAL IDENTIFICATION Dealer: Owner: Firm / Farm: City: State: No. of the Certificate of Guarantee: Serial / No.: Date: Invoice No.: Product: Notes: Introduction The TATU Disc Plow follows
SUNCO IMPLEMENT STABILIZER OPERATOR S MANUAL WITH INSTALLATION INSTRUCTIONS
 SUNCO IMPLEMENT STABILIZER OPERATOR S MANUAL WITH INSTALLATION INSTRUCTIONS To determine what you need for mounting the stabilizer to a toolbar several things need to be considered. 1. Will the Stabilizer
Cover Crop Seed and Small Grain Rate Chart
 For Great Plains Models Turbo-Max 1200/1500/1800 Cover Crop Seed and Small Grain Rate Chart The following pages are to assist in the proper setting of seeding rates for the 12-, 15-, & 18- ft Great Plains
Cover Crop Seed and Small Grain Rate Chart
 For Gandy Orbit-Air Applicators w/ 12-Volt Electric Motor Driven Cover Crop Seed and Small Grain Rate Chart The following pages are to assist in the proper setting of seeding rates utilizing a Gandy Orbit-Air
The easy way to best harvest and great success!
 Seeding is our JOB Flexibility is our aim! Your seeding job needs to be done in fastest time, to the best economical costs, at best effect for a quick growth, even in dry weather periods?! You have a plan
PRECISION AIR 5 SERIES AIR CARTS PRECISION AIR 5 SERIES AIR CARTS
 5 SERIES AIR CARTS PRECISION AIR 5 SERIES AIR CARTS PRECISION AIR PRECISION AIR 5 SERIES AIR CARTS 7 Models Tank Sizes From 350 950 Bushels THE TANK CAPACITY YOU VE BEEN ASKING FOR. 2 MAXIMIZING THE POTENTIAL
FOOD PLOT SEEDERS FP2204 FP2206 FP2208 5PM (10/6/09)
") O P E R A T O R ' S M A N U A L FOOD PLOT SEEDERS FP2204 FP2206 FP2208 5PM50062650 (10/6/09) PLOTMASTER A product of Plotmaster Systems, LTD & Frontier Equipment Introduction To the dealer: Assembly and
O P E R A T O R ' S M A N U A L FOOD PLOT SEEDERS FP2204 FP2206 FP2208 5PM50062650 (10/6/09) PLOTMASTER A product of Plotmaster Systems, LTD & Frontier Equipment Introduction To the dealer: Assembly and
NO-TILL SPECIALISTS NO-TILL DISC SEEDERS LINKAGE & TRAILING AUSTRALIAN DESIGNED & BUILT SINGLE & DOUBLE DISC SEEDERS & BARS
 NO-TILL SPECIALISTS NO-TILL DISC SEEDERS LINKAGE & TRAILING AUSTRALIAN DESIGNED & BUILT SINGLE & DOUBLE DISC SEEDERS & BARS wwwserafinmachinerycomau ULTISOW S Range ULTISOW S30 S40 S50 S60 ROW UNITS Standard
ADVANCED DESIGN BUSHELS PER MINUTE
 GRAIN CARTS GRAIN CARTS 2 DUAL AUGER GRAIN CARTS ADVANCED DESIGN Hydraulically Adjustable Spout DESIGNED FOR THE REALITY OF HARVEST When you purchase a Kinze Dual Auger Grain Cart, you make an investment
TWO-WHEEL TRACTORS SERIES 700
 TWO-WHEEL TRACTORS SERIES 700 What is a two-wheel tractor? It's a self moving engine with a power take-off for connecting several tools and accessories. In the power take-off you can connect mainly: Rotary
Model No. LG55-3PT 55 Gallon Sprayer 3 Point Lawn & Garden Sprayer Model No. LG27-3PT 25 Gallon Sprayer GENERAL INFORMATION
 5300587 Model No. LG27-3PT 25 Gallon Sprayer 5300576 Model No. LG55-3PT 55 Gallon Sprayer 3 Point Lawn & Garden Sprayer Join the center boom to the carrier frame with the two u-bolts, and flange locknuts.
Finishing Mower Estate 72
 Finishing Mower Estate 72 Owners/Operators Manual & Spare Parts List Issue Date: October 2011 1 Introduction Your FIELDMASTER Estate 72 Finishing Mower has been designed to do a range of work to your satisfaction.
Grain Augers Grain Cleaners Roller Mills Hammer Mills GRAIN HANDLING
 Grain Augers Grain Cleaners Roller Mills Hammer Mills GRAIN HANDLING Farm King Grain Handling: grain augers, grain cleaners, roller mill and hammer mill ISO 9001:2015 CERTIFIED FARM KING PRODUCT LINE-UP
Post Hole Digger. Operation Manual MODEL
 Post Hole Digger MODEL 107798 Operation Manual This safety alert symbol identifies important safety messages in this manual. Failure to follow this important safety information may result in serious injury
PROSEM P PROSEM K OPERATING MANUAL MAINTENANCE ADJUSTMENTS DOSAGE. Please read carefully prior to operation.
 PROSEM P PROSEM K OPERATING MANUAL MAINTENANCE ADJUSTMENTS DOSAGE Please read carefully prior to operation. Seed Drills and Fertilizer Spreaders SOLÁ are produced in a factory particularly specialized
DEERE-ORTHMAN DR SERIES PLANTERS
 DR PlanterS DEERE-ORTHMAN DR SERIES PLANTERS All-New Max Emerge TM 5 Row Units For real planting performance, follow the leader in stacking technology. With features like an improved doubles eliminator,
DOUBLE SPINNER SPREADER
 DOUBLE SPINNER SPREADER Operation, Service & Parts Manual For Model RE1000 Form: RE1000Spreader June 2011 SECTION TABLE OF CONTENTS DESCRIPTION...PAGE 1 Introduction...1 2 Preparation Checklist...2 3 Important
Field Operation. All Plant Drill Opener and Tool Bar Adjustments. Leveling the Drill. Recommended Operating Speed. Recommended Adjustment Procedure
 Field Operation Recommended Operating Speed Operating speeds of 4-7 mph will provide optimum results from your Min-Till and All Plant drill. Conventional field conditions can warrant speeds in the upper
HANDLING BIG BALES SAFELY
 HANDLING BIG BALES SAFELY PRE-HARVEST PRECAUTIONS Those big round bales weigh 1,000 to 2,000 pounds. Developing safety awareness begins with the operator's manual. Take time to read through it when the
ARTICULATED LOADERS
 ARTICULATED LOADERS 106 306 406 506 IN THE BEGINNING What began in the 19th century as an agricultural implement manufacturer has grown into a 21st century compact equipment powerhouse Mustang Compact
OWNERS MANUAL. Model No LB. TOW BROADCAST SPREADER. CAUTION: Read Rules for Safe Operation and Instructions Carefully
 OWNERS MANUAL APPLICATION TIPS xxxxxxxxxxxxxxxxxxxxxxxxxxxxxxxxxxxxx xxxxxxxxxxxxxxxxxxxxxxxxxxxxxxxxxxxxxxxxxx xxxxxxxxxxxxxxxxxxxxxxxxxxxxxxxxxxxxxxxxxxx xxxxxxxxxxxxxxxxxxxxxxxxxxxxxxxxxxxxxxxxx xxxxx
Lightning Fast Unloading Built on a Tradition of Value!
 PARKER CORNER-AUGER GRAIN CARTS Lightning Fast Unloading Built on a Tradition of Value! Farmers have relied on Parker products to meet their grain handling needs for over 50 years. The latest generation
Installation Instructions
 86-89 Suzuki Samurai Pedal Rebuild Kit SKU# SIB-PRB! Instructions also includes clutch adjustment procedures. Installation Instructions W e a l s o s u p p l y replacement peddle pads. Click HERE for more
Evaluation Report 684
 Alberta Farm Machinery Research Centre Printed: September, 1992 Tested at: Lethbridge ISSN 0383-3445 Group 9 (c) Evaluation Report 684 Morris 6130 Air Seeder A Co-operative Program Between ALBERTA FARM
Post Hole Diggers Compact Standard Heavy Duty
 Post Hole Diggers Compact Standard Heavy Duty MODEL 90 / MODEL 100 / MODEL 110 # 100623 # 100498 # 100624 Operation Manual This safety alert symbol identifies important safety messages in this manual.
Walker Loader Bucket OPERATOR S AND PARTS MANUAL
 Walker Loader Bucket OPERATOR S AND PARTS MANUAL Please Read and Save These Instructions For Safety, Read all Safety and Operation Instructions Prior To Operating Machine P/N 6690 TABLE OF CONTENTS Introduction
Manufacturing, Inc.
 Table of Contents Appendix Manufacturing, Inc. www.greatplainsmfg.com Seed, Fertilizer and Treatment Rate Charts for Model YP1630F Planters The following pages are to assist in the proper setting of seeding
TULIP MULTIDISC - Australia Disc Harrow
 - Australia Disc Harrow www.lely.com innovators in agriculture Tulip Multidisc Standard The Tulip Multidisc standard series feature 510mm diameter discs and an 800mm clearance between the two disc gangs
Sync-Row for MONOSEM Twin-Row. Setting the Twin-Row Stagger INSURE THESE VALUES ARE CORRECT FOR YOUR TWIN ROW PLANTER
 Sync-Row for MONOSEM Twin-Row TIMING CHART 30" ROW SPACING Chart for Adjustable Metering Sprocket INSURE THESE VALUES ARE CORRECT FOR YOUR TWIN ROW PLANTER Crop Corn Number of Seed Disk Cells (holes) 18
LARGE ROTARY CUTTERS
 LARGE ROTARY CUTTERS FX742 FX530 5026 FX520 FX318 World Class Built to Last schulte.ca FX742 Rotary Cutter World s Largest Rotary Cutter at 42 wide (12.8m) The FX742 s 42 (12.8m) cutting width makes those
OWNERS MANUAL. Model No LB. PUSH BROADCAST SPREADER. Assembly Operation Maintenance Repair Parts
 OWNERS MANUAL Model No. 45-02102-101 SHIELD UP - 8 TO 18 FT. SPREAD WIDTH SHIELD DOWN - 3 TO 4 FT. SPREAD WIDTH 125 LB. PUSH BROADCAST SPREADER CAUTION: Read Rules for Safe Operation and Instructions Carefully
Harrow Option Item Part No. Description Item Part No. Description
 Harrow Option Item Part No. Description 1 959288 Bolt Plate 2 334458 HHCS 1/2" x 6" Gr 5 330142 Lock washer ½" 330134 Hex nut ½" 3 959254 Harrow Arm Mount 4 151050 Bushing 5 336321 HHCS 5/8" x 2 1/4" Gr
Breviglieri Product Guide
 Breviglieri Product Guide QUALITY INNOVATION RELIABILITY silvan.com.au Rotary Hoe CHOOSING THE RIGHT ROTARY HOE Silvan s Brevi range offers features that will individualise a rotary hoe to your specific
2004 Tractor Operation Exam Kansas Hazardous Occupation Training
 Student Name: Date: 2004 Tractor Operation Exam Kansas Hazardous Occupation Training Instructor: A passing score of 75% is recommended for the written exam. Instructions: Place your name and today s date
Rotavator. Rotavator. R500, R600 and R700. Moving agriculture ahead
 Rotavator Rotavator R500, R600 and R700 Moving agriculture ahead Rotavator - Highly effective for optimal tillage Rotavator 500B-230M. Adjustable CE protections. Easy adaptation for front wheels, track
THANK YOU FOR PURCHASING THIS PRODUCT
 Hardware Kit Middle Buster, Sub Soiler, 80900200 Combo SC Middle Buster & Sub Soiler THANK YOU FOR PURCHASING THIS PRODUCT Congratulations on your purchase. Behlen Country has been in the business of providing
365 & 450 Model Grain Wagons
 365 & 450 Model Grain Wagons Features 30 side slope and 40 end slope on the gravity box. Heavy duty bracing on slant side of box and rigid internal box reinforcing braces. Rocking bolster is standard on
Operator s Manual. Go Galvanized! YOU'RE ALWAYS AHEAD...WITH A MODERN BEHIND.
 SUMMER 2008 C2 tilting grader blade Operator s Manual YOU'RE ALWAYS AHEAD...WITH A MODERN BEHIND. 003-5336 003-5342 003-5531 003-5544 P.O. Box 790 Beaumont, Tx 77704 409.833.2665 1.800.231.8198 Fax: 409.726.8333
OPERATOR S MANUAL PARTS IDENTIFICATION _REV_F 11/2016 YETTER MANUFACTURING CO. FOUNDED 1930
 2920-012 DISC SEALER 12 SMOOTH 2920-015 DISC SEALER 13 RESIDUE WHEEL 2920-016 DISC SEALER 16 SMOOTH 2920-016-N DISC SEALER NOTCHED 2920-016-ST DISC SEALER SHARK TOOTH 2920-021 DISC SEALER FOR 2995/2996
O:\Manuals\ MANUAL\ Slicer Seeder P.W doc - 1 -
 O:\Manuals\355. 2000 MANUAL\355...2000 Slicer Seeder P.W. 10.16.2009.doc - 1 - TABLE OF CONTENTS MODEL 355/2000 SLICER SEEDER COVER & TABLE OF CONTENTS....Pages 1 2 STATEMENT OF FACT.... Page 3 SPECIFICATIONS
2016 Quick Reference Guide S67/S68/S96 S77/S78/S97 S88/S98 Models
 2016 Quick Reference Guide S67/S68/S96 S77/S78/S97 S88/S98 Models It is YOUR responsibility to read and understand the safety section in your Operator s Manual and the manual for all attachments before
FURROW PRESSES VARIOPACK FIXPACK FLEXPACK
 FURROW PRESSES VARIOPACK FIXPACK FLEXPACK 2 Ploughing with furrow presses? Ploughing loosens and crumbles the soil, and at the same time, increases its pore volume. This introduces air and warmth into