IT S NOT ROCKET SCIENCE
|
|
|
- Audra Collins
- 5 years ago
- Views:
Transcription
1 IT S NOT ROCKET SCIENCE It s 100% Pure Fun! The complete guide to Air powered model Rockets plus more! What middle school students love to do! By Jess Heller Technology instructor Jackson Middle School Titusville, Florida hellerj@brevard.k12.fl.us 1
2 This manual is intended to be a starting point that will open the doors to endless possibilities only limited by your imagination. The grade level is targeted to middle school students but can be adapted for High School students. Not every detail is included in this manual. I left room for adjustments due to substitution of parts and the availability of supplies. Overview: Students construct paper rockets and launch them with an air pressure rocket launcher. Using simple sighting devices and basic trigonometry and algebra, the altitude the rockets reach can be determined. National Education Standards Science Unifying Concepts Change, constancy, and measurement Physical Sciences Motions and Forces Transfer of energy Science and Technology Abilities of technological design Mathematics Patterns, functions, and algebra Geometry and Spatial Sense Measurement Data analysis, statistics, and probability Technology Education Design Engineering design Troubleshooting, R&D, invention, Innovation and experimentation Abilities for a Technological World Apply the design process The Designed World Energy and power technologies Transportation technologies Manufacturing technologies Construction techniques 2
3 Part 1 Part 2 Part 3 Construction of the rocket launcher. (Air canon) Construction of a paper rocket. Construction of various projects that can be launched. The first rocket launcher is the simplest to construct and least expensive. It s completely manual, but it can be altered to a more advanced version at a later time. The main unit is made out of PVC pipe. The parts can be purchase at any home center. Mine were bought at Lowe s. Some parts were bought at Wal-Mart. LAUNCHER PARTS LIST ITEM NUMBER DESCRIPTION LOWE'S ITEM NUMBER WAL-MART UPC NUMBER PRICE TOTAL 1 1 1/2 in Schedule 40 PVC - 5 ft $0.78 $ in Schedule 40 PVC - 5 ft $3.74 $ /2 in male adapter PVC $0.18 $ /2 in Street EL 90 deg. PVC $0.48 $ in Cap PVC $0.88 $ in Tee PVC $1.34 $ in Coupling PVC $0.71 $ x 1/2 in Bushing Reducer- PVC $0.76 $ /2 in Union $1.68 $ /2 in Threaded Ball Valve $ in Dial Gauge (0-160 psi) 1/4 in NPT 3914 $8.75 $ Bicycle Pump $6.96 $ Tubeless Tire Schrader Valve $1.97 $1.97 GRAND TOTAL $34.35* *Please note that prices may change. The PVC parts are fitted together and cemented with PVC cement. The threaded pieces should be wrapped with 3 layers of Teflon tape. These items can be bought at any home supply store. *If the air pump you are using has a pressure gauge do not buy and install another one for the launcher. 3
4 Materials needed to build a paper rocket and launch 8 1/2 X 11 Colored Cardstock Cellophane Tape Scissors Ruler Pencil Rocket forms ½ PVC appox. 12 long Launcher Electric air compressor or hand pump w/locking air chuck Safety glasses for launch Optional: Duct tape Markers Altitude tracker 4

5 5
6 6
7 7
8 Rocket Construction Use the instruction sheet for constructing the paper rockets. Have your students roll paper around the 1/2" PVC tube. The tubes serve as forms for constructing the rockets. For best performance, the paper should be snug on the form but able to slide easily. Make sure students firmly attach the fins and nose cone for their rockets. Poorly attached nose cones will blow off the rocket, leaving the rocket behind. Poorly made rocket bodies may explode into confetti while on the launch pad. Tips for making rockets: Do not wrap the paper around the ½ PVC too tight. The rocket launcher is the same diameter and has to move off freely. One end of the rocket needs to be closed off completely so no air escapes when you blow through the tube. (Duct tape can be used for this job) Leave in PVC tube in throughout all the steps to avoid rocket tube from collapsing. Especially when putting the fins on. This project usually takes 2 days including decorating. Don t rush! Decorating and customizing the rocket with colored markers, pens or pencils can be fun. Don t forget to have students put their names and class on the rocket. 8
9 Launch Procedures Follow the instructions for constructing paper rockets. When the rockets are ready, follow these instructions for the launch. 1. Select a clear field for the launch. Although the rockets are made of paper, they can still cause injury if someone is struck by them. 2. Connect the air compressor or hand pump to the tire valve on the launcher. Put on safety glasses. With the valve closed, pump the launcher up to 60 pounds of pressure. DO NOT LET STUDENTS PUMP OVER 60 POUNDS. 3. Set up the launcher and orient the base so that the launch tube is between 30 and 45. This launch will go for distance. Set up the launcher and orient the base so that the launch tube is set between 70 and 80. This launch will go for height. NEVER LAUNCH AT 90 (Straight up). To practice safety and to be fair, have students get their launched rockets after the last student has gone. 4. Load the rocket on the launch rod. Clear the landing, site from bystanders 5. Perform a count down. If you will be determining how high the rocket flies, this lets trackers know when the rocket is about to launch. 6. Make adjustments to the aiming as students launch their rockets. 7. Launch all the rockets before you allow the students to retrieve them. Tips: To make it easier to slip rockets on to the launch tube, use a file or sandpaper to taper the upper end of the launch tube. Some teachers have reported better flight performance with low-pressure launches than with high-pressure launches. Aerodynamic drag on the rocket increases with velocity. At higher initial velocities, rocket fins may be distorted, leading to even greater drag and diminished performance. 9
10 SAFETY TIPS 1) Always launch in a flat area, free of trees, bushes, electrical lines and low flying aircraft. The bigger the area, the easier it is to recover your rockets. Fly only on clear days with little or no wind. 2) Before launching, pay attention to the direction of the breeze (if any) and place your launcher so that, even if the wind carries the rocket 10 or 15 meters (30 to 45 feet) away, it should still land in a clear area. Always launch in a vertical direction - never tilt the launcher. 3) Do not pump the launcher up to a pressure greater than ½ the rated pressure of the weakest part. The PVC pipes and the valve come with pressure ratings. If the lowest rating is 150 psi, do not pressurize the launcher greater than 75 psi. This provides a significant safety margin. 4) Be careful in handling the launcher. PVC can crack if dropped or stuck with sufficient force. Inspect the launcher before use. Discard a launcher that shows signs of cracking. 5) Do not lean over the launch rod at any time 6) Do not place anything inside the launch tube. 10
 Supplies needed: Colored 8 ½ X 11 paper (I use #20 fluorescent color paper).")
11 ANOTHER ROCKET I like to introduce paper rockets to students with the construction of an indoor rocket first. This rocket is thinner and is launched inside. The launcher needs an adapter to fit a thinner rocket. (See next page) Supplies needed: Colored 8 ½ X 11 paper (I use #20 fluorescent color paper). Cellophane Tape Scissors Ruler Pencil Rocket forms 7/16 Wood dowel appox. 12 long Rocket Construction: This rocket is made the same way as the bigger rocket is make except for: The colored paper is cut in half to produce 2 4 ¼ X 11 sheets. (One half sheet per rocket) The paper is rolled tightly and taped in the same manner at the larger rocket. No separate nose cone is needed. The tip is flattened and the sides are folded in to form a point and taped closed. Make sure no air escapes when you blow through. 11

.")
12 Parts list for the adapter to launch small rockets 1/2 Coupling - PVC 1/2 Union - PVC 1/2 PVC 2 1/2 Street EL 90 - PVC 3/8 X 15 plastic water supply line Construction of the adapter Place the coupler over the water supply line. Cement the 2 long PVC X 1/2 PVC pipe to the coupler locking the water supply line in between. (You my have to sand or file the end of the water supply line down so it can fit sandwiched between the pipe and the coupler). Cement ½ Street EL 90 to the other end of the 2 long X 1/2 PVC pipe. Cement the larger side of the union onto the1/2 Street EL 90 - PVC 12
13 Suggested Launches for Indoor Rockets Two days can be used launching. 1. Setup a box across the room and have students try to lob their rockets into it. Start with 15 lbs of air pressure. 2. Setup a 2 table and place a small waste basket on its side with the open end facing the launcher. A bull s-eye can be placed inside for a visual effect. Start with 20 lbs of air pressure. Place the launcher on the other table. 13
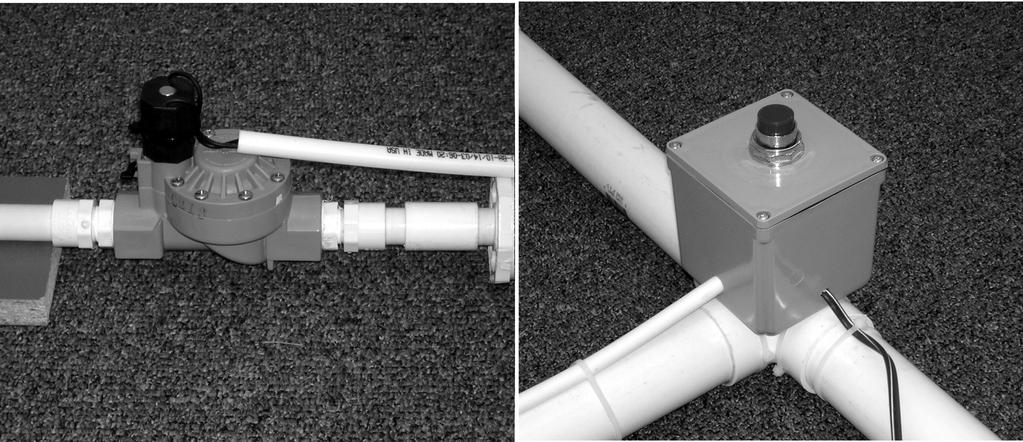
14 Improving the Launcher Instead of using the ball valve with its awkward handle, a solenoid and button can take its place. It s easier to use and give the user a equal burst of air. Students love the ease of operation and it s fun too. In order to bring your launcher up another notch you will have more work along with added cost. Make sure it is worth your wild. A new launcher can be built or modifying your existing one. Supply list for modifying a manual Launcher ITEM NUMBER DESCRIPTION LOWE'S ITEM RADIO SHACK PRICE TOTAL NUMBER NUMBER 1 1 In-Line Irrigation Valve $11.41 $ /2 in Union $1.68 $ /4 X 1/2 MXF Bushing PVC $0.53 $ Pex Pipe 3/8 X $1.78 $ X4X4 electrical box $8.71 $ Transformer $6.96 $ Door bell Button* $3.97 $ /2 in Street EL 90 deg. PVC $0.48 $0.96 In addition to the above you will also need 3 large tie raps, wire nuts, screws, nuts, 90+ inches of lamp cord and plug, electrical tape. * The button called out for is a door bell button. I larger button is preferred. (Like illustrated) It can get costly and the home centers do not carry them. Check with Granger or electrical hardware supplier and look for a momentary button. 14

15 15

16 16
17 17

18 Duel Rocket Launcher Two rockets can be launched simultaneously with the construction of another adapter. A new union can be use or it can be screwed directly into the valve without a union. Parts needed for a Duel Launcher. ½ PVC 1- ½ Tee 2- ½ ½ ½ male adapter Rockets do not go as far when launched together. The air is equally divided to both rockets. 18
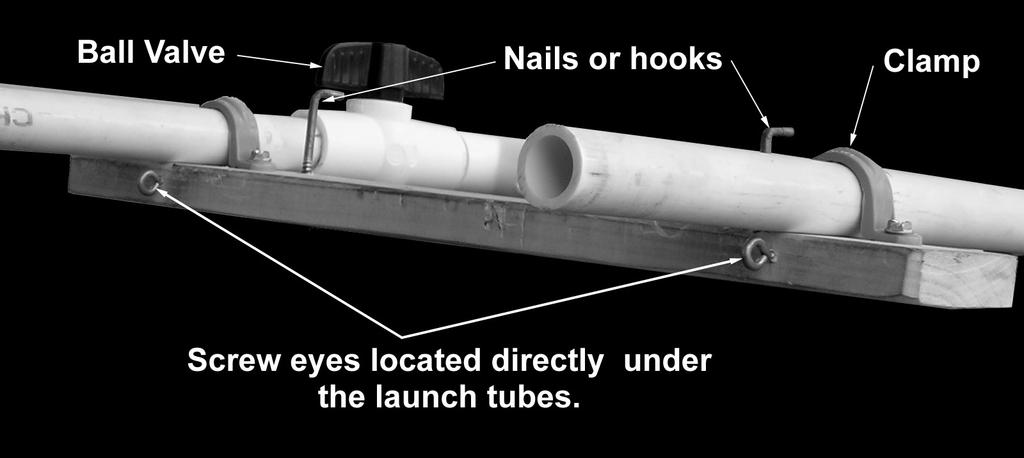
19 Rocket Cars Another use for the rocket launcher takes us out of the sky and down to the ground. This is a type of Co2 car without the Co2 cartridge and launchers. Co2 car launchers are expensive to run and some fail at times. Students that want to launch again and failed launches can get expensive. With this system cars can be launched over and over again at no cost. Students will need access to woodworking equipment and or hand tools. The set up and construction requires a launch end and a receiving end connected by two rows of 50 lb. fishing line. Supply list for modifying a manual Launcher ITEM NUMBER DESCRIPTION LOWE'S ITEM PRICE TOTAL NUMBER 1 1 1/2 in Union $1.68 $ /2 in TEE $.18 $ /2 in ELL $.16 $ /2 in Street EL 90 deg. PVC $0.48 $ /2 in Ball Valve $1.93 $ in X 14 in. Plywood in X 2 X X 3 X 1/2 wood In addition to the above you will also need white glue, screw eyes, nails, ½ PVC clamps, 50# fishing line and #4 leader sleeves. 19

20 Launch End 20

21 Receiving End 21

22 Constructing the Car The car is limited by the tools and equipment available. It starts off with a 6 or 7 block of 2 X 4 (can be longer of you choose). The wheels, axles and screw eyes are purchased from Pitsco. A catalog can be ordered from or There are many wheels styles to choose from. Make sure you order axles and 2 screw eyes for every car. Once you draw a plan, build a prototype. After your car launcher is built, you can then locate the height of the rear hole. Make sure you do this with the wheel on the car flat on the ground. The size of the hole is 7/8 and is best made on the drill press in a vice with a spade bit. The depth of the hole is determined by the location of the rear wheel axle. The car will launch with a 1 deep hole but will go faster with a deeper hole. Two screw eyes are installed on the bottom of the car along the center line. They are needed to guide the car straight down the track. 22

23 Setting up the launcher and launching the car Set up the launcher and approximately 60 away place the wooden receiving end. Make a 1 loop at the end of the fishing line and thread on a leader sleeve as shown. The leader sleeve can be clamped in place with pliers or hammered closed. Thread the looped end through the front of hole C on the wooden receiver. (See illustration) Continue threading the loop through the backside of the other hole C heading back to the launcher. Hook the loop onto the launcher and even up the fishing line. Cut the fishing line back at the launcher. You should have approximately 120 of fishing line exposed. Make another loop using a leader sleeve and hook onto the launcher. Thread one loop through the front screw eye on the bottom of car from front to back. Continue threading through second screw eye. Thread through B screw eye from outside to inside on the launcher. (See illustration) Hook on nail A Repeat for other side. Note: If one car is to be launched, shut the ball valve and use the opposite side. 23
24 Place a rolled up towel on the floor in front of the receiver to protect cars from hitting the front of the receiver. While placing cars on the track you should have slack in the line. Once attached and ready for launch, have a student stand or kneel on the receiver and tighten the lines. The tighter the lines are pulled the better the cars will run. IMPORTANT: NO MORE THE 70 LBS OF AIR SHOULD BE USED. If cars fall on their sides after launching, have a student place one foot on the wooden part of the launcher. After launch, the lines should still be pulled tight and the cars sent back to the launcher. 24
Rocket Activity Advanced High- Power Paper Rockets
 Rocket Activity Advanced High- Power Paper Rockets Objective Design and construct advanced high-power paper rockets for specific flight missions. National Science Content Standards Unifying Concepts and
StratoLauncher IV Assembly Instructions
 Tools required for assembly and items needed to launch rocket: An adjustable wrench (or a 14mm wrench), 4mm & 5mm hex wrench, and Phillips head screwdriver. A plastic (PET*) soda bottle, nose cone, water,
StratoLauncher IV Ultimate Assembly Instructions [launch video:
 StratoLauncher IV Ultimate Assembly Instructions [launch video: https://youtu.be/uebmkyz07zq] Tools required for assembly and items needed to launch rocket: An adjustable wrench, 14mm wrench, 4mm & 5mm
Stomp Rockets. Flight aboard the USS Hornet. From the USS Hornet Museum Education Department. Sue Renner and Alissa Doyle (rev.
 Stomp Rockets Flight aboard the USS Hornet From the USS Hornet Museum Education Department Sue Renner and Alissa Doyle (rev. May 2018) Alissa.Doyle@uss-hornet.org USS Hornet Museum Education Department
Air Pressure Rocket Launcher
 Air Pressure Rocket Launcher (Adapted from the NASA Aerospace Education Services Program s lesson Industrial Strength Paper Rockets by Gregory Voght/ NASA JSC) This launcher is used in conjunction with
FLYING MODEL ROCKET KIT INSTRUCTIONS KEEP FOR FUTURE REFERENCE. TEST-FIT ALL PARTS TOGETHER BEFORE APPLYING ANY GLUE!
 www.estesrockets.com ESTES INDUSTRIES 1295 H Street Penrose, CO 81240 PRINTED IN CHINA EST 1247/2053 FLYING MODEL ROCKET KIT INSTRUCTIONS KEEP FOR FUTURE REFERENCE. ASSEMBLY TIP: Read all instructions
E Physics: A. Newton s Three Laws of Motion Activity: Rocketry Appendix A: Straw Rocket
 Appendix A Note: Do not begin this appendix until you have reached step 7 of the parent lesson, Rocketry. Note: This lesson contains two launch options: Launch Option 1 uses a less formal analysis of launch
Wind Tunnel User Guide V0814
 Airtech X-Stream Wind Tunnel User Guide 57889 V0814 The Airtech X-Stream Wind Tunnel by Pitsco features adjustable speed and runs quietly. Quality-made and designed for accuracy, the versatile X-Stream
Skill Level 3 Average Skills Needed. Skill Level 3. Ibis Parts List
 Kit #05152 Skill Level 3 Made In USA Ibis Parts List Item # Item Name Qty 10076 AT- 18/3.5" LC - Engine Mount Tube 1 10123 AT- 33/6.5" LC - Body Tube 1 10124 AT- 33/18" LC - Body Tube 1 13029 CR- 13/18
Regents Physics Summer Assignment. Physics: Balloon Car Lab
 Regents Physics Summer Assignment Name: Physics: Balloon Car Lab A rocket is simply a chamber filled with pressurized gas. A small opening called a nozzle allows the air to escape, causing thrust that
Blast Off!! Name. Partner. Bell
 Blast Off!! Name Partner Bell During the next two days, you will be constructing a rocket and launching it in order to investigate trigonometry. The lab will be divided into two parts. During the first
MR-1. Please read and understand all instructions before building!
 MR-1 This kit contains all the parts necessary* to build a flying high power rocket: (1) Pre-slotted main airframe (1) Nose cone with strap (3) Fins (1) Transition (1) Airframe section 1 long (1) Piston
POW WOW Rocket Fun
 POW WOW 2004 - Rocket Fun Class Outline I. Introduction (5') - Distribute Handouts - Sign-in Sheet - Brief history of Rockets Date: January 24, 2004 Course Session: Sessions 1, 4 II. Rocket Principles
Bumble Bee. Please read and understand all instructions before building!
 Bumble Bee The Bumble Bee kit contains all the parts necessary* to build a flying high power rocket: (1) Pre-slotted main airframe (1) Recovery tube (1) Nose cone (3) Fins (1) Piston ejection kit: (1)
t!z ESFE~ PARTS AND SUPPLIES ROCKET ASSEMBLY 1. FLYING MODEL ROCKET #2054 .~. 1111l~i '~~
 t!z ESFE~ ESTES INDUSTRIES 1295 H Street Penrose, CO 81240 USA ASSEMBLY TIP BETA LAUNCH FLYING MODEL ROCKET #2054 VEHICLETM Read all instructions before beginning work on your model. Make sure you have
Rocket Races. Rocket Activity. Objective Students investigate Newton s third law of motion by designing and constructing rocketpowered
 Rocket Activity Rocket Races Objective Students investigate Newton s third law of motion by designing and constructing rocketpowered racing cars. National Science Content Standards Unifying Concepts and
Bruce s Science workbench
 Baby Vandegraff Generator by Bruce Yeany 2001 https://www.youtube.com/watch?v=parq01q DKe4 http://www.instructables.com/id/van-de- Graaff-Electrostatic-High-Voltage- Generator/ https://www.youtube.com/watch?v=esz
HOW TO MAKE YOUR OWN BATTERIES
 HOW TO MAKE YOUR OWN BATTERIES 1 Page TABLE OF CONTENTS Introduction....3 Usage....4 Aluminum Can Batteries/Cells....8 A Long Lasting, Yet Powerful Battery....10 PVC Pipe Batteries...13 Lab Notes....17
Skill Level 3 Average Skills Needed. Made In USA. Kit #04997 Skill Level 4. Zephyr Parts List
 Kit #04997 Skill Level 4 Made In USA Zephyr Parts List Item # Item Name Qty 10137 Engine Mount Tube (AT-38/11) 1 10218 Airframe Body Tube (AT-98/18) 4" Thick Wall 1 10219 Airframe Body Tube (AT-98/18)
SUPPLIES In addition to the parts included in the kit you will also need: ASSEMBLY TIP FLYING MODEL ROCKET KIT INSTRUCTIONS EST 2055/1246
 FLYING MODEL ROCKET KIT INSTRUCTIONS www.estesrockets.com Estes Industries 1295 H Street Penrose, CO 81240 PRINTED IN CHINA MOUNT Keep for Future Reference EST 2055/1246 ASSEMBLY TIP Read all instructions
Fly Rocket Fly: Design Lab Report. The J Crispy and The Airbus A
 Fly Rocket Fly: Design Lab Report The J Crispy and The Airbus A380 800 Rockets: Test 1 Overall Question: How can you design a water, bottle rocket to make it fly a maximum distance. It needs to be made
Magnetic MTV Kit. User Guide. Components
 Magnetic MTV Kit User Guide Components The Magnetic MTV Kit should contain the following items. If anything is missing, call Customer Service at 800-358-4983. Two 3" x 18" sheets of 1/4" balsa wood Mousetrap
LPE C5 Battery Relocation Kit
 LPE C5 Battery Relocation Kit The LPE C5 Corvette battery relocation kit improves vehicle weight distribution by moving weight to the rear of the vehicle. The improved weight distribution increases traction
LaserHawk Flying Model Rocket Instructions Designed by Matt Steele
 VEHICLE DATA SHEET Physical Data North Coast Rocketry LaserHawk Flying Model Rocket Instructions Designed by Matt Steele Parameter Dimension Length Diameter 57 (145 cm) 2.64 (6.7 cm) Weight (w/o chute)
Maintenance Information
 16572679 Edition 2 May 2014 Air Drill QP Series Maintenance Information Save These Instructions Product Safety Information WARNING Failure to observe the following warnings, and to avoid these potentially
ADVANCED MODEL ROCKET
 ADVANCED MODEL ROCKET Assembly and Operation Instructions Division of RCS Rocket Components, Inc. BEFORE YOU BEGIN: COMPLETED BARRACUDA ADVANCED MODEL ROCKET 19920-3092 Rev. 8/12/04 Study the illustrations
MiG-29 Retract Kit (for the HET-RC Mini Air Retract System)
") MiG-29 Retract Kit (for the HET-RC Mini Air Retract System) The MiG-29 Retract Kit was designed to allow the easy installation of the HET-RC mini Air Retract system into the twin EDF MiG-29. We recommend
MiG-29 Retract Kit (for the HET-RC Mini Air Retract System) The MiG-29 Retract Kit was designed to allow the easy installation of the HET-RC mini Air Retract system into the twin EDF MiG-29. We recommend
How to build a Hydraulic Ram Pump By Seth Johnson Land To House Version 1.1
 Seth Johnson How to build a Hydraulic Ram Pump By Seth Johnson Land To House Version 1.1 History: A man named John Whitehurst first created the Hydraulic Ram Pump in 1772. That means that this ingenious
SunFlower Helicopter Rocket LUNAR Build Session: 9/25/08 By Tom Desmarais
 SunFlower Helicopter Rocket LUNAR Build Session: 9/25/08 By Tom Desmarais Contents of Kit: A. 3 1/16 x1 x11 basswood rotors B. 3 1/16 x2 x2 basswood fins C. 3 1/16 x5/16 x1/2 basswood hold spacer D. 3
Part# JL AIR IT UP 4 Tire On Board Air Delivery System. (Requires External Air Source)
") Part# 18-1819 JL AIR IT UP 4 Tire On Board Air Delivery System (Requires External Air Source) The most up-to-date instructions always visit www.updownair.com www.updownair.com 833-226-4863 I M P O R T
Part# 18-1819 JL AIR IT UP 4 Tire On Board Air Delivery System (Requires External Air Source) The most up-to-date instructions always visit www.updownair.com www.updownair.com 833-226-4863 I M P O R T
Re-Energy.ca - Solar Electricity - Build Your Own Solar Car
 Backgrounder Build Your Own Solar Car Back to Page 1 Build It! These step-by-step instructions provide you with a plan for making a basic solar car. If you can think of ways to improve the design of your
COMPLETED SUMO LEVEL 1 MODEL ROCKET ADVANCED HIGH POWER MODEL ROCKET ASSEMBLY AND OPERATION INSTRUCTIONS BEFORE YOU BEGIN:
 COMPLETED SUMO LEVEL 1 MODEL ROCKET ADVANCED HIGH POWER MODEL ROCKET ASSEMBLY AND OPERATION INSTRUCTIONS BEFORE YOU BEGIN: Study the illustrations and sequence of assembly. The sequence of assembly is
COMPLETED MIRAGE ADVANCED MODEL ROCKET
 Division of RCS Rocket Components, Inc. BEFORE YOU BEGIN: Study the illustrations and sequence of assembly. The sequence of assembly is important. Review the parts list and become familiar with all parts
Installation Instructions Table of Contents
 Installation Instructions Table of Contents Pre- Installation of Garage Storage Lift 2 Layout the Garage Storage Lift 3 Installing the strut Channels 3 Install the Drive Assembly 5 Install the Drive Shaft
INSTALLATION INSTRUCTIONS
 INSTALLATION INSTRUCTIONS Part# 69-0717 AIR IT UP 4 Tire On Board Installed Air Delivery System with Rear Mounted Controller (Requires External Air Source) For the most up-to-date instructions please visit
OREGON PIONEER 15 OWNER S MANUAL
 OREGON PIONEER 15 OWNER S MANUAL SURVEYORS EXCHANGE COMPANY GEOLASER 3323 DeArmoun Road Anchorage, AK 99516 Phone: 1-507-629-3758 Cell: 1-507-828-0503 www.gold-rus.com INTRODUCTION This manual covers the
Strap-on Booster Pods
 Strap-on Booster Pods Strap-On Booster Parts List Kit #17052 P/N Description Qty 10105 AT-24/12 Slotted (Laser Cut) Tube 2 10068 Engine Mount (AT-18/2.75) Tube 2 13029 CR 13/18 2 13031 CR 18/24 4 14352
Science Day CO 2 Dragster
 Science Day CO 2 Dragster : Introduction Automobile performance can be a measure of many things. It can include acceleration, braking, cornering, fuel economy and top speed. Two design parameters that
DEMOUNTING AND MOUNTING PROCEDURES FOR TRUCK/BUS TIRES
 DEMOUNTING AND MOUNTING PROCEDURES FOR TRUCK/BUS TIRES WARNING TIRE AND WHEEL SERVICING CAN BE DANGEROUS AND MUST BE DONE ONLY BY TRAINED PERSONNEL USING PROPER PROCEDURES AND TOOLS. FAILURE TO READ AND
F3D-30 ARF ASSEMBLY MANUAL
 F3D-30 ARF ASSEMBLY MANUAL This Manuel is the sole property of Kangke Industrial USA, Inc. Reproducing any part without the consent of Kangke Industrial USA, Inc. is a lawful violation. Kangke Industrial
A B C D E F. Tools Required (supplied by others)
") Page 1 of 17 Parts List Below Deck Automatic Retractable Security Cover Kit (1) Tube End Bearing Plate (A) (1) Rope Reel and Cover Drum Motor Assembly (B) (1) Cover Drum (1) Pulley Support Channel (2)
Page 1 of 17 Parts List Below Deck Automatic Retractable Security Cover Kit (1) Tube End Bearing Plate (A) (1) Rope Reel and Cover Drum Motor Assembly (B) (1) Cover Drum (1) Pulley Support Channel (2)
roving on the moon Leader Notes for Grades 6 12 The Challenge Prepare ahead of time Introduce the challenge (5 minutes)
") for Grades 6 12 roving on the moon Leader Notes The Challenge Build a rubber band-powered rover that can scramble across the room. In this challenge, kids follow the engineering design process to: (1)
for Grades 6 12 roving on the moon Leader Notes The Challenge Build a rubber band-powered rover that can scramble across the room. In this challenge, kids follow the engineering design process to: (1)
a) Understand the conditions for lighting a light bulb by connecting it to batteries with wires to make it illuminate.
 Understand the conditions for lighting a light bulb by connecting it to batteries with wires to make it illuminate.") This area deals with simple electric circuits and electromagnets. In this area, students learn about electricity for the first time and build an electromagnet and a simple circuit to compare the brightness
This area deals with simple electric circuits and electromagnets. In this area, students learn about electricity for the first time and build an electromagnet and a simple circuit to compare the brightness
J & D Machine / Hyperdrive / MSA 3711 Moon Bend Rd. Chapel Hill, TN 37034
 J & D Machine / Hyperdrive / MSA 3711 Moon Bend Rd. Chapel Hill, TN 37034 www.hyperdriveracing.com 1 You now own a state of the art 1/10 scale oval race car. The Hyperdrive Assault has gone through months
INSTALLATION INSTRUCTIONS
 INSTALLATION INSTRUCTIONS Part# 22-7810 Add On Kit for Your ADS System Contents: Complete Install Kit for Your ARB CKMTA12V Compressor For the most up-to-date instructions please visit www.updownair.com
Replacing MK4 Golf/Jetta radiator mounts in-car
 Replacing MK4 Golf/Jetta radiator mounts in-car This is a guide to replacing the radiator mounts in a MK4 Golf/Jetta. This involves moving the core support to the service position which allows you to do
Circuit Training. A Selection of Simple, Fun Electronic Projects using the Electricity Box provided with the Heather's Hut project
 Circuit Training A Selection of Simple, Fun Electronic Projects using the Electricity Box provided with the Heather's Hut project Contents Introduction... 3 Notes...3 1. Steady Hand Game... 5 2. Light
Elite Skimmer Installation Manual. Manufacturers of Quality Pond Equipment & Supplies Item #PBESIM
 Elite Skimmer Installation Manual Manufacturers of Quality Pond Equipment & Supplies Item #PBESIM A C G B F E D H I A B C D Biological Waterfall Box Filters harmful waste and toxins from water, keeping
Car. 1/4 Lane guide Track 1-5/8. Figure 1. Car and lane guides.
 1.0 Introduction Building a fast Pinewood Derby car My son s first year in scouting we set about building a Pinewood Derby car with no previous experince. We found a dizzying amount of information on the
1501 Industrial Way N., Toms River, NJ Fax: PACKING LIST INSTALLATION INSTRUCTIONS
 1/6/04 1501 Industrial Way N., Toms River, NJ 08755 732-349-2109 Fax:732-244-0867 MODERATE - Installation requires metric tools and possibly cutting and drilling. The ability to closely follow instructions
Top Down Rollstar Shade Installation Instructions
 Top Down Rollstar Shade Installation Instructions Thank you for purchasing your new Rollstar shade. It has been custom-made from the highest quality materials to the dimensions you specified. With proper
Installation Instructions
 Installation Instructions Jeep JK Unlimited (2007 Present) Mounting Bracket and Air Line System Kit for ARB On-Board Twin Air Compressor (CKMTA12) Made in the USA Kit Contents: 1 Bracket for ARB Compressor
Physics Olympics Schedule
 Physics Olympics Schedule Saturday, April 18, 2009 Time Event Location 9:00AM Registration & Refreshments Room 334, Science Building 9:30AM Welcome/Instructions Room 334, Science Building 9:45AM Morning
INSTALLATION INSTRUCTIONS
 2807 INSTALLATION INSTRUCTIONS SECTION - AIR SPRING SECTION 2 - AIR ACCESSORY -6 ! IMPORTANT PLEASE DON T HURT YOURSELF, YOUR KIT OR YOUR VEHICLE. TAKE A MINUTE TO READ THIS IMPORTANT INFORMATION. This
12 Electricity and Circuits
 12 Electricity and Circuits We use electricity for many purposes to make our tasks easier. For example, we use electricity to operate pumps that lift water from wells or from ground level to the roof top
Shown with optional GFR-1017R Body Posts. J & D Machine / Hyperdrive / MSA 3711 Moon Bend Rd. Chapel Hill, TN
 Shown with optional GFR-1017R Body Posts J & D Machine / Hyperdrive / MSA 3711 Moon Bend Rd. Chapel Hill, TN 37034 www.hyperdriveracing.com 1 You now own a state of the art 1/10 scale oval race car. The
Modular Engine 1, 2008 revision August 3, 2008
 Modular Engine 1, 2008 revision August 3, 2008 David Kerzel 2008 Back in 2002 I wanted to build a bunch of different engines without a lot of detail to learn how to build an engine, what works and what
ADVANCED MODEL ROCKET. Read And Follow All Instructions
 Division of RCS Rocket Components, Inc. Assembly and Operation Instructions BEFORE YOU BEGIN: ADVANCED MODEL ROCKET COMPLETED CHEETAH ADVANCED MODEL ROCKET 19916-3092 Rev. 8/12/04 Study the illustrations
what you need to do is hit the taper housing as hard as you can with your hammers AT THE SAME TIME and at a slight angle, what will happen is you
 first things first, get the car on axle stands and the wheels off. Open the bonnet to let more light through to the area in which you'll be working. The following guide shows the passenger side being done
E-LIFT II+ SYSTEM WITH SPRING LEVER FOR A-SERIES AND FULL FRAME LOOMS
 Congratulations on your purchase of the E-Lift II+ system. This system replaces the action of treadling, eliminating leg strain and fatigue. When you activate the Foot Switch, the motor turns, and selected
Rollstar Shade Installation Instructions
 Rollstar Shade Installation Instructions All Lifting Systems Inside or Outside Mount Thank you for purchasing your new Rollstar shade. It has been custom-made from the highest quality materials to the
INSTALLATION INSTRUCTIONS
 28 INSTALLATION INSTRUCTIONS SECTION - AIR SPRING SECTION 2 - AIR ACCESSORY 2-5 ! IMPORTANT PLEASE DON T HURT YOURSELF, YOUR KIT OR YOUR VEHICLE. TAKE A MINUTE TO READ THIS IMPORTANT INFORMATION. This
YOU MUST WEAR SAFETY GLASSES DURING EACH STEP OF THESE INSTRUCTIONS
 Machine Racer: Rally Preparation 1. Print the Working Drawing of the design you created and simulated in the Mousetrap Car 2.0 STEM Application. You can find your Working Drawing in the "Outputs" tab of
Contents. Preparing the motor Winding the rotating secondary Winding the primary... 8
 120732-130389 Propeller Clock Construction Notes Revision E, December 2, 2013 Contents Preparing the motor... 2 Winding the rotating secondary... 5 Winding the primary... 8 UltiProp Clock (Elektor Dec.
SK-50 ARF ASSEMBLY MANUAL
 SK-50 ARF ASSEMBLY MANUAL Kangke Industrial USA, Inc. 65 East Jefryn Blvd. Deer Park NY 11729 http://www.kangkeusa.com E-mail: info@kangkeusa.com Tel: 1-877-203-2377 Fax: 1-631-274-3296 Congratulations!
Instruction Manual. Wingspan : 1400mm (55.12 in) : 1370mm (53.94 in) : 2600gr gr. : 4 channel / 5 servo. : / 2 stroke_52-71 / 4 stroke
 : 1370mm (53.94 in) : 2600gr gr. : 4 channel / 5 servo. : / 2 stroke_52-71 / 4 stroke") Instruction Manual 540 Wingspan : 1400mm (55.12 in) g Length : 1370mm (53.94 in) Weight : 2600gr - 2800gr Radio : 4 channel / 5 servo Engine : 46-52 / 2 stroke_52-71 / 4 stroke KIT CONTENTS: We have organized
Instruction Manual 540 Wingspan : 1400mm (55.12 in) g Length : 1370mm (53.94 in) Weight : 2600gr - 2800gr Radio : 4 channel / 5 servo Engine : 46-52 / 2 stroke_52-71 / 4 stroke KIT CONTENTS: We have organized
JEEVES. JEEVES Installation Manual. Installation Manual The Easiest Do-It-Yourself Dumbwaiter on the Market
 1 888-323-8755 www.nwlifts.com JEEVES Installation Manual The Easiest Do-It-Yourself Dumbwaiter on the Market This manual will cover the installation procedure step-by-step. The installation of this dumbwaiter
Revision Date: Building a dual pump system for an open boat. Description:
 Disclaimer: The information is provided as-is. The author(s) accepts no liability for the accuracy, availability, suitability, reliability and usability. The following information is in the public domain
Disco 3 Clock Spring / Rotary Coupler replacement
 Disco 3 Clock Spring / Rotary Coupler replacement I recently had to change my Clock spring and thought some folks may find it helpful to see what it entailed. I did lots of reading around but couldn t
MEMO. No.4341 Specification: Wing Span: 29.1 (740mm) Length: 36.6 (930mm) 2. Warranty
 Length: 36.6 (930mm) 2. Warranty") MEMO No.4341 Specification: Wing Span: 29.1 (740mm) Length: 36.6 (930mm) 2 Wing Area: 299 sq.in. (19.29 dm ) Weight: 18.9oz. (536.5g) 2 Wing loading: 0.58 oz./sq.ft (27.8g/dm ) Motor: OBL 29/27-07A Warranty
MEMO No.4341 Specification: Wing Span: 29.1 (740mm) Length: 36.6 (930mm) 2 Wing Area: 299 sq.in. (19.29 dm ) Weight: 18.9oz. (536.5g) 2 Wing loading: 0.58 oz./sq.ft (27.8g/dm ) Motor: OBL 29/27-07A Warranty
Lowering Spring Installation on a Mustang GT
 Lowering Spring Installation on a 99-04 Mustang GT This installation is very the same installation that many of the 79-04 Mustangs excluding Cobra require. Time to install: 2-3 hours to do alone with a
BMK-12. Dual-Gard By-Pass Filter Mounting Kit Installation and Servicing Instructions
 BMK-12 Dual-Gard By-Pass Filter Mounting Kit Installation and Servicing Instructions IMPORTANT NOTICE Read all instructions completely before attempting to install this unit. Improper installation could
COMPLETED ASTROBEE D ADVANCED MODEL ROCKET
 Division of RCS Rocket Components, Inc. BEFORE YOU BEGIN: ADVANCED MODEL ROCKET Assembly and Operation Instructions Study the illustrations and sequence of assembly. The sequence of assembly is important.
Bachmann D11 EM/S4 Finescale Conversion
 Bachmann D11 EM/S4 Finescale Conversion Before you start, it is a good idea to have some small containers or snap top poly bags to put screws and components in for safe keeping...much better than crawling
RECOMMENDED MOTOR AND BATTERY SET UP
 SPECIFICATION - Wingspan: 6000mm (236.2 in) - Length: 2873mm (113.1 in) - Flying weight: 14-18 kg - Wing area: 219.4 dm2 - Wing loading: 64g/dm2 - Wing type: HQ airfoils - Covering type: Genuine ORACOVER
Assorted pieces For Silo 6 + inch square pieces of plastic garbage bag 2 per silo Sand wet or dry (wet packs better) Teflon tape
 Teflon tape") 1 ½inch PVC mini silo Stuart Rymph - 1/19/1999 Parts list Silo 1 ½inch PVC pipe approximately 20 inches long 1 ½inch clean-out adapter with threaded plug fits over the outside of the 1 ½inch pipe PVC cleaner
1 ½inch PVC mini silo Stuart Rymph - 1/19/1999 Parts list Silo 1 ½inch PVC pipe approximately 20 inches long 1 ½inch clean-out adapter with threaded plug fits over the outside of the 1 ½inch pipe PVC cleaner
Steeda Sport Mustang Lowering Springs (2005+) - Installation Instructions
 - Installation Instructions") Steeda Sport Mustang Lowering Springs (2005+) - Installation Instructions The below installation instructions work for the following products: Steeda Sport Mustang Lowering Springs (2005+) Please read
Steeda Sport Mustang Lowering Springs (2005+) - Installation Instructions The below installation instructions work for the following products: Steeda Sport Mustang Lowering Springs (2005+) Please read
Step #1 From your spool of 18 gauge primary wire, cut between 11 and 21 three inch strips of wire. You will only need 11 for the ROV, but it is good t
 How to make a ROV! Step #1 From your spool of 18 gauge primary wire, cut between 11 and 21 three inch strips of wire. You will only need 11 for the ROV, but it is good to have extras. Using the wire cutter,
MASSACHUSETTS INSTITUTE OF TECHNOLOGY Department of Aeronautics and Astronautics
 MASSACHUSETTS INSTITUTE OF TECHNOLOGY Department of Aeronautics and Astronautics 16.00 Introduction to Aerospace and Design Problem Set #4 Issued: February 28, 2002 Due: March 19, 2002 ROCKET PERFORMANCE
Development of a Rubber Disc Piston Seal for the Mahadaga Handpump Peter Govey, Christopher Claassen, Joseph Longenecker Messiah College 2006
 Development of a Rubber Disc Piston Seal for the Mahadaga Handpump Peter Govey, Christopher Claassen, Joseph Longenecker Messiah College 2006 Abstract We developed a new concept for a piston seal that
SDS Continental O-200 Installation Manual Aug. 4/17
 SDS Continental O-200 Installation Manual Aug. 4/17 This manual covers the steps to install the SDS EM-5 fuel injection and ignition system components on O-200 engines. Hall Sensor and Bracket Install
Section 5: Parts Replacement
 Section 5: Parts Replacement Should the STAR TRAC 4500 Treadmill experience a problem requiring replacement of a specific part, the following procedures will help and instruct in the replacement of major
ESPA3D Photo Essay One page ESPA3D Plans are HERE Back to Spad Plans Index
 1 of 8 8/29/2012 12:28 PM ESPA3D Photo Essay One page ESPA3D Plans are HERE Back to Spad Plans Index This little airplane has turned out to be one of the most fun Spad projects we've ever done! It is built
RECOMMENDED MOTOR AND BATTERY SET UP
 SPECIFICATION - Wingspan: 1404mm (55.3in) - Length: 1134mm (44. 6 in) - Flying weight: 3.2-3.4 kg - Covering type: Genuine ORACOVER - Spinner size: scale type (not included) - Radio: 4 channel minimum
Suzuki Samurai to Toyota Front Spring Swap Kit, with Missing Link Shackles (SKU#SSP-TSFM) Installation Instructions
 Installation Instructions") Suzuki Samurai to Toyota Front Spring Swap Kit, with Missing Link Shackles (SKU#SSP-TSFM) Installation Instructions CAUTION: Safety glasses should be worn at all times when working with vehicles and related
Suzuki Samurai to Toyota Front Spring Swap Kit, with Missing Link Shackles (SKU#SSP-TSFM) Installation Instructions CAUTION: Safety glasses should be worn at all times when working with vehicles and related
1660mm (65.4 in) 1200mm (47.2 in) 2700gr gr 6 channel - 7 servo standard 46/ 2 stroke or 52/ 4 stroke
 1200mm (47.2 in) 2700gr gr 6 channel - 7 servo standard 46/ 2 stroke or 52/ 4 stroke") Instruction Manual CESSNA-46 1660mm (65.4 in) 1200mm (47.2 in) 2700gr - 3000gr 6 channel - 7 servo standard 46/ 2 stroke or 52/ 4 stroke KIT CONTENTS: We have organized the parts as they come out of the
Instruction Manual CESSNA-46 1660mm (65.4 in) 1200mm (47.2 in) 2700gr - 3000gr 6 channel - 7 servo standard 46/ 2 stroke or 52/ 4 stroke KIT CONTENTS: We have organized the parts as they come out of the
HP LASERJET
 HP LASERJET 4200 4300 TONER CARTRIDGE REMANUFACTURING INSTRUCTIONS HP LASERJET 4200 TONER CARTRIDGE (Q1338A) HP LASERJET 4300 TONER CARTRIDGE (Q1339A) REMANUFACTURING HP LASERJET 4200/4300 TONER CARTRIDGES
INSTALLATION INSTRUCTIONS
 INSTALLATION INSTRUCTIONS Disc Brake Spindle Kit SUM-BKA2447 1964-72 A-BODY 1967-69 F-BODY 1968-74 X-BODY Thank you for choosing SUMMIT RACING for your braking needs. Please take the time to read and carefully
SALEEN SPEEDLAB BOOST AND WATER TEMPERATURE GAUGE POD KIT
 = SALEEN SPEEDLAB BOOST AND WATER TEMPERATURE GAUGE POD KIT INSTALLATION MANUAL: 2005-09 Mustang 4.6L 3V P/N: 10-8002-C12000B KIT P/N: 10-2903-B11511* Saleen Performance, Inc. 1225 East Maple Rd. Troy,
IT'S MAGNETIC (1 Hour)
") IT'S MAGNETIC (1 Hour) Addresses NGSS Level of Difficulty: 4 Grade Range: 3-5 OVERVIEW In this activity, students will create a simple electromagnet using a nail, a battery, and copper wire. They will
IT'S MAGNETIC (1 Hour) Addresses NGSS Level of Difficulty: 4 Grade Range: 3-5 OVERVIEW In this activity, students will create a simple electromagnet using a nail, a battery, and copper wire. They will
COMPLETED ASTROBEE D ADVANCED MODEL ROCKET ADVANCED MODEL ROCKET
 19915-1092 Rev.6/99 BEFORE YOU BEGIN: ADVANCED MODEL ROCKET Assembly and Operation Instructions COMPLETED ASTROBEE D ADVANCED MODEL ROCKET Study the illustrations and sequence of assembly. The sequence
82-01 Chevy S-10/ GMC Sonoma Front Kit Part No B
 www.airliftcompany.com 82-01 Chevy S-10/ GMC Sonoma Front Kit Part No. 75512B MN-481 (02105) ECN 3549 Please read these instructions completely before proceeding with installation Left Side Upper Shock
Tire Manual. Northern Tool Item #: Marathon Part #: Description: Pneumatic/Air Filled; 4.80/ ribbed; 5/8 bearing bore; 6 hub
 Tire Manual Northern Tool Item #: 121022 Marathon Part #: 20001 Description: Pneumatic/Air Filled; 4.80/4.00-8 ribbed; 5/8 bearing bore; 6 hub Contents Safety Information... 3 Customer Service... 3 Tire
Installation Instructions
 Preparing your vehicle to install your brake system upgrade 1. Rack the vehicle. 2. If you don t have a rack, then you must take extra safety precautions. 3. Choose a firmly packed and level ground to
Post-Paint>Fuselage>Assemble instrument panel. Objectives of this task: Materials and tools required: Prepare the work area
 Post-Paint>Fuselage>Assemble instrument panel Objectives of this task: To fit all instruments into the instrument panel, fit all of the electrical wiring and terminate to multi-pin connectors ready for
KIT No , and 80590
 KIT No. 80531, 80545 and 80590 by MN-354 (05603) ECR 5593 Please read these instructions completely before proceeding with installation Air Spring Kit Parts List Item Description Quantity A Air Spring
MODEL EGA130 OWNERS MANUAL
 3/4 IMPACT WRENCH MODEL EGA130 OWNERS MANUAL www.eaglecompressor.com 1-800-551-2406 READ THE ENTIRE MANUAL BEFORE PUTTING THIS TOOL IN SERVICE Limited Air Tool Warranty Wood Industries, Inc. warrants air
MLGW 2018 A-BLAZING MODEL SOLAR CAR RACE RULES AND VEHICLE SPECIFICATIONS
 MLGW 2018 A-BLAZING MODEL SOLAR CAR RACE RULES AND VEHICLE SPECIFICATIONS The object of the MLGW A-BLAZING MODEL SOLAR CAR RACE is to design and build a vehicle that will complete a race in the shortest
ADVANCED MODEL ROCKET
 Division of RCS Rocket Components, Inc. Assembly and Operation Instructions BEFORE YOU BEGIN: ADVANCED MODEL ROCKET COMPLETED INITIATOR ADVANCED MODEL ROCKET 19911-8091 Rev. 8/12/04 Study the illustrations
MODEL EGA200 OWNERS MANUAL
 3/8 RATCHET WRENCH MODEL EGA200 OWNERS MANUAL www.eaglecompressor.com 1-800-551-2406 READ THE ENTIRE MANUAL BEFORE PUTTING THIS TOOL IN SERVICE Limited Air Tool Warranty Wood Industries, Inc. warrants