Assembly Instructions
|
|
|
- Dorcas Ellis
- 5 years ago
- Views:
Transcription
1


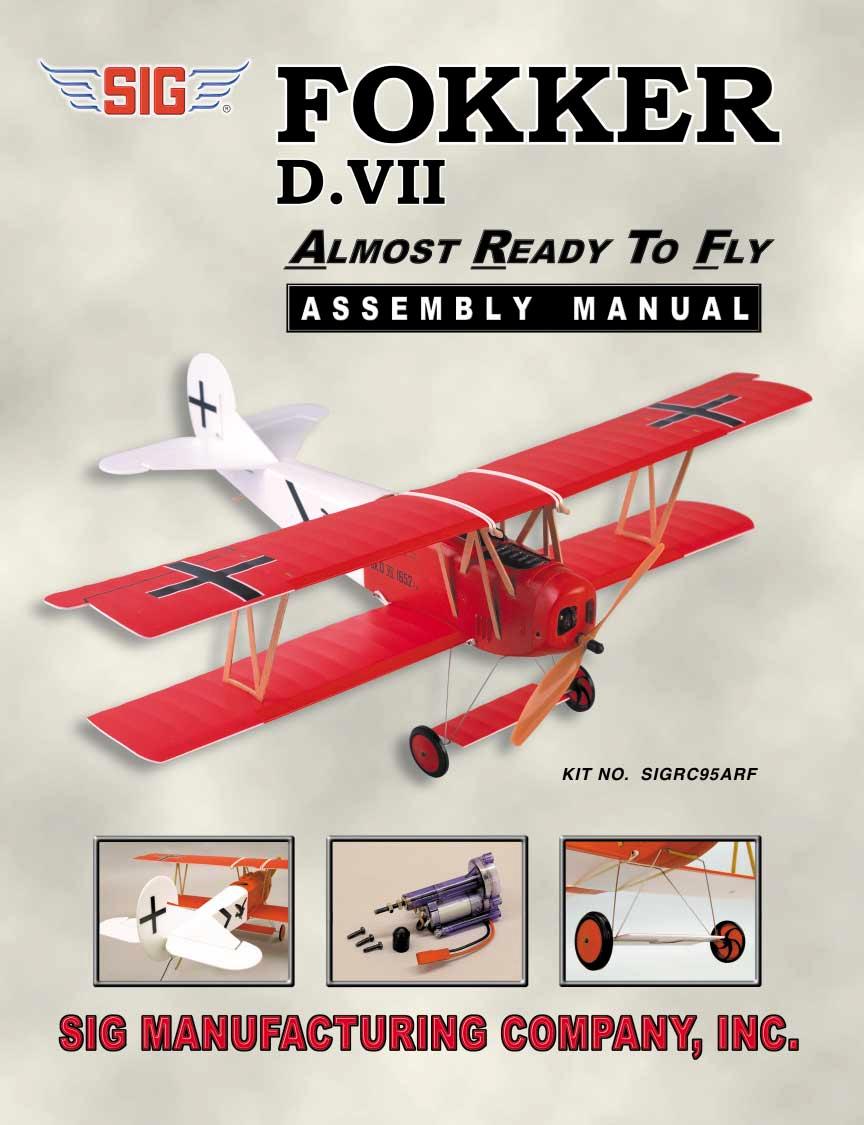
2 Assembly Instructions Easily the most feared German fighter aircraft of World War One... The Fokker D.VII was hurriedly developed in late 1917 and began flying over the front lines in late March of The airplane very quickly earned favor with its pilots because of its outstanding speed, climb and maneuverability characteristics. In addition, it was also well armed with two forward firing 7.92mm Spandau machine guns and 500 rounds of ammunition. Early D.VII aircraft were powered with 6-cylinder 160-hp D.III Mercedes Benz engines. A later variant, the D.VIIF, used the more powerful 185-hp B.M.W. D.IIIa engine. This engine increased the airplane s performance even further, placing the D.VIIF in high demand from all German fighter groups. Fortunately for the allies, these engines could not be built fast enough, and the war ended before the B.M.W. powered D.VIIF could be delivered in mass quantities. The Fokker D.VII was so feared by the allies, that when the armistice treaty that ended World War I was signed in November 1918, the Fokker D.VII was the only aircraft specifically mentioned in Aricle IV as a weapon that must be entirely destroyed or confiscated. The SIG Fokker D.VII represents the aircraft flown by Lt. August von Raben, Commanding Officer of Jasta 18 from March to November This fighter group was called the "Raben" (Raven) squadron and all of their fighter aircraft, including the Fokker D.VII fighters, were painted in the distinctive red and white color scheme depicted on your model. Your SIG Fokker D.VII is a very nice replica of this famous WWI fighter aircraft. It flies very nicely with fighter-like maneuverability and flight characteristics. It is a true "parkflyer" type model that can be flown in smaller areas. The airframe is lightweight and tough and should provide you with many enjoyable missions. To get the most out of your Fokker D.VII, take your time and follow the assembly instructions carefully. SIG FOKKER D.VII SPECIFICATIONS: Wing Span: 32-3/4 (83.2 cm) Wing Area: 273 sq.in. (1761 sq.cm.) Power System: 180 Class with 4.4:1 Gear Box Propeller: E.M.I. 8.5 x 8 Propeller (215.9 x 203mm) Battery: 6-cell 720 mah NiMH Square Pack, or 7-cell 300 mah NiMH "Folded" Pack Flying Weight: 11 oz. (w/ 6-cell 720 mah pack) 10.3 oz. (w/ 7-cell 300 mah pack) Wing Loading: 5.8 oz./sq. ft. (w/ 6-cell 720 mah pack) 5.4 oz./sq. ft. (w/ 7-cell 300 mah pack) Radio Requirements: (1) 3 or more channel transmitter on Aircraft Frequency (1) Micro Receiver (2) Micro Servos (1) 5amp Electronic Speed Control (ESC) Lineup of Fokker D.VIIs belonging to Jasta 18. Note first airplane has fuselage painted red all the way back to the stabilizer, while the second airplane has red to back of cockpit, like the Sig Fokker D.VII. 2


 Bag #6:")


3 Kit Contents: Do a complete inventory of your kit before starting assembly. Bag #1: SIGRPFU Fokker Left Fuselage Side 1...Fokker Right Fuselage Side Bag #5: SIGRPWB Fokker Wood Parts Die-Cut Sheet Bag #2: SIGRPWK Fokker Top Wing 1...Fokker Bottom Wing 1...Fokker L/G Spreader Wing 2...Wing Reinforcing Strips (1-1/4 x 20-1/4 ) Bag #6: SIGRPPROP E.M.I. 8.5 x 8" Propeller Bag #3: 1...Fokker Molded Plastic Hatch Cover SIGRPCC Fokker Molded Plastic Cowl SIGRPCW295 Bag #7: SIGRPMGDU SIG 180 Class Power System 3.. #3 x 10mm Phillips-Head Screws Bag #4: SIGRPTF Fokker Horizontal Stabilizer and Elevators 1...Fokker Vertical Fin and Rudder Bag #8: SIGRPWC Fokker Molded Plastic Wheel Covers mm Dia. Molded Plastic Main Wheels 4...Metal Wheel Retainer Washers 3

 Additional Items Needed To Complete This Model Tools and Supplies: -Small Phillips Screwdriver -Hobby Knife With #11 Blade -Needle Nose Pliers -Small Side")


4 Bag #9: SIGRPHP Wing Attach Rubber Bands (#32) 2...#2 x 8mm Phillips-Head Screws (cowl attach) 1...Velcro Strip (cockpit cover attach) 2...Molded Plastic Control Horn 2...Molded Plastic Control Horn Retainer 2...Molded Plastic Control Horn Clevis 2...Molded Plastic Control Horn Clevis Retainer 2...4mm OD x 75mm Aluminum Wing Tubes Loose Packed in Box: 1...Fokker Decal Sheet SIGDKM Fokker Wire Pushrods With "Z" Bend at One End 1...Fokker Wire Main Landing Gear SIGRPBM Fokker Instruction Manual (not shown) Additional Items Needed To Complete This Model Tools and Supplies: -Small Phillips Screwdriver -Hobby Knife With #11 Blade -Needle Nose Pliers -Small Side Cutting Pliers -Scissors -Sig Thin C/A Glue -1/16 Drill Bit -Small 90 O Square -1 Paint Brush -12 Ruler -Sig 5-Minute Epoxy -3/4 wide Scotch Tape -220 Grit Sandpaper -Rubbing Alcohol -Straight Pins -Sig 30-Minute Epoxy -#32 Rubber Bands or Low Tack Drafting Tape -3/4 wide Filament Packing Tape -Soft Foam Rubber Radio Equipment: Airborne Radio Components... A good, reliable radio system is essential to the enjoyment and safe operation of your Fokker D.VII. We use and highly recommend Hitec radio equipment for this model. We show the installation of Hitec HS-55 micro servos in this manual. These servos are both extremely small and powerful for their size. We use dual conversion receivers for our models because they allow us to fly our airplanes with other modelers without fear of 3rd order interference, a common problem with single conversion receivers. There are several very good dual conversion micro receivers on the market, such as the Hitec Electron 6 and the FMA M5. If you decide to use the Hitec Electron 6 receiver, you can easily remove the plastic case, as we did, saving even more weight. Of course, there are a number of other small receivers and servos on the market that can be substituted with equally good results. Select components that have specifications similar to the HiTEC equipment listed. Watch the weight of components carefully as using heavier than recommended equipment will have a very detrimental effect on the flight performance of your Sig Fokker D.VII. Electronic Speed Control (ESC)... We show the installation and use of a MAXX Products MX-9105 ESC in this manual. Other ESC units may be used, provided they have a minimum rating of 5 amps. Flight Battery Pack: The flight battery supplies power to both the radio system and the motor. We have had good success with two different battery packs: a) 6-Cell 720 mah NiMH (Nickel Metal Hydride) rechargeable pack, in the "square" configuration. b) 7-Cell 300 mah NiMH (Nickel Metal Hydride) rechargeable pack, in the "folded" configuration. Both of these battery pack types will fly your Fokker D.VII well. The difference is that the 6-cell 720mah pack will fly the airplane a little slower but with longer flight times - up to 13 minutes with throttle management. The smaller and lighter 7-cell 300maH pack will fly your Fokker D.VII with greater power but for less flight time - about 6-7 minutes with throttle management. MAXX Products MX-9105 Electronic Speed Control 6-Cell 720 mah NiMh Battery Pack (square) 7-Cell 300 mah NiMh Battery Pack (folded) 4


5 Battery Charger: The charger for the flight battery pack is one of the most critical pieces of equipment for flying electric powered airplanes. Having the correct charger and using it properly can make the difference between an electric airplane that flies well and one that can t even get off the ground. Failure to select the appropriate charger, or using it improperly, will cause performance related problems and unsatisfactory results. By far, the majority of performance related problems we see with electric powered models are almost always traced directly to an improperly or incompletely charged flight battery pack. To correctly charge the recommended battery packs you MUST have a charger that is capable of performing peak detection charging of NiMH (Nickel Metal Hydride) batteries. We use the ASTRO FLIGHT 115D charger, a top-of-the-line AC/DC peak detection charger. This unit is capable of fast-charging or slow-charging either Nicad or NiMH battery packs at selected rates and is very versatile in its operation. Obviously other brands of chargers can also be used, as long as they have capabilities similar to the Astro Flight 115D unit -- i.e. most importantly, peak detection charging of NiMH batteries. An old R/C car battery charger WILL NOT work! Before Beginning Assembly Take your time and follow the assembly instructions carefully. The foam parts of your Fokker D.VII can be dented easily so be gentle. To help protect your model during assembly, cover your work bench with an old towel or a sheet of foam rubber. Use only the glues specified or you will damage the parts. Specifically, DO NOT use C/A Glue on any of the foam parts or they will be damaged. Assembly Starts Here: Slight bevel on inside 1...Use a small piece of 220 grit sandpaper to remove any burrs from the ends of the two 4mm x 3-11/16 Aluminum Wing Tubes. Now use your hobby knife to slightly bevel/sharpen the inside of one end of one tube as shown. Remove burrs from ends Twist tube to bevel 2...Prepare the fuselage halves for assembly by using the sharpened end of the aluminum tube to open up the four required wing dowel holes in the fuselage sides. Lay the fuselage half on a firm surface and gently press the tube into the hole with a twisting motion to finish cutting through the fuselage sides. Next, use your hobby knife to open up the pushrod exit holes in the rear of each fuselage half. Last, lightly sand the mating surfaces of both fuselage halves to remove any molding flash from the foam. 3...Carefully apply 30 minute epoxy to one of the fuselage sides as shown. Since the epoxy is many times stronger than the foam, you only need to use a small amount to bond the fuselage sides together. By applying the epoxy in this manner you will eliminate having a lot of epoxy squeezing out on the outside of the model. We recommend using #32 rubber bands to hold the fuselage sides together until the epoxy cures. Use care to make sure that the fuselage is straight and not bent or twisted. NOTE: You can also use low-tack drafting tape to hold the fuselage sides together if preferred. However, use caution because tape can pull the paint off the model if the adhesive is too tacky. Use tape only on areas of the model that will not be seen after it is completely assembled. GOOD Rubber Bands BAD Tape Apply epoxy sparingly to inside edge of one fuselage side as shown. Fuselage Straight Fuselage Bent Fuselage side (cross section) 5


6 4...Use 5-minute epoxy to glue the plywood Firewall, the 2 Cowl Mounts, the Servo Tray, the Tailskid, and the 2 Aluminum Wing Tubes in place in the fuselage. NOTE: Be sure the firewall is firmly seated into the recess molded into the front of the fuselage. This recess has been molded to provide the correct right and down-thrust for the motor. Glue the servo tray in place with the grain running across the fuselage. Firewall & Cowl Mounts Servo Tray The wing tubes should be centered, so that an equal amount sticks out on each side of the fuselage. Wing Tubes Tail Skid 5...Use 3/4" wide 3M Scotch Crystal Clear Tape to hinge the tail surfaces. Apply a strip of tape to the top of the Horizontal Stabilizer, centered over the hinge line. Turn the stabilizer/elevator assembly over and apply another strip of tape, again centered over the hinge line. Repeat this process with the Vertical Fin/Rudder assembly. NOTE: 3/4 wide tape is available at most office supply stores. Use only clear tranparent tape. Do not use frosted Scotch Magic Tape. 6...Use a sharp hobby knife to trim and remove the unwanted foam bridges from the Stabilizer/Elevator assembly and the Fin/Rudder assembly. There are 5 bridges to remove: A. Trim 2 foam bridges connecting Stabilizer to Elevator. B. Trim foam bridge connecting top of Rudder to Fin. C. Trim foam bridge connecting bottom of Rudder to Tab. D. Trim foam bridge connecting bottom of Fin to Tab. 7...Use a small diameter dowel with a smooth rounded end, similar object, to indent the tape on each side of the tail surface until the two pieces of tape contact each other in the middle of the hinge gap, creating the finished hinge. 8...Now is the best time to apply all the decals to the various model parts, before the parts are glued together and become more cumbersome to handle. Use the box label and the assembly manual pictures for proper positioning of the decals. DECAL APPLICATION NOTES: The decals provided in this kit are a type of water transfer decal that you may not have used before. They are extremely thin and light, and when they are on the model they look like they re painted on. Notice that the decals are printed on the paper carrier upside down. There is a thin clear plastic sheet over the decals that protects a low tack adhesive. 6


7 To apply the decals, leave the clear plastic in position while you cut the individual marking from the main sheet. When ready to apply the decal, remove the clear plastic and place the decal in the desired location, adhesive side down. Make sure you get the decal exactly where you want it. The light tack adhesive allows the decal to be picked up and repositioned if necessary. With the decal in the proper position, use a brush or a soft rag to generously apply cold tap water to the paper. The paper will immediately begin to soak up the water. Let the paper completely soak for at least 1-2 minutes. Now gently SLIDE paper from the top of the decal. DO NOT try to move the decal on the model's surface. The decal is very thin and fragile. If the decal has air bubbles under it, use a soft cloth to gently pat out the bubble, making sure you pat straight up and down, not sideways. DO NOT try to push the bubbles sideways from beneath the decal. While these decals are more fragile than normal decals, the end result is a marking that looks as if it were painted on. Allow the decals to completely dry for at least an hour or two before handling. 9...Use your hobby knife to open the control horn slots in both the rudder and elevators. Insert the rudder control horn through the slot so that the arm sticks out on the left side of the rudder. Insert the elevator control horn from the top so that the arm sticks down from the bottom of the right elevator. Now slide the retainer plates onto the horns with their locating pins facing the foam. Firmly press the clip in place until you hear or feel two "clicks", indicating that the clip is securely locked in place Temporarily attach the lower wing to the fuselage with two rubber bands. Use 5-minute epoxy to glue the stabilizer and elevator assembly in place on the fuselage. The stabilizer should be roughly parallel to the wing and should not be tilting to the left or right. The slot in the stabilizer should be centered with glue seam in the fuselage and must remain free of glue. Use straight pins to hold the stabilizer in position until the epoxy sets. After the glue dries, the bottom wing can be removed. GOOD BAD 11...Use 5-minute epoxy to glue the fin and rudder assembly in place. The bottom of the fin must be glued on top of the stabilizer, while you simultaneously glue the "tab" at the bottom front of the rudder into the corresponding slot at the rear of the fuselage. Make sure the fin and rudder are 90 O to the horizontal and does not tilt to the left or right. Use straight pins to hold the fin in place until the epoxy sets. GOOD 90 O BAD 12...Plug the airborne electronics together and test for proper function. The two servos are plugged into channel 1 (normally aileron) and channel 2 (normally elevator) on the receiver. The electronic speed control plugs into channel 3 on the receiver. When doing this, make very sure that you have installed the three plugs with the correct polarity! Then plug the motor, without the propeller, into the motor" side of the ESC. Make sure your transmitter and airborne battery pack are fully charged. 7
. Test the system by moving the right stick on the transmitter, which should move the rudder and elevator servos.")


8 To operate the system, first turn on the transmitter and place the throttle stick in the full low position. Now plug the airborne battery pack into the "battery" side of the ESC. The system should now be operational (see NOTE below). Test the system by moving the right stick on the transmitter, which should move the rudder and elevator servos. Elevator Servo Motor Rudder Servo Typically, with most ESCs, the motor is not Battery "armed" and will not function when you first turn on the power, for safety reasons. To arm ESC the motor, the throttle stick must be moved all the way up and all the way back, one or Receiver possibly two times. Be sure to read the instructions that came with your particular ESC to learn the manufacturer's arming method. Once the ESC is armed, the motor should function and react to movements of the throttle stick. Make sure everything is functioning properly on your workbench BEFORE you install any of the components into the model. While the radio system is still on, make sure the rudder and elevator trim levers on the transmitter are centered in neutral position. This ensures that the servos are centered. Unplug the battery from the ESC to turn the airborne system off and then turn off the transmitter. NOTE: Some radio manufacturers provide a small micro-size Switch Harness. We suggest that you not use the switch harness to save weight. It is very easy to turn the airborne system on and off by simply plugging in and unplugging the battery pack Install the rudder and elevator servos into the plywood servo tray in the fuselage. Viewing the model from the rear, the rudder servo is mounted on the right side and the elevator servo is mounted on the left side. The servo output arms should be at the rear end of the servo body, as shown. Elevator Servo Notice that elevator & rudder pushrods cross each other in rear of fuselage Install the Wire Pushrod for the rudder into the fuselage. Start by inserting the Z bend end of the wire into the left pushrod exit hole at the rear of the fuselage (again viewing the fuselage from the rear). Run the pushrod all the way up to the rudder servo, which is on the right side of the fuselage. Remove the control arm from the rudder servo, slip it onto the Z bend, and then reinstall the control arm back onto the servo. Be sure to tighten the servo arm screw. Install the elevator pushrod in the same manner. Insert it into the right exit hole at the rear of the fuselage, and run it forward to the elevator servo on the left side of the fuselage. Install the elevator servo control arm to the Z bend Slide a plastic Control Horn Clevis Retainer onto the rudder pushrod wire. Snap a plastic Control Horn Clevis into the rudder horn, with its open side facing outward, as shown. Hold the rudder in neutral while you lay the threaded end of the pushrod wire into the groove in the plastic clevis. Push the wire down firmly into the groove Slide the Clevis Retainer onto the Clevis, trapping the pushrod wire in place. Check to be sure that the rudder is still in the neutral position. If it is not, unsnap the clevis from the control horn and adjust the pushrod length by screwing the clevis in or out on the threads. Then repeat this process to attach the elevator pushrod to the elevator control horn. Rudder Servo Clevis Retainer Push Clevis 8
 to fit over the receiver and hold the receiver in place. Install the ESC on top of the foam rubber.")


9 17...Plug the two servos and the ESC back into the correct receptacles in the receiver. Place the receiver on the bottom of the fuselage, in front of the servos. Cut a piece of soft foam rubber (not furnished) to fit over the receiver and hold the receiver in place. Install the ESC on top of the foam rubber. Poke the ESC s motor plug through the hole in the front of the fuselage and into the motor compartment. Make sure the ESC s battery plug will be accessible at the top of the battery compartment. Turn on your transmitter and then plug the battery pack into the ESC. Stow the battery pack in the radio compartment, right up against the back of the foam firewall. Cut another piece of soft foam rubber to put between the battery pack and the front of the servos, to keep the battery from moving around. Check the radio for proper operation. If the servos move in the wrong direction, use the servo reversing on your transmitter to change the direction of travel. Adjust the control throws to the following measurements: Rudder: 3/4 Right 3/4 Left Elevator: 1/2 Up 1/2 Down Antenna Exit Hole Receiver Is Under Foam ESC Tape 18...Drill a 1/16" dia. hole in the bottom of the fuselage, just behind the rear wing dowel, as shown. Feed the receiver antenna through this hole. Pull the antenna back to the rear of the fuselage and hold it in place with a small piece of Scotch Tape just behind the tailskid. Allow the full length of the antenna to trail behind the model. Do not cut the antenna to shorten it. That will reduce the radio range. Inner Cabane Struts Outer Cabane Struts 19...Remove the cabane struts from the die-cut plywood sheet. Note that there are two inner cabane struts and two outer cabane struts. a. Use 5-minute epoxy to glue the two inner cabane struts into the appropriate pockets molded into the fuselage sides. Note that the pockets are pre-molded at the correct angles. Hold the struts in place until the glue dries. b. Use 5-minute epoxy to glue the two outer cabane struts into the appropriate pockets in the fuselage sides. Let dry. c. Glue the tops of each set of inner and outer cabane struts together, being careful to match up the top edges of the struts to create a smooth wing saddle. 9


10 22..Apply the Wing Reinforcing Tape (14mm X 43mm) to the leading 20...Trim edge the of both plastic the top Hatch and Cover bottom as wing. shown. The tape Test should fit thebe centered trimmed on Hatch the leading Cover edge onto the left top and of right the fuselage and should and be adjust applied as so needed that it wraps for a good around fit. the Note: leading A sharp edge hobby with knife half on and the miniature top of the wing snips and are half very on good the bottom tools for of this the wing. job. Seperate the two parts of the Velcro strip provided. Apply Remove the two the star paper decals backing to the from top one of the part top of wing the Velcro and allow, and to dry. adhere that piece of Velcro to the top of the fuselage. Remove the paper backing from the other half of the Velcro Remove and adhere the two it to plywood the underside wing struts of the from Hatch the Cover, die cut making sheet. sure Insert the it struts lines up through with the Velcro bottom on wing. top Use of the 5 minute fuselage. epoxy to attach the struts to the bottom wing. The struts should be aligned vertical. Now glue the top stubs into the top wing with 5 minute epoxy. Align the wings square and allow the epoxy to dry. Velcro Velcro 22..Use 5 minute epoxy to glue the two die cut plywood landing gear inserts into position on the landing gear. The short one goes at the front of the landing gear and the taller one is at the rear Pre-drill the three motor mount holes in the plywood firewall with a 1/16" dia. drill bit. Use the three #3 x 10mm Phillips-Head Sheet Metal Screws to attach the motor to the front of the model. Feed the motor connector through the hole in the front of the fuselage and connect it to the electronic Trim speed the controller. two Molded Plastic Wheel Covers as shown. Use a 1/16 drill bit to drill a hole for the axle in the center of each cover. Press one Wheel Retainer on each axle and slide all of the way in. Now place the wheel, wheel cover and outer Wheel Retainer into position. The outer wheel retainer should spaced so that the wheel turns freely. Step 22a 23..Attach 22...Trim the and wing install on the molded model using plastic 4 rubber Cowl as bands. follows: Now install the landing gear by pressing the front and rear upper ends completely a. into Use the a sharp slots hobby in the fuselage. knife or a Attach small pair the number of snips decals to trimto the fuselage sides between the wing and the tail surfaces. 3/16 off the base of the cowl as shown Plug b. Sand the the speed trimmed control rear into edge the receiver. of the cowl Charge against and a piece connect of the airborne battery and test the radio and power system WITHfine grit sandpaper to make the rear edge truly flat. OUT THE PROPELLER ATTACHED. c. Carefully cut out the three openings in the front of the Make cowl sure as shown. that all of A the sharp controls hobby and knife the and throttle sandpaper function are properly. good tools for this job. 3/16 Cutoff Step 22b When d. everything Fit the cowl checks onto the out, front securely of the attach fuselage the propeller to check the onto fit. the power system Place Make any the required battery in adjustments. the model and The install cowl the is mounted Plastic Cockpit to the Cover. Step Check 22c the balance of the model. To do this, turn Step the model 22d upside fuselage down using and support two #2 the x model 8mm on Phillips your finger Head tips Sheet placed Metal 1/2 back from the leading edge of the bottom wing. Hold your fingers close to the Screws. Hold the cowl in position on the fuselage while you drill 1/32 dia. pilot holes through the cowl and into the plywood cowl mounts on each side of the nose. Then mount the cowl to the fuselage with the two screws. 10


11 23...Apply the Wing Reinforcing Strips (1-1/4 x 20-1/4 ) onto the leading edges of both the top and bottom wings. The strips should be centered left-to-right on the leading edge, and should be applied so that it wraps around the leading edge, with half its width on top and half its width on the bottom of the wing Remove the two plywood wing struts from the die-cut sheet. Smooth the edges of the struts with sandpaper. Use 5-minute epoxy to glue the struts in place on the bottom wing. Make sure the struts are perpendicular (90 O ) to the top of the wing surface and allow the glue to dry. Wing Reinforcing Strip Now glue the top wing in place on top of the plywood struts with 5-minute epoxy. Align the wings square and hold in position until the epoxy to dries Reinforce the wings to withstand high +G aerobatic maneuvers by running a strip of 3/4" wide filament packing tape (such as Scotch #893) spanwise on the bottom of both wings. Cut a strip of filament tape to fit between the outer wing strut locations and lay it in place on the bottom of each wing, at the high point of the airfoil. Press the tape firmly in place. Filament Tape 26...Use 5-minute epoxy to glue the two die-cut plywood landing gear inserts into position on the Wire Main Landing Gear. Use small strips of tape to hold them in place while the glue dries. Trim the flange off of the two Molded Plastic Wheel Covers as shown. Use a 1/16 dia. drill bit to drill a hole for the axle in the center of each wheel cover. Plywood Inserts Press one Wheel Retainer Washer onto each axle, and slide it all of the way in as far as possible. Now slide on the wheel and then the plastic wheel cover. Finally, install the outer Wheel Retainer Washer. Make sure the wheels turn freely. Use clear Scotch tape to fasten the foam L.G. Spreader Wing in place on top of the wire gear between the landing gear legs. Remove flange Tape 11


12 27...Attach the wings to the fuselage using 4 rubber bands - 2 for the top wing and 2 for the bottom wing. Begin by sliding the wing set over the tail surfaces and into position. Secure the bottom wing first, being careful to line-up the slot in the bottom wing with the corresponding slot in the fuselage as you put on the 2 rubber bands. Then install the landing gear, pressing the front and rear upper ends of the gear completely into the slots in the bottom of the fuselage. Last, rubber band the top wing to the cabane struts Install the propeller on the motor shaft. The proper order of installation on the shaft is; first the rear shaft nut, then the propeller, then the shaft washer, and then the front shaft nut. When properly installed, the prop shaft should have just a little bit (1/16-1/8") of fore and aft "play". Finally, slip the rubber Prop Shaft Protector over the prop shaft and nut, up against propeller. The model is now ready to balance BALANCING YOUR FOKKER IS IMPORTANT! Place the flight battery in the model (do not plug it into the ESC at this time) and attach the plastic hatch cover. Check the balance of the model by turning it upside down and supporting it on your finger tips placed 1/2 back from the leading edge of the bottom wing. Hold your fingers close to the fuselage sides. Supported this way your model should hang perfectly level. If the model hangs tail low, you must move the receiver and battery forward in the fuselage, or if they are already as far forward as possible, add weight to the nose of the model until it hangs level. If the model hangs nose low, you must move the receiver and battery towards the rear, or add weight to the tail of the model until it hangs level. Rubber Prop Shaft Protector Balance 1/2 back from leading edge of bottom wing. Do not attempt to fly your Fokker until it is properly balanced! 30...Always pre-flight your model thoroughly before each flight. It is your responsibility to verify that your model is airworthy. Always follow established safety guidelines while installing the battery, operating the motor, radio, and while flying the model. FLYING YOUR FOKKER Test fly your Fokker D.VII on a day when there is no wind. This allows you to better evaluate and trim the model correctly. The Fokker is a small, light model and should not be flown on breezy days. Because the Fokker is a small model with small wheels, it is normally not practical to take off from a typical grass field. While the Fokker will take off from the ground nicely, it needs a smooth surface to do so. If the grass at your flying area is too long, then you will probably need to hand launch the airplane. This is done by holding the model level, running the motor up to high throttle, and then tossing the model straight ahead at flight speed. NEVER throw the airplane in a nose up attitude or tilted to one side or the other. Throw it perfectly level! If you ve never hand launched an R/C model before, make your first hand launches over tall (knee high) grass. The grass will protect your model from damage in the event of a bad launch. Fly the model to a safe altitude before trimming it out. GOOD LUCK AND SAFE FLYING! WARNING! THIS IS NOT A TOY! Flying machines are not toys! Because of the speeds that airplanes must achieve in order to fly, they are capable of causing bodily harm and property damage if they crash. IT IS YOUR RESPONSIBILITY AND YOURS ALONE to assemble this model airplane correctly according to the instructions, to ground test the finished model before each flight to make sure it is completely airworthy, and to always fly your model in a safe location and in a safe manner. JOIN THE AMA The governing body for R/C model airplanes in the United States is the ACADEMY OF MODEL AERONAUTICS. The AMA provides guidelines for the safe operation of R/C model airplanes. While AMA membership is not mandatory, it is required by most R/C flying clubs in the U.S. and provides you with important liability insurance in case your R/C model should ever cause property damage or personal injury to someone else. For more information contact: ACADEMY OF MODEL AERONAUTICS 5161 East Memorial Drive; Muncie, IN Telephone: (765) AMA WEB SITE: modelaircraft.org CUSTOMER SERVICE Should you encounter any problem building this kit, or discover any missing or damaged parts, please feel free to contact us by mail or telephone. SIG MANUFACTURING COMPANY, INC. P.O. Box 520 Montezuma, IA SIG MODELER S ORDERLINE: (to order parts) SIG MODELER S HOTLINE: (for tech support) SIG WEB SITE: LIMIT OF LIABILITY The craftsmanship, attention to detail, and actions of the builder/flyer of this model airplane kit will ultimately determine the airworthiness, flight performance, and safety of the finished model. SIG MFG. CO. s obligation shall be to replace those parts of the kit proven to be defective or missing. The user shall determine the suitability of the product for his or her intended use and shall assume all risk and liability in connection therewith. KIT CONTENTS SUBJECT TO CHANGE WITHOUT NOTICE. 12
Assembly Instructions
 Curtiss Jenny Assembly Instructions Kit # SIGRC93ARF America s Most Famous World War I Airplane... The Curtiss Jenny originated in 1914 in response to U.S. Army s desire for a modern trainer, an airplane
ALMOST READY TO FLY. Wing Span in cm. 2
 ASSEMBLY MANUAL ALMOST READY TO FLY MS:X9 Specifications Wing Span --------------------------61.4 in ---------------------------156cm. 2 Wing Area --------------------------606.1 sq.in ------------------
Instruction Manual book
 book ITEM CODE:BH 115. SPECIFICATION Wingspan : 6,000 mm 236,22 in. Length : 2,740 mm 107,87 in. Weight : 17.5kg 38.5Lbs. Radio : 08 channels. Servo : 07-08 HS-5685MH(HITEC) Battery : 2 Cells-Li-Po 7.4V
(Glider) ASSEMBLY MANUAL
 ASSEMBLY MANUAL") (Glider) MS:132 ASSEMBLY MANUAL Graphics and specifications may change without notice. Specifications: Wing span ------------------------------118.1in (300cm). Wing area ---------------------902.1sq.in
(Glider) MS:132 ASSEMBLY MANUAL Graphics and specifications may change without notice. Specifications: Wing span ------------------------------118.1in (300cm). Wing area ---------------------902.1sq.in
EXTRA 330LX. Specifications: Code: SEA274. Graphics and specifications may change without notice. ASSEMBLY MANUAL
 ASSEMBLY MANUAL EXTRA 330LX Code: SEA274 Graphics and specifications may change without notice. Specifications: Wingspan---------------82.0 in (208.2 cm). Wing area---------------1349.4 sq.in ( 87.1 sq.dm).
Flyzone Spitfire FF to R/C Conversion Instructions
 Flyzone Spitfire FF to R/C Conversion Instructions Hobbico Flyzone EP FF airplanes have been around for years, with exciting new models being added constantly. The recent interest shown by R/C modelers
I n s t r u c t i o n M a n u a l. Instruction Manual SPECIFICATION
 I n s t r u c t i o n M a n u a l Instruction Manual SPECIFICATION - Wingspan: 3200mm (125,9 in) - Length: 1650mm (64,9 in) - Flying weight: 3000gr 3200gr - Wing area: 64.5 dm2 - Wing loading: 46g/dm2
RECOMMENDED MOTOR AND BATTERY SET UP
 SPECIFICATION - Wingspan: 6000mm (236.2 in) - Length: 2873mm (113.1 in) - Flying weight: 14-18 kg - Wing area: 219.4 dm2 - Wing loading: 64g/dm2 - Wing type: HQ airfoils - Covering type: Genuine ORACOVER
Instruction Manual book
 Instruction Manual book ITEM CODE:BH118. SPECIFICATION Wingspan : 1,050 mm 41.34 inches. Length : 950mm 37.4 inches. Weight : 1 kg 2.2 lbs. Radio : 04 channels. Servo : 4 mini servos. Motor : KMS 2814/05
Gent EPP. Before use please read the explanations carefully
 Before use please read the explanations carefully Gent EPP Instruction Manual Specifications Fuselage length 900mm 35in Wingspan 820mm 32in Flying Weight 210 240g with battery Additional Required Equipment
MS:159 ASSEMBLY MANUAL. Graphics and specifications may change without notice.
 ASSEMBLY MANUAL MS:159 Graphics and specifications may change without notice. Specifications: Wing span ----------------------------61.8in (157cm). Wing area -----------------1100.5sq.in (71.0sq dm). Weight
51in Aerobatic Series Sukhoi SU-26M Almost-Ready-to-Fly. Instruction Manual. Specifications
 51in Aerobatic Series Sukhoi SU-26M Almost-Ready-to-Fly Instruction Manual Specifications Wingspan: 51.2 in (1300mm) Length: 51.2 in (1300mm) Wing Area: 581 sq in (37.5sq dm) Flying Weight: 3.5 lb (1600g)
RECOMMENDED MOTOR AND BATTERY SET UP
 SPECIFICATION - Wingspan: 1404mm (55.3in) - Length: 1134mm (44. 6 in) - Flying weight: 3.2-3.4 kg - Covering type: Genuine ORACOVER - Spinner size: scale type (not included) - Radio: 4 channel minimum
I/C FLIGHT GUIDELINES
 SPECIFICATION - Wingspan: 3500mm (137.8 in) - Length: 1650mm (64.96 in) - Flying weight: 3700-4000 gr - Wing area: 75 dm2 - Wing loading: 49g/dm2 - Wing type: HQ profile - Covering type: Genuine ORACOVER
F3P Instruction Manual
 Before use, please read the explanations carefully! F3P Instruction Manual Specifications Fuselage length: 884mm ( 34. Bin ) Wingspan : 845mm ( 33. 2in) Flying Weight : 135-160g (with battery) Additional
Flyzone P-40 FF to R/C Conversion Instructions
 Flyzone P-40 FF to R/C Conversion Instructions Hobbico Flyzone EP FF airplanes have been around for years, with exciting new models being added constantly. The recent interest shown by R/C modelers in
Instruction Manual book
 book Item code:bh131 SPECIFICATION Wingspan : 3,000 mm 118.1 in. Length : 1,600 mm 62.99 in. Weight : 2.2 kg 4.84 Lbs. Radio : 05 channels. Servo : 06 mini servos. Electric Motor: BOOST 40 Battery : 3celIs
Instruction Manual book
 Instruction Manual book Item code:bh133 SPECIFICATION Wingspan : 1,400 mm 55.12 in. Length : 1,350 mm 53.15 in. Weight : 3.7 kg 8.14 Lbs. Radio : 08-09 channels. Servo : 08-09 servos. EDF : Turingy SK3
Instruction Manual book
 Instruction Manual book ITEM CODE:BH118. SPECIFICATION Wingspan : 1,050 mm 41.34 inches. Length : 950mm 37.4 inches. Weight : 1 kg 2.2 lbs. Radio : 04 channels. Servo : 4 mini servos. Motor : BL2215/20
Instruction Manual. Specification:
 Instruction Manual L O W Specification: Wingspan: 133 cm (52.3 inches) Length : 104 cm (40.9 inches) Weight : 1790gr Engine : 25-32 two stroke Radio : 4 channel - 4 servo W I N G KIT CONTENTS: We have
RECOMMENDED MOTOR AND BATTERY SET UP
 SPECIFICATION - Wingspan: 1410mm (55.5 in) - Length: 1278mm (50.3 in) - Flying weight: 3.2-3.4 kg - Wing area: 41.3 dm2 - Wing loading: 75g/dm2 - Wing type: Naca airfoils - Covering type: Genuine ORACOVER
MS:176 ASSEMBLY MANUAL. Graphics and specifications may change without notice.
 ASSEMBLY MANUAL MS:176 Graphics and specifications may change without notice. Specifications: Wing span ------------------------------98.4in (250cm). Wing area ----------------1576.4sq.in (101.7sq dm).
F3D-30 ARF ASSEMBLY MANUAL
 F3D-30 ARF ASSEMBLY MANUAL This Manuel is the sole property of Kangke Industrial USA, Inc. Reproducing any part without the consent of Kangke Industrial USA, Inc. is a lawful violation. Kangke Industrial
Please read all instructions carefully before assembly and flight!
 Please read all instructions carefully before assembly and flight! Thank you for purchasing the Mig-15. This model is designed for the intermediate to advanced flyer. The model is receiver ready and includes
MS:183 ASSEMBLY MANUAL. Graphics and specifications may change without notice.
 MS:183 ASSEMBLY MANUAL Graphics and specifications may change without notice. Specifications: Wing span ------------------------------79.9in (203cm). Wing area -----------------1165.6sq.in (75.2sq dm).
ASSEMBLY MANUAL
 www.seagullmodels.com MS: X104 ASSEMBLY MANUAL Graphics and specifications may change without notice. Specifications: Wing span ----------------- 35.4in (90.0cm). Wing area ------------------392.2sq.in
Instruction Manual book
 Instruction Manual book ITEM CODE:BH135 SPECIFICATION Wingspan : 4,200mm. 163.35 in. Length : 2,100 mm. 82.68 in. Weight : 7,6 kg. 16.72lbs Radio : 07 channels. Servo : 05 06 standard high torque servos,
8mm EPP Acrocub. Instruction Manual. Specifications
 8mm EPP Acrocub Instruction Manual Specifications Wingspan: 34.6 in (880mm) Length: 31.5 in (800mm) Wing Area: 213.9 sq in (13.8sq dm) Flying Weight: Approx. 9oz (270g) Dear Customer, www.valuehobby.com/8mm-epp-acrocub.html
FUN-50 ARF ASSEMBLY MANUAL
 FUN-50 ARF ASSEMBLY MANUAL This Manuel is the sole property of Kangke Industrial USA, Inc. Reproducing any part without the consent of Kangke Industrial USA, Inc. is a lawful violation. Kangke Industrial
Instruction Manual. Wingspan : 1400 mm (55.12 inch) : 1480 mm (58.27 inch) : 5500gr gr. : 6-9 channel/ 8 servo high torque,1 standard
 : 1480 mm (58.27 inch) : 5500gr gr. : 6-9 channel/ 8 servo high torque,1 standard") Wingspan : 1400 mm (55.12 inch) g Length : 1480 mm (58.27 inch) Weight : 5500gr - 6000gr Radio : 6-9 channel/ 8 servo high torque,1 standard Engine : GT 22 OS KIT CONTENTS: We have organized the parts
Wingspan : 1400 mm (55.12 inch) g Length : 1480 mm (58.27 inch) Weight : 5500gr - 6000gr Radio : 6-9 channel/ 8 servo high torque,1 standard Engine : GT 22 OS KIT CONTENTS: We have organized the parts
Instruction Manual book
 book ITEM CODE:BH 139 SPECIFICATION Wingspan : 1,450mm 57.09 in. Length : 1,140 mm 44.88 in. Weight : 3.3kg 7.26 Lbs. Radio : 05 channels. Servo : 07 mini servos+ 3servos Retracts (FUTABA S3170G) EDF:
SIZE.120 OR 30CC SCALE 1:5 ARF
 PC21 PILATUS MK2 SIZE.120 OR 30CC SCALE 1:5 ARF SPECIFICATION - Wingspan: 1772mm (69.72in) - Length: 2019mm (79.5 in) - Flying weight: 6.4-7.2 kg - Wing area: 57.6 dm2 - Wing loading: 113g/dm2 - Wing type:
RECOMMENDED MOTOR AND BATTERY SET UP
 SPECIFICATION - Wingspan: 2190mm (86.2 in) - Length: 1907mm (75 in) - Flying weight: 9000-12000 gr - Wing area: 92 dm2 - Wing loading: 98g/dm2 - Wing type: Naca airfoils - Retract gear type: Air-retract
ALMOST READY TO FLY. Wing Span in cm. 2
 ASSEMBLY MANUAL ALMOST READY TO FLY MS: X12 A - B Graphics and specfications may change without notice. Kit features. Specifications Wing Span ------------------------------- 42.7 in ---------------------
Instruction Manual book
 book ITEM CODE:BH 145 SPECIFICATION Wingspan: 6,000mm 236.22 in. Length : 2,800 mm 110.24 in. Weight : 18.5 kg 40.7 Lbs. Parts listing required (not included). Radio : 07-08 channels. Servo : 09-10 standard
Instruction Manual book
 book (pusher propeller) ITEM CODE:BH 142 SPECIFICATION Wingspan : 1,450mm 57.09 in. Length : 1,165 mm 45.87 in. Weight : 3.3kg 7.26 Lbs. Radio : 05 channels. Servo : 07 size (29 x 13 x 30) mm. Electric
ASSEMBLY MANUAL. Graphics and specifications may change without notice.
 NEMESISMS: SEA 111 ASSEMBLY MANUAL Graphics and specifications may change without notice. Specifications Wing span------------------------------------- 55.9in ------------------------------- 142cm. Wing
Build Manual. Vector & Xtra Slick
 Build Manual Vector & Xtra Slick Warning information this is not a toy! Read and understand entire manual before assembling model Do not overlook the warnings and instructions enclosed or those provide
ASSEMBLY MANUAL. Kit features. MS:110
 MS:110 ASSEMBLY MANUAL Graphics and specifications may change without notice. Specifications: Wing span-------------------------------------------------- 62.9 in---------------------------------------
MARACANA ASSEMBLY INSTRUCTION .40 ARF LOW WING TRAINER RADIO CONTROL MODEL. Every body can fly
 RADIO CONTROL MODEL ASSEMBLY INSTRUCTION MARACANA.40 ARF LOW WING TRAINER Every body can fly VQA085 EP GP You can use both Gas or Electric power Wingspan: 59in.(1520mm) Fuselage length: 48in.(1220mm) Engine:
Instruction Manual book
 Instruction Manual book SPECIFICATION Wingspan : 1,800mm. 70.87 in. Length : 1,350 mm. 53.15in. Weight : 3.6kg. 7.92lbs. Parts Listing required (not included). Glow Engine : 55-61 2 stroke. 91 4 stroke.
Instruction Manual book
 book SPECIFICATION Wingspan : 1,450 mm 57.09 in. Length : 1,200mm 47.24in. Weight : 3.1 kg 6.82 Lbs. Radio : 05 channels. Servo : 07 servos. Engine : 61-75 2 stroke. 91 4 stroke. Made in Vietnam. This
ASSEMBLY MANUAL. Kit features. MS:76
 ASSEMBLY MANUAL MS:76 Graphics and specfications may change without notice. Specifications: Wingspan---------------------------------------------------- 82.8 in------------------------------------- 210.3cm.
Lanier R/C F-4 Phantom
 Lanier R/C.40-.46 F-4 Phantom Almost Ready to Fly WARNING! THIS IS NOT A TOY! THIS IS NOT A BEGINNERS AIRPLANE This R/C kit and the model you will build from it is not a toy! It is capable of serious bodily
40 EP Gee Bee Y Scale ARF V2 Instruction Manual Specs:
 40 EP Gee Bee Y Scale ARF V2 Instruction Manual Specs: Wing Span: 40" Overall length: 30" Wing area: 306 sq. in Ready to fly weight: 28~32 oz Motor/Engine: Electric: Uranus-28309 brushless outrunner motor,
 WWW.SEAGULLMODELS.COM ASSEMBLY MANUAL Graphics and specifications may change without notice. Code: SEA232 Specifications: Wingspan---------------70.9 in (180 cm). Wing area---------------810.3 sq.in (52.3
RADIO CONTROL MODEL HURRICANE
 RADIO CONTROL MODEL VQAA040G VQAA040B HURRINE Almost ready to fly SPECIFITIONS Wingspan...63 in. / 161cm Length...50 in. / 129cm Engine...50~60 2T / 70~90 4T Or Electric equivalent. RC Functions: Motor
1660mm (65.4 in) 1200mm (47.2 in) 2700gr gr 6 channel - 7 servo standard 46/ 2 stroke or 52/ 4 stroke
 1200mm (47.2 in) 2700gr gr 6 channel - 7 servo standard 46/ 2 stroke or 52/ 4 stroke") Instruction Manual CESSNA-46 1660mm (65.4 in) 1200mm (47.2 in) 2700gr - 3000gr 6 channel - 7 servo standard 46/ 2 stroke or 52/ 4 stroke KIT CONTENTS: We have organized the parts as they come out of the
Instruction Manual CESSNA-46 1660mm (65.4 in) 1200mm (47.2 in) 2700gr - 3000gr 6 channel - 7 servo standard 46/ 2 stroke or 52/ 4 stroke KIT CONTENTS: We have organized the parts as they come out of the
Please read all instructions carefully before assembly and flight!
 c c Please read all instructions carefully before assembly and flight! Thank you for purchasing the. This model is designed for the intermediate to advanced flyer. The model is receiver-ready and includes
to fly. Most hardware included and all replacement parts are available.
 Instruction Manual The Thunderbolt P47 was perhaps the greatest of world war II in terms of all round performance and capability Phoenix Model has recreated a 2C - 60 class engine (or 4c 91 class) It was
PITTS 12 R/C SPORT-SCALE AIRCRAFT ASSEMBLY AND INSTRUCTION MANUAL. Copyright Century UK Limited 2012
 PITTS 12 R/C SPORT-SCALE AIRCRAFT ASSEMBLY AND INSTRUCTION MANUAL 1 Warning: This radio controlled model is not a toy. It requires skill to fly and is not recommended for use by beginners. It should not
Instruction Manual book
 Instruction Manual book Item code:bh144 SPECIFICATION Wingspan : 1,400 mm 55.12 in. Length : 1,350 mm 53.15 in. Weight : 4 kg 8.8 Lbs. Empty Weight: 1.9 kg 4.18 lbs Radio : 08 channels. Servo : 08 size
ASSEMBLY MANUAL. Kit features. MS:88
 MS:88 ASSEMBLY MANUAL Graphics and specfications may change without notice. Specifications: Wingspan-------------------------------------------------- 70.9 in--------------------------------------- 180cm.
RECOMMENDED MOTOR AND BATTERY SET UP
 SPECIFICATION - Wingspan: 1800mm (70.8 in) - Length: 1355mm (53.3 in) - Flying weight: 4100-4300 g - Wing area: 51 dm2 - Wing loading: 80g/dm2 - Wing type: Naca airfoils - Covering type: Genuine ORACOVER
RECOMMENDED MOTOR AND BATTERY SET UP
 SPECIFICATION - Wingspan: 2000mm (78.7in) - Length: 1544mm (60.7 in) - Flying weight: 3600-3800 gr - Wing area: 66 dm2 - Wing loading: 55g/dm2 - Wing type: Naca airfoils - Covering type: Genuine ORACOVER
MS:136 ASSEMBLY MANUAL. Graphics and specifications may change without notice.
 ASSEMBLY MANUAL MS:136 Graphics and specifications may change without notice. Specifications: Wing span ----------------------------79.5in (202cm). Wing area -----------------965.7sq.in (62.3sq dm). Weight
64MM F-16 Fighting Falcon V2
 64MM F-16 Fighting Falcon V2 SIMPLE Simple assembly RIGID STRONG DURABLE EPO STABLE SMOOTH FLYING PERFORMANCE FMSMODEL.COM Table of Contents Introductions 3 Contents of Kit 4 Assemble the plane 5 Battery
Instruction Manual book
 Instruction Manual book ITEM CODE: BH39. SPECIFICATION Wingspan : 181 cm 71.26 inches. Length : 155 cm 61.024 inches. Weight : 04 kg 8.8 lbs. Servo : 9 servos. Radio : 6 channels. Engine : 91 cu.in - 2
AVIATOR 25 ARF Almost Ready-to-Fly
 AVIATOR 25 ARF Almost Ready-to-Fly Instruction Manual Specifications Wingspan: 54.3 in (1380mm) Length: 45.2 in (1150mm) Wing Area: 438 sq in (34sq dm) Flying Weight: 3.8 b (1700g) Dear Customer, Congratulations
Instruction Manual. Wingspan : 2270mm (89.37 inches) : 1870mm (73.62 inches) : 7400gr gr. : 4 channel - 6 standard servo.
 : 1870mm (73.62 inches) : 7400gr gr. : 4 channel - 6 standard servo.") Wingspan : 2270mm (89.37 inches) g Length : 1870mm (73.62 inches) Weight : 7400gr - 7600gr Radio : 4 channel - 6 standard servo Engine : 25cc-35cc KIT CONTENTS: We have organized the parts as they come
Wingspan : 2270mm (89.37 inches) g Length : 1870mm (73.62 inches) Weight : 7400gr - 7600gr Radio : 4 channel - 6 standard servo Engine : 25cc-35cc KIT CONTENTS: We have organized the parts as they come
Instruction Manual book
 book SPECIFICATION Wingspan : 2,310 mm 90.94 in. Length : 1,750 mm 68.90 in. Weight : 8.4 kg 18.48 Lbs. Radio : 06 channels. Servo : 09 servos + 2 mini servos (elevator). Engine : 45-55CC gas. Made in
MS:160 ASSEMBLY MANUAL. Graphics and specifications may change without notice.
 MS:160 ASSEMBLY MANUAL Graphics and specifications may change without notice. Specifications: Wing span ------------------------------70.9in (180cm). Wing area -----------------613.8sq.in (39.6sq dm).
MS:174 ASSEMBLY MANUAL. Graphics and specifications may change without notice.
 MS:174 ASSEMBLY MANUAL Graphics and specifications may change without notice. Specifications: Wing span ------------------------------79.9in (203cm). Wing area -----------------911.4sq.in (58.8sq dm).
JUNKERS CL1 G-BUYU. Specifications: Code: SEA275. Graphics and specifications may change without notice. ASSEMBLY MANUAL
 ASSEMBLY MANUAL JUNKERS CL1 G-BUYU Code: SEA275 Graphics and specifications may change without notice. Specifications: Wingspan---------------68.9 in (175 cm). Wing area---------------776.6 sq.in ( 50.1
RADIO CONTROL MODEL ASSEMBLY INSTRUCTIONS. Wasp
 RADIO CONTROL MODEL ASSEMBLY INSTRUCTIONS Wasp TRAINER Almost ready-to-fly Wingspan 1520mm Fuselage length 1105mm Engine: 40-46 2T / 52-60 4T Electric Motor: 600-700W Radio: 5 channel / 4-5 servo RC Functions:
Radio control model INSTRUCTION MANUAL PYLON RACING. Wingspan: 1148mm (45.2 ) Radio : 4 channels Engine : two-stroke
 Radio : 4 channels Engine : two-stroke") VQA038 VQA039 Radio control model INSTRUCTION MANUAL MAGIC PYLON RACING Wingspan: 1148mm (45.2 ) Radio : 4 channels Engine :.25 -.32 two-stroke WARNING! This radio control model is not a toy. If modified
VQA038 VQA039 Radio control model INSTRUCTION MANUAL MAGIC PYLON RACING Wingspan: 1148mm (45.2 ) Radio : 4 channels Engine :.25 -.32 two-stroke WARNING! This radio control model is not a toy. If modified
 WWW.SEAGULLMODELS.COM ASSEMBLY MANUAL Code: SEA238 Graphics and specifications may change without notice. Specifications: Wingspan---------------68.9 in (175 cm). Wing area---------------776.6 sq.in (
ASSEMBLY MANUAL SIZE: 46-62
 SIZE: 46-62 MS:199 ASSEMBLY MANUAL Graphics and specifications may change without notice. Specifications: Wing span ------------------------------54.9 in ( 139.5cm). Wing area -----------------517.7 sq.in
SBACH SCALE 1:4 ½ ARF
 SPECIFICATION - Wingspan: 1663mm (65.5 in) - Length: 1638mm (64.5 in) - Flying weight: 4700-5200 gr - Wing area: 56 dm2 - Wing loading: 85g/dm2 - Wing type: Naca airfoils - Covering type: Genuine ORACOVER
Aviator Pro 120 ARF. Instruction Manual. Specifications
 Aviator Pro 120 ARF Instruction Manual Specifications Wingspan: 110 in (2800 mm) Length: 74 in (1870 mm) Wing Area: 1581sq in (102 sq dm) Weight: 11.4-13.4 lbs (5190-6100 g) Dear Customer, Congratulations
RECOMMENDED MOTOR AND BATTERY SET UP
 SPECIFICATION - Wingspan: 1669mm (65.7in) - Length: 1229mm (48.43 in) - Flying weight: 3300-3400 gr - Wing area: 44.2 dm2 - Wing loading: 67g/dm2 - Wing type: Naca airfoils - Covering type: Genuine ORACOVER
Instruction Manual book
 Instruction Manual book SPECIFICATION Wingspan : 2,170 mm 85.43 in. Length : 1,760 mm 69.29 in. Weight : 6.3 kg 13.86 Lbs. Radio : 06 channels. Servo : 08 servos. Engine : 45-50CC Gas. Made in Vietnam.
RECOMMENDED MOTOR AND BATTERY SET UP
 SPECIFICATION - Wingspan: 1600mm (63 in) - Length: 1285mm (50.5 in) - Flying weight: 2800-3200 gr - Wing area: 40.1 dm2 - Wing loading: 78g/dm2 - Wing type: Naca airfoils - Covering type: Genuine ORACOVER
Instruction Manual book
 book ITEM CODE:BH 124 SPECIFICATION Wingspan : 2,240 mm 88.19 in. Length : 1,625 mm 63.98 in. Weight : 6,4 kg 14.08Lbs. Radio : 08 channels. Servo : 09 servos. Engine : 26-35cc Gas. Made in Vietnam. This
96in Super Decathlon ARF
 96in Super Decathlon ARF Instruction Manual Specifications Wingspan: 96in (2438mm) Length: 63.5 in (1614mm) Weight: Approx. 13lbs (6.5kg) 1 Dear Customer, Congratulations on your purchase of Super Decathlon
the leading edge of the wing, at the fuselage - Length: 1540mm (60.6 in) 10% expo; High: 15mm up/down, 10% expo - Wing area: 40dm2
 10% expo; High: 15mm up/down, 10% expo - Wing area: 40dm2") SPECIFICATION - Gravity CG: 165-170 mm (6.5-6.7 in) Back from - Wingspan: 1400mm (55.1 in) the leading edge of the wing, at the fuselage - Length: 1540mm (60.6 in) - Control throw Ailerons: Low: 12mm up/down,
SPECIFICATION - Gravity CG: 165-170 mm (6.5-6.7 in) Back from - Wingspan: 1400mm (55.1 in) the leading edge of the wing, at the fuselage - Length: 1540mm (60.6 in) - Control throw Ailerons: Low: 12mm up/down,
Assembly Manual For. Wingspan: 88 in Wing area: sp in Length: 78.8 in Engine: 50CC.
 Assembly Manual For Wingspan: 88 in Wing area: 1479.8 sp in Length: 78.8 in Engine: 50CC www.pilot-rc.com INTRODUCTION Thank you for purchasing our new 50 cc model. We strive to bring you the most complete
PilotRC Trainer USER MANUAL
 PilotRC Trainer USER MANUAL Introduction Thank you for purchasing our Trainer plane. we strive to achieve a good quality quick build ARF aircraft. It requires the least amount of assembly of any ARF kit
MESSERSCHMITT. - Bf 109E 60. Specifications: Code: SEA278. Graphics and specifications may change without notice. ASSEMBLY MANUAL
 ASSEMBLY MANUAL MESSERSCHMITT - Bf 109E 60 Graphics and specifications may change without notice. Code: SEA278 Specifications: Wingspan---------------64.0 in (163 cm). Wing area---------------765.7 sq.in
Turbinator-2 Build Manual
 Turbinator-2 Build Manual Thank you for your purchase of the Turbinator-2 sport jet by Boomerang RC Jets. This RC Jet IS NOT A TOY and should only be flown and operated by experienced RC Turbine Pilots.
 WWW.SEAGULLMODELS.COM ASSEMBLY MANUAL Graphics and specifications may change without notice. Code: SEA240 (SEA240M) (SEA240Y) Specifications: www.seagullmodels.com Wingspan---------------74.8 in (190 cm).
: 6 channel - 9 servo
 g Wingspan : 2005mm (78.94 inches) Length : 1640mm (64.57 inches) Weight : 6400g - 6600g Engine : 25cc - 35cc Radio : 6 channel - 9 servo KIT CONTENTS: We have organized the parts as they come out of
Instruction Manual book
 Instruction Manual book ITEM CODE: BH56. SPECIFICATION Wingspan : 1,660 mm 65.35 in. Length : 1,420 mm 55.91 in. Weight : 3.8 kg 8.36 Lbs. Radio : 06 channels. Servo : 08 servos. Engine : 75 Cu.in 2 Stroke.
Instruction Manual book
 book SPECIFICATION Wingspan : 2,080 mm 81.89 in. Length : 1,680 mm 66.14 in. Weight : 6.2 kg 13.64 Lbs. Radio : 06 channels. Servo : 06 servos. Engine : 30-35 CC Gas(FUJI IMVAC). Made in Vietnam. This
SIZE 55 ASSEMBLY MANUAL
 SIZE 55 ASSEMBLY MANUAL MS:120 Graphics and specifications may change without notice. Specifications: Wing span ------------------------------63in (160cm). Wing area -----------------643.3sq.in (41.5sq
Instruction Manual. Wingspan : 1400mm (55.12 in) : 1370mm (53.94 in) : 2600gr gr. : 4 channel / 5 servo. : / 2 stroke_52-71 / 4 stroke
 : 1370mm (53.94 in) : 2600gr gr. : 4 channel / 5 servo. : / 2 stroke_52-71 / 4 stroke") Instruction Manual 540 Wingspan : 1400mm (55.12 in) g Length : 1370mm (53.94 in) Weight : 2600gr - 2800gr Radio : 4 channel / 5 servo Engine : 46-52 / 2 stroke_52-71 / 4 stroke KIT CONTENTS: We have organized
Instruction Manual 540 Wingspan : 1400mm (55.12 in) g Length : 1370mm (53.94 in) Weight : 2600gr - 2800gr Radio : 4 channel / 5 servo Engine : 46-52 / 2 stroke_52-71 / 4 stroke KIT CONTENTS: We have organized
Instruction Manual book
 book ITEM CODE: BH109 SPECIFICATION Wingspan : 2,200mm. 86.61 in. Length : 1,976 mm. 77.80in. Weight : 8.3 kg. 18.26 lbs. Part listing required (not included) Glow Engine : 55 CC Gas Servo : 9 servos.
Instruction Manual book
 Instruction Manual book Item code:bh117 SPECIFICATION Wingspan : 2,100 mm 82.68 in. Length : 1,875 mm 73.82 in. Weight : 7.5 kg 16.5 Lbs. Parts listing required (not included) Radio : 08 channels. Servo
INSTRUCTION MANUAL BOOK
 INSTRUCTION MANUAL BOOK ITEM CODE BH57. SPECIFICATION Wingspan: 1,470 mm. 57.87 in. Length : 1,180 mm. 46.46 in. Weight : 2.7 Kg. 5.94 Lbs. Engine : 46 cu.in 2 stroke. 52 cu.in 4 stroke. Radio : 4 channels.
ASSEMBLY MANUAL SIZE
 SIZE.75 -.91 ASSEMBLY MANUAL MS:123 Graphics and specifications may change without notice. Specifications: Wing span ----------------------------66.9in (170cm). Wing area -----------------761.1sq.in (49.1sq
ARF. Specifications: ASSEMBLY MANUAL MS: 193. Graphics and specifications may change without notice.
 ASSEMBLY MANUAL Graphics and specifications may change without notice. MS: 193 ARF Specifications: Wingspan---------------62.0 in (157.5 cm). Wing area----------------620 sq.in (40.0 sq.dm). Weight-------------------3.3-3.9
ARF TRAINER KIT ASSEMBLY MANUAL BOOMERANG EP. ALMOST READY TO FLY
 WWW.SEAGULLMODELS.COM ASSEMBLY MANUAL BOOMERANG EP ARF TRAINER KIT Graphics and specifications may change without notice. MS: 211 ALMOST READY TO FLY Specifications: Wingspan---------------56.0 in (142.2
SK-50 ARF ASSEMBLY MANUAL
 SK-50 ARF ASSEMBLY MANUAL Kangke Industrial USA, Inc. 65 East Jefryn Blvd. Deer Park NY 11729 http://www.kangkeusa.com E-mail: info@kangkeusa.com Tel: 1-877-203-2377 Fax: 1-631-274-3296 Congratulations!
Instruction Manual book
 book ITEM CODE: BH99. SPECIFICATION Wingspan : 2,850 mm 112.20 in. Length : 1,910 mm 75.20 in. Weight : 8.1 kg 17.82 Lbs. Radio : 06 channels. Servo : 08 servos. Engine : 35 CC gas. Made in Vietnam. This
Instruction Manual Book
 Book ITEM CODE: BH99. SPECIFICATION Wingspan : 2,850 mm 112.20 in. Length : 1,910 mm 75.20 in. Weight : 8.1 kg 17.82 lbs. Parts listing required (not included): Radio : 06 channels. Servo : 08 standard
YAK 54 Aerobatic Model Aircraft Assembly and Instruction Manual
 YAK 54 Aerobatic Model Aircraft Assembly and Instruction Manual Warning: This radio controlled model is not a toy. It requires skill to fly and is not recommended for the novice pilot. It should not be
INSTRUCTION MANUAL BOOK
 INSTRUCTION MANUAL BOOK ITEM CODE: BH 36. SPECIFICATION Wingspan : 1,620 mm 64 in. Length : 1,340 mm 53 in. Weight : 3.8 Kg 8.36 Lbs. Engine : 15 CC Gas Radio : 8 Channels Servo : 8Servos + 2 servos Retract
Instruction Manual book
 book SPECIFICATION Wingspan : 1,920 mm 75.59 in. Length : 1,560 mm 61.42 in. Weight : 5 kg 11.00Lbs. Radio : 06 channels. Servo : 09 servos. Engine : 120 4 stroke. Made in Vietnam. This instruction manual
: 7 channel - 9 servo, Hi-Torque ( Minimum 6 kg ).
.") g Wingspan : 1820mm (71.65 inches) Length : 1625mm (63.98 inches) Weight : 6900gr Engine : 25cc - 35cc Radio : 7 channel - 9 servo, Hi-Torque ( Minimum 6 kg ). KIT CONTENTS: We have organized the parts
g Wingspan : 1820mm (71.65 inches) Length : 1625mm (63.98 inches) Weight : 6900gr Engine : 25cc - 35cc Radio : 7 channel - 9 servo, Hi-Torque ( Minimum 6 kg ). KIT CONTENTS: We have organized the parts
Instruction Manual book
 book SPECIFICATION Wingspan : 1.750mm 68.90 in. Length : 1.280 mm 50.39 in. Weight : 3.2-3.5 kg 7.04-7.7 Lbs. Radio : 06 channels. Servo : 07-09 mini servos +3 servos retracts (FUTABA,S3170G) Parts listing