1.6 HDI 90 or 110 Turbo and injector upgrade - TF035 Turbo
|
|
|
- Laura Washington
- 5 years ago
- Views:
Transcription
1 1.6 HDI 90 or 110 Turbo and injector upgrade - TF035 Turbo After finishing a few turbo upgrades on the 1.6 HDI engine I started to wonder if there was a better solution. Although a big turbo does offer great top end power, the spool can be too late to get good useable torque. My quest for a better turbo upgrade began and after lots of research I decided to use the Mitsubishi TF035 turbo from the BHP BMW engine. This turbo was obviously capable of 180 BHP quite easily, and when pushed on the BMW 2.0 engine offers over 200 BHP. A major plus for this turbo was that it uses an electronic actuator to control the VNT rather than the old style of an open loop vacuum system. These can be troublesome after turbo rebuilds if the VNT has not been calibrated properly, also there is substantial delay between a corrective signal from the ECU and the VNT arm changing the pitch of the VNT geometry. The TF035 turbo would offer precise control of the VNT with a much better response time. Another benefit would be that thanks to a fully electronic mechanism, a transplant of the same model of turbo would give the same results on another vehicle, hence I would be able to offer this remap to others without needing to carry out a week of development work to get the turbo pre-control settings perfected. The aim of this project wasn t for all out peak horse power, because with that a large turbo is required and this will inevitably have a late spool. A late spool takes away all that low-down torque which makes a diesel car nice to drive. When looking at dyno plots, the useable power is the area beneath the power curve. A power curve with early torque will give a much wider useable power band than one that only peaks at the higher revs. Parts required: I ve been very helpful here and tried to make a complete count of the main parts required. Yes, there will be a few pieces that I missed, and the parts required will probably be slightly different from car to car. Part name Purpose Price QTY Total Paddle clutch black Diamond Clutch " Slim line fan Cooling mm 90 mandrel bend Exhaust mm 45 mandrel bend Exhaust inch stainless flexi 8" Exhaust BMW exhaust gasket part No Exhaust BMW turbo exhaust clamp Exhaust Exhaust silencer Exhaust Exhaust silencer hanger Exhaust mm 180 mandrel bend Exhaust M Titanium Heat wrap Exhaust " V Band grooved flange kit Exhaust mm pipe with 80mm flare Exhaust Stainless Steel manifold adaptor with machined flanges Exhaust manifold adaptor
2 injectors Injectors mm T piece Intake pipe work mm 90 Silicone Intake pipe work mm Aluminium joiner short Intake pipe work mm 57mm alloy pipe Intake pipe work Plug for oil breather Intake pipe work mm mikalor clamp Intake pipe work mm Jubilee clamp Intake pipe work Ramair air filter 76mm Intake pipe work mm jubilee clamp Intake pipe work to 51mm silicone 90 Intercooler mm 45 Silicone Intercooler mm Aluminium 135 bend Intercooler to 90mm Mikalor clamp Intercooler mm mikalor clamp Intercooler x300x75 twin pass intercooler Intercooler mm stainless steel 45 bend long Intercooler Air doser to 57mm silicone 90 Intercooler and turbo inlet Bar MAP sensor Part No MAP sensor mm silicon 90 bend Oil drain mm aluminium tubing x 1 meter Oil drain mm silicone oil pipe Oil drain thick copper banjo washer Oil feed AN-3 M12 45 Banjo Oil feed AN-3 stainless braided teflon hose Oil feed AN-3 M12 90 Banjo Oil feed >25 silicone reducer Rad hose relocation Aluminium Joiner 25mm x 300 Rad hose relocation mm Silicone Hose 1 meter Rad hose relocation mm aluminium 90 bend Rad hose relocation and breather TF035HL6b-13TB-VG Turbo charger Turbo Total 79 1,673.45


3 Injectors + MAP sensor So, let s get the easy parts out the way first, the injectors need to be upgraded to , these are the highest flowing injectors available from a V engine. Generally, these come from the later models from around The MAP sensor on the standard setup reads only to 2.5 bar (absolute), a replacement 3.1 bar sensor can be used. The part number for this is XXXXXXXXXXXX The plug is almost the same, but you ll need to scrape the side off to remove the slot which prevents it going to the sensor. For both the MAP sensor and the injectors it s important that you don t use the vehicle without having them calibrated in to the ECU through a remap.


4 Manifold adaptor The first step to getting the turbo mounted was to design a set of flanges so that a manifold adaptor could be mocked up to hold the turbo in place. Here I drew up the flanges and sent them to be laser cut, much faster and cheaper than CNC machining and they were ready within 24 hours. I found that the 110-manifold looked a little bigger than the 90 manifold so I decided to swap this over. The outlet port wasn t really that round so I used the new flange as a template and then a Dremel to machine it out a bit. I did the same on the exhaust ports to make them as big as possible and increase flow.
. The radiator fan had to go, and the radiator needed to be moved back.")

5 The next step was to find a way to fit the turbo under the bonnet. At first there was no chance of it fitting as it wouldn t fit between the engine and the radiator fan. Here is a comparison of the TF035 against a TD02 (same size as the TD025). The radiator fan had to go, and the radiator needed to be moved back. This is a photo of the radiator housing for a Peugeot 207, most models use a similar setup and there is a large gap between the radiator and the air con radiator. Here I used a cutting disc to take off as much as I could. Two holes can be drilled in the base and then the radiator slotted back in, this holds it perfectly tight and gives much more room. The top can be held in using a couple of bolts through the plastic. Ignore the dents on the radiator, this was from the initial attempts to fit the turbo in, clearly it wasn t going to happen.


6 After a mock-up of the turbo the next issue became apparent. It was going to be very challenging to fit between the oil cooler, alternator and the air conditioning pump. Losing the AC was not an option. The air conditioning pipes were right where the compressor outlet needed to be. Luckily the AC pipes are very malleable, and if you re very careful you can bend them out the way without cracking or breaking the seals anywhere. If you do this use full facial protection just in case you break it and the gasses/oil come out at you. Here a large adjustable spanner around the pipe worked great. After making up a jig I could make a manifold adaptor and get the turbo in place. Here s one I manufactured myself using a MiG welder and very thick butt weld stainless fittings. Due to distortion

7 after welding I needed to take this to a friend s machine shop to get the flanges perfectly flat so that they would make a nice seal. Use a new Peugeot gasket on one side and the BMW gasket on the other side to create a good seal.

8 Oil feed and Oil drain With the turbo in place the next challenge was the oil feed and the oil drain. The oil feed was relatively easy after sourcing the correct parts. Here I used AN3 braided PTFE hose with an M degree banjo at the turbo side, and a M12 90-degree banjo going to the outlet from the oil pump. The fittings come with an olive and a nut, after contacting the supplier they confirmed that the stainless braid must overlap the olive. Although it felt odd as the nut would not go all the way along the thread, I can confirm that this has worked well with no leaks. I would advise getting a hose made with crimped fittings and then it can t fail. The original banjo bolts were re-used, but due to the thinner M12 banjo different copper washers were required. It s important that the thread can tighten all the way without hitting the shank. It s also important that the eye on the bolt is in the middle of the banjo for best flow. Two thick original style washers must be used on one side, and then one original washer and one thin copper washer on the back side which comes with the new banjos. As the washers are being stacked don t try to reuse your old ones as they won t mate together properly and you ll end up with an oil leak. The oil drain of the new turbo is now too low to go in to the original drain hole. This left two options, drill the sump, or use an oil scavenge pump. Initially the scavenge pump seemed like a great idea, however once eventually finding place to mount it I removed it. The scavenge pump is just too unreliable for me and I wouldn t be comfortable with this complexity, especially when it has a thermal cut out after around an hour of use.

 and then drilled a hole through the centre.")
9 After realising that a new sump pan would cost only 30 if my next plan didn t work I took the sump straight off. I saved the oil I drained out and poured it in to the sump. The oil level with 4.5 litres came right to the top of the sump. As the turbo drain can t have any restrictions this at first worried me, but I quickly realised that with the engine running most of the oil would be pumped around the engine. Next, I welded a 16mm tube on to the sump (sump is made of galvanised mild steel) and then drilled a hole through the centre. The tube needs to be as high as possible whilst still letting you get access to weld around it. Obviously put it between two bolt holes and not in line with the sump pan bolts. I put some black Hammerite over the top to prevent rust around the weld. This gravity drain solution was much better and 100% reliable compared to a complex electrical pump. As predicted the oil level when running is not high enough to block the tube so this works perfectly.


10 The drain from the original turbo conveniently fits on to this turbo. Screw this on with a new gasket, and then run the 16mm silicone tube down. It s best to use silicone hose that s designed for oil for the turbo outlet as this will be quite hot initially. Join the silicone with a piece of 16mm tubing and then run it to a 16mm 90 bend. I chose to make this slightly short to keep the bend uphill rather than with a dip at the bottom which would fill with oil.

11 Exhaust system Now the turbo is attached to the engine you can start working on the exhaust system. An 80mm flared 63mm tube fits perfectly on to the BMW turbo. I welded this to a 180 mandrel bend and then another 90 bend to go around the side of the sump. With the correct BMW gasket and clamp this fits reliably on to the turbine outlet without any exhaust leaks. Here s the down pipe and my complete exhaust system. So, I m not a welding specialist and certainly not a fabricator, but once I started working on this and bought a new welder I decided to do it all myself. In hind sight, 300 for materials and the labour involved by an exhaust shop isn t such a bad deal, just pay somebody to do it with one complete pipe and no welds. For the exhaust, I used 63mm stainless tubing all the way along, with a stainless flexi at the front. The brackets I used were an exhaust repair kit from ebay. This gave me the hangars and the rubber mounts which was very helpful. The backbox is a simple 63mm straight through silencer. I used a 2.5 V band clamp after the down pipe, also another before the silencer so that the exhaust could be dismantled without taking the car apart beneath. With the exhaust system completed I chose to mount a support bracket under the turbo. This used a thick piece of steel onto the bolt on the bottom of the turbo. This can then mount to the bolts where the DPF canister would normally be held. As I had made a bracket for the oil pump which was no longer being used, I mounted my bracket on to this. A bracket it important as over time, the heat and vibration and the mass of the turbo will result in a cracked manifold or a crack on the manifold adaptor.

12 Intercooler and turbo pipe work The car already had an uprated intercooler, but I had a much bigger one taking up space in my workshop. In my opinion, a big intercooler makes hardly any difference to turbo lag, but it does drop-down intake temperatures. With this 700x300 intercooler the intake temperatures didn t go past 37 degrees with 2.9 bar boost sat on a dyno with minimal air flow. This really shows how well it works. I ve seen the stock cooler have intake temps of over 100 degrees on the dyno before. There are companies selling intercoolers for upwards of 300, this really isn t required because there are no great changes in technology which can improve an intercooler. It s best to focus on a big intercooler rather than an expensive smaller intercooler as this will always give lower intake temperatures. A twin pass intercooler offers greater efficiency and is much easier to fit as the inlet and outlet will be in the correct place. Surprisingly this monster intercooler fits beneath the bumper on the 207 without any cutting required. Mounting brackets can be welded directly on to the steel bumper support beam. Here I sprayed with some primer after welding but painted black afterwards so it would not show through the bumper.


13 The lower outlet requires a 76 to 51mm 90 bend. A 45-degree stainless 51mm tube can now be used to weld a mounting boss for the MAP sensor and the temperature sensor. The air doser valves can be removed as they are very small and restrictive. The top inlet required a 76 to 57mm 90 bend followed by a 135-degree 57mm alloy join with flared ends. A silicone 57mm 90 bend must now be cut to fit over the turbo outlet.

14 Although the end of the turbo outlet is 51mm, there is no way to secure a pipe on to this without finding the original BMW pipe with a tight radius and a locking clip. Flexible corrugated hose was tested, and this did not last long as the jubilee clamps wore through the hose, although the hose did not pop off. This next step is the only part of the build that I couldn t find a better solution to, however it works very well. Cut a 90 57mm silicon near to the bend. Test to make sure it fits between the turbo and the AC pipes. Smear some sump gasket sealant around the inside of the hose, and then push it all the way over the turbo outlet. Use a jubilee clamp tightened over the opposite side of the flange on the turbo so that the pipe can never pop off. Let the silicone dry before testing the vehicle, you now have a very permanent seal on this hose that will not affect reliability. Although this may at first seem like a bodge I ve glued boost hoses before and found it works very very well. In fact, if you take the hose clamp off you ll need to cut the silicone hose off. It will hold very well and there is no risk of a small boost leak as the silicone fills the gaps perfectly. Here s how it fits next to the AC pump, tight, but no interference with the pipes. I glued both ends of this pipe as it would be very difficult to fix if it were to pop off at any point. I recommend gluing all your boost pipes with silicone gasket sealant once your build is finalised, it just adds that extra reliability as over time the clamps stretch and pipes will pop off. If you can source the BMW hose with a sharp 90 bend and a clip to go on to this turbo then this would obviously be a better solution.


15 The turbo inlet fits a 76mm 90 hose which can be reduced to a 57mm hose. Run the pipe along the front of the engine bay over to a free flow air filter. There is no need to run a MAF on this build as we can calculate air mass through the ECU using the boost pressure reading, air temperature and the volumetric efficiency of the engine. The standard MAF will be maxed out at anything past 145 BHP so it doesn t serve much of a purpose on a build like this. The oil breather can be directed back in to the inlet. I m not a fan of catch tanks as they spew out oil fumes and usually fill up with oil and require maintenance. Using the ford TDCI oil breather clip you can easily make your own breather pipe work.
16 Cooling Due to the exhaust down pipe the radiator pipe needs to be re-routed around the engine bay, this is easy to do with some silicone hose. A slim line fan needs to be fitted on the outside of the air con rad behind the bumper support beam and on the inside of the radiator. Once this is wired in, test using the PP2000 actuator commands to ensure that the front fan is sucking air in to the radiator and the back fan is blowing air through. I found that I could program the fan to come in at a lower temperature in the software and this can then keep temperatures low before they get past 90 degrees. It s better to have too much cooling than to risk overheating in traffic on a hot day. Wiring to the turbo actuator This may seem complicated at first but is relatively simple to do. First you need to find the live feed and the PWM ground from your turbo electro valve. On the PSA vehicles, it s bolted to the back of the engine, on the Fords it s usually at the front right of the engine bay near the ECU. The turbo electro valve used a permanent 12V feed and then the ground is pulse width modulated by the ECU. To find the live, connect a multimeter to ground on your battery, and then test both pins to find which is +12v. This makes the remaining pin PWM. On the TF035 turbo there are a few more pins than we require. Two of them are for a position sensor feedback system which we don t have the option for in this ECU. The Hella actuator requires +12V, GND, and PWM. Run a wire from the battery GND terminal to the actuator, and then the other two wires from the original turbo electro valve wiring. Like the injectors and the MAP sensor, this is another part which won t work until the ECU has been remapped. The PWM frequencies and voltages are different and these need to be set in the ECU.

17 Clutch A Black diamond ceramic paddle clutch was fitted to the solid flywheel. You can get the solid flywheel from the 90 models and the 75 PS vans. The 110 models come with a dual mass flywheel which will not handle this amount of torque. This drives very well, although is does need to warm up before it will hold the full torque. On a normal journey you ll heat it up through a few pull aways whilst warming up the engine anyway.

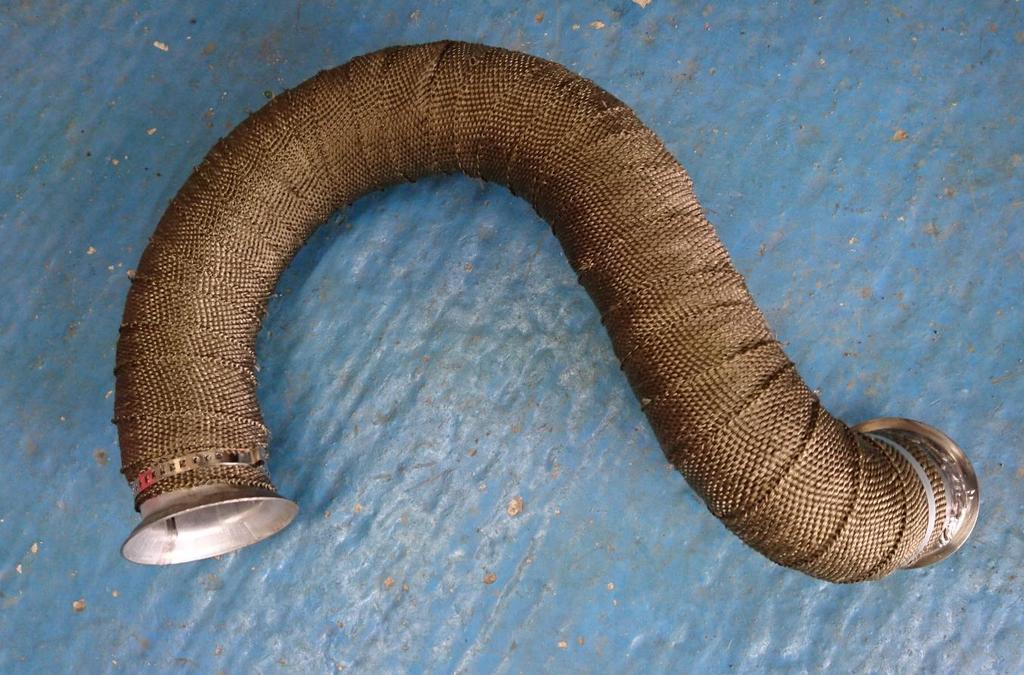
18 Heat wrap Heat wrap the actuator for the turbo. Although it is made of a thermo plastic, it could still be damaged by heat from the exhaust manifold. So far, I ve found that even after very heavy driving the actuator does not experience any problems due to heat, so a bit of heat wrap does work very well. Make sure your heat wrap doesn t interfere with the VNT actuator arm. The exhaust manifold and the turbo need to be heat wrapped to prevent heat soak to the radiator which in turn would raise engine temperatures. The heat wrap can be bolted to the original tin heat shield bolts to hold it in place. Here s the down pipe after wrapping with titanium heat wrap. A tip here is not to use the cheap metal cable ties, but buy a couple of drive shaft clamps. These hold the heat wrap on well and don t come loose. Another tip is not to rub this heat wrap all over your skin, it s VERY itchy stuff.
19

20 Remapping and development Now with all the hard work done, the tuning fun could begin. From the first test drive, I was impressed by the spool of the turbo and at that point I had not even began to optimise it. Numerous tests were made to calibrate the VNT settings to get the turbo to boost as early as possible whilst minimising any boost spikes and keeping boost levels strong and stable. The screen shot below shows just how stable the boost pressure was after lots of fine tuning. This was tested on a 3 rd gear pull at full throttle. Most tuners don t understand how to do this and you ll get a big boost spike followed by a big drop in power. Here I avoid a boost spike which could blow the turbo and I avoid a dip in power afterwards by an over powerful PID loop. This is what separates the real tuners from the beginners who have little understanding of the complex control loops and how they integrate. The logs below show air mass, injected fuel quantity, engine speed, boost pressure set point, boost pressure measured and intake temperature. The slight spike in engine speed was due to a small third gear wheel spin (on a dry road surface). After around a week of work on this, the turbo was performing very well. Now the next hard part began. Fine tuning the fuelling, injection timing and fuel pressure. As this was running MAF-less I would use readings from the MAP sensor to calculate air mass available. The MAP pressure reading can be multiplied by the cylinder volume, the density of air, the volumetric efficiency of the engine and then divided by atmospheric pressure. With these values, the ECU could then calculate how much fuel would be allowed through the Lambda maps to prevent smoke.

21 Results This turbo offered great low-down torque, and the initial dyno results showed lb.ft 378 Nm of torque and BHP. After lots of driving I am very happy with the way this drives. It has much better spool than a gt1544v hybrid with a 52mm compressor wheel and much better spool than the GT1749V and GT052V I ve worked on.
There is also a 115 BHP version which uses a Siemens SID807 ECU, Siemens injectors and a Garrett GTD1244VZ VNT turbo charger.
 The 1.6 8V HDI engine is fitted to vehicles after 2010 and comes with three different power options. There are 75 BHP and 92 BHP models which both use the same injectors, turbo and ECU. These come fitted
1.6 HDI or TDCI (up to 2010) Turbo and injector upgrade
 Turbo and injector upgrade") 1.6 HDI or TDCI (up to 2010) Turbo and injector upgrade The 1.6 90 and 110 16v engines are the same apart from the turbo charger and the injectors. The injectors both use the same body however the 110
1.6 HDI or TDCI (up to 2010) Turbo and injector upgrade The 1.6 90 and 110 16v engines are the same apart from the turbo charger and the injectors. The injectors both use the same body however the 110
A short explanation of the modifications made in a poor quality ECU remap
 HDI-Tuning Limited A short explanation of the modifications made in a poor quality ECU remap Steven Lewis 12 Introduction This document has been written to educate those planning on using a poor quality
ESS INSTALL. The donor car /6 Cosmos Black/Sand UUC Short Shifter Brembo cross drilled rotors Phillips Nav System 16:9
 ESS INSTALL The donor car.. 1997 540/6 Cosmos Black/Sand UUC Short Shifter Brembo cross drilled rotors Phillips Nav System 16:9 The install went in several stages. Disconnect the battery Stage 1 Remove
My Hawk build part 24 by Stuart Clarke. Getting ready to turn the key.
 My Hawk build part 24 by Stuart Clarke Getting ready to turn the key. Things had moved on quite nicely now and the end was virtually in sight. It was getting to that do or die moment when I find out if
Actual CFM = VE Theoretical CFM
 Here is a brief discussion of turbo sizing for a 2.0 liter engine, for example, the 3-SGTE found in the 91-95 Toyota MR2 Turbo. This discussion will compare some compressor maps from the two main suppliers
Intake Kit Supplement for CRV and Pathfinder
 Intake Kit Supplement for CRV and Pathfinder This guide will briefly outline how to install the intake kits for the Honda CRV and Nissan Pathfinder. This is a pretty basic job, but for the average person
03-04 Mach 1. Hellion Power Systems Mach 1 Kit Instructions
 Hellion Power Systems 03-04 Mach 1 Kit Instructions Part 1 Hellion recommends that the front suspension system be installed either by trained professionals or by 5.Remove rack bolts K-Member Installation
99-04 GT. Hellion Power Systems Mustang GT Kit Instructions
 Hellion Power Systems 99-04 Mustang GT Kit Instructions Part 1 Hellion recommends that the front suspension system be installed either by trained professionals or by 5.Remove rack bolts K-Member Installation
Ford Racing BOSS 302 Engine Oil Cooler (11-14 GT)
") Tools needed: 14mm hex socket 7mm socket/wrench 8mm socket/wrench Ford Racing BOSS 302 Engine Oil Cooler (11-14 GT) 10mm socket (for airbox removal) ¾ inch or 19mm wrench Torque wrench Appropriate ratchets
Tools needed: 14mm hex socket 7mm socket/wrench 8mm socket/wrench Ford Racing BOSS 302 Engine Oil Cooler (11-14 GT) 10mm socket (for airbox removal) ¾ inch or 19mm wrench Torque wrench Appropriate ratchets
V1 Truck Manifold Turbo Kit for F-body
 V1 Truck Manifold Turbo Kit for 98-02 F-body Prep: -Remove all A/C Components, Alternator and brackets, tensioner, front bumper, front bumper foam, and front bumper support. Remove radiator and cooling
DUAL REMOTE OIL FILTER MODIFICATION 4 TH GENERATION FIREBIRDS
 Written by Dave Dorey (lonetechie) Copyright FirebirdNation.com The following article details how I installed a dual remote oil filter system on my 2001 Formula Firebird. If you decide to tackle this project,
Corvette Stage X Twin Turbo Installation. Please read the entire instructions as we ve made many changes.
 Corvette Stage X Twin Turbo Installation Please read the entire instructions as we ve made many changes. Disconnect battery. Remove plastic fuel rail covers over the valve cover. Remove Air Box in front
05-08 GT. Hellion Power Systems Mustang Kit Instructions
 Hellion Power Systems 05-08 Mustang Kit Instructions 1. Disconnect Battery 2. Drain Radiator, keep fluid for re-installation. 3. Remove air box and inlethoses. 6. Next, underneath, punch oil pan for turbo
BMW 2002 M42 Swap Notes-THIS IS NOT FINISHED
 BMW 2002 M42 Swap Notes-THIS IS NOT FINISHED This document is to help those that want to install an m42 into a BMW 2002. It is based around an e30 engine, trans, and wiring. You can use the e36 block/head/wiring
4. Remove (4) 10mm and (1) 7mm bolt that holds fascia at front corners, on each side
 10mm and (1) 7mm bolt that holds fascia at front corners, on each side") 2010 Camaro LS3 1. Disconnect battery ground 2. Remove front wheels 3. Remove (5) push pins and (5) #20 torx screws on inner front wheel well liners and remove liners on each side 4. Remove (4) 10mm and
2010 Camaro LS3 1. Disconnect battery ground 2. Remove front wheels 3. Remove (5) push pins and (5) #20 torx screws on inner front wheel well liners and remove liners on each side 4. Remove (4) 10mm and
Z1 Motorsports 300zx 2.5 Upgraded piping & BA SMIC Install Guide
 Z1 Motorsports 300zx 2.5 Upgraded piping & BA SMIC Install Guide Congratulations on your new upgraded piping and intercooler kit, this kit has proven to provide the lowest intake air temps to date on our
This is what we are trying to create in the steps below
 You will need: (1) Some 3/4 aluminium or steel flat bar (+/- 1 foot) (2) About 12 of 3 Aluminium or steel tubing. (2) Piece of 3X3 silicone hose and 2 hose clamps (3) 1 K&N (or similar) high flow filter
Fitting the Bell Auto Services (B-A-S) TDV6 EGR Blanking Kit to a 2006 model Discovery 3 TDV6 HSE
 TDV6 EGR Blanking Kit to a 2006 model Discovery 3 TDV6 HSE") Fitting the Bell Auto Services (B-A-S) TDV6 EGR Blanking Kit to a 2006 model Discovery 3 TDV6 HSE Before I describe how I did this, I must first thank other members of the Disco3.co.uk forum (namely J,moore
Fitting the Bell Auto Services (B-A-S) TDV6 EGR Blanking Kit to a 2006 model Discovery 3 TDV6 HSE Before I describe how I did this, I must first thank other members of the Disco3.co.uk forum (namely J,moore
CXRacing Nissan 240SX KA24E SOHC Turbo Kit Installation Guide
 CXRacing 89-90 Nissan 240SX KA24E SOHC Turbo Kit Installation Guide CXRacing s KA24E Turbo kit is for NA Conversion to Turbo, the kit is designed with simple installation. This guide is intended for Professional
Corrado Club of Canada. VR6 Engine FAQ. By: Dennis
 Corrado Club of Canada VR6 Engine FAQ By: Dennis I thought I would snap a few pics of the engine compartment on my 1994 VR6 Corrado. First, this is the updated engine management system so it does have
M-Tuned reroute kit XX
 M-Tuned reroute kit 14-161XX Manufactured and designed by: *Professional Installation Recommended but not required 1) Disconnect the negative terminal from the battery in the trunk. 2) Drain the coolant
96-04 tt. Hellion Power Systems Mustang Twin Turbo Kit Instructions
 96-04 tt Hellion Power Systems 1996-2004 Mustang Twin Turbo Kit Instructions 1. Disconnect battery and elevate front end of car on either Jack stands or a lift if available 2.Lock steering wheel and remove
CHALLENGER TWIN TURBO SYSTEM INSTALLATION INSTRUCTIONS
 CHALLENGER TWIN TURBO SYSTEM INSTALLATION INSTRUCTIONS 1 Verify contents of kits with supplied packing list 1) Unhook the battery. 2) Remove wheel wells & front fascia of vehicle. 3) Remove the catalytic
How to stick a 3.4L engine into your Boxster.
 How to stick a 3.4L engine into your Boxster. When I purchased my 99 Boxster in January, it was already equipped with a TPC supercharger setup. While fun and a great improvement over the rather anemic
With 190 bhp CORSA VXR STAGE 3 CONVERSION TECH NOTE
 TECH NOTE CORSA VXR STAGE 3 CONVERSION Vauxhall tuning experts Courtenay Sport take us through their Stage 3 and exhaust upgrade for the Corsa VXR. Words and photos: Dougie With 190 bhp in standard form,
Volvo 850 Radiator Replacement Jason Reed 29 March 2013
 This write up covers removing and replacing the radiator on a 97 855 GLT wagon with light pressure turbo and automatic transmission. This car has 162K miles. The radiator, which was original, developed
GT-R Alpha 10/12 Turbo Kit
 GT-R Alpha 10/12 Turbo Kit Instructions V6 The goal of AMS is to provide the highest quality, best performing products available. By utilizing research and development, and rigorous testing programs AMS
Installation of Adapter board and High Boost EEPROM in Lotus Elan
 Installation of Adapter board and High Boost EEPROM in Lotus Elan Checklist Disclaimer This modification is intended for track day use to increase the maximum boost of the Lotus Elan. Installation and
Triumph Street Triple VSM Grip Heater Install
 Triumph Street Triple VSM Grip Heater Install Introduction: With winter fast approaching and with painful memories of last winter riding with the club it was time to do something about getting some grip
OIL COOLER KIT INSTALLATION INSTRUCTIONS D Application: , E89 Z4 sdrive 35i without stock oil cooler* PARTS LIST
 OIL COOLER KIT INSTALLATION INSTRUCTIONS D570-0891 Application: 2009-11, E89 Z4 sdrive 35i without stock oil cooler* PARTS LIST Qty Part No. Description 1 D573-0050 Oil Cooler + Frame Assy 1 D573-0044
Common Terms Selecting a Turbocharger Compressor... 4
 TURBOCHARGERS Common Terms... 2 Adiabatic Efficiency... 2 Pressure Ratio... 2 Density Ratio... 2 Turbine... 2 A/R Ratio... 2 Charge-Air-Cooler... 2 Boost... 3 Waste Gate... 3 Turbo Lag... 3 Boost Threshold...
Replacing MK4 Golf/Jetta radiator mounts in-car
 Replacing MK4 Golf/Jetta radiator mounts in-car This is a guide to replacing the radiator mounts in a MK4 Golf/Jetta. This involves moving the core support to the service position which allows you to do
TiAL R770 & S605. Installation notes. TIAL Sport!! TiALsport.com!! Revision 2
 TiAL R770 & S605 Installation notes TIAL Sport!! TiALsport.com!! Revision 2 Caution! The components in this package may require additional parts to be sourced or fabricated for the installation. Due to
INSTALL MANUAL D o d g e 1 2 v 6 B T A PLEASE READ ALL INSTRUCTIONS BEFORE INSTALLATION.
 PN#1045310 12V Dodge Twin Turbo Kit (I-00273) 1 INSTALL MANUAL BD Twin Turbo Kit 1994-1 9 9 8 D o d g e 1 2 v 6 B T A Part# 1045310 PLEASE READ ALL INSTRUCTIONS BEFORE INSTALLATION. * Picture as shown
3 October 2016 PN# V Dodge Twin Turbo Kit (I-00274) ½ D o d g e 2 4 v I S B
 ½ D o d g e 2 4 v I S B") 3 October 2016 PN#1045320 24V Dodge Twin Turbo Kit (I-00274) 1 DOWNLOAD ENHANCED INSTALL MANUALS AT dieselperformance.com BD Twin Turbo Kit 1998½- 2 0 0 2 D o d g e 2 4 v I S B Part# 1045320 PLEASE READ
3 October 2016 PN#1045320 24V Dodge Twin Turbo Kit (I-00274) 1 DOWNLOAD ENHANCED INSTALL MANUALS AT dieselperformance.com BD Twin Turbo Kit 1998½- 2 0 0 2 D o d g e 2 4 v I S B Part# 1045320 PLEASE READ
Instant Chat off the main page of Or simply call our tech team at
 FRONT MOUNT INTERCOOLER 2015+ WRX 2017-07-07 Thank you for purchasing this PERRIN product for your car! Installation of this product should only be performed by persons experienced with installation of
Specialist Components. SPi 5 Port EFI Kit
 Specialist Components SPi 5 Port EFI Kit Version 1.1 Sept 2012 Congratulations on the purchase of your SPi 5 port EFI Kit! Kit Content:- Alloy inlet manifold gasflowed to suit 45/50mm throttle body Injector
Step 6: Remove and save the MAP sensor for later use. Step 7: Remove the passenger side intercooler pipe and the EGR intake manifold.
 LBZ Twin kit Install Step 1: Disconnect both batteries. Step 2: Drain coolant and oil also remove passenger side inner fender. Step 3: Remove intake box and piping. (Remove and save the MAF sensor in the
03-04 Cobra. Hellion Power Systems Mustang Cobra Kit Instructions
 Hellion Power Systems 03-04 Mustang Cobra Kit Instructions NECESSARY PARTS REQUIRED FOR INSTALLATION Necessary: 03-04 Cobra hellion Kit ONLY 99-01 Alternator #YR3210346AA Alternator Bracket #XR3Z-10153-AB
TURBO KIT INSTRUCTIONS
 Revision 12/20/10 TURBO KIT INSTRUCTIONS This turbo kit consists of the necessary parts to upgrade or add a turbo to your 22R/RE/RET. This kit may require some fabrication to address your particular application
Rotated Tuner Kit for Garrett GT Turbos
 Rotated Tuner Kit for Garrett GT Turbos 031411 Thank you for purchasing the PERRIN performance rotated turbo kit. Installation of this turbo should only be performed by persons experienced in the installation
Air Oil Separator for WRX
 Air Oil Separator for 2015+ WRX 2018-06-05 Thank you for purchasing this PERRIN product for your car! Installation of this product should only be performed by persons experienced with installation of aftermarket
MC Xpress AB Norra Altervägen ALTERSBRUK Sweden
 Installation manual turbo kit SkiDoo/Lynx ACE 900 1 MC Xpress AB Norra Altervägen 821 945 92 ALTERSBRUK Sweden Tel: +46 911 202005 Fax: +46 911 202008 www.mcx.se Supreme of the extreme! Thank you for choosing
Please read all instructions before proceeding with the installation DA1K1 & DA2K1
 Installation Instructions For: Part Number DA1K1 and DA2K1 for K-series engines used with the RSX or Civic Si Transmission into 1990-1993 Acura Integra Hasport Performance mounts and mount kit accessories
Scion FR-S ZN6. GTX2867R Gen2 (Internal Wastegate) Installation Instructions GPP P/N #
 Installation Instructions GPP P/N #") TURBO KIT Scion FR-S ZN6 Subaru BRZ ZC6 GTX2867R Gen2 (Internal Wastegate) Installation Instructions GPP P/N # 11518000 Vehicle Type Chassis Code Engine Code Transmission Model Year Scion FR-S DBA-ZN6
TURBO KIT Scion FR-S ZN6 Subaru BRZ ZC6 GTX2867R Gen2 (Internal Wastegate) Installation Instructions GPP P/N # 11518000 Vehicle Type Chassis Code Engine Code Transmission Model Year Scion FR-S DBA-ZN6
M-TUNED COOLANT RE-ROUTE KIT
 M-TUNED COOLANT RE-ROUTE KIT Part # MC-RR-216, MC-RR-218 Applications: 90-93 Miata 1.6L B6 94-97 Miata 1.8L BP More detailed instructions: http://www.etdracing.com/m-tuned/reroute.pdf 1) Disconnect Negative
Mercedes E63/CLS AMG Carbon Turbo Intake System Instructions
 Mercedes E63/CLS AMG Carbon Turbo Intake System Instructions The goal of Alpha Performance is to provide the highest quality, best performing products available. By utilizing research and development,
Peugeot 406 Coupe: Delocking your boot V.1 April 2005
 This is a first stab at a DIY guide to de-locking your 406 Coupe. It isn t a hard modification to do yourself, but you do need to be confident working on your cars electrics and removing and refitting
Installation Instructions
 2011-2013 LML DURAMAX COMPOUND-ADD 2011-2015 LML A Duramax TURBO KIT Add INSTALL A Turbo INSTRUCTIONS Compound Kit Installation Instructions 1-800-955-0476 - www.industrialinjection.com - info@industrialinjection.com
LML 3 Y-Bridge Kit or High Flow Intake Bundle Package
 2011-2016 LML 3 Y-Bridge Kit or High Flow Intake Bundle Package Covers installation of PN s: WCF100607, WCF100691, WCF100716, & WCF100353 Note: This Kit is for off road competition use only! Overview-
HASPORT PERFORMANCE EFJ1
 HASPORT PERFORMANCE Installation Instructions For: Part Number EFJ1 for J-series V6 engines into 1988-1991 Honda Civic and CR-X Hasport Performance mounts are the result of extensive research and engineering.
FITTING OIL TEMP AND PRESSURE GUAGES
 FITTING OIL TEMP AND PRESSURE GUAGES this guide is of reference to fitting an oil temp and pressure sender/ sensor into a sandwich plate- not the sump plug temp sensor (although it wouldn't be much different
Tempted by the Fruit of Another (A Little Red Diversion)
") Part 4 Tempted by the Fruit of Another (A Little Red Diversion) Last month saw the Green n Mean s back end problems remedied; it also saw the purchase of another V12 XJS by the lost soul writing this article.
Part 4 Tempted by the Fruit of Another (A Little Red Diversion) Last month saw the Green n Mean s back end problems remedied; it also saw the purchase of another V12 XJS by the lost soul writing this article.
POLESTAR HS Management System
 POLESTAR HS Management System Installation Instructions This document contains the information needed to install and adjust the POLESTAR HS Engine Management System. It assumes that the system already
Steeda Sport Mustang Lowering Springs (2005+) - Installation Instructions
 - Installation Instructions") Steeda Sport Mustang Lowering Springs (2005+) - Installation Instructions The below installation instructions work for the following products: Steeda Sport Mustang Lowering Springs (2005+) Please read
Steeda Sport Mustang Lowering Springs (2005+) - Installation Instructions The below installation instructions work for the following products: Steeda Sport Mustang Lowering Springs (2005+) Please read
N55 Turbo upgrade install guide
 N55 Turbo upgrade install guide Thank you for your purchase of the VTT BMW N55 Stage 2 turbo charger upgrade! First thing to do when you open your box is to make sure all parts are in their respective
C5 Audi Allroad (Wabco) Suspension Compressor Strip/Repair.
 Suspension Compressor Strip/Repair.") C5 Audi Allroad (Wabco) Suspension Compressor Strip/Repair. Here are some of my experiences stripping 2 off Audi Allroad C5 suspension compressors to see what makes them tick; The compressor is fairly
C5 Audi Allroad (Wabco) Suspension Compressor Strip/Repair. Here are some of my experiences stripping 2 off Audi Allroad C5 suspension compressors to see what makes them tick; The compressor is fairly
Installation Instructions For: Part Number EGJ1 for J-series V6 engines into Honda Civic, Del Sol And Acura Integra
 Installation Instructions For: Part Number EGJ1 for J-series V6 engines into 1992-1995 Honda Civic, 1994-1997 Del Sol And 1994-2001 Acura Integra Hasport Performance mounts are the result of extensive
Fitting a.45 ACP Conversion Cylinder Copyright 2014 Roy Seifert
 Copyright 2014 Roy Seifert Disclaimer: This article is for entertainment only and is not to be used in lieu of a qualified gunsmith. Please defer all firearms work to a qualified gunsmith. The author assumes
My Hawk build Part 8 by Stuart Clarke
 My Hawk build Part 8 by Stuart Clarke Front hubs, brakes and brake lines. There was still no news on my rear springs so I thought I d find something else to get on with. I had the front hubs, brake calipers
Pump Gas Instructions for Polaris And 800 Models. Important Information before Installing This System:
 Pump Gas Instructions for Polaris 600 700 And 800 Models Important Information before Installing This System: Before you begin your turbo install, read through these instructions to determine if you are
Installation Instructions Diesel Nitrous System (#82028)
") Installation Instructions Diesel Nitrous System (#82028) Thank you for choosing ZEX. If at any time you have questions regarding this or any of our products, please call our Nitrous Help support line at
Installation Instructions Diesel Nitrous System (#82028) Thank you for choosing ZEX. If at any time you have questions regarding this or any of our products, please call our Nitrous Help support line at
(905)
") (905)953-9260 Marc@M-Tuned.com Coolant Reroute Kit *Professional Installation Recommended but not required 1) Disconnect Negative Terminal from Battery in trunk. 2) Drain Coolant from your cooling system.
(905)953-9260 Marc@M-Tuned.com Coolant Reroute Kit *Professional Installation Recommended but not required 1) Disconnect Negative Terminal from Battery in trunk. 2) Drain Coolant from your cooling system.
Troubleshooting Guide for Limoss Systems
 Troubleshooting Guide for Limoss Systems NOTE: Limoss is a manufacturer and importer of linear actuators (motors) hand controls, power supplies, and cables for motion furniture. They are quickly becoming
Keeping You Cool Under Pressure
 Installation Instruction for 92-93 GM 6.5L Turbo Diesel Series 3500-4 Wheel Drive Pickup and Series 1500, 2500, 3500 4 Wheel Drive Suburban Intercooler System (Part No. 2-436) TOOLS REQUIRED: 1.) Normal
There is hence three things you can do - add oil, adjust the temp that the clutch begins to engage, or do both.
 As most of you may be aware, I have been doing a lot of research lately on our cooling system in the 80's including the fact that we have a dead spot on the OEM temp gauge which prompted me to not rely
At Mark's suggestion I thought I'd write this up so future Coupe lovers can have as much fun* as I did with this job.
 At Mark's suggestion I thought I'd write this up so future Coupe lovers can have as much fun* as I did with this job. My enormous thanks to forum members, particularly glorfindel, for their advice when
98-02 LS1 F-Body Single Turbo Truck Manifold Kit
 98-02 LS1 F-Body Single Turbo Truck Manifold Kit Prep: -Remove all A/C Components, Alternator and brackets, tensioner, front bumper, front bumper foam, and front bumper support. Remove radiator and cooling
Troubleshooting Guide for Okin Systems
 Troubleshooting Guide for Okin Systems More lift chair manufacturers use the Okin electronics system than any other system today, mainly because they re quiet running and usually very dependable. There
Ventilation System Before Starting
 How Long Should You Crank An Engine Ventilation System Before Starting Any electric start motor should be able to be started using a rope, (unless the motor Someone may have "worked' on it before and flopped
MGB V8 Roadster restoration project
 21st October 2016. It is now Friday afternoon and my friend Dugald has gone back to North London in his MGBGTV8. Dugald has been up here in North Norfolk helping me since Monday afternoon. We managed to
INSTRUCTIONS. #82028 Diesel Nitrous System. Thank you for choosing ZEX products; we are proud to be your manufacturer of choice.
 1 INSTRUCTIONS #82028 Diesel Nitrous System Thank you for choosing ZEX products; we are proud to be your manufacturer of choice. Why our nitrous system is better: 2 Performance enthusiasts know the potential
Porsche 928 with 16v LH-Jetronic Fuel System
 Porsche 928 with 16v LH-Jetronic Fuel System Toll-Free Tech Hot Line: 877-FOR-928M 877-367-9286 Please do not copy this manual and give copies to your friends. Our ability to bring you this supercharger
FRONT MOUNTED INTERCOOLER KIT. Renault 5 GT Turbo 1985* to 1991
 1 FRONT MOUNTED INTERCOOLER KIT Renault 5 GT Turbo 1985* to 1991 Although this has been fitted to a Phase 2 model, there is little reason to believe it will not fit the Phase 1 model as well. It is recommended
Lancia Delta Integrale tuning guide
 Lancia Delta Integrale tuning guide Front view Important: On cars equipped with A/C, the dryer needs to be relocated and the system has to be recharged with gas Cut out section: Part of the non supporting
JRSC + BBK Install on SVTF. Neil A. Shah medicnas on focaljet September 2006
 JRSC + BBK Install on SVTF Neil A. Shah medicnas on focaljet September 2006 ECU up here. When removing make sure the smaller bundles of wires don t get wrapped around the bottom edge and break - this almost
These instructions were written for reference only and the use of a factory service manual is recommended.
 Introducing the CorkSport High Pressure Fuel Line designed for the MZR DISI. This fuel line is designed to replace the OEM fuel line which are prone to failure at the brazed connection at the rail. The
Instant Chat off the main page of Or simply call our tech team at
 08+ Rotated Tuner Kit for Garrett GT Turbos 2016-11-03 Thank you for purchasing this PERRIN product for your car! Installation of this product should only be performed by persons experienced with installation
Trackspeed Engineering, LLC 1289 Reamwood Ave #A, Sunnyvale, CA
 Trackspeed Engineering, LLC 1289 Reamwood Ave #A, Sunnyvale, CA 94089 650-701-7223 info@trackspeedengineering.com Trackspeed DIY Turbocharger System Installation Instructions v1.00 (10/12/16) Thanks for
Huron Speed Products Twin Turbo Install Gen 2 CTS-V (09-15)
") Huron Speed Products Twin Turbo Install Gen 2 CTS-V (09-15) The following install guide is simply that, a guide to help you with installation. It is by no means the exact method to perform installation,
Huron Speed Products Twin Turbo Install Gen 2 CTS-V (09-15) The following install guide is simply that, a guide to help you with installation. It is by no means the exact method to perform installation,
The Definative 'How to fit a T28' guide
 The Definative 'How to fit a T28' guide Morning all, Looking for bits of info on adapting a t28 for a Rover i found only dribs and drabs of information in a fiew scattered thread, and alot of 'i think'
Tools Required. Metric Wrench Set Screwdriver Set Metric Socket Set Pliers Heavy duty hydraulic Jack and Car Stands Box knife or similar Hacksaw WD40
 Subaru 2004+ Legacy GT & Outback XT For JDM 2.0 twinscroll turbo and USDM 2.5 turbo models Front Mount Intercooler Fitting Instructions PN# LEG-1348-000 You are now the proud owner of a highly tested and
Note: Hydro-shields, filter charger kits and replacement parts are sold on-line at injenonline.com
 Part number SES1202FMGT 2005 1/2-07 Subaru Impreza STi 2006-07 Subaru Impreza WRX 2.5L, 4 cyl. Turbo 1- Six piece mandrel bent piping 1- Giant size front mount (#11028) intercooler core and tanks 23 3/4
TRIUMPH ST ROSTRA ELECTORNIC CRUISE CONTROL
 TRIUMPH ST 1050 - ROSTRA ELECTORNIC CRUISE CONTROL There have been a number of threads discussing the pros and cons of electronic vs throttle lock cruise controls. Living in Texas can require some long
OIL COOLER KIT INSTALLATION INSTRUCTIONS PART NUMBER D
 OIL COOLER KIT INSTALLATION INSTRUCTIONS PART NUMBER D570-0904 APPLICATION: 2011-2012 E90 335i/xi (N55 engine) with BMW standard bumper and with stock oil cooler Congratulations for being selective enough
Thermostats, Radiator, Coolant Hose, Hydraulic Fan/Steering R&R PT38 8V92
 REMOVING AND REPLACING THE THERMOSTATS, COOLANT HOSES, RADIATOR AND CHANGING THE HYDRAULIC FAN/STEERING FILTER/OIL/SHAFT SEALS ON A 1987 PT38 8V92 BY CURT SPRENGER March 2007 Thermostats, Radiator, Coolant
Installation Manual v1.0: 10-Digit P/N: Aurora 3000 Turbo System L Powerstroke Ford
 Installation Manual v1.0: 10-Digit P/N: 202-930-3224 Aurora 3000 Turbo System 99-03 7.3L Powerstroke Ford Please read all instructions before installation. Figure 1 - Full Kit Photo 1. Park the vehicle
Changing the Power Steering Belt
 Changing the Power Steering Belt Brett Dukes (Maverick) from the BigJimny Forum has contributed this article to the Website. Many thanks. Whilst off-roading on Sunday, my alternator Fan Belt snapped -
Free Flow Exhaust Installation Instructions
 Free Flow Exhaust Installation Instructions PART NUMBER: APPLICATION: D660-0035 (polished tips) or D660-0035-BLK (black ceramic tips) 2010-11 X5-M & X6-M Parts List 1 D663-0159 (-BLK, for black tips) X5
Thank you for purchasing the Dezod Motorsports Return Fuel System for your Scion tc.
 Thank you for purchasing the Dezod Motorsports Return Fuel System for your Scion tc. We took much pride in putting together a fuel system that would deliver a maximum amount of fuel as simply as possible
Fitting Instructions For The TDV6 EGR Blanking Kit To A 2006 Model Discovery 3 TDV6 GHSE
 Part Number DA1112 Fitting Instructions For The TDV6 EGR Blanking Kit To A 2006 Model Discovery 3 TDV6 GHSE You do this modification at your own risk. Britpart won t be held responsible for what is written
IT S ELECTRIC SWITCHING TO HOLLEY EFI YIELDS BETTER DRIVABILITY AND MORE POWER FOR A BOOSTED 68 FIREBIRD
 WORDS: Scott Parker PICTURES: By Redline Motorsports IT S ELECTRIC SWITCHING TO HOLLEY EFI YIELDS BETTER DRIVABILITY AND MORE POWER FOR A BOOSTED 68 FIREBIRD I t s been said many times, and often it has
 www.thecarproblems.com/automotive-service-centre How You Diagnose Your Car Problems And Save Money A Quick Look At An Automotive Service Turbo For Your Car - Benefits, Precautions And Just How Does It
Technician Turbocharger Guide for the L Power Stroke Engine
 Technician Turbocharger Guide for the 2003.25 6.0L Power Stroke Engine Vanes VGT Actuator Piston Turbine Wheel Shaft Seal Compressor Wheel VGT Control Valve TURBOCHARGER DESCRIPTION AND BASIC OPERATION
DrVanos.com Stage II Installation Instructions. Tool rental is available with the purchase of a vanos kit *See website for more info*
 DrVanos.com Stage II Installation Instructions Special Tools Needed: Camshaft locking tool TDC Crank pin Sprocket turning tool Tool rental is available with the purchase of a vanos kit *See website for
Hybrid Racing Racing Performance Air Intake System Acura RSX Type S
 Hybrid Racing Racing Performance Air Intake System 02-06 Acura RSX Type S This is a step by step guide on how to install the Hybrid Racing Performance Air Intake System on the 02-06 Acura RSX Type S. Written
2001 V70 T5 ETM Removal and Cleaning Directions
 2001 V70 T5 ETM Removal and Cleaning Directions Howard Cheng howardc64@gmail.com 10/24/05 Version 1.4 Read this before you start I performed this ETM cleaning because I had gotten 2 reduced performance
Turbo Dynamics Z1/F1100T ECU reflash with four switch positions
 Turbo Dynamics Z1/F1100T ECU reflash with four switch positions Gary Berwind bought the Turbo Dynamics Stage 4 tune for his 2010 Z1 SnoPro. He had considered all the current reflash and piggyback tuning
*Some speedometers have these additional electronic connections. If yours does, then remove the smaller slotted screws shown.
 www.odometergears.com 1981-1985 240 Cable-Driven Speedometers (NOT for 1986 and later electronic units) http://www.davebarton.com/240-odometer-repair.html For this set of instructions below, I will not