HYBRID DEVELOPMENT INTERNATIONAL RACING INTERCOOLER KIT INSTALLATION MANUAL
|
|
|
- Rafe Robinson
- 6 years ago
- Views:
Transcription


1 HYBRID DEVELOPMENT INTERNATIONAL RACING INTERCOOLER KIT INSTALLATION MANUAL
2 Please read before continuing Please read through all the instruction and practice all precaution in all aspect of safety and every step prior and during the installation. This installation manual is purely for HYBRID DEVELOPMENT INTERNATIONAL RACING INTERCOOLER KIT And is used as guide only. As different vehicles in different countries may have different specifications and component layout. Therefore, it is important to make sure the connection is properly done by authorized technician or HDi Technical Dealers. Warning Check and clean all open area for foreign object inside. Installation should only be carried out by authorized dealer or agent only. Avoiding water, liquid or fluid during and post installation. Do not install the unit in a place that will interface the driver. This product is for off road use only not for public road. Never adjust the fitment when the car is moving or on public road,doing so is dangerous to yourselves and others Make sure there is adequate ventilation if you are installing or setting it indoors. LIMITED WARRANTY Hybrid Development (HK) ltd will warranty for the period of 1 year from original purchase against all defects in workmanship and materials. Hybrid Development (HK) ltd is not responsible for expenses incurred for labor, personal injury or inconvenience. Hybrid Development (HK) ltd sole responsibility is to offer a replacement product or to repair the damaged product. Hybrid Development (HK) ltd cannot warranty products damaged by improper installation. All other products sold by Hybrid Development (HK) ltd are warranted by the original manufactures and is not the responsibility of Hybrid Development (HK) ltd. All products are for racing use only. All rights reserved. For more information please visit or contact tech@hybrid-power.com This installation manual is a guide only. Pictures are for illustration purposes only as the vehicles and product may vary in different countries / regions. Before opening the content of the Intercooler Kit please read through the installation manual to confirm your vehicle is suitable for this Intercooler Kit.


3 Using a heavy duty car jack lift the vehicle and place heavy duty car stands in the appropriate position as recommended in the Manufacturer s Owners Manual. Remove the screw clips from the air snorkel Permanently remove the air snorkel from the air box


4 Remove the factory air box. Bolt location may vary to picture. Remove the grill shroud and grill by unscrewing the clips


5 Remove the grill and shroud. Unscrew the clips near the headlights Remove the screws from both, drivers and passenger side from under the bumper bar, see over page for complete fixing points.


6 Unbolt the lower splash tray in the indicated points Remove the 3 screw clips from the inner wheel arch on both the drivers and passengers side


7 Push aside the inner wheel arch guard and unbolt from support bracket Carefully remove the front bumper bar in a slide forward movement. Prior to complete separation unclip the fog light harness.


8 Remove the plastic bumper bar support mesh by unbolting 6 bolts HEAD LIGHT REMOVAL (both Passenger and Drivers side). Unbolt the headlight from the front.


9 Unbolt the top and side bolt from the head light brackets Carefully unclip the wiring harness from the back of the Head Light


10 Very carefully remove the Head Light by sliding the light out. PIPE REMOVAL: The factory clamps have metal caps over the screws. These will all need to be removed prior to unscrewing the clamp.


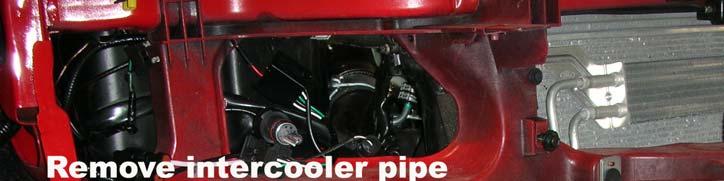
11 Starting at the intake manifold, unscrew and loosen the clamp Remove the factory intercooler pipe from the intake manifold end only


12 Unscrew the clamp close to the radiator of the factory intercooler pipe on the intake manifold side. Now all screw clamps are loosened permanently remove the factory intercooler pipe


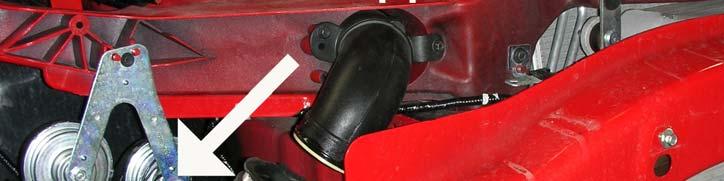
13 Unbolt the intercooler pipe bracket from the head light reinforcement from under the passenger side headlight location. Unscrew the clamp from the passenger side of the factory intercooler


14 Permanently remove the factory intercooler piping by sliding through the plastic reinforcement and away from the vehicle


15 On the drivers side unscrew the clamp from the factory intercooler pipe On the drivers side unscrew the clamp from the factory intercooler
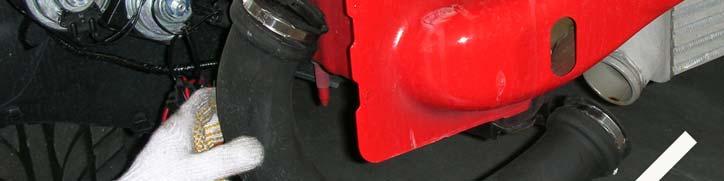


16 Now permanently remove the factory intercooler pipe from the intercooler Unbolt the intercooler pipe bracket from under the head light reinforcement


17 ENGINE BAY on the drivers side: Unbolt the factory intercooler pipe from the metal support bracket Unscrew the clamp from the factory intercooler pipe


18 On the drivers side remove the factory intercooler pipe by sliding through the hole in the plastic headlight reinforcement bar Finally, unscrew the clamps on the intercooler pipe and permanently remove from the turbo.


19 The factory intercooler needs to unbolted in 4 points Slide the factory intercooler down behind the reinforcement bar and remove permanently. Take care not to damage the air conditioning radiator.


20 Unbolt the intercooler bracket from both the drivers and passenger side


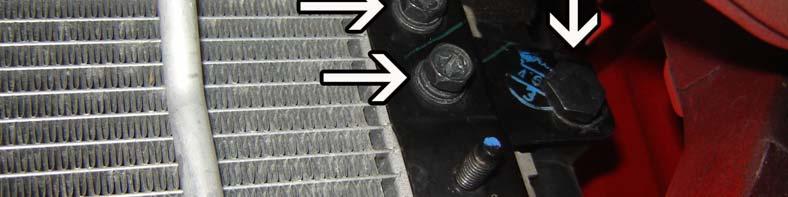
21 Trim the bolt thread on the bracket from both the drivers and passenger side and reinstall to its original position Unbolt the radiator support bracket from the passenger side. ONLY REMOVE ONE BRACKET AT A TIME TO AVOID RADIATOR FALLING FROM POSITION


22 Unbolt the radiator support bracket from the driver s side. ONLY REMOVE ONE BRACKET AT A TIME TO AVOID RADIATOR FALLING FROM POSITION Trim the radiator support bracket in the shaded area for the passenger side


23 Trim the radiator support bracket in the shaded area for the drivers side Reinstall the modified radiator support bracket and fasten tightly
24 Trim the internal edge of the bumper bar support to provide intercooler clearance. Trim the plastic support bar between the headlights for intercooler clearance.
25 Remove the bonnet release catch from the radiator support. Place the HDi top bracket behind the bonnet release and reinstall the bonnet release than fasten tightly Carefully install the HDi GT2 Pro intercooler behind the bumper bar support bar to avoid scratching. Connect the HDi GT2 Pro intercooler to the HDi top intercooler bracket using the supplied M8 bolts. Secure tightly. PICTURE INSTALL LOWER BRACKET Install the HDi Lower brackets to the lower metal front cross member utilizing the existing holes. Fasten tightly with supplied bolts. Then fasten to the HDi GT2 PRO intercooler and secure tightly.

26 Loosen the two screw clamps at the bottom of the intake pipe and rotate approximately 10 degrees to the right. Fasten securely after pipe work is installed. Install an HDi 2.75 Silicon Hose to the intake pipe and fasten tightly with one 2.75 HDi Super Clamp. Slide another 2.75 clamp on the HDi Intercooler pipe. Insert the HDi Intercooler pipe ALP-FGXR6-092 into silicon. Slide the Super Clamp back on to the HDi Silicon hose into position and secure, but not tightly to allow for adjustment.


27 Place the O-Ring on ALP-FGXR6-092 and lubricate. Connect HDi Pipe ALP-FGXR6-088A to pipe ALP-FGXR- 092 and secure with the outer locking ring. Place the O-Ring on ALP-FGXR6-088A and lubricate. Enlarge the intercooler piping hole on the passenger side to suit the HDi Intercooler Piping ALP-FGXR6-088B
28 Insert ALP-FGXR6-088B through the enlarged intercooler piping hole and check for clearance. Now connect ALP-FGXR6-088B to ALP-FGXR6-088A and secure with the outer locking ring. Install an HDi Silicon Hose to ALP-FGXR6-088B and fasten tightly with one 2.75 HDi Super Clamp. Slide another 2.5 clamp on the HDi Intercooler pipe. Insert the HDi Intercooler pipe ALP-FGXR6-087 into silicon. Slide the Super Clamp back on to the HDi Silicon hose into position and secure, but not tightly to allow for adjustment. Place the O-Ring on ALP-FGXR6-087 and lubricate. Connect HDi Pipe ALP-FGXR6-087 to the HDi GT2 PRO Intercooler and secure with the outer locking ring. MAKE FINAL PIPE ADJUSTMENTS THEN SECURE ALL HDI CLAMPS AND THE FACTORY INTAKE PIPE SCREW CLAMPS


29 Enlarge the intercooler piping hole on the passenger side to suit the HDi Intercooler Piping ALP-FGXR6-090 Place the O-Ring on ALP-FGXR6-091 and lubricate. Connect ALP-FGXR6-091 to the HDi GT2 PRO Intercooler and secure with the outer locking ring. Install an HDi 2.5 Silicon Hose to ALP-FGXR6-091 and fasten with one 2.5 HDi Super Clamp.
30 Slide HDi Intercooler pipe ALP-FGXR6-090 through the enlarged piping hole under the head light. Slide a 2.5 Super Clamp over the pipe then connect the pipe to the HDi Silicon hose. Slide the 2.5 Super Clamp back over the silicon and fasten. Connect the HDi Silicon hose to the turbo outlet. Secure tightly with a 2 clamp. Slide an HDi 2.5 Super Clamp on the HDi intercooler pipe ALP-FGXR6-089 then insert the pipe into the silicon hose. Slide the clamp over the silicon hose in position and fasten. Place an O-Ring on to ALP-FGXR6-090 and lubricate. Connect HDi pipe ALP-FGXR6-090 to ALP-FGXR6-089 and secure with outer locking ring. MAKE FINAL PIPE ADJUSTMENTS THEN SECURE ALL HDI CLAMPS


31 The installation of the HDi GT2 PRO Intercooler kit is now complete. Check all pipe clearances and make adjustments then fasten tightly all HDi Super Clamps. Reinstall the headlights, bumper bar, splash tray (some trimming maybe required), grill and air box to their original position. Note: Due to the high flow and low pressure drop characteristic of the HDi intercoolers the turbo efficiency may increase and the factory boost limiter maybe reached. If this is experienced, please consult an HDi Technical Dealer.

32 END OF INSTALLATION MANUAL
HYBRID DEVELOPMENT INTERNATIONAL RACING INTERCOOLER KIT INSTALLATION MANUAL
 HYBRID DEVELOPMENT INTERNATIONAL RACING INTERCOOLER KIT INSTALLATION MANUAL Please read before continuing Please read through all the instruction and practice all precaution in all aspect of safety and
HYBRID DEVELOPMENT INTERNATIONAL RACING INTERCOOLER KIT INSTALLATION MANUAL XR5 MODEL : 11/07 VIN : WF05XXGCD
 HYBRID DEVELOPMENT INTERNATIONAL RACING INTERCOOLER KIT INSTALLATION MANUAL XR5 MODEL : 11/07 VIN : WF05XXGCD Please read before continuing Please read through all the instruction and practice all precaution
HYBRID DEVELOPMENT INTERNATIONAL RACING INTERCOOLER KIT INSTALLATION MENU SUBARU LEGACY B4 BL5 SUBARU LIBERTY GT BL5
 HYBRID DEVELOPMENT INTERNATIONAL RACING INTERCOOLER KIT INSTALLATION MENU SUBARU LEGACY B4 BL5 SUBARU LIBERTY GT BL5 Please read before continue Please read through all the instruction and practice all
Product Detailed Information
 Product Detailed Information HDI SUBARU WRX GDG MY06-07 + CAI GT2-PRO INTERCOOLER KT Description Intercooler kit (work with SUBARU WRX GDG MY06-07 + CAI) Product Code IK-GDG-GT2-PRO-SH More Product Detail
Product Detailed Information
 Product Detailed Information HDI SUBARU WRX GRF + CAI GT2-PRO INTERCOOLER KT Description Intercooler kit (work with SUBARU WRX GRF + CAI) Product Code IK-GRF-GT2-PRO-SH Our Price AUD899.00 More Product
Tools Required. Metric Wrench Set Screwdriver Set Metric Socket Set Pliers Heavy duty hydraulic Jack and Car Stands Box knife or similar Hacksaw WD40
 Subaru 2004+ Legacy GT & Outback XT For JDM 2.0 twinscroll turbo and USDM 2.5 turbo models Front Mount Intercooler Fitting Instructions PN# LEG-1348-000 You are now the proud owner of a highly tested and
START HERE GRILLE REMOVAL. 1) Turn off engine and chalk tires with stop block. Open Hood. 1. Disconnect negative battery terminal.
 Turn off engine and chalk tires with stop block. Open Hood. 1. Disconnect negative battery terminal.") Parts included (1) X-Metal - Main Part #6715791 (1) Stealth X-Metal - Main Part #6715791-BR (1) Laser X-Metal - Main Part #7715891 (1) Laser Stealth X-Metal - Main Part #7715891-BR (1) Universal X-Metal
Parts included (1) X-Metal - Main Part #6715791 (1) Stealth X-Metal - Main Part #6715791-BR (1) Laser X-Metal - Main Part #7715891 (1) Laser Stealth X-Metal - Main Part #7715891-BR (1) Universal X-Metal
IE MK5/MK6 2.0T FSI & TSI FDS INTERCOOLER INSTALL GUIDE PART NUMBER: IETPCB1
 IE MK5/MK6 2.0T FSI & TSI FDS INTERCOOLER INSTALL GUIDE PART NUMBER: IETPCB1 Thank you for purchasing another high quality Integrated Engineering product! This instruction sheet is used for installation
START HERE GRILLE REMOVAL. 1) Turn off engine and chalk tires with stop block. Open Hood. 1. Disconnect negative battery terminal.
 Turn off engine and chalk tires with stop block. Open Hood. 1. Disconnect negative battery terminal.") GRILLE REMOVAL & Grille Installation Guide Parts included (1) LASER TORCH - Main Part #7315711 (1) LASER TORCH STEALTH - Main Part #7315711-BR (1) 30 LED Light Bar (1) Power Cable Wiring Harness Hardware
GRILLE REMOVAL & Grille Installation Guide Parts included (1) LASER TORCH - Main Part #7315711 (1) LASER TORCH STEALTH - Main Part #7315711-BR (1) 30 LED Light Bar (1) Power Cable Wiring Harness Hardware
05-08 GT. Hellion Power Systems Mustang Kit Instructions
 Hellion Power Systems 05-08 Mustang Kit Instructions 1. Disconnect Battery 2. Drain Radiator, keep fluid for re-installation. 3. Remove air box and inlethoses. 6. Next, underneath, punch oil pan for turbo
REVOLVER SERIES GRILLES - INSTALLATION GUIDE
 REVOLVER SERIES GRILLES - INSTALLATION GUIDE Depending on your style and your preferred look of the vehicle, you have the option to install the Raw Aluminum Trim Piece, Color Match, or just opt to leave
7C1550 COBB Tuning R35 GT-R Silicone Hose Kit Install Instructions
 7C1550 COBB Tuning R35 GT-R Silicone Hose Kit Install Instructions Nissan GT-R (R35) Silicone Hose Kit Congratulations on your purchase of the COBB GT-R Silicone Hose Kit for your Nissan GT-R. The following
START HERE GRILLE REMOVAL. 1) Turn off engine and chalk tires with stop block. Open Hood. 1. Disconnect negative battery terminal.
 Turn off engine and chalk tires with stop block. Open Hood. 1. Disconnect negative battery terminal.") GRILLE REMOVAL & Grille Installation Guide Parts included START HERE (1) Billet - 2 PC Main Polished - Part #20571 (1) Billet - 2 PC Main Black - Part #20571B PLEASE READ AND UNDERSTAND ALL INSTRUCTIONS
GRILLE REMOVAL & Grille Installation Guide Parts included START HERE (1) Billet - 2 PC Main Polished - Part #20571 (1) Billet - 2 PC Main Black - Part #20571B PLEASE READ AND UNDERSTAND ALL INSTRUCTIONS
Application List L Cummins
 1 Discharging & Recharging of the A/C System is required for this install. INTERCOOLER INSTALLATION FOR 2010+ DODGE 6.7L CUMMINS Application List 2010+ 6.7L Cummins 1042530 PLEASE READ ALL INSTRUCTIONS
Audi A4 2.0T Front Mount Intercooler INSTALLATION GUIDE
 INSTALLATION GUIDE Congratulations on your purchase of the AWE Tuning Front Mount Intercooler for the 2005.5-08 B7 chassis A4 2.0T. 2005.5-08 Audi A4 2.0T Front Mount Intercooler FOR RACING USE ONLY Exquisite
Audi S4 SMIC Installation. B5 Audi S4 Side Mount Intercooler installation
 Audi S4 SMIC Installation B5 Audi S4 Side Mount Intercooler installation Disclaimer: These installation instructions are to be used as a guide only. It is at the reader and/or installer s discretion to
FRONT MOUNT INTERCOOLER GOLF / JETTA IV 1.8T PART # & P INSTALATION INSTRUCTIONS
 FRONT MOUNT INTERCOOLER GOLF / JETTA IV 1.8T PART # 48.10.90 & 48.10.90P INSTALATION INSTRUCTIONS PART LIST: 1 INTERCOOLER CORE 1 U-BENT TUBE 1 L-SHAPED TUBE 1 INTERCOOLER INLET TUBE 4 M6 NYLOC NUT 3 M6
INSTALLATION INSTRUCTIONS PART NUMBER:
 Equipped with AEM Dryflow Filter No Oil Required! INSTALLATION INSTRUCTIONS PART NUMBER: 21-641 2006 MAZDA Mazdaspeed 6 L4-2.3L C.A.R.B. E.O. # D-670-2 * NOTE: Legal in California only for racing vehicles
INSTALLATION GUIDE VW AMAROK INTERCOOLER KIT P/N PWI63123 INTERCOOLER P/N PWA64398 PIPE KIT
 INSTALLATION GUIDE VW AMAROK INTERCOOLER KIT P/N PWI63123 INTERCOOLER P/N PWA64398 PIPE KIT ENGINEERING THE UNFAIR ADVANTAGE Contents CONDITIONAL MANUFACTURERS WARRANTY... 2 Warranty voids... 2 Warranty
Hybrid Racing Racing Performance Air Intake System Acura RSX Type S
 Hybrid Racing Racing Performance Air Intake System 02-06 Acura RSX Type S This is a step by step guide on how to install the Hybrid Racing Performance Air Intake System on the 02-06 Acura RSX Type S. Written
B5 A4 1.8t Front Mount Intercooler Install Instructions
 B5 A4 1.8t Front Mount Intercooler Install Instructions Only work underneath your vehicle after properly supporting it with adequate jack stands on a flat surface. NEVER work under a vehicle only supported
Installation Instructions :BMW E39 M5 : Page 1
 Installation Instructions :BMW E39 M5 : Page 1 1. We will start by removing the front bumper. Remove the 3 x 8mm hex head bolts in the wheel arch liners on both sides. Turn the wheels to gain access. 2.
T Intercooler System INSTALLATION GUIDE. Contact us with any installation questions AWE-Tuning.com
 INSTALLATION GUIDE 2000-04 2.7T Intercooler System FOR RACING USE ONLY Congratulations on your purchase of the AWE Tuning Intercooler System for the 2002-04 Audi 2.7T engine. Exquisite build quality with
APIKOL Ur-S4/S6 Gen. II Front Mount Intercooler INSTALLATION INSTRUCTIONS
 APIKOL Ur-S4/S6 Gen. II Front Mount Intercooler INSTALLATION INSTRUCTIONS Only work underneath your vehicle after properly supporting it with adequate jack stands on a flat surface. NEVER work under a
advanced FLOW engineering Instruction Manual P/N: Make: Nissan Model: Titan XD Year: Engine: V8-5.
 advanced FLOW engineering Instruction Manual P/N: 46-20281 Make: Nissan Model: Titan XD Year: 2016-2017 Engine: V8-5.0L (td) Cummins Please read the entire instruction manual before proceeding. Ensure
DODGE DART 1.4L I-4 C.A.R.B. E.O. # D
 Equipped with AEM Dryflow Filter No Oil Required! INSTALLATION INSTRUCTIONS PART NUMBER: 21-722C (Gun Metal Grey Finish) 21-722P (Vacuum Metalized Chrome - VMC) 2013-2014 DODGE DART 1.4L I-4 C.A.R.B. E.O.
Kit Part Number:
 Equipped with AEM DRYFLOW Filter No Oil Required! Kit Part Number: 2007-2008 Mazda Mazdaspeed 3 CARB EO # D-392-30 Cold Air Intake Systems that are pending an Executive Order number (EO#) relating to exemptions
* APPLICATION MODELS VARY. WE RECOMMEND TO VERIFY FITMENT BEFORE BEGINNING INSTALLATION PROCESS.
 Parts included (1) Main Grille Polished - Part #6214760 OR Black - Part #6214761 Hardware included (8) - #8 x 3/4 Black Screws (8) - #8 Flat Nuts (3) Push Nut Retainer Clips START HERE PLEASE READ AND
Subaru Front Mount Intercooler Kit STI Subaru Front Mount Intercooler Kit STI
 Subaru Front Mount Intercooler Kit STI 2008-2014 715500 Subaru Front Mount Intercooler Kit STI 2008-2014 Congratulations on your purchase of the Subaru Front Mount Intercooler Kit STI 2008-2014. The following
Banks High-Flow Boost Tubes. Step-by-step installation video: Bankspower.com/v/install-lml-boost-tubes
 with Installation Instructions Owner smanual Banks High-Flow Boost Tubes Stock Fitment 2011-2016 Chevy/GMC Turbo-Diesel Pickup Trucks THIS MANUAL IS FOR USE WITH PART NUMBER 25993 Gale Banks Engineering
Fitting Instructions. Revo MQB Golf/GTi/Octavia/Leon Intercooler. Recommended Tools. Contents RV581M Dealer installation advised.
 RV581M100100 Recommended Tools Contents No. Description Tools Size Intercooler Torx Bit T25, T30 Bracket Kit llen Key 4, 5 mm Silicone Hoses Socket 7, 10, 16, 19 mm Hose Clamps Flat Head Screwdriver Small,
Installation Instructions: (Part # SB612850) TOYOTA FJ CRUISER M1 Front Bumper Kit
 TOYOTA FJ CRUISER M1 Front Bumper Kit") NOTE: Carefully read entire instructions thoroughly before attempting to install this part. Parts Included Qty 93-9101 M1 Front Bumper 1 93-9117 Winch Mounting Plate 1 90-9131 Window Bezel: Drvr 1 90-9132
NOTE: Carefully read entire instructions thoroughly before attempting to install this part. Parts Included Qty 93-9101 M1 Front Bumper 1 93-9117 Winch Mounting Plate 1 90-9131 Window Bezel: Drvr 1 90-9132
INSTALLATION GUIDE HOLDEN COLORADO (RG) INTERCOOLER KIT P/N PWI66175K INTERCOOLER P/N PWA64553 ( ) PIPE KIT
 INTERCOOLER KIT P/N PWI66175K INTERCOOLER P/N PWA64553 ( ) PIPE KIT") INSTALLATION GUIDE HOLDEN COLORADO (RG) INTERCOOLER KIT P/N PWI66175K INTERCOOLER P/N PWA64553 (2012-13) PIPE KIT ENGINEERING THE UNFAIR ADVANTAGE Contents CONDITIONAL MANUFACTURERS WARRANTY... 2 Warranty
INSTALLATION GUIDE HOLDEN COLORADO (RG) INTERCOOLER KIT P/N PWI66175K INTERCOOLER P/N PWA64553 (2012-13) PIPE KIT ENGINEERING THE UNFAIR ADVANTAGE Contents CONDITIONAL MANUFACTURERS WARRANTY... 2 Warranty
---Optional Items---
 1 2 3 4 5 6 ---Optional Items--- 10 9 11 7 8 12 This package should contain: 1. One (1) CorkSport Crashbar Weldment 2. Eight (8) M8x1.25x20 mm Bolts 3. Eight (8) M8x1.25mm Nyloc Nuts 4. Sixteen (16) M8
advanced FLOW engineering Instruction Manual P/N: & Make: BMW Model: 3-Series Year: Engine: L6-2.5L/2.8L/3.
 advanced FLOW engineering Instruction Manual P/N: 51-20442 & 54-20442 Make: BMW Model: 3-Series Year: 99-06 Engine: L6-2.5L/2.8L/3.0L Please read the entire instruction manual before proceeding. Ensure
MAZDASPEED3 Intercooler Instructions
 MAZDASPEED3 Intercooler Instructions Congratulations on your purchase of the COBB Tuning Front Mount Intercooler System for your 2007-2009 Mazdaspeed3. The following instructions should assist you through
Integrated Engineering MK7/MQB TSI GEN 3 FDS Intercooler Install. Part Number IETPCI1
 Integrated Engineering MK7/MQB TSI GEN 3 FDS Intercooler Install Part Number IETPCI1 Thank you for purchasing another high quality Integrated Engineering product! This instruction guide is used for installation
Parts List ILLUSTRATION #1
 Installation Instructions BR10 Front Bumper Replacement Part Number 24219T 2010-2016 Ram HD 2500 & 3500 2/4WD Do not attempt to install this product on any vehicle other than the one listed above! Parts
Rear bumper cannot be used for towing after installation of the rear bumper relocation brackets.
 921RC7020 *RC702BAG2* RC702BAG2 GM 07-13 4WD 1500 P/U 3 Body Lift Thank you for choosing Rough Country for all your suspension needs. Rough Country recommends a certified technician install this kit. Attempts
Instant Chat off the main page of Or simply call our tech team at
 FRONT MOUNT INTERCOOLER 2015+ WRX 2017-07-07 Thank you for purchasing this PERRIN product for your car! Installation of this product should only be performed by persons experienced with installation of
INSTALLATION GUIDE NISSAN NAVARA INTERCOOLER KIT P/N PWI65094K
 INSTALLATION GUIDE NISSAN NAVARA INTERCOOLER KIT P/N PWI65094K ENGINEERING THE UNFAIR ADVANTAGE Contents CONDITIONAL MANUFACTURERS WARRANTY... 2 WARRANTY VOIDS... 2 WARRANTY DOES NOT COVER... 2 LIMIT OF
XRT300 AND XRT350 BA XR6 TURBO UPGRADE KIT FITTING INSTRUCTIONS
 XRT300 AND XRT350 BA XR6 TURBO UPGRADE KIT FITTING INSTRUCTIONS The use of NFU (No Further use) and REUSE (Re Use) relates to the individual parts storage when performing the upgrade. Also note that all
Airtec Snorkel Assembly Vehicle: Toyota FJ Cruiser 4.0L Petrol, 04/2011+ Part No. 011SAT0185A. Read instructions fully before commencing fitment.
 Read instructions fully before commencing fitment. Estimated Fitting Time: 3hrs To provide a totally sealed intake system, it will be necessary to remove all under bonnet air-cleaner plumbing & provide
INSTRUCTIONS. INTERCOOLER UPGRADE BMW E82 135i 2008-
 INSTRUCTIONS INTERCOOLER UPGRADE BMW E82 135i 2008- Parts Included: - Intercooler - Left and right side pipes with hoses - 3 Silicone Hoses ( 2.5 x 3 ) - 1 Silicone Hose 90degree 2.5 elbow - 8 Hoseclamps
Includes: 1. J-hook Block Off / Coolant Reroute 1. Coolant Hose 1. Turbocharger Up Pipe Block Off Disc 2. Hose clamps
 Includes: 1. J-hook Block Off / Coolant Reroute 1. Coolant Hose 1. Turbocharger Up Pipe Block Off Disc 2. Hose clamps WARNING: This product is not legal for sale or use on pollution controlled vehicles
INSTALLATION INSTRUCTIONS ELEVATION FRONT BUMPER DODGE RAM
 INSTALLATION INSTRUCTIONS PARTS LIST: 1 Elevation Bumper Assembly 24 12mm x 37mm OD x 3mm Flat Washers 2 Frame Mounting Brackets 12 12mm Nylon Lock Nuts 8 12-1.75mm x 50mm Hex Bolts 2 License Plate Mounting
INSTALLATION INSTRUCTIONS FOR MOUNTING
 INSTALLATION INSTRUCTIONS FOR MOUNTING FRONT PARKING SENSOR RELOCATION BRACKETS ON THE FOLLOWING PROWLER MAX MODEL NOS.: 320713/321610, 310713/321610, 320713/321512 & 310713/321512 ON: (NOTE: TWO 390210
mk3 SEAT Ibiza Cupra Front Mount Intercooler.
 mk3 SEAT Ibiza Cupra Front Mount Intercooler. Warning be sure not to let any foreign body enter the inlet track of the vehicle whilst the following work is being carried out. Serious engine damage may
Includes: 1. High Flow Turbo Up-Pipe 1. J-Hook Block Off / Coolant Reroute 1. Coolant Hose 1. EGR Valve Block Off Plate 2. Hose Clamps 4.
 Includes: 1. High Flow Turbo Up-Pipe 1. J-Hook Block Off / Coolant Reroute 1. Coolant Hose 1. EGR Valve Block Off Plate 2. Hose Clamps 4. Bolts & Nuts WARNING: This product is not legal for sale or use
Laser BILLET Main Grille
 Laser BILLET Main Grille Main grille - #6219420 / #6219421 2016 TOYOTA TACOMA Parts included (1) Billet Grille - Main Polished - Part #6219420 OR Black - Part #6219421 Hardware included (6) #8 0.7 Screws
INSTRUCTION. INTERCOOLER UPGRADE BMW E92 335i
 INSTRUCTION INTERCOOLER UPGRADE BMW E92 335i 2007-2011 Parts Included: - Intercooler - Shroud with seals - Left and right side pipes with hoses - 1 Silicone Hoses ( 2.5 x 3 ) - 2 Silicone Hose 45 degree
Huron Speed Products Twin Turbo Install Gen 2 CTS-V (09-15)
") Huron Speed Products Twin Turbo Install Gen 2 CTS-V (09-15) 1 2 Remove two bolts in trunk cover with 8mm socket. Pull up on cover to remove. Unscrew net tie down on side cover where battery is located
Huron Speed Products Twin Turbo Install Gen 2 CTS-V (09-15) 1 2 Remove two bolts in trunk cover with 8mm socket. Pull up on cover to remove. Unscrew net tie down on side cover where battery is located
TORCH Main Grille Main grille INSERT - # / # Chevrolet Silverado
 Parts included (1) TORCH Grille - Main (1) 40 LED - Part #6311271 OR Stealth - Part #6311271-BR OR (1) 30 LED - Part #6311281 OR Stealth - Part #6311281-BR Hardware included (1) - Large Bottom Mounting
INSTALLATION INSTRUCTIONS PART NUMBER:
 Equipped with AEM Dryflow Filter No Oil Required! INSTALLATION INSTRUCTIONS PART NUMBER: 41-1406 2006-2013 LEXUS IS250 V6-2.5L LEGAL IN CALIFORNIA ONLY FOR RACING VEHICLES WHICH MAY NEVER BE USED, REGISTERED
INSTALLATION GUIDE PARTS INCLUDED LED LIGHTS INCLUDED HARDWARE INCLUDED TOOLS REQUIRED PAGE 1 FIG 1 FIG FORD F-150 KING RANCH, & PLATINUM
 2018-2019 FORD F-150 KING RANCH, & PLATINUM PART #: Z415581-KIT, & Z415583-KIT FRONT OEM GRILLE LED LIGHT MOUNTS PARTS INCLUDED - (1) Driver Side Light Mount OEM Grille Bracket BEFORE YOU BEGIN INSTALLATION
INSTALLATION INSTRUCTIONS. Upgrade Front Intercooler BMW 335 Twin Turbo P/N 15179
 INSTALLATION INSTRUCTIONS Upgrade Front Intercooler 2007- BMW 335 Twin Turbo P/N 15179 Turbonetics, Inc. * 2255 Agate Court * Simi Valley, CA * 805-581-0333 * TurboneticsInc.com READ THIS FIRST: Study
Kit Part Number:
 Equipped with AEM DRYFLOW Filter No oil required! Kit Part Number: 21-573 2006-2008 Toyota Yaris 1.5L *Legal in California only for racing vehicles which may never be used upon a highway. 2008, Advanced
HOW TO INSTALL YOUR BOV
 Product Name: Product Description: Product Number: BMW Kompact BOV Kit Model specific BOV Kit TS-0203-1050/TS-0203-1250 ------------------------------------------------------------------------------------------------------------------------
Dodge 24v ISBe
 BD SUPER B 2003-2004 Dodge 24v ISBe (Non 600 motors) Part # 1045230 PLEASE READ ALL INSTRUCTIONS BEFORE INSTALLATION This turbo system is not compatible with an AFE intake system WITHOUT MODIFICATIONS.
VOLKSWAGEN GOLF MK5 GTI 2.0 TFSI FMIC INSTALLATION INSTRUCTIONS
 VOLKSWAGEN GOLF MK5 GTI 2.0 TFSI FMIC INSTALLATION INSTRUCTIONS Please thoroughly read through and familiarize yourself with these instructions in their entirety prior to beginning any part of the installation
2014+ Porsche 991TT/TTS S-FLO Carbon Intake INSTALLATION GUIDE FOR RACING USE ONLY
 PERFORMANCE ENGINEERING FOR EUROPEAN AUTOS INSTALLATION GUIDE 2014+ Porsche 991TT/TTS S-FLO Carbon Intake FOR RACING USE ONLY Congratulations on your purchase of the AWE Tuning S-FLO Carbon Intake for
Nissan R35 GTR Intercooler Pipe Kit w/ Cold Air Intake Installation Instructions
 Nissan R35 GTR Intercooler Pipe Kit w/ Cold Air Intake Installation Instructions 1. Disconnect the negative terminal on the battery that is located at the passenger firewall side. 2. Remove both front
2012+ Audi S6/S7 Carbon Fiber S-FLO Intake INSTALLATION GUIDE
 PERFORMANCE ENGINEERING FOR EUROPEAN AUTOS INSTALLATION GUIDE 2012+ Audi S6/S7 Carbon Fiber S-FLO Intake Congratulations on your purchase of the AWE Tuning Carbon Fiber S-FLO Intake for the 2012+ Audi
Removal of bumper & intercooler:
 R56 Front Mount Intercooler 090107 Thank you for purchasing the ALTA Performance R56 Front Mount Intercooler kit. Persons experienced in the proper operation of MINI engines should only perform this installation.
WK2 SNORKEL. Installation Instructions PLEASE READ AND UNDERSTAND ALL INSTRUCTIONS BEFORE YOU START
 WK2 SNORKEL Installation Instructions PLEASE READ AND UNDERSTAND ALL INSTRUCTIONS BEFORE YOU START Please note: This kit is specifically for diesel models only. WK2 Snorkel Installation Instructions Rev.
Front HD Bumper. Part No. FHDB003TI. PARTS LIST: Qty Part Description Qty Part Description
 ` HD Bumper Part No. FHDB003TI Fits: 2015-2016 Chevrolet Silverado 2500/3500 ASSISTANCE IS RECOMMENDED. REMOVE CONTENTS FROM BOX. VERIFY ALL PARTS ARE PRESENT. 60-180 min Cutting Not Required Drilling
INSTALLATION INSTRUCTIONS PART NUMBER:
 Equipped with AEM Dryflow Filter No Oil Required! INSTALLATION INSTRUCTIONS PART NUMBER: 21-548 2003-2006 INFINITI G35 V6-3.5L C.A.R.B. E.O. # D-670-2 * NOTE: Legal in California only for racing vehicles
MAZDA 3 MPS FRONT MOUNTING INTERCOOLER INSTALLATION
 MAZDA 3 MPS FRONT MOUNTING INTERCOOLER INSTALLATION Tools needed: 7mm Hose clamp driver 10mm,12mm sockets and suitable ratchet with extensions Flat bladed screwdriver Pliers Phillips screwdriver KIT CONTENTS
INSTALLATION INSTRUCTIONS PART NUMBER:
 Equipped with AEM Dryflow Filter No Oil Required! INSTALLATION INSTRUCTIONS PART NUMBER: 21-518B (Blue Finish) 21-518C (Gun Metal Grey Finish) 21-518P (Vacuum Metalized Chrome-VMC) 21-518R (Red Finish)
INSTALLATION INSTRUCTIONS ARMOUR FRONT BUMPER W/O LED LIGHTS FOR CHEVY COLORADO PART # AFB-CO15
 INSTALLATION INSTRUCTIONS ARMOUR FRONT BUMPER W/O LED LIGHTS FOR CHEVY COLORADO 15-17 PART # AFB-CO15 ARMOUR FRONT BUMPER PARTS LIST: 1 ARMOUR Bumper Assembly 2 8mm x 25mm Hex Bolts 1 Driver/left Frame
Huron Speed Products Twin Turbo Install Gen 2 CTS-V (09-15)
") Huron Speed Products Twin Turbo Install Gen 2 CTS-V (09-15) The following install guide is simply that, a guide to help you with installation. It is by no means the exact method to perform installation,
Huron Speed Products Twin Turbo Install Gen 2 CTS-V (09-15) The following install guide is simply that, a guide to help you with installation. It is by no means the exact method to perform installation,
INSTALLATION INSTRUCTIONS PART NUMBER: C/P
 Equipped with AEM Dryflow Filter No Oil Required! INSTALLATION INSTRUCTIONS PART NUMBER: 21-725C/P 2011-2016 SCION TC L4-2.5L LEGAL IN CALIFORNIA ONLY FOR RACING VEHICLES WHICH MAY NEVER BE USED, REGISTERED
Left and Right Bar Light L Brackets. Driver/Left Frame Bracket
 PARTS LIST: 1 Bumper 14 12mm Nylon Lock Nuts 1 Bull Nose Hoop 2 10mm Double Bolt Plates 1 Winch Tray 4 10-1.5mm x 25mm Hex Bolts 1 Driver/left Frame Mounting Bracket 8 10mm x 30mm x 2.5mm Flat Washers
SHELBY GT500
 2007-2009 SHELBY GT500 Removal of Factory Unit WARNING: 1. Radiator fluid must be handled properly. Please observe local ordinances with regards to handling and disposal. 2. Allow vehicle and components
Upper Class Grille Main grille INSERT - #54127 / #54131 / #54133 / #51127 / #51131 / 51133
 Parts included (1) - Main Full Opening - Polished - Part #54127 OR 1 Bar - Polished - Part #54131 OR 2 Bar - Polished - Part #54133 OR Full Opening - Black - Part #51127 OR 1 Bar - Black - Part #51131
SAFETY SENSORS FIELD OF VIEW WILL BE ALTERED WITH USE OF THE REPLACEMENT BUMPER. Injury hazard
 SAFETY Your safety and the safety of others is very important. In order to help you make informed decisions about safety, we have provided installation instructions and other information. These instructions
How to: Install a Ford EcoBoost F150 Intercooler
 How to: Install a 2015+ Ford EcoBoost F150 Intercooler This article documents the installation of our Full-Race 2015+ F150 Ecoboost Intercooler / CAC Upgrade Kit. The addition of a high performance air-to-air
Equipped with AEM Dryflow Filter No Oil Required! INSTALLATION INSTRUCTIONS PART NUMBER C (GUN METAL GRAY FINISH) NISSAN SENTRA 1.
 NISSAN SENTRA 1.") Equipped with AEM Dryflow Filter No Oil Required! INSTALLATION INSTRUCTIONS PART NUMBER 21-799C (GUN METAL GRAY FINISH) 2014-16 NISSAN SENTRA 1.8L 1 ITEM NO. PART NUMBER DESCRIPTION QTY. 1 21-2157D AIR
Equipped with AEM Dryflow Filter No Oil Required! INSTALLATION INSTRUCTIONS PART NUMBER 21-799C (GUN METAL GRAY FINISH) 2014-16 NISSAN SENTRA 1.8L 1 ITEM NO. PART NUMBER DESCRIPTION QTY. 1 21-2157D AIR
BASEPLATE KIT INSTALLATION INSTRUCTIONS
 Item Qty. Length Width Name Part No. 1... 4... 30mm... 10mm... 10mm x 1.5 x 30mm... 356101-00 2... 8... 10mm... 10mm FENDER WASHER... 355716-00 3... 4... 10mm... 10mm x 1.5 NUT... 356230-00 4... 4... 10mm...
Owner smanual. Banks Techni-Cooler System Dodge 6.7L Cummins (24-valve) ISB Pickup Trucks (2500/3500) USE WITH SYSTEM P/N 25987
 ISB Pickup Trucks (2500/3500) USE WITH SYSTEM P/N 25987") Owner smanual with Installation Instructions Banks Techni-Cooler System 2013-16 Dodge 6.7L Cummins (24-valve) ISB Pickup Trucks (2500/3500) USE WITH SYSTEM P/N 25987 Gale Banks Engineering 546 Duggan Avenue
Owner smanual with Installation Instructions Banks Techni-Cooler System 2013-16 Dodge 6.7L Cummins (24-valve) ISB Pickup Trucks (2500/3500) USE WITH SYSTEM P/N 25987 Gale Banks Engineering 546 Duggan Avenue
SAFETY SENSORS FIELD OF VIEW WILL BE ALTERED WITH USE OF THE REPLACEMENT BUMPER. Injury hazard
 SAFETY Your safety and the safety of others is very important. In order to help you make informed decisions about safety, we have provided installation instructions and other information. These instructions
Kit Part Number:
 Equipped with AEM DRYFLOW Filter No Oil Required! Kit Part Number: 21-8502 2004-2009 Nissan Titan 5.6L V8 2004-2009 Nissan Armada 5.6LV8 2004-2009 Infiniti QX56 5.6L V8 C.A.R.B. E.O. D-392-33 C.A.R.B.
M-9603-FST FOCUS ST COLD AIR INTAKE KIT INSTALLATION INSTRUCTIONS
 M-9603-FST Please visit www.fordracingparts.com for the most current instruction information.!!! PLEASE READ ALL OF THE FOLLOWING INSTRUCTIONS CAREFULLY PRIOR TO INSTALLATION. AT ANY TIME YOU DO NOT UNDERSTAND
INSTALLATION INSTRUCTIONS PART NUMBER C (GUN METAL GRAY FINISH)
") Equipped with AEM Dryflow Filter No Oil Required! INSTALLATION INSTRUCTIONS PART NUMBER 21-804C (GUN METAL GRAY FINISH) 2016 SCION ia 1.5L 2017 TOYOTA YARIS ia 1.5L 1 ITEM NO. PART NUMBER DESCRIPTION QTY.
Equipped with AEM Dryflow Filter No Oil Required! INSTALLATION INSTRUCTIONS PART NUMBER 21-804C (GUN METAL GRAY FINISH) 2016 SCION ia 1.5L 2017 TOYOTA YARIS ia 1.5L 1 ITEM NO. PART NUMBER DESCRIPTION QTY.
GReddy Intercooler Kit Nissan 350Z (VQ35DE) Front mount Type 23
 Front mount Type 23") GReddy Intercooler Kit 2003 Nissan 350Z (VQ35DE) Front mount Type 23 2003 Nissan 350Z (VQ35DE) Front Mount Type 23 Installation Manual Please read the entire manual before installing this kit. Application:
GReddy Intercooler Kit 2003 Nissan 350Z (VQ35DE) Front mount Type 23 2003 Nissan 350Z (VQ35DE) Front Mount Type 23 Installation Manual Please read the entire manual before installing this kit. Application:
IAG Street Series Air / Oil Separator (AOS) For WRX
 For WRX") P IAG Street Series Air / Oil Separator (AOS) For 2015-16 WRX Part# IAG-ENG-7152 Tools Required: Ratchet, torque wrench, extensions, needle nose pliers, hose cutter, snips/scissors, flat head screw driver,
P IAG Street Series Air / Oil Separator (AOS) For 2015-16 WRX Part# IAG-ENG-7152 Tools Required: Ratchet, torque wrench, extensions, needle nose pliers, hose cutter, snips/scissors, flat head screw driver,
Installation Manual Volvo C30 T5 Front Mount Intercooler System
 Installation Manual Volvo C30 T5 Front Mount System Volvo C30 T5 System / Installation Manual i C Contents Important Information i Parts List i Required Tools and Materials 1 1.0 - Vehicle Preparation
Intercooler Upgrade Kit
 INSTALLATION INSTRUCTIONS Intercooler Upgrade Kit 04-06 Ford 6.0L P/N 70057 99-03 Ford 7.3L P/N 70058 Turbonetics, Inc. * 14399 Princeton Avenue * Moorpark, CA * 805-581-0333 * TurboneticsInc.com READ
INSTALLATION INSTRUCTIONS PART NUMBER:
 Equipped with AEM Dryflow Filter No Oil Required! INSTALLATION INSTRUCTIONS PART NUMBER: 21-488 2006-2008 MAZDA 3 L4 2.3L SEE * NOTE 2004-2008 MAZDA 3 L4 2.0L SEE * NOTE 2004-2005 MAZDA 3 L4 2.3L C.A.R.B.
INSTALLATION INSTRUCTIONS. PART NUMBER C (Gun Metal Gray Finish) 2016 HYUNDAI TUCSON 1.6 Turbo
 2016 HYUNDAI TUCSON 1.6 Turbo") INSTALLATION INSTRUCTIONS PART NUMBER 26-3002C (Gun Metal Gray Finish) 2016 HYUNDAI TUCSON 1.6 Turbo 1 ITEM NO. PART NUMBER DESCRIPTION QTY. 1 08483K HOSE CLAMP #28, BLACK ZINC PLATED 2 2 5-1070 COUPLER;1.75-2.50X3.25"
INSTALLATION INSTRUCTIONS PART NUMBER 26-3002C (Gun Metal Gray Finish) 2016 HYUNDAI TUCSON 1.6 Turbo 1 ITEM NO. PART NUMBER DESCRIPTION QTY. 1 08483K HOSE CLAMP #28, BLACK ZINC PLATED 2 2 5-1070 COUPLER;1.75-2.50X3.25"
Installation Manual TWM Performance 2010 Mazda 3 short shifter 5 and 6 speed non-mazdaspeed
 Installation Manual TWM Performance 2010 Mazda 3 short shifter 5 and 6 speed non-mazdaspeed Begin the installation by parking on a flat surface, as you will have to engage and disengage the hand brake
Current Range Rover Sport STRUT Collection Installation Manual
 2014 - Current Range Rover Sport STRUT Collection Installation Manual 1 1. Removing Main Grille and Lower Fascia 1.1 Run a line of low tack masking tape across the front of the bumper below the grille
COBB Tuning Ford Carbon Fiber Air Scoop Focus ST COBB Ford Carbon Fiber Air Scoop Focus ST
 791450 - COBB Tuning Ford Carbon Fiber Air Scoop Focus ST 2013-2017 791450 COBB Ford Carbon Fiber Air Scoop 2013-2017 Focus ST Congratulations on your purchase of the COBB Tuning Carbon Fiber Air Scoop!
FRONT BUMPER REMOVAL. 1) Turn off engine and chalk tires with stop block. Open Hood. Disconnect Battery.
 Turn off engine and chalk tires with stop block. Open Hood. Disconnect Battery.") Parts included (1) - Main Full Opening - Polished - Part #6202130 Full Opening - Black - Part #6202131 OR GRILLE REMOVAL & Grille Installation Guide Hardware included (5) - Trim Retainer (4) - 1/2 x 1/2-3/16
Parts included (1) - Main Full Opening - Polished - Part #6202130 Full Opening - Black - Part #6202131 OR GRILLE REMOVAL & Grille Installation Guide Hardware included (5) - Trim Retainer (4) - 1/2 x 1/2-3/16
COLD AIR INTAKE SYSTEM. Installation Instructions for: Part Number Mitsubishi Lancer Ralliart Manual Transmission Only
 COLD AIR INTAKE SYSTEM Installation Instructions for: Part Number 21-436 2004-2005 Mitsubishi Lancer Ralliart Manual Transmission Only ADVANCED ENGINE MANAGEMENT INC. 2205 126 TH Street, Unit A Hawthorne,
09-12 Dodge 4WD /4 Body Lift
 92RC80000 09-12 Dodge 4WD 1500 1 1/4 Body Lift Thank you for choosing Rough Country for all your suspension needs. Rough Country recommends a certified technician install this kit. Attempts to install
Mustang GT Splitter Bracket Kit M-17A626-MB INSTALLATION INSTRUCTIONS
 !!! PLEASE READ THE FOLLOWING INSTRUCTIONS CAREFULLY PRIOR TO INSTALLATION!!! Caution: If you are not confident that you can complete the installation safely, have it completed by a certified technician!
IE Audi B9 S4, S5, A4, A5, Allroad FDS Intercooler Install Guide IETPCK1
 IE Audi B9 S4, S5, A4, A5, Allroad FDS Intercooler Install Guide IETPCK1 Thank you for purchasing the best performing intercooler on the market! This instruction guide is used for installation of IE s
2004½-2007 Dodge 5.9L Cummins 24v ISBe (600 motors only)
") 31 October 2006 Part # 1045235-1 - BD Supe r B Single 2004½-2007 Dodge 5.9L Cummins 24v ISBe (600 motors only) Part # 1045235 PLEASE READ ALL INSTRUCTIONS BEFORE INSTALLATION. Note: This turbo system is
31 October 2006 Part # 1045235-1 - BD Supe r B Single 2004½-2007 Dodge 5.9L Cummins 24v ISBe (600 motors only) Part # 1045235 PLEASE READ ALL INSTRUCTIONS BEFORE INSTALLATION. Note: This turbo system is
SAFETY THIS PRODUCT IS FOR OFFROAD USE ONLY. ALL LIABILITY FOR INSTALLATION AND USE RESTS WITH THE OWNER.
 SAFETY Your safety and the safety of others is very important. In order to help you make informed decisions about safety, we have provided installation instructions and other information. These instructions