XRT300 AND XRT350 BA XR6 TURBO UPGRADE KIT FITTING INSTRUCTIONS
|
|
|
- Eleanore Berry
- 5 years ago
- Views:
Transcription

1 XRT300 AND XRT350 BA XR6 TURBO UPGRADE KIT FITTING INSTRUCTIONS The use of NFU (No Further use) and REUSE (Re Use) relates to the individual parts storage when performing the upgrade. Also note that all bolt sizes relate to the spanner required. 1. Unpack box and position parts for easy access. 2. Place vehicle on hoist. 3. Remove battery terminals from battery using a 10mm ring/open ender, remove battery clamp then pull battery straight up (tight fit) and place the clamp with the Pulse battery (REUSE). Remove battery tray (unscrewing large self taper) and place in an area designated for parts that have no further use (NFU). 4. Remove four (4) black plastic screw slips from front of radiator garnish and panel, place in a container for later use (REUSE). 5. Remove two (2) top plastic grille clips and then remove panel (REUSE). 6. Remove fourteen (14) x 7mm screws and plastic clips from black plastic undertray, along with one Phillips head screw from each plastic inner guard (screws support the undertray at the bumper end front) (REUSE).
 people for bumper removal with one (1) person per side of the bumper).")

2 7. Remove black plastic undertray (REUSE). 8. (We recommend two (2) people for bumper removal with one (1) person per side of the bumper). Each person to pull sharply at the side of the front bumper pulling bar away from the guard. 9. Once the bumper sides are free, move to the front of the vehicle and pull the bumper assembly foreword. It should slide off quite easily to reveal two driving light electrical clips that must be unsecured. Bumper can now be removed and stored away from vehicle (REUSE).


3 10. Remove plastic egg shell from behind bumper using 10mm socket. 11. Remove driver s side headlight. a) from the underside of the vehicle, remove indicator globe and leave hanging. b) Using a 10mm socket, remove headlight and place with front bumper. (REUSE).

 bolts and air")
4 12. Unclip headlight wiring (3 clips) 13. Undo 7mm hose clamp from air box. Unclip air filter box, remove filter and then using an 8mm socket, remove (3) bolts and air filter box. (NFU)


5 14. Remove factory cold air snorkel using Philips head screwdriver (2).

.")
6 15. Unscrew and disconnect all intercooler piping from top of engine and at sides of radiator, remove Blow Off Valve hose (the one that goes back to the inlet manifold). Remove all rubber hose clamps for REUSE.
 12mm bolts that hold the intercooler")
.")
7 16. Working at the front of the vehicle using a 12mm spanner, undo four (4) 12mm bolts that hold the intercooler in place (REUSE), ensure all hoses and spring clips are also undone (REUSE). Unclip wiring harness from intercooler bracket.
 (REUSE). Remove steel intercooler bracket from passenger side (NFU) 18.")
. 20.")
8 17. Using a 12mm spanner, remove horns and horn bracket and disconnect wiring (1 x 12mm nut) (REUSE). Remove steel intercooler bracket from passenger side (NFU) 18. Undo 2 x 8mm bolts holding power steering oil cooler mounted underside of factory intercooler. 19. Remove steel intercooler brackets from passenger side (NFU). 20. Remove intercooler (NFU).

, remove bolt situated on the underside")
9 21. Remove aluminium intercooler pipe that is situated on the underside of the battery area. The initial step is to disconnect the sensor wire followed by the sensor itself (10mm spanner), remove bolt situated on the underside and between the battery box and support panel (NFU).


10 22. Pull alloy pipe forwards and immediately replace the earth wires back into their original position using the same bolt. 23. Disconnect throttle body connectors.


11 24. Remove four (4) 5mm throttle body cap screws with a ball type Allen key, and pull throttle body upwards with care not to damage gasket (REUSE).
, remove")

12 25. Using an 8mm socket (or for speedy removal, an air ratchet), unbolt two manifold brackets (between manifold and head), remove dipstick followed by the dipstick tube. (REUSE). 26. INLET MANIFOLD. Remove 14 x 6mm inlet manifold bolts using 3/8 ball type Allen key socket (REUSE).


13 27. Disconnect MAP sensor connector from area close to throttle body, remove brake booster line from rear of manifold, likewise the fuel pressure vacuum line, and LIFT off the inlet manifold noting a reusable metal gasket. Place tape or a rag over the inlet manifold base. (NFU).
 fittings are to be removed and replaced with PNs:")
, for fitment to Cobra Plenum PN: NPP 002 (REUSE).")
14 28. Place manifold on bench where the MAP sensor and brass brake booster (rear of manifold) fittings are to be removed and replaced with PNs: NPT-S10MM (T-piece), NPH-50 (Short Hose), and???? (T-piece), for fitment to Cobra Plenum PN: NPP 002 (REUSE). Also fit carbon canister purge line and PVC hose.
, drill the front most and rear most holes in the factory manifold base use either a short 3/8 air drill or right")
 socket 3/8 drive ratchet and a 6 extension bar and ratchet, remove the two screws holding the original throttle")
15 29. While at bench, equip manifold with Cobra PN: NPT 005 throttle body adaptor. 30. Using a 8.5mm drill (or 11/32 ), drill the front most and rear most holes in the factory manifold base use either a short 3/8 air drill or right angle air drill ensuring absolute straightness and that no material makes its way into the manifold base. 31. Using a 8mm (or 11/32 ) socket 3/8 drive ratchet and a 6 extension bar and ratchet, remove the two screws holding the original throttle body bracket to the inlet manifold base. Discard bracket and replace bolts.

 and PN: NPB-B014 (Washer) through from the underside,")
16 32. Position Cobra battery Tray PN: NPB-B 009, on the left (passenger) side, locating lug into existing rail holes. Note that these may need to be tapped into place using a plastic hammer. Once battery tray is positioned firmly in place, use an 8mm drill bit to drill through battery tray mounting hole through inner guard, and then push PN: NPB-825 (Bolt) and PN: NPB-B014 (Washer) through from the underside, position PN: NPM-8 (13mm Nut & Bolt) and tighten.
17

 and PN: NPB-B014")
18 33. Place Pulse battery on tray (with the terminals on the high side of the tray) and refit using factory clamp with PN: NPB-M8150 (Bolt) and PN: NPB-B014 (Washer).
.")
 plugs and four (4) 10mm bolts")
19 34. NOTE: EXCLUSIVE TO XRT350: Remove and replace fuel injectors using PN: NP (Injectors). The procedure consists of disconnecting six (6) injector clips, six (6) plugs and four (4) 10mm bolts using a 10mm socket.


20 35. Drill two (2) 8.5mm holes in radiator support panel while taking care not to damage wiring on underside of panel (driver s side).
21


22 36. Remove rubber mounts and bosses from factory intercooler and place these on the two top Cobra intercooler bosses. Position the two remaining mounts through bumper iron base using PN: NPM 8 (M8 nuts).

. 39. Replace power oil cooler to original position. 40.")
23 37. INTERCOOLER FITMENT. Prior to placing intercooler in its final position, ensure that existing wiring on the underside of the driver s side radiator support panel is unclipped to ensure no damage occurs. Once intercooler has been slid into position, restore wiring to original position and re-clip. 38. Use four factory intercooler nuts to contain the two newly drilled top end threads (12 & 13mm). 39. Replace power oil cooler to original position. 40. Using factory hose clamp (not spring clamp) from factory intercooler tubing, place the lower factory intercooler hose over intercooler inlet and tighten hose clamp.
, feed it from the passenger side of the")
 once again")
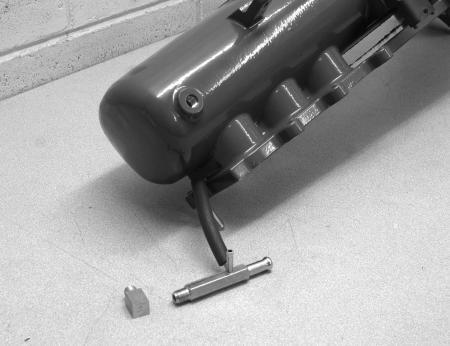
24 41. Cut threaded bolts protruding through intercooler mounts. 42. Using PN: NPB 004 (Intercooler Hose), feed it from the passenger side of the engine bay (white dot end to intercooler), underneath the headlight and place over the intercooler outlet (rubber grease may be used for easier fitment) once again using a factory clamp.


25 43. Apply NPH-S012 (Heat Shrink-wrap) over the battery earth lead terminal. Using supplied cable tie, position battery terminal to existing driver s side wiring harness.


26 44. Remove fuse box lid, undo a 12mm nut, and while holding the main battery feed cable, unclip wiring harness from inner guard and engine crossmember and undo main starter motor power feed.
.")

27 45. Following along a similar line to Instruction 37, using NPB-C010 (Cables), reconnect and then position wiring on passenger side using available holes, then refit fuse box lid. 46. Extend throttle body and boost pressure sensor wiring using PN: NPL-E013 (Loom Extension). Cut wiring at approximately 50mm back from the connector. Join corresponding wires to Loom Extension using solder and shrink wrap. Then slide PVC sleeve towards the connector to cover exposed wires at the other end of the loom. Slide 8mm shrink wrap over the PVC sleeve and join corresponding wires into factory loom. Once this is done, slide the sleeve 8mm back over the joins.

28
; adding a dab of silicon sealant to parting surfaces.")

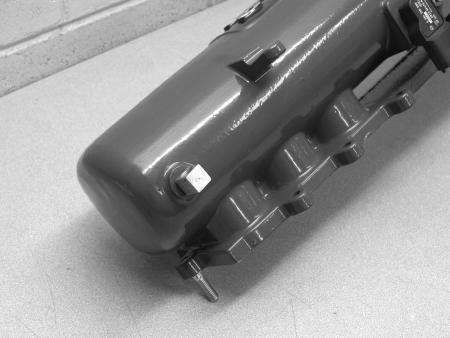
29 47. Remove factory thermostat housing, and replace with PN: NPT-005 (Thermostat Housing); adding a dab of silicon sealant to parting surfaces. Note that for a superior job; neatly trim 20mm off the thermostat end of existing radiator hose to facilitate rotation for best fitment. Top up coolant as required.
30
31


32 48. PN: NPP-002 (Inlet Manifold). Fit factory studs to the front and rearmost manifold flange holes. Position factory throttle body on front of manifold using factory gasket and bolts. (Replace gasket if damaged).
33

34


35 49. Position PVC and canister lines under manifold base.


36 50. Using remaining PN: NPS-M8 (Studs), position in factory inlet manifold base (outer side), refit original steel manifold gasket and place Cobra manifold in position. 51. Using eight (8) PN: MPM-8 (Nuts), and six (6) original cap screw bolts, employ a 3/8 drive 6mm Allen key ball socket and tighten as required. Note that the rearmost manifold bolt is more easily accessed from under the vehicle.
 while taking extreme care")

37 52. Refit manifold braces into original positions, and prior to refitting dipstick tube, slightly exaggerate original bend (for clearance) while taking extreme care not to kink. Replace dipstick. 53. Place factory throttle body rubber onto throttle body. Ensure that you do not confuse this rubber with the turbo inlet pipe rubber.

 rubber coil holders for positioning on PN: NPR 001 (Rocker Cover Garnish). 57. Fit Cobra rocker garnish panel. When positioning factory Allen headed screws, pull these down in stages.")
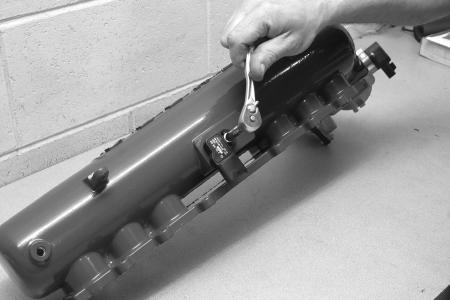
38 54. Position PN: NPT-005 (Reducer) into rubber throttle body adapter, place intercooler hose in position and tighten using factory hose clamps. 55. Connect throttle body and turbo pressure sensor wiring. 56. Remove rocker cover oil filler cap and PVC hose (also disconnect hose at other end, and turn the hose end for end), remove all 5mm Allen headed screws from rocker cover garnish to allow its removal. Remove six (6) rubber coil holders for positioning on PN: NPR 001 (Rocker Cover Garnish). 57. Fit Cobra rocker garnish panel. When positioning factory Allen headed screws, pull these down in stages. Note: As Cobra rocker garnish is of a thicker higher quality material than factory unit, it will appear that the factory screws are in fact too short. This is not the case, however do not over-tighten screws to compensate.

 and PN: RE-0870 (K&N pod filter), sliding small end of intake pipe through from the")
39 58. Re-fit oil filler cap and replace turned PVC hose, adding PN: NPO-B 011 (Rubber Breather Hose). Push onto rocker cover breather and direct hose under the manifold, along the front of the cylinder head, while cable tying to steel pipes. 59. Assemble PN: NPI 003 (Air Intake Pipe) and PN: RE-0870 (K&N pod filter), sliding small end of intake pipe through from the inside of air box. 60. Remove driver s side front mudguard bolt, and rotate radiator hose spring clip to allow air box to sit flush.


40 61. Position PN: NPA 008 (Air Box) and in the process allow assembled intake pipe and filter to rest in their natural position. Do not force air box into position.


41 62. Once assembly is in position with intake pipe positioned on turbocharger, tighten hose clamp. 63. Clip air box under fuse box lid clip carefully so as to a) not break cold air box nor b) fuse box clip. Refit front mudguard bolt into position through air box hole, fit PN: P (Brass Fitting) to air intake pipe and fit PN: NPO-B011 (Breather Hose) to brass fitting.
Tools Required. Metric Wrench Set Screwdriver Set Metric Socket Set Pliers Heavy duty hydraulic Jack and Car Stands Box knife or similar Hacksaw WD40
 Subaru 2004+ Legacy GT & Outback XT For JDM 2.0 twinscroll turbo and USDM 2.5 turbo models Front Mount Intercooler Fitting Instructions PN# LEG-1348-000 You are now the proud owner of a highly tested and
4. Remove (4) 10mm and (1) 7mm bolt that holds fascia at front corners, on each side
 10mm and (1) 7mm bolt that holds fascia at front corners, on each side") 2010 Camaro LS3 1. Disconnect battery ground 2. Remove front wheels 3. Remove (5) push pins and (5) #20 torx screws on inner front wheel well liners and remove liners on each side 4. Remove (4) 10mm and
2010 Camaro LS3 1. Disconnect battery ground 2. Remove front wheels 3. Remove (5) push pins and (5) #20 torx screws on inner front wheel well liners and remove liners on each side 4. Remove (4) 10mm and
MAZDA 3 MPS FRONT MOUNTING INTERCOOLER INSTALLATION
 MAZDA 3 MPS FRONT MOUNTING INTERCOOLER INSTALLATION Tools needed: 7mm Hose clamp driver 10mm,12mm sockets and suitable ratchet with extensions Flat bladed screwdriver Pliers Phillips screwdriver KIT CONTENTS
Huron Speed Products Twin Turbo Install Gen 2 CTS-V (09-15)
") Huron Speed Products Twin Turbo Install Gen 2 CTS-V (09-15) 1 2 Remove two bolts in trunk cover with 8mm socket. Pull up on cover to remove. Unscrew net tie down on side cover where battery is located
Huron Speed Products Twin Turbo Install Gen 2 CTS-V (09-15) 1 2 Remove two bolts in trunk cover with 8mm socket. Pull up on cover to remove. Unscrew net tie down on side cover where battery is located
mk3 SEAT Ibiza Cupra Front Mount Intercooler.
 mk3 SEAT Ibiza Cupra Front Mount Intercooler. Warning be sure not to let any foreign body enter the inlet track of the vehicle whilst the following work is being carried out. Serious engine damage may
Huron Speed Products Twin Turbo Install Gen 2 CTS-V (09-15)
") Huron Speed Products Twin Turbo Install Gen 2 CTS-V (09-15) The following install guide is simply that, a guide to help you with installation. It is by no means the exact method to perform installation,
Huron Speed Products Twin Turbo Install Gen 2 CTS-V (09-15) The following install guide is simply that, a guide to help you with installation. It is by no means the exact method to perform installation,
Step 6: Remove and save the MAP sensor for later use. Step 7: Remove the passenger side intercooler pipe and the EGR intake manifold.
 LBZ Twin kit Install Step 1: Disconnect both batteries. Step 2: Drain coolant and oil also remove passenger side inner fender. Step 3: Remove intake box and piping. (Remove and save the MAF sensor in the
03-04 Mach 1. Hellion Power Systems Mach 1 Kit Instructions
 Hellion Power Systems 03-04 Mach 1 Kit Instructions Part 1 Hellion recommends that the front suspension system be installed either by trained professionals or by 5.Remove rack bolts K-Member Installation
Specialist Components. SPi 5 Port EFI Kit
 Specialist Components SPi 5 Port EFI Kit Version 1.1 Sept 2012 Congratulations on the purchase of your SPi 5 port EFI Kit! Kit Content:- Alloy inlet manifold gasflowed to suit 45/50mm throttle body Injector
05-08 GT. Hellion Power Systems Mustang Kit Instructions
 Hellion Power Systems 05-08 Mustang Kit Instructions 1. Disconnect Battery 2. Drain Radiator, keep fluid for re-installation. 3. Remove air box and inlethoses. 6. Next, underneath, punch oil pan for turbo
03-04 Cobra. Hellion Power Systems Mustang Cobra Kit Instructions
 Hellion Power Systems 03-04 Mustang Cobra Kit Instructions NECESSARY PARTS REQUIRED FOR INSTALLATION Necessary: 03-04 Cobra hellion Kit ONLY 99-01 Alternator #YR3210346AA Alternator Bracket #XR3Z-10153-AB
Installation manual BMW E TS1/TS2
 Installation manual BMW E46 330 TS1/TS2 Technical support Europe: +4741558555 Technical support USA: (858)314-2954 Email support: support@esstuning Installation manual BMW E46 330 TS1/TS2 Remove and send
FULL LENGTH HEADERS/ CATTED HEAD PIPES
 INSTALLATION INSTRUCTIONS INS232 2016-2018 CAMARO 6.2L V8 FULL LENGTH HEADERS/ CATTED HEAD PIPES Part #4044 and 40440 Special Tools required: 10mm, 12mm, 13mm, 15mm Socket and Wrenches, Pliers, Saw, Welder
HYBRID DEVELOPMENT INTERNATIONAL RACING INTERCOOLER KIT INSTALLATION MANUAL
 HYBRID DEVELOPMENT INTERNATIONAL RACING INTERCOOLER KIT INSTALLATION MANUAL Please read before continuing Please read through all the instruction and practice all precaution in all aspect of safety and
2015+ SUBARU STI FRONT-MOUNT INTERCOOLER PARTS LIST AND INSTALLATION GUIDE INSTALL DIFFICULTY DISCLAIMER CAUTION INSTALL PROCEDURE TOOLS NEEDED
 PARTS LIST AND PARTS INCLUDED 1PC ALUMINUM INTAKE PIPE 1PC BAR-AND-PLATE INTERCOOLER 1PC STEEL CRASH BAR W/ MOUNTING HARDWARE 2PC HOT-SIDE INTERCOOLER PIPES 2PC COLD-SIDE INTERCOOLER PIPES 1PC BPV FLANGE
LML 3 Y-Bridge Kit or High Flow Intake Bundle Package
 2011-2016 LML 3 Y-Bridge Kit or High Flow Intake Bundle Package Covers installation of PN s: WCF100607, WCF100691, WCF100716, & WCF100353 Note: This Kit is for off road competition use only! Overview-
#TL T EA888 GEN 3 FUELING SYSTEM/ INSTALLATION INSTRUCTIONS
 #TL100069 2.0T EA888 GEN 3 FUELING SYSTEM/ INSTALLATION INSTRUCTIONS Notes: These instructions were written for a North American specification MkVII GTI. Other models, like the Golf R, are similar. When
Mini R53 Top Mount Intercooler Fitting Instructions
 Parts Pro Alloy Intercooler 2 x M6 x 12 Hex head bolt 2 x M6 Washer 1 x 30-45mm Hose Clip Tools Required T30 Torx Bit 12mm Spanner 11mm Spanner Deep 10mm Socket 11mm Socket 8mm Socket Extension bar Ratchet
Procharger Stage II Intercooled Supercharger System (11-14 GT)
") Procharger Stage II Intercooled Supercharger System (11-14 GT) Installation Time: Approximately one day. Installed on 2012 Mustang GT 5.0/Manual Required Tools 3/8 Socket Set (Standard and Metric) 1/2
Procharger Stage II Intercooled Supercharger System (11-14 GT) Installation Time: Approximately one day. Installed on 2012 Mustang GT 5.0/Manual Required Tools 3/8 Socket Set (Standard and Metric) 1/2
96-04 tt. Hellion Power Systems Mustang Twin Turbo Kit Instructions
 96-04 tt Hellion Power Systems 1996-2004 Mustang Twin Turbo Kit Instructions 1. Disconnect battery and elevate front end of car on either Jack stands or a lift if available 2.Lock steering wheel and remove
IAG Competition Series Air / Oil Separator (AOS) For 2017 STI
 For 2017 STI") P IAG Competition Series Air / Oil Separator (AOS) For 2017 STI Part# IAG-ENG-7251 Tools Required: Ratchet, torque wrench, extensions, needle nose pliers, hose cutter, snips/scissors, flat head screw driver,
P IAG Competition Series Air / Oil Separator (AOS) For 2017 STI Part# IAG-ENG-7251 Tools Required: Ratchet, torque wrench, extensions, needle nose pliers, hose cutter, snips/scissors, flat head screw driver,
Keeping You Cool Under Pressure
 Installation Instruction for 92-93 GM 6.5L Turbo Diesel Series 3500-4 Wheel Drive Pickup and Series 1500, 2500, 3500 4 Wheel Drive Suburban Intercooler System (Part No. 2-436) TOOLS REQUIRED: 1.) Normal
SLP Camaro ZL1 STAGE 3 (650 HP)
") SLP - 2012 Camaro ZL1 STAGE 3 (650 HP) PART #26002 PACKING LIST Before installation, use this check list to make sure all necessary parts have been included. ITEM QTY CHECK PART NUMBER DESCRIPTION 1. 1
SLP - 2012 Camaro ZL1 STAGE 3 (650 HP) PART #26002 PACKING LIST Before installation, use this check list to make sure all necessary parts have been included. ITEM QTY CHECK PART NUMBER DESCRIPTION 1. 1
99-04 GT. Hellion Power Systems Mustang GT Kit Instructions
 Hellion Power Systems 99-04 Mustang GT Kit Instructions Part 1 Hellion recommends that the front suspension system be installed either by trained professionals or by 5.Remove rack bolts K-Member Installation
FMCZTINT Mitsubishi Colt CZT front mounting intercooler installation
 FMCZTINT Mitsubishi Colt CZT front mounting intercooler installation Tools needed: Drill with 8mm HSS drill bit, hacksaw, dremel/stanley knife 3/8 drive ratchet with extension and 10mm,13mm sockets Torx
FIAT 500 ABARTH FRONT MOUNTED INTERCOOLER INSTALLATION
 FIAT 500 ABARTH FRONT MOUNTED INTERCOOLER INSTALLATION Tools needed: T30 screwdriver/bit 10mm socket, suitable extension and ratchet 17mm socket, suitable extension and ratchet 10mm ratchet spanner Pozidriv/Phillips
HIGH FLOW COLD AIR INTAKE SYSTEM INSTALLATION INSTRUCTIONS D , D A
 HIGH FLOW COLD AIR INTAKE SYSTEM INSTALLATION INSTRUCTIONS D760-0320, D760-0320A 1992-95 325i, is 1995 M3 (3.0L) Parts List: 1 Intake Tube 1 Silicone Hose 1 Air Flow Meter Bracket 1 Hose Clamp (#36z) 1
2006 Honda Civic SI Supercharger Kit Installation Instruction Kit #
 2006 Honda Civic SI Supercharger Kit Installation Instruction Kit #350-091 3239 MONIER CIRCLE, STE.5 RANCHO CORDOVA, CA 95742 916.635.4550 FAX 916.635.4632 www.ct-engineering.com INS-157 VERSION: 3.25.2009
V1 Truck Manifold Turbo Kit for F-body
 V1 Truck Manifold Turbo Kit for 98-02 F-body Prep: -Remove all A/C Components, Alternator and brackets, tensioner, front bumper, front bumper foam, and front bumper support. Remove radiator and cooling
INSTALLATION GUIDE HOLDEN COLORADO (RG) INTERCOOLER KIT P/N PWI66175K INTERCOOLER P/N PWA64553 ( ) PIPE KIT
 INTERCOOLER KIT P/N PWI66175K INTERCOOLER P/N PWA64553 ( ) PIPE KIT") INSTALLATION GUIDE HOLDEN COLORADO (RG) INTERCOOLER KIT P/N PWI66175K INTERCOOLER P/N PWA64553 (2012-13) PIPE KIT ENGINEERING THE UNFAIR ADVANTAGE Contents CONDITIONAL MANUFACTURERS WARRANTY... 2 Warranty
INSTALLATION GUIDE HOLDEN COLORADO (RG) INTERCOOLER KIT P/N PWI66175K INTERCOOLER P/N PWA64553 (2012-13) PIPE KIT ENGINEERING THE UNFAIR ADVANTAGE Contents CONDITIONAL MANUFACTURERS WARRANTY... 2 Warranty
NISSAN JUKE DIG- T 1.6T FMIC & HARDPIPE KIT INSTALLATION INSTRUCTIONS
 NISSAN JUKE DIG- T 1.6T FMIC & HARDPIPE KIT INSTALLATION INSTRUCTIONS Please thoroughly read through and familiarize yourself with these instructions in their entirety prior to beginning any part of the
AB65HCTR Maxogen Kit
 AB65HCTR Maxogen Kit For Honda EP3 Civic Type-R & DC5 Integra 1 AB65HCTR Performance Air Box Kit Contents Qty Description Airbox Assembly 1 X AB65H Carbon Air Box 1 X Carbon Fibre Air Filter Retaining
8 Zip Tie Zip Tie 1 Union Fitting 1 ½ ½ Union Reducer Fitting Union 1 5/8 ½ (For Plastic Intake Manifold Vehicles)
") P IAG Street Series Air / Oil Separator (AOS) For 2017 STI Part# IAG-ENG-7151 Tools Required: Ratchet, torque wrench, extensions, needle nose pliers, hose cutter, snips/scissors, flat head screw driver,
P IAG Street Series Air / Oil Separator (AOS) For 2017 STI Part# IAG-ENG-7151 Tools Required: Ratchet, torque wrench, extensions, needle nose pliers, hose cutter, snips/scissors, flat head screw driver,
Always use fuel with a minimum octane rating of 93 (R+M)/2. (Equivalent to 98 RON).
/2. (Equivalent to 98 RON).") Before Commencing Installation Verify that you have all necessary tools as listed. Clean all air ducting prior to commencing installation. The sequence of installation of each part is very important. It
Before Commencing Installation Verify that you have all necessary tools as listed. Clean all air ducting prior to commencing installation. The sequence of installation of each part is very important. It
Fitting Instructions. Revo MQB Golf/GTi/Octavia/Leon Intercooler. Recommended Tools. Contents RV581M Dealer installation advised.
 RV581M100100 Recommended Tools Contents No. Description Tools Size Intercooler Torx Bit T25, T30 Bracket Kit llen Key 4, 5 mm Silicone Hoses Socket 7, 10, 16, 19 mm Hose Clamps Flat Head Screwdriver Small,
PWI Mazda BT50 & Ford Ranger 2012-onwards 2.2L / 3.2L 68mm Intercooler fitment instructions.
 PWI53860 - Mazda BT50 & Ford Ranger 2012-onwards 2.2L / 3.2L 68mm Intercooler fitment instructions. Tools required: 3/8 drive or similar ratchet with 8mm &10mm long sockets. Flat blade screwdriver. T27
2017+ L5P Duramax 3 ½ Down Pipe & EGR Fix Kit
 2017+ L5P Duramax 3 ½ Down Pipe & EGR Fix Kit Covers installation of PN s: WCF100630, WCF100829 Note: This Kit is for off road competition use only! Off Road Competition Use Tuning & Exhaust System is
VW SCIROCCO TWINTERCOOLER INSTALLATION INSTRUCTIONS
 VW SCIROCCO TWINTERCOOLER INSTALLATION INSTRUCTIONS Tools needed: T25 torx driver Small flat head screwdriver 12mm & 13mm socket, with ratchet Dremel or similar with cut off disc Large Phillips screwdriver
Installation Instructions
 2011-2013 LML DURAMAX COMPOUND-ADD 2011-2015 LML A Duramax TURBO KIT Add INSTALL A Turbo INSTRUCTIONS Compound Kit Installation Instructions 1-800-955-0476 - www.industrialinjection.com - info@industrialinjection.com
Subaru Front Mount Intercooler Kit STI Subaru Front Mount Intercooler Kit STI
 Subaru Front Mount Intercooler Kit STI 2008-2014 715500 Subaru Front Mount Intercooler Kit STI 2008-2014 Congratulations on your purchase of the Subaru Front Mount Intercooler Kit STI 2008-2014. The following
KJ JEEP COMBINATION BULL BAR WARNING
 KJ JEEP COMBINATION BULL BAR PRODUCT NUMBER FITTING KIT NUMBER 3450120 6171962 WARNING FOR VEHICLES EQUIPPED WITH SRS AIRBAG WHEN INSTALLED IN ACCORDANCE WITH THESE INSTRUCTIONS, THE FRONT PROTECTION BAR
SHELBY GT500
 2007-2009 SHELBY GT500 Removal of Factory Unit WARNING: 1. Radiator fluid must be handled properly. Please observe local ordinances with regards to handling and disposal. 2. Allow vehicle and components
SL63 Weistec M156 Supercharger System Installation Guide Stage 1 / Stage 2
 SL63 Weistec M156 Supercharger System Installation Guide Stage 1 / Stage 2 WARNING! DO NOT HAVE YOUR ECU REPROGRAMMED ANYWHERE BUT AT WEISTEC FOR THIS SUPERCHARGER. THE AMG 63 USES AN ELECTRONIC THROTTLE
Included parts: 1 - BorgWarner SX-E Turbocharger 1 - SX-E 90-Degree Compressor Outlet Elbow 1 - HSM Cast Exhaust Manifold 1 - HSM Downpipe
 TROUBLESHOOTING: Please read and understand all installation instructions before proceeding with the installation. If you have questions during the installation of this product, please email H&S Motorsports
COLD AIR INTAKE INSTALLATION INSTRUCTIONS. # D Fits: i (4.8L)
") COLD AIR INTAKE INSTALLATION INSTRUCTIONS # D760-0013 Fits: 2006-10 650i (4.8L) PARTS LIST Air Box Assembly Left tube Center tube Right tube Support bracket AFM housing AFM/TB tube Hardware Kit Congratulations
COLD AIR INTAKE INSTALLATION INSTRUCTIONS # D760-0013 Fits: 2006-10 650i (4.8L) PARTS LIST Air Box Assembly Left tube Center tube Right tube Support bracket AFM housing AFM/TB tube Hardware Kit Congratulations
ANTZ Performance. FG-FGX 4 Air Intake Kit + Battery relocation kit installation. Remove factory components:
 ANTZ Performance https://www.facebook.com/antzperformance/ FG-FGX 4 Air Intake Kit + Battery relocation kit installation. Remove factory components: 1.Remove factory intercooler piping on the left, with
COLD AIR INTAKE INSTALLATION INSTRUCTIONS. # D Fits: i (4.8L)
") COLD AIR INTAKE INSTALLATION INSTRUCTIONS # D760-0012 Fits: 2006-10 550i (4.8L) PARTS LIST Air Box Assembly Left tube Center tube Right tube Outer Tube AFM housing AFM/TB tube Hardware Kit Congratulations
COLD AIR INTAKE INSTALLATION INSTRUCTIONS # D760-0012 Fits: 2006-10 550i (4.8L) PARTS LIST Air Box Assembly Left tube Center tube Right tube Outer Tube AFM housing AFM/TB tube Hardware Kit Congratulations
4 December 2017 PN# , , Dodge 6.7L Rumble B SXE (I-00400) 1. BD Rumble B SXE. D o d g e 6. 7 L H P C R Installation Instructions
 1. BD Rumble B SXE. D o d g e 6. 7 L H P C R Installation Instructions") 4 December 2017 PN#1045705, 1045706, 1045708 Dodge 6.7L Rumble B SXE (I-00400) 1 DOWNLOAD ENHANCED INSTALL MANUALS AT dieselperformance.com BD Rumble B SXE D o d g e 6. 7 L H P C R Installation Instructions
4 December 2017 PN#1045705, 1045706, 1045708 Dodge 6.7L Rumble B SXE (I-00400) 1 DOWNLOAD ENHANCED INSTALL MANUALS AT dieselperformance.com BD Rumble B SXE D o d g e 6. 7 L H P C R Installation Instructions
CHALLENGER TWIN TURBO SYSTEM INSTALLATION INSTRUCTIONS
 CHALLENGER TWIN TURBO SYSTEM INSTALLATION INSTRUCTIONS 1 Verify contents of kits with supplied packing list 1) Unhook the battery. 2) Remove wheel wells & front fascia of vehicle. 3) Remove the catalytic
Included parts: 1 - BorgWarner SX-E Turbocharger 1 - SX-E 90-Degree Compressor Outlet Elbow 1 - HSM Cast Exhaust Manifold 1 - HSM Downpipe
 TROUBLESHOOTING: Please read and understand all installation instructions before proceeding with the installation. If you have questions during the installation of this product, please email H&S Motorsports
INSTALLATION GUIDE NISSAN NAVARA INTERCOOLER KIT P/N PWI65094K
 INSTALLATION GUIDE NISSAN NAVARA INTERCOOLER KIT P/N PWI65094K ENGINEERING THE UNFAIR ADVANTAGE Contents CONDITIONAL MANUFACTURERS WARRANTY... 2 WARRANTY VOIDS... 2 WARRANTY DOES NOT COVER... 2 LIMIT OF
Installation Manual v1.0: Aurora Plus Turbo Kit ( ) 5.9L Dodge. Please read all instructions before installation.
 5.9L Dodge. Please read all instructions before installation.") Installation Manual v1.0: Aurora Plus - 4000 Turbo Kit (2003-2007) 5.9L Dodge Please read all instructions before installation. Figure 1: Aurora Plus - 4000 Kit Contents 1 Figure 2: Aurora Plus Hardware
Installation Manual v1.0: Aurora Plus - 4000 Turbo Kit (2003-2007) 5.9L Dodge Please read all instructions before installation. Figure 1: Aurora Plus - 4000 Kit Contents 1 Figure 2: Aurora Plus Hardware
FREE $15 Gift Card for every $100 spent on Ship To Home orders. Find Out How
 1 of 29 10/12/2011 5:05 PM FREE $15 Gift Card for every $100 spent on Ship To Home orders. Find Out How Ford Ranger/Explorer/Mountaineer 1991-1999 Intake Manifold REMOVAL & INSTALLATION Print The engines
Left Hand Drive (non i-eloop) Installation guide for BBR Turbocharger Conversion Mazda MX-5/Miata ND 2.0L 2015 on
 Installation guide for BBR Turbocharger Conversion Mazda MX-5/Miata ND 2.0L 2015 on") Left Hand Drive (non i-eloop) Installation guide for BBR Turbocharger Conversion Mazda MX-5/Miata ND 2.0L 2015 on Contents Introduction... 2 Tools and parts... 2 Required:... 2 Optional:... 2 Torque settings:...
Left Hand Drive (non i-eloop) Installation guide for BBR Turbocharger Conversion Mazda MX-5/Miata ND 2.0L 2015 on Contents Introduction... 2 Tools and parts... 2 Required:... 2 Optional:... 2 Torque settings:...
BD TrackMaster S D o d g e H P C R Installation Instructions
 7 July 2016 PN#1045701, 1045702, 1045704 Dodge 6.7L TMS400 (I-00361) 1 BD TrackMaster S400 2008-2012 D o d g e H P C R Installation Instructions 1045701 2008-2009 Dodge 6.7L TMS400 1045702 2010-2012 Dodge
2004 Volvo C70 L5-2.4L Turbo VIN 63 B5244T7 Cylinder Head Assembly Service and Repair, Removal and Replacement: Cylinder Head/Gasket, Replacing
 1 of 25 8/18/2011 6:10 PM 2004 Volvo C70 L5-2.4L Turbo VIN 63 B5244T7 Cylinder Head Assembly Service and Repair, Removal and Replacement: Cylinder Head/Gasket, Replacing Cylinder head/gasket, replacement
BBK LONG TUBE HEADERS (99-04 GT, Mach 1, Bullitt)
") BBK LONG TUBE HEADERS (99-04 GT, Mach 1, Bullitt) Install Time: Approx. 8-10 hrs Parts Needed: BBK Long Tube Headers Shorty mid pipe X/H O2 wiring harness extensions Hi-temp thread locker Tools Required:
BBK LONG TUBE HEADERS (99-04 GT, Mach 1, Bullitt) Install Time: Approx. 8-10 hrs Parts Needed: BBK Long Tube Headers Shorty mid pipe X/H O2 wiring harness extensions Hi-temp thread locker Tools Required:
IAG Street Series Air / Oil Separator (AOS) For 2017 WRX
 For 2017 WRX") P IAG Street Series Air / Oil Separator (AOS) For 2017 WRX Part# IAG-ENG-7152 Tools Required: Ratchet, torque wrench, extensions, needle nose pliers, hose cutter, snips/scissors, flathead screwdriver,
P IAG Street Series Air / Oil Separator (AOS) For 2017 WRX Part# IAG-ENG-7152 Tools Required: Ratchet, torque wrench, extensions, needle nose pliers, hose cutter, snips/scissors, flathead screwdriver,
EXPANSION TANK PARTS LIST AND INSTALLATION GUIDE
 PARTS LIST AND INSTALLATION GUIDE PARTS LIST 2 PC APPLICATION-SPECIFIC MOUNTING BRACKETS 2 PC BLACK, ANODIZED 6061 ALUMINUM CATCH CANS 4 PC SILICONE HOSES 4 PC PLASTIC BARBED FITTINGS 4 PC WORM-GEAR CLAMPS
M-9424-M50CJ INTAKE MANIFOLD INSTALLATION INSTRUCTIONS
 Please visit www.fordracingparts.com for the most current instruction information!!! PLEASE READ ALL OF THE FOLLOWING INSTRUCTIONS CAREFULLY PRIOR TO INSTALLATION. AT ANY TIME YOU DO NOT UNDERSTAND THE
CLS63 Weistec M156 Supercharger System Installation Guide Stage 1 / Stage 2
 CLS63 Weistec M156 Supercharger System Installation Guide Stage 1 / Stage 2 WARNING! DO NOT HAVE YOUR ECU REPROGRAMMED ANYWHERE BUT AT WEISTEC FOR THIS SUPERCHARGER. THE AMG 63 USES AN ELECTRONIC THROTTLE
3.4L V6 SUPERCHARGER 7 TH INJECTOR KIT
 Part Number: 00602-17620-260 00602-17620-261 00602-17620-263 00602-17620-264 00602-17620-274 00602-17620-275 00602-17620-276 Section I Installation Preparation Kit Contents Item # Quantity Reqd. Description
Parts List See cover Page
 Thank you for purchasing the CorkSport Front Mount Intercooler Kit for the 2010-2013 Mazdaspeed 3. Keep your BAT s under check with the CorkSport FMIC Kit with the small or large intercooler. Please let
7 th Gen. Celica GTS Turbo Kit Installation Guide This kit has not been CARB approved and is intended for racing / offroad purposes only.
 7 th Gen. Celica GTS Turbo Kit Installation Guide This kit has not been CARB approved and is intended for racing / offroad purposes only. The purpose of this guide is to serve as a reference for use when
INSTRUCTIONS E36 SUPERCHARGER WITH C38 BLOWER.
 INSTRUCTIONS 1996-1999 E36 SUPERCHARGER WITH C38 BLOWER. 1 Introduction Congratulations on your purchase of an Active Autowerke Supercharger, and welcome to the AA Tuning family. Your supercharger kit
IAG Street Series Air / Oil Separator (AOS) For WRX
 For WRX") P IAG Street Series Air / Oil Separator (AOS) For 2015-16 WRX Part# IAG-ENG-7152 Tools Required: Ratchet, torque wrench, extensions, needle nose pliers, hose cutter, snips/scissors, flat head screw driver,
P IAG Street Series Air / Oil Separator (AOS) For 2015-16 WRX Part# IAG-ENG-7152 Tools Required: Ratchet, torque wrench, extensions, needle nose pliers, hose cutter, snips/scissors, flat head screw driver,
SALEEN SPEEDLAB BOOST AND WATER TEMPERATURE GAUGE POD KIT
 = SALEEN SPEEDLAB BOOST AND WATER TEMPERATURE GAUGE POD KIT INSTALLATION MANUAL: 2005-09 Mustang 4.6L 3V P/N: 10-8002-C12000B KIT P/N: 10-2903-B11511* Saleen Performance, Inc. 1225 East Maple Rd. Troy,
Disconnect the APP sensor harness connector. See Fig. 4. Remove the accelerator pedal mounting nuts. Remove the APP assembly.
 ENGINE CONTROLS - REMOVAL, OVERHAUL & INSTALLATION - 6.6L DIESEL... Page 1 of 41 FUEL SYSTEMS ACCELERATOR PEDAL POSITION SENSOR Removal & Installation Disconnect the APP sensor harness connector. See Fig.
Installation Instructions
 Installation Instructions 2.0T TSI Intake Manifold: Featuring better flow, higher boost capacity, 40% larger plenum volume, and integrated flapper delete; this product will take your 2.0L VW TSI to the
WARNING TAKE NOTE OF THE FOLLOWING: THIS PRODUCT MUST BE INSTALLED EXACTLY AS PER THESE INSTRUCTIONS USING ONLY THE HARDWARE SUPPLIED.
 ARB WINCH/NONWINCH BUMPER TO SUIT TOYOTA HJ100 IFS PRODUCT No. 3913140 5100050 Top Tube Kit 5100160 Buffer Kit With hole (required when fitting Top Tube) 5100170 Buffer Kit With no hole Fitting Kit No.
Revised 10/23/2015 Page 2 of 10
 1.Remove the gauge, side panels, hood and headlight. Remove the air box from the throttle bodies then remove the seat and gas tank. 2.Carefully remove temp sensor from air box using a small pick or screw
How to: Install a Ford EcoBoost F150 Intercooler
 How to: Install a 2015+ Ford EcoBoost F150 Intercooler This article documents the installation of our Full-Race 2015+ F150 Ecoboost Intercooler / CAC Upgrade Kit. The addition of a high performance air-to-air
JBR MAZDASPEED
 Page1 james Barone Racing Aftermarket Parts and Accessories JBR 2007 2009 MAZDASPEED 3 Front Mount Intercooler Piping Kit Installation Instructions for TR8 Intercooler Tooling: o Jack, Jack Stands, Ramps
REMOVAL & INSTALLATION
 REMOVAL & INSTALLATION NOTE: For reassembly reference, label all electrical connectors, vacuum hoses and fuel lines before removal. Also place mating marks on engine hood and other major assemblies before
Setting the World s Performance Standards
 Setting the World s Performance Standards 743 East Iona Road, Idaho Falls, ID 83401, (208) 529-0244 Fax (208) 529-9000 Forced Air Hot Air Elimination Kit (Bed Fan Kit) For 800 RZR-4 P/N 67-165 Kit Contents:
INSTALLATION INSTRUCTIONS FOR MK4 VOLKSWAGEN JETTA (BORA) /GOLF 1.8T, 2.0L, VR6, & R32 MODELS ALSO FITS ALL MODELS OF SEAT LEON & TOLEDO
 /GOLF 1.8T, 2.0L, VR6, & R32 MODELS ALSO FITS ALL MODELS OF SEAT LEON & TOLEDO") CI100001 INSTALLATION INSTRUCTIONS FOR 1999.5-2005 MK4 VOLKSWAGEN JETTA (BORA) /GOLF 1.8T, 2.0L, VR6, & R32 MODELS ALSO FITS ALL MODELS OF SEAT LEON & TOLEDO Thank you for choosing to purchase a Carbonio
CI100001 INSTALLATION INSTRUCTIONS FOR 1999.5-2005 MK4 VOLKSWAGEN JETTA (BORA) /GOLF 1.8T, 2.0L, VR6, & R32 MODELS ALSO FITS ALL MODELS OF SEAT LEON & TOLEDO Thank you for choosing to purchase a Carbonio
MAZDASPEED3 Intercooler Instructions
 MAZDASPEED3 Intercooler Instructions Congratulations on your purchase of the COBB Tuning Front Mount Intercooler System for your 2007-2009 Mazdaspeed3. The following instructions should assist you through
APIKOL Ur-S4/S6 Gen. II Front Mount Intercooler INSTALLATION INSTRUCTIONS
 APIKOL Ur-S4/S6 Gen. II Front Mount Intercooler INSTALLATION INSTRUCTIONS Only work underneath your vehicle after properly supporting it with adequate jack stands on a flat surface. NEVER work under a
TOYOTA SEQUOIA MY SUPERCHARGER FIT KIT Preparation
 Preparation SEQUOIA FIT KIT: PTR29-0C080 Item Qty Req d Description 1 1 Low Temperature Radiator (LTR) 2 1 TRD Air Filter 3 1 Air Box Lid 4 1 Coolant Cross Over Manifold 5 1 Hardware Bag A 6 1 Hardware
INSTALLATION INSTRUCTIONS BILLET FUEL RAIL KIT
 INSTALLATION INSTRUCTIONS BILLET FUEL RAIL KIT MITSUBISHI LANCER EVOLUTION X Document# 19-0067 Support: info@radiumauto.com WARNING: DON'T SMOKE OR WORK WITH OPEN SPARKS WHILE WORKING ON THE FUEL SYSTEM
Corvette Stage X Twin Turbo Installation. Please read the entire instructions as we ve made many changes.
 Corvette Stage X Twin Turbo Installation Please read the entire instructions as we ve made many changes. Disconnect battery. Remove plastic fuel rail covers over the valve cover. Remove Air Box in front
Installation Instructions for: TOYOTA 4.5L SUPERCHARGER SYSTEM
 Installation Instructions for: TOYOTA 4.5L SUPERCHARGER SYSTEM 1995-1997 Land Cruiser * PREMIUM FUEL REQUIRED * Magnuson Products LLC 1990 Knoll Drive, Bldg A, Ventura, CA 93003 (805) 642-8833 phone *
Installation instructions, accessories - Fuel driven heater 912-D
 XC90 Section Group Weight(Kg/Pounds) Year Month 8 87 2002 10 XC90 2003 D5244T, XC90 2004 D5244T, XC90 2005 D5244T AW50/51 AWD, XC90 2006 D5244T, XC90 2006 D5244T AW50/51 AWD D5244T R8703687 Page 1 of 20
LAND ROVER DISCOVERY 3 ARB BULL BAR AND WINCH BAR WARNING
 LAND ROVER DISCOVERY 3 ARB BULL BAR AND WINCH BAR PART No 3432150 DISCOVERY 3 WINCH BAR PART No 3232150 DISCOVERY 3 BULL BAR WARNING FOR VEHICLES EQUIPPED WITH SRS AIRBAG WHEN INSTALLED IN ACCORDANCE WITH
HYBRID DEVELOPMENT INTERNATIONAL RACING INTERCOOLER KIT INSTALLATION MENU SUBARU LEGACY B4 BL5 SUBARU LIBERTY GT BL5
 HYBRID DEVELOPMENT INTERNATIONAL RACING INTERCOOLER KIT INSTALLATION MENU SUBARU LEGACY B4 BL5 SUBARU LIBERTY GT BL5 Please read before continue Please read through all the instruction and practice all
2003 ACCORD - Intake Manifold Removal and Installation
 2003 ACCORD - Intake Manifold Removal and Installation Exploded View '06-07 Models Removal ('03-05 Models) 1. Disconnect the intake air temperature (IAT) sensor connector (A). 2. Remove the vacuum hose
Part number SP Mitsubishi Lancer 4 cyl. 2.0L non-turbo. 1- Three piece cold air intake
 Part number SP1835 08-09 Mitsubishi Lancer 4 cyl. 2.0L non-turbo 1- Three piece cold air intake 1- Formed silicone hose (#3158) 1-2 1/2 Injen filter (#1012) 1-2 3/4 straight hose (#3043) 4- Power-Bands.312.040
1992 Toyota Cressida
 Monday, May 16, 2016 5:32:47 PM Page 13 2005 Mitchell Repair Information Company, LLC. Fig. 7: Exploded View Of Typical Cylinder Head & Components Fig. 8: Cylinder Head Bolt Removal Sequence Monday, May
97-02 JEEP TJ BODY LIFT KIT INSTRUCTIONS
 92RC60500 97-02 JEEP TJ BODY LIFT KIT INSTRUCTIONS Congratulations on your purchase of a new Rough Country 2 /3 Body Lift. We are committed to providing you with the best product available for the best
Part# PLEASE READ ALL INSTRUCTIONS BEFORE INSTALLATION.
 16 November 2009 HPCR Dodge Twin Turbo Kit #1045430 1 BD Twin Turbo R700 Kit 2003-2007 Dodge HPCR ISBe Installation Instructions Part# 1045430 PLEASE READ ALL INSTRUCTIONS BEFORE INSTALLATION. UNLESS AN
ZZP LNF Cobalt Turbo Upgrade
 ZZP LNF Cobalt Turbo Upgrade Note: These instructions are intended for installers with previous turbo installation experience. Some procedures will not be described in full detail. If you run into any
INSTALLATION INSTRUCTIONS
 HIGH FLOW AIRFLOW METER INSTALLATION INSTRUCTIONS PART NUMBER D763-1600A APPLICATION: 2001-06 E46 M3 Parts List: Hose clamp 64Z (7) Plastic Rivets Air Filter Temp Sensor & Harness (2) Button Head Screws
Special Note About The JDM High Performance Water Pump:
 Page 1 of 30 JDM Engineering, Inc. home Call Us! 732-780- 0770 back to Installation Instructions Electric Fan Upgrade Kit Electric Fan Wiring Diagram Thank you for your purchase of the JDM Engineering
INSTALLATION INSTRUCTIONS FUEL RAIL
 INSTALLATION INSTRUCTIONS FUEL RAIL MITSUBISHI EVO X Document# 19-0067 Support: info@radiumauto.com WARNING: DON'T SMOKE OR WORK WITH OPEN SPARKS WHILE WORKING ON THE FUEL SYSTEM PREPARING THE VEHICLE:
VW SCIROCCO R TWINTERCOOLER INSTALLATION INSTRUCTIONS
 VW SCIROCCO R TWINTERCOOLER INSTALLATION INSTRUCTIONS Tools needed: T25 torx driver Small flat head screwdriver 12mm & 13mm socket, with ratchet Dremel or similar with cut off disc Large Phillips screwdriver
Application List L Cummins
 1 Discharging & Recharging of the A/C System is required for this install. INTERCOOLER INSTALLATION FOR 2010+ DODGE 6.7L CUMMINS Application List 2010+ 6.7L Cummins 1042530 PLEASE READ ALL INSTRUCTIONS
BLACKBIRD INSTALLATION SUPPLEMENT
 BLACKBIRD INSTALLATION SUPPLEMENT FOR 2003-7 FORD 6.0 LITER DIESEL SINGLE ALTERNATOR F-350, F-450, F-550, EXCURSION VERSION 7-07 Parts Description Blackbird Wiring Manual Installation Supplement 6.0 Liter
VR6 Supercharger System Golf III and Jetta III VR6 Installation Manual Model Year
 VR6 Supercharger System Golf III and Jetta III VR6 Installation Manual Model Year 1994-1999.5 Date 10/28/00 Page 1 Index 1.0 Parts List 1.1 Required Tools 1.2 Required Standard Parts 1.3 Required Misc.
ENGINE DEVELOPMENT INC.
 2003 Ford Expedition 4.6L& 5.4L We encourage you to read this manual thoroughly before you begin work, and perform the following: 1. A quick parts check to make certain your kit is complete. If you discover
The M7 Direct Flow Intercooler (DFIC) Installation Guide
 Installation Guide") The M7 Direct Flow Intercooler (DFIC) Installation Guide This information is meant only as a guide. The author of this information,, or any M7 Tuning employees assumes no liabilities for any outcomes resulting
The M7 Direct Flow Intercooler (DFIC) Installation Guide This information is meant only as a guide. The author of this information,, or any M7 Tuning employees assumes no liabilities for any outcomes resulting