Reference Guide for DEPO Lexus GS Tail Light Resistor Installation
|
|
|
- Virgil Palmer
- 6 years ago
- Views:
Transcription

 to run through its functions BEFORE you proceed with the installation.")
1 Reference Guide for DEPO Lexus GS Tail Light Resistor Installation Disclaimer: Buyer assumes any and all risk and liability from the installation and use of this product. Seller, author, or any of their affiliates assume no liability for injury, loss, incidental or consequential damages deriving from installation and/or use of this product. Special Notes Before attempting to install anything, PLEASE always check your order and test it by simply connecting the new DEPO tail light s main connector to your vehicle s main tail light connector (while also connecting the resistors that comes with the new tail light set) to run through its functions BEFORE you proceed with the installation. This way you can rest assure when you are installing the tail light set because you know that the headlight set functions perfectly with your vehicle. This is to save much of the hassle of uninstalling the tail light set (risking also damaging it) if you are to find compatibility issues. PLEASE pay special attention to Steps Any improper installation of the included Resistors may result in burning/melting the trunk lining or wiring. Please take moment to review this BEFORE installing the tail light set. Thanks again for your understanding and support.


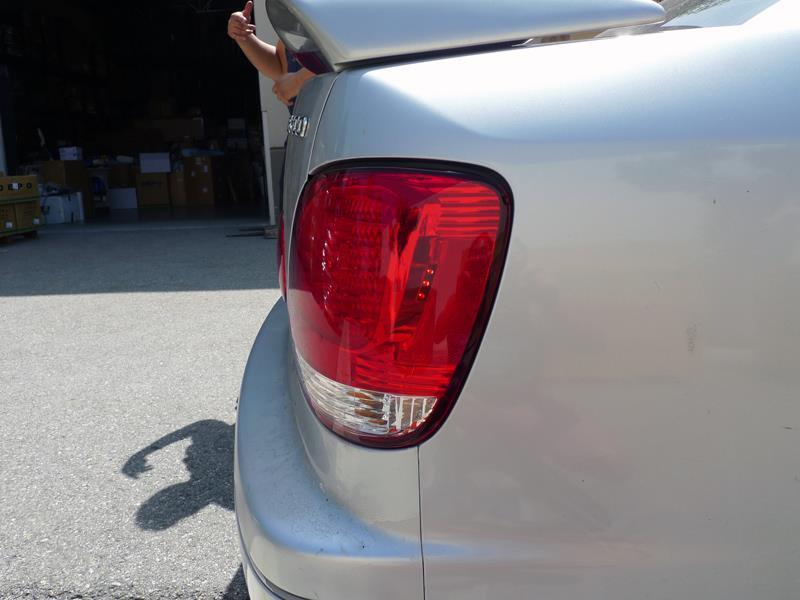
2 1. To remove the outer Tail Light set, you will need to remove the clips on the trunk lining. There are two clips on each tail light side that you may need to remove in order to peel away the trunk cover to access the Tail Light s connectors. Photo Example I shows where the clippings are on the plastic trim. You will remove Clips A and B on each ends, while there is only one Clip C. Photo Example I Photo Example II Photo Example III

.")

3 2. Once you ve removed the clippings to free the plastic trim in order to be able to peel back the trunk lining, you will be able to access your Tail Light s main connector (Photo Example IV). Once you are able to see the main tail light connector, you may unplug it from your Stock Tail Light set. Photo Example IIII Photo Example IV


4 3. Once you ve unplugged the main connector, you will remove the nuts securing the tail light set. There are two nuts to remove from each tail light side. 4. You will need to then remove the outer bolts to free the tail lights. You may need to remove two bolt covers from each tail light side (one is shown in Photo Example V) Photo Example V


5 5. Once Bolt covers are removed, you will have access to remove the two bolts on each tail light side. Photo Example VI


6 6. You should be able to carefully remove the tail light set. Photo Example VII 7. When installing new DEPO tail light set, you will pull the tail lights main wiring connector through the allotted spacing shown in the first photo for Photo Example VIII. Photo Example VIII


7 8. Please ensure that you are placing the rubber grommet on the opening where you are pulling in the DEPO tail light s connector. This is to prevent moisture from entering your inner chassis. Photo Example IX
.")
. Photo Example X 10.")
, PLEASE ensure that you wipe the area you are about to secure the resistors clean")
8 9. You may secure one nut onto the screws shown in Step 3, this is so that the tail light set does not accidentally fall off, when you are connecting and securing the Black Box Resistors (one of them shown in Photo Example X). There will be two Black Box Resistors for each outer tail light side (while the inner tail lights uses one black box resistor for each side). Photo Example X 10. Before you are to secure the Black Box resistors onto your chassis (nowhere near anything sensitive to heat as the resistors needs to dissapate heat), PLEASE ensure that you wipe the area you are about to secure the resistors clean with Rubbing Alcohol. Please check Step 11 to see which areas you will be cleaning. Photo Example XI


")

9 11. Here are the areas where the manufacturer recommends you securing the LED resistors (also where you will clean before applying the heavy duty double-sided tape). Please review the next step (Step 12) on the manufacturer s recommendation in regards to the heavy duty double sided tape. Photo Example XII

, the")


10 12. Manufacturer recommends using just enough heavy duty double sided tape. Manufacturer mentions that the Resistors do get very warm when tail lights are operating. If you are to use too much adhesive (to the point it covers the entire base), the resistor may have trouble dissapating the heat onto your metal chassis. Please also keep an eye out to ensure wires do not come in contact directly against the resistors. Photo Example XIII 13. If you have NOT tested the new tail light set at before you ve installed the tail light set, this may be a good time to run through its functions. 14. PLEASE reverse Step 1-5 to secure the new DEPO tail light set onto your vehicle.


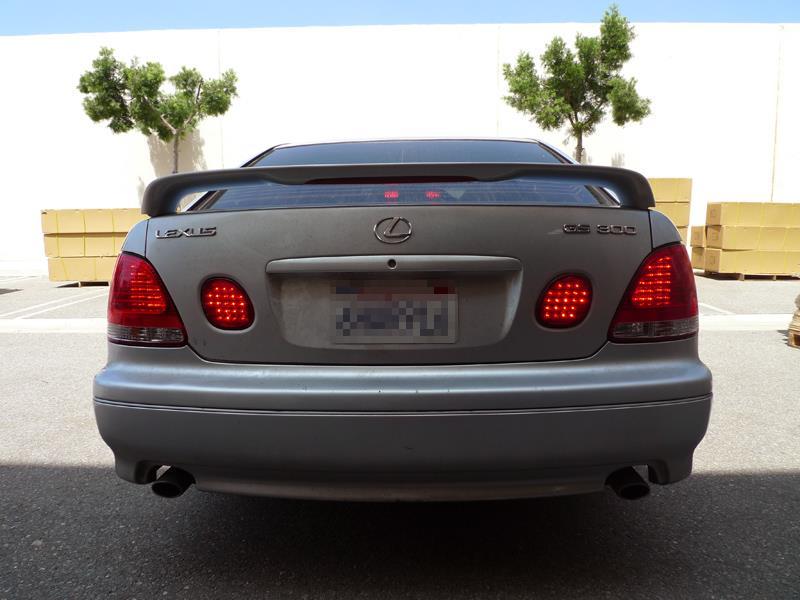
11 15. Enjoy your new Tail Light set!
12
Headlight Removal & Installation: VW Jetta Mk.4 / Bora
 Headlight Removal & Installation: 99-04 VW Jetta Mk.4 / Bora Disclaimer: Buyer assumes any and all risk and liability from the installation and use of this product. Seller, author, or any of their affiliates
Headlight Removal & Installation: BMW E36
 Headlight Removal & Installation: BMW E36 Disclaimer: Buyer assumes any and all risk and liability from the installation and use of this product. Seller, author, or any of their affiliates assume no liability
06-08 BMW Pre-LCI E90/E91 Angel Eye Halo Ring Install on OEM Headlight
 06-08 BMW Pre-LCI E90/E91 Angel Eye Halo Ring Install on OEM Headlight Disclaimer: Buyer assumes any and all risk and liability from the installation and use of this product. Seller, author, or any of
Headlight Removal & Installation: BMW E39
 Headlight Removal & Installation: 97-03 BMW E39 Disclaimer: Buyer assumes any and all risk and liability from the installation and use of this product. Seller, author, or any of their affiliates assume
Headlight Removal & Installation: Mercedes W203 C Class
 Headlight Removal & Installation: 01-07 Mercedes W203 C Class Disclaimer: Buyer assumes any and all risk and liability from the installation and use of this product. Seller, author, or any of their affiliates
Ford Mustang Side Rocker Molding Installation Instructions Application: Ford Mustang
 Ford Mustang Side Rocker Molding Installation Instructions Application: 2005-07 Ford Mustang Before installing your Roush Performance Product(s), read through the entire installation procedure and check
Installation instructions for Pantera Rear Deck Lid Lift Support Kit
 Installation instructions for Pantera Rear Deck Lid Lift Support Kit WARNING Modification of your vehicle with the parts identified above may alter its stock performance; the buyer hereby expressly assumes
SAFETY. Read and understand all safety precautions and instructions before installing this product.
 SAFETY Your safety and the safety of others is very important. In order to help you make informed decisions about safety, we have provided installation instructions and other information. These instructions
TESLA MODEL S REFRESH FRONT FASCIA INSTALLATION MANUAL FIGURE 1. Unplugged Performance 3523 Jack Northrop Ave, Hawthorne, CA 90250
 INSTALLATION MANUAL TESLA MODEL S PARTS QUANTITY INCLUDES FRONT FASCIA 1 PIECE V-STRIPE PANEL 1 PIECE HARDWARE KIT 1 SET PDC SENSOR HOLDERS 4 / 6 PIECES HOOD RELEASE KIT 1 KIT REFRESH FRONT FASCIA PLEASE
Detroit Speed, Inc. Second Generation Camaro/Firebird Mini-Tub Kit Camaro/Firebird P/N: ,
 Detroit Speed, Inc. Second Generation Camaro/Firebird Mini-Tub Kit 1970-1981 Camaro/Firebird P/N: 041222, 041223 The Detroit Speed Second Generation Camaro/Firebird Rear Mini-Tub Kit is designed to accommodate
1. Single-speed bicycle (SSB) lower fork legs... Page 3 2. Multi-speed bicycle (MSB) lower fork legs... Page 4
 lower fork legs... Page 3 2. Multi-speed bicycle (MSB) lower fork legs... Page 4") TM owner s instruction manual the ULTIMATE SURFBOARD RACK I. Messages & Warnings...Page 2 II. FORK BASE UNIT COMPONENTS...Page 2 III. SELECTING PROPER LEG TYPE...Page 2 IV. LEG LENGTH ADJUSTMENT & FORK
TM owner s instruction manual the ULTIMATE SURFBOARD RACK I. Messages & Warnings...Page 2 II. FORK BASE UNIT COMPONENTS...Page 2 III. SELECTING PROPER LEG TYPE...Page 2 IV. LEG LENGTH ADJUSTMENT & FORK
Installation instructions. Carbon Fiber Diffuser for the VW GOLF GTI (type MK VII.)
") Installation instructions Carbon Fiber Diffuser for the VW GOLF GTI (type MK VII.) Congratulations on purchasing an Akrapovič exhaust system. Please read the entire installation manual prior to undertaking
Installation instructions Carbon Fiber Diffuser for the VW GOLF GTI (type MK VII.) Congratulations on purchasing an Akrapovič exhaust system. Please read the entire installation manual prior to undertaking
Part # Instructions: Page 1
 Part #1028827 Instructions: Page 1 2-1/2 Cat-Back Dual Exhaust Kit SUM-680948 DANGER WARNING: SHOULD THE PURCHASER DECIDE TO INSTALL THIS, OR ANY OTHER EXHAUST PRODUCT AT HOME, BE WARNED THAT PLEASURE
Z125 Front Fork Upgrade kits. Installation SOP
 Z125 Front Fork Upgrade kits Installation SOP Tools a. Loctite243 or Loctite2701 (Thread Locker) b. Loctite7649 (Activator) c. 33mm Hex Socket d. 17mm Hex Socket e. Shaft Clamping Tool (12mm) f. Shaft
Fitting a Scottoiler to a 2002 Model BMW F650 GS
 Fitting a Scottoiler to a 2002 Model BMW F650 GS The following instructions detail how to fit a Scottoiler HCR kit to a 2002 model BMW F650GS. It is a little fiddly to do (but not beyond the means of a
U L T I M A T E R A D A R / L A S E R D E F E N S E S Y S T E M
 S m a r t e r Q u i e t e r M o r e A c c u r a t e U L T I M A T E R A D A R / L A S E R D E F E N S E S Y S T E M Installation Manual PASSPORT 9500ci Comes Complete Front Radar Receiver Miniature weatherproof
Prius Maintenance. Air-Conditioner Filter
 Prius Maintenance Air-Conditioner Filter Disclaimer: All the information stated in this document was provided by Prius owners. None were affiliated with Toyota Motor Corporation, except as customers. This
Installation instructions
 Installation instructions Akrapovič Exhaust System Slip-On for the BMW K1600GT/K1600GTL *502967* www.akrapovic.com www.akrapovic.com Congratulations on purchasing an Akrapovič exhaust system. Please read
Installation instructions
 Installation instructions Akrapovič Exhaust Systems: Slip-On for the AUDI TT-S 2008-2010 www.akrapovic.com Installation instructions Akrapovič Exhaust Systems: Slip-On for the AUDI TT-S 2008-2010 www.akrapovic.com
RS5mesh style Grille. Audi A5/S5. Installation Instructions. pre-facelift ES best viewed in Acrobat Reader
 Audi A5/S5 pre-facelift RS5mesh style Grille Installation Instructions ES2627648 This tutorial is provided as a courtesy by ECS Tuning. best viewed in Acrobat Reader Proper service and repair procedures
Kit # NM, # Installation instructions: Note: do not tighten any clamps or nuts until the last step!!
 KIT #680145-NM #8168740 3 Dual Exhaust Kit w/o mufflers page 1 This kit fits A-body, '67-74 Dart/Duster/Demon/Valiant, '67-69 Barracuda, all with V8, standard Hooker Competition headers (otherwise modifications
R O A D S M I T H TRIKE CONVERSIONS BY THE TRIKE SHOP
 R O A D S M I T H TRIKE CONVERSIONS BY THE TRIKE SHOP Please thoroughly review the instructions before and during installation. Keep in mind that this product was designed to be installed by trained dealer
BMW X3 UNDERBODY PANEL TRIM DIAGRAM in
 13107 10/5/2012 BMW X3 PAGE 1 OF 2 GROSS LOAD CAPACITY WHEN USED AS A WEIGHT CARRYING HITCH: 3,500 LBS. TRAILER WEIGHT & 350 LBS. TONGUE WEIGHT. GROSS LOAD CAPACITY WHEN USED AS A WEIGHT DISTRIBUTION HITCH:
Quadratec Replacement LED Tail Lights & Flashers
 Quadratec Replacement LED Tail Lights & Flashers Installation Manual: Tail Lights and Flasher Control Units # 55213.XXXX PARTS LIST: LED Replacement Tail Lights - QTY 2 Replacement/Trailering Flasher -
Installation instructions for IPS parking Brake Kit for 1996 to 2002 Viper
 Installation instructions for IPS parking Brake Kit for 1996 to 2002 Viper WARNING Modification of your vehicle with the parts identified above may alter its stock performance; the buyer hereby expressly
OPERATING INSTRUCTIONS FINISHER 4300
 OPERATING INSTRUCTIONS FINISHER 4300 Model No. BA-FS43 Banner American Products, Inc. Temecula, CA Table of Contents I. For Your Safety... 2 II. Electrical Safeguards... 2-3 III. Specifications... 3 IV.
Mercedes Benz GL (W488AC) Customer Service Guide
 Customer Service Guide") Mercedes Benz GL (W488AC) Customer Service Guide MMXIII Copyright Aria Child Inc. Contents I) Check Battery... 3 II) Check Wiring Condition... 5 III) Check Foot Pedal.... 12 IV) Gearbox Replacement.. 14
Mercedes Benz GL (W488AC) Customer Service Guide MMXIII Copyright Aria Child Inc. Contents I) Check Battery... 3 II) Check Wiring Condition... 5 III) Check Foot Pedal.... 12 IV) Gearbox Replacement.. 14
Installation instructions
 Installation instructions Akrapovič System: Evolution and Optional Front Link Pipe Set for the Porsche Cayenne Turbo (type 958) Porsche Cayenne Turbo S (type 958) www.akrapovic.com Installation instructions
SAFETY THIS PRODUCT IS FOR OFFROAD USE ONLY. ALL LIABILITY FOR INSTALLATION AND USE RESTS WITH THE OWNER.
 SAFETY Your safety and the safety of others is very important. In order to help you make informed decisions about safety, we have provided installation instructions and other information. These instructions
AKRAPOVIC SLIP-ON STREET LEGAL EXHAUST SYSTEM for the YAMAHA MT01 ( ) & MT01 (2007-)
 & MT01 (2007-)") Installation instructions: *500892* AKRAPOVIC SLIP-ON STREET LEGAL EXHAUST SYSTEM for the YAMAHA MT01 (2004-2006) & MT01 (2007-) Congratulations on purchasing an Akrapovic exhaust system. Please read these
Installation instructions: *500892* AKRAPOVIC SLIP-ON STREET LEGAL EXHAUST SYSTEM for the YAMAHA MT01 (2004-2006) & MT01 (2007-) Congratulations on purchasing an Akrapovic exhaust system. Please read these
Installation instructions
 Installation instructions Akrapovič Exhaust System: Slip-On for the Laborghini Gallardo 550-2 Coupe Laborghini Gallardo 560-4 Coupe / Spyder Laborghini Gallardo 570-4 Coupe / Spyder Congratulations on
SAFETY THIS PRODUCT IS FOR OFFROAD USE ONLY. ALL LIABILITY FOR INSTALLATION AND USE RESTS WITH THE OWNER.
 SAFETY Your safety and the safety of others is very important. In order to help you make informed decisions about safety, we have provided installation instructions and other information. These instructions
SAFETY. Read and understand all safety precautions and instructions before installing this product.
 SAFETY Installation Instructions Application: 2015+ FORD F150 Your safety and the safety of others is very important. In order to help you make informed decisions about safety, we have provided installation
13316 INSTALLATION INSTRUCTIONS
 13316 INSTALLATION INSTRUCTIONS Safety glasses should be worn at all times while installing this product. YEARS: 2011-PRESENT 2016-PRESENT MAKE: BMW MODEL: X3 X4 STYLE: WARNING: NEVER EXCEED YOUR VEHICLE
GPS AutoSteer System Installation Manual
 GPS AutoSteer System Installation Manual Supported Vehicles Case IH Vehicles Case 2577 Combines Case 2588 Combines Accuguide Ready PN: 602-0233-01-A LEGAL DISCLAIMER Note: Read and follow ALL instructions
ROUSH Dome Badge Kit
 ROUSH Dome Badge Kit Kit Part Number 13106342508**K Application: 2010-13 Ford Mustang GT Installation Instructions Before installing your ROUSH Performance Product(s), read through the entire installation
Installation instructions
 Installation instructions Akrapovič Exhaust System: Rear Carbon Fiber Diffuser for the Porsche 911 Turbo (type 991) Porsche 911 Turbo S (type 991) www.akrapovic.com Installation instructions Akrapovič
Oil Cooler Guard for the 2015 Ducati Multistrada 1200 INSTALLATION INSTRUCTIONS
 Oil Cooler Guard for the 05 Ducati Multistrada 00 INSTALLATION INSTRUCTIONS Dear Rider, Thank you for choosing AltRider! Whether a seasoned world adventurer or a first time ADV-Newbie, we welcome you to
6V BMW i8 (5F62632) Customer Service Guide
 Customer Service Guide") 6V BMW i8 (5F62632) For internal reference only MMXIV Copyright Aria Child Inc. 1 Contents I) Check Battery... 3 II) Check Wiring Condition........... 6 III) Check Foot Pedal.......... 15 IV) Gearbox Replacement.......
6V BMW i8 (5F62632) For internal reference only MMXIV Copyright Aria Child Inc. 1 Contents I) Check Battery... 3 II) Check Wiring Condition........... 6 III) Check Foot Pedal.......... 15 IV) Gearbox Replacement.......
*70200BAG1* 70200BAG FORD F150 GRILLE LIGHT MOUNT
 927020000 *70200BAG1* 70200BAG1 2015-2018 FORD F150 GRILLE LIGHT MOUNT PRIOR TO INSTALLATION Make sure the kit is complete and you have read these instructions thoroughly before beginning installation.
Installation instructions
 Installation instructions Akrapovič Exhaust System: Slip-On for the Yamaha XJR 1300 *503789* www.akrapovic.com www.akrapovic.com Congratulations on purchasing an Akrapovič exhaust system. Please read the
Installation Instructions
 Installation Instructions Rock Crawler Roof Rack (Part # 76717) 07-Up Jeep Wrangler J/K 4Door For Technical Support/Warranty Information please call 310-762-9944 Smittybilt, 400 West Artesia Blvd, Compton,
Audi B9 A4 & S4 Carbon Fiber Steering Wheel Trim Installation Instructions
 Audi B9 A4 & S4 Carbon Fiber Steering Wheel Trim Installation Instructions Proper service and repair procedures are vital to the safe, reliable operation of all motor vehicles as well as the personal safety
GROUP SIX LIGHTS. Contents of this group:- Tools required for assembly of this group: - 8mm Spanner K AA TAIL LIGHTS K AB HEAD LIGHTS
 GROUP SIX st Edition LIGHTS Contents of this group:- 6: K360AA TAIL LIGHTS 6: K360AB HEAD LIGHTS 6:3 K3603AB WIRING 6: K3605AB WIRING AND SWITCHES 6:5 K360AA INDICATOR PILOT LIGHTS Tools required for assembly
Installation instructions
 Installation instructions Akrapovič Exhaust System: Rear Carbon Fiber Diffuser for the Porsche 911 GT3 (type 991) Installation instructions Akrapovič Exhaust System: Rear Carbon Fiber Diffuser for the
BlueFin User's Manual. Version 1.1
 BlueFin User's Manual Version 1.1 10 August 2005 1 Safety Precautions Battery charging The BlueFin unit comes with a power adapter. Please use this power adapter for operating the unit and charging the
Prius Maintenance. Wiper-Blades
 Prius Maintenance Wiper-Blades Disclaimer: All the information stated in this document was provided by Prius owners. None were affiliated with Toyota Motor Corporation, except as customers. This document
SAFETY THIS PRODUCT IS FOR OFFROAD USE ONLY. ALL LIABILITY FOR INSTALLATION AND USE RESTS WITH THE OWNER.
 SAFETY Your safety and the safety of others is very important. In order to help you make informed decisions about safety, we have provided installation instructions and other information. These instructions
INSTALLATION GUIDE AOI0020. aoielectrical.com IMPALA, 2011+CHEVY CAPRICE FORD F FORD EXPLORER
 INSTALLATION GUIDE AOI0020 2001-2014 IMPALA, 2011+CHEVY CAPRICE 2007-2013 FORD F150 2007-2013+ FORD EXPLORER 2013+ FORD UTILITY/ SEDAN INTERCEPTOR 2007-2013+ DODGE CHARGER 2007-2013+DURANGO 2008-2013+
Ford Mustang Rear Decklid Spoiler Kit. Installation Instructions
 Ford Mustang Rear Decklid Spoiler Kit Application: 2005-09 Ford Mustang Installation Instructions Before installing your ROUSH Performance Product(s), read through the entire installation procedure and
Illuminated Cup Holders Hyundai Elantra (GLS, Limited, Coupe)
") Illuminated Cup Holders 2011-2015 Hyundai Elantra (GLS, Limited, Coupe) Thanks for purchasing this Cup Holder Illumination Install Kit! If you have any questions or feedback please email me direct at info@accentglowled.com
Illuminated Cup Holders 2011-2015 Hyundai Elantra (GLS, Limited, Coupe) Thanks for purchasing this Cup Holder Illumination Install Kit! If you have any questions or feedback please email me direct at info@accentglowled.com
Model: PSB100. Rear Parking Sensor System. Installation Manual TABLE OF CONTENTS
 Rear Parking Sensor System Model: PSB100 Installation Manual TABLE OF CONTENTS Warnings...2 Product Description...3 Packing List...3 Installation Instructions...4 Mounting the Sensors...4 Installing the
RAM BOX INSTALLATION SHEET
 RAM BOX INSTALLATION SHEET Any damaged or missing parts? Parts will be shipped to you directly. Call 844-779-8986 Mon - Fri 8:30 am - 7 pm EST or email support@bakindustries.com 6.5 bed Front (cab) 5.5
PHASERS. Operating and Instruction Manual. a n d A C C E S S O R I E S
 VOLTMETERS PHASERS a n d A C C E S S O R I E S Operating and Instruction Manual HD ELECTRIC COMPANY 1 4 7 5 L A K E S I D E D R I V E WA U K E G A N, I L L I N O I S 6 0 0 8 5 U. S. A. PHONE 847.473.4980
Installation instructions
 Installation instructions Akrapovič Exhaust System: Slip-On for the Porsche 911 Carrera (type 991) Porsche 911 Carrera S (type 991) Porsche 911 Carrera 4 (type 991) Porsche 911 Carrera 4S (type 991) Please
AKRAPOVIC SLIP-ON & SLIP-ON STREET LEGAL EXHAUST SYSTEM for the SUZUKI GSX-R 1000 (2005, 2006)
") Installation instructions: *350154* AKRAPOVIC SLIP-ON & SLIP-ON STREET LEGAL EXHAUST SYSTEM for the SUZUKI GSX-R 1000 (2005, 2006) Congratulations on purchasing an Akrapovic exhaust system. Please read
Installation instructions: *350154* AKRAPOVIC SLIP-ON & SLIP-ON STREET LEGAL EXHAUST SYSTEM for the SUZUKI GSX-R 1000 (2005, 2006) Congratulations on purchasing an Akrapovic exhaust system. Please read
MKVI Jetta Fog Light Kit
 MKVI Jetta Fog Light Kit Part Number VW Jetta Fog Light Installation This tutorial is provided as a courtesy by ECS Tuning. Proper service and repair procedures are vital to the safe, reliable operation
AKRAPOVIC SLIP-ON SP SERIES EXHAUST SYSTEM for the SUZUKI V-STROM DL 1000 (2004), KAWASAKI KLV 1000 (2004)
, KAWASAKI KLV 1000 (2004)") Installation instructions: *350130* AKRAPOVIC SLIP-ON SP SERIES EXHAUST SYSTEM for the SUZUKI V-STROM DL 1000 (2004), KAWASAKI KLV 1000 (2004) Congratulations on purchasing an Akrapovic exhaust system.
Installation instructions: *350130* AKRAPOVIC SLIP-ON SP SERIES EXHAUST SYSTEM for the SUZUKI V-STROM DL 1000 (2004), KAWASAKI KLV 1000 (2004) Congratulations on purchasing an Akrapovic exhaust system.
SAFETY. Read and understand all safety precautions and instructions before installing this product.
 SAFETY Your safety and the safety of others is very important. In order to help you make informed decisions about safety, we have provided installation instructions and other information. These instructions
R O A D S M I T H TRIKE CONVERSIONS BY THE TRIKE SHOP
 R O A D S M I T H TRIKE CONVERSIONS BY THE TRIKE SHOP Please thoroughly review the instructions before and during installation. Keep in mind that this product was designed to be installed by trained dealer
991 ROLL BAR INSTALLATION:
 991 ROLL BAR INSTALLATION: We highly recommend CMS roll bars be fitted by shops with experience in installing roll bars. 1. Move power seats to a location where the four bolts can be removed and remove
Installation instructions:
 Installation instructions: *350106* AKRAPOVIC SLIP-ON, SLIP-ON STREET LEGAL & SLIP-ON SP SERIES EXHAUST SYSTEM for the YAMAHA YZF R1 (2004-2006) Congratulations on purchasing an Akrapovic exhaust system.
INSTALLATION INSTRUCTIONS
 INSTALLATION INSTRUCTIONS Accessory Application 2012 ZDX Publications No. BII 47089 Issue Date SEP 2011 PARTS LIST Tailgate spoiler 2 Brackets 4 Nuts 4 Bolts TOOLS AND SUPPLIES REQUIRED Phillips screwdriver
Current Range Rover Sport STRUT Collection Installation Manual
 2014 - Current Range Rover Sport STRUT Collection Installation Manual 1 1. Removing Main Grille and Lower Fascia 1.1 Run a line of low tack masking tape across the front of the bumper below the grille
2015+ Mustang Rear Valance Installation Instructions P/N: (R F953) (R F953BS)
 (R F953BS)") 2015+ Mustang Rear Valance Installation Instructions P/N: 421894 (R1315-17F953) 421919 (R1315-17F953BS) 39555 Schoolcraft Rd, Plymouth MI, 48170 800.59.ROUSH 2015+ Mustang Rear Valance Kit Installation
2015+ Mustang Rear Valance Installation Instructions P/N: 421894 (R1315-17F953) 421919 (R1315-17F953BS) 39555 Schoolcraft Rd, Plymouth MI, 48170 800.59.ROUSH 2015+ Mustang Rear Valance Kit Installation
SAFETY THIS PRODUCT IS FOR OFFROAD USE ONLY. ALL LIABILITY FOR INSTALLATION AND USE RESTS WITH THE OWNER.
 SAFETY Your safety and the safety of others is very important. In order to help you make informed decisions about safety, we have provided installation instructions and other information. These instructions
INSTALLATION INSTRUCTIONS
 INSTALLATION INSTRUCTIONS Accessory Application Publications No. FENDER FLARES P/N 08P21-S3V-200 2003 MDX BII 24553 Issue Date SEP 2002 PARTS LIST Right rear fender flare Left front fender flare Right
STC2 Car Kit. Installation Guide
 STC2 Car Kit Installation Guide Box Contents When you unpack your STC2 Car Kit, it should include everything as shown below: Suction Cup Mount & Screws Surface Preparation Cleaning Kit (To clean a surface
Dodge/SRT Viper Gen IV and V (2008+) Intake Heat Shield
 Intake Heat Shield") Dodge/SRT Viper Gen IV and V (2008+) Intake Heat Shield Overview: The DSE Intake Heat Shield reduces Intake Air Temperature (IAT) caused by a hot airbox assembly heating the incoming air. Ceramic coating
Dodge/SRT Viper Gen IV and V (2008+) Intake Heat Shield Overview: The DSE Intake Heat Shield reduces Intake Air Temperature (IAT) caused by a hot airbox assembly heating the incoming air. Ceramic coating
INSTALLATION GUIDE AOI0018/ AOI0019. aoielectrical.com UNIVERSAL AIR BAG SWITCH
 INSTALLATION GUIDE AOI0018/ AOI0019 UNIVERSAL AIR BAG SWITCH THESE COMPONENTS ARE REQUIRED TO INSTALL THE AOI AIR BAG CONTROL SYSTEM AOI0018/19 I. The following tools will be required to complete the installation.
INSTALLATION INSTRUCTIONS TOP MOUNT SINKS
 These instructions are for installing top mount stainless steel sinks. (CH365 and CH366 NOT included) Please read all instructions carefully before starting the installation. TABLE OF CONTENTS Preparation
AKRAPOVIC SLIP-ON & SLIP-ON STREET LEGAL EXHAUST SYSTEM for the SUZUKI GSX-R 600 / 750 (2006- )
") Installation instructions: *350331* AKRAPOVIC SLIP-ON & SLIP-ON STREET LEGAL EXHAUST SYSTEM for the SUZUKI GSX-R 600 / 750 (2006- ) Congratulations on purchasing an Akrapovic exhaust system. Please read
Installation instructions: *350331* AKRAPOVIC SLIP-ON & SLIP-ON STREET LEGAL EXHAUST SYSTEM for the SUZUKI GSX-R 600 / 750 (2006- ) Congratulations on purchasing an Akrapovic exhaust system. Please read
INSTALLATION INSTRUCTIONS:
 INSTALLATION INSTRUCTIONS: The CA-5010.II is an ultrasonic parking assist system designed for use on the rear bumper of most cars and trucks. This system detects any people or objects behind the vehicle
INTERCOOLER UPGRADE INSTALLATION INSTRUCTIONS PART NUMBER D
 INTERCOOLER UPGRADE INSTALLATION INSTRUCTIONS PART NUMBER D330-0021 APPLICATION: 2014-16 F22 228i & xdrive coupe (see restrictions below) 2015-16 F23 228i & xdrive convertible 2012-16 F30 328i & xdrive
SAFETY THIS PRODUCT IS FOR OFFROAD USE ONLY. ALL LIABILITY FOR INSTALLATION AND USE RESTS WITH THE OWNER.
 SAFETY Your safety and the safety of others is very important. In order to help you make informed decisions about safety, we have provided installation instructions and other information. These instructions
12114 INSTALLATION INSTRUCTIONS
 12114 INSTALLATION INSTRUCTIONS Safety glasses should be worn at all times while installing this product. YEARS: 2012-PRESENT MAKE: LEXUS MODEL: LS 460 STYLE: SEDAN WARNING: NEVER EXCEED YOUR VEHICLE MANUFACTURER'S
SAFETY THIS PRODUCT IS FOR OFFROAD USE ONLY. ALL LIABILITY FOR INSTALLATION AND USE RESTS WITH THE OWNER.
 SAFETY Your safety and the safety of others is very important. In order to help you make informed decisions about safety, we have provided installation instructions and other information. These instructions
INSTALLATION INSTRUCTIONS
 INSTALLATION INSTRUCTIONS Accessory Application Publications No. Bll 30250 UNDER SPOILER 2006 RSX Issue Date JULY 2005 PARTS LIST Rear under spoiler 5 Stepped bolts 2 Bolts 7 Flange nuts, 6 mm 3 Square
Installation instructions
 Installation instructions Akrapovič Exhaust System: Evolution for the Renault Megane RS Coupe III. 2.0 www.akrapovic.com Installation instructions Akrapovič Exhaust System: Evolution for the Renault Megane
INTERCOOLER UPGRADE INSTALLATION INSTRUCTIONS PART NUMBER D
 INTERCOOLER UPGRADE INSTALLATION INSTRUCTIONS PART NUMBER D330-0021 APPLICATION: 2014-16 F22 228i & xdrive coupe (see restrictions below) 2012-16 F30 328i & xdrive sedan 2014-16 F31 328i xdrive wagon 2014-16
INSTALLATION INSTRUCTIONS
 INSTALLATION INSTRUCTIONS Accessory Application Publications No. SPOILER (LOW) CIVIC 4-DOOR All 30833 Issue Date SEP 2005 PARTS LIST Trunk spoiler Right trunk spring (marked red) Left trunk spring (marked
ROUSH Billet Upper Grille Kit
 ROUSH Billet Upper Grille Kit Part Number R03010141 Application: 2010-11 Mustang GT Installation Instructions Before installing your ROUSH Performance Product(s), read through the entire installation procedure
Before installing your Roush Performance Product(s), read through the entire installation procedure and check to make sure all items are present.
, read through the entire installation procedure and check to make sure all items are present.") Ford Mustang Roush Fog Lamp Wiring Harness Installation Instructions Application: 2005 Ford Mustang GT Model (Designed for use with Roush Fog Lamps SM01-6400-AL) Before installing your Roush Performance
Ford Mustang Roush Fog Lamp Wiring Harness Installation Instructions Application: 2005 Ford Mustang GT Model (Designed for use with Roush Fog Lamps SM01-6400-AL) Before installing your Roush Performance
37SCENE 46SCENE 79SCENE
 Installation and Operation Instructions LED SCENE LIGHT LED SCENE LIGHT 37SCENE 46SCENE 79SCENE 37SCENE 46SCENE Introduction The 37SCENE, 46SCENE, 79SCENE LED Scene Lights are designed for the emergency
Remove 4 circled pins. Route wiring along dashed line. Remove the 2 9mm nuts and black retaining plate that secure extractor.
 2015 Ford Mustang Turn Signal Hood Kit Parts List: Quantity: Tool List: Bracket & pre-installed lamp 2 Flat head screwdriver Wiring harness 1 Phillips screwdriver PB-3660 Parts Bag 1 Ratchet & Socket set
Parts List ILLUSTRATION #1
 Installation Instructions BR20 Rear Bumper Replacement Part Number 28295T 2015-2016 Ford F-150 2/4WD Do not attempt to install this product on any vehicle other than the one listed above! Parts List Item
Four Panel Amber LED Front Light Kit Installation Guide
 Four Panel Amber LED Front Light Kit Installation Guide Kit Contents: 2 LED panels 4 socket plugs 1 cut out template PN 2100886 Please refer to webiste for full warranty information. DIGI-TAILS is not
Installation instructions
 Installation instructions Akrapovič Exhaust Systems: Slip-On for the HONDA CRF450R FOR CLOSED COURSE COMPETITION USE ONLY. NOT INTENDED FOR STREET USE. *503657* www.akrapovic.com www.akrapovic.com Congratulations
Installation instructions
 Installation instructions Akrapovič Component Optional Carbon Fiber Bracket for the Aprilia RSV4 *504746* www.akrapovic.com www.akrapovic.com Congratulations on purchasing an Akrapovič exhaust system.
Installation instructions. Akrapovič Exhaust System: Evolution for the VW GOLF GTI (type MK VII.)
") Installation instructions Akrapovič Exhaust System: Evolution for the VW GOLF GTI (type MK VII.) Congratulations on purchasing an Akrapovič exhaust system. Please read the entire installation manual prior
Installation instructions Akrapovič Exhaust System: Evolution for the VW GOLF GTI (type MK VII.) Congratulations on purchasing an Akrapovič exhaust system. Please read the entire installation manual prior
Installation instructions
 Installation instructions Akrapovič Exhaust System Slip-On for the BMW R1200GS *503648* www.akrapovic.com www.akrapovic.com Congratulations on purchasing an Akrapovič exhaust system. Please read the entire
SAFETY THIS PRODUCT IS FOR OFFROAD USE ONLY. ALL LIABILITY FOR INSTALLATION AND USE RESTS WITH THE OWNER.
 SAFETY Your safety and the safety of others is very important. In order to help you make informed decisions about safety, we have provided installation instructions and other information. These instructions
AKRAPOVIC SLIP-ON, SLIP-ON STREET LEGAL & SLIP-ON SP SERIES EXHAUST SYSTEM for the HONDA CBR 600 RR (2005- )
") Installation instructions: *350166* AKRAPOVIC SLIP-ON, SLIP-ON STREET LEGAL & SLIP-ON SP SERIES EXHAUST SYSTEM for the HONDA CBR 600 RR (2005- ) Congratulations on purchasing an Akrapovic exhaust system.
Installation instructions: *350166* AKRAPOVIC SLIP-ON, SLIP-ON STREET LEGAL & SLIP-ON SP SERIES EXHAUST SYSTEM for the HONDA CBR 600 RR (2005- ) Congratulations on purchasing an Akrapovic exhaust system.
Installation instructions
 Installation instructions Akrapovič Exhaust System: Slip-On Classic Line for the Harley-Davidson Sportster *503783* www.akrapovic.com www.akrapovic.com Congratulations on purchasing an Akrapovič exhaust
INSP Aerial Periodic Inspections
 The Aerial Periodic Inspection course features five individual segments covering the Terex Utilities Aerial Platform Periodic Inspections. The training outlines the Terex Utilities inspection form as well
advanced FLOW engineering Instruction Manual P/N: Make: Nissan Model: Titan XD Year: Engine: V8-5.
 advanced FLOW engineering Instruction Manual P/N: 46-20281 Make: Nissan Model: Titan XD Year: 2016-2017 Engine: V8-5.0L (td) Cummins Please read the entire instruction manual before proceeding. Ensure
Installation instructions
 Installation instructions Akrapovič Exhaust System Slip-On for the Aprilia SMV 750 Dorsoduro *502389* Congratulations on purchasing an Akrapovič exhaust system. Please read the entire installation manual
Installation instructions
 Installation instructions Akrapovič Exhaust System Slip-On for the BMW R1200GS 2010 *502470* www.akrapovic.com www.akrapovic.com Congratulations on purchasing an Akrapovič exhaust system. Please read the