Installation Instructions for BMR Lowering Springs Performance ( Mustang GT)
|
|
|
- Julian McDaniel
- 5 years ago
- Views:
Transcription

1 Installation Instructions for BMR Lowering Springs Performance ( Mustang GT) Time Required: 3+ hours Notes: This install was done with the performance springs from BMR, but install should be the same for the other model springs that they offer. Also note, this install was done on a 2017 performance package GT, so there may be a few small differences here or there, but the same steps exist regardless. All torque specs are listed on the last page for all critical areas. Tools Required: Lift OR Jack with jack stands Impact gun and/or ½ ratchet ½ extensions (may come in handy in a few spots) 3/8 Ratchet 3/8 extensions (may come in handy in a few spots) 13mm socket 15mm socket 18mm socket
2 21mm socket 22mm socket 24mm socket 14mm wrench 17mm wrench Clip removal tool Deadblow hammer Spring Compressor Prybars Front Install 1. First go ahead and pop the hood, jack up the car, and secure on jack stands. Please ensure the jack stands are in the proper locations.

3


4 2. Now let s go ahead and remove all of the wheels. Or you can remove them as you go, no matter.


5 3. Disconnect the end link from the strut body. To do this, you will want to use a wrench to hold the nut on the backside of the flange it is attached to and then remove the nut facing you. Once removed, push the end link out of the strut flange.

6 4. Now we want to get the abs harness off of the strut. It has two clips that hold it in place. Using the clip removal tool, remove those. I then routed the harness around the lower brake/ball joint shield to stay out of the way so it wouldn t get damaged during install.

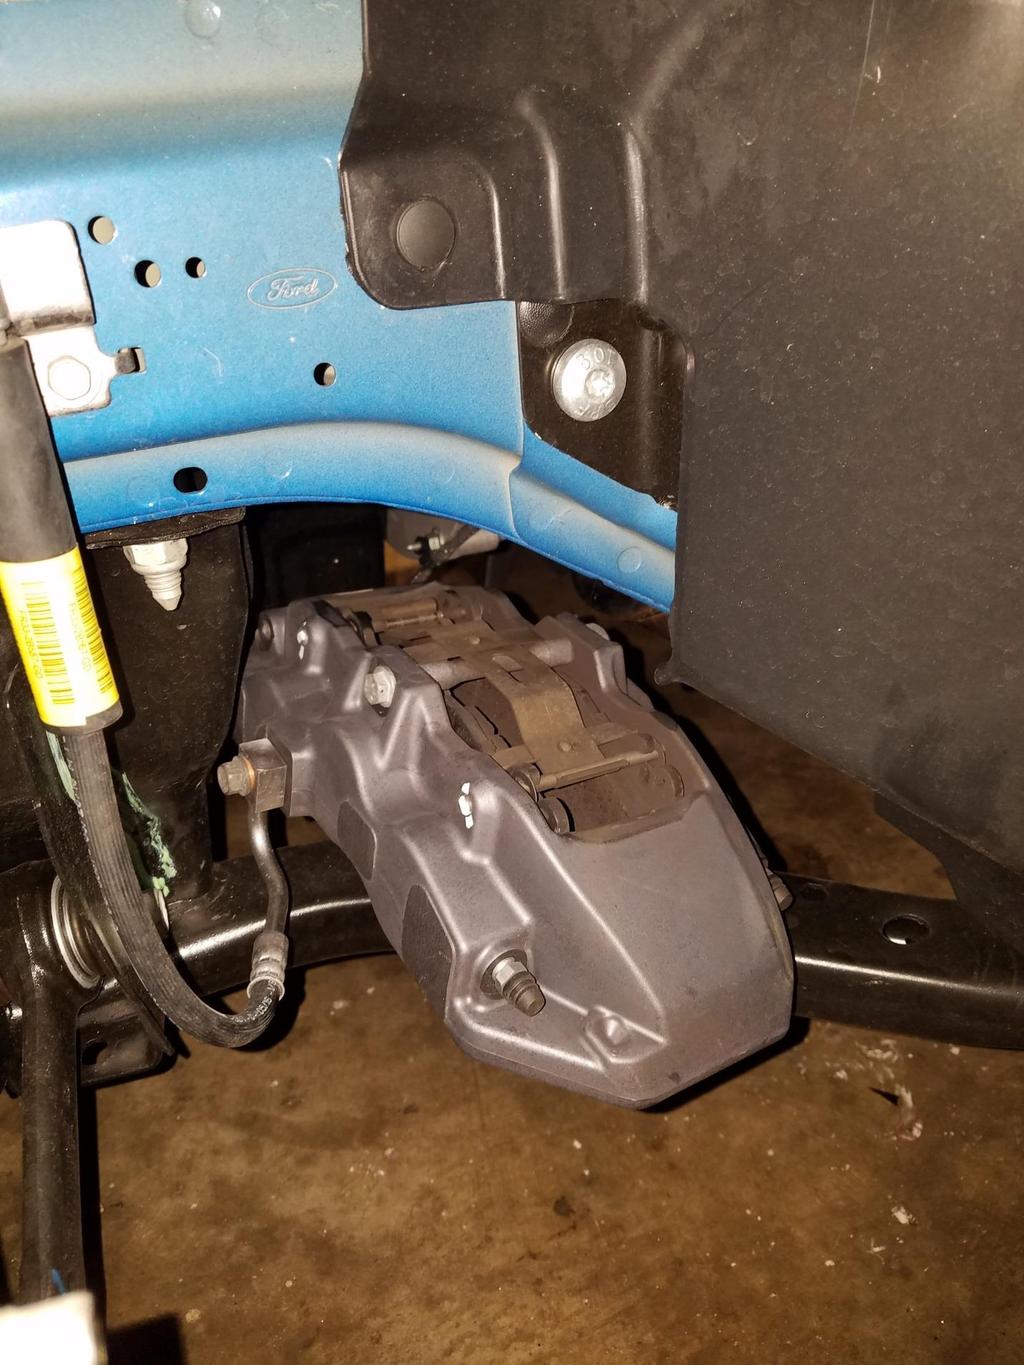
7 5. Now remove the two bolts that hold on the caliper. It will be on the back side of the caliper. Once remove take the caliper and set it aside but make sure there is not strain on the brake line. Setting in on the frame rail worked well for me. Now you will be hammering in the coming steps, so make sure it is balanced where ever it is, or grab some rope to hold it firmly in place. The rotor also will now be loose with the caliper removed, so pull it off the studs and set aside.

8
9

10 6. Loosen the two strut mounting nuts. But do not remove them totally from the bolts. The bolts are splined near the head (so they cannot turn), so you must take the deadblow hammer and beat them out. The nuts are there to protect the threads so you do not damage them. This step can be cumbersome if the bolts don t cooperate. Sometimes it may be helpful to just barely loosen the top strut bolts in the engine bay compartment to allow the strut to move some. Eventually they will break free. If you mushroomed the very tips, that s okay, just file it down before reinstalling.


11

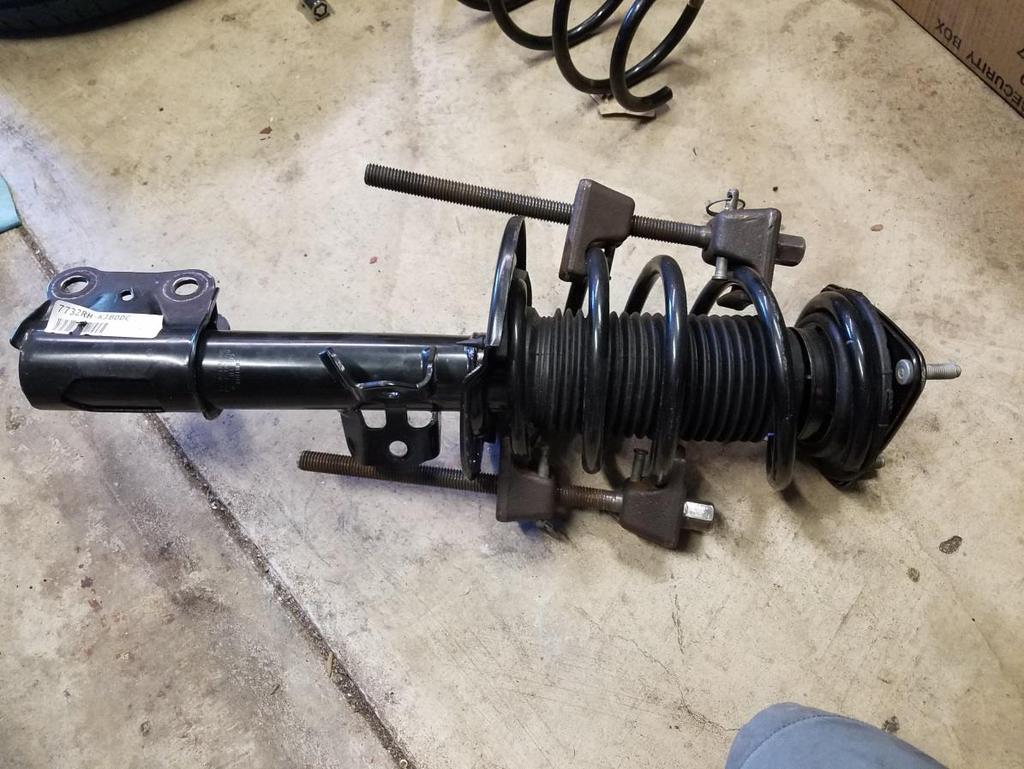
12 7. Now remove the top 3 strut mount nuts in the engine bay, but leave one of the nuts barely threaded. You will want to have one hand holding the strut and the other to spin off the last nut so the strut doesn t fall into the wheel well and potentially break something. 8. Now you will want to use the spring compressor to compress the spring enough to unload the pressure off of the top hat to remove the nut. Use caution and if you are not comfortable with a spring compressor seek expertise!

13

14 9. Now BMR instructs to cut the oem bump stop down. They want the front bump stops overall height to be 1 7/ Slide the bumpstop and dust boot back on the strut. Then compress the new spring and install it on the strut. Put the top hat back on and install the nut. I found it easier to tighten the nut on the top hat on the ground but to torque it completely when install in the vehicle. Take note that the spring sits properly in the rubber holders in the strut!


15

16

17 11. Now reinstall the strut with the new lowering spring in reverse order of taking it apart. A little tip once you get to installation of the caliper; the rotor will want to move around on you, so install one lug nut finger tight on the rotor as shown below to hold it in place. Once finished, repeat to the opposite front side.

18 Rear Install 12. To remove the rear springs, we will be dropping the rear subframe, one side at a time. First remove this bolt shown to allow the brake line to move freely and not get stretched when the subframe drops. 13. Remove the protective cap on the shock. Remove the upper shock bolts, followed by the lower shock bolts, and then completely remove the shock from the car.


19
 the 2 smaller bolts.")
20 Lower shock bolts 14. Now, place your jack (or a support stand if on a lift) under the subframe as shown. Then, on the front subframe bolt, loosen (but do not remove) the 2 smaller bolts. This will hold the bracket from falling down when removing the subframe bolt. Now remove both front and rear subframe bolt.


21 Front subframe bolt


22 Loosened bracket bolts Rear subframe bolt

23 15. Now slowly lower the subframe as far as it will allow. Now using a pry bar, remove the old spring. It can be a bit difficult but if you pry down on the control arm it will allow enough just enough room to get it out. 16. Now remove the top nut off of the shock body. Then pull off the top mounting bracket. Slide off the dust boot (the bump stop holds the dust boot in place, so give it a hard pull and it will come free). Then open a vise as shown below and swiftly pull up on the shock to allow the bump stop to slide over the nut. Then cut the bumps top down so its overall height is 2 3/8. Reinstall the dust boot and snap into the bump stop. Then slide the top mounting bracket back on and tighten the top nut.

24


25


26 17. Once again make sure the spring is properly sitting in the rubber mounts. It may be easier to install the upper rubber mount on the spring ahead of time and then install on the vehicle, or leave the mount on the car. If you are struggling getting the new spring in, try the other method and see if it helps. 18. Reinstall everything else in reverse order. Now is a good time to go back at each corner and double check everything is installed properly and you have no extra parts or bolts. Also a good time to double check everything is tight and torqued. Then reinstall wheels and lower back on the ground. The springs may take a few days to settle, and though some may claim it is not needed, it is wise to get an alignment within a few days of driving (once it seems the springs settled and they won t get any lower) just to be safe.

27 Note: I was unable to find the factory specs for the front and rear subframe bolts, but use good reason. They are massive bolts and very tight when being broken loose. If I run across the torque spec I will have AmericanMuscle update this install guide. Front Suspension Torque 3 upper strut nuts: 46 lb ft Strut mount to spindle bolts: 184 lb ft Brake caliper bolts: 85 lb ft Sway bar end link upper nut: 85 lb ft Rear Suspension Torque Shock top nut: 22 lb ft Shock lower bolts: 35 lb ft Shock upper bolts: 66 lb ft Installation Guide Created and Submitted by AmericanMuscle customer, Chris Kalnasy, on 8/18/2016
Lowering Spring Installation on a Mustang GT
 Lowering Spring Installation on a 99-04 Mustang GT This installation is very the same installation that many of the 79-04 Mustangs excluding Cobra require. Time to install: 2-3 hours to do alone with a
BBK Ceramic Long Tube Headers (99-04 Cobra and Mach 1) - Installation Instructions
 - Installation Instructions") BBK Ceramic Long Tube Headers (99-04 Cobra and 03-04 Mach 1) - Installation Instructions The below installation instructions work for the following products: BBK Ceramic Long Tube Headers (99-04 Cobra
BBK Ceramic Long Tube Headers (99-04 Cobra and 03-04 Mach 1) - Installation Instructions The below installation instructions work for the following products: BBK Ceramic Long Tube Headers (99-04 Cobra
07-13 TOYOTA TUNDRA 2WD 6" LIFT SPINDLES
 MAXTRAC SUSPENSION 4030 E LEAVERTON CT ANAHEIM, CA 92807 714-630-0363 WWW.MAXTRACSUSPENSION.COM SALES@MAXTRACSUSPENSION.COM PRODUCT: K886764 07-13 TOYOTA TUNDRA 2WD 6" LIFT SPINDLES PARTS LIST QTY LIFT
Part # Camber Caster Plates Ford Mustang All Ford Mustang GT500
 Part # 24220 Camber Caster Plates 2005-2010 Ford Mustang All 2007-2014 Ford Mustang GT500 J&M Products once again outdoes our competitors with these fully adjustable (Protected under US Patent No. 8,820,759
Steeda Sport Mustang Lowering Springs (2005+) - Installation Instructions
 - Installation Instructions") Steeda Sport Mustang Lowering Springs (2005+) - Installation Instructions The below installation instructions work for the following products: Steeda Sport Mustang Lowering Springs (2005+) Please read
Steeda Sport Mustang Lowering Springs (2005+) - Installation Instructions The below installation instructions work for the following products: Steeda Sport Mustang Lowering Springs (2005+) Please read
Hawk Brake Pads ( Mustang GT/V6 Rear Pair)
") Hawk Brake Pads (1994-2004 Mustang GT/V6 Rear Pair) The below installation instructions work for the following products: Hawk HPS Brake Pads (1994-2004 Mustang GT/V6 Rear Pair) Hawk Performance Ceramic
Hawk Brake Pads (1994-2004 Mustang GT/V6 Rear Pair) The below installation instructions work for the following products: Hawk HPS Brake Pads (1994-2004 Mustang GT/V6 Rear Pair) Hawk Performance Ceramic
This Package should contain: 1. Two CorkSport Assembled Front Adjustable Struts 2. Two CorkSport Rear Adjustable Shocks 3. Two CorkSport Rear Springs
 1 2 3 This Package should contain: 1. Two CorkSport Assembled Front Adjustable Struts 2. Two CorkSport Rear Adjustable Shocks 3. Two CorkSport Rear Springs Thank you for purchasing the CorkSport Mazda
2005-Pres. Ford Mustang Camber Plate Installation Instructions:
 2005-Pres. Ford Mustang Camber Plate Installation Instructions: J&M Products once again outdoes our competitors with these fully adjustable PATENT PENDING Camber & Caster plate assemblies for the 2005-2010
Steeda Lower Control Arms ( )
") Steeda Lower Control Arms (2005-2012) NOTE: The following installation was performed on a 2007 Mustang GT/California Special. The control arms were previously sold in a blue color, but now they are sold
Steeda Lower Control Arms (2005-2012) NOTE: The following installation was performed on a 2007 Mustang GT/California Special. The control arms were previously sold in a blue color, but now they are sold
Ford Racing GT500 Style Strut Mount Upgrade (05-12 All):
:") Ford Racing GT500 Style Strut Mount Upgrade (05-12 All): Required tools: (2) Jack stands Floor jack (1 is required but 2 is preferred) Torque wrench Spring compressor tool (can be rented at your local
Ford Racing GT500 Style Strut Mount Upgrade (05-12 All): Required tools: (2) Jack stands Floor jack (1 is required but 2 is preferred) Torque wrench Spring compressor tool (can be rented at your local
Changing the Struts on a WK Jeep CRD
 Changing the Struts on a WK Jeep CRD Step by Step By Chirpz Disclaimer: I do not claim that this procedure is the right way or even the best way to change your struts. This is what I did after reading
Steeda Bumpsteer Kit (94-04) - Installation Instructions
 - Installation Instructions") Steeda Bumpsteer Kit (94-04) - Installation Instructions The below installation instructions work for the following products: Steeda Bumpsteer Kit (94-04) Please read through the instructions carefully
Steeda Bumpsteer Kit (94-04) - Installation Instructions The below installation instructions work for the following products: Steeda Bumpsteer Kit (94-04) Please read through the instructions carefully
Barton Short Throw Shifter 11/12 V6, GT Mustang:
 Barton Short Throw Shifter 11/12 V6, GT Mustang: Tools Required: 10mm deep socket Socket wrench 10 extension for socket wrench Jack Jack stand Small piece of wood Small hook tool (recommended) *can be
Anti-Sway Bars Installation Instructions For Mazda MX-5 PART #
 Anti-Sway Bars Installation Instructions For 2006+ Mazda MX-5 PART # 920-330 Tools required: A jack and jack stands, 5mm Allen wrench, ratchet, 10mm, 12mm and 14mm, combination wrenches and sockets, 21mm
Replacement Front Outer Tie Rod End (85-93 All)
") Replacement Front Outer Tie Rod End (85-93 All) Materials in the box: One outer tie rod end, castle nut, cotter pin, nut, and grease fitting. Tools Needed: Jack and Jack Stands Pry bar (you may or may
Replacement Front Outer Tie Rod End (85-93 All) Materials in the box: One outer tie rod end, castle nut, cotter pin, nut, and grease fitting. Tools Needed: Jack and Jack Stands Pry bar (you may or may
Team Z Motorsports. K-Member installation instructions
 Team Z Motorsports K-Member installation instructions Parts Included: 1-Tubular K-Member Needed Items-Solid Steering Shaft Offset Steering Rack Bushings Optional-Heavy Duty Bolt Kit Tubular Front Lower
Installation Instructions HURST STAGE 1 SPRING KIT Chevrolet Camaro SS Fits: Coupe and Convertible Catalog #
 Installation Instructions HURST STAGE 1 SPRING KIT 2016-2017 Chevrolet Camaro SS Fits: Coupe and Convertible Catalog # 6130001 WORK SAFELY: Installation of any Hurst Spring Kit should be performed ONLY
Eibach Pro-Damper Shocks & Struts (05-09 All):
:") Eibach Pro-Damper Shocks & Struts (05-09 All): Required tools: 3/8 and 1/2 drive ratchets 7, 8, 10, 15, 16, 17, 18, 21 & 22 mm open ended wrenches 8 & 10 mm box end wrenches 10mm socket 13, 15 & 18 mm
Eibach Pro-Damper Shocks & Struts (05-09 All): Required tools: 3/8 and 1/2 drive ratchets 7, 8, 10, 15, 16, 17, 18, 21 & 22 mm open ended wrenches 8 & 10 mm box end wrenches 10mm socket 13, 15 & 18 mm
BBK LONG TUBE HEADERS (99-04 GT, Mach 1, Bullitt)
") BBK LONG TUBE HEADERS (99-04 GT, Mach 1, Bullitt) Install Time: Approx. 8-10 hrs Parts Needed: BBK Long Tube Headers Shorty mid pipe X/H O2 wiring harness extensions Hi-temp thread locker Tools Required:
BBK LONG TUBE HEADERS (99-04 GT, Mach 1, Bullitt) Install Time: Approx. 8-10 hrs Parts Needed: BBK Long Tube Headers Shorty mid pipe X/H O2 wiring harness extensions Hi-temp thread locker Tools Required:
ALLOY USA AXLE INSTALLATION (99-04 GT, Mach 1)
") ALLOY USA AXLE INSTALLATION (99-04 GT, Mach 1) Time Necessary: Approximately 4 hours Tools Required: Wrenches: 8mm, 13mm, 15mm, 5.5 mm allen, 6mm allen Sockets: 5/8, 3/4 Ratchet Floor Jack Jack Stands
ALLOY USA AXLE INSTALLATION (99-04 GT, Mach 1) Time Necessary: Approximately 4 hours Tools Required: Wrenches: 8mm, 13mm, 15mm, 5.5 mm allen, 6mm allen Sockets: 5/8, 3/4 Ratchet Floor Jack Jack Stands
Rear End Installation and Bearing Kit - 8.8in (86-12 V8; V6)
") Rear End Installation and Bearing Kit - 8.8in (86-12 V8; 11-13 V6) Tools Required: Jack Stands 5 Floor Jack 2 Oil Pans 1 Wheel Blocks 2 Differential Oil 3 qts Friction Modifier 3 bottles Tube of Black
Rear End Installation and Bearing Kit - 8.8in (86-12 V8; 11-13 V6) Tools Required: Jack Stands 5 Floor Jack 2 Oil Pans 1 Wheel Blocks 2 Differential Oil 3 qts Friction Modifier 3 bottles Tube of Black
Installation Instructions for Teraflex 2.5 Inch Lift Kit with Shocks (2010 Jeep Wrangler Unlimited)
") Installation Instructions for Teraflex 2.5 Inch Lift Kit with Shocks (2010 Jeep Wrangler Unlimited) Installation Time: 6 Hours Tools Required: Floor Jack Jack Stands Ratchet Torque Wrench 15mm Socket 15mm
Installation Instructions for Teraflex 2.5 Inch Lift Kit with Shocks (2010 Jeep Wrangler Unlimited) Installation Time: 6 Hours Tools Required: Floor Jack Jack Stands Ratchet Torque Wrench 15mm Socket 15mm
W205 C63 Suspension Adjustable Suspension Installation Guide
 W205 C63 Suspension Adjustable Suspension Installation Guide 2015+ C63 AMG Sedan 2015+ C63S AMG Sedan Thank you for your purchase of the Weistec W205 C63 Adjustable Suspension. Please follow all directions,
9F1760/9F1761 COBB Sport Springs Ford Focus ST
 9F1760/9F1761 COBB Sport Springs 2013+ Ford Focus ST Installation Instructions Congratulations on your purchase of the COBB Sport Springs for your 2013+ Ford Focus ST. These instructions should only be
Maximum Motorsports Camber Caster Plates (05-10):
:") Maximum Motorsports Camber Caster Plates (05-10): Tools Required: Lug Wrench 21mm Deep Socket 18mm Deep Socket 15mm Deep Socket 17mm Socket 13mm Socket 10mm Socket Torque Wrench (requires 166lb-ft capacity
Maximum Motorsports Camber Caster Plates (05-10): Tools Required: Lug Wrench 21mm Deep Socket 18mm Deep Socket 15mm Deep Socket 17mm Socket 13mm Socket 10mm Socket Torque Wrench (requires 166lb-ft capacity
BBK Caster/Camber Kit (87-93)
") BBK Caster/Camber Kit (87-93) Materials in the box 2 Polished Aluminum Plates 2 Steel Strut Mounts 4 Polyurethane Bushings 2 Stud Plates 2 Bushing Sleeves 2 5/8 Flat Washers 2 5/16 Allen Head Bolts 4 5/16
BBK Caster/Camber Kit (87-93) Materials in the box 2 Polished Aluminum Plates 2 Steel Strut Mounts 4 Polyurethane Bushings 2 Stud Plates 2 Bushing Sleeves 2 5/8 Flat Washers 2 5/16 Allen Head Bolts 4 5/16
Ford Racing Front Rotor Upgrade Kit (05-10 V6) Installation Instructions
 Installation Instructions") Ford Racing Front Rotor Upgrade Kit (05-10 V6) Installation Instructions Time Necessary: Approximately 1.5 hours Tools Required: 15 MM Socket Ratchet PryBar Floor Lift or: o Floor Jack o (2) Jack Stands
Ford Racing Front Rotor Upgrade Kit (05-10 V6) Installation Instructions Time Necessary: Approximately 1.5 hours Tools Required: 15 MM Socket Ratchet PryBar Floor Lift or: o Floor Jack o (2) Jack Stands
Installing Rear Brake Pads on a WK Jeep
 Installing Rear Brake Pads on a WK Jeep Step by Step By Chirpz Disclaimer: I do not claim that this procedure is the right way or even the best way to change your rear brake pads. This is what I did after
COBB SPORT SPRINGS
 915760 - COBB SPORT SPRINGS 2008-2013 Subaru WRX/STi Congratulations on your purchase of the COBB Sport Springs for your 2008-2013 Subaru WRX/STi. The following instructions will assist you through your
FORD COBRA JET SPRING INSTALLATION
 FORD COBRA JET SPRING INSTALLATION Tools Needed: 1. Floor jack with rubber padding on lift point or vehicle lift 2. Jack stands (2) 3. Socket sizes 13/16, 3/4, 15mm, 8mm 4. Pliers 5. Breaker bar, ratchet
Installation Instructions HURST COMPETITION AND BILLET/PLUS SHIFTER Mustang w/5-speed Manual Transmission (GT only)
") Installation Instructions HURST COMPETITION AND BILLET/PLUS SHIFTER 2005-2010 Mustang w/5-speed Manual Transmission (GT only) Catalog# 3915201 WORK SAFELY! For maximum safety, perform this installation
Installation Instructions HURST COMPETITION AND BILLET/PLUS SHIFTER 2005-2010 Mustang w/5-speed Manual Transmission (GT only) Catalog# 3915201 WORK SAFELY! For maximum safety, perform this installation
COBB WRX Sports Springs West 1820 South Salt Lake City, UT USA (801)
") COBB 3362 West 1820 South Salt Lake City, UT 84104 USA (801) 713-0035 2008 WRX Sports Springs Congratulations on your purchase of the COBB Sports Springs. The following instructions should assist you through
COBB 3362 West 1820 South Salt Lake City, UT 84104 USA (801) 713-0035 2008 WRX Sports Springs Congratulations on your purchase of the COBB Sports Springs. The following instructions should assist you through
Installation Instructions
 Preparing your vehicle to install your brake system upgrade 1. Rack the vehicle. 2. If you don t have a rack, then you must take extra safety precautions. 3. Choose a firmly packed and level ground to
MM Rear Coil-Over Kit - Bilstein Shocks (MMCO-3)
") 3430 Sacramento Dr., Unit D San Luis Obispo, CA 93401 Telephone: 805/544-8748 Fax: 805/544-8645 www.maximummotorsports.com MM Rear Coil-Over Kit - Bilstein Shocks (MMCO-3) Read all instructions before
3430 Sacramento Dr., Unit D San Luis Obispo, CA 93401 Telephone: 805/544-8748 Fax: 805/544-8645 www.maximummotorsports.com MM Rear Coil-Over Kit - Bilstein Shocks (MMCO-3) Read all instructions before
Depress each tab as you pull the bezel off. The bezels are tight. L.H. shown.
 2013-2014 Ford Mustang V6 & Boss 302 Lower Valance Fog Light Kit Parts List: Quantity: Tool List: Fog light & bulb with bracket 2 Flat head & Phillips screwdriver Black bezels 2 Ratchet & Socket set OR
Remove the 3-11mm nuts holding mirror on. Don t drop the nuts!
 2005-2012 Ford Mustang Puddle Lamp Kit Parts List: Quantity: Tool List: LED Lamps 2 Flat head screwdriver Seals 2 Ratchet & Socket set OR Nuts 2 Adjustable Wrench Wiring harness 1 Drill & 11/16 th bit
Steeda S550 Mustang Front Coilover Installation Instructions For Part:
 Steeda S550 Mustang Front Coilover Installation Instructions For Part: 555-8170 Tools required 1. Jack 2. Jack stands 3. Torque Wrench 4. 10mm wrench 5. 11mm wrench 6. 17mm wrench 7. 18mm socket 8. Plastic
Mustang 7.5 Limited Slip Differential (28 Spline) V8; V6:
 V8; V6:") Mustang 7.5 Limited Slip Differential (28 Spline) 79-85 V8; 86-10 V6: Required Tools: Ratchet Wrench Torque Wrench 1/2", 5/16, 3/4", 12mm and 15mm Sockets Lug nut Wrench Dial Indicator Digital Measuring
Mustang 7.5 Limited Slip Differential (28 Spline) 79-85 V8; 86-10 V6: Required Tools: Ratchet Wrench Torque Wrench 1/2", 5/16, 3/4", 12mm and 15mm Sockets Lug nut Wrench Dial Indicator Digital Measuring
Moddit. How to Install Stance Coilovers on a Subaru
 Moddit How to Install Stance Coilovers on a Subaru BRZ Let's get LOW (and maybe lighter and stiffer suspension)! In this article, we will install Stance ST- ZN6-XS Coilovers on the FRSport Subaru BRZ.
How to Change Front Brake Pads on a Toyota Corolla
 How to Change Front Brake Pads on a Toyota Corolla Link to this article on (All other links in this document are disabled) Follow this picture guide to change the front brake pads on a 2003-2008 Toyota
Prerequisites: Shop Manual (recommended) pages 3-9 through 3-13.
 pages 3-9 through 3-13.") Prerequisites: Order your gaskets average about $25.00 bucks X 2 so $50.00 4NK-11193-00-00 Obtain a shim kit (Should have several 265 and 270s) (Some dealers will exchange) Obtain a Valve Bucket Tool YM-33961
Prerequisites: Order your gaskets average about $25.00 bucks X 2 so $50.00 4NK-11193-00-00 Obtain a shim kit (Should have several 265 and 270s) (Some dealers will exchange) Obtain a Valve Bucket Tool YM-33961
Remove black panel shown. Save 6 retaining pins for re-install later. Pry up on center part of pin first. Then pry out entire retaining pin.
 2005-2009 Ford Mustang V6 Fog Light Wiring Kit Parts List: Quantity: Tools Required: Wiring harness 1 Flat head screwdriver Supplemental wire leads 2 Ratchet & Socket set OR Wire tap red 2 Adjustable Wrench
TOYOTA FJ CRUISER 6 SUSPENSION KIT
 92177000 TOYOTA FJ CRUISER 6 SUSPENSION KIT Thank you for choosing Rough Country for your suspension needs. Rough Country recommends a certified technician installs this system. In addition to these instructions,
FORD RACING DIFFERENTIAL INSTALLATION (99-04 GT, Mach 1)
") FORD RACING DIFFERENTIAL INSTALLATION (99-04 GT, Mach 1) Time Necessary: Approximately 4 hours Tools Required: Wrenches: 8mm, 13mm, 15mm, 5.5 mm allen, 6mm allen Sockets: 5/8, 3/4 Ratchet Floor Jack Jack
FORD RACING DIFFERENTIAL INSTALLATION (99-04 GT, Mach 1) Time Necessary: Approximately 4 hours Tools Required: Wrenches: 8mm, 13mm, 15mm, 5.5 mm allen, 6mm allen Sockets: 5/8, 3/4 Ratchet Floor Jack Jack
STEP #1: Remove the wheels from the truck. There are (6) 21mm lug nuts holding each wheel on... Remember Lefty Loosy, Righty Tighty.
 21mm lug nuts holding each wheel on... Remember Lefty Loosy, Righty Tighty.") - CustomTacos.com Page 1 of 36 How-To: Toytec Lift Install Read all of these install instructions prior to installing Toytec's suspension lift. I cannot be held responsible for any damages or personal
- CustomTacos.com Page 1 of 36 How-To: Toytec Lift Install Read all of these install instructions prior to installing Toytec's suspension lift. I cannot be held responsible for any damages or personal
WD Dodge Suspension Kit
 92137600 02-05 2WD Dodge 1500 6 Suspension Kit Thank you for choosing Rough Country for your suspension needs. Rough Country recommends a certified technician installs this system. In addition to these
Installation Notes: #86000-R Race Series +3.5 L/T Kit
 159 North Maple St. Unit J, CORONA CA 92880 P. 951-737-9682 F. 951-737-9006 WWW.CHAOSFAB.COM Installation Notes: #86000-R Race Series +3.5 L/T Kit Factory manual is recommended for removal and re-installation
Ford Mustang V6 OEM-Style Fog Light Kit Parts List: Quantity: Tool List:
 2015-2017 Ford Mustang V6 OEM-Style Fog Light Kit Parts List: Quantity: Tool List: LED Foglights/ Bezels 2 Flat head & Phillips screwdriver (if you ordered part#3600) Ratchet & Socket set OR Wiring harness
COBB SPORT SPRINGS
 913760 - COBB SPORT SPRINGS 2004-2007 Subaru WRX/STi Congratulations on your purchase of the COBB Sport Springs for your 2004-2007 Subaru WRX/STi. The following instructions will assist you through your
FRONT DROP SPINDLES
 92725000 88-98 2 FRONT DROP SPINDLES Thank you for choosing Rough Country for all your suspension needs. Rough Country recommends a certified technician install this system. In addition to these instructions,
CHEVY C WHEEL DRIVE STANDARD CAB ONLY (EXCEPT 454SS) FTS1588-7BC 4" LIFT SPINDLES
 FTS1588-7BC 4 LIFT SPINDLES") 1988-1991 CHEVY C1500 2 WHEEL DRIVE STANDARD CAB ONLY (EXCEPT 454SS) FTS1588-7BC 4" LIFT SPINDLES PARTS LIST: 1 EA. LIFT SPINDLE PASS. SIDE FT1588-7BCP 1 EA. LIFT SPINDLE DRIVER'S SIDE FT1588-7BCD 6 EA.
1988-1991 CHEVY C1500 2 WHEEL DRIVE STANDARD CAB ONLY (EXCEPT 454SS) FTS1588-7BC 4" LIFT SPINDLES PARTS LIST: 1 EA. LIFT SPINDLE PASS. SIDE FT1588-7BCP 1 EA. LIFT SPINDLE DRIVER'S SIDE FT1588-7BCD 6 EA.
You will be removing the suspension of your vehicle. If you are not comfortable with this or do not have the proper tools, please do not proceed.
 Thank you for purchasing the CorkSport Mazda 3 and Mazdaspeed 3 Coilover Kit. This suspension system features 15-way adjustable dampening settings and full length adjustment to meet every driver s handling
MM Rear Coil-Over Kit - Koni Single and Double Adjustable Shocks (MMCO-5)
") 3430 Sacramento Dr., Unit D San Luis Obispo, CA 93401 Telephone: 805/544-8748 Fax: 805/544-8645 www.maximummotorsports.com MM Rear Coil-Over Kit - Koni Single and Double Adjustable Shocks (MMCO-5) Read
3430 Sacramento Dr., Unit D San Luis Obispo, CA 93401 Telephone: 805/544-8748 Fax: 805/544-8645 www.maximummotorsports.com MM Rear Coil-Over Kit - Koni Single and Double Adjustable Shocks (MMCO-5) Read
Eibach Pro-System-Plus
 Eibach Pro-System-Plus Tools : - Floor Jack - 3 Jack Stands (4 preferred) - 2 wheel stoppers - Car wrench set - Fire torch - Bolt thread locker (use on every bolt you tight) Disclaimer: This guide is not
LMB-C6 CF Senior Member
 LMB-C6 CF Senior Member Rotor install DIY... ****** FRONT: ****** Remove the wheel. To remove the rotor you need to remove the caliper and the bracket. There are 2 bolts for the caliper (top smaller bolt
MM IRS Coil-Over Kit - Bilstein/MM Shocks (MMCO-4)
") 3430 Sacramento Dr., Unit D San Luis Obispo, CA 93401 Telephone: 805/544-8748 Fax: 805/544-8645 www.maximummotorsports.com MM IRS Coil-Over Kit - Bilstein/MM Shocks (MMCO-4) The lower spring perch is drilled
3430 Sacramento Dr., Unit D San Luis Obispo, CA 93401 Telephone: 805/544-8748 Fax: 805/544-8645 www.maximummotorsports.com MM IRS Coil-Over Kit - Bilstein/MM Shocks (MMCO-4) The lower spring perch is drilled
INSTALLATION INSTRUCTIONS
 INSTALLATION INSTRUCTIONS 2005-2012 Nissan Xterra/Frontier / Pathfinder PART NUMBERS: NP17500, NP17525, NP17550 FRONTIER PARTS & CORRESPONDING HARDWARE LIST XTERRA PATHFINDER ABOVE LISTED 1/2 Metal Lock
INSTALLATION INSTRUCTIONS INS247
 INSTALLATION INSTRUCTIONS INS247 2015-2017 FORD MUSTANG CASTER CAMBER KIT Part # 2553 Special Tools required: xxx INCLUDED IN THIS KIT sdfgadsgf Install Time: xxx Difficulty: xxx STEP 1 STEP 3 Place the
Fox 2.0 Adjustable Coilovers (Par# ) Installation on a 2013 F-150 (2WD)
 Installation on a 2013 F-150 (2WD)") Fox 2.0 Adjustable Coilovers (Par# 983-02-052-2) Installation on a 2013 F-150 (2WD) This guide is for the install of the Fox 2.0 adjustable leveling struts on a 2013 F-150 2WD, these are being installed
Fox 2.0 Adjustable Coilovers (Par# 983-02-052-2) Installation on a 2013 F-150 (2WD) This guide is for the install of the Fox 2.0 adjustable leveling struts on a 2013 F-150 2WD, these are being installed
MK5/MK6 Panzer Plate Install Instructions
 MK5/MK6 Panzer Plate Install Instructions This is the install procedure for the dieselgeek.com MK5/MK6 Panzer Plate Skid Plate Kits. These instructions are for the following vehicles, regardless of engine
AEV30308AA Last Updated: 05/31/18. 4 DUALSPORT sc SUSPENSION system for RAM 1500 air ride standard and rebel INSTALLATION GUIDE
 AEV30308AA Last Updated: 05/31/18 4 DUALSPORT sc SUSPENSION system for RAM 1500 air ride standard and rebel INSTALLATION GUIDE PLEASE READ BEFORE YOU START TO GUARANTEE A QUALITY INSTALLATION, WE RECOMMEND
INSTALLATION INSTRUCTIONS 88518
 INSTALLATION INSTRUCTIONS 88518 For Rancho Suspension Systems RS6518: 2009 FORD F-150 4WD READ ALL INSTRUCTIONS THOROUGHLY FROM START TO FINISH BEFORE BEGINNING INSTALLATION Rev A IMPORTANT NOTES! WARNING:
'99-03 CHEVROLET/GMC IFS 4WD 6" SUSPENSION SYSTEM P/N INSTALLATION INSTRUCTIONS
 1/16/04 '99-03 CHEVROLET/GMC IFS 4WD 6" SUSPENSION SYSTEM P/N. 10-41099 INSTALLATION INSTRUCTIONS NOTE: Each Lift Kit and options to Lift Kits are packaged separately. Therefore, installation procedures
QA1 Caster Camber Plates (79-89 all)
") Time Needed: About 2 hours QA1 Caster Camber Plates (79-89 all) Tools Needed: Socket for lug nuts 13/16 or 6 spline tool is the most common, 17mm socket, 15/16 socket, ¾ socket, 9/16 socket, 15/16 wrench,
Time Needed: About 2 hours QA1 Caster Camber Plates (79-89 all) Tools Needed: Socket for lug nuts 13/16 or 6 spline tool is the most common, 17mm socket, 15/16 socket, ¾ socket, 9/16 socket, 15/16 wrench,
ARK Lowering Springs GT-F and GT-S. (LF , LS ) for Hyundai Genesis Coupe (All Models)
 for Hyundai Genesis Coupe (All Models)") ARK Lowering Springs GT-F and GT-S (LF0702-0900, LS0702-0900) for Hyundai Genesis Coupe (All Models) Contents Front Springs 2 Rear Springs 2 *Orange Springs GT-F *Gold Springs GT-S Tools Required Socket
ARK Lowering Springs GT-F and GT-S (LF0702-0900, LS0702-0900) for Hyundai Genesis Coupe (All Models) Contents Front Springs 2 Rear Springs 2 *Orange Springs GT-F *Gold Springs GT-S Tools Required Socket
Installations Instructions for Maier Racing Front Coilover Kit MS Ford Mustang
 22215 Meekland Avenue Hayward, CA 94541 Phone: (510) 581-7600 Fax: (510) 581-2406 Installations Instructions for Maier Racing Front Coilover Kit MS-02-001 1964-1973 Ford Mustang Contents Front Coilover
Sport Coil Springs set # Cadillac CTS
 Sport Coil Springs set # 1979 2003+ Cadillac CTS Thank you for your purchase from our new line of CTS parts. Please call us at (877) 4NO-ROLL if you have any questions regarding the service or installation
1969 Camaro. Concourse Style Disc Brake Conversion Kit Instllation Instructions
 Concourse Style Disc Brake Conversion Kit Instllation Instructions 1969 Camaro (1970 Chevelle Kit Shown) This document contains our regular disc brake conversion instructions with the addition of GM assembly
How to install Front Brake Pads on your GT, V6
 Time Necessary: Approximately 1.5 hours Tools Required: How to install Front Brake Pads on your 99-04 GT, V6 Jack Jack stands Torque wrench Ratchet Lug wrench 15mm socket 12mm socket Large C-clamp Syringe
WARNING: Only perform this installation if you are experienced, fully equipped mechanic.
 DYNATRAC V3.2 2005-Present Ford Super Duty 250/350-4x4, Front Axle, Free Spin Conversion Kit Some of the less common tools, which will be required: 6 point Spanner socket (OTC #7090-A or equivalent). These
Installation Time One / Two Hours
 Front Caliper (With Bracket) Install Guide 1999-2002 Mustang GT or V6 NOTE: These instructions are for the front driver side caliper, but can also be applied to the passenger side front caliper as well.
SR Performance Sway Bars (2010 Mustang GT)
") Total Installation time: Approximately 2 hours SR Performance Sway Bars (2010 Mustang GT) Tools Required: 15mm deep socket 18mm deep socket 19mm deep socket Ratchet with ½ drive Pliers Torque wrench 15mm
Total Installation time: Approximately 2 hours SR Performance Sway Bars (2010 Mustang GT) Tools Required: 15mm deep socket 18mm deep socket 19mm deep socket Ratchet with ½ drive Pliers Torque wrench 15mm
97-06 JEEP TJ/LJ LONG ARM UPGRADE KIT
 921663U00 97-06 JEEP TJ/LJ LONG ARM UPGRADE KIT Thank you for choosing Rough Country for your suspension needs. This kit is an upgrade kit only. This kit includes frame mounting points and adjustable long
STaSIS Engineering B6 B7 Streetsport Suspension
 STaSIS Engineering B6 B7 Streetsport Suspension SS Suspension Kit Parts List Qty Description Part Number 1 STaSIS adjusted Koni cadmium plated dampers (2 front, 2 rear) 1150-5061 Special Tools Required
PRODUCT USE INFORMATION
 921522000A *52200BAG3* 52200BAG3 Thank you for choosing Rough Country for all your suspension needs. 2009-18 Ford F150 2 Leveling Kit Rough Country recommends a certified technician install this system.
KG09100BK / KG09101BK GM WD.
 KG09100BK / KG09101BK GM. 1988-2006 2 WD. KG09101BK KG09100BK Instruction Sheet: P10476-05 2013 Daystar Products International Inc. Tools Needed Quantity Description 1 Floor Jack 2 Jack Stands 2 Wheel
Audi B6/B7 A4/S4 Rear Wheel Bearing Service Kit
 Audi B6/B7 A4/S4 Installation Tutorial ES2561175 This tutorial is provided as a courtesy by ECS Tuning. Proper service and repair procedures are vital to the safe, reliable operation of all motor vehicles
Sport Coil Springs Chysler 300C SRT-8 05 Dodge Charger SRT-8
 Sport Coil Springs 19105 05 Chysler 300C SRT-8 05 Dodge Charger SRT-8 Warning: This installation should be performed by a trained professional. The installation requires lowering of the rear cradle from
2014 GM 1500 TRUCK STOP---READ THIS FIRST! 7" Lift KIT. **Read These Entire Instructions Before Starting Anything**
 STOP---READ THIS FIRST! **Read These Entire Instructions Before Starting Anything** 2014 GM 1500 TRUCK LIFT KIT INSTRUCTIONS (PART #50768 & #50769 ) 5680 W. Barstow, Fresno, CA 93722 PH: (559) 226-8196
WD CHEVY/GM LIFT
 92750100 99-06 2WD CHEVY/GM 1500 3 LIFT Thank you for choosing Rough Country for all of your suspension needs. Rough Country recommends a certified technician installs this system. In addition to these
This suspension system was developed using a Maximum tire size of 33 X 12.5 with a 17 x 9 aftermarket wheel with 4 1/2-5 backspacing..
 92174700 Thank you for choosing Rough Country for your suspension needs. 2005-15 TACOMA 6 Kit Rough Country recommends a certified technician install this system. In addition to these instructions, professional
Dodge Ram Kit
 92138000 Thank you for choosing Rough Country for your suspension needs. 2002-05 Dodge Ram 1500 4-5.5 Kit Rough Country recommends a certified technician install this system. In addition to these instructions,
INSTALLATION INSTRUCTION Rev A
 INSTALLATION INSTRUCTION 88587 Rev A FOR RANCHO SUSPENSION SYSTEM RS6587B: 2009 DODGE RAM 1500 READ ALL INSTRUCTIONS THOROUGHLY FROM START TO FINISH BEFORE BEGINNING INSTALLATION IMPORTANT NOTES! WARNING:
96-04 tt. Hellion Power Systems Mustang Twin Turbo Kit Instructions
 96-04 tt Hellion Power Systems 1996-2004 Mustang Twin Turbo Kit Instructions 1. Disconnect battery and elevate front end of car on either Jack stands or a lift if available 2.Lock steering wheel and remove
Installation Guide for Rough Country 2.5 inch Lift Kit w/o Shocks (07-15 Wrangler JK) Item # J10212
 Item # J10212") Installation Guide for Rough Country 2.5 inch Lift Kit w/o Shocks (07-15 Wrangler JK) Item # J10212 Installation Time: 3 Hours Tools Required: Jack (2 helps, but not needed) Jack stands(2 3-ton, 2 2-ton)
Installation Guide for Rough Country 2.5 inch Lift Kit w/o Shocks (07-15 Wrangler JK) Item # J10212 Installation Time: 3 Hours Tools Required: Jack (2 helps, but not needed) Jack stands(2 3-ton, 2 2-ton)
INSTALLATION INSTRUCTION 88146
 INSTALLATION INSTRUCTION 88146 Rev H FOR RANCHO SUSPENSION SYSTEM RS6547: 4WD SUBURBAN/YUKON XL, 4WD TAHOE/YUKON, & 4WD AVALANCHE READ ALL INSTRUCTIONS THOROUGHLY FROM START TO FINISH BEFORE BEGINNING
INSTALLATION INSTRUCTION 88581
 INSTALLATION INSTRUCTION 88581 FOR RANCHO SUSPENSION SYSTEM RS6581B: DODGE RAM READ ALL INSTRUCTIONS THOROUGHLY FROM START TO FINISH BEFORE BEGINNING INSTALLATION Rev C IMPORTANT NOTES! WARNING: This suspension
04-08 FORD F150 4 KIT
 9257700 04-08 FORD F50 4 KIT THANK YOU FOR CHOOSING ROUGH COUNTRY FOR YOUR SUSPENSION NEEDS. Rough Country recommends a certified technician install this system. In addition to these instructions, professional
INSTALLATION INSTRUCTION 88148
 INSTALLATION INSTRUCTION 88148 Rev C For Rancho Suspension Systems RS6548, RS6549 & RS6550: GM 2500HD, 2500, and 1500HD Trucks READ ALL INSTRUCTIONS THOROUGHLY FROM START TO FINISH BEFORE BEGINNING INSTALLATION
04-08 FORD F150 6 KIT
 957600 THANK YOU FOR CHOOSING ROUGH COUNTRY FOR YOUR SUSPENSION NEEDS. 0-08 FORD F50 6 KIT Rough Country recommends a certified technician install this system. In addition to these instructions, professional
OEM Cruise Control Installation in GMC/Chevy NBS trucks
 OEM Cruise Control Installation in 99-02 GMC/Chevy NBS trucks May 2008 ~ Rampage_Rick Having just installed factory cruise control in my 00 Sierra, I thought I d share the fun. I followed the steps outlined
*1576BAG9* 1576BAG FORD F KIT C THANK YOU FOR CHOOSING ROUGH COUNTRY FOR YOUR SUSPENSION NEEDS.
 957600C THANK YOU FOR CHOOSING ROUGH COUNTRY FOR YOUR SUSPENSION NEEDS. 0-08 FORD F50-6 KIT Rough Country recommends a certified technician install this system. In addition to these instructions, professional
INSTALLATION INSTRUCTION 88088
 INSTALLATION INSTRUCTION 88088 For Rancho Suspension Systems RS6588 & RS6589: FORD F-150 READ ALL INSTRUCTIONS THOROUGHLY FROM START TO FINISH BEFORE BEGINNING INSTALLATION Rev B IMPORTANT NOTES! WARNING:
PRODUCT USE INFORMATION
 921545200 *54520BAG1* 54520BAG1 Thank you for choosing Rough Country for all your suspension needs. 2009-17 Ford F150 3 Suspension Kit Rough Country recommends a certified technician install this system.
BOSS/ULTIMATE LIFT INSTALLATION INSTRUCTIONS 07+ TUNDRA.
 BOSS/ULTIMATE LIFT INSTALLATION INSTRUCTIONS 07+ TUNDRA support@toyteclifts.com. Prior to installation, please read all install directions and paperwork provided. ToyTec Lifts L.L.C. recommends that all
55-64 Full Size Chevy Installation Instructions Standard Disc Conversion
 55-64 Full Size Chevy Installation Instructions Standard Disc Conversion DBMC09, PV71 & PVB71 Pictured (Booster, master cylinder & valve setups may vary by upgrades selected) Your new disc brake conversion
Slide the billet aluminum cap over the bushing and secure with the 3/8-16 x 2 1/2 socket head allen and locknuts provided.
 Slide the billet aluminum cap over the bushing and secure with the 3/8-16 x 2 1/2 socket head allen and locknuts provided. Put the urethane bushings into the upper antiroll-bar-link eyebolt. Coat the bushings
Sport Coil Springs Dodge Magnum, Chrysler 300C Dodge Challenger SRT Dodge Challenger R/T
 Sport Coil Springs 19101 - Dodge Magnum, Chrysler 300C 19107 - Dodge Challenger SRT-8 19108 - Dodge Challenger R/T Warning: This installation should be performed by a trained professional. The installation
Ford Mustang GT-Style Fog Light Kit Parts List: Quantity: Tool List:
 2013-2014 Ford Mustang GT-Style Fog Light Kit Parts List: Quantity: Tool List: Fog light (Left& Right) 2 Flat head & Phillips screwdriver Upper grille with surround 1 Ratchet & Socket set OR Lower grille
Accel 300+ Ignition Control System (84-95) - Installation Instructions
 - Installation Instructions") Accel 300+ Ignition Control System (84-95) - Installation Instructions The below installation instructions work for the following products: Accel 300+ Ignition Control System (84-95) Please read through
Accel 300+ Ignition Control System (84-95) - Installation Instructions The below installation instructions work for the following products: Accel 300+ Ignition Control System (84-95) Please read through