Pictorial Guide to Ford Mustang Odometer Gear Replacement
|
|
|
- Cecily Leonard
- 5 years ago
- Views:
Transcription
1 Pictorial Guide to Ford Mustang Odometer Gear Replacement ***************************************************************************************************** Please read the first few steps carefully as these are our most common questions we receive after a client has performed a repair and the odometer still does not work. The reason the original gear or gears have failed is that they are made of urethane and lubricated with petroleum grease. This combination breaks down the urethane into a waxy substance which flakes and breaks away. This will also leave a waxy film and deposits on the shafts, gears, housing and peg on the pods. * Work smart, meaning have a clean area to work and the proper tools to perform the repair. General tools that will be needed depending on the vehicle are small standard screwdriver, small Phillips screwdriver, assortment of torx drivers, diagonal cutters (dikes), 1/4" socket set are just a few of the items that may be needed. * No grease is needed with the new gears. Our gears are made using Celcon which has graphite mixed into the material and does not require any additional lubricant. * Make sure that you have blown the speedometer and odometer assembly clean with high pressure compressed air. Even if you think that you have found all of the broken pieces you still need to perform this step. * Wipe the area around the gears, any shaft or shafts that the gears may ride on, the motor shaft and the peg on the pod that the small gear spins on clean, using a clean cloth and rubbing alcohol. Any residue left over from the old gears can allow the new gears to stick and not allow the odometer to work. * Use a small screw driver to remove all of the old gear and residue in the drive gear cradles. Once you have the bulk of the debris removed use a few cotton swabs to thoroughly clean the cradles. ***************************************************************************************************


2

3


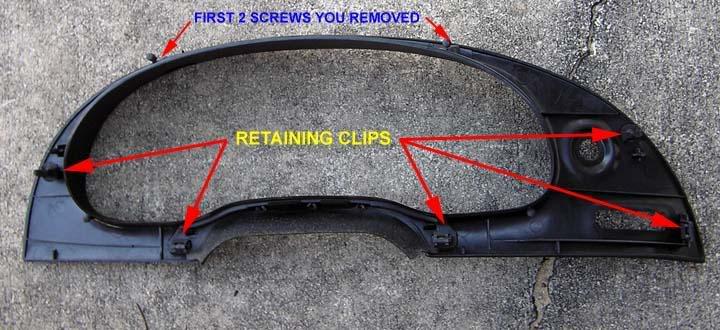
4 To see exact location of the screws to be removed, Please see picture below of the left side as this is a mirrored location of the right side of cluster.

 illumination bulbs are part number #194 and can be purchased from your local auto")
5 You will need to gently pry under the face of each gauge cluster to remove, using a flat blade screwdriver. It is best to remove the left and right gauge clusters first and then the speedometer. The gauges are held into place by electrical studs that press through electrical contact sleeves. The five (5) illumination bulbs are part number #194 and can be purchased from your local auto parts store.


6 The gauges will synchronize once reinstalled and the ignition switch is switched on.

7

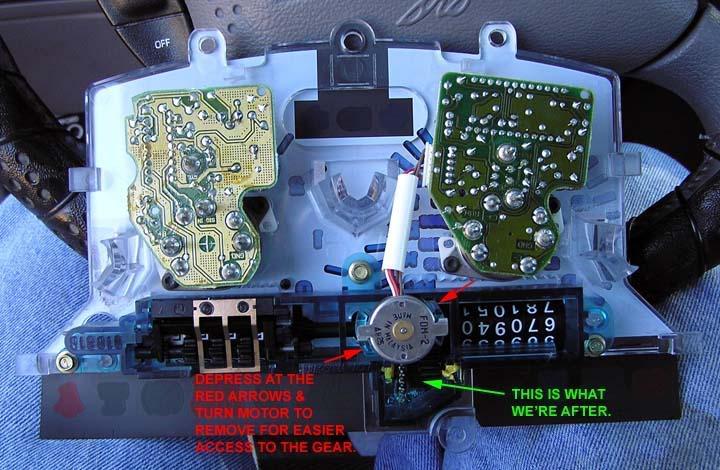
8 When trying to remove the motor you may either have to depress or lift up on the plastic tabs. It is easier to do this with two people but can be done with only one person. Once the motor is removed you will also see the worm gear attached to the bottom side of the motor. If replacing remove the old worm gear by pulling off with your fingers. Install the new worm gear using channel lock pliers or a bench vise leaving the thickness of two business cards between the motor and the gear. The new gear is installed with the neck towards the motor housing. Disregard the statement in the above picture. There is no need to apply grease to the new gears as our gears have graphite mixed into the material.

9
Ford Ranger and Mazda Pickup Odometer Worm Gear Replacement
 www.odometergears.com Ford Ranger and Mazda Pickup Odometer Worm Gear Replacement http://www.therangerstation.com/magazine/fall2008/odometer_worm_gear.htm ****************************************************************************************************
Merkur Scorpio Odometer Repair Instructions
 www.odometergears.com Merkur Scorpio Odometer Repair Instructions http://www.bitsprings.com/gearinst.pdf Please read through these instructions completely once before proceeding. It is important to understand
Porsche 911 Gear and Pod Odometer Repair
 www.odometergears.com Porsche 911 Gear and Pod Odometer Repair http://efinnegan.com/porsche/repair%20maintenance%20and%20miscellaneous%20info/odometer-rebuild.htm http://p-car.com/diy/odometer/ *************************************************************************************************
Rolls Royce Jaeger 20 x? Odometer Gear Replacement This is not an exact how to for this speedometer but the instructions are very similar
 www.odometergears.com Rolls Royce Jaeger 20 x? Odometer Gear Replacement This is not an exact how to for this speedometer but the instructions are very similar This is a combination of several different
Toyota Prius Interior Light Upgrade
 Toyota Prius 2012- Interior Light Upgrade Part Number 00016-00095 Accesory Code: IL2 Conflicts Kit Contents Item # Quantity Reqd. Description 1 1 Y Adapter 2 1 Wire harness 3 1 Hardware Kit 4 2 White Light
TOYOTA AVALON INTERIOR LIGHT UPGRADE Section TOYOTA II - Installation AVALON Procedures
 TOYOTA AVALON 2005 - INTERIOR LIGHT UPGRADE Section TOYOTA II - Installation AVALON Procedures 2007 Base Toyota Illumination Kit Part Number: 00016-00060 Accessory Code: IL1 Kit Contents Item # Quantity
Conflicts. Toyota Avalon Interior Light Upgrade. Part Number Accesory Code: IL2. Color Applicability/Trim Level.
 Toyota Avalon 2011 - Interior Light Upgrade Part Number 00016-00095 Accesory Code: IL2 Conflicts Kit Contents Item # Quantity Reqd. Description 1 1 Y Adapter 2 1 Wire harness 3 1 Hardware Kit 4 2 White
Scion xb Interior Light Upgrade Part Number: Accessory Code: YI1
 Scion xb 2008 - Interior Light Upgrade Part Number: 00016-00065 Accessory Code: YI1 Kit Contents Item # Quantity Reqd. Description 1 2 12 and 9 rod 2 1 Wire harness 3 1 Hardware Kit 4 2 White Light Engines
INSTALL/REMOVAL INSTRUCTIONS: WINDOW LIFT MOTOR
 REMOVAL/INSTALL OF WINDOW REGULATOR (742-269) Ford Mustang 1996 2004 General Tech Tips: Use painter s tape rather than duct tape to secure window. It will not damage paint or leave sticky residue. A plastic
INSTALLATION INSTRUCTIONS
 2007-Current Jeep Wrangler 360º System for Aftermarket display (Kit # AVMS-3700v2) Please read thoroughly before starting installation and check that kit contents are complete. Items Included in the Kit:
Push Start Ignition (05-10 All) Installation
 Installation") Tools Required: Phillips head screwdriver Flat head screwdriver Ratchet 7mm Socket Torx T20 bit Wire strippers/cutters Hand file Needle nose pliers Installation Instructions: Push Start Ignition (05-10
Tools Required: Phillips head screwdriver Flat head screwdriver Ratchet 7mm Socket Torx T20 bit Wire strippers/cutters Hand file Needle nose pliers Installation Instructions: Push Start Ignition (05-10
Model EL8500 Series. Bagless Upright. Assembly/Disassembly Guide 1
 Model EL8500 Series Bagless Upright Assembly/Disassembly Guide 1 Table Of Contents Parts Removal / Installation Guide Belt & Brushroll Section A Page 3 Hood Assembly Section B Page 3 Main PCB Board Section
INSTALLATION INSTRUCTIONS
 2007-Current Jeep Wrangler 360º System for Factory Display Radios (Kit # AVMS-3701) Please read thoroughly before starting installation and check that kit contents are complete. Items Included in the Kit:
INSTALLATION INSTRUCTIONS
 2007-Current Jeep Wrangler 360º System for Factory Display Radios (Kit # AVMS-3701v2) Please read thoroughly before starting installation and check that kit contents are complete. Items Included in the
INSTALLATION INSTRUCTIONS
 2007-Current Jeep Wrangler 360º System for Factory MyGig Display (Kit # AVMS-3701) Please read thoroughly before starting installation and check that kit contents are complete. Items Included in the Kit:
Mustang Clear Lens Instrument Cover (90-93) - Installation Instructions
 - Installation Instructions") Mustang Clear Lens Instrument Cover (90-93) - Installation Instructions The below installation instructions work for the following products: Mustang Clear Lens Instrument Cover (90-93) Please read through
Mustang Clear Lens Instrument Cover (90-93) - Installation Instructions The below installation instructions work for the following products: Mustang Clear Lens Instrument Cover (90-93) Please read through
Installation Instructions COMPETITION/PLUS SHIFTER Ford Mustang MT82 6-Speed Manual Transmission Catalog#
 Installation Instructions COMPETITION/PLUS SHIFTER 2015-2017 Ford Mustang MT82 6-Speed Manual Transmission Catalog# 3916037 Rev. 00 WORK SAFELY! For maximum safety, perform this installation on a clean,
Toyota Venza Interior Light Upgrade
 Toyota Venza 2011 - Interior Light Upgrade Part Number 00016-00095 Accesory Code: IL2 Conflicts Kit Contents Item # Quantity Reqd. Description 1 1 Y Adapter 2 1 Wire harness 3 1 Hardware Kit 4 2 White
Installation Instructions
 Preparing your vehicle to install your brake system upgrade 1. Rack the vehicle. 2. If you don t have a rack, then you must take extra safety precautions. 3. Choose a firmly packed and level ground to
HURST COMP/PLUS SHIFTER 2015 Ford Mustang (Getrag MT82 six-speed manual transmission) Catalog # by Hurst Performance
 Catalog # by Hurst Performance") FORM 159 0205 07/15 HURST COMP/PLUS SHIFTER 2015 Ford Mustang (Getrag MT82 six-speed manual transmission) Catalog #391 0205 2015 by Hurst Performance Thank you for purchasing the Hurst Comp/Plus Shifter.
FORM 159 0205 07/15 HURST COMP/PLUS SHIFTER 2015 Ford Mustang (Getrag MT82 six-speed manual transmission) Catalog #391 0205 2015 by Hurst Performance Thank you for purchasing the Hurst Comp/Plus Shifter.
GENUINE PARTS INSTALLATION INSTRUCTIONS
 GENUINE PARTS INSTALLATION INSTRUCTIONS 1. 2. 3. 4. DESCRIPTION: Accent light Kit APPLICATION: R42H (2011) PART NUMBER: 999F3 AW000 - Universal Accent Lighting Kit. KIT CONTENTS: Item QTY Description Service
M GT 2005 up Mustang ENGINE START Push-Button INSTRUCTION SHEET
 Please contact the Ford Racing Techline for the most current instruction information @ (800) FORD-788!!! PLEASE READ THE FOLLOWING INSTRUCTIONS CAREFULLY PRIOR TO INSTALLATION!!! OVERVIEW: The following
 www.odometergears.com Mercedes-Benz Mechanical Odometer Repair This how to can be used for all mechanical repairs as the only difference will be the removal of the instrument cluster. http://www.dieselgiant.com/repairyourodometer.htm
Toyota Corolla Interior Light Upgrade
 TOYOTA Corolla 2010 INTERIOR LIGHT UPGRADE Toyota Corolla 2012- Interior Light Upgrade Part Part Number #: xxxxx-xxxxxx 00016-0009500095 NOTE: Part number of this accessory may If not printing be the same
GruvenParts.com BRASS GM Power Folding Mirror Gear Replacement Instructions. Updated 8/25/2017 Additional Pictures / Tips Posted!
 Page 1 GruvenParts.com BRASS GM Power Folding Mirror Gear Replacement Instructions Updated 8/25/2017 Additional Pictures / Tips Posted! ** Latest Design is uses an ALL BRASS SPUR GEAR!!! ** ** If you don
2004 Ford Taurus By Gilbert R. Gutierrez
 2004 Ford Taurus By Gilbert R. Gutierrez Vehicle Information: Vehicle type: Four-door sedan. NAGS number*: Windshield part number is DW01528GBYN or TYN. The door glass is DD08853-54GTNN R-L. Rear-door
1. Get fork mounted in stand. You can leave it in the bike, but you must remove the wheel and front brake.
 Tools Needed: Bike stand Lint free shop Towels 1.5mm Allen Key Pick Set Grease (We recommend Slick Honey) Oil Measuring Cup (with cc Scale) Small Metal Drift Shop Vise Oil Bucket 13mm Deep Socket (6 point)
Steeda Billet Charge Motion Control Plates (05-08 GT) - Installation Instructions
 - Installation Instructions") Steeda Billet Charge Motion Control Plates (05-08 GT) - Installation Instructions The below installation instructions work for the following products: Steeda Billet Charge Motion Control Plates (05-08
Steeda Billet Charge Motion Control Plates (05-08 GT) - Installation Instructions The below installation instructions work for the following products: Steeda Billet Charge Motion Control Plates (05-08
Performance Inlet Manifold
 Performance Inlet Manifold Tools needed (some tools not required on some models): 13mm Combination Wrench Flat Blade Screwdriver T30 Torx Driver T25 Torx Driver 10mm Combination Wrench and/or Socket with
Installation Manual TWM Performance Kia Forte Short Shifter
 Installation Manual TWM Performance Kia Forte 2009+ Short Shifter Begin the installation by parking on a flat surface, as you will have to engage and disengage the hand brake and shift from gears to neutral.
INSTALLATION INSTRUCTIONS
 INSTALLATION INSTRUCTIONS Accessory Application Publications No. in- ENTERTAINMENT SYSTEM 2004 TSX BII 24811 Issue Date APRIL 2003 PARTS LIST Attachment Kit P/N 08B23-SDA-101A Monitor bracket harness FM
Custom Dynamics Technical Bulletin
 Custom Dynamics Technical Bulletin Troubleshooting Connection Issues with Turn Signals This bulletin is for the purpose of helping customers solve connection/operation issues on Custom Dynamics LED replacement
Installation Manual TWM Performance Short Shifter 2008 Mitsubishi Lancer
 Page 1 Installation Manual TWM Performance Short Shifter 2008 Mitsubishi Lancer Please Note: It is preferable to park on a flat surface, as you will have to engage and disengage the hand brake and shift
INSTALLATION INSTRUCTIONS
 INSTALLATION INSTRUCTIONS Accessory Application Publications No. AUTOMATIC AII 27160 2005 CR-V Issue Date ATTACHMENT KIT SEP 2004 PARTS LIST Automatic Day/Night Mirror Attachment Kit (sold separately)
Mustang 5.0L Cold Air Intake Installation Instructions P/N:
 2015-2017 Mustang 5.0L Cold Air Intake Installation Instructions P/N: 421826 39555 Schoolcraft Rd, Plymouth MI, 48170 800.59.ROUSH 2015-2017 Mustang 5.0L Cold Air Intake Installation Instructions P/N:
INSTALLATION INSTRUCTIONS
 INSTALLATION INSTRUCTIONS Accessory Application Publications No. S 1998 CIVIC 2/3/4-DOOR All 18767 Issue Date SEP 1997 PARTS LIST Fog Light Kit: P/N 08V31-S01-100 Right fog light (marked R ) Fuse label
Raxiom Mustang Headlights (94-98) - Installation Instructions
 - Installation Instructions") Raxiom Mustang Headlights (94-98) - Installation Instructions The below installation instructions work for the following products: Dark Smoked Mustang Headlights (94-98) Raxiom Chrome Mustang Headlights
Raxiom Mustang Headlights (94-98) - Installation Instructions The below installation instructions work for the following products: Dark Smoked Mustang Headlights (94-98) Raxiom Chrome Mustang Headlights
Remove 4 circled pins. Route wiring along dashed line. Remove the 2 9mm nuts and black retaining plate that secure extractor.
 2015 Ford Mustang Turn Signal Hood Kit Parts List: Quantity: Tool List: Bracket & pre-installed lamp 2 Flat head screwdriver Wiring harness 1 Phillips screwdriver PB-3660 Parts Bag 1 Ratchet & Socket set
Operation and care of the Visual Optics Fiber Scopes
 Operation and care of the Visual Optics Fiber Scopes Congratulations on buying a high quality product from Visual Optics, Inc. We take pride in not only selling our products but serving and reacting to
HP ENTERPRISE 600 M651/M680 SERIES TONER CARTRIDGE REMANUFACTURING INSTRUCTIONS
 HP ENTERPRISE 600 M651/M680 SERIES TONER CARTRIDGE REMANUFACTURING INSTRUCTIONS HP 652A TONER CARTRIDGE RREMANUFACTURING THE HP COLOR ENTERPRISE 600 M651/M680 SERIES TONER CARTRIDGES By Mike Josiah and
J&M Mustang Rear Adjustable Lower Control Arms Installation Guide (99-04)
") J&M Mustang Rear Adjustable Lower Control Arms Installation Guide (99-04) 1. Required Tools: 1.1. 3/8 ratchet 1.2. 1/2 ratchet 1.3. 18mm deep socket 1.4. 18mm standard socket (optional) 1.5. 19mm open
J&M Mustang Rear Adjustable Lower Control Arms Installation Guide (99-04) 1. Required Tools: 1.1. 3/8 ratchet 1.2. 1/2 ratchet 1.3. 18mm deep socket 1.4. 18mm standard socket (optional) 1.5. 19mm open
Installation Instructions
 Installation Instructions Thermostatic Valve and Trim Model No. RH-5944 1 REV.A Restoration Hardware Product Size Specification Diagram General Characteristics In case of instantaneous heaters, hot water
Please read and understand all instructions before attempting installation. Please pay attention to all Cautions and Notes within these instructions.
 Mustang Cluster Kit - INSTALLATION INSTRUCTIONS - For use with Ford Mustang (2005-2009) and Simco Kit Part # s 2046-7XX Revised: Sept. 29, 2008 Rev. B Please read and understand all instructions before
SCT Mustang 4-Bank Eliminator Chip w/ Free Custom Tunes (88-04) - Installation Instructions
 - Installation Instructions") SCT Mustang 4-Bank Eliminator Chip w/ Free Custom Tunes (88-04) - Installation Instructions The below installation instructions work for the following products: SCT Mustang 4-Bank Eliminator Chip w/ Free
SCT Mustang 4-Bank Eliminator Chip w/ Free Custom Tunes (88-04) - Installation Instructions The below installation instructions work for the following products: SCT Mustang 4-Bank Eliminator Chip w/ Free
Volkswagen Cabriolet DIY Guide Installing Interior LEDs
 Volkswagen Cabriolet DIY Guide Installing Interior LEDs Instrument Cluster (does not include tools for removing cluster) Test leads (not required, but makes things easier) 9V battery (not required, but
ACE AUDIO KIT P/N
 ACE AUDIO KIT P/N 2879703 Application SPORTSMAN ACE MODELS Before you begin, read these instructions twice and check to be sure all parts and tools are accounted for. Please retain these installation instructions
Mini Cooper Mini Cooper. Vehicle Type: Two-Door Hatchback. Windshield. AutoGlass Field Guide 53
 Vehicle Type: Two-Door Hatchback NAGS number:* FW02305GTY (Heat) (Rain Sensor) or FW02304GTY. Original-equipment-manufacturer part numbers are 51311505850 (Heat) (Rain Sensor), or 51311505875. FD21652-53
ISSUER: WRC 10/29/10 ENGINEERING: PROD/MTL: QA APPROVAL: REVISION HISTORY
 DRAWING NO: WI 005-152-501 APPROVAL REV: A ISSUER: WRC 10/29/10 ENGINEERING: Work Instruction Field Battery Installation PROD/MTL: QA APPROVAL: REVISION HISTORY LTR DESCRIPTION DATE 1 Preliminary Release
N41421 Peacemakers Exhaust for Harley- Davidson Dyna Series
 Please read these instructions carefully and thoroughly before beginning work. Before installing accessory, carefully consider whether one possesses the necessary technical skills and workshop tools to
CVO - with ipod Amp & Speaker Upgrade Install Instructions for Batwing Fairing
 CVO - with ipod Amp & Speaker Upgrade Install Instructions for Batwing Fairing Tools Needed: 1/2 inch Socket Wire Cutters 7/16 inch Socket Wire Strippers 5/16 inch Socket Phillips Screwdriver 1/2 inch
INSTALLATION INSTRUCTIONS
 INSTALLATION INSTRUCTIONS Accessory Application Publications No. CASSETTE/MP3/ AII 30664 2006 ACCORD IN-DASH CD 2- AND 4-DOOR Issue Date ATTACHMENT AUG 2005 PARTS LIST cable Attachment Kit (sold separately):
Please pay attention to all Cautions and Notes within these instructions.
 Mustang Cluster Kit - INSTALLATION INSTRUCTIONS - For use with Ford Mustang (1994-1998) and Simco Kit Part # s 2034-7XX Revised: Dec 30, 2008 Rev. C Please read and understand all instructions before attempting
N41422 Peacemakers Exhaust for Harley- Davidson Dyna Series 2006
 Please read these instructions carefully and thoroughly before beginning work. Before installing accessory, carefully consider whether one possesses the necessary technical skills and workshop tools to
Throttle Body Spacer (05-09 V6) - Installation Instructions
 - Installation Instructions") Throttle Body Spacer (05-09 V6) - Installation Instructions The below installation instructions work for the following products: Throttle Body Spacer (05-09 V6) Steeda 2005+ 4.0L V6 Intake Throttle Body
Throttle Body Spacer (05-09 V6) - Installation Instructions The below installation instructions work for the following products: Throttle Body Spacer (05-09 V6) Steeda 2005+ 4.0L V6 Intake Throttle Body
YARIS 4-DOOR 2007 INTERIOR LIGHT UPGRADE
 Document # 3999 4/26/06 4-DOOR 2007 INTERIOR LIGHT UPGRADE Preparation Part Number: 00016-52060 Code: IL1 Kit Contents Item # Quantity Reqd. Description 1 1 12 Light Guide 2 1 7 Light Guide 3 1 Hardware
Section II - Installation Procedures Part Number : Accessory Code IL1 Kit Contents. Color Applicability/Trim Level. Hardware Bag Contents
 Document # 10.21.00 PIO/DIO 01/14/09 TOYOTA Rav-4 2009- INTERIOR InteriorLIGHT Light UPGRADE Upgrade Part Number : 00016-00065 Accessory Code IL1 Kit Contents Color Applicability/Trim Level Item # Quantity
TOYOTA YARIS HATCHBACK INTERIOR LIGHT UPGRADE Preparation
 Preparation Part Number PTS21-52062-08 NOTE: Part number of this accessory may not be the same as the part number show Kit Contents Item # Quantity Reqd. Description 1 1 12 Light Guide 2 1 7 Light Guide
INSTALLATION INSTRUCTIONS
 INSTALLATION INSTRUCTIONS Accessory Application Publications No. AII 24642 BODY SIDE CLADDING 2003 CR-V P/N 08P21-S9A-100 Issue Date OCT 2002 PARTS LIST Right rear bumper piece Right front fender piece
FR500 Mustang Steering Wheel Installation Guide
 FR500 Mustang Steering Wheel Installation Guide The below installation instructions work for the following products: Ford Mustang FR500 Style Steering Wheel Replacement This install guide is for the FR500
Motion System Components Diagram. Note: #2 Mirror Cover and X-Axis Motor Cover have been removed for visibility. Maintenance.
 Professional Laser System PLS3.75, PLS4.75, PLS6.75 and PLS6.150D Keeping the laser system clean will ensure the highest quality engraving. A clean laser system is the best performing laser system. The
DM-ST (English) Dealer's Manual. Dual control lever ST-9001 ST-9000 ST-6800 ST-5800 ST-4700 ST-4703
 Dealer's Manual. Dual control lever ST-9001 ST-9000 ST-6800 ST-5800 ST-4700 ST-4703") (English) DM-ST0002-05 Dealer's Manual Dual control lever ST-9001 ST-9000 ST-6800 ST-5800 ST-4700 ST-4703 CONTENTS IMPORTANT NOTICE... 3 TO ENSURE SAFETY... 4 INSTALLATION... 6 List of tools to be used...6
(English) DM-ST0002-05 Dealer's Manual Dual control lever ST-9001 ST-9000 ST-6800 ST-5800 ST-4700 ST-4703 CONTENTS IMPORTANT NOTICE... 3 TO ENSURE SAFETY... 4 INSTALLATION... 6 List of tools to be used...6
Wheel Bearing Replacement Passat TDI
 Rear Bearing/hub assembly replacement This is a fairly straight forward process. Pictures are not necessary for most of this procedure for a person with skills to do this repair. Anyone who thinks they
INSTALLATION INSTRUCTIONS REPAIR SEAL KIT PowerSurvivor 40E
 INSTALLATION INSTRUCTIONS REPAIR SEAL KIT PowerSurvivor 40E PURPOSE OF THE KIT The Repair Seal Kit should be installed after 1000 hours of operation. It should be installed regardless of whether or not
GLACIER PRO RANGER MID SIZE MOUNT KIT
 GLACIER PRO RANGER MID SIZE MOUNT KIT P/N 2880261 APPLICATION FOR USE WITH THE GLACIER PRO MID SIZE PLOW SYSTEM (P/N 2880260) ON 2010 AND NEWER RANGER MID SIZE MODELS BEFORE YOU BEGIN Read these instructions
Rugged Ridge Spartacus HD Tire Carrier Kit Install
 Rugged Ridge Spartacus HD Tire Carrier Kit Install Installation Time: 2 hours Tools Required: Ratchet ¾ socket 19 mm socket 13 mm socket 10 mm socket 19 mm Wrench 10 mm wrench 6mm Allen Wrench T50 torx
HiBoy Maverick/Commander Doors Part # HiBoy4 Maverick/Commander Doors Black
 Racing 3191 N Washington St. Suite 2 Chandler, AZ 85225 1 (800) 708-9803 http://www.racing.com HiBoy Maverick/Commander Doors Part # 07-2001 HiBoy4 Maverick/Commander Doors Black Congratulations on your
INSTALLATION INSTRUCTIONS
 INSTALLATION INSTRUCTIONS Accessory S P/N 08E12-T2A-100B Application 2014 ACCORD 4-DOOR Publications No. AII 49980 Issue Date AUG 2013 PARTS LIST Right front illuminated door sill trim Fuse label 2 Alcohol
2003 CR-V - A/T Shift Cable Replacement-Print Preview
 Page 1 of 7 2003 CR-V - A/T Shift Cable Replacement 1. Raise the front of the vehicle, or lift the vehicle up, and make sure it is securely supported. 2. Remove the driver's dashboard lower cover, and
Short-throw Shifter Installation Guide
 Short-throw Shifter Installation Guide Removal Procedure 1) Remove the shift control knob. A. Lift up on the rear portion of the shift control closeout boot retaining ring and detach the retaining ring
INSTALLATION INSTRUCTIONS
 INSTALLATION INSTRUCTIONS Accessory REMOTE CONTROL Application 2014 TSX (L4) Publications No. BII 50198 Issue Date SEPT 2013 PARTS LIST Remote Engine Starter Unit Kit P/N 08E91-TK4-200A Fuse label Transmitter
MacBook Unibody Model A1342 Clutch Cover
 MacBook Unibody Model A1342 Clutch Cover Replacement Replace a damaged clutch cover. Scritto Da: Andrew Bookholt ifixit CC BY-NC-SA it.ifixit.com Pagina 1 di 16 INTRODUZIONE Remove the clutch cover to
INSTALLATION. DRIVING LIGHTS for FLHT/FLHX/FLHR BLACK. THANK YOU FOR CHOOSING KϋRYAKYN!
 THANK YOU FOR CHOOSING KϋRYAKYN! PROTECT YOURSELF AND OTHERS FROM POSSIBLE INJURY AND PROPERTY DAMAGE OR LOSS. PAY CLOSE ATTENTION TO ALL INSTRUCTIONS, WARNINGS, CAUTIONS, AND NOTICES REGARDING THE, USE,
Fuel Injection System
 7. Fuel Injection System XCITING 400i Fuel Injection System This chapter covers the location and servicing of the fuel system components for the KYMCO XCITING 400i. Air box... 7-2~7-5 Fuel Tank... 7-6~7-10
BODY-24, Late Model 944 ( and Newer) Dash Replacement
 Dash Replacement") BODY-24, Late Model 944 (1985.5 and Newer) Dash Replacement Introduction Replacing the dash in a late model 944 is not overly difficult. However, it is very tedious and a lot of patience is required. It's
BODY-24, Late Model 944 (1985.5 and Newer) Dash Replacement Introduction Replacing the dash in a late model 944 is not overly difficult. However, it is very tedious and a lot of patience is required. It's
Installation For Technicians Only Toyota Tundra Extended Cab By Gilbert Gutierrez. Vehicle information
 2007-08 Toyota Tundra Extended Cab By Gilbert Gutierrez Vehicle information Vehicle type: Four-door extended cab pickup truck NAGS numbers*: Windshield part numbers FW02724, FW02723, FW02722 or FW02721;
Rear Parking Brake Cable (93 Cobra)
") Rear Parking Brake Cable (93 Cobra) Materials in the box: Brake Cable Tools Needed: One jack and four jack stands. One socket wrench with a 12mm, 13mm ( ½ inch, 12 point DEEP WALL DO NOT FORGET THIS) and
Rear Parking Brake Cable (93 Cobra) Materials in the box: Brake Cable Tools Needed: One jack and four jack stands. One socket wrench with a 12mm, 13mm ( ½ inch, 12 point DEEP WALL DO NOT FORGET THIS) and
Mercedes W123 Turn Signal Bulb, Front
 Mercedes W123 Turn Signal Bulb, Front Replacement No one likes to make enemies, but driving without signaling is a quick way to do that. How frustrating is it to try to signal only to fail to due to a
InstalL Instructions. trail-creeper 4.70 transfer case gear kit ( KIT and KIT) kit contents
 kit contents") InstalL Instructions trail-creeper 4.70 transfer case gear kit (105000-1-KIT and 105001-1-KIT) kit contents 5356 PINE AVE FRESNO, CA 93727 USA TOLL FREE: 877.4X4.TOYS WORLDWIDE: 559.252.4950 WWW.TRAIL-GEAR.COM
InstalL Instructions trail-creeper 4.70 transfer case gear kit (105000-1-KIT and 105001-1-KIT) kit contents 5356 PINE AVE FRESNO, CA 93727 USA TOLL FREE: 877.4X4.TOYS WORLDWIDE: 559.252.4950 WWW.TRAIL-GEAR.COM
1. Remove the crankshaft pulley, engine coolant pump pulley and drive belt. 2. Remove the timing belt cover.
 DISASSEMBLY 1. Remove the crankshaft pulley, engine coolant pump pulley and drive belt. 2. Remove the timing belt cover. 3. Turn the crankshaft clockwise and align the timing marks so as to bring the No.
Instructions to Improve SS Dash Gauge Cluster Lighting. By Paul Carreiro, Updated June 2nd, Introduction
 Page 1 Instructions to Improve SS Dash Gauge Cluster Lighting By Paul Carreiro, Updated June 2nd, 2004 Introduction One of the more common complaints from 4th Generation Monte Carlo SS owners is the dim
Installation Manual TWM Performance Short Shift Kit Stage 1 and Stage 2 MazdaSpeed 6
 Page 1 Installation Manual TWM Performance Short Shift Kit Stage 1 and Stage 2 MazdaSpeed 6 Please Note: It is preferable to park on a flat surface, as you will have to engage and disengage the hand brake
2015 Mustang Heat Extractors Installation Instructions P/N: (R C920)
") Installation Instructions P/N: 421869 (R1315-16C920) 39555 Schoolcraft Rd, Plymouth MI, 48170 800.59.ROUSH 2015 Mustang Heat Extractors Installation Instructions P/N: 421869 (R1315-16C920) Application:
Installation Instructions P/N: 421869 (R1315-16C920) 39555 Schoolcraft Rd, Plymouth MI, 48170 800.59.ROUSH 2015 Mustang Heat Extractors Installation Instructions P/N: 421869 (R1315-16C920) Application:
INSTALL/REMOVAL INSTRUCTIONS: WINDOW REGULATOR
 REMOVAL/INSTALL OF WINDOW REGULATOR (741-813) Ford Explorer 4-Door Except Sport Trac, Mercury Mountaineer 2002 05 General Tech Tips: Use painter s tape rather than duct tape to secure window. It will not
Lexus ES Fine Mesh and Adaptive Cruise Control Fine Mesh Grilles Upper and Lower Replacements
 IMPORTANT: PLEASE KEEP THIS INSTRUCTION MANUAL FOR FUTURE REFERENCE! 2013-15 Lexus ES Fine Mesh and Adaptive Cruise Control Fine Mesh Grilles Upper and Lower Replacements Part #1372-0102-13 / Black Ice
Installation Instructions for the Tera Low231 4:1 Heavy-Duty Transfer Case (LOW231)
") Installation Instructions for the Tera Low231 4:1 Heavy-Duty Transfer Case (LOW231) Stop! Read this before beginning installation. Some YJs and XJs require specific modifications for proper installation
Installation Instructions for the Tera Low231 4:1 Heavy-Duty Transfer Case (LOW231) Stop! Read this before beginning installation. Some YJs and XJs require specific modifications for proper installation
Conflicts: Vehicles with a sunroof
 Toyota 4Runner Non/MR 2010-10.2 Overhead Video Part Number: 00016-00110; Fit Kit -00110-15, Beige 00016-00120; Fit Kit -00120-15, Gray Accessory Code: ED6 Conflicts: Vehicles with a sunroof Kit Contents:
INSTALLATION INSTRUCTIONS
 INSTALLATION INSTRUCTIONS Accessory Application 2013 ACCORD 2 AND 4-DOOR Publications No. AII 13003 Issue Date AUG 2012 PARTS LIST Attachment Kit P/N 08V03-T2A-100 Automatic day/night mirror harness Operating
INSTALLATION INSTRUCTIONS FOR THE MOTOR TRIKE GL1500 RAKE KIT
 INSTALLATION INSTRUCTIONS FOR THE MOTOR TRIKE GL1500 RAKE KIT Thank you for choosing the Motor Trike GL1500 Rake Kit. We ask that you read the directions before you start and follow them very closely.
TOYOTA YARIS XM SATELLITE RADIO Preparation (Sedan & Hatchback)
") Preparation (Sedan & Hatchback) Part Number: Mounting Kit PT546-52096 Tuner Assy 86180-0W031 Tuner Assy Kit Contents (86180-0W031) Item # Quantity Reqd. Description 1 1 Tuner Assy, Stereo Component Mounting
Preparation (Sedan & Hatchback) Part Number: Mounting Kit PT546-52096 Tuner Assy 86180-0W031 Tuner Assy Kit Contents (86180-0W031) Item # Quantity Reqd. Description 1 1 Tuner Assy, Stereo Component Mounting
MINOLTA MAGICOLOR 5430/5440/5450 CARTRIDGE REMANUFACTURING INSTRUCTIONS
 MINOLTA MAGICOLOR 5430/5440/5450 CARTRIDGE REMANUFACTURING INSTRUCTIONS MINOLTA MAGICOLOR 5430 Color Laser Printer with Toner Cartridge MINOLTA MAGICOLOR 5430 TONER CARTRIDGE SIDE VIEW WITH END CAP SHOWN
XK8 / XKR Navigation to Triple Gauge Cluster Conversion Harness Kit. Instructions
 XK8 / XKR Navigation to Triple Gauge Cluster Conversion Harness Kit Instructions Kit Contents: 1 - Gauge Cluster Wiring Harness 1 - Posi-Tap connector 4-4" Tie-Wraps 1- Cable pulling tool (shipped pre-applied
Double Barrel Service Instructions Cane Creek R&D. January 2009 V2.0 1
 Double Barrel Service Instructions Cane Creek R&D January 2009 V2.0 1 Table of Contents 3. Diagnosis for Parts Needed 4. Work Flow 5. Initial Disassembly 6. Initial Disassembly Pictures 8. Reservoir Rebuild
Conflicts: Toyota Tundra CrewMax w/non Sunroof Overhead Video. Part Number: Accessory Code: ED80.
 Toyota Tundra CrewMax w/non Sunroof 2011-8.5 Overhead Video Part Number: 00016-00125-07 Accessory Code: ED80 Conflicts: 1.) Third Passenger Front Seating 2.) Sunroof General Applicability: Non Sunroof
INSTALL/REMOVAL INSTRUCTIONS: WINDOW REGULATOR
 REMOVAL/INSTALL OF WINDOW REGULATOR (748-507) Lincoln Aviator 2003 05, Ford Explorer except Sport Trac 2003 05, Ford Explorer 2006 08, Mercury Mountaineer 2003 08 General Tech Tips: Use painter s tape
Owner smanual. Banks Ram-Air Intake System Ford Power Stroke 6.4L Turbo Diesel F250/F350/F450 Trucks. with Installation Instructions
 with Installation Instructions Owner smanual Banks Ram-Air Intake System 2008 Ford Power Stroke 6.4L Turbo Diesel F250/F350/F450 Trucks THIS MANUAL IS FOR USE WITH SYSTEM 42185 Gale Banks Engineering 546
MacBook Unibody Model A1278 AirPort Card Replacement
 MacBook Unibody Model A1278 AirPort Card Replacement Replace the AirPort card in your MacBook Unibody Model A1278. Written By: Walter Galan ifixit CC BY-NC-SA www.ifixit.com Page 1 of 17 INTRODUCTION This
Depress each tab as you pull the bezel off. The bezels are tight. L.H. shown.
 2013-2014 Ford Mustang V6 & Boss 302 Lower Valance Fog Light Kit Parts List: Quantity: Tool List: Fog light & bulb with bracket 2 Flat head & Phillips screwdriver Black bezels 2 Ratchet & Socket set OR
Please read thoroughly before starting installation and check that kit contents are complete.
 Rear Vision System Mirror Display 2013-Current Ram (Kit part number 1009-9518) Please read thoroughly before starting installation and check that kit contents are complete. Items Included in the Kit: Rear
Second Stage Regulator - 1/4 Turn
 Second Stage Regulator - 1/4 Turn MAINTENANCE AND REPAIR TAL 806 (L) Rev. 6 MSA 2008 Prnt. Spec. 10000005389 (I) Mat. 10042827 Doc. 10000015245 1/4 TURN SECOND STAGE REGULATOR SECOND STAGE REGULATOR COMPONENTS
3/8 Universal Joint Phillips Head Screwdriver
 Magnetic retrieval tool Pliers 1/4 Ratchet Drive T-35 Torx Socket 3/8 Ratchet Drive 5mm Allen Head Socket Torque Wrench 7-3/8 Drive Extension Flat Head Screwdriver 10mm Socket 8mm Socket 3/8 Universal