Terminating RFS LCF /8 Corrugated Coaxial Cable with RFS Omni-Fit (F) N-Connector
|
|
|
- Betty Watkins
- 5 years ago
- Views:
Transcription


1 December 12, 2018


2 RFS TRIM-L-158-A Trimming and Stripping Tool


3 Additional Tools Used for Termination Drill press vice temporarily attached to trailer tailgate to secure cable during termination. Obviously, the spool of cable could not be just picked up and taken inside to the workbench.


4
 was used to trim the cable.")


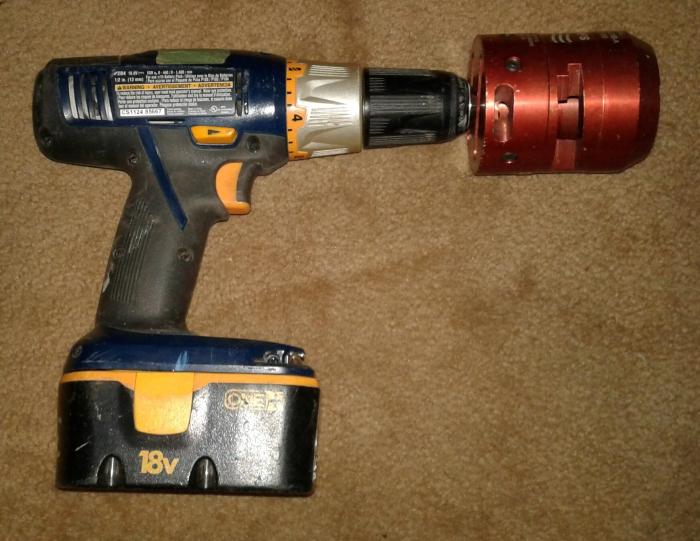
5 Installing the RFS NF-LCF158-D01 Female N-Type Connector With the cable secured in the vise, the end of the cable was sawed as squarely on the end as possible. Then the RFS Trim Tool (attached to a cordless drill) was used to trim the cable. The Trim Tool is designed so that it will cut the end of the cable with the largest diameter of a ridge being the end/working face of the cable. As can be seen in this photo, the Trim Tool removes exactly 1.5 inches of the cable outer jacket, and the remaining outer jacket ends on a ridge as it should for proper installation of the NF-LCF158-D01 connector. Using the proper Trim Tool eliminates the steps of overcutting the outer jacket, applying the saw guide, and cutting the outer shield, foam, and inner conductor to 1.5 length. After deburring the copper shield with a flat file, deburring the inner conductor copper with a utility knife, then carefully brushing away any copper, foam, and jacket debris with a non-metallic brush, the process of installing the connector begins by carefully pushing the back nut onto the cable.


6 Installing NF-LCF158-D01 Female N-Type Connector (continued) I have found that a screen roller works very well for flaring the copper shield outward to the shape of the end of the plastic clamping fingers. By carefully but fairly firmly rolling the slightly rounded edge of the screen roller tool around the inside of the copper shield while pushing outward on it, the shield gets the proper flare without being cut, gouged, or otherwise damaged. Once the outer shield is properly flared, if there is not yet a little bit of a gap between the foam dielectric and the outer shield, the rounded edge of a small screwdriver works well for pushing the outer edge of the foam toward the center conductor slightly, creating a gap for the ring in the connector to slip into without getting jammed up by the foam dielectric. On the next page, you will get to see how I improvised (cheated?) because RFS Corp. designed these connectors to be installed using special 5mm pin-type spanner tools and a torque wrench. Unfortunately there are none of those special spanner tools to be found in the marketplace. RFS discontinued these particular D01 series connectors, and I highly suspect RFS has totally discontinued the manufacturing of the spanner tools designed for installing them, meaning there may never be any more of those spanners available for purchase.


7 Installing NF-LCF158-D01 Female N-Type Connector (continued) This is where I had to improvise/cheat on the connector installation. With none of the special spanner wrenches or Uni-Spanner adapters available, I had to come up with a Plan B. There are no flat surfaces on these connectors to facilitate using a large open end wrench of any kind, and I did not want to use pipe wrenches, which could gouge the connector and back nut, possibly promoting corrosion of the connector. Enter the rubber strap wrenches I picked up at a well-known tool and hardware store. Those managed to give me a firm enough grip on the back nut and connector to firmly thread the back nut into the connector body. With these connectors, only the back nut should be turned you do not want the connector body turning, because doing so can damage the metal fingerstock type flanges in the connector which press their way into the center conductor to make contact between it and the center conductor of the N- type connector (or DIN connector, if you happen to be using a DIN instead of N- type connector.) Lacking the availability of the spanner wrench and adapters, there was no feasible means of using a torque wrench to tighten the back nut to the connector body to the factory specified torque. In deciding how tight to tighten it using the rubber strap wrenches, my logic was pretty simple: Tighten it enough that the rubber O-Ring which sits between the back nut and the connector body is compressed enough for an obvious weatherproof seal, but not to the point that the O-Ring gets damaged or protrudes from the gap so much it means it s getting over-compressed. When this end of the cable gets pulled up the tower and the pigtail connector from the antenna gets attached to it via the N-connector, a specially sized piece of Cold Shrink will be applied which will weatherproof the entire union of the two cables including all of the connectors and some cable beyond those on both sides of the junction, so seal/weatherproofing will not be an issue.


8 Sweeping the Installed Connector and Entire Spool of Feedline Using the highly trusted and versatile IFR-1600S as a tracking generator in order to sweep the LCF /8 cable, starting from the freshly installed N-connector. The sunlight outside prevented the camera from being able to clearly capture the tracking generator/spectrum analyzer display on the IFR-1600S, but you can see portions of the first dip which was detected. Adjusting one of the markers to the center of that first dip it read to be roughly MHz,which you can see in the white highlighted area in the right-hand area of the display. That represents the first 1/4-wave frequency of the cable length. Seeing those dips meant the connector was properly installed. The formula for determining the length of a cable in feet by sweeping it is 234 divided by the first 1/4-wavelength dip (in MHz), multiplied by the velocity factor (VF) of the cable. RFS specifications indicate a VF of 0.90 for LCF158 Cellflex cable. Doing the math: 234 / x 0.9 = feet This spool of cable was purchased to be 550 feet in length. The sweep method and calculations resulted in a very close match (within 0.8%) Plus keep in mind that some cable was sawed and cut off in the process of installing the connector. Bottom line: this feedline and connector tests good, is ready to be hoisted up the tower, the other end cut to the proper length, a connector installed at that end, and she s good to go.
Accessories. Introduction. Cable Hangers LINE PRODUCTS TRANSMISSION
 Accessories Introduction While a number of cable related accessories are available on the market, RFS components are of the highest quality and are designed to provide years of trouble-free service. Together
INSTALLATION MANUAL. Thunderstone Manufacturing LLC 3400 West O Street Lincoln, NE (Fax)
") INSTALLATION MANUAL August 7 th 2018 43 /48 /50 2011 and Older Timpte STD/Split 36 Style Hopper Trailers with Roller Bearing Doors Kit #101533 for 96w & Kit #101534 for 102w Thunderstone Manufacturing
INSTALLATION MANUAL August 7 th 2018 43 /48 /50 2011 and Older Timpte STD/Split 36 Style Hopper Trailers with Roller Bearing Doors Kit #101533 for 96w & Kit #101534 for 102w Thunderstone Manufacturing
Please read thoroughly before starting installation and check that kit contents are complete.
 Rear Vision System Mirror Display 2013-Current Ram (Kit part number 1009-9518) Please read thoroughly before starting installation and check that kit contents are complete. Items Included in the Kit: Rear
FITTING KIT No s : BULL BAR WINCH ( P/No ) BULL BAR NON WINCH ( P/No )
 BULL BAR NON WINCH ( P/No )") ARB WINCH / NON WINCH BULL BAR TO SUIT LANDROVER DISCOVERY 2003 ONWARD. FITTING KIT No s :- 617 1793 BULL BAR WINCH ( P/No 343 2120 ) 617 1794 BULL BAR NON WINCH ( P/No 323 2120 ) WARNING FOR VEHICLES
ARB WINCH / NON WINCH BULL BAR TO SUIT LANDROVER DISCOVERY 2003 ONWARD. FITTING KIT No s :- 617 1793 BULL BAR WINCH ( P/No 343 2120 ) 617 1794 BULL BAR NON WINCH ( P/No 323 2120 ) WARNING FOR VEHICLES
JL SHIELD TIRE CARRIER INSTALLATION INSTRUCTIONS
 JL SHIELD TIRE CARRIER INSTALLATION INSTRUCTIONS TOOLS NEEDED 3/4 Wrench 3/4 Socket 9/16 Wrench or Socket 1 1/2 Socket 1 1/8 Wrench 13mm Socket Torque Wrench for 1 1/2 Socket HARDWARE 2-1/2 X 2 Hex Bolt
(gd8) 5/8 x 18 x (2) machined
 5/8 x 18 x (2) machined") 655 SOUTH LINCOLN AVE / SAN BERNARDINO CA. 92408 PHONE 877-470-2975 / FAX 909-890-0703 Web address: globalwest.net COR-5864 V / S / Q (1958 64) Impala rear coilover kit. This kit bolts on, welding is not
655 SOUTH LINCOLN AVE / SAN BERNARDINO CA. 92408 PHONE 877-470-2975 / FAX 909-890-0703 Web address: globalwest.net COR-5864 V / S / Q (1958 64) Impala rear coilover kit. This kit bolts on, welding is not
Raw Designs Scorpion Tips Install
 Raw Designs Scorpion Tips Install Disclaimer: The information contained in this website is for general information purposes only. The information is provided by mym109r.com and while I endeavor to keep
INSTALLATION INSTRUCTIONS
 COLD AIR INTAKE INSTALLATION INSTRUCTIONS PART NUMBER D760-0390C APPLICATION: 1999-2003 E39 M5 PARTS LIST 1 Left Aluminum Intake Tube 1 Air Pump Bracket (A) 1 Right Aluminum Intake Tube 1 Air Pump Bracket
Deuce/Ace Installation Instructions
 HARDWARE KIT: Upper Mounting Plate: 2-7/16" (11mm) X 3.5" bolts 2-7/16" flange nuts 2-2" spacers 2-7/16" trim cap mounting washers 2 - plastic trim caps TOOLS NEEDED: safety glasses wrenches 16mm or 5/8"
Rebuilding the Power Steering Pump for a 2007 Honda Accord 4CYL
 Rebuilding the Power Steering Pump for a 2007 Honda Accord 4CYL Disclaimer: I have benefited greatly from others who have taken the time to post auto repair videos/tutorials online. To try and return the
PERFORMANCE HOOD VENTS CONTENTS: Left Side Hood Vent (1) Right Side Hood Vent (1) Mounting Bracket, Inner (2) Mounting Bracket, Outer (2) OE Hood Temp
 Right Side Hood Vent (1) Mounting Bracket, Inner (2) Mounting Bracket, Outer (2) OE Hood Temp") CONTENTS: Left Side Hood Vent (1) Right Side Hood Vent (1) Mounting Bracket, Inner (2) Mounting Bracket, Outer (2) OE Hood Template (1) HARDWARE: Mounting Bracket, Inner X 2 Phillips Screw X 8 Mounting
CONTENTS: Left Side Hood Vent (1) Right Side Hood Vent (1) Mounting Bracket, Inner (2) Mounting Bracket, Outer (2) OE Hood Template (1) HARDWARE: Mounting Bracket, Inner X 2 Phillips Screw X 8 Mounting
Assembly Instructions-C12 Amphenol Triax BNC, 180 Polarity
 Assembly Instructions-C2 Amphenol Triax BNC, 80 Polarity Washer C Washer D Contact Inner Insulator E Inner Body F Inner Insulator G Body Nut Gasket Washer B Washer A (2 pcs. if needed) Teflon Washer 3-4774-3
COLD AIR INTAKE INSTALLATION INSTRUCTIONS
 COLD AIR INTAKE INSTALLATION INSTRUCTIONS # D760-0030 Fits: 2007-10 135i (E82, E88; with N54 engine) 2007-08 335i/xi (E90) 2007-10 335i (E92, E93; with N54 engine) Congratulations for being selective enough
INSTALLATION INSTRUCTIONS
 Rear Vision System Aftermarket and Factory 5.0, 8.4 and 6.1 MyGig Touch Screen Display (Factory Display requires Chrysler/Dodge dealer to activate) 2009 Current* Dodge Ram (Kit part number 1009-6503) *NOTE:
The Ryan Overdrive by Tom Endy
 The Ryan Overdrive by Tom Endy The Ryan overdrive is a factory built overdrive designed for the Model a Ford. They were manufactured in Denver, Colorado and marketed between 1990 and 2000. They were discontinued
Geared Drives 200Z PSRU Zero Offset Gearbox with Centrifugal Clutch Assembly
 Instructions for Removing and replacing Gen X Gearbox with Geared Drives 200Z Prior to your gear box arriving: Using a strap or chain and an engine hoist to hold your engine up in the mount, remove your
INSTALLATION INSTRUCTIONS. FD3S RX7 Manual Rack Conversion
 INSTALLATION INSTRUCTIONS FD3S RX7 Manual Rack Conversion 1 Removal of Stock Rack 1.1 With your steering wheel centered, remove the pinch bolt from the factory intermediate shaft lower knuckle. If you
H31 BOOSTER REBUILD & MASTER CYLINDER
 2010 1991 BMW 750iL George Fontes gajfontes@yahoo.com H31 BOOSTER REBUILD & MASTER CYLINDER Rebuild hydraulic booster and replace Master Cylinder. Page 1 of 16 Master Cylinder Removal & Brake Booster Rebuild
Rebuilding the Alternator for a 2007 Honda Accord 4CYL. Honda CYL Alternator (Denso)
") Rebuilding the Alternator for a 2007 Honda Accord 4CYL Honda 2007 4CYL Alternator (Denso) The OEM brushes and bearings for this alternator are available for purchase online. On my vehicle with ~240k miles,
Rebuilding the Alternator for a 2007 Honda Accord 4CYL Honda 2007 4CYL Alternator (Denso) The OEM brushes and bearings for this alternator are available for purchase online. On my vehicle with ~240k miles,
INSTALLATION INSTRUCTIONS
 9002-6513 Rear Vision System W/ Zoom Aftermarket and Factory 8.4 Touch Screen Display (Factory Display requires Chrysler/Dodge dealer to activate) 2009 2012 RAM (Part B) 2013 Current RAM (Part A) NOTE:
HIGH FLOW COLD AIR INTAKE SYSTEM INSTALLATION INSTRUCTIONS D , D A
 HIGH FLOW COLD AIR INTAKE SYSTEM INSTALLATION INSTRUCTIONS D760-0320, D760-0320A 1992-95 325i, is 1995 M3 (3.0L) Parts List: 1 Intake Tube 1 Silicone Hose 1 Air Flow Meter Bracket 1 Hose Clamp (#36z) 1
Installation Instructions Z-Gate Shifter
 Installation Instructions Z-Gate Shifter Part Number 80681 1998, 2001 by B&M Racing and Performance Products The B&M Z-Gate shifter can be used in vehicles equipped with most popular three speed automatic
LPE C5 Battery Relocation Kit
 LPE C5 Battery Relocation Kit The LPE C5 Corvette battery relocation kit improves vehicle weight distribution by moving weight to the rear of the vehicle. The improved weight distribution increases traction
<THESE INSTRUCTIONS MUST BE GIVEN TO THE END USER> B&W
 B&W Trailer Hitches 1216 Hawaii Rd / PO Box 186 Humboldt, KS 66748 P:620.473.3664 F:620.869.9031 Turnoverball Gooseneck Hitch Installation Instructions
Installation of Barricade Flat Style Fender Flare Kit (97-06 Wrangler TJ)
") Installation of Barricade Flat Style Fender Flare Kit (97-06 Wrangler TJ) Installation Time: 3-4 Hours Tools Required: 8mm wrench 8mm socket drive #1 Phillips screw driver Pliers Pry bar Electric drill
Installation of Barricade Flat Style Fender Flare Kit (97-06 Wrangler TJ) Installation Time: 3-4 Hours Tools Required: 8mm wrench 8mm socket drive #1 Phillips screw driver Pliers Pry bar Electric drill
PYRTE. Building The Front Axle, Fork and Steering
 PYRTE Building The Front Axle, Fork and Steering The front axle on this traction engine is a very simple affair, in that it is a rectangular steel rod, sat on edge, with a pivot in the centre, which is
FORK FREE PISTON MODIFICATION 2011 HONDA CRF250R
 217 Lorain Place Los Gatos, California 95032 408.406.2089 www.smartperformanceinc.com www.spi-racing.com FORK FREE PISTON MODIFICATION 2011 HONDA CRF250R WHAT? All production versions of the 2011 HONDA
Rear Vision System Liftgate Emblem Camera for Aftermarket Display Ford Flex (Kit part number )
") Rear Vision System Liftgate Emblem Camera for Aftermarket Display 2009-2012 Ford Flex (Kit part number 1008-6509) Kit Contents: Liftgate Emblem Mount with Camera Chassis Harness with RCA (Note: In some
Rear Vision System Liftgate Emblem Camera for Aftermarket Display 2009-2012 Ford Flex (Kit part number 1008-6509) Kit Contents: Liftgate Emblem Mount with Camera Chassis Harness with RCA (Note: In some
INSTALLATION INSTRUCTIONS
 Rear Vision System Tailgate Emblem Camera Mirror Display 2009-Current Ford F-150 and 2010-Current Super Duty (Kit part number 1008-9527) Kit Contents: Mirror Tailgate Emblem Mount with Camera Interior
SCdefault. 900 Monteringsanvisning
 SCdefault 900 Monteringsanvisning SITdefault Towbar MONTERINGSANVISNING INSTALLATION INSTRUCTIONS MONTAGEANLEITUNG INSTRUCTIONS DE MONTAGE Accessories Part No. Group Date Instruction Part No. Replaces
INSTALLATION INSTRUCTIONS
 INSTALLATION INSTRUCTIONS Accessory Application Publications No. UNDER 2007 CIVIC SI All 33529 Issue Date AUG 2006 PARTS LIST Rear under spoiler Clip Rubber washer 6 Flange bolts 6 Flange nuts TOOLS REQUIRED
Industrial Injections Compound Turbo Installation For 6.7L Scorpion
 Industrial Injections Compound Turbo Installation For 6.7L Scorpion Step 1: Whenever you are doing an installation the first thing you should do is unhook the batteries to avoid arcing. You will need an
INSTALLATION GUIDE DODGE PRODUCT CODE:
 INSTALLATION GUIDE 2002-09 DODGE 1500-3500 PRODUCT CODE: 445 & 455 May 17, 2011 TOOLS NEEDED COMPONENTS INCLUDED 3/8" Drill P2 Tip 1/2" Drill Bit #2 Philips Screwdriver Flange(s) x 2 Hinged Lid Track(s)
COLD AIR INTAKE INSTALLATION INSTRUCTIONS
 COLD AIR INTAKE INSTALLATION INSTRUCTIONS # D760-0029 Fits: 2009-10 335i/xi (E90; with N54 engine) Congratulations for being selective enough to use a Dinan Engineering Cold Air Intake. We have spent many
Installation Instructions for Lifeline MC: Cable Splice Using Ceramic Standoffs Technical Information Sheet #402
 Installation Instructions for Lifeline MC: Cable Splice Using Ceramic Standoffs Technical Information Sheet #402 Classified by Underwriters Laboratories to UL 2196 for one hour installations For use with
*NOTE* The following suspension system will not work with heavy duty axle housings as pictured below.
 1964 ½ - 1970 Ford Mustang Triangulated 4-Link Suspension Installation Instructions Tech Line: 1-855-693-1259 www.totalcostinvolved.com Read and understand these instructions before starting any work!
WARNING TAKE NOTE OF THE FOLLOWING: THIS PRODUCT MUST BE INSTALLED EXACTLY AS PER THESE INSTRUCTIONS USING ONLY THE HARDWARE SUPPLIED.
 ARB WINCH/NONWINCH BUMPER TO SUIT TOYOTA HJ100 IFS PRODUCT No. 3913140 5100050 Top Tube Kit 5100160 Buffer Kit With hole (required when fitting Top Tube) 5100170 Buffer Kit With no hole Fitting Kit No.
Installationn Instruction Manual
 Table of Contents Supplied Kit Parts.Page 2 Required Tool List Page 2 Step by Step Installation Instructions Pages 3-6 Battery Requirements.Page 6 Operation Page 7 Maintenance Page 7 Wiring Diagrams..Page
INSTALLATION INSTRUCTIONS
 INSTALLATION INSTRUCTIONS Accessory Application Publications No. Bll 30250 UNDER SPOILER 2006 RSX Issue Date JULY 2005 PARTS LIST Rear under spoiler 5 Stepped bolts 2 Bolts 7 Flange nuts, 6 mm 3 Square
Replacing MK4 Golf/Jetta radiator mounts in-car
 Replacing MK4 Golf/Jetta radiator mounts in-car This is a guide to replacing the radiator mounts in a MK4 Golf/Jetta. This involves moving the core support to the service position which allows you to do
WJ AUTO TRANS. ATLAS SHIFTER
 KIT CONSISTS OF: No. Qty Part No. Description 4320 Aerotech Center Way, Page 1 of 8 1 1 302051 BASE- ATLAS TWIN STICK MOUNT 2 1 302080 STUD BOLT 1/2-13 X 7 B7 3 1 303120 Serrated-Flange Hex Locknut 1/2-13
INSTALLATION INSTRUCTIONS
 Rear Vision System Tailgate Handle Camera Mirror Display 2004-2014 Ford F-150 and 2008-2015 Ford Super Duty (Kit part numbers 9002-9521) Kit Contents: Mirror Tailgate Handle with camera and harness Interior
Pickup Truck Rack. Installation instructions for Ford - Chevy - Ram
 Installation instructions for Pickup Truck Rack Ford - Chevy - Ram MyGlassTruck.com 200 Acorn Road LOCAL 856-595-9069 WEB www.myglasstruck.com Glassboro, NJ 08028 FAX 856-863-1480 1-844-364-4022 Version
Installation Guide Current Ford F-250 & Ford F-350 Super Duty. Product Code: 109 & 119
 Installation Guide 2008 - Current Ford F-250 & Ford F-350 Super Duty Product Code: 109 & 119 September 1, 2012 Tools Needed Components Included 3/8" Drill P2 Tip #2 Philips Screwdriver 1/2" Drill Bit Hinged
Installation Instructions for Mobile Room Divider
 Installation Instructions for Mobile Room Divider Introduction Thank you for your investment in Mason kennels. We take great pride in providing our customers with the highest quality animal enclosures,
Chevy Chevy 2500 & 3500 SuperRail Mounting Kit #3515
 1999-2007 Chevy 1500 1999-2010 Chevy 2500 & 3500 SuperRail Mounting Kit #3515 #3600 SuperGlide (24K) Gross Trailer Weight (Maximum) Vertical Load Weight (Max. Pin Weight) 24,000 lbs. 6,000 lbs. Installation
STEALTH BIG AIR KIT - Yamaha Roadliner/Stratoliner and Raider
 Page: 1 If you question your abilities it may be best for an experienced service technician perform this installation. A Yamaha Service Manual would be helpful to have on hand for reference. Revision:
Prusa i3 Printer Assembly Guide
 Prusa i3 Printer Assembly Guide Special thanks to Carlos Sanchez and Miguel Sanchez for the graphics. All graphics captured from their great animation: http://www.carlos-sanchez.com/ Prusa3/ For copyright
INSTALLATION GUIDE STANDARD PRODUCT CODES:
 INSTALLATION GUIDE STANDARD PRODUCT CODES: 100, 105, 110, 111, 112, 113, 115, 120, 130, 140, 145, 146, 150, 200, 210, 240, 250, 255, 260, 300, 305, 405, 406, 407, 408, 425, 426, 435, 447, 500, 505, 510,
1 August Dodge Adjustable Track bar with Relocation Bracket 1
 1 August 2017 1032011-1994-2002 Dodge Adjustable Track bar with Relocation Bracket 1 DOWNLOAD ENHANCED INSTALL MANUALS AT BD Adjustable Track Bar w/bracket Dodge 2500-3500 4WD Models 1994-2002 Dodge 1500
Sport Model with an easy-lube spindle
 1. List of tools: Back To Top 1. Safety glasses 2. Hammer 3. Brass or aluminum punch 4. channel locks 5. Block of wood or plastic 6. grease gun 7. razor knife 8. 6" long, 2" diameter or 1 ½" diameter pipe
Technical Support (707)
") Installation Instructions CONSOLE MEGASHIFTER Fits: 1982-1992 Camaro & Firebird w/automatic Transmission *except 1988-1992 Firebird Formula Model Catalog # 80692 WORK SAFELY! For maximum safety, perform
Installation Instructions CONSOLE MEGASHIFTER Fits: 1982-1992 Camaro & Firebird w/automatic Transmission *except 1988-1992 Firebird Formula Model Catalog # 80692 WORK SAFELY! For maximum safety, perform
WARNING. BX Fiat 500 Abarth/Turbo 2014 Fiat 500c Abarth Installation Instructions
 Attachment Tab Height: 13 Attachment Tab Width: 22 Please read BOTH these and the General Instructions prior to installing or operating this equipment. 1. Blue Ox towing products and accessories are intended
Setup Guide and Chassis Tuning Tips (simple version) By Jim Daniels
 By Jim Daniels") This document is released into the public domain and may be reproduced and distributed in its entirety so long as all credit to Jim Daniels remains. If you find this guide helpful please consider donating
This document is released into the public domain and may be reproduced and distributed in its entirety so long as all credit to Jim Daniels remains. If you find this guide helpful please consider donating
DRIVE AXLE Volvo 960 DESCRIPTION & OPERATION AXLE IDENTIFICATION DRIVE AXLES Volvo Differentials & Axle Shafts
 DRIVE AXLE 1994 Volvo 960 1994 DRIVE AXLES Volvo Differentials & Axle Shafts 960 DESCRIPTION & OPERATION All 960 station wagon models use type 1041 rear axle assembly. All 960 4-door models use type 1045
JK SHIELD TIRE CARRIER INSTALLATION INSTRUCTIONS
 JK SHIELD TIRE CARRIER INSTALLATION INSTRUCTIONS TOOLS NEEDED 3/4 Wrench 3/4 Socket 9/16 Wrench or Socket 1 1/2 Socket 1 1/8 Wrench 13mm Socket Torque Wrench for 1 1/2 Socket 5mm Allen T20 Torx Hammer
2013 RT / 2014RT / 2015 RT - Shock Spring Adjuster Installation Instructions
 2013 RT / 2014RT / 2015 RT - Shock Spring Adjuster Installation Instructions Billet Aluminum Adjusters (2) Shock Spring Compressors (Optional) Spanner Wrench (1) BajaRon Decals Not Shown (4) Adjuster Scuff
*Some speedometers have these additional electronic connections. If yours does, then remove the smaller slotted screws shown.
 www.odometergears.com 1981-1985 240 Cable-Driven Speedometers (NOT for 1986 and later electronic units) http://www.davebarton.com/240-odometer-repair.html For this set of instructions below, I will not
SUT-450-I ASSEMBLY REQUIREMENTS
 SUT-450-I Torque wrench, carpenters square, wire cutters, Phillips screwdriver, 7/16, 9/16, and 3/4 combination wrenches, ratchet, 9/16,3/4,13/16, and 7/8 sockets. ASSEMBLY REQUIREMENTS *Torque all T-bolt
Current Ford F150 Race Series R Rear Bumper Installation Instructions
 2015 - Current Ford F150 Race Series R Rear Bumper Installation Instructions PREPARATION STEPS 1. Disconnect the negative terminal on the battery. Park the vehicle on level ground and set the emergency
JK REAR BUMPER AND TIRE CARRIER
 JK REAR BUMPER AND TIRE CARRIER Installation Guide AEV30105AA (Updated 5/10/10) Page 1 of 20 Page 2 of 20 EXPLODED VIEW PLEASE READ BEFORE YOU START IN ORDER TO INSTALL THIS PART PROPERLY YOU OR YOUR INSTALLER
Part No amatic 350
 Watch our installation video on YouTube Installation Instructions Shift Improver Kit Part No. 30262 1968-1981 TurboHy urbohydr drama amatic 350 B&M Racing and Performance Products 2002 Congratulations!
INSTALLATION INSTRUCTIONS For 65800, 65801, 66355, 69250, Rear Bumper And Tire Carrier For Jeep XJ Cherokee
 INSTALLATION INSTRUCTIONS For 65800, 65801, 66355, 69250, 69251 Rear Bumper And Tire Carrier For Jeep XJ Cherokee Your safety, and the safety of others, is very important. To help you make informed decisions
INSTALLATION INSTRUCTIONS
 Rear Vision System Liftgate Emblem Camera Mirror Display 2009-2012 Ford Flex (Kit part number 1008-9527) Kit Contents: Mirror Liftgate Emblem Mount with Camera Interior (shorter) Harness Chassis (longer)
Transmission Overhaul Procedures-Bench Service
 How to Assemble the Lower Reverse Idler Gear Assembly Special Instructions In 1996 Eaton changed the reverse idler system design. In the nut design, the reverse idler bearing was lubricated through a hole
1 GENERAL INFORMATION
 Broadcast and Entertainment Products ProAx Triaxial Camera Connectors Installation Instructions Content Page 1 GENERAL INFORMATION... 2 1.1 Standard Tools... 3 1.2 ADC ProAx Triaxial Cable Strip Gauge...
Rebuilding the HE-120 Redrive
 Rebuilding the HE-120 Redrive Rick Cavallaro Disclaimer: I am NOT an expert mechanic. If something looks or sounds wrong in these directions, it probably is. I d be happy to receive any tips or feedback
Light Truck MegaShifter
 Installation Instructions Light Truck MegaShifter The B&M Light Truck Megashifter shifter is designed to be used in most light trucks equipped with most popular three speed or four speed automatic transmissions.
Hard Bar Sport, M1/M2 Hard Core Hardtop, M2 Sport, and Xtreme Installation Instructions
 HARDWARE KIT: Hard Bar Sport, M1/M2 Hard Core Shoulder Harness Guide Relocation Assemblies: 2-3/8" X 1" grade 8 bolts 4-3/8" flat washers 2-3/8" lock nuts 2 - brass bushings 2 - plastic trim caps 2-3/8"
General Maintenance Tool Kit (GMTK) Drawer layout
 Drawer layout") 26 2 8 6 5 32 31 35 25 11 9 33 7 24 23 22 28 21 20 27 19 18 17 34 16 15 10 14 13 12 4 3 30 1 General Maintenance Tool Kit (GMTK) Drawer layout COMP # DESCRIPTION BRAND PART NO. WARRANTY 1-3/16 Drawer,
26 2 8 6 5 32 31 35 25 11 9 33 7 24 23 22 28 21 20 27 19 18 17 34 16 15 10 14 13 12 4 3 30 1 General Maintenance Tool Kit (GMTK) Drawer layout COMP # DESCRIPTION BRAND PART NO. WARRANTY 1-3/16 Drawer,
INSTALL MANUAL. FOR ON LINE ORDERING- E Commerce Visit Our Website
 INSTALL MANUAL FOR ON LINE ORDERING- E Commerce Visit Our Website WWW.PRESSUREGUARD.COM Contact Information Technical Support: Chris@pressureguard.com Sales Support: Sales@pressureguard.com By Phone: 615-227-6024
INSTALLATION INSTRUCTIONS SEMI-HIDDEN WINCH MOUNT Part Number:70005 Application: Ford Super Duty
 INSTALLATION INSTRUCTIONS SEMI-HIDDEN WINCH MOUNT Part Number:70005 Application: Ford Super Duty Your safety, and the safety of others, is very important. To help you make informed decisions about safety,
Wiring checks below assume the vehicle is in reverse, secured so it won't roll, and key is on so backup lights are illuminated:
 Reverse Lockout Troubleshooting The way that the backup solenoid works is: When the backup lights are lit on your tow vehicle, 12 volt power should come down the blue wire through the trailer connector
 www.odometergears.com Mercedes-Benz Mechanical Odometer Repair This how to can be used for all mechanical repairs as the only difference will be the removal of the instrument cluster. http://www.dieselgiant.com/repairyourodometer.htm
THE BATTERY CHARGER OF RON PUGH
 THE BATTERY CHARGER OF RON PUGH THANKS IS DUE TO RON PUGH WHO HAS KINDLY SHARED THE CONSTRUCTION DETAILS OF HIS VERY SUCCESSFUL BATTERY CHARGER WHICH IS COP=13 WHEN OPERATING AT 24 VOLTS. IF YOU DECIDE
DL650 Odyssey Luggage Installation Guide
 DL650 Odyssey Luggage Installation Guide Thank you for purchasing Jesse Luggage for your Motorcycle. Our Luggage, handcrafted in the USA, is designed for those with an interest in finding the most durable
FLUID POWER FLUID POWER EQUIPMENT TUTORIAL PIPE WORK. This work covers part of outcome 2 of the Edexcel standard module:
 FLUID POWER FLUID POWER EQUIPMENT TUTORIAL PIPE WORK This work covers part of outcome 2 of the Edexcel standard module: UNIT 21746P APPLIED PNEUMATICS AND HYDRAULICS The material needed for outcome 2 is
OIL COOLER KIT INSTALLATION INSTRUCTIONS PART NUMBER D E92 335is (N54 engine) with BMW M-Technic bumper and with stock oil cooler
 with BMW M-Technic bumper and with stock oil cooler") OIL COOLER KIT INSTALLATION INSTRUCTIONS PART NUMBER D570-0923 APPLICATION: 2011 E92 335is (N54 engine) with BMW M-Technic bumper and with stock oil cooler Congratulations for being selective enough to
OIL COOLER KIT INSTALLATION INSTRUCTIONS PART NUMBER D570-0923 APPLICATION: 2011 E92 335is (N54 engine) with BMW M-Technic bumper and with stock oil cooler Congratulations for being selective enough to
American Standard ProAx Triaxial Camera Connectors Installation Instructions
 American Standard ProAx Triaxial Camera Connectors Installation Instructions Content Page INTRODUCTION............................................................................. 1 Revision History........................................................................
Installation instructions for Camaro/Firebird and Nova* Windshield Wiper Systems
 Installation instructions for 1967-69 Camaro/Firebird and 1968-74 Nova* Windshield Wiper Systems The Raingear 1967-69 Camaro/Firebird and 1964-74 Nova wiper system is designed for ease of installation
INSTALLATION INSTRUCTIONS
 Rear Vision System NAV Display 2009-Current Chevrolet Silverado, Silverado HD; GMC Sierra, Sierra HD (Kit part number 9002-9501) Kit Contents: Camera/Module/Bezel Assembly Chassis Harness NAV Harness 1
N. 15th Street, Middlesboro, KY TARP-N-GO SYSTEMS INSTALLATION INSTRUCTIONS
 1-800-248-7717 1002 N. 15th Street, Middlesboro, KY 40965 TARP-N-GO SYSTEMS INSTALLATION INSTRUCTIONS Congratulations on your purchase of a Mountain Tarp Tarp-N-Go tarping system. With tarping systems
INSTALLATION INSTRUCTIONS
 INSTALLATION INSTRUCTIONS Honda Dealer: Please give a copy of these instructions to your customer. PARTS LIST (15) (8) (12) (14) (13) (10) (11) (18) (17) (1) Accessory Application Publications No. TRX500FA/FGA
EZ-Glide Wheels Installation Patent Pending Revised 8/23/2011
 EZ-Glide Wheels Installation Patent Pending Revised 8/23/2011 Questions: Lakeside Quilt Co. Jack Boersma Toll Free (888) 361-4806 www.lovetoquilt.com Cell (406) 270-4715 sales@lovetoquilt.com Toll Free
INSTALLATION MANUAL
 INSTALLATION MANUAL 1500350 Parts List 1 Driver / left inner fender liner 1 Passenger / right inner fender liner 4 Z-hanger brackets 1 Thread-set bolt, M6 1 Thread-set washer 1 Thread-set spacer 22 Hex
INSTALLATION GUIDE. JK Rear bumper & tire carrier. AEV30105AC Last Updated: 10/11/16 US PATENT: D642,502 ; D
 AEV30105AC Last Updated: 10/11/16 JK Rear bumper & tire carrier US PATENT: D642,502 ; D633.024 INSTALLATION GUIDE PLEASE READ BEFORE YOU START TO GUARANTEE A QUALITY INSTALLATION, WE RECOMMEND READING
MGB V8 Roadster restoration project Report 138
 24th May 2017. FITTING THE CARPETS - continued I have included quite a lot of detail and photographs on the carpet and trim fitting, as it may help those who decide to do this job on their own car. The
JK SHIELD TIRE CARRIER INSTALLATION INSTRUCTIONS
 JK SHIELD TIRE CARRIER INSTALLATION INSTRUCTIONS TOOLS NEEDED 3/4 Wrench 3/4 Socket 9/16 Wrench or Socket 1 1/2 Socket 1 1/8 Wrench 13mm Socket Torque Wrench for 1 1/2 Socket 5mm Allen T20 Torx Hammer
1 Green Pressure Regulator Spring Automatic transmissions operate at temperatures between 150ºF and
 Installation Instructions for 603107 Valve Body Kit C-4 1970 & Later Tools Required Speed Handle or Ratchet 3/8 Drive 1/2 Socket 3/8 Drive 7/16 Socket 3/8 Drive 5/16 Socket 3/8 Drive Small Screwdriver
Installation Instructions for Lifeline MC Cable Splice Using Ceramic Standoffs
 Technical Information Sheet # 402 Subject: Installation Instructions for Lifeline MC Cable Splice Using Ceramic Standoffs Classified by Underwriters Laboratories to UL 2196 for one hour installations For
INSTALLATION INSTRUCTIONS
 Rear Vision System Tailgate Emblem Camera Aftermarket Display 2009-Current Ford F-150 and 2010-Current Super Duty (Kit part number 1008-6509) Kit Contents: Tailgate Emblem Mount with Camera Chassis Harness
COYOTE STP (Service Termination Point)
") March 2019 COYOTE STP (Service Termination Point) Be sure to read and completely understand this procedure before applying product. Be sure to select the proper PREFORMED TM product before application.
March 2019 COYOTE STP (Service Termination Point) Be sure to read and completely understand this procedure before applying product. Be sure to select the proper PREFORMED TM product before application.
SLP PART # ATTENTION DEALER
 PART #09-8000 ATTENTION DEALER PLEASE PROVIDE YOUR CUSTOMER WITH THE INSTALLATION AND INSTRUCTION DATA THAT IS SUPPLIED IN THIS PACKET FOR THIS PRODUCT. Before you begin, please read the following: The
Athearn Pacific Digital Sound Decoder Installation Notes
 New Dimensions in Digital Sound Technology TM APPLICATION NOTE Overview This application note describes how to install a DSD-100LC Digital Sound Decoder into the Athearn Pacific Locomotive. All of the
FAKRA Jack Right Angle Connector Crimp/Solder Attachment for RG174, RG316, RG188,.100 inch, PE-B100, PE-C100, LMR-100, White Color
 FAKRA Jack Right Angle Connector Crimp/Solder Attachment for RG174, RG316, RG188, 100 inch, PE-B100, PE-C100, LMR-100, White Color PE44648B Configuration FAKRA Jack Connector 50 Ohms Right Angle Body Geometry
FRONT BUMPER REMOVAL. 1) Turn off engine and chalk tires with stop block. Open Hood. Disconnect Battery.
 Turn off engine and chalk tires with stop block. Open Hood. Disconnect Battery.") Parts included (1) - Main Full Opening - Polished - Part #6202130 Full Opening - Black - Part #6202131 OR GRILLE REMOVAL & Grille Installation Guide Hardware included (5) - Trim Retainer (4) - 1/2 x 1/2-3/16
Parts included (1) - Main Full Opening - Polished - Part #6202130 Full Opening - Black - Part #6202131 OR GRILLE REMOVAL & Grille Installation Guide Hardware included (5) - Trim Retainer (4) - 1/2 x 1/2-3/16
Accel 300+ Ignition Control System (84-95) - Installation Instructions
 - Installation Instructions") Accel 300+ Ignition Control System (84-95) - Installation Instructions The below installation instructions work for the following products: Accel 300+ Ignition Control System (84-95) Please read through
Accel 300+ Ignition Control System (84-95) - Installation Instructions The below installation instructions work for the following products: Accel 300+ Ignition Control System (84-95) Please read through
Using a Boat Lift Hoist to Tilt Over an HDX-5106 Tower
 Using a Boat Lift Hoist to Tilt Over an HDX-5106 Tower Rick Karlquist, N6RK June 9, 2013 INTRODUCTION: I installed a TRX-100HD raising fixture for my US Tower HDX-5106 106 foot crank up tower. It came
INSTALLATION INSTRUCTIONS Model FPT 50
 INSTALLATION INSTRUCTIONS Model FPT 50 Electronic Water Level Control Systems WATERLINE CONTROLS is the optimum choice for any situation requiring precise control of a water level. It is ideal for automatically
INSTALLATION and MAINTENANCE INSTRUCTIONS SHO SERIES ELECTRIC CABLE REELS
 INSTALLATION and MAINTENANCE INSTRUCTIONS SHO SERIES ELECTRIC CABLE REELS All units are provided with right hand rotation unless otherwise specified. This means that cable is pulled off spool top left