Specifications THIS UNIT UTILIZES UVA LAMPS. REPLACE ONLY WITH ERGOLINE R SUPER POWER 100W (69 ) AND JK ERGOLINE 400W (FACE TANNER).
|
|
|
- Clarissa Williams
- 5 years ago
- Views:
Transcription
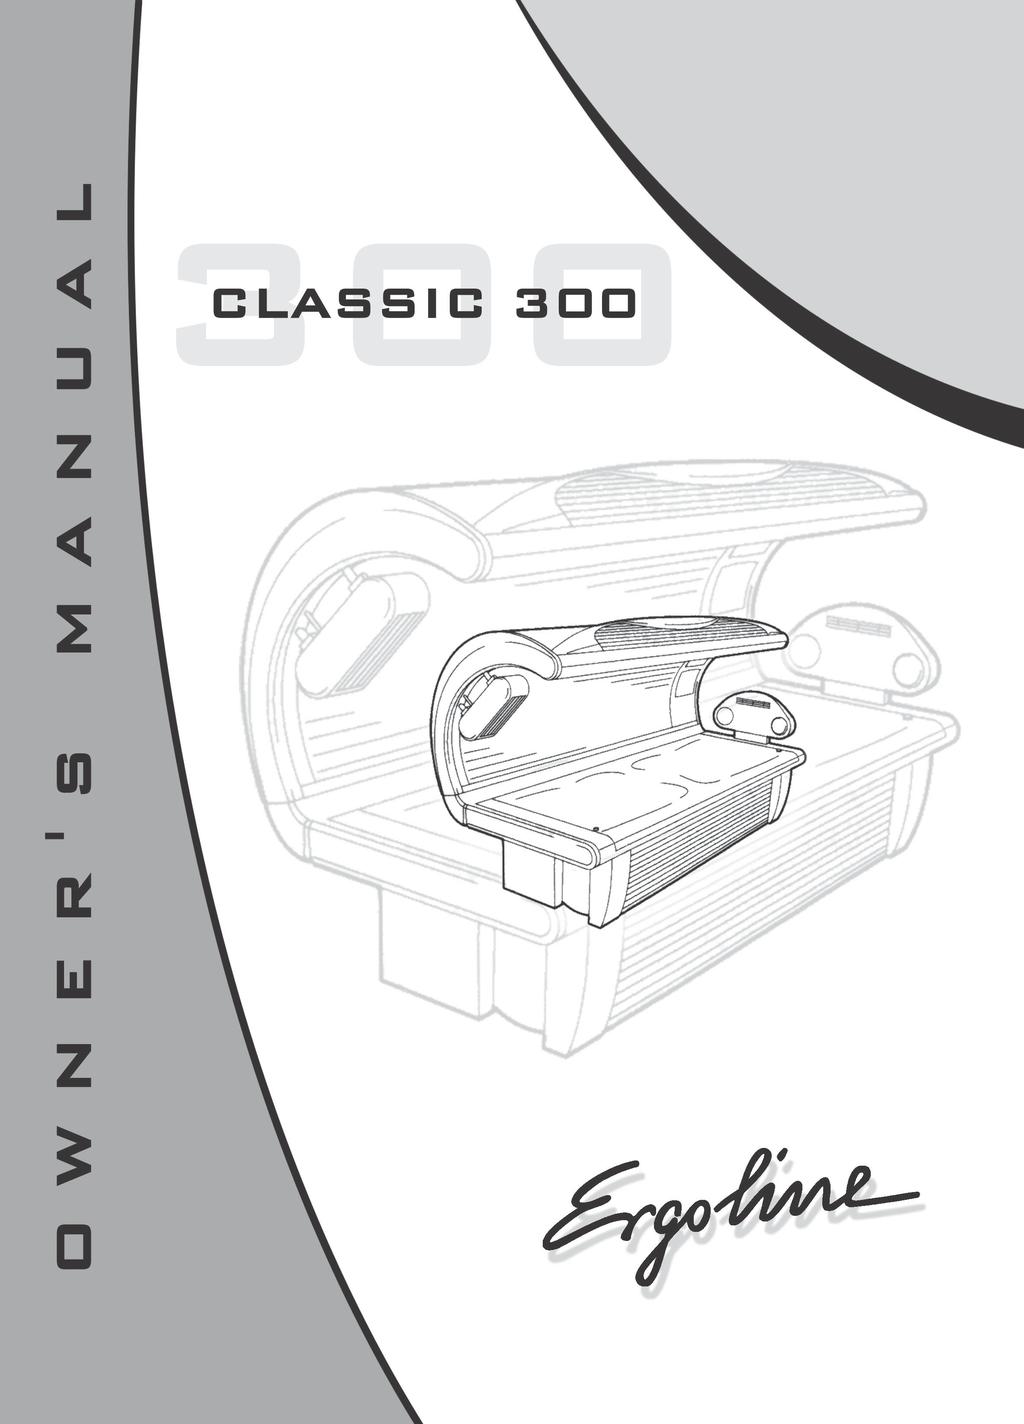
1
2 Specifications 300 Length: 88.5 Width: 38 Height: Shipping Weight: 560 Lbs. No. of Lamps: 41 ( Watt, Watt) Electrical: Volts Circuit Required: 240 Volt, 2-Pole 40 Amp Breaker DANGER - ULTRAVIOLET RADIATION. FOLLOW INSTRUCTIONS. AVOID OVEREXPOSURE. AS WITH NATURAL SUNLIGHT, OVEREXPOSURE CAN CAUSE EYE AND SKIN INJURY AND ALLERGIC REACTIONS. REPEATED EXPOSURE MAY CAUSE PREMATURE AGING OF THE SKIN AND SKIN CANCER. WEAR PROTECTIVE EYEWEAR; FAILURE TO MAY RESULT IN SEVERE BURNS OR LONG-TERM INJURY TO EYES. MEDICATIONS OR COSMETICS MAY INCREASE YOUR SENSITIVITY TO THE ULTRAVIOLET RADIATION. CONSULT PHYSICIAN BEFORE USING SUNLAMP IF YOU ARE USING MEDICATIONS OR HAVE A HISTORY OF SKIN PROBLEMS OR BELIEVE YOURSELF ESPECIALLY SENSITIVE TO SUNLIGHT. IF YOU DO NOT TAN IN THE SUN, YOU ARE UNLIKELY TO TAN FROM THE USE OF THIS PRODUCT. THIS UNIT UTILIZES UVA LAMPS. REPLACE ONLY WITH ERGOLINE R SUPER POWER 100W (69 ) AND JK ERGOLINE 400W (FACE TANNER). LIE ON ACRYLIC SURFACE AND LOWER TOP SECTION. TOP SECTION WILL STOP AT 15.5 INCHES (394 MM) FROM BOTTOM ACRYLIC SURFACE. THE USE OF ANY OTHER POSITION MAY RESULT IN OVEREXPOSURE. SKIN TYPE RECOMMENDED EXPOSURE SCHEDULE WEEK 1 1 ST-3RD TREATMENTS WEEK 2 4TH-6TH TREATMENTS WEEK 3 7TH-10TH TREATMENTS WEEK 4 11TH-15TH TREATMENTS WEEKLY SUBSEQUENT TREATMENTS II - FAIR III - AVERAGE IV - BROWN V - DARK BROWN 3 MIN. 3 MIN. 3 MIN. 3 MIN. 7 MIN. 7 MIN. 10 MIN. 10 MIN. 15 MIN. 15 MIN. 15 MIN. 15 MIN. MAXIMUM EXPOSURE TIME IS 20 MINUTES. TANNING CAN BEGIN ON A REGULAR BASIS. AN APPEARANCE OF TANNING NORMALLY APPEARS AFTER A FEW EXPOSURES AND MAXIMIZES AFTER FOUR (4) WEEKS OF EXPOSURE FOLLOWING THE RECOMMENDED SCHEDULE FOR YOUR SKIN TYPE. USE PROTECTIVE EYEWEAR, SUPER SUNNIES, WHENEVER THE EQUIPMENT IS ENERGIZED. READ THE INSTRUCTION BOOKLET BEFORE USING THIS UNIT. INSTRUCTIONS ACCOMPANYING THIS PRODUCT SHOULD ALWAYS BE FOLLOWED TO AVOID OR MINIMIZE POTENTIAL INJURY. THIS PRODUCT IS IN CONFORMITY WITH PERFORMANCE STANDARDS FOR SUNLAMP PRODUCTS UNDER 21CFR PART
3 General Safety Information Safety Recommendations 1. The Sun Ergoline tanning unit must have been assembled and installed properly by trained and experienced personnel. 2. Compliance with all the warning and safety labels attached to the tanning unit required. 3. No safety device or safety notice may be removed or disabled, as doing so could impair the reliable functioning of the tanning unit. 4. The tanning unit must only be operated under the guidelines in this manual. 5. The tanning unit must only be operated when in full working order. 6. Carefully read all instructions included in this Sun Ergoline Operation and Instruction Manual. 7. Do not use tanning unit if the timer is inoperative or defective or if the VIT filter glass is cracked, broken or not in place in your unit. 8. Special care should be exercised if the user is particularly sensitive to UV light and if certain medications or cosmetics have been used. If there is any doubt by the salon operator or tanning bed customer, the user should consult with a physician. 9. Cosmetics should be removed prior to each tanning session. 10. Use only lotions, creams and oils specifically designed and formulated for indoor use. 11. Wear protective eyewear anytime the tanning unit is energized. 12. Do not tan more than once per 24 hour period. 13. Follow the recommendations on tanning times, intervals between tanning sessions and the distance from the lamps. Refer to the Exposure Times and Frequencies section of this manual for specific details. 14. The tanning unit may not be used by individuals who, when exposed to the sun, develope a sunburn without subsequently tanning. 15. Over exposure to ultraviolet light from the sun or from the tanning unit may cause damage to the skin or eyes. These biological effects will vary due to the individuals specific skin type. 16. Excessive exposure from the tanning unit can lead to sunburn, premature aging and a risk of skin injury. 17. The tanning unit should be utilized by only one person at a time. 18. While there is no immediate clinical evidence of the effects of UVA exposure to expectant mothers, it is strongly advised that expectant mothers be discouraged from using the tanning unit. 19. Persons using the tanning unit could experience a reddening of the skin or heat rash. This rash is often caused by the heat of the tanning system and should go away within 24 hours and should not reappear. Safety Precautions 1. The installation, electrical connection and the repair of the tanning unit must be performed by a factory trained or approved technician or appropriately qualified personnel. 2. The electrical installation must comply with all national and local electrical codes. 4. The tanning unit may only be operated under the timer control for a maximum of 20 minutes. The display on the timer should be set to the recommended time for your specific skin type based on the number of exposures. Increasing the timer settings or disabling the timer could result in injury. 3. The tanning unit must be operated as specified in this instruction manual. 3
4 Care and Cleaning of Your Tanning Unit After each session is completed, spray the acrylic surface with specially formulated UVT (ultraviolet transmitting) acrylic cleaner. Wipe the surface of the acrylic with a clean cloth. The acrylic should never be wiped with a dry cloth because this will generate a slight static charge which will attract dust. A mild liquid detergent and water solution can be used temporarily in place of Acrylic Cleaner. For maximum efficiency of your tanning unit, periodic cleaning of lamps, reflectors and the inside of the acrylic is required. Refer to relamping instructions for acrylic removal. CAUTION: Do not use excessive amounts of water, any abrasive cleaners, or any spray cleaners that carry label warnings regarding reactions to contact with skin! DO NOT USE ALCOHOL OR AMMONIA Electrical Safety: The tanning unit should be disconnected from the power supply before cleaning or disinfecting the inside of the acrylic. Avoid water or solution entering the lamp compartment. Base Lamp Removal Relamping Instructions 1. Unlock bottom unit acrylic with a flat blade screwdriver. Insert screwdriver and turn acrylic retainer clockwise 1/4 turn. (Refer to Illustration L1) Illustration L1 2. Raise the acrylic panel assembly and slide acrylic forward to remove. 3. Remove head and foot starter covers by removing the self tapping philips head screw. (Refer to Illustration L2) 4. Lift front of starter cover and slide forward to remove. 5. To remove lamps turn lamp 1/4 turn and slide lamp upward from lampholder. 6. To install lamps place lamp in lampholder and turn lamp 1/4 turn. To install lamp properly the lamp etch must be facing the acrylic. Illustration L2 7. Repeat Steps 1 through 4 in reverse order to reassemble the tanning unit. 4
 2.")
5 Relamping Instructions Top Canopy Lamp Removal Illustration L3 1. To detach top unit acrylic remove the attaching screws with the provided Ergoline Service Key. Insert key in attaching screw and rotate screw counter clockwise until removed. Repeat procedure for the opposing end of top unit. (Refer to Illustration L3) 2. After detaching the acrylic assembly, carefully lower the front down, and remove back of the acrylic from slot in back rail of top unit. (Refer to Illustration L3) 3. Remove facial tanner cover. Pull cover down and slide front edge of cover out of unit. Slide cover upward out of rear edge of unit and remove. (Refer to Illustration L4) Illustration L4 4. Remove foot end lamp cover. Pull cover down and slide front edge of cover out of unit. Slide cover upward out of the rear edge of the unit and remove. (Refer to Illustration L5) 5. To remove lamps turn lamp 1/4 turn and slide lamp upward from lampholder. 6. To install lamps place lamp in lamp holder and turn lamp 1/4 turn. To install lamp properly the lamp etch must be facing the acrylic. 7. To reinstall the top acrylic slide back of acrylic into grove in the rear of the unit. Rotate acrylic upward and attach with the acrylic retaining screws. Tighten securely. Illustration L5 Note: If lamps will not light inspect the lamp. The Sun Ergoline 300 utilizes reflector lamps and only emits UV light from the top side of the lamp. It is also recommended during a lamp change that you inspect all starters to insure they are in good working order and replace if necessary. 5
 2.")
6 Relamping Instructions Facial Replacement Illustration L6 1. To detach top unit acrylic remove the attaching screws with the provided Ergoline Service key. Insert key in attaching screw and rotate counter clockwise until removed. Repeat procedure for the opposing end of the top unit. (Refer to Illustration L6) 2. After detaching the acrylic assembly carefully lower the front of the acrylic, and remove back of the acrylic from slot in back rail of top unit. (Refer to Illustration L6) 3. To remove facial tanner cover. Pull cover down and slide front edge of cover out of unit. Slide cover upward out of rear edge of unit and remove. (Refer to Illustration L7) Illustration L7 4. Remove philips attaching screw from front of facial cassette assembly. (Refer to Illustration L8) 5. Pivot facial cassette down to remove filter lenses remove philips screw a from retainer bracket and pivot bracket down. (Refer to Illustration L9) Illustration L8 Illustration L9 6
7 Relamping Instructions 6. Slide filter lenses from cassette assembly. (Refer to Illustration L10) Illustration L10 7. Prior to handling the facial lamp it is important not to touch the glass envelope of the lamp with your hands. The oil from your finger prints will cause the lamp to malfunction and rupture. 8. Using a lint free towel remove the facial lamp by applying pressure on the lamp toward the spring loaded lampholder and disengaging the lamp from the stationary lampholder. (Refer to Illustration L11) 9. Clean the facial reflector with a damp cloth. 10. Replace the facial lamp using a lint free towel by applying pressure to the lamp and slide toward the spring loaded lampholder and seat lamp into the stationary lampholder. (Refer to Illustration L11) Illustration L Repeat Steps 1 thru 4 in reverse order to reassemble unit. 7
8 Exposure Time and Frequencies Melanin - The brownish pigment produced by special cells in the base layer of your skin determines the individual s tan. As the skin is exposed to the ultraviolet light, the melanin is activated and combines with protein cells that rise to the skin s surface, thus producing a tan. The amount of melanin in your body determines how quickly and dark you tan. The more melanin produced and exposure time an individual has, the faster and deeper the individual will tan. NOTE The tan produced by the tanning unit is a deep, rich COSMETIC tan. However, regardless of how dark an individual may tan on this system, it will not provide adequate protection against overexposure to natural sunlight or UVB tanning systems. SKIN TYPE II - This is the individual that usually burns easily and severely, tans minimally or lightly and peels. SKIN TYPE III - Often referred to as AVERAGE complexion, burns moderately and tans about average. SKIN TYPE IV - This individual burns minimally, tans easily and above average with each exposure. SKIN TYPE V - This individual s system rarely burns, tans easily and substantially. SKIN TYPE II - FAIR III - AVERAGE IV - BROWN V - DARK BROWN Recommended Exposure Schedule WEEK 1 1 ST-3RD TREATMENTS 3 MIN. 3 MIN. 3 MIN. 3 MIN. WEEK 2 4TH-6TH TREATMENTS 7 MIN. 7 MIN. 10 MIN. 10 MIN. MAXIMUM EXPOSURE TIME IS 20 MINUTES. WEEK 3 7TH-10TH TREATMENTS 15 MIN. 15 MIN. 15 MIN. 15 MIN. WEEK 4 11TH-15TH TREATMENTS No two individual skin tones are the same. A tan to one person may be different to another and treatment length may vary. WEEKLY SUBSEQUENT TREATMENTS NOTE: Adequate ventilation of the room or booth housing the tanning unit is required for proper and comfortable operation. Your tanning unit will perform best at the ambient temperature of 75 to 90 F. Equally important many facial makeups have oil bases and should be removed prior to a session. It is recommended that, following a tanning session, a skin moisturizer be applied. This promotes a smoother, more even looking tan. It is recommended you do not use tanning creams or lotions intended for outdoors use. 8
9 Assembly Instructions 1. Remove base assembly parts from box marked Unterteil and place in floor. Assemble base using four (4) M6X10 socket head screws. The screws should be installed using the provided Ergoline Service Key. Do not tighten screws at this time. (Refer to Illustration A1) 2. Locate bottom unit and place acrylic side down in the desired location for assembly. Place the pre-assembled base assembly onto the bottom unit. Take note that all holes in the base assembly align with the threaded inserts in the bottom unit. (Refer to Illustration A2) Illustration A1 Illustration A2 3. Secure base assembly to the bottom unit with four (4) M6X20 socket head screws and washers. Tighten all screws at this time. (Refer to Illustration A2) 4. Install bottom unit after fitting base assembly. (Refer to Illustration A3) 5. Locate hinge assemblies and two (2) remove philips screws. Do not remove the third screw at this time. (Refer to Illustration A4) 6. Install hinge assembly into opening at the end of bottom unit. It is required for proper assembly that the alignment hook on the hinge insert between the slot and trim panel in the end cap. (Refer to Illustration A5) Illustration A3 7. Secure hinge assembly to trim panel with the previously removed screws. (Refer to Illustration A5) 8. Repeat Steps 5 thru 7 for the opposing hinge. Illustration A4 Illustration A5 9
10 Assembly Instructions 9. Install curved hinge covers to bottom unit. The retaining hooks should be to the bottom of the part and should engage into unit. Feed top unit wiring assemblies through cover. (Refer to Illustration A6) 10. Secure curved hinge cover to the bottom unit using three (3) self tapping 3.5X9.5 screws. (Refer to Illustration A7) 11. Repeat Step 10 for the opposing hinge Illustration A6 12. Remove top unit from box marked Oberteil. Support top unit from both ends, position unit over hinge assemblies aligning the grove in top with the upright on hinge. (Refer to Illustration A8) Illustration A7 13. Slide top unit down over the uprights of the hinge evenly until the unit bottoms out against base of hinge. 14. Apply slight pressure to front rail of top unit and remove locking screws from hinge assembly. (Refer to Illustration A9) 15. Lower top unit and connect wiring assemblies to the corresponding plug in rear of top unit. Plug are keyed to insure proper installation. (Refer to Illustration A10) Illusrtration A8 16. Repeat Step 15 for the opposing end. Illustration A9 Illustration A10 10
 19. Repeat Steps 17 and 18 for opposing cover. 20. Install rear upper trim panel.")
11 Assembly Instructions 17. Push up the outer section of the curved hinge cover. Hinge cover slots should snap over the tabs on the top unit. (Refer to Illustration A11) Illustration A Secure hinge cover to the top unit with one 2 9 x 2.9 self tapping screw. (Refer to Illustration A11) 19. Repeat Steps 17 and 18 for opposing cover. 20. Install rear upper trim panel. To install trim panel remove center two screws and loosen outer two screws. Push trim panel into place allowing slots in mounting bracket to slide behind screws and pull trim panel upright until screws are in the top of the slot. Tighten screws securely. (Refer to Illustration A12) Illustration A Open top unit to full upright position. Fit lower trim panel into the three (3) brackets on bottom unit. (Refer to Illustration A13) 22. Remove head end body cooling fan from box marked Unterreil. Remove M6 nuts and washers from body fan retaining bolts. Connect body fan plug to the outlet from the bottom unit. (Refer to Illustration A14) 23. Rotate body cooling fan to the upright position and guide retaining bolts into the provided holes in the bottom unit. Secure body fan with the M6 nuts and washers. (Refer to Illustration A14) 4 Illustration A13 Illustration A14 11
12 24. Locate box marked VSG-Trager open and remove the ballast tray support bar. Install support bar to the base assembly using six (6) 4.8x16 self tapping philips screws factory installed in base. (Refer to Illustration A15) Assembly Instructions 25. Remove ballast tray A from box marked VSG -Trager and slide bottom of tray onto support bar. (Refer to Illustration A16) Illustration A Connect ballast harness plugs to the corresponding receptacle on the ballast tray. The plugs are keyed to eliminate the possibility of incorrect installation. (Refer to Illustration A17) Illustration A Hinge ballast tray up into place and attach with two (2) 4.8x13 screws. (Refer to Illustration A18) 28. Locate and install the lower trim panels to base. Thread two M6x30 socket head screws into each trim panel. The screws should protrude from the trim panel approximately 1 inch to allow installation. (Refer to Illustration A19) 29. Slide trim panel on front of base with the head of screws behind slot in base. Tighten screws securely. (Refer to Illustration A19) Illustration A Repeat Steps 28 and 29 for opposing trim panel. 31. Connect Intellitan Remote timer into head end receptacle located on the back of the bottom unit. (Refer to Illustration A20) Refer to Timer Operating Instructions for unit operation. Illustration A18 Illustration A19 12
 Illustration S1 2. Raise the acrylic panel assembly and slide acrylic forward to remove. 3.")
 Illustration S2 6.")
13 Spring Adjustment 1. Unlock bottom unit acrylic with a flat blade screwdriver. Insert screwdriver and turn acrylic retainer clockwise 1/4 turn. (Refer to Illustration S1) Illustration S1 2. Raise the acrylic panel assembly and slide acrylic forward to remove. 3. Remove head and foot starter covers by removing the self tapping philips head screw. (Refer to Illustration S2) 4. Lift front of starter cover and slide forward to remove. 5. Turn wing nut counter clockwise if the top unit will not stay down and clockwise if the top will not stay up. (Refer to Illustration S3) Illustration S2 6. Repeat Steps 1 thru 4 in the opposite order to reassemble bottom unit. Illustration S3 13
14 Intellitan by Sun Industries, Inc. Operating Instructions To Set Time STEP 1: STEP 2: Press s button to reach desired setting in minutes. Press Start/Stop to begin operation. The session is counted down in minutes and seconds. NOTE: If a session delay is preprogrammed (P04), the display will begin to flash the session time. The display will continue to flash the session time for the duration of the session delay according to the programming or until Start/ Stop the button is pressed. If the Start/Stop button is pressed before the session delay expires, the display will stop flashing and the session time will begin to count down. At one (1) minute, before the start of the tanning session, an audible beep will sound (if programmed in P02). At thirty (30) seconds, before the start of the tanning session, another audible beep will sound. At ten (10) seconds the audible beep will sound and continue once each second until tanning unit lights. Once the tanning unit has started, the session delay will not repeat on subsequent restarts. To Stop Unit STEP 1: Press Start/Stop anytime during a session. This will stop the countdown and hold time. To restart the unit simply press Start/Stop. To Clear Time STEP 1: Press Reset, the timer clears to read 00:00. NOTE: If the unit is counting down, the Start/Stop button must be pressed before resetting.
15 To Change Parameters To enter the System s data bank, monitor operations and verify the vital functions concerning your unit, use the following step-by-step instructions. Note: Each timer manufactured after 1995 displays the current software version on power up. These instructions are for level 23 and above of the Intellitan Plus timer. Enter Password Clearance 1. Press (at the same time) then release s and t buttons; the display will change from 00:00 to If you cannot get the display to change to 0000, assure that you have disconnected the network cable(s) from the timer. If power to the tanning unit is not cycled on/off after disconnecting the network cable, you must wait for thirty seconds for the timer to award access to the above mentioned buttons. 2. Press the Reset button once so that 0000 begin to flash. 3. Use the s button to enter the appropriate password to perform the desired function. Password 0010 (ten) must be entered to view parameters, and 0102 (one hundred and two) to edit parameters. After entering the password press the Reset button. The display will stop flashing and 0001(level one) or 0002 (level two) will appear in the display. 4. Press the Start/Stop button to reach the desired parameter. If you go past a parameter press the st button to exit parameter mode and restart from step 1. Each time the Start/Stop is pressed the timer will display PXX (XX represents numbers) representing the parameter reached and then the display will change showing the value of the parameter. 5. If you are using the second level password, press the Reset button to edit the parameter (once the Reset button is pressed the display will begin to flash). Use either the tor s button to set the appropriate value for the parameter, then press to exit the parameter. 6. Press the Start/Stop to advance to the next parameter. You may st press buttons simultaneously to exit the edit parameter mode.
16 P02 Parameter 2 is the chime mechanism that provides an audible beep sound when the keys are depressed and to indicate the various operations occurring. The audible beep can be turned on or turned off. The unit comes with the chime mechanism turned on to provide an audible beep. When parameter 02 is shown, the display will read To maintain the chime mechanism, press the s now and go to P03. To silence it, do the following: To Change Parameter 2, Alarm On/Off Press Reset once then release it. The display will begin to flash. Press t and hold it down, scrolling down to Now press Reset once again. The chime is now deactivated. To reactivate the chime, change parameter 02 back to 0001 using the same instructions provided above. Now press Start/Stop to reach parameter 4 P(05), the session delay. P04 Parameter 4 is the session delay. The session delay allows a programmable amount of time at the beginning of a session to get ready for the tanning session. The tanning session time shown on the timer flashes during the session delay. The unit comes with no session delay preprogrammed. To Change Parameter 4, Session Delay When parameter 04 is shown, the display will read 0.0 for no session delay. To change the session delay, do the following: Press Reset once then release it, the display will begin to flash. Now press s or tto reach the desired setting. Time is displayed from 0.0 to 10.0, with the decimal representing tenths of a minute. For Example: 2.5 equals 2 minutes, 30 seconds. After reaching the desired setting, press Reset once and release it. Session delay is now set. Now press Start/Stop to reach Parameter 5 (P05), the Station Address function. P05 Parameter 5 is the station address. The station address allows the tanning unit to be identified for interface with the CCS series controllers, the Intellitan Single Station Console, or the Intellitan Protocol Interface (IPI) for your computer system. The unit comes with a station address of zero (0) preprogrammed, if you have multiple units each must be uniquely addressed. To Change Parameter 5, Station Address When parameter 05 is shown, the display will read 0000 for station address zero. To change the station address, do the following: Press Reset once and release it, the display will begin to flash. Now press s or t to reach desired address setting. Once the desired setting is reached press Reset once and release it. The station address is now set. Now press Start/Stop to reach Parameter 6 (P06), the Lamp-Hour Accumulation on Current Lamp Bank function.
17 P06 Parameter 6 is the lamp hour accumulation counter. The lamp hour accumulation counter keeps track of the number of hours on the current lamp bank. This is a resettable parameter that should be reset to 0 when the lamps are changed. When current lamp hour accumulation reaches 1000, a beep will chime each time the unit is turned on, indicating that a lamp change is necessary. Chime will not sound if it has been turned off through parameter 2. Parameter 6 is only editable at password level 1. When parameter 06 is shown, the display will read from 0000 to To clear the lamp hour accumulator, do the following: To Clear Parameter 6, Lamp Hour Accumulation Press Reset once and release, the display will begin to flash. Now press t and hold until 0000 is displayed. When the display reads 0000 press Reset once and release. Lamp hour accumulation is now cleared. Now press Start/Stop once and release it to advance to Parameter 15 (P15), clean room feature. P15 Parameter 15 is the clean room feature. When on, the clean room feature will show all dashes (----) on the timer display at the end of each tanning session to show that the tanning unit needs to be cleaned. In network mode, no new time can be placed on the timer when the clean room indicator is displayed. To reset the clean room feature from the room, indicating that the room has been cleaned, press the Reset button twice in rapid succession. When the clean room feature is reset, the in room timer will display 00:00. The unit comes with the clean room feature off. To Change Parameter 15, Clean Room Feature Press Reset once then release it, the display will begin to flash. Now press s once to display 0001, then press Reset once and release it. The Clean Room Feature is now enabled. To disable the Clean Room Feature simply change parameter 15 back to Now press Start/Stop once and release it to reach Parameter 16 (P16), The Econometer P16 Parameter 16 is the Econometer. The Econometer measures the electrical cost to power unit for previous session or the current session if the tanning unit is active. The cost displayed is derived from the session cost per minute entered in P17. The reading is displayed immediately. Measurement is in cents and tenths of a cent. This function is read only and can not be changed. For Example - A reading of 10.7 would equal 10.7 cents. Now press Start/Stop once and release it to reach Parameter 17 (P17), Cost Per Session.
18 P17 Parameter 17 is the session cost per minute. This figure is automatically entered into the tanning unit s data bank in accordance with the National Average of 7.5 per kilowatt hour. The formula used is Unit_KwH_Draw X National_Average / 60_minutes = cost per minute. In the case of the R32B this is 3.1 x 7.5 / 60 = rounded up to.4 cents per minute. To Change Parameter 17, Cost Per Minute Press Reset once then release it, the display will begin to flash. Now press s or t until the desired cost per minute is displayed. Measurement in cents and tenths of a cent. For Example. A reading of.4 would equal four tenths of one cent. Once the desired reading is displayed press Reset once and release it. The Cost Per Minute is now set. Now press Start/Stop once and release it to reach Parameter 18 (P18), The Session Counter. P18 Parameter 18 is the Session Counter. The session counter displays the total number of times a session has been started since first day of operation. The session counter counts from 0000 to 9999 then rolls over. The session counter cannot be adjusted or reset. Now press Start/Stop once and release it to reach Parameter 19 (P19), Total Hour Accumulation. P19 Parameter 19 is the total hour accumulator. This accumulator displays the total number hours on the unit since first day of operation. The accumulator counts from 0000 to 9999 then rolls over. The total hour accumulator cannot be adjusted or reset. Now press Start/Stop once and release it to reach Parameter 24 (P24), Continuous Countdown Mode. Note: Parameters are reserved for factory use. P24 Parameter 24 is the continuous countdown mode toggle. The default is 0 for disabled. The continuous countdown mode allows the salon owner to maintain a tighter schedule by disabling the pause function of the timer thus allowing the tanning time to continue to count down even if the lamps are turned off by pressing the start/stop key. This feature is only available with software level 16 or higher. To Change Parameter 24, Continuous Countdown Mode Press Reset once then release it, the display will begin to flash. Now press s until 0001 is displayed, press Reset once and release it. Next cycle the power to the timer and tanning unit off and back on. The Continuous Countdown Mode is now enabled. To disable this function change parameter 24 back to Now press Start/Stop once and release it to reach Parameter 25 (P25), Keylock Configuration.
19 P25 Parameter 25 is the keylock configuration option. The default is 3 for 30 seconds. The keylock configuration option allows the salon owner to maintain a higher sense of security by locking out the front rail keys in several specified intervals while the timer is connected to a network. This feature is only available with software level 16 or higher. The keylock intervals are: 0 - Lock keys and release only when power cycled. 1 - Lock keys and release only when parameter is changed to an option other than Lock keys and release only after the network cable has been removed for 2 minutes. 3 - Lock keys and release only after the network cable has been removed for 30 seconds. WARNING: If you set parameter 25 to 01 (Lock until parameter changed) you will be unable to change this parameter or unlock the front rail keys without the use of a CCS-1 or other control device. The Intellitan Protocol Interface (IPI) does not edit this or any other parameter. To Change Parameter 25, Keylock Configuration Press Reset once then release it, the display will begin to flash. Now press s until the desired option 0,1,2,3 is displayed, press Reset once and release it. Next cycle the power to the timer and tanning unit off and back on. The Keylock Configuration is now saved. Now press Start/Stop once and release it to reach Parameter 26 (P26), TPI Interface Enable. P26 Parameter 26 is the Third Party Interface (TPI) Mode toggle. The default is 0 for disabled. The Intellitan Plus timer has a TPI jack built in to the timer itself. This jack replaces the need for a second or additional interface when using other timer systems. The TPI jack is located next to the two network jacks on the top of the tanning unit(under the hinge cover). It is the larger of the three jacks and comes with a unused modular plug in the jack. When using the Intellitan Plus timer in TPI mode the Intellitan Plus looks for control voltage (5-30v) on the outside two wires of the modular cable plugged into the TPI port. When this voltage is seen, the maximum tanning time is sent to the timer and the tanning unit is started. Any session delay should be programmed on the third party timer and the Intellitan session delay should be set to 0. The front rail keys are locked in TPI mode. This feature is only available with software level 16 or higher. To Change Parameter 26, TPI Mode Press Reset once then release it, the display will begin to flash. Now press s until 0001 is displayed, press Reset once and release it. Next cycle the power to the timer and tanning unit off and back on. The TPI Mode is now enabled. To disable this function range parameter 26 back to Now press Start/Stop once and release it to reach Parameter 27 (P27), Timer Protocol Option.
20 P27 Parameter 27 is the Timer Protocol Option. The default is 0 for Intellitan Protocol. The timer protocol option allows the salon owner to change timer network protocols from the Intellitan Network to the T-Max 1 protocol for use with the Applied Digital T-Max Manager. For additional information please consult the T-Max documentation. This feature is only available with software level 16 or higher. To Change Parameter 27, Timer Protocol Option Press Reset once then release it, the display will begin to flash. Now press s until 0001 is displayed, press Reset once and release it. Next cycle the power to the timer and tanning unit off and back on. The T-Max Protocol is now on. To turn off this function change parameter 27 back to 0000 using the parameter edit instructions in the T-Max documentation. You can not use a CCS-1 or IPI with a timer using T-Max Protocol. Now press Start/Stop once and release it to reach Parameter 28 (P28), Total Operating Cost. P28 Parameter 28 is the Total Operating Cost Accumulator. This parameter tracks total operating costs of the tanning unit based upon parameter 17, session cost per minute. This parameter is displayed in dollars and tenths and rolls over at $ The Total Operating Cost Accumulator can be reset to 0 at anytime in order to track or determine daily, weekly, monthly, quarterly, or annual operating costs. To Change Parameter 28, Total Operating Cost Press Reset once then release it, the display will begin to flash. Now press s until 0000 is displayed, press Reset once and release it. The Total Operating Cost is now reset to 0 and will begin accumulating at the next session. Now press Start/Stop once and release to reach parameter Parameter 30 (P30), Facial Control. 1 T-Max is a registered trademark of Salon Systems, Inc./Applied Digital, Inc. Branson, MO.
21 General Troubleshooting Guide The following troubleshooting information is divided into two sections. Section A contains items in which the owner may check without the aid of a service person. Section B contains items which must be preformed by QUALIFIED SERVICE PERSONNEL ONLY. If you have any questions other than the ones listed in your troubleshooting guide, contact your dealer or distributor. (NOTE: All tanning units are not the same, therefore some of the causes may not apply to your unit.) General Troubleshooting (Section A) 1. Tanning unit does not operate. CAUSE SOLUTION 1. No power to unit. 1. Check circuit breaker servicing bed. 2. Timer is not activated. 2. Press up button, then start button. (Note: If there is power to the unit but the display on the timer is not lighting, you may need to replace the power board and/or the C.P.C. board. Contact Sun Ergoline or your local representative for information.) 2. Lamps will not light or lamps flicker. CAUSE SOLUTION 1. Lamp not seated properly in lampholder. 1. Remove lamp, inspect contact on lamp, and reinstall lamp securely into lampholder. 2. Faulty Lamp. 2. Replace lamp. (Refer to Instruction Manual for correct lamp. 3. Faulty Starter. 3. Replace Starter. 3. Top unit does not hold its position. CAUSE SOLUTION 1. Springs need to be adjusted. 1. Refer to spring adjusting in your Operation and Instruction Manual. General Troubleshooting (Section B) All services in the following section are to be completed by a Qualified Service Technician. This section is to aid in isolating and correcting and problems which may occur and is not intended for the use by the owner. Refer to the assembly instructions included with each unit for reference in disassembling and wiring the tanning unit. Disconnect all power to the unit before servicing. Use only factory authorize components for replacement parts. 1. Tanning unit does not operate. CAUSE 1. Incorrect connection of incoming power. 2. Faulty timer. 3. Faulty relay in bed. 4. Poor wiring connections. 2. Lamps will not light. CAUSE 1. Poor wiring crimp at lampholder. 2. Faulty or damaged lampholder. 3. Incoming power to unit incorrect. 4. Faulty ballast. 5. Loose power wire to ballast. SOLUTION 1. Check electrical connection on wiring diagram and correct as necessary. 2. Replace. 3. Replace. 4. Check wiring circuit against appropriate wiring diagram and correct as required. SOLUTION 1. Check for loose wire and repair. 2. Replace. 3. Check incoming voltage and correct to requirements. 4. Locate and replace. 5. Locate loose wire and repair. 21
22 Wiring Diagram 22
23 Wiring Diagram 23
24 Wiring Diagram 24
25 SUN ERGOLINE Limited Warranty Sun Ergoline warrants its products to be free from defects in materials and workmanship under intended normal use as described in the unit s Operation and Instruction Manual, for a period of one (1) year from date of sale. This Limited Warranty applies only to the original purchaser of the equipment through Sun Ergoline or its authorized dealer or distributor, and is not transferable. Sun Ergoline obligations under this warranty are limited to repair or replacement of any defective part without charge for that part to the original purchaser, with the following exceptions: A. Fluorescent lamps are warranted against defects for a period of thirty (30) days from date of sale. B. Only parts obtained through Sun Ergoline, its authorized dealers or distributors may be used. Transportation costs for parts shipped to the consumer and the return of defective parts to Sun Ergoline are not included. C. Labor will be furnished without charge for ninety (90) days from date of purchase only. All labor and related charges must be authorized by Sun Ergoline prior to start of repairs, and must coincide with Sun Ergoline established rates and time allotment policy. D. Acrylic: Refer to Manufacturer s Acrylic Warranty Policy. It is imperative that the original customer completes and returns the enclosed warranty card within 10 days after purchase to insure valid registration and coverage for potential claims. If the warranty card is not registered, proof of purchase from Sun Ergoline or its authorized dealer or distributor will be required prior to any consideration on warranty claims. This could result in service delays. This warranty is extended to the individual or legal entity, whose name appears on the warranty registration card filed with Sun Ergoline or whose name appears on the original sale document and may not be transferred to any other individual or legal entity. This warranty does not apply to any failure of the product, or any parts of the product due to alterations, modifications, misuse, abuse, accident, improper maintenance, improper installation, acts of God or if the serial number on the product has been removed, altered or defaced. Adequate packaging must be used for returned goods to prevent freight damage. THERE ARE NO WARRANTIES WHICH EXTEND BEYOND THE DESCRIPTION ON THE FACE HEREOF. THERE IS NO EXPRESS OR IMPLIED WARRANTY OF FITNESS OR MERCHANTABILITY. THE REMEDIES PROVIDED IN THIS LIMITED WARRANTY ARE THE EXCLUSIVE REMEDIES PROVIDED TO THE PURCHASER BY SUN ERGOLINE AND ARE PROVIDED IN SUBSTITUTION OF ALL OTHER REMEDIES. CONSEQUENTIAL AND INCIDENTAL DAMAGES ARE EXCLUDED. No person, firm or corporation is authorized to obligate Sun Ergoline for any liability in connection with the sale or use of these goods. 25
26 Limited Acrylic Warranty Sun Ergoline warrants its acrylic sheets to be free from defects in material and workmanship, under intended normal use, for a period of one (1) year from date of sale of the tanning bed. Due to the tanning lotions, cosmetics, disinfectant and improper cleaners used on tanning surfaces that cannot be controlled by Sun Ergoline, after the first thirty (30) days of warranty period. Acrylic will be subject to a prorated cost to the consumer on breakage. Sun Ergoline obligations do not include transportation charges on replacement acrylic. Sun Ergoline assumes no liability for the cost of removing defective sheets or installing replacement sheets, nor for damage to persons or property. To make a claim, contact an authorized dealer or distributor of Sun Ergoline or Sun Ergoline Service Department with the model number, the serial number, and the date of purchase of the bed in which the acrylic will be used. THERE ARE NO WARRANTIES WHICH EXTEND BEYOND THE DESCRIPTION ON THE FACE HEREOF. THERE IS NO EXPRESS OR IMPLIED WARRANTY OF FITNESS OR MERCHANTABILITY. THE REMEDIES PROVIDED IN THIS LIMITED WARRANTY ARE THE EXCLUSIVE REMEDIES PROVIDED TO THE PURCHASER BY SUN ERGOLINE AND ARE PROVIDED IN SUBSTITUTION OF ALL OTHER REMEDIES - CONSEQUENTIAL AND INCIDENTAL DAMAGES ARE EXCLUDED. Sun Ergoline P.O. Box 2026 Jonesboro, Arkansas (in Arkansas) 26
27 Warranty Claims Policy & Procedures 1. When to file a Warranty Claim: In the event that your tanning system is not functioning properly under intended normal use as described in the unit s Operation and Instruction Manual, you may then have established cause to file a Warranty Claim. NOTE: Both the tanning system and legal registered owner must meet the criteria established under Sun Ergoline Limited Warranty as described in this manual before any Warranty Claim will be considered. 2. Where to call to place a Warranty Claim: Sun Ergoline is supported nationwide by an extensive dealer/distributor network through whom the majority of our units are sold. These dealers/distributors are required by contract to stock sufficient parts to meet the various warranty and nonwarranty needs of their customers. Therefore, in order for you to properly file a Warranty Claim, you must locate the name and phone number of the dealer/distributor through whom you purchased your unit. Normally this information can be easily located either on your paid invoice or other proof of purchase documentation that you received when taking delivery of the unit. Next, notify the dealer/distributor of the serial number, model number and date unit was purchased. This will initiate the Warranty Claim process. Upon determination of the problem, your dealer/distributor can then supply you with the part(s) and proper instructions to return your unit to working order. Each dealer/distributor has their own internal procedure for handling Warranty Claims and credits. NOTE: Sun Ergoline, the manufacturer, does not involve itself in the direct handling of a Warranty Claim except where mitigating circumstances apply and where required by law. 27
28 Parts Warranty Claim/Credit Review 1. Customer calls Sun Ergoline and notifies the Service Department of problem. 2. Sun Ergoline Service Department determines course of action. 3. Sun Ergoline ships part and R.A.I. to customer freight collect and bills customer on net30 basis for part only. 4. Customer, within 15 days of receiving new part, returns defective part to Sun Ergoline along with R.A.I. 5. Upon receipt of defective part and R.A.I., Sun Ergoline issues customer a credit invoice which offsets original bill. Customer s account is returned to zero balance concerning this claim. NOTE: If part returned to Sun Ergoline proves to be operational and not defective, or if product code numbers on part do not correspond with individual unit date on file with Sun Ergoline, then a 30% restocking fee will be charged in addition to the retail purchase price of part. Acknowledgment of the Agreement is not required for acceptance of the foregoing stipulations. LABOR WARRANTY CLAIM/CREDIT PROCEDURES Sun Ergoline furnishes labor without charge for a period of 90 days from date of purchase. All labor and related charges must be authorized by Sun Ergoline prior to start or repairs, and must coincide with Sun Ergoline established rates and time allotment policy. Please contact our Service Department for authorization and billing procedures. 28
29 Limited Lifetime Warranty Sun Ergoline warrants specific individual components of the Genesis tanning systems against defects in materials and workmanship for the life of the product. Coverage is limited to units purchased after November 1, This warranty is restricted by the following components only: Steel Back Panels Structural Steel Frame Components Exterior Steel Body NOTE: Components are warranted on an individual basis and not as they may effect the complete product. Warranty coverage does not include cosmetic abnormalities such as scratches, nicks, dents, oxidation of paint or other cosmetic changes that do not interfere with the designed function of the unit. This warranty does not include failure of the product due to alteration, modifications, misuse, abuse, improper maintenance, improper installation or repair. This warranty is not transferable and is only applicable to the original purchaser named on a completed and registered warranty record at Sun Ergoline headquarters. Sun Ergoline obligations do not include transportation charged on the shipping of new components to the customer or on the return of defective components of the manufacturer. All freight charges must be paid by the customer. THERE ARE NO WARRANTIES WHICH EXTEND BEYOND THE DESCRIPTION ON THE FACE HEREOF. THERE IS NO EXPRESS OR IMPLIED WARRANTY OF FITNESS OR MERCHANTABILITY. THE REMEDIES PROVIDED IN THIS LIMITED WARRANTY ARE THE EXCLUSIVE REMEDIES PROVIDED TO THE PURCHASER BY SUN ERGOLINE AND ARE PROVIDED IN SUBSTITUTION OF ALL OTHER REMEDIES - CONSEQUENTIAL AND INCIDENTAL DAMAGES ARE EXCLUDED. 29
30
Specifications THIS UNIT UTILIZES UVA LAMPS. REPLACE ONLY WITH PHILIPS PROFESSIONAL 160W AND JK ERGOLINE 500 SE C11292 (FACE TANNER).
.") Specifications 450 Length: 92 Width: 46.5 Height: 45 Shipping Weight: 1000 Lbs. No. of Lamps: 46 (42-160 Watt, 4-400 Watt) Electrical: 28 AMPS @ 240 Volts 3Ø Circuit Required: 120/240V 3Ø 40 Amp 3-Pole
Specifications 450 Length: 92 Width: 46.5 Height: 45 Shipping Weight: 1000 Lbs. No. of Lamps: 46 (42-160 Watt, 4-400 Watt) Electrical: 28 AMPS @ 240 Volts 3Ø Circuit Required: 120/240V 3Ø 40 Amp 3-Pole
Specifications WEAR PROTECTIVE EYEWEAR; FAILURE TO MAY RESULT UN SEVERE BURNS OR LONG-TERM INJURY TO EYES.
 TK8000 Specifications Width: 53 Height: 83 Shipping Weight: 850 Pounds No. of Lamps: 6 Facials and 2 Hand Tanners Electrical: 28 Amps @ 240 Volts Circuit Required: 120/240 Volt, 2 Pole, 40 Amp Breaker
Specifications. Recommended Exposure Schedule WEEK 1 1 ST-3RD TREATMENTS WEEK 2 4TH-6TH TREATMENTS 5 MIN. 5 MIN. 7 MIN. 7 MIN.
 1 252 Specifications Depth: 50" Door Closed, 63 Door Open Width : 39.5" Height: 90" Shipping Weight: 1325 Lbs. No. of Lamps : 52 Electrical : 39 AMPS @ 225 Volts, Three Phase or 63 Amps @ 225 Volts, Single
SunMaster Shadow. Care and Use Guide. Important! Read this manual before installing, operating or servicing this product.
 From Place Stamp Here Care and Use Guide UVA SunSystems, Inc. 6208 Technology Dr. Browns Summit, NC 27214 FOLD AT LINE AND SECURE WITH TAPE CUT ON DOTTED LINE SunMaster Shadow 32 Lamp Commercial Tanning
DANGER DANGER DANGER WARNING CAUTION RECOMMENDED EXPOSURE TIMES IN MINUTES. Electrical Requirements. Unpacking and Inspection
 DANGER Ultraviolet radiation. Follow instructions. Avoid overexposure. As with natural sunlight, overexposure can cause eye and skin injury and allergic reactions. Repeated exposure may cause premature
DANGER DANGER DANGER WARNING CAUTION RECOMMENDED EXPOSURE TIMES IN MINUTES. Unpacking and Inspection
 DANGER Ultraviolet radiation. Follow instructions. Avoid overexposure. As with natural sunlight, overexposure can cause eye and skin injury and allergic reactions. Repeated exposure may cause premature
DANGER. Electrical Requirements. Hardware Inventory (These items and a small pillow) DANGER WARNING CAUTION
 DANGER WARNING CAUTION") Ultraviolet radiation. Follow instructions. Avoid overexposure. As with DANGERnatural sunlight, overexposure can cause eye and skin injury and allergic reactions. Repeated exposure may cause premature
Ultraviolet radiation. Follow instructions. Avoid overexposure. As with DANGERnatural sunlight, overexposure can cause eye and skin injury and allergic reactions. Repeated exposure may cause premature
DANGER DANGER DANGER WARNING CAUTION RECOMMENDED EXPOSURE TIMES IN MINUTES. Electrical Requirements
 DANGER Ultraviolet radiation. Follow instructions. Avoid overexposure. As with natural sunlight, overexposure can cause eye and skin injury and allergic reactions. Repeated exposure may cause premature
DANGER. Unpacking and Inspection. Hardware Inventory (These items and a small pillow) Electrical Requirements DANGER WARNING CAUTION
 Electrical Requirements DANGER WARNING CAUTION") Ultraviolet radiation. Follow instructions. Avoid overexposure. As with DANGERnatural sunlight, overexposure can cause eye and skin injury and allergic reactions. Repeated exposure may cause premature
Ultraviolet radiation. Follow instructions. Avoid overexposure. As with DANGERnatural sunlight, overexposure can cause eye and skin injury and allergic reactions. Repeated exposure may cause premature
DANGER DANGER DANGER WARNING CAUTION RECOMMENDED EXPOSURE TIMES IN MINUTES. Unpacking and Inspection
 DANGER Ultraviolet radiation. Follow instructions. Avoid overexposure. As with natural sunlight, overexposure can cause eye and skin injury and allergic reactions. Repeated exposure may cause premature
USER MANUAL A
 Pro 16SE USER MANUAL Limited Lifetime Warranty SunQuest warrants your tanning unit to be free of structural defects in its material and workmanship, under normal use, for its lifetime. SunQuest will repair
WARNING: FAILURE TO FOLLOW THESE RULES MAY RESULT IN SERIOUS PERSONAL INJURY CAUTION: INSTALLATION LOCATION:
 2 Please read the safety and installation instructions carefully to help ensure a correct and SAFE installation of your Second Wind Ultraviolet Germicidal Photo-catalytic Air Purifier. WARNING: FAILURE
Remote Vehicle Control System. Keyless Entry and Convenience System
 1 Remote Vehicle Control System PC 6100 TM Owner's Manual Keyless Entry and Convenience System IMPORTANT NOTE: The operation of the Power Code as described in this manual is applicable to most vehicles.
CA 5054 Owner s Guide
 PROFESSIONAL SERIES CA 5054 Owner s Guide Remote Start and Keyless Entry System IMPORTANT NOTE: The operation of the Security and Convenience System as described in this manual is applicable to most vehicles.
Owner s Guide. ca5354
 PROFESSIONAL SERIES Owner s Guide for models: ca5354 Deluxe Vehicle Remote Start System with 900Mhz 2 Way Confirming LED Remote Control IMPORTANT NOTE: The operation of the Security and Convenience System
Remote Vehicle Control System. Keyless Entry & Remote Start System
 1 Remote Vehicle Control System PC 7400 TM Owner's Manual Keyless Entry & Remote Start System IMPORTANT NOTE: The operation of the Power Code as described in this manual is applicable to most vehicles.
Reach ins, Freeezers & Refrigerators Installation & Operation Manual
 Reach ins, Freeezers & Refrigerators Installation & Operation Manual BSR23 BSF23 BSR49 BSF49 BSR72 BSF72 IMPORTANT SAFETY INSTRUCTIONS (SAVE THESE INSTRUCTIONS) Visit us on the web at www.blueairinc.com
Owner s Guide. ca5154
 PROFESSIONAL SERIES Owner s Guide for models: ca5154 Automatic / Manual Transmission Remote Start and Keyless Entry System IMPORTANT NOTE: The operation of the Security and Convenience System as described
Soltron XL OPERATING INSTRUCTIONS INSTRUCTIONS D UTILISATION INSTRUCCIONES DE USO. XL-200/20 Shark Mattress Xtra / us / fr / es / 04.
 Soltron XL 1000244-01- / us / fr / es / 04.2006 OPERATING INSTRUCTIONS INSTRUCTIONS D UTILISATION INSTRUCCIONES DE USO XL-200/20 Shark Mattress Xtra ............................................ 3...........................................
A SSEMBLY A ND U SER G UIDE
 A SSEMBLY A ND U SER G UIDE M O D E L S P R O 2 4 R S / 2 4 R S F / 2 4 R S T 2 6 R S / 2 6 R S T 21165A Lifetime Warranty What Is Covered? SunQuest warrants your tanning unit to be free of structural
Owner s Guide CA 5055
 PROFESSIONAL SERIES Owner s Guide For Model: CA 5055 Vehicle Remote Start and Keyless Entry System IMPORTANT NOTE: The operation of the Security and Convenience System as described in this manual is applicable
Owner s Guide. ca6154
 PROFESSIONAL SERIES Owner s Guide For Models: ca6154 Deluxe Vehicle Security and Remote Start System IMPORTANT NOTE: The operation of the Security and Convenience System as described in this manual is
Owner s Guide CARS & CA4B5
 PROFESSIONAL SERIES Owner s Guide For Model: CARS & CA4B5 Deluxe Vehicle Remote Start and Keyless Entry System IMPORTANT NOTE: The operation of the Security and Convenience System as described in this
Owner s Guide ca4054 ca4554
 PROFESSIONAL SERIES Owner s Guide ca4054 ca4554 Remote Start System IMPORTANT NOTE: The operation of the Security and Convenience System as described in this manual is applicable to most vehicles. However,
Remote Vehicle Control System CA-150. Owner's Manual. Vehicle Security System With Remote Keyless Entry
 Remote Vehicle Control System CA-150 Owner's Manual Vehicle Security System With Remote Keyless Entry IMPORTANT NOTE: The operation of the Security and Convenience System as described in this manual is
Blue Air. Commercial Refrigeration Inc. Installation & Operation Manual Chef Bases
 Blue Air Commercial Refrigeration Inc. Installation & Operation Manual Chef Bases Please read this manual completely before installing or operating this unit! BACB53 BACB71 BACB74 BACB83 BACB86 BACB96
10 Year Limited Warranty
 Power. On Your Terms. 10 Year Limited Warranty PHI 2.7 TM PHI 3.5 TM 60A SIMPLIPHI POWER, INC. REV020618 10 Year Limited Warranty: PHI 2.7 TM PHI 3.5 TM 60A 24V 48V Limited Pro-Rated Warranty Coverage
Installation & Operation Manual Chef Base
 Installation & Operation Manual Chef Base Please read this manual completely before installing or operating this unit! BACB53 BACB53M BACB71 BACB71M BACB74 BACB74M BACB83 BACB83M BACB86 BACB86M BACB96
DUAL WIDEBAND AIR/FUEL RATIO GAUGE Product Numbers: GS-W702W_Dual, GS-C702W_Dual, GS-T702W_Dual
 Installation Instructions Tech Support: 856.768.8300 TechSupport@GlowShiftGauges.com DUAL WIDEBAND AIR/FUEL RATIO GAUGE Product Numbers: GS-W702W_Dual, GS-C702W_Dual, GS-T702W_Dual (1) Gauge (2) Controllers
Installer s Manual. PCO/UV N-Duct Model
 Installer s Manual PCO/UV N-Duct Model FACTS ABOUT THE PCO/UV N-DUCT UNIT AirGorilla combines the power of two highly regarded contaminant fighting technologies - ultraviolet light and PCO (photocatalytic
CA 6550 Owner s Guide
 PROFESSIONAL SERIES CA 6550 Owner s Guide 2 Way LCD Vehicle Security and Remote Start System IMPORTANT NOTE: The operation of the Security and Convenience System as described in this manual is applicable
ca 5550SST Owner s Guide
 PROFESSIONAL SERIES ca 5550SST Owner s Guide Deluxe Vehicle Remote Start System with 900Mhz 2 Way Confirming LCD Remote Control IMPORTANT NOTE: The operation of the Security and Convenience System as described
Owner s Guide CA 4555
 PROFESSIONAL SERIES Owner s Guide For Model: CA 4555 Vehicle Remote Start System with 2 Way Confirming Remote Control IMPORTANT NOTE: The operation of the Security and Convenience System as described in
Installation and Operation Manual
 Installation and Operation Manual * Read all installation instruction and warranty information prior to beginning installation * XeVision HID landing and taxi lights are for experimental aircraft only
Operator's Manual. Storage System. Ultrasound Probe Cabinet. Manufactured by:
 Storage System Ultrasound Probe Cabinet Operator's Manual Manufactured by: CIVCO Medical Solutions 102 First Street South Kalona, IA 52247 USA 319.248.6757 / 800.445.6741 WWW.CIVCO.COM Copyright 2018 All
Table of Contents. How the Surestart SE 433 Operates Starting the Vehicle with the Remote Starter... 3
 Table of Contents How the Surestart SE 433 Operates... 3 Starting the Vehicle with the Remote Starter... 3 Stopping the Vehicle While It Is Running Via the Remote Starter... 4 Operating Your Vehicle While
Blue Air. Commercial Refrigeration Inc. Installation & Operation Manual Glass Door Countertop Refrigerator
 Blue Air Commercial Refrigeration Inc. Installation & Operation Manual Glass Door Countertop Refrigerator Please read this manual completely before installing or operating this unit! BAGR7 Blue Air reserves
Owner s Guide PR1BZ PR1BZLR
 Owner s Guide For Models: PR1BZ PR1BZLR PRORS RF Upgrade Kit IMPORTANT NOTE: The operation of the Security and Convenience System as described in this manual is applicable to most vehicles. However, due
21", 33", 45", & 61" Installation & Operation Manual
 21", 33", 45", & 61" Installation & Operation Manual 120V 230V 277V XL 21" #06170 #06178 #06171 XL 33" #06172 #06179 #06173 XL 45" #06174 #06188 #06175 XL 61" #06176 #06189 #06177 FEATURES Reduces or prevents
Owner s Guide APS596Z
 Owner s Guide For Models: APS596Z Security / Keyles Entry System IMPORTANT NOTE: The operation of the Security and Convenience System as described in this manual is applicable to most vehicles. However,
Product range 2010 /11. isolde the new generation of Philips tanning lamps
 Product range 2010 /11 isolde the new generation of Philips tanning lamps Tanning is pure joy of life The isolde product range, the new generation of Philips tanning lamps, provides a sophisticated choice
Power. On Your Terms.
 Power. On Your Terms. 10 YEAR LIMITED WARRANTY PHI 1310 TM 1 SIMPLIPHI POWER, INC. REV102016 10 YEAR LIMITED WARRANTY: PHI 1310 TM LIMITED PRO-RATED WARRANTY COVERAGE The SimpliPhi Power PHI 1310 as supplied
Q-Series Ultraviolet Lamps OPERATOR S MANUAL
 Q-Series Ultraviolet Lamps OPERATOR S MANUAL AM05008-3 PRINTED IN U.S.A. ISSUED: FEBRUARY 2011 Q-Series Ultraviolet Lamps DANGER Ultraviolet radiation emitted from this product. Avoid exposure. ALWAYS
USER MANUAL A
 42 Series USER MANUAL Limited Lifetime Warranty Solaris warrants your tanning unit to be free of structural defects in its material and workmanship, under normal use, for its lifetime. Solaris will repair
182-LED Solar-Powered Motion Security Light. Owner s Manual
 182-LED Solar-Powered Motion Security Light Owner s Manual WARNING: Read carefully and understand all ASSEMBLY AND OPERATION INSTRUCTIONS before operating. Failure to follow the safety rules and other
MODELS PRO 28LX / 28LXT / 28LX2F USER GUIDE
 MODELS PRO 28LX / 28LXT / 28LX2F USER GUIDE Limited Lifetime Warranty SUNVISION warrants your tanning unit to be free of structural defects in its material and workmanship, under normal use, for its lifetime.
CA 5053 Owner s Guide
 PROFESSIONAL SERIES CA 5053 Owner s Guide Remote Start and Keyless Entry System IMPORTANT NOTE: The operation of the Security and Convenience System as described in this manual is applicable to most vehicles.
Safety, Installation and Service Manual Models 1952, 1953 & 1972
 Ultraviolet Germicidal Lamps Model 1952 24 Rooftop Unit Model 1953 32 Rooftop Unit Model 1972 Rooftop Unit, Internal Mount Safety, Installation and Service Manual Models 1952, 1953 & 1972 READ AND SAVE
4-LED Solar-Powered Pendant Shed Light
 4-LED Solar-Powered Pendant Shed Light Owner s Manual WARNING: Read carefully and understand all ASSEMBLY AND OPERATION INSTRUCTIONS before operating. Failure to follow the safety rules and other basic
1000-LB. MOTORCYCLE LIFT TABLE OWNER S MANUAL
 1000-LB. MOTORCYCLE LIFT TABLE OWNER S MANUAL WARNING: Read carefully and understand all ASSEMBLY AND OPERATION INSTRUCTIONS before operating. Failure to follow the safety rules and other basic safety
V-55 Turbo Power EXPOSURE 9 min 9 min TIME
 V-55 Turbo Power EXPOSURE 9 min TIME OPERATING INSTRUCTIONS 1005813-00 / us / kn / 04.2008 V-55 Turbo Power Identify your tanning system For contact with Customer Services, please write down the device
Laboratory Series. Ultraviolet Ozone Destruct System Installation, Operation and Maintenance Manual. One Source for All Your UV Needs!
 Laboratory Series Ultraviolet Ozone Destruct System Installation, Operation and Maintenance Manual KEEP THIS MANUAL ON HAND IT IS IMPORTANT THAT THOSE RESPONSIBLE FOR THE INSTALLATION OF THIS EQUIPMENT,
Owner s Guide CARS & CA2LCD5
 PROFESSIONAL SERIES Owner s Guide For Models: CARS & CA2LCD5 Deluxe Vehicle Remote Start and Keyless Entry System IMPORTANT NOTE: The operation of the Security and Convenience System as described in this
120-LED Solar-Powered Motion Security Light
 120-LED Solar-Powered Motion Security Light Owner s Manual WARNING: Read carefully and understand all ASSEMBLY AND OPERATION INSTRUCTIONS before operating. Failure to follow the safety rules and other
Heavy Duty Engine Cranes
 Heavy Duty Engine Cranes Operating Instructions & Parts Manual Model Number Atd-7484 Atd-7485 (Foldable Legs) Capacity 2 Ton 2 Ton Model Atd-7484 Model Atd-7485 Atd Tools Inc. 160 Enterprise Drive, Wentzville,
Hawk Enterprises of Elkhart THE BRUTE Owner s Manual
 Hawk Enterprises of Elkhart THE BRUTE Owner s Manual Operation Care Service COMMERICAL/INDUSTRIAL DUTY STONE RESTORATION MACHINE 13, 15, 17, 20 165 RPM 1.5 HP 180 FRAME TOTALLY ENCLOSED FAN COVERED MOTOR
Remove packaging and place your SunTouch Plus on a level surface.
 Quick Start 1) 2) Remove packaging and place your SunTouch Plus on a level surface. Plug unit into an electrical socket. 3) Using the control panel adjust the unit to desired setting. (See next page for
60 PSI Boost Gauge. For Product Numbers: MT-DV01_60, MT-WDV01_60
 60 PSI Boost Gauge For Product Numbers: MT-DV01_60, MT-WDV01_60 Red: 12v Constant (un-switched) Source (+) Orange: 12v Dimmer (switched) Source (+) (optional) White: 12v Ignition (switched) Source (+)
Operating Instructions & Parts Manual
 Hydraulic Long Ram Operating Instructions & Parts Manual Model Number ATD-7486 Capacity 8 Ton WARNING: This product may contain chemicals, including lead, known to the State of California to cause cancer,
MODELS SUPER ZX32 / ZX32 3F / ZX32 T 22544A
 USER GUIDE MODELS SUPER ZX32 / ZX32 3F / ZX32 T 22544A Limited Lifetime Warranty SunStar warrants your tanning unit to be free of structural defects in its material and workmanship, under normal use, for
(Equipped with Bottle Jack)
") Operating Instructions & Parts Manual Please read and save these instructions. Read carefully before attempting to assemble, install, operate or maintain the product described. Protect yourself and others
Operating Instructions & Parts Manual Please read and save these instructions. Read carefully before attempting to assemble, install, operate or maintain the product described. Protect yourself and others
WARRANTY REGISTRATION FORM
 WARRANTY REGISTRATION FORM Please read & fill out attached warranty registration form to activate warranty This warranty registration must be received within 45 days from the time of purchase. Your New
INSTALLATION INSTRUCTIONS
 THANK YOU FOR CHOOSING KURYAKYN! Protect yourself and others from possible injury and property damage or loss. Pay close attention to all instructions, warnings, cautions, and notices regarding the installation,
Super ZX 30 USER MANUAL
 Super ZX 30 USER MANUAL Limited Lifetime Warranty SunStar warrants your tanning unit to be free of structural defects in its material and workmanship, under normal use, for its lifetime. SunStar will repair
MINISTICK TM UV Germicidal Ultraviolet Light
 MINISTICK TM UV Germicidal Ultraviolet Light Installation & Operation Manual 120V - Part # 19400 230V - Part # 19401 GENERAL This product emits germicidal ultraviolet (UV-C) light to help disinfect the
Smart Battery Charger GPC-35-MAX GPC-45-MAX GPC-55-MAX GPC-75-MAX GPC-100-MAX. Owner s Manual
 Smart Battery Charger GPC-35-MAX GPC-45-MAX GPC-55-MAX GPC-75-MAX GPC-100-MAX Owner s Manual Table of Contents Important Safety Instructions 2 Features 3 Installation Guidelines 5 Warranty 8 1.0 Important
L I M I T E D L I F E T I M E W A R R A N T Y
 L I M I T E D L I F E T I M E W A R R A N T Y Products manufactured and sold by OMEGA RESEARCH & DEVELOPMENT, INC. (the Company), are warranted to be free from defects in materials and workmanship under
CA611 Owners Manual CAUTION!
 CA611 Owners Manual CAUTION! Be certain that the vehicle is outdoors before using this or any remote vehicle starting device. A running engine produces dangerous carbon monoxide fumes which can be harmful
12 Volt Heavy-Duty Air Inflator
 12 Volt Heavy-Duty Air Inflator Owner s Manual WARNING: Read carefully and understand all ASSEMBLY AND OPERATION INSTRUCTIONS before operating. Failure to follow the safety rules and other basic safety
OUTDOOR TABLE TENNIS TABLE ASSEMBLY INSTRUCTIONS
 OUTDOOR TABLE TENNIS TABLE ASSEMBLY INSTRUCTIONS Please Do Not Hesitate to Contact Our Consumer Hotline at 800-759-0977 with Any Questions That May Arise During Assembly or Use of This Product! NG2336P
Product range. isolde The successful tanning lamp program for all, who appreciate the proven Philips product quality. A perfect team.
 Product range isolde The successful tanning lamp program for all, who appreciate the proven Philips product quality. A perfect team. Tanning with pleasure The intelligent isolde product line is the result
Air Actuated Hydraulic Bottle Jacks
 Air Actuated Hydraulic Bottle Jacks Operating Instructions & Parts Manual Model Number Atd-7412 Atd-7420 Capacity 12 Ton 20 Ton Atd Tools Inc. 160 Enterprise Drive, Wentzville MO 63385 Printed in China
Spotlight 1,000,000 Power Series Cordless Rechargeable
 VEC156CFL_Manual_012405 1/24/05 4:29 PM Page iv VEC156 Spotlight 1,000,000 Power Series Cordless Rechargeable OWNER S MANUAL & WARRANTY INFORMATION 53SB E231887 IMPORTANT SAFETY INFORMATION, SAVE THESE
AEROMOTIVE Part # L Ford F L Ford Expedition L Ford F-250 Super Duty INSTALLATION INSTRUCTIONS
 AEROMOTIVE Part # 14118 97-03 5.4L Ford F-150 97-02 5.4L Ford Expedition 98-03 5.4L Ford F-250 Super Duty INSTALLATION INSTRUCTIONS CAUTION: Installation of this product requires detailed knowledge of
Air Actuated Hydraulic Bottle Jack on Wheels
 Operating Instructions & Parts Manual Air Actuated Hydraulic Bottle Jack on Wheels Model Number 18127 18207 Capacity 12 Ton 20 Ton Shinn Fu Co. of America, Inc. 2002 10939 N. Pomona Avenue Kansas City,
AEROMOTIVE Part # and F-Body Fuel System Kit INSTALLATION INSTRUCTIONS
 AEROMOTIVE Part # 17101 and 17102 93-97 F-Body Fuel System Kit INSTALLATION INSTRUCTIONS CAUTION: Installation of this product requires detailed knowledge of automotive systems and repair procedures. We
BX7322 Adventurer Tow Bar Operator Manual & Installation Instructions
 Please visit www.blueox.com for the latest version of these installation instructions. BX7322 Operator Manual & Installation Instructions Serial Number (5,000 lb) 2 Inch Coupler 292-1263 Rev J Page 1 of
Advanced PCO System. Installation Instructions & Consumer Information. Section I. Important Installer Information WARNINGS
 Advanced PCO System Installation Instructions & Consumer Information Section I. Important Installer Information The Dynamic Advanced Photo Catalytic Oxidation (PCO) System utilizes the latest developments
60 Watt Industrial LED Low Bay Light
 60 Watt Industrial LED Low Bay Light Owner s Manual WARNING: Read carefully and understand all ASSEMBLY AND OPERATION INSTRUCTIONS before operating. Failure to follow the safety rules and other basic safety
HAWK. HAWK G2 Raptor Orbital Floor Machine Dry Stripping, Scrubbing, Stripping. Operation Care Service ENTERPRISES
 HAWK ENTERPRISES HAWK G2 Raptor Orbital Floor Machine Dry Stripping, Scrubbing, Stripping Operation Care Service Ÿ HAWK ENTERPRISES 2902 Park Six Court, Elkhart, IN 46514 (574) 294-1910 (888) 289-4295
Firstmate Installation Manual and User's Guide May, 2003
 Firstmate Installation Manual and User's Guide May, 2003 Aqualogic Marine, Inc. 506-D Terry Lane - Washington - Missouri - 63090 Warning No user serviceable parts are located inside your Firstmate unit.
Important Operating Instructions and Warranty Information On Your New Electronic AMSEC Safe
 Important Operating Instructions and Warranty Information On Your New Electronic AMSEC Safe MODELS: ES914, ES149, ES1814, ES813, ES916, ES1014, ES2014, ES412, WES149, WES2114 Read Contents Carefully For
1000-lb Hydraulic Truck Crane
 1000-lb Hydraulic Truck Crane Owner s Manual WARNING: Read carefully and understand all ASSEMBLY AND OPERATION INSTRUCTIONS before operating. Failure to follow the safety rules and other basic safety precautions
USER MANUAL B
 USER MANUAL 18 MONTH BRONZE MEDAL WARRANTY SUN-CO, Inc., through a manufacturer s warranty, warrants your tanning unit to be free of structural defects in material and workmanship, under normal use, for
HARDWARE KIT INSTALLATION GLOVES
 COIL MOUNT STEEL DUCT MOUNT DUCTBOARD MOUNT CLAMP PLATE Z-BRACKET PCO BRACKET SHIELDED LAMP ASSEMBLY ALSO INCLUDED BALLAST TECH MANUAL HARDWARE KIT INSTALLATION GLOVES Rev 1 Issued: 09/03/2014 SERVICE
Sawhorse with Chainsaw Holder
 Sawhorse with Chainsaw Holder Owner s Manual Chainsaw not included. WARNING: Read carefully and understand all ASSEMBLY AND OPERATION INSTRUCTIONS before operating. Failure to follow the safety rules and
Installation Instructions: (Part # SB76828) Jeep JK 2dr/4dr XRC Modular Front Bumper Full Width End Plate Kit
 Jeep JK 2dr/4dr XRC Modular Front Bumper Full Width End Plate Kit") 2007-2013 Jeep JK 2dr/4dr NOTE: Carefully read entire instructions thoroughly before attempting to install this part. Parts Included Qty 93-7649 Full Width End Plate: Drvr 1 93-7652 Full Width End Plate:
2007-2013 Jeep JK 2dr/4dr NOTE: Carefully read entire instructions thoroughly before attempting to install this part. Parts Included Qty 93-7649 Full Width End Plate: Drvr 1 93-7652 Full Width End Plate:
Level One Electric Vehicle Charging Station FREE STANDING Product Guide
 Level One Electric Vehicle Charging Station FREE STANDING Product Guide Model # SC2-120 Shorepower Technologies 2351 NW York St. Portland, OR 98664 503-892-7345 info@shorepower.com www.shorepower.com 2
Tissue Master. User Manual
 Tissue Master User Manual This page left blank intentionally This manual is a guide for the use of the Omni International Tissue Master and accessories. Data herein has been verified and validated. It
AEROMOTIVE Part # L 4V Fuel Rails INSTALLATION INSTRUCTIONS
 AEROMOTIVE Part # 14130 5.0L 4V Fuel Rails INSTALLATION INSTRUCTIONS CAUTION: Installation of this product requires detailed knowledge of automotive systems and repair procedures. We recommend that this
16 Inch Hanging Pendant Barn Light
 16 Inch Hanging Pendant Barn Light Owner s Manual WARNING: Read carefully and understand all ASSEMBLY AND OPERATION INSTRUCTIONS before operating. Failure to follow the safety rules and other basic safety
110 Volt/12 Volt Portable Inflator
 110 Volt/12 Volt Portable Inflator Owner s Manual WARNING: Read carefully and understand all ASSEMBLY AND OPERATION INSTRUCTIONS before operating. Failure to follow the safety rules and other basic safety
Twin-Beam Spotlight 3,000,000 Power Series Corded Cordless Rechargeable
 VEC158CFL_Manual_012405 1/24/05 4:37 PM Page iv VEC158 Twin-Beam Spotlight 3,000,000 Power Series Corded Cordless Rechargeable OWNER S MANUAL & WARRANTY INFORMATION IMPORTANT SAFETY INFORMATION, SAVE THESE
Chair-Check II User Manual
 Chair-Check II User Manual 0163-437-H Reducing the Risk of Falls Through Innovative Technology Since 1978 1-800-523-7956 www.bedcheck.com 2008 The Stanley Works All Rights Reserved Bed-Check, Chair-Check,
User Guide IGD Series
 US User Guide IGD Series DANGER PRIOR TO USE, READ AND UNDERSTAND PRODUCT SAFETY INFORMATION. Failure to follow the instructions may result in ELECTRICAL SHOCK, EXPLOSION, or FIRE, which may result in
Heavy Duty Engine Cranes
 Heavy Duty Engine Cranes Operating Instructions & Parts Manual Model Number ATD-7484 ATD-7485 (Foldable Legs) Capacity 2 Ton 2 Ton Model ATD-7484 Model ATD-7485 WARNING: This product may contain chemicals,
Installation & Maintenance of the Fresh-Aire UV Airborne Duct System for Commercial HVAC Systems. Parts Included. Optional Parts
 Installation & Maintenance of the Fresh-Aire UV Airborne Duct System for Commercial HVAC Systems The Fresh-Aire UV Airborne Duct System is designed for installation into commercial HVAC system ducts for
UV-AIRE AIR PURIFYING SYSTEM
 UV-AIRE AIR PURIFYING SYSTEM Model: UV-16/24 The UV-Aire unit is designed to emit powerful UVC Band light rays, which sterilize and reduce airborne microorganisms as they pass through a heating or air
Owner s Guide ca4053 ca4553
 PROFESSIONAL SERIES Owner s Guide ca4053 ca4553 Remote Start System IMPORTANT NOTE: The operation of the Security and Convenience System as described in this manual is applicable to most vehicles. However,
BX7322 Adventurer Tow Bar Operator Manual & Installation Instructions
 Please visit www.blueox.com for the latest version of these installation instructions. BX7322 Operator Manual & Installation Instructions Serial Number (5,000 lb) 2 Inch Coupler 292-1263 Rev J Page 1 of