ENG. Royal Exclusiv pumps & skimmers. Operating and maintenance manual for Bubble King Supermarin For all Bubble King Supermarin skimmer 200, 250, 300
|
|
|
- Alan Lucas
- 6 years ago
- Views:
Transcription


1 Royal Exclusiv pumps & skimmers v3.0 Operating and maintenance manual for Bubble King Supermarin For all Bubble King Supermarin skimmer 200, 250, 300 ENG
2 Operating and maintenance manual for Bubble King Supermarin For all Bubble King Supermarin skimmer 200, 250, 300 The Bubble King SuperMarin can be equipped with Red Dragon 1 (RD1) oder Red Dragon 3 (RD3), the guide primarily shows the RD1. For information regarding the handling and maintenance of the RD3, please refer to the separate RD3 instructions. 1. Commissioning (putting into operation) Change of the port of the pump Setup instructions, adjustable nozzle Red Dragon 1 pump Adjusting the water stripline by the wedge shaped tube Maintenance Disassembling the pump Red Dragon 1 (RD1) pump Deliming and cleaning the impeller of the RD Disassembling and cleaning the riser tube of the skimmer Disassembling the plexiglas riser tube from the base plate Maintenance of the skimmer head PVC thread Maintenance of the resonator / silencer, older version with 2 pumps BK SM General Ozon plug Good to know! Possible sources of error Cleaning the silencer/resonator Bubble King Supermarin Defects and claims for compensation, disclaimer Manufacturer s declaration Manufacturer Informations and support...12 Important Notice Please read this manual carefully before you install the device. We recommend not to proceed the installation of the device until you read the manual. This prevents any questions and problems that might occur in installation process. As soon as you power-on the skimmer for the first time, you agree that you read and understood this manual. In doubt or if anything is unclear please contact your supplier/vendor or dealer before you start-up the skimmer. 1


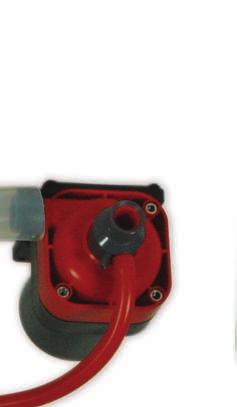
3 1. Commissioning (putting into operation) Please take the Bubble King out of the package and check the skimmer for shipping damage, which must be filed to your local dealer within 24 hours. The Bubble King is preinstalled and ready for operation and may be put into the filter sump for instant operation. Please install the skimmer head and put the skimmer into the filter sump or equivalent to get familiar to the device. The lower water level of the Bubble King Supermarin should not be below 18 cm and shouldn t exceed 23 cm. The best matching water level is 20 cm. Now, please plug the power cable into the desired wall outlet. Please note, that sub water level pumps must be only connected to a ground fault circuit interrupter (FI safety switch). Furthermore we recommend a frame connector with voltage surge protection, which, in the case of a short circuit in the mains, prevents a high voltage boost to the Red Dragon pump which will burn the internal fuse. In the case the RD fuse (melting fuse) was blown, the motor can t be repaired and therefore must be replaced. In general, new skimmers require a certain amount of time to produce firm foam. New skimmers may contain several substances like grease, glue residue and similar substances which prevent foam forming. Depending on the contamination of your aquarium water it may take from 2 minutes to 1 week until solid foam was formed. A general statement on the amount of time needed for a skimmer to run smoothly cannot be made. As soon as the foam is firm enough see photo below screw the pot onto the column. Please make sure that the O-ring on the inside is firmly attached to the notch, without distortion, warping or other irregularities, as they may result in minor leakage. If the foam is now sufficiently firm, you can carefully adjust the water level in the skimmer by turning the wedge shaped tube clockwise or counter-clockwise, see photo. Please note that it is absolutely prohibited to cut the plug from the power cable to prolong or short the power line. Sub water pumps with cut power cables do not meet the safety regulations and any warranty on the device will be void. Furthermore, we are not allowed to repair sub water pumps, if the power cable was manipulated. After running the pump, within a short time, a foam cushion should be formed like shown on the figure to the left. Let the skimmer run for several hours without placing the pot on top. There is a small screw at the edge of the wedge shaped tube holder with which the wedge shaped tube can be clamped into the guide holder. 2


 you can see the water level stripline approx.")


 has been filled by a foamy liquid.")
4 The screw should only be tightened loosely without using any tools. Risk of breakage! operate the device with open outlet in the first few days. Photo right: Mount plug only after running in. The transition of wet water foam into dry foam takes place at the water/air separation line. If possible, the water level should not exceed the maximum water separation line which is usually at the end of the riser. This maximum line ensures dry skimming. However, this line can be exceeded, if required. Our recommendation is a guideline and not a requirement. It is at the discretion of the user whether he prefers dry or wet skimming. However, the user should take into consideration that the Bubble King Supermarin skimmer may become very sensitive if the separation layer is too high. This can result in overflowing if impurities like fat rich feed, various trace elements or fresh filter media come into contact with water. Current water level On the figure (Current water level) you can see the water level stripline approx. 5 cm below the maximum level. This water level stripline can be lowered or rised by turning the tube.the water level stripline is different in every aquarium, depending on quality and surface tension of the salt water. The left photo below shows the ideal condition not too dry and not too wet. To maintain this condition it is vital to After the skimmer was forming enough dry foam it is recommended to grease the upper end of the riser tube as well as the inner foam ring. This will prevent the foam cup to be filled with solid dry foam, because the bubbles will burst immediately when touching the grease. This will force adsorbate into the cup and no dry foam, which might leave the cup through the ventilation holes and fall back into the filter sump. Please keep the skimmer running until the absorbate pot (skimmer head) has been filled by a foamy liquid. All Bubble King skimmers have a so called absorbate drain. On the bottom of the pot (skimmer head) is a 10mm hole located, which was sealed by a silicone plug. This is the hand-over location. The customer may install an additional attachment (p. ex. a small ball tap) to drain the absorbate, which makes cleaning easy. Notice: Please do not wait too long until cleaning an over-filled pot. 1.0 Change of the port of the pump The Bubble King Supermarin offers 2 connectivity of the pump on the skimmer. A silicone hose extension is provided for this purpose. 3


5 1.1. Setup instructions, adjustable nozzle Red Dragon 1 All internal Bubble King skimmers are fit with an adjustable water inlet nozzle. Using the nozzle mainly adjusts the water flow rarely affecting the air performance. Please note: A skimmer performs best, when a perfectly well defined amount of water and air enters the skimmer on the lowest point of the device. The Bubble King Red Dragon pumps has a so called ideal operation point. The ideal point is well defined and will be found as shown below: Please turn to completely screw nozzle, as on the upper left picture shown. Then please turn to the nozzle to the left, counter clockwise. Usually turn. This is the best operating point. The black dots are used only for orientation. The user may exceed or under-run this point as desired. Under-running the point may be advisable to reduce the skimmer performance in coral tanks with only a few fish. Increasing the flow-through may be advisable on tanks with many fish or in the case of disaster. A dying big Tridacna, algae emitting spores or poisoning triggered by dying animals or similar reasons require a fast and wet foaming. Notice: Each spin increases water flow-through by approx. 500 litres. Operation without nozzle screw is prohibited. The air flow would be reduced by half and water flow would be increased by 300%. In this state the pump will be overloaded and within a short time automatically switched off. The noise level also would exceed dramatically Adjusting the water stripline by the wedge shaped tube It is also possible to adjust the water level in the skimmer by help of the wedge shaped tube. The wedge shaped tube should be only used for fine tuning or flooding of the skimmer head. In this case flooding means the cleaning of the Bubble King head without removing the head. The wedge shaped tube must be almost closed forcing the water level immediately into the skimmer head. Now use a brush to clean the riser tube to flush the residue into the skimmer head without draining back into the filter tank. By the resolve of the titanium screw and turn the tube to the left or to the right you will fine tune the foam level. 4


6 2. Maintenance We recommend the cleaning of the Bubble King at frequent intervals respectively to check the needle wheel for foreign objects. To check the needle wheel it is not necessary to remove the skimmer from the filter tank. Unplug the skimmer from the mains. Remove the jet tube from its seating. Turn the skimmer into your direction and optically check the first row of needles for foreign objects like snails, mussels, activated carbon pellets, filter cotton or food debris. In case of an accumulation of debris in the pump, the pump must be disassembled. Red Dragon Bubble King pumps have a built-in automatic shutoff. The internal circuit is permanently measuring the pumps power consumption. In the case of serious calcifying, and thus, stiff bearings, the internal circuit will classify the rising power consumption as a failure and switch off the pump, due to safety reasons. Because of this behaviour a Bubble King pump never can be damaged by smouldering fire or other damage due to a short circuit. Just plug off and on to bring the pump back into operation. Please note, that it is not advisable to trick the internal circuit into normal operation by a repeated switching of the device. If a Red Dragon pump was switched off, a failure occurred apparently, which must be solved. If happened, usually only a cleaning session is required. IMPORTANT: Permanently tricking the circuit may result in severe motor damage, which will not be covered by warranty Disassembling the RD1 pump After removing the pump from the silicone hose please remove the inlet nozzle from the designated opening. Put the skimmer onto a flat, soft surface or a towel and start to disassemble the pump as shown below. You just need a standard mid size screw driver and an Allen wrench M5 required for a complete disassembling. Turn off the 4 housing screws and remove the head. Caution: The pump holders are made from plastic. Just tighten the screws until the gap between pump head and holder was closed. Overtighten the screws may damage the threads. The housing screws were made from titan and, thus, are 100 % salt water proof. Use your fingers to grab behind the needle wheel and softly pull the wheel from its guidance. Clean the wheel by the help of a sharp tip. Please decalcify the wheel unit in an applicable decalcifying bath. DO NEVER use hydrochloric acid even when thoroughly diluted!!! The pump may be seriously damaged. Applicable are, formic acid, acetic acid and phosphoric acid or even household decalcifiers for water conditioners and coffee machines. Basically the wheel bearing of the motor should be also decalcified. Thick, greasy residues should be removed under running water by the help of a semi hard brush. Attention: Please consider the safety regulations imprinted when using decalcifiers. Please wear protective clothing and safety glasses. 5

 We recommend to check the Red")


7 If the bearing fits on the shaft, like shown on the picture on the left, when pulled out, then manually remove it from the shaft. And the bearing after removal from the shaft. (shown on the picture on the right) We recommend to check the Red Dragon pump already after three months, to determine the possible maintenance intervals that, can be depending on precipitation between 2-12 months. If the impeller group extremely calcified, solve the plate between engine and rotor. Cover enter with a small slot screwdriver,!carefully! Under no circumstances put the bearing loosely onto the shaft and then insert the wheel unit into the motor block. The bearing wont fit in its slide, and thus, the pump will hum extremely after putting into operation. The bearing must securely installed into its slide before assembling the wheel unit. After the bearing was installed into its slide, the O-ring seal must be seated by the help of a mid-size screw driver. After thoroughly rinsing of all decalcified parts with water, we now begin to reassemble the device Deliming and cleaning the impeller of the RD1 Important notice: The backside bearing of the wheel unit should have your special attention, because most failures result from there. At first, check if the bearing sleeve of the wheel unit on the back was seated properly. Now take the wheel unit and position in a way that the rectangular slide shows upward. This rectangular slide will fit into the motor only, when showing upwards. Wheel unit with slide and the counterpart on the motor shown on the picture on the left. 6


8 3. Disassembling and cleaning the riser tube of the skimmer Bubble King skimmers can be totally disassembled. Thanks to new production processes with a precision range of 100/mm, all CNC-machined parts have a so-called zero fit. This means that most of the parts are not bonded to each other, but feature precise fits. All screws are made from pure titanium, grade 2, and are absolutely seawater resistant and rustfree. Please detach the skimmer in the filter tank as far as possible. Remove the pump, pull out the telescope tube and unscrew the skimmer head. Please prevent the head from falling off sideways. Clean the parts as far as possible by a soft material and decalcify if necessary. Attention: Do not overtighten the screws in the base plate. Pay attention to the accuracy of the holes to connect of the silicone hose of pump. (fig. above) The silicone hose for the air lead with rotating movements through the wedge tube and connect to the silencer to the provided port. Please do not use sharp, abrasive or acid cleansers, because the plexiglass is sensitive to scratches Disassembling the plexiglas riser tube from the base plate From the date of manufacturing as 2015, Bubble King skimmers are not glued to the base plate anymore, but firmly fixed by screws. This allows lifting the riser tube from the base plate to make the innards accessible to thorough cleaning. Please proceed as follows: First, untighten the 3 screws with a suitable slot screwdriver. After removing the screws, you can take off the base plate. As shown in the right picture above. Note for optimal cleaning: The skimmer tube should be rinsed under flowing water with some chlorine. Chlorine doesn t damage the skimmer parts. 7


9 4. Maintenance of the skimmer head PVC thread All Bubble King skimmers have a CNC-milled PVC-thread, providing 100% tightness of the head installed to the skimmer tube. After every thorough cleansing the thread should be lubricated by some silicone grease or oil, which makes the head much easier to spin. The surface of the seal should be also treated by some oil, which allows a smoother seating of the head and adds more tightness. The seal itself was made from silicone and, thus, is permanently salt water proof. 5. Maintenance of the resonator / silencer older version with 2 pumps BK SM 300 The left figure below shows the opened resonator. Thoroughly clean the resonator and reassemble. The cellular material is only helpful for noise reduction but must not be replaced if not desired. 6. General Please do not overtighten the screws. Important: correctly seated adjustable nozzle The noozle fits tightly into a notch and is removable. After cleaning the nozzle please check that it was completely pressed into the notch, like shown in the left figure. The nozzle must be firmly seated. If the nozzle was not firmly seated the consequences are equal to a wide open nozzle screw causing huge water flow and turbulences in the skimmer. Bubble King skimmers are extremely low-noise. The noise of the air jet is perfectly dimmed by a valuable resonator. The so called Helmholtz-Resonator reduces noise by frequency phase shifting. The Royal Exclusiv resonators are mostly maintenance-free, because the air is not forced through filters like in other devices, but smoothly pass through the resonator. Dusty air or accidentally dipping the resonator into salt water may require an internal cleaning to prevent plugging from accumulated salt crystals. Please check the resonator for obstructions by manually blowing through it. If you experience some resistance please proceed as follows: Open the resonator by the use of a matching M5 tool Ozon plug Please remove the hose from below the resonator and install a 12mm T-set auf. Install another hose on the lower end of the T-set. The 12mm T-opening must be reduced to 6mm and fitted with a nozzle. Plug the ozoniser to the small nozzle. Usually the depression of the Bubble King pump is sufficient to provide enough suction to the ozone. If the hose is too long you may use a small air pump to feed the airozone mix into the skimmer. 8


 this is the height of the water in the filter basin! 3.")
10 Under no circumstances try to connect the 10mm silicone hose from the Bubble King pump directly to the ozoniser. It is definitely not functional! The high resistance of ozonisers make it impossible to be directly driven through the pump. The skimmer performance would be instantly reduced by 90 %.The pump would be overloaded and the safety circuit will emergency shut off the pump to prevent damage to the pump. Nozzle with air- and ozon- plug 6.2. Good to know! We state explicitly that the pump must not dry run. Furthermore it is not allowed, even for testing purposes, to switch on the pump in a dry state. Resulting damage to bearings and/or axles are not subject to warranty. Royal Exclusiv products are manufactured on state-ofthe-art CNC milling machines. Our staff is all well trained carefully working master craftsmen. In the case of complaints or improvements, please contact our service at info@royal-exclusiv.de. We are glad to help you. Royal Exclusiv guarantees a permant supply of spare parts for at least 5 years. Do not forget! At least mm are required for the removal and cleaning of the entire skimmer cup! 7. Possible sources of error To get an optimal skimming result, the following informations are important: 1. Water does not become water straight away! As a result of the different composition, the skimmer may need a few days before it starts to skim. (Particularly with new products) 2. Pay attention to the water filling level between from ~ 180 mm up to ~ 230 mm (ideally ~ 200 mm) this is the height of the water in the filter basin! 3. The water level in the skimmer is controlled using a tube. This sets the amount of foam to be produced. (The level of water in the skimmer is set by turning it left or right). 4. If the skimmer produces a water-air mixture in the tube when it is turned on, this means that the skimmer is operating correctly. The skimming default must lie elsewhere. 5. Do not let the pump run dry - this would lead to permanent damage! 6. A sufficient pre-filtering of the water before it enters the skimmer, is recommended! So, the pump will be spared as before large parts, such as snail shells or shells, which can lead to a blockage of the needle wheel. Depending on how high is the water fill level in the filter, the Bubble King Supermarin can be placed on the right height, to achieve an optimal result of skimming. Water fill level -100mm Water fill level -50mm Water fill level 240mm 9


11 Royal Exclusiv pumps & skimmers 7.1. Cleaning the silencer/resonator Bubble King Supermarin The resonator is not glued but clamped in the nut. The silencer needs regular cleaning. When the pump is at rest or the water level in the filter is extremely high, some water can penetrate into the resonator. This is no cause for concern because once the pump runs again, it will evaporate the water. Over time, salt crystals may clot and heavily block the silencer. Please inspect the silencer regulary, once every 1-3 months. Solve the resonator - pull the silicone hose - back set up The pictures show the opening of the resonator. Now, the silencer inlay can be washed out with fresh water. The inlay must be completely dry before reinstalled again! Important: When removing the skimmer from the filter basin, it is essential to ensure that no salt water enters the silencer! This could lead to salt crystal formation, which would hamper the performance of the silencer and produce unpleasant noises. 10
12 8. Defects and claims for compensation, disclaimer 8. Defects and claims for compensation 8.1. Barring any further claims we are only liable that the supplied goods are free of defects until the initial transfer of perils. Insignificant variations of the contracted appearance and workmanship or marginal limitation of the usability or suitability of the product are unremarkable. The warranted condition, endurance and usability the product is solely subject to the specification agreed in writing, in the product specification and / or in this manual. Further oral agreements, especially from preliminary talks, advertising and / or in related industrial standards will are only valid as integral part of a written contract. Only conditions and specifications assured specifically by us are valid. We do not accept conditions or specifications made by third parties. Specifically the specification assured in this manual are valid. If the customer wants to use the product for other than the intended purpose, he is obliged to thoroughly the suitability of the product for the other purposes. We give no warranty and no liability accrues for any applications that are not agreed on by us explicitly and in written form. Any manipulation of the pump, the (needle whell) impeller or the electronic as well as any attempt to modify the software, to influence the software or to read out or re-engineer the software of the driver unit immediately causes a loss of warranty and all claims and rights expire. Every user is held responsible for the appropriate usage of his Bubble King Supermarin skimmer. The user manual does not discharge you from your liability for a safe, appropriate and secure application, installation, operation and maintenance. By using this manual you agree that in no circumstances the manufacturer can or will be held liable for any personal injuries or property damages which possibly occur due to the usage of the device. This applies specifically for any damages that are due to inappropriate piping or plumbing. Insufficient or missing cleaning- or maintenance intervals and damages that might result due to these are not covered by warranty. This applies especially for calcinations (salt water usage) and accumulated foreign particles (pond usage) such as sand or gravel, which lead to damages on rotors, bearings, rotor housing or motor housing, that are not covered by warranty Our warranty for defects is strictly limited to supplementary performance. This is upon our choice either removal of defects or replacement delivery free from defects. In the case of challenge, impossibility or failure of the supplementary performance the customer has the right for impairment or the right to withdraw from the contract. Additional expenses which arise because the customer has brought the sales item to another place than his subsidiary. The manufacturer explicitly limits the warranty to the pump itself. We are not reliable for consequential damages, or damages that are caused by a malfunction or failure of the skimmer, such as a loss of animals. It is in the responsibility of the customer to provide back-up devices for the case of a potential malfunction or failure of the pump The customer has to check the goods immediately thoroughly, also for product safety. Apparent damages have to be reported in written form immediately. Hidden damages have to be reported immediately after their discovery. The customer is liable to report transport damages within 24 hours to the carrier and/or the delivery service. Disregarding the rules for checking and reporting results in a loss of warranty Furthermore we are not liable for the consequences of inappropriate application, usage, maintenance and handling of the product by the customer or his subsidiaries, neither for normal abrasion. This applies specifically to the consequences of thermal, chemical, electrochemical or electrical influences as well as for infringements against our uses- and maintenance manuals. The same applies to damages which are the result of changes or adjustments by the customer which have not been approved by us in beforehand Our liability for wanton negligence is limited to claims of injury of life, body and health, to claims based upon the law on product liability and to claims from culpable fundamental breach of the contract which peril contractual obligations. For the rest our liabilities for wantonly negligent breach of contractual obligations, which are foreseeable at the time of the conclusion of the contract, are barred. Damages, which are unambiguously attributed to inappropriate usage of the product, are in general to be accounted for by the customer. In the case of returns of the product the customer has to use break-proof packaging for the product. The customer is liable for any damages that can be accounted to an inappropriate packaging. 11
13 8.6. Claims against us become time-barred within a year after the initial delivery of the goods to the customer. The same applies to claims for damages regardless of their juridical cause. The limitation period does not apply to claims based upon the malicious concealment of damages from the injury of life, health or body and for other damages that result out of intention or wanton negligence If it becomes apparent during our examination of damages reported by the customer or in the course of our removal of defects, that the reported damages or claims were made wantonly negligent or unwarranted, we may charge an adequate consideration for our examination and for the removal of defects. The customer has the right to neglect a necessary repairing and to demand the return of the skimmer. In general every examination of damages is bound to lump-sum compensation if it occurs that the customer has to be accounted for the damages Spare parts Our liability to deliver and hold spare parts available is limited to the period of 5 years after initial shipment of the product. Our respective list prices apply for spare parts Disposal We offer our customers to take back products that fall under the restriction of hazardous substances directive (ElektroG) within Germany free of charge, for products, which were brought into circulation after the 13th of August We will take care for the disposal. If a customer chooses not to let us take care for the disposal, he takes the responsibility of a disposal according to legal regulations and discharges us from our liabilities according to 10 sect. 2 ElektroG and any associated liabilities of others Subject to alterations The manufacture has the right for changes in hardware and software of the product at any time without preliminary notice, as long as these changes advance reliability or quality of the skimmer. No claims can be made if for instance design, functionality or performance of the skimmer changes elementary. The assured specification of the skimmer is always guaranteed. 9. Manufacturer s declaration Titles against Royal Exclusiv concerning the products described in this manual adress on the Royal Exclusiv guarantee clauses. Specification may vary due technical improvements Manufacturer Royal Exclusiv pumps and skimmers Made in Germany Royal-Exclusiv EAR-number: WEE.Reg.No Informations and support Thank your for purchasing a Royal Exclusiv Bubble King protein skimmer. This protein skimmer is a high quality product made in Germany with the highest manufacturing demands on modern CNC maschines. This manual is supposed to help you to setup the protein skimmer for use and to advice you with the necessarily maintenance procedures. To ensure longlasting satisfaction with this product we please you to read this manual carefully and follow our guidelines. Royal Exclusiv guarantees 5 years of spare part availability for the Bubble King Supermarin protein skimmer. Should the device in some way not meet the high demands you expect from Royal Exclusiv please contact the dealer where you purchases your Bubble King Supermarin protein skimmer. This is usually the best way for product support. However you may feel free to contact our support on our website: 12
ENG. Royal Exclusiv pumps & skimmers. Operating and maintenance manual for Mini Bubble King For all Mini Bubble King skimmer 160, 180, 200.
 Operating and maintenance manual for Mini Bubble King For all Mini Bubble King skimmer 160, 180, 200 v12 ENG Operating and maintenance manual for Mini Bubble King For all Mini Bubble King skimmer 160,
ENG. Royal Exclusiv pumps & skimmers
 Data sheet and list of s for Bubble King Supermarin 250 For all Bubble King Supermarin protein skimmer 250 vs14 ENG Data sheet for protein skimmer Bubble King Supermarin 250 VS14 Protein skimmer Bubble
ENG. Royal Exclusiv pumps & skimmers
 Data sheet and list of s for Bubble King Supermarin 200 For all Bubble King Supermarin protein skimmer 200 vs12 ENG Data sheet for protein skimmer Bubble King Supermarin 200 1136,00 for aquariums from
ENG. Royal Exclusiv pumps & skimmers
 Data sheet and list of s for Bubble King Supermarin 200 For all Bubble King Supermarin protein skimmer 200 vs15 ENG Data sheet for protein skimmer Bubble King Supermarin 200 1192,80 for aquariums from
ENG. Royal Exclusiv pumps & skimmers
 Data sheet and list of s for Bubble King Supermarin 300 For all Bubble King Supermarin protein skimmer 300 vs14 ENG Data sheet for protein skimmer Bubble King Supermarin 300 1755,60 for aquariums from
USA. Royal Exclusiv pumps & skimmers
 Data sheet and list of s for Bubble King Supermarin 300 For all Bubble King Supermarin protein skimmer 300 with Red Dragon 3 Mini Speedy vs15 USA Royal Exclusiv pumps & skimmers Data sheet for protein
Turboflotor multi SL
 Operation Manual for the Turboflotor multi SL Motor driven skimmer for saltwater aquaria up to 000 l. In purchasing this unit you have selected a top quality product. It has been specifically designed
TC TC Operating instruction
 TC 2060 - TC 3070 Operating instruction IMPORTANT SAFETY INSTRUCTIONS To guard against injury, basic safety precautions should be observed, including the following. 1) READ AND FOLLOW ALL SAFETY INSTRUCTIONS.
Turboflotor Blue 500. Operation Manual GB. Motor driven skimmer for saltwater aquaria up to a volume of 250 liters
 Turboflotor Blue 500 Operation Manual GB Motor driven skimmer for saltwater aquaria up to a volume of 250 liters In purchasing this unit, you have selected a top quality product. It has been specifically
ValveSentry USER S MANUAL REVISED 8/6/16 IMPORTANT! PLEASE READ CAREFULLY AND SAVE
 ValveSentry USER S MANUAL REVISED 8/6/16 IMPORTANT! PLEASE READ CAREFULLY AND SAVE This user s manual contains important information about your ValveSentry device s operation. If you are installing this
Operation Manual. Turboflotor 5000 SHORTY
 Operation Manual Turboflotor 5000 SHORTY Protein skimmer for aquariums up to 1500 litres (400 Gallons) Powerful skimmers for in cabinet installation. With the purchase of this protein skimmer you have
Operating Manual Includes Pumps: PG-9000 Part #R809606
 Operating Manual Includes Pumps: PG-9000 Part #R809606 Introduction Thank you for selecting the PG Series Pumps from Lifegard Aquatics. Before using this pump please take a moment to review this manual.
In Sump Cone Protein Skimmer 400
 In Sump Cone Protein Skimmer 400 IN SUMP PROTEIN SKIMMER TOP QUALITY & HIGHLY EFFICIENT INCLUDES NEEDLE WHEEL PUMP 1 YEAR WARRANTY 1 ASSEMBLY PARTS NOTE: Make sure all connections are secure. Examine for
ENG. Royal Exclusiv pumps & skimmers
 Operating- and maintenance manual Red Dragon 3 pumps For all Red Dragon 3 skimmer-, filter- and flow pumps with and without controller v1.0 ENG Operating- and maintenance manual Red Dragon 3 pumps For
Operation Manual. Turboflotor Protein skimmer for aquaria up to 5000 litres
 Operation Manual Protein skimmer for aquaria up to 5000 litres With the purchase of this protein skimmer you have selected a top quality product. It has been specifically designed for aquarium use and
IN SUMP PROTEIN SKIMMER TOP QUALITY & HIGHLY EFFICIENT INCLUDES NEEDLE WHEEL PUMP 1 YEAR WARRANTY
 IN SUMP PROTEIN SKIMMER TOP QUALITY & HIGHLY EFFICIENT INCLUDES NEEDLE WHEEL PUMP 1 YEAR WARRANTY 1 ASSEMBLY PARTS NOTE: Make sure all connections are secure. Examine for damages before installation. Bubble
Snow Cone Skimmer Instruction
 Snow Cone Skimmer Instruction I. Setting Up a. Remove the skimmer and all parts from the package. b. Attach Venturi (7) to the pump, and make sure it is fully pushed onto pump. Affix Air Intake Tube (4)
ELECTRONIC FLUSH VALVE FOR URINALS jupiter 2040
 ELECTRONIC FLUSH VALVE FOR URINALS jupiter 2040 InstallatIon and maintenance guide 1 index 1 TECHNICAL DATA 2 PACK CONTENTS 3 PRE-INSTALLATION INFO 4-8 INSTALLATION 9 BATTERY REPLACEMENT INSTRUCTIONS 10-11
Container Fountain Kit with LED Light
 Container Fountain Kit with LED Light REMINDER CALL 1-888-755-6750 BEFORE RETURNING TO STORE. PACKAGE CONTENTS Questions, problems, missing parts? Before returning to your retailer, call our customer service
Installation and Maintenance Guide SF1593 SF1594 B/E ELECTRONIC LAVATORY FAUCET
 Installation and Maintenance Guide SF1593 SF1594 B/E ELECTRONIC LAVATORY FAUCET 1 INDEX 1 TECHNICAL DATA 2 PACK CONTENTS 3 PRE INSTALLATION INFORMATION 4-5 FAUCET INSTALLATION 6-8 SETTINGS ADJUSTMENT 9
ValveSentry USER S MANUAL PLEASE READ CAREFULLY AND SAVE
 ValveSentry USER S MANUAL IMPORTANT! PLEASE READ CAREFULLY AND SAVE This user s manual contains important information about your ValveSentry device s operation. If you are installing this ValveSentry device
INSTALLATION AND MAINTENANCE GUIDE SF1596 B/E ELECTRONIC LAVATORY FAUCET
 INSTALLATION AND MAINTENANCE GUIDE SF1596 B/E ELECTRONIC LAVATORY FAUCET 1 INDEX 1 TECHNICAL DATA 2 PACK CONTENTS 3 PRE-INSTALLATION INFO 4-5 INSTALLATION 6-8 SETTINGS ADJUSTMENT WITH REMOTE CONTROL 9
OWNER S MANUAL EVOLUTION 3500, 4500, 5500, & 8500 SERIES PUMPS
 OWNER S MANUAL EVOLUTION 3500, 4500, 5500, & 8500 SERIES PUMPS IMPORTANT SAFETY INSTRUCTIONS When installing and using this electrical equipment, basic safety precautions should always be followed, including
Mechanical Filter Pump Kit Up to 500 gallons
 Mechanical Filter Pump Kit Up to 500 gallons REMINDER CALL 1-888-755-6750 BEFORE RETURNING TO STORE. ITEM #FM002P Questions, problems, missing parts? Before returning to your retailer, call our customer
Mechanical Filter Box Kit
 Mechanical Filter Box Kit REMINDER CALL 1-888-755-4497 BEFORE RETURNING TO STORE. MODEL #MFBX500P Questions, problems, missing parts? Before returning to your retailer, call our customer service department
Turboflotor Blue 1000
 Turboflotor Blue 1000 Operation Manual GB Motor driven skimmer for saltwater aquaria up to a volume of 500 liters. In purchasing this unit you have selected a top quality product. It has been specifically
Vertex Omega 180 i Protein Skimmer
 Vertex Omega 180 i Protein Skimmer Thank you for your purchase of the Vertex Omega 180 i protein skimmer. Please be sure to read and follow this brief guide to ensure proper install and operation of your
MODEL VG08001 CONTENT PACKING LIST / TOOLS NEEDED PANEL DIMENSIONS FITTINGS / TECHNICAL DATA WALL/CORNER INSTALLATION CARE AND TROUBLE SHOOTING
 CONTENT PACKING LIST / TOOLS NEEDED PANEL DIMENSIONS FITTINGS / TECHNICAL DATA WALL/CORNER INSTALLATION CARE AND TROUBLE SHOOTING WARRANTY 1 PACKING LIST DESCRIPTION MODEL NUMBER - PANEL HOUSING 88057
Premium Pond Pump 330 Gallons Per Hour
 Premium Pond 330 Gallons Per Hour REMINDER CALL 1-888-755-4497 BEFORE RETURNING TO STORE. MODEL #PDP330 Questions, problems, missing parts? Before returning to your retailer, call our customer service
GREEN & GREEN 1000 ELECTRONIC LAVATORY FAUCET. InstallatIon and maintenance guide
 GREEN & GREEN 1000 ELECTRONIC LAVATORY FAUCET InstallatIon and maintenance guide INDEX 1 TECHNICAL DATA 2-3 PACK CONTENTS 4 PRE INSTALLATION INFORMATION 5-8 FAUCET INSTALLATION 9-11 SETTINGS ADJUSTMENT
Installation Manual TWM Performance Short Shifter Cobalt SS/SC, SS/TC, HHR SS, Ion Redline and Saab 9-3
 Page 1 Installation Manual TWM Performance Short Shifter Cobalt SS/SC, SS/TC, HHR SS, Ion Redline and Saab 9-3 Please Note: It is preferable to park on a flat surface, as you will have to engage and disengage
Model P-40 & Model P-25 POWER PUSHER
 Power Pusher Description INSTRUCTION MANUAL The Power Pusher provides ram capability by using the spreading power of the POWER HAWK P-16 Rescue Tool. (The Power Pusher may also be used with other spreader
Series: PFUEG 1/12HP, 5000 RPM, 60 Hz Utility Pumps
 INSTALLATION MANUAL Series: 1/12HP, 5000 RPM, 60 Hz ISP No: - 6/09 General Safety Information Before installation, read the following instructions carefully. Failure to follow instruction and Safety information
StormPro BA Series Sump Pump
 Page 1 of 8 Marks & Meanings DANGER: Keep the pump equipment out of the reach of children! Warns that the failure to follow the directions given could cause serious risk to individuals or objects. WARNING:
ESE Series Cast Iron Sewage Pumps
 Owner s Manual ESE Series Cast Iron Sewage Pumps TABLE OF CONTENTS General Safety.................... 2 Specifications..................... 3 Installation.................... 4 & 5 Troubleshooting...................
Adjustable Angled Incline Conveyor Owners Manual with Operating Instructions
 Adjustable Angled Incline Conveyor Owners Manual with Operating Instructions Revision 012211 Table of Contents Basic Conveyor Features 3 Getting Started 4 Setting Up the Incline Conveyor 5 Belt Removal
ENG. Royal Exclusiv pumps & skimmers
 Data sheet and list of s for Bubble King DeLuxe 200 For all Bubble King DeLuxe protein skimmer 200 external vs12 ENG Data sheet for protein skimmer Bubble King DeLuxe 200 external 1.592,00 for aquariums
INSTALLATION AND MAINTENANCE GUIDE ELITE SERIES ELECTRONIC LAVATORY FAUCET
 INSTALLATION AND MAINTENANCE GUIDE ELITE SERIES ELECTRONIC LAVATORY FAUCET 1 INDEX 1 TECHNICAL DATA 2 PACK CONTENTS 3 PRE-INSTALLATION INFO 4-5 INSTALLATION 6-9 SETTINGS ADJUSTMENT 10 BATTERY REPLACEMENT
STOP CITY PRESSURE BOOSTER PUMP INSTRUCTION MANUAL
 CITY PRESSURE BOOSTER PUMP INSTRUCTION MANUAL MODEL #VP05, VP10 C US NSF/ANSI 372 255405 For loose, missing or damaged parts, or if the unit does not seem to be operating properly, please call before returning
Cone Skimmers. Instructions. for Models 75G, 150G and 300G. Please read these instructions in their entirety before attempting to use this product.
 Cone Skimmers Instructions for Models 75G, 150G and 300G Please read these instructions in their entirety before attempting to use this product. The pumps used with the Coralife 75G, 150G and 300G Cone
Complete Pond Kit REMINDER CALL BEFORE RETURNING TO STORE. PLEASE CALL BEFORE RETURNING TO THE STORE.
 Complete Pond Kit REMINDER CA 1-888-755-4497 BEFORE RETURNING TO STORE. Questions, problems, missing parts? Before returning to your retailer, call our customer service department at 1-888-755-4497, 8
D28 SERIES WALL MOUNTED ELECTRONIC FAUCET FOR COLD OR PREMIXED WATER. D28 B D28 E D28 Dual Power B D28 Dual Power E D28 Box D28 Box E
 D28 SERIES WALL MOUNTED ELECTRONIC FAUCET FOR COLD OR PREMIXED WATER D28 B D28 E D28 Dual Power B D28 Dual Power E D28 Box D28 Box E 1 INDEX 1 TECHNICAL DATA 2-4 PACK CONTENTS 5 PRE-INSTALLATION INFO 6-11
1200W INVERTER GENERATOR
 1200W INVERTER GENERATOR MODEL NO: IG1200 PART NO: 8877070 OPERATION & MAINTENANCE INSTRUCTIONS LS0117 INTRODUCTION Thank you for purchasing this CLARKE 1200W Inverter Generator. Before attempting to use
HALLMARK INDUSTRIES INC
 Performance Part No. HP. CONVERTIBLE JET PUMP USER S MANUAL GPH of Water @ Total Discharge Pressure of 40 psi Max. Pressure Max suction (shallow well) Max Suction (deep well) Max GPM (@0 head) Max Discharge
Safety Precautions. Please be sure to closely follow all safety precautions and warnings. Danger. Warning. Caution
 Contents Specifications...4 List of Contents...4 Installation Instructions...5 Operating Instructions...6 Maintenance Instructions...7 Warranty Provisions...9 Disposal Method...9 Safety Precautions Please
Premium Waterfall Pump 1200 Gallons Per Hour
 Premium Waterfall 1200 Gallons Per Hour REMINDER CALL 1-888-755-4497 BEFORE RETURNING TO STORE. MODEL #PWP1200 Questions, problems, missing parts? Before returning to your retailer, call our customer service
Spin Klin 3"-4" Apollo Angle
 Spin Klin 3"-4" Apollo Angle w w w. a r k a l - f i l t e r s. c o m 3"-4" Spin Klin Angle Apollo Battery Service & Maintenance Manual Table of Contents Subject Page No. 1. Introduction... 3 2. Safety
Artesian2 Owners Manual
 Artesian2 Owners Manual Energy-Efficient, Self Priming Centrifugal Pumps Discharge Inlet Important Safety Instructions Please read all instructions completely before you install or operate your new pump.
SUNC1200 / ITEM #40882 SUBMERSIBLE UTILITY PUMP OPERATIONS MANUAL
 SUNC1200 / ITEM #40882 SUBMERSIBLE UTILITY PUMP OPERATIONS MANUAL WWW.SUNRUNNERPOOL.COM Performance Model HP GPH of Water @ Total Feet Of Lift 0 ft. 5 ft. 10 ft. 15 ft. 20 ft. 25 ft. Max. Lift SUNC1200
Illumifalls Patio Pond
 Illumifalls Patio Pond REMINDER CALL 1-888-755-4497 BEFORE RETURNING TO STORE. Questions, problems, missing parts? Before returning to your retailer, call our customer service department at 1-888-755-4497,
Submersible Pond Pump with UV 800 Gallons Per Hour
 Submersible Pond Pump with UV 800 Gallons Per Hour REMINDER CALL 1-888-755-6750 BEFORE RETURNING TO STORE. PACKAGE CONTENTS ITEM #PP800UV Questions, problems, missing parts? Before returning to your retailer,
INSTALLATION, OPERATION AND MAINTENANCE INSTRUCTIONS
 INSTALLATION, OPERATION AND MAINTENANCE INSTRUCTIONS Contents Section 1. General Observations... 2 2. Operation... 4 3. Control During Operation... 5 4. Trouble Shooting... 6 5. Maintenance... 7 Please
4" Spin Klin Twin Apollo Battery. Service & Maintenance Manual
 4" Spin Klin Twin Apollo Battery Service & Maintenance Manual Table of Contents Subject Page No. 1. Introduction... 3 2. Safety Instructions... 3 3. Description and Operation... 4 4. Technical Data...
Spin Klin 4" Apollo Twin
 Spin Klin 4" Apollo Twin w w w. a r k a l - f i l t e r s. c o m 4" Spin Klin Twin Apollo Battery Service & Maintenance Manual Table of Contents Subject Page No. 1. Introduction... 3 2. Safety Instructions...
INSTALLATION AND MAINTENANCE GUIDE EXTREME WM WALL MOUNTED ELECTRONIC FAUCET FOR COLD OR PREMIXED WATER
 INSTALLATION AND MAINTENANCE GUIDE EXTREME WM WALL MOUNTED ELECTRONIC FAUCET FOR COLD OR PREMIXED WATER Extreme WMB Extreme WME Extreme WMLB Extreme WMLE 1 INDEX 1 TECHNICAL DATA 2 PACK CONTENTS 2 OPERATION
7.3L POWERSTROKE BANJO BOLT KIT Fits L Powerstroke Diesel. Installation Guide
 7.3L POWERSTROKE BANJO BOLT KIT Fits 94-03 7.3L Powerstroke Diesel Installation Guide INSPECT CONTENTS OF THIS KIT THOROUGHLY BEFORE STARTING THE INSTALLATION PROCESS! IF YOU FIND A PROBLEM WITH YOUR PACKAGE:
Single Pump Station with Delay, 10HP/1PH DU PS2001C-PG
 Single Pump Station with Delay, 10HP/1PH DU PS2001C-PG Owner s Manual #0810 Customer Number: Model Number: Serial Number: Installation Date: Please read and u n d e r s t a n d t h i s manual. Store in
PACKING LIST DESCRIPTION MODEL NUMBER - PANEL HOUSING HAND SHOWER HOSE HAND SHOWER FLEXIBLE HOSES 16" LONG WITH 1/2" FEMALE 88
 MODEL VG-08009 CONTENT PACKING LIST / TOOLS NEEDED PANEL DIMENSIONS FITTINGS / TECHNICAL DATA WALL/CORNER INSTALLATION CARE AND TROUBLE SHOOTING WARRANTY 1 PACKING LIST DESCRIPTION MODEL NUMBER - PANEL
Operators Manual. Model 3370 Air Cooled Recirculator rev.8/98
 Operators Manual Model 3370 Air Cooled Recirculator 110-080 rev.8/98 Table of contents Section 1. General Information 1.1 Warranty 1.2 Unpacking Section 2. Product Information 2.1 Description 2.2 Specification
T1-Titanium Non-HVLP Spray Gun
 T1-Titanium Non-HVLP Spray Gun THE SPRAY GUN PEOPLE FOR PRODUCT INFORMATION CALL: 1-800-742-7731 Important Safety Instructions Read all warnings and instructions in this manual. Save these instructions.
1100W PORTABLE GENERATOR
 1100W PORTABLE GENERATOR MODEL NO: G1200 PART NO: 8010110 OPERATION & MAINTENANCE INSTRUCTIONS LS0312 INTRODUCTION Thank you for purchasing this CLARKE 1100W Portable Generator. Before attempting to use
D Instructions/Parts. Siphon Feed Detail Spray Gun D
 Instructions/Parts D-5-55 Siphon Feed Detail Spray Gun FOR PRODUCT INFORMATION CALL: 1-800-742-7731 309991D Important Safety Instructions Read all warnings and instructions in this manual. Save these instructions.
HOW TO INSTALL YOUR BOV
 Product Name: Product Description: Product Number: BMW Kompact BOV Kit Model specific BOV Kit TS-0203-1050/TS-0203-1250 ------------------------------------------------------------------------------------------------------------------------
HOT WASHER MODEL NO: KING 125 OPERATION & MAINTENANCE INSTRUCTIONS PART NO: LS1009
 HOT WASHER MODEL NO: KING 125 PART NO: 7320170 OPERATION & MAINTENANCE INSTRUCTIONS LS1009 INTRODUCTION Thank you for purchasing this Hot Washer. This machine is a portable, high pressure power washer,
Installation Instructions / Warranty
 Installation Instructions / Warranty Axor Uno 38020XX1 Axor Uno 38025XX1 Axor Uno 38210XX1 Uno Single-control Lavatory Faucet 38020XX1 Uno Single-control Tall Lavatory Faucet 38025XX1 Uno Single-control
Installation Instructions / Warranty
 Installation Instructions / Warranty Axor Citterio 39133XX1 Axor Citterio 39135XX1 Axor Citterio 39233XX1 Axor Citterio 39235XX1 Axor Citterio Widespread Lavatory Faucet Axor Citterio Widespread Bidet
PACIFICA Shower Cabin Installation Instructions
 PACIFICA Shower Cabin Installation Instructions IMPORTANT Please read carefully the following instructions before installing your shower cabin. If you have any questions on this shower cabin installation
OWNER S MANUAL. 6. If you aren t competent to instal the pump, get help from a qualified source.
 OWNER S MANUAL RK2 Systems Pro Pump Energy-Efficient, Self Priming Centrifugal Pumps Important Safety Instructions Please read all instructions completely before you install or operate your new pump. Save
Natural Fiber Planter Fountain
 Natural iber Planter ountain REMINDER CALL 1-888-755-5641 BEORE RETURNING TO STORE. PACKAGE CONTENTS Questions, problems, missing parts? Before returning to your retailer, call our customer service department
MGFHVLP. Instructions/Parts. Mini Gravity Feed System E. Part No Includes MGFHVLP Mini Gravity Feed Spray Gun and MGC 125 Gravity Cup.
 Instructions/Parts MGFHVLP Mini Gravity Feed System FOR PRODUCT INFORMATION CALL: 1-800-742-7731 309989E For gravity feed spraying of automotive colors and clears. Ideal for touch-up and detail work. Important
Pug Mill NRA-04 NRA-04S
 91345B Pug Mill Instruction Manual NRA-04 NRA-04S Please make sure to read the entire instruction manual thoroughly before initial set-up, operation, maintenance and inspection to ensure proper use. Please
Instruction Manual Extruder Sensor Rheomex 252/254
 Instruction Manual Extruder Sensor Rheomex 252/254 Part No. 002-8632 3-1-014-2 08.1992 Thermo Haake Thermo Haake (USA) Rheo s.a. (France) Dieselstraße 4 53 W. Century Road 99 Route de Versailles D-76227
Submersible Waterfall Pump 1200 Gallons Per Hour
 ITEM # LL1200 Submersible Waterfall Pump 1200 Gallons Per Hour REMINDER CALL 1-888-412-6001 EFORE RETURNING TO STORE. PACKAGE CONTENTS Questions, problems, missing parts? efore returning to your retailer,
RADEX -N Composite Operating/Assembly instructions
 1 of 14 RADEX -N is a torsionally stiff flexible steel lamina coupling. It is able to compensate for shaft misalignment, for example caused by thermal expansion, etc. note ISO 101. Drawn: 0.05.15 Kb/Wig
Installation Instructions / Warranty. Raindance Allrounder 28110XX1 Wall Outlet Adapter with Hose Connection 28108XX1
 Installation Instructions / Warranty Raindance Allrounder 28110XX1 Wall Outlet Adapter with Hose Connection 28108XX1 Raindance Allrounder 28110XX1 Technical Data Max. flow rate of showerhead 2.5 gpm Determining
Installation and Operating Manual for Tank and Equipment Cleaning Nozzles Series 5TM
 Installation and Operating Manual for Tank and Equipment Cleaning Nozzles Series 5TM 150 150 150 This instruction manual contains proprietary information which is protected by copyright laws. No part of
VADA - V75-S PRODUCT OVERVIEW CONSTRUCTION USAGE LIMITATIONS MOTOR WARRANTY
 PRODUCT OVERVIEW The VADA V75-S submersible pumps are suitable for installation in traditional wells, water deposits, collection tanks, clear watercourses, lakes etc. The V75-S provides a hydraulic system
SUNTURA SOLAR TRACKER
 WindyNation SUNTURA SOLAR TRACKER SOT-TRKS-NF User s Manual Page 1 of 10 WindyNation 08/09/2012 Table of Contents 1 Introduction... 3 1.1 Limited Warranty... 3 1.2 Restrictions... 3 1.3 Warranty Claims
Installation Instructions / Warranty
 Installation Instructions / Warranty Metris 31436XX1 Talis 32313XX1 Focus 31732XX1 Metris 31446XX1 Talis 32314XX1 Focus 31733XX1 Trim, 3- and 4-Hole Roman Tub Sets 3-Hole 4-Hole Metris 31436001 31446001
MODELS 108 and 138 CRAWL SPACE PUMPING SYSTEM PREINSTALLATION CHECKLIST
 NOTICE TO INSTALLER: Instructions must remain with installation. Your Peace of Mind is Our Top Priority Product information presented here reflects conditions at time of publication. Consult factory regarding
QWIK JON ULTIMA 204 SYSTEMS INSTALLATION INSTRUCTIONS PREINSTALLATION CHECKLIST
 NOTICE TO INSTALLER: Instructions must remain with installation. SECTION: 6.10.065 Your Peace of Mind is Our Top Priority Product information presented here reflects conditions at time of publication.
Installation Operation Parts
 OWNER S MANUAL BATTERY BACKUP SUMP Installation Operation Parts For further operating, installation or maintenance assistance, Call 98-8-05 PRINTED IN U.S.A. M-8 (/9) RULES FOR SAFE INSTALLATION AND OPERATION
Matala. VersiFlow Series. Instruction and Maintenance Manual
 VersiFlow Series High Flow Multi-Purpose "Versatile " Pump V-3200 1/5HP 150W / Discharge 2 V-3900 1/3HP 250W / Discharge 2 V-4700 1/2HP 400W / Discharge 2 V-5600 1HP 750W / Discharge 2 Instruction and
CM3-E Operation Manual DOK-347E / Rev.:1.01 KH / October 1999 Portable 3 turbine check meter
 -E DOK-347E / Rev.:1.01 KH / October 1999 Portable 3 turbine check meter Contents 1 General Remarks... 1-1 1.1 About This Manual... 1-1 1.2 How to Use This Manual... 1-1 2 Approval... 2-1 2.1 Explosion
HOW TO INSTALL YOUR BOV
 Product Name: Product Description: Product Number: Subaru Dual port Fits WRX 01 07, WRX STI 01 08, Forester XT 06 TS-0205-1015/TS-0205-1016 ------------------------------------------------------------------------------------------------------------------------
RENA AF371Feeder Operating Manual. Feeder. Operating Manual. Manual Part #: M AF371 Operations Rev
 Manual Part #: M-3022 Feeder AF371 Operations Rev. 3-16-04 1 RENA AF371 Feeder YOUR RENA AF371 IS DISTRIBUTED BY RENA SYSTEMS INC. SERVICE AND SUPPORT FOR THIS PRODUCT IS PROVIDED BY YOUR RENA DEALER.
Armon Edero. User manual
 User manual Armon Edero Foreword.... 2 Symbols used 2 Intended use.... 2 About the Armon Edero... 2 Mounting options of the Edero 2 Braces. 3 How to set up the Armon Edero.. 3 How to attach the brace to
Euro-Reef. Maintenance Log/Skimmer Notes
 ATTENTION!! If you do not read this you might regret it!! It is EXTREMELY IMPORTANT that you fill out and return the WARRANTY REGISTRATION section of the manual. If you do not fill it out per instructions
PACKING, HANDLING, TRANSPORTING AND STORING MOTORS
 PACKING, HANDLING, TRANSPORTING AND STORING MOTORS Make sure that the shaft of the motor is not loaded in any way and is protected from knocks. Axial loads or shocks may easily damage the bearings inside
RS/CS Series Protein Skimmer Owner s Manual REV
 RS/CS Series Protein Skimmer Owner s Manual REV 110108 IMPORTANT!!! ATTENTION!! PLEASE READ THIS!! It is EXTREMELY IMPORTANT that you fill out and return the WARRANTY REGISTRATION document included with
OWNER S MANUAL SELF-PRIMING PORTABLE UTILITY PUMP
 Model 54011-0 OWNER S MANUAL SELF-PRIMING PORTABLE UTILITY PUMP Questions, problems, missing parts? Before returning to the store call AQUAPRO Customer Service 8 a.m. - 5 p.m., EST, Monday-Friday 1-844-242-2475
900 PEAK AMP PORTABLE JUMP STARTER
 900 PEAK AMP PORTABLE JUMP STARTER Item Number W1665 OWNER S MANUAL WARNING It is the owner and/or operators responsibility to study all WARNINGS, operating, and maintenance instructions contained on the
Instruction & Operation Manual
 Instruction & Operation Manual HSC Series Spring Check Valve Read and understand this manual prior to installing, operating or servicing this equipment This manual contains installation, operation, cleaning,
Pneumatic Cylinder 14 Bore X 22 Stroke Part No. R (Formerly P )
") Pneumatic Cylinder 14 Bore X 22 Stroke Part No. R434001268 (Formerly P -193419-00003) Service Information INSTALLATION Before installing this cylinder, all air lines in the system should be blown clean
Pneumatic Cylinder 14 Bore X 22 Stroke Part No. R434001268 (Formerly P -193419-00003) Service Information INSTALLATION Before installing this cylinder, all air lines in the system should be blown clean
EZ FILL FAUCET AUTOMATIC DECK MOUNTED FAUCET INSTALLATION AND MAINTENANCE GUIDE
 EZ FILL FAUCET AUTOMATIC DECK MOUNTED FAUCET INSTALLATION AND MAINTENANCE GUIDE 05 September 018 TABLE OF CONTENTS PRE-INSTALLATION INFORMATION PRE-INSTALLATION INFORMATION 3 PACK CONTENTS 4 TECHNICAL
Installation Instructions / Warranty
 Installation Instructions / Warranty Axor Citterio 39144XX1 Axor Citterio 39148XX1 Axor Citterio Wall Mount Lav Mixer with Cross Handles 39144XX1 Axor Citterio Wall Mount Lav Mixer with Lever Handles 39148XX1
Installation Instructions / Warranty
 Installation Instructions / Warranty Citterio 39136XX1 39156XX1 Citterio 39236XX1 Axor Citterio Widespread Lav Mixer 39136XX1 Axor Citterio Bidet Mixer 39236XX1 39136XX1 User instructions Turn the right
SUNTURA HD SOLAR TRACKER
 WindyNation SUNTURA HD SOLAR TRACKER SOT-TRKS-NFHD User s Manual Page 1 of 11 WindyNation 08/09/2012 Table of Contents 1! Introduction... 3! 1.1! Limited Warranty... 3! 1.2! Restrictions... 3! 1.3! Warranty
SandPro POOL FILTER SYSTEM OWNER S MANUAL Model 4515
 SandPro POOL FILTER SYSTEM OWNER S MANUAL Model 4515 IMPORTANT SAFETY RULES Read all instructions BEFORE assembling and using this product. KEEP THIS MANUAL. Sand not included. USE ONLY No. 20 Silica Sand
GARDEN HOSE UTILITY PUMP
 GARDEN HOSE UTILITY PUMP MODEL #HPP360, HPP12V, 473707 MODEL #HPP360, 473707 MODEL #HPP12V ATTACH YOUR RECEIPT HERE Purchase Date SAFETY INFORMATION Please read and understand this entire manual before