T100 Hybrid/T200 Hybrid
|
|
|
- Lillian Watkins
- 5 years ago
- Views:
Transcription

1 T100 Hybrid/T200 Hybrid Installation & Operating Instructions Manuel d Installation et d Utilisation Instrucciones para Instalacion y Operacion Turbo 100 Hybrid Turbo 200 Hybrid ISO 9001:2000 Quality Management System
2 2 CONTENTS CAUTION: To reduce risk of injury, user must read and understand the Installation & Operating Instructions before using this product. ITEM PAGE Introduction. 3 Safety... 4 Installation Operation Maintenance Trouble Shooting Specifications Repair Parts Motor.. 13 Repair Parts Lower Warranty.. 20 Locations.. 20

3 3 INTRODUCTION Please take the time to read this instruction manual thoroughly and follow the procedures. This will help increase the life of your injector. PRESENTATION Certain precautions, which are marked with this symbol: need to be read carefully. The injector is packaged with the following items (figure 1) Dosmatic injector (not shown) Dosage piston (A)* 1-Viton O-ring (B)* 1 lower end seal( C) * SS Weight Nut (D) * Outer Injection Hose Assy. (E) * Solution filter (F) * Suction hose 5 ft. (G) * 2-Hose Clamps (H) * Included w/t100 Shipments 4-Neoprene rubber isolators 8-10mm 1.5 stainless steel locknuts 4-10mm stainless steel flat washers Included in USA shipments:t100/t200 2-Flange gasket, Kevlar 2-Flange,2 NPT, 150 psi,steel 8-bolt, 5/8-11 x 3.1 long 16-Washer,5/8,flat SAE 8-5/8-11 locknut Included for T200 Shipments: 1 left, 1 right vert bracket 1L,1R Horiz bracket 8-3/8 x 16 unc x 1 bolts 8-3/8 x 16 unc nuts 8-3/8 Lock washers 4-3/8 Flatwashers * indicates double qty if dual injector. Note: Overseas shipments do not include flanges. Steel flanges as well as gaskets and hardware can be purchased & installed onto holes provided. PARTS PACKAGED WITH INJECTOR Fig. 1

4 4 INSTALLATION Before using your T100 Hybrid or T200 Hybrid, install the injection hose(s). There will be one hose if using a single injector and two for a dual injector. SEE FIGURE 12 FOR OUTER HOSE LOCATIONS. One hose per injection head. Plugs provided for single head injectors Loosen hose clamps and apply Teflon tape to install hose fittings easier. It is not necessary to remove the hose from the fittings. WARNING NOT FOR HUMAN CONSUMPTION Remove the red caps at the inlet and outlet openings, as well as at the suction tube fitting (figure 4). Save the red caps; you can use them later when you store your Hybrid injector. Using Appropriate Tools During Installation When you install your Hybrid Injector into the water line, you will need the following tools & supplies: 1. Pipe Cutters 2. Pipe Wrench 3. PVC glue and primer 4. Teflon tape 5. 2-Adjustable wrench 6. 13mm wrench 7. 5/8 wrench (USA only) Fig. 4
5 5 INSTALLATION Finding a location for your Hybrid injector Refer to Figures 5 & 6 You can place your Hybrid injector anywhere in a cold water line. Select a location that provides a safe and accessible place for the solution container, and adequate structure to support the mounted weight. Keep your T100 Hybrid/ T200 Hybrid away from children, and avoid spilling or touching the chemicals in the solution container. Figure 5 & 6 shows the suggested mounting area and dimensions of the T100 Hybrid and T200 Hybrid, so you can calculate the area you need for installation. Figure 6A show the mating hole patterns for the T200 Hybrid, see figure 6 for mounting holes for the T100 Hybrid. T100 Hybrid Fig. 6A T200 Hybrid Figure 5
6 INSTALLATION Figure 6 T100 Hybrid T200 Hybrid T200 Hybrid TYPICAL INSTALLATION * Consult local code requirements for backflor prevention. T100 Hybrid injector shown; Plumbing patter similar for T200. Although not shown, a hammer arrestor is recommended immediately downstream of this installation to protect plumbing and equipment. Fig. 2 A backflow preventor and other devices may be required before installing, check your local code requirements. 6
7 7 Installation Cont... Mounting Instructions To mount your Hybrid Injector 1. Turn off water pressure and drain water line. 2. Attach your injector to a solid structure (e.g. a wall or beam) 3. Use provided isolators and nuts with flat washers to mount your turbo in place. Reference figures 5 & Install your injector directly in 2 or 3 pipeline (depending on model) or 50mm or 76mm with standard pipe fittings. Your piping should meet your local plumbing codes. 104 micron filter is the minimum requirement for protecting against random impurities. Filter size must be large enough to accommodate flow and pressure used. 5. Install the water supply to the injector connector in the direction of the water flow (in figure 5 & 6, follow the arrows). Refer to installation diagram cautions for plumbing assistance check your local code requirements. T100 Hybrid uses Isolators. T200 uses wall mounting
8 8 OPERATION Connecting the Solution Container Your Hybrid injector handles water flow from 20 to 100 gallons per minute for the T100 Hybrid or for the T200; use a big solution container big enough to avoid filling the container often. Hint:Calculate container size = (max%solution)(flow/day) =Recommended minimum container size capacity. Use only liquid solutions Undissolved solution materials will clog and/or damage injector (lower end). To Connect Solution Container; 1. Fit suction fitting onto lower end of your injector. 2. If you solution container has a cover, insert suction tube filter through the cover by drilling a hole. Leave the cover on the container to prevent debris from entering the solution container. See figure 7 3. Fill the solution container enough to cover the solution filter by at least 2, reference fig. 7. Figure 7
9 9 MAINTANANCE General Maintenance The unit has been designed and built to inject liquid solutions with a minimum of maintenance. However, solution being pumped by the unit will leave deposits, residue and precipitates that require attention to provide maximum dependable service. The degree to which these contaminants accumulate depends on the solutions being pumped and the water supply. RINSE INJECTOR AFTER EACH USE: Put suction tube into a 1qt. (4L) Or more container of fresh filtered water. Pull fresh water through the injector by operating until container is empty. Additive allowed to remain in injector can dry out and foul or damage lower end at the next start up. This procedure is not needed for continuous operation. CLEAN SOLUTION CONTAINER: Keep covered to prevent dirt, flies, feathers, and other flying debris from entering container. Rinse container thoroughly and often. Do not mix chemicals together that might react and cause a precipitate. Use FIL- TERED WATER when filling container. Use only Silicone grease. Using petroleum-based lubricants, such as Vaseline, baby oil and motor oil on any parts of the injector may damage the o-rings.
10 10 MAINTANANCE Cont. CLEAN INLET FILTER: Clean or replace inlet filter as required to increase the life of the unit as well as reduce pressure loss. SOLUTION FILTER SCREEN: Inspect and clean each time new solution is added. Clean as frequently as necessary by washing in fresh water. Remove suction tube and run water backwards through the filter. Keep filter screen off bottom of container to prevent dirt and precipitate from clogging the filter. Clogged filter will result in damage to lower end piston & cylinder. INSTALL ANTI SIPHON VALVE:The water line to the unit should have an anti-siphon valve installed to prevent the full strength of the chemical from siphoning into the feed lines. Periodic inspection to ensure sealing is suggested. SHUT-OFF VALVE: Install the unit as shown in Fig 5 & 6 and always control the unit using the valve on the exiting water line. LABELING WATER LINES: Label all water lines, valves, and connections with a warning that the water supply contains a chemical solution Example: Do not drink this water. MAINTAINING WATER LINE PRESSURE: Install the injector in a cold water line; between 32 F(0 C) and 100 F(38 C) with a minimum water pressure of 15 psi/1.02 bar, and a maximum pressure of 120 psi/8.17 bar. If you use a water flow greater than the one recommended, you may cause permanent damage to you injector and void the warranty.
11 11 MAINTANANCE Cont. Replacing Wear Parts: Replace wear parts once every three to four months if you use the injector frequently. To replace the parts, (refer to figures 10,11, 12, 13, 14 and 15) 1. Loosen clamp screw (#37). 2. Unscrew the lower end assembly and separate it from the body of the injector. Set aside. Bending the cylinder will damage the shaft assembly. 3. Remove lower shaft #51 from the upper shaft #52.(4ml or 2ml) 4. Replace the dosage piston #44 & #14 o ring.. 5. Replace lower shaft #51 and #22 o-ring. 6. Firmly lock lower shaft #51 into place. (Screw until bottoms on 4ML) Now that you are sure you installed the wear parts correctly: 1. Reinstall the cylinder assembly. 2. Ensure that the #16 seal is correctly installed. 3. Tighten the inner cylinder & tighten lockscrew #37. To make sure the injector works correctly after you replace the wear parts, fill the injector by slowly turning on the main water until the suction tube is full of water. Follow procedures on page 13. Reset ratio settings and exact measure for critical applications and for 4ML. Reordering Parts: To reorder parts for your injector contact your local Dosmatic Distributor using the parts lists located in this manual. NOTE: Some components sold as kits only.
12 12 Technical Information To start the injector, look at figure 6 and follow these steps: 1. Close the inlet and outlet valves. 2. Open the bypass valve. 3. Slowly open the main water supply valve to release entrapped air, see figure Open the inlet valve so that water can enter and pressurize the T100 Hybrid or T200 Hybrid. 5. Close bypass & open the outlet valve slowly! Water will now flow through the injector and begin running. Once the injector is running, check for system leaks and correct if necessary. To check for leaks, close the bypass valves. Initially prime the suction/ solution lines at psi/ bar at gpm/ lpm. The water from the solution container should now go up the solution tube and flow through the chemical injection tube of your injector. NOTE: The 4ML& 2ML requires special priming technique. Set the lower end adjuster to the lowest ratio and allow 2 minutes for purging of air in suction line. Once primed, set ratio adjustment to desired settings. Tips for Chemical Mixing: See instructions on your chemical packaging, visit or call us at to speak with a technician. ADJUSTING RATIO SETTINGS If you use improper injection ratios, you may harm yourself, your injector and property! To adjust ratio settings, rotate the adjuster sleeve until the white line in the window aligns with the setting printed on the ratio adjuster sleeve.
13 13 Technical Information Cont... Numbers appear on the left and right sides of the adjuster. The right-hand column lists an injection percentage, and the lefthand column gives the ratio of the solution that you want to inject to water passing through the unit. When determining the setting for your ratio adjuster, always use common units of measure for both the chemical solution and water. E.g., gallons to gallons or milliliters to milliliters. For critical applications, an exact measurement should be performed. The unit will repeat this dosage to the specifications provided. We recommend the 4ML and 2ML unit be exactly measured to insure exact dosage. STORING YOUR INJECTOR To store the T100 Hybrid or T200 Hybrid, 1. Rinse the lower end with fresh water. 2. Remove your injector from the water line. 3. Remove and clean the lower end assembly. 4. Store your injector and the lower end submersed in a suitable container of mildly-chlorinated water to prevent the interior parts from drying. Protect your injector from freezing temperature and take it offline during winter storms.
14 14 T100 Hybrid Body * part # s subject to change. REPAIR PARTS Figure 8 SEE FOLLOWING PAGE FOR PARTS LIST
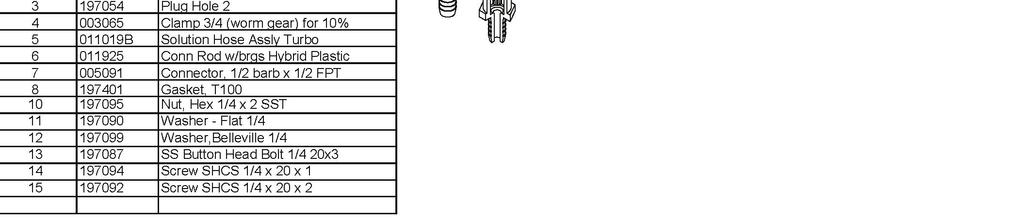
15 15 T100 HYBRID BODY PARTS LIST REF. NO. PART NO. DESCRIPTION Label, hybrid T Cover Assembly Hybrid Turbo A120 Cover, Molded Pin, Dowel Cover HiFlow Screw Cap - 3/ Gasket, T A120 Cover, Intermediate Bearing, 6202 Hybrid, SS E O-ring T100 Body Body, Machined, T100 Hybrid Impeller Assy, T100 Hybrid Gear Impeller with machining Shaft, Gear, T100-DD Seal, Wiper A A120 (G-3) Seal, Wiper B A120 (G-3) Base, Machined, T100-T Isolator Kit x 1.5 mm, ss locknut w/nylon insert ss flatwasher, 10 mm Neoprene Rubber Isolator E O-Ring Lwr Shaft Modified Screw Cap 3/ pph screw #4-40unc, 1/4" long, 316ss Crank Arm Assy Plastic plastic wrist pin Bearing, SR4C Upper Shaft, Hybrid, Plastic Conn Rod w/brgs Hybrid Plastic Top Crank Arm, Plastic Conn. Rod Shaft 1/4" brg 1/4id x 5/16od x 3/8 lg bronze sae 660 sleeve Conn. Rod, Turbo, Plastic Bottom Crank Arm, Plastic
16 16 T200 Hybrid Body * part # s subject to change. REPAIR PARTS Figure 9A SEE FOLLOWING PAGE FOR PARTS LIST
17 17 T200 HYBRID BODY PARTS LIST REF. NO. PART NO. DESCRIPTION Label, hybrid T Cover Assembly Hybrid Turbo A120 Cover, Molded Pin, Dowel Cover HiFlow Screw Cap - 3/ Gasket, T A120 Cover, Intermediate Bearing, 6202 Hybrid, SS E O-ring T100 Body Body, Machined, T200 Hybrid Impeller Assy, T200 Hybrid Gear Impeller with machining Shaft, Gear, T200-DD Seal, Wiper A A120 (G-3) Seal, Wiper B A120 (G-3) Base, Machined, T100-T E O-Ring Lwr Shaft Modified Screw Cap 3/ pph screw #4-40unc, 1/4" long, 316ss Crank Arm Assy Plastic Conn Rod w/brgs Hybrid Plastic Top Crank Arm, Plastic Conn. Rod Shaft 1/4" brg 1/4id x 5/16od x 3/8 lg bronze sae 660 sleeve Conn. Rod, Turbo, Plastic Bottom Crank Arm, Plastic Bearing, SR4C plastic wrist pin Bearing, SR4C Upper Shaft, Hybrid, Plastic


18 18 T100 Hybrid & T200 Hybrid Components Wear Parts Kits Figure 9B
19 19 LOWER END INJECTOR PARTS T100 Hybrid 4ML Figure 10 * part # s subject to change.

20 20 LOWER END INJECTOR PARTS T100 Hybrid.5 % Figure 11 * part # s subject to change.
21 21 LOWER END INJECTOR PARTS T100 Hybrid 1% Figure 12 * part # s subject to change.
22 22 LOWER END INJECTOR PARTS T200 Hybrid 2ML Figure 13 * part # s subject to change.

23 23 LOWER END INJECTOR PARTS T200 Hybrid.25% Figure 14 * part # s subject to change.

24 24 LOWER END INJECTOR PARTS T200 Hybrid.5% Figure 15 * part # s subject to change.
25 25 THE DOSMATIC WARRANTY: We believe that we make the best and most reliable water-driven injectors available. Therefore, our warranty reflects our confidence; we will back our units with the best guarantee available. Dosmatic will provide for replacement of all parts proven to be defective in material or workmanship from the date of purchase for the following time periods: In the United States and Canada All Other 3 years The lower end are warranted to be free from defects in materials and workmanship for THREE YEARS from date of purchase, or we ll replace them free of charge. 2 years The water motor & motor shafts is warranted to be free from defects in materials and workmanship for TWO YEARS from date of purchase, or we ll replace it free of charge. Excluding wear parts such removable lips, o-rings, and ball bearings. 1 year The body components is guaranteed for ONE YEAR, or we ll replace it free of charge. Your only responsibility is ordinary maintenance proper filtration of incoming water and solution. Replacing the O-ring and plastic dosage piston, motor wear items such as wiper seals & bearings and crank arm bearings when worn.* 2. Return the unit to the distributor or to Dosmatic s manufacturing facility, freight prepaid. Upon inspection, the unit will be repaired or replaced, at Dosmatic s option, free of charge, if found to be defective in material or workmanship and will be returned freight prepaid.
26 26 DOSMATIC LOCATIONS: Part #
SUPERDOS 20. Installation & Operating Instructions. Model No. SuperDos %, 2.5%, 5%, 10% Certified ISO 9001:2000 Quality Management System
 SUPERDOS 20 Installation & Operating Instructions Model No. SuperDos 20-0.4%, 2.5%, 5%, 10% Certified ISO 9001:2000 Quality Management System CONTENTS: CAUTION: To reduce risk of injury, user must read
Operating Manual. Model 0.4% Model 1% Model 2.5% Model 5% Model 10% Model 20% Fluid Flow Range: 0.03 gpm to 12 gpm* 7 lph to 2,700 lph*
 Operating Manual Model 0.4% Model 1% Model 2.5% Model 5% Model % Model 20% Fluid Flow Range: 0.03 gpm to gpm* 7 lph to 2,700 lph* Injection Range Dosage: 0.025% to 20% 1:4000 to 1:5 Operating Pressure:
Agxcel GX12i Chemical Injection System
 Agxcel GX12i Chemical Injection System Table of Contents System Contents... 3 Specifications... 4 Safety Precautions and Tips... 5 Operations... 6 Installation... 7 Maintenance... 8-9 Troubleshooting...
MINIDOS. Installation & Operating Instructions. Model No. MiniDos - 0.4%, 2.5%, 5%, 10%, 20% Certified ISO 9001:2000 Quality Management System
 MINIDOS Installation & Operating Instructions Model No. MiniDos - 0.4%, 2.5%, 5%, 10%, 20% Certified ISO 9001:2000 Quality Management System 1 CONTENTS: CAUTION: To reduce risk of injury, user must read
AGXCEL GX12i CHEMICAL INJECTOR 2% INJECTOR UNIT - PN# % INJECTOR UNIT - PN# E 6TH ST KEARNEY NE
 AGXCEL GX12i CHEMICAL INJECTOR 2% INJECTOR UNIT - PN#20202 5% INJECTOR UNIT - PN#20556 116 E 6TH ST KEARNEY NE 68847 877.218.1981 #1 Table of Contents System Contents... 3 3 Specifications... 4 4 and Tips...
THE DOSMATIC ADVANTAGE. INSTALLATION AND OPERATING MANUAL For A20-2.5% Model
 THE DOSMATIC ADVANTAGE INSTALLATION AND OPERATING MANUAL For A20-2.5% Model This document is for information only and does not constitute a formal contract. Dosmatic reserves the right to modify the content
THE DOSMATIC ADVANTAGE. INSTALLATION AND OPERATING MANUAL For all A15 Models
 THE DOSMATIC ADVANTAGE INSTALLATION AND OPERATING MANUAL For all A15 Models A15-4ml A15-2.5% This document is for information only and does not constitute a formal contract. Dosmatic reserves the right
systems company Operating Manual - Adjustable Lower End Model 0.2% - 2% WSP Model 0.78% - 5% WSP
 systems company Operating Manual - Adjustable Lower End Model 0.2% - 2% WSP Model 0.78% - 5% WSP Fluid Flow Range: 0.04 gpm to 11 gpm 10-2500 l/hr Injection Range: 0.2% to 5% 1:500 to 1:20 Operating Pressure:
Owner s Manual WARNING
 Filter Housing Models: AWP20C-V, AWP30C-V, AWP32B-V. Overview: Owner s Manual VIQUA offers a variety of housing sizes and styles in durable, molded polymer that defies rust and corrosion, and ensures a
SINGLE-STAGE INJECTOR MODELS 200-3C, 200C, 201C, 202C, 203C, 204C, 206C, 208C
 D E M A SINGLE-STAGE MODELS SINGLE-STAGE MODELS 1. PARTS A. Injector B. Backup washer (Models 204C & smaller). C. Ceramic Weight. D. Tubing 8 long w/ foot strainer. E. Three brass nozzle bushings Metering
Disassembly and Assembly
 K EN R 623 2-00 August 2006 Disassembly and Assembly 2506-15 Industrial Engine M G A (Engine) MGB (Engine) M G D (Engine) Important Safety Information Most accidents that involve product operation, maintenance
INSTALLATION, OPERATING AND SERVICE MANUAL
 INSTALLATION, OPERATING AND SERVICE MANUAL ECONO-mist WATER SOFTENER Demand Regeneration 7-LMC56-75B 7-LM56-75B 7-LM56-100B 7-LM56-150B 7-LM56-200B Congratulations on purchasing your new Lancaster Water
Installation, Operation and Maintenance Manual
 IOM-HS-QTColdBevMax Installation, Operation and Maintenance Manual QT TM Cold Bev Max TM Models: QTCLDBMX-1S-.5M, QTCLDBMX-2S-.5M, QTCLDBMX-3S-.5M, QTCLDBMX-4S-.5M, QTCLDBMX-5S-.5M Tested and Certified
Model GP Triplex Ceramic Plunger Pump Operating Instructions/ Manual
 Model GP6145-3100 Triplex Ceramic Plunger Pump Operating Instructions/ Manual Contents: Installation Instructions: page 2 Pump Specifications: page 3 Exploded View: page 4 Parts List / Kits: page 5 Repair
MODEL NO GALLON H.P. SKID SPRAYER ASSEMBLY / OPERATION INSTRUCTIONS / PARTS
 5300431 MODEL NO. 9-150 150 GALLON - 5.5 H.P. SKID SPRAYER ASSEMBLY / OPERATION INSTRUCTIONS / PARTS Pressure Gauge - Adjustable Pressure Range Suction Line Filter Handgun With 25 Feet Of Handgun Hose
Installation, Operation and Maintenance Manual
 IOM-HS-QTCubeMax Installation, Operation and Maintenance Manual QT TM Cube Max TM Models: QTCBMX-1S-1M, QTCBMX-2S-1M, QTCBMX-3S-1M, QTCBMX-4S-1M, QTCBMX-1L-1M, QTCBMX-2L-1M, QTCBMX-3L-1M, QTCBMX-4L-1M,
IMPORTANT OPERATING CONDITIONS. Failure to comply with any of these conditions invalidates the warranty. STANDARD CONFIGURATIONS
 X-SERIES TRIPLEX CERAMIC PLUNGER PUMPS OPERATING MANUAL MODELS X8 X10 X20 IMPORTANT OPERATING CONDITIONS Failure to comply with any of these conditions invalidates the warranty. Lubrication - Prior to
Model BP6150. Triplex Ceramic Plunger Pump Operating Instructions/ Manual
 Model BP6150 Triplex Ceramic Plunger Pump Operating Instructions/ Manual Contents: Installation Instructions: page 2 Pump Specs: page 3 Exploded View: page 4 Parts List / Kits Torque Specifications: page
Model GX Series. Consumer Pump. Triplex Plunger Pump Operating Instructions/ Repair Instructions Manual
 Model GX Series Triplex Plunger Pump Operating Instructions/ Repair Instructions Manual Consumer Pump Horizontal/Vertical Pump with built-in Thermal Relief Valve and Siphon Injector Contents: Installation
Polypropylene Piston Drum Pumps
 Please read and save this Repair Parts Manual. Read this manual and the General Operating Instructions carefully before attempting to assemble, install, operate or maintain the product described. Protect
DEMA BLEND CENTER MODELS: 633GAP INSTALLATION INSTRUCTIONS
 The 633GAP Series Blend Center modular design lets you easily couple together any number of stations to create a system that meets your specific needs. Mix and match both high and low flow units for filling
WARNING Carefully Read These Instructions Before Use
 DO NOT RETURN THIS SPRAYER TO STORE Call: 1-800-950-4458 Backpack Sprayer Use and Care Manual Manufactured for Northern Tool + Equipment Co., Inc. WARNING Carefully Read These Instructions Before Use Model
Model GP5128. Triplex Ceramic Plunger Pump Operating Instructions / Manual
 Model GP5128 Triplex Ceramic Plunger Pump Operating Instructions / Manual Updated 11/17 Contents: Installation Instructions: page 2 Pump Specifications: page 3 Exploded View: page 4 Parts List: page 5
Model CP420/CP425. Triplex Ceramic Plunger Pump Operating Instructions/ Repair and Service Manual
 Model CP420/CP425 Triplex Ceramic Plunger Pump Operating Instructions/ Repair and Service Manual Updated 02/12 Contents: Installation Instructions: page 2 Pump Specifications: page 3 Exploded View: page
Warning and Safety Precautions
 EXPRESS WARRANTY AND DISCLAIMER OF IMPLIED WARRANTIES Lily Corporation unconditionally guarantees its products to be free of defects in material or workmanship and further warrants that, for a period of
Model LP200, LP250 & LP250W-MT
 Triplex Ceramic Plunger Pump Operating Instructions/ Repair and Service Manual Model LP200, LP250 & LP250W-MT Updated 5/02 Contents: Installation Instructions: page 2 LP200 Specifications: page 3 Exploded
TABLE 1. * SPECIFY S Stainless Steel Knob Part No S or Part No ST (for tips) for pressure exceeding 700 PSI.
 for pressure exceeding 700 PSI.") 1. PARTS A. Injector B. Ceramic Weight. C. Plastic tubing 8' long with foot strainer. 2. INSTALLATION The injector may be installed in any position in the water line with the arrow in the direction of
1. PARTS A. Injector B. Ceramic Weight. C. Plastic tubing 8' long with foot strainer. 2. INSTALLATION The injector may be installed in any position in the water line with the arrow in the direction of
1-BUTTON DISPENSER INSTALLATION INSTRUCTIONS
 R 1-BUTTON DISPENSER INSTALLATION INSTRUCTIONS Model: #91162-00 The Green Earth II 1-button dispenser allows you to dispense one product for mop buckets and automatic scrubbers. The modular design lets
Pneumatic High-Viscosity Filtration System Instruction Manual
 Pneumatic High-Viscosity Filtration System Instruction Manual P/N: 61512 05/17 1 2 Pneumatic High Viscosity Filtration Systems PN: 61512 14 April, 2009 rev A 36933 Pneumatic Hand Cart HV Filtration System
INSTALLATION MANUAL IMPORTANT CONSIDERATIONS TECHNICAL INFORMATION. Tools you may need
 Model: IS102, IS102-1-X Two Way Pressure Balance Valve 1/2 Rough and Trim Set INSTALLATION MANUAL U P C C Compliance: ASME A112.18.1 CSA B125.1 IMPORTANT CONSIDERATIONS This product and other additional
or OWNER S MANUAL MODEL R
 www.superiorwaterandair.com 801-974-9090 or 800-974-7638 OWNER S MANUAL MODEL 48-1000R Table of Contents Introduction...Page 1 Flow Diagrams...Page 3 The Electro-mechanical Timer Programming...Page 4 Extra
Model GP5128HS. Hydraulic Drive Pump. Triplex Ceramic Plunger Pump Operating Instructions / Manual
 Model GP5128HS Hydraulic Drive Pump Triplex Ceramic Plunger Pump Operating Instructions / Manual Contents: Installation Instructions: page 2 Pump Specifications: page 3 Exploded View: page 4 Parts List:
LG-60-3PT-WP-309-BL-TSC
 55 Model No: LG-0-PT-WP-0-BL-TSC 0 Gallon Point Lawn & Garden Sprayer W/Pump & Coupler & Boomless Boom Assembly / Operation Instructions / Parts ASSEMBLY Most of the sprayer has been assembled at the factory..
DEMA BLEND CENTER MODELS: 637GAP-1 and 637GAP-4 INSTALLATION INSTRUCTIONS
 1. PARTS CHECKLIST: ITEM DESCRIPTION QTY. A. Blend Center Assembly 1 B. ¼ ID X 8 Long Vinyl Supply Tubing & Foot Valve Assembly 4 C. Ceramic Weight 1 D. ½ ID X 6 Long Vinyl Outlet Tubing (For 1 GPM Station
Sand Filtration System
 Sand Filtration System Owners Manual Installation, Operation, and Parts SHOW FILTRATION SYSTEM SAVE THIS INSTRUCTION MANUAL Note: Use only High Rate Sand No. 20 Silica Sand (.45mm -.55) specifically manufactured
STOP CITY PRESSURE BOOSTER PUMP INSTRUCTION MANUAL
 CITY PRESSURE BOOSTER PUMP INSTRUCTION MANUAL MODEL #VP05, VP10 C US NSF/ANSI 372 255405 For loose, missing or damaged parts, or if the unit does not seem to be operating properly, please call before returning
Specifications Information and Repair Parts Manual , , , &
 Please read and save this Repair Parts Manual. Read this manual and the General Operating Instructions carefully before attempting to assemble, install, operate or maintain the product described. Protect
GLOBE FLOWCELL. Operating Manual. Rola-Chem Flowcell PN /01/2013 page: 1 of 8
 GLOBE FLOWCELL Operating Manual Rola-Chem Flowcell PN 550182 4/01/2013 page: 1 of 8 Table of Contents Section title Page 1.0 Safety Instructions 2 2.0 Description 2 3.0 Installation 3 4.0 Use of Manifold
1600 PSI ELECTRIC PRESSURE WASHER
 MODEL NO.: XE03 SKU: 39-8508-6 1600 PSI ELECTRIC PRESSURE WASHER Owner s Manual QUESTIONS, PROBLEMS, MISSING PARTS? Before returning to your retailer, visit our web site or call our customer service at
MODEL: ATVBK-710 BEFORE RETURNING THIS PRODUCT FOR ANY REASON, PLEASE CALL
 5307 MODEL: ATVBK-70 7 Nozzle boom assembly W/CONNECTING FITTINGS Assembly / Operation Instructions / Parts original sales slip, or other evidence of purchase date, to your distributor / dealer. TECHNICAL
Atlas PV-9WP Addendum
 Atlas PV-9WP Addendum 9,000 lb. Capacity Two-Post Overhead Lift The Atlas PV-9WP above ground hoist is 6 inches wider than the Atlas PV-9P, giving it an overall width of 141 (11 9 ) and a drive thru width
DI GPM Operating Manual
 DI 16 11 GPM Operating Manual CONTENTS INTRODUCTION... 1 Specifications... 1 Accessories... 2 Operating Principle... 3 BOX CONTENTS... 4 PRECAUTION... 5 Installation... 5 Maintenance... 5 Service... 5
Installation & Operator s Manual
 Installation & Operator s Manual LS6 Liquid Spray System for SHPE1500, 2000 Style Spreaders Installation Instructions 1. Position Support (3013939) in truck s bed. Place 30 gal. Tank (#3014062) on support
Model. Triplex Ceramic Plunger Pump Operating Instructions/ Repair and Service Manual SP100W/SP351W
 Model Triplex Ceramic Plunger Pump Operating Instructions/ Repair and Service Manual SP100W/SP351W Contents: Installation Instructions: page 2 Pump Specifications: pages 3-4 Parts List/Torque Specs.: page
G1000 Feeder IMPORTANT INFORMATION
 INSTALLATION GUIDE G1000 Feeder IMPORTANT INFORMATION Table of Contents Introduction...3 Installation...3 Exploded Parts Diagram...10 Operation...11 Feeder Overview...11 Filling the Feeder...11 Use of
Pressurized Bead Filters
 Pressurized Bead Filters Installation Instructions Table of Contents Safety Information Installation Assembly Start Up Maintenance Troubleshooting Warranty Safety Information: 1. Installation should be
CONTENTS. Product Features and Specifications...1. Installation Requirement Steps of Installation.. 5. Exploded View Test Run...
 CONTENTS Product Features and Specifications...1 Installation Requirement... 3 Steps of Installation.. 5 Exploded View...18 Test Run...21 Operation Instruction...22 Maintenance... 23 Trouble Shooting...
DEMA SPRAY STATION II MODEL 606T-2 INSTALLATION INSTRUCTIONS
 The 0T-2 Spray Station II Dispensers are used in any application where a chemical product must be sprayed or foamed without the use of compressed air or a high pressure pump. City water pressure and optional
Models GP5132, GP5136, GP5142 & GP5145. Triplex Ceramic Plunger Pump Operating Instructions / Manual
 Models GP5132, GP5136, GP5142 & GP5145 Triplex Ceramic Plunger Pump Operating Instructions / Manual Updated 07/14 Contents: Installation Instructions: page 2 Pump Specifications: page 3 Exploded View:
VSP SERIES Installation, Operation and Maintenance Manual
 VSP SERIES Installation, Operation and Maintenance Manual VARIABLE SPEED PERISTALTIC METERING PUMPS VSP-12 and VSP-20 Models READ ALL WARNINGS CAREFULLY BEFORE INSTALLING PUMP PUMP DATA/SPECIFICATIONS
EBF-750 Deck-Mounted Battery Powered Sensor Operated Gooseneck Faucets
 INSTALLATION INSTRUCTIONS BATTERY POWERED SENSOR OPERATED HAND WASHING FAUCETS EBF-750 I.I. Code No. 0816324 EBF-750 Deck-Mounted Battery Powered Sensor Operated Gooseneck Faucets Includes Instructions
DEMA BLEND CENTER MODEL 681GAP-3 INSTALLATION INSTRUCTIONS
 1. PARTS CHECKLIST: A. Blend Center Assembly B. Vinyl Supply Tubing with Foot Valve Assembly C. Ceramic Weight D. Vinyl Outlet Tubing E. Screw and Anchor Kit F. Label Card G. Metering Tip Kit 2. INSTALLATION:
DEMA MODEL 693T FOAM STATION II INSTALLATION INSTRUCTION
 1. PARTS CHECKLIST: 2. INSTALLATION: DEMA MODEL 93T FOAM STATION II ITEM DESCRIPTION QTY. A. Foam Station Assembly 1 B. ¼ ID Tubing & Foot Strainer 1 C. 3/ ID Tubing & Foot Strainer 1 D. Ceramic Weight
Value Super Filter Max Installation Manual
 Value Super Filter Max Installation Manual Barrie, Ontario, Canada, L4N 4Y8 www.excaliburwater.com EXCALIBUR VALUE SUPER FILTER MAX INSTALLATION MANUAL INSTALLATION PROCEDURES: The Value Super Filter Max
INSTALLATION INSTRUCTIONS DEMA BLEND CENTER MODEL B-GAP, T-GAP
 1. PARTS: ITEM DESCRIPTION QTY. A. Blend Center Assembly 1 B. ¼ ID X 8 Long Vinyl Supply Tubing & Foot Valve Assembly 1 C. Ceramic Weight 1 D. ½ ID X 6 Long Vinyl Outlet Tubing (For 4 GPM Station Only)
AIR/HYDRAULIC INJECTION GUN MODEL INSTRUCTIONS
 I. OPERATION & DESCRIPTION The Air / Hydraulic Injection Gun is a high-pressure tool that should be used with caution and according to these instructions. IMPORTANT: The Gun is 0,000 psi rated. Do not
0.7 m 3 /h - 3 GPM D 07 RE 125 D 07 RE 5. owner s manual
 0.7 m 3 /h - 3 GPM D 07 RE 125 D 07 RE 5 owner s manual GB You have just become the owner of one of the latest in the line of DOSATRON proportional dosing pumps and we congratulate you on your choice.
ACHL Series Pump. Operation and Maintenance Manual Air Driven, Hand Operated High Pressure Liquid Pump
 ACHL Series Pump Operation and Maintenance Manual Air Driven, Hand Operated High Pressure Liquid Pump Catalog: 02-9245ME February 2013 Model # Serial # Drawing # Order # Mfg. Date Table of Contents page
Professional Series 1/2HP 2 YEAR WARRANTY CONVERTIBLE JET PUMP REPAIR PARTS
 Model T033 CONVERTIBLE JET PUMP /HP 900 GPH Suction lift Head of 5 (7.5m) in shallow well mode Professional Series YEAR WARRANTY Suction: /4 Discharge: NPT Maximum pressure: 85 PSI US GPH LPH 5 900 3400
DP556 Pump. 55:1, Air-operated, Grease. General. Operation. Technical Data. Installation. Mounting with Reinforced Cover (Recommended)
") DP556 Pump 55:1, Air-operated, Grease General The DP556 Pump is a compressed air-operated reciprocating piston pump. This high capacity demand pump is compatible with mineral and synthetic grease and suitable
DP556 Pump 55:1, Air-operated, Grease General The DP556 Pump is a compressed air-operated reciprocating piston pump. This high capacity demand pump is compatible with mineral and synthetic grease and suitable
Installation & Operator s Manual
 Installation & Operator s Manual LS5 Liquid Spray System 2 x 10⁵ Gallon Tanks Installation Instructions 1. Position pump enclosure bracket (#3028485) 4 from rear gusset on driver side of hopper spreader,
Installation & Operator s Manual
 Installation & Operator s Manual LS7 Liquid Spray System for SCH Style Spreaders Installation Instructions 1. Position and weld Enclosure Bracket (#3028485) and Support (#3014077) to spreader as shown
TABLE 1-1 GPM FLOW RATE PROPORTIONER, 1/4 I.D. TUBING Injection Rates For Viscosities Shown Metering Tip Color
 Blend Safe II Dispensing System is a modular, locking dispensing system that allows user to dispense chemicals safely, control dispenser inventory and has the flexibility in the field to meet changing
HARMSCO Hurricane Swing Bolt Water Filters Models: HUR 1X170FL, HUR 3X170FL HUR 5X170FL, & HUR 8X170FL
 Models: HUR 1X170FL, HUR 3X170FL HUR 5X170FL, & HUR 8X170FL INSTALLATION AND OPERATION MANUAL HUR 8X170FL HUR 5X170FL HUR 3X170FL HUR 1X170FL Harmsco Filtration Products With Patented Up-Flow and Tangential/Rotational
OWNER S MANUAL D.E. CARTRIDGE. Installation Operation Parts. Models PCDE-30 PCDE-40
 D.E. CARTRIDGE OWNER S MANUAL Installation Operation Parts Models PCDE-30 PCDE-40 2200 East Sturgis Road, Oxnard, CA 93030 Ph. (805) 981-0262 Fax (805) 981-9403 www.waterwayplastics.com waterway@waterwayplastics.com
180 Lake Ave North Paynesville, MN Phone: (320) MASTER MANUFACTURING MASTER GARDNER
 MASTER MANUFACTURING MASTER GARDNER") 180 Lake Ave North Paynesville, MN 56362 Phone: (320) 340-6464 www.master-mfg.com MASTER MANUFACTURING MASTER GARDNER Part Number PCD-E3-009B-MM July 2017 Note: Do not return product to the distributor/dealer
180 Lake Ave North Paynesville, MN 56362 Phone: (320) 340-6464 www.master-mfg.com MASTER MANUFACTURING MASTER GARDNER Part Number PCD-E3-009B-MM July 2017 Note: Do not return product to the distributor/dealer
Model LP301A Triplex Ceramic Plunger Pump Operating Instructions/ Manual
 Model LP301A-5100 Triplex Ceramic Plunger Pump Operating Instructions/ Manual Contents: Installation Instructions: page 2 Specifications: page 3 Exploded View: page 4 Parts List / Kits: page 5 Repair Instructions:
Clean Water Made Easy
 Clean Water Made Easy http://www.cleanwaterstore.com Pro-OX 2510 Manual Backwash Iron Filter Installation & Start-Up Guide Thank you for purchasing a Clean Water System! With proper installation and a
DEMA SPRAY CLEAN DISPENSERS MODEL 605T INSTALLATION INSTRUCTION
 The 605T Spray Clean Dispenser is used in any application where a chemical product must be sprayed or foamed without the use of compressed air or a high pressure pump. City water pressure and optional
INSTALLATION, OPERATION, AND MAINTENANCE MANUAL
 INSTALLATION, OPERATION, AND MAINTENANCE MANUAL MODEL 4D-200 REDUCED PRESSURE PRINCIPLE (RPZ) & MODEL 4D-700 REDUCED PRESSURE DETECTOR ASSEMBLY (RPDA) BACKFLOW PREVENTERS 2 ½ 10 Conbraco Industries Inc.
P SERIES PUMPS. 18mm Versions Nickle-Aluminum Bronze Models: P , P , P , P , P , P , P
 P200-3100 SERIES PUMPS 18mm Versions Nickle-Aluminum Bronze Models: P217-3100, P218-3100, P219-3100, P220-3100, P221-3100, P227-3100, P230-3100 Triplex Ceramic Plunger Pump Operating Instructions/ Repair
Model No. LG55-3PT 55 Gallon Sprayer 3 Point Lawn & Garden Sprayer Model No. LG27-3PT 25 Gallon Sprayer GENERAL INFORMATION
 5300587 Model No. LG27-3PT 25 Gallon Sprayer 5300576 Model No. LG55-3PT 55 Gallon Sprayer 3 Point Lawn & Garden Sprayer Join the center boom to the carrier frame with the two u-bolts, and flange locknuts.
OWNER S MANUAL EVOLUTION 3500, 4500, 5500, & 8500 SERIES PUMPS
 OWNER S MANUAL EVOLUTION 3500, 4500, 5500, & 8500 SERIES PUMPS IMPORTANT SAFETY INSTRUCTIONS When installing and using this electrical equipment, basic safety precautions should always be followed, including
Spray Clean 606T-2 Installation Instruction
 Spray Clean 606T-2 Installation Instruction Overview The 606T-2 unit is designed to be used as a spray or foam unit where up to two chemicals can be attached to the unit along with a clean water rinse.
Installation For Service Only
 For Service Only IMPORTANT! Aerada 1100 Series Low Arc Faucet S53-302 Battery Infrared Metering Faucet (Center Shank with 4" Trimplate) THIS SIDE UP! Packing List Read this entire installation manual to
MicroCoat. System Operating Manual MC2000 Series. MC785, MC785-WF Spray Valves. US: UK: Mexico:
 MicroCoat System Operating Manual MC2 Series MC785, MC785-WF Spray Valves A NORDSON COMPANY US: 8-498-8865 UK: 8 585733 Mexico: 1-8-556-3484 Introduction The MicroCoat System provides precise lubrication
PeroxiDraw Dispenser
 The PeroxiDraw Dispensing System is a locking dispensing system that allows the user to dispense Green Earth Peroxide Cleaner for up to six different dilutions and applications safely and effectively.
CUSTOM COMBINATION AIR VALVE
 INSTALLATION / OPERATION / MAINTENANCE CUSTOM COMBINATION AIR VALVE INTRODUCTION This manual will provide you with the information to properly install and maintain this valve to ensure a long service life.
ONE. Cartridge Tank Filters
 ONE Cartridge Tank Filters TABLE OF CONTENTS Preinstallation Instructions....3 EF-835-1 Bypass Installation...3 Installation Instructions....5 Cartridge Replacement Instructions....7 EF-835-2 Installation
Air Operated Double Diaphragm Pump. M-Pump ½ Metallic Non Metallic Pump INSTALLATION, OPERATION & MAINTENANCE MANUAL
 Air Operated Double Diaphragm Pump M-Pump ½ Metallic Non Metallic Pump INSTALLATION, OPERATION & MAINTENANCE MANUAL 0.5 I.O.M rev 05. 12/2015 INDEX Title Section Introduction.1 Safety.2 Warranty, General
MODEL 200 MULTI-JET FLOW METER
 MODEL 200 MULTI-JET FLOW METER - For Water Applications - INSTALLATION & INSTRUCTION MANUAL 8635 Washington Avenue Racine, Wisconsin 53406 Toll Free: 800.235.1638 Phone: 262.639.6770 Fax: 262.417.1155
INSTALLATION MANUAL IMPORTANT CONSIDERATIONS TECHNICAL INFORMATION. Tools you may need
 Model: IS203, IS203-1-X Three Way Thermostatic Valve 3/4 Rough and Trim Set INSTALLATION MANUAL U P C C Compliance: ASME A112.18.1 CSA B125.1 IMPORTANT CONSIDERATIONS This product and other additional
Industrial Turbo Meters, Sizes 2" through 6"
 Industrial Turbo Meters Sizes 2" through 6" TUR-UM-00530-EN-19 (October 2014) User Manual Industrial Turbo Meters, Sizes 2" through 6" User Manual CONTENTS Scope of the Manual 5 Specifications 5 Product
Bypass / Filter Feeders Operations & Maintenance Manual
 Bypass / Filter Feeders Operations & Maintenance Manual Record Your Model, Serial Number and Other Information on the back of this document. Manufacturing: Bypass & Filter Feeders, Glycol Feed Packages,
The 606T-2 unit is designed to be used as a spray or foam unit where up to two chemicals can be attached to the unit along with a clean water rinse.
 Overview The 606T-2 unit is designed to be used as a spray or foam unit where up to two chemicals can be attached to the unit along with a clean water rinse. The unit features three ball valves for control
DEMA MODEL 692T FOAM STATION I INSTALLATION INSTRUCTION
 1. PARTS CHECKLIST: ITEM DESCRIPTION QTY. A. Foam Station Assembly 1 B. #10 Screw & Anchor Kit Set (Total: 4 Screws & 4 Anchors) 1 C. Ceramic Weight 1 D. ¼ ID Tubing & Foot Valve Assembly 1 E. Metering
GLYCOL FEED SYSTEMS OPERATION & MAINTENANCE MANUAL
 GLYCOL FEED SYSTEMS OPERATION & MAINTENANCE MANUAL PLEASE RECORD THE FOLLOWING DATA (Information is located on the product label or packing slip) Model Number: Date Code: Installation Date: Installation
Viscount I Hydraulic Motor and Displacement Pump
 INSTRUCTIONS-PARTS LIST 308 674 INSTRUCTIONS This manual contains important warnings and information. READ AND KEEP FOR REFERENCE. Rev. C Supersedes Rev. B Viscount I Hydraulic Motor and Displacement Pump
OWNER S MANUAL. Model: UTL-60-12V ( ) (60 Gallon Lawn & Garden Utility Sprayer w/5-nozzle Boom)
 (60 Gallon Lawn & Garden Utility Sprayer w/5-nozzle Boom)") OWNER S MANUAL Model: UTL-60-12V (5301347) (60 Gallon Lawn & Garden Utility Sprayer w/5-nozzle Boom) Technical Specifications 60 Gal. Corrosion-Resistant Polyethylene Tank Deluxe Pistol-Grip Handgun w/25
OWNER S MANUAL Model: UTL-60-12V (5301347) (60 Gallon Lawn & Garden Utility Sprayer w/5-nozzle Boom) Technical Specifications 60 Gal. Corrosion-Resistant Polyethylene Tank Deluxe Pistol-Grip Handgun w/25
MODEL 900 IMPELLER-TYPE FLOW METER
 MODEL 900 IMPELLER-TYPE FLOW METER - For Water Applications - INSTALLATION & INSTRUCTION MANUAL 8635 Washington Avenue Racine, Wisconsin 53406 Toll Free: 800.235.1638 Phone: 262.639.6770 Fax: 262.417.1155
IMPORTANT!!!! Read this manual before attempting any installation, wiring or operation.
 Industrial Turbo Meters Sizes 2" through 6" Installation & Operation Manual IMPORTANT!!!! Read this manual before attempting any installation, wiring or operation. BadgerMeter,Inc. IOM-003-15 Part No.
Maintenance Manual Reduced Pressure Assembly Models 860 & 880V 2 1 /2" 10"
 IOM-F-860_880V INSTALLATION, OPERATION, MAINTENANCE Maintenance Manual Reduced Pressure Assembly Models 860 & 880V 2 1 /2" 10" 860 880V Standard Configuration 880V Vertical Configuration INDEX Vandalism..............................................
Medi-Flow. Model M101 & M101D Medicator Instructions GETTING TECHNICAL ASSISTANCE
 UNPACKING Please open and inspect your package upon receipt. Your package was packed with great care and all the necessary packing materials to arrive to you undamaged. If you do find an item that is broken
Model T Professional Series 1/2HP 2 YEAR WARRANTY SHALLOW WELL JET PUMP
 Model T03121 SHALLOW WELL JET PUMP Professional Series 2 YEAR WARRANTY 1/2HP 916 GPH Head of 25 (7,5 m) US GPH LPH Suction: 1 1/4 NPT Discharge: 1 NPT Maximum Pressure: 65 PSI Stainless steel shaft and
Owner's Manual. Model: ATVBK-710 ( ) (7-Nozzle Deluxe Boom Assembly w/connecting Fittings) Technical Specifications.
 (7-Nozzle Deluxe Boom Assembly w/connecting Fittings) Technical Specifications.") Owner's Manual Model: ATVBK-70 (5307) (7-Nozzle Deluxe Boom Assembly w/connecting Fittings) (Tank NOT Included with Boom Kit) Technical Specifications 7-Nozzle Boom Assembly (Diaphragm/Check Valve Nozzles)
Owner's Manual Model: ATVBK-70 (5307) (7-Nozzle Deluxe Boom Assembly w/connecting Fittings) (Tank NOT Included with Boom Kit) Technical Specifications 7-Nozzle Boom Assembly (Diaphragm/Check Valve Nozzles)
Port size: 1 NPT Shaft size: 5/8 Solid or 1/2 Hollow. Pump shaft rotation: CW Standard/CCW Optional. Weight: 19 lbs. Rollers: Ultra Rollers standard
 4-, 5-, 6-, 7-, 8-Roller Pump Instruction Manual 01509-MN (Read carefully before installation and operation) GENERAL Delavan roller pumps are available with a variety of options, such as a choice of roller
CONTENTS. Product Features and Specifications Installation Requirement Steps of Installation 4. Exploded View Test Run...
 CONTENTS Product Features and Specifications... 1 Installation Requirement... 3 Steps of Installation 4 Exploded View... 14 Test Run... 16 Operation Instruction... 19 Maintenance... 20 Trouble Shooting...
Under Axle Jack Max. Capacity: 25 Tons
 SPX Corporation 655 Eisenhower Drive Owatonna, MN 55060-0995 USA Phone: (507) 455-7000 Tech. Serv.: (800) 533-6127 Fax: (800) 955-8329 Order Entry: (800) 533-6127 Fax: (800) 283-8665 International Sales:
Installation & Operating Manual
 Installation & Operating Manual 25INV-M 1/17 Edition NV Series Vertical Booster Stainless Steel Multistage Centrifugal Pump Congratulations On Your Choice In Purchasing This Webtrol Pump Its Quality is
IMPORTANT SAFETY INSTRUCTIONS
 OWNER S MANUAL FLO-MASTER XP2 SERIES PUMPS IMPORTANT SAFETY INSTRUCTIONS When installing and using this electrical equipment, basic safety precautions should always be followed, including the following: