FS-50 LEG EXTENSION/CURL ASSEMBLY MANUAL AM-FS50
|
|
|
- Brianne Collins
- 5 years ago
- Views:
Transcription

1 FS-50 LEG EXTENSION/CURL ASSEMBLY MANUAL AM-FS50
2 A MESSAGE TO OUR CUSTOMERS Thank you for purchasing the Paramount FS-50 Leg Extension/Curl machine. Because of the many unique features included in this product, this manual was created to provide you with information on how to properly assemble and maintain your equipment. Proper maintenance will ensure that your new equipment will last for years. For your convenience, product questions can be answered by an Authorized Paramount Dealer or by contacting a Paramount Customer Service Representative at: or or nasales@paramountfitness.com Office hours are Monday-Friday, 7:30 am - 4:30 pm PST Paramount Fitness Corporation 6450 East Bandini Blvd. Los Angeles, CA 90040! IMPORTANT REVIEW THE GENERAL MAINTENANCE MANUAL FOR IMPORTANT SAFETY AND MAINTENANCE TIPS. THE MANUAL HAS BEEN INCLUDED WITH YOUR MACHINE ORDER AND CAN ALSO BE DOWNLOADED FROM OUR WEBSITE AT: PLEASE RETAIN THIS MANUAL FOR FUTURE REFERENCE. 2
3 TABLE OF CONTENTS SAFETY... 4 GENERAL CARE AND MAINTENANCE... 5 DIMENSIONS AND WEIGHT... 6 PREPARATION... 7 FS-50 BOX 1 CARTON CONTENTS... 8 FS-50 BOX 2 CARTON CONTENTS... 9 INSTALLATION & ASSEMBLY STEP 1: ASSEMBLE THE FRAME COMPONENTS STEP 2: ASSEMBLE THE PADS AND HANDLES STEP 3: ASSEMBLE THE ARM AND AXLE STEP 4: ASSEMBLE THE ROLLERS STEP 5: ASSEMBLE THE CABLE AND PULLEYS STEP 6: ASSEMBLE THE WEIGHT STACK STEP 7: INSTALL THE FRONT SHROUD STEP 8: INSTALL THE REAR SHROUD AND TOP CAP STEP 9: INSTALL THE WEIGHT STACK LABEL MACHINE LABELS SERVICE PARAMOUNT LIMITED WARRANTY
4 SAFETY 1. Review and understand all of the warning labels affixed to this machine and on the facility safety sign. Replace any warning label at first sign of wear. Labels and the Facility Safety Sign may be obtained from Paramount free of charge. 2. Be certain that the machine operation is understood before it is used. Refer to the instruction label provided with the machine. 3. Keep children away from this equipment. Supervise use by teenagers. 4. DO NOT high-pin or double-pin the weight stack. DO NOT allow the machine to be used if the top plate or weight stack is pinned in a raised position. Use an assistant and carefully return the machine to the proper position with the cap plate resting on the top weight. Inspect the cable to ensure that it is seated in all of the pulleys. 5. Use ONLY Paramount weight selector pins. Other manufacturer s pins may work free of the weight stack causing possible injury. Be certain the pin is completely inserted prior to use. 6. Cables: Inspect the entire cable weekly and the end fittings daily. Pay close attention to the area going over pulleys and to the end connections. Replace all cables at first signs of wear or on an annual basis. Use only Paramount supplied replacement cables. 7. Nuts, Bolts, and Fasteners: Check tightness weekly. If any hardware has become loose, retighten and/or use Loctite Threadlocker Frames and Lifting Arms: Inspect weekly for integrity and function. Replace any component at first signs of wear. 9. Adjustment Pins: check the function of the position selector pins on the adjustable arms. Make sure that the selector pin inserts completely into each position without binding. 10. DO NOT attempt to free any jammed assemblies by yourself as this may cause injury. 11. DO NOT use adder weights or adder weight systems on this machine. 12. Instruct Users NOT to make arm position adjustments during exercise or when pulling on the cable end. Always support the arms when making position adjustments. 13. Instruct Users to return the handgrips and bars to their rest position before releasing. Sudden release of the handgrips and bars may cause serious injury to users or bystanders. 14. Instruct users NOT to attach two cables to single bars or handles. Use one handle or exercise bar for each weight stack at a time. 15. Instruct Users not to wear loose or dangling clothes or have headphone wire hanging when using this equipment. 16. It is recommended that users receive a thorough medical exam before commencing an exercise program. All medical issues should be reviewed to ensure that weight training will not aggravate pre-existing medical conditions. 17. Check the function of your machine regularly by verifying the following: Cables and end fittings are intact. All adjustments are possible and carried out with ease. The proper selector pin is in the weight stack. The exercise is performed smoothly, free of noise and/or binding. 18. Follow the installation guidelines provided with the products. 19. Retain these instructions for future reference. 20. If you have any questions, do not hesitate to contact your Paramount dealer or Paramount Fitness Corp. at (800) or (323) or nasales@paramountfitness.com. 21. Refer to Maintenance Schedule label on the machine and this manual for when to perform maintenance. 4
5 GENERAL CARE AND MAINTENANCE 1. Cable Ends: Inspect end fittings daily for wear. Replace cables at the first sign of wear or on an annual basis. If the cable tension has been adjusted, be certain that the cable nut is tight. 2. Nuts, Bolts, and Fasteners: Check tightness weekly. If any hardware has become loose, retighten and/or use Loctite TM brand Threadlocker Frames: Wipe all machines down with a damp cloth and dry completely each day. This includes painted parts, chrome parts and upholstered pads. 4. Painted and chrome plated parts: Use Simple Green or similar cleaner for light dirt and grime. Use Turtle Wax Polishing Compound or a good car polish to remove heavier dirt and grease as well as for polishing. DO NOT use solvents, lacquer thinner, acetone or finger nail polish remover. For scuffs and marks that are not removed by the above methods use a soft scrub cleanser. Make sure all parts are dry upon completion. 5. Weight stack enclosures (shrouds): Wipe down with a damp cloth as needed. 6. Exercise instruction labels: Clean with soap and water as needed. 7. Guide rods: Wipe all dirt and dust from the guide rods before applying a light application of Tri-Flow TM or other teflon spray lubricant. Spray the Tri-Flow TM on a rag and then wipe the guide rods with the rag. DO NOT use oil lubricants such as WD-40. Caution: Tri-Flow TM will stain carpet and clothing. 8. Bronze bushings: Check monthly for signs of wear and replace as needed. Lubricate monthly with Tri-Flow TM. 9. Please refer to the General Maintenance Manual (part number: AM-GMM) for other important safety and maintenance information. 10. Hardware and components are indicated with a balloon. Refer to the hardware tables that accompany each step for corresponding size and type. 11. Be sure all hardware is tight before using the machine.! DO NOT install any fitness equipment near a pool, hot tub or other damp locations. Corrosion caused by installation in these locations can lead to premature failure of components.! After you have unpacked and inventoried all of the components, read through the remainder of the assembly instructions to familiarize yourself with the assembly procedure! Each step will require the components shown in the table associated with the step. Read the instructions for each step before assembling. 5
 MACHINE WEIGHT AND FLOOR LOADING WEIGHT STACK CONFIGURATION MACHINE WEIGHT APPROXIMATE FLOOR LOADING 170 lbs.")
6 DIMENSIONS AND WEIGHT IN USE MACHINE DIMENSIONS 43.0 (109 cm) 56.5 (144 cm) 66.0 (168 cm) Maximum user weight: 300 lbs. (136 KG) MACHINE WEIGHT AND FLOOR LOADING WEIGHT STACK CONFIGURATION MACHINE WEIGHT APPROXIMATE FLOOR LOADING 170 lbs. 457 LBS [207 KG] 72 LBS/FT 2 [351 KG/M 2 ] 250 lbs. 537 LBS [244 KG] 85 LBS/FT 2 [413 KG/M 2 ] 6
7 REQUIRED TOOLS: Ratchet Wrench and Sockets: 9/16 PREPARATION Wrenches: 9/16, 3/4. (or an adjustable crescent wrench). Rubber Mallet Allen wrenches: (included with the machine) Hardware Measurement Guide: BHCS - BUTTON HEAD CAP SCREW SHCS - SOCKET HEAD CAP SCREW FHCS - FLAT HEAD CAP SCREW MEASURE BOLT FROM HERE HHCS - HEX HEAD CAP SCREW Weight Plate Cartons: Weight plates are packaged (4) per box. You should have (4) boxes of weights. This will give you a total of 16 weight plates. The weight plates are available in two different sizes, 10 lbs. and 15 lbs. The 10 lbs. plates are used on the 170 lbs weight stack, the 15 lbs. plates are used on the 250 lbs. weight stack. Make sure you know which size weight stack is to be installed on this machine. 10 LB. Weight Plate Box Part Number: B1602 Comprised of (4) x 10 lb. Weight Plates OR 15 LB. Weight Plate Box Part Number: B1603 Comprised of (4) x 15lb. Weight Plates 7

8 FS-50 BOX 1 CARTON CONTENTS 1 2 ITEM PART NO. DESCRIPTION QTY. 1 FS-CAP-000X TOP UPRIGHT CAP 1 2 FS-GRD-100X GUIDE ROD 2 3 FS-SHD-150X REAR SHROUD 1 4 FS50-SHD-100X FRONT SHROUD 1 5 FS50-UPR-000X UPRIGHT FRAME 1 6 FS-BKT-000 GUIDE ROD BRACKET 2 7 FS-WSB-000 WEIGHT STACK BASE 2 8 FS-PAD-000X BACK PAD

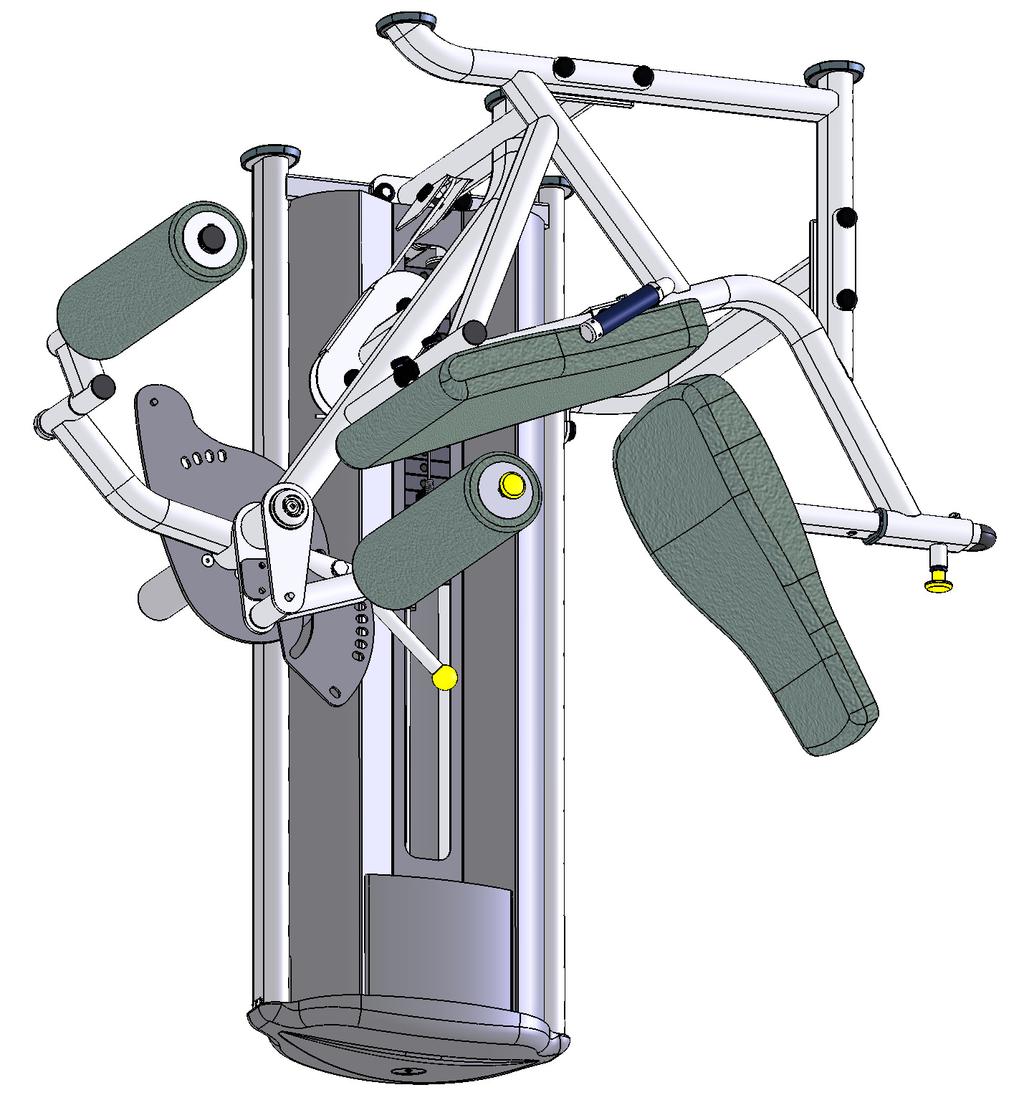
9 FS-50 BOX 2 CARTON CONTENTS ITEM PART NO. DESCRIPTION QTY. 1 FS50-MFR-000X MAIN FRAME FS50-ARM-000X EXT/CURL ARM 1 3 FS50-ARM-100X THIGH PAD, ASSY 1 4 FS50-ARM-200X ANKLE ROLLER PAD, ASSY 1 5 FS50-MFR-300X HANDLES 1 6 FS50-ADJ-000X THIGH ADJUSTMENT PLATE 1 7 FS50-MFR-100X FRONT FRAME 1 8 FS50-MFR-400X AXLE HOUSING 1 9 FS50-MFR-200X REAR BRACE 1 10 FS50-AXL-000X AXLE AND HUB 1 11 FS50-ADJ-100X ADJUSTMENT PLATE 1 12 FS50-SFR-000X BACK PAD SEAT FRAME 1 13 FS50-HWR-000X FL-50 HARDWARE BOX 1 14 FS50-PAD-100X SEAT PAD 1 15 FS-SBR-000X SELECTOR BAR
10 STEP 1: ASSEMBLE THE FRAME COMPONENTS 1. Assemble the Main Frame and the Front Frame using hardware from detail A and D. 2. Install the cable as shown and then loosely assemble the hardware in detail E. 3. Attach the Rear Brace and loosely assemble the hardware in details B, C, and D. 4. Assemble the Rubber feet. 5. After aligning all component edges and surfaces, tighten ALL the hardware. ITEM PART NO. DESCRIPTION QTY. 1 C 445 SCREW, 3/8-16 X C 449 SCREW, 3/8-16 X 2-1/4 2 3 C 481 SCREW, 3/8-16 X 4-1/4 4 4 C 749 LOCKWASHER, 3/8 7 5 C 754C FLAT WASHER, 3/ C 766A LOCKNUT, 3/ C 955S PLASTIC CAP, SILVER 15 8 C 955A BASE, PLASTIC CAP 15 9 FS50-MFR-000X MAIN FRAME 1 10 FS50-MFR-100X FRONT FRAME 1 11 FS50-MFR-200X REAR BRACE 1 12 FS50-UPR-000X UPRIGHT FRAME 1 13 S-550 RUBBER FOOT 6 14 FS-CBL-100X FS-50 CABLE Assemble the cable (FS50-CBL-100X) as shown. D 11 C 9 B 13 E 10 A 13 10
11 STEP 1: ASSEMBLE THE FRAME COMPONENTS 7, 2, 4, 8, 5 7, 1, 4, 8, 5 DETAIL D 7, 3, 8, 5 DETAIL E 7, 1, 4, 8, 5 7, 3, 8, 5 DETAIL C 7, 6, 8, 5 13 DETAIL A 11 7, 6, 8, 5 DETAIL B

12 STEP 2: ASSEMBLE THE PADS AND HANDLES 1. Assemble the back pad to the seat frame. 2. Loosely assemble the handles to the main frame. 3. Assemble the seat pad to the main frame. 4. Loosely assemble all hardware. 5. After aligning all component edges and surfaces, tighten the hardware. ITEM PART NO. DESCRIPTION QTY. 1 C 445 SCREW, 3/8-16 X C 451 SCREW, 3/8-16 X 2-3/4 5 3 C 455 SCREW, 3/8-16 X C 749 LOCKWASHER, 3/8 6 5 C 754C FLAT WASHER, 3/8 9 6 C 766A LOCK NUT, 3/ C 955S PLASTIC CAP 9 8 C 955A BASE, PLASTIC CAP 9 9 FS-PAD-000X BACK PAD 1 10 FS50-PAD-100X SEAT PAD 1 11 FS50-MFR-300X HANDLES 1 12 FS50-SFR-000X SEAT FRAME , 2, 4, 8, , 2, 4, 8, , 6, 8, 5 1, 4 7, 3, 8, 5 7, 2, 4, 8, 5 12
13 STEP 3: ASSEMBLE THE ARM AND AXLE 1. Assemble the adjustment disc to the axle with (4) Flat Head screws. Use blue Loctite #242 on the threads of the screws. 2. Insert axle through adjustment arm and then into main frame. 3. Assemble axle housing and then all the hardware shown 4. Use blue Loctite #242 on the button head screws at the axle ends. 5. Tighten ALL the hardware. Make sure arm can adjust easily and verify that the pop pin fully inserts into each adjustment hole. USE BLUE LOCTITE 3 8 Note orientation of axle hub. Weld on this side ITEM PART NO. DESCRIPTION QTY. 1 C 445 SCREW, 3/8-16 X 1 HHCS 2 2 C 653A SCREW, 3/8-16 X 3/4 FHCS 4 3 C 678 SCREW, 3/8-16 X 1 BHCS 2 4 C-749 LOCK WASHER, 3/8 2 5 C 754C FLAT WASHER, 3/8 2 6 C 955S PLASTIC CAP, SILVER 2 7 C 955A BASE, PLASTIC CAP 2 8 FS-CAP-001 END CAP, AXLE 2 9 FS50-AXL-000X AXLE AND HUB 1 10 FS50-ADJ-100X ADJUSTMENT PLATE 1 11 FS-MFR--400X AXLE HOUSING 1 12 FS50-ARM-000X EXT/CURL ARM 1 10 USE BLUE LOCTITE 8 3 6, 1, 4, 7, 5 2 X4 USE BLUE LOCTITE 12 13

14 STEP 4: ASSEMBLE THE ROLLERS 1. Assemble the ankle roller pad as shown. Assemble the collar so that the pad frame can rotate freely. 2. Assemble the thigh adjustment plate as shown. Then assemble the thigh roller pad. 3. After aligning all component edges and surfaces, tighten the hardware. 4. Make sure the arm can adjust easily and that the pop pin fully inserts into each adjustment hole. ITEM PART NO. DESCRIPTION QTY. 1 FS50-AXL-102X SCREW, 1/2-13 X 5-1/4 FHCS 1 2 C-658 SCREW, 3/8-16 X 1 FHCS 2 3 C-754C FLAT WASHER, 3/8 2 4 C 755 FLAT WASHER, 1/2 1 5 C 766 LOCK NUT, 1/2 1 6 C 766A LOCK NUT, 3/8 2 7 FS-CLR-002 COLLAR, FS50-ARM-100X THIGH ROLLER PAD, ASSEMBLY 1 9 FS50-ARM-200X ANKLE ROLLER PAD, ASSEMBLY 1 10 FS50-AXL-101X AXLE, THIGH PAD 1 11 FS50-ADJ-000X THIGH ADJUSTMENT PLATE , 3 5,

15 STEP 5: ASSEMBLE THE CABLE AND PULLEYS 1. Route the cable as shown, installing the associated pulleys and hardware as you go along. 2. After assembly, make sure the cable and pulleys can move freely. 3. Tighten ALL the hardware. ITEM PART NO. DESCRIPTION QTY. 1 FS50-CBL-100X FS-50 CABLE 1 2 B 900 PULLEY, 4-1/2 DIA. 5 3 C 448 SCREW, 3/8 X 1-3/4 HHCS 5 4 C 766A LOCKNUT, 3/ C 754C FLAT WASHER, 3/ C 955S BOLT COVER 6 7 C 955A BASE, BOLT COVER, 3/8 6 3, 5 4, , 4, 7, 5 3, 5 2 4, 5 6, 3, 7, 5 2 6, 3, 7, 5 4, 5 15


 plates for counter weight. If you are using 15 lb. plates on this stack, pin only one (1) plate.")
16 STEP 6: ASSEMBLE THE WEIGHT STACK 1. Place the guide rods in the upright. 2. Install the weight stack base, rubber bumpers, and washers. 3. Install the weight plates. 4. Install the cap plate and attach the cable with the selector pin as shown. 5. Install the Guide rod hubs. 6. Pin the weight plates as shown. ITEM PART NO. DESCRIPTION QTY. 1 C 445 SCREW, 3/8-16 X 1 HHCS 2 2 C 749 LOCKWASHER 3/8 2 3 C 754C FLAT WASHER, 3/8 3 4 FS-GRD-100X ASSY, GUIDE ROD 2 5 FS-BMP-001 RUBBER BUMPER 2 6 FS-WSB-000 WEIGHT STACK BASE 2 7 FS-BKT-000 GUIDE ROD BRACKET 2 8 FS-SBR-000X CAP PLATE ASSY 1 9 WHT-PLATE WEIGT PLATE 10# OR 15# C 757A FLAT WASHER, C 955 BOLT CAP, BLACK 1 12 C 461 SCREW, 3/8-16 X 5-1/2 HHCS 1 13 C 955A BASE, BOLT CAP, 3/ C 766A LOCK NUT, 3/ FS-SPN-000X SELECTOR PIN 1 1, 2, MAX 1 (25mm) If you are using 10 lb. plates on this weight stack, pin two (2) plates for counter weight. If you are using 15 lb. plates on this stack, pin only one (1) plate. INSTALL SELECTOR PIN RING AROUND CABLE BOLT AS SHOWN IMPORTANT! 15 lb. plates X1 6 11, 12, 13; 14, lb. plates X2 16

17 STEP 7: INSTALL THE FRONT SHROUD 1. Place the front shroud into position. 2. Align the holes and assemble the hardware. 3. Tighten all the hardware. ITEM PART NO. DESCRIPTION QTY. 1 C 445 SCREW, 3/8-16 X 1 HHCS 4 2 C 749 LOCK WASHER 4 3 C 754C FLAT WASHER 4 4 FS50-SHD-100X FRONT SHROUD 1 4 1, 2, 3 17


18 STEP 8: INSTALL THE REAR SHROUD AND TOP CAP 1. Set the lower screws of the shroud into the lower brackets on the upright frame. 2. Then align the holes for the brackets at the top of the shroud. 3. Assemble all the shroud hardware and tighten. 4. Assemble the top cap and hardware. ITEM PART NO. DESCRIPTION QTY. 1 C 766A LOCKNUT, 3/ C 675D SCREW, 1/4-20 X 1/2 BHCS 8 3 C 444 SCREW, 3/8-16 X 3/4 HHCS 2 4 FS-SHD-150X REAR SHROUD 1 5 C 754C FLAT WASHER, 3/8 4 6 FS-CAP-000X TOP CAP, UPRIGHT 1 7 FS-BKT-001 TOP CAP BRACKET , 5 1,
 LBL-WSM-01170 (for kilograms). 3. If you ordered a 250 lb. weight stack, use labels: LBL-WSE-01250 (for pounds) LBL-WSM-01250 (for kilograms). 4.")
19 STEP 9: INSTALL THE WEIGHT STACK LABEL 1. Select the appropriate weight stack label(s) according to your order. You can install pound labels, kilogram labels, or both. 2. If you ordered a 170 lb. weight stack, use labels: LBL-WSE (for pounds) LBL-WSM (for kilograms). 3. If you ordered a 250 lb. weight stack, use labels: LBL-WSE (for pounds) LBL-WSM (for kilograms). 4. Remove the backing from the label to expose the adhesive. Carefully locate the label on the shroud so that it is centered between the edge and the bend. Line up the numbers with their corresponding weight plate. Once the correct position is attained and the label is a uniform distance from the edge, press firmly along the entire length of the label. 5. NOTE: Adhesive takes 24 hours to fully set. 20 INSTALL LABEL HERE OR HERE

 LBL-WSE-01250 (250 LB) LBL-WSM-01170 (77 KG) LBL-WSM-01250 (114 KG)!")

20 MACHINE LABELS The following are the Warning labels required for this FS machine. If any of these labels are missing or become damaged, Paramount will replace them free of charge. Note: these labels are not to scale.! MAXIMUM Height Under Nut to Bolt Head. MAKE SURE locking nut is tight. B2141C WARNING B2141C MAX 1! WARNING SERIOUS INJURY CAN OCCUR ON THIS EQUIPMENT IF THE CABLES AND THEIR ATTACH- MENT COMPONENTS ARE NOT INSPECTED OFTEN. REPLACE AT FIRST SIGNS OF WEAR. P/N B2051 B2051 LBL-WRN-0002 LBL-WSE (170 LB) LBL-WSE (250 LB) LBL-WSM (77 KG) LBL-WSM (114 KG)! WARNING SERIOUS INJURY CAN OCCUR ON THIS EQUIPMENT IF THE PIN IS NOT COMPLETELY INSERTED BEFORE USE. ASTM F1749 P/N B2065 B2065 If this machine is to be installed in a public use facility, ASTM F1749 requirements specify that the facility sign shown to the right is to be installed in plain view. If you did not receive the facility sign with your order, you can obtain one free of charge from Paramount by calling BE ALERT! THE FITNESS EQUIPMENT IN THIS FACILITY PRESENTS HAZARDS WHICH, IF NOT AVOIDED, COULD CAUSE SERIOUS INJURY OR DEATH. PRIOR TO USING THE EQUIPMENT, READ THE WARNING LABELS AND INSTRUCTION PLACARDS AFFIXED TO EACH MACHINE. IF YOU ARE UNSURE ON HOW TO USE A MACHINE, SEEK THE ASSISTANCE OF OUR FLOOR PERSONNEL. WE WILL BE HAPPY TO INSTRUCT YOU ON HOW TO USE THE EQUIPMENT PROPERLY. IMMEDIATELY REPORT ANY PIECE OF EQUIPMENT THAT IS NOT FUCTIONING PROPERLY TO OUR FLOOR PERSONNEL SO THAT IT MAY BE EVALUATED AND SERVICED PROMPTLY. DO NOT ATTEMPT TO USE OR FIX ANY PIECE OF EQUIPMENT THAT IS NOT FUNCTIONING PROPERLY ASTM F LBL-PR-FS50 20

21 SERVICE HOW TO OBTAIN SERVICE For warranty service, contact an Authorized Paramount Dealer or a Paramount Customer Service representative at or Or by at nasales@paramountfitness.com. Before you call, please have the following information ready. Model Number: FS-50 LEG EXT/CURL Serial Number: Date of Installation: A brief description of the problem The serial number is located on the front of the upright frame at the bottom as shown. Serial Number FINAL CHECK 1. If you haven t already done so, lubricate the guide rods and seat adjustment tubes with a teflon spray lubricant. Paramount recommends using TriFlow TM brand. 2. Adjust the foot plate through each position. Verify that the adjustment pin inserts freely into each position and is fully engaged. 3. Place the selector pin into the holder on the cap plate. Push the foot plate out slowly until it tops out against the stop. Verify that the cable moves freely, without any binding. 4. Verify that the selector pin can be inserted into each weight plate. 5. Perform the exercise to verify the cable routes smoothly and the machine operates correctly. 21
22 PARAMOUNT LIMITED WARRANTY Paramount warrants to the original purchaser from a Paramount authorized dealer that Paramount equipment or equipment from a Paramount authorized manufacturing contractor will be free from defects in material and workmanship under normal use and service for the following periods and in the following respects: LIFETIME WARRANTY - Welds, Weight Plates and Guide Rods FIVE YEAR WARRANTY - Bronze Bushings, Sealed Rotating Bearings and Pulley Wheels ONE YEAR WARRANTY - Cables, Linear Bearings, Linear Shafts and all other components not mentioned elsewhere in this warranty NINETY DAY WARRANTY - Upholstery and Grips This limited warranty DOES NOT cover and no warranty is given with respect to: Products not manufactured by Paramount Products which are altered without the express written consent of Paramount Products purchased other than directly from Paramount or through a Paramount Authorized Dealer. All warranty periods begin to run from the date of delivery to the original purchaser. The obligation of Paramount under this warranty is limited to repairing or replacing warranted defective parts, as Paramount may elect, at Paramount's plant in Los Angeles, California, without charge to purchaser for either parts or labor. Purchaser is responsible for all transportation and insurance costs on returned or replaced equipment to and from Paramount's plant in Los Angeles. ANY IMPLIED WARRANTY, INCLUDING BUT NOT LIMITED TO THE IMPLIED WARRANTY OF FITNESS FOR A PARTICULAR PURPOSE AND THE IMPLIED WARRANTY OF MERCHANTABILITY, IS LIMITED TO ONE YEAR DURATION FROM THE DATE OF DELIVERY TO THE ORIGINAL PURCHASER. SOME STATES DO NOT ALLOW LIMITATIONS ON HOW LONG AN IMPLIED WARRANTY LASTS, SO THE ABOVE LIMITATION MAY NOT APPLY TO YOU. THE REMEDY OF REPAIR AND REPLACEMENT IS THE EXCLUSIVE AND SOLE REMEDY OF THE PURCHASER. PARAMOUNT SHALL NOT BE LIABLE FOR ANY SPECIAL, INCIDENTAL, CONTINGENT OR CONSEQUENTIAL DAMAGES OF ANY KIND, INCLUDING, BUT NOT LIMITED TO, DAMAGE OF LOSS OF OTHER PROPERTY OR EQUIPMENT AND LOST PROFITS OR REVENUE. SOME STATES DO NOT ALLOW THE EXCLUSION OR LIMITATION OF INCIDENTAL OR CONSEQUENTIAL DAMAGES, SO THE ABOVE LIMITATION OR EXCLUSION MAY NOT APPLY TO YOU. No action for breach of this written limited warranty or an implied warranty shall be commenced more than one year after the accrual of the cause of action. This written limited warranty is the complete, final and exclusive agreement of the parties with respect to the quality or performance of the goods and any and all warranties and representations. No modifications of this limited warranty or waiver of its terms shall be binding on either party unless approved in writing by an authorized corporate officer of Paramount. This limited warranty gives you specific legal rights, and you may also have other rights which may vary from state to state. Contact Paramount Fitness Corp., 6450 E. Bandini Blvd., Los Angeles, California , for a list of authorized dealers or before returning any defective equipment. Paramount Fitness Corp PARAMOUNT FITNESS CORPORATION 6450 E. BANDINI BLVD., LOS ANGELES, CA USA 22
23 NOTES 23
24 Paramount Fitness Corporation 6450 E. Bandini Blvd. Los Angeles, CA Phone: Fax: AM-FS fm REV:3/9/07
ASSEMBLY MANUAL PFT-200 FUNCTIONAL TRAINER
 ASSEMBLY MANUAL PFT-200 FUNCTIONAL TRAINER AM-pft-200.fm Rev 11-08-05 SAFETY REQUIREMENTS 1. Review and understand all of the warning labels affixed to the machines and the facility safety sign. Replace
FS-61 LEG CURL ASSEMBLY MANUAL AM-FS
 FS-61 LEG CURL ASSEMBLY MANUAL AM-FS61 010913 A MESSAGE TO OUR CUSTOMERS Thank you for purchasing products from the Paramount FS line. Because of the many unique features included in these machines, this
FS-51 LEG PRESS ASSEMBLY MANUAL AM-FS
 FS-51 LEG PRESS ASSEMBLY MANUAL AM-FS51 010913 A MESSAGE TO OUR CUSTOMERS Thank you for purchasing products from the Paramount FS line. Because of the many unique features included in these machines, this
FS-65 SHOULDER PRESS ASSEMBLY MANUAL AM-FS
 FS-65 SHOULDER PRESS ASSEMBLY MANUAL AM-FS65 010913 A MESSAGE TO OUR CUSTOMERS Thank you for purchasing products from the Paramount FS line. Because of the many unique features included in these machines,
FS-56 BICEPS/TRICEPS ASSEMBLY MANUAL AM-FS
 FS-56 BICEPS/TRICEPS ASSEMBLY MANUAL AM-FS56 010913 A MESSAGE TO OUR CUSTOMERS Thank you for purchasing products from the Paramount FS line. Because of the many unique features included in these machines,
XFW7200 OLYMPIC INCLINE BENCH INSTALLATION MANUAL AM-XFW7200 REV:
 XFW7200 OLYMPIC INCLINE BENCH INSTALLATION MANUAL AM-XFW7200 REV: 010913 A MESSAGE TO OUR CUSTOMERS Thank you for purchasing products from the Paramount XFW line. Because of the many unique features included
XFW5000 INSTALLATION MANUAL PREACHER CURL BENCH AM-XFW5000 REV:
 XFW5000 PREACHER CURL BENCH INSTALLATION MANUAL AM-XFW5000 REV: 010913 A MESSAGE TO OUR CUSTOMERS Thank you for purchasing products from the Paramount XFW line. Because of the many unique features included
XFW8200 OLYMPIC 3-WAY BENCH INSTALLATION MANUAL AM-XFW8200 REV:
 XFW8200 OLYMPIC 3-WAY BENCH INSTALLATION MANUAL AM-XFW8200 REV: 072313 A MESSAGE TO OUR CUSTOMERS Thank you for purchasing products from the Paramount XFW line. Because of the many unique features included
XFW8300 DUAL SIDED HALF RACK INSTALLATION MANUAL AM- XFW8300 REV:
 XFW8300 DUAL SIDED HALF RACK INSTALLATION MANUAL AM- XFW8300 REV: 072716 A MESSAGE TO OUR CUSTOMERS Thank you for purchasing products from the TRUE XFW line. Because of the many unique features included
TUFFSTUFF FITNESS INTERNATIONAL OWNER S MANUAL
 TUFFSTUFF FITNESS INTERNATIONAL OWNER S MANUAL Maintenance & Assembly Instructions IMPORTANT: KEEP THIS MANUAL FOR FUTURE REFERENCE NOTICE It is the Purchaser s/owner s obligation: 1. To disclose and post
TUFFSTUFF FITNESS INTERNATIONAL OWNER S MANUAL
 TUFFSTUFF FITNESS INTERNATIONAL OWNER S MANUAL Maintenance & Assembly Instructions IMPORTANT: KEEP THIS MANUAL FOR FUTURE REFERENCE NOTICE It is the Purchaser s/owner s obligation: 1. To disclose and post
OWNERS MANUAL. ULTRA Single-Station Strength G7-S34 Seated Row
 OWNERS MANUAL ULTRA Single-Station Strength G7-S34 Seated Row Table Of Contents Safety, General Care & Maintenence...3 Getting Started (Product Specifications)...5 Assembly Information...6 Markings...7
Owner s Manual. 4 Functional Trainer. Serial Number Here. Date of Purchase
 Revision 2 June 2014 Functional Trainer Owner s Manual Serial Number Here Date of Purchase www.batcafitness.com 1207 New Hope Road, Raleigh, NC - 919.255.1233 Fusion - www.batcafitness.com 4 Functional
OWNERS MANUAL. ULTRA Single-Station Strength G7-S42 Triceps Press
 OWNERS MANUAL ULTRA Single-Station Strength G7-S42 Triceps Press Table Of Contents Safety, General Care & Maintenence... 3 Getting Started (Product Specifications)... 5 Assembly Information... 6 Parts
OWNERS MANUAL. ULTRA Single-Station Strength G7-S13 Chest Press
 OWNERS MANUAL ULTRA Single-Station Strength G7-S13 Chest Press Table Of Contents Safety, General Care & Maintenence...3 Getting Started (Product Specifications)...5 Assembly Information...6 Markings...7
OWNER S MANUAL & Assembly Instructions
 OWNER S MANUAL & Assembly Instructions EWT- Olympic Plate Tree L2 X W 2 X H1 EWT-_Rev0 Revision Date -27-12 Table of Contents DANGER, WARNING, & CAUTION LABELS INFORMATION...Page - IMPORTANT SAFETY INSTRUCTIONS...Page
IMPORTANT READ ME FIRST
 IMPORTANT READ ME FIRST Thank you for purchasing your Kushlan Mixer. We hope that you will enjoy using it for many years to come. SHOULD YOU REQUIRE ANY SET-UP OR OPERATING ASSISTANCE WITH YOUR PRODUCT,
Heavy Duty Four Wheeled Walker
 Heavy Duty Four Wheeled Walker Weight Capacity: 500 lbs. ITEM # W1802 Made in China 2011 ESSENTIAL MEDICAL SUPPLY, INC. Manufactured for Orlando, FL 32822 -- SAVE THESE INSTRUCTIONS -- Do not attempt to
AMERICA S PREMIER EXERCISE EQUIPMENT SP-4415 INNER/OUTER THIGH ASSEMBLY MANUAL REV /2" 54" PLATINUM L 56 1/2" W 54" H 54 3/4"
 AMERICA S PREMIER EXERCISE EQUIPMENT SP-4415 INNER/OUTER THIGH ASSEMBLY MANUAL REV. 0 56 1/2" " PLATINUM L 56 1/2" W " H 3/4" Introduction About the Inner/Outer Thigh SP-4415 Congratulations on your new
SP-4407 PLATINUM CABLE COLUMN ASSEMBLY MANUAL REV. 0 L 43 W 43 H 91
 SP-4407 CABLE COLUMN ASSEMBLY MANUAL REV. 0 PLATINUM L 43 W 43 H 91 Introduction About the Cable Column SP-4407 Congratulations on your new purchase of the Cable Column. We hope you are completely satisfied
HF4145 FOLDING MULTI-POSITION WORKOUT BENCH
 HF4145 FOLDING MULTI-POSITION WORKOUT BENCH Note: Both Serial Number and Model Number are Required when Ordering Parts RECORD SERIAL NUMBER HERE CATALOG NUMBER 0406-001 Customer Service (800) 548-5438
Owner s Manual. Upper Body Unit. Serial Number Here. Date of Purchase New Hope Road, Raleigh, NC Fusion -
 Revision 1 March 2012 Upper Body Unit Owner s Manual Serial Number Here Date of Purchase www.batcafitness.com 1207 New Hope Road, Raleigh, NC - 919.255.1233 Fusion - www.batcafitness.com 4 Upper Body Station
Owner s Manual. Upper Body Unit. Serial Number Here. Date of Purchase New Hope Road, Raleigh, NC Fusion -
 Revision 3 April 2015 Upper Body Unit Owner s Manual Serial Number Here Date of Purchase www.batcafitness.com 1207 New Hope Road, Raleigh, NC - 919.255.1233 Fusion - www.batcafitness.com 4 Upper Body Station
SP-4405 PLATINUM PECTORAL CONTRACTOR ASSEMBLY MANUAL REV. 0 L 48 W 77 H 55
 SP-45 PECTORAL CONTRACTOR ASSEMBLY MANUAL REV. 0 PLATINUM L 48 W 77 H 55 Introduction About the Pectoral Contractor SP-45 Congratulations on your new purchase of the Pectoral Contractor. We hope you are
CG-7519 OWNER S MANUAL NOTICE. Maintenance & Assembly Instructions. Abdominal Crunch IMPORTANT: KEEP THIS MANUAL FOR FUTURE REFERENCE
 OWNER S MANUAL Maintenance & Assembly Instructions IMPORTANT: KEEP THIS MANUAL FOR FUTURE REFERENCE NOTICE It is the Purchaser s/owner s obligation: 1. To disclose and post all Rules & Regulations, Danger,
3 Owner s Manual P E R S O N A L G Y M. Serial Number Here. Date of Purchase
 Revision 5 FEB 2016 P E R S O N A L G Y M Owner s Manual Serial Number Here Date of Purchase www.batcafitness.com 1207 New Hope Road, Raleigh, NC - 919.255.1233 - Fusion www.batcafitness.com 3 Owner s
PERFORM THE FOLLOWING SAFETY CHECK DAILY:
 FITNESS Introduction We at Vectra Fitness appreciate your selection of our product for your fitness program, and invite your questions and comments. We're sure that you ll be pleased with your new Vectra
IMPORTANT READ ME FIRST
 IMPORTANT READ ME FIRST Thank you for purchasing your Kushlan Mixer. We hope that you will enjoy using it for many years to come. SHOULD YOU REQUIRE ANY SET-UP OR OPERATING ASSISTANCE WITH YOUR PRODUCT,
OWNER S MANUAL QUESTIONS? CAUTION. Model No. F811.0 Serial No. Write the serial number in the space above for reference. Serial Number Decal
 Model No. F811.0 Serial No. Write the serial number in the space above for reference. OWNER S MANUAL Serial Number Decal QUESTIONS? If you have questions, or if parts are damaged or missing, please see
AXIS Free Trainer Owner's Manual
 Revision 0 Nov 2017 Free Trainer Owner s Manual Serial Number Here Date of Purchase www.batcafitness.com AXIS Free Trainer Owner's Manual Congratulations on the purchase of your new Batca AXIS Free Trainer.
AXIS Smith Trainer Owner's Manual
 Revision 0 June 2018 Smith Trainer Owner s Manual Serial Number Here Date of Purchase www.batcafitness.com AXIS Smith Trainer Owner's Manual Instructions Congratulations on the purchase of your new Batca
AXIS Dip/Plyo Platform Owner's Manual
 Revision 0 June 2018 Dip/Plyo Platform Owner s Manual Serial Number Here Date of Purchase www.batcafitness.com AXIS Dip/Plyo Platform Owner's Manual Page Instructions 2 Tools Required/Hardware Sheet 3
AXIS Kettlebell/Ball Storage Owner's Manual
 Revision 0 June 2018 Kettlebell/Ball Storage Owner s Manual Serial Number Here Date of Purchase www.batcafitness.com AXIS Kettlebell/Ball Storage Owner's Manual Page Instructions 2 Tools Required/Hardware
AXIS Accessory Module Owner's Manual
 Revision 0 June 2018 Accessory Module Owner s Manual Serial Number Here Date of Purchase www.batcafitness.com AXIS Accessory Module Owner's Manual Page Instructions 2 Tools Required/Hardware Sheet 3 AXIS
Flat/Incline/Decline Bench Owner s Manual
 Revision 0 June 2018 Flat/Incline/Decline Bench Owner s Manual Serial Number Here Date of Purchase www.batcafitness.com AXIS F.I.D. Bench Owner's Manual Page Instructions 2 Tools Required/Hardware Sheet
3 Owner s Manual. Serial Number Here. Date of Purchase New Hope Road, Raleigh, NC Fusion
 Revision 2 Feb. 2013 Owner s Manual Serial Number Here Date of Purchase www.batcafitness.com 1207 New Hope Road, Raleigh, NC - 919.255.1233 - Fusion www.batcafitness.com 3 Owner s Manual Instructions Congratulations
ATV TRACK KIT. Operator s Manual Installation Instructions Service Instructions Replacement Parts List. Effective Date: October, 2012
 p/n 2258-642 ATV TRACK KIT Operator s Manual Installation Instructions Service Instructions Replacement Parts List Track Assembly Kits (p/n 1436-204) Mounting Assembly Kits (p/n 1436-205) 1436-815) Effective
OWNERS MANUAL. Versa Single-Station Strength VS-S33 Lat Pulldown
 OWNERS MANUAL Versa Single-Station Strength VS-S33 Lat Pulldown Table Of Contents Safety, General Care & Maintenence...3 Getting Started (Product Specifications)...5 Assembly Information...6 Parts List...7
OWNER S MANUAL RSM-600. Basic Smith-Half Cage
 OWNER S MANUAL 5" 0" 71 1/2" RSM-600 Basic Smith-Half Cage TuffStuff Fitness Equipment, Inc. 125 E. Franklin Avenue Pomona, CA 91766, USA Ph: 909-629-1600 Fax: 909-629-4967 E-mail: service@tuffstuff.net
ASSEMBLY & OPERATION MANUAL. CDVK2 Power Tower RECORD SERIAL NUMBER HERE
 ASSEMBLY & OPERATION MANUAL CDVK2 Power Tower RECORD SERIAL NUMBER HERE www.inspirefitness.net by Health In Motion LLC Feb. 2011 TABLE OF CONTENTS Section Description.. Page Instructions.. 1 Tools Required
FLAT BENCH OWNER S MANUAL QUESTIONS? CAUTION. Visit our website at.
 Model No. GZFW20611 Serial No. Write the serial number in the space above for future reference. Serial Number Decal QUESTIONS? As a manufacturer, we are committed to providing complete customer satisfaction.
QUESTIONS? PATENT PENDING. Model No. WESY85100 Serial No. Write the serial number in the space above for future reference.
 PATENT PENDING Model No. WESY85100 Serial No. Write the serial number in the space above for future reference. Serial Number Decal-- QUESTIONS? As a manufacturer, we are commiffed to providing complete
CLUB SERIES LEG EXTENSION
 CLUB SERIES LEG EXTENSION ASSEMBLY INSTRUCTIONS Part # 7580 Rev B. Revision: 0//0 PARTS LIST KEY 3 5 6 7 8 0 3 5 6 7 8 0 PART # DESCRIPTION 657xx TOWER 650xx PIVOT ARM SUPPORT 650xx HANDLE 666xx PIVOT
888 SMITH SYSTEM USER S GUIDE WARNING: Read and follow all directions for each step to insure proper assembly of this product.
 888 SMITH SYSTEM USER S GUIDE WARNING: Read and follow all directions for each step to insure proper assembly of this product. CLASS H PART # 733970 REV. B Version: 88809 Revision: 0/09/03 TABLE OF CONTENTS
USER'S MANUAL QUESTIONS?
 Model No. WESY19510 Serial No. (Write the serial number in the space above for reference.) USER'S MANUAL Serial Number Decal QUESTIONS? As a manufacturer, we are committed to providing complete customer
OWNERS MANUAL. Versa Single-Station Strength VS-S53 Abdominal
 OWNERS MANUAL Versa Single-Station Strength VS-S53 Abdominal Table Of Contents Safety, General Care & Maintenence... 3 Getting Started (Product Specifications)... 5 Assembly Information... 6 Markings...
HF4664 AB / BACK ROMAN HYPER
 OWNERS HF4664 AB / BACK ROMAN HYPER Note: Both Serial Number and Model Number are Required when Ordering Parts RECORD SERIAL NUMBER HERE CATALOG NUMBER 0206-001 Customer Service (800) 548-54 (858) 578-7676
OWNER'S MANUAL RPL-5363-A CALF RAISE
 Note: Both Serial Number and Model Number are Required when Ordering Parts RECORD SERIAL NUMBER HERE Customer Service MACHINE CODE B01 RPL-5363-A CALF RAISE **WARNING!** TO PREVENT POSSIBLE TIPPING, BOLT
ASSEMBLY INSTRUCTIONS
 ASSEMBLY INSTRUCTIONS TABLE OF CONTENTS: Introduction Pg. 2 Safety Precautions Pg. - Pg. 4 Assembly Instructions Pg. 5 - Pg. 9 SBU-400 Exploded View Diagram Pg. 10 SHS-410 Exploded View Diagram Pg. 11
Hydraulic Transmission Jack, Telescopic
 Operating Instructions & Parts Manual Hydraulic Transmission Jack, Telescopic Model 4000 400 (Air Operated) Capacity 000 lbs. 000 lbs. Model 4000 Model 400 U.S. Patent No. 6,02,377! This is the safety
1000-LB. MOTORCYCLE LIFT TABLE OWNER S MANUAL
 1000-LB. MOTORCYCLE LIFT TABLE OWNER S MANUAL WARNING: Read carefully and understand all ASSEMBLY AND OPERATION INSTRUCTIONS before operating. Failure to follow the safety rules and other basic safety
General Safety & Maintenance Manual Precor Icarian Line Commercial Strength Equipment
 General Safety & Maintenance Manual Precor Icarian Line Commercial Strength Equipment Important Safety Guidelines To ensure the safe and proper working condition of the equipment, follow these important
General Safety & Maintenance Manual Precor Icarian Line Commercial Strength Equipment
 General Safety & Maintenance Manual Precor Icarian Line Commercial Strength Equipment Important Safety Guidelines To ensure the safe and proper working condition of the equipment, follow these important
Marcy Diamond Home Gym
 NOTE: Please read all instructions carefully before using this product Table of Contents Safety Notice Hardware Identifier Assembly Instruction Marcy Diamond Home Gym MD-2109 Parts List Resistance Chart
1250 LB. CAPACITY MECHANICAL WHEEL DOLLY
 1250 LB. CAPACITY MECHANICAL WHEEL DOLLY 67287 SET-UP AND OPERATING INSTRUCTIONS Visit our website at: http://www.harborfreight.com Read this material before using this product. Failure to do so can result
OWNER'S MANUAL RPL-5363 CALF RAISE. Customer Service (800) (858) Fax (858) RECORD SERIAL NUMBER HERE CATALOG NUMBER
 (858) Fax (858) RECORD SERIAL NUMBER HERE CATALOG NUMBER") Note: Both Serial Number and Model Number are Required when Ordering Parts RECORD SERIAL NUMBER HERE CATALOG NUMBER 1007-003 RPL-5363 CALF RAISE Customer Service (800) 548-5438 (858) 578-7676 Fax (858)
Note: Both Serial Number and Model Number are Required when Ordering Parts RECORD SERIAL NUMBER HERE CATALOG NUMBER 1007-003 RPL-5363 CALF RAISE Customer Service (800) 548-5438 (858) 578-7676 Fax (858)
USER'S MANUAL QUESTIONS? TABLE OF CONTENTS CAUTION. Model No. GGSY49230 Serial No. Serial Number Decal (Under Seat)
") Model No. GGSY4920 Serial No. Write the serial number in the space above for reference. USER'S MANUAL Serial Number Decal (Under Seat) QUESTIONS? As a manufacturer, we are committed to providing complete
Model No. GGSY4920 Serial No. Write the serial number in the space above for reference. USER'S MANUAL Serial Number Decal (Under Seat) QUESTIONS? As a manufacturer, we are committed to providing complete
MARCY PLATINUM MP-3500 HOME GYM
 NOTE: Please read all instructions carefully before using this product Table of Contents Safety Notice Hardware Identifier MARCY PLATINUM MP-3500 HOME GYM Assembly Instruction Parts List Warranty Ordering
G3-MS20 G3-MS40 G3-MS24 G3-MS51 G3-MS52 G3-MS53 G3-MS50 G3-MS80 AURA SERIES
 AURA SERIES G3-MS G3-MS5 G3-MS5 G3-MS53 G3-MS0 G3-MS0 G3-MS50 G3-MS80 IMPORTANT SAFETY INFORMATION It is the sole responsibility of the purchaser of MATRIX products to instruct all individuals, whether
Kushlan Products, Inc. !IMPORTANT! Read Me First!
 Kushlan Products, Inc.!IMPORTANT! Read Me First! Thank you for purchasing this Kushlan Product. We hope you will enjoy using it for many years. Be sure to keep your box and all packing material in case
FIT SERIES FIT-3 W/ LEG PRESS
 FIT SERIES FIT-3 W/ LEG PRESS ASSEMBLY INSTRUCTIONS Part # 734820 Rev C. Revision:4/04/03 KEY 2 3 4 5 6 7 8 9 0 2 3 4 5 6 7 8 9 20 2 22 23 24 25 26 27 28 29 30 3 32 33 34 35 36 37 38 39 40 4 42 PART #
OWNERS MANUAL HF4985. Note: Both Serial Number and Model Number are Required when Ordering Parts (800) (619) CATALOG NUMBER
 (619) CATALOG NUMBER") OWNERS MANUAL HF4985 Note: Both Serial Number and Model Number are Required when Ordering Parts RECORD SERIAL NUMBER HERE Customer Service (800) 548-5438 (619) 578-7676 CATALOG NUMBER Fax 1205-000 (619)
OWNERS MANUAL HF4985 Note: Both Serial Number and Model Number are Required when Ordering Parts RECORD SERIAL NUMBER HERE Customer Service (800) 548-5438 (619) 578-7676 CATALOG NUMBER Fax 1205-000 (619)
1000-LB. ENGINE STAND
 1000-LB. ENGINE STAND WARNING: Read carefully and understand all ASSEMBLY AND OPERATION INSTRUCTIONS before operating. Failure to follow the safety rules and other basic safety precautions may result in
16K and 19K Sidewinder TM Service Kit Instructions 86005
 86005 Equipment Required: Wrenches: 15/16, 1 1/8, Torque Wrench, Rubber Mallet Included Service Kit Items: 1 Qty. (1) Wear Plate 2 Qty. (6) 5/8 Conical Washer 3 Qty. (2) Wedge Bolt, 5/8-11 X 1 3/4 GRD
Operating Instructions & Parts Manual
 Aluminum / Steel Hybrid Service Jack Operating Instructions & Parts Manual Model 26017 26028 26033 Capacity 1.5 Ton 2.5 Ton 3 Ton! This is the safety alert symbol. It is used to alert you to potential
Operating Instructions & Parts Manual. Fuel Tank Adapter
 Operating Instructions & Parts Manual Fuel Tank Adapter Model Number 40080 Capacity 80 lb.! This is the safety alert symbol. It is used to alert you to potential personal injury hazards. Obey all safety
SIDE-WIND, A-FRAME TRAILER JACK. Model Due to continuing improvements, actual product may differ slightly from the product described herein.
 SIDE-WIND, A-FRAME TRAILER JACK Model 95157 Assembly And Operation Instructions Due to continuing improvements, actual product may differ slightly from the product described herein. 3491 Mission Oaks Blvd.,
PT1 Power Trainer ASSEMBLY & OPERATION MANUAL RECORD SERIAL NUMBER HERE
 PT1 Power Trainer ASSEMBLY & OPERATION MANUAL RECORD SERIAL NUMBER HERE www.inspirefitness.net by Health In Motion LLC Dec. 2010 TABLE OF CONTENTS Section Description.. Page Instructions.. 1 Tools Required
TUFFSTUFF FITNESS INTERNATIONAL OWNER S MANUAL
 TUFFSTUFF FITNESS INTERNATIONAL OWNER S MANUAL Maintenance & Assembly Instructions IMPORTANT: KEEP THIS MANUAL FOR FUTURE REFERENCE NOTICE It is the Purchaser s/owner s obligation: 1. To disclose and post
Be Strong. NS 200X. Assembly Manual. Model: NS 200X. P/N: Rev A (10/04/2006)
") Be Strong. Assembly Manual NS 00X Model: NS 00X P/N: 00-700 Rev A (0/0/00) TABLE OF CONTENTS Before You Assemble... 3 Product Specifications... Product Features... Parts List / Box Contents... 5 Exploded
Be Strong. Assembly Manual NS 00X Model: NS 00X P/N: 00-700 Rev A (0/0/00) TABLE OF CONTENTS Before You Assemble... 3 Product Specifications... Product Features... Parts List / Box Contents... 5 Exploded
OWNER'S MANUAL RS-1401-A ROC-IT LEG EXTENSION
 Note: Both Serial Number and Model Number are Required when Ordering Parts RECORD SERIAL NUMBER HERE Customer Service MACHINE CODE C04 RS-1401-A ROC-IT LEG EXTENSION **WARNING!** TO PREVENT POSSIBLE TIPPING,
2000-LB. ENGINE STAND
 2000-LB. ENGINE STAND WARNING: Read carefully and understand all ASSEMBLY AND OPERATION INSTRUCTIONS before operating. Failure to follow the safety rules and other basic safety precautions may result in
DISC BRAKE CALIPER TOOL SET
 DISC BRAKE CALIPER TOOL SET 40732 ASSEMBLY AND OPERATING INSTRUCTIONS Diagrams within this manual may not be drawn proportionally. Due to continuing improvements, actual product may differ slightly from
RS-1203 SEATED MID-ROW
 Note: Both Serial Number and Model Number are Required when Ordering Parts RECORD SERIAL NUMBER HERE CATALOG NUMBER 0306-005 RS-1203 SEATED MID-ROW Customer Service (800) 548-5438 (858) 578-7676 Fax (858)
Low Profile Service Jack Jack Stand Combo
 Low Profile Service Jack Jack Stand Combo Jack Stands Low Profile Service Jack U.S. Patent No. 6,199,379! This is the safety alert symbol. It is used to alert you to potential personal injury hazards.
General Safety & Maintenance Manual Precor Icarian Line Commercial Strength Equipment
 General Safety & Maintenance Manual Precor Icarian Line Commercial Strength Equipment Important Safety Guidelines for Owners Follow these guidelines to maintain proper working condition of the equipment:
VICE MOUNTED BEAD ROLLER
 VICE MOUNTED BEAD ROLLER Owner s Manual WARNING: Read carefully and understand all ASSEMBLY AND OPERATION INSTRUCTIONS before operating. Failure to follow the safety rules and other basic safety precautions
POWERHOUSE CORNER GYM GS 9
 NOTE: Please read all instructions carefully before using this product Table of Contents Safety Notice Hardware Pack Assembly Instruction Parts List POWERHOUSE CORNER GYM GS 9 Resistance Chart Warranty
RPL-5403-B DUAL ACTION LEG PRESS
 Note: Both Serial Number and Model Number are Required when Ordering Parts RECORD SERIAL NUMBER HERE Customer Service MACHINE CODE A04 RPL-5403-B DUAL ACTION LEG PRESS (800) 548-5438 (858) 578-7676 Fax
FLAT BENCH OWNER S MANUAL QUESTIONS? CAUTION. Visit our website at.
 Model No. GZFW21410 Serial No. Write the serial number in the space above for future reference. Serial Number Decal QUESTIONS? As a manufacturer, we are committed to providing complete customer satisfaction.
OWNER'S MANUAL RPL-5102
 RPL-5102 PLATE LOADED PREACHER CURL **WARNING!** TO PREVENT POSSIBLE TIPPING, BOLT THIS UNIT TO THE EXERCISE FLOOR. FAILURE TO DO SO MAY RESULT IN SERIOUS INJURY OR DEATH. Note: Both Serial Number and
805 FLAT & INCLINE BENCH SYSTEM
 805 FLAT & INCLINE BENCH SYSTEM WARNING: Read and follow all directions for each step to insure proper assembly of this product. USER S GUIDE CLASS H PART # 70760 REV. B Version: 80507 Revision: 06//0
OWNER'S MANUAL RS-1204 LOW BACK
 Note: Both Serial Number and Model Number are Required when Ordering Parts RECORD SERIAL NUMBER HERE Customer Service MACHINE CODE A10 RS-1204 LOW BACK **WARNING!** TO PREVENT POSSIBLE TIPPING, BOLT THIS
User s Manual. Table of Contents CAUTION. Model No. MTSC20000
 Model No. MTSC20000 Table of Contents Important Precautions..........2 Limited Warranty..............2 Before You Begin.............3 How to Set Up and Fold the Scooter...............4 How to Operate the
Zuma. Multi-Hip Option. Assembly Instructions
 Zuma Multi-Hip Option Assembly Instructions Important Safety Instructions Before beginning any fitness program, you should obtain a complete physical examination from your physician. Il est conseillé de
Owner s Manual & Safety Instructions
 Owner s Manual & Safety Instructions Save This Manual Keep this manual for the safety warnings and precautions, assembly, operating, inspection, maintenance and cleaning procedures. Write the product s
CLUB SERIES HIP AB/ADDUCTOR
 CLUB SERIES HIP AB/ADDUCTOR ASSEMBLY INSTRUCTIONS Part # 718601 Rev E 1 Revision: 1/2/03 KEY PART # DESCRIPTION QTY KEY PART # DESCRIPTION QT Y 1 71710xx TOWER 1 22 3102915 3/8 X 3-1/ BOLT 2 1A 6692601
OWNER S MANUAL SPT-6 SIX-PACK TRAINER AMERICA S PREMIER EXERCISE EQUIPMENT SPT-6
 OWNER S MANUAL SPT-6 SIX-PACK TRAINER AMERICA S PREMIER EXERCISE EQUIPMENT SPT-6 L W 32 H 80 SPT-6 Rev0 Revision Date 10-7-2008 Introduction About the Congratulations on your new purchase of the SPT-6.
OWNER'S MANUAL HD-3800 INNER / OUTER THIGH
 Note: Both Serial Number and Model Number are Required when Ordering Parts RECORD SERIAL NUMBER HERE Customer Service MACHINE CODE A01 HD-3800 INNER / OUTER THIGH **WARNING!** TO PREVENT POSSIBLE TIPPING,
OWNERS MANUAL HF4263
 OWNERS MANUAL HF4263 ADJUSTABLE AB / BACK HYPER BENCH Note: Both Serial Number and Model Number are Required when Ordering Parts RECORD SERIAL NUMBER HERE CATALOG NUMBER 0805-000 Customer Service (800)
5 th Airborne Sidewinder Service Kit Instructions 94316
 94316 Equipment Required: Wrenches: 15/16, Torque Wrench, Rubber Mallet 3 4 5 2 Included Service Kit Items: 1 Qty. (1) Wear Plate 2 Qty. (1) Wear Bushing 3 Qty. (1) Wear Disc 4 Qty. (4) 5/8-11x2 GRD8 Bolt
USER MANUAL. Tides La Mer Treatment Table Rev A 3/28/19. *all tables shown with optional accessories and/or finishes
 USER MANUAL Tides La Mer Treatment Table *all tables shown with optional accessories and/or finishes 1-400-0041 Rev A 3/28/19 Living Earth Crafts 2019, All Rights Reserved Legal Notice The information
MARCY PREMIER HOME GYM
 NOTE: Please read all instructions carefully before using this product Table of Contents Safety Notice Hardware Identifier Assembly Instruction MARCY PREMIER HOME GYM Parts List Resistance Chart Warranty
Adjustable Steel Welding Table
 Adjustable Steel Welding Table Owner s Manual WARNING: Read carefully and understand all ASSEMBLY AND OPERATION INSTRUCTIONS before operating. Failure to follow the safety rules and other basic safety
Fast Lift Service Jack, Low Profile
 Blackhawk Automotive is a Licensed Trade Mark Made by SFA Companies, Kansas City, MO Fast Lift Service Jack, Low Profile Operating Instructions & Parts Manual Model BH6023B Capacity 2 Ton! U.S. Patent
TXJ0500/RR500 1,000-lbs. Truck Bed Roller Dolly
 OWNER S MANUAL TXJ0500/RR500 1,000-lbs. Truck Bed Roller Dolly WARNING: Questions, problems, missing parts? Before returning to your retailer, call our customer service department at 1-888-448-6746, 8
OWNER S MANUAL QUESTIONS? CAUTION. Visit our website at. Model No. GZFI Serial No.
 OWNER S MANUAL Model No. GZFI8008.0 Serial No. Write the serial number in the space above for future reference. Serial Number Decal (inside tower) QUESTIONS? At FreeMotion Fitness, we are committed to
CLUB SERIES GLUTE MACHINE
 CLUB SERIES GLUTE MACHINE ASSEMBLY INSTRUCTIONS Part # 7109801 Rev D. 1 Revision:11/12/01 PARTS LIST KEY PART # DESCRIPTION QTY KEY PART # DESCRIPTION QTY 1 71086xx TOWER 1 11 3102901 3/8 X 1-1/4 BOLT
RPL-5301 ADDENDUM RPL-5301 OWNER'S MANUAL ADDENDUM READ THIS FIRST!
 RPL-5301 ADDENDUM RPL-5301 OWNER'S MANUAL ADDENDUM READ THIS FIRST! THE FOLLOWING PAGES WILL SUPERCEDE THE EXISTING PAGES IN THE RPL-5301 MANUAL CATALOG NUMBER 0208-002 Note: Both Serial Number and Model
Heavy-Duty Sawhorse. Owner s Manual
 Heavy-Duty Sawhorse Owner s Manual WARNING: Read carefully and understand all ASSEMBLY AND OPERATION INSTRUCTIONS before operating. Failure to follow the safety rules and other basic safety precautions