ASTA Handling System Installation & Operating Instructions
|
|
|
- Colleen Page
- 6 years ago
- Views:
Transcription
 237-8154 Fax (800) 330-3800 www.looktopsi.")
1 ASTA Handling System Installation & Operating Instructions Part #s V2HS-03, V2HS-05LS & V2HS 01/25/11 Handling System Serial # ASTA Serial # Date: PRACTICAL SYSTEMS, INC Prospect Road Odessa, FL (800) Fax (800)
2 ASTA Handling System Installation & Operating Instructions Transportation & Storage 1. The ASTA Handling System is fully inspected before leaving the manufacturer. Inspect the packaging upon arrival for any damage. Report any damage immediately to the freight company. 2. The ASTA Handling System is shipped in a wooden crate. Use a fork lift to move the crate. Make sure it is not tilted. Keep the crate in a clean, dry area that is above freezing until ready to unpack. Safety Precautions Never attempt to operate this machine before you have thoroughly read and understand all the instructions. Keep this user s manual on hand and review it frequently to ensure continued safe operation. Turn off the electrical and air connections before doing maintenance or repairs on the machine. The applicator is driven by electrical and pneumatic power. The machine will only operate when the upper lid is closed. The manufacturer does not assume any responsibility or liability for any damages caused by negligence or ignorance of the precautions in this manual or use of the machine for any purpose other than to apply surface tape to optical lenses. Inappropriate use, installation, maintenance or modifications to the machine will render the warranty null and void. Make sure the ASTA Handling System is placed on the ground where it is level and vibration-free. The ASTA Handling System should only be operated by trained staff who have read the operating manual and are at least 16 years of age. Make sure the workstation and surrounding area is clean and worker friendly. Operator Training 1. Train operators on the operation of the handling system as described in this manual. 2. Allow only trained employees to operate the ASTA Handling System. 3. Make sure operators have been informed of all safety measures when operating this machine. 4. Provide training at regular intervals, at least once every year. 2
3 ASTA Handling System Technical Information Technical Data Dimensions: Weight: Electrical: Air: Working pressure: Sound: 4 10 W x 3 5 D x H (adjustable) 1470mm W x 1050mm D x mm H (adjustable) 518 lbs. (235 kg) volt AC, HZ filtered, compressed air 72-82psi; 5-6 bar under 70 decibels Lens Blanks: Diameters: Edge height: Total height: plastic or glass 55-82mm min. 2mm max. 24mm Capacity per cycle: Cycle time: Productivity: Materials: 2 lenses approximately 15 seconds up to 400 lenses per hour All standard, liner or linerless surface tapes. It is recommended that you use PSI s double roll tape for higher efficiency (available in green or blue). 3
4 ASTA Handling System Parts o u r t y w e a s i q 4
 Automatic Surface Tape Applicator (ASTA) on swivel table Conveyor belt with drive motor and pneumatic stops Left side arm with four finger grab Right side arm with four-finger grab")
5 ASTA Handling System Parts Parts Listing: q w e r t y u i o a s Adjustable legs - for adjusting the conveyor belt height (750mm-950mm) Automatic Surface Tape Applicator (ASTA) on swivel table Conveyor belt with drive motor and pneumatic stops Left side arm with four finger grab Right side arm with four-finger grab Doors with contact safety switch Operation control panel - see below Cabinet Signal Lamp - indicates level of operation Alarm - sounds when ASTA is out of tape Red Light - solid - trouble has occurred; flashing - out of tape Orange Light - jam on conveyor belt White Light - Main Power Switch is on Main power switch - turns handling system on and off Set-up control knobs - used to customize the operation of the handling system to the owner s needs. u Operation control panel f g h j d d f g h j Emergency Stop Button - stops ASTA and conveyor belts while in operation. Reset Button - sets the unit to home position Start Button - starts operation Stop Button - stops operation Auto/Hand Switch (key operated) - to switch between automatic and manual operation modes. 5


6 ASTA Handling System Parts t q ASTA Swivel Table in the operating position k e r y w ASTA Swivel Table in the open position Parts Listing: k q w e r t y ASTA Swivel Table Transport Safety Device - must be removed before operating the system ASTA Swivel Table in the operating position ASTA Swivel Table in the open position ASTA Transport Safety Devices - must be removed before operating the system ASTA Reset Button ASTA On/Off Switch ASTA Upper Cylinder Unit 6


7 Installation Instructions The ASTA Handling System is fully automated to apply protective tape to semi-finished lenses. Job trays are transported via a conveyor belt, while robotic arms with four-finger grab pick up the lenses and place them in the ASTA to be taped and place them back in the tray to be taken to the next station. The ASTA applies tape to plastic or glass lenses on the convex side of the lens blank. Using the ASTA Handling System for any other purpose than applying lens tape to lenses will null and void the warranty. To ensure proper operation, follow the instructions in this manual. Safety devices have been designed into the handling system for the operator s safety. Disengaging or modifying these devices will void the warranty. Only use tape designed for lenses such as PSI s LenSaver tapes in single and double rolls. Installation Instructions 1. Locate the unit where it can be hooked up to the lab s existing conveyor belt system but also allows room for the ASTA Swivel Table to open ( w ) and provide room for the operator to perform maintenance and change out the tape. 2. The ASTA Handling System must be level before securing the unit to the floor by screwing the 4 angled feet to the ground ( q ). 3. Unscrew the Transport Safety Device ( k ) on the right that holds the ASTA Swivel Table ( q ) secure for shipping. 4. Once the ASTA Swivel Table s Transport Safety Device has been removed, swing the ASTA into the open position ( w ) so you can remove the two Transport Safety Devices ( e ) on the drawer of the ASTA. 5. Swing the ASTA back into the operating position ( q ). 6. Hook up the appropriate electrical and air connections as specified in the Technical Specifications Section. The hookups are located on the left side of the unit 7
8 Installation Instructions Turning the ASTA Handling System On 1. Make sure the Emergency Stop Button ( d ) is not engaged. If so, release it by turning it to the right. 2. Make sure the plexiglass doors are closed firmly ( y ). 3. Turn the Auto/Hand Switch ( j ) to AUTO. 4. Make sure the ASTA is in the operating position ( q ). 5. Make sure the ASTA Reset Button ( r ) is not pressed in. If in, press the button to release it. 6. Turn the ASTA On/Off Switch ( t ) to the ON position. 7. Turn the Main Power Switch ( a ) on the handling system to 1. The SPS control system and air supply is now activated. The Reset Button ( f ) will flash green. 8. Press the Reset Button ( f ). The system will go to home position. The white Start Button ( g ) will flash. IMPORTANT: If the red light on the Signal Lamp ( o ) does not go out, call PSI for assistance at or toll free in the US at Turning the ASTA Handling System Off Do not switch the system off while it is in operation. 1. Press the Stop Button ( h ). 2. Turn the Main Power Switch ( a ) to Perform daily cleaning and maintenance as described in the Maintenance Manual. IMPORTANT SAFETY INFORMATION! Emergency Stop Button 1. An Emergency Stop Button ( d ) has been provided to stop all operations immediately if necessary. 2. The Emergency Stop Button ( d ) is on the upper right of the operating panel of the ASTA Handling System. 3. When the Emergency Stop Button ( d ) is pressed, all functions of the ASTA Handling System are immediately ceased. 4. To disengage, turn the button to the right. 8
 or Eurolens Saver Tape (part #1400) for alloy or PSI s Clear Tape (part #1006) for wax blocking.")
9 Installing Liner Tape To The ASTA Set-Up Instructions Recommended liner tapes to be used with this unit are PSI Blue Lens Saver Tape (part #s: single roll; double roll) and PSI s Green LensSaver Tape (part #s: single roll; double roll) or Eurolens Saver Tape (part #1400) for alloy or PSI s Clear Tape (part #1006) for wax blocking. If you are using linerless tape in the unit, consult the ASTA Owner s Manual for Set-Up for Linerless Tape. Manual Transport Button Take-Up Guide (8) Tape Spool (2) Take-Up Reel (7) Drive Shaft (6) Alignment Shaft (5) Conveyor Belt w/tape (4) Alignment Shaft (3) Liner Take-Up Reel (1) 1. Swing the ASTA Swivel Table to the open position ( w ). 2. Open the side doors on the ASTA. 3. Release the fast-locks located on the inside of the upper cylinder unit. Lift the cylinder unit up and lay it back on the housing of the machine. 4. Lift up the take-up guide (8). 5. Unscrew the positioning knob on the take-up reel (7) on the left side of the machine. Put an empty takeup core on the reel and screw in the knob. 6. Remove the positioning knob from the tape spool (2) on the bottom right. Put on a roll of surfacing tape with a liner and screw on the positioning knob. 7. Separate the liner from the tape and position the tape onto the tape conveyor belt (4) adhesive side down, in front of the alignment shaft (3). 8. While holding the liner, advance the tape to the left side of the machine using the manual tape transport button on the right. 9. Insert the liner in the slot in the liner take-up reel (1) on the top right. Screw on the positioning knob. 10. Advance the tape to the take-up reel (7) on the left. 11. Place the end of the tape over the empty core and advance the tape to secure. Lower the take-up guide. 12. Close the upper cylinder unit and the side doors. 13. Swing the ASTA Swivel Table back into operating position ( q ). 9
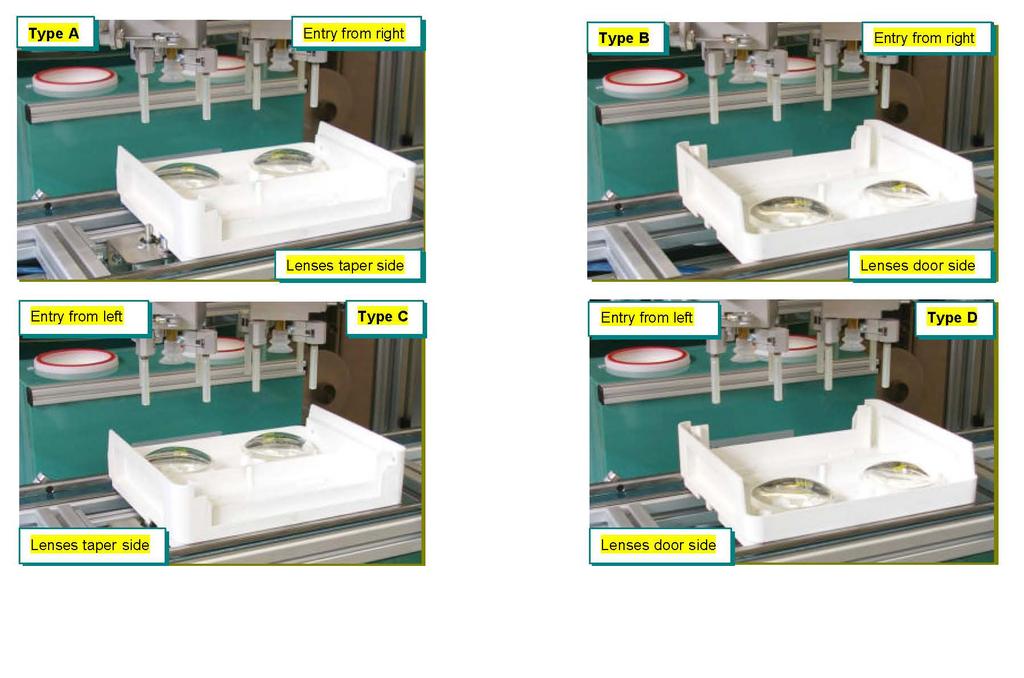
10 Operating Instructions Before processing check the ASTA to make sure of the following: The ASTA has tape. The conveyor belt is clean and undamaged on the ASTA. Tape is loaded correctly on the conveyor belt of the ASTA. The take-up spool is working properly. Cylinder tops are undamaged. The Sealing Ring (V2A-362) on the cylinder tops is clean and undamaged. The plastic insert in the cylinder tops is clean and inserted correctly. The position O-Ring (V2A-361) is clean and undamaged. The piston s Aerator Insert (V2A-360) is clean and undamaged. The Vacuum Filters (V2A-358) are clean and undamaged. BEFORE PROCESSING MAKE SURE OF THE FOLLOWING: The ASTA On/Off Switch ( t ) is ON. The ASTA is loaded with tape. The ASTA is engaged in the operating position ( k ). The handling systems Main Power Switch ( a ) is on I. The key operated Auto/Hand Switch ( j ) is in the AUTO position. There are no job trays on the conveyor belt. The white Start Button ( g ) is flashing and the red light element of the Signal Lamp ( o ) is off. Job Trays Use only job trays that meet the specifications of the ASTA Handling System s configuration. See available configurations on page 14. Make sure the job trays are undamaged and clean. Make sure the job tray has a contact plate. CAUTION: Do not use damaged job trays in the ASTA Handling System. 10
11 Operating Instructions Placing the Lenses In The Job Tray The ASTA Handling System is designed to tape round, plastic or glass lens blanks. Place one or two lens blanks per job tray. Place the lenses with the convex side up into the reception area of the job tray. Make sure all items and papers in the job tray are within the confines of the tray and do not hang over the edges. WARNING: Lenses not placed properly in the job tray can be damaged and may cause the system to malfunction. Start Processing 1. Place the job tray with the lenses on the conveyor belt ( e ) - the job tray must be placed between the two skids. 2. Make sure the lenses are positioned on the conveyor belt based on how the handling system has been configured. (See available configurations on page 14) 3. Turn the Auto/Hand Switch ( j ) to the AUTO position. 4. Press the Start Button ( g ) - the conveyor belt will move, taking the job tray into the handling system where the arms with four-finger grab ( r & t ) will place the lenses into the ASTA for taping and back into the job tray. 5. After the tape has been applied, the job tray will continue down the conveyor. 6. The next job tray will be processed automatically. SAFETY NOTE: If any problems occur during operation, press the Emergency Stop Button ( d ) on the Operating Control Panel ( u ) to immediately stop all functions. Once the problem has been resolved, turn the Emergency Stop Button to the right to release. Stop Processing 1. Press the Stop Button ( h ) - the conveyor belt will stop after the current job has finished processing. If there are no jobs in process, the conveyor belt will stop immediately. 11
12 Operating Instructions Changing out tape The red light element of the Signal Lamp flashes and an alarm sounds when the tape roll needs to be replaced. NOTE: To reduce tape roll change outs, utilize PSI s Double Roll Tape. Available in PSI Green LenSaver Tape (Part #1005-1) and PSI Blue LenSaver Tape (Part #1007-1). 1. Turn the key-operated Auto/Hand Switch ( j ) to the HAND position. 2. Replace the tape as described on page Turn the key-operated Auto/Hand Switch ( j ) to the AUTO position. 4. Restart the machine following the Start Processing instructions on the previous page. Shutting Down At The End Of The Day 1. Press the Stop Button ( h ) - the conveyor belt will stop after the current job has finished processing. If there are no jobs in process, the conveyor belt will stop immediately. 2. Put the key-operated Auto/Hand Switch ( j ) in the HAND position. 3. Switch the ASTA On/Off Switch ( t ) to the OFF position. 4. Turn the Main Power Switch ( a ) to the handling system to the 0 position. The electrical and air supply is now off. 5. Perform the daily maintenance procedures on the Handling System and ASTA as described in the owners manual. VERY IMPORTANT - In order to keep the ASTA Handling System functioning properly and to extend its life, daily, monthly and yearly maintenance procedures must be performed as specified in the owner s manuals. Failure to do so will shorten the equipment s life as well as lead to operating malfunctions. 12
13 Safety Instructions for Maintenance: 1. Make sure electrical is disconnected before cleaning with any detergents. 2. Use of a vacuum cleaner and brush are recommended. Mild detergent and water may be used to clean the machine. Do not use solvents or solvent based cleaners. 3. Maintenance operations should be carried out by a trained employee at regular intervals. 4. Some maintenance operations should be carried out with the machine completely shut off. Follow all maintenance instructions carefully. 5. Make sure any electrical maintenance or repairs are performed by qualified personnel. 6. Allow only authorized trained personnel to open the cabinet. 7. Make sure the Main Power Switch ( a ) is turned to 0 before working on any elements inside the cabinet. 8. Use a voltage meter to detect dead circuits or broken wires. 9. To avoid electrical shock, make sure the machine is grounded. 10. Fuses must not be patched or bridged. Daily Maintenance To Be Performed On The ASTA Before Processing: Before performing maintenance, turn the ATSA Main Power Switch ( t ) to OFF. Open the upper cylinder unit ( y )and make sure the interior of the cutting units are clean of debris and smooth running. Make sure the shank spring has sufficient tension to press the cutter blades to the outside of the bell. Check the cutter blades to make sure they are clean and sharp. CAUTION: Worn cutter blades must be replaced. Instructions for changing out the cutter blades can be found in the ASTA Manual. 13
14 Job Tray Configurations 14
CLEAN ROOM DEVICES, LLC "WHERE TUBING AND FITTINGS COME TOGETHER"
 CLEAN ROOM DEVICES, LLC "WHERE TUBING AND FITTINGS COME TOGETHER" CRD600AF Automatic Fitting Inserter With Auto Feed OPERATIONS MANUAL (Shown with optional alcohol dispenser) 1 VERSION 1.1 LAST EDITED
MOVING HEAD. User manual CAUTION!
 TM MOVING HEAD OBY-3 User manual CAUTION! contents Features Description of the appearance Inspection. Safety instructions Lamp Installation Rigging Connection with the mains Linking Instruction for gobo
OLYMPIAN MODEL 740 Operation and Service Manual
 OLYMPIAN MODEL 740 Operation and Service Manual P/N 133911-102 FCI MANUAL P/N 133865-001 Data herein has been verified and validated and believed adequate for the intended use. If the machine or procedures
FD Conveyor for FD 260 Tabber
 FD 260-20 Conveyor for FD 260 Tabber Operator Manual 1/2011 First Edition TABLE OF CONTENTS 1. INTRODUCTION... 1 1.1 FD 260-20 DESCRIPTION... 1 1.2 ITEMS INCLUDED... 1 1.3 OPERATING MANUAL SAFETY TERMS...
CLEAN ROOM DEVICES, LLC "WHERE TUBING AND FITTINGS COME TOGETHER"
 CLEAN ROOM DEVICES, LLC "WHERE TUBING AND FITTINGS COME TOGETHER" CRD600 Automatic Fitting Inserter OPERATIONS MANUAL VERSION 2.1 LAST EDITED 7.25.14 DOCUMENT NUMBER 001 cleanroomdevices.com 1 Table of
CRD600 Automatic Fitting Inserter
 CRD600 Automatic Fitting Inserter OPERATIONS MANUAL VERSION 2.3 LAST EDITED 12.07.2018 cleanroomdevices.com 1 Table of Contents Title Page.. 1 Table of Contents. 2 1.0 General Product & Safety Information...3
Instruction Manual AVTM for. Strip Chart Recorder Catalog Nos and
 AVTM220003 Rev. B January 2003 Instruction Manual AVTM220003 for DC µa Strip Chart Recorder Catalog Nos. 220003 and 220003-47 PO Box 9007 Valley Forge, PA 19485-1007 U.S.A. 610-676-8500 Shipping Address:
OBY-5. User manual MOVING HEAD CAUTION!
 TM MOVING HEAD OBY-5 User manual CAUTION! contents Features Description of the appearance Inspection. Safety instructions Lamp Installation Rigging Connection with the mains Linking Instruction for gobo
PRODUCT OPERATING MANUAL
 PRODUCT OPERATING MANUAL PANBLAST TM AURORA LED HELMET & HOSE MOUNT KITS Manual Number: ZVP PC 0034 01 SECTION 1. GENERAL INFORMATION 2. INTRODUCTION 3. INSTALLATION 4. OPERATING INSTRUCTIONS 5. MAINTENANCE
CRD610 Automatic Fitting Inserter
 CRD610 Automatic Fitting Inserter OPERATIONS MANUAL VERSION 1.2 LAST EDITED 12.12.2018 cleanroomdevices.com 1 Table of Contents Title Page. 1 Table of Contents...2 1.0 General Product & Safety Information....3
EAVERLINE. Operator s Manual. Series 5 Feed Cart Models 521, 525, 531 & 537. Weaverline, LLC - Churchtown, PA 17555
 EAVERLINE Operator s Manual Series 5 Feed Cart Models 521, 525, 531 & 537 CAUTION: Drive at a speed slow enough to ensure safety and complete control at all times. CAUTION: Know the controls and how to
A935 OWNER'S MANUAL ASSEMBLY INSTRUCTIONS
 2013.02 A935 OWNER'S MANUAL ASSEMBLY INSTRUCTIONS A. SAFETY INSTRUCTIONS Read all cautions/warnings and obtain proper instruction on use of the machines prior to using. Use appropriate positioning and
RENA AF371Feeder Operating Manual. Feeder. Operating Manual. Manual Part #: M AF371 Operations Rev
 Manual Part #: M-3022 Feeder AF371 Operations Rev. 3-16-04 1 RENA AF371 Feeder YOUR RENA AF371 IS DISTRIBUTED BY RENA SYSTEMS INC. SERVICE AND SUPPORT FOR THIS PRODUCT IS PROVIDED BY YOUR RENA DEALER.
Quick Install Lift AL065 Installation Guide & Owners Manual
 Quick Install Lift AL065 Installation Guide & Owners Manual Congratulations on your new lift purchase. The Quick Install Lift line is one of the easiest and most trouble free ways to transport your scooter
Heavy Duty Sprayer Owners Manual Model MS-O
 Heavy Duty Sprayer Owners Manual Model MS-O Table of Contents Warranty 4 Warning 5 Assembly and Preparation 6 Operation 7 Cleaning and Storage 7 Standard Spray Gun & Parts List 8 Trigger Style Spray Gun
THIS PRODUCT IS FOR PROFESSIONAL LABORATORY USE ONLY USER'S MANUAL. WELLS ENGINE UNIT 230 VOLT Product No. U905, U906, U907, U908
 DENTAL, INC. TECHNICAL BULLETIN U807-022510 5860 FLYNN CREEK ROAD READ ALL INSTRUCTIONS P.O. BOX 106 BEFORE PROCEEDING COMPTCHE, CALIFORNIA, U.S.A. 95427 SAVE THIS FOR FUTURE REFERENCE THIS PRODUCT IS
SLM - Sealing Liquid Monitor INSTRUCTIONS FOR USE
 INSTRUCTIONS FOR USE 1/8 1 INSTALLATION SLM - Sealing Liquid Monitor INSTRUCTIONS FOR USE 1.1 Mounting The SLM has a mounting plate for simple installation. The SML can be mounted using a bolt already
MODEL MC1500 Installation and Operation Manual Important:
 MODEL MC1500 Installation and Operation Manual Important: This manual contains specific cautionary statements relative to worker safety. Read this manual thoroughly and follow as directed. It is impossible
Index. 1. Important safety instructions Overview of the lift Installation instructions Operation instructions 8-9
 2 Index 1. Important safety instructions 4-5 1.1 Safety Warnings 1.2 Qualified personnel 1.3 Safety 1.4 Warning signs 2. Overview of the lift 6 2.1 General descriptions 2.2 Technical data 2.3 Construction
FIXED DEPTH INSERTION METER INSTRUCTIONS
 UNPACKING Please open and inspect your package upon receipt. Your package was packed with great care and all the necessary packing materials to arrive to you undamaged. If you do find an item that is broken
Operator's Manual. Storage System. Ultrasound Probe Cabinet. Manufactured by:
 Storage System Ultrasound Probe Cabinet Operator's Manual Manufactured by: CIVCO Medical Solutions 102 First Street South Kalona, IA 52247 USA 319.248.6757 / 800.445.6741 WWW.CIVCO.COM Copyright 2018 All
EZ LINER EXPRESS USERS MANUAL
 EZ LINER EXPRESS 2013 Vehicle Service Group CHIEF'S LIMITED ONE-YEAR WARRANTY & LIABILITY Chief Automotive Technologies warrants for one year from date of installation and/or purchase any components of
EQUIPMENT OWNERS MANUAL MATTHIESEN HEAVY DUTY SHAKER
 PASSION COMMITMENT QUALITY WWW.MATTHIESENEQUIPMENT.COM 566 NORTH W.W. WHITE RD. SAN ANTONIO, TEXAS 78219 1-800-624-8635 EQUIPMENT OWNERS MANUAL MATTHIESEN HEAVY DUTY SHAKER TABLE OF CONTENTS 1) General
Please read this manual carefully before operating! Unpacking, assembly, and operating videos are available at
 OPERATING MANUAL Gfp 563TH Please read this manual carefully before operating! Unpacking, assembly, and operating videos are available at www.gfpsmoothstart.com 1 Table of Contents Contents Page 1. Introduction
Fiber Optic Illuminator. Model 21AC Model 21DC
 Operation Manual Fiber Optic Illuminator Model 21AC Model 21DC Warning This symbol is intended to alert the user to the presence of uninsulated dangerous voltage within the product s enclosure that may
Snapshot LX5 USER MANUAL. OK on Dimmer Outdoor OK Sound Activated DMX512 Master/Slave 115V/230V Switch Replaceable Fuse User Serviceable Duty Cycle
 LX5 Snapshot OK on Dimmer Outdoor OK Sound Activated DMX512 Master/Slave 115V/230V Switch Replaceable Fuse User Serviceable Duty Cycle USER MANUAL Chauvet, 5200 NW 108th Avenue, Sunrise, FL 33351 U.S.A.
FLOORMASTER 18B OPERATING & MAINTENANCE READ THIS BOOK
 FLOORMASTER 18B INTRODUCTION OPERATING & MAINTENANCE INSTRUCTIONS This operator s book has important information for the use and safe operation of this machine. Read this book carefully before starting
Maintenance and Repair
 Maintenance and Repair WARNING ALWAYS shut off the engine, remove key from ignition, make sure the engine is cool, and disconnect the spark plug and positive battery terminal from the battery before cleaning,
SSX-180ST. SolarMaxx 180 Illuminator Service Manual
 SSX-180ST SolarMaxx 180 Illuminator Service Manual 6018 Bowdendale Avenue Jacksonville, FL 32216 Customer Service: 904 731-5869 FAX 904 733 0012 Toll Free 800-684-6404 (English) Page 1 of 12 TABLE OF CONTENTS
Best/Flex ULTRA Gravity Conveyor
 Best/Flex ULTRA Gravity Conveyor Operation, Maintenance and Parts Manual Factory Order Number: Serial Number: Ship Date: BEST Conveyors 4929 Krueger Drive Jonesboro, AR 72401 800-327-9209 870-935-0970
Sherman + Reilly Battery-powered Pistol Grip Cable Cutters
 OPERATION MANUAL Serial Number (SRG16X shown) Español... 1 Français... Sherman + Reilly Battery-powered Pistol Grip Cable Cutters Read and understand all of the instructions and safety information in this
PARTS & SERVICE Manual for PANORAMA ROTISSERIE Model SP-7
 PARTS & SERVICE Manual for PANORAMA ROTISSERIE Model SP-7 THIS MANUAL SHOULD BE RETAINED FOR FUTURE USE SP7serv 12-22-08 WARRANTY The SP-7 carries a 1 year warranty on parts and labor from date of unit
LED Pinspot 2. Snapshot. User Manual
 LED Pinspot 2 Snapshot Use on Dimmer Outdoor Use Sound Activated DMX Master/Slave Auto-ranging Power Supply Replaceable Fuse User Serviceable Duty Cycle User Manual 3000 N 29 th Ct, Hollywood, FL 33020
MIDRISE MODEL SM60F_1 // SM60F_A 6,500 LB. CAPACITY
 INSTALLATION and OPERATION MANUAL READ THIS INSTRUCTION MANUAL THOROUGHLY BEFORE INSTALLING, OPERATING, SERVICING OR MAINTAINING THE LIFT. SAVE THIS MANUAL. NOV 2007 REV.B MIDRISE MODEL SM60F_1 // SM60F_A
Installation, operation and maintenance manual
 Installation, operation and maintenance manual HCT1LX30 FULL RISE SCISSOR LIFT READ THIS ENTIRE MANUAL BEFORE INSTALLATION TO ENSURE CORRECT OPERATION AND A LONG SERVICE LIFE 2 Tiraines str. Riga, LV 1058
LED Pinspot 2. Snapshot. User Manual
 LED Pinspot 2 Snapshot Use on Dimmer Outdoor Use Sound-Activated DMX Master/Slave Auto-ranging Power Supply Replaceable Fuse User-Serviceable User Manual 5200 NW 108th Avenue, Sunrise, FL 33351 U.S.A.
Installation / Operating Manual. Infinity Series Model AS2002. Distributed by: Shyda s Services Inc.
 Installation / Operating Manual Infinity Series Model AS2002 Distributed by: Shyda s Services Inc. WARRANTY: INFINITY SERIES MODEL AS2002 For two(2) years from the original date of purchase, Lincoln Traps
Battery Powered Hydraulic Pump; Kit PN [ ]
![Battery Powered Hydraulic Pump; Kit PN [ ]](/thumbs/73/68120284.jpg "Battery Powered Hydraulic Pump; Kit PN [ ]") ORIGINAL INSTRUCTIONS Battery Powered Hydraulic Pump; Kit PN 1804111-[ ] Customer Manual 409-10060 16 NOV 16 Rev D SAFETY PRES IMPORTANT SAFETY INFO READ THIS FIRST!... 2 SAFETY PRES AVOID INJURY READ
ORIGINAL INSTRUCTIONS Battery Powered Hydraulic Pump; Kit PN 1804111-[ ] Customer Manual 409-10060 16 NOV 16 Rev D SAFETY PRES IMPORTANT SAFETY INFO READ THIS FIRST!... 2 SAFETY PRES AVOID INJURY READ
RESOURCE GUIDE. P r o d u c t M a n u a l. START International
 RESOURCE GUIDE P r o d u c t M a n u a l The information contained in this Resource Guide along with additional maintenance and repair information, videos and photos can be found online at www.startinternational.com
USER MANUAL. Ride-on Scrubbers. Model # Serial No.# READ USER MANUAL CAREFULLY BEFORE USE. Please fill out & return your warranty card
 Ride-on Scrubbers USER MANUAL READ USER MANUAL CAREFULLY BEFORE USE Please fill out & return your warranty card Model # Serial No.# VIPER INDUSTRIAL ESTATE LIANG BIAN, LIAO BU DONGGUAN, GUANGDONG CHINA
MODEL 7400 STRUT SPRING COMPRESSOR
 MODEL 7400 STRUT SPRING COMPRESSOR Installation, Operation & Repair Parts Information Branick Industries, Inc. 4245 Main Avenue P.O. Box 1937 Fargo, North Dakota 58103 REV112712 P/N: 81-0103A TABLE OF
Toshin-Cho Itabashi-ku Tokyo, Japan Tel Fax /06
 4270 Airborn Drive Addison, TX 75001, USA Toll Free 800.259.1986 Tel 972.248.1999 Fax 972.248.1991 info@startinternational.com www.startinternational.com 1-26-14 Toshin-Cho Itabashi-ku Tokyo, Japan Tel
Perfmaster Air V3. Serial Number. Date
 Perfmaster Air V3 12-2015 Serial Number Date TABLE OF CONTENTS SPECIFICATIONS.3 SAFETY PROCEDURES/CARE & MAINTENANCE..4 COMPONENT IDENTIFICATION 5 DELIVERY TRAY ASSEMBLY.6 PAPER STOP ASSEMBLIES..7 MACHINE
INSTALLATION and OPERATION BALL WASHER MODEL NO: BW-001N
 Easy Picker Golf Products, Inc. 415 Leonard Blvd. N., Lehigh Acres, FL 33971 PH: 239-368-6600 FAX: 239-369-1579 Service: 800-982-4653 SALES: 800-641-4653 www.easypicker.com salesdept@easypicker.com INSTALLATION
MODEL 7600 STRUT SPRING COMPRESSOR
 MODEL 7600 STRUT SPRING COMPRESSOR Installation, Operation & Repair Parts Information Branick Industries, Inc. 4245 Main Avenue P.O. Box 1937 Fargo, North Dakota 58103 REV6162014 P/N: 81-0246 TABLE OF
FD 342 Document Folder
 FD 342 Document Folder 6/2010 OPERATOR MANUAL FIRST EDITION TABLE OF CONTENTS SUBJECT PAGE DESCRIPTION 1 SPECIFICATIONS 1 UNPACKING 2 SETUP 2 CONTROL PANEL 3 OPERATION 4 SETTING CUSTOM FOLDS 5 BATCH COUNTING
Operations Manual Eagle 1000 Series Stretch Wrapper
 Operations Manual Eagle 1000 Series Stretch Wrapper Models A & B - 1 - READ ALL INSTRUCTIONS CONTAINED IN THIS MANUAL PRIOR TO MACHINE INSTALLATION! - 2 - Contents page 1. Machine Safety Information 1.1
FULL OPERATING AND MAINTENANCE MANUAL
 Enter Serial No. here. In the event of an enquiry please quote this serial number. www.monoequip.com FULL OPERATING AND MAINTENANCE MANUAL FOR THE STAND ALONE DIVIDER FG398 Stand alone divider REV.A17
Owner s Operating and Maintenance Manual For Standard Wheelchairs
 L200 Owner s Operating and Maintenance Manual For Standard Wheelchairs INTRODUCTION Standard wheelchairs are the result of extensive engineering research, and rigid quality assurance testing. Every new
Copyright 2011, MTS Medication Technologies. All rights reserved. MTS USA MTS UK MTS GERMANY
 Copyright 2011, MTS Medication Technologies. All rights reserved. MTS USA MTS UK MTS GERMANY Table of Contents INTRODUCTION... 3 THE ROLL OF AN OPERATOR... 3 LOCATING THE AUTOBOND... 3 SETTING UP THE AUTOBOND
INSTALLATION and OPERATION BALL DISPENSER MODEL NOS: BD-001 THRU BD-004, BD-010, BD-011
 Easy Picker Golf Products, Inc. 415 Leonard Blvd. N., Lehigh Acres, FL 33971 PH: 239-368-6600 FAX: 239-369-1579 Service: 800-982-4653 SALES: 800-641-4653 www.easypicker.com salesdept@easypicker.com INSTALLATION
Property of American Airlines
 Date Maintenance Check list The inspection and preventive maintenance schedule of the Power Stow Rollertrack is as follows: Daily (10 hrs), Weekly (50 hrs.), every 6 months ( hrs.), yearly (1 hrs.) and
PRODUCT OPERATING MANUAL
 PRODUCT OPERATING MANUAL PANBLAST TM CS37 SUCTION BLAST CABINET Manual Number: ZVP PC 0069 00 SECTION 1. GENERAL INFORMATION 2. ASSEMBLY & INSTALLATION INSTRUCTIONS 3. OPERATING INSTRUCTIONS 4. MAINTENANCE
CRS-D Powder Coating Booth with Reverse Jet Cleaning System
 Operating Instructions CRS-D Powder Coating Booth with Reverse Jet Cleaning System CRS-D (J) 27 1 1 1 2 2 2 4 4 4 3 3 3 CRS-D Booth with Reverse Jet Cleaning System 1 10 2 3 9 12 11 11 1 Exhaust air unit
FPU SYSTEMS OPERATION MANUAL BOH PORTABLE DRAWER MODULE (PDM) (INCLUDING REPAIR PARTS & SPECIAL TOOL LIST) BOH FPU Field Pack-up Units CHAPTER 5
 (INCLUDING REPAIR PARTS & SPECIAL TOOL LIST) BOH FPU Field Pack-up Units CHAPTER 5") FPU SYSTEMS OPERATION MANUAL BOH PORTABLE DRAWER MODULE (PDM) (INCLUDING REPAIR PARTS & SPECIAL TOOL LIST) BOH FPU Field Pack-up Units CHAPTER 5 UNIT MAINTENANCE INSTRUCTIONS 06 BOH Environmental LLC This
FPU SYSTEMS OPERATION MANUAL BOH PORTABLE DRAWER MODULE (PDM) (INCLUDING REPAIR PARTS & SPECIAL TOOL LIST) BOH FPU Field Pack-up Units CHAPTER 5 UNIT MAINTENANCE INSTRUCTIONS 06 BOH Environmental LLC This
ASVC2 OWNER S MANUAL. Vane Cutter PART # MACHINERY DIVISION
 A S ASVC2 Vane Cutter PART # 43013 MACHINERY DIVISION OWNER S MANUAL -1- INTRODUCTION The ASVC2 Hollow Vane Cutting Machine was designed utilizing the best current technology to provide greater reliability.
On-A-Roll Lifter Instruction Manual for Standard Models Read Before Use!
 On-A-Roll Lifter Instruction Manual for Standard Models Read Before Use! Important instructional, safety and precautionary information! It is the user s responsibility to exercise good judgment, common
User Manual. Snapshot. Use on Dimmer. Outdoor Use. Sound Activated DMX 512. Master/Slave. 115/230V Power Switch. Replaceable Fuse.
 Snapshot Use on Dimmer Outdoor Use Sound Activated DMX 512 Master/Slave 115/230V Power Switch Replaceable Fuse User Serviceable Duty Cycle User Manual 3000 N 29 th Ct, Hollywood, FL 33020 U.S.A. (800)
SSX-300ST SolarMaxx 300 Illuminator
 SSX-300ST SolarMaxx 300 Illuminator Service Manual 6018 Bowdendale Avenue Jacksonville, FL 32216 Customer Service: 904 731 5869 FAX 904 733 0012 Toll Free 800 684 6404 (English) TABLE OF CONTENTS Page
Dispenser & Warmer RIC-1909 RIC-1909EXP
 Dispenser & Warmer RIC-1909 RIC-1909EXP Safety Precautions CAUTION This equipment is designed and sold for commercial use only. This equipment is not to be used by the consumer in home use. Do not allow
Safety, Operation and Maintenance Instructions For Long & Short Nose Upholstery Air Stapler (NS10 & NS11)
") Safety, Operation and Maintenance Instructions For Long & Short Nose Upholstery Air Stapler (NS10 & NS11) Important: Drop 3 drops of oil into the stapler air inlet BEFORE first use. See page 2. Please
Safety, Operation and Maintenance Instructions For Long & Short Nose Upholstery Air Stapler (NS10 & NS11) Important: Drop 3 drops of oil into the stapler air inlet BEFORE first use. See page 2. Please
CHESTERTON FLOW GUARDIAN S50 AND SP50 SINGLE FLOWMETER INSTALLATION INSTRUCTIONS
 INSTALLATION INSTRUCTIONS CHESTERTON FLOW GUARDIAN S50 AND SP50 SINGLE FLOWMETER INSTALLATION INSTRUCTIONS GENERAL The function of the FLOW GUARDIAN Single S50 (Item # 199801 compression fitting, 199804
Snapshot. Use on Dimmer Outdoor Use Sound-Activated DMX Master/Slave 120 V/230 V Switchable Replaceable Fuse User-Serviceable.
 Snapshot Use on Dimmer Outdoor Use Sound-Activated DMX Master/Slave 120 V/230 V Switchable Replaceable Fuse User-Serviceable User Manual TABLE OF CONTENTS 1. BEFORE YOU BEGIN... 3 WHAT IS INCLUDED... 3
Centrifuge Operator / Service Manual
 3000 Centrifuge Centrifuge Operator / Service Manual cat.# 26230 & 26231 The Q-sep 3000 centrifuge complies with all requirements of UL standard 3101 20, Can/CSA C22.2 No. 1010.1, and Can/CSA C22.2 No.
15.0 SLICE Trouble-Shooting Guide
 15.0 SLICE Trouble-Shooting Guide IMPORTANT Before opening up the SLICE machine for inspection or for repairs/component replacement, be sure to turn the machine off, unplug the power cord from the ECONO-
EasySelect-Cup Manual Powder Gun
 E Operating Instructions and Spare parts list EasySelect-Cup Manual Powder Gun EasySelect-Cup 27 28 EasySelect-Cup Table of Contents Safety rules EasySelect-Cup Manual Powder gun...........................................
Snapshot LX10 USER MANUAL. OK on Dimmer Outdoor OK Sound Activated DMX512 Master/Slave 115V/230V Switch Replaceable Fuse User Serviceable Duty Cycle
 LX10 Snapshot OK on Dimmer Outdoor OK Sound Activated DMX512 Master/Slave 115V/230V Switch Replaceable Fuse User Serviceable Duty Cycle USER MANUAL Chauvet, 3000 N 29 th Ct, Hollywood, FL 33020 U.S.A.
TCA34 Series Tire Changer
 OPERATION INSTRUCTIONS Form 5734-T, 07-10d TCA34 Series Tire Changer Copyright 2008-2011 Hunter Engineering Company OWNER INFORMATION Model Number Serial Number Date Installed Service and Parts Representative
TROUBLE SHOOTING FOR NEGATIVE GROUND TRUCKS
 TROUBLE SHOOTING GUIDE TROUBLE SHOOTING FOR NEGATIVE GROUND TRUCKS IMPORTANT CAUTIONS WHEN CHECKING SENSOR SYSTEM, DO NOT HAVE VEHICLE ENGINE RUNNING EXCEPT WHERE TOLD TO DO SO. Ensure that the electrical
High Pressure Abrasive Blast Cabinet 42000
 Please read and save these instructions. Read through this owner s manual carefully before using product. Protect yourself and others by observing all safety information, warnings, and cautions. Failure
Instruction Sheet. 1/2 HP Portable Electric Pumps SAFETY FIRST. L2062 Rev. F 02/ IMPORTANT RECEIVING INSTRUCTIONS 2.
 Instruction Sheet 1/2 HP Portable Electric Pumps L2062 Rev. F 02/12 Index: English:...................................... 1-7 Français:.................................... 8-14 Deutsch:...................................
Troubleshooting 3Z8 038 Rev B
 Troubleshooting 3Z8 038 Rev B INSTRUCTIONS WARNING INJECTION HAZARD This form is only a quick reference for troubleshooting Graco sprayers. To reduce the risk of serious injury, including fluid injection,
Preventive Maintenance...
 Preventive Maintenance........................................ 2 Introduction This chapter contains recommended preventive maintenance (PM) procedures for the AccuFlex printer. Itemized logs for the PM
Description of the Power Nozzle Accessory Kit 4
 Contents IMPORTANT SAFETY INSTRUCTIONS 2 Polarization Instructions 3 Description of the Power Nozzle Accessory Kit 4 Operating the Power Nozzle & Accessories 5 Inserting the hose Turning on the power nozzle
945 SERIES SERVICE MANUAL
 Daniel Woodhead Company A Woodhead Industries, Inc. Subsidiary 945 SERIES SERVICE MANUAL IMPORTANT SAFETY INSTRUCTIONS Please read this manual carefully and follow its instructions. Improper use or failure
FPU SYSTEMS OPERATION MANUAL BOH PORTABLE DRAWER MODULE (PDM) (INCLUDING REPAIR PARTS & SPECIAL TOOL LIST) BOH FPU Field Pack-up Units CHAPTER 4
 (INCLUDING REPAIR PARTS & SPECIAL TOOL LIST) BOH FPU Field Pack-up Units CHAPTER 4") FPU SYSTEMS OPERATION MANUAL BOH PORTABLE DRAWER MODULE (PDM) (INCLUDING REPAIR PARTS & SPECIAL TOOL LIST) BOH FPU Field Pack-up Units CHAPTER 4 OPERATOR MAINTENANCE INSTRUCTIONS 2016 BOH Environmental
FPU SYSTEMS OPERATION MANUAL BOH PORTABLE DRAWER MODULE (PDM) (INCLUDING REPAIR PARTS & SPECIAL TOOL LIST) BOH FPU Field Pack-up Units CHAPTER 4 OPERATOR MAINTENANCE INSTRUCTIONS 2016 BOH Environmental
Please read this manual carefully before operating! Unpacking, assembly, and operating videos are available at
 OPERATING MANUAL Gfp 563TH Please read this manual carefully before operating! Unpacking, assembly, and operating videos are available at www.gfpsmoothstart.com 1 Table of Contents Contents Page 1. Introduction
INSTALLATION and OPERATION BALL DISPENSER MODEL NOS: BD-001AN, -002, -003AN, -004, -010AN, -011
 Easy Picker Golf Products, Inc. 415 Leonard Blvd. N., Lehigh Acres, FL 33971 PH: 239-368-6600 FAX: 239-369-1579 Service: 800-982-4653 SALES: 800-641-4653 www.easypicker.com salesdept@easypicker.com INSTALLATION
OWI 35C-7/ 35C-7H PIPE SPINNER
 OWI 35C-7/ 35C-7H PIPE SPINNER OIL WORKS, INC.. manufactures the OWI 35C-7 pipe spinner in Pneumatic and Hydraulic Versions at our facility in Odessa, TX. We offer new and rebuilt units, and stock a full
16" STAND FAN WITH REMOTE
 OWNER S MANUAL 16" STAND FAN WITH REMOTE MODEL:FS40-8JR READ AND SAVE THESE INSTRUCTIONS Attention: Pictures in the IM are for reference only. CAUTION Read rules for safe operation and instrucions carefully.
OPERATOR S MANUAL 2200 SERIES LIFT - LIL HOISTER. July 2017
 July 2017 OPERATOR S MANUAL 2200 SERIES LIFT - LIL HOISTER! Before operating this lift, read and understand this Operator s Manual. Become familiar with the potential hazards of this unit. Call SUMNER
EZ-EX Tape Head (2" & 3" )
") EZ-EX Tape Head (2" & 3" ) EZ-EX Tape Cartridge for Eastey Industrial Case Tapers User Guide EZ-EX Tape Head (2" & 3" ) EZ-EX Tape Cartridge for Eastey Industrial Case Tapers User Guide Revised 12/09/2016
EZ-EX Tape Head (2" & 3" ) EZ-EX Tape Cartridge for Eastey Industrial Case Tapers User Guide EZ-EX Tape Head (2" & 3" ) EZ-EX Tape Cartridge for Eastey Industrial Case Tapers User Guide Revised 12/09/2016
Installation For Service Only
 For Service Only IMPORTANT! Aerada 1100 Series Low Arc Faucet S53-302 Battery Infrared Metering Faucet (Center Shank with 4" Trimplate) THIS SIDE UP! Packing List Read this entire installation manual to
ATD GALLON PRESSURIZED OIL DRAIN TANK
 ATD-5203 30 GALLON PRESSURIZED OIL DRAIN TANK ASSEMBLY & OPERATING INSTRUCTIONS TECHNICAL SPECIFICATIONS Model: ATD-5203 Capacity: 30 Gallon Drain Funnel: Adjusts from 47.25 to 70.5 Drain Funnel Diameter:
instructions ZCM ZCM START International 4270 Airborn Dr. Addison, TX 75001, USA Tel Fax
 ZCM 1000 START International 4270 Airborn Dr. Addison, TX 75001, USA Tel 972.248.1999 Fax 972.248.1991 TM START Japan Corporation 1-26-14 Toshin-Cho Itabashi-ku Tokyo, Japan Tel 81.3.3554.5608 instructions
Model 1100B CHG Terminator. Installation Instructions
 Model 1100B CHG Terminator Installation Instructions 1 Contents: 1.0 Safety Information... 3 2.0 Set-up and Adjustments... 3 3.0 Ram Adjustments... 10 4.0 Wire Termination Quality... 12 5.0 General Maintenance...
Owner s Manual. Bariatric Manual Wheelchairs. Specializing in Bariatric Patient Aids
 Owner s Manual Bariatric Manual Wheelchairs 700 LB CAPACITY XL Series Wheelchair by ConvaQuip Specializing in Bariatric Patient Aids P.O. Box 3417 * Abilene, TX 79604 U.S.A. Toll 800/637-8436 * FAX 325/677-7217
INSTRUCTION MANUAL FOR THE CLINICAL 50 CENTRIFUGE
 INSTRUCTION MANUAL FOR THE CLINICAL 50 CENTRIFUGE 82013-800 January 2006 INDEX PAGE 1. General Information... 2 1.1 Description... 2 1.2 Safety precautions to be observed before operating the centrifuge...
Welker Heated Instrument Regulator
 Installation, Operation, and Maintenance Manual Welker Heated Instrument Regulator Model The information in this manual has been carefully checked for accuracy and is intended to be used as a guide for
Installation Instructions
 Instructions Aerada 900 Series Futura Faucet With Battery (BIR) Infrared Control S53-284 4" Centerset/Centershank S53-289 Centerset/Centershank w/plate Table of Contents Pre- Information............2 900
OWNER S MANUAL. Model: FSUTL60-12V ( ) Technical Specifications. Assembly Instructions
 Technical Specifications. Assembly Instructions") OWNER S MANUAL Model: FSUTL60-12V (5301421) (60 Gallon Lawn & Garden Utility Sprayer - Boom-Ready) Technical Specifications 60 Gal. Corrosion-Resistant Polyethylene Tank Deluxe Pistol-Grip Handgun 25 Ft.
OWNER S MANUAL Model: FSUTL60-12V (5301421) (60 Gallon Lawn & Garden Utility Sprayer - Boom-Ready) Technical Specifications 60 Gal. Corrosion-Resistant Polyethylene Tank Deluxe Pistol-Grip Handgun 25 Ft.
OWNER S MANUAL. Model: FSUTL40-12V ( ) Technical Specifications. Assembly Instructions
 Technical Specifications. Assembly Instructions") OWNER S MANUAL Model: FSUTL40-12V (5301420) (60 Gallon Lawn & Garden Utility Sprayer - Boom-Ready) Technical Specifications 40 Gal. Corrosion-Resistant Polyethylene Tank Deluxe Pistol-Grip Handgun 25 Ft.
OWNER S MANUAL Model: FSUTL40-12V (5301420) (60 Gallon Lawn & Garden Utility Sprayer - Boom-Ready) Technical Specifications 40 Gal. Corrosion-Resistant Polyethylene Tank Deluxe Pistol-Grip Handgun 25 Ft.
LVO Manufacturing, Inc. CT24 Conveyor Table Owner s Manual
 CT24 Conveyor Table Owner s Manual * Sanitation Listing on 9ft Table Only Warranty LVO Manufacturing Inc. warrants equipment manufactured by it to be free from defects in material and workmanship for a
UNION Series No. 5 and No. 15 Roller Coater OPERATING MANUAL INDEX
 UNION Series No. 5 and No. 15 Roller Coater DATE: SERIAL NO.: OPERATING MANUAL INDEX Assembly Drawing No. Electrical Drawing No. Pneumatic Drawing No. A. INTRODUCTION Page 2 B. INSTALLATION Location Page
DEMOUNTABLE BODY INSPECTION PROCEDURE Follow Detailed Instructions Inside for Each Step
 DEMOUNTABLE BODY INSPECTION PROCEDURE Follow Detailed Instructions Inside for Each Step Inspection Date: Inspected By: Serial #: Unit #: INSPECT: Inspected OK Needs Repair Comments Front Locking Bar Rear
Giant Cone Display Case
 Instruction Manual Model #8211 Part No. 76132 Revised June 1996 Cincinnati, OH 45241-4807 USA SAFETY PRECAUTIONS This equipment is designed and sold for commercial use only. This equipment is not to be
SAFETY RULES SPECIFICATIONS READ ALL INSTRUCTIONS BEFORE OPERATING SAVE THESE INSTRUCTIONS
 READ ALL INSTRUCTIONS BEFORE OPERATING SAVE THESE INSTRUCTIONS Thank you for purchasing 7" Polisher. Before attempting to operate your new Polisher please read these instructions thoroughly. You will need
Vantage 17. antage 17 Battery. Battery / Cable. Operator s Manual. Service Manual
 Vantage 17 Battery / Cable antage 17 Battery Operator s Manual Service Manual Form No. 9097182000-11/2009 SERVICE MANUAL ENGLISH TABLE OF CONTENTS GENERAL INFORMATION... 3 GENERAL INFORMATION... 3 MACHINE
Measurements are expressed in millimeters.
 T-Rex user manual Measurements are expressed in millimeters. 1 Lamp access 2 Focus adjustment 3 Mounting bracket 4 Swivel locks 5 Clamp hole 6 Air vent 190 285 7 AC input & main fuse 8 Microphone 490 164
GRSM17 Pneumatic Center Punch Tool Owner s Manual and Operating Instructions
 Owner s Manual and Operating Instructions Table of Contents Page Information 2 Safety Guidelines and Warranty 3 Overview and Installation 4 Air System Requirements 5 Setting Controls 6 Installing Clamps