Stockholm GT Table Tennis Table Model /890 & /890
|
|
|
- Carmel Stewart
- 6 years ago
- Views:
Transcription


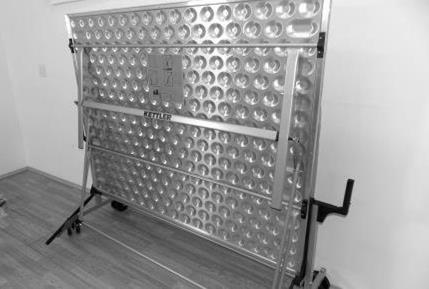
1 Stockholm GT Table Tennis Table Model /890 & /890 dult ssembly Required Made in Germany Picture Similar KETTLER International, Inc London ridge Road Virginia each, V US info@kettlerusa.com Please do not return this product to the store. Contact KETTLER for parts and service: call toll free or send to parts@kettlerusa.com. Tools needed; not included Please visit our website to view a video demonstration of product assembly or scan the QR Code above.
2 efore ssembly efore assembling or using the table tennis table, please read the following instructions carefully. They contain important information for use and maintenance of the equipment as well as for your personal safety. Keep these instructions in a safe place for maintenance purposes or for ordering spare parts. ll KETTLER products are designed in accordance with the latest safety regulations and undergo a constant process of quality control during manufacturing. The knowledge gained in this process is used to constantly improve and develop our products. In order to offer our customers the very best in product quality, we reserve the right to make technical changes at any time. In spite of this, should you have any cause for complaint, please contact KETTLER. Note on Safety The table tennis table should be used only for its intended purpose, i.e. for playing with suitable table tennis racquets and balls. ll other uses are prohibited and may be dangerous. The manufacturer cannot be held liable for damage or injury caused by improper use of the table. Damage or worn components may endanger your safety or shorten the lifespan of the table tennis table. Replace worn or damaged components immediately and remove the table from use until this has been done. Use only spare parts manufactured by KETTLER. The table tennis table complies with all safety regulations. Incorrect repairs, alterations to the design (removal of original parts, addition of other components etc.) may endanger the safety of the user. Instruct other persons (in particular children) using the table in its correct use, and draw their attention to any potential source of danger, especially when setting up or dismantling the table. Caution: During assembly, keep all items out of children s reach (choking hazard contains small parts). When setting up or dismantling the table, stay clear of its folding radius. When folded up, the table tennis table presents a large surface to the wind. For this reason, ensure that it is stored in a sheltered position. The table tennis table may be pushed only in the transport position otherwise there is a risk of injury. The unit complies with the standard EN :2004. Regularly check all screws, bolts, etc. to ensure they are in good condition. Warning: Children should not attempt to fold/unfold table. May result in injury Handling the Equipment 2 Do not use the table tennis table until it has been fully and correctly assembled and checked. Ensure that indoor table tennis tables are not exposed to dampness or rain. Keep them well away from direct sources of heat. Should the surface become warped, lay the table on a level surface for a few days. Set the table up on a level surface. Do not cover it with a tarp, which can result in condensation forming. We recommend the weatherproof KETTLER cover, part number Cover should only be used when table is in folded position. For practicing without a partner, the table halves can be folded up individually. Do not use corrosive or abrasive materials to clean the equipment. Ensure that such materials are not allowed to pollute the environment. In most cases, a slightly dampened cloth is sufficient. Waste Disposal: KETTLER products are recyclable. t the end of its useful life, please dispose of correctly and safely complying with your local facilities and guidelines. Store table in folded position when not in use.

3 efore ssembly (continued) General ssembly Instructions The equipment must be assembled with care by two adults. Separate all the parts including the hardware. Compare quantities with the package contents section and that all items are undamaged. If there are any problems, please contact KETTLER. efore assembling the equipment, study the drawings and photos carefully then assemble in the order shown. Please note that there is always a danger of injury when working with tools or doing manual work. Therefore, please be careful during assembly. Ensure that your working area is free of possible sources of danger, for example don t leave any tools lying around. lways dispose of packaging material in such a way that it may not cause any danger. There is always a risk of suffocation if children play with plastic bags! The fastening items required for each assembly step are shown at the beginning of the step. Use the fastening items exactly as instructed. olt all the parts together loosely at first, and check that they have been assembled correctly. Then use spanner for final tightening. Then check that all screw connections have been tightened firmly. For technical reasons, we reserve the right to carry out preliminary assembly work (e.g. addition of tubing plugs). Please keep original packaging, so that it may be used for transport at a later date, if necessary. Goods may only be returned after prior arrangement and in packaging that is safe for transportation (in the original box if possible). It is important to provide a detailed defect description/damage report. Package Contents Number Included - 2 Number Incl 4 locking Number Incl 4 non locking Number Included - 2 Number Included - 1 Number Included - 2 Number Included - 2 Number Included - 2 Number Included - 3 Number Included - 2 Number Included - 2 3


4 Package Contents (continued) 2 2 Number Included - 2 Number Included 2 of each Number Included - 6 Number Included - 2 Number Included - 2 Number Included - 2 Tool included Not shown at actual size Items below are shown at actual size Number Included - 2 Number Included - 4 Number Included 4 m8x125 Number Included 4 m8x110 Number Included 4 m6x100 Number Included 6 m8x60 Number Included 6 3.9x13 4 Number Included 4 m6x49 Number Included 2 m6x58
5 Package Contents (continued) Items below are shown at actual size Number Incl 8 m8 Number Incl 6 m6 Number Incl 4 m6x3mm End view and side view shown Number Incl 4 m6x5mm Number Incl 10 dia 25x8 Number Incl 24 dia 16x8 Number Incl 8 dia 12x6 Number Incl 4 dia 12x5 Number Incl 4 Number Incl 4 m6 Number Incl 2 End view and side view shown Number Incl 4 m12x6x15 Number Incl 4 Number Incl 4 m12x6x3 Number Incl 2 Number Incl 4 m5 locking Number Included 4 m6x45 Number Included 4 m5x65 5


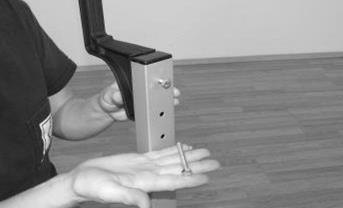
6 egin the assembly of your table by carefully removing the plastic wrap and all of the loose contents. Separate the two table tops by removing the four plastic corner protectors and the plastic side strips. Step 1 lign footlock with stemtube. Insert drift pin. There are two footlocks and stemtubes. ssemble both as shown. C 6


7 Step 2 Install stemtubes to wheelbases as shown. egin by installing locking stemtube to wheelbase (-H) Repeat for non-locking stemtube as shown in I. 4 Required dia 25x8 8 Required dia 16x8 4 Required m8x125 4 Required 4 Required m8 16x8 25x8 C 16x8 D E F m8 G H I 7


8 Step 3 Install non-locking wheels. Do not over torque; wheels should roll smoothly. Install non-locking wheels on both wheelbase assemblies. m8 m8x110 8 Required dia 16x8 C D E 8


9 Step 4 Install locking wheels. The grooves of the wheels should face inward. Do not over torque; wheels should roll smoothly. Install locking wheels on both wheelbase assemblies. m8 8 Required dia 16x8 m8x110 C D E 9


10 Step 5 ssemble net posts as shown. 4 Required m6x3mm 4 Required m6x45 C D E F G H I J 10


.")


11 Step 6 Install H-pads to alignment strut (-F). Insert nut into strut (G-J). Secure strut to wheelbase (K-U). Repeat for opposite side. 4 Required m5 locking 4 Required m6 4 Required 4 Required dia 12x5 4 Required m5x65 C D E F m5 locking G H m5 locking I J K L 11

12 Step 6 (continued) 12x5 m5x65 12x5 m5x65 M N O P Q m6 R m6 S T U 12


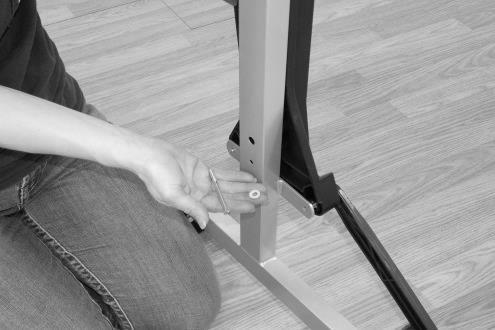
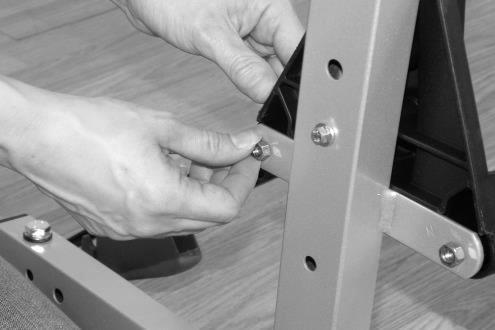
13 Step 7 Lock wheels. Step 8 olt Crossbar to Wheelbases as shown. Upon completing Step 8, assembly should match F. dia 25x8 m8x60 C D E F 13


 and a Jbar")


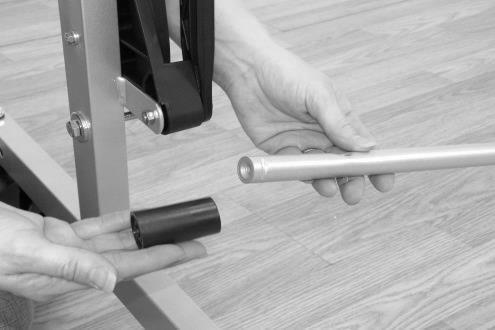
14 Step 9 Jbar Important: Have two people complete Steps With assistance, lift one table top onto the wheelbase; the legs will be facing outward. Have one person support the top while it is resting on the base while the other person completes assembly. ssemble crossbar to Jbars and support leg in the order shown. Note: a Jbar with safety lever should be assembled on the right side) and a Jbar without lever on the left side. The support leg is always assembled closest to the wheelbase. You may need to lower table slightly to line up the bolt holes. Do not fully tighten the bolts until both ends are assembled. Support Leg m8x60 dia 25x8 Jbar C Support Leg D E F G 14


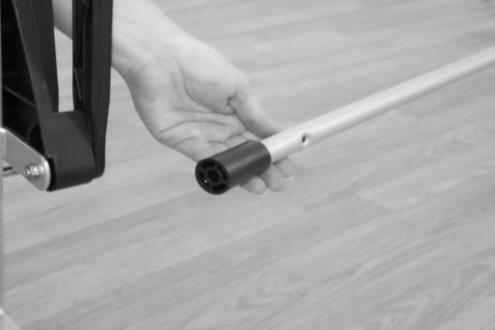
15 Step 10 Install plug into crossbar as shown. End view and side view shown m6x5mm C 15


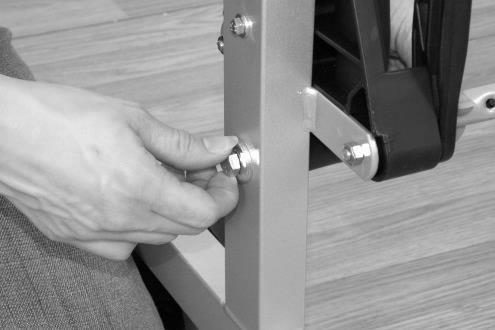
16 Step 11 Raise safety lever up straight. olt the safety lever to leg. 1 Required m6x58 dia 12x6 1 Required m6 C D E F G H I 16


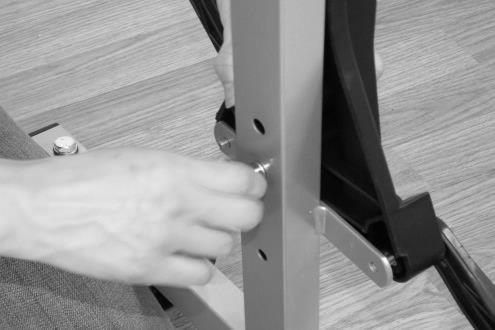
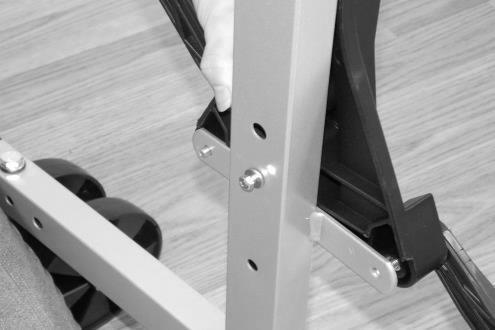
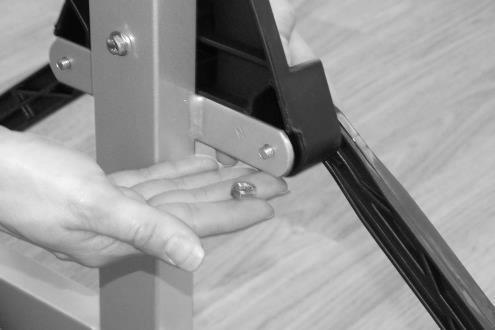
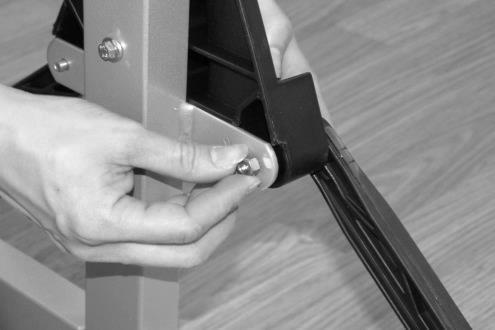
17 Step 12 olt the Jbars to leg. m12x6x3 m6x100 End view and side view shown m12x6x15 C D E F G 17


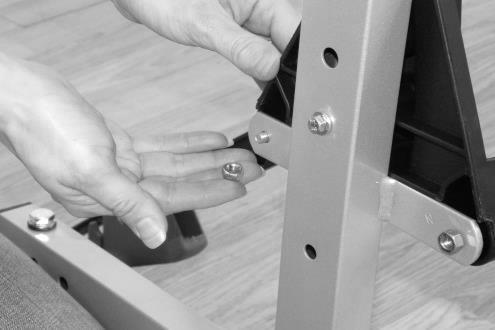
18 Step 13 olt locking struts to support leg. Repeat for left side of top as shown in H. m6x49 dia 12x6 m6 C D E F Carry out steps 9-13 again for the other side. G H 18


19 Step 14 Install handgrips as shown. Open Table Top to Complete ssembly To properly open table into playing position: lock wheels. Push the thumb latch down on the locking strut. Squeeze the strut on the right side and lower table into playing position. Support the table as you lower it; never allow it to drop down. J C D E 19


. Tie string to")


20 Step 15 6 Required 3.9x13 Screw sideshroud into place. Repeat installation of the second shroud on opposite side of wheelbase assembly. Net ssembly C Slide Jpin through net (, ). Place Jpin in designated slots (C). Tie string to tension tab (D). Place string in slots over Jpin and net post. djust net tension by adjusting tension tab (E). Screw djuster into underside of net post (F, G). 3 screws C D E F G 20


21 Remove Film Remove protective plastic film from table surface. Folding Table To properly fold the table, lock wheels, unlock the net post, press the safety lever up and lift top. Once the top is halfway up you can release lever and continue to fold the top. C D Racquet and all Holder ssembly C 21
22 Limited Warranty THERE RE NO WRRNTIES, EXPRESSED OR IMPLIED, MDE Y EITHER THE DISTRIUTOR OR THE MNUFCTURER ON KETTLER PRODUCTS, EXCEPT THE MNUFCTURER S LIMITED WRRNTY GINST DEFECTS IN MTERIL SET OUT ELOW: This KETTLER Limited Warranty applies to products sold through the KETTLER uthorized Dealer Network to the original retail purchaser and authenticated by proof of purchase from a retailer located in the United States. ny shipments made under this warranty will be shipped to the United States only. ny shipment outside of the United States will be at the sole cost of the customer. This KETTLER Limited Warranty is a manufacturer s warranty and is not changed or modified by additional warranties extended by individual retailers at the point of sale. Manufacturer warrants this product to be free from defects in material at the time of the product s tender of delivery for a period of 3 years for residential use. This Limited Warranty is not transferable and does not cover normal wear and tear (including, but not limited to, damage and wear to tires, power shocks, drive belts and other non-durable parts). The liability of the manufacturer under this Limited Warranty shall not include any liability for direct, indirect, or consequential damages resulting from the defect. This Limited Warranty is void if the product is damaged by accident, unreasonable use, improper service, failure to follow instructions provided, modification from its original state, or other causes determined not arising out of defects in material. This warranty gives you specific legal rights. Should this product become defective due to material within the warranty period, contact KETTLER Parts & Service Dept. by phone at , fax at , or at parts@kettlerusa.com. THIS LIMITED WRRNTY IS EXPRESSLY IN LIEU OF NY OTHER WRRNTIES, EXPRESSED OR IMPLIED, INCLUDING NY IMPLIED WRRNTY OF MERCHNTILITY OR FITNESS FOR PRTICULR PURPOSE, ND OF NY OTHER OLIGTIONS OR LIILITY ON THE PRT OF THE MNUFCTURER. KETTLER NEITHER SSUMES NOR UTHORIZES NY OTHER PERSON TO SSUME FOR IT NY OTHER LIILITY IN CONNECTION WITH SUCH PRODUCTS. 22

23 Limited Warranty Ordering Spare Parts When ordering spare parts, always state the full model number, spare part number, the quantity required and the serial number. Example order: Model / spare part number / qty 1/ serial number Important: Spare part prices do not include fastening materials; if fastening material (bolts, nuts, washers, etc.) is required, this should be clearly stated on the order by adding the words with fastening material. Contact: KETTLER International Inc., 1355 London ridge Road, Virginia each, V US Online: info@kettlerusa.com For parts/service: call or parts@kettlerusa.com Serial Number 23

24 Spare Parts For 7122-XXX 24
25 Spare Parts Number Spare Part Number for 7122-XXX Indoor Spare Part Number for 7162-XXX Outdoor Number Description Required 1 Top (-490) Top (-890) Leg Footcap Clamp (indoor only) Clamp (outdoor only) Support Leg Wheelbase Endcap Wheel (locking) Stemtube (non-locking) Clamp (indoor only) Locking strut with thumb latch Locking strut without thumb latch Safety Lever Crossbar (round) Jbar Side shroud Netpost Net Shoulder olt m6x Shoulder olt m6x Crossbar Plug Hardware ag Jbar with Safety Lever hole lignment Strut ushing Spacer Sleeve Handgrip Shoulder olt m6x Hpad Stemtube (locking) Tension tab Foot lock Wheel (non-locking) all and racquet holder Clamp


26 2013 KETTLER ll rights reserved. No part of this manual may be reproduced, stored in a retrieval system, or transmitted in any form, or by any means, such as electronic, mechanical, photocopying or otherwise, without the prior written permission of KETTLER. KETTLER International Inc., 1355 London ridge Road, Virginia each, V US info@kettlerusa.com For parts/service: call or parts@kettlerusa.com 26 Docu
Owners manual Table Tennis Table STOCKHOLM GT USA. Adult Assembly Required. picture similar
 US dult ssembly Required picture similar KETTLER International Inc. 55 London ridge Road Virginia each, V 3453 US www.kettlerusa.com info@kettlerusa.com Owners manual Table Tennis Table STOCKHOLM GT Item
Assembly Instructions
 Assembly Instructions Kid s Wheelbarrow Model # 84-8 Picture Similar KETTLER International Inc. 355 London Bridge Road Virginia Beach, VA 3453 USA www.kettlerusa.com / parts@kettlerusa.com / 866-804-0440
Assembly instructions for Kettrike KALISTA
 Assembly instructions for Kettrike KALISTA Item # 0852-899 -6 Adult assembly required Ibs Printed on 00% recyceled paper. Picture similar. KETTLER International Inc. 355 London Bridge Road Virginia Beach
Assembly instructions Table Tennis Table Oxford Adult Assembly Required USA
 Please do not return this product to the store. Contact KETTLER for parts and service: call toll free 866.804.0440 or send email to parts@kettlerusa.com. Please visit our web site www.kettlerusa.com to
Team Trike Assembly Instructions for 8142 Models
 Team Trike Assembly Instructions for 84 Models paper! Tools required for adult assembly Printed on 00% recycled KETTLER International Inc 355 London Bridge Road Virginia Beach, Virginia 3453 USA www.kettlerusa.com
AERO AIR TIRE PEDAL CAR. Assembly Instructions Model # USA. Tools Required: Recommended for children up to 200 lbs, ages 5-9
 AERO AIR TIRE PEDAL CAR Assembly Instructions Model # 998-700 USA Printed on 00% recycled paper! Recommended for children up to 200 lbs, ages 5-9 Tools Required: (pliers) (phillips head screwdriver) AERO
Assembly Instructions for Kettcar KABRIO
 Assembly Instructions for Kettcar KABRIO Item # 08857-090 USA Printed on 00 % recycled paper. KETTLER International Inc. 355 London Bridge Road Virginia Beach VA 23450 USA www.kettlerusa.com 2 Assembly
Montageanleitung für Fahrrad-Deckenhalter SPEZI
 Montageanleitung für Fahrrad-Deckenhalter Spezi Extension Kit SPEZI rt. Nr. 899-600 0899-00 D G Der Umwelt zuliebe: wir drucken auf 100% ltpapier! F NL HEINZ KETTLER GmbH & Co. Postfach 100 D-9463 Ense-Parsit
OUTDOOR TABLE TENNIS TABLE ASSEMBLY INSTRUCTIONS
 OUTDOOR TABLE TENNIS TABLE ASSEMBLY INSTRUCTIONS Please Do Not Hesitate to Contact Our Consumer Hotline at 800-759-0977 with Any Questions That May Arise During Assembly or Use of This Product! NG2336P
VICTORY TABLE TENNIS TABLE ASSEMBLY INSTRUCTIONS
 VICTORY TABLE TENNIS TABLE ASSEMBLY INSTRUCTIONS NG2322 THANK YOU! Thank you for your purchase of our product. We work around the clock and around the globe to ensure that our products maintain the highest
OWNER'S MANUAL. Please Do Not Return This Product To The Store!
 TABLE TENNIS TABLE MODEL NO. T87 OWNER'S MANUAL 1. Read this manual carefully before starting assembly. Read each step completely before beginning each step. 2. Some smaller parts may be shipped inside
Palma Casual Fire Table
 Palma Casual Fire Table 193319-2210 IMPORTNT PLESE EEP THIS OOLET FOR FUTURE REFERENCE. THIS IS IMPORTNT INFORMTION REGRDING THE USE ND CRE OF YOUR GRDEN FURNITURE. ug 2017 Parts List Table Legs Table
Merida Table 37"x37"
 Merida Table 37"x37" 194440-4009 IMPORTANT PLEASE KEEP THIS BOOKLET FOR FUTURE REFERENCE. THIS IS IMPORTANT INFORMATION REGARDING THE USE AND CARE OF YOUR GARDEN FURNITURE. Oct 2017 Parts List A Table
Merida Lounge Chair IMPORTANT
 Merida Lounge Chair 194410-4009 IMPORTANT PLEASE KEEP THIS BOOKLET FOR FUTURE REFERENCE. THIS IS IMPORTANT INFORMATION REGARDING THE USE AND CARE OF YOUR GARDEN FURNITURE. Oct 2017 Parts List A Seat Top
MAVERICK 7' POOL TABLE WITH TABLE TENNIS ASSEMBLY INSTRUCTIONS
 MAVERICK 7' POOL TABLE WITH ASSEMBLY INSTRUCTIONS NG1023 THANK YOU! Thank you for purchasing this product. We work around the clock and around the globe to ensure that our products maintain the highest
Please Do Not Return This Product To The Store!
 TABLE TENNIS TABLE MODEL NOS. T8167 QUICKPLAY 1000 T8267 QUICKPLAY 1000 T8180 METRO OWNER'S MANUAL 1. Read this manual carefully before starting assembly. Read each step completely before beginning each
38 MINI TRAMPOLINE. The contents of this package are not suitable for children under 3 years of age. Contains small parts which may cause choking.
 38 MINI TRAMPOLINE PRODUCT MANUAL - VERSION 12.17.03 FOR AGES: 13+ WEIGHT LIMIT: 250 Lbs 114 Kgs ADULT(S) NEEDED: WARNING/ADVERTENCIA CUSTOMER SERVICE Do not allow more than one person on this product
Montageanleitung für TANDEM
 Montageanleitung für TANDEM Art. Nr. 0836-000/-500/-600 D GB F NL Der Umwelt zuliebe: wir drucken auf 00% Altpapier! E I PL HEINZ KETTLER GmbH & Co. KG Postfach 020 D-59463 Ense-Parsit GB Assembly Instructions
The contents of this package are not suitable for children under 3 years of age.
 FLAT BENCH PRODUCT MANUAL - VERSION 08.17.04 FOR AGES: 13+ WEIGHT LIMIT: 400 Lbs 181 Kgs ADULT(S) NEEDED: TOOLS NEEDED: WARNING/ADVERTENCIA CUSTOMER SERVICE Do not allow more than one person at any time.
Montageanleitung für Fahrrad-Deckenhalter SPEZI
 Montageanleitung für Fahrrad-Deckenhalter SPEZI Art. Nr. 0899-00 D GB Der Umwelt zuliebe: wir drucken auf 100% Altpapier! F NL HEINZ KETTLER GmbH & Co. Postfach 100 D-9463 Ense-Parsit GB Assembly Instructions
AIRSCREEN 8700, 8701, 8702, 8703
 IRSCRE 8700, 8701, 8702, 8703 = North merican English PRTS INCLUDED C D E F G H I J K L part description 8700 qty. 8701, 8702, 8703 qty. fairing blade 1 1 C D driveside wing non-driveside wing protective
Rocket. Two Seat Bicycle Trailer. Model Number ACIS99ROCKTBLU
 Rocket Two Seat Bicycle Trailer Model Number ACIS99ROCKTBLU User s Manual This manual contains safety, assembly, use and maintenance instructions. Read these instructions carefully before use and keep
Single Seat Bicycle Trailer
 Single Seat Bicycle Trailer User s Manual This manual contains safety, assembly, use and maintenance instructions. Read these instructions carefully before use and keep them for future reference. Your
AURORA TABLE TENNIS. Replacement Parts
 AURORA TABLE TENNIS Replacement Parts Order direct at or call our Customer Service department at (800) 225-7593 8 am to 4:30 pm Central Standard Time July 2014 UPC Code 7-19265-51826-6 Staple your receipt
PARTS INCLUDED. part description part number qty B chock wheel strap SPRINT speed link pad C coussinet Speed Link SPRINT
 SPRINT XT 528001 PRTS INCLUDED C D E L M F G I J H K part description part number qty. mount screw cover 8523510001 1 chock wheel strap 8523285001 1 SPRINT speed link pad C coussinet Speed Link SPRINT
A S S E M B L Y I N S T R U C T I O N S
 A S S E M B L Y I N S T R U C T I O N S Please Do Not Return This Product to the Store! Contact Escalade Sports customer service department at: Phone: 1-888-USA-GOAL Toll-Free! Fax: 1-866-873-3536 Toll-Free!
Two Seat Bicycle Trailer
 Two Seat Bicycle Trailer User s Manual This manual contains safety, assembly, use and maintenance instructions. Read these instructions carefully before use and keep them for future reference. Your child
Harvil 4 Foot Air Hockey Table
 Harvil 4 Foot Air Hockey Table Thank you for your purchase of this Harvil product! We work around the clock and around the globe to ensure that Harvil products maintain the highest possible quality. However,
OnBoard Drum Major Podium
 Assembly and Owner s Manual OnBoard Drum Major Podium CONTENTS CONTENTS................................................................................. 1 SAFETY...................................................................................
Harvil 5 Foot Air Hockey Table
 ASSEMBLY INSTRUCTIONS Harvil 5 Foot Air Hockey Table Thank you for your purchase of this Harvil product! We work around the clock and around the globe to ensure that Harvil products maintain the highest
PLAYOFF 48" FOOSBALL TABLE ASSEMBLY INSTRUCTIONS
 PLAYOFF 48" FOOSBALL TABLE ASSEMBLY INSTRUCTIONS NG1031F THANK YOU! Thank you for purchasing this product. We work around the clock and around the globe to ensure that our products maintain the highest
ASSEMBLY / OPERATION INSTRUCTIONS. Low Profile Motorcycle Dolly
 ASSEMBLY / OPERATION INSTRUCTIONS 1,500LB CAPACITY Low Profile Motorcycle Dolly Model: 03-CG1500-01(B1) WARNING BEFORE USE PLEASE READ ALL WARNINGS AND INSTRUCTIONS TO PREVENT SERIOUS INJURY Drop-Tail
Owner s Manual & Safety Instructions
 Owner s Manual & Safety Instructions Save Save This This Manual Keep Keep this this manual manual for for the the safety safety warnings warnings and and precautions, assembly, assembly, operating, inspection,
48 SUPER JUMPER KIDS TRAMPOLINE
 48 SUPER JUMPER KIDS TRAMPOLINE PRODUCT MANUAL - VERSION 01.18.07 FOR AGES: WEIGHT LIMIT: 100 Lbs 45 Kgs TO BUILD: 3-10 1 X TOOLS NEEDED: CUSTOMER SERVICE GQBrands.com CustomerService@GQBrands.com 1-866-498-5269
Make sure the rail is clamped square as shown. Start at the front, and place the first clamp approx 6 to 9 inches back.
 INSTALLATION SHEET Any damaged or missing parts? Parts will be shipped to you directly. Call 844-779-8986 Mon - Fri 5:30 am - 4 pm Pacific Time TOOLS RECOMMENDED 9/16 Wrench or socket 7/8 Drill bit & drill
Fitting Instruction for EZI-GRIP Bike Rack
 Fitting Instruction for EZI-GRIP Bike Rack Congratulations on purchasing Ezi-Grip to carry your valued bicycles. We are sure you will get many years of enjoyable use from your Ezi-Grip Bike Rack. These
DISC BRAKE CALIPER TOOL SET
 DISC BRAKE CALIPER TOOL SET 40732 ASSEMBLY AND OPERATING INSTRUCTIONS Diagrams within this manual may not be drawn proportionally. Due to continuing improvements, actual product may differ slightly from
Harvil 4 Foot Air Hockey Table
 AH48-2 Harvil 4 Foot Air Hockey Table Thank you for your purchase of this Harvil product! We work around the clock and around the globe to ensure that Harvil products maintain the highest possible quality.
MLS KICK-OFF TABLETOP SOCCER TABLE ASSEMBLY INSTRUCTIONS
 MLS KICK-OFF TABLETOP SOCCER TABLE ASSEMBLY INSTRUCTIONS NGD1028 1 THANK YOU! Thank you for your purchase of this Harvil product. We work around the clock and around the globe to ensure that Harvil products
IMPORTANT SAFETY INFORMATION
 Specifications Tricycle Height 26 Front Wheel 5/8 Axle Diameter, 13 Pneumatic Knobby Tire Back Wheels 5/8 Axle Diameter, 10 Pneumatic Knobby Tire Age Range 5 and up Weight Capacity 150 lb. IMPORTANT SAFETY
INSTALLATION SHEET. PARTS INCLUDED IN YOUR KIT 1 Pair rails (L&R) Roll top assembly Bulkhead seals (1x 1/4 & 1x 3/4 thick) (1x 1/4 & 1x 1/4 thick)
 Roll top assembly Bulkhead seals (1x 1/4 & 1x 3/4 thick) (1x 1/4 & 1x 1/4 thick)") INSTALLATION SHEET Any damaged or missing parts? Parts will be shipped to you directly. Call 844-779-8986 Mon - Fri 8:30 am - 7 pm EST or email support@bakindustries.com TOOLS RECOMMENDED 9/16 Wrench or
INSTALLATION SHEET Any damaged or missing parts? Parts will be shipped to you directly. Call 844-779-8986 Mon - Fri 8:30 am - 7 pm EST or email support@bakindustries.com TOOLS RECOMMENDED 9/16 Wrench or
HURRICANE 54-IN FOOSBALL TABLE ASSEMBLY INSTRUCTIONS
 HURRICANE 54-IN FOOSBALL TABLE ASSEMBLY INSTRUCTIONS Please Do Not Hesitate to Contact Our Consumer Hotline at 800-759-0977 with Any Questions That May Arise During Assembly or Use of This Product! NG1033F
SAFETY INSTRUCTIONS. A) Unroll cover toward tailgate. B) Position header into header stops. Rotate header down and press to lock toggle into header.
 Unroll cover toward tailgate. B) Position header into header stops. Rotate header down and press to lock toggle into header.") STEP 7: operation While driving vehicle, Shur-ond VELCRO brand fasteners must be secured along entire length of cover to prevent wind lift. For best results, leave cover fastened to side rails while opening.
STEP 7: operation While driving vehicle, Shur-ond VELCRO brand fasteners must be secured along entire length of cover to prevent wind lift. For best results, leave cover fastened to side rails while opening.
HUSTLER 7' & 8' POOL TABLE ASSEMBLY INSTRUCTIONS
 HUSTLER 7' & 8' POOL TABLE ASSEMBLY INSTRUCTIONS NG2515PB/NG2520PB THANK YOU! Thank you for purchasing this product. We work around the clock and around the globe to ensure that our products maintain the
Style Number: PRD00005 PRIMED 3-in-1 Soccer Trainer
 To avoid injury during assembly, disassembly, use, adjustment and/or movement of the PRIMED 3-in-1 Soccer Trainer, the following warnings MUST be observed at all times: Adult assembly (2 adults) required
Owner s Manual. FLIPIT. 6FT Table Tennis & Dining Top. Manual version: 2.1
 FLIPIT 6FT Table Tennis & Dining Top Owner s Manual. Manual version: 2.1 Congratulations on purchasing your very own FLIPIT 6FT Table Tennis & Dining Top We are very confident you will have hours of fun
Dealer Stamp. Rollator (R6 and R8) Assembly & Operating Instructions
 Assembly & Operating Instructions") The manufacturer reserves the right to alter without notice any weights, measurements or other technical data shown in this manual. All figures, measurements and capacities shown in this manual are approximate
The manufacturer reserves the right to alter without notice any weights, measurements or other technical data shown in this manual. All figures, measurements and capacities shown in this manual are approximate
3 Year Residential Warranty and a 1 Year Institutional Warranty.
 Assembly Instructions This Am Tryke product has been designed in accordance with the latest standards of safety and subjected to constant quality monitoring. The data gained from this quality process is
Owner s Manual & Safety Instructions
 Owner s Manual & Safety Instructions Save This Manual Keep this manual for the safety warnings and precautions, assembly, operating, inspection, maintenance and cleaning procedures. Write the product s
Spirit Trailer with stroller attachment
 Spirit Trailer with stroller attachment User s Manual This manual contains safety, assembly, use and maintenance instructions. Read these instructions carefully before use and keep them for future reference.
36" Galvanized Direct Drive Hyflo Fan Installation and Operators Instruction Manual. Fan and Framing Dimensions
 6" Galvanized Direct Drive Hyflo Fan Installation and Operators Instruction Manual Fan and Framing Dimensions Planning the layout of the spacing between Fans is very important. Spacing too close together
SIDE-WIND, A-FRAME TRAILER JACK. Model Due to continuing improvements, actual product may differ slightly from the product described herein.
 SIDE-WIND, A-FRAME TRAILER JACK Model 95157 Assembly And Operation Instructions Due to continuing improvements, actual product may differ slightly from the product described herein. 3491 Mission Oaks Blvd.,
EN main stinger assembly 1. EN bike trays with ratchet arms 2. EN front wheel holder 2. EN rear wheel holder assembly 2.
 T2 PRO XT (2" RECEIVER) 9034 (1.25" RECEIVER) 9035 PRTS INCLUDED C D E F G H I J K L M N part description qty. main stinger assembly 1 bike trays with ratchet arms 2 C front wheel holder 2 D rear wheel
This sheet must be read completely to:
 Instalation Preparation This sheet must be read completely to: 2. Avoid causing injury to installer, customer, end user, or others. 3. Prevent damage to ATV, UTV, and Motorcycle and/or accessory. 4. Prevent
634031C. Visit our website at. to register your product and to enter our sweepstakes. (No purchase necessary)
") LIMIE WRRNY he Little ikes ompany makes fun, high quality toys. We warrant to the original purchaser that this product is free of defects in materials or workmanship for one year from the date of purchase
LIMIE WRRNY he Little ikes ompany makes fun, high quality toys. We warrant to the original purchaser that this product is free of defects in materials or workmanship for one year from the date of purchase
MLS DEFENDER SOCCER TABLE ASSEMBLY INSTRUCTIONS
 MLS DEFENDER SOCCER TABLE ASSEMBLY INSTRUCTIONS NGD1032 THANK YOU! Thank you for your purchase of this Harvil product. We work around the clock and around the globe to ensure that Harvil products maintain
RENEGADE SLATE BUMPER POOL TABLE ASSEMBLY INSTRUCTIONS
 RENEGADE SLATE BUMPER POOL TABLE ASSEMBLY INSTRUCTIONS NG2404PG THANK YOU! Thank you for purchasing this product. We work around the clock and around the globe to ensure that our products maintain the
OPERATIONS MANUAL LEVER CHAIN HOIST
 OPERATIONS MANUAL LEVER CHAIN HOIST IMPORTANT SAFETY INFORMATION Please read, understand and follow all safety information contained in these instructions prior to the use of this hoist. Retain these instructions
1250 LB. CAPACITY MECHANICAL WHEEL DOLLY
 1250 LB. CAPACITY MECHANICAL WHEEL DOLLY 67287 SET-UP AND OPERATING INSTRUCTIONS Visit our website at: http://www.harborfreight.com Read this material before using this product. Failure to do so can result
Table Tennis Table. Assembly Instructions Model CONTACT INFO. Hours
 FOLD N STORE PATENT - www.eastpointsports.com Table Tennis Table TWO OR MORE ADULTS REQUIRED FOR ASSEMBLY Assembly Instructions Model 1-1-33610 CONTACT INFO WARNING: CHOKING HAZARD - Small balls. Not for
Magician Comfy. Owner s Manual
 Magician Comfy Owner s Manual Table Of Contents Introduction...................................... 2 Safety Precautions................................ 3 Assembly........................................4-9
DF Ford F Short Bed 2009-Current
 921019 DF921019 Ford F150 5.5 Short Bed 2009-Current Hardware (Box 1 of 2) 1. Tango front rail assembly 2. Tango left rail assembly 3. Tango right rail assembly 4. Rhino Rack cross bars (2) 5. Clamps (8)
ASSEMBLY / OPERATION INSTRUCTIONS. Low Profile / Stand-Up Motorcycle Dolly
 ASSEMBLY / OPERATION INSTRUCTIONS 1,500LB CAPACITY Low Profile / Stand-Up Motorcycle Dolly Model: 03-CGPR1500-01(C) WARNING BEFORE USE PLEASE READ ALL WARNINGS AND INSTRUCTIONS TO PREVENT SERIOUS INJURY
Nitro Rollator
 Nitro Rollator Parts List 3 1 4 2 6 5 7 12 8 11 10 9 1. Handgrip 2. Adjustable tubing handgrip 3. Rear reflector on handgrip 4. Brake lever 5. Interlock button for handgrips 6. Back Rest 7. Seat 8. Bag
Owner s Manual and Assembly Instructions
 RollPlay 6V Mini Quad Owner s Manual and Assembly Instructions Model #: ACQUAD-P, ACQUAD-CAM, ACQUAD Read and understand the entire manual before assembly and operation. The vehicle must be assembled by
PUSH BUTTON KEY CABINET
 PUSH BUTTON KEY CABINET Model 95689 INSTALLATION And Operation Instructions Due to continuing improvements, actual product may differ slightly from the product described herein. 3491 Mission Oaks Blvd.,
CUB CADET HARDTOP CAB FOR 3000 SERIES GT
 CUB CADET HARDTOP CAB FOR 3000 SERIES GT OWNER'S MANUAL INSTALLATION MAINTENANCE PARTS IMPORTANT READ THIS MANUAL COMPLETELY AND KEEP FOR FUTURE REFERENCE 1 WARNING 1.This cab is designed to provide foul
Keston 151 cm (6 Seater) Glass Top Dining Table
 Glass Top Dining Table") Keston 151 cm (6 Seater) Glass Top Dining Table GLAC-559-74KD IMPORTANT PLEASE KEEP THIS BOOKLET FOR FUTURE REFERENCE. THIS IS IMPORTANT INFORMATION REGARDING THE USE AND CARE OF YOUR GARDEN FURNITURE.
Keston 151 cm (6 Seater) Glass Top Dining Table GLAC-559-74KD IMPORTANT PLEASE KEEP THIS BOOKLET FOR FUTURE REFERENCE. THIS IS IMPORTANT INFORMATION REGARDING THE USE AND CARE OF YOUR GARDEN FURNITURE.
User Manual. Posture+ Adjustable Base. For customer service call:
 User Manual Posture+ Adjustable Base For customer service call: 1-877-707-7533 1 IMPORTANT INFORMATION PLEASE READ THESE INSTRUCTIONS THOROUGHLY BEFORE USING THIS PRODUCT. PROPER OPERATION OF YOUR ADJUSTABLE
Owners Manual. LifeGuard Power Lift Model # Rev. 2/1/13
 Owners Manual LifeGuard Power Lift Model #100287 Rev. 2/1/13 Table of Contents 1. ASSEMBLY INSTRUCTIONS 3-5 A. Lift Assembly 3 B. Setup 3 1. Clinch Pin Location Drawings 4 2. Down Tube and Seat Assembly
!"" #$% "!&' ( ( ) *
 *") !"" #$% "!&' (( ) * FunPop CART Assembly Manual Model # 2689 CARTS Part No. 59411 Revised: FEB 2009 Cincinnati, OH 45241-4807 USA INSTALLATION INSTRUCTIONS Checking Shipment Unpack all cartons and check
!"" #$% "!&' (( ) * FunPop CART Assembly Manual Model # 2689 CARTS Part No. 59411 Revised: FEB 2009 Cincinnati, OH 45241-4807 USA INSTALLATION INSTRUCTIONS Checking Shipment Unpack all cartons and check
Angle Grinder Holder
 Angle Grinder Holder Owner s Manual WARNING: Read carefully and understand all ASSEMBLY AND OPERATION INSTRUCTIONS before operating. Failure to follow the safety rules and other basic safety precautions
6V Dizzy Driver. Owner s Manual and Assembly Instructions
 6V Dizzy Driver Owner s Manual and Assembly Instructions Model #: W407AC, W407AC-B, W407AC-P Read and understand the entire manual before assembly and operation. The vehicle must be assembled by an adult
FOLD N STORE. Table Tennis Table. Assembly Instructions Model DS, DS CONTACT INFO Hours.
 FOLD N STORE TM PATENT - www.eastpointsports.com Table Tennis Table Assembly Instructions Model 1-1-33525-DS, 1-1-33536-DS CONTACT INFO Hours Technical Support Monday to Friday (9am to 5pm EST) Email us
4-in-1 Fold n Go Trike
 LIMITED WARRANTY The Little Tikes Company makes fun, high quality toys. We warrant to the original purchaser that this product is free of defects in materials or workmanship for one year* from the date
CAB #11670 FOR JOHN DEERE 2320 TRACTOR
 CAB #11670 FOR JOHN DEERE 2320 TRACTOR OPERATION - PARTS LIST - ASSEMBLY IMPORTANT READ THIS MANUAL CAREFULLY AND KEEP FOR FUTURE REFERENCE CAUTION! REMOVE THE VINYL PANELS FOR TRANSPORT IN AN OPEN TRUCK
CAB #11606 FOR John Deere X500, X520, X530, X534, X540
 CAB #11606 FOR John Deere X500, X520, X530, X534, X540 ASSEMBLY INSTRUCTIONS PARTS LIST IMPORTANT READ THIS MANUAL CAREFULLY AND KEEP FOR FUTURE REFERENCE CAUTION! REMOVE THE VINYL PANELS FOR TRANSPORT
SIDEKICK TABLETOP SOCCER ASSEMBLY INSTRUCTIONS
 SIDEKICK TABLETOP SOCCER ASSEMBLY INSTRUCTIONS NG1028T3 THANK YOU! Thank you for purchasing this product. We work around the clock and around the globe to ensure that our products maintain the highest
Assembly Instructions
 Assembly Instructions Aluminum Padded Sling Chaise Lounge Questions, problems, or missing parts? Before returning to the store, call Customer Service. -866-988-3300 8 a.m. -5 p.m., PST Monday - Friday
Owner s Manual & Safety Instructions
 Owner s Manual & Safety Instructions Save This Manual Keep this manual for the safety warnings and precautions, assembly, operating, inspection, maintenance and cleaning procedures. Write the product s
Owner s Manual & Safety Instructions
 Owner s Manual & Safety Instructions Save This Manual Keep this manual for the safety warnings and precautions, assembly, operating, inspection, maintenance and cleaning procedures. Write the product s
PREMIUM HITCH MOUNT PLATFORM BIKE CARRIER
 model no. 040-96-2 PREMIUM HITCH MOUNT PLTFORM BIKE CRRIER NOTE: Read instructions carefully before installation. Refer to assembly instructions and ensure the bike carrier is installed correctly. Keep
INSTALLATION SHEET. PARTS INCLUDED IN YOUR KIT 1 Pair rails (L&R) Roll top assembly Bulkhead seals (1x 1/4 & 1x 3/4 thick) (1x 1/4 & 1x 1/4 thick)
 Roll top assembly Bulkhead seals (1x 1/4 & 1x 3/4 thick) (1x 1/4 & 1x 1/4 thick)") INSTALLATION SHEET Any damaged or missing parts? Parts will be shipped to you directly. Call 818-365-9000 Mon - Fri 8:00 am - 4 pm Pacific Time or email support@bakindustries.com TOOLS RECOMMENDED 9/16
INSTALLATION SHEET Any damaged or missing parts? Parts will be shipped to you directly. Call 818-365-9000 Mon - Fri 8:00 am - 4 pm Pacific Time or email support@bakindustries.com TOOLS RECOMMENDED 9/16
Model FM2260 Wall Mount. Full Motion Television Wall Mount
 Model FM2260 Wall Mount Full Motion Television Wall Mount Getting Started Introduction Congratulations on the purchase of your new udio Solutions FM2260 Television Wall Mount. For maximum benefit, please
VersaHitch Bike Rack
 VersaHitch Bike Rack Installation Manual: for Jeep Wrangler with VersaHitch # 92034.3000 PARTS LIST: Receiver Bases - QTY 2 Main Rack System - QTY 1 Installation Hardware - SEE PAGE 3 REQUIRED TOOLS: Safety
Component Size Weight Capacity
 Specifications Component Size Weight Capacity Top Shelf 72 W x 19-1/2 L 1500 lb Drawer A (x3) 37-3/8 W x 19-1/2 L x 2-1/4 H 154 lb each Drawer B 37-3/8 W x 19-1/2 L x 5-1/4 H 220 lb Drawer C 37-3/8 W x
KidWalk KidWalk II Dynamic Mobility System
 OWNER S MANUAL KidWalk KidWalk II Dynamic Mobility System Manufactured By Prime Engineering A Division of Axiom Industries, Inc. Supplier Info 70111KWOM 2 TABLE OF CONTENTS This owner s manual is organized
Installation Precautions. Use Precautions. Specifications
 Important Safety Information Safety Setup Operation Maintenance Read all safety warnings and instructions. Failure to follow the warnings and instructions may result in serious injury. Save all warnings
Owner s Manual. Upper Body Unit. Serial Number Here. Date of Purchase New Hope Road, Raleigh, NC Fusion -
 Revision 3 April 2015 Upper Body Unit Owner s Manual Serial Number Here Date of Purchase www.batcafitness.com 1207 New Hope Road, Raleigh, NC - 919.255.1233 Fusion - www.batcafitness.com 4 Upper Body Station
InstallatIon and owner s InstrUCtIons
 InstallatIon and owner s InstrUCtIons GS Baseline Series Wall-Mounted Goal Systems table of Contents Safety Instructions... 2 Goal Specifications... 3 Determine Installation Specifications... 3 Parts List
Rotary Folding Hoists. Owner s Manual
 Rotary Folding Hoists Owner s Manual Introduction Congratulations Congratulations on the purchase of your new Hills Rotary Hoist, which will bring you many years of trouble free and efficient outdoor drying.
Owner s Manual. Upper Body Unit. Serial Number Here. Date of Purchase New Hope Road, Raleigh, NC Fusion -
 Revision 1 March 2012 Upper Body Unit Owner s Manual Serial Number Here Date of Purchase www.batcafitness.com 1207 New Hope Road, Raleigh, NC - 919.255.1233 Fusion - www.batcafitness.com 4 Upper Body Station
3PC TONNEAU COVER INSTALLATION INSTRUCTIONS. Ford Ranger/Mazda BT-50 (without bedliner)
") 3PC TONNEAU COVER INSTALLATION INSTRUCTIONS Ford Ranger/Mazda BT-50 (without bedliner) Care Instructions: Clean Tonneau Cover with a mild detergent and water solution. Do not use abrasive cleaners or solvents.
3PC TONNEAU COVER INSTALLATION INSTRUCTIONS Ford Ranger/Mazda BT-50 (without bedliner) Care Instructions: Clean Tonneau Cover with a mild detergent and water solution. Do not use abrasive cleaners or solvents.
Adjustable Angled Incline Conveyor Owners Manual with Operating Instructions
 Adjustable Angled Incline Conveyor Owners Manual with Operating Instructions Revision 012211 Table of Contents Basic Conveyor Features 3 Getting Started 4 Setting Up the Incline Conveyor 5 Belt Removal
Hollywood Racks Assembly & installation instructions for models:
 Hollywood Racks Assembly & installation instructions for models: HR1400Y (4 bike), HR1450Y (2 bike), HR1475Y, 1450Y-E & 1455Y-E (E bikes) For use on 2 hitches only. Do not use a 1 ¼ -2 hitch adapter. Maximum
12V Jaguar CX-75. Owner s Manual and Assembly Instructions
 12V Jaguar CX-75 Owner s Manual and Assembly Instructions Model #: W466AC, W466AC-F Read and understand the entire manual before assembly and operation. The vehicle must be assembled by an adult who has
Audi R8. Ride-on Car 5F62630 OWNER S MANUAL. Keep instructions for future reference
 Audi R8 Ride-on Car 5F62630 OWNER S MANUAL Keep instructions for future reference 1 Safety The owner s manual contains assembly, use and maintenance instructions. The vehicle must be assembled by an adult
SPECIFICATIONS GENERAL SAFETY RULES PERSONAL SAFETY. Save This Manual TOOL USE AND CARE WORK AREA
 SPECIFICATIONS 2 Forged Safety Latch Hooks Cable extends to: 44 Drop forged steel hanging bracket Heavy duty 3/16 Steel Cable Pulling Capacity: 1200 LB. One piece double ratchet gear Save This Manual You
ASSEMBLY INSTRUCTIONS ITEM 61940, Campeche All Weather Wicker 5 Piece Bistro Set
 ASSEMBLY INSTRUCTIONS Table of Contents: General Information...Page 2 Safety Information Page 2 Preparation...Page 2 Parts List......Page 3 Assembly. Page 4 Warranty Information Page 5 **IMPORTANT NOTICE**
Shur-Co. Owners & Installation Manual. READ INSTRUCTIONS - Failure to assemble cover properly will void warranty.
 Owners & Installation Manual READ INSTRUCTIONS - Failure to assemble cover properly will void warranty. Damaged or missing parts? Call 1-877-878-9336 Mon - Fri 8 am - 5 pm CT Parts will be shipped to you