DENTAL AIR SYSTEM. Installation and Operation Manual
|
|
|
- Theresa Arnold
- 6 years ago
- Views:
Transcription


1 DENTAL AIR SYSTEM Installation and Operation Manual
2
3 TABLE OF CONTENTS SECTION PAGE Congratulations... 4 Safety Instructions... 5 Key Parts Identification... 6 Sizing Guide... 7 Operating Information... 7 Site Requirements... 8 Installation Information Troubleshooting Maintenance Replacement Parts Optional Accessories Product Specifications Warranty On-Line Warranty Registration LIST OF ILLUSTRATIONS FIGURE TITLE PAGE 1 AirStar Parts Location Overall Site Requirements Left and Right Head Assembly Installation Left and Right Head Assembly Motor Connections AirStar Electrical Connections Moisture Monitor and 5 Micron Filter Location AirStar Filter Location Service Timer Page 3
4 CONGRATULATIONS Your AIRSTAR generates 100% oil-less, ultra-dry dental air which protects valuable handpieces from premature failure due to the effects of moist air and the build-up of oil residue. Because no oil is used for mechanical lubrication, there is no chance of introducing an oily film to a prepared surface which could compromise resin retention and restorations, wasting chair time. Most important, your patients s health is protected with ultra-dry air that provides an environment that is not conducive to bacterial growth. The AIRSTAR utilizes a long stroke, small bore piston to compress the air. This piston is bonded with an anti-friction polymer to eliminate the need for oil. The air is forced through the Membrane Dryer System consisting of the cooler and the membrane. This system removes moisture and air impurities providing the driest possible compressed air while maximizing performance. This 100% ultra-dry air is reserved in the main storage tank for use by the operatory air system. The AIRSTAR features include: Virtually Maintenance Free Low Pressure Dew Point Uninterrupted Compressor Availability Maximum Dryness with Quadruple Filtered Air Compact size for space-saving installation Since 1971, when Air Techniques pioneered the manufacture of oil-less air for dentistry, thousands of dentists have depended on their AIRSTAR. Now that your practice has an AIRSTAR, you, too, can depend on the delivery of 100% oil-less, ultra-dry air and efficient, trouble-free operation. Page 4


5 SAFETY INSTRUCTIONS Use of the AIRSTAR not in conformance with the instructions specified in this manual may result in permanent failure of the unit. WARNING: To prevent fire or electrical shock, do not expose this appliance to rain in or moisture. All user serviceable items are described in the maintenance section. Manufacturing date code on serial number label is in the format Month YYYY. ATTENTION USERS: Alerts users to important Operating and Maintenance instructions. Read carefully to avoid any problems. I ON O OFF Warns users that uninsulated voltage within the unit may be of sufficient magnitude to cause electric shock. Indicates the ON and OFF position for the Equipment power switch. MEDICAL ELECTRICAL EQUIPMENT WITH RESPECT TO ELECTRICAL SHOCK, FIRE, MECHANICAL AND OTHER SPECIFIED HAZARDS ONLY IN ACCORDANCE WITH UL , CAN/CSA C22.2 NO CA All AirStar compressors comply with NFPA 99C level 3 requirements Indicates that the equipment complies with the Medical Device Directive 93/42/EEC. Indicates protective Earth Ground for the Equipment power switch Walt Whitman Road Melville, New York, USA EC REP Medical Device Safety Service Schiffgraben Hannover, Germany Page 5


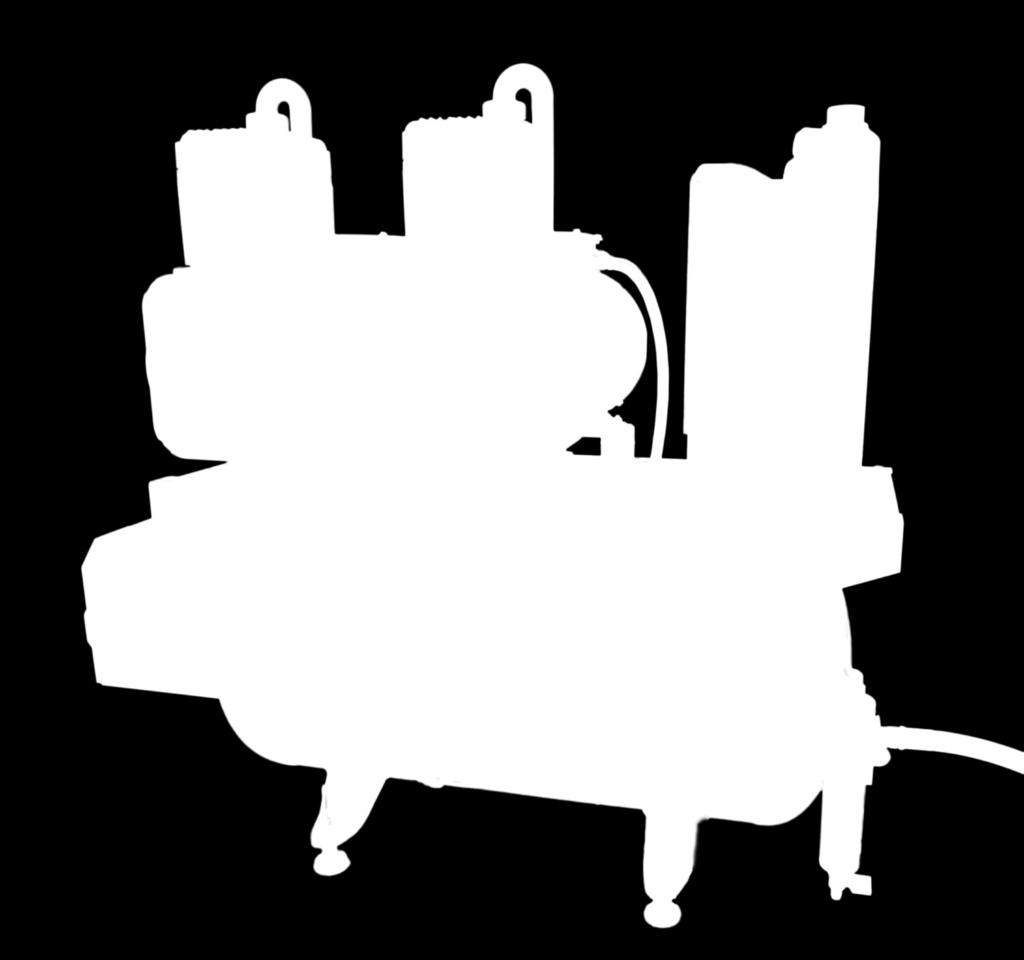
6 KEY PARTS IDENTIFICATION Sound Reducing Intake Filters Membrane Dryer Cooler Membrane Dryer Service Timer Control Box Motor Circuit Breaker Motor Power Switches Membrane Dryer Drain Valve Main Tank Check Valve 24V Circuit Breaker View B. Right -Side View View A. Front View Pressure Switch Supplied Air Outlet Hose Moisture Monitor Control Box Pressure Gauge Drain Valve Power Line Cord Pressure Relief Valve Tank Outlet Valve 5 Micron Filter View C. Input Power Connection Detail View View D. Tank Outlet Assembly Detail View Figure 1. AirStar Parts Location Page 6
7 SIZING GUIDE Choosing the correct size AIRSTAR for your practice depends on the number of air users and the anticipated air demand. To assure optimum compressor operation, the air demands should not exceed the number of air handpiece users shown in the chart below: Model Recommended Number of Users Number of Heads Number of Motors AS AS AS AS AS AS AS AS AS OPERATING INFORMATION AS10, AS12, AS21 and AS22 If a remote Control Panel is being used, the circuit breaker on the face of the compressor Control box must be in the ON position. The 24 volt circuit breaker must also be in the ON position. Make sure the reset button is flush with the face of the circuit breaker. If it isn t, push it in to reset. If a Remote Control Panel is not being used, be sure that the yellow and the orange wires are connected to one another. These wires are located in the pressure switch. The circuit breaker located on the face of the compressor Control Box is the power control for the motor. AS30, AS40, AS50, AS70 and AS100 If a Remote Control Panel is being used, ALL switches on the face of the compressor Control Box must be in the ON position. If a Remote Control Panel is not being used, be sure that the yellow and the orange wires are connected to one another. These wires are located on the pressure switch. The power switches located on the face of the compressor Control Box are the power control for each motor. Note: Compressor motors are designed to run together. Do not run one head at a time unless one head has failed and you are waiting for service. The motor circuit breaker must be kept in the ON position and should not be used as a switch. Page 7
8 SITE REQUIREMENTS Service Clearance: Allow 12" on all sides for all models. Ambient Temperature: Must not exceed 105 F Air System Plumbing Connection: 3/8" F.N.P.T. Shut-off valve and a 6 ft. pressure hose (supplied) Air distribution piping for all models - 1/2", type "L" or type "K" copper If pipe volume is too great, more than 235 in 3 or more than 100 ft. of 1/2" diameter pipe, a pressure regulator should be installed between the main tank and the distribution piping. Set pressure to pressure switch cut in value (factory set at 85 PSI). Environmental: Operating Indoor use at altitudes up to 2000m. Temperature 5 to 40 C (41 to 105 F). Maximum relative humidity 80% for temperatures up to 31 C, decreasing linearly to 50% relative humidity at 40 C. Supply voltage fluctuation of +/- 10% of nominal voltage. Storage and Transport: Temperature, -18 to 65 C (0 to 150 F). Relative Humidity, 0 to 90%. IEC Classification: Protection against electric shock (5.1, 5.2): Class I Applied Parts: There are no Applied Parts. Protection against harmful ingress of water (5.3): Ordinary, IPXO Degree of safety in the presence of flammable anesthetics mixture with air or with oxygen or with nitrous oxide (5.5): Not suitable. Mode of operation (5.6): - All Modes Except AS100: Continuous - AS100 Only: 50% Duty Cycle; Maximum Continuous ON Time of 20 Min Page 8
 60 60 60 60 60 60 60 60 60 Full Load Amps 8 4 15 8 8 12 16 24 20 Minimum Panel Breaker Rating (Amps) 20 10 30 20 20 20 30 40 30 Minimum.")


9 SITE REQUIREMENTS Site Electrical Requirements Requirement AirStar Model AS10 AS12 AS21 AS22 AS30 AS40 AS50 AS70 AS100 Nominal Supply Voltage (VAC, see note) Frequency (Hz) Full Load Amps Minimum Panel Breaker Rating (Amps) Minimum. Wire Size (AWG) Note: Install a buck or boost transformer if actual facility service is above or below the supply voltage fluctuation of ±10% of nominal voltage ratings listed. Building Power Supply Panel Type AS R AS21 NEMA* AS12 AS22 AS30 AS40 AS50 AS70 AS R NEMA* Hard Wired** Buck/Boost Transformer (optional) * Use Hospital Grade Receptacle Only ** Only AS100 Models use 3-Phase Power. Disconnect Needed when Servicing. Green Dot Green Dot Style See Figure 3 for Connection Details. Side Clearance 12 inches OUTSIDE AIR PIPE 2-Inch Pipe for Air Intake. Must be protected from rain and animals Shroud & Screen Remote Air Intake Kit Manifold - Kit includes 2 inch PVC Pipe and flexible hose with 70 inches of clear tubing for connection to the air intake of each compressor. See Note max Screen Drip Leg with Drain Valve See Note 2 Notes: 36 Inch Maximum Height 1. Remote Air Intake Kit Manifold - Refer to the Optional Accessories listing, page 18, for the kit part number corresponding to the AirStar model. 2. Remote Air Intake Drip Leg & Valve - A drip leg with drain valve must be installed at lower end of the remote air intake pipe to collect condensation during operation. Attach a drain tube to the drip leg valve to allow drainage into floor drain/sink. 3. Membrane Dryer Drain Valve - See Key Parts Identification, page 6, and install the Drain Tube found in either accessory kit P/N or P/N used to drain moisture collected in the Membrane Dryer. Remote 24 Volt Switch with Pilot Light (sold separately) Rear Clearance 12 inches minimum from wall Membrane Dryer Drain Valve See Note 3 Control Cable 18 Gauge 4 Conductor Connect to Pressure Switch. See 24 Volt Circuit Connections. Maximum 24 inches from main air line 3/8 FNPT End fitting 1/2 Copper Main Air Line Figure 2. Overall Site Requirements Page 9
10 INSTALLATION INFORMATION AS100 ASSEMBLED at the SITE Installing Left and Right Head Assemblies All AIRSTAR models, except the AS100, are shipped assembled and can be installed upon delivery by following the installation guidelines for plumbing and electrical connections provided by pages 12 & 13. The AS100 is shipped as separate assemblies that must be assembled during installing the system at the site Place the tank assembly in the installation space; then perform the following procedure to install the left and right head assemblies onto the AS100 tank assembly. Left head installation. Move air hose A and B to make sure they are not damaged during installation. Orient the left head with its electrical box on the right side. Align the 4 screw holes of the mounting plate with the 4 left shock mounts. Install the head assembly onto the 4 left shock mounts and secure with 4 nuts provided with the head assembly accessory kit. Right head installation. Each assembly (tank and heads) weighs over 100 pounds and requires two people to lift. Move air hose A and B to make sure they are not damaged during installation. Orient the right head with its electrical box on the left side. Align the 4 screw holes of the mounting plate with the 4 right shock mounts. Install the head assembly onto the 4 right shock mounts and secure with 4 nuts provided with the head assembly accessory kit. Left Head Assembly Right Head Assembly Rear Membrane Dryer Rear Cooler Front Membrane Dryer Front Cooler Mounting Plate Facing Electrical Connection Boxes Mounting Plate Air Hose A Left Shock Mounts Air Hose B Right Shock Mounts Figure 3. Left and Right Head Assembly Installation Page 10

 A1 (REAR TABS) A1 From Left Motor Harness 85468 Rev.")
11 AS10, AS12, AS21, AS22, AS30, INSTALLATION INFORMATION Install strain relief to the motor harness of the left and right head assemblies. Connect each harness as shown by Figure 4. Make sure to run each harness through their associated clips. Connect air hose A to left head assembly and air hose B to right head assembly. Make sure all system power is removed prior to working with electrical circuits. Contacting high voltage can cause serious injury or even death. Air Hose A Air Hose B (REAR TABS) A1 (REAR TABS) A1 From Left Motor Harness Rev. B To Electrical Box Motor Harness Connections From Right Motor Harness Green Ground Green Ground Orange Switch L Orange Switch R To Electrical Box Gray Contactor L - A1 Tab (under L1) Gray Contactor R - A1 Tab (under L1) Red Contactor L - L1 Box Lug (over A1) Red Contactor R - L1 Box Lug (over A1) White Contactor L - L2 Box Lug White Contactor R - L2 Box Lug Black Contactor L - L3 Box Lug Black Contactor R - L3 Box Lug Figure 4. Left and Right Head Assembly Motor Connections Page 11
12 INSTALLATION INFORMATION AIRSTARs are installed by authorized Air Techniques dealer technicians. Please review these installation guidelines to make sure that your AIRSTAR works to capacity for your office. (See Site Requirements, pages 8 & 9.) Your AIRSTAR should be installed in a well ventilated area, with at least 12 inch clearance on each side for service access and to prevent overheating during high demand periods. If other equipment is located in the vicinity, the ambient temperature of the area must not exceed 105 F. The installation site should be clean and dry to prevent the air intake filters from clogging. If there is a concern about the quality of air where the AIRSTAR is placed, we recommend an optional Remote Air Intake (See Optional Accessories, page 18) which allows the compressor to intake clean air from a remote location. Air distribution piping for all models should be 1/2", type "L" or type "K" copper. PLUMBING CONNECTION: The Tank Outlet Assembly (See Figure 1, View A), (the storage tank outlet for the dry air) is connected to the operatory air system via a 3/8" F.N.P.T. shut-off valve and 6 foot length of pressure hose (supplied). Important: Each system should have a dedicated circuit panel. Remove all power to the system prior to working with electrical circuits. Contacting high voltage can cause serious injury or even death. All systems must be wired directly from an electrical box that complies with local electrical codes. Page 12 Note: If voltage is higher than 132V/242V, install a bucking transformer. MINIMUM VOLTAGE: The minimum voltage for an AS10 or AS21 is 108 Volts. The minimum voltage required for an AS12, AS22, AS30, AS40, AS50, AS70 or AS100 is 198 Volts. Install a boost transformer if the service is below these ratings. WIRING REQUIREMENTS: To help prevent fire, electric shock, injury, or death, the wiring and grounding must conform to the latest edition of the National Electrical Code, ANSI/NFPA 70 and all applicable local regulations. Please contact a qualified electrician to check your wiring and breakers/fuses to ensure that there is adequate electrical power to operate the AIRSTAR. EQUIPMENT GROUNDING: All AIRSTARs must be connected to a grounded metal, permanent wiring system, or an equipment grounding conductor must be run with the circuit conductors and connected to the equipment grounding lead in the AIRSTAR's flexible metal conduit power supply. Failure to do so can result in fire, electric shock, injury, or death. See Figure 2, Overall Site Requirements, page 9. ELECTRICAL POWER CONNECTION: AS10, AS12, AS21, AS22, AS30 and AS40 systems are supplied with a connected line cord. AS50, AS70 and AS100 systems are shipped with open electrical connections. Systems supplied with a line cord must be plugged into a hospital grade electrical outlet. See Figure 2 for receptacle requirements. Systems with open electrical connections are directly connected to the branch supply circuit as shown by Figure 3. See Site Electrical Requirements, page 9, for required branch circuit size for each system.
13 INSTALLATION INFORMATION 24VDC CONNECTIONS: 24VDC connections are used when installing a 24VDC remote switch. Make the 24VDC connections shown by Figure 3 for the remote switch. When not using the remote switch, insulate the BRN wire and tie the ORG and YEL wires together. BLACK WHITE GREEN BLACK WHITE GREEN L1 L2 GND HARD WIRED CONNECTED AIRSTAR MODELS AS50 & AS70 GND RED BLUE BLACK GREEN RED BLUE BLACK GREEN L1 L2 L3 L4 HARD WIRED CONNECTED AIRSTAR MODEL AS100 AS50 and AS70 Electrical Connections AS100 3-Phase Electrical Connections Pressure Switch Notes: 1. Use 18 Gauge, 4 conductor, interconnect cable between the AirStar unit and Remote Switch Panel. When any 24V circuit exceeds 150 feet, use #16 AWG. 2. As shown, 3 conductors of the 24V circuit cable from each compressor connect via the user-supplied interconnect cable. 3. The fourth conductor of interconnect cable to be used for future equipment options/enhancements. 4. Leave with factory connection, without a 24 V Switch, or connect the associated interconnect cable directly to remote switch. Please note that one switch is used for each compressor. From Electrical Box To Remote Panel Interconnect Cable Remote Panel White White BLU BLK BRN BLU ORN BRN BLK YEL 3 ORN 2 4 YEL BRN Yellow 2 Brown 4 See Note 4 Yellow 2 Brown 4 Orange 3 Orange 3 Future Use See Note 3 2 YEL 3 ORG 4 BRN Connection without 24 V Switch 24VDC Connections Figure 5. Airstar Electrical Connections Page 13
14 INSTALLATION INFORMATION POST INSTALLATION CHECK Make Sure Everything Is Running Properly After your AIRSTAR has been installed and before it is put into operation, be sure to follow the check-out procedure detailed below: Check that Intake Filter(s) are fully seated into the compressor head(s) and that the Tank Outlet Valve is closed. Turn on the electricity. Check the incoming line voltage. It should be at least 108 Volts for the AS10 and AS21; and 198 Volts for the AS12, AS22, AS30, AS40, AS50, AS70 and AS100. This voltage should remain at or above these levels while the AIRSTAR is running. If not, install the appropriate boost transformer and check that the correct main circuit breaker and wire size are being used. Check pump-up and recovery times as detailed below and compare to the times in the table. Turn on the AIRSTAR s power and determine the pump-up time from PSI. See the table below. Drain the storage tank to 80 PSI and determine the recovery time from 85 to 115 PSI. See the table below. Model Number of Motors/Heads Pump-up Time PSI Maximum Recovery Time PSI Maximum AS10 1/1 2 minutes, 55 seconds 48 seconds AS12 1/1 2 minutes, 55 seconds 48 seconds AS21 1/2 3 minutes, 10 seconds 47 seconds AS22 1/2 3 minutes, 10 seconds 47 seconds AS30 2/2 3 minutes, 10 seconds 47 seconds AS40 2/3 1 minute, 40 seconds 34 seconds AS50 2/4 2 minutes, 50 seconds 42 seconds AS70 3/6 2 minutes, 40 seconds 40 seconds AS100 2/8 2 minutes, 15 seconds 30 seconds If the recovery time differ as listed above, call authorized dealer for service. Page 14
15 TROUBLESHOOTING Problem Possible Cause Possible Solutions 1. Motor does not start. a. No electric power. a. Check circuit breaker at main power panel. b. Power not connected. b. Check 24 Volt remote connections. c. Defective circuit breaker. c. Circuit breaker needs to be replaced. Call your authorized Air Techniques dealer for service. 2. Motor tries to start, circuit breaker trips off. (* See bottom page 14) a. Voltage too low.if each compressor head runs separately,but will not run together, the voltage is too low. a. AS10 and AS21 require a minimum of 108 Volts. AS12, AS22, AS30, AS50, AS70 and AS100 require a minimum of 198 Volts. If the voltage is below the required minimum, a boost transformer must be installed. Call your authorized dealer. b. Power supply cable too small. b. See SITE REQUIREMENTS Table. c. Loose electrical connection. c. Call your authorized dealer for service. 3. Unusual noise. a. Intake filter(s) not seated correctly. a. Remove filter(s). Replace if clogged or dirty. When installing, make sure filter chamber is clean and rubber flange on top of filter is pushed all the way down into the metal cylinder b. Intake filter(s) clogged or dirty. b. Replace filter(s). ( PN 89831) c. Motor noise. c. Call your authorized dealer for service. d. Air leaks d. Call your authorized dealer for service. e. Check cooling fans e. If fan is loose or broken, call your authorized dealer for service. 4 Compressor cycles but no pressure buildup to 115 psi. a. Motor noise. a. Replace filter(s). ( PN 89831) b. Leak in compressor. b. Close the storage tank outlet valve. Check all fittings for leaks. If a leak is found, call your authorized dealer for service. c. Pressure switch needs to be adjusted. c. Disconnect the main power supply. Drain the storage tank slowly until a click is heard. Storage tank pressure should read 85 PSI on the pressure gauge. Close the tank outlet valve, turn on the power switch and verify the pump-up time for your model AirStar. Call your authorized dealer if the pump-uptime is incorrect. (See Post Installation Check for pump-up times.) Page 15
16 TROUBLESHOOTING Problem Possible Cause Possible Solutions 5. Compressor cycles even when there is no air demand from the operatory. 6. Moisture monitor is not blue (pink or white). a. Leak in the compressor. a. Disconnect the main power supply. Drain the storage tank slowly until a click is heard. Storage tank pressure should read 85 PSI on the pressure gauge. Close the tank outlet valve, turn on the power switch and verify the pumpup time for your model AirStar. Call your authorized Air Techniques dealer if the pump-uptime is incorrect. (See Post Installation Check for pump-up times.) b. Leak in the office air system. b. Look at the moisture monitor (see KEY PARTS to locate). If it is blue, perform the following: 1. With the AirStar s power switch ON, drain the storage tank to 85 PSI to start the compression cycle. 2. When the cycle shuts off at 115 PSI, close the storage tank outlet valve. 3. Wait 5 minutes and open the storage tank outlet valve. 4. If the pressure drops, the air leak is in the office air system or delivery units and not in the AirStar. Call your dealer or plumber for service. If it is pink, see #6 below a. Leak in the office air system. a. If the moisture monitor is pink, there is too much moisture in the system. Call your authorized Air Techniques dealer for service. b. Compressor keeps cycling. b. Check the SIZING GUIDE. There may be excessive air demands placed on the AirStar. A larger capacity model may be required. *DIAGNOSTIC PROCEDURE FOR DEFECTIVE COMPRESSOR HEAD(S) 1. Put power switches in the OFF position. 2. Reset the circuit breaker if it was previously tripped. 3. Test heads by turning ONE on at a time. If the motor fails to start, or the circuit breaker trips, the problem may be in that compressor head. Leave the power switch for the effective head in the OFF position. Call your Authorized Air Techniques dealer for service. NOTE: One head may be run TEMPORARILY while waiting for service. 4. If all heads run independently, but will not run together, check the line voltage. If the voltage is within the min./max. voltage required in PRODUCT SPECIFICATIONS, call your Authorized Air Techniques dealer for service. Page 16


17 MAINTENANCE Like all precision products, your AIRSTAR requires a certain amount of care on a regularly scheduled basis. A well-organized maintenance program aids dependable equipment operation and reduces problems to a minimum. Routine checks help to detect general overall wear, and replacement of parts can often be made before a problem occurs. Understanding this, we have established minimum maintenance requirements listed below that include routine inspections and the replacement of filters using preventive maintenance kits available for the specific AIRSTAR model. Adherence to this recommended maintenance schedule will ensure that the equipment will continue performing at its best with uninterrupted service. Routine Inspection - Monthly Clean exterior surfaces. Check for abnormal noises and air leaks. Make sure that no flammable, corrosive, or combustible materials are stored in the equipment room (especially in the area around the equipment). Check operational range of pressure switch is between psi. Inspect the Moisture Monitor (Figure 4) for a color change: Blue indicates that the air in the storage tank is dry. Pink indicates a high level of humidity is in the storage tank. See TROUBLESHOOTING page 14 to correct this situation. Note: To comply with NFPA 99C, a 5-micron Filter is installed on the output of all AIRSTAR models. Routine Inspection - Yearly Refer to Figure 4 and check the Service Indicator on the 5-micron Outlet Filter. Red indicates that the filter must be replaced P/N Green indicates No service is required. Service Indicator Moisture Monitor 5 Micron Filter Figure 6. Moisture Monitor and 5-Micron Filter Location Page 17


18 MAINTENANCE Important: In dusty environments, the Intake Filter, PN 89938, may need to be changed more often than once a year. Always dispose of the removed filter in accordance with local codes. Filter Replacement - Yearly Refer to Figure 5 for the location of filters to be replaced using the preventive maintenance kit for the specific AIRSTAR mode listed below. Replace the filters and associated O-rings in accordance with the instructions provided with the kit. Preventive Maintenance Kits Supplied Components AirStar Model AS10 & AS21, AS22 AS12 & AS30 AS40 AS50 AS70 AS100 Kit Part No R - See Table for Kit Quantities Component Part No. Qty Qty Qty Qty Qty Qty Compressor Air Intake Filter 89938R Top Membrane Filter Bottom Membrane Filter Top Cover O-ring Filter Bowl O-ring Compressor Air Intake Filters P/N 89938R (1 each cylinder head) Top Membrane Filter P/N Note: Top Cover O-ring, P/N 87368, is replaced with the Top Membrane Filter. See instructions provided with the kit. Membrane Dryer Bottom Membrane Filter P/N Note: Bottom Cover O-ring, P/N 85529, is replaced with the Bottom Membrane Filter. See instructions provided with the kit. Figure 7. AirStar Filter Location Page 18
19 MAINTENANCE SERVICE TIMER Alerts User to Perform Scheduled Maintenance The Service Timer is designed to track, in hours, the operating time of the AIRSTAR motors and alerts the user when regularly scheduled preventive maintenance is due. (See View A.) The typical interval between servicing is 1,000 hours of operation. The tracking is done by setting the timer to 1,000 hours at the start of each new service period and having the timer count down only during operation when the motors are working. When the Service Timer reaches 100 hours or less, a SVC DUE message appears (See View B.) once every minute to indicate it will soon be time to perform preventive maintenance. When the service timer has counted down 1,000 hours, a SVC NOW message flashes to indicate it is time to do preventive maintenance on your AIRSTAR. (See View C.) The Timer Display alternates between the service due and time remaining screens. Service Timer Mode Icon View A View B View C Timer Display Figure 8. Service Timer Warranty Indicator The Service Timer feature is included to help the user adhere to the recommended maintenance schedule provided in this manual. Timely performance of this maintenance ensures that your AIRSTAR will provide uninterrupted service and continue to perform at its best. The only user action necessary is as follows. 1. Perform the preventive maintenance when alerted. 2. Reset the Service Timer for the next service interval. Refer to the table below summarizing the Service Timer functions as necessary. Mode Button Timer Display: When set in the Hour Meter Mode, shows the total number of operating hours the unit has run. (See View A.) Displays service alerts in SVC DUE Mode when timer reaches the 100 and 1000 hour default intervals. (See Views B and C.) NOTE: The Mode Icon blinks when Mode Button is pressed. Mode Button: Allows selection between the Hour Meter Mode and the SVC DUE Mode. 1. When in SVC DUE Mode, press the Mode Button once to return to the Hour Meter Mode. 2. Resets service timer when held down for 6 seconds. Warranty (dot) Indicator: NOTE: The dot indicator appears only after the first 2 hours of running time. (See View A.) The Warranty Indicator is the dot in the lower right hand corner that tracks the warranty period. When blinking, the until is still within the 5,000 hours warranty period. The 5,000 hours warranty period has elapsed if the dot is solid (stops blinking). Page 19
20 REPLACEMENT PARTS Description Part No. 5 Micron Replacement Filter Preventive Maintenance Kits AirStar Model Kit Part No. AS10 & AS AS21 AS22 AS AS AS AS AS OPTIONAL ACCESSORIES Description Model Part Number REMOTE AIR INTAKE KIT AirStar 10 & 12 AirStar 21, 22, 30 AirStar 40 AirStar 50 AirStar 70 AirStar REMOTE CONTROL PANEL w/24 V switches 1-Switch Plate Kit 2-Switch Plate Kit 3-Switch Plate Kit 4-Switch Plate Kit SOUND COVER For all AirStars AirStar 10 AirStar 12 AirStar 21 AirStar 22 AirStar 30 AirStar 40 AirStar 50 AirStar M M 85963M 87440M 89523M 89574M Page 20
21 PRODUCT SPECIFICATIONS Requirement AirStar Model AS10 AS12 AS21 AS22 AS30 AS40 AS50 AS70 AS100 Phase Φ Horsepower Kilowatts Voltage Rating Frequency (Hz) Maximum Number of Simultaneous Air Users CFM (Cubic 80 psi Pump-up Time PSI 2 min, 55 secs 2 min, 55 secs 3 min, 10 secs 3 min, 10 secs 3 min, 10 secs 1 min, 40 secs 2 min, 50 secs 2 min, 40 secs 2 min, 30 secs Recovery Time PSI (seconds) Tank Size (cu. ft.) (US Gal.) Shipping Weight (Approximate lbs) No Sound Cover With Sound Cover N/A N/A Dimensions (inches) No Sound Cover With Sound Cover H W D H W D N/A N/A N/A Page 21
22 WARRANTY AS10, AS12, AS21, AS22, AS30, Each AIRSTAR is warranted to be free from defects in material and workmanship from the date of installation for a period as follows: Full System Warranty: 2 years (24 months) or 2,000 hours. Specific Component Warranty: 5 years (60 months) or 5,000 hours Whichever comes first on all motors, heads, PCBs and membrane dryers.* *For eligibility customer must provide confirmation in the form of a dealer invoice to the dentist that preventative maintenance kit or coalescent filter was installed on the unit within two thousand (2,000) hours or latest after twenty four (24) months of failure (whichever comes first). (PINs & 87367). All part and component returns and replacement equipment require a Return Materials Authorization (RMA). Returns must be received within three months of the RMA issue date and in appropriate packaging to prevent shipping damage. In case of advanced replacement, products shall be returned in the original packaging. Items returned without an RMA, or included with other products for which an RMA has been issued, will be returned to the customer at the discretion of ; the return shipping is the customer's responsibility. Any item returned under warranty, will be repaired or replaced at our option at no charge provided that our inspection confirms it to be defective. is not liable for indirect or consequential damages or loss of any nature in connection with this equipment. Dealer labor, shipping and handling charges are not covered by this warranty. Warranty credit will not be applied to product returns that exhibit damage due to shipping, misuse, careless handling, and improper installation by dealers, or repairs by unauthorized personnel. Credit, or partial credit, will not be issued until products/parts have been received and assessed. If, after the evaluation it is determined that there is no-fault found and the unit is working properly, a credit will not be issued. Warranty is void if product is installed incorrectly or installed or serviced by anyone other than an authorized Air Techniques' dealer or service personnel. This warranty is in lieu of all other warranties expressed or implied. No representative or person is authorized to assume for us any liability in connection with the sale of our equipment. ON-LINE WARRANTY REGISTRATION Quickly and easily register your new AIRSTAR on-line. Just have your product model and serial numbers available. Then go to the Air Techniques web site, click the warranty registration link and complete the registration form. This on-line registration ensures a record for the warranty period and helps us keep you informed of product updates and other valuable information. Page 22
23 NOTES Page 23

24 For over 50 years, Air Techniques has been a leading innovator and manufacturer of dental products. Our priority is ensuring complete satisfaction by manufacturing reliable products and providing excellent customer and technical support. Whether the need is digital imaging, utility room equipment or merchandise, Air Techniques can provide the solution via our network of authorized professional dealers. Proudly designed, tested and manufactured in the U.S., our products are helping dental professionals take their practices to the next level. Air Techniques family of quality products for the dental professional include: Digital Imaging Digital Radiography Intraoral Camera Caries Detection Aid Intraoral X-ray Panoramic X-ray Film Processors Utility Room Dry Vacuums Wet Vacuums Air Compressors Amalgam Separator Utility Accessories Utility Packages Merchandise Surface Disinfectant Enzymatic Cleaner Hand Sanitizer and Lotion Waterline Cleaner Evacuation System Cleaner Imaging Accessories Chemistry Processor Accessories Corporate Headquarters 1295 Walt Whitman Road Melville, New York Phone: Fax: Western Facility 291 Bonnie Lane, Suite 101 Corona, CA Phone: Fax: AirStar is a registered trademark of Copyright 2009 P/N 87109, Rev. R October 2017
DENTAL AIR SYSTEM. Installation and Operation Manual
 DENTAL AIR SYSTEM Installation and Operation Manual TABLE OF CONTENTS Section SAFETY INSTRUCTIONS Use of the AirStar not in conformance with the instructions specified in this manual may result in permanent
INSTALLATION and OPERATION INSTRUCTIONS
 Part Numbers: 54580 and 54580-2 Part Number 54580 Shown OUT IN INSTALLATION and OPERATION INSTRUCTIONS TABLE OF CONTENTS Section Page Warranty.... 2 General Information.... 3 Introduction..... 3 System
Installation and Operation Manual
 DENTAL VACUUM SYSTEM Installation and Operation Manual RECOMMEND DAILY USE OF MONARCH CLEANSTREAM TABLE OF CONTENTS Section Page Congratulations.... 3 Purpose of this Manual.... 3 Warranty.............................................................4
PRE-INSTALLATION GUIDE
 Dry Vacuum System Part Numbers V3, V5, V7, 2V3, 2V3CT, 2V5, 2V5CT, 2V7, 3V5 and 4V5 PRE-INSTALLATION GUIDE All pumps comply with NFPA 99C level 3 requirements. All installations must conform to local codes.
Dry Vacuum System. Part Numbers: V15, 2V15, 3V15 and 4V15 USER S MANUAL. Recommend Daily use of Monarch CleanStream
 Dry Vacuum System Part Numbers: V15, 2V15, 3V15 and 4V15 USER S MANUAL Recommend Daily use of Monarch CleanStream TABLE OF CONTENTS Description Page Congratulations...3 Purpose of this Manual....3 Safety
ClassicSeries Compressor Installation
 ClassicSeries Compressor Installation Applies to Models: CL21-115 Volts CL22, CL32, CL52-208- 230 Volts Equipment Alert Compressor system must be installed per local plumbing and electrical codes. Note:
PARTS CATALOG EQUIPMENT ACCESSORIES
 PARTS CATALOG 2 0 1 8 D I G I T A L EQUIPMENT ACCESSORIES EQUIPPED FOR LIFE WITH AIR TECHNIQUES Dear Valued Customer: This year, we look forward to a year of growth through our best-in-class sales organization.
PowerAir Compressor Installation
 PowerAir Compressor Installation Applies to Models: P21-115 Volts P22, P32-230 Volts P52, P72-230 Volts Equipment Alert Compressor system must be installed per local plumbing and electrical codes. Model
User s and Installation Manual
 Dry Vacuum System Part Numbers V3, V5, V7, 2V3, 2V3CT, 2V5, 2V5CT, 2V7, 3V5 and 4V5 User s and Installation Manual We Recommend Daily use of Monarch CleanStream TABLE OF CONTENTS Description Page Congratulations...4
Dental Compressed Air System
 Part No. CI-101A (Rev B) Dental Compressed Air System Installation/User Guide Operation & Maintenance Manual Registered Trademark/ Trademark of JUN-AIR Inc. Copyright 2011 JUN-AIR Manufacturing Inc. All
Automatic Burnout Furnaces 115 to 230-volt Models OPERATOR S MANUAL
 Automatic Burnout Furnaces 115 to 230-volt Models OPERATOR S MANUAL TABLE OF CONTENTS Introduction...3 Warranty...3 On-Line Warranty Registration...3 Safety Instructions........................................................3
IMAGING UTILITY ROOM ACCESSORIES
 IMAGING UTILITY ROOM ACCESSORIES PARTS CATALOG 2014 Equipped for Life with Air Techniques Dear Valued Customer: At Air Techniques, we are focused on high quality products, innovative new technology and
AirStar Tandem Installation Kit Part Number 85694
 Tandem Installation Kit Part Number 8569 Kit Parts Supplied Part No. Description Quantity 60510 10 PSI Safety Relief Valve 866 85-115 psi 1 85686 Installation Schematic for two Tandem compressors 1 System
Part Numbers: A1250 and A1350 INSTRUCTION MANUAL
 Part Numbers: A1250 and A1350 INSTRUCTION MANUAL TABLE OF CONTENTS Section Page Introduction.......................................................................... 3 Safety Notice.........................................................................
INSPECTOR LINE LOAD SIMULATOR INSTRUCTION MANUAL TASCO, INC.
 INSPECTOR LINE LOAD SIMULATOR INSTRUCTION MANUAL INS120P TASCO, INC. THIS TESTER IS DESIGNED FOR USE ONLY BY QUALIFIED ELECTRICIANS. IMPORTANT SAFETY WARNINGS mwarning Read and understand this material
Dental Dry Suction. Installation/User Guide
 Dental Dry Suction System Installation/User Guide Operation & Maintenance Manual Registered Trademark/ EcoPowerVac Trademark of Omxie Corp. Copyright 2017. All Rights Reserved. WWW.SMTMAX.com. 1 P a g
Infinity Burnout Furnaces
 Infinity Burnout Furnaces 115V, 60Hz Models TM OPERATOR S MANUAL P TABLE OF CONTENTS Introduction...2 Warranty...2 On Line Warranty Registration....2 Safety Instructions............................................................2
OPERATION and MAINTENANCE INSTRUCTION MANUAL. AA-98 AirPac II Compressor 110V
 OPERATION and MAINTENANCE INSTRUCTION MANUAL AA-98 AirPac II Compressor 110V TABLE OF CONTENTS: Rules For Safe Operation.........1 Introduction....................2 Package Contents...............2 Set
INSTALLATION AND OPERATING INSTRUCTIONS OF THE INTERNATIONAL ISOBOX SERIES ISOLATION TRANSFORMERS.
 INSTALLATION AND OPERATING INSTRUCTIONS OF THE INTERNATIONAL ISOBOX SERIES ISOLATION TRANSFORMERS. Before installing and/or using this product, please check for any visual damage of the enclosure, power
OBE, OBEXU, ON BOARD Battery Chargers
 C O R P O R A T IO N O P E R A T I N G I N S T R U C T I O N S OBE, OBEXU, ON BOARD Battery Chargers INTRODUCTION: These chargers are designed for the permanent installation on battery powered vehicles
Operator's Manual. Storage System. Ultrasound Probe Cabinet. Manufactured by:
 Storage System Ultrasound Probe Cabinet Operator's Manual Manufactured by: CIVCO Medical Solutions 102 First Street South Kalona, IA 52247 USA 319.248.6757 / 800.445.6741 WWW.CIVCO.COM Copyright 2018 All
OBAE, OBAEXU, ON BOARD Battery Chargers
 C O R P O R A T IO N O P E R A T I N G I N S T R U C T I O N S OBAE, OBAEXU, ON BOARD Battery Chargers INTRODUCTION: The OBAE line of chargers are designed for the permanent installation on battery powered
INSTALLATION AND OPERATING INSTRUCTIONS OF THE INTERNATIONAL ISOBOX SERIES ISOLATION TRANSFORMERS.
 INSTALLATION AND OPERATING INSTRUCTIONS OF THE INTERNATIONAL ISOBOX SERIES ISOLATION TRANSFORMERS. Before installing and/or using this product, please check for any visual damage of the enclosure, power
P. D. Q. Automatic Burnout Furnaces. 115 and 230-volt Models OPERATOR S MANUAL
 P. D. Q. Automatic Burnout Furnaces 115 and 230-volt Models OPERATOR S MANUAL TABLE OF CONTENTS Introduction... 3 Warranty... 3 Safety Instructions........................................................
Operating Instructions for PAC800 Battery Charger
 Operating Instructions for PAC800 Battery Charger General Safety The charger may only be used for the specified battery types. This battery charger is supplied with pre-set charging curves that are adapted
Blue Air. Commercial Refrigeration Inc. Installation & Operation Manual Chef Bases
 Blue Air Commercial Refrigeration Inc. Installation & Operation Manual Chef Bases Please read this manual completely before installing or operating this unit! BACB53 BACB71 BACB74 BACB83 BACB86 BACB96
INSTALLATION INSTRUCTIONS
 INSTALLATION INSTRUCTIONS Universal Air Series!! NOTE!! Covers the following model: 6000 Series 85-0100B-AZ Rev 0 5/07 To ensure that the system is installed properly, provide your electrician with these
Installation and Operating Manual
 Model u002 & u003 Installation and Operating Manual Ultrasonic Level Switch 60 Great Hill Road Naugatuck, CT 06770 ph: 203-729-6434 fax: 203-729-6696 www.innovativesensing.com Read this Manual Before Installing
Nature Power Inverters. True Sinewave Inverter Modified Sinewave Inverter. Owner s Manual
 Version 1.1 Version 2 Nature Power Inverters True Sinewave Inverter Modified Sinewave Inverter Owner s Manual!!!!!!!!!!! 38304 38204 For safe and optimum performance, the Power Inverter must be used properly.
Battery Charger Retrofit Kit Q-DCCHG1 for DC Cabinet Retrofit Manual
 Battery Charger Retrofit Kit Q-DCCHG1 for DC Cabinet Retrofit Manual 25500181 Rev. A0 415 Printed in U.S.A. Copyright 2015 Federal Signal Corporation Limited Warranty The Alerting and Notification Systems
model ps600 Address all communications and shipments to: FEDERAL SIGNAL CORPORATION
 MODEL: PS600 HZ: 60 A model ps600 installation and service manual for federal model ps600 FEDERAL SIGNAL CORPORATION POWER SUPPLY VOLTS: SERIES: 120VAC FEDERAL SIGNAL CORPORATION UNIVERSITY PARK, IL. U.S.A.
Dimensions 12/800N 12/1200N D. DC to AC Power Inverters. OWNERS MANUAL for Models: OWNERS MANUAL April ISO 9001:2000 Certified Company
 Manufacturer of Dimensions Inverters 4467 White Bear Parkway St. Paul, MN 55110 Phone: 651-653-7000 Fax: 651-653-7600 E-mail: inverterinfo@sensata.com Web: www.dimensions.sensata.com OWNERS MANUAL April
DCell Suction. Model DM Operating Instructions & Maintenance Manual. Clearing The Airway Is Our #1 Priority
 DCell Suction Model DM10-001 Clearing The Airway Is Our #1 Priority Operating Instructions & Maintenance Manual, INC. 11064 Randall Street Sun Valley, CA 91352 USA www.sscor.com Email: marketing@sscor.com
Owner's/Installation Manual
 Owner's/Installation Manual Power Management Module (PMM) and Starter Kit NOTE: The starter kit must be purchased and installed prior to individual PMM usage. Model Numbers: 00686-0 PMM 00699-0 PMM WITH
Please Read this manual before operating your UltraRide Suspension, and keep it for future reference.
 OWNER S MANUAL Model # 800M1300 Lot/Serial # Questions? Contact this Professional Installer : Company : Phone : ELECTRONIC AIR CONTROL KIT Installer : Date : MN-769 80003011 MAR 20, 2013 Please Read this
ACC Series Power Conditioner OPERATION & INSTALLATION MANUAL
 ACC Series Power Conditioner OPERATION & INSTALLATION MANUAL PHASETEC digital power conditioners are designed to safely operate electrical equipment in the harshest power quality environments. With a wide
QSSE, QSSEX INDUSTRIAL Battery Chargers
 C O R P O R A T IO N O P E R A T I N G I N S T R U C T I O N S QSSE, QSSEX INDUSTRIAL Battery Chargers INTRODUCTION The QSE line are electronically controlled float chargers. The batteries are brought
Installation and Service Manual for SRC25, SRC252, SRC50, SRC502, SRC75, SRC752
 Rocking Piston Compressors Installation and Service Manual for SRC25, SRC252, SRC50, SRC502, SRC75, SRC752 Thank you for purchasing the Stratus SRC series rocking piston compressor. This instruction manual
SUBMERSIBLE SUMP PUMPS
 SUBMERSIBLE SUMP PUMPS Zoeller is a registered trademark of Zoeller Co. All Rights Reserved. MODEL #1099-0001 Español p. 11 ATTACH YOUR RECEIPT HERE Serial Number Purchase Date Questions, problems, missing
OWNER S MANUAL SELF-PRIMING PORTABLE UTILITY PUMP
 Model 54011-0 OWNER S MANUAL SELF-PRIMING PORTABLE UTILITY PUMP Questions, problems, missing parts? Before returning to the store call AQUAPRO Customer Service 8 a.m. - 5 p.m., EST, Monday-Friday 1-844-242-2475
Quickdraw. Model 2400 Series. Operating Instructions & Maintenance Manual. Clearing The Airway Is Our #1 Priority
 Quickdraw Model 2400 Series Clearing The Airway Is Our #1 Priority Operating Instructions & Maintenance Manual, INC. 11064 Randall Street Sun Valley, CA 91352 USA www.sscor.com Email: marketing@sscor.com
Power Inverter 400 MW Owner s Manual
 Power Inverter 400 MW 1204 Owner s Manual For safe and optimum performance, the Power Inverter must be used properly. Carefully read and follow all instructions and guidelines in this manual and give special
ADI-125/750 ADI-125/1500 ADI-125/2500
 Manufacturer of Dimensions TM Inverters 4467 White Bear Parkway St. Paul, MN 55110 Phone: 651-653-7000 Fax: 651-653-7600 E-mail: inverterinfo@sensata.com Web: www.dimensions.sensata.com 121094B OWNERS
6L Oil-less Air Compressor 53103
 6L Oil-less Air Compressor 53103 Operating Instructions Please read and save these instructions before attempting to assemble, install, operate or maintain the product. Protect yourself and others by observing
DC to AC Power Inverters
 Manufacturer of Dimensions TM Inverters 4467 White Bear Parkway St. Paul, MN 55110 Phone: 651-653-7000 Fax: 651-653-7600 E-mail: inverterinfo@sensata.com Web: www.dimensions.sensata.com ISO 9001:2000 Certified
INSTRUCTIONS FOR THE RELIANCE Fast/Tran TM ARL0909 & ARL0909R
 INSTRUCTIONS FOR THE RELIANCE Fast/Tran TM ARL0909 & ARL0909R THE RELIANCE Fast/Tran IS NOT FOR "DO-IT-YOURSELF" INSTALLATION. It must be installed by a qualified electrician thoroughly familiar with all
MIL-24/2600Q MIL-24/3200DQ
 Manufacturer of Dimensions TM Inverters 4467 White Bear Parkway St. Paul, MN 55110 Phone: 651-653-7000 Fax: 651-653-7600 E-mail: inverterinfo@sensata.com Web: www.dimensions.sensata.com 121473B OWNER'S
Installation & Operation Manual Chef Base
 Installation & Operation Manual Chef Base Please read this manual completely before installing or operating this unit! BACB53 BACB53M BACB71 BACB71M BACB74 BACB74M BACB83 BACB83M BACB86 BACB86M BACB96
The Power of Reliability INSTRUCTION MANUAL
 The Power of Reliability INSTRUCTION MANUAL SAFETY & WARNINGS Read this manual carefully and understand all Warnings and Cautions before connections are made to the Inverter. If unsure about any aspects
SPECIFICATIONS Horsepower: 1.5 HP Running Maximum PSI: 125 PSI Tank Capacity: 15 Gallons CFM: 6 40 PSI 5 90 PSI
 15 GALLON AIR COMPRESSOR Model: 7678 DO NOT RETURN TO STORE Please call 800-348-5004 for parts and service CALIFORNIA PROPOSITION 65 WARNING: You can create dust when you cut, sand, drill or grind materials
DC to AC Power Inverters
 Manufacturer of Dimensions TM Inverters 4467 White Bear Parkway St. Paul, MN 55110 Phone: 651-653-7000 Fax: 651-653-7600 E-mail: inverterinfo@sensata.com Web: www.dimensions.sensata.com 121114C OWNERS
Installation, Operation and Maintenance Manual Stancor SSD & SL Series Pumps
 Installation, Operation and Maintenance Manual Stancor SSD & SL Series Pumps EI-700-008 Rev -- Table of Contents Safety Guidelines 3 Caution 4 Wiring 4 Maintenance 4 Nameplate format 4 Prior to Operation
User Manual ELECTRICAL VEHICLE CHARGING STATION LEVEL 2 EVC30T/EVC30T-IN
 User Manual ELECTRICAL VEHICLE CHARGING STATION LEVEL 2 EVC30T/EVC30T-IN ELMEC Inc. Rev.: June 2016 TABLE OF CONTENTS Overview (Models 4, 5, 30 and 31) 2 Parts List 3 Operation Sequence 10 Operating Modes
MEDICAL IRRIGATION K PUMP OPERATING MANUAL: Manufactured for: K.M.I 3185 Palisades Dr Corona CA USA Model No.
 OPERATING MANUAL: MEDICAL IRRIGATION K PUMP Manufactured for: K.M.I 3185 Palisades Dr Corona CA 92880-9432 USA 1-866-412-7867 Model No. 1000-0031 A-1299-5091 Edition 01 TABLE OF CONTENTS Title SAFETY PRECAUTIONS
PowerMax Surgical Suction Producers
 PowerMax Surgical Suction Producers Models: PM-1, PM-3, PM-4 Installation & Operation 10496800 Rev. B Table of Contents Section 1 About PowerMax...1 Section 2 Specifications & Model Selection...3 2.1
Technical Manual. DLM Module. This manual should remain with the unit.
 Technical Manual DLM Module This manual should remain with the unit. Safety Rules SAVE THESE INSTRUCTIONS! Read the following information carefully before attempting to install, operate or service this
U00X ULTRASONIC LEVEL SWITCH. Ultrasonic Liquid Level Switches INSTALLATION AND OPERATIONS MANUAL. For Models: U002, U003 & U004
 U00X ULTRASONIC LEVEL SWITCH INSTALLATION AND OPERATIONS MANUAL Ultrasonic Liquid Level Switches For Non-Hazardous Locations For Models: U002, U003 & U004 READ THIS MANUAL PRIOR TO INSTALLATION This manual
ACCUSENSE CHARGE SERIES ON/OFF BOARD FULLY AUTOMATIC BATTERY CHARGER
 ACCUSENSE CHARGE SERIES ON/OFF BOARD FULLY AUTOMATIC BATTERY CHARGER SPECIFICATIONS: *Photo for reference only* Part number 8890439 Mode Select: Selects Battery Type Refer to Section 6. IMPORTANT: READ
Electrical Installation
 Electrical Installation Symmetra LX Tower UPS Models 200 V, 4-8 kva 208/240 V, 4-8 kva 220/230/240 V, 4-8 kva 200 V, 4-16 kva 208/240 V, 4-16 kva 220/230/240 V, 4-16 kva Important Safety Messages SAVE
SLA Battery Capacity Analyzer
 Model: 600B SLA Battery Capacity Analyzer USER MANUAL Safety Summary The following safety precautions apply to both operating and maintenance personnel and must be followed during all phases of operation,
Digital Apex Locator. ipex OPERATION MANUAL OM-E0285E
 Digital Apex Locator ipex OPERATION MANUAL 0197 OM-E0285E The EU directive 93/42/EEC was applied in the design and production of this medical device. Thank you for purchasing the ipex. This is apex locator.
INSTRUCTIONS FOR THE RELIANCE CONTROLS ARM SERIES AUTOMATIC TRANSFER SWITCH
 INSTRUCTIONS FOR THE RELIANCE CONTROLS ARM SERIES AUTOMATIC TRANSFER SWITCH THE RELIANCE CONTROLS ARM SERIES AUTOMATIC TRANSFER SWITCH IS NOT FOR "DO-IT-YOURSELF" INSTALLATION. It must be installed by
QPET, QPETXU Battery Chargers
 C O R P O R A T IO N O P E R A T I N G I N S T R U C T I O N S QPET, QPETXU Battery Chargers INTRODUCTION: The QPET line of chargers are designed for general purpose deep cycle batteries. They are an electronically
4" ENVIRONMENTAL E-SERIES PUMPS OWNER'S MANUAL. DANGER warns about hazards that will cause. WARNING warns about hazards that can cause
 4" ENVIRONMENTAL E-SERIES PUMPS OWNER'S MANUAL BEFORE INSTALLING PUMP, BE SURE TO READ THIS OWNER S MANUAL CAREFULLY. CAUTION Fill pump with water before starting or pump will be damaged. The motor on
Electronically Commutated Motors
 Electronically Commutated Motors INSTALLATION, OPERATION & MAINTENANCE MANUAL IM-4055 September 2016 Throughout this manual, there are a number of HAZARD WARNINGS that must be read and adhered to in order
ACCESSORY KIT INSTALLATION INSTRUCTIONS
 ACCESSORY KIT INSTALLATION INSTRUCTIONS Low Ambient Accessory For Air Cooled Split-System Air Conditioners YD360/480/600, YJ-30/-40/-50 and J30/40/50 YD Models 642546-UAI-A-080 GENERAL Standard operation
dv Sentry TM 208V 600V INSTALLATION GUIDE Quick Reference ❶ How to Install Pages 6 14 ❷ Startup/Troubleshooting Pages WARNING
 dv Sentry TM 208V 600V INSTALLATION GUIDE FORM: DVS-IG-E REL. January 2018 REV. 003 2018 MTE Corporation High Voltage! Only a qualified electrician can carry out the electrical installation of this filter.
INSTALLATION INSTRUCTIONS
 INSTALLATION INSTRUCTIONS Universal Air Series!! NOTE!! Covers the following models: 9000 Series 6000 Series To ensure that the system is installed properly, provide your electrician with these instructions.
1000 Watt Power Inverter INSTRUCTION MANUAL HT87112-AUOXY
 1000 Watt Power Inverter INSTRUCTION MANUAL HT87112-AUOXY CONTENTS Warranty 2 Introduction 3 Environmental protection 3 Specifications 3 General safety warnings and instructions 4 Important safety instructions
OWNERS MANUAL JANUARY 2007 ISO
 Manufacturer of Dimensions TM Inverters 4467 White Bear Parkway St. Paul, MN 55110 Phone: 651-653-7000 Fax: 651-653-7600 E-mail: inverterinfo@sensata.com Web: www.dimensions.sensata.com 121231B OWNERS
SUBMERSIBLE SUMP PUMPS
 SUBMERSIBLE SUMP PUMPS Zoeller is a registered trademark of Zoeller Co. All Rights Reserved. MODELS #1073-0001, 1075-0001 Español p. 9 ATTACH YOUR RECEIPT HERE Serial Number Purchase Date Questions, problems,
PBA Series Prelube Controls
 VARNA Products Engineered Innovation PBA Series Prelube Controls Simple, Compact, Industrial Full featured control for running prelube from the control or from a remote station Easy internal wiring connections
Podiatry Procedures Chair. For Models: Barrier-Free. User s Guide
 Podiatry Procedures Chair For Models: 646 647 Barrier-Free User s Guide Product Information (The information below is required when calling for service.) Dealer : Date of Purchase: Model / Serial Number:
XENON POWER SUPPLY 4000 Watt Gladiator IV
 XENON POWER SUPPLY 4000 Watt Gladiator IV 220 Volt Equipment Type 62-00049 Rev. February 2003 STRONG INTERNATIONAL a division of Ballantyne of Omaha, Inc. 4350 McKinley Street Omaha, Nebraska 68112 USA
CurrentGuard. CurrentGuard. CurrentGuard. Plus. Surge Protective Devices. Installation,Operation and Maintenance Manual PN
 Installation,Operation and Maintenance Manual PN 750-0098-001 CurrentGuard CurrentGuard Plus Surge Protective Devices CurrentGuard CurrentGuard and CurrentGuard Plus Installation, Operation and Maintenance
User s Manual. Automatic Switch-Mode Battery Charger
 User s Manual Automatic Switch-Mode Battery Charger IMPORTANT Read, understand, and follow these safety rules and operating instructions before using this battery charger. Only authorized and trained service
Model 8144NC Fresh Air Ventilator
 Model 8144NC Fresh Air Ventilator Installation and Operating Instructions MOUNTING BRACKETS WIRE ENTRY LOCATION INTEGRAL PRESSURE PORTS (PORT ON INLET SIDE NOT SHOWN) OVAL OUTLET COLLAR FOR 6" DIAMETER
USER GUIDE TURBOCORD TM PORTABLE CHARGER 240V. AeroVironment EV Solutions
 USER GUIDE TURBOCORD TM PORTABLE CHARGER 240V AeroVironment EV Solutions 2013 AeroVironment, Inc. All rights reserved. AeroVironment, EV Solutions, and the AeroVironment logo are trademarks of AeroVironment,
COLT CELL BATTERY CHARGER Installation and Operating Instructions
 COLT CELL BATTERY CHARGER Installation and Operating Instructions INSTALLATION All COLT chargers are for indoor use only. All COLT chargers are designed for installation into the battery tray. Charging
Matrix APAX. 380V-415V 50Hz TECHNICAL REFERENCE MANUAL
 Matrix APAX 380V-415V 50Hz TECHNICAL REFERENCE MANUAL WARNING High Voltage! Only a qualified electrician can carry out the electrical installation of this filter. Quick Reference ❶ Performance Data Pages
Model 2310 Series. Operating Instructions & Maintenance Manual. Clearing The Airway Is Our #1 Priority
 VX-2 Model 2310 Series Clearing The Airway Is Our #1 Priority Operating Instructions & Maintenance Manual, INC. 11064 Randall Street Sun Valley, CA 91352 USA www.sscor.com Email: marketing@sscor.com techsupport@sscor.com
Scale Feeder Manifold Water Filtration System Instruction Manual
 3M TM Water Filtration Products Scale Feeder Manifold Water Filtration System Instruction Manual For SF1XX High Flow Series Water Filtration Systems Installer: Please leave this manual with owner/operator.
U00X ULTRASONIC LEVEL SWITCH. Ultrasonic Liquid Level Switches INSTALLATION AND OPERATIONS MANUAL. For Models: U002, U003 & U004
 U00X ULTRASONIC LEVEL SWITCH INSTALLATION AND OPERATIONS MANUAL Ultrasonic Liquid Level Switches For Non-Hazardous Locations For Models: U002, U003 & U004 READ THIS MANUAL PRIOR TO INSTALLATION This manual
VANGUARD A EZ INSTALL OPERATOR S MANUAL
 Parker Hannifin Corporation Porter Instrument Division 245 Township Line Rd. P.O. Box 907 Hatfield, PA 19440-0907 USA (215) 723-4000 / fax (215) 723-5106 VANGUARD A EZ INSTALL OPERATOR S MANUAL FM-1145
PowerOhm Installation Manual for LG ATV Series Braking Modules
 PowerOhm Installation Manual for LG ATV Series Braking Modules IMPORTANT: These instructions should be read thoroughly before installation. All warnings and precautions should be observed for both personal
Enclosed Electric Rotary Screw Compressor Installation Guide
 Enclosed Electric Rotary Screw Compressor Installation Guide Air compressors should only be installed trained installation personnel call 800-531-9656 to find a local trained. Warning: Read all installation
Installation & Maintenance of the Fresh-Aire UV Airborne Duct System for Commercial HVAC Systems. Parts Included. Optional Parts
 Installation & Maintenance of the Fresh-Aire UV Airborne Duct System for Commercial HVAC Systems The Fresh-Aire UV Airborne Duct System is designed for installation into commercial HVAC system ducts for
8 Light Controller. Instruction Manual. With Light Timer 240 Volts. Product # INNOVATING SINCE 1995
 8 Light Controller With Light Timer 240 Volts Product #703008 Instruction Manual INNOVATING SINCE 1995 1 www.titancontrols.net 8 Light Controller This manual covers the following: Warnings & Cautions 8
MAINFRAME HOT RUNNER TEMPERATURE CONTROL SYSTEMS. Instruction Manual
 MAINFRAME HOT RUNNER TEMPERATURE CONTROL SYSTEMS Instruction Manual Copyright, Athena Controls, Inc., 2006 Printed in USA CompuStep is a registered trademark of Athena Controls, Inc. SafeChange is a trademark
Installation and Operating Instructions. MPPT Solar System Controller ISC3040
 Installation and Operating Instructions MPPT Solar System Controller ISC3040 ABOUT THIS MANUAL These operating instructions come with the product and should be kept with it as a reference to all user s
Utility Distribution Systems Installation, Operation, and Maintenance Manual
 Utility Distribution Systems Installation, Operation, and Maintenance Manual RECEIVING AND INSPECTION Upon receiving unit, check for any interior and exterior damage, and if found, report it immediately
M-3025CB-AV Fuel Pump
 SAVE THESE INSTRUCTIONS M-3025CB-AV Fuel Pump Owner s Manual TABLE OF CONTENTS General Information... 2 Safety Instructions... 2 Installation... 3 Operation... 4 Maintenance... 4 Repair... 5 Troubleshooting...
miconverter 18-Module Rack-Mount Power Chassis User Manual 38 Tesla, Irvine, CA USA Phone: (949) ; Fax: (949) Page 12
 ; Fax: (949) Page 12") miconverter 18-Module Rack-Mount Power Chassis User Manual Page 12 38 Tesla, Irvine, CA 92618 USA Phone: (949) 250-6510; Fax: (949) 250-6514 General and Copyright Notice This publication is protected by
miconverter 18-Module Rack-Mount Power Chassis User Manual Page 12 38 Tesla, Irvine, CA 92618 USA Phone: (949) 250-6510; Fax: (949) 250-6514 General and Copyright Notice This publication is protected by
OWNERS MANUAL JANUARY 2007 ISO
 Manufacturer of Dimensions TM Inverters 4467 White Bear Parkway St. Paul, MN 55110 Phone: 651-653-7000 Fax: 651-653-7600 E-mail: inverterinfo@sensata.com Web: www.dimensions.sensata.com OWNERS MANUAL JANUARY
M T E C o r p o r a t i o n MATRIX FILTER. SERIES B Volts, 50HZ USER MANUAL PART NO. INSTR REL MTE Corporation
 M T E C o r p o r a t i o n MATRIX FILTER SERIES B 380-415 Volts, 50HZ USER MANUAL PART NO. INSTR - 015 REL. 060628 2006 MTE Corporation IMPORTANT USER INFORMATION NOTICE The MTE Corporation Matrix Filter
Installation and Operating Instructions. Solar System Controller ISC3020
 Installation and Operating Instructions Solar System Controller ISC3020 ABOUT THIS MANUAL These operating instructions come with the product and should be kept with it as a reference to all user s of
High Frequency SineWave Guardian TM
 High Frequency SineWave Guardian TM 380V 480V INSTALLATION GUIDE FORM: SHF-IG-E REL. January 2018 REV. 002 2018 MTE Corporation High Voltage! Only a qualified electrician can carry out the electrical installation
Blue Air. Commercial Refrigeration Inc. Installation & Operation Manual Glass Door Countertop Refrigerator
 Blue Air Commercial Refrigeration Inc. Installation & Operation Manual Glass Door Countertop Refrigerator Please read this manual completely before installing or operating this unit! BAGR7 Blue Air reserves
Dual/Triple Manifold Water Filtration Systems Instruction Manual
 3M TM Water Filtration Products Dual/Triple Manifold Water Filtration Systems Instruction Manual High Flow Series Water Filtration Systems Installer: Please leave this manual with owner/operator. 3M Water
Helios. 24 Light 240 Volt Controller. PRODUCT # Instruction Manual.
 Helios 14 24 Light 240 Volt Controller PRODUCT # 702832 Instruction Manual www.titancontrols.net Warnings & Cautions Helios 14 Lighting Controller Overview Instructions for Operation Troubleshooting Tips