OPERATOR S MANUAL SMARTIRE TIRE PRESSURE MONITORING SYSTEM BY BENDIX CVS
|
|
|
- Dortha Ball
- 6 years ago
- Views:
Transcription

1 1 Operator s Manual
2 2
3 OPERATOR S MANUAL SMARTIRE TIRE PRESSURE MONITORING SYSTEM BY BENDIX CVS Thank you for purchasing the SmarTire Tire Pressure Monitoring System (TPMS). With SmarTire TPMS onboard, your vehicle is equipped with a wireless communication network allowing seamless integration of wireless sensing technology. The SmarTire TPMS application is an advanced tire pressure monitoring system specifically designed for commercial vehicles. The system constantly monitors the pressure and temperature of each tire on your vehicle in order to provide real-time, on-demand tire status information and to warn the driver of a tire-related problem before it becomes dangerous. SMARTIRE TPMS: Extends tire life, Reduces maintenance costs and time, Maximizes fuel economy by ensuring tires are properly inflated, Reduces vehicle downtime, and Reduces accident risk caused by a tire blowout or tire fire. FEATURES OF SMARTIRE : Temperature compensated alert: know when your tires are at risk no matter how long you ve been driving. Real-time tire information while you drive. Tire alerts provide instant visual and optional audible alert of a tire problem. 3 types of alerts: Pressure Deviation Alert, Critical Low Pressure Alert, and High Temperature Alert. Can be linked to the J1939 communication network for seamless vehicle integration. IMPORTANT NOTICE: PLEASE READ SmarTire tire sensors can be broken when mounting and dismounting a tire unless specific instructions are followed. If tire work is done by a non-bendix authorized facility, please let them know that a tire pressure monitoring system is installed on the vehicle before they remove a tire from a wheel. 3
4 WARNING! PLEASE READ AND FOLLOW THESE INSTRUCTIONS TO AVOID PERSONAL INJURY OR DEATH: When working on or around a vehicle, the following general precautions should be observed at all times. 1. Park the vehicle on a level surface, apply the parking brakes, and always block the wheels. Always wear safety glasses. 2. Stop the engine and remove ignition key when working under or around the vehicle. When working in the engine compartment, the engine should be shut off and the ignition key should be removed. Where circumstances require that the engine be in operation, EXTREME CAUTION should be used to prevent personal injury resulting from contact with moving, rotating, leaking, heated or electrically charged components. 3. Do not attempt to install, remove, disassemble or assemble a component until you have read and thoroughly understand the recommended procedures. Use only the proper tools and observe all precautions pertaining to use of those tools. 4. If the work is being performed on the vehicle s air brake system, or any auxiliary pressurized air systems, make certain to drain the air pressure from all reservoirs before beginning ANY work on the vehicle. If the vehicle is equipped with an AD-IS air dryer system or a dryer reservoir module, be sure to drain the purge reservoir. 5. Following the vehicle manufacturer s recommended procedures, deactivate the electrical system in a manner that safely removes all electrical power from the vehicle. 6. Never exceed manufacturer s recommended pressures. 7. Never connect or disconnect a hose or line containing pressure; it may whip. Never remove a component or plug unless you are certain all system pressure has been depleted. 8. Use only genuine Bendix replacement parts, components and kits. Replacement hardware, tubing, hose, fittings, etc. must be of equivalent size, type and strength as original equipment and be designed specifically for such applications and systems. 9. Components with stripped threads or damaged parts should be replaced rather than repaired. Do not attempt repairs requiring machining or welding unless specifically stated and approved by the vehicle and component manufacturer. 10. Prior to returning the vehicle to service, make certain all components and systems are restored to their proper operating condition. 11. For vehicles with Automatic Traction Control (ATC), the ATC function must be disabled (ATC indicator lamp should be ON) prior to performing any vehicle maintenance where one or more wheels on a drive axle are lifted off the ground and moving. 4
5 TABLE OF CONTENTS SmarTire Tire Pressure Monitoring System by Bendix CVS... 3 SmarTire TPMS:... 3 Features of SmarTire :... 3 IMPORTANT NOTICE: PLEASE READ... 3 WARNING! Please read and follow these instructions to avoid personal injury or death:... 4 Section A: System Overview System Overview System Components Maintenance Tools How Does The SmarTire TPMS System Work? Why is Temperature Monitoring Important? Tire Maintenance Section B: System Programming Configuring & Customizing Your SmarTire System Pre-Configured Settings SmarTire Sensor Learn Instructions Section C: SmarTire Display Operation Display Overview: Alerts Power, Mounting, and Environmental Requirements J1939 Connector Pin Descriptions Using SmarTire TPMS Getting Started Checking Tire Temperature, Pressure, and Pressure Deviation Audible and Visual Alerts Reacting to Audible and Visual Alerts Diagnostic Trouble Code Message Overview Setup Mode For Use When SmarTire Diagnostics Software Is Not Available Section D: System Installation - Electrical System Installation: Electrical Tools Required Getting Started Step 1: Installing the Receiver and Display Step 2: Assembling and Installing the Antenna(s) Wireless Gateway Receiver Specifications SmarTire Display Specifications Vehicle Wiring Harness: Light Wiring Harness: Trailer Section E: System Installation Tire Sensors System Installation: Tire Sensors Sensor Overview IMPORTANT NOTICE: PLEASE READ Tools Required Tire Sensor Installation Re-Mounting Tires After a Sensor has been Installed Removing a Tire That Has a SmarTire Sensor Installed Tire Sensor Specifications
6 Section F: Troubleshooting Troubleshooting Guide SmarTire Gauge Display Q&A SmarTire Receiver Q&A SmarTire System Q&A Diagnosing a Defective, Missing, or Misplaced Sensor SmarTire Hand Tool Troubleshooting Quick Reference Guide to SmarTire System Troubleshooting Appendix 1: Replacement Parts Replacement Parts Appendix 2: System Scope of Use & Alerts System Scope of Use and Alerts System Installation and Usage Use of Chemicals Reacting to Alerts FCC Notice
7 A. SmarTire Tire Pressure Monitoring System by Bendix CVS Section A: System Overview S E C T I O N 7


8 1.0 SYSTEM OVERVIEW 1.1 SYSTEM COMPONENTS The Wireless Gateway Receiver forms the "brain" of the SmarTire platform. The receiver captures data transmissions from tire sensors mounted on each wheel which is then analyzed against programmed user-defined settings and, if it determines that a tire is under-inflated or running over temperature, an alert is triggered. Robust and weatherproof in design, the Wireless Gateway Receiver can be conveniently mounted directly to the vehicle's chassis. It also interfaces with the vehicle's J1939 network for seamless integration. Real-time tire pressure and temperature information is available to the driver on demand via the SmarTire display. If the system detects a tire that is under-inflated or overly hot, the display will alert the driver to the condition before it becomes dangerous. Industrially designed for the harsh environment of a commercial truck tire, the tire sensor measures internal tire pressure and temperature every 12 seconds and transmits data every three to five minutes. If the system detects a pressure change of 3 PSI (0.206 bar) or greater, it breaks its regular schedule and transmits data immediately. Each tire sensor is mounted in a break away cradle so that in the event of in-field damage, the sensor remains unbroken. Tire sensors are mounted to the surface of the rim using a stainless steel strap. Installed by Bendix on hundreds of thousands of wheels world wide, strap mounting is the most reliable and universal method of sensor installation available. Wireless signals from tires on the front axle are captured by the wireless gateway directly. Signals from the rear axles and the trailer are captured by an antenna mounted at the rear of the vehicle. An external antenna ensures signal reception reliability so that SmarTire TPMS always has up-to-date tire status information accessible at the push of a button. When a tire problem occurs on a towed trailer, the trailer lamp will clearly indicate it to the driver. The lamp illuminates at the first sign of trouble, as well as flashes to indicate the type of problem found. 8

.")
9 1.2 MAINTENANCE TOOLS Maintaining tires in the yard is just as important as real-time tire information for the driver, but most TPMS systems don't take maintenance personnel into account. The SmarTire universal hand tool acts like an 'electronic billy-club' allowing maintenance personnel to wirelessly 'ping' a tire to measure its pressure and temperature. The SmarTire hand tool improves inflation accuracy and reduces diagnostic time in order to keep every tire rolling safely and cost effectively. (Maintenance Tool comes with a separate manual). The LF Tool allows the user to wirelessly 'ping' a tire and can be used instead of a Hand Tool to add tires to the system configuration, either during the initial setup or when tires are changed. 9
10 1.3 HOW DOES THE SMARTIRE TPMS SYSTEM WORK? 1. The SmarTire Wireless Gateway receiver creates a wireless bubble around a vehicle allowing various sensing technologies to seamlessly interact. 2. Tire sensors mounted on each wheel measure tire pressure and temperature every 12 seconds and wirelessly transmit tire data every three to five minutes. 3. Industrially designed for the rugged requirements of a commercial vehicle chassis, the wireless gateway can monitor up to 20 wheel positions and is able to handle the most complex commercial and off-highway vehicle configurations. 4. Real-time tire pressure and temperature information is available to the driver on demand via the SmarTire display. Ranging from a simple illuminated light to an easy to read and simple to use interactive gauge that provides real-time tire status information, the SmarTire display will alert the driver to a low pressure or high temperature condition before it becomes dangerous. 5. Trailer tires can also be monitored using a stand-alone system and/or trailer lamp. 6. The SmarTire universal hand tool acts like an electronic billy-club allowing maintenance personnel to wirelessly ping a tire to measure its real-time tire pressure. The SmarTire maintenance hand tool improves inflation accuracy and reduces diagnostic time in order to keep every tire rolling cost effectively. 1.4 WHY IS TEMPERATURE MONITORING IMPORTANT? THE PRESSURE TEMPERATURE RELATIONSHIP Tire manufacturers specify that tire pressures should be checked and adjusted when a tire is cold, but most people may not know why, or even what a cold tire is. The temperature of a tire actually has a significant impact on its inflation pressure. According to tire manufacturers, a tire is considered to be cold when its temperature is 65 F (18 C). The inflation values provided by vehicle manufacturers, fleet maintenance personnel or industry published load inflation tables are called Cold Inflation Pressures (CIP) because they represent the correct amount of pressure a tire should be inflated to when it is cold. The reason that tires have cold inflation pressures set at specific temperatures is because a tire s pressure will change relative to its temperature. Air naturally expands when heated and contracts when cooled. Inside a contained vessel such as a tire, this expansion and contraction causes a change in contained air pressure. As a tire heats up, its pressure will naturally increase and as it cools down, its pressure will naturally decrease. 10

11 For example, a tire inflated to a CIP of 105 PSI at 65 F will increase in pressure to 125 PSI at 152 F and decrease in pressure to 97 PSI at 32 F. The SmarTire tire monitoring system considers these changes in temperature and pressure as part of normal operation and adapts accordingly to provide more accurate information while helping to prevent false alerts. Tire manufacturers never recommend inflating a tire to less than the specified cold inflation pressure. In extreme cases, the beads of a commercial tire can unseat if its pressure gets too low resulting in a catastrophic tire failure. Always refer to the vehicle manufacturer s recommendations for minimum cold inflation pressures. The charts below illustrate the equivalent inflation values for a series of cold inflation pressures at various temperatures. The temperature values represent the temperature of the air contained inside the tire. This temperature can be estimated for a cold tire using the outside, ambient temperature. 11
12 The charts above are to be used as a guide only. Always refer to the tire / vehicle manufacturer s recommendations for minimum cold inflation pressures. Thermal Equilibrium As a vehicle moves, its tires naturally heat up due to friction from the road and the flexing of its side-walls. Weight, vehicle speed and a tire s starting inflation pressure all have an impact on how much and how quickly heat is generated. As the tire generates heat, its pressure increases, causing a reduction in side-wall flexing. Less side-wall flexing and road resistance combined with air rushing past the tire as the vehicle moves effectively counteracts the conditions that cause the tire to heat up. As a result, the temperature increase tapers off until the tire reaches a point of balance called Thermal Equilibrium. Tire Thermal Equilibrium is the point where the heat being generated is equal to the heat being dissipated. Tires are designed with the principles of temperature and pressure in mind in order for them to achieve Thermal Equilibrium. Once a properly inflated tire reaches Thermal Equilibrium, it will operate at its peak; providing the best performance, handling, tire life and fuel economy. SmarTire TPMS Temperature Compensation Since a tire s contained air pressure naturally increases as a vehicle moves, it can be difficult to tell if a hot tire is under-inflated. Without some form of temperature compensation, a hot tire that is under-inflated might appear to be fine because its contained air pressure is at or above its cold inflation pressure (CIP). For example, a tire correctly inflated to a CIP of 105 PSI at 65 F will reach thermal equilibrium when its temperature increases to 152 F and its pressure increases to 125 PSI. A tire starting at 95 PSI at 65 F (10 PSI under inflated) would have to reach 202 F for it to reach thermal 12
13 equilibrium (125 PSI). The tire will then be running 50 F hotter than it should be, causing more tire wear and the potential for a catastrophic failure or tire fire. When checked using a handheld gauge or a tire monitoring system that does not measure operating temperature, this 10 PSI under-inflated tire can appear to be normal. When equipped with tire sensors that mount inside the tire, SmarTire TPMS measures both tire pressure and temperature in order to provide Temperature Compensated pressure deviation values and alerts. By measuring the operating temperature of a tire and comparing it to the cold inflation pressure (CIP) value programmed into the system, the SmarTire system will know what a tire s pressure is supposed to be in relation to its operating temperature. The system is able to warn the driver of an under-inflated tire even if that tire s actual contained air pressure is at or above its CIP. The advantages of temperature compensation are even more dramatic when a tire has a slow leak. A tire that is constantly losing pressure will not be able to reach thermal equilibrium because the contained air simply can not expand enough to generate the required pressure, regardless of how hot the tire becomes. Since the leak is slow, the tire may appear over an extended period of time to be properly inflated when it is actually dangerously under-inflated and operating well above its temperature capacity. As air leaks from the tire, increased side-wall flexing and rolling resistance cause the tire s temperature and pressure to increase. The pressure increase will soon plateau and begin to slowly decrease while the tire s temperature continues to increase. Eventually, the tire will become so hot that its structure will degrade and then fail in the form of a blow-out and / or tire fire. 2.0 TIRE MAINTENANCE Proper tire maintenance is critically important for keeping tires rolling smoothly. When properly maintained and inflated, tires will provide shorter stopping distances, better vehicle handling in emergency situations and better fuel economy. Maintenance Tips for Long Tire Life: Keep tires properly inflated at all times. Visually inspect tires for injuries prior to each trip. Match dual tires for size and keep pressures within 5 PSI (0.344 bar). Re-tread tire before wear causes excessive belt damage or fatigue. 13
14 B. SmarTire Tire Pressure Monitoring System by Bendix CVS Section B: System Programming S E C T I O N 14
 install the sensors as per the diagram below.")
15 IMPORTANT READ THESE INSTRUCTIONS PRIOR TO INSTALLATION This SmarTire kit is pre-programmed and ready to use, subject to your application: Sensors have been PRE-ASSIGNED TO WHEEL POSITIONS and are identified on each unit with a position label (P1, P2, P3, etc.) install the sensors as per the diagram below. Default values have been assigned to each axle for the following: o Cold Inflation Pressure (CIP) 100 PSI o First Alert Level (FAL) set to a deviation of ±15% from CIP o o Second Alert Level (SAL) set to -20% from CIP High temperature alert (optional) ITEC specific kits set to OFF, all other kits set to 85 C Installation steps: 1. Install the receiver, display, antenna and harnesses on the vehicle, following the instructions in Section D Installation Electrical section of the SmarTire manual. 2. Install the sensors in the pre-programmed locations as above, following the instructions in Section E Installation Tire Sensors section of the SmarTire manual. 3. Adjust any system parameters as required, following Section B System Programming section of the SmarTire manual. 15
16 3.0 CONFIGURING & CUSTOMIZING YOUR SMARTIRE SYSTEM During the installation process, the default settings for SmarTire TPMS should be customized to the vehicle by the installer. At any time, alert thresholds can be made more or less sensitive and system settings can be adjusted to accommodate vehicle changes and use. Replacing vehicle tires or installing the system on a new vehicle may also require adjustment of pre-configured settings. The following section describes how to adjust the pre-configured settings of your SmarTire TPMS. 3.1 PRE-CONFIGURED SETTINGS Generally, the SmarTire TPMS is pre-configured with the default settings listed below. Depending on your vehicle, your system may have a different initial setup. Cold Inflation Pressure (CIP): o 6-Wheel (4x2 Configuration) Steer Axle: 100 PSI (6.89 bar) o Drive Axle: 100 PSI (6.89 bar) 10-Wheel or 6-Wheel with Super Singles Steer Axle: 100 PSI (6.89 bar) Drive Axle: 100 PSI (6.89 bar) First Alert Level (FAL) Pressure Deviation Alert: CIP +/- 15% Second Alert Level (SAL) Critical Low Pressure Alert: CIP -20% High Temperature Alert: 185 F (85 C) Default cold inflation pressure settings should always be customized to the vehicle. Check the vehicle s owner s manual, placard or the industry published load inflation table to determine the recommended cold inflation pressure settings. Bendix recommends setting the Second Alert Level (SAL) critical low pressure alert at 20% below the recommended cold inflation pressure for your vehicle. Bendix also does not recommend changing the First Alert Level (FAL) pressure deviation alert setting. 3.2 SMARTIRE SENSOR LEARN INSTRUCTIONS This section contains the instructions to program vehicle sensors into the SmarTire system using the SmarTire Diagnostic Tool software Equipment Hardware On-Vehicle J1939 Diagnostic Port J1939 CAN Adaptor (e.g. Vansco DLA, USBLink) SmarTire Vehicle Harness J1939 Wireless Gateway Receiver (Optional) LF Initiator; SmarTire Maintenance Hand Tool; or SmarTire LF Tool Software SmarTire Diagnostic Software (Version or higher download at PC with Microsoft Windows XP 16


17 3.2.2 Communications Setup To setup communications over J1939: 1. Connect the Gateway connector on the SmarTire harness to the vehicle s Gateway. 2. Connect the J1939 Diagnostic port of the harness to your PC-to-CAN adaptor (i.e. RP1210A). 3. Connect the harness VIN1 and GND1 wires to 12-24VDC. 4. Apply power to the hardware. 5. Run SmarTire Diagnostic Tool.exe on your PC. 6. Select your J1939 Adaptor on the menu bar. If it doesn t appear in the Adaptor dropdown list, ensure you have the appropriate drivers installed on your computer. 7. Click Connect J1939 to start the interface communicating over J

 and Alert Levels.")
18 8. If the adaptor is correctly installed and identified, the TPM system details will be filled in at the bottom of the screen with information from the SmarTire Wireless Gateway Configuring Your Vehicle There are two steps to having the Gateway Receiver learn your vehicle s configuration: 1. Axle/Tire configuration 2. Sensor Programming Axle/Tire Configuration During this step, we must tell the Gateway Receiver how many tires there are on the vehicle and their locations. Also, we will program the Cold Inflation Pressures (CIP) and Alert Levels. The alert levels can be changed at anytime later without affecting the vehicle layout, but it is best to put a default value in at this time. 1. With the SmarTire Diagnostic Tool setup and running, click on the Setup tab (or press the F6 key). 18


19 2. To specify how many axles are present on the vehicle, click on the check mark after the last axle on your vehicle. Darkened axles and tires are active and can be programmed. Grayed out axles and tires are disabled. 3. Next, ensure that all active axles have the correct number of tires assigned. Use the Dual Wheel check box under each axle to configure this. Note: Steps two and three must be carried out each time the software is restarted, regardless of the saved configuration in the receiver. 4. When you ve completed setting up the vehicle s axles, adjust the CIP values for each axle. If you would like to change the units being displayed, click the Units of Measure button on the left side of the window (or press ALT-6). 5. Now we will check the Alert levels to ensure they are the right values for your system. Click the System Parameters button (or press ALT-4). Bendix recommends that you use the default values that came programmed with the Wireless Gateway, but you can change them here if desired. 6. Click the Axle Configuration button (or press ALT-1) to return to the Axle Configuration screen. 19
.")
20 7. To save the settings you ve entered into the Wireless Gateway Receiver, click Save Configuration on the Axle Configuration screen. To save the settings for use on another vehicle, click the Load/Save Configuration button (or press ALT-5). On this screen, click Save Configuration and choose the filename and location to save this file. Included in the saved file is: Axle layout Axle CIP levels Alert Levels All Sensor IDs Once you ve saved a configuration, when you start the Diagnostic Tool the next time, you must simply go to the Load/Save Configuration screen and click Load Configuration to restore the complete profile you were working on previously. You can then proceed to programming the sensors into the new Gateway Receiver. Learning Sensors After setting up or loading a profile, you can begin programming sensors into the Gateway. 1. On the Setup tab, select the Sensor Configuration button. 20


21 2. Select the tire you wish to program. 3. Each sensor has a unique ID that the Gateway Receiver uses to identify it. You can either enter this ID into the Gateway Receiver manually, or trigger the sensor to identify itself and have the Gateway Receiver automatically learn it. Having the Gateway Receiver identify the sensor is a slower method than manually entering the ID, but it is particularly useful if a sensor has already been installed in a tire. Manual Sensor Learn a. To do a manual sensor learn enter the ID of the sensor into the green dashed text box. The ID for the sensor is the 7 digit code on the top label of the sensor (i.e #######). b. Now click Assign Selected Sensor. The sensor ID will then appear on the tire map. 21
.")

22 Gateway Sensor Learn a. To have the Gateway Receiver detect a sensor s ID, click the Learn Selected Sensor button in the SmarTire Diagnostics Software. b. You now need to trigger a Learn transmission from the tire within the next two minutes (or press ESC to cancel). This can be done using the LF Initiator Tool, LF Tool, or Maintenance Hand Tool. Press the Learn button with the device in the appropriate position shown below. Check the manual for the tool you are using to select the Learn function. c. Once triggered, it can take up to 30 seconds for the Gateway to receive the transmission and complete the learn process. When successful, the sensor icon in the tire map will turn green and the detected ID will be displayed. d. If the sensor ID fails to be recognized in the selected tire position after you have triggered a transmission, there may be some interference (e.g. due to its orientation relative to the Gateway or the Antenna) that is causing the signal not to be seen by the Gateway. Re-attempt to communicate at least twice. If unsuccessful a sensor may be pointing directly down into the ground, or away from the Gateway or Antenna causing the signal reception to be disrupted. In these cases, it may be useful to move the vehicle forward or backward about a half-turn of the wheels, to reposition the sensor, and then retry. If this is unsuccessful, refer to Section F: Troubleshooting or visit for videos that include additional troubleshooting information. 4. Perform the above steps for each sensor on the tire map. 5. Sensor programming is now complete and the sensors are stored on the Gateway receiver. 22
23 C. SmarTire Tire Pressure Monitoring System by Bendix CVS Section C: SmarTire Display Operation S E C T I O N 23

: 2.55 in. Bezel thickness: 0.240 in (6.069 mm).")
. 4.")
24 4.0 DISPLAY OVERVIEW: ALERTS SMARTIRE Display Dual Light Display Note: If you are using a 3 rd party display to view SmarTire information, please refer to the respective user manual or contact your vehicle vendor for instructions. 4.1 POWER, MOUNTING, AND ENVIRONMENTAL REQUIREMENTS Operating voltage range V Typical current consumption (with no external loads) 30mA Connector type: Deutsch Lock: W6S-Deutsch Plugs: DT06-6S-Deutsch SAE J1939 protocol compliant, 250 kbps Overall depth of unit (back of bezel to the end of the connector): 2.55 in. Bezel thickness: in (6.069 mm). Bezel diameter: 2.29 in ( mm). Panel Cutout: Std SAE 2 in. gauge panel cutout Mounting (clamp ring and wave spring): to in (1.27 mm to mm). 4.2 J1939 CONNECTOR PIN DESCRIPTIONS (Buzzer) Output CAN - L CAN - H Vin GND Backlight Check the back of the 6-pin Deutsch connector for numbering. 24

25 Line Colors versus Pin Numbers for Standard SmarTire Harnesses (White wires are labeled for Display connector): Pin Line Color Red Black White Yellow Green White 5.0 USING SMARTIRE TPMS 5.1 GETTING STARTED When the vehicle s ignition switch is turned on, the SmarTire system will power up and the display will indicate that the system is Initializing. During initialization, the display receives vehicle configuration data and tire pressure/temperature parameters from the receiver. After approximately 10 seconds, the display will show the TPMS Ready screen indicating that the system is ready to receive tire data from the sensors. When showing the TPMS Ready screen, the display will show TPMS Ready and a tire icon. If a Dual Light Display or Trailer Lamp is installed, they will flash once as the SmarTire system is powered up to indicate their TMPS Ready status. 4.1 When the vehicle is driven over 14 mph (24 km/h), the tire sensors will activate and SmarTire TPMS will begin to receive tire data. While the vehicle is in motion, the sensors will measure tire pressure and temperature every 12 seconds and transmit tire data approximately every 3-5 minutes. If an Alert icon (triangle with an exclamation mark) is displayed on the TPMS Ready screen, a tire pressure or temperature condition has been detected and should be investigated / corrected before the vehicle is driven. Bendix recommends that tire pressure and temperature conditions always be corrected before a vehicle is driven to ensure the safety of the driver, vehicle and cargo. If the TPMS ready screen shows an alert icon but no tire icon, the display has not received any tire programming information from the receiver. NOTE: Standard tire sensors transmit data once every 15 minutes while stationary. They contain a motion switch and will send data regularly once the vehicle reaches a speed of approximately 14 mph (22 km/h). 5.2 CHECKING TIRE TEMPERATURE, PRESSURE, AND PRESSURE DEVIATION At the push of a button, SmarTire TPMS will provide the driver with real-time tire pressure and temperature information for each tire on their vehicle. Please check tires only when the vehicle is stopped and in a safe location. Never check tire status when the vehicle is in motion and the driver s attention is on the road. 25
26 SmarTire TPMS displays tire status information by axle using various axle screens. Each axle programmed in the display has a corresponding axle screen. The diagram on the next page outlines the different screen elements of the axle screens. To check your tire pressure, temperature, and pressure deviation: 1. Starting from the TPMS Ready screen, press the right button once and the display will show the first axle screen starting at the front of the vehicle with one tire position highlighted. The pressure, temperature and pressure deviation information displayed is for the selected tire. 2. To move to the next wheel on the vehicle, press the right button once. The next tire in sequence will be highlighted and its pressure, temperature and pressure deviation reading will be displayed. Each time the right button is pushed, the next tire in sequence will be selected and its information displayed. Pressing the right button when the last tire on the axle is selected will re-select the first tire on that axle. 3. To move to the next axle on the vehicle, press the left button once. Once again, pressing the right button will scroll the display to the next tire on that axle. Each time the left button is pressed the display will show the next axle on the vehicle. When the left button is pressed from the last axle screen programmed in the display, the first axle will once again be shown. 4. Repeat steps 1, 2 and 3 until all desired wheel positions and axles have been checked. 5. To exit back to the TPMS Ready screen, press the center button once. 5.3 AUDIBLE AND VISUAL ALERTS Pressure Deviation Alert The Pressure Deviation Alert is the first indicator of an underinflated tire. If a tire deviates 15% from its proper inflation pressure, the driver is alerted to the condition by an indicator light and an audible alarm (optional). SmarTire calculates a tire s proper inflation pressure by first mathematically calculating the amount of pressure that is supposed to be in the tire based on its operating temperature and its cold inflation pressure setting, and then comparing this calculated value to the actual, measured pressure value of the tire. The pressure deviation value that is displayed is the difference between the actual pressure and the calculated correct pressure. This temperature compensation calculation enables SmarTire TPMS to provide pressure deviation 26

27 values and alerts even when a tire is hot. The default setting triggers the pressure deviation alert when a tire is 15% under- or over-inflated. This setting can be customized by the user. The alert can also be customized to be a fixed pressure alert rather than a temperature compensated alert. The units of measure can also be customized to PSI, bar, or kpa. The acronym for the Pressure Deviation Alert is FAL for First Alert Level. Critical Low Pressure Alert The Critical Low Pressure Alert is the second indication of an underinflated tire. It alerts the driver when a tire s pressure falls 20% below the programmed Cold Inflation Pressure (CIP) value. This visual and audible (optional) alert is intended to alert the driver to a critical tire condition in order for them to take immediate precautions. Unlike the Pressure Deviation Alert, the default setting for the Critical Low Pressure Alert does not include the temperature compensation calculation. As such, if a tire s pressure falls below the default setting, the tire is critically under-inflated and should be addressed immediately. Like the Pressure Deviation Alert, the default settings for the Critical Low Pressure Alert can be customized by the user. The alert can also be set to be temperature compensated. The acronym for the Critical Low Pressure Alert is SAL for Second Alert Level. High Temperature Alert The High Temperature Alert warns the driver when a tire s temperature exceeds 185 F (85 C). High tire temperatures are typically caused by under-inflation and the SmarTire system will usually provide a Pressure Deviation Alert and a Critical Low Pressure Alert well in advance of a High Temperature Alert. If triggered on its own, the High Temperature Alert can be an indication of an alternative problem, such as a dragging brake or a bearing failure. Like the other two alerts, the default High Temperature Alert setting can be customized by the user. The acronym for the high temperature alert is Over Temp. Sensor Diagnostic Trouble Code Alert A Sensor Diagnostic Trouble Code Alert will be issued for any programmed sensor that has not reported its data to the Gateway receiver within 35 minutes of the last transmission. Sensor Diagnostic Trouble Code Alerts are self-clearing as soon as data is received from the given sensor. Prolonged Sensor Diagnostic Trouble Codes can indicate damaged or missing sensors and should be examined further. 27
28 Low Sensor Battery Alert A Low Sensor Battery Alert will be displayed for a given sensor when it is near the end of its battery life. Typically, a low sensor battery alert will be triggered when the battery reaches 2.1 Volts and below. The sensor should be replaced as soon as possible to avoid a continuous sensor Diagnostic Trouble Code from being issued by the same tire location. No Tires Programmed Alert The No Tires Programmed message will be displayed after the startup sequence if the Gateway receiver unit has not been programmed with any axle and wheel configurations. The Gauge s Profile Definition mode or the SmarTire Diagnostics software can be used to program new axle and tire combinations into the receiver. A SmarTire LF Hand tool is also required for this step. 5.4 REACTING TO AUDIBLE AND VISUAL ALERTS It is important to always react to the audible and visual alerts provided by the SmarTire TPMS system. When an alert is triggered, immediately bring the vehicle to a stop in a safe location in order to asses the nature of the problem. Tire conditions should always be corrected before the vehicle is driven. SmarTire Gauge When a SmarTire tire alert is triggered, the indicator light will illuminate, an audible alarm will sound (optional), and an icon will appear on the TPMS Ready screen. To access the alert, press the left button once. For both pressure alerts, the affected tire and axle will be indicated along with a number indicating the amount of pressure the tire has lost. The same will be shown for the high temperature alert except the number will indicate the temperature of the affected tire. Below are images that show on the screen for each alert. Pressure Deviation Critical Low Pressure High Temperature 28
 Alarm Critical Low Pressure Pressure Deviation Sensor or System Diagnostic Trouble Code 5.")
29 Dual Light Display Light Appearance Alarm On Solid Critical Low Pressure Top Flashing Pressure Deviation Off No Alarm On Solid High Temperature Bottom Flashing Sensor or System Diagnostic Trouble Code Off No Alarm Trailer Lamp Appearance On Solid Flashing Rapidly Flashing (Twice, then long delay) Alarm Critical Low Pressure Pressure Deviation Sensor or System Diagnostic Trouble Code 5.5 DIAGNOSTIC TROUBLE CODE MESSAGE OVERVIEW The chart below outlines the six diagnostic trouble code messages that can be displayed by SmarTire TPMS. Message SENSOR DIAGNOSTIC TROUBLE CODE Cause & Solution Cause: No signal has been received from a sensor for 35 minutes. If the SENSOR diagnostic trouble code persists after the vehicle is driven, then a signal reception problem has been detected. Solution: This problem is frequently due to the removal of the tire with the programmed sensor. If the correct tire is still installed, this may be caused by a malfunctioning antenna, sensor or receiver. Contact your authorized dealer for assistance. NO TIRES PROGRAMMED Cause: Indicates the receiver was not programmed with any tire locations during the initial programming stage. Solution: The SmarTire Diagnostics Tool will need to be interfaced to the Wireless Gateway for proper tire programming. Contact your authorized dealer for additional information. AMB SENSOR DIAGNOSTIC TROUBLE CODE Cause: The Ambient Pressure sensor has not been received for 35 minutes. Solution: A default ambient pressure value of 14.7 PSI (1.013 bar) or the last received ambient reading will be substituted until new ambient 29
30 Message Cause & Solution data is received. This may be caused by a malfunctioning antenna, sensor or receiver. Contact your authorized dealer for assistance. ERROR RE-ENTER VALUE Cause: The value being entered was not accepted due to increased network traffic. Solution: The user will be returned to the original menu upon pressing any button in order to re-enter the value. SENSOR DIAGNOSTIC TROUBLE CODE - Dual Light Display & Trailer Lamp Only (lower light flashes twice followed by a 5 second pause, repeated) SYSTEM DIAGNOSTIC TROUBLE CODE - Dual Light Display & Trailer Lamp Only Cause: No signal has been received from a sensor for 35 minutes as a result of a broken sensor or wireless reception issue. If the diagnostic trouble code is intermittent, it is usually caused by inconsistent reception. If the diagnostic trouble code is consistent after the vehicle is driven, the sensor may be broken. Solution: This problem is frequently due to the removal of the tire with the programmed sensor. If the correct tire is still installed, reception quality and/or sensor functionality must be diagnosed. Contact your authorized dealer for assistance. Cause: Improper programming, program corruption, electrical problems, and component failures can cause a system diagnostic trouble code. Solution: Contact your authorized dealer for assistance if this diagnostic trouble code persists for more than an hour of driving the vehicle. 5.6 SETUP MODE FOR USE WHEN SMARTIRE DIAGNOSTICS SOFTWARE IS NOT AVAILABLE SmarTire TPMS can be configured by accessing its Setup Mode. Follow the steps below to access the Setup Mode: 1. The Setup Mode can only be accessed from the TPMS Ready screen. Press the center button repeatedly until the TPMS Ready screen is displayed (screen shows TPMS Ready and tire icon). 2. Press and hold the center button for two seconds and the display will show a password entry screen. NOTE: If the password function has not been activated, the setup mode will be entered directly. 3. To enter a password, press the left button to scroll the first digit from 9 to 0. When the correct digit is displayed, press the right button to move to the next digit in sequence. 4. Repeat step three until all four digits are entered correctly and then push the right button to enter the password. If the password is correct, the display will enter Setup Mode. If the password is incorrect, the display will indicate that the wrong password was entered and return to the password entry screen. 30
31 Below is a list of menu items available in Setup Mode and their application: Menu Item Change Units Vehicle Params Axle Params Altitude Adjust Screen Contrast Buzzer Learn Sensors Profile Definition Change Password Application Use this menu item to change the units of measure from imperial to metric or from PSI to Bar to kpa. Use this menu item to adjust alert thresholds. Use this menu item to program the cold inflation pressures (CIP) per axle. Use this menu item to add or remove altitude compensation (requires ambient pressure sensor). Use this menu item to increase or decrease screen contrast. Use this menu item to customize the audible alert (requires audible alert module). Use this menu item to program new sensors into the receiver or change the wheel position assigned to a sensor. Use this menu item to select the number of axles and wheels per axle for a new vehicle profile definition. This menu item will also overwrite the existing definition and relearn all sensors after a new profile definition has been completed. Use this menu item to change the password for accessing the setup mode. To scroll to the next menu item on the list, press the left button. To select a menu item, press the right button. Below is a description of each menu item Changing the Units of Measure The default "units of measure" setting is usually customized for the region in which the SmarTire system was sold. Use the steps below to customize the units of measure. 1. Enter the Setup Mode using the steps outlined in section When in the Setup Mode, press the left button until Change Units is highlighted. Then press the right button to select the function. 3. Temperature and Pressure options will then be displayed along with the corresponding unit of measure. Press the left button to scroll between Temperature and Pressure and press the right button to select the highlighted option for customization. 4. Press the left button to scroll between the different units of measure options. For pressure, the options are PSI, Bar, and kpa. For temperature, the options are degrees Fahrenheit and degrees Celsius. 5. Select the desired option by pressing the right button and the display will revert to the Temperature and Pressure option screen. 6. Repeat steps 3 5 should further customization be required. 31
 function is used to adjust the default thresholds for the pressure deviation, critical low pressure and high temperature alerts.")
32 7. To save the changes and exit the Change Unit function, press the center button once. Press the center button again to exit Setup Mode Changing the Alert Thresholds The Vehicle Parameters (vehicle params) function is used to adjust the default thresholds for the pressure deviation, critical low pressure and high temperature alerts. The acronyms for each alert along with the instructions for alert threshold customization are outlined below: Pressure Deviation Alert = FAL: First Alert Level Critical Low Pressure Alert = SAL: Second Alert Level High Temperature Alert = Over Temp Follow the instructions below to customize the thresholds for each alert: 1. Enter the Setup Mode using the steps outlined in section When in the Setup Mode, press the left button until Vehicle Params is highlighted. Then press the right button to select the function. 3. The alert thresholds for each alert will be displayed. Press the left button to highlight an alert and the right button to select it for customization. 4. Press the left button to increase the number or the right button to decrease the number until the desired value is shown. Hold down either button to quickly increase or decrease the number. When the desired value is displayed, press the center button to save the value. 5. Repeat steps 3 and 4 to continue customizing the alert thresholds until all values are programmed correctly. 6. To save the changes and exit the Vehicle Params function, press the center button once. Press the center button again to exit Setup Mode. NOTE: The High Temperature Alert setting applies to all axle locations Changing the Cold Inflation Pressure (CIP) Value for Each Axle 32
33 The Axle Parameters (axle params) function is used to adjust the default cold inflation pressure setting for each axle on the vehicle. Follow the instructions below to modify the CIP values for each axle: 1. Enter the Setup Mode using the steps outlined in section When in the Setup Mode, press the left button until Axle Params is highlighted. Then press the right button to select the function. 3. The first axle will then be displayed along with its CIP value. Press the left button to scroll to each programmed axle on the vehicle. Each time the left button is pressed, the axle designator will change to the next axle in sequence and the CIP for that axle will be displayed. Press the right button to select the axle for programming. 4. Press the left button to increase the number or the right button to decrease the number until the desired value is shown. Hold down either button to quickly increase or decrease the number. When the desired value is displayed, press the center button to save the value. 5. Repeat steps 3 and 4 to continue customizing the CIP values for each axle until all axles are programmed correctly. 6. To save the changes and exit the Axle Params function, press the center button once. Press the center button again to exit Setup Mode Altitude Compensation (Optional) SmarTire TPMS can be made to compensate for the pressure changes caused by elevation. To compensate for elevation, the system uses an ambient pressure sensor. The primary use of this feature is for off-highway equipment located in elevations other than sea level for extended periods of time. Unless an ambient pressure sensor has been installed on the vehicle, the Altitude Adjust setting should be set to OFF. Follow the instructions below to modify the Altitude Adjust setting: 1. Enter the Setup Mode using the steps outlined in section When in the Setup Mode, press the left button until Altitude Adjust is highlighted. Then press the right button to select the function. 3. The display will then show Altitude Comp with either ON or OFF highlighted. Press either the left or right buttons to scroll between the ON and OFF setting. 4. When the desired setting is highlighted, press the center button once to save the value. Press the center button again to exit Setup Mode. 33


34 5.6.5 Display Contrast Follow the instructions below to modify the contrast of the display: 1. Enter the Setup Mode using the steps outlined in section When in the Setup Mode, press the left button until Screen Contrast is highlighted. Then press the right button to select the function. 3. The display will then show Contrast Adjust and a bar indicating the level of contrast. Press the right button to increase the contrast and the left button to decrease the contrast. Each time the right button is pushed, an additional box on the contrast bar will darken and the contrast will increase. Each time the left button is pushed, one less box on the contrast bar will be dark and the contrast will decrease. 4. When the desired level of contrast is attained, press the center button once to save the setting. Press the center button again to exit Setup Mode Audible Alert Settings SmarTire TPMS has an optional Audible Alert (part number ) to compliment the Visual Alert light that is triggered during a tire pressure or temperature alert. If the system was installed with the audible alert module, the alert can be disabled and customized by the user. Follow the instructions below to modify the audible alert settings: 1. Enter the Setup Mode using the steps outlined in section When in the Setup Mode, press the left button until Buzzer is highlighted. Then press the right button to select the function. 3. The display will then show a Startup setting and an Alarm setting along with their preset values. Press the left button to scroll between the two programmable functions and the right button to select the function for programming. 4. Once selected, press the down button to scroll between setting the function to ON or OFF. When the Startup function is set to ON, SmarTire TPMS will make a noise on start up. When the Alarm function is set to ON, the system will emit an audible alarm when an alert is triggered. When the desired value is displayed, press the right button to select it. 5. Repeat steps 3 and 4 until all settings are correct. To save the new settings, press the center button once. 34

35 6. Press the center button again to exit Setup Mode Learning Sensors into the Wireless Gateway Receiver In order for the display to show information specific to a given tire location, the Wireless Gateway Receiver is programmed with a sensor ID number for each sensor on the vehicle and each number is associated with a specific wheel position. Every sensor has a unique ID number specific to it so that when fully programmed, the SmarTire system will recognize only sensors associated with the vehicle and will know the specific wheel positions for each sensor. If a wheel is moved to a different location on the vehicle or a sensor is broken and needs to be replaced, the Wireless Gateway Receiver must be reprogrammed. Otherwise, when a tire alert is generated, the display will not show the correct wheel position for the affected tire. When programming a single sensor ID number into the Wireless Gateway Receiver, use the Learn function as described below. When programming more than one sensor ID number or performing a tire rotation, use the Walk-Around Learn function in the SmarTire Maintenance Tool (see Maintenance Tool manual) and/or SmarTire Diagnostics Tool. Exercise caution when proceeding with the following steps! Loss of power to the SmarTire TPMS during Learn Sensor operations will cause sensor location to be deleted. Do not proceed without the use of SmarTire LF Tool or SmarTire Maintenance Tool! 1. Enter the Setup Mode using the steps outlined in section When in Setup Mode, scroll to the Learn Sensors menu item. Press the right button to select the Learn Sensor function. 3. The first axle on the vehicle and Select Tire To Learn will then be displayed. Press the right button to scroll to the next tire on the axle and the left button to move to the next axle on the vehicle. 4. When the desired wheel position is highlighted, press and hold the center button for two seconds to delete the ID stored for that tire. The screen will then show Deleting Tire and the selected wheel position will flash. 5. When the ID for the selected tire has been deleted, the screen will show Learn in Progress. The sensor inside the tire for the wheel position to be programmed must now be provoked to transmit its ID. This can be done using the SmarTire Maintenance Hand Tool, SmarTire LF Tool, or LF Initiator. 35

36 A. If using an LF Initiator Tool (obsolete): Turn the LF Initiator ON (push switch upward) Hold the LF Initiator pointed towards the tire s sidewall adjacent to sensor s location approximately 2" away from the tire s surface. The sensor should be located at the valve stem with a rim label indicating its location. Do not touch the side of the tire or the edge of the rim. Press Learn button once & hold LF Initiator tool in position for 5 seconds (until - diagnostic light turns off). Do not hold down the Learn button. B. If using the SmarTire LF Tool: Turn the SmarTire LF Tool ON by pressing and holding the On/Off/Mode Select button for 2 seconds. Press the On/Off/Mode Select button once more to toggle the tool mode to the Learn sensor function. The LED under the head with the question mark must now be ON. Point the SmarTire LF Tool towards the tire s sidewall adjacent to sensor s location approximately 2" away from the tire s surface. The sensor should be located at the valve stem with a rim label indicating its location. Do not touch the edge of the rim with the tool. Press and release the Initiate/Learn button once & hold the LF Initiator tool in position for 5 seconds until 4 rapid beeps are heard. Do not hold down the Initiate/Learn button. C. If using the SmarTire Maintenance Tool: Turn the SmarTire Maintenance Tool ON (Press and release the red button). Button functionality: o Left Button: Initiate Function o Center Button: Setup Menu o Right Button: Learn Function Hold the SmarTire Maintenance Tool pointed towards the tire s sidewall adjacent to sensor s location approximately 2" away from the tire s surface. The sensor should be located at the valve stem with a rim label indicating its location. Do not touch the side of the tire or the edge of the rim. Press right button (learn function) once & hold tool in position until the screen is updated. Do not continue to press the button. 6. When completed correctly, the screen will show Learn Complete. Repeat steps 3 5 until all wheel positions are programmed. If the screen shows: Learn Time Out: A Learn transmission was not provoked fast enough and the system timed out. Repeat the Learn process. Duplicate Sensor ID: The sensor ID that was programmed to the wheel position is also programmed to another wheel position. 7. When all wheel positions are correctly programmed, press the center button once to save the changes and exit the Learn function. Press the center button again to exit Setup Mode. 36

37 5.6.8 Selecting a new Vehicle Profile Definition If the vehicle profile definition changes, for example, in the event of converting from a rear duallywheel axle to single, wide-base tires; this option gives access to change the number of axles used on the vehicle and the amount of tires mounted per axle. 1. Enter the Setup Mode using the steps outlined in section When in the Setup Mode, press the left button until Profile Definition is highlighted. Then press the right button to select the function. 3. Select the number of axles required for the vehicle profile by pressing the left button. Press the right button after selecting the number of axles to gain access to the axle definition screen. 4. Using the left button, select the axle that needs to be defined as a single, dually or spare tire axle. Press the right button to open the axle profile screen. 5. Press the left button to toggle the axle profile option from single to dually or S for Spare. Once you have selected the required axle profile, press the center button to save your selection and return to the axle selection screen. 6. Repeat steps 4 and 5, until all axles have been given a profile. Press the center button to exit the axle selection screen. This will prompt the Ready to Learn All Tires? confirmation screen. Press the left button to select Yes or press the right button to select No. If No is selected, the profile will remain unchanged from the original and any button can be pressed again to exit to the Setup menu. 7. If Yes is selected in step 6, the Overwrite Existing Profile? screen is entered. Pressing the left button for No will exit the Vehicle Profile Definition mode, with no changes to the current profile. Press any button after the notice appears, to exit back to the Setup menu. Pressing the right button for Yes will initialize the new profile and erase all previous axle and wheel combinations. This process can take several minutes and the display will prompt not to cycle power for the system during this time. 8. The display will now enter the Walk Around Learn Mode for the axle and tires previously selected in the profile definition process. Each tire will be marked in black for learn in a specific order. To learn the marked tire into the system, follow steps 5 to 7 in the Learn Mode procedure under section After all locations have been learned successfully, the gauge will restart and the new vehicle profile definition will be in effect. In the event that the process had to be canceled or power was lost to the system, the gauge will assign placeholder IDs to each unlearned location. After restarting, each of the previously missed locations can be accessed individually via the Learn Sensor menu and be reprogrammed. 37

38 5.6.9 Changing the Password A four digit, numerical password is required to enter the Setup Mode. The default password is Follow the instructions below to customize the password: 1. Enter the Setup Mode using the steps outlined in section When in the Setup Mode, press the left button until Change Password is highlighted. Then press the right button to select the function. 3. The display will then show Enter Password and four digits. Before a new password can be set, the original password must be confirmed. To enter a password, press the left button to scroll the first digit from 9 to 0. When the correct digit is displayed, press the right button to move to the next digit in sequence. 4. Repeat step three until all four digits are entered correctly and then push the right button to enter the password. 5. If the password that was entered was correct, the display will show Enter New Password and four digits. Again, press the left button to scroll the first digit from 9 to 0. When the desired digit is displayed, press the right button to move to the next digit in sequence. 6. Repeat step five until all four digits are entered as desired and then push the right button. 7. The screen will then prompt to Save Password with a choice of YES or NO. If the password entered is correct, press the right button to save it as the new password. Press the left button or the center button to reject the password and enter a new one. 8. Press the center button once to exit to the Setup menu and again to exit Setup Mode. 38
39 D. SmarTire Tire Pressure Monitoring System by Bendix CVS Section D: System Installation - Electrical S E C T I O N 39
 hole saw 2. 1 Ring terminal 22-18 AWG, stud size 8-10 for grounding* Installing the Antennas 1.")
40 6.0 SYSTEM INSTALLATION: ELECTRICAL 6.1 TOOLS REQUIRED Installing the Receiver 1. Two ¼ -20 (M6X1) flange head cap screws with lock washers and nuts 2. Wrenches for tightening cap screw Installing the Display 1. Power drill & 2 1/8" (54mm) hole saw 2. 1 Ring terminal AWG, stud size 8-10 for grounding* Installing the Antennas 1. Power drill & bits * 2. Silicone sealant * 3. 1" open ended wrench or crescent wrench 4. 2 small self-tapping screws for antenna bracket to fit 3/16" holes* medium sized, black cable ties 6. Electrical tape * Tool may not be required 6.2 GETTING STARTED Like all integrated systems, the installation location of each component is dependant upon the location of the other components in the system. As such, it is best to select the overall location of each component before starting. The following diagrams show common vehicle system configurations: Truck with Trailer 1. Dash-mounted display connects to Wireless Gateway Receiver. 2. Wireless Gateway Receiver connects to underside of vehicle. 3. Antenna at rear axle(s) connects to Wireless Gateway Receiver nd Wireless Gateway Receiver mounts to the trailer at its rear axle(s). 5. Trailer lamp mounts within view of the driver and connects to the Wireless Gateway Receiver. 6. Sensors mount to the wheels. 40
 connects to Wireless Gateway Receiver. 4. Sensors mount to the wheels. 6.2.")
41 Straight Trucks, Buses, OTR Vehicles 1. Dash-mounted display connects to Wireless Gateway Receiver. 2. Wireless Gateway Receiver connects to underside of vehicle. 3. Antenna at rear axle(s) connects to Wireless Gateway Receiver. 4. Sensors mount to the wheels Guidelines and Best Practices Use the guidelines below to help select the best installation location for the Wireless Gateway Receiver and the antenna(s). Guidelines are also provided for routing antenna cables. Antenna Placement DO: Choose a location for the antenna that is within the allowable cable length for connection to the Wireless Gateway Receiver (e.g. 40 ft antenna cable will not reach a straight-line point 40 ft away on a given vehicle). Choose a location in which the antenna whip does not contact the vehicle. The antenna should only contact the vehicle at its mounting base. Orient the antenna so that it has clear line of sight to the tires. If it is pointed downward, a minimum of 1.5 feet (46 cm) is required between the tip of the antenna and the ground. If it is pointed upward, it can not be shielded by any metal on the underside of the vehicle. In general, a horizontal antenna orientation along the center line of the vehicle yields the best results. When placing the antenna near the front axle, choose a location that offers protection in the driving direction e.g. if placed on the front cross member, face the antenna rearward on the rear-most vertical side of the cross member. When placing an antenna near or on suspension supports, make sure there is enough room to allow the suspension to travel to its full compression. DO NOT: Do not place the antenna near large concentrations of metal e.g. steel I-beam support, axle differentials, etc. Do not place antenna near large concentrations of electrical wiring, generators, amplifiers or pre-existing transceiver assemblies (e.g. GPS/Telematics systems, CB Radio, Data Loggers, etc). Do not place the antenna on or near moving parts such as steering linkages, drive shafts, or suspension assemblies. 41
42 Avoid placing the antenna close to the ground or having it point downwards instead face the antenna horizontally or point it up into the vehicle if the ground clearance is less than 1.5 ft (46 cm). Antenna Cable Routing DO: Choose the proper cable length for the given antenna location. Protect the cable from heat and sharp edges e.g. keep adequate distance from exhaust pipes and avoid potential chafing on sharp metal. Route the cable along existing cable tree on the underside of vehicle (i.e. along I-beams for tractor trailer). Provide some slack in the cable (a few feet depending on vehicle application) at each end point of cable / antenna to allow for slight repositioning if needed. Route head first for hole-through & magnetic mount antennas when passing cable through frame holes and tight access points (route small cable end first always). Apply cable ties every 2 feet (61 cm) to ensure secure attachment avoid chafing by not over tightening. Secure antenna cable with cable ties on both sides of the connectors for extensions, splitters and antenna mounts. Make sure all connections are properly locked and secured. For TNC Hex heads, apply 17 to 23 inch-pounds of torque. DO NOT: Do not strain the cable and its connectors if length barely reaches choose a longer cable (chassis-flex during driving may tear an already tight cable). Do not subject the cable to sharp bends try to allow for a natural cable path flow. Do not route over or under moving parts like steering linkages and shock mounts. Do not over-tighten cable ties. Receiver Placement For outside mounting, Wireless Gateway Receiver must be properly secured via bolt-on faceplate, heavy duty straps, or custom mount. Mount the Wireless Gateway Receiver away from forward driving direction e.g. if possible, have object between receiver box and open road surface such as a cross member. Preferred mounting orientation to shed water is vertical (Connector side facing down). Apply the same precautions described under Antenna Placement since Wireless Gateway Receiver has built-in antenna. Caution: Make sure all power input lines are fitted with 5 Amp fuses for proper protection of the SmarTire system components. If the Gateway Receiver, Gauge, and Diagnostics port are hooked to the same power line, only one 5 Amp fuse is required before the line branches to each part. 42

 Flange Head Cap screws, attach the receiver to the vehicle. The supplied mounting plate (PN 264.")
: 2.")
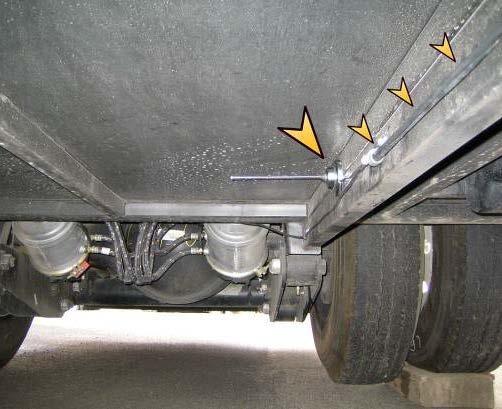
43 6.3 STEP 1: INSTALLING THE RECEIVER AND DISPLAY 1. The Wireless Gateway Receiver has a built-in antenna capable of receiving wireless signals from various sensor types, including tire sensors. It should be externally mounted to the vehicle s chassis or frame rail near the front of the vehicle and in a position as close to the vehicle s centerline as possible. The Receiver can be mounted with the connectors facing downwards or upwards (to protect cables from ground effects damage) and it must always be within clear line of sight of the front wheels. Using the integrated bolt holes and two ¼ -20 (M6X1) Flange Head Cap screws, attach the receiver to the vehicle. The supplied mounting plate (PN ) can be used with existing bolts / bolt holes to mount the receiver (see picture). Torque to 7-10 FT/LBS (13 Nm). For location testing, heavy-duty safety straps may also be temporarily used. Note: To protect the receiver input cables from any ground effects damage it is also permissible to mount the receiver upside down as seen below (cables exiting out the top): 2. With the vehicle s power turned OFF, connect the wiring harness to the main connector on the receiver (see P1 in vehicle wiring harness: Light diagram). Route the J1939 bus and power line through the chassis towards the driver s cab and dashboard area. Identify Power line VIN and Ground line GND in the vehicle wiring harness diagram and connect the power line to a 5 Amp fuse protected, ignition keyed 12 or 24 Volt power source. Ensure that this power source is properly grounded through the GND line. For more information, please refer to the circuit diagram in your vehicle specific manual. 3. Run the display cable (see P5 in vehicle wiring harness: Light diagram) from the wiring harness to the desired location on the dash or consol (may require drilling a hole in the dash). For systems using a 2" SmarTire display, use the dashboard lock ring and metal spring to secure the display in the dash (may require the cutting of a 2-1/8" (54 mm) port hole in the dash see picture, also cut a small notch into the bottom of the hole to create a turn stop. Insert the gauge so that the tab at the bottom fits into the notch. If the lock ring cannot be engaged, either remove the metal spring completely or bend it flat 43
.")


 and within a clear line of sight to the trailer s wheels.")
44 for a better fit. For systems using a dual-light display, identify connector P7 in the vehicle wiring harness diagram (not included under section 5 of the SmarTire manual). Use a spare rocker switch on the dashboard to situate the dual-light display. 4. Connect P5 of the Light vehicle wiring harness to the back of the 2" SmarTire Display / P7 to the back of the dual-light display. Locate the Display power and ground line on the harness diagram (see back of 6-pin Display connector, printed on wire) and plug them into a spare outlet on the vehicle s fuse box with a 5 Amp fuse protection. Ensure that the ground line is properly connected it is possible to use the same ground point as in Step 2. For more information, please refer to the circuit diagram in your vehicle specific manual Trailer Specific Installation 1. For installations on commercial trailers, position the receiver on the centerline of the trailer if possible, between the two rear axles (if 3-axle trailer, position near center axle) and within a clear line of sight to the trailer s wheels. Using the integrated bolt holes and two ¼ -20 (M6X1) Flange Head Cap screws, attach the receiver to a frame bracket or a mounting plate and torque to 7-10 FT/LBS (13 Nm). 2. Attach supplied antenna to the external TNC antenna port. 44
.")


45 3. Locate the ABS ECU power supply line or junction box on the trailer chassis. Plug the ABS Power Splice from the trailer harness into the power supply line at P11 and P12 (see wiring harness: Trailer /98). If no ABS breakout is present, route line F of the trailer harness directly into the junction box via a 5 Amp fuse connector. This may require cutting line F before P11/12. For more information, please refer to the circuit diagram in your vehicle specific manual. 4. Plug the TPMS Indicator Lamp output P13 into the existing trailer lamp (see wiring harness: Trailer /98). If an auxiliary lamp is not already installed, refer to the Bendix optional trailer indicator lamp part number Position the lamp alongside the trailer in an area that is easily viewable from either the left or right rear view mirror. Use the mounting hardware that is supplied with the Lamp module to secure it on the trailer. Run additional 18 gauge cable (not included) from the lamp output of the SmarTire harness to the location of the lamp on the trailer. 5. Connect P1 (see wiring harness: Trailer /98) to the receiver module and secure the diagnostics port P8 and P9 (optional) in a convenient location along the trailer chassis using a medium sized P-clamp around the back of the connector (not included). 6. Interface the SmarTire Diagnostics Software Tool to port P8 (see wiring harness: Trailer /98) to program the trailer s Wireless Gateway Receiver. Refer to the diagnostics tool manual for additional setup information. 45


46 Note: For sliding suspension trailers, route all cables along the vehicle s existing umbilical harness to avoid damage when the slider is moved. Note: Trailers manufactured prior to 1998 do not have an auxiliary power line populated within the 7 pin connector box at the front of the trailer. The auxiliary power is usually on a blue pin/line and would run the length of the trailer. For trailers manufactured prior to 1998, the aux power cable must be installed before the SmarTire harness can be properly connected at the rear. This can be a time-consuming process and should be assessed before the installation of a SmarTire trailer system. 46
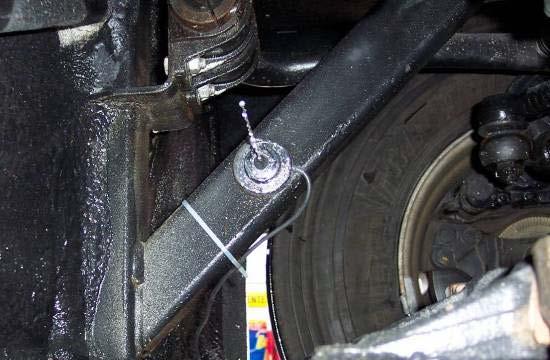
47 6.4 STEP 2: ASSEMBLING AND INSTALLING THE ANTENNA(S) 1. The Wireless Gateway Receiver has an internal antenna that will pick up wireless signals from the front axle. Mount the second antenna at the rear axle. If there are two axles at the rear of the vehicle, mount the antenna between the two axles. 2. Since wireless signals are reflected by metal surfaces, the antenna(s) require a clear lineof-sight to the tires. Mount the antenna / bracket to the underside of the vehicle in a location that is open and unobstructed with as much ground clearance as possible. The bracket / antenna should be installed as close to the axle as possible along the vehicle s centerline and should be attached to frame rails, sub frames, brackets, or face plates as required. 3. Pod Antenna (part #s: ; bracket; hole mount cable): A. Attach the bracket using 2 self-tapping screws (need to fit 3/16" holes) or existing bolts. The mounting holes on the bracket may need to be enlarged to fit existing bolts. If necessary, the bracket can also be flattened with a hammer. B. Once the bracket has been installed, assemble the antenna. Remove the red rubber cap from the threaded connector on the antenna base assembly and unscrew the 1 inch locknut. Be careful not to lose or damage the thin, rubber seal that is pressed into the locknut. Pass the threaded connector through the main hole in the bracket and orient the base assembly so that the TNC cable naturally points in the direction of the cable it will connect to without being bent. The base assembly MUST be properly centered in the hole so that the grooved tabs prevent it from being pulled through when the locknut is tightened. With the rubber seal pressed into the locknut and facing the bracket, screw the locknut back onto the connector using a 1 inch adjustable wrench. Press the rubber base seal against the base of the antenna. When assembled correctly, the rubber base seal will adhere to the antenna base on its own. Carefully thread the antenna onto the locknut and, using one hand to tighten the antenna and the other to ensure the antenna base assembly does not turn, hand tighten the antenna until it is firmly assembled (can not be turned further using one hand) and the rubber base seal slightly overlaps the edges of the metal bracket on all sides. 4. Whip Antenna (part #: ): A. Slide the metal retainer over the antenna whip and pull it tight so that the rubber boot fits snugly in the retainer. B. Install the rubber washer and screw the antenna whip / metal retainer on to the antenna base ensuring that the retainer is not cross threaded. Tighten the assembly using a wrench. C. Completed assembly. 47
48 5. PIFA Antenna (part #: ): A. Remove PIFA from plastic bag and uncoil 2ft TNC connector cable. B. Following step 2, locate a spot along the vehicle underside which will leave a minimum of 3 inches of clearance from any metal object on all sides of the PIFA (except the mounting side). C. Use a minimum of 2 of the 4 integrated mounting holes to bolt the antenna to the frame or a bracket. Do NOT enlarge the mounting holes in the antenna body! Use only matching bolts and washers. Do NOT over tighten the bolts as this may cause damage to the integrated bolt hole sleeves. D. Mount PIFA with flat side facing the forward driving direction along the centerline of the vehicle, close to the axles for best results. This will also prevent the trapping of mud and debris in the base angle of the antenna. Vehicle Direction 6. Tape up the TNC connectors on both ends of the antenna cable extension to prevent any dirt or grease from entering the connector during the cable routing process. Ensure that the proper end is routed from the receiver to the antenna. Run the cable the length of the vehicle and connect it to the external antenna port on the Wireless Gateway Receiver. Secure the antenna cable every 2 feet (61 cm) along the chassis with cable ties and allow for additional cable flex at bend points. Be sure that the cables avoid moving parts and excessive heat. The following pictures are examples of proper cable routing and antenna placement. 48


49 NOTE: These antenna locations are only suggestions as every vehicle is different. 49
50 6.5 WIRELESS GATEWAY RECEIVER SPECIFICATIONS Power, Mounting, and Environmental Requirements Operating voltage range V Typical current consumption (with no external loads) 0.12A 5A fuse is required between the main power line of the receiver and the vehicle battery Preferred mounting orientation to shed water is vertical (Connector side facing down) Preferred Mounting hardware: ¼ -20 (M6X1) Flange Head CAPSCREW, torque to 7-10 FT/LBS (13 Nm) Mating Connector: Plug Tyco Amp Operating temperature range: -40 F to +185 F (-40 C to +85 C); Sealed to IP67;Tested to SAE J1455, J1113 Frequency MHz Communication Interface: RS-232 (diagnostic interface port via harness); SAE J1939 protocol compliant, 250 kbps Wireless Gateway Dimensions (inches) 50
51 6.5.3 Wireless Gateway Connector Pin Description Line Colors versus Pin Numbers for SmarTire harness in terms of populated pins): Harnesses (configuration may vary by Pin Line White Black Red Orange Red Grey Pink Purple White Blue Green Yellow Black Color &Red Pin Clear Line Black Red Black N/A N/A N/A N/A N/A N/A N/A Black or Black Color White The general purpose I/O lines are: 3 digital inputs, 0 32V (pins 4, 5 and 6) 2 high-side drivers, 2A max each (pins 7 and 8) 1 low-side LED driver, 0.15A max (Pin 3) Pins 1, 14, 24, 26, 13: Common Grounds 6.6 SMARTIRE DISPLAY SPECIFICATIONS Power, Mounting, and Environmental Requirements Operating voltage range V Typical current consumption (with no external loads) 30mA Connector type: Deutsch Lock: W6S-Deutsch Plugs: DT06-6S-Deutsch SAE J1939 protocol compliant, 250 kbps 51
52 Overall depth of unit (back of bezel to the end of the connector): 2.55 in. Bezel thickness: in (6.069 mm). Bezel diameter: 2.29 in ( mm). Panel Cutout: Std SAE 2 in. gauge panel cutout Mounting (clamp ring and wave spring): to in (1.27 mm to mm) J1939 Connector Pin Descriptions (Buzzer) Output CAN - L CAN - H Vin GND Backlight Check the back of the 6-pin Deutsch connector for numbering. Line Colors versus Pin Numbers for Standard SmarTire Harnesses (White wires are labeled for Display connector): Pin Line Color Red Black White Yellow Green White 52
53 6.7 VEHICLE WIRING HARNESS: LIGHT Part No:
54 6.8 WIRING HARNESS: TRAILER Part No: /98 54
55 E. SmarTire Tire Pressure Monitoring System by Bendix CVS Section E: System Installation Tire Sensors S E C T I O N 55
56 7.0 SYSTEM INSTALLATION: TIRE SENSORS 7.1 SENSOR OVERVIEW SmarTire TPMS offers two types of tire sensors; a standard tire sensor (orange) that has a battery saving stationary mode, and an always on tire sensor (yellow) that does not. The standard sensor s stationary mode is initiated when the vehicle is stopped or consistently traveling less than 14 mph (22 km/h) for 15 minutes. In stationary mode, the standard tire sensor measures and transmits tire pressure and temperature every 15 minutes. When the vehicle moves 14 mph (22 km/h), a centrifugal switch activates the standard sensor causing it to sense tire pressure and temperature every 12 seconds and transmit tire data every 3 5 minutes. If a pressure change of 3 PSI or a major temperature change is detected, the sensor breaks its regular schedule and transmits tire data immediately. Estimated battery life for the standard tire sensor is 5-7 years or 1 million miles. The always on tire sensor does not have a sleep mode. It senses tire pressure and temperature every 12 seconds and transmits tire data every 3 5 minutes. When equipped with the always on tire sensor, SmarTire TPMS will provide tire data without having to move the vehicle. This tire sensor also accommodates vehicles that seldom travel 14 mph (22 km/h). Without the battery saving sleep mode, always on tire sensors have an estimated battery life of 5 years Break Away Cradle If proper care is not taken when removing or installing a tire on a rim that has a tire sensor installed, damage can occur. Each SmarTire tire sensor is conveniently mounted in a breakaway cradle so that if damage accidentally occurs, the inexpensive cradle is broken instead of the sensor. IMPORTANT NOTICE: PLEASE READ Please read this section carefully and follow each step precisely to ensure that you do not damage a sensor and the sensors are installed in the correct, pre-programmed locations. SmarTire tire sensors can be broken when mounting and dismounting a tire unless specific instructions are followed. If tire work is done by an unauthorized facility, please let them know that a tire pressure monitoring system is installed on the vehicle before they remove a tire from a wheel. Exercise caution when cutting strap (Section 6.2 step 2.). May result in sharp edges! 56


57 7.2 TOOLS REQUIRED Installing the Sensors 1. 5/16" or 8 mm hexagon driver 2. Metal cutter 3. Torque wrench* 4. Tire changing equipment 5. Tire balancing equipment * Tool may not be required 7.3 TIRE SENSOR INSTALLATION 1. Remove the wheel from the vehicle and then remove the tire. 2. Wrap the strap around the rim in the lowest point of the drop center well and mark it 1" (2.5 cm) past the worm gear. Cut the strap at the mark. Excess strap must be removed or it will potentially break-off and damage the tire. 3. Slide on the sensor. 4. With the strap and sensor positioned in the lowest point of the drop center well, feed the end of the strap into the worm gear and pull it tight. Orient the sensor so that it is positioned at the valve with the worm gear 4" (10 cm) away from the edge of the sensor. The sensor must always be installed at the valve in order to know its approximate location after the tire has been mounted. 5. Hand-tighten the strap using a 5/16" (8 mm) hexagon driver until the sensor can not be moved. CAUTION: Do not over tighten the strap. Reference torque: 35 in-lbs (4 Nm). 6. Indicate the location of the sensor by applying the supplied rim label to a clean and dry location on the rim. 57


58 7.4 RE-MOUNTING TIRES AFTER A SENSOR HAS BEEN INSTALLED Please read this section carefully and follow each step precisely to ensure you do not damage the sensor when mounting the tire. If steps are not taken to avoid the sensor located in the drop center well of the rim, it can be damaged by tire beads as the tire is mounted Internal Tire Sensor Servicing SmarTire tire sensors are designed to be serviceable if damage occurs during the mounting or de-mounting process. Each sensor is mounted inside a break-away cradle that is designed to absorb the impact of damage during the tire mounting / de-mounting process. If damage occurs, the inexpensive cradle will break instead of the tire sensor. If a sensor cradle is damaged, it along with the mounting strap must be replaced. Carefully remove the tire sensor from the damaged cradle, re-insert it into a new cradle, and then continue the mounting process Re-Mounting Tires Using Tire Irons To avoid damaging the sensor, simply mount the tire so that the last part of the bead to slip over the flange happens directly at the sensor. Start at one end of the tire and work towards the opposite end with the tire oriented so that the beads are first pushed under the rim flange directly opposite the sensor (1) and then worked over the flange toward the sensor (2). The bead will finally slip over the rim flange at the sensor without contacting it (3). Repeat for the remaining bead Re-Mounting Commercial Tires Using a Vertical Tire Machine 1. Place the rim on the machine so that the rim flange clamp is at the 12 o clock position, the sensor is at the 2 o clock position and the mounting hook is at the 8 o clock position. Rim Flange Clamp Sensor 58


59 2. Advance the wheel clockwise to pass both beads over the rim flange simultaneously. The tire should mount onto the wheel without contacting the sensor. Mounting Hook Re-Mounting Commercial Vehicle Tires Using A Center Post Tire Machine 1. Place the rim on the machine with the mounting shoe at the 9 o clock position and the sensor at the 5 o clock position. Mounting Shoe Sensor 2. Place the tire on the rim with the bottom bead under the flange at the 6 o clock position with the mounting shoe at the 9 o clock position. 3. Advance the mounting shoe clockwise to pass the lower bead over the rim flange. 4. Return the mounting shoe to the 9 o clock position, depress the upper bead under the rim flange at the 6 o clock position and advance the mounting shoe clockwise until the second bead is completely mounted. 59

 before the sensor.")

60 7.4.5 Dual Wheel Assemblies In order to accommodate SmarTire system programming, dual wheels MUST always be mounted on the vehicle with the valve stems 180 apart or as close as possible to opposite each other Re-Mounting Light Truck Tires Using a Tire Machine 1. Place the rim on the turn-table of a tire mounting machine with the sensor at the 7 o clock position and the mount head at the 12 o clock position. 2. Starting from the mount head, manually depress the bottom bead of the lubricated tire on the rim and into the drop center well until its pinch point is approximately 3" (7.5 cm) before the sensor. (Note: The pinch point, also known as a traction point is the position on the rim where the tire bead encounters resistance when trying to slip over the rim flange.) 3. Advance the turn-table clockwise using the mount head to guide the rest of the bottom bead over the flange and on to the rim. When assembled correctly, the bead will slip over the flange without contacting the sensor. 4. Repeat for the top bead. Do not allow the pinch point to slip as the rim rotates or the sensor could be broken. 5. Finish the tire installation as normal (seat the beads, install the valve core, inflate to the recommended cold inflation pressure, balance tires and mount wheels in specified locations). 60

61 7.5 REMOVING A TIRE THAT HAS A SMARTIRE SENSOR INSTALLED This section outlines the correct methods for removing a tire from a wheel that is equipped with a SmarTire sensor. Instructions for using both tire irons and a tire mounting machine are provided. Please read these instructions carefully and follow each step precisely to ensure you do not damage a sensor when dismounting the tire. If steps are not taken to avoid the sensor located in the drop center well of the rim, it can be crushed by the beads as the tire is removed Using Tire Irons 1. After removing the deflated tire / wheel assembly from the vehicle, lay the assembly on a floor mat and unseat both beads directly opposite the sensor. The sensor should be located at the valve stem (the rim mounted decal should also indicate the sensor s location). Do not unseat the bead at or near the sensor / valve stem. 2. Ensure that the mounting side of the wheel is facing upward and both the bead and wheel flange are properly lubricated. 3. Starting near the sensor, lift the top bead over the wheel flange using tire irons and progressively work away from the sensor until the top bead is free. Be careful not to contact the sensor with the tire irons. 4. Again starting near the sensor, repeat the process for the bottom bead until the tire is free from the wheel Using a Tire Mounting Machine 1. After removing the deflated tire / wheel assembly from the vehicle, unseat the beads directly opposite the sensor and valve stem. The sensor should be located at the valve stem (the rim mounted decal should also indicate the sensor s location). Do not break the bead at or near the sensor / valve stem. 2. Position the lubricated tire / wheel assembly on the machine so that the dismount head and the sensor are approximately aligned. 3. Lift the bead over the rim flange with the bead lifting bar and then advance the assembly / dismount head clockwise to remove the top bead. 4. Repeat steps 2 and 3 to remove the bottom bead. NOTE: This information should be provided to tire installers that are not authorized SmarTire TPMS dealers to ensure a sensor is not broken when a tire is dismounted. 61
62 7.6 TIRE SENSOR SPECIFICATIONS Standard Tire Sensor (with cradle) Always On Tire Sensor (with cradle) Power Internal Lithium Battery Internal Lithium Battery Weight 1.89 oz (58.7 g) 1.89 oz (58.7 g) Dimensions 3.58 x 1.65 x 1.34 in. (91 x 42 x 34 mm) 3.58 x 1.65 x 1.34 in. (91 x 42 x 34 mm) Operating Temperature -40 ºF to 257 ºF (-40 ºC to 125 ºC) -40 ºF to 257 ºF (-40 ºC to 125 ºC) Pressure Accuracy +/ PSI (0.65 bar) at 0ºC to 50 ºC +/ PSI (0.65 bar) at 0ºC to 50 ºC Maximum Cold Inflation 160 PSI (11.03 bar) 160 PSI (11.03 bar) Pressure Maximum Sensing 188 PSI (13.0 bar) 188 PSI (13.0 bar) Pressure Battery Life 6 years at 10 hours driving per day 5 years operational, 5 year shelf 62
63 F. SmarTire Tire Pressure Monitoring System by Bendix CVS Section F: Troubleshooting S E C T I O N 63
 mph to wake up the sensors.")
64 8.0 TROUBLESHOOTING GUIDE 8.1 SMARTIRE GAUGE DISPLAY Q&A Q: The Gauge only displays dashes for the tire information; there is no pressure, temperature, or deviation value. A: Depending on the type of tire sensor purchased, the vehicle may need to be driven above fifteen (15) mph to wake up the sensors. If the vehicle is stationary with the ignition on, a time interval of up to 15 minutes may be required for all tire locations to be registered on the Gauge. To facilitate the display or information, use the LF Initiator, SmarTire LF Tool, or SmarTire Hand Tool and initiate each of the tires that have not reported to the Gauge. On the LF Initiator, press initiate as you hold it against the tire sidewall above the valve stem (default sensor location). Hold the LF Initiator in place until the green light turns off. On the SmarTire Hand Tool, press the left-most button as you point the tool s antenna into the tire sidewall above the valve stem (default sensor location). Remember, that both the LF Initiator and SmarTire Hand Tool are capable of activating the inner tire on a dual tire assembly from the outboard tire position. For use of the SmarTire LF Tool, please refer to manual In cases where no transmissions were received from a specific tire, move the LF Initiator or Hand Tool 5 inches in a clockwise or counterclockwise direction and try again. Should the problem persist, a defective, missing, or misplaced sensor may need to be diagnosed see section Q: There is no audible alarm when the Gauge shows a deviation or severe underinflation alert. A: Make sure the optional buzzer is connected to the SmarTire harness and that the buzzer option is set to ON in the Gauge setup menu. Please refer to section Audible Alert Settings for instructions on how to enable the buzzer. Follow the steps below to access the Setup Mode: 1. The Setup Mode can only be accessed from the TPMS Ready screen. Press the center button until the TPMS Ready screen is displayed (screen shows TPMS Ready and tire icon). 2. Press and hold the center button for two seconds and the display will show a password entry screen. If a password has not been set for the system, go to (5). To obtain the password number it may be necessary to talk to the maintenance manager, or similar, to find out the code. There is no default password set for the gauge so if this function is enabled it will be specific to the fleet. 64

65 3. To enter the password, press the left button to scroll the first digit from 9 to 0. When the correct digit is displayed, press the right button to move to the next digit in sequence. 4. Repeat step three until all four digits are entered correctly and then push the right button to enter the password. If the password is correct, the display will enter Setup Mode. If the password is incorrect, the display will indicate that the wrong password was entered and returned to the password entry screen. 5. When in the Setup Mode, press the left button until Buzzer is highlighted. Then press the right button to select the function. 6. The display will then show a Startup setting and an Alarm setting along with their preset values. Press the left button to scroll between the two programmable functions and the right button to select the function for programming. 7. Once selected, press the down button to scroll between setting the function to ON or OFF. When the Startup function is set to ON, SmarTire TPMS will make a noise on start up. When the Alarm function is set to ON, the system will emit an audible alarm when an alert is triggered. When the desired value is displayed, press the right button to select it. 8. Repeat steps 3 and 4 until all settings are correct. To save the new settings, press the center button once. 9. Press the center button again to exit Setup Mode Q: When the Gauge first powers up, the alert lamp is blinking and an exclamation mark is displayed. A few minutes later the alert clears and the display returns to normal. Was there an alert? A: During the start up sequence, the Gauge may clear itself of a previous alert condition or issue a momentary alert if a tire sensor has not reported in. As soon as the tire sensors report their latest readings and they do not constitute an alert condition, the Gauge will clear the alert. Ensure that the user keeps an eye on the particular alert until it is cleared. If the alert does not clear itself, the user may indeed have an alert condition that needs to be checked further. Updating the given tire position with new information by using the LF Initiator or Hand Tool (press Initiate ), would clear the alert faster, unless an alert condition does exist or the sensor is malfunctioning. 65


: Harnesses (White wires are Pin 1 2 3 4 5 6 Line Color Red Black White Yellow Green White Check the voltage on pin")
66 8.1.4 Q: The Gauge appears to turn itself on and off, flicker repeatedly, or does not turn on at all when the ignition is on. A: Check the Gauge power and ground wire hook ups in the fuse box to ensure they are properly seated in their respective sockets. In cases where terminal rings are used, ensure that the terminal screws are properly fastened. If the problem persists, please contact your local SmarTire product representative. Also check the 6-pin Deutsch connector at the back of the Gauge for any damage and a proper fit. Unplug the connector and check the pins in the Gauge socket as well as on the connector. (Buzzer) Output CAN - L CAN - H Vin GND Backlight Check the back of the 6-pin Deutsch connector for numbering. Line Colors versus Pin Numbers for Standard SmarTire labeled for Display connector): Harnesses (White wires are Pin Line Color Red Black White Yellow Green White Check the voltage on pin 1 to be either 12V or 24V when ignition is turned on using a Voltmeter. In addition, locate the SmarTire Receiver power supply splice in either the engine compartment or in-cab fuse panel and also check for a 12V to 24V power supply during ignition on. When checking the engine compartment for the power splice location, follow the receiver harness from the frontal underbody up into the engine bay to identify on which side of the engine bay the splice is located. Usual splice points are near headlight and auxiliary device cable looms. Example of harness routed towards right-hand frame rail with power splice at auxiliary driving light in front right corner of engine bay: 8.2 SMARTIRE RECEIVER Q&A 66


67 8.2 SMARTIRE RECEIVER Q&A Q: The Gauge or Diagnostics software is not receiving any information from the receiver. A: Check to make sure the LED indicator light on the front of the receiver lights up when the ignition is switched on. The receiver LED will turn on at the same time the ignition key is turned and remain on for 2 seconds, then turn off or blink depending on its configuration. If the light does not turn on at all, check the power supply connections and 5 Amp fuse, if installed, in the fuse panel that connects to the receiver power line. If the receiver continues to be unresponsive, please contact your local SmarTire product representative. Also, make sure that the CAN High (yellow) and CAN Low (Green) lines are properly connected on the back of the Gauge, as well as on the Tyco P1 Superseal connector at the receiver. Check to make sure the Tyco P1 Superseal connector is fully locked (top two, white tabs are pushed all the way down and flush with the female 26 pin panel) and that it is completely seated in the receiver (listen for the Click of the locking tab as the connection is made). If the tabs are not fully locked then the pins can be pushed back when the connector is engaged TNC Connector On-Board LED Fully Locked - Correct Unlocked - Incorrect 67
68 In cases where the LED indicator light is blinking multiple times with a pattern and there is no data being transmitted from the receiver, but the display is powered and has initialized, check the blink code table below for reference: Alarms Priority On Board LED Solution NO ALARMS 0 Off SECOND LEVEL LOW PRESSURE (SAL) 13 Off PREVIOUS SAL 13 Off SAL CLEARED 0 Off FIRST LEVEL HIGH PRESSURE (FAL) 11 Off FIRST LEVEL LOW PRESSURE (FAL) 11 Off PREVIOUS FAL 11 Off FAL CLEARED 0 Off HIGH TEMPERATURE 9 Off PREVIOUS HIGH TEMPERATURE 9 Off HIGH TEMPERATURE CLEARED 0 Off RF SUBSECTION ERROR 7 Pattern flashing code: 7 Replace Receiver INTERNAL ERROR 7 Pattern flashing code: 7 Replace Receiver ROM TO BOTH COPY PERFORMED 5 Pattern flashing code: 5 Check Settings with DDT SET UP ERROR 5 Pattern flashing code: 5 Check Settings with DDT SENSOR ERROR SET 3 Pattern flashing code: 3 Diagnose Sensor Error PREVIOUS SENSOR ERROR 3 Pattern flashing code: 3 Diagnose Sensor Error SENSOR ERROR CLEARED 0 Off FACTORY TO CUSTOM COPY PERFORMED 1 Pattern flashing code: 1 Normal Operation CUSTOM TO FACTORY COPY PERFORMED 1 Pattern flashing code: 1 Normal Operation BLACK BOX INITIALIZED 1 Pattern flashing code: 1 Normal Operation WATCHDOG RESET 1 Pattern flashing code: 1 Normal Operation AUTOLEARN COMPLETE 1 Pattern flashing code: 1 Normal Operation Note: Flash patterns will have periods of 0.3 second on and 0.3 second off repeating every 6 seconds. The number of high pulses in each 6 second window will be determined by a code. For example if the flash code is 2, the pattern will be 0.3 second on, 0.3 second off, 0.3 second on, 5.1 seconds off and then repeated. 8.3 SMARTIRE SYSTEM Q&A Q: Several tires on the rear axle(s) are reporting sensor diagnostic trouble codes. A: Check the condition of the rear antenna to ensure it has not been damaged, bent, or moved. Also, check the condition of the antenna cable leading to the front of the vehicle as well as the connection of the antenna cable to the receiver. If the sensor diagnostic trouble codes continue to show up, please contact your local SmarTire product representative. If a cluster of tire sensors continues to issue sensor diagnostic trouble codes, the cause is most likely a malfunctioning rear antenna or antenna cable as described above since it would be responsible for receiving tire sensors on the entire rear section of the vehicle. Check for above mentioned physical damage and verify the receiver programming using the SmarTire Diagnostics Software. In addition, check the following connections in more detail if no external damage can be found: 68


.")

69 1. Disconnect the antenna from the TNC connector at the front of the receiver unit and check for water ingress, dirt, pin & connector corrosion on the inside, and a bent center pin. Taking safety precautions, including eye protection, blow air into both connectors to clean out any coarse dirt or water. Should the center pin be bent or damaged, a new connector may need to be crimped on. 2. Disconnect the 12 inch hole mount adaptor cable at the rear of the vehicle, just before the pod/whip antenna. Perform the same check as step Unscrew the antenna pod/whip from the hole-mount base and check for water ingress, dirt and corrosion. Ensure that the rubber sealant ring is intact. Clean any rust or dirt residue off the center contact area on the hole-mount base and the flat metal contact on the antenna pod. You may use 400-grit sandpaper and lightly brush each surface (see picture below). Secure the pod back on its base without cross threading the socket and apply silicone sealant around the base of the antenna in case the rubber seal was damaged. Check to make sure the antenna pod or whip is securely fastened to the hole-mount base. Advanced Check: In cases where the above steps did not solve the problem, perform an electrical continuity test on the TNC antenna extension cable between the receiver and 12" hole-mount. Follow the steps below: a. Disconnect the pod antenna from its base at the back of the vehicle. b. Disconnect the TNC extension from the TNC connector at the receiver on the front of the vehicle. c. Use a Multimeter to check the resistance between the inside pin and outside jacket it should be in the Mega ohm range i.e. no numbers are displayed below the 2M scale; should this NOT be the case the cable will have to be replaced; you may also perform this check at the antenna base between the brass center and outer lock nut. 69
70 d. If step C was successful, connect a 9V battery to the antenna base assembly by taping one contact across the brass center and the other along the outer locking nut. e. Use the Multimeter to measure the voltage on the brass center. You may also choose to measure the voltage at the end-of-line TNC connector that connects to the receiver. If there is no significant change in the battery voltage reading, the problem lies elsewhere. Otherwise the 30 ft TNC extension cable and possibly the antenna base assembly must be replaced. Field Tip: Use the 9V battery out of the LF Tool or LF Initiator for step D Q: A tire continues to show a deviation value/alert although it was aired up properly. A: Check the CIP value in the Gauge to make sure it matches that of the intended inflation value for the tire in question. To do so, please refer to section in the SmarTire system manual as well as the inflation tables under section 1.4. If the CIP value is matched to the recommended inflation pressure for the vehicle and the prevailing ambient temperature but the deviation value continues to show up, the tire is exhibiting a slow leak. Take appropriate steps to have the tire inspected for any damage or leaks. Follow the steps below to access the Setup Mode: 1. The Setup Mode can only be accessed from the TPMS Ready screen. Press the center button until the TPMS Ready screen is displayed (screen shows TPMS Ready and tire icon). 2. Press and hold the center button for two seconds and the display will show a password entry screen. If a password has not been set for the system then go to (5). To obtain the password number it may be necessary to talk to the maintenance manager, or similar, to find out the code. There is not a default password set for the gauge so if this function is enabled it will be specific to the fleet. 3. To enter a password, press the left button to scroll the first digit from 9 to 0. When the correct digit is displayed, press the right button to move to the next digit in sequence. 4. Repeat step three until all four digits are entered correctly and then push the right button to enter the password. If the password is correct, the display will enter Setup Mode. If the password is incorrect, the display will indicate that the wrong password was entered and return to the password entry screen. 5. When in the Setup Mode, press the left button until Axle Params is highlighted. Then press the right button to select the function. 6. The first axle will then be displayed along with its CIP value. Press the left button to scroll to each programmed axle on the vehicle. Each time the left button is pressed, the axle designator will change to the next axle in sequence and the CIP for that axle will be displayed. Press the right button to select the axle for programming. 70
71 7. Press the left button to increase the number or the right button to decrease the number until the desired value is shown. Hold down either button to quickly increase or decrease the number. When the desired value is displayed, press the center button to save the value. 8. Repeat steps 3 and 4 to continue customizing the CIP values for each axle until all axles are programmed correctly. 9. To save the changes and exit the Axle Params function, press the center button once. Press the center button again to exit Setup Mode Q: Pressure readings at a tire location do not change on the gauge when air is added, or removed, to correct tire pressure value. A: When the transmitters are in stationary mode they sense pressure and transmit every 15 minutes. Wait for a new transmission to be received or initiate a transmission with the LF Initiator, SmarTire LF Tool, or SmarTire Hand Tool. Transmitters will transmit data every 3 to 5 minutes. In cases where no transmission was received from the specific tire, move the LF Initiator, Hand Tool, or LF Tool 5 inches in a clockwise or counterclockwise direction and try again. Should the problem persist, a defective, missing, or misplaced sensor may need to be diagnosed see section Q: Pressure readings at a tire location do not change on the gauge when air is added, or removed, to correct tire pressure, and a new transmission has been received. A: Tire / Wheel assemblies may have been relocated on the vehicle without the receiver being updated. Cycle power to the receiver, initiate a transmission from that tire location and note the location where pressure is registered on the display. Correct the preprogrammed tire locations as necessary using the Gauge or Diagnostics Software and Hand Tool, LF Tool, or LF Initiator. The sensor location correction can be made using the Gauge and LF Tool, SmarTire Maintenance Tool, or LF Initiator by going through the single tire learn process for each affected tire location. In the case of a sensor location mismatch, at least 2 tire positions need to be corrected. Follow the steps below when using the Gauge Display IMPORTANT DO NOT POWER DOWN THE SYSTEM DURING STEPS a. to c. OR THE DATA IN THE RECEIVER COULD BE CORRUPTED. a. The first tire must be deleted and cannot be learned right away since it will cause a Duplicate Sensor error. Abort the learn process by pressing the Setup button and then reenter the learn menu and select the second tire for learn. At this point, press the setup button to delete the second tire and now learn the correct tire (i.e. the tire that was deleted earlier) using the LF Initiator, LF Tool or Hand Tool. b. Upon completion, return to the first tire location and learn the new sensor ID by pressing the setup button to yet again delete the tire and then learn the new position using the LF Initiator, LF Tool or Hand Tool. 71

72 c. Exit the Learn Mode using the setup button and press it once more to return to the TPMS Ready screen. When using the SmarTire Diagnostics Software, simply enter the correct ID numbers under the Setup/Sensor configuration tab (write down the ID numbers of the affected tires before assigning them to new tire locations). If more than 2 tires are affected, you may also choose to carry out a complete relearn of all tires. 8.4 DIAGNOSING A DEFECTIVE, MISSING, OR MISPLACED SENSOR In the event that a tire sensor does not report to the display after having gone through the steps above, the following sensor checks should also be performed: a. Try to initiate the sensor opposite of the valve stem. There are times when the tire installer accidentally places the sensor 180 degrees opposite of the valve by misreading the instructions (sensors are required to be placed 180 degrees opposite of each other for dual wheel assemblies). Check for new data on the Gauge for the affected wheel position. b. If step a. was unsuccessful, try to initiate the sensor at the bottom of the wheel, no matter where the valve stem is located. If this attempt updated the display screen, rotate the wheel 180 degrees forward and initiate the sensor again at the BOTTOM of the wheel. If the second initiation also provided new data (cycle power between tries to empty the screen, not necessary when 72
Trucks. Tire Pressure Monitoring System (TPMS) Contents: Volvo Trucks North America Greensboro, NC USA PV
 Contents: Volvo Trucks North America Greensboro, NC USA PV") Volvo Trucks North America Greensboro, NC USA DService Bulletin Trucks Date Group No. Page 6.2009 776 00 1(18) Tire Pressure Monitoring System (TPMS) Tire Pressure Monitoring System (TPMS) Since properly
Volvo Trucks North America Greensboro, NC USA DService Bulletin Trucks Date Group No. Page 6.2009 776 00 1(18) Tire Pressure Monitoring System (TPMS) Tire Pressure Monitoring System (TPMS) Since properly
Instruction Manual. SmarTire Dealer Programming Tool. PN: Revision Copyright 2006 SmarTire Systems Inc.
 SmarTire Dealer Programming Tool PN: 710.0021 Revision 1.04 Instruction Manual Copyright 2006 SmarTire Systems Inc. Duplication of this document in whole or in part for any purposes other than those for
SmarTire TPMS Maintenance Hand Tool. Revision User Manual
 SmarTire TPMS Maintenance Hand Tool Revision 1.04 User Manual Page 2 Table of Contents FCC Compliance Label... 4 User Interface Illustration... 4 Introduction... 5 Testing Tire Sensors... 5 Main Menu...
Wireless Tire Pressure and Temperature Monitoring System Instruction Manual Model #: TM-507 SCE 507 Commercial Cap Sensors with Monochrome Display
 Wireless Tire Pressure and Temperature Monitoring System Instruction Manual Model #: TM-507 SCE 507 Commercial Cap Sensors with Monochrome Display Thank you for purchasing the TST Tire Pressure Monitoring
SmarTire TPMS Maintenance Hand Tool. Revision User Manual
 SmarTire TPMS Maintenance Hand Tool Revision 1.03 User Manual Page 2 Table of Contents FCC Compliance Label...4 User Interface Illustration...4 Introduction...5 Testing Tire Sensors...5 Main Menu...6 Main
SMARTIRE FOR RVs SYSTEM GUIDE
 SMARTIRE FOR RVs SYSTEM GUIDE Suite 150, 13151 Vanier Place Richmond, BC, Canada, V6V 2J1 info@smartire.com 604.276.9884 www.smartire.com SMARTIRE FOR RVs SYSTEM GUIDE Thank-you for purchasing SmarTire
SD Bendix M-21 and M-22 AntiLock Modulator Assembly DESCRIPTION M-21 MODULATOR M-22 MODULATOR
 SD-13-4793 Bendix M-21 and M-22 AntiLock Modulator Assembly CONNECTOR DELIVERY (CAST-IN ID #2) (CAST-IN ID #3) DELIVERY (CAST-IN ID #2) (CAST-IN ID #1) DELIVERY DELIVERY (CAST-IN ID #1) CONNECTOR MOUNTING
Wireless Tire Pressure and Temperature Monitoring System Instruction Manual Model #: TM Cap Sensors
 Wireless Tire Pressure and Temperature Monitoring System Instruction Manual Model #: TM-510 510 Cap Sensors Thank you for purchasing the TST Tire Pressure Monitoring System. With minimal care, your new
Wireless Tire Pressure and Temperature Monitoring System Color Display Manual. Wide Screen Color Display Model #: TST-507-D-C
 Wireless Tire Pressure and Temperature Monitoring System Color Display Manual Wide Screen Color Display Model #: TST-507-D-C Thank you for purchasing the TST Tire Pressure Monitoring System. With minimal
Smart Sensor Pro+ User Guide
 Smart Sensor Pro+ User Guide Important Information FCC Notice This device complies with part 15 of the FCC Rules. Operation is subject to the following two conditions: 1. This device may not cause harmful
Instructions for the Vertical and Lateral Alignment of Bendix Radar Sensors
 Instructions for the Vertical and Lateral Alignment of Bendix Radar Sensors This is an extract from the Bendix Service Data Sheet SD-13-4962 Bendix Wingman Advanced. To download the full document, visit
Function ECU, Wireless
 Commercial Vehicle Systems Product DATA PD-551-000 Function ECU, Wireless The is a Gateway Receiver system to alert the driver if any monitored tyre runs under its normal pressure or above its normal temperature.
Tires are available in a number of sizes and tread patterns dependent on the vehicle usage. Tire sizes are as follows:
 Published: Jan 26, 2005 Wheels and Tires GENERAL A number of alloy wheel and tire size combinations are available. A Tire Pressure Monitoring System (TPMS) is also available. This system monitors the pressure
Function ECU, Wireless
 Commercial Vehicle Systems Product DATA PD-551-000 Function ECU, Wireless The is a Gateway Receiver system to alert the driver if any monitored tyre runs under its normal pressure or above its normal temperature.
Tire Pressure Monitoring System (TPMS) Introduction
 Introduction") Tire Pressure Monitoring System (TPMS) Applicable only in the United States Introduction In this section you ll find information about: Indicator light (telltale) Indicator light (telltale) Tire Pressure
Tire Pressure Monitoring System (TPMS) Applicable only in the United States Introduction In this section you ll find information about: Indicator light (telltale) Indicator light (telltale) Tire Pressure
TALON 22 WHEEL & TALON X-TREME 38 WHEEL TPMS, UP to 188 PSI PRESSURE AND TEMPERATURE WITH CAP OR FEEDTHRU SENSORS
 TALON 22 WHEEL & TALON X-TREME 38 WHEEL TPMS, UP to 188 PSI PRESSURE AND TEMPERATURE WITH CAP OR FEEDTHRU SENSORS Thank you for your purchase of The HawksHead TALON OR TALON X-TREME TPMS System With ease
翔鑫科技股份有限公司. Oro Technology Co., LTD. 無線胎壓監測器 Tire Pressure Monitoring System 型號 : W410
 翔鑫科技股份有限公司 Oro Technology Co., LTD 無線胎壓監測器 Tire Pressure Monitoring System 型號 : W410 ORO TPMS User Manual To ensure correct operations and services please read these instructions before installing and
Valve stems pictured may differ from stems packed in kit.
 1504-1510 Key Features: Visual and audible warnings Set desired PSI level Mounts to windshield or dashboard Alerts when tire pressure is too low Alerts when tire pressure is too high Alerts when tire temperature
SD Bendix MV-3 Dash Control Module DESCRIPTION. Bottom View
 SD-03-3415 Bendix MV-3 Dash Control Module MOUNTING PLATE MOUNTING HOLES (4) Dual Circuit SUPPLY Check VALVE AUXILIARY PORT (Optional) delivery DESCRIPTION secondary supply Trailer delivery FIGURE 1 -
Full Function Display User s Manual
 Full Function Display User s Manual SmarTire Systems Inc. reserves the right to change the contents of this manual at any time and without notice. The information contained in this manual is proprietary
Key Features: Alerts when tire pressure is too low Alerts when tire pressure is too high Alerts when tire temperature is too high
 Key Features: Visual and audible warnings Set desired PSI level Alerts when tire pressure is too low Alerts when tire pressure is too high Alerts when tire temperature is too high Mounts to windshield
COVER. Bendix ATR-6 Antilock. Traction Relay Valves DELIVERY PORTS (6) FIGURE 1 - BENDIX ATR-6 (AND ATR-3 ) ANTILOCK TRACTION RELAY VALVES
 FIGURE 1 - BENDIX ATR-6 (AND ATR-3 ) ANTILOCK TRACTION RELAY VALVES") SD-13-4861 Bendix ATR-6 and ATR-3 Antilock Traction Relay Valves 2 PIN SOLENOID CONNECTOR Bendix ATR-3 Antilock Traction Relay Valves CONTROL SOLENOID CONTROL PORT COVER Bendix ATR-6 Antilock Traction
SD-13-4861 Bendix ATR-6 and ATR-3 Antilock Traction Relay Valves 2 PIN SOLENOID CONNECTOR Bendix ATR-3 Antilock Traction Relay Valves CONTROL SOLENOID CONTROL PORT COVER Bendix ATR-6 Antilock Traction
SD Bendix SR-5 Trailer Spring Brake Valve DESCRIPTION PORTS. 1-1/2" or 3/4" NPT Spring Brake Reservoir Mounting (SPR BK RES)
") SD-03-4516 Bendix SR-5 Trailer Spring Brake Valve PRESSURE PROTECTION SR-5 IDENTIFICATION HOLE 1/4 NPT (2) COVER* FIGURE 1 DESCRIPTION 1/4 NPT TRAILER 1/4 NPT SR-5 TRAILER *SHOWN WITH OPTIONAL ANTI-COMPOUNDING
SD-03-4516 Bendix SR-5 Trailer Spring Brake Valve PRESSURE PROTECTION SR-5 IDENTIFICATION HOLE 1/4 NPT (2) COVER* FIGURE 1 DESCRIPTION 1/4 NPT TRAILER 1/4 NPT SR-5 TRAILER *SHOWN WITH OPTIONAL ANTI-COMPOUNDING
Key Features: Visual and audible warnings Set desired PSI levels Adjustable windshield mount included
 Key Features: Visual and audible warnings Set desired PSI levels Adjustable windshield mount included Alerts when tire pressure is too low or too high Alerts when tire temperature is too high Easy Plug-In
Indicator light (telltale) TPMS-DIRECT EMPTY MODULE for REUSE Tire Pressure Monitoring System (TPMS) and recalibration with the MFI
 TPMS-DIRECT EMPTY MODULE for REUSE Tire Pressure Monitoring System (TPMS) and recalibration with the MFI") Tire Pressure Monitoring System (TPMS) Introduction In this section you ll find information about: Indicator light (telltale) TPMS-DIRECT EMPTY MODULE for REUSE Tire Pressure Monitoring System (TPMS) and
Tire Pressure Monitoring System (TPMS) Introduction In this section you ll find information about: Indicator light (telltale) TPMS-DIRECT EMPTY MODULE for REUSE Tire Pressure Monitoring System (TPMS) and
SD Bendix SV-1 Synchro Valve SV-3 & SV-4 Trailer Release Valve CONTROL CONTROL EXHAUST EXHAUST DELIVERY DELIVERY SUPPLY SUPPLY
 SD-03-4020 Bendix SV-1 Synchro Valve SV-3 & SV-4 Trailer Release Valve BENDIX SV-3 BENDIX SV-4 PISTON PISTON PISTON PISTON 1/8" P.T. BODY 1/8" P.T. GUIDE BODY GUIDE CHECK DETAIL OF BENDIX SV-3 DETAIL OF
Mazda New CX-5 TPMS Pressure by Location Display TABLE OF CONTENTS TIRE PRESSURE MONITORING SYSTEMS, TPMS... 2
 Mazda New CX-5 TPMS Pressure by Location Display TABLE OF CONTENTS TIRE PRESSURE MONITORING SYSTEMS, TPMS... 2 NOTICE... 2 SPECIFICATIONS OF TPMS... 4 ACCESSORIES... 4 DISPLAY UNIT INSTALLATION... 5 SYSTEM
SD Bendix TP-4 Tractor Protection Valve (Formerly VM-1) DESCRIPTION
 DESCRIPTION") SD-03-3653 Bendix TP-4 Tractor Protection Valve (Formerly VM-1) CIRCUIT DELIVERY PORT (SCD) PRIMARY CIRCUIT DELIVERY PORT (PCD) EMERG. STOP LIGHT SWITCH (TE-SLS) PORT EMERG. SUPPLY (TES) PORT MOUNTING
SD-03-3653 Bendix TP-4 Tractor Protection Valve (Formerly VM-1) CIRCUIT DELIVERY PORT (SCD) PRIMARY CIRCUIT DELIVERY PORT (PCD) EMERG. STOP LIGHT SWITCH (TE-SLS) PORT EMERG. SUPPLY (TES) PORT MOUNTING
DIAGNOSIS AND TESTING
 204-04-1 Wheels and Tires 204-04-1 DIAGNOSIS AND TESTING Tire Pressure Monitoring System Special Tool(s) Vehicle Communication Module (VCM) and Integrated Diagnostic System (IDS) software with appropriate
TPMS (Tire Pressure Monitoring Systems)
") P458 App English manual V1.3 2016 TPMS (Tire Pressure Monitoring Systems) Tire Pressure Monitoring Systems (TPMS) improves safety while driving. Once installed in your vehicle, the system will automatically
P458 App English manual V1.3 2016 TPMS (Tire Pressure Monitoring Systems) Tire Pressure Monitoring Systems (TPMS) improves safety while driving. Once installed in your vehicle, the system will automatically
NO PART OF THIS DOCUMENT MAY BE REPRODUCED WITHOUT PRIOR AGREEMENT AND WRITTEN PERMISSION OF FORD PERFORMANCE PARTS.
 Table of Contents Table of Contents... 1 Getting Started... 2 ProCal Flash Tool... 2 Verify Package Contents... 2 Getting to Know the ProCal 3 Software... 3 Prepare Vehicle for Flashing... 7 Download Calibration
Please read this Manual carefully before using this product.
 Manufacturing LLC Please read this Manual carefully before using this product. 360SL Monitors up to 38 different wheel positions I. INTRODUCTION The Doran 360SL (SmartLink) is a full-time wireless electronic
Installation Instructions
 Installation Instructions Recall Campaign No. 16E045 FIELD REPAIR KIT FOR THE BENDIX SR-5 TRAILER SPRING BRAKE VALVE Spring Retainer Reservoir Fitting 1/4" P.T. Service/Spring Brake Reservoir (2) SR-5
IVTM Installation Manual
 Integrated Vehicle Tire Pressure Monitoring IVTM Installation Manual 2nd edition Copyright WABCO 2006 Vehicle Control Systems An American Standard Company The right of amendment is reserved Version 002/06.06(us)
TripTek Tire Car Kit Installation Procedure
 TripTek Tire Car Kit Installation Procedure ANTENNA INSTALLATION 1. Assemble the antenna. Be sure to install the rubber washer and tighten the assembly using a wrench. 2. Magnetically mount the antenna
Owners Manual for TPMS plus GPS
 To ensure correct operation and service please read these instructions before installing and operating the TPMS feature of the TPMS/GPS unit. Owners Manual for TPMS plus GPS TABLE OF CONTENTS TIRE PRESSURE
T P M S. Multi Wheel Bluetooth. Tire Pressure Monitoring System. User Manual. Model: External
 T P M S Multi Wheel Bluetooth Tire Pressure Monitoring System User Manual Model: External Table of Contents 1. PRODUCT INTRODUCTION... 2 2. NOTICE... 2 3. BLE TPMS SPECIFICATION... 3 4. BLE TPMS PACKAGE...
SD Bendix TC-4 Modulating Control Valve TYPICAL PIPING DIAGRAM EXHAUST PORT DELIVERY PORT DELIVERY PORT FIGURE 1 SUPPLY PORT FIGURE 2
 SD-03-4503 Bendix TC-4 Modulating Control Valve EXHAUST DELIVERY DELIVERY FIGURE 1 SUPPLY TC-2 TP-2 TRAILER SERVICE BRAKE CHAMBERS GAUGE TW-1 MANIFOLD TC-2 SV-1 DS-1 COUPLINGS TRAILER EMERGENCY SPRING
Multi Wheel Bluetooth Tire Pressure Monitoring System User Manual Model: External
 T P M S Multi Wheel Bluetooth Tire Pressure Monitoring System User Manual Model: External Table of Contents 1. PRODUCT INTRODUCTION... 2 2. NOTICE... 2 3. BLE TPMS SPECIFICATION... 3 4. BLE TPMS PACKAGE...
SD Bendix Manual Slack Adjusters DESCRIPTION ADJUSTING MECHANISM OPERATION
 SD-05-1200 Bendix Manual Slack Adjusters WORM SHAFT (LOCK SCREW) FIGURE 1 - POSITIVE LOCK TYPE SLACK ADJUSTER DESCRIPTION In an s-cam type foundation brake, the final link between the pneumatic system
The monitor can be placed on the dashboard, on the sun visor or mounted in any convenient place in the vehicle.
 1 Introduction Congratulations on purchasing the new TYREGUARD 400 - TYRE PRESSURE MONITORING SYSTEM (TPMS). This system is a safety system for monitoring vehicle s tyre air pressure and temperature. It
SYSTEM WIRELESS TIRE PRESSURE AND TEMPERATURE MONITORING SYSTEM (TPMS)
") EEZ RV PRODUCTS EezTire T515 SYSTEM WIRELESS TIRE PRESSURE AND TEMPERATURE MONITORING SYSTEM (TPMS) Instruction Manual Model No: TM-515T22/SP TABLE OF CONTENTS High Temperature Alert... 22 Fast Leakage
EEZ RV PRODUCTS EezTire T515 SYSTEM WIRELESS TIRE PRESSURE AND TEMPERATURE MONITORING SYSTEM (TPMS) Instruction Manual Model No: TM-515T22/SP TABLE OF CONTENTS High Temperature Alert... 22 Fast Leakage
REV F2.0. User's Manual. Hydraulic ABS (HABS) Hydraulic Power Brake (HPB) Page 1 of 28
 Hydraulic Power Brake (HPB) Page 1 of 28") REV F2.0 User's Manual Hydraulic ABS (HABS) Hydraulic Power Brake (HPB) Page 1 of 28 Table of Contents INTRODUCTION...4 Starting TOOLBOX Software... 5 MAIN MENU...6 System Setup... 6 Language... 7 Select
REV F2.0 User's Manual Hydraulic ABS (HABS) Hydraulic Power Brake (HPB) Page 1 of 28 Table of Contents INTRODUCTION...4 Starting TOOLBOX Software... 5 MAIN MENU...6 System Setup... 6 Language... 7 Select
Owner's Manual. Remote Security and Convenience System INS0866 8/98
 Remote Security and Convenience System Owner's Manual IMPORTANT NOTE: The operation of the SURESTART as described in this manual is applicable to most vehicles. However, due to the engine type and configuration
Model PRO-9775T Owner's Manual 4 Button Remote Start Security System With Plug-In Shock Sensor & Starter Disable
 Model PRO-9775T Owner's Manual 4 Button Remote Start Security System With Plug-In Shock Sensor & Starter Disable FEATURES:! 2 Four Button Programmable RF Transmitters! Four Channel Code Learning Receiver
To ensure correct operation and service please read these instructions before installing and operating the TPMS P451 TPMS Manual TABLE OF CONTENTS
 To ensure correct operation and service please read these instructions before installing and operating the TPMS P451 TPMS Manual TABLE OF CONTENTS TIRE PRESSURE MONITORING SYSTEMS, TPMS... 2 NOTICE...
Model PRO-9675FT4 Owner's Manual
 Model PRO-9675FT4 Owner's Manual 4 Button Remote Start Security System With Plug-In Shock Sensor & Starter Disable FEATURES : w 2 Four Button Programmable RF Transmitters w Four Channel Code Learning Receiver
Installation and User Manual. with RAIN SENSOR.
 with RAIN SENSOR www.solarsmartopener.com Revision..0 TABLE OF CONTENTS Features In The Box Further Items Required Basic Operation Solar Panel and Operator Installation Operator Installation Solar Panel
Tire. Operator s Manual. For Monitoring Tire Pressure & Temperature.
 Tire Operator s Manual For Monitoring Tire Pressure & Temperature www.triptek.net Trademarks Coretronics is a registered trademark, and TripTek is a trademark of Coretronics, Inc. SmarTire is a registered
SD Bendix PP-7 Trailer Supply Valve FUNCTION AND DESCRIPTION
 SD-03-3617 Bendix PP-7 Trailer FUNCTION AND DESCRIPTION NUT & THREAD 1/8 P.T. SUPPLY EXHAUST The PP-7 trailer supply valve provides in cab control for the tractor protection system and functions in conjunction
PN# A,13-316A,13-317A, , , & TireGard
 PN# 13-315A,13-316A,13-317A, 13-325, 13-326, & 13-327 TireGard Wireless Tire Pressure Monitoring System Table of Contents Precautions 2 TireGard Features and Benefits 2 Controls 3 LCD Receiver/Monitor
SECONDARY SERVICE EXTERIOR R-12DC VALVE (MODEL WITH 4 VERTICAL DELIVERY PORTS) DELIVERY COVER SECONDARY RELAY PISTON VALVE RETAINER INLET EXHAUST
 DELIVERY COVER SECONDARY RELAY PISTON VALVE RETAINER INLET EXHAUST") SD-03-1068 Bendix R-12DC Relay Valve with Biased Double Check PRIMARY SECONDARY EXTERIOR R-12DC (MODEL WITH 4 VERTICAL DELIVERY PORTS) SUPPLY (2) EXTERIOR R-12DC (MODEL WITH 2 HORIZONTAL PORTS) DELIVERY
SD-03-1068 Bendix R-12DC Relay Valve with Biased Double Check PRIMARY SECONDARY EXTERIOR R-12DC (MODEL WITH 4 VERTICAL DELIVERY PORTS) SUPPLY (2) EXTERIOR R-12DC (MODEL WITH 2 HORIZONTAL PORTS) DELIVERY
Idle Timer Controller - ITC Freightliner MT45 Contact InterMotive for additional vehicle applications
 An ISO 9001:2008 Registered Company System Operation Idle Timer Controller - ITC805 2013-2018 Freightliner MT45 Contact InterMotive for additional vehicle applications The ITC805 system shuts down idling
International A26 (2017)
") International A26 (2017) Overview: Engine Warning & Protection System A26_EWPS_05012017 Engine Warning & Protection System TABLE OF CONTENTS General Overview: Engine Warning and Protection System... 1
International A26 (2017) Overview: Engine Warning & Protection System A26_EWPS_05012017 Engine Warning & Protection System TABLE OF CONTENTS General Overview: Engine Warning and Protection System... 1
ITCEMS950 Idle Timer Controller - Engine Monitor Shutdown Isuzu NPR 6.0L Gasoline Engine
 Introduction An ISO 9001:2008 Registered Company ITCEMS950 Idle Timer Controller - Engine Monitor Shutdown 2014-2016 Isuzu NPR 6.0L Gasoline Engine Contact InterMotive for additional vehicle applications
PRESSURE GOVERNOR, ENGINE MONITORING, AND MASTER PRESSURE DISPLAY MODEL: TCA100
 Document Number: XE-TCA1PM-R0A TCA100 Rev0511 PRESSURE GOVERNOR, ENGINE MONITORING, AND MASTER PRESSURE DISPLAY MODEL: TCA100 FIRE RESEARCH CORPORATION www.fireresearch.com 26 Southern Blvd., Nesconset,
MaxxForce DT, 9, 10 ( )
") MaxxForce DT, 9, 10 (2007-2009) Overview: Engine Warning & Protection System NAV_EWPS_030211 Engine Warning & Protection System TABLE OF CONTENTS General Overview: Engine Warning And Protection System...
MaxxForce DT, 9, 10 (2007-2009) Overview: Engine Warning & Protection System NAV_EWPS_030211 Engine Warning & Protection System TABLE OF CONTENTS General Overview: Engine Warning And Protection System...
STP116 STP188. Tyre Pressure Monitoring System. User manual
 STP116 STP188 Tyre Pressure Monitoring System User manual What s Included Standalone display In-Vehicle Charger Wireless LCD display unit Built-in rechargeable lithium battery Auto backlight Selectable
ELD DRIVER GUIDE June 21, 2018
 ELD DRIVER GUIDE June 21, 2018 Contents Getting Started with PrePass ELD...4 Enroll in the PrePass ELD Program... 4 For a Carrier Enroll in the ELD Service... 4 For a Driver Get Driver Login Information...
Operations Manual. Automated Fuel Maintenance System FUEL TECHNOLOGIES INTERNATIONAL
 Operations Manual Automated Fuel Maintenance System FTI-10A & 20A FUEL TECHNOLOGIES INTERNATIONAL Replacement Manuals Available on Website: www.fueltechnologiesinternational.com 07/15/2015 Rev E Fuel Technologies
SD Bendix TP-3DC Tractor Protection Valve with Double Check DESCRIPTION
 SD-03-3656 Bendix TP-3DC Tractor Protection Valve with Double Check 3/8"-18 NPT 3/8"-18 NPT DATE CODE STAMPED HERE LABEL WITH TP-3DC O.E. PC. NO. HERE AUXILIARY 1/4" -18 NPT QR-L FACTORY INSTALLED ON SOME
SCHEMATIC AND ROUTING DIAGRAMS
 2004 ACCESSORIES & EQUIPMENT Tire Pressure Monitoring - Corvette SCHEMATIC AND ROUTING DIAGRAMS TIRE PRESSURE MONITORING SYSTEM SCHEMATICS Fig. 1: Tire Pressure Monitoring System Schematics Courtesy of
SD Bendix R-7 Modulating Valve DESCRIPTION INVERTED R-7 VALVE
 SD-03-4504 Bendix R-7 Modulating Valve MOUNTING HOLE (2) PORT BALANCE PORT INLET SPRING PORT DELIVERY (2) SUPPLY PORT MOUNTING SURFACE INLET INLET SEAT BALANCE PISTON PISTON DOUBLE CHECK (SUPPLY PORT &
3/8" NPT PISTON SPRING INLET EXHAUST VALVE SPRING LOWER PISTON ASSEMBLY
 SD-03-951 Bendix LQ-3 & LQ-4 * Front Axle Ratio Valve 1/4" NPT 3/8" NPT INLET LOWER ASSEMBLY 1/4" NPT 3/8" NPT HOLD OFF (WHEN REQUIRED) LQ-3 FRONT AXLE RATIO LQ-4 FRONT AXLE RATIO * (*THE LQ-4 'S OPERATION
Advanced User Manual
 Advanced User Manual Banks SpeedBrake For use with Palm Tungsten E2 2004-2005 Chevy/GMC 6.6L (LLY) Turbo-Diesel Pickup THIS MANUAL IS FOR USE WITH KITS 55419 & 55421 Gale Banks Engineering 546 Duggan Avenue
Model: APS-610a Owner s Manual 4 Button Remote Security System with Dual Stage Shock Sensor
 Model: APS-610a Owner s Manual 4 Button Remote Security System with Dual Stage Shock Sensor IMPORTANT! In order to provide the highest possible level of security to your vehicle, this system is equipped
Cannondale Diagnostic Tool Manual
 Cannondale Diagnostic Tool Manual For vehicles (ATV & Motorcycles) equipped with the MC1000 Engine Management System Software CD P/N 971-5001983 Data Cable P/N 971-5001984 POTENTIAL HAZARD Running the
MaxxForce 11 and 13 ( )
") MaxxForce 11 and 13 (2007-2009) Overview: Engine Warning & Protection System NAV_EWPS_022311 Engine Warning & Protection System TABLE OF CONTENTS General Overview: Engine Warning And Protection System...
MaxxForce 11 and 13 (2007-2009) Overview: Engine Warning & Protection System NAV_EWPS_022311 Engine Warning & Protection System TABLE OF CONTENTS General Overview: Engine Warning And Protection System...
CAUTION-ELECTRICALLY OPERATED PRODUCT
 CAUTION-ELECTRICALLY OPERATED PRODUCT NOT RECOMMENDED FOR CHILDREN UNDER 14 YEARS OF AGE. AS WITH ALL ELECTRIC PRODUCTS, PRECAUTIONS SHOULD BE OBSERVED DURING HANDLING AND USE TO PREVENT ELECTRIC SHOCK.
Tire Pressure Monitoring Systems
 Service Training Self-Study Program 861603 Tire Pressure Monitoring Systems Volkswagen of America, Inc. Volkswagen Academy Printed in U.S.A. Printed 10/2006 Course Number 861603 2006 Volkswagen of America,
Solar TPMS. Operating Manual
 The sales package may offer products with color on color or packaging shown in this manual are different. Picture only for reference, technical specifications subject to change without notice. Parts supply
Solar TPMS. Operating Manual
 The sales package may offer products with color on color or packaging shown in this manual are different. Picture only for reference, technical specifications subject to change without notice. Parts supply
2001 Chevrolet Corvette ACCESSORIES & EQUIPMENT Remote Keyless Entry Systems - Corvette
 DESCRIPTION 2001 ACCESSORIES & EQUIPMENT Remote Keyless Entry Systems - Corvette Remote Keyless Entry (RKE) system is controlled by Remote Function Actuation (RFA) system. Transmitter allows remote control
" MANUALLY OVERRIDING YOUR SYSTEM
 Model PRO 2000aS Owner s Manual 3 Button Remote Security System with Keyless Entry IMPORTANT! In order to provide the highest possible level of security to your vehicle, this system is equipped with selectable
To ensure correct operation and service please read these instructions before installing and operating the TPMS. TPMS Manual
 To ensure correct operation and service please read these instructions before installing and operating the TPMS TPMS Manual TABLE OF CONTENTS TIRE PRESSURE MONITORING SYSTEMS, TPMS... 2 NOTICE... 2 SPECIFICATIONS
CA 6550 Owner s Guide
 PROFESSIONAL SERIES CA 6550 Owner s Guide 2 Way LCD Vehicle Security and Remote Start System IMPORTANT NOTE: The operation of the Security and Convenience System as described in this manual is applicable
SD Bendix EC-14 AntiLock Controller Assembly DESCRIPTION GENERAL MOUNTING PHYSICAL
 Bendix EC-14 AntiLock Controller Assembly SD-13-4784 30 PIN WIRE HARNESS CONNECTOR MOUNTING HOLES (4) DIAGSTICS WINDOW DESCRIPTION GENERAL Bendix trailer antilock systems utilizing the EC-14 electronic
INSTALL GUIDE IDL-IDS(RS)-BZ2B-[ADS-BZ2]-EN
![INSTALL GUIDE IDL-IDS(RS)-BZ2B-[ADS-BZ2]-EN](/thumbs/94/120297305.jpg "INSTALL GUIDE IDL-IDS(RS)-BZ2B-[ADS-BZ2]-EN") INSTALL GUIDE DOCUMENT NUMBER 450 REVISION DATE FIRMWARE IDL-IDS(RS)-BZB-[ADS-BZ] HARDWARE ADS-BZ ESSORIES ADS-USB (REQUIRED) COMPATIBLE RF-KIT (OPTIONAL) DIRECTED SMART & ADS-HRN(RS)-SM0 (OPTIONAL) ADS-TOOLS-MB0
INSTALL GUIDE DOCUMENT NUMBER 450 REVISION DATE FIRMWARE IDL-IDS(RS)-BZB-[ADS-BZ] HARDWARE ADS-BZ ESSORIES ADS-USB (REQUIRED) COMPATIBLE RF-KIT (OPTIONAL) DIRECTED SMART & ADS-HRN(RS)-SM0 (OPTIONAL) ADS-TOOLS-MB0
Model AS-9234E. Owners Guides
 Model AS-9234E Owners Guides This unit is capable of 3 installation methods. Select the guide for your customer that matches the installation in their particular vehicle. PATENTED: www.voxxintlcorp.com/company/patents
Product Campaign Bulletin
 Nissan Ireland Cedar House Park West Business Park Nangor Road, Dublin 12 Product Campaign Bulletin REFERENCE: MODEL: SUBJECT: PIB-NES-DAS-13-001 E12 New Note TB E12 - New Note New Technology Systems 1)
Tyre Pressure Monitoring System TyrePal Solar. Innovative safety solutions for your peace of mind
 SOLAR Tyre Pressure Monitoring System TyrePal Solar Innovative safety solutions for your peace of mind TyrePal, Wheel Solutions Ltd, Unit 2 Upper Keys Business Park, Keys Park Road, Hednesford, Cannock,
SD Bendix BP-R1 Bobtail Proportioning Relay Valve DESCRIPTION
 SD-03-1067 Bendix BP-R1 Bobtail Proportioning Relay Valve CONTROL SERVICE SERVICE CONTROL SUPPLY DELIVERY SUPPLY DESCRIPTION The BP-R1 bobtail proportioning relay valve is a combination of two individual
Begin to Use The New ESC: Before use the new ESC please carefully check every connections are correct or not. Yellow motor wire B Blue motor wire A
 HIMOTO ZTW Brushless Electronic Speed Control for car or truck Thank you for purchasing ZTW Brushless Electronic Speed Controller(ESC). The ZTW electronic speed control (ESC) is specifically designed for
DIAGNOSIS AND TESTING
 204-04-1 Wheels and Tires 204-04-1 DIAGNOSIS AND TESTING Tire Pressure Monitoring System Special Tool(s) Principles of Operation Activation Tool, Tire Pressure Monitor 204-363 Digital Tire Gauge 204-354
2002 Dodge Intrepid ES ACCESSORIES & EQUIPMENT Anti-Theft Systems - Concorde, Intrepid & 300M
 DESCRIPTION SENTRY KEY IMMOBILIZER SYSTEM 2002-03 ACCESSORIES & EQUIPMENT Anti-Theft Systems - Concorde, Intrepid & 300M CAUTION: Large metallic objects, or items such as magnetic pass-keys, may cause
Issue 2.0 December EPAS Midi User Manual EPAS35
 Issue 2.0 December 2017 EPAS Midi EPAS35 CONTENTS 1 Introduction 4 1.1 What is EPAS Desktop Pro? 4 1.2 About This Manual 4 1.3 Typographical Conventions 5 1.4 Getting Technical Support 5 2 Getting Started
Vehicle Programming Instructions
 Page 1 of 20 Form 0161A 2/24/2006 Superchips Model 2805 Tuner 2001-2006 GM Duramax 2500-3500 Diesel Trucks ming Instructions PLEASE READ THIS ENTIRE INSTRUCTION SHEET BEFORE YOU PROCEED Thank you for choosing
Model H30 Operation Manual
 Model H30 Operation Manual Model H30 Version 1.0 August 1, 2007 2 135 West Davenport Street Rhinelander WI 54501 Phone: 866.441.7997 Fax: 866.278.0036 info@houstonst.com www.houstonst.com 3 Table of Contents
An ISO 9001:2008 Registered Company
 An ISO 9001:2008 Registered Company Introduction Engine Monitor System 2009-2018 Ford E Series (EMS501-D) 2008-2010 Ford F250-550 6.2L, 6.8L (EMS506-D) 2011-2016 Ford F250-550 6.2L, 6.8L (EMS507-D) 2017
CONTENTS ESC CONTENTS... 1 FEATURES... 2 LAYOUT... 3 DISPLAYS... 4 CONNECTIONS... 5 MENU... 6 MESSAGES... 7 SYSTEM OPERATION... 8
 CONTENTS ESC CONTENTS... 1 FEATURES... 2 LAYOUT... 3 DISPLAYS... 4 CONNECTIONS... 5 MENU... 6 MESSAGES... 7 SYSTEM OPERATION... 8 1 F EATURES s Engine Status Center (ESC - p/n 105536) provides the pump
AL-100DP Full-Feature Vehicle Security System for Factory-Equipped Remote Keyless Entry Transmitters Owner s Guide
 This device complies with FCC Rules part 15. Operation is subject to the following two conditions, (1) This device may not cause harmful interference and, (2) This device must accept any interference that
CA611 Owners Manual CAUTION!
 CA611 Owners Manual CAUTION! Be certain that the vehicle is outdoors before using this or any remote vehicle starting device. A running engine produces dangerous carbon monoxide fumes which can be harmful
SD Bendix E-10PR Retarder Control Brake Valve DESCRIPTION. OPERATION - Refer to Figure 2
 SD-03-832 Bendix E-10PR Retarder Control Brake Valve MOUNTING PLATE SUPPLY 4 PORTS ELECTRICAL AUXILIARY DESCRIPTION TREADLE RETARDER CONTROL SECTION EXHAUST DELIVERY 4 PORTS FIGURE 1 - E-10PR RETARDER
QUICK START GUIDE FOR ACCESS CONTROL BOARDS. DX Series Four Door TCP/IP Web Server Controller. Model: ACP-DXEL4
 QUICK START GUIDE FOR ACCESS CONTROL BOARDS DX Series Four Door TCP/IP Web Server Controller Model: ACP-DXEL Table of Contents 0- Introduction 0 - Overview 0. - Package Contents 0. - Installation Requirements
MEGA WAY LCD PAGER ALARM WITH REMOTE ENGINE STARTER. Operation Manual MEGATRONIX CHATSWORTH, CA U.S.A. MEGA 2700 OPERATE 1
 MEGA 2700 2-WAY LCD PAGER ALARM WITH REMOTE ENGINE STARTER Operation Manual MEGATRONIX CHATSWORTH, CA U.S.A. MEGA 2700 OPERATE 1 2 WARNINGS: As with any product that performs automatic functions, there
INSTALLATION GUIDE Table of Contents
 CT-3100 Automatic transmission remote engine starter systems. What s included..2 INSTALLATION GUIDE Table of Contents Door lock toggle mode..... 4 Notice...2 Installation points to remember. 2 Features..2
Tyre Pressure Monitoring System TyrePal Solar. Innovative safety solutions for your peace of mind
 SOLAR Tyre Pressure Monitoring System TyrePal Solar Innovative safety solutions for your peace of mind TyrePal, Wheel Solutions Ltd, Unit 2 Upper Keys Business Park, Keys Park Road, Hednesford, Cannock,
sens.it HD we get your profit out of inflation! Professional Tire Management Integrated tire management with automated tire pressure monitoring
 sens.it HD we get your profit out of inflation! Integrated tire management with automated tire pressure monitoring Professional Tire Management Make your fleet more effective! sens.it HD for professionals
ABS Operator s Manual
 ABS Operator s Manual Bendix Antilock Brake Systems With optional advanced antilock braking features: Automatic Traction Control (ATC) and RSP Roll Stability System Read, understand and follow the information
AK-105B. ADVANCED KEYS Smart Keyless Entry + Push Start Ignition System USER MANUAL. Product Features:
 AK-105B REV: A05-15-0901 ADVANCED KEYS Smart Keyless Entry + Push Start Ignition System USER MANUAL Product Features: Smart Keyless Locking/Unlocking Compact Sized Smart Keys Dual-Antenna Setup Bypass