SAFETY, OPERATION, MAINTENANCE, & COMMONLY USED PARTS MANUAL Revised October 2011
|
|
|
- Deirdre Parker
- 6 years ago
- Views:
Transcription

1 SAFETY, OPERATION, MAINTENANCE, & COMMONLY USED PARTS MANUAL Revised October 2011 Curbilder Models: MC-550, MC-650, MC-655 Under Guard Rail MC-850 MC-900 Part #35001
2 This manual is for the Miller Curbilder Read the contents of this Manual BEFORE putting this machine in Service. Models: MC-550, MC-650, MC-655, MC-850, MC-900 Part #35001 Table of Contents Description Page(s) General Machine Model Configuration 3-5 New Machine Assembly 6-9 SAFETY Lifting, Tie Down and Transportation Instructions Preparing for the Job Choosing the Curb Form Curb Mix Information Choosing the appropriate Auger Size for a given Curb Form Choosing either a Solid or Hollow Auger 26 Reviewing any Special Applications that can apply to your Job Site Layout of the Job Site Operating the Curbilder Curbilder Controls and Adjustments Preparing the Curbilder for Operation 40 Assign Crew to Work Stations 40 Curbilder is now in position to extrude curb 41 Curbilder Cleaning 42 Curbilder Maintenance Abbreviated Parts listing SPARK ARRESTER SERVICE: Your engine is not factory-equipped with a spark arrester. In some areas, it is illegal to operate an engine without a spark arrester. Check local laws and regulations. A spark arrester is available from your authorized engine dealer. 2
3 General Machine Model Configuration: Note: All Machines are assembled with the auger assembly on the left side of the machine except for the MC-655 Under Guardrail Curbilder which only comes with right hand assembly. On the other models you can request right hand assembly of Auger if required at the time the order is placed. MC-550 MC-650 MC-655 MC-850 MC-900 Engine Frame Motor Mount 13 HP Honda Recoil Start w/ Recoil Backup STD Duty STD Duty 13 HP Honda Electric Start w/ Recoil Backup STD Duty STD Duty 13 HP Honda Electric Start w/ Recoil Backup STD Duty Offset STD Duty 20HP Honda Electric Start w/recoil Backup Heavy Duty Heavy Duty 20 HP Honda Electric Start w/ Recoil Backup Heavy Duty Heavy Duty Auger Qty & Size Auger Type Compaction Tube Cast Solid STD Duty Steel Cast Solid STD Duty Steel Cast Solid STD Duty Steel Cast Solid Heavy Duty Cast Cast Solid Heavy Duty Cast Auger Housing STD Duty Steel STD Duty Steel Heavy Duty Steel Heavy Duty Steel Heavy Duty Steel Wheel/Tire Quantity and Type 3 Wheel Uprights 8 x 2 Solid Std. Duty. Nine (9) Total. STD Duty 8-1/2 Vertical Adjust Curb Form One (1) Form Customer Choice 8 x 2 Solid Std. Duty. Nine (9) Total. STD Duty 8-1/2 Vertical Adjust One (1) Form Customer Choice 8 x 2 Solid Std. Duty. Nine (9) Total. STD Duty 8-1/2 Vertical Adjust One (1) Form Customer Choice x Pneumatic. Six (6) Total. Heavy Duty 19 Vertical Adjust One (1) Form Customer Choice x Pneumatic for Front. Four (4). 8 x 2-1/2 solid Heavy Duty for Rear. Three (3). Heavy Duty 19 Vertical Adjust One (1) Form Customer Choice 3
4 Options Available: MC-550 MC-650 MC-655 MC-850 MC-900 Engine 15 HP Kohler Recoil Start 15 HP Kohler Electric Start 15 HP Kohler Electric Start N/A N/A 5 Solid CAST Standard Duty Auger Assembly with two (2) 9 Long Augers 5 Hollow CAST Standard Duty Auger Assembly with two(2) 9 Long Augers 6 Solid CAST Heavy Duty Auger Assembly with either two(2) or three(3) 9 Long Augers A A N/A A N/A A A N/A A N/A A Two (2) Augers/ Assembly A Two (2) Augers/ Assembly N/A A Two (2) Augers/ Assembly Standard Equipment Three (3) Augers/ Assembly 6 Hollow Cast Standard Duty Auger Assembly with two(2) 9 Long Augers A Two (2) Augers/ Assembly A Two (2) Augers/ Assembly N/A A Two (2) Augers/ Assembly N/A 6 Hollow CAST Heavy Duty Auger Assembly with either two(2) or three(3) 9 Long Augers A Two (2) Augers/ Assembly A Two (2) Augers/ Assembly N/A A Two (2) Augers/ Assembly A Three (3) Augers/ Assembly Solid Fabricated Steel Standard Duty Auger Assembly with one (1) 18 Long Auger A One (1) Auger/ Assembly # A One (1) Auger/ Assembly # N/A A One (1) Auger/ Assembly # N/A 4
5 Options Available: MC-550 MC-650 MC-655 MC-850 MC Solid Fabricated Steel Heavy Duty Auger Assembly with either one (1) 18 Long Auger or three (3) 9 Long Auger A One (1) Auger/ Assembly A One (1) Auger/ Assembly N/A A One (1) Auger/ Assembly A Three (3) Augers/ Assembly Hollow Fabricated Steel Standard Duty Auger Assembly with one (1) 18 Long Auger A One (1) Auger/ Assembly A One (1) Auger/ Assembly N/A A One (1) Auger/ Assembly N/A 8 Hollow Fabricated Steel Heavy Duty Auger Assembly with one (1) 18 Long Auger A One (1) Auger/ Assembly A One (1) Auger/ Assembly N/A A One (1) Auger/ Assembly N/A 10 Solid Fabricated Steel Heavy Duty Auger Assembly with either one(1) 18 Long Auger or three(3) 9 Long Auger Curb Form/Mold for extruding curb over dowel pins Wheel/Tire Quantity and Type N/A N/A N/A A One (1) Auger/ Assembly One (1) Form Customer Choice N/A One (1) Form Customer Choice x Pneumatic for front and rear. Six (6) total One (1) Form Customer Choice One (1) Form Customer Choice N/A 8 x 2-1/2 Heavy Duty solid, front and rear. Nine (9) total N/A Three (3) Augers/ Assembly One (1) Form Customer Choice x Pneumatic for front and rear. Six (6) total. 5
6 New Machine Assembly: 1) Remove Curbilder from Shipping Skid. 2) Loosen the two (2) Hopper Retention Bolts/ Wing nut assemblies. Unlatch the two (2) rubber hood latches on the Belt Guard which holds the Engine Cover in Place. Fold the Engine Cover into the hopper. With two (2) people, lift the hopper and engine cover off of the Curbilder frame and set these parts on the ground. Remove the Steering/Brake Handle that is shipped on the top of the Curbilder frame. 3) On Electric Start Models: A) On ALL Electric Start Models the Ignition Keys for the Engine are wire tied to the Ignition Switch on the Right side of the Engine. B) On Models MC-650, MC-655: Remove the two (2) wing nuts on the top of the Black Battery Cover on the Battery Box in the middle of the Curbilder frame. Then remove the Battery Cover. Connect the Black Ground to the Left Front Bolt Assembly holding the Battery Box to the Curbilder frame. Be sure to replace BOTH Star Lock Washers as shown to obtain a good Ground. Replace Battery Cover. Replace Hopper and Engine Cover. 6
7 C) On Models MC-850, MC-900: Locate the two (2) Grey Battery Cable Plugs at the Left side of the Engine. Orient the Plugs so they will connect together with the correct +/- polarity. Push the two (2) plugs together until they are fully engaged and snapped into position. Replace Hopper and Engine Cover. 4) Attach the Steering/Brake Handle to the Front Wheel Assembly on the same side of the machine that the Auger assembly is located. Use 3/8-16NC Hex Head Cap Screw x 3-3/4 Long with Nylock lock nut. For Curbilders with Solid Front Wheels assemble the Handle in the two (2) holes in the fork of the Front Wheel Assembly toward the Rear of the machine. For Curbilders with Pneumatic Front Wheels assemble the Handle in the two(2) holes in the fork of the Front Wheel Assembly toward the Front of the machine. Tighten bolt so the Handle pivots smoothly without binding. 7
8 5) Attach Curb Form to the end of the Compaction Tube using three (3) ½ -13NC Hex Head Cap Screw with Split Lock Washer and Hex Nut. Then turn the Tee Handled Curb Form Hold Down bolt clockwise until the end of the bolt makes firm contact with the end of the Curb Form. DO NOT OVERTIGHTEN THIS T BOLT. 6) Fill the engine with the proper grade and amount of motor oil. Refer to the Engine Owner s Manual. 7) Lube all grease fittings. See the Maintenance Section. 8
9 8) Reverse the Position of the Rear Wheel Assembly on the Frame of the Curbilder. The Rear Wheel Assembly is shipped with the Vertical Square Tube placed facing the Front of the Curbilder. This position prevents shipping damage. To place the Vertical Tube in the correct position for machine operation: A) Turn the Rear Wheel Assembly Crank Clockwise until the Rear Wheel Assembly is off of the ground. B) Remove the one (1) vertical Retention Bolt holding the Rear Wheel Assembly Clamp to the horizontal square tube at the rear of the machine. C) Pull the Rear Wheel Assembly and Bracket off of the square tube of the frame. D) Reinstall the Rear Wheel Assembly and Bracket to the rear of the Frame of the Curbilder sliding the Bracket over the Square Tube with the Vertical Rear Wheel Assembly facing to the REAR of the Curbilder. E) Locate the outside edge of the Rear Wheel Assembly nearest the Curb Form two (2 ) from the edge of the Curb Form. F) Replace the vertical Retention Bolt in the Bracket and tighten. 9
10 10
11 SAFETY See Operating the Curbilder, page 30 for location of machine controls. This symbol applies to all items in the Safety section unless otherwise noted. This CAUTION symbol indicates a possibility of Personal Injury or Equipment Damage if the Instructions in this manual and on the decals attached to the machine are not followed. This DANGER symbol, when it appears, indicates a strong possibility of Severe Personal Injury or Death if the Instructions in this manual and on the decals attached to the machine are not followed. These safety and operating instructions for Miller Spreader curbing equipment are for your protection. Careless regard of these instructions and other safe construction practices could result in accidents and injury. Read and Understand this manual and ALL Decals located on this machine BEFORE putting this machine into service. A. General Safety Replace damaged or worn decals. Replace damaged or worn decals only with original equipment decals. Do not modify decals in any way. Know what safety equipment is required to operate and maintain this machine. Safety equipment must include but not limited to Safety Glasses, Reflector type Vests, Gloves, Ear Protection and Steel Toed Work Boots. Never operate or perform any maintenance on this machine while under the influence of Drugs and/or Alcohol. A qualified service mechanic using only MILLER SPREADER replacement parts or their approved equal must make all repairs to this machine. Any deviation from the original MILLER SPREADER supplied machine in the operation, repair, and/or modifications of the machine without the express written consent of the MILLER SPREADER COMPANY, voids all machine warranties and any liability for injuries and/or damage to person or property. B. Before putting this equipment into operation inspect the equipment daily. Inspect this equipment on a hard and level surface. 1. Shut engine off. LOCK-OUT, TAG-OUT Equipment BEFORE serving. 2. Push in any one (1) Emergency Stop Switch and remove Spark Plug Wire(s) to prevent accidental starts. 3. Block wheels in both directions to prevent machine movement. Lower machine using the three (3) Wheel Height Adjustment Cranks until Auger Housing Assembly engages the ground and the Curb Machine is Immobile. 4. Inspect belt tension/chain tension. Adjust if required. See Machine Adjustment Section. 11
12 5. Inspect auger for wear. Repair or replace if required. See Machine Cleaning and Maintenance Section. 6. Inspect tires, wheels and tire pressure on pneumatic tire models. Air pressure should be 30 PSI. 7. Inspect all operating controls: Engine Speed Control Linkage, Steering Handle, Service Brake and Wheel Height Adjustment three (3) places. 8. Inspect Safety Torque Arm Assembly for proper operation, cleanliness, and adjustment. See Machine Adjustment Section. 9. Inspect engine oil level. Follow all maintenance as outlined in the Machine Cleaning and Maintenance Section. 10. Before adding fuel: A hot and/or running engine can ignite spilled gasoline. Shut engine off. Let engine cool off a minimum of 5 minutes Extinguish smoking materials Use funnel Do not overfill Replace fuel cap after adding fuel. Exercise extreme caution when refueling. After making Inspections and Adjustments 1-10, REPLACE ALL MACHINE GUARDS. Start engine. Verify that centrifugal clutch operates correctly. At idle speed the clutch fully Disengages auger drive and the auger stops turning. When engine speed is increased to full speed, the clutch engages and auger turns freely. Do not operate the Curbilder unless Centrifugal Clutch operates correctly. Make any necessary repairs or adjustments before putting this equipment into operation. All repairs must be made by qualified service personnel using only MILLER SPREADER replacement parts or their approved equal. Any deviation from the original MILLER SPREADER supplied machine in the operation, repair and/or modifications of the machine without the express written consent of the MILLER SPREADER COMPANY voids all machine warranties and any liability for injuries and/or damage to person or property. ALL GUARDS MUST BE IN PLACE AND FUNCTIONAL. Refer to the Machine Cleaning and Maintenance and Machine Adjustments Sections of this manual. C. Familiarize yourself with the work site and job conditions PRIOR to using the Curbilder. This equipment must only be operated by trained personnel who fully understand its safe operation. Each operator must be able to identify any unsafe worksite conditions and report these conditions to his supervisor for immediate correction. Do not start or operate this equipment in an unventilated area. A GASOLINE ENGINE DISCHARGES CARBON MONOXIDE GAS WHICH CAUSES INJURY OR DEATH IF INHALED. ENGINE EXHAUST AND SOME OF ITS CONSTITUENTES ARE KNOWN TO CAUSE CANCER, BIRTH DEFECTS AND OTHER REPRODUCTIVE HARM. DO NOT OPERATE THIS MACHINE IN A BUILDING OR OTHER AREA WHERE THERE IS NOT ADEQUATE VENTILATION FOR THE OPERATOR. WHERE THERE IS ANY POSSIBILITY 12
13 OF INADEQUATE VENTILATION ON THE JOB DUE TO BUT NOT LIMITED TO CARBON MONOXIDE GAS, THE JOB SITE AREA MUST BE TESTED REGULARILY (EVERY ONE (1) HOUR) PER OSHA 29 CFR PART FURTHER, THE JOBSITE MUST MEET ALL OSHA MINIMUM ATMOSPHERE GUIDELINES FOR THE JOB SITE AS SET FORTH IN THE SAFETY AND HEALTH REGULATIONS FOR CONSTRUCTION, OSHA 29CFR PART APPENDIX A. ADEQUATE VENTILATION MUST BE DETERMINED BY FOLLOWING JOB SITE INSPECTION PROCEDURES AS OUTLINED BY OSHA. ALL JOB SITE VENTILATION ISSUES MUST BE CORRECTED BEFORE EXPOSING WORKERS TO HARMFUL JOB SITES. Do not operate this equipment on unsafe surfaces. This equipment is intended for use only on leveled and compacted surfaces. AVOID ANY CONDITIONS OF SLOPE AND/OR GRADE, WHICH CAN CAUSE THIS EQUIPMENT TO TIP. 1. Verify that all surfaces will support safely the maximum load of the machine with the payload. Refer to the Lifting/Tie Down Section in this Manual and Lifting/Tie Down/ Operation Decals Under the Engine Cover. Be aware of the maximum Gross Vehicle Weight (GVW) of Miller Curbilders when the hopper of these machines are filled with concrete/asphalt. Verify the entire surface of the job site will support the maximum GVW as listed. If job site conditions so warrant, correct deficiencies before using Curbilder. SAFETY & OPERATION SPECIFICATION CHART FOR MILLER SPREADER CURBILDER MODELS MC-550, MC-650, MC-655, MC-850, MC-900 MAX VEHICLE GVW with TIRE PRESSURE (IF PNEUMATIC) CONCRETE/ASPHALT FRONT REAR 1600 LBS 30 PSI 30 PSI 2. All surfaces must have suitable surface for good footing for the operator and machine. Wet, muddy and/or loose surfaces may cause an operator to lose his/her footing and fall. Correct job site surface deficiencies before using Curbilder. 3. Identify all unprotected openings on jobsite and do not operate this equipment near these openings. 4. Identify all overhead structures, electrical wires, and door openings on the jobsite. Be sure the Curbilder and Asphalt/Concrete Truck will safely pass through and under. 5. When working on an active/in-use roadway set up safety protection for all employees and equipment as required by local codes. This safety equipment should include but is not limited to Traffic Cones, Flagmen for traffic control, Safe Access and Exit for Asphalt/Concrete Truck. 6. Dismiss all untrained employees and bystanders from the area in which this machine will be operated. 13
14 D. Operation of this equipment Use caution when operating near other people and obstructions. Always look to the rear before backing up and back up slowly. Never operate Curbilder with safety torque arm out of adjustment or serious injury may result. Never feed auger with a tool that could get caught in a turning auger and strike someone. Know the two(2) ways a Curbilder Auger can be Stopped: 1) IN AN EMERGENCY: Push IN any one (1) of the Emergency Stop Switch RED Buttons on the Curbilder. On Models MC-550, MC-650 and MC-655 there are two (2) Emergency Stop Switches located on BOTH ends of the Belt Guard (Part # ). On Models MC-850 and MC-900 there are two (2) additional Emergency Stop Switches located at the left and right rear corners of the machine frame. These Emergency Stop Switches have two (2) MAINTAINED POSITIONS: Pulled OUT Position, Engine/Auger will operate; Pushed IN Position, Engine/Auger will not run. Note: On all machines manufactured prior to July 2007 there is one (1) Emergency Stop Switch located on the Belt Guard and/or the engine. The operation of this switch requires that the switch be pushed in and HELD IN to stop Engine/Auger. 2) In Normal Machine On-Off Operation: Use the Engine Speed Control (Throttle) to Decrease engine speed to the slowest Idle Speed (750 RPM) to DISENGAGE the Centrifugal Clutch. Know how to operate the Engine Throttle on your machine BEFORE putting the machine into service: A) MC-550, MC-650, MC-655, built after November 2007 see page 31 of this manual and Parts Drawing # in the complete Parts Manual, Part # B) MC-850, MC-900 built after February 2007 see page 31 of this manual and Parts Drawing # in the complete Parts Manual, Part # C) MC-550, MC-650, MC-655 built between February 2006 to November 2007 Parts Drawing # D) MC-850, MC-900 built between February 2006 and February 2007 Parts Drawing # E) On all models of Curbilders built prior to February 2006 the Engine Speed Control is accomplished by using the throttle located on the engine. Refer to your engine manual for operation. This vehicle is not intended for the transportation of any personnel. NO RIDERS! Do not operate equipment with oily dirty gloves and/or controls. Do not operate recklessly. Careless operation causes accidents and injury. 14
15 If operator must leave operator s station (standing at the steering handle) he must 1. Stop Auger from turning. 2. Shut OFF engine. Shut off engine by depressing any Emergency Stop button on the machine. 3. Lower machine using three (3) Wheel Height Adjustment Cranks until the Auger Housing Assembly engages the ground and the Curb Machine is immobile. This equipment is not intended to be towed. NO TOWING. Refer to Lifting and Tie down Instructions section of this manual and machine decals. Note the three (3) ways a Curbilder may be lifted and tied down and the appropriate lifting and tie down points for each method. Note the specific load ratings for chains, straps, and forklifts. Avoid all operating conditions where you, the operator, and/or other people can become trapped or pinched between the Curbilder and some other obstacle or where a Curbilder lifted by a crane etc. can fall on you or when loading the Curbilder onto a trailer. A Curbilder cannot be operated in areas with flammable or explosive atmospheres. Refer to code of Federal Regulations (OSHA.) 29 CFR Part to determine permissible areas where these Curbilders may be operated. Keep hands clear of auger during operation of Curbilder. Rotating auger contact can cause injury or death. Keep away! 15
16 Lifting, Tie Down, and Transportation Instructions All chains/straps must pull away from and to the front and rear as shown below. A Curbilder can only be lifted with a forklift when the Curbilder has first been attached to a suitable skid rated to support a minimum of 1,500#. Failure to attach the Curbilder to a skid before lifting with a forklift may result in damage to Curbilder and/or injury to bystanders. Note: An Empty Curbilder weighs between 760# and 1,140# depending on model and auger assembly. Only lift, load and tie down Curbuilder with the Hopper EMPTY, the Engine Off and the Engine Fuel turned Off). A. To load a Curbilder onto a trailer: Either: Load the Curbilder using a Crane (see item C below). or Pull the Curbilder onto a trailer using ramp(s). Note: When pulling Curbilder onto a trailer, the top, loading surface of the ramp(s) must be clean and dry. The Loading Surface of the Trailer must be level, dry and the brakes on the towing vehicle secure. Three (3) people are required to pull the machine onto the trailer. Pull the machine with the Steering Handle toward the front of the trailer. Turn the Height Adjusting Screws COUNTER-Clockwise to provide 6 of clearance between the bottom of the Auger Housing and the ground. This clearance is required for the Curbilder to clear the ramp pivot point on the trailer. Also raise the Pointer Rod up so there is a minimum of 6 of Clearance between the bottom end of the Pointer Rod and the Ground. The ramps must not exceed a 25% (15 Degree) Grade. If three (3) people are not available to pull the machine onto the trailer a 1000# rated Winch is required to safely pull the Curbilder onto the trailer. 16
17 B. To tie Curbilder down to the Trailer Bed, Truck Bed, etc. Lower Curbilder using three (3) Wheel Height Adjusting Screws until Auger Housing makes firm contact with the trailer bed and Curbilder is level with bed of trailer and the Curbilder is immobile. Chock all wheels to prevent machine movement in all directions. Secure Curbilder to trailer bed using three (3) chains or straps as follows: 1. 1 strap at the front middle of the Curbilder frame straps, 1 at each pocket formed by the tube and frame at the rear of the machine. All chains/straps must pull away and to the front and rear as shown. 17
18 C. To lift Curbilder To lift the Curbilder use a crane or other mechanical hoist rated at a 1,500# Working Load and: Position the chains or straps as follows: a) One (1) at the front corner formed by the motor mount and the Curbilder frame. b) Two (2) at rear corners formed by the auger housing and the Curbilder frame. Position each chain or strap in a U shape around the Curbilder frame. Adjust chains or straps so that when the Curbilder is lifted it is level in both length and width. Use OSHA approved lifting/tie down chains and straps that are designed to have a minimum working load limit of 2500# per chain or strap. Lift or tie down Curbilder only when hopper is empty. Only transport Curbilder with engine off. Turn fuel switch to off position to prevent fuel from entering crankcase. 18
19 Preparing for the Job Choosing the Curb Form Miller Spreader has manufactured over 1600 different Curb Forms. Any of these Curb Forms are available or you may request a Curb Form to your specific dimensions. To Order a Curb Form: A. If you have an existing Curb Form locate the stamped number (one (1) to five (5) digits/letter) on the outside face of the curb form mounting flange. Submit this number to your local Miller Dealer. Be sure to note any special features your Curb Form can have, for example, does it operate over dowel pins, will it extrude 3/8 (#3) reinforcing rod rebar through the center of the auger shaft, etc. B. If you have a drawing with dimensions or a full size tracing of the exact shape of the curb form you want to purchase, submit this information to the Miller Spreader Company. Be sure to note any special features your Curb Form can have, for example, does it operate over dowel pins, will it extrude 3/8 (#3) reinforcing rod rebar through the center of the auger shaft, etc. The Miller Spreader Customer Service Department will try to match your Curb Form information with our listing of previously manufactured forms. If your Information matches a form made previously, the number and drawing of this form will be sent to you. If the form has never been made a new Curb Form Design (CFD) Number will be assigned. C. For Curb Forms in which the shape is non-symmetrical (Drawing a vertical center line down the center of a Curb Shape, the left and right halves of the Curb Form Shape are not the same) a left or right hand Curb Form must be determined. To determine Curb Form Hand for non-symmetrical Curb Forms: i. Imagine a Curbilder equipped with the desired curb form to be in operation moving AWAY from an observer at the rear of the machine (where the curb comes out). See drawing below. 19
20 ii. With an observer looking at the Curbilder as shown determine from the observer s viewpoint on which side (left/right) the most vertical side of the curb is being formed. The location of the most vertical side on the Curb Form determines the hand of the form. For example, if the most vertical side of the curb is on the observers left side, the curb form required to extrude the curb should be designated as a left-hand form. Note: The majority of Curb Forms (over 90%) are manufactured as Left Hand. Curb Mix Information Determine the mix design and select a material supplier. Because available mix and job conditions will vary from one area to another, the following concrete and asphalt mix specifications can be used as guides to determine exact mix requirements for your application. General Conditions that apply to all Mixes: All Aggregates must be thoroughly washed in order for either the cement or asphalt to bind properly to the aggregate. Moisture content in the aggregate will affect mix performance. A lot of rain water in any aggregate used in making concrete will increase mix slump. Aggregates used to manufacture asphalt mixes must be dry (less than 5% moisture by weight) or the steam created in the mix will prevent sufficient mix density. Wet Aggregates will prevent asphalt from sticking to the aggregates and cause steam, which will compromise curb density. TEST THE MIX BEFORE USING. The same mix formula in different geographic areas will have somewhat different results on the job site. Avoid Mix surprises on the job site. Some Mix adjustments are required when using different curb forms and auger sizes. Tall, narrow, molds need lower slump (less than 1 ) or less heat (asphalt mixes, less than 275 Degrees F). Larger molds (using 8 or 10 augers) can use larger stone (up to ¾ / #57). Avoid Curb Mixes with excessive amounts of sand and fine aggregates (less than 3/32 / #8 sieve). These types of mixes can have a very smooth surface requiring little if any finishing. However, the lack of larger stone results in a weak curb. And a high concentration of fines will cause High Wear on the auger, compaction tube and curb form. Furthermore, a high concentration of fines has an excessive amount of surface area requiring greater amounts of Portland Cement or Asphalt to provide proper adhesion. Mixes with high concentrations of fines can also result in slower machine speeds because of the slip of the fines past the auger. 20
21 A. Concrete Curb Mix: 1) Components of One(1) Cubic Yard of Concrete Curb Mix: a) Cement: Use Portland Cement. Typically, Concrete Curb Mixes use 6 to 7 sacks/ # of Portland Cement per cubic yard. A higher concentration of cement is required because of the greater surface area of the smaller aggregates used in this mix. When desired, certain Mineral Admixtures can be substituted for some but not all of the Cement in the mix. These Admixtures include Fly Ash or Ground Granulated Blast Furnace Slag (GGBF Slag). Consult the job specifications and your local concrete plant to determine what allowances are possible for these Admixtures. b) Water: Water used in the mix must be clean and clear. Potable/Drinkable water is best but not required. Between 25 to 40 gallons of water per cubic yard will produce 1-2 slump depending on the moisture content already in the aggregate. Let the concrete plant know what slump you need when the Mix is DELIVERED to the job site. They will make allowances for the moisture content in the aggregates and travel time. c) Aggregates: Crushed aggregates produce stronger Curb Mixes and have better standing properties when extruding taller curbs than smooth river stone. A good starting point is an aggregate blend having 60% sand and 40% stone. Sand: Use Concrete sand blend with 100% passing a #8/2.4 mm Sieve. Stone: Use Stone with 100% passing a 3/8 /9.5 mm sieve. When extruding curb forms with 8 or 10 augers some of the 3/8 stone can be replaced with larger stone up to ¾ /#57. If excessive voids appear in the Mix, reduce the size of the larger stone (not the %) until the curb surface improves. d) Admixtures: Note: Consult the job site specifications to determine requirements/allowances for admixtures. 1) Air Entraining Admixtures: Adds durability to Concrete Curb exposed to cold weather and road salt. 2) Retarding Admixture: Slows down the early hardening of concrete. Extends workability/finishing time. 3) Water Reducing Admixture: Reduces the amount of water and cement required to achieve a given slump in the concrete. The use of this admixture can increase the strength of the concrete. 2) A recommended mix design for one cubic yard of concrete: Cement: 660# (7 sacks) Sand: 1,600 #, 5% moisture Aggregate: 1,400 #, 3/8" Water: Approximately 25 gallons/ 1 Slump 21
22 Keep loads to 3-5 yards when possible. Water content required to maintain slump will vary according to moisture content in the aggregate. Larger loads and/or higher air temperatures may require more water to maintain slump. Add water at job site only. Work materials to dry side. Retardant admixture should be used at the manufacturers recommended minimum amount. This amount may be adjusted based on local conditions. Air entrainment should be added at approximately 5%. This amount may be adjusted based on local conditions. B. Asphalt Curb Mix: 1) Components of One (1) Ton of Asphalt Curb Mix: a) Liquid Asphalt: Asphalt Content should be 6.0 to 9.0% by weight of total mix Liquid Asphalt should be AC-20 or AR-8000 (60-70 penetration). The liquid asphalt content will also have to be raised if the mix has slag, or other absorptive materials in it. b) Aggregates: All aggregates must be heated and dried. Crushed aggregates produce stronger Curb Mixes and have better standing properties when extruding taller curbs than round river stone. A good starting point is an aggregate blend having 60% sand and 40% stone. When extruding curb forms with 8 or 10 augers some of the 3/8 stone can be replaced with larger stone up to ¾ / #57. If excessive voids appear on the surface of the extruded curb, reduce the size of the larger stone (not the %) until the curb surfaces improves. Aggregate graduation SIEVE SIZE PASSING % BY WEIGHT ½ 100 3/ No No No No c) Temperature: optimum working temperature needs to be 250 to 290 degrees Fahrenheit. Under no circumstances should mix temperatures exceed 300 Degrees F. 22
23 C. Mix required for a given Curb Form Use the following calculations to help determine the quantity of mix required for any given curb form. It is usually a good practice to reduce yield per cubic yard/per ton by 5% to allow for waste, shortages, etc: CONCRETE: 3,888 = lineal feet of curb per cubic yard Area of curb form in Square Inches ASPHALT: 1920 = lineal feet of curb per ton Area of curb form in Square Inches NOTE: Contact Miller Spreader Customer Service to obtain the Curb Form Design Sheet for the Curb Form you are using to obtain the square inch area of the curb form. Choosing the appropriate Auger Size for a given Curb Form Curbilders can be equipped with one of four (4) different extrusion auger assembly sizes. These sizes are a nominal 5, 6, 8, and 10 in diameter. Note: The 10 diameter auger is designed to work on the MC-850 and MC-900 Curbilders only. The square inch area and height of a curb form design are to a large degree, but not solely, determine which auger assembly size is correct for any given curb form. For purposes of initially matching an auger size to a particular curb form use the curb form area: Curb Form width X height less the area of sloped side(s). Exceptions to this guideline will be noted at the end of this section. The following examples will help you determine the correct auger size to use with a curb form. Please refer to the following chart. Auger Size Min Sq Max Sq Min Height Max Height Min Width Max Width Inch Area Inch Area The area of each curb form is available from the Miller Spreader Company. Locate the stamped number (one (1) to five (5) digits/letter) on the outside face of the curb form mounting flange. Contact the Customer Service department with this number and a Miller service representative can supply the area for that curb form. You can consult the factory for curb form and auger size recommendations. IMPROPER SELECTION OF THE AUGER SIZE FOR A CURB FORM CAN CAUSE EXCESSIVE COMPONENT WEAR, POOR MACHINE PERFORMANCE AND/OR THE COMPLETE FAILURE TO OPERATE. 23
24 Examples of choosing an auger size for a given Curb Form Example #1 The curb form to be used is Curb Form Design (CFD) #14. The area of this curb form is 38.9 square inches and the overall height of this curb form is 6. Referring to the chart above see the area of #14 curb form falls within the 33 to 55 square inch recommended range of a 6 diameter auger. Then see that both the height and width of this curb form also fall within the recommended range for a 6 diameter auger. For best results in terms of both production and curb quality a 6 diameter auger is recommended. CFD # 14 Area 38.9 SQ IN Auger Size 6 95 Linear Feet per CU YD of concrete 50 Linear Feet per Ton of Asphalt 24
25 Example #2 CFD # 1021 Area 25 SQ IN Auger Size Linear Feet per CU YD of concre 78 Linear Feet per Ton of Asphalt The curb form to be used is Curb Form Design (CFD) #1021. The area of this curb form is 25 square inches and the overall height of this curb form is 4. Referring to the chart above see the area of #1021 curb form falls within the 18 to 32 square inch recommended range of a 5 diameter auger. Then see that both the height and width of this curb form also fall within the recommended range for a 5 diameter auger. Because the height and width of this curb form also fall within the recommended height and width range of a 6 diameter auger the temptation might be to use a 6 diameter auger to achieve greater production/speed. However, for best overall results in terms of production, life of wear parts and curb quality, a 5 diameter auger is the better choice. The most common mistake in sizing a curb form to the correct auger size is choosing a curb shape, which is too small for a particular auger. In example #2, the previously mentioned curb with an area of 25 square inches would work well with a 5 diameter auger assembly, but would most likely not work at all with a 6 diameter assembly. The amount of material discharged by the 6 diameter auger into the curb mold would be so great in relation to the curb size that the mold would not be able to discharge or extrude the material fast enough. In effect, the mold becomes a BOTTLENECK. As a result, excessive pressure will be created inside the form. When the density of the material in the curb form reaches the point where it can be compacted no further, the excessive pressure in the form will be transmitted back through the drive train, causing repeated disengagement of the safety torque arm, raising up of the curb form and/or shear bolt breakage. To avoid the problem, the auger size must be reduced or the curb form size increased. The second problem in sizing curb sections to auger sizes is choosing a form that is too large for a particular auger. An undersized auger can discharge enough material to propel the machine, but the curb produced will have inadequate density, a curb surface full of voids and/or a curb that will not stand up. In the most severe cases of an undersized auger, the auger will not discharge enough material to propel the machine. An undersized auger can be corrected by either increasing the auger size or by reducing the curb form area. Possible exceptions: If the curb form size is within 5-10% the recommended ranges in either upper or lower limits in the chart above the curb form may operate with the mix in your area. Only tests with local mixes will confirm satisfactory performance. Be aware that operating a Curbilder with an auger size OUTSIDE of the recommended limits can cause excessive wear and/or insufficient curb density. THE CUSTOMER ASSUMES ALL PERFORMANCE AND WEAR ISSUES WHEN OPERATING THE CURBILDER WITH AN AUGER OUTSIDE THE RECOMMENDED RANGES. 25
26 Choosing either a Solid or Hollow Auger Auger assemblies can be provided as HOLLOW assemblies allowing the insertion of 3/8 (#3) reinforcing rod into the curb during the extrusion process, or as SOLID assemblies for curbing without rebar. Determine which type of auger is required for your job site. The augers that are mounted onto a solid auger shaft have one (1) long shear bolt through the center of each auger. The augers that are mounted onto a hollow auger shaft have two (2), short, specially machined shear bolts which engage each side of the shaft but do not interfere with the rebar. Note: Hollow Auger Assemblies can only be mounted on the LEFT side of the Curbilder. Reviewing any Special Applications that can Apply to your Job Site A. Placing Reinforcing Rod/Rebar in an Extruded Curb With a hollow auger assembly (available for 5, 6 and 8 diameter augers) a 3 / 8 diameter steel reinforcing rod can be inserted through the center of the Optional Hollow Shaft Assembly. The Front Wheel Support must be moved away from the LEFT side of the frame on which the Auger housing is mounted so that a special bracket can be mounted to the front of the frame to guide the rebar into the Hollow auger Shaft. The machine operator inserts reinforcing rod in 10 lengths into this bracket. From the bracket the rebar then passes into the Hollow Shaft during the curbing operation. The rod passes through the auger shaft and curb form and into the finished curb. For radius work stranded steel aircraft cable can be used. When choosing a curb form to be used with reinforcing rod, curb height and configuration are important considerations. As much material as possible should surround the rod within the finished curb. The location of the rod from the ground is fixed for each auger size. Therefore, it is important to have sufficient curb form height to adequately cover the rod. With a 5 auger assembly, the top of the reinforcing rod will be approximately 3-1/2 above the ground. With a 6 auger assembly, the top of the reinforcing rod will be approximately 4 from the ground. With an 8 auger assembly, the top of the reinforcing rod will be approximately 5 from the ground. A minimum of 1 and preferably 2 of material should be on top of the reinforcing rod. 26
27 B. Extruding Curb over vertical Dowel Pins With a Miller Curbilder, curb can be extruded over vertical dowel pins. This is accomplished by raising the machine with the leveling screws at each wheel assembly in order to allow the screw housing to pass over the pins. Curbing over dowel pins also requires a special curb form. The form must be made with an elevated auger opening to accommodate the raised auger assembly. It must also incorporate an opening at the bottom of the mounting flange to allow the pins to pass into the form as the machine moves over them. Curb forms for curbing over pins are made for a specific pin height. Therefore, the pins cannot exceed the pin height that the curb form was designed for. Also, pin placement is critical. Pins must be on line, not more than ½ left or right of center to prevent pins from hitting the form. The most important aspect to remember when considering curbing over pins is that there must be a minimum of 5 between the top of the finished curb and the top of the pin. For example, to curb over 1 pins, the curb height must be 6 ; over 2 pins, the curb height must be 7 ; over 3 pins the curb height must be 8. In most cases, the Curbilder cannot extrude rebar and pass over pins at the same time. C. Extruding Curb Under an existing Guardrail A Miller Curbilder Model MC-655 has an offset frame, auger housing and hopper so that asphalt curb can be placed under existing guardrail. Supply the Miller Spreader Customer Service Department a drawing showing the curb form shape and the guardrail dimensions under which the curb must be placed. Our Customer Service Department will evaluate the feasibility of your job your application. D. Extruding New Curb over Old Curb A Miller Curbilder can extrude new curb over old curb. A special curb form is required. Roads that have several layers of pavement built up against the curb will diminish the curb height. Extruding new curb over the old can increase the curb height. To build this special curb form, both the old curb form design and the new curb form design are required. Consult with the factory about your specific requirements. E. Extruding Curb into an Offset Ditch A Miller Curbilder can extrude a new curb into an excavated ditch/trench at the edge of a paved road surface. A special curb form is required. There are some limitations to this procedure depending on curb size, the amount of offset required and the distance to the 27
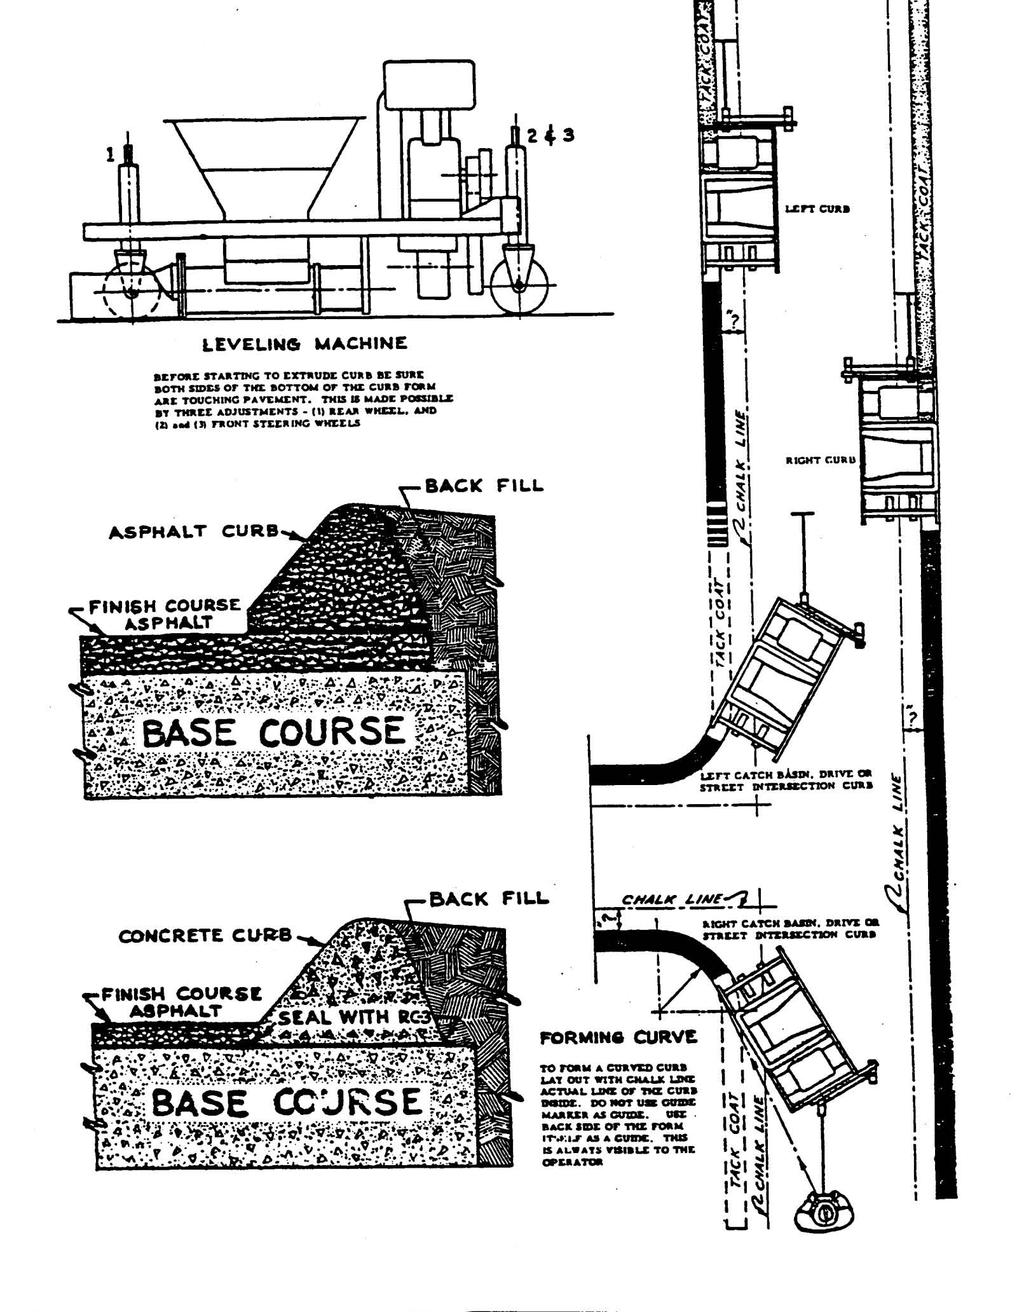
28 bottom of the ditch/trench. Supply the factory the curb form shape, the amount of offset and the depth of the ditch/trench from the top of the road surface to determine the feasibility of your application. Layout the Job Site Before putting the Miller Curbilder in use determine the location of the curb on the job site. Work from either plan job site drawings or surveyors grade stakes. A) Determine the SEQUENCE or ORDER in which each curb section will be placed. Consider the hand(s) (Left and/or Right) of Curb Forms required, the exit areas available at the end of straight sections and the starting locations of curbs required against walls and other curbs. Anticipate the best sequence of moves for the concrete trucks. Note the location of unprotected openings, walls, excavations, etc. Also note the location of any overhead wires, openings or obstructions that will affect the curb placement sequence. Note any job conditions that are unsafe and take corrective action BEFORE putting the Curbilder into service. For example, correct any soft condition in base or exit areas. All surfaces where the Curbilder must travel must be leveled within a 5% slope and compacted in excess of 90%. DO NOT OPERATE THE CURBILDER ON SOFT, UNEVEN SURFACES WHICH CAN CAUSE THE CURBILDER TO GET STUCK AND/OR TIP. Job site grades must not exceed 15%/ 8.5 Degrees. Dangerous Job Site Conditions that will be present during curb placement must be marked and protected with sufficient equipment to prevent any injury to personnel. Examples include but are not limited to overhead wires, openings with more than a 6 drop off, other job site work activity, etc. B) Determine the LOCATION where each curb section will be placed. Mark all the locations of the inside curb face. The inside curb face is the face/side of the curb that faces toward the middle of the road or toward the center of a parking area. Then snap a chalk line or nail in place a colored string 12 from the location of the inside face of the curb toward the center of the road/parking area. This mark/string will be the reference for the pointer on the front of the Curbilder. C) Apply Adhesive. i) When placing Concrete Curb over an existing concrete surface, apply a spray coating of Concrete Epoxy to the area where a concrete curb will be located on top of a concrete surface. Permit the epoxy to become tacky before applying curb. Follow epoxy directions for curing, amounts to be placed and safety. ii) When placing Concrete Curb over an existing asphalt or compacted rock surface apply a spray coating of SS-1 Emulsified Asphalt Tack Coat to the area where a concrete curb will be located. Apply from.05 to.15 gallons per square yard. iii) When placing Asphalt Curb over an existing asphalt, concrete or compacted rock surface apply a spray coating of SS-1Emulsified Asphalt Tack Coat to the area where a concrete curb will be located. Apply from.05 to.15 gallons per square yard. 28
29 29
30 Operating the Curbilder A. Know how to Use and Adjust ALL Controls and Features of the Miller Curbilder BEFORE putting this machine into Operation. 30
31 ENGINE: Review the Engine Manual. Know how to SAFELY start, stop and add fuel to the engine. ENGINE THROTTLE: Locate the Engine Throttle on your engine. Refer to page #13 in the Safety Section On throttle operation. Know how to increase engine speed to engage the centrifugal clutch and auger. Know how to decrease engine speed to disengage/ STOP the clutch and the auger. MACHINE HEIGHT: The machine height of the Miller Curbilder can be adjusted using three (3) crank handles located on the top of each Height Adjusting Screw Assembly, two (2) in the front of the machine, one (1) in the rear of the machine. Turn the crank handle CLOCKWISE (as looking down on the handle) to LOWER the machine height. Turn the crank handle COUNTER-CLOCKWISE to RAISE the machine height. 31
32 STEERING: The Steering Control of the Miller Curbilder is done by means of a Steering Handle, which can be, attached either to the Left or Right front wheel fork. BRAKE: The Steering Handle is equipped with both a Service Brake. Push DOWN on the Steering Handle to apply the Service Brake against the front wheels. FRONT WHEEL SUPPORT: The Front Wheel Support of the Curbilder can shifted to the Right or Left of the machine main frame to keep the front wheels from tracking in the asphalt tack coat or concrete epoxy. To adjust the Front Wheel Support loosen (but DO NOT REMOVE) the two (2) bolts holding the Front Wheel Support in position. Then loosen (but DO NOT REMOVE) the one (1) bolt assembly that holds the Pointer Rod in position. For Curbilder Models MC-550, MC-650 and MC-655: 1) Place the Curbilder on a LEVEL concrete or asphalt surface. Block the Wheels in both directions. 2) Raise the front of the machine high enough to place two (2) jack stands rated at 1000# each under the front of the frame. See drawing. 3) Lower the Curbilder onto the jack stands. Then raise both front wheels one (1 ) inch above the ground. 4) With the machine secure on the jack stands and the bolts holding the Front Wheel Support loosened, push the Front Wheel Support in the direction desired. DO NOT STRIKE THE FRONT WHEEL SUPPORT WITH A HAMMER. Position the wheel closest to the curb form approximately two (2 ) inches from the inside edge of the Curb Form. 5) Tighten the Two (2) bolts holding the Front Wheel Support. 6) Raise the machine enough to clear the jack stands. 7) Remove the jack stands and lower the machine onto the ground. 8) Leave the Pointer Rod Assembly loose until the Curbilder is in position to place curbing. Then tighten in position as required. 32
33 For Curbilder Models MC-850 and MC-900: 1) Place the Curbilder on a LEVEL concrete or asphalt surface. Block the Wheels in both directions. Leave the Front Wheels on the Ground. 2) With the machine secure on a level, hard surface and the two (2) bolts holding the Front Wheel Support loosened, push the Front Wheel Support in the direction desired using the Pry Bar supplied with the machine. Place the flat end of the pry bar in any slot in the Front Wheel Support and engage another slot in the angled bracket in the front of the frame of the machine. Push the Front Wheel Support with the pry Bar in the direction desired. Repeat this action until the wheel closest to the curb form is approximately two (2 ) inches from the inside edge of the Curb Form. DO NOT STRIKE THE FRONT WHEEL SUPPORT WITH A HAMMER. 2) Tighten the Two (2) bolts holding the Front Wheel Support. 3) Leave the Pointer Assembly loose until the Curbilder is in position to place curbing. Then tighten in position as required. 33
34 REAR TAIL WHEEL ASSEMBLY: The Rear Tail Wheel Assembly consisting of the Holding Bracket and Vertical Upright Tube with wheels should be mounted with the Holding Bracket and Vertical Tube to the Rear of the Main Frame Rear Cross Tube. To adjust the LATERAL LOCATION of the Rear Tail Wheel Assembly turn the crank handle CLOCKWISE until the rear wheels are 1 above the ground. Then loosen the one (1) 3 long vertical retention Bolt on the Holding Bracket to move the Rear Tail Wheel Assembly. Slide the Rear Tail Wheel Assembly to the Left or Right so that the wheel closest to the curb form is no closer than 2 from the inside edge of the curb form. Tighten the one (1) vertical retention bolt. Note: When the Curb Form to be used is over 10 tall the Rear Wheel Outer Upright Tube can be repositioned vertically down to gain additional height of the frame of the Curbilder. To Adjust the VERTICAL HEIGHT POSITION of the rear of the Curbilder frame upward, raise the rear of the Curbilder frame as shown using the Rear Tail Wheel Assembly. Insert two(2) jack stands under the rear of the Curbilder frame. Loosen and remove the two (2) 3-1/2 long horizontal retention bolts on the Holding Bracket. Then LOWER the Rear Tail Wheel Outer Tube by turning the crank handle CLOCKWISE and at the same time pushing this tube down until the slots in the next lower tube position can be lined up with the square holes in the Rear Tail Wheel Bracket. Each lower slot position gains 2-1/4 vertical rear height of the Curbilder. When the desired position is achieved, replace and tighten the two (2) horizontal retention bolts. Remove jack stands. 34
Discount-Equipment.com
 SAFETY, OPERATION, MAINTENANCE, & COMMONLY USED PARTS MANUAL Revised June 2012 Curbilder Models: MC-550, MC-650, MC-655 Under Guard Rail MC-850 MC-900 Part #35001 is your online resource for commercial
SAFETY AND OPERATION REQUIREMENTS CHART
 OPERATION, MAINTENANCE and SAFETY MANUAL MB16 and MTB16 Scoot-Crete Power Buggies IMPORTANT MACHINE SERVICE NOTES This manual covers the safety, operation and adjustment procedures for the Miller Scoot-Crete
Voltmaster Centrifugal Trash Pumps
 Voltmaster Centrifugal Trash Pumps Model TSP2, TSP3 and TSP4 Owner s Manual February 2011 Table of Contents 1 Introduction............................ 1 1.1 Read before using..................... 1 1.2
Package Contents Part A (3) I-Beam (1) Base (2) Other parts
 I-Beam (1) Base (2) Other parts") Page 1 Installation Instructions for 81245 Adjustable Height Gantry Crane 1-Ton Capacity Table of Contents Important Safety Information pg. 2 Specific Operation Warnings pg. 2 Main Parts of Product pg.
Page 1 Installation Instructions for 81245 Adjustable Height Gantry Crane 1-Ton Capacity Table of Contents Important Safety Information pg. 2 Specific Operation Warnings pg. 2 Main Parts of Product pg.
Risk Management Department. Forklift Safety
 Risk Management Department Forklift 1 Introduction to Forklift Operating a forklift is an important job. So important that the federal government requires that all lift truck operators be trained and authorized
Owner s Manual. Mortar / Plaster Mixer. Models M785 M1000 M1200
 Owner s Manual Mortar / Plaster Mixer Models M785 M1000 M1200 Tiger Equipment LLC. 15 Byrd Lane Rocky Mount, VA 24151 Tel: 540-489-7777 Fax: 540-489-7778 www.tigerequip.com 1. PREFACE This manual contains
610 BUSHEL MANURE SPREADER
 610 BUSHEL MANURE SPREADER RODA MANUFACTURING 1008 LOCUST ST. HULL, IA. 51239 Art s-way Manufacturing 712-439-2366 Co., Inc. Hwy 9 West - PO Box 288 WWW.RODAMFG.COM Armstrong, IA. 50514 U.S.A 2 INTRODUCTION
Wheel Horse. 44 Snowthrower. for 5xi Lawn and Garden Tractors. Model No & Up. Operator s Manual
 FORM NO. 8 Rev A Wheel Horse Snowthrower for 5xi Lawn and Garden Tractors Model No. 7966 890050 & Up Operator s Manual IMPORTANT: Read this manual, and your tractor manual, carefully. They contain information
TP300 INDUSTRIAL TRASH PUMP OPERATOR S MANUAL
 TP300 INDUSTRIAL TRASH PUMP OPERATOR S MANUAL IT IS EXTREMELY IMPORTANT TO READ AND UNDERSTAND THE ENTIRE CONTENTS OF THIS OPERATOR S MANUAL BEFORE ATTEMPTING TO OPERATE THE PRODUCT. THIS EQUIPMENT IS
DIAMOND CONCRETE SAW MODEL CC1800XL P R O D U C T S OPERATOR S MANUAL. February Part #
 DIAMOND P R O D U C T S OPERATOR S MANUAL CONCRETE SAW MODEL CC1800XL February 2007 Part #1801038 Intentionally Blank GENERAL SAFETY WARNINGS AND PRECAUTIONS PERSONAL SAFETY Read and understand all operating
INSTALLATION MANUAL SWS
 INSTALLATION MANUAL SWS 30-30 Gallon Auxiliary Tank FOR RVB1500, 2000, 2500 SPREADERS Sno-Way, Down Pressure and EIS are registered trademarks of Sno-Way International, Inc. ProControl, MegaBlade, V-Wing,
Table of Contents. Safety symbols... 3 Assembly 6. Operation Maintenance Troubleshooting 11. Storage. 12. Notes. 13
 Table of Contents Safety symbols... 3 Assembly 6 Operation... 8 Maintenance... 10 Troubleshooting 11 Storage. 12 Notes. 13 2 Safety Information Attention; this machine can be dangerous! All operators should
Rotary Brush Cutter. Model Number RBV. Serial Number. Serial Number and Greater. Maximum Flow Rate gpm. Phone: RBV
 Rotary Brush Cutter Model Number RBV. Serial Number. Serial Number 75 and Greater Maximum Flow Rate gpm. Phone: 0--700 0/5/0 Revised // RBV Features of Virnig Mfg. Inc. Rotary Brush Cutter include: diameter
MODEL TB-8, TB-10, TB-12, & TB-14 TRAILER HOIST INSTALLATION AND OPERATION MANUAL
 TRUCK BODIES & EQUIPMENT INTERNATIONAL, Inc. Website: www.tbei.com E-mail: sales@tbei.com Phone: 1-800-869-9162 1-800-533-0494 090001 MODEL TB-8, TB-10, TB-12, & TB-14 TRAILER HOIST INSTALLATION AND OPERATION
OPERATOR S MANUAL. 20-bu 3-Point Hitch Material Collection System. LP65048 Supplier ST /07/2017 English. North American Edition Printed in USA
 OPERATOR S MANUAL 20-bu 3-Point Hitch Material Collection System LP65048 Supplier ST48289 11/07/2017 English North American Edition Printed in USA Introduction Using Your Operator s Manual Read this entire
EJ212 Electric Jack 1 Ton (2,000 lbs) Assembly & Operating Instructions
 Assembly & Operating Instructions") EJ212 Electric Jack 1 Ton (2,000 lbs) Assembly & Operating Instructions READ ALL INSTRUCTIONS AND WARNINGS BEFORE USING THIS PRODUCT. This manual provides important information on proper operation & maintenance.
EJ212 Electric Jack 1 Ton (2,000 lbs) Assembly & Operating Instructions READ ALL INSTRUCTIONS AND WARNINGS BEFORE USING THIS PRODUCT. This manual provides important information on proper operation & maintenance.
Installation Instructions Crossfire Spreader 64740, 66263, and 66264
 Form 1-1091R1 July 2016 Installation Instructions Crossfire Spreader 64740, 66263, 64742 and 66264 Determining Vehicle Payload It is necessary to calculate the available material payload to prevent overloading
Read instructions carefully and follow rules for safe operation. Failure to do so could result in serious injury. Fradan Manufacturing Corp.
 OPERATOR MANUAL FRADAN POWER BLOWERS Part No. 888-011-222-0 Read instructions carefully and follow rules for safe operation. Failure to do so could result in serious injury. Fradan Manufacturing Corp.
MODEL HD99 HYDRAULIC ONE MAN TOWABLE EARTHDRILL
 DO NOT THROW AWAY IMPORTANT MANUAL MODEL HD99 HYDRAULIC ONE MAN TOWABLE EARTHDRILL Operators Manual GROUND HOG, INC. P.O.BOX 290 San Bernardino, CA. 92402 Phone (909) 478-5700 Fax (909) 478-5710 E-mail:
Begin Program: Welcome everyone and introduce yourself, speaker(s) and/or interpreter if one is present/necessary. Feel free to include your name/prog
 and/or interpreter if one is present/necessary. Feel free to include your name/prog") Begin Program: Welcome everyone and introduce yourself, speaker(s) and/or interpreter if one is present/necessary. Feel free to include your name/program name on the title slide for purposes of personalization.
Begin Program: Welcome everyone and introduce yourself, speaker(s) and/or interpreter if one is present/necessary. Feel free to include your name/program name on the title slide for purposes of personalization.
Rotary Brush Cutter (Standard Flow)
") Rotary Brush Cutter (Standard Flow) Model Number RBV. Serial Number. Serial Number 6795-0050 Maximum Flow Rate gpm. For and 5 GPM Max Models Phone: 0-9-700 0/5/0 Revised // RBV Features of Virnig Mfg.
Rotary Brush Cutter (Standard Flow) Model Number RBV. Serial Number. Serial Number 6795-0050 Maximum Flow Rate gpm. For and 5 GPM Max Models Phone: 0-9-700 0/5/0 Revised // RBV Features of Virnig Mfg.
Industrial Truck (Forklift) Safety Program
 Safety Program") University of North Carolina Wilmington Environmental Health & Safety Workplace Safety Industrial Truck (Forklift) Safety Program GENERAL The UNCW Environmental Health & Safety Department (EH&S) is authorized
University of North Carolina Wilmington Environmental Health & Safety Workplace Safety Industrial Truck (Forklift) Safety Program GENERAL The UNCW Environmental Health & Safety Department (EH&S) is authorized
DFS Vac Collection System 400 Series Z Master
 Form No. 0 DFS Vac Collection System 00 Series Z Master Model No. 780 Serial No. 000000 and Up Operator s Manual Register your product at www.toro.com Original Instructions (EN/GB) Contents Page Introduction................................
SECTION 11 POWERED INDUSTRIAL TRUCKS
 SECTION 11 POWERED INDUSTRIAL TRUCKS 11.1 Powered Industrial Truck Procedure 11.2 Forklift Inspection 11.3 Operator Performance Evaluation Checklist Revised: May 2009 Updated: November 2017 Reviewed: October
Worldlawn Power Equipment, Inc. Industrial Park 2415 Ashland Ave. Beatrice, NE Toll Free Number:
 Operator s Manual R WYZ48/52/60CS BAGGER Worldlawn Power Equipment, Inc. Industrial Park 2415 Ashland Ave. Beatrice, NE 68310 Toll Free Number: 1-800-267-4255 OPERATOR S MANUAL This catcher manual is for
BEFCO. Operator s Manual BABY HOP & HOP FERTILIZER SPREADERS ACCESSORIES SIDE ROW DISCHARGE. AA4-120 (fits models Hop 209 & 212) DEFLECTOR
 DEFLECTOR") BEFCO Operator s Manual BABY HOP & HOP FERTILIZER SPREADERS ACCESSORIES SIDE ROW DISCHARGE AA-0 (fits models Hop 09 & ) DEFLECTOR AA-0 (fits models Baby Hop 0 & 06) 009-95 (fits models Hop 0 & 06) 009-968
BEFCO Operator s Manual BABY HOP & HOP FERTILIZER SPREADERS ACCESSORIES SIDE ROW DISCHARGE AA-0 (fits models Hop 09 & ) DEFLECTOR AA-0 (fits models Baby Hop 0 & 06) 009-95 (fits models Hop 0 & 06) 009-968
LIFTING MECHANISM PART NO SRM 965
 LIFTING MECHANISM B60Z [A230]; B80Z [A233]; C60Z [A478]; C80Z [A479]; W60Z [A231]; W65Z [A229]; W80Z [A234]; B60Z AC [B230]; B80Z AC [B233]; C60Z AC [B478]; C80Z AC [B479] PART NO. 1500202 4000 SRM 965
DYNAPAC CONCRETE EQUIPMENT RAMIRENT. BG70 Power Floats INSTRUCTIONS & SPARE PARTS CATALOGUE BG70 - IS ENG
 DYNAPAC CONCRETE EQUIPMENT INSTRUCTIONS & SPARE PARTS CATALOGUE BG70 Power Floats BG70 - IS - 10682 - ENG SAFETY INSTRUCTIONS - MACHINES SUBMITTED : Powered with : Electric, Pneumatic, Petrol or Diesel
Propane torch. Model Assembly And Operation Instructions
 Propane torch Model 39953 Assembly And Operation Instructions Due to continuing improvements, actual product may differ slightly from the product described herein. 3491 Mission Oaks Blvd., Camarillo, CA
MODEL LR-2066 & LR-2866A HOIST INSTALLATION AND OPERATION MANUAL
 TRUCK BODIES & EQUIPMENT INTERNATIONAL, Inc. Website: www.rugbymfg.com E-mail: sales@rugbymfg.com Phone: 1-800-869-9162 03 5839 MODEL LR-2066 & LR-2866A HOIST INSTALLATION AND OPERATION MANUAL Hoist Serial
Owner s Manual This Manual Must Be Read Before Operating The Equipment
 Owner s Manual This Manual Must Be Read Before Operating The Equipment MS4500 Serial No. 140410300001MS4500 and higher Madison Heights, Michigan 48071 866-5-TURFEX www.turfexproducts.com CUSTOMER COPY
Operator's Manual. VC-60 & VC-60 Plus Harper Industries, Inc. 7/03 Part No
 Operator's Manual VC-60 & VC-60 Plus 2003 Harper Industries, Inc. 7/03 Part No. 970066 Thank you for purchasing a Harper/Goossen Verti-Cutter. As with all Harper/Goossen products, the Harper/Goossen Verti-Cutter
25 BUSHEL MANURE SPREADER
 25 BUSHEL MANURE SPREADER RODA MANUFACTURING 338 MAIN ST. HULL, IA. 51239 Art s-way Manufacturing 712-439-2366 Co., Inc. Hwy 9 West - PO Box 288 WWW.RODAMFG.COM Armstrong, IA. 50514 U.S.A 2 INTRODUCTION
Owners Manual. Cart-Away Concrete Systems, Inc NE Alpha Dr. McMinnville, OR fax:
 Owners Manual All drawings and statements in this document are proprietary information, title to which is held by Cart- Away Concrete Systems, Inc. Use of these materials contrary to the best interest
RAPID ROLLER OPERATOR S MANUAL. L&C ENTERPRISES - U.S.A, Inc N.75 Drive, Escanaba, MI OWNER S NAME MODEL
 RAPID ROLLER OPERATOR S MANUAL OWNER S NAME MODEL SERIAL NUMBER DATE OF PURCHASE L&C ENTERPRISES - U.S.A, Inc. 6652 N.75 Drive, Escanaba, MI 49829 906-786-1008 1-866-786-1009 LIMITED WARRANTY L&C Enterprises-USA,
LKS300/LKS450 OPERATOR S MANUAL
 LKS300/LKS450 OPERATOR S MANUAL SAFETY RULES SHIFTA 300/450 Conveyor DANGER Failure to obey the instructions and safety rules in this manual will result in death or serious injury. Do Not Operate Unless:
GRASS CATCHER PART S & OPERATORS MANUAL
 GRASS CATCHER PART S & OPERATORS MANUAL WORLDLAWN POWER EQUIPMENT, INC. WORLDLAWN.COM 2415 ASHLAND AVE BEATRICE, NE 68310 800-267-4255 FAX 402-223-4103 2 3 4 OPERATORS MANUAL This catcher manual is for
DIAMONDBACK/EDGE GRASS COLLECTION SYSTEM PARTS & OPERATORS MANUAL
 DIAMONDBACK/EDGE GRASS COLLECTION SYSTEM PARTS & OPERATORS MANUAL GRASS CATCHER W/WEIGHT: TUBE KIT: BLOWER KIT: 48 5101305 632093 632078 52 5101305 542119 632074 60 632086 542120 632081 3 WORLDLAWN POWER
KING COBRA/CALIBER GRASS COLLECTION SYSTEM PARTS & OPERATORS MANUAL
 KING COBRA/CALIBER GRASS COLLECTION SYSTEM PARTS & OPERATORS MANUAL GRASS CATCHER W/WEIGHTS: TUBE KITS: BLOWER KITS: 52 542128 52 542119 5101002 60 542129 60 542120 5101003 2 WORLDLAWN POWER EQUIPMENT
before serial number 2214
 before serial number 2214 Contents Page Safety Rules... 3 Pre-operational & Safety Inspection... 4 Operating Instructions... 6 Transport... 12 Maintenance & Routine Service... 12 Specifications... 14 SAFETY
SBCNNS. Abrasive Blast Cabinet Assembly & Operating Instructions
 SBCNNS Abrasive Blast Cabinet Assembly & Operating Instructions READ ALL INSTRUCTIONS AND WARNINGS BEFORE USING THIS PRODUCT. This manual provides important information on proper operation & maintenance.
ELIMINATOR LP. Operation Manual. To Be Filled In By Installer. Body Serial #: In Service Date: Dealer: Address: City, State, ZIP:
 Website: www.tbei.com E-mail: sales@tbei.com Phone: 1-800-869-9162 Rugby 1-800-255-4345 DuraClass 1-800-533-0494 Crysteel ELIMINATOR LP Operation Manual To Be Filled In By Installer Body Serial #: In Service
Single and Double Head Powered Screed. Screed King. User Manual. SCR-UM EN-04 (December 2018)
") Single and Double Head Powered Screed Screed King SCR-UM-00364-EN-04 () User Manual Single and Double Head Powered Screed, Screed King CONTENTS Scope of This Manual.............................................
Single and Double Head Powered Screed Screed King SCR-UM-00364-EN-04 () User Manual Single and Double Head Powered Screed, Screed King CONTENTS Scope of This Manual.............................................
TurfMaker TAILGATE MULCHER
 TurfMaker TAILGATE MULCHER OPERATORS MANUAL AND PARTS LIST FOREWORD Congratulations on your purchase of a TurfMaker Tailgate Mulcher. You will find this to be one of the most versatile and work-saving
Defender Series. Overfill Prevention Valve. Automatic Shutoff for USTs. Installation, Operation and Maintenance Series
 Defender Series Overfill Prevention Valve Automatic Shutoff for USTs Installation, Operation and Maintenance 708-590 Series For use in 4" gravity-fill applications only 25-370 Gallons per Minute flow Compatible
North Dakota State University Grounds Maintenance Equipment
 North Dakota State University Grounds Maintenance Equipment I. Introduction Grounds maintenance equipment is an important part of the work activities on NDSU campus. They can make grounds maintenance jobs
OPERATOR'S MANUAL 304 Row Mulcher
 OPERATOR'S MANUAL 0 Row Mulcher PUBLICATION DATE: // Millcreek Manufacturing Company Reservoir Road Honey Brook PA MILLCREEK PART# 0 WARNING: DO NOT assemble, operate, or maintain this equipment without
Powered Industrial Trucks
 INDIANA UNIVERSITY-PURDUE UNIVERSITY at INDIANAPOLIS IUPUI Department of Environmental Health and Safety 620 Union Drive, Room 043, Indianapolis, Indiana 46202 Powered Industrial Trucks Purpose and Background
LIFT TRUCK SAFETY OPERATOR TRAINING
 LIFT TRUCK SAFETY OPERATOR TRAINING Avoiding Injury One person and a lift truck can move large amounts of material with ease and efficiency. Employers are responsible for training operators in the safe
Powered Industrial Truck Safety Program
 Powered Industrial Truck Safety Program 0 TABLE OF CONTENTS Forklift Safety Program 1.0 Overview.. 2 2.0 Purpose....2 3.0 Procedures..2 4.0 Responsibilities. 4 5.0 Training Requirements......5 Appendix
PORTABLE CONCRETE VIBRATOR
 PORTABLE CONCRETE VIBRATOR OPERATION MANUAL MODEL PV45S INTRODUCTION We have taken care in the selection, testing and design of this product. Should service or spare parts be required this can be provided
SECTION 14: AERIAL LIFT PROGRAM
 SECTION 14: AERIAL LIFT PROGRAM Fisher Auto Parts is committed to promoting a safe and healthy environment for all employees and customers. Protection from accidental loss of any resources, especially
National N-55. LOAD CHARTS for Use With WRITTEN EXAMINATIONS
 LOAD CHARTS for Use With WRITTEN EXAMINATIONS National N-55 Manitowoc Crane Group, by providing pages of one of its manuals, is not providing a substitute for training on a Manitowoc crane. These pages
INSTRUCTIONS AND SPARE PARTS READ CAREFULLY BEFORE OPERATING MACHINE
 SP Series OPERATING INSTRUCTIONS AND SPARE PARTS READ CAREFULLY BEFORE OPERATING MACHINE July 2006 Technical Data SERIES "SP Model SP 150 SP 250 SP 300 SP 400 SP 500 Capacity 149 li 198 li 250 li 302 li
Smart-Till. Models ST101, ST151, ST203, and ST303. HCC, inc st Avenue Mendota, IL
 Owners Manual Smart-Till Models ST101, ST151, ST203, and ST303 HCC, inc. 1501 1st Avenue Mendota, IL 61342 815-539-9371 www.hccincorporated.com C-1159 May 2010 Safety Most work related accidents are caused
SPECIFICATIONS Horsepower: 1.5 HP Running Maximum PSI: 125 PSI Tank Capacity: 15 Gallons CFM: 6 40 PSI 5 90 PSI
 15 GALLON AIR COMPRESSOR Model: 7678 DO NOT RETURN TO STORE Please call 800-348-5004 for parts and service CALIFORNIA PROPOSITION 65 WARNING: You can create dust when you cut, sand, drill or grind materials
Hydraulic Wheel Dolly
 Hydraulic Wheel Dolly Operating Instructions & Parts Manual Model Number HW93766 Capacity 3/4 Ton Made in the U.S.A. This is the safety alert symbol. It is used to alert you to potential personal injury
OPERATOR and PARTS MANUAL GRAIN GRINDER MODEL GG 10
 1 Serial # GG10-AUG10-6-0701 to GG10-AUG10-276-0314 ROTO GRIND OPERATOR and PARTS MANUAL GRAIN GRINDER MODEL GG 10 ROTO GRIND BURROWS ENTERPRISES, INC. 2024 East 8 th Street Greeley, Colorado 80631 970-353-3769
WARNING WARNING WARNING. Warnings and Cautions MOVING PARTS ENTANGLEMENT HAZARD CHEMICAL AND FIRE HAZARD FALLING OR CRUSHING HAZARD
 Warnings and Cautions As you read these instructions, you will see S, S, NOTICES and NOTES. Each message has a specific purpose. S are safety messages that indicate a potentially hazardous situation, which,
Important. Contents. Contact us:
 Operator's Manual Third Edition Third Printing Important Read, understand and obey these safety rules and operating instructions before operating this machine. Only trained and authorized personnel shall
Decals. IMPORTANT INFORMATION Xxxx xxx xxxx xx xxxx x xxxx. WARNING! Xxxx xxx xxxx xx xxxx x xxxx.
 symbols and decals Xxxx xxx xxxx xx xxxx x xxxx. IMPORTANT INFORMATION Xxxx xxx xxxx xx xxxx x xxxx. Used in this publication to notify the reader of a risk of personal injury, particularly if the reader
44 and 52 Twin Bagger 100 Series Z Master
 Form No. 7 87 and 5 Twin Bagger 00 Series Z Master Model No. 7855 Serial No. 000000 and Up Operator s Manual English (CE) Contents Page Introduction................................ Safety.....................................
Model E600 Tarping System
 10 Boulder Parkway N. Oxford, MA 01537 866-353-5826 pioneersales@wastequip.com www.pioneercoverall.com Model E600 Tarping System Installation Instructions WARNING: In order to prevent damage, the tarp
INSTALLATION MANUAL - v4
 I-LOCKTM COUPLER INSTALLATION MANUAL - v4 SPECIAL NOTE Your new Wedgelock Coupler fitted with the I-LOCK TM Safety Device requires the installation of a third hydraulic line - please follow the instructions
OPERATOR and PARTS MANUAL GRAIN GRINDER MODEL GG 7
 1 Serial # GG7-AUG10-71-1013 and Higher 2014 and up ROTO GRIND OPERATOR and PARTS MANUAL GRAIN GRINDER MODEL GG 7 ROTO GRIND BURROWS ENTERPRISES LLC 2024 East 8 th Street Greeley, Colorado 80631 970-353-3769
WARM ENGINE STARTING PROCEDURE
 saw starting COLD ENGINE STARTING PROCEDURE 1. Pull the choke lever out. 2. Lock the throttle in the start position by depressing and holding the throttle lock button (C) while releasing the trigger (A)
ArmorGuard Barrier Portable Longitudinal Barrier
 ArmorGuard Barrier Portable Longitudinal Barrier Installation & Maintenance Manual AGB I&M 082409 Page 1 of 12 ArmorGuard Barrier Table of contents Preface... 2 Applications and System Characteristics
OWNER S, INSTALLATION AND PARTS MANUAL
 OWNER S, INSTALLATION AND PARTS MANUAL QUICK HITCH CONVERSION KIT CONVERTS ST TO 22 SERIES HITCH FOR PLOW SERIAL NUMBERS AFTER STD100000 STG100000 2006 Sno-Way International 97101306A TABLE OF CONTENTS
Pump Owner s Manual. PLEASE! Read All Instructions Carefully Before Installing Pump
 Pump Owner s Manual PLEASE! Read All Instructions Carefully Before Installing Pump Guarantee Associate Engineering Corporation warrants that pumps purchased from them will be free of defects in material
INSTALLATION / OPERATING INSTRUCTIONS Reese Elite Series FIFTH WHEEL SLIDER HITCH
 INSTALLATION / OPERATING INSTRUCTIONS Reese Elite Series FIFTH WHEEL SLIDER HITCH DEALER/INSTALLER: (1) Provide this Manual to end user. (2) Physically demonstrate hitching and unhitching procedures in
Quiet Collector. Model No & Up
 FORM NO. -8GB Rev A Quiet Collector Model No. 795-890000 & Up Operator s Manual IMPORTANT: Read this manual, and your tractor manual, carefully. They contain information about your safety and the safety
WARNING! Decals. IMPORTANT INFORMATION Xxxx xxx xxxx xx xxxx x xxxx. Xxxx xxx xxxx xx xxxx x xxxx.
 symbols and decals Xxxx xxx xxxx xx xxxx x xxxx. Used in this publication to notify the reader of a risk of personal injury, particularly if the reader DOES NOT follow the instructions given in the manual.
SINGLE BLADE ROOF CUTTER
 Phone: 404-766-7027 Fax: 404-766-7277 www.eastpointequipment.com SINGLE BLADE ROOF CUTTER OPERATING INSTRUCTIONS READ THE INSTRUCTIONS You have purchased a quality piece of roofing equipment. This equipment
Mulcher Operators Manual
 Mulcher Operators Manual Skid Pro Attachments PO Box 982 Alexandria, MN 56308 October 2015 1 2 Contents 1. Introduction And Warranty... 4 1.1 Introduction... 4 1.2 Warranty... 4 2. Component Identification...
Color Logo use on white background only. Red: Blue: PMS Black Logo use on white background only
 Color Logo use on white background only Red: 0-0-0-0 Blue: PMS 29 0-6-0-0 Owners Manual LH400 (Lift Hoist 400) Platform Hoist This Hoist is Equipped with a Quick Change Cable Drum Effective: /18/2011 Black
MODELS 1324 & 1624 & 1824
 THE MODELS 1324 & 1624 & 1824 HYDRAULIC TRENCHERS CONGRATULATIONS! You are now the proud owner of a BARRETO trencher. Please take a moment of your time to look over the following information. Familiarize
42in GT Classic Single Stage Snowthrower Conversion Kit XT Series Garden Tractor
 Form No. 9 66 in GT Classic Single Stage Snowthrower Conversion Kit XT Series Garden Tractor Part No. 06 88 Installation Instructions English (EN) This kit is for installing an existing 00 Series Classic
CAM-LIFT WHEEL MOVE KIT 1500-SERIES S-DRIVE STANDARD CONVEYORS ASSEMBLY MANUAL
 CAM-LIFT WHEEL MOVE KIT ASSEMBLY MANUAL This manual applies to the following models: 1565, 1575, 1585, 1590, 15100 ORIGINAL INSTRUCTIONS Read this manual before using product. Failure to follow instructions
FSG175 FENCE STAPLE GUN
 Kencove Farm Fence Supplies 344 Kendall Rd Blairsville, PA 15717 1-800-KENCOVE sales@kencove.com www.kencove.com OPERATING MANUAL FSG175 FENCE STAPLE GUN To reduce the risk of possible injury, read the
SeekTech Inductive Clamp
 Inductive Clamp Manual SeekTech Inductive Clamp! Read this Operator s Manual carefully before using this tool. Failure to understand and follow the contents of this manual may result in electrical shock,
OWNER S MANUAL. Item #
 GAS-POWERED CONCRETE SCREED OWNER S MANUAL WARNING: Read carefully and understand all INSTRUCTIONS before operating. Failure to follow the safety rules and other basic safety precautions may result in
OPERATING & INSTRUCTION MANUAL
 251 Welsh Pool Rd Exton, PA 19341 610-941- 4333 www.safetyhoistcompany.com OPERATING & INSTRUCTION MANUAL VH-300 BRIGGS & STRATTON VH-300 HONDA IMPORTANT RETAIN THIS MANUAL For instruction on assembly
Loose Parts Note: Determine the left and right sides of the machine from the normal operating position.
 Brake Kit Dingo TX 0 & Compact Utility Loader Part No. 0 0 & 0 Loose Parts Note: Determine the left and right sides of the machine from the normal operating position. Description Qty. Use Drive wheel Brake
Brake System H TX, H2.0TXS [B475]; H TX [B466] Safety Precautions Maintenance and Repair
![Brake System H TX, H2.0TXS [B475]; H TX [B466] Safety Precautions Maintenance and Repair](/thumbs/86/93834005.jpg "Brake System H TX, H2.0TXS [B475]; H TX [B466] Safety Precautions Maintenance and Repair") HMM180001 Brake System H1.5-1.8TX, H2.0TXS [B475]; H2.5-3.5TX [B466] Safety Precautions Maintenance and Repair When lifting parts or assemblies, make sure all slings, chains, or cables are correctly fastened,
HMM180001 Brake System H1.5-1.8TX, H2.0TXS [B475]; H2.5-3.5TX [B466] Safety Precautions Maintenance and Repair When lifting parts or assemblies, make sure all slings, chains, or cables are correctly fastened,
Low Profile Service Jack
 Low Profile Service Jack Model GMG29031 Capacity 3 Ton U.S. Patent No. 6,199,379! This is the safety alert symbol. It is used to alert you to potential personal injury hazards. Obey all safety messages
Hydraulic Wheel Dolly
 Hydraulic Wheel Dolly Operating Instructions & Parts Manual Model Number HW93765 Capacity 3/4 Ton Made in the U.S.A. This is the safety alert symbol. It is used to alert you to potential personal injury
Long Chassis Hydraulic Service Jacks
 Model BH6011 Long Chassis Hydraulic Service Jacks Operating Instructions and Parts Manual Capacity 10 Ton Model BH6011 U.S. Patent No's. 5,946,912 5,341,723! This is the safety alert symbol. It is used
INSTRUCTION MANUAL & PARTS BOOK. Vibratory Screed
 INSTRUCTION MANUAL & PARTS BOOK Vibratory Screed 200 COMMERCE DRIVE, FREEHOLD, NEW JERSEY, USA, 07728, 732-566-5400 FAX 732-5444 Doc. # OI-M09201 Current Rev. 07 Revised: 11/2013 Orig. Rel.: 06/2014 SAFETY
ArmorGuard Barrier Portable Longitudinal Barrier
 ArmorGuard Barrier Portable Longitudinal Barrier Installation & Maintenance Manual AGB I&M 112811 Page 1 of 13 ArmorGuard Barrier Table of contents Preface... 2 Applications and System Characteristics
EZ LINER EXPRESS USERS MANUAL
 EZ LINER EXPRESS 2013 Vehicle Service Group CHIEF'S LIMITED ONE-YEAR WARRANTY & LIABILITY Chief Automotive Technologies warrants for one year from date of installation and/or purchase any components of
Log Splitter. Owner/Operator Manual. Models HCWP1-26
 Log Splitter Owner/Operator Manual Models HCWP1-26 SAFETY..........................2 SAFETY WARNING SYMBOL.........3 SAFETY RULES.................. 4-5 SPECIFICATIONS................. 6 CONTROLS AND FEATURES.......
V50 Rotary Brush Cutter-Standard Deck (RBV) (Standard and High Flow Models)
 (Standard and High Flow Models)") Optional Front Caster Assembly (BCC) 00PP /"- TOP LOCK NUT PP 7/" X -/" LG LYNCH PIN 779PP /"- X " LG HHCS 09PP /" X 0GA MACH BUSHING 09PP /" EXTERNAL SNAP RING PP /" DIA X 9/" LG BUSH 7 0PP /"- STRAIGHT
Optional Front Caster Assembly (BCC) 00PP /"- TOP LOCK NUT PP 7/" X -/" LG LYNCH PIN 779PP /"- X " LG HHCS 09PP /" X 0GA MACH BUSHING 09PP /" EXTERNAL SNAP RING PP /" DIA X 9/" LG BUSH 7 0PP /"- STRAIGHT
High Pressure Abrasive Blast Cabinet 42000
 Please read and save these instructions. Read through this owner s manual carefully before using product. Protect yourself and others by observing all safety information, warnings, and cautions. Failure
ASSEMBLY INSTRUCTIONS Reese Elite Series FIFTH WHEEL SLIDER HITCH
 ASSEMBLY INSTRUCTIONS Reese Elite Series FIFTH WHEEL SLIDER HITCH DEALER/INSTALLER: (1) Provide this Manual to end user. (2) Physically demonstrate procedures in this Manual to end user. (3) Have end user
Operating Instructions & Parts Manual
 Swift Lift Hydraulic Service Jack Operating Instructions & Parts Manual Model Number ATD7341 Capacity 3-1/2 Ton U.S. Patent No's. 5,946,912 6,199,379! This is the safety alert symbol. It is used to alert
Important. Contents. Contact us:
 Operator's Manual First Edition Ninth Printing Important Read, understand and obey these safety rules and operating instructions before operating this machine. Only trained and authorized personnel shall
WARNING WARNING CAUTION. Warnings and Cautions MOVING PARTS ENTANGLEMENT HAZARD MOVING PARTS ENTANGLEMENT HAZARD CHEMICAL AND FIRE HAZARD
 Warnings and Cautions As you read these instructions, you will see S, S, NOTICES and NOTES. Each message has a specific purpose. S are safety messages that indicate a potentially hazardous situation, which,
Operator Manual. The most important component is you. This operator manual. has information for. all models of series. B plus some options and
 Operator Manual This operator manual has information for all models of series B plus some options and accessories. Some of the illustrations and information may not apply to your truck. The most important
CONTENTS: SPECIFICATIONS 5712BT - 12 TON BENCH TOP HYDRAULIC SHOP PRESS OWNER'S MANUAL
 OWNER'S MANUAL CONTENTS: Page 1 Specifications 2 Warning Information 3 Assembly and Operating Instructions 4 Preventative Maintenance and Warranty Information 5 Exploded View Drawing and Parts List SPECIFICATIONS
WARNING this attachments capacity changes depending on the Skid Steer Loader it is hooked up to. CAPACITY AT 24 LOAD CENTER
 SKID STEER FORKLIFT ATTACHMENT Any piece of equipment can be dangerous if not operated properly. YOU are responsible for the safe operation of this equipment. The operator must carefully read and follow