Upper Extremities USER MANUAL GAT444-IP. Stealth s User Manual And Maintenance Guide for the Gatlin Swivel Tablet Mount
|
|
|
- Calvin Miller
- 5 years ago
- Views:
Transcription


1 Upper Extremities USER MANUAL GAT444-IP Stealth s User Manual And Maintenance Guide for the Gatlin Swivel Tablet Mount


2 Customer Satisfaction 1.0 Stealth Products strives for 100% customer satisfaction. Your complete satisfaction is important. Please contact us with feedback or suggested changes that will help improve the quality and usability of our products. You may reach us at: Stealth Products, LLC 104 John Kelly Drive, Burnet, TX Phone: (512) Toll Free: 1(800) Fax: (512) Toll Free: 1(800) MDSS GmbH Schiffgraben Hannover, Germany General Read and understand all instructions prior to the use of the product. Failure to adhere to instructions and warnings in this document may result in property damage, injury, or death. Product misuse due to failure of the following instructions will void the warranty. Immediately discontinue use if any function is compromised, parts are missing, loose, or shows signs of excessive wear. Consult with your supplier for repair, adjustment, or replacement. i
3 Important Information 2.0 Important Information! All persons responsible for fitting, adjustment, and daily use of the devices discussed in these instructions must be familiar with and understand all safety aspects of the devices mentioned. In order for our products to be used successfully, you must: Read and understand all instructions and warnings. Maintain our products according to our instruction on care and maintenance. Devices should be installed and adjusted by a trained technician. Supplier Reference Supplier: Telephone: Address: Purchase Date: Model: ii
4 Introduction 3.0 Before you install or begin using this product, it is important that you read and understand the content of these installation and operating instructions. The installation instructions will guide you through the possibilities with the Gatlin Swivel Mount. Instructions are written with the expressed intent of use with standard configurations. They also contain important safety and maintenance information. For further assistance, or more advanced applications, please contact your supplier or Stealth Products at (512) or toll free at Always keep the operating instructions in a safe place so they may be referenced as necessary. All information, pictures, illustrations, and specifications are based on the product information that was available at the time of printing. Pictures and illustrations shown in these instructions are representative examples and are not intended to be exact depictions of the various parts of the product. Ordering Documentation You can download additional copies of this User Manual on the Stealth website: Or search: GAT444-IP User Manual in the search bar at the top of the page. iii
5 Warranty 4.0 Our products are designed, manufactured, and produced to the highest of standards. If any defect in material or workmanship is found, Stealth Products will repair or replace the product at our discretion. Any implied warranty, including the implied warranties of merchantability and fitness for a particular purpose, shall not extend beyond the duration of this warranty. Stealth Products, LLC does not warrant damage due to, but not limited to: Misuse, abuse, or misapplication of products. Modification or product without written approval from Stealth Products, LLC. Any alteration or lack of serial number, where applicable, will automatically void this warranty. Stealth Products, LLC is liable for replacement parts only. Stealth Products, LLC is not liable for any incurred labor costs. No person is authorized to alter, extend, or waive the warranties of Stealth Products, LLC. Stealth Products warrants against failure due to defective materials or workmanship: Covers: 180 days Hardware: 5 years Electronics: 3 years In Case of Product Failure In the event of product failure covered by our warranty, please follow the procedures outlined below: 1. Call Stealth at +1 (512) or toll free Request the Returns Department or obtain an RA from the Returns Department and follow department or documentation instructions. iv
6 Table of Contents Customer Satisfaction... i 2.0 Important Information... ii 3.0 Introduction... iii 4.0 Warranty... iv 5.0 Table of Contents... v 6.0 Warning Labels... vi 6.1 Warning Labels... vi 6.2 Limited Liability... vi 6.3 Testing... vi 7.0 Parts And Accessories... vii 7.1 Parts Included... vii 8.0 Mounting Intended Use GAT400-IP Swivel Mount Hardware Mounting Armrest Mounting Positioning Gatlin Positioning Adjustments GAT444-IP Adjustment Gatlin Adjustment First Time Use Dealer Assistance User Testing Conditions Of Use Maintenance Care And Maintenance... 8 v
7 Warning Labels 6.0 Warning Labels 6.1 Warnings are included for the safety of the user, client, operator and property. Please read and understand what the signal words SAFETY, NOTICE, CAUTION, WARNING and DANGER mean, how they could affect the user, those around the user, and property. DANGER WARNING CAUTION NOTICE SAFETY Identifies an imminent situation which (if not avoided) will result in severe injury, death, and property damage. Identifies a potential situation which (if not avoided) will result in severe injury, death, and property damage. Identifies a potential situation which (if not avoided) will result in minor to moderate injury, and property damage. Identifies important information not related to injury, but possible property damage. Indicates steps or instructions for safe practices, reminders of safe procedures, or important safety equipment that may be necessary. Limited Liability 6.2 Stealth Products, LLC accepts no liability for personal injury or damage to property that may arise from the failure of the user or other persons to follow the recommendations, warnings, and instructions in this manual. Testing 6.3 Initial setup and driving should be done in an open area free of obstacles until the user is fully capable of driving safely. The GAT444-IP should always be tested without any person sitting in the wheelchair until every alteration of the physical installation or adjustment is complete. vi
 SU275 17mm Ring (2) 1/4 /20 x 3/4 Socket Head Screws (3) 10-24 x 1/2 Socket Head Screws (4) 8-32 x 1/2")
8 Parts and Accessories 7.0 Parts Included 7.1 The Gatlin Swivel Table Mount is pre-assembled before delivery. Included with the swivel mount is: GAT444-IP Swivel Mount (1) SU275 17mm Ring (2) 1/4 /20 x 3/4 Socket Head Screws (3) x 1/2 Socket Head Screws (4) 8-32 x 1/2 Cross Head Screws (5) 8-32 Nut (6) (4) (2) (3) (5) (1) 8) (6) vii

 ranging from 7.")

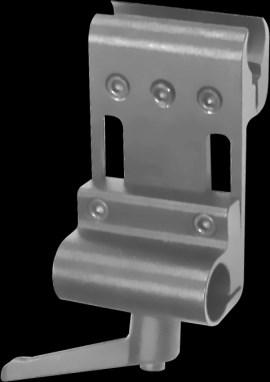
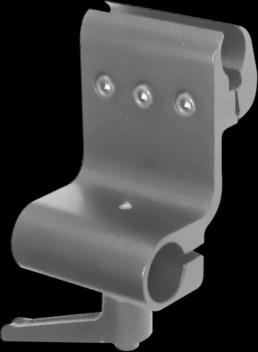
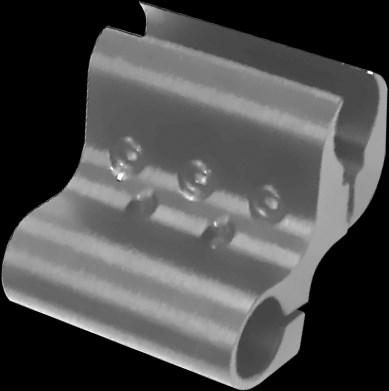
9 Mounting 8.0 Intended Use 8.1 The GAT444-IP is a versatile hardware to add virtually any tablet to a Gatlin armrest positioning mount. With 360 rotating capability and great compatibility, the GAT444-IP is a great way to attach a tablet to a seating system. GAT444-IP Swivel Mount 8.2 The technical specs of this swivel mount include: Support tablet heights (long side) ranging from 7.3 to and a maximum width of 7.75 Held in place by support cups on opposing ends of the cradle. To Install: Pull out retracting spring loaded support cups Place tablet in between and allow support cup to retract over the tablet. The spring loaded support cup applies planar tension on the tablet, allowing for a sturdy and static position while gently cradling the tablet. 1


10 Mounting 8.0 Hardware Mounting 8.3 Installation varies depending on which mounting hardware is used. Refer to list below and follow corresponding instructions. 1. ARM240 Standard mount (1 & 3) 2. ARM250 Adjustable mount (1 & 6) 3. ARM250-I Fixed mount for Invacare armrests (1 & 6) 4. ARM240-I Adjustable mount for Invacare armrests (1 & 6) 5. ARM250-P Adjustable mount for Permobil armrests (2 & 6) (1) (2) (5) (3) (4) (6) (7) (8) (9) (10) (11) 2
11 Mounting 8.0 Armrest Mounting 8.4 To mount an armrest with clamps: 1. Loosely thread screws through clamp plate (7) into base plate (8). 2. Position armrests tube between clamp. 3. Tighten screws (6) with a 3/16 hex key until the hardware firmly clamps onto the armrest tube. To mount an armrest with a Permobil track: 1. Lightly thread screws through the four holes on the hardware into track nuts (9). 2. Slide track nuts (9) into Permobil armrest track and tighten screws with a 1/8 hex key until the hardware firmly clamps on the armrest track. To mount 3/4 stem rod with ARM240 hardware: 1. Slide rod into tube clamp. 2. Tighten the two socket head screws (10) with a 3/16 hex key until the hardware firmly clamps the rod. To mount 3/4 stem rod with a ratchet handle (11): 1. Slide the rod into the tube clamp. 2. Tighten ratchet handle (11) until the hardware firmly clamps the rod. 3. Permobil and Invacare specific hardware comes in 5/8 & 7/8 size rods. NOTICE To prevent electronics and sensitive devices from damage, keep area clear when swinging rod away. 3


12 Positioning 9.0 Gatlin Positioning 9.1 Hardware operation varies depending on which Gatlin is used. GAT400 8 positions available GAT405 3 positions available To change the hardware position: 1. Pull and hold the top of the Gatlin barrel from the bottom. 2. Move to desired position. 3. Allow Gatlin barrel top to retract and lock into the new position. GAT400-8 POSITION GAT405-3 POSITION GAT SWING The GAT does not lock into place and has no set position, but does allows for 180 swing away for fast transfers. To prevent electronics and sensitive devices from damage, keep area clear when swinging rod away Closed Open 4


 For 20 angle and 360 rotational adjustment at the ball")
13 Adjustments 10.0 GAT444-IP Adjustment 10.1 The GAT444-IP swivel mount allows for highly versatile rotational adjustment. For horizontal position and 360 rotational adjustment along the Gatlin arm: 1. Loosen the screw with a 3/16 hex key. 2. Position hardware to the desired location and retighten the screw. (1) For 20 angle and 360 rotational adjustment at the ball mount: 1. Loosen the three screws on the mounting ring with a 5/32 hex key. 2. Position hardware in desired location and retighten the screws. (2) 5


 holding the hardware")

 Further Adjustment: Adjustable mounting")
14 Adjustments 10.0 Gatlin Adjustment 10.2 Vertical Adjustment: 1. Loosen screw (9) on Gatlin barrel with a 3/16 hex key. 2. Place height and rotation to desired position and retighten screws. (3) Fore and Aft Adjustment: 1. Loosen the two screws (5) holding the hardware rod (6). 2. Position the hardware to the desired location and retighten. (4) Further Adjustment: Adjustable mounting hardware allows for further vertical height adjustment. 1. Loosen screws (6) with a 3/16 hex key. 2. Position the hardware to the desired location and retighten. (5) 6
15 First Time Use 11.0 Dealer Assistance 11.1 During first time use by the client, it is advised that the dealer or service technician assists and explains the configuration to the customer (the user and/or the attendant). If needed, the dealer can make final adjustments. WARNING The Gatlin Swivel Table should only be prescribed and fitted by qualified health care professionals. User Testing 11.2 It is important that the customer is fully aware of the installation and how the headrest can be adjusted in order to gain the best positioning possible. As a dealer, proceed as follows: Explain and show the customer how you have executed the installation, and explain the function. Have the user test the position of the GAT444-IP hardware: Is the hardware in the proper position for the client? Can the user safely operate the chair? Is the placement of the GAT444-IP in an optimal position for the user? If needed, adjust the hardware to the proper position. Explain to the customer any possible issues and how to address them. Conditions of Use 11.3 The Gatlin Swivel Table is intended for use as installed by the dealer, in accordance to the installation instructions in this manual: The foreseen conditions of use are communicated by the dealer or service technician to the user and/or attendant during the first time use. If the conditions of use change significantly, please contact your dealer or a qualified service technician to avoid excessive wear and tear or unintended damage. 7
16 Maintenance 12.0 Care and Maintenance 12.1 Periodically check the hardware for loose screws or worn parts. To clean, use a general household cleaner. It may be required to tighten the set screw if the swing away mechanism is loose. If the hardware unintentionally swings away or does not lock into place when put in the operating position, the set screw will need to be loosened. SAFETY Replace or repair parts as needed. DANGER Failure to comply with these warnings could result in serious bodily harm. 8
17 NOTES 13.0 a
18 NOTES 13.0 b
19 NOTES 13.0 c
20 Stealth Products, LLC. +1(800) (512) John Kelly Drive, Burnet TX P91D15R2 Revision Date
Ultra Headrest Series
 Positioning & Support USER MANUAL Ultra Headrest Series Stealth s User Manual and Maintenance Guide for the Ultra Headrest Series Customer Satisfaction 1.0 Stealth Products strives for 100% customer satisfaction.
SUS9 Swing Away Series
 Positioning & Support USER MANUAL SUS9 Swing Away Series Stealth s User Manual and Maintenance Guide for the SUS9 Swing Away Series Customer Satisfaction 1.0 Stealth Products strives for 100% customer
Lower Extremities USER MANUAL RLSHW100. Stealth s User Manual and Maintenance Guide for Residual Limb Support
 Lower Extremities USER MANUAL RLSHW100 Stealth s User Manual and Maintenance Guide for Residual Limb Support Customer Satisfaction 1.0 Stealth Products strives for 100% customer satisfaction. Your complete
Positioning & Support USER MANUAL. Combo Series. Stealth s User Manual and Maintenance Guide for the Combo Series Headrest
 Positioning & Support USER MANUAL Combo Series Stealth s User Manual and Maintenance Guide for the Combo Series Headrest Customer Satisfaction 1.0 Stealth Products strives for 100% customer satisfaction.
SUS9 Swing Away Series
 Positioning & Support USER MANUAL SUS9 Swing Away Series Stealth s User Manual and Maintenance Guide for the SUS9 Swing Away Series Customer Satisfaction 1.0 Stealth Products strives for 100% customer
The World s Best Laterals
 Lateral and Trunk Support USER MANUAL The World s Best Laterals Stealth s User Manual and Maintenance Guide for The World s Best Laterals Customer Satisfaction 1.0 Stealth Products strives for 100% customer
Backs and Support OWNER MANUAL. J&L Hardware. TFB Hardware J&L Owner s Manual
 Backs and Support OWNER MANUAL J&L Hardware TFB Hardware J&L Owner s Manual Customer Satisfaction 1.0 Stealth Products strives for 100% customer satisfaction. Your complete satisfaction is important. Please
UniLink Elbow Support Hardware
 Upper Extremities OWNER MANUAL UniLink Elbow Support Hardware UniLink Elbow Hardware Owner s Manual Customer Satisfaction 1.0 Stealth Products strives for 100% customer satisfaction. Your complete satisfaction
Stealth Power i-tilt
 Power Tilts OWNERS MANUAL Stealth Power i-tilt User Manual and Maintenance Guide for Stealth s i-tilt Customer Satisfaction 1.0 Stealth Products strives for 100% customer satisfaction. Your complete satisfaction
Quick Release Mounting Hardware
 Mounting Hardware USER MANUAL Quick Release Mounting Hardware Stealth s User Manual and Maintenance Guide for ADI s Quick Release Mounting Hardware Customer Satisfaction 1.0 Stealth Products strives for
Quick Reference. Sideguard Template. Installation Manual for Creating a Sideguard Template
 Quick Reference Sideguard Template Installation Manual for Creating a Sideguard Template Customer Satisfaction 1.0 Stealth Products strives for 100% customer satisfaction. Your complete satisfaction is
Quick Reference. 4-Point PRO Mounting Hardware. For Aluminum & Carbon Series Back Supports
 Quick Reference 4-Point PRO Mounting Hardware For Aluminum & Carbon Series Back Supports Customer Satisfaction 1.0 Stealth Products strives for 100% customer satisfaction. Your complete satisfaction is
Quick Reference. Carbon Fiber Seating. Seat Base Installation
 Quick Reference Carbon Fiber Seating Seat Base Installation Customer Satisfaction 1.0 Stealth Products strives for 100% customer satisfaction. Your complete satisfaction is important. Please contact us
Quick Reference. Fixed ELITE Mounting Hardware. For Carbon Fiber Backs
 Quick Reference Fixed ELITE Mounting Hardware For Carbon Fiber Backs Customer Satisfaction 1.0 Stealth Products strives for 100% customer satisfaction. Your complete satisfaction is important. Please contact
Quick Release Hardware
 Backs and Support OWNER S MANUAL Quick Release Hardware True Forming Back s Quick Release Hardware Owner s Manual Customer Satisfaction 1.0 Stealth Products strives for 100% customer satisfaction. Your
User Manual Stealth s Power Tilt
 User Manual Stealth s Power Tilt Copyright 2014 Stealth Products, Inc. Copyright 2014 Stealth Products, Inc. All rights reserved. Published by Stealth Products, Inc. November 7, 2014 P45D61R1 Customer
Mobility Bases OWNER S MANUAL. Lightning Pushchair. Lightning Pushchair Owner s Manual
 Mobility Bases OWNER S MANUAL Lightning Pushchair Lightning Pushchair Owner s Manual Customer Satisfaction 1.0 Stealth Products strives for 100% customer satisfaction. Your complete satisfaction is important.
INSTALLATION MANUAL. ADI Disc Brake Systems. Installation Manual for HA-10, HA-12, and HA-14 Hub Assemblies
 INSTALLATION MANUAL ADI Disc Brake Systems Installation Manual for HA-10, HA-12, and HA-14 Hub Assemblies Customer Satisfaction 1.0 Stealth Products strives for 100% customer satisfaction. Your complete
Heavy Duty Four Wheeled Walker
 Heavy Duty Four Wheeled Walker Weight Capacity: 500 lbs. ITEM # W1802 Made in China 2011 ESSENTIAL MEDICAL SUPPLY, INC. Manufactured for Orlando, FL 32822 -- SAVE THESE INSTRUCTIONS -- Do not attempt to
Instruction Manual. ATV Plow Tube System
 Instruction Manual ATV Plow Tube System Manual Conventions This manual uses the following symbols to help differentiate between different kinds of information. The safety symbol is used with a key word
Quadratec 3 Add-A-Leaf Suspension Lift Kit
 Quadratec 3 Add-A-Leaf Suspension Lift Kit Installation Manual: for 1984-2001 Cherokee (XJ) # 16400.005X PARTS LIST: Front Coil Springs - QTY 2 Add-A-Leafs - QTY 2 5/16 x 3 Tie Bolts - QTY 2 5/16 Tie Bolt
Swing Arm Magnifying Lamp
 Owner s Manual & Safety Instructions Save This Manual Keep this manual for the safety warnings and precautions, assembly, operating, inspection, maintenance and cleaning procedures. Write the product s
CAUTION CAUTION indicates a potentially hazardous situation which, if not avoided, may result in minor or moderate injury.
 Instruction Manual Notes: Page Manual Conventions This manual uses the following symbols to help differentiate between different kinds of information. The safety symbol is used with a key word to alert
Part Number Mini Linear Lift Assembly Installation & Operator s Instruction Manual
 Part Number 39644 Mini Linear Lift Assembly Installation & Operator s Instruction Manual April 1999 MV1505C Chore-Time Warranty Mini Linear Lift Assembly Manual Chore-Time Warranty Chore-Time Equipment
Owner s (Operator s) Manual & Safety Instructions Manually Lever Operated Chain Hoist Model LX1B
 Manual & Safety Instructions Manually Lever Operated Chain Hoist Model LX1B") Owner s (Operator s) Manual & Safety Instructions Manually Lever Operated Chain Hoist Model LX1B BULLETIN NO. LX-0804-CE-06 WARNING This equipment must not be installed, operated or maintained by any person
Owner s (Operator s) Manual & Safety Instructions Manually Lever Operated Chain Hoist Model LX1B BULLETIN NO. LX-0804-CE-06 WARNING This equipment must not be installed, operated or maintained by any person
Full Length Bed Rail - Model G29
 User Manual DEALER: These instructions MUST be given to the user of the product. USER: BEFORE using this product, read this manual and save for future reference. 1 General Check all parts for shipping
1. Contents 1. CONTENTS INTRODUCTION SAFETY WARNINGS POWER TILT STANDARD OPERATING INSTRUCTIONS... 5.
 1. Contents 1. CONTENTS..... 2. INTRODUCTION..... 3. SAFETY WARNINGS..... 4. POWER TILT STANDARD OPERATING INSTRUCTIONS....... 5. POWER SEAT LIFT STANDARD OPERATING INSTRUCTIONS...... 6. POWER TILT / SEAT
1000-lb Hydraulic Truck Crane
 1000-lb Hydraulic Truck Crane Owner s Manual WARNING: Read carefully and understand all ASSEMBLY AND OPERATION INSTRUCTIONS before operating. Failure to follow the safety rules and other basic safety precautions
Quadratec Aluminum Transfer Case Skid Plate
 Quadratec Aluminum Transfer Case Skid Plate Installation Manual for 07-Current Wrangler (JK) 2 or 4 Door # 12500.0213 Note: This skid plate must be used in conjunction with the Engine & Transmission Skid
Instruction Manual. ATV Manual Plow Lift
 Instruction Manual ATV Manual Plow Lift Manual Conventions This manual uses the following symbols to help differentiate between different kinds of information. The safety symbol is used with a key word
Magician Comfy. Owner s Manual
 Magician Comfy Owner s Manual Table Of Contents Introduction...................................... 2 Safety Precautions................................ 3 Assembly........................................4-9
Quadratec Spare Tire Mounted Bike Rack
 Quadratec Spare Tire Mounted Bike Rack Installation Manual: Designed for Jeep 76-18 CJ, YJ, TJ & JK Wrangler Vehicles # 92034.1005 TO REDUCE RISK OF SERIOUS INJURY OR PROPERTY DAMAGE: READ ALL SAFETY MESSAGES
HATCHGRIP Installation Instructions/Operation and Maintenance Manual
 HATCHGRIP Installation Instructions/Operation and Maintenance Manual Models: HTG-PCG Contact Information Table of Contents: Safety Precautions... 2 Product Information... 2 Operation... 3 Installation
Innovation in Mobility. R1208 Six-Way Power Seat Base. Operator Manual. 03/25/02 32DSB01.A RICON CORPORATION All Rights Reserved
 Innovation in Mobility R1208 Six-Way Power Seat Base Operator Manual 03/25/02 32DSB01.A 92-2002 RICON CORPORATION All Rights Reserved Printed in the United States of America This RICON product must be
1250 LB. CAPACITY MECHANICAL WHEEL DOLLY
 1250 LB. CAPACITY MECHANICAL WHEEL DOLLY 67287 SET-UP AND OPERATING INSTRUCTIONS Visit our website at: http://www.harborfreight.com Read this material before using this product. Failure to do so can result
REACH USER MANUAL USER: READ THIS MANUAL BEFORE USING THIS DEPENDENT MOBILITY BASE AND SAVE FOR FUTURE REFERENCE
 USER MANUAL CHAIR PROVIDER: THIS MANUAL MUST BE GIVEN TO THE USER OF THIS DEPENDENT MOBILITY BASE USER: READ THIS MANUAL BEFORE USING THIS DEPENDENT MOBILITY BASE AND SAVE FOR FUTURE REFERENCE Revision
Owner s Manual & Safety Instructions
 Owner s Manual & Safety Instructions Save Save This This Manual Keep Keep this this manual manual for for the the safety safety warnings warnings and and precautions, assembly, assembly, operating, inspection,
SAVE THESE INSTRUCTIONS DANGER
 Contoura Back and Seat Cushions Assembly, Installation and Operating Instructions SAVE THESE INSTRUCTIONS To ensure the safe operation and use of the Contoura Back and Cushion, these instructions MUST
Linear Actuator. Installation Manual. warranty installation parts list. Linear Actuator Installation Manual Page 1
 Linear Actuator Installation Manual warranty installation parts list January 2004 Linear Actuator Installation Manual Page 1 MA1221B12 Warranty Information Chore-Time Equipment ( Chore-Time ) warrants
Before installing your Roush Performance Product(s), read through the entire installation procedure and check to make sure all items are present.
, read through the entire installation procedure and check to make sure all items are present.") 2005-2006 Ford Mustang GT Legal / Stage 3 / Offroad Exhaust Kits for Roush Rear Valence Installation Instructions Application: 2005- Ford Mustang GT Model Must have Roush Rear Valence Kit #R03030061 Before
2005-2006 Ford Mustang GT Legal / Stage 3 / Offroad Exhaust Kits for Roush Rear Valence Installation Instructions Application: 2005- Ford Mustang GT Model Must have Roush Rear Valence Kit #R03030061 Before
Component for OTC No or No. 1750A
 655 Eisenhower Drive Owatonna, MN 55060 USA Phone: (507) 455-7000 Tech. Serv.: (800) 533-6127 Fax: (800) 955-8329 Order Entry: (800) 533-6127 Fax: (800) 283-8665 International Sales: (507) 455-7223 Fax:
Table of Contents. Safety... 2 Specifications... 3 Setup Parts List and Diagram Warranty Operation Maintenance
 Table of Contents Safety Setup Operation Maintenance Safety... 2 Specifications... 3 Setup... 4 Operation... 5 WARNING SYMBOLS AND DEFINITIONS Maintenance... 9 Parts List and Diagram... 10 Warranty...
Please visit for the latest version of these installation instructions.
 Please visit www.blueox.com for the latest version of these installation instructions. Attachment Tab Height: 16 Serial Number Attachment Tab Width: 35 Please read BOTH these and the General Information
2000-lb Hand Winch Truck Crane
 2000-lb Hand Winch Truck Crane Owner s Manual WARNING: Read carefully and understand all ASSEMBLY AND OPERATION INSTRUCTIONS before operating. Failure to follow the safety rules and other basic safety
Manual Operated Floor Jack
 Manual Operated Floor Jack OPERATING INSTRUCTIONS Note: There may be some slight differences in the appearance of the various manually-operated floor jacks, however the instructions in this manual apply
RAM 1500, 2019 CLASSIC & 2010-ON 2500/3500 INSTALLATION INSTRUCTIONS
 2009-18 RAM 1500, 2019 CLASSIC & 2010-ON 2500/3500 INSTALLATION INSTRUCTIONS Thank you for purchasing ROCKSTARTM Splash Guard Mud Flaps. Agri-Cover, Inc. proudly manufactured these mud flaps using superior
EXTRA WIDE STEEL ROLLATOR
 EXTRA WIDE STEEL ROLLATOR Product Codes: LM3882WBL Blue LM3882WBU Burgundy Extra Wide steel Rollator liquid coated painted frame. Soft touch hand brakes with locking mechanism. PVC extra wide seat. 8"
Quadratec Aluminum Skid Plate for Front Swaybar
 Quadratec Aluminum Skid Plate for Front Swaybar Installation Manual for 07-Current Wrangler (JK) 2 or 4 Door # 12500.0211 & # 12500.0218 Front View Rear View TO REDUCE RISK OF SERIOUS INJURY OR PROPERTY
25 GALLON PORTABLE OIL LIFT
 25 GALLON PORTABLE OIL LIFT Model 92859 SET UP AND OPERATING INSTRUCTIONS Diagrams within this manual may not be drawn proportionally. Due to continuing improvements, actual product may differ slightly
Please visit for the latest version of these installation instructions.
 Please visit www.blueox.com for the latest version of these installation instructions. BX1139 2018 Jeep Wrangler / Wrangler Unlimited (JL) (All Models w/standard Bumper) Attachment Tab Height: 18 Serial
400 Watt WIND TURBINE
 400 Watt WIND TURBINE User s Manual Congratulations on your Coleman solar product purchase. This product is designed to the highest technical specifications and standards. It will supply years of maintenance
CDS-JOHN BLUE COMPANY
 VRH-1000 HYDRAULIC VARIABLE RATE DRIVE AND MOUNT KIT PARTS AND INSTRUCTION MANUAL CDS-JOHN BLUE COMPANY DIVISION OF ADVANCED SYSTEMS TECHNOLOGY, INC. 290 Pinehurst Drive - Huntsville, Alabama 35806 P.O.
USER MANUAL. Tides La Mer Treatment Table Rev A 3/28/19. *all tables shown with optional accessories and/or finishes
 USER MANUAL Tides La Mer Treatment Table *all tables shown with optional accessories and/or finishes 1-400-0041 Rev A 3/28/19 Living Earth Crafts 2019, All Rights Reserved Legal Notice The information
Please visit for the latest version of these installation instructions.
 Please visit www.blueox.com for the latest version of these installation instructions. BX2414 2019 Ram 1500 (Includes Rebel) (No Classic) Attachment Tab Height: 17 Serial Number Attachment Tab Width: 38.5
PRISM BACKS (BASIC, ULTRA, TRUEFITT, AIR BACK AND SUPER BACK FOR KIDS) 850 REV04 REV DATE: 09/03/2014 Page 1 of 16
 850 REV04 REV DATE: 09/03/2014 Page 1 of 16") PRISM BACKS (BASIC, ULTRA, TRUEFITT, AIR BACK AND SUPER BACK FOR KIDS) 850 REV04 REV DATE: 09/03/2014 850 REV04 REV DATE: 09/03/2014 Page 1 of 16 Table of Contents Page 3 1.0 Hardware Kit Contents Page
PRISM BACKS (BASIC, ULTRA, TRUEFITT, AIR BACK AND SUPER BACK FOR KIDS) 850 REV04 REV DATE: 09/03/2014 850 REV04 REV DATE: 09/03/2014 Page 1 of 16 Table of Contents Page 3 1.0 Hardware Kit Contents Page
VANGUARD Series 36" Slant Wall and Cone Direct Drive Fans Installation & Operator s Instruction Manual
 VANGUARD Series 36" Slant Wall and Cone Direct Drive Fans Installation & Operator s Instruction Manual MV1600-1C 9/99 1625-003 2/2000 March 200 Chore-Time Warranty VANGUARD Series 36" Slant Wall and Cone
Presoak & Tire/Engine Cleaner Systems (Air Pump) DU TC_A & DU PS_A
 DU TC_A & DU PS_A") Presoak & Tire/Engine Cleaner Systems (Air Pump) DU TC_A & DU PS_A Owner s Manual #0795 Customer Number: Model Number: Serial Number: Installation Date: IMPORTANT Please read and u n d e r s t a n d t
Presoak & Tire/Engine Cleaner Systems (Air Pump) DU TC_A & DU PS_A Owner s Manual #0795 Customer Number: Model Number: Serial Number: Installation Date: IMPORTANT Please read and u n d e r s t a n d t
Please visit for the latest version of these installation instructions.
 Please visit www.blueox.com for the latest version of these installation instructions. BX2412 2016-18 Ram 1500 Rebel 2016-18 Ram 1500 Bighorn/Laramie/Laramie Longhorn (Chrome Bumpers) 2018 Ram 1500 (Metal
General Guidelines. Instructions for Part # SC-SWING-AWAY-V2. Safety
 Instructions for Part # SC-SWING-AWAY-V2 General Guidelines It is the user s responsibility to read and follow all instructions. Keep these instructions with the product at all times and review before
Please visit for the latest version of these installation instructions.
 Please visit www.blueox.com for the latest version of these installation instructions. Attachment Tab Height: 19-1/2 Serial Number Attachment Tab Width: 19 Please read BOTH these and the General Information
Quadratec Aluminum Skid Plate for Fuel Tank
 RIVAL_JK_FUELT_SKID_8_A4.qxp_A4 6/13/17 4:13 PM Page 1 Quadratec Aluminum Skid Plate for Fuel Tank Installation Manual for 07-Current Wrangler (JK) 2 Door # 12500.0215 TO REDUCE RISK OF SERIOUS INJURY
Breezy EC Transport Wheelchair
 B r e e z y E C Tr a n s p o r t W h e e l c h a i r Breezy EC Transport Wheelchair O w n e r s M a n u a l READ BEFORE USE REVIEW THIS MANUAL Before using this chair you, and each person who may assist
Component Size Weight Capacity
 Specifications Component Size Weight Capacity Top Shelf 72 W x 19-1/2 L 1500 lb Drawer A (x3) 37-3/8 W x 19-1/2 L x 2-1/4 H 154 lb each Drawer B 37-3/8 W x 19-1/2 L x 5-1/4 H 220 lb Drawer C 37-3/8 W x
Component for OTC No or No. 1750A Engine Mounting Adapter
 655 EISENHOWER DRIVE OWATONNA, MN 55060-0995 USA PHONE: (507) 455-7000 TECH. SERV.: (800) 533-6127 FAX: (800) 955-8329 ORDER ENTRY: (800) 533-6127 FAX: (800) 283-8665 INTERNATIONAL SALES: (507) 455-7223
Uplift Premium Power Lifting Seat
 Uplift Premium Power Lifting Seat User Guide Read all instructions before using the Uplift Power Seat DANGER - To reduce the risk of electric shock: IMPORTANT SAFETY INSTRUCTIONS Always unplug the Uplift
JL 2 Shock Extensions
 1 JL 2 Shock Extensions # 198200 - Jeep JL Wrangler, 2 Shock Extensions www.teraflex.com Important Notes: Prior to beginning this install, or any installation, read the instructions thoroughly to familiarize
JL 2 Bumpstop Kit. Important Notes:
 1 JL 2 Bumpstop Kit Important Notes: Prior to beginning this install, or any installation, read the instructions thoroughly to familiarize yourself with the required steps. Evaluate if you are experienced
Jeep JL 1.5 Spacer Lift
 Jeep JL 1.5 Spacer Lift Kit #1165100 - Jeep JL Wrangler, DR 1.5" Spacer Lift Kit Kit #116500 - Jeep JL Wrangler, DR ST1, No Shocks Kit #116511 - Jeep JL Wrangler, DR S/T1 Kit,.1 Falcon Shocks Kit #116500
Lift N Go [Model 210] Electric Carrier For use with power chairs & scooters Installation Guide & Owners Manual
![Lift N Go [Model 210] Electric Carrier For use with power chairs & scooters Installation Guide & Owners Manual](/thumbs/74/70316262.jpg "Lift N Go [Model 210] Electric Carrier For use with power chairs & scooters Installation Guide & Owners Manual") 203 Matzinger Road Toledo, OH 43612 Phone: 1-800-541-3213 Fax: (419) 478-4425 www.wheelchaircarrier.com E-mail: admin@wheelchaircarrier.com Lift N Go [Model 210] Electric Carrier For use with power chairs
203 Matzinger Road Toledo, OH 43612 Phone: 1-800-541-3213 Fax: (419) 478-4425 www.wheelchaircarrier.com E-mail: admin@wheelchaircarrier.com Lift N Go [Model 210] Electric Carrier For use with power chairs
TUFFSTUFF FITNESS INTERNATIONAL OWNER S MANUAL
 TUFFSTUFF FITNESS INTERNATIONAL OWNER S MANUAL Maintenance & Assembly Instructions IMPORTANT: KEEP THIS MANUAL FOR FUTURE REFERENCE NOTICE It is the Purchaser s/owner s obligation: 1. To disclose and post
Quadratec 2 Coil Spacer Lift Kit
 Quadratec 2 Coil Spacer Lift Kit Installation Manual: for 2007-Current Wrangler (JK) # 16400.0X42 PARTS LIST: JK 2 Front Coil Spacers - QTY 2 JK 2 Rear Coil Spacers - QTY 2 2 Front Bump Stop Spacers -
Premium Supply. Tilt Deck. Models PCK-TD PCK-PTD. Operator s Manual and Installation Instructions
 Tilt Deck Models PCK-TD PCK-PTD Operator s Manual and Installation Instructions Premium Supply 2038 West Interstate 30 866-934-0777 Proud members of: and June 1, 2015 Table of Contents Introduction...
Owner s Manual. Transport / Companion Wheelchairs M4TV M2TF M2TC M2TL HEALTH PRODUCTS, INC.
 Owner s Manual M4TV M2TF Transport / Companion Wheelchairs M2TL M2TC HEALTH PRODUCTS, INC. INTRODUCTION Congratulations on the purchase of your new companion chair. Please read this introduction with your
Universal Anchoring. Serrated Double Bolt Jaw Users Manual. April 2016 by Vehicle Service Group. All rights reserved. CO9722.1
 Universal Anchoring Serrated Double Bolt Jaw Users Manual April 2016 by Vehicle Service Group. All rights reserved. CO9722.1 IN20780 Rev. - 4/27/2016 CHIEF'S LIMITED ONE-YEAR WARRANTY & LIABILITY Chief
Performance Zone Assembly and Maintenance Manual
 Performance Zone Assembly and Maintenance Manual 1 INTRODUCTION KEISER CORPORATION has always taken pride in designing and engineering the highest quality equipment on the market. This means that you will
RDC 100 & RDC DRUM ROTATING CARTS ASSEMBLY INSTRUCTIONS
 Vestil Manufacturing Corp. 2999 North Wayne Street, P.O. Box 507, Angola, IN 46703 Telephone: (260) 665 7586 or Toll Free (800) 348 0868 Fax: (260) 665 1339 www.vestilmfg.com e mail: info@vestil.com RDC
Hose reel. Models and Installation and maintenance guide. Danger
 Installation and maintenance guide Hose reel Models 81133 and 81323 Date of issue March 2014 Form number 402674B Section E35 Page 75B Danger Read manual prior to installation or use of this product. Keep
Aug 24, 2017 ATS AFX Spindle Installation Instructions
 Aug 24, 2017 ATS AFX Spindle Installation Instructions 1 P a g e The following instructions are intended for professional installers and are guidelines only. Speedtech Performance assumes NO responsibility
Heavy-Duty Sawhorse. Owner s Manual
 Heavy-Duty Sawhorse Owner s Manual WARNING: Read carefully and understand all ASSEMBLY AND OPERATION INSTRUCTIONS before operating. Failure to follow the safety rules and other basic safety precautions
MG12K24T60V4 Mechanical Grapple
 170 State Route 271 Attachment Solutions MG12K24T60V4 Mechanical Grapple Operators Manual KENCO Mechanical Grapple Operation Manual 1 TABLE OF CONTENTS 170 State Route 271 Section I. General Information....
2000-LB. ENGINE STAND
 2000-LB. ENGINE STAND WARNING: Read carefully and understand all ASSEMBLY AND OPERATION INSTRUCTIONS before operating. Failure to follow the safety rules and other basic safety precautions may result in
Please visit for the latest version of these installation instructions.
 Please visit www.blueox.com for the latest version of these installation instructions. BX3623 2017-19 Subaru Impreza (Manual) (No Fog Lights) Attachment Tab Height: 13 Serial Number Attachment Tab Width:
Water Jetter Units DU JT50 / DU JT100
 Water Jetter Units DU JT50 / DU JT100 Serial Number: Owner s Manual #0818 102011 Installation Date: IMPORTANT Please read and u n d e r s t a n d t h i s manual. Store in safe location for future reference.
Amarr SuperFlex. Installation Instructions and Owner's Manual. Entrematic 165 Carriage Court Winston Salem, NC
 Entrematic 165 Carriage Court Winston Salem, NC 27105 www.amarr.com 877-512-6277 Amarr SuperFlex Installation Instructions and Owner's Manual Do not install, operate or service this product unless you
TJ Hood Mount Light Bar Mounting Brackets
 TJ Hood Mount Light Bar Mounting Brackets For 97-06 Wrangler TJ and Unlimited Vehicles: # 97109.2001 Passenger Driver *Hardware included with lightbar. PARTS LIST: Hood Light Mounting Brackets - QTY 2
Installation Power Management Unit Battery Cables and Battery Harness
 Installation Power Management Unit Battery Cables and Battery Harness Important Safety Messages SAVE THESE INSTRUCTIONS - This manual contains important instructions that should be followed during installation
Model 90 Twin Control Unit
 Model 90 Twin Control Unit Installation Manual MAY 02 Model 90 Twin Control Unit Installation Manual Page 1 MA1277B Warranty Information Chore-Time Equipment, a division of CTB, Inc., ("Chore-Time") warrants
INSTALLATION MANUAL. Max. PRISM BACK (Ultra) (TrueFitt) (Air) innovative seating and mobility solutions
 (TrueFitt) (Air) innovative seating and mobility solutions") the Max maximum positioning back PRISM BACK (Ultra) (TrueFitt) (Air) innovative seating and mobility solutions CANADA Future Mobility Healthcare Inc. 3223 Orlando Drive Mississauga, ON L4V 1C5 905 671-1661
the Max maximum positioning back PRISM BACK (Ultra) (TrueFitt) (Air) innovative seating and mobility solutions CANADA Future Mobility Healthcare Inc. 3223 Orlando Drive Mississauga, ON L4V 1C5 905 671-1661
55-Gallon Drum Cradle
 55-Gallon Drum Cradle Owner s Manual WARNING: Read carefully and understand all ASSEMBLY AND OPERATION INSTRUCTIONS before operating. Failure to follow the safety rules and other basic safety precautions
TT Series Benchtop Turntables Instruction Manual
 Vestil Manufacturing Corp. 2999 North Wayne Street, P.O. Box 507, Angola, IN 6703 Telephone: (260) 665-7586 -or- Toll Free (800) 38-0868 Fax: (260) 665-1339 URL: www.vestilmfg.com Email: info@vestil.com
Please visit for the latest version of these installation instructions.
 Please visit www.blueox.com for the latest version of these installation instructions. BX2409 2009-18 Dodge Ram 1500 Sport/ST/Laramie Limited Please read BOTH these and the General Information sheet prior
Model 35 PARTS MANUAL
 Model 35 PARTS MANUAL Version 3-2007 Ashland Industries Inc. 1115 Rail Drive P.O. Box 717 Ashland, WI. 54806 Ph: 877-634-4622 Toll Free Ph: 715-682-4622 Fx: 715-682-9717 www.ashlandind.com Model 35 Scraper
Quadratec 2 or 4 Bike Receiver Bike Racks
 Quadratec 2 or 4 Bike Receiver Bike Racks Installation Manual: Designed for Jeep Vehicles with 2 Receiver Style Hitches # 92034.1000 and # 92034.1001 PARTS LIST: Receiver Base & Main Rack System - QTY
CAUTION CAUTION indicates a potentially
 Instruction Manual Manual Conventions This manual uses the following symbols to help differentiate between different kinds of information. The safety symbol is used with a key word to alert you to potential
Please visit for the latest version of these installation instructions.
 Please visit www.blueox.com for the latest version of these installation instructions. Attachment Tab Height: 16.5 Serial Number Attachment Tab Width: 30.5 Please read BOTH these and the General Information
Manual Operated Floor Jack
 Manual Operated Floor Jack OPERATING INSTRUCTIONS Note: There may be some slight differences in the appearance of the various manually-operated floor jacks, however the instructions in this manual apply
Canopy Frame Assembly Instructions
 Canopy Frame Assembly Instructions 14 Foot // 22 Foot // 24 Foot // 26 Foot // 28 Foot // 30 Foot // 32 Foot INTRODUCTION The Starr line of Boat Lift Canopy Frames by Great Lakes Entry Systems has been
CAMBELT TENSION GAUGE
 CAMBELT TENSION GAUGE Model 96557 Operating Instructions Diagrams within this manual may not be drawn proportionally. Due to continuing improvements, actual product may differ slightly from the product
Instruction Sheet SRSR SERIES. Rotating Sliding Rail System
 Instruction Sheet SRSR SERIES Rotating Sliding Rail System THANK YOU Thank you for purchasing the SRSR Series Rotating Sliding Rail System. Please read these instructions thoroughly before assembling this
JK HD ADJUSTABLE SPARE TIRE MOUNTING KIT
 JK HD ADJUSTABLE SPARE TIRE MOUNTING KIT #838130 Kit for 5 on 5 Wheels #83835 Kit for 5 on 5.5 Wheels #838188 Kit for 8 on 6.5 Wheels 1 IMPORTANT NOTES: Prior to beginning this install, or any installation,