Holley Alternator and P/S Bracket System Part Number
|
|
|
- Prudence O’Neal’
- 5 years ago
- Views:
Transcription
:... 3 Water Pump and Tensioner Assembly Determination:... 4 Parts List:.")

1 Holley Alternator and P/S Bracket System Part Number Table of Contents: Introduction:... 2 Crank Pulley Belt Alignment Determination:... 3 Overview of Parts Required (but NOT included with accessory drive system):... 3 Water Pump and Tensioner Assembly Determination:... 4 Parts List:... 7 Assembly Instructions... 8 Driver s Side Bracket Installation:... 8 Power Steering Pump Installation:... 9 Idler Pulley Installation (position options): P/S Pulley & Alternator Installation: Belt Routing & Length Calculation: Power Steering Pump Reservoir Options: Warranty Information

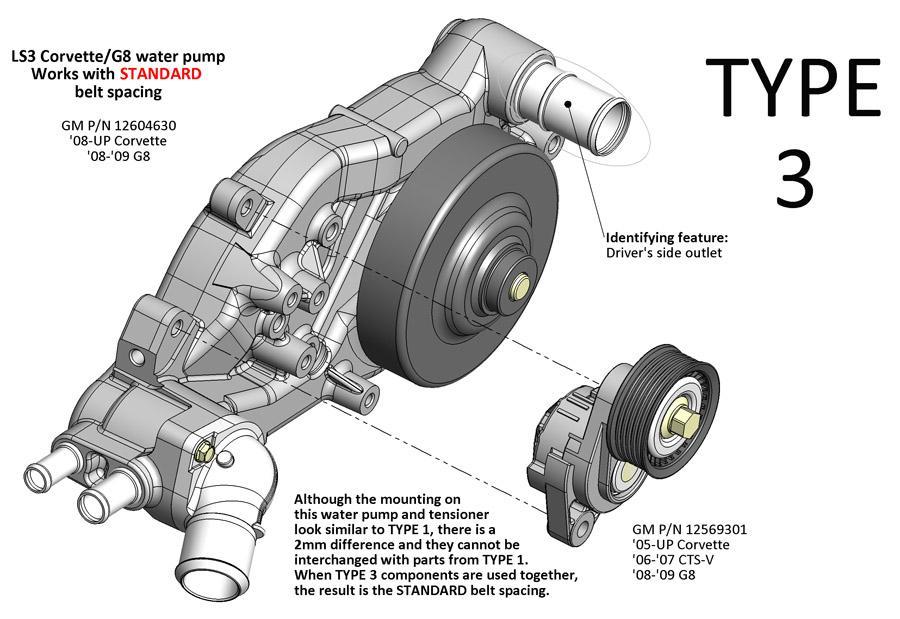
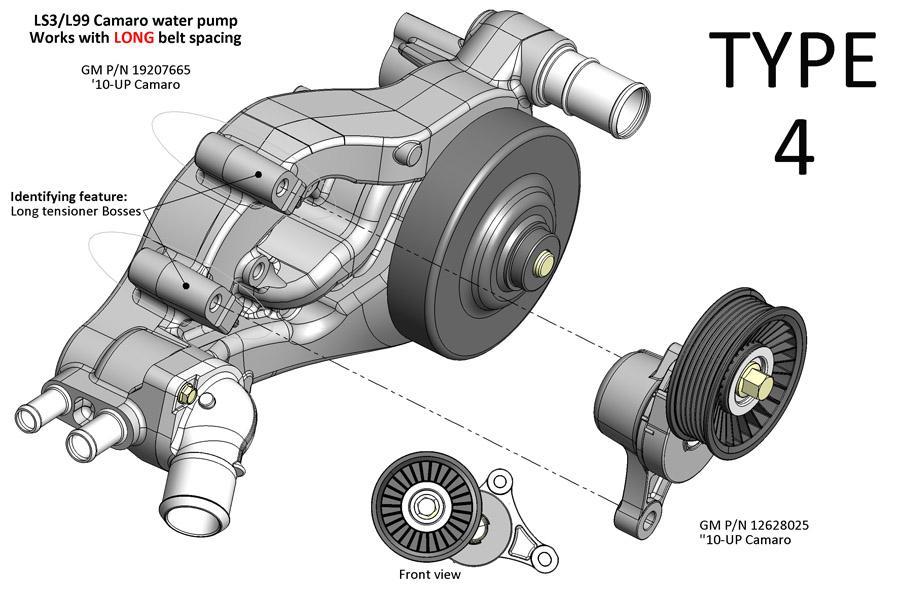
2 Introduction: Holley s accessory drive systems offer clean, economical brackets and accessories for LS engines. These accessory drives look truly at home on any LS engine as if they came from the factory this way. Holley s complete alternator and P/S bracket system comes with virtually everything needed for installation, from the accessories to the pulleys. The can be used with any of Holley s passenger s side A/C bracket systems or used stand-alone in most cases, using the application s original tensioner that matches the crank pulley and water pump s belt alignment. The first step is to determine which belt alignment you want to proceed with. This is determined by the crank pulley and often, but not always, the water pump. If clearance to the radiator is an issue, the compact STANDARD spacing common on the Corvette may be preferred. Otherwise, it is most cost effective to retain the existing crank pulley/water pump and space the bracket and other accessories to match. An application specific installation kit (part # 21-2 or 21-3) is REQUIRED for this accessory drive system if not using a STANDARD belt alignment. 2
: Components with specific belt alignments Belt Alignment Group LS Application (Alignment Specific) Holley Installation")
3 Crank Pulley Belt Alignment Determination: See the below chart for reference dimensions. Overview of Parts Required (but NOT included with accessory drive system): Components with specific belt alignments Belt Alignment Group LS Application (Alignment Specific) Holley Installation Kit (Alignment Specific) Crank Pulley (Reference Dimension) Water Pump (Alignment Specific) GM # Standard Corvette / CTS-V / G8 Not required 1.5" 37 MM , , or Middle F-body / GTO " 55 MM Long Camaro ('10-UP) / Truck (all) * " 75 MM or any truck WP * Note for truck applications, a tensioner will also be required 3


4 Water Pump and Tensioner Assembly Determination: To determine which water pump type and associated tensioner you have, refer to the following: 4
5 5

6 NOTE: Torque M8 bolts to 18 ft./lbs. and M10 bolts to 36 ft./lbs. 6

 Driver s Side Bracket 1 P/S Pump (P/N 198-100) Driver s Side Bracket 1 Smooth Idler Pulley")

 2 Socket Head Cap Bolt, M10 x 1.5 x 80 Alternator Bolts 2 Flange Head Bolt, M8 x 1.")

7 Parts List: If used with Middle or Long belt alignments, this bracket system requires installation kit part # 21-2 or 21-3 respectively. For Standard alignments no installation kit is required. Parts included with bracket kit (see list supplied with installation kit for additional parts): PICTURE QTY DESCRIPTION APPLICATION 1 Alternator (P/N ) Driver s Side Bracket 1 P/S Pump (P/N ) Driver s Side Bracket 1 Smooth Idler Pulley (P/N ) Driver s & Passenger s Side Brackets 1 Pigtail (P/N ) Alternator 1 Ribbed Pulley (P/N ) P/S Pump 1 Driver s Side Bracket Assembly Alternator & Power Steering Pump 1 Power Steering Pump Plate Bracket Front Support of Power Steering Pump 1 Step Spacer Driver s Side Idler Pulley 2 Tensioner Spacer Between Tensioner & Water Pump (Use only with Type 5 water pump & Long belt alignment) 2 Socket Head Cap Bolt, M10 x 1.5 x 80 Alternator Bolts 2 Flange Head Bolt, M8 x 1.25 x 20 Power Steering Pump Bolts 2 Flange Head Bolt, M8 x 1.25 x 80 Power Steering Pump Bolts 1 Flange Head Bolt, M10 x 1.5 x 45 Idler Pulley to Driver s Side Bracket 1 Flange Head Bolt, M10 x 1.5 x 60 Driver s Side Bracket to Head (NOT used with Middle & Long belt alignments) 3 Flange Head Bolt, M10 x 1.5 x 70 Driver s Side Bracket to Head (NOT used with Middle & Long belt alignments) 7

8 Driver s Side Bracket Installation: Assembly Instructions NOTE: Torque M8 bolts to 18 ft./lbs. and M10 bolts to 36 ft./lbs. 8

9 Power Steering Pump Installation: NOTE: Torque M8 bolts to 18 ft./lbs. and M10 bolts to 36 ft./lbs. 9

10 Idler Pulley Installation (position options): NOTE: Torque M8 bolts to 18 ft./lbs. and M10 bolts to 36 ft./lbs. 10

11 P/S Pulley & Alternator Installation: NOTE: Torque M8 bolts to 18 ft./lbs. and M10 bolts to 36 ft./lbs. The P/S pulley must be installed using an installation tool that can be rented at most auto parts stores. Incorrect installation of this pulley may damage the P/S pump internals. When installed, the pulley bore face should be flush with the end of the pump shaft. Helpful hint: Open faced pulley part can be installed onto pump before bracket assembly as bolts can be accessed through pulley windows. Helpful hint: When wiring the alternator, install the included plug into the alternator. Next connect the yellow wire to switched voltage that is on when the key is in the run position. If the vehicle has a charge indicator light the yellow wire can be connected to that circuit. 11


. Go to any auto parts store and ask for a 6PK0000 belt with the 0000 being the length in millimeters.")
12 Belt Routing & Length Calculation: HELPFUL HINT: When installing the belt, route around all the pulleys except the water pump pulley. While fully rotating the tensioner arm, slip the belt on the smooth water pump pulley last. Both the bracket application and pulley diameters vary and will directly affect belt length. To acquire the measurement for the correct belt, perform the following: After all brackets and accessories are installed, route masking tape or string around the belt path. Leave the tensioner in the un-sprung position for this measurement. Mark or cut the tape/string to length and remove from the pulleys. Subtract approximately 1 1/8 (28 mm) from the measured length to compensate for the un-sprung tensioner position. You will need to convert belt length to millimeters if measured in inches (inches X 25.4 = mm). Go to any auto parts store and ask for a 6PK0000 belt with the 0000 being the length in millimeters. For example, if you measured 2493 mm and then subtracted 28 mm, you would get 2465 mm, and the part number would be 6PK2465. Remember, if you miss on size, the driver s side idler can be moved to decrease the required belt length by 1/2. OR 12


13 Power Steering Pump Reservoir Options: The Holley driver s side bracket works with reservoirs found on 97-up Corvettes. Other remote reservoirs can be custom fitted with this bracket as well. All the below reservoir parts are included in Holley kit #
14 Warranty Information Holley Performance Products Limited Warranty All Holley Performance Products Limited Warranties are extended to the original consumer only. This Limited Warranty is not assignable or otherwise transferable. There are no warranties that extend beyond those stated herein. Holley Performance Products offers no other warranties expressed or implied beyond this Limited Warranty. In the event of an alleged defect in material or workmanship, Holley Performance Products responsibility is strictly limited to repair or replace the defective product. Holley has no other obligation expressed or implied. Final warranty determination will be in the sole discretion of Holley Performance Products. Holley shall not be responsible for; (a) actual or alleged labor, transportation, or other incidental charges; or (b) actual or alleged consequential or other damages incurred by use of any product of Holley Performance Products. To initiate the warranty process, the consumer must return the alleged defective product to the place of purchase with a dated receipt and completed applicable warranty claim tag. Warranty claims will be rejected if the date of purchase cannot be established by the consumer. Do not send products directly to Holley Performance Products. Holley Performance Products assumes no responsibility for products sent directly to Holley Performance Products. This Limited Warranty sets forth specific legal rights. The consumer may have other rights as a result of variations in state laws or provincial laws. This Limited Warranty supersedes all prior warranty statements. HOLLEY/FLOWTECH/HOOKER/NOS/WEIAND NEW PRODUCT Holley Performance Products warrants its new Holley, Flowtech, Hooker, NOS, and Weiand products to be free from defects in material and workmanship for a period of 90 days from date of purchase. Holley Performance Products Limited Warranty specifically does not apply to products, which have been (a) modified or altered in any way; (b) subjected to adverse conditions, such as misuse, neglect, accident, improper installation or adjustment, dirt or other contaminants, water, corrosion, or faulty repair; or (c) used in other than those applications recommended by Holley Performance Products. Holley Performance Products also does not warrant, and disclaims all liability for products used in racing activities and/or applications other than those specifically recommended in the current brand catalog. Holley limits the warranty on Metallic Ceramic Coatings to be free from defects in material and workmanship for a period of 90 days from the date of purchase. This limited coating warranty does not apply to any products which have been subjected to adverse conditions, such as high heat encountered during engine break-in or if used during any racing activity. MARINE PRODUCTS Holley Performance Products warrants its new marine products to be free from defects in material and workmanship for a period of 90 days from date of purchase. For the safety and protection of persons and property, all United States Coast Guard and other marine product safety installation and use requirements and recommendations must be carefully studied and applied. The above recommendations include, but are not limited to the recommendation that the installation, adjustment, and repair of Holley carburetors or other marine products must be performed only by a trained mechanic having adequate marine fuel system experience, and in strict compliance with the applicable Holley installation, maintenance, and other instructions. Failure to follow such requirements and recommendations will void this Holley Marine Limited Warranty, and Holley disclaims any responsibility and/or liability for accidents resulting from such failure. Holley Performance Products Limited Warranty specifically does not apply to products, which have been (a) modified or altered in any way; (b) subjected to adverse conditions, such as misuse, neglect, accident, improper installation or adjustment, dirt or other contaminants, water, corrosion, or faulty repair; or (c) used in other than those applications recommended by Holley Performance Products. Holley Performance Products also does not warrant, and disclaims all liability for products used in racing activities and/or applications other than those specifically recommended in the current brand catalog. Holley Performance Products, Inc Russellville Road Bowling Green, KY Technical Support: Phone: Fax: Holley Performance Products, Inc. All rights reserved. 199R10644 Date:
Holley Accessory Drive System Part Number Table of Contents
 Holley Accessory Drive System Part Number 20-136 Table of Contents Introduction:... 2 Crank Pulley Belt Alignment Determination:... 3 Overview of Parts Required (but NOT included with 20-136 accessory
Holley A/C Bracket System Part Number
 Holley A/C Bracket System Part Number 20-141 Table of Contents: Introduction:... 2 Crank Pulley Belt Alignment Determination:... 3 Overview of Parts Required (but NOT included with 20-141 accessory drive
Holley Accessory Drive Kit Part Number &
 Holley Accessory Drive Kit Part Number 20-156 & 20-162 Table of Contents A/C side not included with 20-156 Introduction:... 2 Crank Pulley Belt Alignment Determination:... 3 Overview of Parts Needed (but
Assembly Instructions. Holley Accessory Drive Kit Part Number
 Assembly Instructions Holley Accessory Drive Kit Part Number 20-131 Table of Contents Parts List:... 2 Driver s Side Bracket Installation:... 3 Power Steering Pump Installation:... 4 Idler Pulley Installation
Holley Accessory Drive Kit Part Number
 Assembly Instructions Holley Accessory Drive Kit Part Number 20-133 Table of Contents Parts List:... 2 Passenger s Side Bracket Installation:... 3 A/C Compressor Installation:... 4 Idler & Tensioner Installation:...
Holley Accessory Drive Kit Part Number
 Assembly Instructions Holley Accessory Drive Kit Part Number 20-132 Table of Contents Parts List:... 1 Driver s Side Bracket Installation:... 4 Power Steering Pump Installation:... 5 Idler Pulley Installation
Fitment and Required Components Guide and Assembly Instructions. Holley Accessory Drive Kit Part Number , , &
 Fitment and Required Components Guide and Assembly Instructions Holley Accessory Drive Kit Part Number 20-159, 20-160, & 20-162 1 Table of Contents: Introduction:... 4 Crank Pulley Belt Alignment Determination:...
Holley Accessory Drive System Part Number Table of Contents
 Holley Accessory Drive System Part Number 20-138 Table of Contents Introduction:... 2 Crank Pulley Belt Alignment Determination:... 3 Overview of Parts Required (but NOT included with 20-138 accessory
Holley Alternator and P/S Bracket System Part Number
 Assembly Instructions Holley Alternator and P/S Bracket System Part Number 20-143 Table of Contents: Introduction:... 2 Crank Pulley Belt Alignment Determination:... 3 Overview of Parts Required (but NOT
DEMON CARBURETOR MANUAL CHOKE KIT #421441
 DEMON CARBURETOR MANUAL CHOKE KIT #421441 CHOKE INSTALLATION INSTRUCTIONS LIT703 This manual choke kit is designed to be used on any Demon Carburetor with a choke tower. This covers the Road Demon Jr.
Fitment and Required Components Guide. Holley Accessory Drive Kit Part Number
 Fitment and Required Components Guide Holley Accessory Drive Kit Part Number 20-133 Table of Contents Introduction:... 2 Crank Pulley Belt Alignment Determination:... 3 Overview of Parts Needed (but NOT
CARBURETOR REBUILD KIT (Vacuum Secondary) Models Demon Carburetors & Holley Model 4160 LIT704
 Models Demon Carburetors & Holley Model 4160 LIT704") CARBURETOR REBUILD KIT 190000 (Vacuum Secondary) Models Demon Carburetors & Holley Model 4160 LIT704 INSTRUCTIONS: Before getting to the actual rebuild, it should be noted that the carbs shown here are
CARBURETOR REBUILD KIT 190000 (Vacuum Secondary) Models Demon Carburetors & Holley Model 4160 LIT704 INSTRUCTIONS: Before getting to the actual rebuild, it should be noted that the carbs shown here are
Fitment and Required Components Guide. Holley Accessory Drive Kit Part Number
 Fitment and Required Components Guide Holley Accessory Drive Kit Part Number 20-134 Table of Contents Introduction:... 2 Crank Pulley Belt Alignment Determination:... 3 Overview of Parts Needed (but NOT
SPEED & ROAD DEMON ELECTRIC CHOKE KIT #421440
 SPEED & ROAD DEMON ELECTRIC CHOKE KIT #421440 CHOKE INSTALLATION INSTRUCTIONS LIT702 Please make sure you have read and completely understand the instructions before you begin the installation. Keep in
Fitment and Required Components Guide
 Fitment and Required Components Guide Holley Accessory Drive Kit Part Number 20-135 Table of Contents Introduction:... 2 Crank Pulley Belt Alignment Determination:... 3 Overview of Parts Needed (but NOT
Fitment and Required Components Guide
 Fitment and Required Components Guide Holley Accessory Drive Kit Part Number 20-135 Table of Contents Introduction:... 2 Crank Pulley Belt Alignment Determination:... 3 Overview of Parts Needed (but NOT
Holley Accessory Drive Kit Fitment and Required Components Guide Part Number
 Holley Accessory Drive Kit Fitment and Required Components Guide Part Number 20-131 Table of Contents Introduction:... 2 Crank Pulley Belt Alignment Determination:... 3 Overview of Parts Required (but
Fitment and Required Components Guide. Holley Accessory Drive Kit Part Number
 Fitment and Required Components Guide Holley Accessory Drive Kit Part Number 20-132 Table of Contents Introduction:... 2 Crank Pulley Belt Alignment Determination:... 3 Overview of Parts Required (but
Fitment and Required Components Guide. Holley Accessory Drive Kit Part Number
 Fitment and Required Components Guide Holley Accessory Drive Kit Part Number 20-132 Table of Contents Introduction:... 2 Crank Pulley Belt Alignment Determination:... 3 Overview of Parts Required (but
Complete Holley Mid-Mount Accessory Drive Kit
 Complete Holley Mid-Mount Accessory Drive Kit Part Numbers: 20-180, 20-180BK, 20-180P, 20-185, 20-185BK, 20-185P, 20-190, 20-190BK, 20-190P, 20-200, 20-200BK, and 20-200P 20-200 shown Holley s Mid-Mount
Complete Holley Mid-Mount Accessory Drive Kit
 Complete Holley Mid-Mount Accessory Drive Kit Part Numbers: 20-181, 20-181BK, 20-181P, 20-182, 20-182BK, 20-182P, 20-191, 20-191BK, 20-191P, 20-192, 20-192BK, 20-192P, 20-201, 20-201BK, 20-201P, 20-202,
INVERTER HARNESS INSTALLATION FOR FREIGHTLINER CASCADIA
 FOR FREIGHTLINER CASCADIA Part #: P808 1004FC 08/05/2014 Doc 1.04 INST065 Page 1 Step 1: Unpack the plate assembly and both positive and negative cables. INSTALLATION INSTRUCTIONS Step 2: Insert the negative
Revised Chevy LS-1 - LS-7 Serpentine Kit. Installation Instructions Kit #20050 (Corvette LS-1 with Power Steering)
") Revised 12-13-08 Chevy LS-1 - LS-7 Serpentine Kit Installation Instructions Kit #20050 (Corvette LS-1 with Power Steering) LS-1/LS-2 Parts List 1-20051-A... Alternator Bracket Body 1 - S144... 5 16 x 7
Revised 12-13-08 Chevy LS-1 - LS-7 Serpentine Kit Installation Instructions Kit #20050 (Corvette LS-1 with Power Steering) LS-1/LS-2 Parts List 1-20051-A... Alternator Bracket Body 1 - S144... 5 16 x 7
Installation Instructions
 1 BD DODGE CUMMINS PERFORMANCE E X H A U S T M A N I F O L D Installation Instructions Application List 1994-1998 12V 1045980 1998½-2002 24V 1045985 PLEASE READ ALL INSTRUCTIONS BEFORE INSTALLATION KIT
SOLAR DASH CHARGING SYSTEM USER GUIDE
 SOLAR DASH CHARGING SYSTEM Doc 1.01 INST049 INSTALLATION STEP 1 Place 20 watt solar panel in the dash of the vehicle facing up. Note: For ideal results position the vehicle in a manner in which the solar
2019-ON RAM 1500 INSTALLATION INSTRUCTIONS
 2019-ON RAM 1500 INSTALLATION INSTRUCTIONS Thank you for purchasing ROCKSTARTM Splash Guard Mud Flaps. Agri-Cover, Inc. proudly manufactured these mud flaps using superior quality materials and workmanship.
RAM 1500, 2019 CLASSIC & 2010-ON 2500/3500 INSTALLATION INSTRUCTIONS
 2009-18 RAM 1500, 2019 CLASSIC & 2010-ON 2500/3500 INSTALLATION INSTRUCTIONS Thank you for purchasing ROCKSTARTM Splash Guard Mud Flaps. Agri-Cover, Inc. proudly manufactured these mud flaps using superior
Highly Styled, Low Cost Serpentine Drive
 Revised - - Highly Styled, Low Cost Serpentine Drive Installation Instructions Chevy Big Block Electric Water Pump Bracket Kit #23115 (Alternator A/C & Power SteeringPump) #23110 (Alternator & A/C) 23110
Chevy LS-1 - LS-2 Serpentine Kit
 Revised 9-8-08 Chevy LS-1 - LS-2 Serpentine Kit Installation Instructions Kit #20065 (Corvette LS-2 with Power Steering) Kit #20075 (Corvette LS-2 without Power Steering) Kit #20085 (LS-1 Motors with Power
Installation Instructions and Warranty Information
 Installation Instructions and Warranty Information For JBA Headers 1997-2004 Chevrolet Corvette and z06 LS-1 / LS-6 V-8 Part# Application 1817 97-99 with 1-5/8 tube 1817-1 01-04 with 1-5/8 tube 1817-2
MOVE ON TO THE REAR BAR INSTALLATION
 22410 STREET SWAY BAR SET 2001-UP LEXUS IS300 Thank you for your purchase from our line of Lexus parts. Please call us at (877) 4NO-ROLL if you have any questions regarding the service or installation
OWNERS MANUAL HF4550 PREACHER CURL. Customer Service (800) (858) Fax (858) RECORD SERIAL NUMBER HERE
 (858) Fax (858) RECORD SERIAL NUMBER HERE") OWNERS MANUAL HF4550 PREACHER CURL Note: Both Serial Number and Model Number are Required when Ordering Parts RECORD SERIAL NUMBER HERE CATALOG NUMBER 0805-001 Customer Service (800) 548-5438 (858) 578-7676
OWNERS MANUAL HF4550 PREACHER CURL Note: Both Serial Number and Model Number are Required when Ordering Parts RECORD SERIAL NUMBER HERE CATALOG NUMBER 0805-001 Customer Service (800) 548-5438 (858) 578-7676
Fuel Pump Controller with Returnless Feature* For both Carbureted or Injected Fuel Pumps *Carbureted mode operates with or without a return line.
 FUELONDEMAND Fuel Pump Controller with Returnless Feature* For both Carbureted or Injected Fuel Pumps *Carbureted mode operates with or without a return line. The FuelOnDemand Kit is a unique product that
OWNERS MANUAL HF PAIR VERTICAL DUMBBELL RACK. Customer Service (800) (858) Fax (858) RECORD SERIAL NUMBER HERE
 (858) Fax (858) RECORD SERIAL NUMBER HERE") OWNERS MANUAL HF4459 5 PAIR VERTICAL DUMBBELL RACK Note: Both Serial Number and Model Number are Required when Ordering Parts RECORD SERIAL NUMBER HERE CATALOG NUMBER 0605-000 Customer Service (800) 548-5438
OWNERS MANUAL HF4459 5 PAIR VERTICAL DUMBBELL RACK Note: Both Serial Number and Model Number are Required when Ordering Parts RECORD SERIAL NUMBER HERE CATALOG NUMBER 0605-000 Customer Service (800) 548-5438
Badger Truck Refrigeration, Inc. Warranty Policy
 Badger Truck Refrigeration, Inc. Warranty Policy The manufacturer warrants each new heater, air conditioner or part to be free from defects in materials and workmanship under conditions of normal use and
Compressor Clutch Replacement Procedure
 Clutch Replacement Procedure P-1401-WE 819-0316 Installation Instructions An Altra Industrial Motion Company Warner Replacement Clutches for the following compressors: Denso 6E171 10P15 6P148 6C17 Ford
OWNERS MANUAL HF
 OWNERS MANUAL HF4461-48 HORIZONTAL DUMBBELL RACK Note: Both Serial Number and Model Number are Required when Ordering Parts RECORD SERIAL NUMBER HERE CATALOG NUMBER 1005-000 Customer Service (800) 548-5438
Revised Chevy LS-1 - LS-7 Serpentine Kit. Installation Instructions Kit #20040 (Corvette LS-1, Alternator Only)
") Revised -0-09 Chevy LS-1 - LS-7 Serpentine Kit Installation Instructions Kit #20040 (Corvette LS-1, Alternator Only) Parts List NOTE: Kits do not come with Crank Hub Adapter or Alternator. The Crank Hub
Revised -0-09 Chevy LS-1 - LS-7 Serpentine Kit Installation Instructions Kit #20040 (Corvette LS-1, Alternator Only) Parts List NOTE: Kits do not come with Crank Hub Adapter or Alternator. The Crank Hub
Sport Coil Springs Dodge Magnum, Chrysler 300C Dodge Challenger SRT Dodge Challenger R/T
 Sport Coil Springs 19101 - Dodge Magnum, Chrysler 300C 19107 - Dodge Challenger SRT-8 19108 - Dodge Challenger R/T Thank you for your purchase from our new line of Magnum/300C parts. Please call us at
advanced FLOW engineering Instruction Manual P/N: Make: BMW Model: M3 (E90/92/93) Year: Engine: V8-4.0L
 Year: Engine: V8-4.0L") advanced FLOW engineering Instruction Manual P/N: 79-10001 Make: BMW Model: M3 (E90/92/93) Year: 2007-2008 Engine: V8-4.0L Please read the entire instruction manual before proceeding. Ensure all components
advanced FLOW engineering Instruction Manual P/N: 79-10001 Make: BMW Model: M3 (E90/92/93) Year: 2007-2008 Engine: V8-4.0L Please read the entire instruction manual before proceeding. Ensure all components
1 CMP throttle stud, two 3/8" nuts, a 3/8" bolt and corrector plate) CMP R4 Universal Cable 1
 CMP R4 Universal Cable 1") INSTRUCTIONS 370816 TCI TV Cable Bracket For Holley Carburetors Thank you for choosing TCI products; we are proud to be your manufacturer of choice. Please read this instruction sheet carefully before
INSTRUCTIONS 370816 TCI TV Cable Bracket For Holley Carburetors Thank you for choosing TCI products; we are proud to be your manufacturer of choice. Please read this instruction sheet carefully before
RV-10 Center Arm Rest Console
 RV-10 Center Arm Rest Console Important Notice: This manual contains important information that may affect the safety of your aircraft. Read the Warranty / Agreement below. There is information in the
Kit # NM, # Installation instructions: Note: do not tighten any clamps or nuts until the last step!!
 KIT #680145-NM #8168740 3 Dual Exhaust Kit w/o mufflers page 1 This kit fits A-body, '67-74 Dart/Duster/Demon/Valiant, '67-69 Barracuda, all with V8, standard Hooker Competition headers (otherwise modifications
HOLLEY LS-SWAP WATER PUMPS WATER PUMP INSTALLATION INSTRUCTIONS FOR GM LS-ENGINE APPLICATIONS:
 HOLLEY LS-SWAP WATER PUMPS WATER PUMP INSTALLATION INSTRUCTIONS FOR GM LS-ENGINE APPLICATIONS: Holley LS- Swap cast water pumps are designed for street/performance applications and provide optimum performance
TERMS OF USE TERMS AND CONDITIONS. Plumbing and Heating Products (PL-WR)
") TERMS OF USE 1. Watts pricing and product data is subject to change without notice and such changes supersede all previous versions. 2. Watts data is to be used as provided. Watts is not responsible for
TERMS OF USE 1. Watts pricing and product data is subject to change without notice and such changes supersede all previous versions. 2. Watts data is to be used as provided. Watts is not responsible for
Highly Styled, Low Cost Serpentine Drive
 Revised 12-9-08 Highly Styled, Low Cost Serpentine Drive Installation Instructions Chevy Small Block Kit #21100 (without Power Steering) and #21150 (with Remote Power Steering) and #21155 (with Saginaw
Anti-roll bar set Chrysler Magnum, Charger, 300C, SRT Dodge Challenger
 Anti-roll bar set 22101 Chrysler Magnum, Charger, 300C, SRT-8 22107 Dodge Challenger Thank you for your purchase from our new line of Chrysler parts. Please call us at (877) 4NO-ROLL if you have any questions
Highly Styled, Low Cost Serpentine Drive
 Revised 11-15-11 Highly Styled, Low Cost Serpentine Drive Installation Instructions Chevy Small Block Kit #21110 (without Power Steering) Kit #21160 (with Remote Power Steering) Kit #21165 (with Saginaw
Highly Styled, Low Cost Serpentine Drive
 Revised 5-4-09 Highly Styled, Low Cost Serpentine Drive Installation Instructions Chevy Small Block Electric Water Pump Bracket Kit #22100 (Billet Alternator & Power SteeringPump) #22105 (Chrome Alternator
Part # Instructions: Page 1
 Part #1028827 Instructions: Page 1 2-1/2 Cat-Back Dual Exhaust Kit SUM-680948 DANGER WARNING: SHOULD THE PURCHASER DECIDE TO INSTALL THIS, OR ANY OTHER EXHAUST PRODUCT AT HOME, BE WARNED THAT PLEASURE
Service Letter. Ariens Company 655 W. Ryan St. Brillion, WI
 Date: Dec. 2012 No. L-2124R Service Letter Ariens Company 655 W. Ryan St. Brillion, WI 54110 www.ariens.com Product Family: Ariens and Gravely Products with Hydro-Gear Components Subject: Hydro-Gear Warranty
Installation Instructions
 Installation Instructions IMPORTANT! READ AND UNDERSTAND THESE INSTRUCTIONS FOR SAFETY, INSTALLATION, OPERATION, AND MAINTENANCE. SAVE ALL INSTRUCTIONS FOR FUTURE REFERENCE. Tested. Trusted. Guaranteed.
Highly Styled, Low Cost Serpentine Drive
 Revised -28-09 Highly Styled, Low Cost Serpentine Drive Installation Instructions Chevy Big Block Electric Water Pump Bracket Kit #2100 (Billet Alternator & Power SteeringPump) #2105 (Chrome Alternator
OWNERS MANUAL HF4263
 OWNERS MANUAL HF4263 ADJUSTABLE AB / BACK HYPER BENCH Note: Both Serial Number and Model Number are Required when Ordering Parts RECORD SERIAL NUMBER HERE CATALOG NUMBER 0805-000 Customer Service (800)
Highly Styled, Low Cost Serpentine Drive. Chrysler 383, 440 and 426 HEMI
 Revised 8-26-08 Highly Styled, Low Cost Serpentine Drive Installation Instructions Chrysler 8, 440 and 426 HEMI Kit #40720 (without Power Steering) Use 71.5" Serpentine Belt Kit #40725 (with Power Steering)
Slimline Duals Installation Instructions Harley-Davidson Touring Models 2009-Current
 Slimline Duals Installation Instructions Harley-Davidson Touring Models 2009-Current Thank you for buying a Rinehart Racing exhaust system. We are committed to providing premium products that with proper
REAR SWAY BAR 2207R GM CAMARO/FIREBIRD
 REAR SWAY BAR 2207R 67-69 GM CAMARO/FIREBIRD Thank you for your purchase of this Hotchkis Performance product. Your stabilizer bar set was designed with the performance and durability you ve come to expect
Thompson Performance, LLC - POWERBLAST PLATE
 Thompson Performance, LLC - POWERBLAST PLATE INSTALLATION INSTRUCTIONS FOR PBP EC-56 AND PBP EC-78 IMPORTANT NOTE: Proper installation and safe use of the POWERBLAST PLATE is the responsibility of the
Thompson Performance, LLC - POWERBLAST PLATE
 Thompson Performance, LLC - POWERBLAST PLATE INSTALLATION INSTRUCTIONS and LIMITED WARRANTY FOR PBP H-1, HD-1 AND HD-2 IMPORTANT NOTE: Proper installation is the responsibility of the purchaser. Improper
Installation Instructions and Warranty Information
 Installation Instructions and Warranty Information 1999 2003 Ford SuperDuty Truck and Excursion Part# 1669S, 1669S-1, 1669S-2 Read all instructions carefully before attempting installation. Rev. 10/05
2006 SHOCK TOWER BRACE 93-UP F-BODY CAMARO/FIREBIRD
 2006 SHOCK TOWER BRACE 93-UP F-BODY CAMARO/FIREBIRD Thank you for your purchase of this Hotchkis Performance product. Please call us at (800) 4NO-ROLL if you have any questions regarding this product.
Anti-Roll Bar Set # 2279, Cadillac CTS V6 & CTS-V
 Anti-Roll Bar Set # 2279, 2280 2003+ Cadillac CTS V6 & CTS-V Thank you for your purchase from our new line of CTS parts. Please call us at (877) 4NO-ROLL if you have any questions regarding the service
Part# Accessory Power Distribution Module
 7 February 2006 Power Pod (1038800) Page 1 BD Powe r Pod Installation Instructions Part# 1038800 Accessory Power Distribution Module Power Pod Specifications: Eliminate multiple T-taps and splices on OEM
UNIVERSAL CUSTOMIZABLE MUD FLAP INSTALLATION INSTRUCTIONS
 UNIVERSAL CUSTOMIZABLE MUD FLAP INSTALLATION INSTRUCTIONS Thank you for purchasing ROCKSTARTM Splash Guard Mud Flaps. Agri-Cover, Inc. proudly manufactured these mud flaps using superior quality materials
7.3L POWERSTROKE BANJO BOLT KIT Fits L Powerstroke Diesel. Installation Guide
 7.3L POWERSTROKE BANJO BOLT KIT Fits 94-03 7.3L Powerstroke Diesel Installation Guide INSPECT CONTENTS OF THIS KIT THOROUGHLY BEFORE STARTING THE INSTALLATION PROCESS! IF YOU FIND A PROBLEM WITH YOUR PACKAGE:
Highly Styled, Low Cost Serpentine Drive
 Revised --12 Highly Styled, Low Cost Serpentine Drive Installation Instructions Ford 1 Cleveland Kit #040 (Chrome Alternator and Power Steering) Kit #0460 (Billet Alternator and Power Steering) Included
1401 / 1402 / 1403 ADJUSTABLE TRAILING ARM MOUNT BRACES INSTALLATION OF HOTCHKIS PERFORMANCE ADJUSTABLE TRAILING ARM MOUNT BRACES
 1401 / 1402 / 1403 ADJUSTABLE TRAILING ARM MOUNT BRACES 1401 78-88 GM A/G-BODY / 1402 68-72 GM A-BODY / 1403 64-67 GM A-BODY Thank you for your purchase. Please call us at (562) 907-7757 if you have any
INSTALLATION INSTRUCTIONS
 INSTALLATION INSTRUCTIONS 1301 / 1302 / 1305 / 1306 THANK YOU FOR CHOOSING HOTCHKIS PERFORMANCE PRODUCTS Removal of Stock Lower Trailing Arms 1) Place car on level surface. 2) Support rear of the car on
Highly Styled, Low Cost Serpentine Drive
 Revised 10-13-08 Highly Styled, Low Cost Serpentine Drive Installation Instructions Chevy Big Block #21200 (without Power Steering) #21250 (with Remote Power Steering) #21255 (with Saginaw Power Steering)
Model AS-RC3260 TV Cart. Rolling Cart for Audio Mount System & Flat Panel TVs
 Model AS-RC3260 TV Cart Rolling Cart for Audio Mount System & Flat Panel TVs GETTING STARTED Introduction Congratulations on the purchase of your new Helios AS-RC3260 Rolling Cart. For maximum benefit,
Highly Styled, Low Cost Serpentine Drive
 Revised 2-27-08 Highly Styled, Low Cost Serpentine Drive Installation Instructions Ford 460 Big Block Kit #30275 (with Power Steering) and #30270 (without Power Steering) Included Parts List Main Front
5) The trailing arm should then pivot smoothly on the chassis. 6) Install the rear bolt. 7) Place one drop of blue Loctite
 The trailing arm should then pivot smoothly on the chassis. 6) Install the rear bolt. 7) Place one drop of blue Loctite") INSTALLATION INSTRUCTIONS 1301 / 1302 / 1305 / 1306 THANK YOU FOR CHOOSING HOTCHKIS PERFORMANCE PRODUCTS Removal of Stock Lower Trailing Arms 1) Place car on level surface. 2) Support rear of the car on
INSTALLATION INSTRUCTIONS 1301 / 1302 / 1305 / 1306 THANK YOU FOR CHOOSING HOTCHKIS PERFORMANCE PRODUCTS Removal of Stock Lower Trailing Arms 1) Place car on level surface. 2) Support rear of the car on
Installation manual. Front leveling kit. Part # Part # Important customer information: Ram WD Ram WD
 Installation manual Front leveling kit 2014-2018 Ram 2500 4WD 2013-2018 Ram 3500 4WD Part # 32909 sj10182013rev.02 Part # 32909 2014-2018 Ram 2500 4WD 2013-2018 Ram 3500 4WD Front leveling kit Part # Description
22427 SWAY BAR SET 2002-UP SUBARU WRX WAGON
 22427 SWAY BAR SET 2002-UP SUBARU WRX WAGON Thank you for your purchase from our line of Subaru WRX parts. Please call us at (877) 4NO-ROLL if you have any questions regarding the service or installation
INSTALLATION INSTRUCTIONS
 INSTALLATION INSTRUCTIONS Thank you for purchasing ROXTERTM Hitch Mounted Mud Flaps. Agri-Cover, Inc. proudly manufactured these mud flaps using superior quality materials and workmanship. With proper
Compressor Clutch Replacement Procedure
 P-1411 819-0361 Compressor Clutch Replacement Procedure Installation Instructions World Clutch with Unidamp Armature for Ford FX-15 and FS-10 Compressors and all Denso Models with 30mm bearing fit. Keep
2015 & 2018 Fender Brace Installation Instructions
 2015 & 2018 Fender Brace Installation Instructions Thank you for your purchase of this Hotchkis Performance product. Your Fender Brace set was designed with the performance and durability you ve come to
J3 LED Light Bars. with Amber Clearance Lights. For 97 - Current TJ, JK & JKU Wrangler Vehicles: # X. The Trusted Source.
 J3 LED Light Bars with Amber Clearance Lights For 97 - Current TJ, JK & JKU Wrangler Vehicles: # 97109.112X 28 Bar Shown Above with Kit Contents 17 Bar 28 Bar 17 Bar PARTS LIST: Light bar - QTY 1 Deutsch
Transmission Connector Kit (Includes throttle stud, two 3/8" nuts, a 3/8" bolt and corrector plate)
") INSTRUCTIONS 304147 EZ-EFI Cable Bracket Kit Thank you for choosing products; we are proud to be your manufacturer of choice. Please read this instruction sheet carefully before beginning installation,
INSTRUCTIONS 304147 EZ-EFI Cable Bracket Kit Thank you for choosing products; we are proud to be your manufacturer of choice. Please read this instruction sheet carefully before beginning installation,
INSTALLATION INSTRUCTIONS FOR MOUNTING HARDWARE KIT F-105K2.5
 MY SAFE T PLUS UNIT INSTALLATION INSTRUCTIONS FOR MOUNTING HARDWARE KIT F-105K2.5 This kit supports installation of SAFE T PLUS : MODEL # 41-140 (RED) MODEL # 41-180 (WHITE) MODEL #41-230 (BLUE) KEEP INSTRUCTIONS
Highly Styled, Low Cost Serpentine Drive
 Revised 8-20-11 Highly Styled, Low Cost Serpentine Drive Installation Instructions Chevy Big Block (Style Track) #21200 (without Power Steering) #21250 (with Remote Power Steering) #21255 (with Saginaw
Electromagnetic Particle Brakes Model: PRB-H
 P-223-3 819-0370 Electromagnetic Particle Brakes Model: PRB-H Installation Instructions Table of Contents Introduction............................2 Installation Instructions....................3 Start
Sport Sway Bar Kit (22431 ) Subaru Forester INSTALLATION OF HOTCHKIS FRONT SWAY BAR
 Subaru Forester INSTALLATION OF HOTCHKIS FRONT SWAY BAR") Sport Sway Bar Kit (22431 ) Subaru Forester Thank you for your purchase from our new line of Forester parts. Please call us at (877) 4NO - ROLL if you have any questions regarding the service or installation
Sport Sway Bar Kit (22431 ) Subaru Forester Thank you for your purchase from our new line of Forester parts. Please call us at (877) 4NO - ROLL if you have any questions regarding the service or installation
Highly Styled, Low Cost Serpentine Drive
 Revised 11-12-08 Highly Styled, Low Cost Serpentine Drive Installation Instructions Chrysler 18, 40 and 60 Kit #4040 (without Power Steering) 69" Belt Kit #40440 (with Remote Power Steering) 80" Belt Kit
Installation Instructions **THIS RAIL MOUNTING KIT USES 11 BOLTS**
 Installation Instructions CUSTOM QUICK INSTALL MOUNTING KIT FORD SUPER DUTY Part Numbers: 50074 WARNING:Under no circumstances do we recommend exceeding the towing vehicle manufacturers recommended vehicle
Highly Styled, Low Cost Serpentine Drive
 Revised 1-17-11 Highly Styled, Low Cost Serpentine Drive Installation Instructions Chrysler 18, 40 and 60 Kit #4040 (without Power Steering) 66.5" Belt Kit #40440 (with Remote Power Steering) 81.5" Belt
INSTALLATION OF HOTCHKIS FRONT STABILIZER BAR
 22441 FRONT AND REAR SPORT SWAY BAR SET Infiniti G37/S Coupe & G35/S Sedan Thank you for your purchase from our Hotchkis line of suspension parts. Please call us at (877) 4NO-ROLL if you have any questions
UPPER TRAILING ARM REMOVAL
 #1204 MUSTANG UPPER TRAILING ARMS Thank you for your purchase. Please call us at (562) 907-7757 if you have any questions regarding your Hotchkis Performance products. Visit us online @ www.hotchkis.net
WR Air Accessory Mounting Brackets
 2529 www.riderite.com WR1-760-2529 Air Accessory Mounting Brackets The air accessory mounting kit is designed to work with all Ride-Rite air accessory systems without an air tank. If your air accessory
Air Lift. Kit PERFORMANCE INSTALLATION GUIDE Scion xb
 Air Lift PERFORMANCE Kit 75699 2008- Scion xb MN-689 (041108) ECR 7072 INSTALLATION GUIDE For maximum effectiveness and safety, please read these instructions completely before proceeding with installation.
Installation Instructions and Warranty Information
 Installation Instructions and Warranty Information For 2004-05 Nissan Titan 5.6L Part#1400S Read all instructions carefully before attempting installation. Rev. 10/05 Installation instructions for JBA
OWNERS MANUAL HF4261
 OWNERS MANUAL HF4261 ADJUSTABLE AB BENCH Note: Both Serial Number and Model Number are Required when Ordering Parts RECORD SERIAL NUMBER HERE CATALOG NUMBER 0905-000 Customer Service (800) 548-5438 (858)
Quadratec Aluminum Skid Plate for Fuel Tank
 RIVAL_JK_FUELT_SKID_8_A4.qxp_A4 6/13/17 4:13 PM Page 1 Quadratec Aluminum Skid Plate for Fuel Tank Installation Manual for 07-Current Wrangler (JK) 2 Door # 12500.0215 TO REDUCE RISK OF SERIOUS INJURY
BMW E46 M3 SPORT SWAY BAR SET # 22826
 BMW E46 M3 SPORT SWAY BAR SET # 22826 Thank you for your purchase from our new line of BMW E46 parts. Please call us at (877) 4NO - ROLL if you have any questions regarding the service or installation
INSTALLATION INSTRUCTIONS AND OWNER S MANUAL
 INSTALLATION INSTRUCTIONS AND OWNER S MANUAL Thank you for purchasing ADARAC Truck Bed Rack. Agri-Cover, Inc. proudly manufactured this product using superior quality materials and workmanship. With proper
14366, Adjustable Strut Rods Chrysler A-Body Chrysler B-Body Chrysler E-Body
 14366, 14385 Adjustable Strut Rods 67-76 Chrysler A-Body 1966-1970 Chrysler B-Body 1970-1974 Chrysler E-Body Thank you for your purchase from our new line of B & E-Body parts. Please call us at (877) 4NO
VERTICAL AND HORIZONTAL SPLIT CASE FIRE PUMPS
 480 MODELS VERTICAL AND HORIZONTAL SPLIT CASE FIRE PUMPS REPAIR PARTS INDEX NOTE! Read and understand the pump and driver instructions before attempting to install, disassemble or repair the pump. Part
Revised Chevy Big Block Front Mount Kit. Installation Instructions. Kits #20350, #20360, #20370, #20380 #20375, #20385
 Revised -18-09 Chevy Big Block Front Mount Kit Installation Instructions Kits #2050, #2060, #2070, #2080 #2075, #2085 Included Parts List A/C Nose Cover (94) or (9) carbon fiber Wing Bracket (2055) or
ERD Electrically Released Brakes
 ERD Electrically Released Brakes P-229 819-0453 Installation Instructions Warner Electric s ERD series spring set, electrically released brakes are designed to hold a load when the power to the brake is
EMISSION CONTROL WARRANTY STATEMENT
 EMISSION CONTROL WARRANTY STATEMENT YOUR WARRANTY RIGHTS AND OBLIGATIONS The California Air Resources Board, U.S. EPA and Zenith Power Products LLC (ZPP) are pleased to explain the emission control system