INSTALLATION GUIDE. TCP KCSXX Weld-In Full-Length Subframe Clip for Mustang and Cougar
|
|
|
- Julius Robbins
- 5 years ago
- Views:
Transcription


1 READ ALL INSTRUCTIONS COMPLETELY AND THOROUGHLY UNDERSTAND THEM BEFORE DOING ANYTHING. CALL TOTAL CONTROL PRODUCTS TECH SUPPORT (916) IF YOU NEED ASSISTANCE. INSTALLATION GUIDE TCP KCSXX Weld-In Full-Length Subframe Clip for Mustang and Cougar Description: Weld-in front subframe clip system replaces factory frame rails, lower radiator core crossmember and shock towers. Applications: Cougar 67-73, Mustang
2 2
3 3
4 PARTS LIST TCP KCSXX - Subframe Clip Weldments, Mustang You will receive one of the following items. Qty Part Number Description For tubular anti-roll bar without engine mount frame adapters For tubular anti-roll bar with Ford small block or big block mounts For tubular anti-roll bar with Ford modular motor mounts For tubular anti-roll bar with Chevy LS mounts For splined anti-roll bar without engine mount frame adapters For splined anti-roll bar with Ford small block or big block mounts For splined anti-roll bar with Ford modular motor mounts For splined anti-roll bar with Chevy LS mounts TCP KCSXX - Full-Subframe Clip Accessories, Mustang You will receive each of the following items unless otherwise noted. Qty Part Number Description Weld fl ange and alignment tab set Full frame rail weldment Frame gusset, driver side Frame gusset, passenger side 1 TCP JA1 Shock tower delete panels (pair), only 1 TCP JA2 Shock tower delete panels (pair), only TCP KCFXX - Engine Mounts - OPTIONAL Qty Part Number Description 1 TCP MM-C1S Ford Small Block, Steel 1 TCP MM-C2S Ford Big Block FE, Steel 1 TCP MM-C3S Ford Modular, Steel 1 TCP MM-C4S Ford Small Block Adjustable, Steel LSR-S Chevy LS, Steel CV8-S Chevy V8, Steel Additional Components - OPTIONAL Qty Part Number Description 1 TCP MTC-U4 Weld-in transmission crossmember 1 TCP JC1 Shock-tower-delete splash fl aps (pair) Body outrigger, driver side Body outrigger, passenger side 4


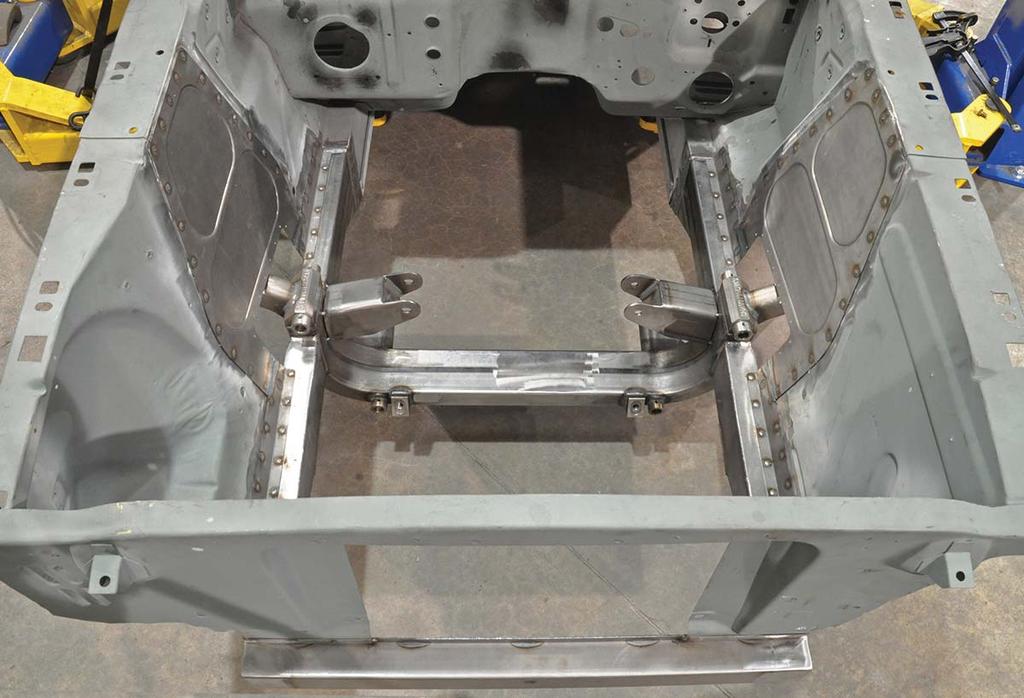
. 1. We begin with a completely bare chassis.")
5 INSTRUCTIONS NOTE: A 1965 Mustang was used for the following images and may show slight differences from the later Mustang and Cougar platforms. The installation procedure is identical. Procedures shown must be repeated for both sides of vehicle. Total Control Products front subframe clip replaces the factory frame rails, lower core support crossmember and shock towers. The replacement subframe ships as a factorywelded assembly. Additional accessories include shock tower delete panels, inner fender weld fl anges, replacement lower rail and outer frame gussets (lower rail and gusset not shown). 1. We begin with a completely bare chassis. All components forward of the fi rewall must be removed. The fl oorboard areas of the interior must also be cleared to avoid risk of fi re while welding. 5


6 2. If the vehicle has torque boxes installed, the triangular gusset must be removed by drilling out the spot welds. A replacement gusset is provided. The torque box structure can remain in place during the rest of the installation. 3. With spot welds drilled the gusset can be cleanly removed. 4. The fi rst cuts are made from the engine compartment along the corner where the inner fender and frame rail meet. 5. Make two 3 -long cuts centered over the bumper mounting holes located on the outside of the frame rail. The fi rst begins against the radiator core support panel. The second is spaced approximately 3-4 apart. 6


7 6. Bolt the alignment tabs to the bumper mounting holes. 7. Securely tack weld the alignment tabs to the inner fender. These tabs are used to locate the replacement subframe later on. 8. Measurements for the next few steps are taken from the inside surface of the lower control arm mounts. 7


8 9. Measure and mark 15 back from the lower control arm mount. 10. Use a square to extend the line perpendicular to the top of the frame rail. 11. This is our inside cut-off line. 8


9 12. Using a straight edge, measure 15 back from inside of the lower control arm mount. 13. You will need to use the square along the above sheet metal seam to mark a perpendicular line. 14. Visually compare the lines to make sure they meet squarely at the bottom of the rail. 15. Continue marking the cut lines along the inner fender. From the radiator core support to the shock tower overlap seam forward of the tower. And from the 15 line forward to the tower overlap seam. 16. The core support crossmember is cut from the front side. 9


10 17. Mark the lower control arm mount along the inside corner to just above the curved area. 18. The shock tower should look similar to this. Remaining tower cuts are made from opposite side. 19. Make sure to avoid cutting through the alignment tabs when fi nishing the cut along the forward length of the inner fender. 10


11 20. Make the fi nal cuts along the front of the core support. The vertical cut is left a little long, but can be trimmed to match the radiator opening once the subframe has been removed. 21. From the outside, cut away the fl ange that spans the shock tower opening. 22. Cut up and around the shock tower along the line shown. The bottom legs of this cut must meet the cuts along the inner fender and frame rail. 11


12 23. At this point make sure that the subframe is well supported by jack stands. The next few steps will detach it from the chassis. 24. Make the vertical cuts on the outside and inside of the frame rail. Do not cut through the bottom part of the rail at this time. 25. Remove the two bolts at the alignment tabs on each side of the vehicle. 12


13 26. Make the fi nal cut through the bottom of the frame rail. 27. The factory subframe can now be lowered out of the way. 28. Drill three 3/8 rosette holes, 1 in from the edge, and at 3/4, 2, and 3-1/4 down from the top edge of the frame rail. This is repeated for the inside and outside walls of each frame rail. 3/ /4 1 13


14 29. Weld Preparation - Use a scotch brite wheel to clean the following areas down to bare metal. Frame Rails - inside and outside past the rosette holes Inner Fenders - bottom 2 along engine side Core Support - bottom 1 along engine side 30. Raise the new subframe assembly into position. Factory frame rail position will vary between vehicles and minor working of the factory rail may be required. 31. Once the rear of the subframe is raised completely into position, install the bolts through the alignment tabs. 14


15 32. With the subframe now in it s fi nal position, we can begin tack welding. 33. Close up any gaps along the outside of the rail before securely tack welding the top and bottom corners of the main frame rail. 34. Fitment of the lower rail requires cutting along the inside and outside corners of the factory frame rail. In the image to the right, gray is factory sheet metal and blue is the replacement lower rail and subframe. Mark the position of the end of the factory frame rail. The replacement rail must match. 15


16 35. The top corners are cut along the torque box area and the tunnel reinforcement. 36. Free-standing areas of the frame rail are cut at the corner where the rail meets the fl oor, leaving the original rail fl ange attached to the chassis. 37. Trim the front lower corner of the factory rail to follow the angle of the replacement rail. 38. Once fi t, remove the gusset before drilling two additional evenly spaced 3/8 rosette holes through each wall, 1 in from the edge. 16


17 39. Weld the rosette holes before fully welding all seams. 40. TOWER REMOVAL From the engine side, use the overlap seam as a guide to cut completely around and remove the shock tower. 41. From the outside we re left with a doublethick fl ange on which to weld the tower delete panels. 17


18 42. TOWER REMOVAL From the engine side, use the overlap seam as a guide to cut completely around and remove the shock tower. Extend the two outside cuts to meets the top corner of the inner fender. 43. Cut a 1 slot extending along each top edge. 44. From the engine bay side, the delete panel folded lip inserts through the slots to sit underneath the top of the inner fender. VIEW FROM ENGINE BAY IMAGES AT RIGHT Gray is factory sheet metal Blue is delete panel 45. When welded the top fl ange is plug welded to the bottomside of the inner fender and the main panel body welds on top of the inner fender. VIEW FROM WHEEL SIDE 18


19 46. On the engine bay side, use a scotch brite pad to clean 1 around the shock tower opening down to bare metal. 47. If purchased, temporarily install the rubber splash fl aps with a few screws to help with alignment of the tower delete panels. 48. Align the shock tower delete panels approximately 3/16 down from the top of the inner fender panel and centered over the opening. 49. When viewed from the outside, spacing between the bead-rolled edges and the opening is not critical. Splash fl ap alignment and the top edge alignment determine the correct position. 19


20 50. To clear the top bead-rolled edge, cut a horizontal line tangent to the highest radius to meet the other side of the opening. 51. Fitment of the delete panel and forward and rear weld fl anges, that tie the inner fenders to the frame rail, needs to be done simultaneously. Align the delete panel using the top of the inner fender and the splash fl ap. The bottom extensions of the delete panel are then trimmed to sit atop the weld fl anges. Read through the next few steps before beginning to weld. 20


21 52. Rear Weld Flange - Front edge is fl ush with splash fl ap opening. Rear edge is notched for tighter fi t over factory rail. 53. Forward Weld Flange - Rear edge is fl ush with splash fl ap opening. Front edge is trimmed at core support if needed. 54. Beginning at the joints between the delete panel and weld fl anges, plug weld each of the rosette holes before fully welding the seam. 21


22 55. Continue plug welding the remaining rosette holes along the weld fl anges, delete panels, and core support. 56. The edge of the core support is welded as a short stitch to better blend the two surfaces. 57. A coarse scotch brite pad can be used to bring the welds fl ush. 58. Optional frame outriggers are used on vehicles without torque boxes. Position them along the leading edge of the fl at section of fl oor board. 59. Once fi t, the areas along all edges must be cleaned to bare metal before welding completely around. 22


23 60. Frame Gusset (with torque box) - Test fi t, prep for weld, then stitch weld along edges. 61. Frame Gusset (without torque box) - A small bit of trimming is required along the gusset edge that meets the outrigger closest to the frame rail. 62. Once fi t, prep for weld, then stitch weld along edges. 23


24 63. Unbolt the alignment tabs. 64. Welding portion of the installation is complete. 24

25 25
26 NOTES: 26
27 NOTES: 27
28 WARRANTY NOTICE: There are NO WARRANTIES, either expressed or implied. Neither the seller nor manufacturer will be liable for any loss, damage or injury, direct or indirect, arising from the use or inability to determine the appropriate use of any products. Before any attempt at installation, all drawings and/or instruction sheets should be completely reviewed to determine the suitability of the product for its intended use. In this connection, the user assumes all responsibility and risk. We reserve the right to change specifi cation without notice. Further, Chris Alston s Chassisworks, Inc., makes NO GUARANTEE in reference to any specific class legality of any component. ALL PRODUCTS ARE INTENDED FOR RACING AND OFF-ROAD USE AND MAY NOT BE LEGALLY USED ON THE HIGHWAY. The products offered for sale are true race-car components and, in all cases, require some fabrication skill. NO PRODUCT OR SERVICE IS DESIGNED OR INTENDED TO PREVENT INJURY OR DEATH. Total Control Products A Chris Alston s Chassisworks, Inc. Brand 8661 Younger Creek Drive Sacramento, CA Phone: Technical Support: tcptech@cachassisworks.com CHRIS ALSTON'S Chassisworks THE HOME OF HIGHER H TECHNOLOGY O 7903-KCSXX REV 03/23/16 28
INSTALLATION GUIDE. TCP SUBFC-01 Weld-in Subframe Connector (Hardtop Models) Mustang and Cougar
 Mustang and Cougar") READ ALL INSTRUCTIONS COMPLETELY AND THOROUGHLY UNDERSTAND THEM BEFORE DOING ANYTHING. CALL TOTAL CONTROL PRODUCTS TECH SUPPORT (916) 388-0288 IF YOU NEED ASSISTANCE. INSTALLATION GUIDE TCP SUBFC-01 Weld-in
READ ALL INSTRUCTIONS COMPLETELY AND THOROUGHLY UNDERSTAND THEM BEFORE DOING ANYTHING. CALL TOTAL CONTROL PRODUCTS TECH SUPPORT (916) 388-0288 IF YOU NEED ASSISTANCE. INSTALLATION GUIDE TCP SUBFC-01 Weld-in
INSTALLATION GUIDE F10 g-connector Bolt-in Camaro/Firebird with OEM Rear Frame
 READ ALL INSTRUCTIONS COMPLETELY AND THOROUGHLY UNDERSTAND THEM BEFORE DOING ANYTHING. CALL CHASSISWORKS TECH SUPPORT (916) 388-0288 IF YOU NEED ASSISTANCE. INSTALLATION GUIDE 5903-F10 g-connector Bolt-in
INSTALLATION GUIDE. Bolt-In Front Suspension Conversion for Chevy II
 READ ALL INSTRUCTIONS COMPLETELY AND THOROUGHLY UNDERSTAND THEM BEFORE DOING ANYTHING. CALL CHASSISWORKS TECH SUPPORT (916)388-0288 IF YOU NEED ASSISTANCE. INSTALLATION GUIDE Bolt-In Front Suspension Conversion
INSTALLATION GUIDE x2 Eliminator II Rear Frame
 READ ALL INSTRUCTIONS COMPLETELY AND THOROUGHLY UNDERSTAND THEM BEFORE DOING ANYTHING. CALL CHASSISWORKS TECH SUPPORT (916) 388-0288 IF YOU NEED ASSISTANCE. INSTALLATION GUIDE 7136 3x2 Eliminator II Rear
INSTALLATION GUIDE TCP TIER-18
 READ ALL INSTRUCTIONS COMPLETELY AND THOROUGHLY UNDERSTAND THEM BEFORE DOING ANYTHING. CALL TOTAL CONTROL PRODUCTS TECH SUPPORT (916) 388-0288 IF YOU NEED ASSISTANCE. INSTALLATION GUIDE TCP TIER-18 Tie
INSTALLATION GUIDE TCP RCKM-01
 READ ALL INSTRUCTIONS COMPLETELY AND THOROUGHLY UNDERSTAND THEM BEFORE DOING ANYTHING. CALL TOTAL CONTROL PRODUCTS TECH SUPPORT (916) 388-0288 IF YOU NEED ASSISTANCE. INSTALLATION GUIDE TCP RCKM-01 Manual
INSTALLATION GUIDE Canted Billet 4-Bar, 4x2 Rear Frame
 INSTALLATION GUIDE 7154 Canted Billet 4-Bar, 4x2 Rear Frame Description: Non-application specific, weld-in, 4 x 2 rear frame for use with Chassisworks 6241 billet aluminum suspension links. IMPORTANT:
INSTALLATION GUIDE. TCP PSP-FD Power Steering Pump Kit
 READ ALL INSTRUCTIONS COMPLETELY AND THOROUGHLY UNDERSTAND THEM BEFORE DOING ANYTHING. CALL TOTAL CONTROL PRODUCTS TECH SUPPORT (916) 388-0288 IF YOU NEED ASSISTANCE. INSTALLATION GUIDE TCP PSP-FD Power
INSTALLATION GUIDE. TCP PHA-M10 Sliding Link Anti-Roll Bar for Panhard Bar System for Mustang and Cougar
 READ ALL INSTRUCTIONS COMPLETELY AND THOROUGHLY UNDERSTAND THEM BEFORE DOING ANYTHING. CALL TOTAL CONTROL PRODUCTS TECH SUPPORT (916) 388-0288 IF YOU NEED ASSISTANCE. INSTALLATION GUIDE TCP PHA-M10 Sliding
INSTALLATION GUIDE. TCP STRD-07 Adjustable Strut Rods
 READ ALL INSTRUCTIONS COMPLETELY AND THOROUGHLY UNDERSTAND THEM BEFORE DOING ANYTHING. CALL TOTAL CONTROL PRODUCTS TECH SUPPORT (916) 388-0288 IF YOU NEED ASSISTANCE. INSTALLATION GUIDE TCP STRD-07 Adjustable
INSTALLATION GUIDE P/N: TCP COLM-10
 INSTALLATION GUIDE Column Set 10 For 1960 1970 Mustang/Falcon/Cougar with 2 Aftermarket Steering Column P/N: TCP COLM-10 DESCRIPTION: LOWER COLUMN FLOOR SUPPORT BRACKET WITH COLUMN CLAMP, COLUMN MOUNT
INSTALLATION GUIDE
 READ ALL INSTRUCTIONS COMPLETELY AND THOROUGHLY UNDERSTAND THEM BEFORE DOING ANYTHING. CALL CHASSISWORKS TECH SUPPORT (916) 388-0288 IF YOU NEED ASSISTANCE. INSTALLATION GUIDE 5736-75-56 Bump Steer Kit
INSTALLATION GUIDE Bolt-On Drag-Race Strut Clip Chevy II
 INSTALLATION GUIDE 7702 Bolt-On Drag-Race Strut Clip 1962-67 Chevy II Description: STRUT CLIP 4130 BOLT ON 62-67 CHEVY II, INCLUDES 4130 ROUND TUBE FRAME CLIP, DOUBLE-ADJUSTABLE STRUTS, ADJUSTABLE-HEIGHT
TCP UCA-07 Coil-Spring Upper Control Arm with Dropped Pivot Shaft Mustang
 READ ALL INSTRUCTIONS COMPLETELY AND THOROUGHLY UNDERSTAND THEM BEFORE DOING ANYTHING. CALL TOTAL CONTROL PRODUCTS TECH SUPPORT (916) 388-0288 IF YOU NEED ASSISTANCE. INSTALLATION GUIDE TCP UCA-07 Coil-Spring
INSTALLATION GUIDE TCP SPND MUSTANG SPINDLES WITH GRANADA OUTER TIE-ROD TAPER
 READ ALL INSTRUCTIONS COMPLETELY AND THOROUGHLY UNDERSTAND THEM BEFORE DOING ANYTHING. CALL TOTAL CONTROL PRODUCTS TECH SUPPORT (916) 388-0288 IF YOU NEED ASSISTANCE. INSTALLATION GUIDE TCP SPND-04 70-73
INSTALLATION GUIDE A20-18-A g-link Rear Adjustable 1-1/8 Anti-roll Bar GM A-Body
 READ ALL INSTRUCTIONS COMPLETELY AND THOROUGHLY UNDERSTAND THEM BEFORE DOING ANYTHING. CALL CHASSISWORKS TECH SUPPORT (916) 388-0288 IF YOU NEED ASSISTANCE. INSTALLATION GUIDE 5825-A20-18-A g-link Rear
INSTALLATION GUIDE
 INSTALLATION GUIDE 6140-215 POWER RACK & PINION FOR 30 WIDE STREET MACHINE CROSSMEMBER USED ON 62-67 CHEVY II Note: This unit is only to be used with Chassisworks power steering pump kits. The rack-and-
INSTALLATION GUIDE. TCP TIER-14 Bump Steer Conversion Kit - Early Mustang to Late Spindle
 READ ALL INSTRUCTIONS COMPLETELY AND THOROUGHLY UNDERSTAND THEM BEFORE DOING ANYTHING. CALL TOTAL CONTROL PRODUCTS TECH SUPPORT (916) 388-0288 IF YOU NEED ASSISTANCE. INSTALLATION GUIDE TCP TIER-14 Bump
INSTALLATION GUIDE 5824-A10
 READ ALL INSTRUCTIONS COMPLETELY AND THOROUGHLY UNDERSTAND THEM BEFORE DOING ANYTHING. CALL CHASSISWORKS TECH SUPPORT (916) 388-0288 IF YOU NEED ASSISTANCE. INSTALLATION GUIDE 5824-A10 VariShock Rear Coil-Over
INSTALLATION GUIDE 5820-A10
 READ ALL INSTRUCTIONS COMPLETELY AND THOROUGHLY UNDERSTAND THEM BEFORE DOING ANYTHING. CALL CHASSISWORKS TECH SUPPORT (916) 388-0288 IF YOU NEED ASSISTANCE. INSTALLATION GUIDE 5820-A10 Poly-Bushed Upper
INSTALLATION GUIDE M10 g-bar Canted 4-Bar Air-Spring Rear Suspension Mustang
 READ ALL INSTRUCTIONS COMPLETELY AND THOROUGHLY UNDERSTAND THEM BEFORE DOING ANYTHING. CALL CHASSISWORKS TECH SUPPORT (916) 388-0288 IF YOU NEED ASSISTANCE. INSTALLATION GUIDE 5801-M10 g-bar Canted 4-Bar
KPC CBO-S S-10/ SONOMA BOLT-ON CANTILEVER INSTALLATION INSTRUCTIONS
 82-03 S-0/ SONOMA BOLT-ON CANTILEVER INSTALLATION INSTRUCTIONS NOTE: You must have previously installed a Bolt on 4-link to utilize this cantilever kit. If you are installing both kits at the same time,
INSTALLATION GUIDE KPC 4LBO-C51
 INSTALLATION GUIDE KPC 4LBO-C1 Bolt-On 4-Link Kit 197-1987 Chevrolet and GMC C10 Pickup Description: Bolt-on, urethane-bushed 4-link rear suspension for 197-1987 Chevrolet and GMC C10 pickup. Includes
KPC 4LBO-F FORD F-150 BOLT ON 4-LINK
 KPC 4LBO-F71 97-03 FORD F-150 BOLT ON 4-LINK INSTALLATION INSTRUCTIONS 1. Jack the vehicle and support it with stands under the frame on all four corners. The suspension must be left handing. 2. Remove
INSTALLATION GUIDE KPC SRBF-C51
 INSTALLATION GUIDE KPC SRBF-C51 Front Shock Relocater Kit 1973-1987 Chevrolet and GMC C10 Pickup Description: Bolt-on upper shock mount for 1973-1987 Chevrolet and GMC C10 pickup, with mounting hardware.
INSTALLATION GUIDE KPC 4LBO-C61
 INSTALLATION GUIDE KPC 4LBO-C61 Bolt-On 4-Link Kit 1988-1998 Chevrolet and GMC 1500 Series Pickup Description: Bolt-on, urethane-bushed 4-link rear suspension for 1988-1998 Chevrolet and GMC 1500 series
INSTALLATION GUIDE M10 g-bar Sliding-Link Anti-Roll Bar Mustang and Cougar
 READ ALL INSTRUCTIONS COMPLETELY AND THOROUGHLY UNDERSTAND THEM BEFORE DOING ANYTHING. CALL CHASSISWORKS TECH SUPPORT (916) 388-0288 IF YOU NEED ASSISTANCE. INSTALLATION GUIDE 5812-M10 g-bar Sliding-Link
INSTALLATION GUIDE Avenger 4-Link, Scalloped for 1-5/8 Clips and Chassis
 INSTALLATION GUIDE 6260 Avenger 4-Link, Scalloped for 1-5/8 Clips and Chassis WARRANTY NOTICE: There are NO WARRANTIES, either expressed or implied. Neither the seller nor manufacturer will be liable for
INSTALLATION GUIDE STAINLESS DRAG-RACE STEERING COLUMN
 INSTALLATION GUIDE STAINLESS DRAG-RACE STEERING COLUMN Description: STEERING COLUMN STAINLESS TUBE x 4 LONG, DUAL /4- SPLINE /4 x 48 TUBULAR COLUMN SHAFTS, BILLET MOUNTS, DUAL ALUMINUM U-JOINTS & QUICK
INSTALLATION GUIDE X20 Billet AirLink Canted 4-Bar Rear Air Suspension Nova
 READ ALL INSTRUCTIONS COMPLETELY AND THOROUGHLY UNDERSTAND THEM BEFORE DOING ANYTHING. CALL CHASSISWORKS TECH SUPPORT (916) 388-0288 IF YOU NEED ASSISTANCE. INSTALLATION GUIDE 5814-X20 Billet AirLink Canted
INSTALLATION GUIDE X10 AirLink Canted 4-Bar Rear Air Suspension Chevy II
 READ ALL INSTRUCTIONS COMPLETELY AND THOROUGHLY UNDERSTAND THEM BEFORE DOING ANYTHING. CALL CHASSISWORKS TECH SUPPORT (916) 388-0288 IF YOU NEED ASSISTANCE. INSTALLATION GUIDE 5805-X10 AirLink Canted 4-Bar
INSTALLATION GUIDE. O 5800-F10 g-bar Canted 4-Bar Coil-Over Rear Suspension Camaro & Firebird
 READ ALL INSTRUCTIONS COMPLETELY AND THOROUGHLY UNDERSTAND THEM BEFORE DOING ANYTHING. CALL CHASSISWORKS TECH SUPPORT (916) 388-0288 IF YOU NEED ASSISTANCE. INSTALLATION GUIDE Chassisworks CHRIS ALSTON'S
INSTALLATION GUIDE. TCP RCKP121 Power Rack and Pinion Mustang, Small Block Left Hand Drive (USA)
") READ ALL INSTRUCTIONS COMPLETELY AND THOROUGHLY UNDERSTAND THEM BEFORE DOING ANYTHING. CALL TOTAL CONTROL PRODUCTS TECH SUPPORT (916) 388-0288 IF YOU NEED ASSISTANCE. INSTALLATION GUIDE TCP RCKP121 Power
READ ALL INSTRUCTIONS COMPLETELY AND THOROUGHLY UNDERSTAND THEM BEFORE DOING ANYTHING. CALL TOTAL CONTROL PRODUCTS TECH SUPPORT (916) 388-0288 IF YOU NEED ASSISTANCE. INSTALLATION GUIDE TCP RCKP121 Power
INSTALLATION GUIDE. TCP RCKP223 Power Rack and Pinion Early 1967 Mustang, Small Block Left Hand Drive (USA)
") READ ALL INSTRUCTIONS COMPLETELY AND THOROUGHLY UNDERSTAND THEM BEFORE DOING ANYTHING. CALL TOTAL CONTROL PRODUCTS TECH SUPPORT (916) 388-0288 IF YOU NEED ASSISTANCE. INSTALLATION GUIDE TCP RCKP223 Power
READ ALL INSTRUCTIONS COMPLETELY AND THOROUGHLY UNDERSTAND THEM BEFORE DOING ANYTHING. CALL TOTAL CONTROL PRODUCTS TECH SUPPORT (916) 388-0288 IF YOU NEED ASSISTANCE. INSTALLATION GUIDE TCP RCKP223 Power
INSTALLATION GUIDE TCP RCKP-05
 READ ALL INSTRUCTIONS COMPLETELY AND THOROUGHLY UNDERSTAND THEM BEFORE DOING ANYTHING. CALL TOTAL CONTROL PRODUCTS TECH SUPPORT (916) 388-0288 IF YOU NEED ASSISTANCE. INSTALLATION GUIDE TCP RCKP-05 Power
INSTALLATION GUIDE F22 g-bar Canted 4-Bar Coil-Over Rear Suspension Camaro & Firebird
 READ ALL INSTRUCTIONS COMPLETELY AND THOROUGHLY UNDERSTAND THEM BEFORE DOING ANYTHING. CALL CHASSISWORKS TECH SUPPORT (916) 388-0288 IF YOU NEED ASSISTANCE. INSTALLATION GUIDE 5800-F22 g-bar Canted 4-Bar
INSTALLATION GUIDE. TCP RCKP314 Power Rack and Pinion 1970 Mustang, Big Block Left Hand Drive (USA)
") READ ALL INSTRUCTIONS COMPLETELY AND THOROUGHLY UNDERSTAND THEM BEFORE DOING ANYTHING. CALL TOTAL CONTROL PRODUCTS TECH SUPPORT (916) 388-0288 IF YOU NEED ASSISTANCE. INSTALLATION GUIDE TCP RCKP314 Power
READ ALL INSTRUCTIONS COMPLETELY AND THOROUGHLY UNDERSTAND THEM BEFORE DOING ANYTHING. CALL TOTAL CONTROL PRODUCTS TECH SUPPORT (916) 388-0288 IF YOU NEED ASSISTANCE. INSTALLATION GUIDE TCP RCKP314 Power
INSTALLATION GUIDE. TCP RCKP324 Power Rack and Pinion 1970 Mustang, Small Block Left Hand Drive (USA)
") READ ALL INSTRUCTIONS COMPLETELY AND THOROUGHLY UNDERSTAND THEM BEFORE DOING ANYTHING. CALL TOTAL CONTROL PRODUCTS TECH SUPPORT (916) 388-0288 IF YOU NEED ASSISTANCE. INSTALLATION GUIDE TCP RCKP324 Power
READ ALL INSTRUCTIONS COMPLETELY AND THOROUGHLY UNDERSTAND THEM BEFORE DOING ANYTHING. CALL TOTAL CONTROL PRODUCTS TECH SUPPORT (916) 388-0288 IF YOU NEED ASSISTANCE. INSTALLATION GUIDE TCP RCKP324 Power
INSTALLATION GUIDE F20 g-link Billet Canted 4-Bar Air-Spring Rear Frame and Suspension Camaro & Firebird
 READ ALL INSTRUCTIONS COMPLETELY AND THOROUGHLY UNDERSTAND THEM BEFORE DOING ANYTHING. CALL CHASSISWORKS TECH SUPPORT (916) 388-0288 IF YOU NEED ASSISTANCE. INSTALLATION GUIDE 5843-F20 g-link Billet Canted
INSTALLATION INSTRUCTIONS QA1 P/N x400, x500, x600, x400, x500, x F100 Front Coil-over Suspension System
 INSTALLATION INSTRUCTIONS QA1 P/N 52620-x400, 52620-x500, 52620-x600, 52621-x400, 52621-x500, 52621-x600 65-72 F100 Front Coil-over Suspension System TOOLS AND SUPPLIES REQUIRED Floor Jack Two (2) Jack
7211 A-ARM FRONT, 4-LINK, 3 X 2 FRAME, INTERMEDIATE, ELIMINATOR CHASSIS ITEM QTY SIZE/PART NO. TUBE CODE DESCRIPTION
 #917211 Page 1 of 6 7211 A-ARM FRONT, 4-LINK, 3 X 2 FRAME, INTERMEDIATE, ELIMINATOR CHASSIS ITEM QTY SIZE/PART NO. TUBE CODE DESCRIPTION 1 2 4138 Cage Side 2 2 4208 Forward strut 3 1 4038 Main Hoop 4 1
Detroit Speed, Inc Mustang Mini-Tubs P/N:
 Detroit Speed, Inc. 1964.5-1970 Mustang Mini-Tubs P/N: 040405 Item Component Quantity 1 DSE Mini-Tubs - Mustang 2 2 Frame Rail Sections 2 3 Doubler Plate 4" x 3.25" 4 4 Doubler Plate 4" x 2" 4 5 Installation
INSTALLATION GUIDE TCP COLVF-07
 READ ALL INSTRUCTIONS COMPLETELY AND THOROUGHLY UNDERSTAND THEM BEFORE DOING ANYTHING. CALL TOTAL CONTROL PRODUCTS TECH SUPPORT (916) 388-0288 IF YOU NEED ASSISTANCE. INSTALLATION GUIDE TCP COLVF-07 Front
INSTALLATION INSTRUCTIONS 64 ½ - 70 SUPERRIDE II INDEPENDENT FRONT SUSPENSION BX-350 FOR COYOTE AND MOD ENGINES
 INSTALLATION INSTRUCTIONS 64 ½ - 70 SUPERRIDE II INDEPENDENT FRONT SUSPENSION BX-350 FOR COYOTE AND MOD ENGINES Please read these instructions completely before starting your installation. Assemble suspension
60-65 Falcon, Comet & Ranchero Coil Spring IFS
 60-65 Falcon, 62-65 Comet & 62-65 Ranchero Coil Spring IFS All engine installations with this front end will require a rear sump oil pan. 289-302 Small Block Ford Motors Milodon rear sump pan holds 7 quarts
CLICK for More Info Online
 CLICK for More Info Online Weld-In Front Frame Clip and Suspension for 1964-1970 Mustang The Most Complete Subframe System Total Control Products front subframe clip is a directfit, high-performance suspension
INSTALLATION GUIDE TCP RCKP-03
 READ ALL INSTRUCTIONS COMPLETELY AND THOROUGHLY UNDERSTAND THEM BEFORE DOING ANYTHING. CALL TOTAL CONTROL PRODUCTS TECH SUPPORT (916) 388-0288 IF YOU NEED ASSISTANCE. INSTALLATION GUIDE TCP RCKP-03 Power
Detroit Speed, Inc. Mini Tubs Camaro/Firebird P/N:
 Detroit Speed, Inc. Mini Tubs 1967-1969 Camaro/Firebird P/N: 040401 The Detroit Speed Mini-Tubs are inner wheel housings designed to accommodate a wider wheel and tire package. They are engineered for
Detroit Speed, Inc. Mustang Mini-Tub Kit Mustang P/N:
 Detroit Speed, Inc. Mustang Mini-Tub Kit 1964.5-70 Mustang P/N: 040405 The Detroit Speed Mini-Tubs are inner wheel housings designed to accommodate wider wheel and tire package for the 1964½ - 1970 Mustang.
7333 INSTRUCTIONS FOR MILD STEEL A-ARM AVENGER CHASSIS MUSTANG
 #917333 Page 1 of 5 7333 INSTRUCTIONS FOR MILD STEEL A-ARM AVENGER CHASSIS 1994-2004 MUSTANG ITEM QTY PART NO/SIZE TUBE CODE DESCRIPTION 1 1 4080 Main hoop 2 1 pr 4180 Cage side (driver & passenger side)
Camaro Frame System. g-machine Front Subframe, Frame Connector and g-bar Rear Suspension System for Camaro/Firebird
 1970-81 Camaro Frame System g-machine Front Subframe, Frame Connector and g-bar Rear Suspension System for 70-81 Camaro/Firebird Subframe Connector System g-bar Rear Suspension System (Full-length frame
Alignment Spec. Power Rack & Pinion: 5 degrees positive Camber 0 degrees Toe-In 1/32
 333-TCIE237 1967-1969 Chevy Camaro Front Suspension 1968-1972 Chevy Nova Front Suspension 1967-1969 Pontiac Firebird Front Suspension 1-800-984-6259 www.totalcostinvolved.com 1967-1969 Chevy Camaro Front
Installation Instructions
 Installation Instructions Important INSTALLATION REQUIRES WELDING to the unibody chassis by a qualified welder or metal fabricator. A bolt-on installation is not possible for this product. CHECK STEERING
INTERCOOLER UPGRADE INSTALLATION INSTRUCTIONS PART NUMBER D
 INTERCOOLER UPGRADE INSTALLATION INSTRUCTIONS PART NUMBER D330-0021 APPLICATION: 2014-16 F22 228i & xdrive coupe (see restrictions below) 2015-16 F23 228i & xdrive convertible 2012-16 F30 328i & xdrive
INSTALLATION GUIDE. PKG A-ARM A-Arm Suspension for Chassisworks 4x2 Crossmember
 READ ALL INSTRUCTIONS COMPLETELY AND THOROUGHLY UNDERSTAND THEM BEFORE DOING ANYTHING. CALL CHASSISWORKS TECH SUPPORT (916) 388-0288 IF YOU NEED ASSISTANCE. INSTALLATION GUIDE PKG A-ARM A-Arm Suspension
INTERCOOLER UPGRADE INSTALLATION INSTRUCTIONS PART NUMBER D
 INTERCOOLER UPGRADE INSTALLATION INSTRUCTIONS PART NUMBER D330-0021 APPLICATION: 2014-16 F22 228i & xdrive coupe (see restrictions below) 2012-16 F30 328i & xdrive sedan 2014-16 F31 328i xdrive wagon 2014-16
7256 INSTRUCTIONS FOR ELIMINATOR II A-ARM FRONT, 4-LINK REAR, MILD STEEL, INTERMEDIATE, SERIES CHASSIS
 #917256 Page 1 of 7 7256 INSTRUCTIONS FOR ELIMINATOR II A-ARM FRONT, 4-LINK REAR, MILD STEEL, INTERMEDIATE, SERIES CHASSIS ITEM QTY SIZE/PART NO. TUBE CODE DESCRIPTION 1 2 4138 Cage Side 2 2 4208 Forward
Detroit Speed, Inc. Mini-Tub Kit Chevy Nova, Oldsmobile Omega, Pontiac Ventura P/N: &
 Detroit Speed, Inc. Mini-Tub Kit 1968-74 Chevy Nova, Oldsmobile Omega, Pontiac Ventura P/N: 041207 & 041208 Item Component Quantity 1 DSE Mini Tubs 1968-74 X-Body 2 2 Rear Upper Shock Crossmember 1 3 Upper
Roll Bar (MMRB-6.1 to -6.7)
") 3430 Sacramento Dr., Unit D San Luis Obispo, CA 93401 Telephone: 805/544-8748 Fax: 805/544-8645 www.maximummotorsports.com 1994-04 Roll Bar (MMRB-6.1 to -6.7) NOTE: These instructions cover Roll Bars with
3430 Sacramento Dr., Unit D San Luis Obispo, CA 93401 Telephone: 805/544-8748 Fax: 805/544-8645 www.maximummotorsports.com 1994-04 Roll Bar (MMRB-6.1 to -6.7) NOTE: These instructions cover Roll Bars with
CLAYTON OFF ROAD COR JEEP GRAND CHEROKEE LONG ARM UPGRADE KIT ( WJ)
") CLAYTON OFF ROAD COR-4806011 JEEP GRAND CHEROKEE LONG ARM UPGRADE KIT (1999-2004 WJ) NOTES: This product requires general welding, fabrication and automotive mechanic skills. ing should only be done by
CLAYTON OFF ROAD COR-4806011 JEEP GRAND CHEROKEE LONG ARM UPGRADE KIT (1999-2004 WJ) NOTES: This product requires general welding, fabrication and automotive mechanic skills. ing should only be done by
Drag Race Roll Bar (MMRB-6, -7)
") 3430 Sacramento Dr., Unit D San Luis Obispo, CA 93401 Telephone: 805/544-8748 Fax: 805/544-8645 www.maximummotorsports.com 1994-04 Drag Race Roll Bar (MMRB-6, -7) The Maximum Motorsports 6-point Drag Race
3430 Sacramento Dr., Unit D San Luis Obispo, CA 93401 Telephone: 805/544-8748 Fax: 805/544-8645 www.maximummotorsports.com 1994-04 Drag Race Roll Bar (MMRB-6, -7) The Maximum Motorsports 6-point Drag Race
COLD AIR INTAKE INSTALLATION INSTRUCTIONS
 COLD AIR INTAKE INSTALLATION INSTRUCTIONS # D760-0030 Fits: 2007-10 135i (E82, E88; with N54 engine) 2007-08 335i/xi (E90) 2007-10 335i (E92, E93; with N54 engine) Congratulations for being selective enough
INSTRUCTION G-Comp Unser Edition Rear Suspension: Chevy Nova. Kit Contents:
 INSTRUCTION 350-400 G-Comp Unser Edition Rear Suspension: 62-67 Chevy Nova Speedway Motors, Inc. 2017 Kit Contents: 350003.1 G-Comp Chassis Brace 350003.2 G-Comp Front Support 350400.1 Chevy II Unser Rear
INSTALLATION GUIDE PREMIUM FRONT BUMPER FOR RAM AEV30304AA Last Updated: 09/18/17
 AEV30304AA Last Updated: 09/18/17 PREMIUM FRONT BUMPER FOR RAM 1500 INSTALLATION GUIDE PLEASE READ BEFORE YOU START To guarantee a quality installation, we recommend reading these instructions thoroughly
Detroit Speed, Inc. Mini Tubs Camaro/Firebird P/N:
 Detroit Speed, Inc. Mini Tubs 1967-1969 Camaro/Firebird P/N: 040401 The Detroit Speed Mini-Tubs are inner wheel housings designed to accommodate a wider wheel and tire package. They are engineered for
WIDE RIDE IFS (STOP --- READ ALL THE DIRECTIONS FIRST!)
") WIDE RIDE IFS We are happy to inform you that you have purchased the best I.F.S. kit on the market for you truck. The NO LIMIT WIDE-RIDE I.F.S. is our own design, based on years of truck building experience.
WIDE RIDE IFS We are happy to inform you that you have purchased the best I.F.S. kit on the market for you truck. The NO LIMIT WIDE-RIDE I.F.S. is our own design, based on years of truck building experience.
James Barone Racing Custom Fabrication of Aftermarket Parts and Accessories Mazda 3 and MAZDASPEED 3 Mud Flap Installation Instructions
 James Barone Racing Custom Fabrication of Aftermarket Parts and Accessories 2010+ Mazda 3 and MAZDASPEED 3 Mud Flap Installation Instructions To protect and avoid damage to your new JBR Mud Flaps care
HOT TUBBIN INCREASING WHEELWELL REAL ESTATE WITH A MINI-TUB KIT FROM CHRIS ALSTON S CHASSISWORKS.
 TECH Steven CLICK for Product Info Rupp the Author and Dick Kvamme HOT TUBBIN INCREASING WHEELWELL REAL ESTATE WITH A MINI-TUB KIT FROM CHRIS ALSTON S CHASSISWORKS. Under a classic Chevy, big rear meats
INSTRUCTIONS, (FORD) SUPER DUTY INSTALLATION KIT (C2 PICKUP LIFTGATES)
 SUPER DUTY INSTALLATION KIT (C2 PICKUP LIFTGATES)") LIFT CORPORATION Sht. 1 of 20 DSG# M-14-32 Rev. B Date: 05/31/2017 INSTRUCTIONS, (FORD) SUPER DUTY INSTALLATION KIT (C2 PICKUP LIFTGATES) FORD SUPER DUTY F-250 PICKUP TRUCKS, 1999-2016 FORD SUPER DUTY
LIFT CORPORATION Sht. 1 of 20 DSG# M-14-32 Rev. B Date: 05/31/2017 INSTRUCTIONS, (FORD) SUPER DUTY INSTALLATION KIT (C2 PICKUP LIFTGATES) FORD SUPER DUTY F-250 PICKUP TRUCKS, 1999-2016 FORD SUPER DUTY
R O A D M A S T E R, I N C.
 R O A D M A S T E R, I N C. ROADMASTER, Inc. 6110 NE 127th Ave. Vancouver, WA 98682 12 7 5 6 4 11 9 14 8 10 360-896-0407 fax 360-735-9300 www.roadmasterinc.com 15 13 BREAKAWAY SWITCH MOUNT ITEM QTY NAME
EVO-1050 JK Long Arm Upgrade w/ EVOlever
 EVO-1050 JK Long Arm Upgrade w/ EVOlever Recommended: All Vehicles that spend time on salted roads. It is recommended that removal of both threaded collar and joint on all arms. Apply a small amount of
INSTRUCTIONS, (FORD) SUPER DUTY INSTALLATION KIT (C2 PICKUP LIFTGATES)
 SUPER DUTY INSTALLATION KIT (C2 PICKUP LIFTGATES)") LIFT CORPORATION Sht. 1 of 22 DSG# M-16-32 Rev. - Date: 12/13/16 INSTRUCTIONS, (FORD) SUPER DUTY INSTALLATION KIT (C2 PICKUP LIFTGATES) FORD SUPER DUTY F-250, F-350 & F-450 PICKUP TRUCKS, 2017 MODEL KIT
LIFT CORPORATION Sht. 1 of 22 DSG# M-16-32 Rev. - Date: 12/13/16 INSTRUCTIONS, (FORD) SUPER DUTY INSTALLATION KIT (C2 PICKUP LIFTGATES) FORD SUPER DUTY F-250, F-350 & F-450 PICKUP TRUCKS, 2017 MODEL KIT
Detroit Speed, Inc Chevy II Mini-Tubs P/N:
 Detroit Speed, Inc. 1962-67 Chevy II Mini-Tubs P/N: 040404 The Detroit Speed, Inc. Mini-Tubs are inner wheel housings designed to accommodate wider tire and wheel packages, including tires as wide as 295mm
INSTRUCTIONS FOR STRUT FRONT, 4-LINK REAR, 1 5/8 FRAME, FULL SIZE, 4130 ELIMINATOR CHASSIS
 #917230 Page 1 of 6 7230 INSTRUCTIONS FOR STRUT FRONT, 4-LINK REAR, 1 5/8 FRAME, FULL SIZE, 4130 ELIMINATOR CHASSIS ITEM QTY SIZE/PART NO. TUBE CODE DESCRIPTION 1 2 4350 Cage Side 2 2 4351 Forward strut
Installation Instructions Supertop for Truck
 Installation Instructions Supertop for Truck Vehicle Application: Ford F-150 5.5 Ft. Styleside 2004 and newer Part Number: 76309 www.bestop.com - We re here to help! Visit our web site and click on Ask
2015 Ford F150 Front Bumper w/ LED
 PARTS LIST: 2015 Ford F150 Bumper w/ LED 1 Bumper Assembly 4 8mm Lock Washers 1 Driver/left L Bracket (center LED light) 2 8mm Hex Nuts 1 Passenger/right L Bracket (center LED light) 2 6mm x 20mm Button
INSTRUCTION G-Comp Rear Suspension: Chevy Camaro. Kit Contents:
 INSTRUCTION 350-700 G-Comp Rear Suspension: 70-81 Chevy Camaro Speedway Motors, Inc. 2017 Kit Contents: 350700.1 G-Comp Crossmember & Chassis Brace 350700.2 G-Comp Rear Crossmember Assembly 350700.3 G-Comp
CLICK for More Info Online
 CLICK for More Info Online Exact-Fit Pro-Touring-Style Roll Bars and Cages for Popular GM and Ford Muscle Cars Roll Cage Roll Bar The gstreet Exact-Fit roll cages and roll bars are intended for pro-touring
Installation Instructions Supertop for Truck
 Installation Instructions Supertop for Truck US Patent 6827391 Vehicle Application: Ford F150 1987-1996 (8 ft.) Part Number: 76315 Ford F250 1987-1998 (8 ft.) Part Number: 76315 Ford F350 1987-1998 (8
7260 INSTRUCTIONS FOR ELIMINATOR II STRUT FRONT, 4-LINK REAR, MILD STEEL, FULL SIZE, SERIES CHASSIS
 #917260 Page 1 of 6 7260 INSTRUCTIONS FOR ELIMINATOR II STRUT FRONT, 4-LINK REAR, MILD STEEL, FULL SIZE, SERIES CHASSIS ITEM QTY SIZE/PART NO. TUBE CODE DESCRIPTION 1 2 4139 Cage Side 2 2 4250 Forward
INSTRUCTIONS FOR STRUT FRONT, 4-LINK REAR, ROADSTER CHASSIS
 #917406 Page 1 of 5 7406 INSTRUCTIONS FOR STRUT FRONT, 4-LINK REAR, ROADSTER CHASSIS ITEM QTY SIZE/PART NO. TUBE CODE DESCRIPTION 1 1 4215 Front frame rail strut 1 5/8 (pair) 2 1 4236 Roadster firewall
CHECK ALL PARTS INCLUDED IN THIS KIT TO THE PARTS LIST BEFORE INSTALLATION. IF ANY PIECES ARE MISSING, PLEASE CONTACT: TOTAL COST INVOLVED
 333-TCIE237 1967-1969 Chevy Camaro Front End, 1968-1972 Chevy Nova Front End 1967-1969 Pontiac Firebird Front End Suspension Installation Instructions 1-855-693-1259 www.totalcostinvolved.com CHECK ALL
Installation Instructions Supertop for Truck
 Installation Instructions Supertop for Truck US Patent 6827391 Vehicle Application: Toyota Tacoma Double Cab 2005-2011 (5 ft.) Part Number: 76308 INSTALLATION TIME SKILL LEVEL 1-1/2 Hours 2 - Moderately
Detroit Speed, Inc. Second Generation Camaro/Firebird Mini-Tub Kit Camaro/Firebird P/N: ,
 Detroit Speed, Inc. Second Generation Camaro/Firebird Mini-Tub Kit 1970-1981 Camaro/Firebird P/N: 041222, 041223 The Detroit Speed Second Generation Camaro/Firebird Rear Mini-Tub Kit is designed to accommodate
INSTALLATION INSTRUCTIONS `64 ½ - 70 MUSTANG, HEIDTS IFS, PRO-G GEN II P/N: MTF-201
 INSTALLATION INSTRUCTIONS `64 ½ - 70 MUSTANG, HEIDTS IFS, PRO-G GEN II P/N: MTF-201 Please read these instructions completely Before starting your installation. Assemble suspension on vehicle before powder-coating
Ford Passenger Cars Mustang II Independent Front Suspension Installation Instructions
 1935-1948 Ford Passenger Cars Mustang II Independent Front Suspension Installation Instructions 1-866-925-1101 www.totalcostinvolved.com The installation of the Total Cost Involved's Mustang Independent
Installation Instructions Supertop for Truck
 Installation Instructions Supertop for Truck Vehicle Application: Ford F-150 Regular / Super Cab 2004 2011 (6.5 ft.) Part Number: 76305 US Patent 6827391 www.bestop.com - We re here to help! Visit our
Chevrolet 3100 IFS Kit
 1947-54 Chevrolet 3100 IFS Kit Congratulations on your purchase on what we believe is the finest IFS kit available for 1947-54 Chevrolet pickups with stock frames. We have invested many hours into designing
Detroit Speed, Inc. Rear Coilover Tower Brace Kit Camaro P/N:
 Detroit Speed, Inc. Rear Coilover Tower Brace Kit 2016+ Camaro P/N: 042433 The Detroit Speed, Inc. 2016+ Camaro Rear Coilover Tower Brace Kit is a bolt-in design that increases overall vehicle stiffness.
LPE C5 Battery Relocation Kit
 LPE C5 Battery Relocation Kit The LPE C5 Corvette battery relocation kit improves vehicle weight distribution by moving weight to the rear of the vehicle. The improved weight distribution increases traction
Detroit Speed, Inc. ALUMA-Frame Front Suspension System Ford Mustang P/N:
 Detroit Speed, Inc. ALUMA-Frame Front Suspension System 1964.5-1970 Ford Mustang P/N: 032050 INTRODUCTION All aluminum front suspension system for 1964.5-1970 Mustangs featuring DSE s unique suspension
COLD AIR INTAKE INSTALLATION INSTRUCTIONS
 COLD AIR INTAKE INSTALLATION INSTRUCTIONS # D760-0033 Fits: 2013-15 F01 B7, 750i & xdrive (N63TU engine) 2013-15 F02 B7L, 750Li & xdrive (N63TU engine) PARTS LIST Left and right carbon fiber air box lids
Installation Instructions Supertop for Truck
 Installation Instructions Supertop for Truck Vehicle Application: Toyota Tacoma Double Cab 2005 - Current (5 ft.) Part Number: 76308 US Patent 6827391 www.bestop.com - We re here to help! Visit our web
Master Your Terrain (307)
") Master Your Terrain (307) 775 9565 www.tntcustoms.com Y-Link Extreme Duty Long Arm Coil Conversion Jeep Cherokee Installation Instructions Congratulations for purchasing a TNT, INC. Extreme Duty Y-Link
Master Your Terrain (307) 775 9565 www.tntcustoms.com Y-Link Extreme Duty Long Arm Coil Conversion Jeep Cherokee Installation Instructions Congratulations for purchasing a TNT, INC. Extreme Duty Y-Link
Standard Duty Oil Filter Relocation Kit (OC-3)
") 3430 Sacramento Dr., Unit D San Luis Obispo, CA 93401 Telephone: 805/544-8748 Fax: 805/544-8645 www.maximummotorsports.com Standard Duty Oil Filter Relocation Kit (OC-3) Read all of the instructions before
3430 Sacramento Dr., Unit D San Luis Obispo, CA 93401 Telephone: 805/544-8748 Fax: 805/544-8645 www.maximummotorsports.com Standard Duty Oil Filter Relocation Kit (OC-3) Read all of the instructions before
Pickup Truck Rack. Installation instructions for Ford - Chevy - Ram
 Installation instructions for Pickup Truck Rack Ford - Chevy - Ram MyGlassTruck.com 200 Acorn Road LOCAL 856-595-9069 WEB www.myglasstruck.com Glassboro, NJ 08028 FAX 856-863-1480 1-844-364-4022 Version
Bolt-On Front VariShock Air-Spring Conversion
 A Chris Alston s Chassisworks, Inc. Brand CLICK for More Info Online Bolt-On Front VariShock Air-Spring Conversion for Chevy II and Early Mustang & Ford/Mercury GM Applications Chevy II Nova 62-67 Ford/Mercury
67 [ ] OR [ ] REAR BRACKETS BARS Shocks Includes: Includes: Includes: Includes:
![67 [ ] OR [ ] REAR BRACKETS BARS Shocks Includes: Includes: Includes: Includes:](/thumbs/76/73590788.jpg "67 [ ] OR [ ] REAR BRACKETS BARS Shocks Includes: Includes: Includes: Includes:") 1967-1969 Firebird Mini Tub 4-Link Install Instructions 1-866-925-1101 www.totalcostinvolved.com CHECK ALL PARTS INCLUDED IN THIS KIT TO THE PARTS LIST BEFORE INSTALLATING OF THE KIT. IF ANY PIECES ARE
1967-1969 Firebird Mini Tub 4-Link Install Instructions 1-866-925-1101 www.totalcostinvolved.com CHECK ALL PARTS INCLUDED IN THIS KIT TO THE PARTS LIST BEFORE INSTALLATING OF THE KIT. IF ANY PIECES ARE
2011 Cadillac CTS Coupe EGX Exhaust Tip & Rear Valance Mesh Accent Kit Part #: Complete E
 BILLET GRILLS IMPORTANT: PLEASE KEEP THIS INSTRUCTION MANUAL FOR FUTURE REFERENCE! 2011 Cadillac CTS Coupe EGX Exhaust Tip & Rear Valance Mesh Accent Kit Part #: Complete 5122-1900-11E TOOLS REQUIRED Automotive
Installation Instructions Supertop for Truck
 Installation Instructions Supertop for Truck US Patent 6827391 Vehicle Application: Dodge Ram 1500 / 2500 Regular / Quad / Mega Cab 6.5' Bed 2002 2011 Part Number: 76304 www.bestop.com - We re here to