Stand the FBT upright wheels on your side. 1. Push wheels apart with knees.
|
|
|
- Ashley Griffin
- 5 years ago
- Views:
Transcription


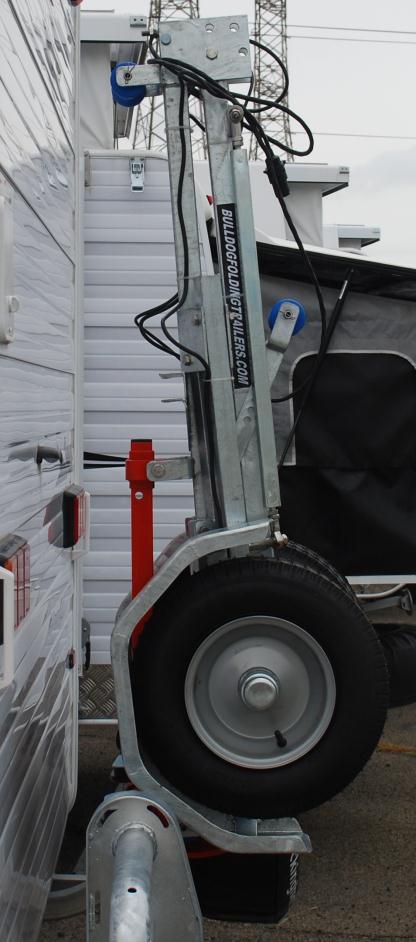
1 Operation Manual Version 8. Please make sure BEFORE you use your trailer you have read this entire booklet and have conducted the pre delivery check list found in the plastic pocket with this Operation Manual. The Pre delivery checklist ensures the trailer is ready to be used. Stand the FBT upright wheels on your side. 1. Push wheels apart with knees. 2. Grab the drawbar and walk backwards lowering the trailer onto the ground.


2 3. Install the removable cross bar and connect with bolts. The removable cross bar needs to be inserted on its side with the number plate bracket facing upwards. Push to half way on a 45 degree angle then twist 90 degrees. Removable crossbar. 4. Connect vertical struts to removable crossbar. 5. Place pin in to lock drawbar if required. A boat can be loaded using the brake back feature of the trailer. Once the boat is on the trailer it must be secured tightly at the bow which will lock the position of the drawbar, therefore the locking pin is not required. 6. Place the inner sleeve in the end of the drawbar and fasten with pins and R clips


3 7. Connect the other end of the drawbar and fasten with pins and R clips. As seen below: 8. Attach to tow bar of car, attach safety chain and attach light socket to car. The lights on the trailer already include the number plate light. It can be seen on the left hand side light on its right hand side as seen below.


4 Caravan Bracket / carrier How to attach to the caravan. 1. Bolt bracket to rear bar of caravan. (Bolts are not included with the bracket) 2. Remove the second roller from the back of the trailer. 3. Place the base of the trailer on the base plate of the carrier. Lift the trailer up until the holes in the roller bracket are aligned. Then screw bolts into the hole to secure trailer.

5


 1 x rail, 1 x Bracket")

")


6 Kayak / Canoe accessory rail and bracket: In order to set up the trailer to carry kayak s and or canoes, you will need the kayak / Canoe Accessory rail and bracket with the nuts and bolts. (See to the left) 1 x rail, 1 x Bracket 1 x packet of nuts and bolts to attach the bracket. 1) Attach the bracket to the front drawbar of the trailer as seen here: 2) Slide the rail through the bracket and secure with bolts. 3) Once secure, you can place the carry cradles onto the rails front and back of the trailer or place the kayak s and canoes directly onto the two rails. The carry cradles seen below right ARE NOT INCLUDED and are sold SEPERATELY. There are many different styles of kayak carry accessories. (Not purchased from Bulldog)


7 Inflatable Boat Accessory kit - Installation: In order to carry your inflatable boat on the Bulldog, you will need to purchase the Inflatable Boat Accessory kit as shown here: (This accessory can be purchased from Bulldog Folding Trailers) Replace the side skid hull supports with the inflatable boat pontoon roller supports as shown above. Once secure, you can winch the inflatable up onto the trailer.

8 Bulldog FBT Maintenance and Commissioning It is imperative that the FBT is looked after and maintained to ensure longevity and safe workings of your trailer. This will always ensure hassle free use of your trailer and continuation of the warranty to its full extent. 1. Always check the nuts and bolts of the trailer before use to ensure they are all tightened correctly. This is especially important for the 2 bolts that connect the removable cross member and wheel guards. WHEEL and Draw Bar alignment: Using a tape measure check that the wheels are square with the trailer. This can also be seen when the trailer is folded as the wheels move in alignment with the trailer at all times. Check left and right alignments. 3. If there is some misalignment then loosen the bolt at the rear of wheel assembly at the outside end of the rear swing arm (As illustrated below). This will allow for the wheels to be towed in or out. It is very important that the wheels are within 1-2mm from the measurement of the front of the tyre to the main frame and the back of the tyre to the main frame. The closer the alignment the less wear you will get on your tyres. It is better to have the wheels slightly towed in at the front than out at the back. Once inline retighten the bolt firmly. slotted holes
9 bolts IMPORTANT: - If the alignment is not true or EXACT you will have excessive wear of the tyres 3. Then fold the trailer up, stand and push the wheels in hard against the trailer frame. Then twist the tie rods simultaneously in the direction that pulls the drawbar into the trailer until the drawbar has a tight spring feeling. Not too tight just enough so that when you move the trailer the hitch does not drag on the ground. Then lock off tie rod lock nuts. Note the drawbar should be roughly in line with the rear frame. Please see photos over the page.


10 Wheels pushed hard in Tyre rod Lock nut Twist tyre rod
 are sufficiently greased at all times. 5. Tyres should be inflated to the recommended inflation pressure to avoid excessive wear.")

11 Firm drawbar Lock nut 4. Always check the bearings before embarking on long trips. The bearings are set 14 bearings and can be purchased from any trailer retailer. Ensure that the wheel bearings (set 14) are sufficiently greased at all times. 5. Tyres should be inflated to the recommended inflation pressure to avoid excessive wear. Recommended pressure with average load 40PSI. If using trailer to maximum capacity inflate to 50PSI. 6. Make sure your trailer is weighted correctly with approximately 20kg of weight on your tow ball. If you have negative weight on your tow ball you will have severe sway in the trailer. PARTS for the Bulldog Trailer: Parts, such as nuts and bolts and pins etc for the Bulldog Trailers can be generally purchased from any trailer retailer including Bunnings. The bearings are set 14 and can also be purchased from trailer retailers across Australia. Bulldog Trailers can also sell these to you direct. If you require further information please contact your retailer or go to the Bulldog Folding Trailers website.
All trailers will come pre assembled You will have the Naked frame (No accessories) attached. See drawing of trailer below.
 attached. See drawing of trailer below.") Operation Manual Version 9 Please make sure BEFORE you use the trailer you have read this entire booklet and have conducted the pre delivery check list found in the plastic pocket with this Operation Manual.
Operation Manual Version 9 Please make sure BEFORE you use the trailer you have read this entire booklet and have conducted the pre delivery check list found in the plastic pocket with this Operation Manual.
USA G-103 Twin Astir
 USA G-103 Procedures for safe assembly and dis-assembly of the glider (Trailers 2 and 3) Grob Glider Rigging Tools Required: Needle nosed pliers Wire cutters (side cut) Very large crescent wrench (for
What are the Different Hitch Classes?
 What are the Different Hitch Classes? Class I Class II Class III Class IV Class V Class I hitches are weight carrying (WC) hitches rated up to 2000 lbs. gross trailer weight (GTW) with a maximum trailer
QUICK START GUIDE for: VERTEX SWING AWAY 9031XT
 QUICK STRT GUIDE for: VERTEX SWING WY 9031XT DO - ttach swing arm and upright assembly as shown (STEP 1). - Install in receiver and bolt with washer and lock washer (STEP 3). - Load heaviest bike first-
ADJUSTING THE GANG ANGLE
 ADJUSTING THE GANG ANGLE 1. Raise the machine until the discs are clear of the ground. 2. Set the diverter valve ( Fig. 1) to the angle position 3. Remove the appropriate angling pin (Fig 2 ) and replace
Installation Instructions Table of Contents
 Installation Instructions Table of Contents Pre- Installation of Garage Storage Lift 2 Layout the Garage Storage Lift 3 Installing the strut Channels 3 Install the Drive Assembly 5 Install the Drive Shaft
Installation Guide. Stowe Cargo Management System. Table of Contents
 Installation Guide Stowe Cargo Management System Table of Contents 1. Pre-Installation (Page 2) a. Notes, Installation Kit contents & Tools needed 2. How to Install the Stowe Cargo Management System (Pages
Your G3 buggy is fitted with three switches on the front part of the body:
 CONTENTS Buggy operation... 3 General Maintenance... 5 Technical Maintenance... 6 Front wheel bearing replacement... 6 Rear wheel bearing replacement... 7 Chain replacement... 8 Chain Adjustment... 9 Brake
SUT-450-I ASSEMBLY REQUIREMENTS
 SUT-450-I Torque wrench, carpenters square, wire cutters, Phillips screwdriver, 7/16, 9/16, and 3/4 combination wrenches, ratchet, 9/16,3/4,13/16, and 7/8 sockets. ASSEMBLY REQUIREMENTS *Torque all T-bolt
The Right Angle of the Latch to the Snare. Adjusting the Latch relative to the Snare
 Page 1 Applies to product version - 2018 File: Installation-25 Jan Before you start here you should have looked at the Before You Install details. This is designed to help you with the vast range of trailers,
Remove the rear tire and the (8) 13mm bolts holding the tire carrier to the tailgate. Remove the 3rd brake light wiring harness.
 13mm bolts holding the tire carrier to the tailgate. Remove the 3rd brake light wiring harness.") J108781 2 4 Rear Bumper & Tire Carrier & Optional Flood Lights Jeep Wrangler JK (2007-2017) Tools Required: Basic Hand Tools 35mm Socket Tape Measure Grease Gun Straight Edge Remove the rear tire and the
J108781 2 4 Rear Bumper & Tire Carrier & Optional Flood Lights Jeep Wrangler JK (2007-2017) Tools Required: Basic Hand Tools 35mm Socket Tape Measure Grease Gun Straight Edge Remove the rear tire and the
Rhino-Rack Kayak T-Load 2 Hitch Mount (RTL002)
") Important: Please read these instructions carefully prior to installation. Please refer to your fitting instruction to ensure that the roof racks are installed in the correct locations. Check the contents
Important: Please read these instructions carefully prior to installation. Please refer to your fitting instruction to ensure that the roof racks are installed in the correct locations. Check the contents
The Right Angle of the Latch to the Snare. Adjusting the Latch relative to the Snare
 Page 1 Applies to product version - 2018 File: Installation-18 Sept Before you start here you should have looked at the Before You Install details. This is designed to help you with the vast range of trailers,
3 Axles and brakes. 3.1 Function and construction of the axles Construction Function
 3 Axles and brakes 3.1 Function and construction of the axles 3.1.1 Function Each wheel has an independent suspension system in the axle body (1), so that individual wheel suspension is provided. The swinging
Engo 10,000lb. 12 Volt Electric Winch Install
 Engo 10,000lb. 12 Volt Electric Winch Install Note: This installation was completed on a 2016 JK with Rough Country Modular Winch Plate Bumper. A bumper with winch mount, or a winch plate is required for
1 M-3000-H4 F150 4X4 Lowering Kit
 READ INSTRUCTIONS COMPLETELY THROUGH BEFORE STARTING. IT IS RECOMMENDED THAT INSTALLATION BE DONE BY A QUALIFIED MECHANIC. REPLACE ALL STOCK PARTS THAT ARE DAMAGED OR WORN. ALWAYS WEAR EYE PROTECTION.
INSTALLATION INSTRUCTIONS FOR DSP9600/9100 WHEEL BALANCER
 Form 5063T, 06-05 Supersedes Form 5063T, 02-04 INSTALLATION INSTRUCTIONS FOR DSP9600/9100 WHEEL BALANCER This document provides the information needed to install the DSP9600/9100 Wheel Balancer. NOTE:
TRAILER PARTS DISTRIBUTOR. part #D20110 PLASTIC FENDER Dimensions WxLxH 7.08 x x Price $5.60 PO # Zip CSC. Billing Zip
 TRAILER PARTS DISTRIBUTOR part #D20100 Dimensions WxLxH 6.30 x 21.65 x 6.89 part #D20110 Dimensions WxLxH 7.08 x 24.01 x 9.64 part #D20112 Dimensions WxLxH 7.48 x 25.98 x 11.81 Multiple pre-drilled mounting
PART NUMBER: E361SAJ400
 A KIT CONTENTS: Do not use this product with hitch extenders. PIVOT BOLT (1X) PIVOT WASHER (2X) PIVOT NUT (1X) HITCH BOLT (1X) LOCK WASHER (1X) WASHER(1X) SAFETY CLIP (1X) STRAP (6X) BASE (1X) LOCKING
Application chart / Tableau Des Doses D application Tabla De Aplication / Tabella di Applicazione / Quadro de Aplicaco
 Particular Guide-line for : 10 Inch Rims 13 Inch Rims Boat trailers, Horse Box trailers, 145/70 10 150 175/60 13 250 Utility Trailers & Towing caravans 145/80 10 150 185/60 13 250 6 200 155/60 10 150 195/60
Operator s and Assembly Manual. RACKandROLL 66 Trailer RACKandROLL 78 Trailer
 2008-09 Operator s and Assembly Manual RACKandROLL 66 Trailer RACKandROLL 78 Trailer Operator s and Assembly Manual Keep this Operator s Manual in your glove box. This manual is also a guide for assembling
Installation instructions
 Installation instructions warning: never exceed your vehicle manufacturer's recommended towing capacity BOLT-TOGETHER WEIGHT DISTRIBUTION MAINTENANCE Keep the socket-mounted ends of the spring bars and
Stowe Cargo Management System
 Installation Guide Stowe Cargo Management System Table of Contents 1. Pre-Installation (Page 2) a. Notes, Installation Kit contents & Tools needed 2. How to Install the Stowe Cargo Management System (Pages
Rhino-Rack Kayak T-Load Tow Ball Mount (RTL001)
") CONTROLLED Rhino-Rack Kayak T-Load Tow Ball Mount (RTL001) Important: Please read these instructions carefully prior to installation. Please refer to your fi tting instruction to ensure that the roof racks
CONTROLLED Rhino-Rack Kayak T-Load Tow Ball Mount (RTL001) Important: Please read these instructions carefully prior to installation. Please refer to your fi tting instruction to ensure that the roof racks
DRAG-A-BOX BRAND MATERIAL SPREADERS
 DRAG-A-BOX BRAND MATERIAL SPREADERS MODEL CE 7-12 PARTS MANUAL BY J. PYOTT & ASSOCIATES 1 This is the PARTS MANUAL. In this manual you will find pictures and descriptions of the standard parts used to
PARTS INCLUDED. part description part number qty. 2 B base rail endcap C plastic wedge/shim /6
 SR Base Rails PARTS INLUDED H I F G D A B E part description part number qty. A base rail (left & right) 2 B base rail endcap 854-2536-001 4 plastic wedge/shim 852-7645-001 4/6 D rubber expansion block
SPRING MAX. TONGUE MAX. GROSS TRAILER BAR WEIGHT(LB) WEIGHT (LB)
 WEIGHT (LB)") INSTALLATION / OPERATION INSTRUCTIONS WEIGHT DISTRIBUTING HITCH SYSTEMS 7901, 7902, 7903, 7979 (DUAL SWAY CONTROL ATTACHMENT) 7901=600LB WDH KIT, 7902=800LB WDH KIT, 7903=1200LB WDH KIT, 7979=HEAD KIT
INSTALLATION / OPERATION INSTRUCTIONS WEIGHT DISTRIBUTING HITCH SYSTEMS 7901, 7902, 7903, 7979 (DUAL SWAY CONTROL ATTACHMENT) 7901=600LB WDH KIT, 7902=800LB WDH KIT, 7903=1200LB WDH KIT, 7979=HEAD KIT
Australia s best value ebikes
 IMPORTANT NOTICE Read manual, Instructions and Terms carefully before use. It is the buyer s responsibility to make sure the drift trike is safe to ride. If necessary ask for help at any good local bicycle
CHUTE TRAILER PRODUCT MANUAL arrowquip.com
 CHUTE TRAILER PRODUCT MANUAL 1-877-275-6075 cs@arrowquip.com arrowquip.com CONTENTS General Description of the Chute Trailer 1 Safety Precautions 1 Risk Assessment 2 Operating the Chute Trailer 3 Trailer
ShowBoat 66. For Factory racks: Check fitlist. notes, for your vehicle s crossbar spread. CROSSBAR SPREAD
 For Factory racks: Check fitlist notes, for your vehicle s crossbar spread. ShowBoat 66 Support Bar (2x) ROLLER (1x) END CAP (4x) END CAP (2x) STOP COLLAR (1x) TORX WRENCH (1x) Tape Measure (1x) Front
LoD Offroad. Jeep JK Rear Bumper with Tire Carrier Installation Instructions
 LoD Offroad Jeep JK Rear Bumper with Tire Carrier Installation Instructions Please read through the instructions before beginning any part of the installation process. Packaging List: 1-Rear Bumper 1-Tire
2014 F /6 LIFT KIT
 92157500 2014 F-150 4 /6 LIFT KIT THANK YOU FOR CHOOSING ROUGH COUNTRY FOR YOUR SUSPENSION NEEDS. Rough Country recommends a certified technician install this system. In addition to these instructions,
USA Trailer #1. Trailer Towing Tips And Quick Reference
 USA Trailer #1 Trailer Towing Tips And Quick Reference Trailer #1 Loading and Unloading THIS TRAILER IS UNUSABLE FOR THE TWIN ASTIR This trailer loads and unloads over the trailer tongue. There is no rear
Utah Soaring Association Rigging and De-Rigging. USA G-103 Twin II. Procedures for safe assembly and dis-assembly of the glider. (Trailers 1, 2 and 3)
") USA G-103 Procedures for safe assembly and dis-assembly of the glider (Trailers 1, 2 and 3) Grob Glider Rigging Tools Required: Large blade standard screwdriver #2 (medium blade) Phillips screwdriver (if
USA G-103 Procedures for safe assembly and dis-assembly of the glider (Trailers 1, 2 and 3) Grob Glider Rigging Tools Required: Large blade standard screwdriver #2 (medium blade) Phillips screwdriver (if
INSTALLATION INSTRUCTIONS
 INSTALLATION INSTRUCTIONS WARNING: NEVER EXCEED YOUR VEHICLE MANUFACTURER'S RECOMMENDED TOWING CAPACITY PIN-STYLE TRUNNION BAR WEIGHT DISTRIBUTION KIT MAINTENANCE Keep the socket-mounted ends of the spring
SCION tc LOWERING SPRINGS Preparation
 Preparation Part Number: PTR11-21100 PTR11-21100-50 Kit Contents Item # Quantity Reqd. Description 1 2 Front Spring 2 2 Rear Spring 3 2 Locking Nut 4 2 Spring Bumper, Front 5 1 Instruction Form Hardware
SUT-250-S (These instructions are used for SUT-250-SCLC also)
") SUT-250-S (These instructions are used for SUT-250-SCLC also) Torque wrench, carpenters square, wire cutters, Phillips screwdriver, 7/16, 9/16, and 3/4 combination wrenches, ratchet, 9/16, 3/4, 13/16,
SUT-250-S (These instructions are used for SUT-250-SCLC also) Torque wrench, carpenters square, wire cutters, Phillips screwdriver, 7/16, 9/16, and 3/4 combination wrenches, ratchet, 9/16, 3/4, 13/16,
MAINTENANCE WEIGHT RATINGS WARNINGS. warning: never exceed your vehicle manufacturer's recommended towing capacity
 Installation instructions warning: never exceed your vehicle manufacturer's recommended towing capacity Round Bar WEIGHT DISTRIBUTION MAINTENANCE Keep the socket-mounted ends of the spring bars and the
JL SHIELD TIRE CARRIER INSTALLATION INSTRUCTIONS
 JL SHIELD TIRE CARRIER INSTALLATION INSTRUCTIONS TOOLS NEEDED 3/4 Wrench 3/4 Socket 9/16 Wrench or Socket 1 1/2 Socket 1 1/8 Wrench 13mm Socket Torque Wrench for 1 1/2 Socket HARDWARE 2-1/2 X 2 Hex Bolt
LoD Offroad. Jeep JK Door Linked Rear Bumper with Tire Carrier Installation Instructions
 LoD Offroad Jeep JK Door Linked Rear Bumper with Tire Carrier Installation Instructions Please read through the instructions before beginning any part of the installation process. Packaging List: 1-Rear
AEV30308AA Last Updated: 05/31/18. 4 DUALSPORT sc SUSPENSION system for RAM 1500 air ride standard and rebel INSTALLATION GUIDE
 AEV30308AA Last Updated: 05/31/18 4 DUALSPORT sc SUSPENSION system for RAM 1500 air ride standard and rebel INSTALLATION GUIDE PLEASE READ BEFORE YOU START TO GUARANTEE A QUALITY INSTALLATION, WE RECOMMEND
SCION xb LOWERING SPRINGS Preparation
 Preparation Part Number: PTR07-52080 Kit Contents Item # Quantity Reqd. Description 1 2 Front Springs 2 2 Rear Springs 3 1 Instruction Form Hardware Bag Contents Item # Quantity Reqd. Description 1 2 3
INSTALLATION INSTRUCTIONS
 INSTALLATION INSTRUCTIONS Accessory Application Publications No. 2003 ELEMENT AII 24318 Issue Date DEC 2002 PARTS LIST Trailer Hitch Kit P/N 08L92-SCV-100 4 Bolts, 12 x 35 mm Trailer hitch U-bolt 2 Nuts,
2015 Ford F150 Rear Bumper w/ LED
 2015 Ford F150 Bumper w/ LED T527990 T527991 PARTS LIST: 1 Bumper Assembly 4 12mm Lock Washers 2 Mounting Brackets 6 12 mm Nylon Lock Nuts 4 Sensor Hole Plugs 8 4mm x 10mm Button Head Bolts 2 Plastic Plugs
Slave Cylinder Weep Hole Drilling Procedure
 Slave Cylinder Weep Hole Drilling Procedure Tools Required: T20 Torx Driver T25 Torx Driver T25 Torx Bit with ¼ Ratchet Wrench 4mm Hex Key (Allen wrench) 5mm Hex Key 6mm Hex Key 8mm Hex Key 12mm Hex Key
Haul-Your-Might T3. Product Name: Product Code: Please read all instructions carefully before assembly, installation and/or use of this product.
 WARNING: DO NOT exceed 800 lbs. (363 Kgs) WARNING: DO NOT exceed vehicle manufacturer s weight rating. Tools Required: 17mm Socket 5mm Hex Key 1/8 Hex Key Tape Measure 17mm Wrench 13mm Socket Hack Saw
Trailer Sale. Kayak Lift & Launch Storage Racks Aluminum Paddlesport Trailers Rowing Docks Commercial & Residential Launch Systems
 800-870-6756 www.thedockdoctors.com/paddle-products Kayak Lift & Launch Storage Racks Aluminum Paddlesport Trailers Rowing Docks Commercial & Residential Launch Systems Trailer Sale Storage Racks: for
ProPass-200 Top Dresser
 Setup Manual Form No. 3365-184 Rev A ProPass-200 Top Dresser Model No. 44700-Serial No. 310000001 and Up Model No. 44701-Serial No. 310000001 and Up Model No. 44704 Model No. 44705 Model No. 44706 Model
*1553BAG3* F-150 2WD 4 /5 /6 LIFT KIT 1553BAG3
 *1553BAG3* 1553BAG3 921553220 2015-16 F-150 2WD 4 /5 /6 LIFT KIT THANK YOU FOR CHOOSING ROUGH COUNTRY FOR YOUR SUSPENSION NEEDS. Rough Country recommends a certified technician install this system. In
MAINTENANCE WEIGHT RATINGS WARNINGS. warning: never exceed your vehicle manufacturer's recommended towing capacity
 Installation instructions warning: never exceed your vehicle manufacturer's recommended towing capacity Round Bar WEIGHT DISTRIBUTION kit MAINTENANCE Keep the socket-mounted ends of the spring bars and
Wheelchair Trailer Lift Operations & Parts Manual Maintenance Schedule
 Wheelchair Trailer Lift Operations & Parts Manual Maintenance Schedule Keith Consolidated Industries www.kcigse.com 541-830-8678 1718 Antelope Rd. White City, OR 97502 Table of Contents Overview 2 Operations
Directions for use VIBRO FLEX 7400
 Directions for use VIBRO FLEX 7400 Contents Introduction... 3 Identification... 3 Explanation of symbols... 4 Safety... 5 General safety advice... 5 Coupling and uncoupling... 5 Three-point hitch or linkage...
KJ JEEP COMBINATION BULL BAR WARNING
 KJ JEEP COMBINATION BULL BAR PRODUCT NUMBER FITTING KIT NUMBER 3450120 6171962 WARNING FOR VEHICLES EQUIPPED WITH SRS AIRBAG WHEN INSTALLED IN ACCORDANCE WITH THESE INSTRUCTIONS, THE FRONT PROTECTION BAR
Important Information
 Important: Please read these instructions carefully prior to installation. Please refer to your fitting instruction to ensure that the roof racks are installed in the correct locations. Check the contents
BPW height-adjustable drawbars
 Maintenance instructions ZAV BPW BERGISCHE ACHSEN BPW height-adjustable drawbars Series ZAV REPAIR, MAINTENANCE AND OPERATING INSTRUCTIONS Maintenance and Operating Instructions ZAV Table of contents:
09-13 FORD F150 4 LIFT KIT
 92159900 09-13 FORD F150 4 LIFT KIT THANK YOU FOR CHOOSING ROUGH COUNTRY FOR YOUR SUSPENSION NEEDS. Rough Country recommends a certified technician install this system. In addition to these instructions,
2015 F /5 /6 LIFT KIT
 92155700 2015 F-150 4 /5 /6 LIFT KIT THANK YOU FOR CHOOSING ROUGH COUNTRY FOR YOUR SUSPENSION NEEDS. Rough Country recommends a certified technician install this system. In addition to these instructions,
Towing and Road Service Procedures for the 2002 BMW Mini Cooper and Mini Cooper S
 Towing and Road Service Procedures for the 2002 BMW Mini Cooper and Mini Cooper S Towing Refer to all information and precautions found in the General Information section of the AAA/CAA Towing and Service
07 & UP GM 1500 PICKUP 2.0 FRONT 1.0 REAR LEVELING KIT INSTALLATION
 INSTRUCTION PART NO 15265 LEVELING KIT NO 3813 07 & UP GM 1500 PICKUP 2.0 FRONT 1.0 REAR LEVELING KIT INSTALLATION READ INSTRUCTIONS/WARNINGS COMPLETELY THROUGH BEFORE STARTING. FAILURE TO ADHERE TO THE
2014 F /6 LIFT KIT
 92157500 2014 F-150 4 /6 LIFT KIT THANK YOU FOR CHOOSING ROUGH COUNTRY FOR YOUR SUSPENSION NEEDS. Rough Country recommends a certified technician install this system. In addition to these instructions,
CARRY BIKE 200UL UNIVERSAL
 63 CARRY BIKE PRO C2 CARRY BIKE 200UL UNIVERSAL DELUXE BUNK LADDERS Compact design which can be installed under window. 2 bike standard with capacity for up to 4 bikes with installation of additional rails.
Parts List ILLUSTRATION #1
 Installation Instructions BR20 Rear Bumper Replacement Part Number 28171T 2014-2016 Chevrolet Silverado 1500 2/4WD Do not attempt to install this product on any vehicle other than the one listed above!
DWHOIST. Drywall Hoist Assembly & Operating Instructions
 DWHOIST Drywall Hoist Assembly & Operating Instructions READ ALL INSTRUCTIONS AND WARNINGS BEFORE USING THIS PRODUCT. SAVE THESE INSTRUCTIONS FOR FUTURE REFERENCE. This manual provides important information
SECTION V ASSEMBLY CAUTION THE FOLLOWING SAFETY PRECAUTIONS SHOULD BE THOROUGHLY UNDERSTOOD BEFORE ATTEMPTING MACHINE ASSEMBLY.
 SECTION V ASSEMBLY CAUTION THE FOLLOWING SAFETY PRECAUTIONS SHOULD BE THOROUGHLY UNDERSTOOD BEFORE ATTEMPTING MACHINE ASSEMBLY. 1. Wear personal protective equipment such as, but not limited to protection
CRUISEMASTER XT COIL - INDEPENDENT SUSPENSION SYSTEMS
 VEHICLE COMPONENTS PTY LTD A.B.N. 44 010 033 762 352b Bilsen Rd Geebung QLD 4034 PO Box 14 VIRGINIA BC QLD 4014 Accounts: 07 3624 3810 Fax 07 3624 3888 accounts@ Sales: 07 3624 3800 Fax 07 3624 3888 sales@
Installation Instructions
 Equipment Required: Wrenches: 9/16, 3/4, 1-1/8 Drill Bits: 11/32 Torque Wrench capable of reading 260 ft-lbs. Installation Instructions IN DEALERS: Please give these instructions to your customer. Do Not
Turning Point Pin Box. by Trailair OWNER'S MANUAL
 Turning Point Pin Box by Trailair OWNER'S MANUAL TABLE OF CONTENTS Product and Safety Information 2 Preparation 3 Tow Rating Weights Check 3 Cab and Bed Clearance Check 3 Operation 3 Conventional Transport
Repair Manual 11/99 PS-34. Page 1
 Repair Manual /99 PS-4 Page Table of contents Index Technical Data page Special tools 4 Repair instructions, general 0 Chain brake 6 0 Centrifugal clutch 8 0 Oil pump 9-04 Ignition system - 0 Starting
07-UP AVALANCHE 7.5 KIT
 92120900R1 07-UP AVALANCHE 7.5 KIT Thank you for choosing Rough Country for your suspension needs. We appreciate your business!! This kit will not fit vehicles equipped with electric steering or trucks
BOAT TRAILER PARTS SECTION I
 SECTON BOAT TRALER PARTS nformation Boat Guides Pipe Lights Boat Guide Light Bracket Bow Guides Bunkboard Guide On s Short Bunkboard GuideOn s Carpeted Bunk Boards Roller GuidesOn s Bunk Wrap Modular Bunk
Pilatus B-4 Procedures for safe assembly and dis-assembly of the glider
 Pilatus B-4 Procedures for safe assembly and dis-assembly of the glider (Trailer 6) Pilatus B-4 Procedures for safely removing the various components from the trailer, and for assembly of the glider Initial
Installation Notes: #86000-R Race Series +3.5 L/T Kit
 159 North Maple St. Unit J, CORONA CA 92880 P. 951-737-9682 F. 951-737-9006 WWW.CHAOSFAB.COM Installation Notes: #86000-R Race Series +3.5 L/T Kit Factory manual is recommended for removal and re-installation
Approximate installation time: 2 hrs. REV. DATE: 3/17/2016 Page 1 of 7
 Installation Instructions BR20 Rear Bumper Replacement Part Number 28169T 2011-2014 Chevrolet Silverado 2500HD & 3500HD 2/4WD Do not attempt to install this product on any vehicle other than the one listed
270PK SERVICE GUIDELINES
 270 Coupling THE FIRST NAME IN QUALITY COUPLINGS 270PK SERVICE GUIDELINES BEFORE GETTING STARTED: This procedure should only be performed by a qualified mechanic. Measure the wear on the coupling s pintle
Installation Instructions
 Equipment Required: Fastener Kit: F Wrenches: 3/4, 15/16 Drill Bits: 1/4 Other Tools: Drill Installation Instructions Short & Long Bed All Megacabs 9464/9474 HIDE-A-GOOSE HITCH INSTALLATION WARNING: Under
A1062 & A1072 AUGER ASSEMBLY MANUAL. Read & understand all instructions pertaining to this auger prior to use!
 A1062 & A1072 AUGER ASSEMBLY MANUAL Read & understand all instructions pertaining to this auger prior to use! Safety Alert Watch for this ALERT Symbol. It identifies potential hazards to Personal SAFETY
Part # GM G Body Air Suspension System
 350 S. St. Charles St. Jasper, In. 47546 Ph. 812.482.2932 Fax 812.634.6632 www.ridetech.com Part # 11320298 78-88 GM G Body Air Suspension System Front Components: 1 11323001 HQ Series Front Shockwaves
580RK SERVICE GUIDELINES For coupling models: 580 & 580J
 580 Coupling THE FIRST NAME IN QUALITY COUPLINGS 580RK SERVICE GUIDELINES For coupling models: 580 & 580J BEFORE GETTING STARTED: This procedure should only be performed by a qualified mechanic. Measure
09-12 Dodge 4WD Leveling Kit
 9235900 09-12 Dodge 4WD 1500 2.5 Leveling Kit Thank you for choosing Rough Country for all your suspension needs. DOES NOT FIT TRX PACKAGE VEHICLES!! Rough Country recommends a certified technician install
1 Cable harness for trailer hitch 3 Supporting plate, detachable ball neck 4 Bolts 12 Detachable ball neck 12a Mount X52 Trailer hitch connector
 an3110p8080aa Page 1 of 3 Retrofit trailer hitch AN31.10- P- 8080AA Retrofit trailer hitch 5.11.99 MODEL 163.113 /136 / 154 /172 #A as of 145273, 163.113 / 136 /154 / 172 #X as of 708319, 163.128 / 175
TOYOTA PRIUS PLUS LOWERING SPRINGS Preparation
 Preparation Part Number: PTR07-47100 Kit Contents Item # Quantity Reqd. Description 1 2 Front Spring 2 2 Rear Spring 3 2 Nut 4 1 Instructions Hardware Bag Contents Item # Quantity Reqd. Description 1 2
*1274BAG9* 1274BAG GM 4-6 SUSPENSION KIT N2.0. Thank you for choosing Rough Country for your suspension needs A
 92127400A 88-98 GM 4-6 SUSPENSION KIT N2.0 Thank you for choosing Rough Country for your suspension needs. *1274BAG9* 1274BAG9 Rough Country recommends a certified technician installs this system. In addition
TRAILER CATALOGUE 2016 /17
 TRAILER CATALOGUE 2016 /17 NIPPER SERIES Suitable for a wide range of aluminium, inflatable, fiberglass and kayaks, built strong to get you and your boat to the ramp and back safy 4M NIPPER-13SL 13 3.9M
RANGER WD/4WD KIT PACKING SLIP
 RANGER +2.5 2WD/4WD KIT PACKING SLIP DYNAMICS Thank you for puchasing our long travel kit. We pride ourselves on designing and fabricating our parts in our shop located in Las Vegas, Nevada. If you have
Baxley Trailer Company 3300 E. Cottonwood Rd. Dothan, Al (334) Fax (334)
 Fax (334)") Baxley Trailer Company 3300 E. Cottonwood Rd. Dothan, Al. 36301 (334) 794-2393 Fax (334) 671-1351 www.baxleycompanies.com Patents #5,988,402 #6,520,521 Patents Pending....... SB-001 Motorcycle Trailer
Baxley Trailer Company 3300 E. Cottonwood Rd. Dothan, Al. 36301 (334) 794-2393 Fax (334) 671-1351 www.baxleycompanies.com Patents #5,988,402 #6,520,521 Patents Pending....... SB-001 Motorcycle Trailer
SECTION steering mechanism
 07-302.01/ 1 2011MR17 SECTION 07-302.01 GENERAL Description See Figure 1. The includes the steering wheel (1), the steering column, the miter box (3), the steering shafts (2 and 4), and the drag link (7).
VR482 Hay Rake OPERATOR & PARTS MANUAL. Last Updated: May 12, 2014
 VR482 Hay Rake OPERATOR & PARTS MANUAL Last Updated: May 12, 2014 Bridgeview Manufacturing Inc. P.O. Box 4 Gerald, SK S0A 1B0 (306) 745-2711 www.bridgeviewmanufacturing.com bmi@sasktel.net Your Authorized
UNPACK AND IDENTIFY THE FOLLOWING PARTS.
 SUT-250-M2 ASSEMBLY REQUIREMENTS *Torque all T-bolt nuts to 35-40 foot pounds. *Check all lights before towing. *Tire pressure not to exceed recommendation on serial tag. *Re-torque wheel nuts after first
Parts List ILLUSTRATION #1
 Installation Instructions BR20 Rear Bumper Replacement Part Number 28295T 2015-2016 Ford F-150 2/4WD Do not attempt to install this product on any vehicle other than the one listed above! Parts List Item
09-UP FORD F150 6 LIFT KIT
 92159800 09-UP FORD F150 6 LIFT KIT THANK YOU FOR CHOOSING ROUGH COUNTRY FOR YOUR SUSPENSION NEEDS. Rough Country recommends a certified technician install this system. In addition to these instructions,
PRODUCT MANUAL Gecko Wireless One Zone LED Dimmer and Receiver
 Product Description The Gecko Wireless One Zone Wall LED Dimmer has been designed to bring light control easily. No wires or switch box locations are needed, just stick or mount the Gecko to any flat location
Owner's Manual. Entire contents of manual must be read by owner
 Owner's Manual Entire contents of manual must be read by owner CAUTION This dolly will not accommodate all vehicles. The size and shape of any particular vehicle, its wheel height and the position of fender
Fullsize Van & Sprinter Lowtop
 IEA INSTRUCTION MANUAL H3 SERIES ALUMINUM + Endcap Fullsize Van & Sprinter Lowtop 2002-06 z Required Tools 1/2 Wrench Power Tool with Phillips head PART # DESCRIPTION 1Bar 2 BAR 3 BAR 4bar ITEMs (not drawn
Installation Instructions BR20 Rear Bumper Replacement Part # 28178T Toyo ta Tundra 2/4WD
 Installation Instructions BR20 Rear Bumper Replacement Part # 28178T 2014-2016 Toyo ta Tundra 2/4WD Excludes Models with B lind Spot Monitoring & Cross Traffic Alert Parts List Item Qty. Part # Description
09-UP F150 2WD 6 LIFT KIT
 92157300 09-UP F150 2WD 6 LIFT KIT THANK YOU FOR CHOOSING ROUGH COUNTRY FOR YOUR SUSPENSION NEEDS. Rough Country recommends a certified technician install this system. In addition to these instructions,
EN washer 12mm id 24mm od 9. EN washer 8 mm id 16 mm od 12. EN lockwasher 12mm id 1. EN hex head bolt 12 x 40 mm 2. EN backbone screw 1
 T CLASSIC 9046 IKE ADD-ON FOR (" HITCH) = North American English PARTS INCLUDED A C D E N F G H I J M O K L part description qty. A lock plug 4 washer 1mm id 4mm od 9 C washer 8 mm id 16 mm od 1 D lockwasher
Parts List. Item Qty. Part # Description Item Qty. Description Torque
 Installation Instructions BR20 Rear Bumper Replacement Part Number 28171T Chevrolet Silverado 1500 2/4WD Parts List Item Qty. Part # Description Item Qty. Description Torque 1 1 28171T0AA Bumper Replacement
TONNEAU INSTALLATION GUIDE
 TONNEAU INSTALLATION GUIDE Warranty, Care & Maintenance Model 1080 GMC Sierra Ext/Crew Cab 5.7' Short Bed 2007-Current EASY AS 1-2-3! NORMAL INSTALLATION TIME 30 MINUTES For Warranty Issues, Contact UnderCover
Spare Tire Access Guide (2) Plastic Plugs for License Plate on Trailer Plug Bracket Trailer Plug Bracket
 Plastic Plugs for License Plate on Trailer Plug Bracket Trailer Plug Bracket") LDB-CSIL55-RB PARTS LIST: 1 LD1 Bumper Assembly 12 14mm x 28mm OD x 2.5mm Flat Washers 1 Driver/left Frame Bracket 6 14mm Nylon Lock Nuts 1 Passenger/right Frame Bracket 4 12-1.75mm x 35mm Hex Bolts 1
LDB-CSIL55-RB PARTS LIST: 1 LD1 Bumper Assembly 12 14mm x 28mm OD x 2.5mm Flat Washers 1 Driver/left Frame Bracket 6 14mm Nylon Lock Nuts 1 Passenger/right Frame Bracket 4 12-1.75mm x 35mm Hex Bolts 1
Single Seat Trailer. Owner s manual and safety instructions
 Single Seat Trailer Owner s manual and safety instructions Owner s Manual Every effort has been made to ensure your trailer is of top quality and proven safe design, ready to provide you with many years