Rotary Folding Hoists. Owner s Manual
|
|
|
- Justin Watkins
- 5 years ago
- Views:
Transcription


1 Rotary Folding Hoists Owner s Manual
2 Introduction Congratulations Congratulations on the purchase of your new Hills Rotary Hoist, which will bring you many years of trouble free and efficient outdoor drying. It is important that you read this owner s manual thoroughly before installation and use. In this way you will benefit from all of the design features and enjoy safe use of the product. Carton Contents Part name Qty. Main standard 1 Head assembly 1 Ground socket with cover 1 Line retaining strap 1 Plastic spacers 3 Thank you for choosing Hills. Warning Do not allow children or pets to swing on the Rotary Hoist or items of laundry. Do not use for any purpose other than to hang and dry washing. Do not use your Rotary Hoist if parts are worn or damaged. Patents and registered designs apply to this product. 2
3 Installation Site Selection Fig mm (2 ) Select a suitable area for installation. Allow a minimum of 600mm (2 ) clearance around your Rotary Hoist (Fig. 1). 4m (13 ) Rotary m (14 9 ) Rotary 450 Install the Ground Socket 5m (16 6 ) Rotary Dig a hole 250mm (10 ) diameter by approximately 650mm (26 ) deep (Fig. 2). 600mm (2 ) 2. Place approximately 200mm (8 ) of coarse gravel into the hole. 3. Insert the main standard into the ground socket. Engage the locking collar and lock into position. Fig. 2 Make sure the tabs are closed to prevent concrete entering the locking recess. 4. Place the ground socket and main standard into the hole. Check for level Push the base of the ground socket into the gravel. Check level vertically. The top of the ground socket must sit approximately 6-12mm (1/4-1/2 ) above ground level. Main standard 5. Support the main standard and concrete into position. Concrete should be damp enough to hold together when squeezed in your hand. Settle concrete by pushing a thin stick into the mix several times. Leave the main standard in the ground socket until the concrete has set. Keep concrete out of the locking recess in the ground socket. 6. Allow 24 hours for the concrete to set before final assembly and use of your Rotary Hoist. Locking collar Engage into ground socket. Rotate to lock. Ground socket 250mm (10 ) Close tabs to prevent entry of concrete Top of socket approximately 6-12mm (1/4-1/2 ) above ground level 450mm (18 ) concrete 200mm (8 ) gravel 650mm (26 ) 3
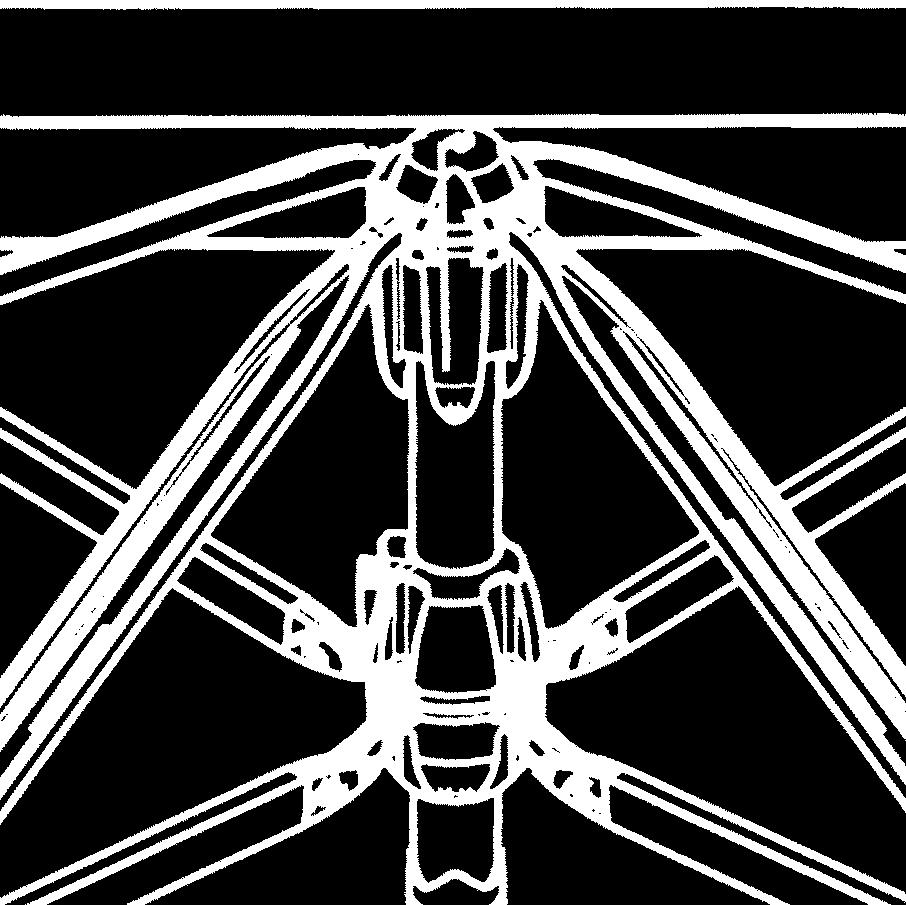
4 Assembly Assemble the Hoist 1. Remove the plastic sleeve from the head assembly. 2. Place the main standard in the ground socket. 3. Place the bottom of the head assembly into the top of the main standard and lower it gently until it stops (Fig. 3). 4. To engage, raise the head assembly by approximately 100mm (4 ) and lower until a click is heard. 5. Check the head assembly is locked in position by lifting upwards (it should not move). If the head assembly is not engaged, repeat Step 4. Note: there is a small amount of rotational movement between the wind brake and the lower cross latch. This is normal. Fig. 3 Head assembly Lower cross Wind brake Plastic sleeve Latch Insert head assembly Main standard Engage by raising and lowering until a click is heard Ground level 4
 (Fig. 4).")


5 Operation Operating the Hoist 1. To adjust the height of your Rotary Hoist, wind the handle and head assembly down and then fit one or more of the plastic spacers in the ground socket. The suggested operating height is the user s head height +25mm (1 ) (Fig. 4). Note: The height adjusting winding mechanism has an automatic device to disengage the handle at the maximum and minimum heights. A slight clicking noise will be heard when this system is operating. 2. To Open: Remove the line retaining strap. Make sure the lines are tangle free. Push the lower cross and arms up until the latch engages. 3. To Fold: 1. Release the lower cross assembly by gently lifting an arm up to relieve the lock (Fig. 5). 2. Pull down the latch gently to release 3. Lower the arm and cross assembly until closed (Fig. 5a) 4. Wrap the line retaining strap around the hoist to prevent lines from becoming tangled. 5. To Remove from the ground socket: Unlock the locking collar by rotating anti-clockwise. Lift the Rotary Hoist from the ground socket and store in a suitable place. Insert the cover into the top of the ground socket. Fig. 4 Fig Users head height +25mm (1 ) Locking collar Spacers Cover Fig. 5a Ground level Ground socket 5

.")
6 Line Tensioning Tensioning the Lines The lines are pre-tensioned in the factory. No initial tensioning is required. If over time, the line does need tensioning, the Rotary Hoist must be in the open position. With the Rotary Hoist open, follow the tensioning instructions below. Note: A video describing this operation can be viewed on the Hills website at Step 1 Step 2 Remove the line cover by rotating anti-clockwise. Step 3 Unthread the line from the tensioner, pull the line through tensioner until desired tension is reached (do not over tension). Step 4 Loop the line around the rear groove of the tensioner and pull tight to prevent line from slipping. Feed the line up and through the front slot of the tensioner and pull tight. Step 5 Step 6 12mm (1/2 ) Using scissors carefully trim off excess line, leaving approximately 12mm (1/2 ). Re-attach the line cover by rotating clockwise. This will obscure the small piece of excess line remaining. 6

7 Rotary Plus Packs Rotary Plus Packs Rotary Plus Packs are available, which include additional items to enhance the functionality of your Hoist. Additional items included in the Plus Pack are: An umbrella socket adaptor pack A handy storage case for adaptors Wall storage brackets A rain bag for the hoist A set of 20 Hills Smart PegsTM (additional packs of 20 or 50 are available from your retailer) Refer to the back page for a list of your nearest contacts. 7
8 Handy Hints Hills Handy Hints One of the benefits of a Rotary Hoist is that it spins naturally in the breeze, allowing the sun to shine on all your clothes and speed up drying time. Raise your hoist for maximum drying efficiency and to ensure clearance for longer items. Place smaller items of clothing on the lines nearest the centre and work your way outwards for larger items. When hanging thick or bulky items, you may hang the item over more than one line. When you do not expect to fill the capacity of your hoist, hang your clothes on the outer lines, this will allow your clothesline to spin more easily. Care and Maintenance It is a good idea to occasionally inspect all components and check for wear and tear or damage. If there is any damage, parts should be replaced with original Hills spares or the Hoist repaired before using again. The hoist should be periodically wiped clean with a damp cloth and mild detergent. The hoist should be easy to remove from the ground, but if left for a period of many years it may become more difficult. It is recommended the hoist is lifted out of the ground at least every six months. 8
9 Guarantee and Contact Details Hills Guarantee Hills Industries Limited undertakes that if any part of its manufacture has failed to operate correctly due to faulty workmanship or defective material, it will repair or replace the part free of cost for a period of TEN (10) years from date of purchase of the article, given fair wear and tear. The PVC line and the Rotary Hoist Plus components (rain bag, Smart PegsTM, brackets, adaptors and case) are also guaranteed for a period of ONE (1) year. Evidence of unfair usage or incorrect adjustment by the owner will void this promise. Hills Industries Limited will not be responsible for any costs in connection with freight or postage, or for expenditure necessary to dismantle the article, replace the part in position and re assemble the article. This guarantee is in addition to any legal rights or remedies conferred on the consumer. Hills Industries Limited does not recommend the application of a canopy on any of their outdoor dryer range. Unless any addition or attachment to this product has Hills specific approval or is sold as a Hills product the warranty on this product is waived. The product is designed to perform a specific task under established test loads and unauthorised attachments may produce stresses for which the design is not appropriate. Designs, specifications and colours are subject to change without notice. Please retain this Owner s Manual. Record the following information from the carton for future reference. Product Number: Date of purchase: Name and location of store: Hills Contacts As a proudly Australian company we are committed to provide you with complete customer satisfaction. If you have questions about this product or find there are missing or damaged parts please contact your nearest Consumer Advice Centre during their local business hours. Australia info@hills.com.au New Zealand sales@hills.co.nz United States of America (Eastern) gsutterlin@verizon.net Canada (Eastern) hillscanada@hills.com.au South Africa info@hillssolar.co.za or visit Made in China 9
10 Hills Industries Limited A.B.N Issue November 2008 PD1079c
Traditional Rotary 42 Hoist. Owner s Manual
 Traditional Rotary 42 Hoist Owner s Manual Introduction Congratulations Congratulations on the purchase of your new Hills Traditional Rotary Hoist, which will bring you many years of trouble free and efficient
Rotary Folding Hoists
 Rotary Folding Hoists Owner s Manual To suit models: Rotary 400TM Rotary 450TM Rotary 500TM Rotary 400TM Plus Rotary 450TM Plus Rotary 500TM Plus Unpacking Introductionthe Hoist Congratulations Congratulations
the heavy duty knapsack sprayer product manual 16 litre model
 the heavy duty knapsack sprayer product manual 16 litre model 2 Introduction Safety Instructions 3 Warning This sprayer is designed for use with liquid chemicals used for gardening, horticulture, agriculture,
Clotheslines April 2011
 Clotheslines April 2011 Clotheslines Premium Range Folding Rotary Hoists 1 Folding Frame Clotheslines 2 Retracting Clotheslines 4 Portable Clotheslines 5 Everyday Range Folding Rotary Hoists 6 Folding
Tri-Wheel Wheeled Walker
 Tri-Wheel Wheeled Walker Handle with lever brake Brake cable Handle height adjustment knob Removable basket and tray Large vinyl bag 8 inch (203 mm) wheels user guide Prior to use please read all instructions.
Euro Lightweight Wheeled Walker
 Euro Lightweight Wheeled Walker Handle with lever brake Backrest Brake cable Handle height adjustment button Removable shopping bag 8 inch (200 mm) wheels Cane holder user guide Prior to use please read
Mighty Mack Wheeled Walker
 Mighty Mack Wheeled Walker Handle with lever brake Backrest Handle height adjustment knob Brake cable Extra wide padded seat Shopping basket Side brace 7 inch (180 mm) wheels user guide Prior to use please
Replay Fabric Replacement Top
 Replay Fabric Replacement Top Installation Instructions For: GEO Tracker, Suzuki Sidekick Part Number: 51137 & Vitara 1986-1994 WARNING This product is designed to enhance the appearance of the vehicle
Petite Wheeled Walker
 Petite Wheeled Walker Handle with lever brake Brake cable Handle height adjustment knob Backrest Padded seat with concealed pouch Bag with shopping basket inside Side brace 6 inch (150 mm) wheels user
Replace - A - Top Installation Instructions
 Replace - A - Top Installation Instructions For: Suzuki Samurai Part Number: 51361 Congratulations on your purchasing decision. Bestop designed this Convertible Top to give you years of dependability and
All Terrain Wheeled Walker
 All Terrain Wheeled Walker Handle with lever brake Brake cable Handle height adjustment knob Backrest Padded seat with concealed pouch Side brace Bag with shopping basket inside 8 inch (200 mm) all terrain
Handling Belts. ARTG No: LM53072 LM53073
 Handling Belts ARTG No: 179502 LM53072 LM53073 Thank you for purchasing this Handling Belt. It is strongly recommended that you read through this user manual prior to using your Handling Belt for the first
IMPORTANT! KEEP INSTRUCTIONS FOR FUTURE REFERENCE.
 T1838 IMPORTANT! KEEP INSTRUCTIONS FOR FUTURE REFERENCE. www.fisher-price.com.au Consumer Information WARNING Prevent serious injury or death from falls or sliding out: Always use the restraint system
ASSIST & TRANSIT. osd USER MANUAL TABLE OF CONTENTS
 osd ASSIST & TRANSIT USER MANUAL TABLE OF CONTENTS 1. Key Specifications 2. List of Components 3. Assembly & Use 4. Troubleshooting 5. Care & Maintenance 6. Warnings 7. Warranty 8. Compliance. Service
BX4330 Acclaim Tow Bar Operator Manual & Installation Instructions
 Operator Manual & Installation Instructions Serial Number (5,000 lb) 2 Inch Coupler 292-2205 Rev J Page 1 of 7 4/23/13 DO NOT INSTALL, OPERATE OR USE THIS EQUIPMENT UNTIL THE FOLLOWING OPERATING AND SAFETY
ALPHA Tow Bar (6,500 lb) 2 Inch Receiver
 2 Inch Receiver") Operator Manual & Serial Number ALPHA Tow Bar (6,500 lb) 2 Inch Receiver 405-0154 Rev C Page 1 of 7 7/29/13 DO NOT INSTALL, OPERATE OR USE THIS EQUIPMENT UNTIL THE FOLLOWING OPERATING AND SAFETY INSTRUCTIONS
Operator Manual & Serial Number ALPHA Tow Bar (6,500 lb) 2 Inch Receiver 405-0154 Rev C Page 1 of 7 7/29/13 DO NOT INSTALL, OPERATE OR USE THIS EQUIPMENT UNTIL THE FOLLOWING OPERATING AND SAFETY INSTRUCTIONS
For: Model Year Jeep Wrangler/TJ Part Number: For: Model Year Jeep Wrangler/TJ Part Number: 58709
 TJ Tinted Window Kit Installation Instructions TM For: 1997-2002 Model Year Jeep Wrangler/TJ Part Number: 58609 For: 2003-2004 Model Year Jeep Wrangler/TJ Part Number: 58709 www.bestop.com Inc. DO NOT
Push Down Wheeled Walker
 Push Down Wheeled Walker Push down hand grip Handle height adjustment knob Backrest Padded seat with concealed pouch Side brace Bag with shopping basket inside Push down brake stopper 6 inch (150 mm) wheels
Installation Instructions For: Suzuki Samurai, All Years Part Number: TM
 Installation Instructions For: Suzuki Samurai, All Years Part Number: 51761 TM Patent Pending WARNING This product is designed to enhance the appearance of the vehicle and to shield the occupants from
EXTRA WIDE STEEL ROLLATOR
 EXTRA WIDE STEEL ROLLATOR Product Codes: LM3882WBL Blue LM3882WBU Burgundy Extra Wide steel Rollator liquid coated painted frame. Soft touch hand brakes with locking mechanism. PVC extra wide seat. 8"
Tri-Wheeled Walkers. User Guide with Fixing and Maintenance Instructions
 Tri-Wheeled Walkers VP174SS Blue Tri Walker with Bag VP174RS Red Tri Walker with Bag VP174SS/N Blue Tri Walker No Bag VP174RS/N Red Tri Walker No Bag Basket available to buy separately VP103 User Guide
Stop! Read This Important Information.
 Stop! Read This Important Information. Stop, Do Not Proceed, Read This This door replacement kit is designed for the replacement of doors on a Supertop ONLY! This door will not work on any other style
Ipai Car Seat. Installation & User manual
 Ipai Car Seat Installation & User manual IMPORTANT CONSUMER INFORMATION NOTICE: This manual contains important instructions that must be passed on to the user of this product. Please do not remove this
BX4330 Acclaim Tow Bar Operator Manual & Installation Instructions
 Operator Manual & Installation Instructions (5,000 lb) 2 Inch Coupler General Information DO NOT INSTALL, OPERATE OR USE THIS EQUIPMENT UNTIL THE FOLLOWING OPERATING AND SAFETY INSTRUCTIONS HAVE BEEN READ
Fabric Replacement Top Installation Instructions
 Fabric Replacement Top Installation Instructions For: GEO Tracker, Suzuki Sidekick & Vitara 1986-1994 Parts List Top, Soft (1) Rear Window (1) WARNING This product is designed to enhance the appearance
Transit Wheelchair. user guide. Profiled grip attendant handles. Padded seat and backrest. Lift up, padded armrests. Park brakes
 Transit Wheelchair Profiled grip attendant handles Padded seat and backrest Lift up, padded armrests Park brakes Pneumatic 12 (305 mm) rear wheels Solid 7 (180 mm) front wheels Detachable, swing away footrests
HAPPY TRAILS NO-ZIP PET STROLLER
 For The ON-THE-GO Pet INSTRUCTION MANUAL HAPPY TRAILS NO-ZIP PET STROLLER PG8100NZ Interior Dimensions: 24.5"L x 12"W x 21"H To see our full line of products, visit us online at: www.petgearinc.com CUSTOMER
D40C HINGE # x Support Plate x M8 Bolt 8 x M8 Washer 6 x M6 20mm Bolts 6 x M6 Washers 19 x Screws
 HINGE # 1017 2 x Support Plate 1018 8 x M8 Bolt 8 x M8 Washer 6 x M6 20mm Bolts 6 x M6 Washers 19 x Screws 2 x Lid mount gas strut bracket 1041 2 x Self tap strut mount 1040 1 x Central Lock bracket 1510
Compact Solar Charger. Model Number ACSC-116 INSTRUCTION MANUAL
 Compact Solar Charger Model Number ACSC-116 INSTRUCTION MANUAL AUS 1300 886 649 Model: ACSC-116 Product Code: 45276 03/2016 Welcome Congratulations on choosing to buy a Bauhn product. All products brought
Compact Solar Charger. Model Number ACSC-114 INSTRUCTION MANUAL
 Compact Solar Charger Model Number ACSC-114 INSTRUCTION MANUAL AUS 1300 886 649 Model: ACSC-114 Product Code: 45276 03/2015 Welcome Congratulations on choosing to buy a Bauhn product. All products brought
ASSIST & TRANSIT. osd USER MANUAL TABLE OF CONTENTS
 osd ASSIST & TRANSIT USER MANUAL TABLE OF CONTENTS 1. Key Specifications 2. List of Components 3. Assembly & Use 4. Troubleshooting 5. Care & Maintenance 6. Warnings 7. Warranty 8. Compliance 9. Service
Full Top Deck Kit. Installation Instructions
 Full Top Deck Kit For: De fe nde r 90 1997 Model Year Installation Instructions Pa rt Num be r: 71741AM WARNING Installation Tips This product is designed primarily to enhance the appearance of the vehicle
OWNER S MANUAL Kellen Gross Dr., Yankton SD Phone: TRUXEDO ( ) Fax: (605) Web Site:
 Fax: (605) Web Site:") Owner s & Installation Manual READ INSTRUCTIONS - Failure to assemble cover properly will void warranty. OWNER S MANUAL Damaged or missing parts? Call 1-877-878-9336 Mon - Fri 8 am - 5 pm CT Parts will
Owner s & Installation Manual READ INSTRUCTIONS - Failure to assemble cover properly will void warranty. OWNER S MANUAL Damaged or missing parts? Call 1-877-878-9336 Mon - Fri 8 am - 5 pm CT Parts will
2 Piece Soft Door Installation Instructions
 2 Piece Soft Door Installation Instructions For: Wrangler/TJ (1997-on) Part Number: 51789 Note: Use of this product will eliminate the factory side mirrors and requires the removal of the entry light bulbs.
Installation Manual TWM Performance Short Shifter Cobalt SS/SC, SS/TC, HHR SS, Ion Redline and Saab 9-3
 Page 1 Installation Manual TWM Performance Short Shifter Cobalt SS/SC, SS/TC, HHR SS, Ion Redline and Saab 9-3 Please Note: It is preferable to park on a flat surface, as you will have to engage and disengage
4-in-1 Fold n Go Trike
 LIMITED WARRANTY The Little Tikes Company makes fun, high quality toys. We warrant to the original purchaser that this product is free of defects in materials or workmanship for one year* from the date
Aluminium 4-Wheeled Rollator/ Occassional Transport Chair VP184 Range Usage and Maintenance Instructions
 Aluminium 4-Wheeled Rollator/ Occassional Transport Chair VP184 Range Usage and Maintenance Instructions This file is available to view and download as a PDF at www.aidapt.co.uk. Sight impaired customers
Healthy Care High Chair
 Healthy Care High Chair Product features and decoration may vary from the photo above. Model Number: 79638, 79639, 79640, 79641, B2875 Please keep this instruction sheet for future reference, as it contains
QUICKIE 5 R Quick Guide. IMPORTANT! Read all Warnings and Instructions contained in the complete Owner s Manual prior to using this product.
 QUICKIE 5 R Quick Guide IMPORTANT! Read all Warnings and Instructions contained in the complete Owner s Manual prior to using this product. Backrest Upholstery Back Canes Tire Seat Sling Handrim Angle-Adjustable
Supertop Replacement Top with Tinted Side and Rear Windows Installation Instructions
 Supertop Replacement Top with Tinted Side and Rear Windows Installation Instructions TM Inc. For: Wrangler TJ 1997 2002 Part Number: 55629 Does Not Include Hardware This product is only designed for the
Do not dispose of packaging until the shades are operating to your satisfaction.
 for purchasing from smith+noble. Your new shade has been custom-crafted to your exact window dimensions from the highest quality materials. Once in your windows, they will provide you with a lifetime of
BX7460P Allure Tow Bar Operator Manual & Installation Instructions. ALLURE Tow Bar (10,000 lb) Pintle Coupler
 Pintle Coupler") Operator Manual & Installation Instructions ALLURE Tow Bar (10,000 lb) Pintle Coupler Hooking Up to Towed Vehicle 1. Position the towing vehicle on a level surface with a straight driveway ahead and engage
Operator Manual & Installation Instructions ALLURE Tow Bar (10,000 lb) Pintle Coupler Hooking Up to Towed Vehicle 1. Position the towing vehicle on a level surface with a straight driveway ahead and engage
INSTALLATION & OWNER S MANUAL
 Rev. B, p. 1 of 25 INSTALLATION & OWNER S MANUAL POLARIS RANGER RCS (for models XP or HD) (for model years 2009-) cab without doors kit (p/n 1POLRCWD) cab with doors kit (p/n 1POLRC) doors only kit (p/n
Installation Instructions TJ Tinted Window Kit
 Installation Instructions TJ Tinted Window Kit Vehicle Application: Jeep Wrangler TJ 1997 2006 Part Number: 58709 www.bestop.com - We re here to help! Visit our web site and click on Ask a Question. Click
(H) TOUR VANTAGE STROLLER ASSEMBLY INSTRUCTIONS ADULT ASSEMBLY REQUIRED. Styles and colors may vary
 TOUR VANTAGE STROLLER ASSEMBLY INSTRUCTIONS ADULT ASSEMBLY REQUIRED. Styles and colors may vary") TOUR VANTAGE STROLLER ASSEMBLY INSTRUCTIONS ADULT ASSEMBLY REQUIRED Styles and colors may vary IMPORTANT: Read all instructions before assembly and use of the stroller Keep the instructions for future
TOUR VANTAGE STROLLER ASSEMBLY INSTRUCTIONS ADULT ASSEMBLY REQUIRED Styles and colors may vary IMPORTANT: Read all instructions before assembly and use of the stroller Keep the instructions for future
BX7445 Aventa LX Tow Bar Operator Manual & Installation Instructions
 Please visit www.blueox.com for the latest version of these installation instructions. BX7445 Operator Manual & Installation Instructions Serial Number (10,000 lb) 2 Inch Receiver 292-2938 Rev D Page 1
Owners & Installation Manual
 Owners & Installation Manual Read Instructions - Failure to assemble cover properly will void warranty. Damaged or missing parts? Call 1-855-427-4568 Mon - Fri 8 am - 5 pm CT Parts will be shipped to you
International Scout Traveler Installation Instructions
 International Scout Traveler Installation Instructions Tools needed: 9/64 drill bit 1/8 drill bit #2 Philips bit for drill Tape measure Pencil Drill #3 Philips Screwdriver #2 Philips Screwdriver Utility
Fabric Replacement Top and Doors with Tinted Side and Rear Curtains Installation Instructions
 Fabric Replacement Top and Doors with Tinted Side and Rear Curtains Installation Instructions For: Wrangler/TJ 1997-2002 Part Number: 51124 www.bestop.com DO NOT INSTALL THIS PRODUCT ON ANY VEHICLE OTHER
Owners & Installation Manual. READ INSTRUCTIONS - Failure to assemble cover properly will void warranty.
 Owners & Installation Manual READ INSTRUCTIONS - Failure to assemble cover properly will void warranty. Damaged or missing parts? Call 1-605-582-7200 Mon - Fri 8 am - 5 pm CT Parts will be shipped to you
Lincoln Hoist. Web Hoist Operating Manual. Lincoln Hoist
 Lincoln Hoist Web Hoist Operating Manual Lincoln Hoist Mfg. by Lincoln Precision Machining Company 121 Creeper Hill Road, P.O. Box 458, North Grafton, MA 01536 USA Toll Free (888) 306-7222 Phone (774)
BX7322 Adventurer Tow Bar Operator Manual & Installation Instructions
 Please visit www.blueox.com for the latest version of these installation instructions. BX7322 Operator Manual & Installation Instructions Serial Number (5,000 lb) 2 Inch Coupler 292-1263 Rev J Page 1 of
C15C C15C. Page 1 of 20
 2 x Lid Front Hinge 1135 8 x M8 Bolt 8 x M8 Washer (3mm Thick) 4 x M6 Large washers 4 x M6 Spring washers 4 x M6 x 40mm Bolts 6 x M6 20mm Bolts 6 x M6 Washers 20 x Screws 2 x Lid mount gas strut bracket
Installation Manual TWM Performance Full replacement short shifter assembly Civic all trims and models
 Installation Manual TWM Performance Full replacement short shifter assembly 2006+ Civic all trims and models Begin the installation by parking on a flat surface, as you will have to engage and disengage
PRODUCT MANUAL. Heavy Duty Shoulder Sprayer 5L & 8L
 PRODUCT MANUAL SUPERIOR PERFORMANCE Heavy Duty Shoulder Sprayer 5L & 8L Contents E A B I H F D C G A. Pump Handle with lance holder B. Safety Valve C. Spray Bottle D. Pump Assembly E. Stainless steel lance
Group 0+ Birth to 13kgs (29lbs) Birth to approximately 9-12 months
 Birth to approximately 9-12 months") Ventura Plus Instructions Group 0+ Birth to 13kgs (29lbs) Birth to approximately 9-12 months IMPORTNT, RETIN FOR FUTURE REFERENCE: RED CREFULLY Keep in the pocket provided on your Ventura Plus VERY IMPORTNT
Ventura Plus Instructions Group 0+ Birth to 13kgs (29lbs) Birth to approximately 9-12 months IMPORTNT, RETIN FOR FUTURE REFERENCE: RED CREFULLY Keep in the pocket provided on your Ventura Plus VERY IMPORTNT
KEEP THIS INSTRUCTION BOOKLET IN THE PLACE PROVIDED ON THE CHILD RESTRAINT
 INSTRUCTIONS FOR USE Model 8JA#####AU NWL0000658116D 11/17 2017 baby jogger IMPORTANT: KEEP THIS INSTRUCTION BOOKLET IN THE PLACE PROVIDED ON THE CHILD RESTRAINT babyjogger.com DO NOT USE THIS CHILD RESTRAINT
Owners & Installation Manual. Read Instructions - Failure to assemble cover properly will void warranty.
 Owners & Installation Manual Read Instructions - Failure to assemble cover properly will void warranty. Damaged or missing parts? Call 1-877-878-9336 Mon - Fri 8 am - 5 pm CT Parts will be shipped to you
BX7322 Adventurer Tow Bar Operator Manual & Installation Instructions
 Please visit www.blueox.com for the latest version of these installation instructions. BX7322 Operator Manual & Installation Instructions Serial Number (5,000 lb) 2 Inch Coupler 292-1263 Rev J Page 1 of
LIGHTWEIGHT TRANSPORT CHAIR ECTR 01 Assembly and Operating Instructions
 LIGHTWEIGHT TRANSPORT CHAIR ECTR 01 Assembly and Operating Instructions Page 1 of 12 INTRODUCTION Thank you for purchasing LIGHTWEIGHT TRANSPORT CHAIR. This model has been designed to help you gain independence
Installation Instructions Supertop with Tinted Side and Rear Windows
 Installation Instructions Supertop with Tinted Side and Rear Windows Vehicle Application: Jeep Wrangler TJ 1997 2006 Part Number: 54709 www.bestop.com - We re here to help! Visit our web site and click
How to fold your MGB top (pre 1970 pack away top & frame)
") How to fold your MGB top (pre 1970 pack away top & frame) It is most important that the instructions given for raising, lowering and folding the hood are followed. Do not use undue force on the hood frame-members.
How to fold your MGB top (pre 1970 pack away top & frame) It is most important that the instructions given for raising, lowering and folding the hood are followed. Do not use undue force on the hood frame-members.
User Manual Ellipse Heavy Duty Rollator
 User Manual Ellipse Heavy Duty Rollator Aluminum Rollator Ellipse-HD Ver.1.0 July 2017 1 Thank you for purchasing the Peak-Care Ellipse Heavy Duty (Ellipse-HD) Rollator. The Walking aid is suitable for
OWNER S MANUAL LIFETIME WARRANTY. Truxedo TonneauTraX
 OWNER S MANUAL Truxedo TonneauTraX Premium Soft Roll-Up cargo rail Tonneau Cover combination LIFETIME WARRANTY TruXedo warrants that all new, unused products are free from defects in material and workmanship.
Instruction Manual UK
 Instruction Manual UK Product: Monterey2 child booster seat Model: 15000 Mfg. by: DIONO Unit D Ventura House Ventura Park Road Tamworth Staffs B78 3LZ UK CUSTOMER SERVICE Tel: 0845.300.9071 Email: dionouk@diono.com
Roller Door Operator
 INSTALLATION INSTRUCTIONS AND OWNERS MANUAL Roller Door Operator IMPORTANT PLEASE READ THESE INSTRUCTIONS CAREFULLY PRIOR TO COMMENCING THE INSTALLATION OF THE OPERATOR UNIT CAUTION This Automatic Opener
Convertible Top Installation Instructions
 Convertible Top Installation Instructions For: 1995-1998 Geo Tracker & Suzuki Sidekick Part Number: 51364 Parts List Top, Soft (1) Window (1) Quater Window, Rt. (1) Quarter Window, Lt. (1) WARNING This
KidWalk KidWalk II Dynamic Mobility System
 OWNER S MANUAL KidWalk KidWalk II Dynamic Mobility System Manufactured By Prime Engineering A Division of Axiom Industries, Inc. Supplier Info 70111KWOM 2 TABLE OF CONTENTS This owner s manual is organized
Installation Instructions Supertop for Truck
 Installation Instructions Supertop for Truck Vehicle Application: Ford F-150 5.5 Ft. Styleside 2004 and newer Part Number: 76309 www.bestop.com - We re here to help! Visit our web site and click on Ask
POWER ASSISTED BICYCLES OWNERS MANUAL
 OWNERS MANUAL Simply explained this is how your e.life bike basically works. Firstly may we congratulate you on purchasing your new electric power assisted e.bike. Please take time to read your manual.
OPERATIONS MANUAL LEVER CHAIN HOIST
 OPERATIONS MANUAL LEVER CHAIN HOIST IMPORTANT SAFETY INFORMATION Please read, understand and follow all safety information contained in these instructions prior to the use of this hoist. Retain these instructions
USER S MANUAL CAUTION. Visit our website at. new products, prizes, fitness tips, and much more!
 Patent Pending Model No. 831.159730 Serial No. The serial number is found in the location shown below. Write the serial number in the space above. USER S MANUAL Serial Number Decal SEARS, ROEBUCK AND CO.
Single Seat Bicycle Trailer
 Single Seat Bicycle Trailer User s Manual This manual contains safety, assembly, use and maintenance instructions. Read these instructions carefully before use and keep them for future reference. Your
Rollstar Shade Installation Instructions
 Rollstar Shade Installation Instructions All Lifting Systems Inside or Outside Mount Thank you for purchasing your new Rollstar shade. It has been custom-made from the highest quality materials to the
FlexJet - Flex Cable Replacement
 P/N: 109515R0 14140 NE 200th St. Woodinville, WA. 98072 PH: (425) 398-8282 FX: (425) 398-8383 FlexJet - Flex Cable Replacement Notices: Warning! Ensure that all AC power cables are removed from the printer
Instruction/Service Manual
 Instruction/Service Manual INDEX MAINTENANCE / SERVICE MANUAL PAGE 1. Foreword 1 2. Important 1 3. Warranty Registration 1 4. Warranty Service Problem 1 5. Warranty Policy 1 6. Warranty Exclusions 2 7.
Installation Instructions
 Roller & Roman Shades Lifting Systems Cassette and Sure-Lift EZ Lift Cordless EZ Pull Standard and Cassette R-Series Clutch SL-Series Clutch Spring Roller Fascias and Valances 3, 4 Flat and 4 Curved Fascia
Basic Steel Rollator with 6" Wheels Knockdown Rolling Walker
 Basic Steel Rollator with 6" Wheels Knockdown Rolling Walker User Instructions & Warranty MDS86850ESKD Latex Free 2 Table of Contents Safety Instructions... 4 Rollator Parts List... 5 Assembly Instructions...
Columbia Car Seat. User Guide. IMPORTANT Please retain this User Guide for future reference. Conforms to ECE R44.03 Universal
 Columbia Car Seat User Guide Conforms to ECE R44.03 Universal IMPORTANT Please retain this User Guide for future reference EXTREME HAZARD: Parents should not under any circumstances use this child restraint
BASIC STEEL ROLLATOR WITH 6" WHEELS KNOCKDOWN ROLLING WALKER
 BASIC STEEL ROLLATOR WITH 6" WHEELS KNOCKDOWN ROLLING WALKER USER INSTRUCTIONS & WARRANTY 100RA Product is not made with natural rubber latex. 2 Revised: 09/20/2016 Table of Contents Safety Instructions...4
OWNER S MANUAL. Sentry & Sentry CT THREE YEAR WARRANTY. Phone: ( ) Fax: (605) SAFETY INSTRUCTIONS
 Fax: (605) SAFETY INSTRUCTIONS") OWNER S MANUAL Sentry & Sentry CT HARD ROLL-UP TRUCK BED COVER SAFETY INSTRUCTIONS 1. Do not place objects on or against cover or framework. 2. Do not tie cargo to truck bed cover framework. 3. Never allow
OWNER S MANUAL Sentry & Sentry CT HARD ROLL-UP TRUCK BED COVER SAFETY INSTRUCTIONS 1. Do not place objects on or against cover or framework. 2. Do not tie cargo to truck bed cover framework. 3. Never allow
Required Tools: Phillips screw driver to remove original soft top. Torx sockets are required to completely remove the original soft top hardware.
 RAMPAGE P R O D U C T S Installation Instructions Part number 1099XX, Frameless Soft Top for 2 door Jeep Wrangler JK 2007- NOTE: Installation of the top in warm weather is optimal for ease of installation.
Installation Operation Care
 Installation Operation Care Alustra Woven Textures Standard and Cassette Roller Shades CONTENTS Getting Started: Product View...1 Tools and Fasteners Needed...2 Installation: Installation Overview...3
BX4325 Aladdin Tow Bar Operator Manual & Installation Instructions. ALADDIN Tow Bar (7,500 lb) 2 Inch Receiver
 2 Inch Receiver") Operator Manual & Installation Instructions ALADDIN Tow Bar (7,500 lb) 2 Inch Receiver General Information 1. Ensure that your product(s) are registered online. It is crucial to register your product(s)
Operator Manual & Installation Instructions ALADDIN Tow Bar (7,500 lb) 2 Inch Receiver General Information 1. Ensure that your product(s) are registered online. It is crucial to register your product(s)
INSTALLATION INSTRUCTIONS
 INSTALLATION INSTRUCTIONS Thank you for purchasing ACCESS Original Roll-Up Cover. Agri-Cover, Inc. proudly manufactured this cover using superior quality materials and workmanship. With proper care, your
Compact Easy Rollator M66739
 User Instructions Compact Easy Rollator M66739 Maximum Safe Working Load 21st 135kg Please ensure these Instructions are fully read and understood before using this equipment. Retain these instructions
Installation Instructions For: GEO Tracker & Suzuki Sidekick ( ) Part Number: 51762
 Part Number: 51762") Installation Instructions For: GEO Tracker & Suzuki Sidekick (1986-1994) Part Number: 51762 TM Patent Pending Congratulations on your purchasing decision. Bestop designed this Convertible Top to provide
Installation Instructions For: GEO Tracker & Suzuki Sidekick (1986-1994) Part Number: 51762 TM Patent Pending Congratulations on your purchasing decision. Bestop designed this Convertible Top to provide
Installation Instructions Sunrider for Hardtop
 Installation Instructions Sunrider for Hardtop Installation Instructions Sunrider for Hardtop Vehicle Application: Jeep Wrangler / Wrangler Unlimited 2007- current Part Number 52450 Installation Tips Before
INSTALLATION INSTRUCTIONS
 INSTALLATION INSTRUCTIONS Thank you for purchasing TONNOSPORT Roll-Up Cover. Agri-Cover, Inc. proudly manufactured this cover using superior quality materials and workmanship. With proper care, your cover
2 Hours. Skill Level. 1 - Easy
 Installation Instructions Window Kit for Trektop NX Twill Vehicle Application: Jeep Wrangler Unlimited (JK) 4 Door 2007 Current Part Number: 58423 Installation Tips Before you begin installing your new
BX7322 Adventurer Tow Bar Operator Manual & Installation Instructions. (5,000 lb) 2 Inch Coupler
 2 Inch Coupler") Operator Manual & Installation Instructions (5,000 lb) 2 Inch Coupler General Information DO NOT INSTALL, OPERATE OR USE THIS EQUIPMENT UNTIL THE FOLLOWING OPERATING AND SAFETY INSTRUCTIONS HAVE BEEN READ
Operator Manual & Installation Instructions (5,000 lb) 2 Inch Coupler General Information DO NOT INSTALL, OPERATE OR USE THIS EQUIPMENT UNTIL THE FOLLOWING OPERATING AND SAFETY INSTRUCTIONS HAVE BEEN READ
VOLKSWAGEN AMAROK 3 PIECE HARD TONNEAU COVER INSTALLATION INSTRUCTIONS
 VOLKSWAGEN AMAROK 3 PIECE HARD TONNEAU COVER INSTALLATION INSTRUCTIONS Care Instructions: Clean Tonneau Cover with a mild detergent and water solution. Do not use abrasive cleaners or solvents. Place these
Installation Instructions Trektop NX Twill
 Installation Instructions Trektop NX Twill Vehicle Application: Jeep Wrangler TJ 1997 2006 Part Number: 56920 www.bestop.com - We re here to help! Visit our web site and click on Ask a Question. Click
Installation Instructions Seat Covers, Front Kit WARNING. Installation Tips. Installation Time. Tools. Skill Level
 Installation Instructions Seat Covers, Front Kit Vehicle Application: Wrangler 2DR, Wrangler Unlimited 2013-2017 Part Number 29283 Installation Tips Read and follow, precisely, all installation instructions
Continuous Cord Loop Designer Series Roller Shades
 Shade Maintenance Leveling a Crooked Shade 1. Pull down shade until roller is exposed. Do not pull further to avoid pulling cloth off roller. 2. Stick a 5" strip of masking tape into the roller at opposite
Fastback Top Installation Instructions and Owner s Manual
 Fastback Top Installation Instructions and Owner s Manual MODEL: Suzuki Samurai 1985-1989 PART NUMBER Congratulations on your purchasing decision. Bestop designed the Convertible Top to give you years
OWNER S MANUAL. Sentry & Sentry CT THREE YEAR WARRANTY. Phone: ( ) Fax: (605) SAFETY INSTRUCTIONS
 Fax: (605) SAFETY INSTRUCTIONS") OWNER S MANUAL Sentry & Sentry CT HARD ROLL-UP TRUCK BED COVER SAFETY INSTRUCTIONS 1. Do not place objects on or against cover or framework. 2. Do not tie cargo to truck bed cover framework. 3. Never allow
OWNER S MANUAL Sentry & Sentry CT HARD ROLL-UP TRUCK BED COVER SAFETY INSTRUCTIONS 1. Do not place objects on or against cover or framework. 2. Do not tie cargo to truck bed cover framework. 3. Never allow
PREMIUM HITCH MOUNT PLATFORM BIKE CARRIER
 model no. 040-96-2 PREMIUM HITCH MOUNT PLTFORM BIKE CRRIER NOTE: Read instructions carefully before installation. Refer to assembly instructions and ensure the bike carrier is installed correctly. Keep
User Manual VERSION 1.1
 User Manual VERSION 1.1 Thank you for purchasing the MGI Quad series motorised buggy. To get the most out of your buggy please follow these quick steps before use. Register your buggy online [section 1.0]
OUTDOOR TABLE TENNIS TABLE ASSEMBLY INSTRUCTIONS
 OUTDOOR TABLE TENNIS TABLE ASSEMBLY INSTRUCTIONS Please Do Not Hesitate to Contact Our Consumer Hotline at 800-759-0977 with Any Questions That May Arise During Assembly or Use of This Product! NG2336P