OIL PUMP (G306709) DISCOVERY 3, ENGINE - TDV6 2.7L DIESEL SPECIAL TOOL(S) Crankshaft Front Seal Remover PUMP - OIL - RENEW
|
|
|
- Allyson Lang
- 5 years ago
- Views:
Transcription


")

1 DISCOVERY 3, ENGINE - TDV6 2.7L DIESEL OIL PUMP (G306709) IN-VEHICLE REPAIR PUMP - OIL - RENEW 2700 CC 4.3 USED WITHINS SPECIAL TOOL(S) Crankshaft Front Seal Remover
2 Crankshaft Front Seal Sleeve Crankshaft Front Seal Installer REMOVAL 1. Disconnect the battery ground cable. For additional information, refer to: Specifications ( Battery and Charging System - General Information, Specifications). 2. Remove the generator. For additional information, refer to: Generator (414-02C Generator and Regulator - TDV6 2.7L Diesel, Removal and Installation). 3.
3 Remove the accessory drive belt tensioner. 4. Remove the generator mounting bracket. 5. Remove and discard the timing belt. For additional information, refer to: Timing Belt Engine - TDV6 2.7L Diesel, In-vehicle Repair). (303-01C 6.
4 Remove the crankshaft pulley. Remove the crankshaft pulley retaining bolt. Discard the bolt. 7. WARNING: Do not work on or under a vehicle supported only by a jack. Always support the vehicle on safety stands. Raise and support the vehicle. 8.
5 9. Release the battery positive cable.
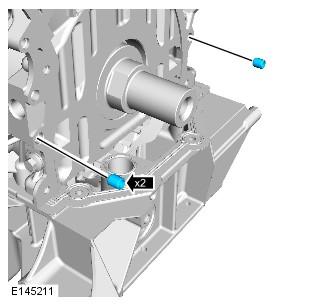
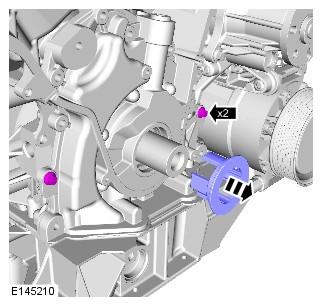
6 10. Remove the oil pump lower retaining bolts.
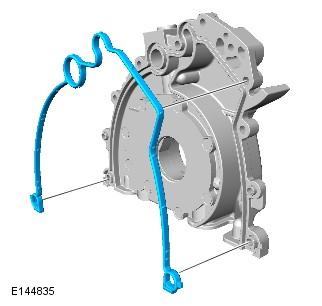
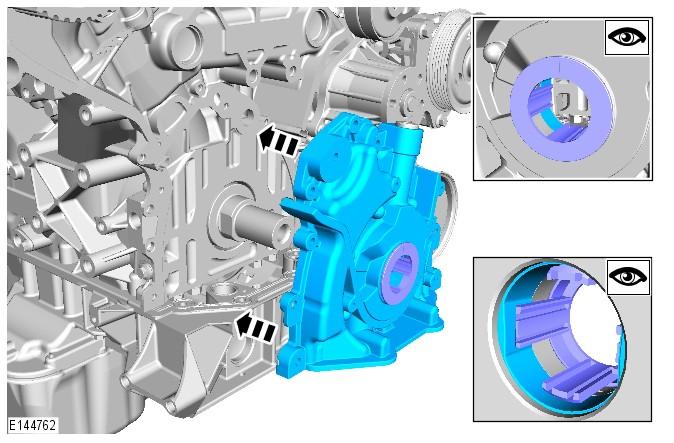
7 Remove the timing belt cover sealing strips. 11. Remove the oil pump. Remove the ten retaining bolts. 12.
8 Remove the alignment dowels (if equipped). INSTALLATION 1. Install a new oil pump gasket. 2.
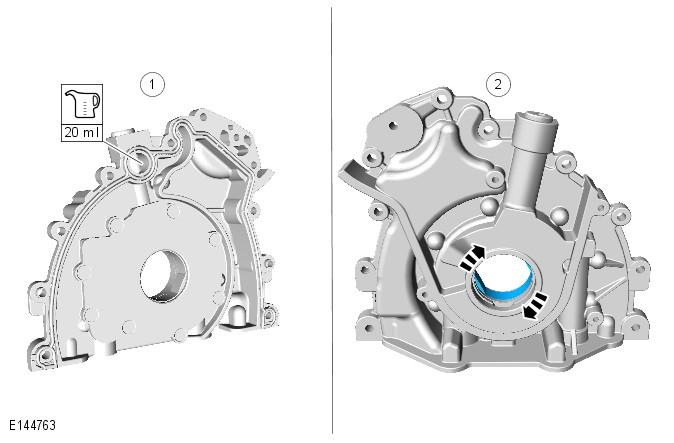
9 Prime the oil pump. Fill the orifice shown with 20 ml of engine oil. Rotate the oil pump drive 2 complete turns. 3. CAUTION: Make sure that the mating faces are clean and free of foreign material.
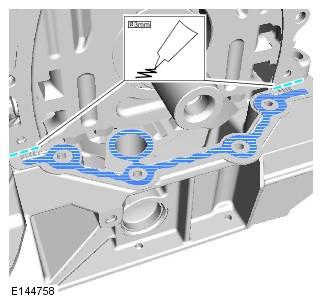
10 Apply sealant WSE-M4G323-A5 in an 3mm bead to the two areas shown, also apply a smear of sealant to the gasket face as illustrated. 4. CAUTIONS: Make sure that the mating faces are clean and free of foreign material. Make sure the gasket is installed correctly.
11 Install the oil pump. 5. Install two bolts to the oil pump, only finger tighten at this stage. Remove the oil pump locator.
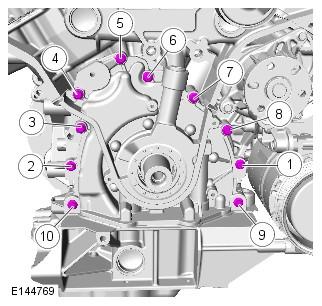
12 6. Install the oil pump lower retaining bolts. Tighten the 4 bolts to 10 Nm. 7. Secure the oil pump. Tighten the bolts in the sequence shown to 10 Nm.
13 8. Install the timing belt cover sealing strips. 9. CAUTION: Do not use any lubricant on the crankshaft front seal, special tools or the crankshaft. Failure to follow this instruction may result in damage to the vehicle. NOTE: Make sure all component mating faces are clean.
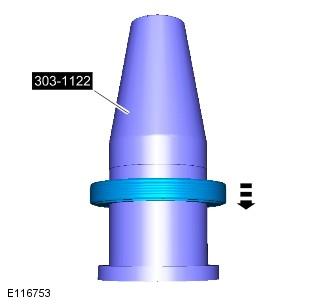
14 10. Install a new crankshaft front seal to the special tool.
15 Reposition the crankshaft front seal along the special tool. Remove the sleeve from the special tool. 11.
16 Install the special tool to the crankshaft.
17 12. Remove the special tool from the crankshaft. 13. Install the special tool to the crankshaft. 14. CAUTION: Make sure the seal is installed correctly.
18 Using the special tool, install the crankshaft front seal. Use the crankshaft bolt with the service tool. 15. CAUTION: Make sure the seal is installed correctly. NOTE: Wait 10 seconds before removing the crankshaft seal installation tool.
19 Remove the special tool. Remove and discard the crankshaft pulley retaining bolt. 16. Install the battery positive cable.
20 Tighten the two retaining bolts to 10 Nm. 17. CAUTION: Make sure that a new crankshaft pulley bolt is installed. NOTE: Before installing the crankshaft pulley retaining bolt, note the thread size of the bolt (there are two different sized threads, M14 and M16). Failure to follow this instruction may result in damage to the vehicle. Install the crankshaft pulley. Tighten the M14 retaining bolt in two stages: Stage one: Tighten to 100 Nm. Stage two: Tighten a further 90degrees. Tighten the M16 retaining bolt in three stages: Stage one: Tighten to 150 Nm. Stage two: Tighten to 300 Nm.
21 Stage three: Tighten a further 90 degrees. 18. Install the new timing belt kit. For additional information, refer to: Timing Belt Engine - TDV6 2.7L Diesel, In-vehicle Repair). (303-01C 19. Install the generator mounting bracket. Tighten the bolts in the sequence shown to 22 Nm. 20. Install the accessory drive belt tensioner. Tighten the bolt to 45 Nm.
22 21. Install the generator. For additional information, refer to: Generator (414-02C Generator and Regulator - TDV6 2.7L Diesel, Removal and Installation). 22. Connect the battery ground cable. For additional information, refer to: Specifications ( Battery and Charging System - General Information, Specifications).
Removal. All vehicles. Published: 11-Mar-2014 Engine - TDV6 2.7L Diesel - Timing Belt In-vehicle Repair. Special Tool(s) Check Pin - Camshaft Pulleys
 Check Pin - Camshaft Pulleys") Published: 11-Mar-2014 Engine - TDV6 2.7L Diesel - Timing Belt In-vehicle Repair Special Tool(s) Check Pin - Camshaft Pulleys 303-1132 Timing Pin - Camshaft Pulleys 303-1126 Timing Pin - Automatic Transmission
Published: 11-Mar-2014 Engine - TDV6 2.7L Diesel - Timing Belt In-vehicle Repair Special Tool(s) Check Pin - Camshaft Pulleys 303-1132 Timing Pin - Camshaft Pulleys 303-1126 Timing Pin - Automatic Transmission
IN-VEHICLE REPAIR. Engine Front Cover
 303-01B-1 IN-VEHICLE REPAIR Engine Front Cover Material Item Specification 303-01B-1 Special Tool(s) Motorcraft SAE 5W-20 WSS-M2C930-A Premium Synthetic Blend 3-Jaw Puller Motor Oil 303-D121 XO-5W20-QSP
SECTION C Engine 5.4L (3V)
") 303-01C-i Engine 5.4L (3V) 303-01C-i SECTION 303-01C Engine 5.4L (3V) CONTENTS PAGE IN-VEHICLE REPAIR Engine Front Cover... 303-01C-2 303-01C-2 Engine 5.4L (3V) 303-01C-2 IN-VEHICLE REPAIR Engine Front
303-01C-i Engine 5.4L (3V) 303-01C-i SECTION 303-01C Engine 5.4L (3V) CONTENTS PAGE IN-VEHICLE REPAIR Engine Front Cover... 303-01C-2 303-01C-2 Engine 5.4L (3V) 303-01C-2 IN-VEHICLE REPAIR Engine Front
Engine Front Cover. Special Tool(s) 3-Jaw Puller 303-D121 or equivalent. Installer, Front Cover Oil Seal (T88T-6701-A)
 3-Jaw Puller 303-D121 or equivalent. Installer, Front Cover Oil Seal (T88T-6701-A)") SECTION 303-01B: Engine 4.6L (3V) 2009 Mustang Workshop Manual IN-VEHICLE REPAIR Procedure revision date: 05/23/2008 Engine Front Cover Special Tool(s) 3-Jaw Puller 303-D121 or equivalent Installer, Front
SECTION 303-01B: Engine 4.6L (3V) 2009 Mustang Workshop Manual IN-VEHICLE REPAIR Procedure revision date: 05/23/2008 Engine Front Cover Special Tool(s) 3-Jaw Puller 303-D121 or equivalent Installer, Front
IN-VEHICLE REPAIR. Engine Front Cover
 303-01A-1 IN-VEHICLE REPAIR Engine Front Cover Material Item Specification 303-01A-1 Special Tool(s) SAE 5W-20 Premium WSS-M2C930-A Synthetic Blend Motor Oil Alignment Plate, Camshaft XO-5W20-QSP (in Canada
2006 Expedition/Navigator Workshop Manual
 7. Remove the RH variable camshaft timing (VCT) oil control solenoid. For additional information, refer to Section 303-14. 8. Remove the RH ignition coils. For additional information, refer to Section
 Page 1 of 5 303-01B Engine 3.0L (4V) 2004 Escape IN-VEHICLE REPAIR Procedure revision date: 05/26/2005 Engine Front Cover Material Removal Item Motocraft Metal Surface Cleaner ZC-21 Silicone Gasket and
 Page 1 of 14 Oil Pan Removal & Installation 4.2L Engine 4WD Vehicles To Remove: 1. Before servicing the vehicle refer to the precautions at the beginning of this section. 2. Raise and support the vehicle.
 Page 1 of 11 Assembly 50. Install the timing chain guide. Tighten to 12 Nm. Page 2 of 11 51. Install the crankshaft sprocket. 52. Install the chain tensioning tool 303-532 to the exhaust camshaft sprocket.
 Page 1 of 8 303-01A Engine 2.3L 2007 Escape/Mariner/Escape Hybrid/Mariner Hybrid IN-VEHICLE REPAIR Procedure revision date: 10/05/2008 Cylinder Head Special Tool(s) Alignment Plate, Camshaft 303-465 (T94P-6256-CH)
ASSEMBLY Procedure revision date: 11/22/2001
 Page 1 of 39 Evan Groenke From: Daniel Lelovic [dlelovic@rogers.com] Sent: May 8, 2005 12:08 PM To: 'Evan Groenke' Subject: 2.5L Engine Re-assembly SECTION 303-01B: Engine 2.5L 2000 Contour/Mystique Workshop
1991 Volkswagen Vanagon Syncro
 corner of radiator. See Fig. 1. Fig. 1: Bleeding Cooling System 2. Open bleeder valve in engine compartment (turn counterclockwise). See Fig. 1. Fill expansion tank until full. Start and run engine at
ENGINE - V8. Seal - crankshaft - rear. Refit 1. Ensure both seal location and running surface on crankshaft are clean.
 REPAIRS Seal - crankshaft - rear 1. Ensure both seal location and running surface on crankshaft are clean. 1. Automatic gearbox models: converter drive plate. ENGINE - V8, REPAIRS, Plate - drive - automatic.
 Page 1 of 8 2012 Ford F450 Super Duty 6.7L Eng Service Manual: ENGINE MECHANICAL - 6.7L DIESEL -- F250-F550 SUPER DUTY IN-VEHICLE REPAIR > OIL PAN - LOWER MATERIAL SPECIFICATIONS Item Motorcraft SAE 0W-30
FUEL PUMP CAMSHAFT TIMING ADJUSTMENT (G )
") PUBLISHED: 10-OCT-2017 2010.0 RANGE ROVER SPORT (LS), 303-01 ENGINE - V8 S/C 5.0L PETROL FUEL PUMP CAMSHAFT TIMING ADJUSTMENT (G1473741) GENERAL PROCEDURES 19.90.17 HIGH PRESSURE FUEL TIMING CHECK AND
PUBLISHED: 10-OCT-2017 2010.0 RANGE ROVER SPORT (LS), 303-01 ENGINE - V8 S/C 5.0L PETROL FUEL PUMP CAMSHAFT TIMING ADJUSTMENT (G1473741) GENERAL PROCEDURES 19.90.17 HIGH PRESSURE FUEL TIMING CHECK AND
2006 Freestar/Monterey Workshop Manual. IN-VEHICLE REPAIR Procedure revision date: 12/01/2005
 SECTION 303-01: Engine 3.9L and 4.2L IN-VEHICLE REPAIR Procedure revision date: 12/01/2005 Valve Cover LH Item Part Number Description 1 W708650 Oil level indicator tube bolt 2 6754 Oil level indicator
 Page 1 of 9 SECTION 303-01B: Engine 2.0L SPI 2002 Focus Workshop Manual ASSEMBLY Procedure revision date: 12/14/2000 Engine Special Tool(s) Crankshaft Rear Seal Pilot 303-329 (T88P-6701-B2) Crankshaft
2/13/2018 Engine 3.0L (4V) - Valve Cover RH - in Vehicle Repair 2006 Lincoln Zephyr MotoLogic
 - Valve Cover RH - in Vehicle Repair 2006 Lincoln Zephyr MotoLogic") 2006 Zephyr Applies to: 3.0L (4V) Report a problem with this article SECTION 303-01B: Engine 3.0L (4V) 2006 Fusion/Milan/Zephyr Workshop Manual IN-VEHICLE REPAIR Procedure revision date: 07/24/2006 Valve
2006 Zephyr Applies to: 3.0L (4V) Report a problem with this article SECTION 303-01B: Engine 3.0L (4V) 2006 Fusion/Milan/Zephyr Workshop Manual IN-VEHICLE REPAIR Procedure revision date: 07/24/2006 Valve
2000 Econoline Workshop Manual. 3. Install the upper intake manifold. 2. NOTE: Tighten the bolts in two stages.
 2. NOTE: Tighten the bolts in two stages. Tighten the bolts in the sequence shown. Stage 1: Tighten to 2 Nm (18 lb-in). Stage 2: Tighten to 10 Nm (89 lb-in). 3. Install the upper intake manifold. Position
file://c:\program Files\tsocache\OFFICE_5416\SY1~us~en~file=SY131B46.htm~gen~ref...
 Page 1 of 41 SECTION 303-01B: Engine 4.6L and 5.4L 2000 F-150 Workshop Manual ASSEMBLY Procedure revision date: 01/27/2004 Engine 4.6L Special Tool(s) Compressor, Valve Spring 303-567 (T97P-6565-AH) Compressor
2002 Crown Victoria/Grand Marquis Workshop Manual
 Page 1 of 24 SECTION 303-01: Engine 2002 Crown Victoria/Grand Marquis Workshop Manual INSTALLATION Procedure revision date: 01/02/2003 Cylinder Heads Special Tool(s) Installer, Crankshaft Vibration Damper
 Page 1 of 75 303-01D Engine - 5.2L 32V Ti-VCT 2016 Mustang Assembly Procedure revision date: 12/15/2016 Special Tool(s) / General Equipment Engine Base Part Number: 6L084 205-142 (T80T-4000-J) Installer,
Engine Front Cover. Special Tool(s) Lifting Bracket, Engine (2 required) 303-D087 (D93P-6001-A1) or equivalent. Support Bar, Engine 303-F070
 Lifting Bracket, Engine (2 required) 303-D087 (D93P-6001-A1) or equivalent. Support Bar, Engine 303-F070") SECTION 303-01C: Engine 5.4L (4V) 2009 Mustang Workshop Manual IN-VEHICLE REPAIR Procedure revision date: 07/25/2008 Engine Front Cover Special Tool(s) Lifting Bracket, Engine (2 required) 303-D087 (D93P-6001-A1)
SECTION 303-01C: Engine 5.4L (4V) 2009 Mustang Workshop Manual IN-VEHICLE REPAIR Procedure revision date: 07/25/2008 Engine Front Cover Special Tool(s) Lifting Bracket, Engine (2 required) 303-D087 (D93P-6001-A1)
1996 Aerostar/Ranger/Explorer
 Page 1 of 10 Section 03-01B: Engine, 3.0L V-6 IN-VEHICLE SERVICE 1996 Aerostar and Ranger Vehicles Workshop Manual Engine Front Cover SPECIAL SERVICE TOOL(S) REQUIRED Description Tool Number Fan Clutch
Crankshaft Rear Seal with Retainer Plate
 SECTION 303-01C: Engine 5.4L (4V) 2009 Mustang Workshop Manual IN-VEHICLE REPAIR Procedure revision date: 07/25/2008 Crankshaft Rear Seal with Retainer Plate Special Tool(s) Installer, Crankshaft Rear
2012 Kia Soul L4 2.0L
 2012 Kia Soul L4 2.0L Vehicle» Engine, Cooling and Exhaust» Engine» Timing Chain» Service and Repair» Repair Procedures» Part 2 Installation 1. The TDC marks of the intake and exhaust CVVT sprockets are
Timing Drive Components ( )
") Page 1 of 14 (12.65.13) Removal 1. Remove the engine front cover. For additional information, refer to For additional information, refer to. 2. Remove the spark plugs. 3. Remove the crankshaft position
Page 1 of 14 (12.65.13) Removal 1. Remove the engine front cover. For additional information, refer to For additional information, refer to. 2. Remove the spark plugs. 3. Remove the crankshaft position
2004 Nissan/Datsun Truck Quest Mini Van 3.5L SFI DOHC 6cyl Repair Guides Engin...
 Page 1 of 10 SAVE 20% ON ONLINE SHIP-TO-HOME ORDERS OF $100 OR MORE. Use Code: MOM20 See Details Nissan Quest 2001-02 and 2004-06 REMOVAL & INSTALLATION Timing Chain Cover Removal & Installation 3.5L Engine
Vehicle Level Engine, Cooling and Exhaust Cooling System Water Pump Service and Repair Removal. Removal
 1 of 7 4/5/2008 11:18 PM Home Account Contact ALLDATA Log Out Help Select Vehicle New TSBs Technician's Reference Component Search: METRO TOYOTA OK 1994 Jeep Truck Wrangler L6-242 4.0L VIN S MFI Conversion
Valve Cover - RH Material
 1 of 5 5/15/2015 8:06 AM Valve Cover - RH Material 2 of 5 5/15/2015 8:06 AM 3 of 5 5/15/2015 8:06 AM Removal CAUTION: During engine repair procedures, cleanliness is extremely important. Any foreign material,
1995 Aerostar/Ranger/Explorer
 Page 1 of 13 Section 03-01C: Engine, 4.0L V-6 DISASSEMBLY AND ASSEMBLY 1995 Aerostar/Ranger/Explorer Workshop Manual Engine Disassembly 1. NOTE: Before starting disassembly, remove all wiring harnesses,
Timing Drive Components
 1 of 27 3/9/2012 8:26 AM Timing Drive Components Special Tool(s) Material LLDATA Online - 2006 Ford Truck Expedition 4WD V8-5.4L VIN 5 -... 2 of 27 3/9/2012 8:26 AM Material Removal 1. Remove the engine
Engine. Special Tool(s) Compressor, Valve Spring (T97P-6565-AH) Compressor Spacer, Valve Spring (T91P-6565-AH)
 Compressor, Valve Spring (T97P-6565-AH) Compressor Spacer, Valve Spring (T91P-6565-AH)") Page 1 of 41 SECTION 303-01A: Engine 5.4L (2V) 2000 F-Super Duty 250-550/Excursion/F-53 Motorhome Chassis Workshop Manual ASSEMBLY Procedure revision date: 04/04/2003 Engine Special Tool(s) Compressor,
Page 1 of 41 SECTION 303-01A: Engine 5.4L (2V) 2000 F-Super Duty 250-550/Excursion/F-53 Motorhome Chassis Workshop Manual ASSEMBLY Procedure revision date: 04/04/2003 Engine Special Tool(s) Compressor,
FUEL PUMP CAMSHAFT TIMING CHECK
 PUBLISHED: 26-FEB-2018 2010.0 RANGE ROVER SPORT (LS), 303-01 ENGINE - V8 S/C 5.0L PETROL FUEL PUMP CAMSHAFT TIMING CHECK (G1473740) GENERAL PROCEDURES 19.90.16 HIGH PRESSURE FUEL TIMING CHECK 5000 CC,
2003 Taurus/Sable Workshop Manual
 Page 1 of 24 SECTION 303-01A: Engine 3.0L (2V) ASSEMBLY 2003 Taurus/Sable Workshop Manual Engine Special Tool(s) Piston Ring Compressor 303- D032 (D81L-6002-C) Camshaft Bearing Set 303-017 (T65L-6250-A)
Cylinder Block Cradle
 SECTION 303-01A: Engine 4.0L SOHC 2009 Mustang Workshop Manual IN-VEHICLE REPAIR Procedure revision date: 01/27/2010 Cylinder Block Cradle Special Tool(s) Lifting Bracket, Engine 303-050 (T70P-6000) Support
Sealing flanges and flywheel/drive plate, removing and installing
 Page 1 of 20 13-47 Sealing flanges and flywheel/drive plate, removing and installing Note: For repairs to the clutch: Repair Manual, 5 Spd. Manual Transmission 012/01W Front Wheel Drive, Repair Group 30
Front Suspension - Front Stabilizer Bar Bushing Removal and Installation
 1 of 3 23/02/2012 7:34 AM Front Suspension - Front Stabilizer Bar Bushing Removal and Installation Published: 11-May-2011 Removal WARNING: Make sure to support the vehicle with axle stands. Raise and support
TECHNICAL BULLETIN Engine Vibration/Noise Above 1000 RPM Oil Pump Resonance Install Revised Oil Pump SERVICE DATE MODEL 2002 MY.
 SERVICE V8 XJ Series DATE 12/02 TECHNICAL BULLETIN Engine Vibration/Noise Above 1000 RPM Oil Pump Resonance Install Revised Oil Pump 100-21 MODEL 2002 MY V8 XJ Series VIN F44114 - F55936 Issue: Some 2002
1996 Aerostar/Ranger/Explorer
 Page 1 of 11 Section 03-01B: Engine, 3.0L V-6 IN-VEHICLE SERVICE 1996 Aerostar and Ranger Vehicles Workshop Manual Water Pump SPECIAL SERVICE TOOL(S) REQUIRED Description Tool Number Fan Clutch Holding
Intake Components 1117
 Item Part Number Description 1 W705654 Bolt 2 N807309 Bolt (2 req'd) 3 9F460 Bracket 4 N807071 Bolt (5 req'd) 5 9A448 Intake manifold (upper) 6 9E498 Vacuum harness 7 9F792 Fuel injection supply manifold
2011 Mercury Grand Marquis LS
 Fig. 6: Locating Intake Manifold Crash Bracket With Tie Strap 24. Remove the intake manifold crash bracket bolt. 25. Disconnect the fuel rail pressure and temperature sensor vacuum and electrical connectors.
REMOVAL AND INSTALLATION
 303-04C-1 REMOVAL AND INSTALLATION Fuel Injectors Special Tool(s) Caps, Fuel System 310-158 Special Tool(s) 303-04C-1 Holding Rack, Fuel Injector 303-D114 (D94T-9000-E1) Cups, Fuel Injector 303-1261 Tool,
This information covers procedures for replacing the sealant for the crankshaft cover on the Volvo D16F engine.
 Volvo Trucks North America Greensboro, NC USA DService Bulletin Trucks Date Group No. Page 1.2008 216 50 1(17) Sealant Crankshaft Cover, Replacement D16F Sealant Crankshaft Cover, Replacement W2005773
Fuel Injector ( )
") Published: Mar 29, 2010 Fuel Injector (196010) Special Service Tools Fuel Injector remover 303-1127 Removal WARNING: Do not smoke or carry lighted tobacco or open flame of any type when working on or near
Published: Mar 29, 2010 Fuel Injector (196010) Special Service Tools Fuel Injector remover 303-1127 Removal WARNING: Do not smoke or carry lighted tobacco or open flame of any type when working on or near
 Page 1 of 6 Section 03-01C: Engine, 7.5L MFI 1996 Bronco/F-Series Workshop Manual IN-VEHICLE SERVICE Procedure revision date: 06/19/2000 Cylinder Heads Removal SPECIAL SERVICE TOOL(S) REQUIRED Description
Engine - Timing Chain/Front Cover Revised Procedure Classification: EM98-009
 1995 Nissan-Datsun 200SX L4-1597cc 1.6L DOHC MFI (GA16DE) Page 1 Technical Service Bulletin # 98-107 Date: 990111 Engine - Timing Chain/Front Cover Revised Procedure Classification: EM98-009 Reference:
IN-VEHICLE SERVICING > VALVE COVER - RH
 Page 1 of 20 Service Manual: ENGINE - 5.4L (3V)- F-150 & MARK LT IN-VEHICLE SERVICING > VALVE COVER - RH 2008 Ford Pickup 5.4L Eng F150 Material Item Specification Motorcraft Metal Surface Prep ZC-31 PAG
CAMSHAFT ASSEMBLY. Preceding Work: Removal of cylinder head cover. Intake Camshaft and Exhaust Camshaft. Finger Follower and HLA. Camshaft Sprockets
 24 02 CAMSHAFT ASSEMBLY Preceding Work: Removal of cylinder head cover Finger Follower and HLA Intake Camshaft and Exhaust Camshaft D20DT Camshaft Sprockets D27DT D20DT D27DT Camshaft Position Sensor Cylinder
IN-VEHICLE REPAIR. Timing Drive Components. Removal. 3. Position the crankshaft keyway at the 12 o clock position.
 303-01B-1 IN-VEHICLE REPAIR Timing Drive Components 303-01B-1 Special Tool(s) Compressor, Valve Spring 303-1039 Locking Tool, Camshaft Phaser Sprocket 303-1046 3. Position the crankshaft keyway at the
Zoom and Print Options
 Vehicle» Engine, Cooling and Exhaust» Engine» Cylinder Head Assembly» Service and Repair» Procedures» Removal Cylinder Heads http://repair.alldata.com/alldata/article/display.action?componentid=65&itypeid=376&nonstandardid=682956&vehicleid=45317&windowname=maina
Engine. Special Tool(s) Adapter for (T97T-6256-A) Adapter for (T97T-6256-D)
 Adapter for (T97T-6256-A) Adapter for (T97T-6256-D)") SECTION 303-01A: Engine 4.0L SOHC 2009 Mustang Workshop Manual ASSEMBLY Procedure revision date: 05/10/2010 Engine Special Tool(s) Adapter for 303-564 303-578 (T97T-6256-A) Adapter for 303-577 303-576
SECTION 303-01A: Engine 4.0L SOHC 2009 Mustang Workshop Manual ASSEMBLY Procedure revision date: 05/10/2010 Engine Special Tool(s) Adapter for 303-564 303-578 (T97T-6256-A) Adapter for 303-577 303-576
IN-VEHICLE REPAIR. Timing Drive Components. Removal. 3. Position the crankshaft keyway at the 12 o clock position.
 303-01C-1 IN-VEHICLE REPAIR Timing Drive Components 303-01C-1 Special Tool(s) Compressor, Valve Spring 303-1039 Locking Tool, Camshaft Phaser Sprocket 303-1046 3. Position the crankshaft keyway at the
Servicing the APU Generator Belt. Determining if a belt adjustment or replacement is required
 Affected Parts: 40-S31-31K Generator Belt Kit, PG1040 Tool, 30-S70-82K Servicing the APU Generator Belt UNIT ONLY TO BE SERVICED BY QUALIFIED PERSONNEL Determining if a belt adjustment or replacement is
SECTION C Engine 6.0L Diesel
 303-01C-i Engine 6.0L Diesel 303-01C-i SECTION 303-01C Engine 6.0L Diesel CONTENTS PAGE IN-VEHICLE REPAIR Crankshaft Rear Seal... 303-01C-2 303-01C-2 Engine 6.0L Diesel 303-01C-2 IN-VEHICLE REPAIR Crankshaft
& MX Loosen the righthand front wheel lug nuts, then raise and support the vehicle with jack stands.
 Vehicle: 1996 MAZDA 626: DX 2.0L L4 GAS-FI-N Content: Engine Service >> Timing Belt >> Timing Belt, Replace 1993-97 626 & MX-6 This engine is classified as an Interference engine. If the timing belt breaks
2012 Kia Soul L4 2.0L
 2012 Kia Soul L4 2.0L Vehicle» Engine, Cooling and Exhaust» Engine» Timing Chain» Service and Repair» Repair Procedures» Part 1 Removal Engine removal is not required for this procedure. CAUTION: Use fender
 Page 1 of 23 303-01C Engine - 3.2L Duratorq-TDCi (148kW/200PS) - Puma 2011-2014 Ranger Assembly Procedure revision date: 07/21/2016 Special Tool(s) / General Equipment Engine Base Part Number: 6L084 100-002
TIMING BELT REPLACEMENT. Tools Required. J A (KM-421-A) Timing Belt Adjuster J Angle Meter KM-470-B Angular Torque Gage
 Timing Belt Adjuster J Angle Meter KM-470-B Angular Torque Gage") Page 1 of 20 TIMING BELT REPLACEMENT Tools Required J 42492-A (KM-421-A) Timing Belt Adjuster J 45059 Angle Meter KM-470-B Angular Torque Gage Removal Procedure Fig. 37: View Of Throttle Cable CAUTION:
Page 1 of 20 TIMING BELT REPLACEMENT Tools Required J 42492-A (KM-421-A) Timing Belt Adjuster J 45059 Angle Meter KM-470-B Angular Torque Gage Removal Procedure Fig. 37: View Of Throttle Cable CAUTION:
2010 Explorer, Mountaineer, Explorer Sport Trac Workshop Manual. IN-VEHICLE REPAIR Procedure revision date: 06/11/2009
 SECTION 303-01B: Engine - 4.6L 2010 Explorer, Mountaineer, Explorer Sport Trac Workshop (3V) Manual IN-VEHICLE REPAIR Procedure revision date: 06/11/2009 Engine Lubrication Components - Exploded View Brackets,
ASSEMBLY. Engine. Special Tool(s) Installer, Crankshaft Vibration Damper (T74P-6316-B) Special Tool(s)
 Installer, Crankshaft Vibration Damper (T74P-6316-B) Special Tool(s)") 303-01A-1 ASSEMBLY Engine Special Tool(s) Tensioner, Timing Chain 303-571 (T97T-6K254-A) Special Tool(s) 303-01A-1 Installer, Crankshaft Vibration Damper 303-102 (T74P-6316-B) Holding Tool, Camshaft Sprocket
303-01A-1 ASSEMBLY Engine Special Tool(s) Tensioner, Timing Chain 303-571 (T97T-6K254-A) Special Tool(s) 303-01A-1 Installer, Crankshaft Vibration Damper 303-102 (T74P-6316-B) Holding Tool, Camshaft Sprocket
2001 Chevrolet Corvette V8-5.7L VIN G
 1 of 14 2/21/2013 10:34 AM 2001 Chevrolet Corvette V8-5.7L VIN G Vehicle» Engine, Cooling and Exhaust» Engine» Oil Pan» Service and Repair Oil Pan Replacement Removal Procedure 1. 2. 3. Remove the front
1 of 15 1/26/2017 8:57 AM
 1 of 15 1/26/2017 8:57 AM Timing Belt and Balancer Belt Removal Special Tools Required ^ Holder Handle 07JAB-001020A ^ Holder Attachment, 50 mm, Offset 07MAB-PY3010A ^ Socket, 19 mm 07JAA-001020A or a
TSI Date Group No. Supp. Page
 Volvo Trucks North America, Inc. Greensboro, NC USA Timing Gear Cover TSI Date Group No. Supp. Page 11.2001 215 006 1(7) Timing Gear Cover D12C Fig. 1: VOLVO D12C Engine W2003244 This information covers
Engine. Special Tool(s) Compressor, Piston Ring 303-D032 (D81L-6002-C) or equivalent. Compressor, Valve Spring (T93P-6565-AR)
 Compressor, Piston Ring 303-D032 (D81L-6002-C) or equivalent. Compressor, Valve Spring (T93P-6565-AR)") SECTION 303-01C: Engine 5.4L (4V) 2009 Mustang Workshop Manual ASSEMBLY Procedure revision date: 12/12/2008 Engine Special Tool(s) Compressor, Piston Ring 303-D032 (D81L-6002-C) or equivalent Compressor,
SECTION 303-01C: Engine 5.4L (4V) 2009 Mustang Workshop Manual ASSEMBLY Procedure revision date: 12/12/2008 Engine Special Tool(s) Compressor, Piston Ring 303-D032 (D81L-6002-C) or equivalent Compressor,
1999 Honda Accord DX
 Installation 1. Clean tensioner pulleys. Ensure cylinder No. 1 is at TDC by aligning dimple on timing belt drive pulley with pointer on oil pump housing. See Fig. 4. Ensure camshaft pulley TDC marks are
Replacing the oil pump / front crankshaft seal
 "VCC097797 EN 20100518" 1(5) Replacing the oil pump / front crankshaft seal Special tools: 998 6187, 999 5433, 999 5455, 999 5919, 999 5747, 951 2050 Note! As the illustrations in the information are used
1999 Nissan Altima GLE
 TIMING CHAIN CAUTION: If cylinder head is installed and timing chain is disconnected, DO NOT rotate camshaft or crankshaft; valves will contact pistons, resulting in bent valves. NOTE: Following procedure
5-18 ENGINE TOP END. Cylinder Head Cover
 5-18 ENGINE TOP END Cylinder Head Cover Cylinder Head Cover Installation Replace the head cover gasket [A] with a new one. Apply silicone sealant [B] to the cylinder head as shown. Sealant - Kawasaki Bond
Timing Chain Renew ( ) Renew. Section Title. Special Tools. Proprietary Tools Scraper Engine support bar
 Renew. Section Title. Special Tools. Proprietary Tools Scraper Engine support bar") Timing Chain Renew ( 34 0) Special Tools 40 400 40 Engine support bar 40 0 Adaptor for -40 40 03 Adaptor for -40 Proprietary Tools Scraper Workshop Equipment Transmission jack Materials Cable ties Sealer
Timing Chain Renew ( 34 0) Special Tools 40 400 40 Engine support bar 40 0 Adaptor for -40 40 03 Adaptor for -40 Proprietary Tools Scraper Workshop Equipment Transmission jack Materials Cable ties Sealer
Zoom and Print Options
 Vehicle» Engine, Cooling and Exhaust» Engine» Timing Components» Service and Repair» Procedures» Timing Drive Components Timing Drive Components Special Tools And Equipment Special Tool(s) Material Material
Lower Intake Manifold Replacement
 Lower Intake Manifold Replacement Removal Procedure 1. Turn OFF all the lamps and the accessories. 2. Ensure the ignition switch is in the OFF position. 3. Disconnect the negative battery cable from the
SECTION C Engine 5.4L (3V)
") 303-01C-i Engine 5.4L (3V) 303-01C-i SECTION 303-01C Engine 5.4L (3V) CONTENTS PAGE IN-VEHICLE REPAIR Timing Drive Components... 303-01C-2 303-01C-2 Engine 5.4L (3V) 303-01C-2 IN-VEHICLE REPAIR Timing
303-01C-i Engine 5.4L (3V) 303-01C-i SECTION 303-01C Engine 5.4L (3V) CONTENTS PAGE IN-VEHICLE REPAIR Timing Drive Components... 303-01C-2 303-01C-2 Engine 5.4L (3V) 303-01C-2 IN-VEHICLE REPAIR Timing
Toyota Truck Pickup 2WD L4-2.4L SOHC (22R) 1987
 1987") Timing Chain: Service and Repair Toyota Truck Pickup 2WD L4-2.4L SOHC (22R) 1987 PREPARATION FOR REMOVAL OF TIMING CHAIN 1. REMOVE CYLINDER HEAD 2. REMOVE RADIATOR 3. REMOVE OIL PAN (a) Remove the engine
Timing Chain: Service and Repair Toyota Truck Pickup 2WD L4-2.4L SOHC (22R) 1987 PREPARATION FOR REMOVAL OF TIMING CHAIN 1. REMOVE CYLINDER HEAD 2. REMOVE RADIATOR 3. REMOVE OIL PAN (a) Remove the engine
2005 Chevrolet Equinox Equinox VIN L Service Manual Engine Engine Mechanical - 3.4L Repair Instructions - On Vehicle Document ID:
 xtooltipelement Service Information 2005 Chevrolet Equinox Equinox VIN L Service Manual Engine Engine Mechanical - 3.4L Repair Instructions - On Vehicle Document ID: 1383623 Engine Front Cover Replacement
1 of 10 2/10/2017 5:20 PM
 1 of 10 2/10/2017 5:20 PM Crankshaft Pulley Removal NOTICE: Do not loosen or remove the crankshaft pulley bolt without first installing the special tools as instructed in this procedure. The crankshaft
Timing Belt: Service and Repair 2002 Acura Truck MDX V6-3.5L
 Timing Belt: Service and Repair 2002 Acura Truck MDX V6-3.5L Timing Belt Removal Special Tools Required - Holder handle 07JAB-001020A - Holder attachment, 50 mm, offset 07MAB-PY3010A - Socket, 19 mm 07JAA-001020A
2001 Chevrolet Metro LSi ENGINES 1.3L 4-Cylinder - Metro & Firefly (Canadian) Fig. 3: Exploded View Of Timing Belt & Components (Typical)
 Fig. 3: Exploded View Of Timing Belt & Components (Typical)") Fig. 3: Exploded View Of Timing Belt & Components (Typical) Fig. 4: Aligning Timing Marks 6. Loosen the timing belt tensioner bolt and the stud. 7. After pushing up the tensioner plate completely with
Fig. 3: Exploded View Of Timing Belt & Components (Typical) Fig. 4: Aligning Timing Marks 6. Loosen the timing belt tensioner bolt and the stud. 7. After pushing up the tensioner plate completely with
IN-VEHICLE REPAIR. Cylinder Head. Special Tool(s) Timing Tool, Crankshaft TDC (T97T-6303-A) or. Special Tool(s) equivalent
 Timing Tool, Crankshaft TDC (T97T-6303-A) or. Special Tool(s) equivalent") 303-01A-1 IN-VEHICLE REPAIR Cylinder Head Special Tool(s) Torque Wrench Extension 303-575 (T97T-6256-F) or equivalent Special Tool(s) 303-01A-1 Timing Tool, Crankshaft TDC 303-573 (T97T-6303-A) or equivalent
303-01A-1 IN-VEHICLE REPAIR Cylinder Head Special Tool(s) Torque Wrench Extension 303-575 (T97T-6256-F) or equivalent Special Tool(s) 303-01A-1 Timing Tool, Crankshaft TDC 303-573 (T97T-6303-A) or equivalent
2014 RAM C/V Tradesman
 Fig. 91: Suction Hose Ball Valve NOTE: View typical 14. Open the suction hose's ball valve to begin refilling the cooling system. 15. When the vacuum gauge reads zero, the system is filled. NOTE: On some
1. Disconnect negative battery cable. 2. Remove upper and lower front timing belt covers..
 BELT AND SPROCKETS-TIMING REMOVAL TIMING BELT Zoom 1. Disconnect negative battery cable. 2. Remove upper and lower front timing belt covers.. CAUTION: When aligning crankshaft and camshaft timing marks
This bulletin involves using new procedures when replacing/installing timing belt tensioner components.
 NUMBER: GROUP: 09 06 00 Engine DATE: Mar. 10, 2000 This bulletin is supplied as technical information only and is not an authorization for repair. No part of this publication may be reproduced, stored
2000 Nissan Altima SE
 Removal 1. Release fuel pressure. See FUEL PRESSURE RELEASE. Drain coolant from radiator and cylinder block. Drain engine oil. Disconnect all necessary coolant hoses, electrical connectors, vacuum hoses,
ALLDATA Online Land Rover Freelander (LN) V6-2.5L - Camshaft Timing Belt
 V6-2.5L - Camshaft Timing Belt") Page 1 of 13 Camshaft Timing Belt Service Repair No - 12.65.18 Remove 1. Disconnect battery earth lead. 2. Remove ancillary drive belt. 3. Remove RH front road wheel. 4. Remove 3 bolts securing RH splash
Page 1 of 13 Camshaft Timing Belt Service Repair No - 12.65.18 Remove 1. Disconnect battery earth lead. 2. Remove ancillary drive belt. 3. Remove RH front road wheel. 4. Remove 3 bolts securing RH splash
PEUGEOT / 206 CC 1.6i 16V / 09/ /2007 / Cabriolet Country of manufacture EU Cubic capacity/power 1.6 / 80 kw Motor tag RB key PEU 814
 1 Vehicle PEUGEOT / 206 CC 1.6i 16V / 09/2000-03/2007 / Cabriolet Country of manufacture EU Cubic capacity/power 1.6 / 80 kw Motor tag NFU RB key PEU 814 Replacement Interval Guide Peugeot recommend: 206:
Service and Repair. Removal. Remove the engine cover. Remove the drive belt. Select Vehicle New TSBs Technician's Reference
 1 of 7 4/5/2008 9:30 AM Home Account Contact ALLDATA Log Out Help Select Vehicle New TSBs Technician's Reference Component Search: METRO TOYOTA OK 2002 Kia Truck Sedona EX V6-3.5L Vehicle Level Engine,
 Page 1 of 18 303-01C Engine 5.4L (3V) 2010 F-150 IN-VEHICLE REPAIR Procedure revision date: 07/01/2009 Timing Drive Components Special Tool(s) Compressor, Valve Spring 303-1039 Holding Tool, Crankshaft
Timing Belt: Service and Repair Dismantling the Belt Drive. Dismantling Belt drive, dismantling Special tools: , ,
 2005 Volvo XC90 L5-2.5L Turbo VIN 59 B5254T2 Page 1 Timing Belt: Service and Repair Dismantling the Belt Drive Dismantling Belt drive, dismantling Special tools: 999 5304, 999 5433, 999 5747 Note: As the
Mazda3 - Workshop Manual - Engine
 Page 1 of 18 2005 - Mazda3 - Workshop Manual - Engine TIMING CHAIN REMOVAL/INSTALLATION WARNING: Fuel vapor is hazardous. It can very easily ignite, causing serious injury and damage. Always keep sparks
11/29/2017 Engine Cooling - Coolant Pump - Removal and Installation 2010 Ford Edge MotoLogic Engine Cooling 2010 Edge, MKX
 2010 Edge Report a problem with this article 303-03 Engine Cooling 2010 Edge, MKX REMOVAL AND INSTALLATION Procedure revision date: 10/04/2010 Coolant Pump Special Tool(s) Camshaft Holding Tool 303-1248
2008 F-Super Duty Workshop Manual
 Page 1 of 13 SECTION 303-04C: Fuel Charging and Controls 6.4L Diesel 2008 F-Super Duty 250-550 Workshop Manual REMOVAL AND INSTALLATION Procedure revision date: 03/04/2009 Fuel Injection Pump High Pressure,
TO C. Install CAUTION
 Install TO C CAUTION Make sure the cylinder head gasket is correctly aligned with holes in the cylinder block. If not aligned properly, it can cause engine damage. Position the new cylinder head gasket
2010 Transit Connect Workshop Manual. 31. Remove the 3 bolts, thermostat housing and thermostat.
 31. Remove the 3 bolts, thermostat housing and thermostat. 32. Remove the 2 bolts, stud bolt and the A/C compressor. 33. Remove the bolt and the KS. 34. Remove the 8 bolts and the crankcase vent oil separator.
Disassembly and Assembly
 K EN R 623 2-00 August 2006 Disassembly and Assembly 2506-15 Industrial Engine M G A (Engine) MGB (Engine) M G D (Engine) Important Safety Information Most accidents that involve product operation, maintenance
Removing and installing timing case cover. A. Engine
 01-2100 Removing and installing timing case cover Operation no. of operation texts and work units or standard texts and flat rates 01-0080, 8009 A. Engine 119.960 Viscous fan clutch remove, install (20-3120).
AJV8 Engine Assembly. AJV8 Engine Assembly
 AJV8 Engine Assembly Contents Cylinder Block Dowels, Plugs and Pipes 2 4 Crankshaft Bearing and Cylinder Bore Dimensions 5 9 Bearing Measuring 6 Engine Dimensions and Codes 6 7 Main Bearing Selection Chart
Timing Drive Components
 2006 Ford F 150 : Engine Mechanical > Engine, 5.4L (3V) > IN VEHICLE REPAIR > Timing Drive Components Timing Drive Components Listen SECTION 303 01C: Engine 5.4L (3V) 2006 F 150/Mark LT Workshop Manual
Service and Repair CAMSHAFT
 Service and Repair CAMSHAFT Removal and Installation REMOVAL 1. Remove front timing chain case, camshaft sprocket, timing chain and rear timing chain case. Refer to "REMOVAL". 2. Remove camshaft position
ENG-14, Balance Shaft Oil Seal Replacement
 ENG-14, Balance Shaft Oil Seal Replacement Introduction The following procedure will provide instructions for replacing the balance shaft seals on a 944. It will also provide instructions for resealing
Testing and Inspection. Diagnostic Procedure Step 1-2
 1 of 4 5/22/2008 7:54 AM Home Account Contact ALLDATA Log Out Help Select Vehicle New TSBs Technician's Reference Component Search: METRO TOYOTA OK 2002 Nissan-Datsun Altima 2.5 S L4-2.5L (QR25DE) Vehicle