OUTSOURCE MAINTENANCE MANUAL & RESOURCE GUIDE FIRST EDITION
|
|
|
- Britton Stone
- 5 years ago
- Views:
Transcription


")
1 FLORIDA PUBLIC TRANSIT OUTSOURCE MAINTENANCE MANUAL & RESOURCE GUIDE FIRST EDITION Florida Department of Transportation Public Transit Office developed by The Preventative Maintenance Planning, Training and Technical Assistance Program (PrMPT) Institute for Applied Business Research Florida State University College of Business (850) March 2017
2 FLORIDA PUBLIC TRANSIT OUTSOURCE MAINTENANCE MANUAL & RESOURCE GUIDE TABLE OF CONTENTS Pg. OVERVIEW 1 PRE-TRIP & POST-TRIP INSPECTIONS 2 Pre-Trip Inspections 2 Post-Trip Inspections 5 Documenting Pre-Trip & Post-Trip Inspections 6 PREVENTATIVE MAINTENANCE 7 ABC Progressive Inspections 8 Conducting Preventative Maintenance Inspections 9 A Level Inspections 10 B Level Inspections 19 C Level Inspections 21 OEM Recommendations 22 Oil Changes 22 Multiple Party Inspections 23 Documenting Preventative Maintenance Inspections 24 Repairing Defects 24 CHOOSING AN OUTSOURCE MAINTENANCE FACILITY 26 Outsource Maintenance Contracting 27 Mechanic Training 27 Evaluating Your Outsource Maintenance Facility 27 WRITTEN PLANS, FORMS, AND FILES 30 Maintenance Plans 30 Asset Management Plans 31 Maintenance Forms 31 Vehicle History Files 32 MAINTENANCE COMPLIANCE REVIEWS 33 TECHNICAL ASSISTANCE & RESOURCES 35
3 FLORIDA PUBLIC TRANSIT OUTSOURCE MAINTENANCE MANUAL & RESOURCE GUIDE OVERVIEW The Florida Department of Transportation requires agencies who purchase vehicles with state and/or federal funds to maintain their vehicles by conducting routine preventative maintenance using proactive maintenance practices. These maintenance requirements, defined by FDOT as minimum maintenance requirements, are provided in the FDOT Preventative Maintenance Standards Manual and are intended to ensure optimal safety and cost efficiency for riders, the agency, and the Department. Agencies may have additional maintenance requirements depending on their coordination contracts with other transit agencies or FDOT District offices. The Outsource Maintenance Manual describes these minimum maintenance requirements and provides recommendations for implementing and maintaining a successful preventative maintenance program using outsource maintenance facilities to conduct maintenance activities. Florida s public transit providers are encouraged to use this document when developing any service agreement with such vendors in order to specifically outline the agency s expectations and to ensure that the agency is complying with state and federal maintenance requirements. This document was developed by the Preventative Maintenance Planning and Training Program (PrMPT) at the Institute for Applied Business Research within the Florida State University College of Business.
4 PRE-TRIP & POST-TRIP INSPECTIONS Before utilizing vehicles for transportation service, FDOT requires drivers to conduct pretrip inspections. The pre-trip inspection is significant in the detection of vehicle deficiencies that can impact passenger safety. All agencies, whether their maintenance is performed in-house or outsourced, must complete a pre-trip inspection form. The pre-trip inspection form ensures that vital vehicle components are inspected before a vehicle departs for service. Table 1 identifies the minimum pre-trip inspection components and approved procedures. These components are also identified under Chapter 1490 of the Florida Administrative Code and the FDOT State Management Plan. Table 1: Pre-Trip Inspection Components & Procedures Component Procedure Service Brakes From the driver s seat, pump the brake pedal three or four times, and then hold constant downward pressure on the pedal for at least five seconds. The brake pedal should hold firm and not drift down. If equipped with a hydraulic brake reserve system, with the key off, depress the brake pedal and listen for the sound of the reserve system electric motor. If equipped with hydro boost system or vacuum assist system, with the key off, pump the brake at least five times and depress the brake pedal. It should feel firm. Remain holding the pedal and start the engine. The pedal should move slightly to the floor and then rise. Check that the warning buzzer or brake light is off. Parking Brakes Apply the parking brake and shift vehicle into low gear slightly pulling against the brakes. Vehicle should not move.
5 Ta Component Procedure Tires & Wheels The minimum tire tread depth on steering axle (front tires) is 4/32 inch in every major groove. No re-caps are allowed on the steering axle. The minimum tire tread depth on all other tires is 2/32 inch in every major groove. Check all tires for uneven tread wear and cuts or damage to tread and sidewalls. Check for tire inflation by hitting the tires with a mallet or similar device to check for flats. To check for exact tire inflation a tire air gauge must be used. Check rims for bends, damage, or welds. Rims must not have any welding repairs. Check valve stems for damage and for missing valve caps. Check that the wheels and hubs are free of oil or grease. Oil or grease present could indicate a leaking hub or axle seal. Check that all lug nuts are present. Check for signs of rust streaks or shiny threads that could indicate loose lug nuts. Steering With the engine running, turn the wheel back and forth. Steering play should not exceed 2 inches (on a 20-inch wheel) until the front wheels barely move. Horn Check that the horn works properly. Lighting Devices Windshield Wipers Turn on exterior lights. Turn on 4-way flashers. Perform a complete walk around of the exterior of the vehicle and check all lights for proper operation and lens for cleanliness. Turn off 4-way flashers and turn on left turn signal and check left signal lights for operation. Turn on right turn signal and check right signal lights for operation. Turn on hi-beam head lights and check for operation. Checking brake lights and back-up lights may require assistance. With someone in the driver s seat, instruct them to step on the brake pedal while observing the operation of the brake lights. At this time have the assistant place the vehicle in reverse. Check back-up light operation and back-up alarm if equipped. Turn on all interior lights and check for operation. Starting from the exterior of the vehicle, check the condition of the wiper blades and that the arms and blades are secure. From the interior of the vehicle, check that the windshield washer works correctly and that the wipers operate smoothly Windshield should be clean with no obstructions or damage to glass. Mirrors Rear view mirrors and side view mirrors should be secure with no mirror bracket damage. Check for proper adjustment. Check mirror glass for cleanliness or fading. Climate Control Operate and check heater and air conditioning controls through all selector ranges and check varying fan speed for proper function. Check rear unit as applicable. Emergency Exit Windows and Inspect side and rear windows for cracks, scratches and proper function of opening mechanisms. Doors Check emergency exits to ensure all exits function properly and stay shut after opening. Passenger Doors Check doors for damage and that they operate smoothly. Hinges should be secure with seals intact. Check door entry area for debris and any loose or extensively worn flooring.
6 Table 1: Pre-Trip Inspection Components & Procedures (cont.) Component Interior Gauges and Warning Exhaust System Procedure Activate ignition switch and check all warning indicator lights (oil, battery, check engine, ABS, etc.) for proper operation. If the vehicle is equipped with gauges, check proper readings after the engine has been started. Check tailpipe for placement and secure mounting. Start engine and listen for exhaust leaks and check for exhaust fumes in areas other than the tailpipe end. Wheelchair Lift and Ramp Belts and Securement Devices Interlock Systems Safety, Security, & Emergency Equipment Check wheelchair lift doors for operation and damage. Cycle lift from stow position to floor level and check outboard roll stop barrier for proper latching. Cycle lift to ground level and check for any leaking, damaged, missing parts, and for smooth operation. Raise lift from ground level. With platform slightly off ground, make sure outboard roll stop barrier raises and it is latched securely. This must be performed by visually inspecting and latching mechanism to ensure it is in the correct locked position and by physically attempting to pull/push barrier down with an adequate amount of force to make certain the barrier is securely latched. Continue to raise lift to floor level and check for any unusual noises or abnormal operation. Check all warning lights and audible signals for proper operation. Due to varying lift configurations, refer to your lift s Owner s Manual for a list of warning lights and audible alarms to ensure all of these safety warning devices are working properly. Stow lift. With lift door in the open position, check shift interlock by trying to shift vehicle into gear. Bus should not shift out of park. Inspect retractors for damaged webbing and proper locking. Inspect shoulder belts. Inspect foldaway seats for operation. Inspect floor anchors. Check for proper number and condition of belts, tie downs and any other securement devices If equipped, check to ensure interlock system is working properly. Vehicle should not shift out of park with either the front door or lift door open. If the rear emergency exit door is open or closed, and locked, the vehicle should not start. Check for audible alarm and warning light if rear door is open with vehicle running. Check for properly charged and rated fire extinguisher. Check for safety triangles and flares, if equipped. Check for first aid kit, if equipped. Fire Suppression Additional Items Check the fire suppression gauge and ensure that the gauge indicates the fire suppression system is properly functioning. The arrow should be pointing in the green area of the gauge. Your agency may require additional items to be checked during the pre-trip/post-trip inspection, such as fluid checks, engine, hoses and belts under the hood. Check these additional items as necessary using procedures set forth by your agency.
7 As previously stated, drivers must complete a pre-trip inspection form to document whether the vehicle components were found to be ok or deficient. When a defect or deficiency is found during the pre-trip inspection, the driver must report this defect in writing to a manager or supervisor immediately. If the defect is safety related, the vehicle cannot be used for transportation service until the defect is repaired. Defects determined by FDOT to be safety related are defined in Table 2. Table 2: Safety-Related Defects Defects discovered during the pre-trip inspection that are considered safety-related are: Steering System Service and Parking Brakes Suspension and Undercarriage Tires, Wheels and Wheel End Components Fuel and Exhaust Systems All Lights, Mirrors, Wipers and Warning Devices Interlock Systems Interior Controls, Gauges, and Safety Equipment Wheelchair Lifts Air System Emergency Exits (doors, windows, etc.) Fire Suppression Systems Vehicle with safety-related defects should be removed from service until appropriate repairs are completed. Evidence of these repairs should be attached to the pre-trip inspection form and filed in the vehicle history file. Post-Trip Inspections Agencies are also required to conduct a post-trip inspection when a vehicle returns from service. Some vehicle defects can only be identified by drivers while the vehicle is in use. For example, during the course of service, drivers may notice that the brakes are squealing, feel the vehicle shake when applying brakes, smell exhaust fumes, etc. In many cases, what may appear as minor defects can lead to major defects when they are not addressed in a timely manner. This is why drivers are considered the first line of defense when it comes to identifying defects and preventing vehicle failures. Documenting Pre-Trip & Post-Trip Inspection Repairs When pre-trip inspection defects are repaired, the repair must be documented. Such repairs can be documented in one of the following ways.
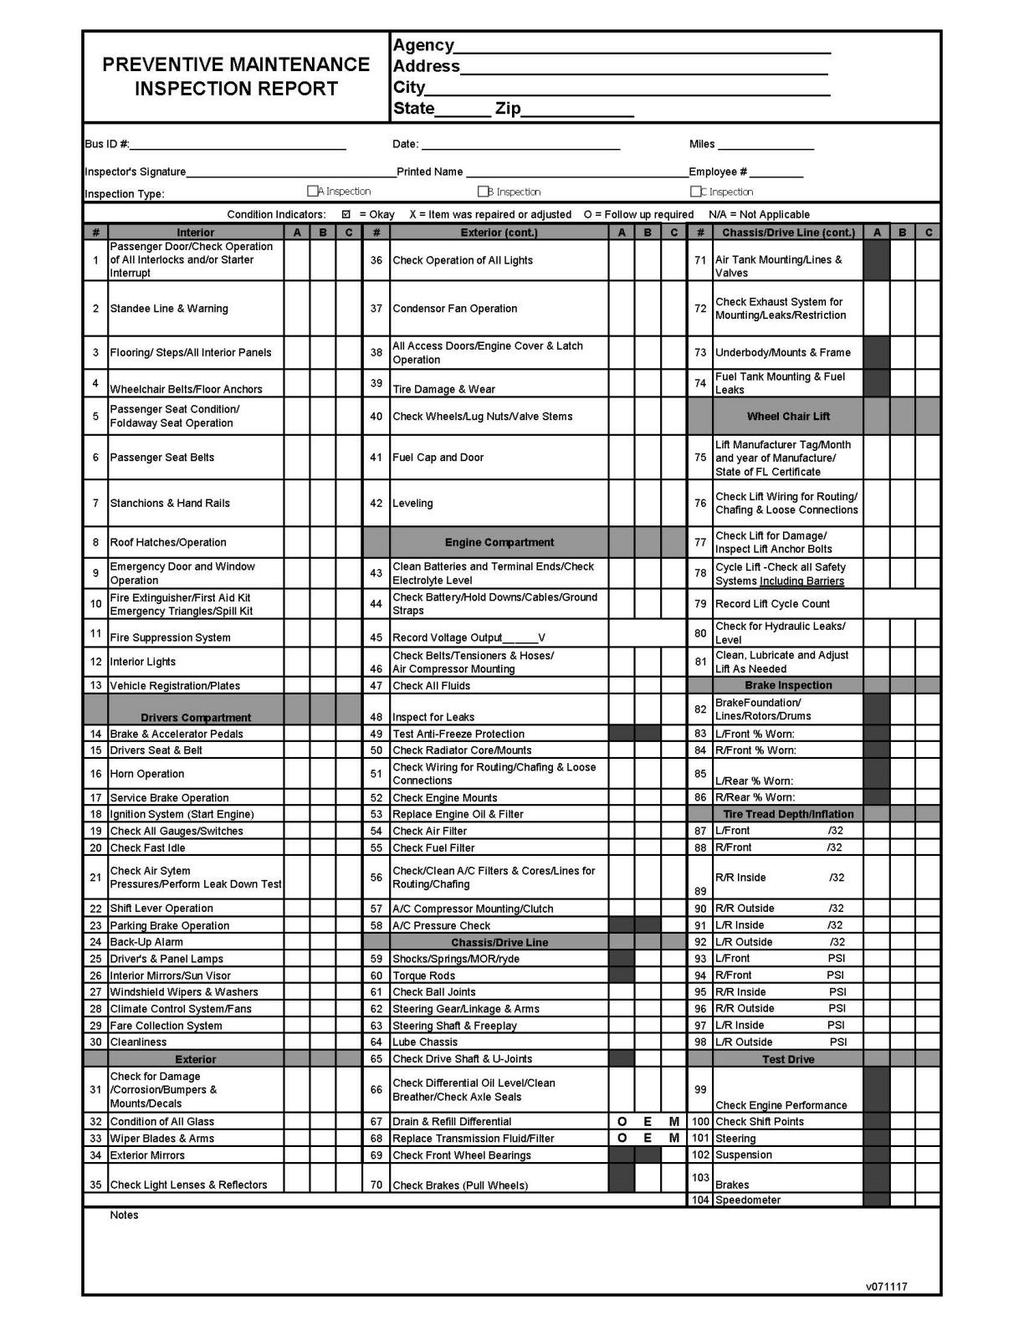
8 1. Pre-trip inspection forms must be signed and dated along with a brief description of the repair made; OR 2. Work order forms showing the repairs must be attached to the pre-trip inspection form. In either case, the pre-trip inspection form and accompanying repair documentation must be filed in the vehicle history file and kept for the life of the vehicle. 1 The Florida Department of Transportation has developed a pre-trip/post-trip inspection form, titled Pre-trip/Post-Trip Inspection Form (Figures 1 & 2), for agency use. This form complies with the minimum maintenance standards regarding these inspections as previously described. The approved form is provided on the following page. Agencies may choose to use their own customized forms for conducting pre-trip/post-trip inspections. However, customized forms must include, at a minimum, all of the required vehicle components listed in Table 1 and illustrated in Figure 1. 1 Per Chapter 14-90, pre-trip inspection forms that do not contain or record defects can be discarded after a minimum of 14 days. However, agencies should check with their FDOT District Representative since the District may require the forms be maintained for a longer period of time.
9
10
11 PREVENTATIVE MAINTENANCE FDOT requires that agencies conduct routine preventative maintenance inspections on their vehicles. These inspections should meet or exceed Original Equipment Manufacturer (OEM) recommendations and/or the minimum maintenance requirements established in the FDOT Preventative Maintenance Standards Manual. In addition to prolonging the useful life of the vehicle, the purpose of preventative maintenance inspections is to proactively identify and repair potential vehicle component failures before they occur. This reduces vehicle downtime, improve passenger safety, and reduces cost. Consider the two following examples. EXAMPLE 1: Brake Replacement During a scheduled preventative maintenance inspection, it was determined that Bus 1 needed new brake pads and the repair was made. Brakes on Bus 2 were not replaced until a breakdown occurred, resulting in additional parts replacement and cost. Vehicle ID Type of Maintenance Repair Work Performed Parts Replaced Total Cost Bus 1 Scheduled Rear brake job Brake pads $ Bus 2 Unscheduled due to Rear brake job Calipers, pads and breakdown rotors $1, EXAMPLE 2: Bearings Maintenance Bearings on Bus 1 were determined to need replacement during a schedule maintenance inspection at a cost of $150. Bearings on Bus 2 were not properly maintained, resulting in a breakdown and costing the agency $1,630. Vehicle ID Type of Maintenance Repair Work Performed Parts Replaced Total Cost Bus 1 Scheduled Repack front wheel Front seals bearings $ Bus 2 Unscheduled due to Replace all front end Spindle, brake rotor, breakdown parts on side that failed pads, caliper, bearings, seals and a new wheel $1,630.00
12 ABC Progressive Inspections Preventative maintenance inspections should be scheduled in a progressive method by using a predetermined target mileage interval chosen by the agency. These intervals, however, should not exceed 6,000 miles. 2 Although some agencies have attempted to use dates when scheduling preventative maintenance inspections, mileage intervals should be used, particularly for high-mileage vehicles. The ABC progressive inspection method is comprised of three progressive levels: A level inspections, B level inspections and C level inspections. Inspections should be performed in the following sequence: A, B, A, C. For example, if an agency chooses to perform preventative maintenance inspections using a 6,000 mile interval, the inspections would follow this sequence: Inspection Type A B A C A B A B C Mileage of Inspection 6,000 miles 12,000 miles 18,000 miles 24,000 miles 30,000 miles 36,000 miles 42,000 miles 48,000 miles 54,000 miles 2 Agencies may elect to use shorter mileage intervals, but this should be specified within their maintenance plan and an outsource provider should be provided with that schedule. Shorter mileage intervals will also result in potentially unnecessary cost.
13 Conducting Preventative Maintenance Inspections The following tables provide a step-by-step guide for conducting preventative maintenance inspections using the ABC progressive inspection method. Table 3 identifies the minimum components/items that must be inspected during an A level inspection. Table 4 identifies the components/items that must be inspected during a B level inspection, and Table 5 identifies C level inspection items. NOTE ABAC inspections are cumulative. This means that B level inspections must also include A level inspections, and C level inspections must include both A and B level inspections. NOTE Whether you perform maintenance inspections in-house, outsource them, or use multiple vendors to conduct preventative maintenance inspections, FDOT has determined that the following vehicle components require a vehicle lift to be properly inspected: Ball joints A-frames bushings Physical check of suspension parts Steering U-joints Front wheel bearings Rear wheel bearings
14 Table 3: A Level Inspection Components The Item # in these tables correspond to numbers on the FDOT-approved Preventative Maintenance Inspection Report Checklist. This form is included in the Preventative Maintenance Standards Manual. Item # Component Interior Passenger Door/ Check Operation of All Interlocks and/or Starter Interrupt Check to ensure interlock system is working properly when parking brake is applied. 1 Vehicle should not come out of park with either the front door or wheelchair lift door open. If equipped, check passenger door sensitive edge operation. Standee Line & Warning On vehicles designed to allow standees, check the condition of the standee line and sign. 2 The line must be of contrasting color at least two inches wide and the sign, prohibiting anyone from occupying a space forward of the line, must be posted at or near the front of the vehicle Flooring/ Steps/ All Interior Panels Inspect floor covering for tears, rips, or gouges. Inspect headliner for damage, sag, or dirt. Inspect the condition of side panels. Check steps for yellow edge or nosing to pronounce presence of steps. Wheelchair Belts/ Floor Anchors Check wheelchair seat belt lap extensions and wheelchair shoulder harnesses for proper function. Inspect wheelchair securement devices for damaged webbing and proper operation of locking mechanism. Inspect floor tie down anchors. Ensure the vehicle is equipped with the proper amount of securement devices for the number of wheelchair positions. Passenger Seat Condition/ Foldaway Seat Operation Seat covering for the driver and passenger seats should be inspected for rips, tears, gouges, exposed springs, and security of floor mounting. Arm rest(s) should be inspected for proper attachment to seat(s). Check folding seats for proper operation of adjustment controls. Check the driver s seat for proper fore and aft movement and tracks should be lubricated as necessary. Passenger Seat Belts Seat belts should be inspected for proper retraction mechanisms and damaged webbing. Stanchions & Hand Rails Inspect condition of the grab rails and stanchions for the standee passengers. Tighten grab rails as necessary. Note if extensive repairs are necessary. Roof Hatches/ Operation Check roof hatches to ensure proper function and that they shut and open properly. Emergency Door and Window Operation Check emergency door operation to ensure proper function. Check window exits to ensure all exits function properly. Ensure that all emergency exit signage is clear and legible.
15 Table 3: A Level Inspection Components (cont.) Item # Component Fire Extinguisher/ First Aid Kit/ Emergency Triangles/ Spill Kit Inspect the above mentioned safety equipment to ensure it is in proper working order, securely mounted, and easily accessible. Fire extinguisher must be fully charged with a dry chemical or carbon dioxide, having at least a 1A:BC rating and bearing the label Underwriters Laboratory Inc. Check maintenance tag for expiration date and condition of all components for damage or conditions that may prevent operation. Nozzle outlets must be unobstructed and properly aimed. Fire Suppression System If equipped with fire suppression system check System OK LED is illuminated. Check that system is properly charged and that all instruction labels are intact, clean, and legible. Ensure inspection tag for expiration date. Check the condition of all components for damage or conditions that may prevent operation. Nozzle outlets must be unobstructed, properly aimed, and must have their protective covers. Follow the fire suppression system manufacturer s guidelines for servicing the system. Interior Lights Inspect the interior lights. Check step well lights if applicable for proper function by opening door. Check dome light switch/rheostat. Check turn signal and the hi-lo beam switches as well as the indicators on dash for proper function. Check all emergency exit lights at emergency windows and rear exit door. Vehicle Registration/ Plates Check condition and currency of license plate and registration and appropriate manuals. Ensure accident report forms and other appropriate documents are up to date and available in the vehicle. Check for wheelchair lift operating manual, if applicable. Drivers Compartment Brake & Accelerator Pedals Check pedals for sticking, binding, or failure to return to normal position. Check pedals for excessive pad wear. Driver s Seat & Belt Check the driver s seat for proper fore and aft movement, and tracks should be lubricated as necessary. Check the driver s seat belt for proper retraction mechanisms and damaged webbing. Horn Operation Check horn. The horn must be capable of emitting a sound audible under normal conditions from a distance of not less than 200 feet. Service Brake Operation From the driver s seat, pump the brake pedal three or four times and then hold constant downward pressure on pedal for at least five seconds. The brake pedal should hold firm and not drift down. If equipped with a hydraulic brake reserve system, with the key off, depress the brake pedal and listen for the sound of the reserve system electric motor. If equipped with hydro boost system or vacuum assist system, with the key off, pump the brake at least five times and depress the brake pedal. It should feel firm. Remain holding the pedal and start the engine. The pedal should move slightly to the floor and then rise. Check that the warning buzzer or light is off.
16 Table 3: A Level Inspection Components (cont.) Item # Component 18 Ignition System (Start Engine) When starting the engine, listen for starter drag or grind, belt squeal, and any other unusual noises. As engine warms, monitor all gauges. Check shift selector for smooth operation and can be shifted into all ranges. 19 Check All Gauges/ Switches Activate ignition switch and check all warning indicator lights (oil, battery, engine, etc.) for proper operation. If the vehicle is equipped with gauges, check proper readings after the engine has been started. Check all switches, levers, and knobs for proper function. 20 Check Fast Idle Check fast idle system for proper operation. 21 Check Air System Pressures/ Perform Leak Down Test Drain all air tanks and check operation of system drier. Build air system to maximum air pressure and observe governor cut out ( psi). Shut off engine and chock wheels if necessary. Release emergency brake and make a full brake application and hold for one minute. Check air gauge to see if pressure drops more than three pounds in one minute. Next, rapidly pump the foot brake. Buzzer should activate before air pressure drops below 60 psi. Continue to pump brakes until emergency brake pops up. This should occur at approximately 40 psi. The amount of time it takes to build the air pressure is important. Air pressure should go from 85psi to 100psi in 40 seconds. 22 Shift Lever Operation Move the shift lever into each gear and ensure the detents are operating correctly. 23 Parking Brake Operation While the vehicle is on an incline, apply the parking brake and shift vehicle into low gear slightly pulling against the brakes. Vehicle should not move. If the vehicle cannot be checked on an incline, lightly accelerate the vehicle while the parking brake is applied. Again, the vehicle should not move. Parking brake should be adjusted to hold the vehicle in all terrains. 24 Back-Up Alarm While depressing the brakes shift the vehicle into reverse and check the audible back-up alarm. 25 Driver s & Panel Lamps Inspect the interior lights. Check step well lights if applicable for proper function by opening door. Check dome light switch/rheostat. Check turn signal and the hi-lo beam switches as well as the indicators on dash for proper function. Check all emergency exit lights at emergency windows and rear exit door. Check all dash and gauge lights for proper operation. 26 Interior Mirrors/ Sun Visor Check inside rear view mirror(s) for proper mounting, adjustment, and condition of the glass. Also check the right and left exterior mirrors for adequate field of vision. Check sun visor.
17 Table 3: A Level Inspection Components (cont.) Item # Component 27 Windshield Wipers & Washers Inspect windshield for cracks, scratches, and any visible damage. Operate windshield wipers through all ranges on wet glass. Check washer fluid level. 28 Climate Control System/ Fans Operate and check heater and air conditioning controls through all selector ranges and check varying fan speed for proper function. Check rear unit output as applicable. 29 Fare Collection System If equipped, ensure fare collection equipment is securely mounted and operating properly. 30 Cleanliness Check the general cleanliness of the vehicle interior. Exterior Inspection 31 Check for Damage/ Corrosion/ Bumpers & Mounts/ Decals Inspect exterior of vehicle for signs of body damage, missing trim, decals, paint condition, and any signs of developing rust. Check front and rear bumpers. Inspect for loose, damaged or missing hardware. Note and repair any significant damage. Inspect the outside of all windows for cracks, blemishes, or other damage. Inspect mirror brackets for secure mounting or rusting. Check mirrors for broken/fading glass. 32 Condition of All Glass Inspect the outside of all windows for cracks, blemishes, or other damage. 33 Wiper Blades & Arms Inspect condition of windshield wiper blades and arms. Replace if needed. 34 Exterior Mirrors Inspect mirror brackets for secure mounting or rusting. Check mirrors for broken/fading glass. 35 Check Light Lenses & Reflectors Check the condition of the exterior light lenses and reflectors. 36 Check Operation of All Lights Outside assistance may be required when making this check. Check parking, low and hi beam headlights, turn signal operation front and rear, and hazard flashers. Turn on all outside clearance lights and check operation. At this time also check license plate lights, back-up lights, brake lights, decal lights. All lighting must comply with the minimum requirements set for the in Florida Statutes , , , , , , and
18 Table 3: A Level Inspection Components (cont.) Item # Component 37 Condensor Fan Operation Visually inspect fan blades for cracks, bends and proper clearance from shroud or screen. Check for debris. Turn on the air conditioning system and check fan operation. Listen for any unusual noises. 38 All Access Doors/ Engine Cover & Latch Operation Inspect exterior access doors and lubricate hinges or spring latches as necessary. Check hood latch and lubricate. Check hood retainer bar. 39 Tire Damage & Wear Inspect all tires for signs of uneven wear due to imbalance or improper front end alignment, check for exposed cord or steel belts, inspect valve cores, and check sidewalls for scrubbing or damage. Determine tread depth using tread depth gauge. Tread group pattern depth shall not be any less than 4/32 (1/8) inch, measured at any point on a major tread groove for tires on the steering axle and no less than 2/32 (1/16) inch measured at any point on a major tread groove for all other tires. Check air pressure in all tires including spare using tire air gauge. Check condition of spare tire and mounting. Check tires for cuts, nails, or other embedded foreign objects. Check all wheels, including spare, for any damage, welds, or improper bead seating of tire. Check for missing balance weights. Check hubcaps for secure mounting. 40 Check Wheels/ Lug Nuts/ Valve Stems Check wheel lugs for proper torque. Inspect rims for any signs of damage or cracks. Check for any missing lug nuts. 41 Fuel Cap and Door Check fuel cap for proper fit and any signs of damage to fuel servicing piping/ hoses. 42 Leveling Check vehicle for proper leveling. Engine Compartment 43 Clean Batteries and Terminal Ends/ Check Electrolyte Level Check battery mounting tray condition for corrosion and wear. Check battery case for cracking or damage. Check post and fasteners for corrosion clean and cover with protectant. If applicable check and service water levels. If it is maintenance free battery check green indicator. 44 Check Battery Hold Downs/ Cables/ Ground Straps Check battery hold downs. Check cables for fraying or signs of deterioration. Check battery slide out tray for proper function. 45 Record Voltage Output Record battery output voltage. 46 Check Belts/ Tensioners & Hoses/ Air Compressor Mounting Inspect all belts for signs of wear, fraying, cracks, glazing, and proper tension. Inspect heater hoses and connections. Check air compressor mounting for alignment, missing / loose bolts and bracket fractures and/or breaks.
19 Table 3: A Level Inspection Components (cont.) Item # Component 47 Check All Fluids Check transmission fluid level with the fluid warm and the engine running. Check color of fluid for any signs of overheating. Also check the fluid levels for engine oil, engine coolant, power steering fluid, brake fluid and windshield washer fluid. 48 Inspect for Leaks Inspect all lines, hoses and reservoirs for signs of leakage. Check engine, transmission, differential and all engine accessories for signs of leaks around gaskets, seals, drain plugs, etc. Repair as necessary. 50 Check Radiator Core/ Mounts Inspect radiator cap for signs of leaks or pressure loss. Before removing the cap allow the engine to cool down. Relieve any built-up pressure in the system. Remove and inspect the radiator cap. At this time, the radiator cores and the interior of the radiator housing may be visually inspected for corrosion or clogging. Also, if circulation problems are suspected, operation of the water pump and circulation of the coolant may be verified with the engine running. 51 Check Wiring for Routing/ Chafing & Loose Connections Inspect wiring for signs of chafing, corrosion, loss of insulation and crimping. Ensure wiring does not come in contact with moving parts or heated surfaces. 52 Check Engine Mounts Check for mounting, routing, leaks and restrictions. Look for any signs of loose hardware or deterioration. 53 Replace Engine Oil & Filter Change oil according to manufacturer s specifications either under the normal or severe duty operating conditions. The information listed below defines which schedule you need to follow for each vehicle. If operating under every day driving conditions, use the recommendations for normal operating conditions. If operating under the following conditions listed below, use the recommendations for severe operating conditions: o Making frequent short trips (less than five miles) o Driving in hot weather stop-and-go traffic o Driving at sustained high speeds during hot weather o Driving in areas with heavy dust (gravel roads, construction zones, etc.) o Making frequent short trips (less than 10 miles) when temperatures are below freezing o Extensive idling and/or low speed driving for long periods of time (taxi, police, door-to-door delivery, etc.) o Towing a trailer 54 Check Air Filter Remove air filter and inspect. Inspect air intake hoses and clamps. Visually inspect all vacuum hoses and connections. Replace air filter as needed.
20 Table 3: A Level Inspection Components (cont.) Item # Component 55 Check Fuel Filter Check and/or replace fuel filter. Inspect fuel lines for leaks or damage. 56 Check/ Clean A/C Filters & Cores/ Lines for Routing/ Chafing Remove filters and clean or replace, if equipped. Inspect lines for any signs of leaks or chafing. Clean condenser and evaporator fins of any debris. 57 A/C Compressor Mounting/ Clutch Inspect compressor for any loose or missing hardware. Check pulley alignment and correct if needed. Ensure all wiring is securely routed. Chassis/Drive Line 61 Check Ball Joints Inspect all ball joints according to manufacturer s recommendations. Lubricate after inspection. Check king pins if applicable. Due to varying road conditions, vehicle type, age of vehicle, and type ofjoint, it is recommended that you check the ball joints on every A inspection or if any of the following symptoms are observed: Front wheel shimmy at low speed Steering wander Clunking noises from the front suspension Camber wear on the tires Note: Most original equipment ball joints today are designed to provide many miles of durability. Many never make it that far for a variety of reasons. One is wear. The constant friction created by turning and driving creates friction between the ball stud and bearing. The rougher the roads and the heavier the vehicle, the faster the rate of wear will occur. Wear can be further accelerated by contamination and/or lack of lubrication. With a greaseable joint, lubing the chassis periodically is necessary to maintain a layer of grease within the joint. Lubing the joint also helps flush out the old grease and contaminants, which extends the service life of the joint. Most OEM ball joints today as well as some aftermarket replacement joints are "sealed for life" and have no grease fittings. Load carrying ball joints do tend to wear at a faster rate than their unloaded counterparts because of the weight they carry. That's why the lower ball joints on an SLA (short long arm) suspension typically wear out before the upper joints. 62 Steering Gear/ Linkage & Arms Check steering column for any absence or looseness of U-bolts or positioning parts; worn, faulty, or any welded universal joints. Check steering wheel broken spokes or cracks and for securement. Check steering box for any mounting bolts loose or missing, any cracks in gear box or mounting brackets. Check for any looseness of the pitman arm on the steering gear output shaft. Check for leaks.
21 Table 3: A Level Inspection Components (cont.) Item # Component 63 Steering Shaft & Free Play Check for any motion, other than rotational, between any linkage member and its attachment point. Check for loose clamps or clamp bolt on tie rod or drag link. Check for linkage components that are not secured with proper pins or devices. Check for any looseness in any threaded joint. 64 Lube Chassis Lubricate all steering and suspension zirk fittings. 66 Check Differential Oil Level/ Clean Breather/ Check Axle Seals Check for proper level. Ensure breather is clean. Check seals for any signs of leakage. Ensure all hardware is secure. 72 Check Exhaust System for Mounting/ Leaks/ Restriction Check the exhaust system for mounting, routing, leaks and restrictions. Wheelchair Lift Inspection 75 Lift Manufacturer Tag/ Month & Year Manufactured/ State of FL Certificate Check that each wheelchair lift or ramp are legibly and permanently marked by the manufacturer or installer with the following information: The manufacturer s name and address The month and year of manufacture A certificate that the wheelchair lift or ramp securement devices, and their installation, conform to State of Florida requirements applicable to accessible buses. 76 Check Lift Wiring for Routing/ Chafing & Loose Connections Inspect all lift wiring for proper routing. Inspect pendant cord for any damage. 77 Check Lift for Damage/ Inspect Lift Anchor Bolts Inspect lift towers for proper alignment. Ensure lift mounting hardware is secure. 78 Cycle Lift Check all Safety Systems Including Barriers Cycle lift from stow position to floor level and check outboard roll stop barrier for proper latching. Continue to lower lift to ground level and check for any leaking, damaged, missing parts, and for smooth operation. Raise lift from ground level. With platform slightly off ground make certain the outboard roll stop barrier raises and it is latched securely. This must be performed by visually inspecting the latching mechanism to ensure it is in the correct locked position and by physically attempting to pull/push barrier down with an adequate amount of force to make certain the barrier is secured. Continue to raise lift to floor level and check for any unusual noises or abnormal operation. Stand on lift platform or place at least 50 pounds of weight on platform and attempt to stow lift. Lift should not fold in. Remove weight and stow lift. Due to varying lift configurations refer to your lifts Owner s Manual for a list of warning lights and audible alarms to ensure all of these safety warning devices are working properly. 79 Record Lift Cycle Count Document the lift cycle count on your preventative maintenance inspection form. 80 Check for Hydraulic Leaks/ Level Inspect cylinders, hoses, pump and reservoir for any signs of leaks. Check for proper fluid level. 81 Clean, Lubricate & Adjust Lift As Needed Check lift padding and labels. Check lift manual operation and instruction label. Lubricate appropriate lube points. (see illustrations at the end of this section) Refer to original owner s manual for lift adjustments if necessary.
22 Table 3: A Level Inspection Components (cont.) Item # Component Tire Tread Depth/Inflation 87 L/ Front Record the tread depth for the left front tire. 88 R/ Front Record the tread depth for the right front tire. 89 R/R Inside Record the tread depth for the right rear inside tire, if applicable. 90 R/R Outside Record the tread depth for the right rear outside tire. 91 L/R Inside Record the tread depth for the left rear inside tire, if applicable. 92 L/R Outside Record the tread depth for the left rear outside tire. 93 L/Front Record the air pressure for the left front tire. 94 R/ Front Record the air pressure for the right front tire. 95 R/R Inside Record the air pressure for the right rear inside tire, if applicable. 96 R/R Outside Record the air pressure for the right rear outside tire. 97 L/R Inside Record the air pressure for the left rear inside tire, if applicable. 98 L/R Outside Record the air pressure for the left rear outside tire, if applicable.
23 Table 4: B Level Inspection Components Remember, during a B level inspection, all A level components must also be checked. Item # Component Chassis/Drive Line 59 Shocks/ Springs/ MOR/ryde Inspect shock absorber cylinders for signs of leakage. Check bushings for signs of wear and the mounting brackets for secure mounting. Inspect coil and/or leaf springs for signs of damage or wear. Check MOR/ryde shear springs if equipped. If equipped with air springs check for leaks, cracks and dry rotting. 60 Torque Rods Inspect for any damaged or missing bushings. Ensure all hardware is intact and secure. 65 Check Drive Shaft & U-Joints Check the driveshaft chock wheels if needed and place transmission in neutral. Grasp either side of the u-joint and rotate it back and forth while watching and feeling for any play between the cross and the yoke. If the cross moves inside the yoke, replacement of the u-joint is warranted. Check slip joint for play. On vehicles with two piece drive shafts, check center support bearing for excessive compression of the rubber insulator. Inspect the center support bearing by rotating the inner race while holding the outer race. Replace if there is evidence of roughness or wear. Lubricate all zirk fittings. Lubricate driveline u-joints and slip yoke. 70 Check Brakes (Pull Wheels) Remove wheels and inspect all brake pads/linings for wear. 71 Air Tank Mounting/ Lines and Valves Check air tank(s), lines and valves for secure mounting. Look for any loose or missing hardware. Check for leaks. 73 Underbody/ Mounts & Frames Inspect underbody mounts and frame for proper securement. Look for any loose or missing hardware, bushing deterioration, cracks, etc. 74 Fuel Tank Mounting & Fuel Leaks Check fuel tank for secure attachment to vehicle by inspecting for loose, broken or missing mounting bolts or brackets (some fuel tanks use springs or rubber bushings to permit movement). Check fuel system for any visible leak at any point. Brake Inspection 82 Brake Foundation/ Lines/ Rotors/ Drums Check rotors/drums for wear, scoring, and warping. Check calipers/cylinders and brake lines for signs of wear, chafing or leaks. Check for any dirt or grease accumulation on the brake system. 83 L/ Front % Worn Record the wear observed on the left front brake. 84 R/ Front % Worn Record the wear observed on the right front brake. 85 L/ Rear % Worn Record the wear observed on the left rear brake. 86 R/ Rear % Worn Record the wear observed on the right rear brake.
24 Table 4: B Level Inspection Components (cont.) Item # Component Test Drive 99 Check Engine Performance Start engine and check for any unusual noises. Check exhaust stream for any unusual color, odor or sound. Check for any active or inactive fault codes and if the engine has any outstanding Technical Service Bulletins from manufacturer. During operational test drive, check for smoothness of acceleration. 100 Check Shift Points During operational test drive, check operation and position of shift lever and indicator. Check operation in each gear. Check shift points through all gear ranges in drive position. 101 Steering During operational test drive, check the centering of the steering wheel and the smoothness of turns. Also check for looseness in steering wheel. 102 Suspension During operational test drive, check for proper tracking of the vehicle, balance of tires, and front end alignment. 103 Brakes Check for smooth pedal operation during braking. Check for any pulling, vibrating or shaking while braking. Check for any unusual noises such as grinding or squealing coming from wheels. 104 Speedometer During operational test drive, check operation of speedometer.
25 Table 5: C Level Inspection Components Remember, during a C level inspection, all A and B level components must also be checked. Item # Component Engine Compartment 49 Test Anti-Freeze Protection Test antifreeze for proper protection level using the correct testing equipment. The protection should be at least -34 degrees which represents a 50/50 mixture of water and antifreeze. More protection may be desired depending on your specific climate region. Coolant should appear clean and translucent. Add, change or flush coolant as necessary to provide adequate protection. 58 A/C Pressure Check Each spring, prior to the season for constant air conditioning use, the air conditioning system should be scheduled for a thorough operational check. The system should be checked with the appropriate air conditioning service equipment and gauges. Check the entire system for leaks. Note: The Freon level should be checked and serviced as necessary. If the system is to be serviced with the opening of a closed system, the complete system should be evacuated; the receiver dryer replaced and the system must be completely recharged, including refrigerant oil. Note: All air conditioning work involving opening the system for repair and recharging must be performed by a licensed certified technician. Chassis/Drive Line 69 Check Front Wheel Bearings Remove and inspect front wheel bearings, clean and lubricate or replace if necessary. OEM Recommended Intervals 67 Drain & Refill Differential Drain and refill differential fluid according to the vehicle s OEM recommended interval. Invoices or work orders documenting this must be placed in the vehicle s history file. 68 Replace Transmission Fluid/ Filter Remove transmission pan and drain fluid according to the vehicle s OEM recommended interval. If the transmission torque converter is equipped with a drain plug, drain fluid from it as well. Inspect debris in the bottom of pan for signs of internal transmission damage. Check the color of fluid for signs of overheating. Remove and replace filter screen. Note any abnormalities on the check off sheet. Invoices or work orders documenting this must be placed in the vehicle s history file.
26
27 OEM Recommendations All vehicles contain an OEM manufacturer manual where specific vehicle components are recommended for inspection or maintenance services are recommended to be performed within designated mileage intervals in order for the vehicle to remain under active warranty status. For example, these manuals may recommend transmission fluids to be replaced at 60,000 miles. In most cases, these manufacturer recommended intervals exceed the intervals stated in the FDOT Preventative Maintenance Standards Manual. An agency may choose to inspect certain vehicle components using the manufacturer recommended mileage interval instead of using the required interval stated in the FDOT Preventative Maintenance Standards Manual. In these cases, the agency must list in their maintenance plan each OEM recommended vehicle component and target mileage interval that will be used. The inspection of these items must be documented on a preventative maintenance inspection form and filed in the vehicle s maintenance history file. The remaining vehicle components listed in the FDOT Preventative Maintenance Standards Manual that do not have OEM manufacturer recommended target mileage intervals must continue to be inspected using the intervals and methods described in the FDOT Preventative Maintenance Standards Manual. Oil Changes Agencies should choose a target mileage for conducting oil changes that meets or exceeds OEM manufacturer recommendations. Agencies are encouraged to perform oil changes during the vehicle s preventative maintenance inspection as this is the most efficient way of reducing vehicle downtime. Many people are taught that vehicles must receive oil changes every 3,000 miles or 3 months, as this has become a normal practice for maintaining personal vehicles. However, in most cases where the vehicles do not have high mileages and are not operating under severe conditions, the target oil change interval can easily exceed 3,000 miles. However, the target oil change interval cannot exceed 6,000 miles unless it meets an OEM recommended mileage interval or unless the agency has supporting documentation from an oil analysis program. If an agency intends to exceed the 6,000 mile oil change interval, the agency must use a systematic approach. At a minimum, the agency must use an oil analysis program to examine wear metals, silica, coolant contamination, and fuel contamination. Wear metals consist of zinc, copper, chromium, tin, and aluminum. Prior to extending the oil change intervals, the agency must pull a minimum of six oil samples for each vehicle using the preventative maintenance inspection interval described in the agency s maintenance plan to establish a baseline on wear metals and silica. The baseline serves as an average on wear metals and silica as long as neither are showing unusually high. During the oil sample analysis, at least 75% of the fleet must fall into the same parameters of not showing contamination. Fuel or coolant contamination indicates a problem that must be addressed immediately. After establishing a baseline on wear metals and silica and provided that oil samples do not show contamination, the agency should extend oil change intervals in 500 mile increments until the agency sees a rise in either silica or wear metals in the oil sample analysis. If the agency detects a rise in either silica or wear metals, the agency should use the previous interval as the established extended oil change interval. There must be
28 documentation of this process kept on file. The agency must also continue to monitor the oil samples through a regular fluid analysis program since conditions could change that might affect oil contamination, potentially changing the extended oil change intervals. Agencies should seek approval from FDOT before implementing extended oil change intervals. Multiple Party Inspections Some agencies have a small in-house maintenance shop or hire a contractor to perform a portion of the preventative maintenance inspections. Vehicle components that require specialized equipment for inspection are typically sent to an outside maintenance vendor and/or facility. In cases where the preventative maintenance inspections are conducted by two or more parties, it is essential that each part of the inspection be performed within the designated target mileage interval. Each of the partial inspections must be documented on separate preventative maintenance inspection forms that provide the date and odometer mileage at the time of the inspection, the name of maintenance facility inspecting the vehicle components and whether the components were found to be ok or deficient.
29 Documenting Preventative Maintenance Inspections The FDOT Preventative Maintenance Standards Manual provides a recommended preventative maintenance inspection form titled Preventive Maintenance Inspection Report that uses the ABC progressive inspection method and complies with FDOT s minimum maintenance requirements. Agencies may alternately choose to create their own preventative maintenance inspection forms to use. However, the form must include all items listed on the FDOT-approved form. Preventative maintenance inspection forms must be thoroughly completed and include basic information about the inspection such as the date and mileage at the time of the inspection. It must also properly identify whether each vehicle component item inspected was found to be ok or deficient. If a safety sensitive item is found to be defective, the vehicle cannot be utilized for service again until the appropriate repairs have been made. Any repair work conducted as a result of defects identified during the preventative maintenance inspection should be attached to the inspection form. Completed preventative maintenance inspection forms and corresponding work orders should then be filed in the vehicle s history file for the life of the vehicle. Repairing Defects When defects are found during preventative maintenance inspections, they must be documented on the preventative maintenance inspection form as being defective. All safety defects found during the preventative maintenance inspections must be repaired before the vehicle resumes transportation service. Again, FDOT has determined that the following vehicle components are considered to be safety sensitive items: Steering System Service and Parking Brakes Suspension and Undercarriage Tires, Wheels and Wheel End Components Fuel and Exhaust Systems All Lights, Mirrors, Wipers and Warning Devices Interlock Systems Interior Controls, Gauges, and Safety Equipment Wheelchair Lifts Air System Emergency Exits (doors, windows, etc.) Fire Suppression Systems All non-safety related defects can be repaired at a later date in cases where agencies need to wait for parts to be ordered or vehicles are needed for transportation service. In these cases, the preventative maintenance inspection that showed the defect should be noted that a repair has been scheduled for repair at a later date. A work order or invoice documenting the necessary repair should be filed in the vehicle history file along with the corresponding preventative maintenance inspection form that showed the defect.
FLORIDA DEPARTMENT OF TRANSPORTATION PREVENTATIVE MAINTENANCE STANDARDS MANUAL
 FLORIDA DEPARTMENT OF TRANSPORTATION PREVENTATIVE MAINTENANCE STANDARDS MANUAL EDITION 4.1 Florida Department of Transportation Public Transit Office developed by The Preventative Maintenance Planning,
FDOT DISTRICT 5 PREVENTATIVE MAINTENANCE PLAN TEMPLATE
 Click here to enter text. Date Adopted: Click here to enter text. Page 1 Insert Agency Name Preventative Maintenance Plan It is the goal of Click here to enter text. to maintain an effective preventative
SRT OPERATIONS MANUAL
 MAINTENANCE SECTION PAGE # VEHICLE DAILY INSPECTION.......................................1 P.M. INSPECTION #1.................................................3 P.M. INSPECTION #2.................................................6
LA County Fire Department Pre -Trip Inspection Class B Vehicles
 LA County Fire Department Pre -Trip Inspection Class B Vehicles Pre Trip Inspection This slide program was designed to assist firefighter s s with their pre trip inspection This slide program comes with
CLASS B PRE-TRIP VEHICLE INSPECTION
 Warren County ESC 320 E. Silver Street Lebanon, OH 45036 April 1, 2006 CLASS B PRE-TRIP VEHICLE INSPECTION A vehicle inspection test evaluates your ability to inspect important parts of a commercial vehicle.
CDL Series Pre-Trip Inspection AT-TC3TS T1-JA01. Pre-Trip Inspection Checklist
 Pre-Trip Inspection Checklist This checklist covers different parts of the vehicle you would check before a trip. Note that some specifications described in the following content may not be the same as
ESCONDIDO FIRE DEPT TRAINING MANUAL Section DRIVER OPERATOR Page 1 of 13 Pre-Trip Inspection Revised
 DRIVER OPERATOR Page 1 of 13 PRE-TRIP INSPECTION The purpose of a vehicle inspection is to identify systems or parts of a vehicle that are not working properly, have failed or are missing parts so that
PRE-TRIP INSPECTION CDL SKILLS TEST
 CDL SKILLS TEST PRE-TRIP INSPECTION Engine Compartment +1 Axle Side and Back of Truck +1 Axle Connections and Trailer +1 Axle External Light Check In-Cab with Brake Check 1810 N WATKINS RD, WATKINS, CO
Department of Motor Vehicles Loudoun County Public Schools School Bus Inspection Study Guide Hand Out
 Department of Motor Vehicles Loudoun County Public Schools School Bus Inspection Study Guide Hand Out During the actual tests, you will be expected to point or touch each of the parts of your vehicle.
SECTION 5 MAINTENANCE
 SECTION 5 Maintenance requirements................................ 166 General maintenance..................................... 167 Does your vehicle need repairing?......................... 170 Scheduled
Other employees or individuals are not allowed to start, pre-trip, or drive the bus without permission from the Transportation Office.
 Pre-Trip Inspection January 27, 2014 Drivers Pre-Trip Inspection The Virginia State Department of Education and Virginia Department of Motor Vehicles REQUIRE a pre-trip inspection. A check must be put
Commercial Vehicle Trip Inspection Schedule Heavy Passenger Vehicles and Trailers
 Accessibility devices Air brake system Cargo ment Coupling devices Alarm does not operate Equipment does not operate Interlock system does not operate Audible air leak Slow air pressure build-up rate Cargo
Hands On Test Scoring Instructions
 Hands On Test Scoring Instructions Each scoring box contains 3 to 6 line items and up to 7 numbers plus a 0. Each section has a separate criteria for scoring. Based on the criteria, you will score the
Taking the CDL Pre-trip Inspection Test
 Taking the CDL Pre-trip Inspection Test Class A Pre-trip Inspection Test: If you are applying for a Class A CDL, you will be required to perform a pre-trip inspection in the vehicle you have brought with
PRE-TRIP Inspection. CDL Skills Test
 CDL Skills Test PRE-TRIP Inspection Engine Compartment +1 Axle Side and Back of Truck +1 Axle Connections and Trailer +1 Axle External Light Check In-Cab with Brake Check 7505 Dahlia St. Commerce City,
TABLE OF CONTENTS Pre Trip and Post Trip Inspections
 TABLE OF CONTENTS Pre Trip and Post Trip Inspections Introduction. 11 Pre Trip Inspection.. 12 Circle Check.. 12 Rear of Bus...12 Right Side of Bus...13 Air Brake Procedure...13 Post Trip Inspection. 13
Vehicle Inspection Study Guide TRUCK/TRAILER (PINTLE HOOK)
") Department of Motor Vehicles Vehicle Inspection Study Guide TRUCK/TRAILER (PINTLE HOOK) During the actual tests, you will be expected to point to or touch each of the parts of your vehicle listed below.
Department of Motor Vehicles Vehicle Inspection Study Guide TRUCK/TRAILER (PINTLE HOOK) During the actual tests, you will be expected to point to or touch each of the parts of your vehicle listed below.
Pre-Trip Inspection Bus, School Bus.
 Pre-Trip Inspection Bus, School Bus. CHECK OUTSIDE IN FRONT OF YOUR VEHICLE (Front of Vehicle, Lights/Reflectors, Engine Compartment & Steering Components) 1. Clearance lights, alternately flashing amber
TRUCKINGTRUTH.COM T T. Daniel B s Pre-Trip Inspection Checklist
 TRUCKINGTRUTH.COM T T Daniel B s Pre-Trip Inspection Checklist 1 My pre-trip begins as I approach the vehicle. I am looking for leaks, leaning one way or the other (which may indicate a low tire or bad
Commercial Vehicle Trip Inspection Schedule School Bus
 Accessibility devices Air brake system Alternating overhead lamps (if the vehicle is required to be equipped with them by a law of Manitoba or Canada or by school authority policy, or if there is evidence
This list applies to buses (other than motor coaches), minibuses and any trailer towed by a bus, minibus or motor coach.
, minibuses and any trailer towed by a bus, minibus or motor coach.") List 2 Bus This list applies to buses (other than motor coaches), minibuses and any trailer towed by a bus, minibus or motor coach. 1. Coupling devices The defects provided for in points 1.C and 1.F apply
List 2 Bus This list applies to buses (other than motor coaches), minibuses and any trailer towed by a bus, minibus or motor coach. 1. Coupling devices The defects provided for in points 1.C and 1.F apply
All outside contractors have to be qualified by Fleet Services.
 Vehicle Practice Practice: Reference: 1 of 7 1.0 INTRODUCTION The Preventive Maintenance Inspection Program is designed to ensure routine service functions are performed at regular intervals on Company
WINDSHIELD WIPER BLADES
 OUTSIDE VEHICLE OUTSIDE VEHICLE GENERAL These are maintenance and inspection items which are considered to be the owner s responsibility. They can be done by the owner or they can have them done at a service
AIS Transportation Preventative Maintenance Procedures Manual
 AIS Transportation Preventative Maintenance Procedures Manual 2016-2017 1 TABLE OF CONTENTS 2 Reason for this document... 2 3 Drivers Daily Pre-Trip Inspection... 2 3.1 Reason for Daily Inspection... 2
As a safety precaution, remove keys from the ignition while working under or around the vehicle.
 CAB AND CHASSIS As a safety precaution, remove keys from the ignition while working under or around the vehicle. 1. Approach Check the overall appearance of vehicle stance (not leaning). Check for signs
SHERMAN VOLUNTEER FIRE DEPARTMENT SVFD DRIVER TRAINING INFORMATION
 SHERMAN VOLUNTEER FIRE DEPARTMENT SVFD DRIVER TRAINING INFORMATION The State of Connecticut requires any member operating a vehicle over 26,000 lbs. gross vehicle weight (GVW) to have at the minimum a
Pre-Trip Inspection Tractor Trailer
 Pre-Trip Inspection Tractor Trailer CHECK OUTSIDE IN FRONT OF YOUR VEHICLE (Front of Vehicle, Lights/Reflectors, Engine Compartment & Steering Components) 1. Clearance lights, head lights, four-way flasher
Ed Kelley Service Consultant. M. Rhoades Certified Technician
 Thank you for allowing us to help you maintain your vehicle. In our effort to help you keep your vehicle operating at peak performance, we have assembled this customized Recommended Action Plan that addresses
NSC DAILY VEHICLE TRIP INSPECTION
 NSC DAILY VEHICLE TRIP INSPECTION GOALS OF THE STANDARD The daily vehicle trip inspection standard is intended to ensure early identification of vehicle problems and defects, and to prevent the operation
Appendices. Appendix 2 Lists of Defects. List 1 Heavy vehicle
 146 Appendix 2 Lists of Defects List 1 Heavy vehicle This list applies to heavy vehicles other than a bus, minibus or motor coach. Any trailer towed by a bus, minibus or motor coach must be inspected in
Table of New Minor and Major Mechanical Defects To Identify During the Mechanical Inspection of a Road Vehicle
 Table of Minor and Major Mechanical Defects 1 - Headlights and lights In the case of a headlight that uses light emitting diodes (LEDs), less than 100% of the diodes are in working order and in the case
A SYSTEMATIC SEQUENCE FOR PM INSPECTIONS
 A SYSTEMATIC SEQUENCE FOR PM INSPECTIONS TYPE OF INSPECTION UNDER THE HOOD GASOLINE AND DIESEL 1 Fuel, oil, exhaust leaks - inspect 2 Oil and fuel lines inspect for kinks and wear 3 Automatic transmission
DRIVER S GUIDE. For VEHICLE INSPECTIONS
 DRIVER S GUIDE For VEHICLE INSPECTIONS The United States Laws and Federal regulations published herein are in public domain. Due to the constantly changing nature of government regulations, it is impossible
Engine Compartment Inspection
 Engine Compartment Inspection Unit Contents Student Page Student Components Learning Activities Sheet... 7 3 Abbreviated Checklist.... 7 5 Objective Sheet... 7 7 Expanded Checklist... 7 9 * Job Sheets
Customer/Dealer name VIN. Inspection Area Check Point Measurements / Comments Description Repair Est.
 Customer/Dealer name Date Gold VIN License/Stock # Year/Make/Model Mileage In/Out / Road Test Starts, idles Check Engine light Instrument panel lights Instrument panel gauges Speedometer, odometer Tachometer
Commercial Vehicle Pre-Trip Inspection Checklist
 Commercial Vehicle Pre-Trip Inspection Checklist The Commercial Vehicle Pre-Trip Inspection Test is designed to test your ability to check a variety of commercial vehicle safety equipment and vehicle components.
Commercial Vehicle Trip Inspection Schedule Trucks, Truck Tractors and Trailers
 Air brake system Cab Cargo securement Coupling devices Audible air leak Slow air pressure build-up rate Driver's or passenger's door does not open Cargo is covered but the cover is not attached, or does
PORSCHE CLUB OF AMERICA - INLAND NORTHWEST REGION. OWNER and Declaration
 PORSCHE CLUB OF AMERICA - INLAND NORTHWEST REGION Driver Education Technical Inspection Program Pre-Event Inspection Welcome to our 2018 Driving Season. This inspection shall be completed within 30 days
Part Inspection, Repair, and Maintenance
 Part 396 - Inspection, Repair, and Maintenance General Requirements (396.3(a)) Every carrier shall systematically inspect, repair, and maintain all commercial motor vehicles under its control. Record Keeping
APPRENTICE TECHNICIAN PROGRESS LOG
 APPRENTICE TECHNICIAN PROGRESS LOG APPRENTICE INRUCTIONS: At the end of each day track your progress on the attached log by including work order number and date next to each new skill you perform. Have
DAILY INSPECTION (TRIP) AND MAINTENANCE REQUIREMENTS BUS, COACH AND SCHOOL BUS
 AND MAINTENANCE REQUIREMENTS BUS, COACH AND SCHOOL BUS") DAILY INSPECTION (TRIP) AND MAINTENANCE REQUIREMENTS BUS, COACH AND SCHOOL BUS September 4, 2007 Queen's Printer for Ontario, 2007. This is an unofficial version of Government of Ontario legal materials.
DAILY INSPECTION (TRIP) AND MAINTENANCE REQUIREMENTS BUS, COACH AND SCHOOL BUS September 4, 2007 Queen's Printer for Ontario, 2007. This is an unofficial version of Government of Ontario legal materials.
O U R V A L U E D C U S T O M E R
 O U R V A L U E D C U S T O M E R Cori Nastro Service Consultant J. Morris Certified Technician Y O U R V E H I C L E Year 2008 Make Lincoln Model MKX Engine Type 3.5L V6 C DOHC (MFI) Odometer 101,678
USPS: Preventative Maintenance (PMI) Directive Last Revision: December 1, 2016
 Directive Last Revision: December 1, 2016") USPS: Preventative Maintenance (PMI) Directive Last Revision: December 1, 2016 The U.S. Postal Service has 200,000 vehicles for Vehicle Body Repair & Painting in of the Postal Fleet. The U.S. Postal Service
USPS: Preventative Maintenance (PMI) Directive Last Revision: December 1, 2016 The U.S. Postal Service has 200,000 vehicles for Vehicle Body Repair & Painting in of the Postal Fleet. The U.S. Postal Service
Asset Maintenance Policy
 Asset Maintenance Policy Grantees are required to maintain project equipment at a high level of cleanliness, safety, and mechanical soundness. At a minimum, grantees will perform maintenance according
HIGHWAY TRAFFIC ACT COMMERCIAL VEHICLE (TRIP INSPECTION AND RECORDS) REGULATIONS
 REGULATIONS") c t HIGHWAY TRAFFIC ACT COMMERCIAL VEHICLE (TRIP INSPECTION AND RECORDS) REGULATIONS PLEASE NOTE This document, prepared by the Legislative Counsel Office, is an office consolidation of this regulation,
c t HIGHWAY TRAFFIC ACT COMMERCIAL VEHICLE (TRIP INSPECTION AND RECORDS) REGULATIONS PLEASE NOTE This document, prepared by the Legislative Counsel Office, is an office consolidation of this regulation,
Zip's Truck Equipment. 316 W. Milwaukee Street New Hampton, Iowa Phone: Fax: Visual Inspection.
 Zip's Truck Equipment 316 W. Milwaukee Street New Hampton, Iowa 50659 Phone: 641-394-3166 Fax: 641-394-4044 Visual Inspection Page: 1 of 6 Customer: Address: Division: Phone: null Reference #: 2NPRLZ9X37M730087
Proactive Methods and Tools for CMV Readiness. Tuesday, April 15 12:30 1:30 p.m. Larry E. Nelson Minnesota Department of Transportation
 Proactive Methods and Tools for CMV Readiness Tuesday, April 15 12:30 1:30 p.m. Larry E. Nelson Minnesota Department of Transportation Unit # 209144 (sample) Class: 33 Plow #: 209145 Wing #: 209146 Sander
A Seven-Step Inspection Method Method of Inspection.
 A Seven-Step Inspection Method Method of Inspection. You should do a pre-trip inspection the same way each time so you will learn all the steps and be less likely to forget something. The following seven-step
Zip's Truck Equipment. 316 W. Milwaukee Street New Hampton, Iowa Phone: Fax: Visual Inspection.
 Zip's Truck Equipment 316 W. Milwaukee Street New Hampton, Iowa 50659 Phone: 641-394-3166 Fax: 641-394-4044 Visual Inspection Page: 1 of 6 Customer: Division: null Address: Phone: Reference #: 1GBKC34J9VJ103606
BEGINNING SCHOOL BUS DRIVER CURRICULUM
 BEGINNING SCHOOL BUS DRIVER CURRICULUM UNIT III VEHICLE INSPECTIONS Revised 11/2007 06/2011 (Page 6 Pre-Trip Inspection) 07/2013 Instructional Content UNIT III VEHICLE INSPECTIONS TABLE OF CONTENTS Table
O U R V A L U E D C U S T O M E R
 O U R V A L U E D C U S T O M E R Cori Nastro Service Consultant J. Ramirez Certified Technician Y O U R V E H I C L E Year 2013 Make GMC Model Terrain Engine Type 2.4L 4-cyl K DOHC (DI) Odometer 105,571
Preventive Maintenance Inspection Form: Trailers
 Preventive Maintenance Inspection Form: Trailers A. Under Structure Test glad hands (glad hand with gauge and valve) Air hose Review history record and insure that parts necessary to complete inspection
It is the responsibility of a public passenger vehicle licensee to ensure that:
 City of Chicago Business Affairs and Consumer Protection Public Vehicle Operations Division 2350 W. Ogden, First Floor Chicago, IL 60608 312-746-4200 BACPPV@CITYOFCHICAGO.ORG WWW.CITYOFCHICAGO.ORG/BACP
Vehicle Inspection Report (DVIR) - Workflow For MCP s 110 and 200
 - Workflow For MCP s 110 and 200") Page 1 Vehicle Inspection Report (DVIR) - Workflow This document contains confidential proprietary information and is the property of Shaw Tracking. The contents of this document may not be disclosed to
Page 1 Vehicle Inspection Report (DVIR) - Workflow This document contains confidential proprietary information and is the property of Shaw Tracking. The contents of this document may not be disclosed to
ENGINE LUBRICATION & COOLING SYSTEMS SECTIONLC CONTENTS. ENGINE LUBRICATION SYSTEM...2 Precautions...2
 ENGINE LUBRICATION & COOLING SYSTEMS SECTIONLC CONTENTS ENGINE LUBRICATION SYSTEM...2 Precautions...2 LIQUID GASKET APPLICATION PROCEDURE...2 Preparation...2 SPECIAL SERVICE TOOLS...2 Lubrication Circuit...3
Section 11 Vehicle Inspection Test
 Section 11 Vehicle Inspection Test This Section Covers Internal Inspection External Inspection During the Vehicle inspection, you must show that the vehicle is safe to drive. You will have to walk around
*[BK00050( ALL)05/95]
![*[BK00050( ALL)05/95]](/thumbs/95/123627048.jpg "*[BK00050( ALL)05/95]") General Information 1 Table of Contents General Maintenance Information... 3 What Maintenance Schedule Do You Follow?... 5 Normal Schedule... 6 Severe Duty Schedule... 16 Owner Maintenance Checks... 30
General Information 1 Table of Contents General Maintenance Information... 3 What Maintenance Schedule Do You Follow?... 5 Normal Schedule... 6 Severe Duty Schedule... 16 Owner Maintenance Checks... 30
Pre and Post Trip Inspection for School Bus Drivers Video Reference Guide and Test
 1 Pre and Post Trip Inspection for School Bus Drivers Video Reference Guide and Test Produced by Video Communications www.safetyvideos.org 2 INTRODUCTION School buses are complicated pieces of equipment.
THE 150-POINT VEHICLE CERTIFICATION CHECKLIST INCLUDES:
 Page 1 THE ACURA DEALERSHIP TECHNICIANS GIVE IT THE ONCE OVER 150 TIMES. Every vehicle must pass stringent measures before it can become a Certified Pre-Owned Acura. Only wellmaintained, late-model Acura
Light condition and operation Windshield glass condition Wiper blade condition Paint condition and corrosion Fluid leaks Door and hood lock condition
 GENERAL CHECKS Engine Compartment The following should be checked regularly: Engine oil level and condition Transmission fluid level and condition Brake fluid level Clutch fluid level Engine coolant level
Accident Prevention Program
 Accident Prevention Program Maintenance Aspects of Owning Your Own Airplane Introduction As an owner-pilot, FAR Part 43 allows you to perform certain types of inspections and maintenance on your airplane.
I-USED VEHICLES - PST
 O U R V A L U E D C U S T O M E R I-USED VEHICLES - PST SK 236-1810 None Alisha Gaudry Service Consultant (306)236-0239 alisha@pineridgeford.com D. Goodwin Certified Technician Y O U R V E H I C L E Year
PSATS CDL PROGRAM. Vehicle Records. PSATS CDL Program 4855 Woodland Drive Enola, PA (P) (F) (E)
 (F) (E)") PSATS CDL PROGRAM Vehicle Records PSATS CDL Program 4855 Woodland Drive Enola, PA 17025 (P) 717-763-0930 (F) 717-763-9732 (E) cdl@psats.org PSATS CDL Program GUIDANCE ON VEHICLE RECORDS In accordance with
PSATS CDL PROGRAM Vehicle Records PSATS CDL Program 4855 Woodland Drive Enola, PA 17025 (P) 717-763-0930 (F) 717-763-9732 (E) cdl@psats.org PSATS CDL Program GUIDANCE ON VEHICLE RECORDS In accordance with
Ed Kelley Service Consultant. J. Brown Certified Technician
 Thank you for allowing us to help you maintain your vehicle. In our effort to help you keep your vehicle operating at peak performance, we have assembled this customized Recommended Action Plan that addresses
O U R V A L U E D C U S T O M E R
 O U R V A L U E D C U S T O M E R Cori Nastro Service Consultant E. Ruiz Certified Technician Y O U R V E H I C L E Year 2000 Make Chevrolet Model Corvette Engine Type 5.7L V8 G OHV (MFI) Odometer 58,837
Page 1 of 6 VAN DAILY VEHICLE PRE CHECKS INFORMATION
 Page 1 of 6 VAN DAILY VEHICLE PRE CHECKS INFORMATION There are approximately 2.5 million vehicles in national fleet in Ireland. As vehicles age they are subject to wear and tear and unless attended to
Used NA/NB Miata Inspection List
 Used NA/NB Miata Inspection List Original Author: Chet95; Updated by the Miata.net community - August 2018 This is a checklist companion to the Wiki article Checking Out a Used NA or NB Miata. This is
Driver s Vehicle Inspection Report
 Driver s Vehicle Inspection Report Check ANY Defective Item and Give Details under Remarks. DATE: TRuCk/TRACTOR NO. Air Compressor Air Lines Battery Brake Accessories Brakes Carburetor Clutch Defroster
TC Series Cooling Systems
 TC Series Cooling Systems Table of Contents Table of Contents...1 List of Figures...1 Safety...2 Introduction...2 General Specifications...2 Types of Coolant...2 Routine Maintenance...2 Surge Tank Coolant
Pre-Trip Vehicle Inspection Circle Check OPERATOR S COMPARTMENT
 Pre-Trip Vehicle Inspection Circle Check 1) Entrance Way: Free and clear of debris Handrails secure Service door is functional 2) Parking Brake: Applied 3) Safety Items contains: Fire Extinguisher and
SUSPENSION 2-1 SUSPENSION TABLE OF CONTENTS
 DN SUSPENSION 2-1 SUSPENSION TABLE OF CONTENTS page ALIGNMENT... 1 FRONT SUSPENSION - 4x2... 6 page FRONT SUSPENSION - 4x4... 14 REAR SUSPENSION... 23 ALIGNMENT TABLE OF CONTENTS page AND OPERATION WHEEL
Section 11 Vehicle Pre-Trip Inspection
 Section 11 Vehicle Pre-Trip Inspection Air Gauge Make sure the air gauge is working properly. Build air pressure to governor cut-out, roughly 120 to 140 psi. Removed Parking Brake Check With the parking
BRAKE SYSTEM Return To Main Table of Contents
 BRAKE SYSTEM Return To Main Table of Contents GENERAL... 2 BRAKE PEDAL... 10 MASTER CYLINDER... 13 BRAKE BOOSTER... 16 BRAKE LINE... 18 PROPORTIONING VALVE... 19 FRONT DISC BRAKE... 20 REAR DRUM BRAKE...
Pre-Trip Inspection 2017 PRESENTED BY DON WEST
 Pre-Trip Inspection 2017 PRESENTED BY DON WEST Everyone knows how to do a pre-trip We do it everyday I ve been driving for twenty years Complacent Were they grandfathered in? Starting your Pre-Trip As
Attached) Image(s): Alignment Quick.jpg. Right-hand mouse-click on link and select 'Open Link in New Tab' Left Front Tire Pressure was 60PSI
 Image(s): Alignment Quick.jpg. Right-hand mouse-click on link and select 'Open Link in New Tab' Left Front Tire Pressure was 60PSI") OK at this time Alignment Quick Check Left Front Tire Right Front Tire Passed Alignment Quick Check (Picture Attached) Alignment Quick.jpg 8/32 (Or Greater) Tread Left Left Front Tire Pressure was 60PSI
OK at this time Alignment Quick Check Left Front Tire Right Front Tire Passed Alignment Quick Check (Picture Attached) Alignment Quick.jpg 8/32 (Or Greater) Tread Left Left Front Tire Pressure was 60PSI
SUSPENSION 2-1 SUSPENSION TABLE OF CONTENTS
 XJ SUSPENSION 2-1 SUSPENSION TABLE OF CONTENTS page ALIGNMENT... 1 FRONT SUSPENSION... 7 page REAR SUSPENSION... 16 ALIGNMENT TABLE OF CONTENTS page AND WHEEL ALIGNMENT...1 DIAGNOSIS AND TESTING SUSPENSION
Service/Inspection Checklist and Report
 Fastrac 2155 and 2170 Service/Inspection Checklist and Report Fastrac 2155 and 2170 Issued by JCB Technical Publications, JCB Service, World Parts Centre, Beamhurst, Uttoxeter, Staffordshire, ST14 5PA,
Vehicle & Operator Services Agency. June 2011
 Vehicle & Operator Services Agency June 2011 . Alan Everingham The aim of VOSA is: To contribute to the improvement of road safety and environmental standards and to the reduction of vehicle crime www.vosa.gov.uk
SCHEDULED MAINTENANCE SERVICE PROGRAM
 NOTES SCHEDULED MAINTENANCE SERVICE PROGRAM Services suggested in this schedule have been determined by the manufacturer s general recommendations and our years of automotive experience in our severe climate
Colorado Recommended Pre-Trip Out of Service Criteria
 Colorado Recommended Pre-Trip Out of Service Criteria School Transportation Office 201 E. Colfax Ave., Denver, CO 80203 February 2014 transportation@cde.state.co.us REPORT TITLE 2 Accelerator: 1) Check
Maintenance and Lubrication
 Maintenance and Lubrication Proper maintenance is necessary to ensure safe, trouble free operation. Inspecting the lift for any wear, damage or other abnormal conditions should be a part of the transit
#1 #2 #3 #4 #5 #6 #7 #8
 JDM Legends Vehicle Inspection Form Date 5/12/11 Int. Color Black Date Acquired 5/9/11 Ext. Color White (Ivory) VIN # KGC10037077 Engine Code L20 Year 1971 Displacement 2.0L Make Nissan Tech Eric Model
SECTION 4A HYDRAULIC BRAKES
 SECTION 4A HYDRAULIC BRAKES CAUTION: Disconnect the negative battery cable before removing or installing any electrical unit or when a tool or equipment could easily come in contact with exposed electrical
Vehicle Final Inspection Checklist Form
 Vehicle Final Inspection list Form Wheelchair Lifts / Platforms: 1. Platform angle is adjusted as specified by manufacturer 2. Lift location in entryway (clears door, operators and door posts) 3. All switches
General Knowledge Test D. 1. Which of these statements about driving in areas with strong winds are true?
 General Knowledge Test D 1. Which of these statements about driving in areas with strong winds are true? a. Winds are especially a problem when coming out of tunnels. b. You should drive alongside other
Webinar Series. APTA Bus Technical Maintenance Committee Webinar Series. Disc Brake Wheels On Inspection. Presents
 1 Webinar Series APTA Bus Technical Maintenance Committee Webinar Series Presents Disc Brake Wheels On Inspection January 28, 2015 2 Introduction Welcome to today s webinar in which we will cover a wheels
LUBRICATION AND MAINTENANCE
 DN LUBRICATION AND MAINTENANCE 0-1 LUBRICATION AND MAINTENANCE TABLE OF CONTENTS LUBRICANTS... 1 MAINTENANCE SCHEDULES... 3 JUMP STARTING, TOWING AND HOISTING... 8 LUBRICANTS TABLE OF CONTENTS SERVICE
SECTION 8 2 DO IT YOURSELF MAINTENANCE. Chassis
 DO IT YOURSELF MAINTENANCE Chassis SECTION 8 2 Checking the coolant level of the traction motor................ 184 Checking the radiator....................................... 185 Checking brake fluid........................................
Standard features. Standard features of the Unimog U500 NA 2005 model
 of the Unimog U500 NA 2005 model Engine: - MB 906 diesel engine; 260 hp at 2,200 rpm, torque 700 ft-lbs, max. rpm: 2,500 - Mercedes-Benz 6-cylinder diesel engine water cooled, turbo charger and intercooler
SECTION steering mechanism
 07-302.01/ 1 2011MR17 SECTION 07-302.01 GENERAL Description See Figure 1. The includes the steering wheel (1), the steering column, the miter box (3), the steering shafts (2 and 4), and the drag link (7).
 Page 1 of 8 SECTION 204-00: Suspension System - General Information 1998 Contour/Mystique Workshop Manual DIAGNOSIS AND TESTING Procedure revision date: 09/14/2001 Suspension System Special Tool(s) Dial
First 50 Hours. These checks should be performed after the machine has been in service for 50 hours.
 Section 5-4-2 Maintenance Checklists Periodic scheduled maintenance is intended to be performed in a complete maintenance facility by trained mechanics. Scheduled maintenance procedures can be found by
O U R V A L U E D C U S T O M E R
 O U R V A L U E D C U S T O M E R Cori Nastro Service Consultant D. don juan Certified Technician Y O U R V E H I C L E Year 2005 Make Cadillac Model CTS Engine Type 3.6L V6 7 DOHC (MFI) Odometer 125,843
As stated, these are solely based off of how I like to do the Pre-Trip. I give my personal opinions as well as some helpful tips.
 Here are our sections: Engine Compartment Drivers Door Fuel Area Coupling System Trailer (Please note in the type of suspension your trailer has) Light Check In-Cab Inspection and Brake Tests You will
LUBRICATION AND MAINTENANCE
 PL LUBRICATION AND MAINTENANCE 0-1 LUBRICATION AND MAINTENANCE CONTENTS GENERAL INFORMATION... 1 JUMP STARTING, TOWING AND HOISTING... 7 MAINTENANCE SCHEDULES... 3 GENERAL INFORMATION INDEX GENERAL INFORMATION
Course Information Course Number: AMT 1003 Course Name: Automotive Foundations
 Course Information Course Number: AMT 1003 Course Name: Automotive Foundations Credit-By-Assessment (CBA) Competency List Written Assessment Competency List Electrical Describe the effects of temperature,
Commercial Driver s License Manual SECTION 2. Section-2 Driving Safely
 SECTION 2 driving safely this section Is for all commercial drivers Section-2 Driving Safely section 2 - driving safely this section covers vehicle Inspection basic control of Your vehicle shifting Gears
IVTM Installation Manual
 Integrated Vehicle Tire Pressure Monitoring IVTM Installation Manual 2nd edition Copyright WABCO 2006 Vehicle Control Systems An American Standard Company The right of amendment is reserved Version 002/06.06(us)
Pre-Purchase Inspection Report
 Inspecting Shop Name Address Phone Shop Foreman Mechanic Year Make Model Vin Color Miles Engine ECM Horsepower Torque Transmission Engine Brake 3 stage Rear Ends Model Ratio Differential Lock Steering
AIR BRAKES THIS SECTION IS FOR DRIVERS WHO DRIVE VEHICLES WITH AIR BRAKES
 Section 5 AIR BRAKES THIS SECTION IS FOR DRIVERS WHO DRIVE VEHICLES WITH AIR BRAKES AIR BRAKES/Section 5 SECTION 5: AIR BRAKES THIS SECTION COVERS Air Brake System Parts Dual Air Brake Systems Inspecting