CAREFULLY READ THESE GUIDELINES BEFORE STARTING!
|
|
|
- Ellen Hines
- 5 years ago
- Views:
Transcription
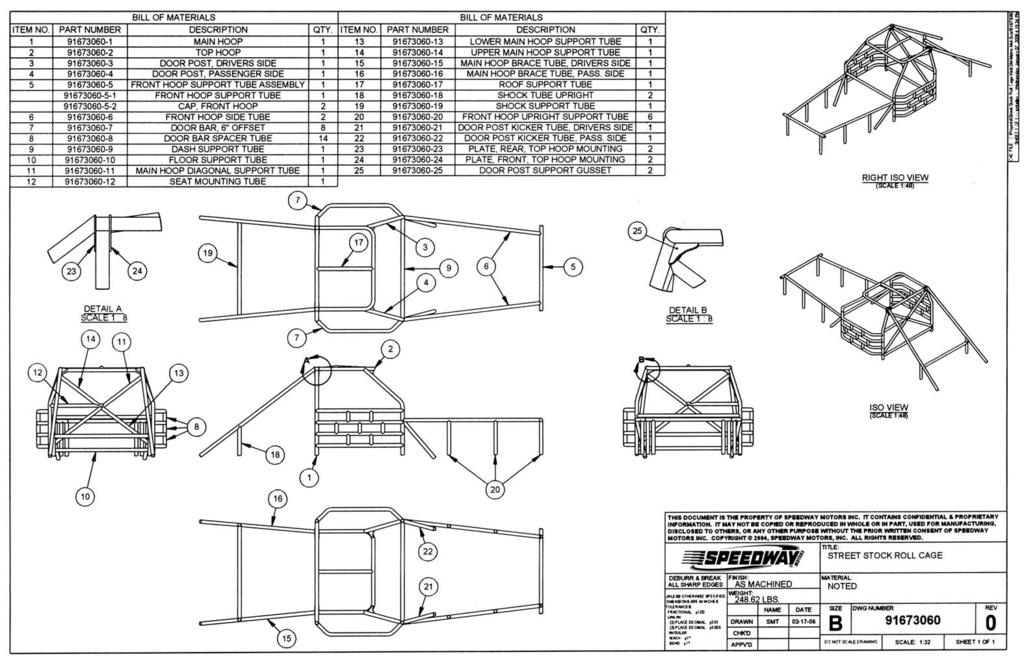
1 INSTRUCTIONS * * Street Stock Roll Cage Kit Installation Guidelines CAREFULLY READ THESE GUIDELINES BEFORE STARTING! These are the basic guidelines for the installation of a roll cage as used in circle track racing applications. In no way do we imply that these are the standard for roll cage installation. You must contact the sanctioning body in which you intend to participate and request the rules and regulations for your particular class with regards to tube diameter, tube wall thickness, material specifications, seat, harness, and fuel tank mounting requirements. If you lack the equipment or experience to complete this type of construction you should seek the advice of an experienced chassis builder. All finish welding should be accomplished by a certified welder. NOTE: As this kit is universal in order to fit in different classes or organizations several of the tubes are longer than necessary, or, are not notched on one end to facilitate custom installations. TOOLS RECOMMENDED: Cutting Torch 7" Grinder 4" Grinder Speedy Tubing Notcher Wire Brush Floor Jack 4 or more Jack Stands Reciprocating Saw Air Chisel Hammers Pliers Levels Angle Finder Tape Measures Wire Feed Welder Fire Extinguisher Gloves (WEAR AT ALL TIMES!) Safety Glasses (WEAR AT ALL TIMES)! Speedway Motors Inc., P.O. Box Lincoln, NE , Speedway Motors, Inc.
2 1) PREPARE CAR A) Prior to any cutting, welding or fabrication, you would normally strip the car of non-essentials. The first and most important item to be removed would be the fuel tank. It is recommended this be done outdoors with great caution. Also with great care, remove all glass from car. (WEAR EYE PROTECTION AND GLOVES AT ALL TIMES). B) Next, you would remove the doors, hood, front end sheet metal, trunk lid and all interior items not required by the rules. C) Then remove drive shaft, engine and transmission as needed. D) Raise car to a comfortable height to allow easy access to the underside of the car. Place jack stands under the frame at the cowl area and in front of the rear axle. Additional stands at each corner would be advised. E) Place a level on the rocker panels on each side and across the frame, both front and rear. Adjust or shim jack stands until car is level in each direction. 2) SUB-FRAME CONNECTION (UNI-BODY OR SUB-FRAME CARS ONLY) Don't be tempted to cut the roof off at this point!! On uni-body and sub-frame cars, you need to tie the front frame/sub-frame to the rear uni-body. Not only does this help take much of the flex out of the chassis, it also gives you something to weld the roll cage and door bars to. Normally 2"x2" or 2"x3".120 wall tubing is used. (This material is NOT included with your kit. Available locally from welding shop). A) Locate where the front of the leaf spring mounts to the body. On some cars the leaf spring attaches to a bracket that bolts to the body. If your car has this feature, it is recommended that you retain the ability to replace the bracket easily when damaged (don't just weld it up). Start by removing sheet metal from the inside of the car directly over where the spring mount is located. You will be adding tubing to this area, so only remove as much material as needed. B) Lay tubing in spring mount recess of uni-body and tack weld in place. Then place a piece of tubing from this piece over to the rocker panel and tack in place. In most cases this is what you will mount your roll cage hoop to, so plan ahead. C) Now you will need to locate where on the front frame you are going to attach the frame connector to. On most Camaro/Firebird/Nova sub frames, 2''x3''.120 wall tubing will fit into the original frame. This will run back to the tubing you welded into the spring mount recess. In most cases you will need to notch the floor pan to allow the frame connector to clear. Try to get the tubing as far into the original frame as possible and tack weld in place. D) Now run 2"x2".120 wall tubing along the rocker panel. This is what you will attach the door bars and door post to. Measure the length of your door bar and make sure the rocker panel tubing is far enough forward to attach the door post leg to. Run 2"x2".120 tubing from the frame connector to the rocker panel tubing. Once you have all tubing in place and are comfortable with its layout, finish weld all tubing joints.
3 3) REAR HOOP INSTALLATION A) Remove roof. ( A reciprocating saw works best here.) B) Locate the area where the rear hoop will be attached to the frame. Measure ahead the length of the door bar to make sure the door post and windshield post fit close, but do not interfere with each other. On a full frame car you will need to remove enough sheet metal from the floor to allow you to weld the hoop to the frame. On the uni-body cars you should have already prepared the body and tied the sub-frame together. (See 2 above) C) There are several different ways to attach the rear hoop to the frame. One is to use a hole saw and drill a hole into the frame rail on each side the same width as the rear hoop. Use caution when doing this, as some frame rails are not wide enough to accept the tubing without weakening the frame. Also some frames are rusted to the point you may need to plate the frame to strengthen it. Another method is to make a plate out of 1/8" plate 2 1/2"x21/2" and hole saw a 1 7/8" hole in the center. Weld this plate to the top of the frame rail, then set the rear hoop into it. This offers a degree of shear strength you would not get by just welding it to the top of the frame. D) Lay the rear hoop on the floor and find true center of the top. Then lay the roof hoop and gussets in place. Measure from center line out to each side and center roof hoop with the rear hoop. Tack weld the gussets only. E) Now put rear hoop in place and set roof back on. Measure how much you need to remove from the hoop. (Remember, measure twice, cut once.) It is best if the hoop just clears the roof when installed. Check rear hoop for level and square and tack weld in place. You may have to trim the inner sheet metal from the roof for additional clearance. 4) ROOF HOOP INSTALLATION A) With the roof in place, measure from rear hoop to the front edge of the roof to determine how much to remove from the roof hoop. Trim as needed. Level, square and tack weld. 5) DOOR POST INSTALLATION A) With the short end of the door post down, position the door post in place using the door bars as a guide. This allows you to mark the exact location for the door post. As in 3-C above, you will need to determine how you want to attach the door post to the frame. Once this is done, position door post in place and determine the maximum height above the frame that allows clearance between the door post and the windshield post. Trim as required. Cut long end of door post off flush with TOP of roof hoop. You will want to keep the door post behind the windshield post as much as possible to prevent blocking line of vision. THE DOOR POSTS ARE THE MOST DIFFICULT PIECES TO FIT IN THE ROLL CAGE KIT. BE PATIENT AND MAKE SMALL CUTS. USE SCRAP PIECES OR CARDBOARD TEMPLATES TO TRIAL FIT.
 DOOR BAR INSTALLATION A) Starting with the top door bar, check fit against door skin. Level in center and both ends. Tack weld.")
4 B) When a good fit is achieved, check with level and use door bars to position door post. Tack weld. C) Repeat for other side. 6) DOOR BAR INSTALLATION A) Starting with the top door bar, check fit against door skin. Level in center and both ends. Tack weld. B) Position second door bar and place spacers between top and second door bar. Level each end and tack ends only. Repeat with third and fourth door bars. Trial fit door skin with each door bar for fit. C) Repeat for other side. 7) ROOF HOOP DIAGONAL BAR A) This bar can be installed either diagonally or straight. Check your rules to clarify. 8) INSTALL DASH BAR BETWEEN DOOR POSTS. 9) REAR HOOP DIAGONAL, CROSS BAR AND SEAT MOUNT. A) Install lower rear hoop cross bar just above transmission tunnel. Level and tack weld. B) Install rear hoop diagonal bar. Tack weld. C) Install seat belt/seat brace bar. This should be approximately 2" below shoulder height. Level and tack weld. 10) REAR HOOP TO TRUNK BRACE INSTALLATION A) Locate where you want the braces to connect in the trunk. Normally on a leaf spring car this would be directly above where the rear shackle would mount to the frame. It is advised to weld a piece of 2"x3" 3/16 thick plate to the top of the frame at this connection. You will need to remove sheet metal to allow the tubing to pass through. B) Install rear shock bar and support braces. If the car is a uni-body design, you will need to use a plate (such as in 10-A) to reinforce the floor where these tubes attach. Coil spring cars would run these bars to the top of the coil spring bucket.
5 11) FRONT HOOP INSTALLATION A) Install fenders and cross measure to get them square. Measure hood to get width correct. B) Determine where the radiator and shroud are to be located. C) Cut two uprights to hold front most cross bar at proper height to support front fenders and radiator. The front cross bar may be cut to desired width and the ends capped, but is not necessary. Normally the hood pins would be mounted to the bar, so plan ahead. Do not weld at this point. D) You now need to trim sheet metal from the firewall to allow the front loop tubing to pass through. Remember it has to clear the master cyl., booster, etc. E) Measure from the door post to up to the uprights at the radiator support. Cut tubing to length, fit and tack weld. F) Add braces as close to the upper control arm mounts as possible. Some use these as their upper shock mount. G) Now turn wheels all the way both directions and bounce front end as far as possible to check for tire clearance. It is best if checked with the wheel/tire combination you will race with. Check for clearance at all points the tires could rub. 12) FINISH UP Speedway Motors, Inc A) Install 45 degree brace from the door post to the dogleg area of the frame. Each application will be different. Placement and clearance will need to be considered carefully. B) Check hood and roof fit one more time. If everything fits the way you want, it's time to finish weld all joints. C) Re-attach roof. Weld seams. D) Mounting the seat. Normally you would use a prefabricated seat mount that welds to the roll cage and frame. When positioning the seat, the driver should sit in the car with driving suit and helmet on. Make sure his head is below the top hoop and that he is not so far to the left, that his arms hit the door bars when steering. Also check his line of sight. Too far left and he will be trying to look through the windshield post.
6
7 6" 7" 6" 5" Viewed from back to front
8 IMPORTANT DISCLAIMER In an effort to offer our customers the low prices, quick service and great value, Speedway Motors reserves the right to change suppliers, specifications, colors, prices, materials. Each of the previous items is subject to change without notice. Speedway is not responsible for any typographical errors or misinterpretations. Quantities are limited on some items. WARRANTY DISCLAIMER The purchaser understands and recognizes that racing parts, specialized street rod equipment, and all parts and services sold by Speedway Motors, Inc. are exposed to many and varied conditions due to the manner in which they are installed and used. Speedway Motors, Inc. makes no warranties, either express or implied, including any warranty of merchantability or fitness for a particular purpose other than those contained in its current catalog with respect to the goods identified on the face of the invoice. There is no warranty expressed or implied as to whether the goods sold hereby will protect purchaser or ultimate user of such goods from injury or death. Speedway Motors assumes no liability after this period. DAMAGE CLAIMS Always inspect your package upon delivery. Inspect all packages in the presence of the delivery driver. The driver must note any damage. Ask the driver the Carrier s procedures for handling damage claims. You must hold the original box, packing material and damaged merchandise for inspection or the carrier will not honor the claim. Notify Speedway Motors customer service department for instructions on returning damaged goods. Speedway is not responsible if no notification is given within 5 days of receipt. SHORTAGES Always check the contents of your delivery to insure all the parts that you ordered were received. Please read the invoice. Double check all packing materials, small items may be wrapped inside with these products. Shortages may occur from damage to the box, so save all packing materials. Inspect the box for holes that would allow parts to fall out. If you are missing any item(s) be sure to check your invoice for back orders or canceled items before calling the customer service department. If Speedway has to split a shipment into multiple boxes, packages may be delivered on different days. You need to contact the customer service department within 5 days of delivery to assure the prompt replacement. Speedway Motors assumes no liability after this period. REFUSALS All refused COD customers will be billed a 15% restocking charge plus freight to and from the destination! If you have questions please contact Speedway s customer service department. WARRANTY CLAIMS If an item has a manufacturer s warranty as being free from defects we will exchange only. If the item has been used and you are requesting warranty work, this may take up to 30 days as warranty work is done by the manufacturer NOT Speedway Motors. If you have any questions please contact customer service. RETURNS Speedway wants you to be satisfied with your purchase. If within 30 days after you receive your shipment you are not satisfied, you may return the item for refund or exchange. All exchanged or returned merchandise must be in original factory condition with no modifications or alterations. Returned merchandise must include all packaging materials, warranty cards, manuals, and accessories. If the items being returned need to be repackaged there will be a re-packing charge. Re-pack the item in a sturdy box and include a copy of your invoice and complete the form on the back of the invoice. You must ship orders back PRE-PAID. WE DO NOT ACCEPT COD SHIPMENTS. All exchanges need to have reshipping charges included. Items that are returned after 30 days are subject to 15% restocking charges. All fiberglass returned will have 15% restocking charge. No returns on electrical parts, video tapes, and books. Absolutely no returns on special order or close out merchandise. FREE CATALOGS Speedway Motors offers FREE catalogs for Race, Street, Sprint and Midget, Sport Compact and Pedal Car Restoration. Some items are not legal for sale or use in California on pollution controlled motor vehicles. These items are legal in California for racing vehicles only which may never be used upon a highway. Speedway Motors Inc., P.O. Box Lincoln, NE , Speedway Motors, Inc.
INSTRUCTIONS
 INSTRUCTIONS 910-34489 SOCALOOK RADIUS ROD BRACKET ASSEMBLY One side only/repeat for opposite side. Figure 1 STEP 1. LOCATING RADIUS ROD BRACKETS From under the vehicle, remove the 2 bolts that secure
Front Axle Assembly: Hairpin Radius Rods
 INSTRUCTIONS 916-395 *916-395* August 2011, Speedway Motors, Inc. Front Axle Assembly: Hairpin Radius Rods This radius rod front end kit is used with OEM or aftermarket tube or I-beam axles that use a
Installation and Tuning Instructions for TM Multi Carb linkage kit PLEASE READ INSTRUCTIONS COMPLETELY BEFORE BEGINNING INSTALLATION
 INSTRUCTIONS Installation and Tuning Instructions for TM Multi Carb linkage kit 135-6721 135-6723 Speedway Motors, Inc. September 2009 PLEASE READ INSTRUCTIONS COMPLETELY BEFORE BEGINNING INSTALLATION
INSTRUCTIONS 12 Circuit Wiring Kit Instructions
 Fan 47 9 56 4 7 6 72 40 45 48 5 8 6 Gauge Power Temp Sender Headlight Power Power Radio Constant Power Instruments and Dash Rear of Vehicle Ignition and Lights Fuse Panel & Front of Vehicle Horn Alt Excitor
Wilwood Brake Kit for Total Performance Spindle
 INSTRUCTIONS 835-140170 Speedway Motors, Inc. May 2011 Wilwood Brake Kit for Total Performance Spindle Note: NOTE: Disc brakes operate in a harsh environment. To prevent bolts from working loose, every
INSTRUCTIONS Circuit Wiring Kit Instructions _2017. Fuse Box Connections. (viewed from underside) 2018, Speedway Motors, Inc.
 2018, Speedway Motors, Inc.") Fuse Box Connections (viewed from underside) 4D 4C 100 50 300 4D 4C 4B 4A 43 107 39 103 3B 2G 104 93 2F 2E 2D 2C 2B 40 69A 102 101 105 2G 2F 2E 3A A 2A B 40A,B 27 69A 106 201, Speedway Motors, Inc. 1 Fuse
Fuse Box Connections (viewed from underside) 4D 4C 100 50 300 4D 4C 4B 4A 43 107 39 103 3B 2G 104 93 2F 2E 2D 2C 2B 40 69A 102 101 105 2G 2F 2E 3A A 2A B 40A,B 27 69A 106 201, Speedway Motors, Inc. 1 Fuse
40A A 40B. Horn Relay Connector. Brake Switch. Third Brake Light. Brake Switch. Brake Switch. Wires. page 3. Rear Body Feed Wires.
 Fuse Box Connections (viewed from underside) 4D 4C 4D 0 50 300 4C 43 7 39 3 6 4 93 A 2G 2F 2E 2D 2C 2B 2G 2F 2E 40 69A 2 1 5 27 69A 3A B 40A,B 11A,B 40A 156 Dimmer Dome Feed page 2 Horn Relay 2D 2 29 40B
Please Read Instructions Completely Before Starting Your Installation QTY. PART NO. DESCRIPTION
 INSTRUCTIONS 916-31926 Master Cylinder and Pedal Assembly Speedway Motors, Inc. 2015 Master Cylinder and Pedal Assembly Model T Model A, and '32 Fords The master cylinder is suitable for 4-wheel disc or
INSTRUCTIONS ASSEMBLY INSTRUCTIONS - FOLLOW STEP BY STEP
 INSTRUCTIONS 910-28905 916-28901 March 2011, Speedway Motors, Inc. Adapts '49-'53 Ford/Mercury Flatheads to Late Model, Ford C4 or AOD Automatic Transmissions FORD C4 TRANSMISSION IDENTIFICATION GUIDE
INSTRUCTIONS. 4-Link Triangulated Rear Suspension System FOR MOPAR MUSCLE CARS: B-BODY (RS-5530) B-BODY (RS-5540)
 B-BODY (RS-5540)") MOPAR 1966-1972 B-BODY 4-LINK TRIANGULATED SYSTEM INSTRUCTIONS 4-Link Triangulated Rear Suspension System FOR MOPAR MUSCLE CARS: 1966-1970 B-BODY (RS-5530) 1971-1972 B-BODY (RS-5540) Revised: 7-1-2015
MOPAR 1966-1972 B-BODY 4-LINK TRIANGULATED SYSTEM INSTRUCTIONS 4-Link Triangulated Rear Suspension System FOR MOPAR MUSCLE CARS: 1966-1970 B-BODY (RS-5530) 1971-1972 B-BODY (RS-5540) Revised: 7-1-2015
INSTRUCTIONS. 4-Link Parallel With Panhard Bar Rear Suspension Systems FOR MOPAR MUSCLE CARS: B-BODY (RS-5460)
") MOPAR 1962-1965 B-BODY 4-LINK SYSTEM W/PANHARD BAR INSTRUCTIONS 4-Link Parallel With Panhard Bar Rear Suspension Systems FOR MOPAR MUSCLE CARS: 1962-1965 B-BODY (RS-5460) Revised: 4-1-2014 Page 2 Page
MOPAR 1962-1965 B-BODY 4-LINK SYSTEM W/PANHARD BAR INSTRUCTIONS 4-Link Parallel With Panhard Bar Rear Suspension Systems FOR MOPAR MUSCLE CARS: 1962-1965 B-BODY (RS-5460) Revised: 4-1-2014 Page 2 Page
S&W Race Cars and Components, Inc.
 S&W Race Cars and Components, Inc. 11 Mennonite Church Road Spring City, PA 19475 TECH & INFORMATION: 610-948-7303 ORDERS: 1-800-523-3353 FAX: 610-948-7342 CAUTION!!! - The most important requirement for
Make sure all tubes are installed to your satisfaction BEFORE finish welding!!
 INTRODUCTION: This S&W Roll Bar or Roll Cage performs both a safety and performance function. As a safety device, the main hoop of the cage protects the driver from impact. The rear braces and side bars
Part# C3132/C Up Ford Mustang 8-Point Roll Bar
 Part# C3132/C3156 2005-Up Ford Mustang 8-Point Roll Bar Installation Instructions Please read the instructions completely BEFORE starting this project. Competition Engineering 8-Point Roll Bars are not
7316 INSTRUCTIONS FOR MILD STEEL STRUT AVENGER CHASSIS CHEVY FULL SIZE WITH 3" TOP CHOP
 #917316 Page 1 of 5 7316 INSTRUCTIONS FOR MILD STEEL STRUT AVENGER CHASSIS 1955-1957 CHEVY FULL SIZE WITH 3" TOP CHOP ITEM QTY PART NO/SIZE TUBE CODE DESCRIPTION 1 1 4054 Main hoop 2 1 pr 4154 Cage side
7311 INSTRUCTIONS FOR 4130 STRUT AVENGER CHASSIS CAMARO/FIREBIRD
 #917311 Page 1 of 5 7311 INSTRUCTIONS FOR 4130 STRUT AVENGER CHASSIS 1993-1995 CAMARO/FIREBIRD ITEM QTY PART NO/SIZE TUBE CODE DESCRIPTION 1 1 4382 Main hoop 2 1 pr 4383 Cage side (driver & passenger side)
7333 INSTRUCTIONS FOR MILD STEEL A-ARM AVENGER CHASSIS MUSTANG
 #917333 Page 1 of 5 7333 INSTRUCTIONS FOR MILD STEEL A-ARM AVENGER CHASSIS 1994-2004 MUSTANG ITEM QTY PART NO/SIZE TUBE CODE DESCRIPTION 1 1 4080 Main hoop 2 1 pr 4180 Cage side (driver & passenger side)
INSTRUCTIONS FOR MILD STEEL STRUT AVENGER CHASSIS 1937 CHEVY, SCALED DOWN BODY
 #917325 Page 1 of 5 7325 INSTRUCTIONS FOR MILD STEEL STRUT AVENGER CHASSIS 1937 CHEVY, SCALED DOWN BODY Item Qty Part No/Tube Size Tube Code Description 1 1 4069 Main hoop 2 1 pr 4169 Cage side (driver&passenger
7256 INSTRUCTIONS FOR ELIMINATOR II A-ARM FRONT, 4-LINK REAR, MILD STEEL, INTERMEDIATE, SERIES CHASSIS
 #917256 Page 1 of 7 7256 INSTRUCTIONS FOR ELIMINATOR II A-ARM FRONT, 4-LINK REAR, MILD STEEL, INTERMEDIATE, SERIES CHASSIS ITEM QTY SIZE/PART NO. TUBE CODE DESCRIPTION 1 2 4138 Cage Side 2 2 4208 Forward
Installation Instructions
 Mar 13, 2018 1955-1957 Chevy Smooth Firewall Part number 81511 Installation Instructions The following instructions are intended for professional installers and are guidelines only. Speedtech Performance
7260 INSTRUCTIONS FOR ELIMINATOR II STRUT FRONT, 4-LINK REAR, MILD STEEL, FULL SIZE, SERIES CHASSIS
 #917260 Page 1 of 6 7260 INSTRUCTIONS FOR ELIMINATOR II STRUT FRONT, 4-LINK REAR, MILD STEEL, FULL SIZE, SERIES CHASSIS ITEM QTY SIZE/PART NO. TUBE CODE DESCRIPTION 1 2 4139 Cage Side 2 2 4250 Forward
Section 10 Mini Stocks
 Section 10 Mini Stocks 10.1 DEFINITION. 10.1.1 The word stock will mean unaltered as originally factory produced and installed for make. All Cars and trucks will be stock unless otherwise specified within
INSTALLATION INSTRUCTIONS FOR PLEASE READ AND UNDERSTAND TERMS/POLICIES BEFORE YOU INSTALL THIS SYSTEM
 MOUNTAIN OFF ROAD ENTERPRISES. LLC. P.O. BOX 690 DELTA, COLORADO 81416 970-625-0500 E-mail: info@mountainoffroad.com www.mountainoffroad.com INSTALLATION INSTRUCTIONS FOR 8795-2 PLEASE READ AND UNDERSTAND
CFC Limited Weld Demolition Derby Rules 2018 (Safety Pages) These rules are REQUIRED and must be met or you will not run.
 These rules are REQUIRED and must be met or you will not run.") CFC Limited Weld Demolition Derby Rules 2018 (Safety Pages) These rules are REQUIRED and must be met or you will not run. 1. Overall condition must be safe. This applies to used cars as well as fresh cars.
CFC Limited Weld Demolition Derby Rules 2018 (Safety Pages) These rules are REQUIRED and must be met or you will not run. 1. Overall condition must be safe. This applies to used cars as well as fresh cars.
7211 A-ARM FRONT, 4-LINK, 3 X 2 FRAME, INTERMEDIATE, ELIMINATOR CHASSIS ITEM QTY SIZE/PART NO. TUBE CODE DESCRIPTION
 #917211 Page 1 of 6 7211 A-ARM FRONT, 4-LINK, 3 X 2 FRAME, INTERMEDIATE, ELIMINATOR CHASSIS ITEM QTY SIZE/PART NO. TUBE CODE DESCRIPTION 1 2 4138 Cage Side 2 2 4208 Forward strut 3 1 4038 Main Hoop 4 1
ENDURO 4-6 Cyl Division 2015 RULES AND REGULATIONS
 ENDURO 4-6 Cyl Division 2015 RULES AND REGULATIONS 2. ENDURO 4-6 Cylinder Front Wheel Drive (FWD) BUILDING RULES 1. Open to any make of 4 or 6 cylinder front wheel drive (FWD) car with two or four doors
INSTALLATION INSTRUCTIONS FOR M.O.R.E. SHACKLE REVERSAL SYSTEM (S.R.S. ) PART # THIS SYSTEM FITS Jeep CJ-5, CJ-7, CJ-8 VEHICLES.
 PART # THIS SYSTEM FITS Jeep CJ-5, CJ-7, CJ-8 VEHICLES.") INSTALLATION INSTRUCTIONS FOR M.O.R.E. SHACKLE REVERSAL SYSTEM (S.R.S. ) PART # 7686-6 THIS SYSTEM FITS 1976-1986 Jeep CJ-5, CJ-7, CJ-8 VEHICLES. Please read all instructions carefully (including terms-policies)
INSTALLATION INSTRUCTIONS FOR M.O.R.E. SHACKLE REVERSAL SYSTEM (S.R.S. ) PART # 7686-6 THIS SYSTEM FITS 1976-1986 Jeep CJ-5, CJ-7, CJ-8 VEHICLES. Please read all instructions carefully (including terms-policies)
Please read the following key points before installing this kit.
 Please read the following key points before installing this kit. 1 Before performing the subframe connector installation, the vehicle must be completely assembled with all body and component parts installed
2018 Renegade/V8 Extreme Rules
 2018 2018 Renegade/V8 Extreme Rules Evergreen Speedway, Monroe, WA (Updated 11/13/2017) Rule Book Disclaimer The rules and regulations are designed to provide for the orderly conduct of racing events and
ENDURO Division 2016 RULES AND REGULATIONS
 ENDURO Division 2016 RULES AND REGULATIONS 1. ELIGIBLE VEHICLES: Open to any make of front wheel drive (FWD) car with two or four doors. All wheel drive cars (AWD) will be allowed but driveshaft must be
INSTALLATION INSTRUCTIONS FOR M.OR.E. SHACKLE SYSTEM (S.R.S. ) Please read terms and Policies page 5.
 Please read terms and Policies page 5.") MOUNTAIN OFF ROAD ENTERPRISES INC. P.O. BOX 690, DELTA CO. 81416 970-625-0500 970-625-3747 fax E-mail: info@mountainoffroad.com www.mountainoffroad.com INSTALLATION INSTRUCTIONS FOR M.OR.E. SHACKLE SYSTEM
MOUNTAIN OFF ROAD ENTERPRISES INC. P.O. BOX 690, DELTA CO. 81416 970-625-0500 970-625-3747 fax E-mail: info@mountainoffroad.com www.mountainoffroad.com INSTALLATION INSTRUCTIONS FOR M.OR.E. SHACKLE SYSTEM
5) The trailing arm should then pivot smoothly on the chassis. 6) Install the rear bolt. 7) Place one drop of blue Loctite
 The trailing arm should then pivot smoothly on the chassis. 6) Install the rear bolt. 7) Place one drop of blue Loctite") INSTALLATION INSTRUCTIONS 1301 / 1302 / 1305 / 1306 THANK YOU FOR CHOOSING HOTCHKIS PERFORMANCE PRODUCTS Removal of Stock Lower Trailing Arms 1) Place car on level surface. 2) Support rear of the car on
INSTALLATION INSTRUCTIONS 1301 / 1302 / 1305 / 1306 THANK YOU FOR CHOOSING HOTCHKIS PERFORMANCE PRODUCTS Removal of Stock Lower Trailing Arms 1) Place car on level surface. 2) Support rear of the car on
2236 Sway Bar Installation Instructions
 2236 Sway Bar Installation Instructions Thank you for your purchase of this Hotchkis Performance product. Your stabilizer bar set was designed with the performance and durability you ve come to expect
Detroit Speed, Inc. 4-Point Roll Cage Camaro/Firebird P/N:
 Detroit Speed, Inc. 4-Point Roll Cage 1970-1981 Camaro/Firebird P/N: 011303 Thank you for your purchase of the Detroit Speed 4-Point Roll Cage. The exclusive DSE design follows the interior lines of the
Pro/Series 2000 Tubular A-Arm Front Suspension
 11 Mennonite Church Road Spring City, PA 19475 (610) 948-7303 Installation Instructions Pro/Series 2000 Tubular A-Arm Front Suspension (Pinto-Style) CAUTION!!! The most important requirement for a successful
DAY OF WRECKONING UTAH STATE FAIR SEPT 17TH, 6 PM
 DAY OF WRECKONING UTAH STATE FAIR SEPT 17TH, 6 PM STATEMENT: BECAUSE OF THE CONCERN OF THE HIGH PAYOUTS CAUSING SANDBAGGING WHICH IS ALSO A CONCERN OF MINE. FIRST UNDERSTAND THAT WE HAVE 3 AND ONLY 3 HOURS
INSTALLATION INSTRUCTIONS FOR PLEASE READ AND UNDERSTAND TERMS/POLICIES BEFORE YOU INSTALL THIS SYSTEM
 MOUNTAIN OFF ROAD ENTERPRISES. INC. P.O. BOX 690 DELTA, COLORADO 81416 970-625-0500 E-mail: info@mountainoffroad.com www.mountainoffroad.com INSTALLATION INSTRUCTIONS FOR 8795-3 PLEASE READ AND UNDERSTAND
2017 A AND B GROUP TECH REQUIREMENTS
 Driver Requirements ELIGIBILITY 2017 A AND B GROUP TECH REQUIREMENTS - Drivers must be of legal driving age, and if under 18 must submit a minor release form signed and notarized by their parents/guardians,
SCOTT S HOTRODS n CUSTOMS STANDARD FRONT STEER IFS INSTALLATION INSTRUCTIONS 1
 SCOTT S HOTRODS n CUSTOMS STANDARD FRONT STEER IFS INSTALLATION INSTRUCTIONS 1 Installation Manual for Scott s Hotrods Standard Front Steer IFS ***READ THIS FIRST*** Check the parts list thoroughly to
Installation Instructions Tubular A-Arm Front Suspension
 11 Mennonite Church Road Spring City, PA 19475 (610) 948-7303 Installation Instructions Tubular A-Arm Front Suspension (Mustang II -Style) CAUTION!!! The most important requirement for a successful installation
2015 Hornet Rules. Evergreen Speedway, Monroe, WA. (Updated 12/05/2014)
") 2015 Hornet Rules Evergreen Speedway, Monroe, WA (Updated 12/05/2014) Rule Book Disclaimer The rules and regulations are designed to provide for the orderly conduct of racing events and to establish minimum
2015 Hornet Rules Evergreen Speedway, Monroe, WA (Updated 12/05/2014) Rule Book Disclaimer The rules and regulations are designed to provide for the orderly conduct of racing events and to establish minimum
Alaska State Fair Demolition Derby Rules (LARGE CARS)
") 2017-18 Alaska State Fair Demolition Derby Rules (LARGE CARS) If car does not pass inspection or driver is unwilling to change car to pass inspection, car will not run in derby - absolutely no refunds!!
2017-18 Alaska State Fair Demolition Derby Rules (LARGE CARS) If car does not pass inspection or driver is unwilling to change car to pass inspection, car will not run in derby - absolutely no refunds!!
SANDIA SPEEDWAY 2018 STREET STOCK DIVISION RULES
 SANDIA SPEEDWAY 2018 STREET STOCK DIVISION RULES DRIVER: The minimum age for a driver is fourteen (14), unless approved by two of the following three: race director, tech inspector or promoter. All required
2012 Pro Stock Rules
 2012 Pro Stock Rules Areas highlighted in red are changes for 2012 Revised 5-5-2012 PRO STOCK: Any North American made car 1968 to present. This division was created as a controlled, economical and competitive
REAR SWAY BAR 2207R GM CAMARO/FIREBIRD
 REAR SWAY BAR 2207R 67-69 GM CAMARO/FIREBIRD Thank you for your purchase of this Hotchkis Performance product. Your stabilizer bar set was designed with the performance and durability you ve come to expect
Detroit Speed, Inc. Mini Tubs Camaro/Firebird P/N:
 Detroit Speed, Inc. Mini Tubs 1967-1969 Camaro/Firebird P/N: 040401 The Detroit Speed Mini-Tubs are inner wheel housings designed to accommodate a wider wheel and tire package. They are engineered for
Stock Class Rules 2018
 Stock Class Rules 2018 EVENT RULES DISCLAIMER The rules and/or regulations set forth herein are designed to provide for the orderly conduct of racing events and to establish minimum acceptable requirements
SUPER 4-CYLINDER RULES MODELS
 SOUTHERN OREGON SPEEDWAY 2177 South Pacific Highway Medford, OR 97501 541-282-8066 / 1-800-963-3367 Fax: 541-774-3627 / Website: www.sospeedway.com SUPER 4-CYLINDER RULES 2009 1. MODELS A. Any front engine,
Convertible MM Roll Bar (MMRB-10.1 to -10.7)
") 3430 Sacramento Dr., Unit D San Luis Obispo, CA 93401 Telephone: 805/544-8748 Fax: 805/544-8645 www.maximummotorsports.com 1983-93 Convertible MM Roll Bar (MMRB-10.1 to -10.7) The Maximum Motorsports RB-10.1
3430 Sacramento Dr., Unit D San Luis Obispo, CA 93401 Telephone: 805/544-8748 Fax: 805/544-8645 www.maximummotorsports.com 1983-93 Convertible MM Roll Bar (MMRB-10.1 to -10.7) The Maximum Motorsports RB-10.1
Mounting Body CHAPTER 9
 CHAPTER 9 Mounting Body During the build of your car, you will need to trial fit the body numerous times. It is possible to construct a simple moveable rack that can lift the body and then move the body
Installation Instructions and Suggestions For Jeep YJ Fiberglass Replacement Bodies
 Installation Instructions and Suggestions For Jeep YJ Fiberglass Replacement Bodies Getting started with the removal of your existing Jeep body. Trust nothing to memory; take photos of everything at different
4007/4008/ Camaro/Firebird. Please read the following key points before installing this kit.
 Please read the following key points before installing this kit. 1 Before performing the subframe connector installation, the vehicle must be completely assembled with all body and component parts installed
INSTRUCTIONS FOR STRUT FRONT, 4-LINK REAR, 1 5/8 FRAME, FULL SIZE, 4130 ELIMINATOR CHASSIS
 #917230 Page 1 of 6 7230 INSTRUCTIONS FOR STRUT FRONT, 4-LINK REAR, 1 5/8 FRAME, FULL SIZE, 4130 ELIMINATOR CHASSIS ITEM QTY SIZE/PART NO. TUBE CODE DESCRIPTION 1 2 4350 Cage Side 2 2 4351 Forward strut
Camaro / Firebird. Please read the following key points before installing this kit.
 Please read the following key points before installing this kit. 1 Before performing the subframe connector installation, the vehicle must be completely assembled with all body and component parts installed
Detroit Speed, Inc. Mini Tubs Camaro/Firebird P/N:
 Detroit Speed, Inc. Mini Tubs 1967-1969 Camaro/Firebird P/N: 040401 The Detroit Speed Mini-Tubs are inner wheel housings designed to accommodate a wider wheel and tire package. They are engineered for
HEIDTS RF-110. INSTALLATION INSTRUCTIONS Fairlane Comet Rear 4-Link
 HEIDTS RF-110 INSTALLATION INSTRUCTIONS 66-67 Fairlane 66-67 Comet Rear 4-Link Please read these instructions completely before starting your installation. Remember the basic rule for a successful installation:
Body Preparation. Stretching the Frame. Stretch Kit CHAPTER 4
 CHAPTER 4 Body Preparation This step will require cutting the back half of the Fiero from the front half. You will also remove a portion of the front fenders and bumpers. You will need to relocate the
1107 Tubular Upper A-Arms Camaro/Firebird
 1107 Tubular Upper A-Arms 67-69 Camaro/Firebird Thank you for your purchase from our new line of F-Body parts. Please call us at (877) 4NO - ROLL if you have any questions regarding the service or installation
1. American made automobile steel, aluminum or rubber glass bodies are allowed as long as they follow original body lines.
 Modified Style Bodies MAHONING VALLEY SPEEDWAY 2014 MODIFIED RULES Revised 12-2-13 ALL CARS MEETING THESE RULES & SPECIFICATIONS WILL BE ELIGIBLE TO RACE Any touring car motor is legal except big blocks.
INSTRUCTION G-Comp Rear Suspension: Chevy Camaro. Kit Contents:
 INSTRUCTION 350-700 G-Comp Rear Suspension: 70-81 Chevy Camaro Speedway Motors, Inc. 2017 Kit Contents: 350700.1 G-Comp Crossmember & Chassis Brace 350700.2 G-Comp Rear Crossmember Assembly 350700.3 G-Comp
4007/4008/ Camaro/Firebird. Please read the following key points before installing this kit.
 Please read the following key points before installing this kit. 1 Before performing the subframe connector installation, the vehicle must be completely assembled with all body and component parts installed
Rear Suspension System C-10 Pickup Truck
 Rear Suspension System 18390 67-72 C-10 Pickup Truck Thank you for your purchase from our new line of Chevy parts. Please call us at 877-4NO - ROLL if you have any questions regarding the service or installation
IFS Eliminator Kit,
 IFS Eliminator Kit, 110001-1 IFS Eliminator Kit Contents: Front Leaf Springs (choice 3", 4", or 5") 1.0 High Steer Crossover Steering Kit 1.0 Frame Tube Jig Kit 1.0 Steering Stabilizer Kit 1.0 U-bolt Flip
Sport Coil Springs Dodge Magnum, Chrysler 300C Dodge Challenger SRT Dodge Challenger R/T
 Sport Coil Springs 19101 - Dodge Magnum, Chrysler 300C 19107 - Dodge Challenger SRT-8 19108 - Dodge Challenger R/T Thank you for your purchase from our new line of Magnum/300C parts. Please call us at
PURE MINI STOCK CLAIMERS 2008
 SOUTHERN OREGON SPEEDWAY 113 Haskell St., Central Point, OR 97502 541 261 7077 Fax: 541 664 6657 Website: www.sospeedway.com PURE MINI STOCK CLAIMERS 2008 1. MODELS: A. Any front engine, front or rear
PROSTOCK CLASS. Infraction of rules will be decided by Race Officials. Number Plate
 PROSTOCK CLASS Tech Rules: Must have race receiver and needs to work (cruiser class: both driver & passenger must be able to hear) All four brakes must lock up or won t race. You will load up and go home
SPORT COIL SPRINGS Scion xa & xb Part #19412 INSTALLATION OF HOTCHKIS FRONT COIL SPRINGS
 SPORT COIL SPRINGS 2004+ Scion xa & xb Part #19412 Thank you for your purchase from our new line of Scion xa / xb parts. Please call us at (877) 4NO-ROLL if you have any questions regarding the service
2018 Salina Highbanks Speedway Super Stock Rules
 2018 Salina Highbanks Speedway Super Stock Rules Changes and clarifications highlighted SAFETY 1. Raceivers will be MANDATORY in 2018. 2. All holes in firewall must be sealed off from engine compartment
2018 CHARGER DIVISION RULES
 ! 2018 CHARGER DIVISION RULES Jennerstown Speedway (Intersections of Rt. 30 & Rt. 985) PO Box 270 206 Somerset Street Jennerstown, PA 15547-0099 Track Phone: 814.703.8009 Fax: 814.703.8163 For Track Promoter
INSTRUCTIONS FOR STRUT FRONT, 4-LINK REAR, ROADSTER CHASSIS
 #917406 Page 1 of 5 7406 INSTRUCTIONS FOR STRUT FRONT, 4-LINK REAR, ROADSTER CHASSIS ITEM QTY SIZE/PART NO. TUBE CODE DESCRIPTION 1 1 4215 Front frame rail strut 1 5/8 (pair) 2 1 4236 Roadster firewall
SOUTH BUXTON RACEWAY LTD BOMBER RULES
 SOUTH BUXTON RACEWAY LTD. 2017 BOMBER RULES RULE BOOK DISCLAIMER The rules and/or regulations set forth herein are designed to provide for the orderly conduct of racing events and to establish minimum
Installation Manual Clayton Off Road Suspension: XJ 6.5 Coil Conversion Long Arm Lift Kit Jeep Cherokee Last Revision No.: 3/1/11 PN
 Thank you for purchasing a Clayton Off Road suspension. Please check to make sure you have all necessary parts before you start your install. XJ 8.0 Coil 1100107 3 Link Bridge W/mount 1100108 Front Spring
Sport Sway Bar Kit C-10 Truck
 Sport Sway Bar Kit 22390 67-72 C-10 Truck Thank you for your purchase from our new line of Chevy parts. Please call us at 877-4NO - ROLL if you have any questions regarding the service or installation
EAGLE VALLEY SPEEDWAY - JIM FALLS, WI HORNET RULES
 EAGLE VALLEY SPEEDWAY - JIM FALLS, WI - 2017 HORNET RULES General: 1. All cars are subject to an inspection at any time. It is the responsibility of the driver to prepare their car free of defects and
INSTALLATION INSTRUCTIONS FOR M.O.R.E. SHACKLE REVERSAL SYSTEM (S.R.S. ) PART # THIS SYSTEM FITS Jeep CJ-5, CJ-7, CJ-8 VEHICLES.
 PART # THIS SYSTEM FITS Jeep CJ-5, CJ-7, CJ-8 VEHICLES.") MOUNTAIN OFF ROAD ENTERPRISES LLC. P O BOX 690, DELTA, COLORADO 81416 970-625-0500 www.mountainoffroad.com INSTALLATION INSTRUCTIONS FOR M.O.R.E. SHACKLE REVERSAL SYSTEM (S.R.S. ) PART # 7686-5 THIS SYSTEM
MOUNTAIN OFF ROAD ENTERPRISES LLC. P O BOX 690, DELTA, COLORADO 81416 970-625-0500 www.mountainoffroad.com INSTALLATION INSTRUCTIONS FOR M.O.R.E. SHACKLE REVERSAL SYSTEM (S.R.S. ) PART # 7686-5 THIS SYSTEM
PARTS LIST. (1) Main Hoop (1) Cage Leg (Left) (1) Main Hoop Crossbar (1) Cage Leg (Right) (1) Windshield Crossbar (2) 39 Hoop Diagonals
 Main Hoop (1) Cage Leg (Left) (1) Main Hoop Crossbar (1) Cage Leg (Right) (1) Windshield Crossbar (2) 39 Hoop Diagonals") 10-POINT ROLL CAGE, CHROME MOLY 1994-98 MUSTANG HDTP P/N C3279 NOTE: This style cage kit is designed for use with the factory dash to remain in place and the front cage supports to pass through the dash.
10-POINT ROLL CAGE, CHROME MOLY 1994-98 MUSTANG HDTP P/N C3279 NOTE: This style cage kit is designed for use with the factory dash to remain in place and the front cage supports to pass through the dash.
Rear Sway Bar Kit 22390R C-10 Truck
 Rear Sway Bar Kit 22390R 67-72 C-10 Truck Thank you for your purchase from our new line of Chevy parts. Please call us at 877-4NO - ROLL if you have any questions regarding the service or installation
Sport Coil Springs (19425) Scion tc
 Scion tc") Sport Coil Springs (19425) Scion tc Thank you for your purchase from our new line of Scion tc parts. Please call us at (877) 4NO-ROLL if you have any questions regarding the service or installation of
Sport Coil Springs (19425) Scion tc Thank you for your purchase from our new line of Scion tc parts. Please call us at (877) 4NO-ROLL if you have any questions regarding the service or installation of
INSTALLATION GUIDE Canted Billet 4-Bar, 4x2 Rear Frame
 INSTALLATION GUIDE 7154 Canted Billet 4-Bar, 4x2 Rear Frame Description: Non-application specific, weld-in, 4 x 2 rear frame for use with Chassisworks 6241 billet aluminum suspension links. IMPORTANT:
Detroit Speed, Inc. Mini-Tub Kit Chevy Nova, Oldsmobile Omega, Pontiac Ventura P/N: &
 Detroit Speed, Inc. Mini-Tub Kit 1968-74 Chevy Nova, Oldsmobile Omega, Pontiac Ventura P/N: 041207 & 041208 Item Component Quantity 1 DSE Mini Tubs 1968-74 X-Body 2 2 Rear Upper Shock Crossmember 1 3 Upper
2018 Lake County Fair Derby Chain N Bang Rules
 2018 Lake County Fair Derby Chain N Bang Rules The derby is open to any American made hard top model stock car or station wagon. No commercial vehicles, convertibles, pick-ups, SUVs, four wheel drive,
Sport Sway Bar Kit (22431 ) Subaru Forester INSTALLATION OF HOTCHKIS FRONT SWAY BAR
 Subaru Forester INSTALLATION OF HOTCHKIS FRONT SWAY BAR") Sport Sway Bar Kit (22431 ) Subaru Forester Thank you for your purchase from our new line of Forester parts. Please call us at (877) 4NO - ROLL if you have any questions regarding the service or installation
Sport Sway Bar Kit (22431 ) Subaru Forester Thank you for your purchase from our new line of Forester parts. Please call us at (877) 4NO - ROLL if you have any questions regarding the service or installation
Installation Instructions
 86-95 Low Range Off Road Universal Front Shock Tower Kit for Suzuki Samurai (SKU# SSP-UST) Installation Instructions Revised 10/29/13 Suggested Tools: CAUTION: Safety glasses should be worn at all times
FORD RANGER/SPLASH MAZDA B-SERIES (2&4WD, STANDARD & EXT. CAB) 3 BODY LIFT KIT INSTALLATION INSTRUCTIONS KIT# 853
 3 BODY LIFT KIT INSTALLATION INSTRUCTIONS KIT# 853") 3651 N Highway 89 Chino Valley, AZ 86323 (928) 636-7080 www.p-a-g.net FORD RANGER/SPLASH MAZDA B-SERIES (2&4WD, STANDARD & EXT. CAB) 3 BODY LIFT KIT INSTALLATION INSTRUCTIONS 1995-1997 KIT# 853 Installation
3651 N Highway 89 Chino Valley, AZ 86323 (928) 636-7080 www.p-a-g.net FORD RANGER/SPLASH MAZDA B-SERIES (2&4WD, STANDARD & EXT. CAB) 3 BODY LIFT KIT INSTALLATION INSTRUCTIONS 1995-1997 KIT# 853 Installation
2018 UCAR Rules. May 14, 2018
 2018 UCAR Rules May 14, 2018 RULE BOOK DISCLAIMER: The rules and/or regulations set forth herein are designed to provide for the orderly conduct of racing events and to establish minimum acceptable requirements
RANGER WD/4WD KIT PACKING SLIP
 RANGER +2.5 2WD/4WD KIT PACKING SLIP DYNAMICS Thank you for puchasing our long travel kit. We pride ourselves on designing and fabricating our parts in our shop located in Las Vegas, Nevada. If you have
I-96 Speedway Cylinder Rules
 I-96 Speedway 2019-4 Cylinder Rules Personal Protection Equipment It is the sole responsibility of each competitor for the effectiveness and proper installation, per the manufacturers specifications to
2018 Mini Sport Rules
 2018 Mini Sport Rules Mini Sport 2018 revised 12/21/2016 1. ELIGIBILITY A. Front engine, compact cars and short wheel base mini trucks with conventional cabs. B. NO Convertables, Station Wagons, supercabs,
UPPER TRAILING ARM REMOVAL
 #1204 MUSTANG UPPER TRAILING ARMS Thank you for your purchase. Please call us at (562) 907-7757 if you have any questions regarding your Hotchkis Performance products. Visit us online @ www.hotchkis.net
Must have a shut off mechanism easily accessible in case of emergencies,
 2017 Open Wire / Beginner Wire Demolition Derby Rules Any full size sedan,or station wagon may be used in the competition of this class, { No full frame or sub frame imperial up to 1973 are not allowed
1109 Tubular Lower A-Arms Camaro/Firebird
 1109 Tubular Lower A-Arms 67-69 Camaro/Firebird Tubular Lower A-Arms: Thank you for your purchase from our new line of F-Body parts. Please call us at (877) 4NO - ROLL if you have any questions regarding
STREET STOCK & CYCLONES COMBINED RULES
 2019 STREET STOCK & CYCLONES COMBINED RULES In 2019 we are combining the street stocks and the cyclones into one division. We have been working hard on trying to incorporate the rules to make this a fair
DODGE DAKOTA 3 BODY LIFT INSTALLATION INSTRUCTIONS KIT # 60153
 DODGE DAKOTA 3 BODY LIFT INSTALLATION INSTRUCTIONS 2003-04 KIT # 60153 Installation of a Performance Automotive Group body lift kit will change the vehicle s center of gravity and handling characteristics
Chicane Coilover Kit For '64 to '72 Chevelle/ A Body. Installation Instructions
 Nov 3, 2017 Chicane Coilover Kit For '64 to '72 Chevelle/ A Body Installation Instructions Actual parts may vary from photo depending on application. 1 P a g e The following instructions are intended for
1401 / 1402 / 1403 ADJUSTABLE TRAILING ARM MOUNT BRACES INSTALLATION OF HOTCHKIS PERFORMANCE ADJUSTABLE TRAILING ARM MOUNT BRACES
 1401 / 1402 / 1403 ADJUSTABLE TRAILING ARM MOUNT BRACES 1401 78-88 GM A/G-BODY / 1402 68-72 GM A-BODY / 1403 64-67 GM A-BODY Thank you for your purchase. Please call us at (562) 907-7757 if you have any
King of the Ring Rules 2019
 King of the Ring Rules 2019 Show Format: 55 Car Maximum Entry Heat 1: 55 Cars will run down to top 25 (Mad Dog will advance to Main Feature automatically.) Consolation Cars will be guaranteed 30 minutes
Technical Support Line: (952) Hanover Ave. Lakeville, MN
 Hanover Ave. Lakeville, MN") Technical Support Line: (952) 985-5675 Email: Sales@QA1.net 21730 Hanover Ave. Lakeville, MN 55044 www.qa1.net INSTALLATION INSTRUCTIONS QA1 1967-1979 Mopar A-Body Rear 6 link Conversion System QA1 p/n
Technical Support Line: (952) 985-5675 Email: Sales@QA1.net 21730 Hanover Ave. Lakeville, MN 55044 www.qa1.net INSTALLATION INSTRUCTIONS QA1 1967-1979 Mopar A-Body Rear 6 link Conversion System QA1 p/n
Section 9 Street Stocks
 Section 9 Street Stocks 9.1.1 DEFINITION 9.1.1 The word stock will mean unaltered as originally factory produced and installed for make (GM to GM) (Mopar to Mopar). All cars and trucks will be stock unless
2012 Roadrunner Rules
 2012 Roadrunner Rules Areas highlighted in red are changes for 2012 Revised 4-8-12 The purpose of this division was to create a controlled economical, competitive form of entry-level racing. The primary
2018 Truck Demo Rules
 2018 Truck Demo Rules Evergreen Speedway, Monroe, WA (Effective 1/12/2018) Body 1. FOUR WHEEL DRIVES are allowed. Must remove front driveline 2. Any North American made full size ½ ton or ¾ ton Pick up