Appendix B Print Head Maintenance Document Number: Released: Subject: Description: Materials: 0.1Cleaning Fluid Usage 0.1.
|
|
|
- Lauren Pearson
- 6 years ago
- Views:
Transcription
1 Appendix B Print Head Maintenance Document Number: Rev. A Released: October 10, 2003 Subject: Print Head Cleaning, Nozzle Protection and Recovery Description: Instructions for properly cleaning and/or flushing ink buildup from the capping station, carriage face plate and the print head nozzle plates on the Arizona 600 printer Materials: Isopropyl Alcohol (91% Isopropyl or higher) Polyethylene Plastic Wrap Shallow 9-Inch x 14-Inch Pan 50-ml Syringe (OIN # ) Swabs (OIN # , part # ) Safety Glasses (OIN # , part # ) Lint-Free Cloth (OIN # , part # ) Butyl Gloves (OIN # , part # ) Cleaning Fluid (part # is ink dependant) CGS-50 for use with 3M inks, 1 gallon (OIN # ) 0.1Cleaning Fluid Usage The cleaning fluid is used for cleaning and flushing print heads and the carriage face plate. Cleaning fluid is also used to remove ink from surfaces. Ink stains on painted sheet metal should only be exposed to the cleaning fluid for a few seconds at a time when wiping with a lint-free cloth to prevent the paint finish from smearing. The cleaning fluid is also used to supply and preserve the capping station foam pads during operation of the printer. The operator should replace or refill the cleaning fluid container located on the bottom right side of the printer (next to the waste bottle) when the printer indicates the container is nearing empty Material Usage A specified quantity of cleaning fluid, butyl gloves and a lint-free cloth are used to clean the capping station and the carriage face plate. A specified quantity of cleaning fluid is used with supplied swabs to clean the print head nozzles. A respirator should be used during each cleaning procedure. 0.2Precautionary Messages IMPORTANT: If your printer does not have the battery back-up option, powering off the printer is NOT recommended. 10/10/03 B-1
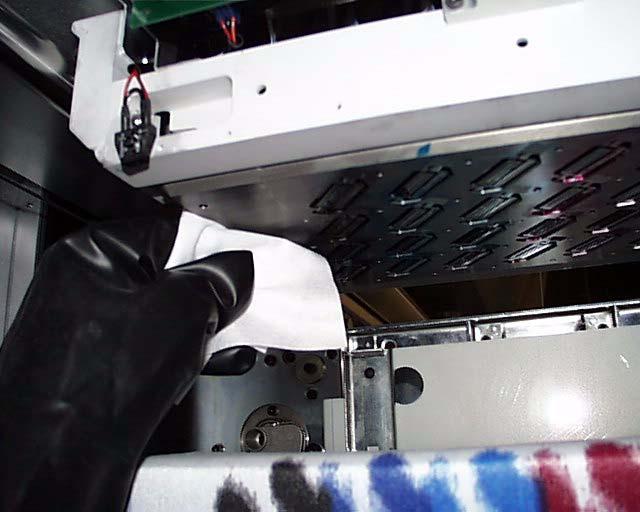
2 Océ WARNING! Without the battery back-up option, all ink will leak out of the ink reservoirs within an hour or two if the printer is powered off, unless you drain out all the ink. If the printer must be powered off for more than one hour and up to one day, you must drain out all the ink from the ink reservoirs (juice boxes), clean the print head nozzle plates, and cover the capping station with polyethylene plastic film. If the printer must be powered off for more than one day a trained service technician must flush out the printer ink system with maintenance fluid, clean the print head nozzle plates, and cover the capping station with polyethylene plastic film General Recommendations for the Operator Always perform the low or high purge using the Operator/Maintenance menu as a first step to bring nozzles back for printing. Prepare materials for each cleaning procedure before accessing the carriage over the maintenance (blotting cloth) station. Swab each print head nozzle plate at the end of each work day. Manually flush print heads as a last resort to clear blocked nozzles. Contact your field service representative for assistance with this procedure. Read guidelines as outlined in the Material Safety Data Sheet (MSDS) before handling or discarding ink contaminated items Cleaning the Capping Station 1. Move the carriage assembly by using the Operator/Maintenance/Access Carriage menu on the control panel. Swing open the two doors on the right and locate the capping station. 2. Put on the protective butyl gloves before handling any ink residue with a lint-free cloth. 3. Apply cleaning fluid on a lint-free cloth and begin cleaning the capping station as shown in Photo 1. Wipe away the ink build-up on the face of the capping station and inside the ink purge drains. IMPORTANT: Do not reuse the ink soaked lint-free cloth on any other surfaces of the printer Cleaning the Carriage Face Plate 1. If you have just cleaned the capping station, then go to the left side of the printer and swing open the two left-end doors. Otherwise, access the carriage assembly via the control panel using the Operator/Maintenance/Access Carriage menu before opening the two left-end doors. B-2
3 2. Retract/lower the maintenance station to expose the print head nozzle plates and carriage face plate as shown in Photo Continue using the protective butyl gloves when handling the ink residue. 4. Apply cleaning fluid on a lint-free cloth and gently wipe away any ink buildup on the carriage face plate shown in Photo 3. Be careful not to touch any of the print head nozzle plates Cleaning Print Head Nozzle Plates This procedure should be performed at the end of each work day. Always use a new swab for each color when performing this procedure. Note:Adhering to this procedure will provide maximum head life. 1. Use an individual, small container of cleaning fluid and a new swab for each color. Only use this cleaning fluid for several cleanings until it becomes slightly discolored. WARNING! Never use Isopropyl alcohol on the print head nozzle plates. 2. Access the carriage assembly via the control panel using the Operator/Maintenance/ Access Carriage menu. 3. Lower the maintenance station to access the carriage faceplate. 4. Dip the clean swab into the small container of cleaning fluid. WARNING! Each swab has a seam that may scratch the print head nozzle plate. Use the long semi-curved smooth side of the swab. 5. Starting with the light cyan print heads, use a saturated swab to gently apply the cleaning fluid onto the nozzle plates. Gently move the swab across each head nozzle plate one time to moisten the ink on each head surface, as shown in Photo 4. IMPORTANT: Applying too much force with the swab against the nozzle plate may scratch the surface. 6. Repeat steps 4 and 5 for each color beginning next with light magenta, working your way through cyan. IMPORTANT: Use one clean swab and container of cleaning fluid per color. Never mix an ink stained swab outside the color you are working with. 7. Allow the heads to soak a couple of minutes. 8. Starting with the light cyan print heads again, dip the light cyan swab into its cleaning fluid and gently move the saturated swab across each head nozzle plate several times to remove the softened ink from each head surface. 10/10/03 B-3
4 Océ IMPORTANT: Applying too much force with the swab against the nozzle plate may scratch the surface. 9. Repeat step 8 for each color beginning next with light magenta, working your way through cyan. 10. Empty or store the cleaning fluid containers and unused cleaning items (swabs and/ or lint-free cloth) for the next scheduled cleaning. Do not store new swabs in the cleaning fluid. 11. Park the carriage assembly via the control panel using the Operator/Maintenance/ Park Carriage menu. 12. Close all doors, the printer automatically raises and locks the maintenance station back into place. 13. Do a low purge of all colors from the Operator Maintenance menu. Check the Nozzle Print for nozzles out. If you still have nozzles missing do one or two high purges for the problem colors Flushing a Print Head This procedure is not performed daily. It is performed as a last resort to clear blocked nozzles. It should only be performed by a trained operator. Contact your field service representative for assistance with this procedure. 1. Access the carriage assembly via the control panel using the Operator/Maintenance/ Access Carriage menu. 2. Swing open the two doors on the left side of the printer, then lower the maintenance station to expose the print head nozzle plate, as shown in Photo 2. Place a shallow 9-in. x 14-in. pan on top of the maintenance station. 3. Locate the print head to be flushed. Disconnect and cap the ink line coming from the ink reservoir to the selected print head to prevent ink spillage. 4. Fill the syringe with cleaning fluid, then attach it to the ink line going into the selected print head. 5. Flush the print head into the pan below (situated on top of the maintenance station). Looking from the carriage face plate level, visually check to see the fluid exiting the print head nozzles evenly (straight down versus multidirectional streams of clear fluid) into the pan from the print head. WARNING! Do not allow any air to enter the print head. 6. Disconnect the syringe from the head ink line, then reconnect the head and reservoir ink lines back together. B-4
5 7. Return the catch pan, return the carriage to the home position and close the left-end doors. Run a long purge of all colors to prime the print heads. Run a low or high purge for all colors to generate a nozzle test print to verify all nozzles are firing. Contact your field service representative if this procedure fails to correct your problem Nozzle Protection Requirements The plastic film installation procedure is required to prevent the ink from drying out on the print head nozzle plates when the printer remains idle for a period of time longer than overnight, such as weekends and holidays. If the printer is not going to be used for more than one week, plastic film installation is not sufficient. The ink lines and reservoirs (juice boxes) must be flushed out with maintenance fluid by a trained service technician. Installing the Polyethylene Plastic Film The only recommended material for use is polyethylene plastic film. IMPORTANT: Before using an unknown type of plastic wrap you should always test its compatibility with the Arizona 600 printer cleaning fluid for one week to ensure the plastic wrap does not dissolve. We have found that plastic wrap containing polyethylene is most suitable in this application. Any polyethylene plastic wrap that you have tested and are currently using on the Arizona 90/180 printer capping plate can also be used on the Arizona 600 printer. 1. Access the carriage using the Operator/Maintenance/Access Carriage menu. 2. Clean all print heads per the Cleaning Print Head Nozzle Plates procedure on page B-3, stopping after step Cut a 1-foot square sheet of polyethylene plastic film and lay it smoothly over the capping station making sure it covers all corners of the plate, as shown in Photo Apply a couple of drops of cleaning fluid onto the plastic film, directly above each foam pad, to keep each head wet when the carriage is parked. IMPORTANT: Do not allow any wrinkles in the film to form before moving the carriage back over the capping station. 5. Return the carriage to the capping station. As the front of the carriage first comes in contact with the capping station, watch and hold the plastic film, if necessary, so that it does not slip off. Check for complete coverage. 6. Close the doors on both ends and press the ONLINE button on the control panel allowing the printer to go to Idle Mode. 10/10/03 B-5
6 Océ Removing the Polyethylene Plastic Film Océ recommends delaying the removal of the polyethylene plastic film until print jobs are ready to be sent to the printer at the beginning of each work day. Removing the plastic film several hours before printing could adversely affect print quality. 1. Swing open the doors on the right end. 2. Manually move the carriage off the capping station by slowly pulling on the carriage cable. 3. Remove and discard the used plastic film. 4. Access the carriage using the Operator/Maintenance/Access Carriage menu. 5. Clean all print heads per the Cleaning Print Head Nozzle Plates procedure on page B-3, stopping after step Fill a syringe with cleaning fluid and apply a small amount onto each capping station pad. 7. Park the carriage using the Operator/Maintenance/Park Carriage menu. 8. Install media if it was removed the night before. 9. Access the Operator/Maintenance/High purge nozzles menu and run a high purge. View the nozzle print for good quality (few or no nozzles missing). Otherwise, repeat the high purge. The printer is now ready to receive the first print of the day. B-6

7 Photo 1 10/10/03 B-7

8 Océ Photo 2 Photo 3 B-8


9 Photo 4 Photo 5 10/10/03 B-9
10 Océ B-10
Daily T-Jet2 TM Maintenance Procedures January 2007 Ver1.1
 Daily T-Jet2 TM Maintenance Procedures January 2007 Ver1.1 As a T-Jet2 owner there is daily maintenance that will need to be performed to ensure proper operation of your printer. By not following the required
Requests for Daily Care and Maintenance
 Inkjet printer JFX200-2513 Requests for Daily Care and Maintenance This machine is a precision machine equipped with extremely fine mechanisms. Especially, the nozzle surface of the heads from which the
Requests for Daily Care and Maintenance
 Inkjet printer UJF-3042MkII/3042MkII EX/6042MkII Requests for Daily Care and Maintenance This machine is a precision machine equipped with extremely fine mechanisms. Especially, the nozzle surface of the
A maintenance guide for all GT-3 Series users
 A l l u s e f u l i n f o r m a t i o n t o s u c c e e d i n y o u r p r i n t i n g b u s i n e s s T H E G T 3 S E R I E S A maintenance guide for all GT3 Series users v 1.0 ENVIRONMENTAL CONDITIONS
User Maintenance Kit
 User Maintenance Kit Dear Customer, This document will guide you through the maintenance for the Océ CS9000 Eco-Solvent series printers. All necessary tools, accessories and parts are collected in one
Preparation for an Extended Idle Period of the GT-381/361
 Preparation for an Extended Idle Period of the GT-381/361 If the printer is not to be used for an extended period of time, the white print heads and ink tubes will still need to be maintained. The tube
Maintenance information for Roland TrueVis Ink sets
 Maintenance information for Roland TrueVis Ink sets The amount of maintenance required varies according to printer usage. As a minimum requirement, Roland recommends Manual preventative cleaning at least
A maintenance guide for all GT-3 Series users
 A l l u s e f u l i n f o r m a t i o n t o s u c c e e d i n y o u r p r i n t i n g b u s i n e s s T H E G T 3 S E R I E S A maintenance guide for all GT3 Series users v 2.1 ENVIRONMENTAL CONDITIONS
User Maintenance Kit Océ CS9200 Low Solvent Series Printers
 IMPORTANT INSTALLATION INFORMATION Dear Customer, User Maintenance Kit Océ CS9200 Low Solvent Series Printers This document will guide you through the daily, weekly and monthly maintenance which is needed
Weekly T-Jet2 TM Maintenance Procedures January 2007 Ver1.3
 Weekly T-Jet2 TM - Maintenance Procedures Weekly T-Jet2 TM Maintenance Procedures January 2007 Ver1.3 As a T-Jet2 owner there is weekly maintenance that will need to be performed to ensure proper operation
Technical Information Bulletin
 Mutoh America Inc. 2602 South 47th Street, Suite 102 Phoenix, Arizona 85034 USA Tel. (480) 968-7772 Fax (480) 968-7990 Technical Information Bulletin FROM: MUTOH AMERICA - Service & Support. Re Release
Installation Instructions: Epson 1400 CFS
 Installation Instructions: Epson 1400 CFS Epson 1400 with MIS CFS Installed *A perfect print with OEM cartridges is a must* Prerequisite - Before starting this installation, you MUST test your printer
Maintenance Adjustments
 4 Maintenance and Adjustments Chapter Contents Cleaning the Printer and Paper Handling Accessories..... 158 Cleaning the HP Digital Copier....................... 161 Cleaning ADF and Glass............................
Request for daily care
 Daily Care Manual Request for daily care Inkjet printer is the precision machine that has highly delicate mechanism. Especially, little dust and paper powder may have effect on a head nozzle firing ink,
A. VEHICLE INSPECTION PROCEDURE
 MAZDA3 AND MAZDA5 POWER STEERING VOLUNTARY SAFETY RECALL ATTACHMENT IV MAZDA3 AND MAZDA5 POWER STEERING VOLUNTARY SAFETY RECALL A. VEHICLE INSPECTION PROCEDURE 1. Verify that the vehicle is within the
Periodic Maintenance 7-1
 Periodic Maintenance This section provides periodic maintenance guidelines for keeping the InkCenter Refill System in optimal operational condition and detailed descriptions of maintenance procedures.
BlueFin User's Manual. Version 1.1
 BlueFin User's Manual Version 1.1 10 August 2005 1 Safety Precautions Battery charging The BlueFin unit comes with a power adapter. Please use this power adapter for operating the unit and charging the
Copyright 2004 Alcatel. All rights reserved.
 Alcatel assumes no responsibility for the accuracy of the information presented, which is subject to change without notice. Alcatel, the Alcatel logo, MainStreet, and Newbridge are registered trademarks
INSTALLATION & USER S GUIDE
 REKLUSE MOTOR SPORTS The Rekluse Left Hand Rear Brake Kit INSTALLATION TIPS INSTALLATION & USER S GUIDE Doc ID: 196-5301 Doc Rev: 031016 Before continuing, we recommend watching the Brake Kit Installation
Fluid level checks ENGINE OIL CHECK
 Fluid level checks ENGINE OIL CHECK Check the engine oil weekly. If any significant or sudden drop in oil level is noted, seek qualified assistance. If the message ENGINE OIL PRESSURE LOW is displayed,
Steps 3 through 9 in this procedure describe making and using a cooling system bleed tool.
 Cooling System Bleed Procedure Steps 3 through 9 in this procedure describe making and using a cooling system bleed tool. However, you can use a commercially available funnel-type coolant refill bleed
Compact Cleaning System
 Series 9900 Compact Cleaning System THANK YOU FOR CHOOSING OUR PRODUCTS Please use this equipment carefully and observe all warnings and cautions. WEAR ALWAYS protective clothing and eyewear when working
Bulk Supply Station. Collins Ink
 Collins Ink Bulk Supply Station Collins Ink s Bulk Supply Station provides a simple alternative to cartridges for high volume applications, while cutting ink costs up 50%. Each gravity fed system consists
ICS Integrated Cleaning System. Rechargeable Battery
 ICS 8900 Integrated Cleaning System Rechargeable Battery THANK YOU FOR CHOOSING OUR PRODUCTS Hydro Systems manufactures quality chemical proportioners. Please use this equipment carefully and observe all
ADJUSTING PRESSURE USING THE BOOM NOZZLES OPERATION
 6. The pressure gauge is shipped in a parts bag. Thread the gauge into the tee fitting as shown on the exploded view drawing. Use a good quality thread sealant to prevent leaks. The in-line switch turns
for filling and bleeding hydraulic disk brake systems Instruction
 Seite 1 von 6 Instruction All processes described in this instruction are applicable for brake fluid DOT4 and hydraulic fluid based on mineral oil. Never the less the fluids must never be mixed up, otherwise
Bulk Supply Station. HSAUSA Bulk Supply Station HSAUSA
 HSAUSA HSAUSA The HSAUSA provides a simple alternative to cartridges for high volume applications, while cutting ink costs up 50%. Each gravity fed system consists of a 1-liter ink bottle that feeds up
2004 Fresh Water Cooling Installation Instructions - V-Drive Kit RK147050A
 2004 Fresh Water Cooling Installation Instructions - V-Drive Kit This Page Was Intentially Left Blank TABLE OF CONTENTS 1 - FWC Kit Installation Instructions - V-Drive... Table of Contents...... 1 Installation
Service Bulletin INFORMATION
 Service Bulletin INFORMATION File in Section: 08 - Body and Accessories Bulletin No.: 12-08-51-002 Date: November, 2012 Subject: Spray-in Bed Liner General Information and Repair Procedures Models: 2013
Motion System Components Diagram. Note: #2 Mirror Cover and X-Axis Motor Cover have been removed for visibility. Maintenance.
 Professional Laser System PLS3.75, PLS4.75, PLS6.75 and PLS6.150D Keeping the laser system clean will ensure the highest quality engraving. A clean laser system is the best performing laser system. The
Airless Spray Gun INSTRUCTIONS DP psi (345 bar) Maximum Working Pressure
 Maximum Working Pressure") INSTRUCTIONS DP-6376 Airless Spray Gun 5000 psi (345 bar) Maximum Working Pressure INSTRUCTIONS This manual contains important warnings and information. READ AND KEEP FOR REFERENCE. Table of Contents Warnings......................................
INSTRUCTIONS DP-6376 Airless Spray Gun 5000 psi (345 bar) Maximum Working Pressure INSTRUCTIONS This manual contains important warnings and information. READ AND KEEP FOR REFERENCE. Table of Contents Warnings......................................
Creation Date Last Mod Date Model Year Drawings Estimated Time. 5/22/2009 6/15/2009 S120/S90/E min.
 You are here: Service > Forks > 2008 > E100 > S120/S90/E100 50-hour Service Open the Specialized Business Online site in a new window... S120/S90/E100 50-hour Service Creation Date Last Mod Date Model
OVERVIEW: This bulletin involves removing and installing the deck lid spoiler.
 NUMBER: 23-041-05 GROUP: Body DATE: September 9, 2005 This bulletin is supplied as technical information only and is not an authorization for repair. No part of this publication may be reproduced, stored
STAR Case. Case Number: S Release Date: 3/26/14. Symptom/Vehicle Issue: Diagnosis: Customer Complaint Of Damp Carpet And/Or Waterleak
 STAR Case Case Number: S1323000012 Release Date: 3/26/14 Symptom/Vehicle Issue: Customer Complaint Of Damp Carpet And/Or Waterleak Diagnosis: This case is broken out by possible leak location and provides
X-Tractor Series. Cutters INSTRUCTION MANUAL
 INSTRUCTION MANUAL X-Tractor Series Cutters PRINTED IN USA 0305 PART NO. 159R141 Rev. 02 2005 Hale Products, Inc. Hale Products, Inc. reserves the right to make changes at any time, without notice or obligation,
WXGUARD WIND SEGMENTED LIGHTNING DIVERTER STRIPS INSTALLATION GUIDE.
 WXGUARD WIND SEGMENTED LIGHTNING DIVERTER STRIPS INSTALLATION GUIDE www.wxguardwind.com Shine Wire Products, Inc. 25 Print Works Drive Adams, MA 01220 1-800-543-5151 www.shinewire.com WXGuard is the new
Roush Side Rocker Panel Splitters (10-13 All)
") Required tools: Jack stands (2) Floor jack (1 is required but 2 is preferred) Pliers Small Phillips screw driver Drill ¼ Drill bit T15 Torx bit (for some models of vehicle) Hacksaw (for some models of
Required tools: Jack stands (2) Floor jack (1 is required but 2 is preferred) Pliers Small Phillips screw driver Drill ¼ Drill bit T15 Torx bit (for some models of vehicle) Hacksaw (for some models of
D Instructions/Parts. Siphon Feed Detail Spray Gun D
 Instructions/Parts D-5-55 Siphon Feed Detail Spray Gun FOR PRODUCT INFORMATION CALL: 1-800-742-7731 309991D Important Safety Instructions Read all warnings and instructions in this manual. Save these instructions.
HP ENTERPRISE 600 M651/M680 SERIES TONER CARTRIDGE REMANUFACTURING INSTRUCTIONS
 HP ENTERPRISE 600 M651/M680 SERIES TONER CARTRIDGE REMANUFACTURING INSTRUCTIONS HP 652A TONER CARTRIDGE RREMANUFACTURING THE HP COLOR ENTERPRISE 600 M651/M680 SERIES TONER CARTRIDGES By Mike Josiah and
(2) Remove the customer's Waste Ink Cartridge and replace to a new one. (3) Make sure GT-541 is not in the middle of any operation.
 Remove the customer's Waste Ink Cartridge and replace to a new one. (3) Make sure GT-541 is not in the middle of any operation.") 9. Transporting Preparation before transportation Make sure the following SA5719101 service kit parts are all available. Part name Qty. Cleaning Cartridge 2 IH Head Carton 4 IH Head Case 8 Cap Tube 4 Tube
9. Transporting Preparation before transportation Make sure the following SA5719101 service kit parts are all available. Part name Qty. Cleaning Cartridge 2 IH Head Carton 4 IH Head Case 8 Cap Tube 4 Tube
MOTORVAC. BrakeVac-II. MODEL NUMBER Brake Fluid Service System. Operator Manual MotorVac
 MOTORVAC BrakeVac-II MODEL NUMBER 500-800 Brake Fluid Service System Operator Manual Why should the Brake system be Flushed? Brake fluid is hygroscopic meaning it can absorb moisture from the air resulting
MGFHVLP. Instructions/Parts. Mini Gravity Feed System E. Part No Includes MGFHVLP Mini Gravity Feed Spray Gun and MGC 125 Gravity Cup.
 Instructions/Parts MGFHVLP Mini Gravity Feed System FOR PRODUCT INFORMATION CALL: 1-800-742-7731 309989E For gravity feed spraying of automotive colors and clears. Ideal for touch-up and detail work. Important
80563 Spectrum Z510 Preventative Maintenance Procedure Rev D
 80563 Spectrum Z510 Preventative Maintenance Procedure Rev D Description: This procedure is for the purpose of preventative maintenance on the Spectrum 510. Prerequisites: Printers should be inspected
LMT Lens/Optics Cleaning Procedure. Lens Cleaning Procedure
 SVC-LMT-Procedure REV. TBD Product Support Engineer: Effective: Sheet: MP 04/13/11 Pg. 1 of 10 Lens 1. Assemble the following cleaning components as depicted in Figure 1. Alcohol Canned Dry Air Nozzle
CBEA/CJAA Timing belt procedure. Written by: greengeeker Photos by: DanG144, Kriesel, coalminer16. Required tools:
 CBEA/CJAA Timing belt procedure Written by: greengeeker Photos by: DanG144, Kriesel, coalminer16 Required tools: 1. Securing pin 3359 (you need two of them!) 2. Crankshaft stop T10050 3. Counter-hold tool
D-04/G-04 Maintenance
 D-04/G-04 Maintenance NOTE: The numbers in parentheses are the Ref. Nos. on the illustrations in the Parts Manual. Daily Check the oil level and the condition of the oil. The oil level should be 1/4 in.
Alpha Tech Pet, Inc. HydroMAID - "Mobile Automated Integrated Diluter" Rechargeable Battery
 Alpha Tech Pet, Inc. HydroMAID - "Mobile Automated Integrated Diluter" Rechargeable Battery WEAR ALWAYS THANK YOU FOR CHOOSING OUR PRODUCTS Please use this equipment carefully and observe all warnings
STOP. LP-50DEF-BRL Lever Hand Pump System Barrel Mounting. Owner s Manual DO NOT RETURN THIS PRODUCT TO THE STORE! SAVE THESE INSTRUCTIONS
 SAVE THESE INSTRUCTIONS LP-50DEF-BRL Lever Hand Pump System Barrel Mounting Owner s Manual 5252 East 36th Street North Wichita, KS USA 67220-3205 316-686-7361 FAX: 316-686-6746 800-835-0113 www.gpipumps.net
SECTION Automatic Transaxle/Transmission 6R80
 307-01-i Automatic Transaxle/Transmission 6R80 307-01-i SECTION 307-01 Automatic Transaxle/Transmission 6R80 CONTENTS PAGE GENERAL PROCEDURES Transmission Fluid Drain and Refill... 307-01-2 Drain... 307-01-2
STATIM CASSETTE AUTOCLAVE TROUBLESHOOTING GUIDE
 STATIM CASSETTE AUTOCLAVE TROUBLESHOOTING GUIDE Version 2.1 Original Statim Error Codes The Statim Sterilizer should never leak steam or have water dripping from under the machine. If either of these conditions
D/G-10 Maintenance. Daily. Shutdown Procedure During Freezing Temperatures. Periodically
 D/G-10 Maintenance NOTE: The numbers in parentheses are the Reference Numbers on the exploded view illustrations found in this manual and in the Parts Manual. Daily Check oil level and condition of oil.
Maintenance. Daily. Shutdown Procedure. Periodically. During Freezing Temperatures
 Maintenance Daily Check the oil level and the condition of the oil. When the pump is operating, the oil in the pump housing gets warm and expands, filling into the oil reservoir. Depending on the type
Read this document carefully before implementing the upgrade!
 PRODUCT: NUR Fresco HiQ PART/ASSEMBLY: Fresco HiQ 8C Upgrade OPTIONAL UPGRADE KIT: NUR Fresco HiQ 3200 ISSUE DATE: 6-Feb-03 DESCRIPTION OF CHANGE: Fresco 4-Color to 8-Color P/N: 10-0808 NUR Fresco HiQ
QUEST; WATER LEAK IN CARGO AREA
 Classification: Reference: Date: BT05-018 NTB05-049 June 22, 2005 2004 2005 QUEST; WATER LEAK IN CARGO AREA APPLIED VEHICLES: 2004 2005 Quest (V42) IF YOU CONFIRM IF YOU CONFIRM Rear Cargo Area Water is
LG-60-3PT-WP-309-BL-TSC
 55 Model No: LG-0-PT-WP-0-BL-TSC 0 Gallon Point Lawn & Garden Sprayer W/Pump & Coupler & Boomless Boom Assembly / Operation Instructions / Parts ASSEMBLY Most of the sprayer has been assembled at the factory..
Engineering the Future of Payment Solutions
 Subject: Preventative Maintenance and Cleaning Procedure for MSM Bill Validator Objective: To outline a procedure to ensure your Cashcode bill validator continues to operate as per factory specifications
 Page 1 of 7 SECTION 307-01B: Automatic Transaxle/Transmission 6R80 GENERAL PROCEDURES Procedure revision date: 06/07/2011 Transmission Fluid Drain and Refill Printable View (1081 KB) Special Tool(s) Rubber
OWNER S MANUAL. Model: FSUTV-45-12V ( ) (45 Gallon Lawn & Garden UTV Sprayer, Boom Ready) Technical Specifications. Assembly Instructions
 (45 Gallon Lawn & Garden UTV Sprayer, Boom Ready) Technical Specifications. Assembly Instructions") OWNER S MANUAL Model: FSUTV-45-12V (5302903) (45 Gallon Lawn & Garden UTV Sprayer, Boom Ready) Technical Specifications 45 Gal. Corrosion-Resistant Polyethylene Tank Deluxe Pistol-Grip Handgun 25 Ft. Handgun
OWNER S MANUAL Model: FSUTV-45-12V (5302903) (45 Gallon Lawn & Garden UTV Sprayer, Boom Ready) Technical Specifications 45 Gal. Corrosion-Resistant Polyethylene Tank Deluxe Pistol-Grip Handgun 25 Ft. Handgun
INSTALLATION INSTRUCTIONS South Highway 11 Westminster, SC Toll Free (888) (864) FAX (864)
 (864) FAX (864)") These instructions apply to the servicing of the Lift Technologies MaxiMizer Integral Sideshifters Cylinder Head. WARNING! Unless the steps in the following Installation Instructions are properly followed
These instructions apply to the servicing of the Lift Technologies MaxiMizer Integral Sideshifters Cylinder Head. WARNING! Unless the steps in the following Installation Instructions are properly followed
Section 10: Engraving Machine Cleaning
 Section 10: Engraving Machine Cleaning In This Section Cleaning Important! Laser Tube Cleaning - Important! Fire Warning! Through normal use your laser system can collect debris and soot that are potentially
Operating Manual. High Performance Vacuum Pump Models and 15600
 Operating Manual High Performance Vacuum Pump Models 15400 and 15600 CoolTech High Performance Vacuum Pumps Congratulations on purchasing one of Robinair s top quality CoolTech vacuum pumps. Your pump
OPERATION MANUAL VCX-1
 OPERATION MANUAL VCX-1 Vacuum Coolant Exchanger MAHLE Aftermarket Inc., Service Solutions 10 Innovation Drive York, PA 17402 800-468-2321 www.servicesolutions.mahle.com Manual P/N 035 81661 00 (REV B)
JADE Bottle Top Dispenser
 Accrediting Certifying Bodies S C B A (E) ASCB(E) UK ISO 13485 JADE Bottle Top Dispenser Re-Circulation Valve Operation Manual TABLE OF CONTENTS Page No. Intended Use Of The Instrument 1 Safety Instruction
FlexJet - Flex Cable Replacement
 P/N: 109515R0 14140 NE 200th St. Woodinville, WA. 98072 PH: (425) 398-8282 FX: (425) 398-8383 FlexJet - Flex Cable Replacement Notices: Warning! Ensure that all AC power cables are removed from the printer
Troubleshooting. This section outlines procedures for troubleshooting problems with the operation of the system:
 Troubleshooting This section outlines procedures for troubleshooting problems with the operation of the system: 4.1 System Error Messages... 4-2 4.2 Prep Station Troubleshooting... 4-6 4.2.1 Adapter Not
OWNER S MANUAL. Model: UTV-65-BL ( ) (65 Gallon Lawn & Garden UTV Sprayer w/boomless Boom)
 (65 Gallon Lawn & Garden UTV Sprayer w/boomless Boom)") OWNER S MANUAL Model: UTV-65-BL (5302843) (65 Gallon Lawn & Garden UTV Sprayer w/boomless Boom) Technical Specifications 65 Gal. Corrosion-Resistant Polyethylene Tank Deluxe Pistol-Grip Handgun 25 Ft.
OWNER S MANUAL Model: UTV-65-BL (5302843) (65 Gallon Lawn & Garden UTV Sprayer w/boomless Boom) Technical Specifications 65 Gal. Corrosion-Resistant Polyethylene Tank Deluxe Pistol-Grip Handgun 25 Ft.
SAGINAW P-SERIES PUMP INSTALLATION
 SAGINAW P-SERIES PUMP INSTALLATION WARNING Failure to read and follow these instructions will void any warranty, can cause severe damage to power steering components and premature failure. Pump internals
Statim G4 Error Codes
 Statim G4 Error Codes All leaks should be corrected before proceeding with troubleshooting Cycle Fault #1 The cassette temperature failed to reach 95 C within a time-out period. 1. An extremely large steam
CBEA/CJAA Timing belt procedure. Written by: greengeeker Photos by: DanG144, Kriesel, coalminer16. Required tools:
 CBEA/CJAA Timing belt procedure Written by: greengeeker Photos by: DanG144, Kriesel, coalminer16 Required tools: Securing pin 3359 (need two of them!) Crankshaft stop T10050 Counter-hold tool T10172 Special
Front Brake Caliper. Item Standard Service Limit /.051mm Measurements Brake Disc Runout /.50mm. Rear Brake Caliper
 CHAPTER 9 BRAKES Specifications/Torques... 9.1 Brake System Service Notes... 9.2 Brake Pad Kits... 9.2 Brake Noise Troubleshooting... 9.3 Hydraulic Brake System Operation... 9.4 Fluid Replacement/Bleeding
GT-R MIL ON WITH DTC P0729/P2832 STORED
 Classification: Reference: Date: AT10-006 NTB11-011 February 18, 2011 2009-2011 GT-R MIL ON WITH DTC P0729/P2832 STORED APPLIED VEHICLE: 2009 2011 GT-R (R35) IF YOU CONFIRM For 2009 - The MIL is on and
Geo-Prime Tank. Table of Contents. Installation, Operation & Maintenance Instructions AFCG1PT Revision: 7/3/14. Replacing a Pump 12
 Geo-Prime Tank Installation, Operation & Maintenance Instructions AFCG1PT Revision: 7/3/14 Table of Contents General Description 3 Installation 4 Flushing and Purging 7 Initial Start-up 9 Replacing a Pump
WARNING. Do not put your hands in the ink cartridge slot, otherwise the needle inside the slot may cause injury. CAUTION
 9. Transporting 9. Transporting This chapter describes how to transport. WARNING Do not put your hands in the ink cartridge slot, otherwise the needle inside the slot may cause injury. CAUTION Setting
EBS PRODUCTS
 ! EBS PRODUCTS WWW.ebsproducts.com OPERATIONS MANUAL EDS-1 Dip Stick Fluid Exchange Equipment #1000-0075 1-1-16 TABLE OF CONTENTS I. SAFETY INFORMATION... 2 1.01 IMPORTANT SAFETY NOTICE... 2 1.02 IMPORTANT
Quick user guide for the DM dispenser
 Quick user guide for the DM dispenser READ FIRST! Use the shortest/thickest USB cable possible, if the screen dims too much during operation (to the point where it s hard to read the text) your cable or
PRODUCT CATALOGUE - SPILL KITS
 PRODUCT CATALOGUE - SPILL KITS A PORTABLE/TRUCK SPILL KITS (Refills kits and single items replacements available for all kits) 45l UNIVERSAL SPILL KIT: OILS, DIESEL, FUEL & SOLVENTS 75l UNIVERSAL SPILL
Geo-Prime Tank U.S. Patent Number 8,544,282
 www.geo-flo.com Geothermal and Hydronics Specialists Installation, Operating, and Maintenance Manual Part # 3487 Rev. 03JUL2014 Geo-Prime Tank U.S. Patent Number 8,544,282 Geo-Flo Products Corporation
Changing the Printer Paper Monthly
 DCA Vantage HbA1C: Appendix E - Instrument Maintenance Maintenance Schedule Daily As Needed Clean the exterior Changing the Printer Paper Monthly Calibrating the Touchscreen Clean the Barcode Window Quarterly
Operation Manual BOTTLE TOP DISPENSER
 Operation Manual BOTTLE TOP DISPENSER TABLE OF CONTENTS Page No. Intended Use Of The Instrument 1 Safety Instructions 1 Functions and Limitations of Use 2 Operating Exclusions 3 Storage Conditions 3 Chemical
Prospenser. User Manual Mode d emploi Bedienungsanleitung Manual Usuario. For capacities of 2.5 ml 5 ml 10 ml 30 ml and 50 ml
 Prospenser User Manual Mode d emploi Bedienungsanleitung Manual Usuario For capacities of 2.5 ml 5 ml 10 ml 30 ml and 50 ml Prospenser User Manual...1 Mode d emploi... 11 Bedienungsanleitung... 21 Manual
1 CONDIMENT DISPENSING SYSTEMS MODELS MCD-1 & MCD-2
 1 CONDIMENT DISPENSING SYSTEMS MODELS MCD-1 & MCD-2 THIS EQUIPMENT CHAPTER SHOULD BE INSERTED IN THE EQUIPMENT MANUAL MANUFACTURED FOR McDONALD S BY PERFECTION EQUIPMENT, INC. 4259 LEE AVENUE GURNEE, ILLINOIS
OWNER S MANUAL. Model: UTL-60-12V ( ) (60 Gallon Lawn & Garden Utility Sprayer w/5-nozzle Boom)
 (60 Gallon Lawn & Garden Utility Sprayer w/5-nozzle Boom)") OWNER S MANUAL Model: UTL-60-12V (5301347) (60 Gallon Lawn & Garden Utility Sprayer w/5-nozzle Boom) Technical Specifications 60 Gal. Corrosion-Resistant Polyethylene Tank Deluxe Pistol-Grip Handgun w/25
OWNER S MANUAL Model: UTL-60-12V (5301347) (60 Gallon Lawn & Garden Utility Sprayer w/5-nozzle Boom) Technical Specifications 60 Gal. Corrosion-Resistant Polyethylene Tank Deluxe Pistol-Grip Handgun w/25
PIKE DUAL AIR PICTORIAL INSTRUCTIONS. INSTRUCTIONS FOR INSTALLING ENDURO FORK SEALS AND CHANGING SEMI-BATH OIL in RockShox PIKE Dual Air Forks
 INSTRUCTIONS FOR INSTALLING ENDURO FORK SEALS AND CHANGING SEMI-BATH OIL in RockShox PIKE Dual Air Forks RECOMMENDED PARTS AND TOOLS -Bicycle work stand -Plastic bucket/drain pan -5mm Allen wrench -DH
Honda Civic Oil Change
 1988-1991 Honda Civic Oil Change Change the oil in your '88-'91 Honda Civic to improve engine performance and longevity. Written By: Phillip Takahashi ifixit CC BY-NC-SA www.ifixit.com Page 1 of 13 INTRODUCTION
Maintenance. Part A, Section 5. This section covers the following unit configurations.
 Part A, Section 5 This section covers the following unit configurations. Model 3100V 3400V 3830V 3860V 3890V 3930V Voltage 1, 2 Pump AC Gear (K or L) Manifold 4-Port (J)) Control Vista Standard (V) Vista
T1-Titanium Non-HVLP Spray Gun
 T1-Titanium Non-HVLP Spray Gun THE SPRAY GUN PEOPLE FOR PRODUCT INFORMATION CALL: 1-800-742-7731 Important Safety Instructions Read all warnings and instructions in this manual. Save these instructions.
Maintenance Guide AZTEC BNF-2000 BILL ACCEPTOR PRIMARY COMPONENT PARTS
 AZTEC BNF-2000 Bill Acceptor Maintenance Guide October, 2007 October, 2007 Maintenance Guide JCM is a registered trademark of JCM American Corporation. All other product names mentioned herein may be registered
Volkswagen New Beetle Body - Exterior 50 Body - Front (Page GR-50)
") 50 Body - Front (Page GR-50) Body, front Front end, Assembly overview Front fender, assembly overview Lock carrier, removing and installing Lock carrier, service position Noise insulation, assembly overview
50 Body - Front (Page GR-50) Body, front Front end, Assembly overview Front fender, assembly overview Lock carrier, removing and installing Lock carrier, service position Noise insulation, assembly overview
LC I LIPPERT COMPONENTS HYDRAULIC FULL WALL SLIDEOUT SYSTEM OPERATION AND SERVICE MANUAL
 LC I LIPPERT COMPONENTS HYDRAULIC FULL WALL SLIDEOUT SYSTEM OPERATION AND SERVICE MANUAL TABLE OF CONTENTS SYSTEM...... 3 Warning...... 3 Description..... 3 Prior to Operation... 4 4 OPERATION... Main
Preventive Maintenance...
 Preventive Maintenance........................................ 2 Introduction This chapter contains recommended preventive maintenance (PM) procedures for the AccuFlex printer. Itemized logs for the PM
HydroCycle Vertical NFT Lettuce & Herb Systems
 HydroCycle Vertical NFT Lettuce & Herb Systems 2016 Growers Supply All Rights Reserved. Reproduction is prohibited without permission. STK# DIMENSIONS 11510950 51" W x 80" H x 58" L* *Dimensions have been
Volkswagen New Beetle Body - Exterior 53 Body - Rear (Page GR-53)
") 53 Body - Rear (Page GR-53) Body, rear Rear end, assembly overview Rear fender, assembly overview Transparent foil protection for rear fenders Body, rear (Page 53-1) Rear end, assembly overview Note: The
53 Body - Rear (Page GR-53) Body, rear Rear end, assembly overview Rear fender, assembly overview Transparent foil protection for rear fenders Body, rear (Page 53-1) Rear end, assembly overview Note: The
Preventive Maintenance for Pail Melters
 Instruction Sheet P/N Preventive Maintenance for Pail Melters 1. Introduction These procedures are recommended in addition to the standard preventive maintenance. Use them to keep yourvista controlled
HYDRAULICS. TX420 & & lower. Hydraulic Tandem Pump Removal. 4. Remove the LH side panel (Fig. 0388).
.") TX420 & 425 240000299 & lower 4. Remove the LH side panel (Fig. 0388). Hydraulic Tandem Pump Removal Note: Cleanliness is a key factor in a successful repair of any hydraulic system. Thoroughly clean all
TX420 & 425 240000299 & lower 4. Remove the LH side panel (Fig. 0388). Hydraulic Tandem Pump Removal Note: Cleanliness is a key factor in a successful repair of any hydraulic system. Thoroughly clean all
Aerial Maintenance. Drip less oil or light machine oil is used on control cables, door latches, and hinges.
 Oils, greases, and other lubricants used by this Department. Engine oil SAE 15W40 is used in the crankcase of our apparatus, high-fog pump, 1981 American La France road pump transmission and also as a
Filling and Flushing the Hydrostatic System
 Filling and Flushing the Hydrostatic System Sudden movement of the machine or release of oil under pressure can cause injury to persons on or near the machine. To prevent possible injury, perform the procedure
Innoquest Item # Product Manual
 Innoquest Item # 29480 Product Manual Table of Contents 1.0 Safety Information. 2 2.0 Introduction... 3 2.1 Spray Case Diagram. 3 2.2 Features 4 3.0 Specifications. 5 4.0 Set-up & Operation... 6 4.1 Charging
3-TONNE GARAGE JACK OPERATION & MAINTENANCE INSTRUCTIONS MODEL NO: CTJ3000GB PART NO: ORIGINAL INSTRUCTIONS
 3-TONNE GARAGE JACK MODEL NO: CTJ3000GB PART NO: 7623032 OPERATION & MAINTENANCE INSTRUCTIONS ORIGINAL INSTRUCTIONS GC1216 2 INTRODUCTION Thank you for purchasing this CLARKE Garage Jack. Before attempting
OWNER S MANUAL Model: TR-40-EX ( ) (40 Gallon Lawn & Garden Trailer Sprayer w/5-nozzle Boom Assembly)
 (40 Gallon Lawn & Garden Trailer Sprayer w/5-nozzle Boom Assembly)") OWNER S MANUAL Model: TR-40-EX (5301338) (40 Gallon Lawn & Garden Trailer Sprayer w/5-nozzle Boom Assembly) Technical Specifications 40 Gal. Corrosion-Resistant Polyethylene Tank 12 Volt Diaphragm Pump,
OWNER S MANUAL Model: TR-40-EX (5301338) (40 Gallon Lawn & Garden Trailer Sprayer w/5-nozzle Boom Assembly) Technical Specifications 40 Gal. Corrosion-Resistant Polyethylene Tank 12 Volt Diaphragm Pump,
PENTECH, INC. BD Spray Gun. Operating Manual Parts Manual May, 2008 Issue 1. Plural Component, Impingement Mixing, Mechanical Purge Spray Gun
 PENTECH, INC. Operating Manual Parts Manual May, 2008 Issue 1 Plural Component, Impingement Mixing, Mechanical Purge Spray Gun BD Spray Gun PENTECH, INC. 7256 21 st Street East Sarasota, FL 34243 Phone: