General maintenance knowledge required for practical driving test
|
|
|
- Sharon Lorraine Robbins
- 5 years ago
- Views:
Transcription
1 General maintenance knowledge required for practical driving test Contents Location of parts. 2 The maintenance items listed, should be performed weekly.. 3 Brake/Power steering fluid level 4 Tyres 5 Wiper blades 7 Lights, battery and servicing.8
2 From 1st September 2003 the examiner will ask candidates 2 "show me/tell me" questions at the start of the test. Should the candidate fail to answer either one or both questions correctly, this would be assessed as 1 driving fault and would not therefore constitute a reason for failing the test in its own right. A candidate will have to either SHOW or EXPLAIN how to do simple maintenance tasks. At the start of the practical test the Examiner will ask the pupil a 'Tell Me' question, for example "Tell me how you would check the indicators are working on this vehicle. This would be followed by a 'Show Me' question, for example "Show me where to check the oil level". A candidate will not FAIL a Driving Test for a wrong answer however they will get ONE Driving Fault if they are wrong. This test will be included inside the existing time limit for the practical test which means less time spend out on the road. This section has been designed to help you through this element of the practical test. When performing any inspection or maintenance work on your vehicle, always take care to prevent serious accidental injury to yourself or damage to the vehicle. The following are general precautions which should be observed. Park your vehicle on a level surface, apply the hand brake and chock the wheels to prevent the vehicle moving. If you have a automatic, move the control lever to neutral ("N"). Turn off the engine and wait until it cools down. Do not work while the engine is hot. If you have to work with the engine running, keep your hands, clothing, hair and tools away from moving parts such as the fan belt and fans. It is advisable to remove ties and jewellery, such as rings, watches. If the engine is running in a enclosed space such as a garage, make sure there is proper ventilation for exhaust fumes. Never get under the vehicle while it is only supported by a jack. Support the vehicle with safety stands. Never smoke and keep flames and sparks away from the fuel and battery. Never connect or disconnect either the battery or any other electrical components while the ignition is switched on. 1


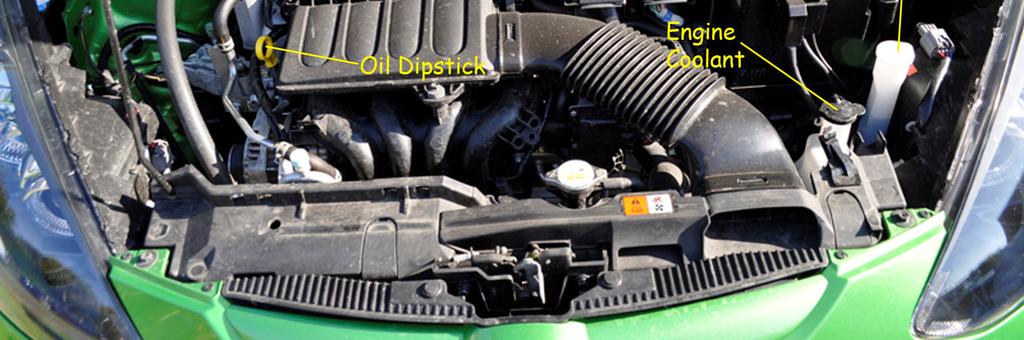
3 Location of parts My engine 2
4 The maintenance items listed should be performed weekly. Caution! Oil Level should be checked regularly. Using too little or too much oil can damage the engine. It is normal to add some oil between maintenance intervals depending on the severity of the operating conditions. 1. Park the vehicle on level ground and apply the handbrake. 2. Run the engine until it reaches operating temperature. 3. Turn off the engine. Wait a few minutes for the oil to drain back into the oil pan. 4. Remove the dipstick and wipe it clean with a dry cloth. Re-insert it fully. 5. Remove the dipstick again and check the oil level. It should be between the "H" and "L" marks. If the oil is below the "L" mark, remove the oil filler cap and pour recommended oil through the opening. Do not overfill. or you'll be burning it off, creating unwanted exhaust smoke. Worse, it could blow an oil seal. 6. Recheck oil level with dipstick. Checking Coolant Level Caution! Never remove the radiator cap when the engine is hot. Serious scalding could be caused by hot fluid under high pressure escaping from the radiator. Wait until the engine and radiator cool down. Check the coolant level in the reservoir tank when the engine is cold. If the coolant level is below the "MIN", add coolant up to the "MAX" level. If the reservoir tank is empty, check the coolant level in the radiator when the engine is cold. If coolant level is not at the top of the radiator, fill with undiluted coolant up to the filler opening and also add it to the reservoir tank up to the "MAX" level. NOTE: Some older vehicles do not have a coolant reservoir tank. If this is the case for your vehicle, then just remove the radiator cap and check the coolant is up to the filler opening. 3


5 Brake/Power Steering Fluid Level Caution! Brake and Power steering fluid are poisonous and should be stored carefully in marked containers out of reach of children. Use only NEW brake fluid. Old fluid may be contaminated which may result in damage to the braking system. Do not spill fluid on painted surfaces. This will damage the paint. If fluid is spilled, wash with water as soon as possible. Check the fluid in the reservoir. If the fluid is below the "MIN" level or the brake warning light comes on, add brake fluid up to the "MAX" line. If the fluid is added frequently, the system should be thoroughly checked by a competent mechanic because the system may have developed a leak. Notes for Power Steering owners The Power steering Fluid level should be checked when the fluid is cold DO not Overfill Use only steering fluid recommended for your vehicle. Windscreen Washer Fluid Caution! Do not substitute engine anti-freeze for screen wash solution. This may result in damage to the paint. Do not use washing up liquid. It contains salt which could ruin your paint work. If your windscreen washer has a bottle (as shown LEFT), flip the tab open. Fill the bottle to the neck using windscreen washer fluid or water. During winter months water is likely to freeze so make sure 50% windscreen washer fluid is added. DO NOT USE ANTI-FREEZE. Some vehicles have washer bottles with only the filler tab visible. With these bottles, you check the fluid level by using your finger to plug the centre hole of the cap assembly (as shown RIGHT), then remove it from the bottle. Fluid will be retained in the tube to indicate the current bottle level. 4

6 Tyres Caution! Remember tyre age. Never use a tyre over Six Years old, regardless of whether it has been used or not. At least every week check the tyre pressure (including spare). Incorrect tyre pressure may adversely affect tyre life and vehicle handling. Tyre pressure should be checked when tyres are cold after the vehicle has been parked for three or more hours, or driven less than 1 mile. COLD tyre pressures are shown on garage forecourt. Different vehicles have different tyre pressures so check the charts. Insufficient pressure can lead to overheating of the tyre and subsequently internal damage. At high speeds, this could result in tread separation and even bursting of the tyre. Tyres should also be inspected for wear, cracking, bulging, or objects caught in the tread. If excessive wear, cracks, bulging, or deep cuts are found, the tyre should be replaced. Most new tyres have a built-in tread wear indicator (See diagram RIGHT). When wear indicator is visible, the tyre should be replaced. Cars, light vans and light trailers must have a tread depth of at least 1.6mm across the central three-quarters of the breath of the tread and around the entire circumference. Motorcycles, large vehicles and passenger carrying vehicles must have a tread depth of at least 1mm. WARNING Do not use a deformed wheel even if it has been repaired. Such wheels could have structural damage and could fail without warning. Unbalanced wheels may affect vehicle handling and tyre life. Even with regular use, wheels can get out of balance. Therefore, they should be balanced as required. Motorists are failing to check the condition of their tyres, which could have fatal consequences, Although tyres are critical for the safety of all road users, many motorists are in breach of, and, oblivious to, the legal 1.6mm tread depth requirement, and may have tyres classified as severely damaged. With a maximum fine of 2,500 per tyre with discretionary disqualification including three penalty points, motorists could be in for a nasty shock, if caught driving with illegal tyres. Quick look at the top tips to ensure tyres are legal and in top condition: Examine tyres every two weeks for signs of damage, uneven wear, splits or cracks. Keep track of tyre tread depth by purchasing an easy-to-use tread depth gauge. The legal requirement is 1.6mm, but many manufacturers recommend changing at 2mm or even 3mm. 5
7 Check tyres are inflated to the correct pressure every week using a reliable gauge. Do this when the tyres are cold. Tyres will wear at different speeds especially between front and back. Don't presume all tyres will be in the same condition. Ask a garage to check the vehicle's tracking every six months, or after any collision or heavy kerb impact. Incorrect tracking leads to uneven and accelerated tyre wear. Aggressive driving styles can take thousand of miles from the life expectancy of tyres. Harsh acceleration and braking will reduce the tread significantly. When changing tyres, never risk buying part worn or second-hand tyres, a brand new tyre or retread is always a safer investment. How to change a tyre: We re learning all the time. So the next time you have a damaged or flat tyre, don t look for a mechanic. Just follow these simple steps and change it yourself. When on a motorway:- Never change a flat tyre on the hard shoulder. Breakdown patrols are trained to do roadside repairs safely, while their flashing lights are much more noticeable than your car's hazard lights. Choose a safe place to stop away from the main carriageway and ensure your passengers get out of the car and wait in a safe area away from other traffic. Switch on the hazard warning lights to alert other road users. Apply the handbrake and engage 1st gear 9 select 'P' for an automatic transmission) Ensure the jack is positioned on firm, level ground. Do not position the jack on metal gratings or manhole covers. If jacking on a slope, place chocks (a house brick would do) at the front and rear of the wheel diagonally opposite the one to be removed. Before raising the car, remove the wheel trim and use the wheel nut spanner to slacken each of the wheel nuts anti-clockwise. Turn the jack clockwise to raise the car until the tyre is clear of the ground. Remove the wheel nuts and the wheel Fit the spare wheel and tighten the wheel nuts (domed side towards the wheel) until the wheel is firmly seated. Lower the car and remove the jack and the wheel chocks, then FULLY tighten the wheel nuts in diagonal sequence. Refit the wheel trim. It s as simple as that! 6
8 Wiper blades Caution! When cleaning the Wiper blades do not use strong household soap, strong chemical detergents, petrol or solvents. If your windscreen is not clear after using the windscreen washer, here are tell-tale signs of worn out wipes. Lines appearing on windscreen - A wiper blade's rubber can harden or become damaged with age, leaving fine beads of water on the windscreen. Bands appearing on windscreen - Hardened or aging wiper rubber can cause thicker bands of water on the screen. Lace Curtains - Arm defects or long periods in the parked position can deform the wiper blade lip, causing a veil affect across the windscreen. This means visibility danger is greatest when passing other vehicles at night. Chattering - A deformed wiper element can cause blades to judder across the screen, leaving radial streaks. Unwashed Margins - A deterioration in the wiper blades or decreased wiper pressure can leave parts of the windscreen unclear. Noise - Noisy wipers may be a sign that the wiper element is deformed or hardened, so that the wiper blade structure is worn. Judder - A deformed wiper element, wrong adaptor or blade aging can result in jerky and noisy wiper arm movement Wind Lift - If high speeds persistently cause the wiper to miss parts of the screen, either the wiper blade or wiper arm should be replaced. Clean the outside of the windscreen with a mild detergent. Your windscreen is clean if beads do not form when rinsing with clear water. Clean the blade by wiping it with a cloth soaked in a washer solution. Rinse the blade with clear water. If the windscreen is still not clear after cleaning blades and using the wiper, replace the blades. To replace the blades Pull the wiper arm up Push in the lock pin (see diagram RIGHT). Move the wiper blade down the arm until the lock pin is clear, then remove the blade completely. Insert a new wiper blade to the wiper arm until the pin clicks into place. 7

9 Lights Make sure that the headlights, stop lights, rear lights, parking lights, indicator lights, and other lights are all operating properly. Battery Caution! Do not expose the battery to flames or electrical sparks. Hydrogen gas generated by battery action is highly combustible. Do not allow battery fluid to contact your skin, eyes, fabrics or paint work. Keep battery surface clean and dry. Any corrosion (That 'white powder' that appears around the terminals) should be washed off with a solution of baking soda and water. Make certain the terminal connections are clean and securely tightened. If the vehicle is not to be used for 30 days or longer, disconnect the negative "- " battery terminal cable to prevent battery discharge Normally the battery does not require additional water, however adding distilled water may be necessary during the battery life. It should be between the "MIN" mark and the edge of the lid (See diagram on the LEFT). If it is necessary to add fluid, add only DISTILLED water to raise the level in each cell to the maximum mark. Do not overfill. To add water to the cells first remove the cell caps. Add distilled water up to the "MAX" level. Refit the cell caps ensuring that they are securely fastened Minor and Major Vehicle Service Minor and Major servicing is required to ensure good engine and emission control, and to keep the vehicle in good mechanical condition. Always refer to your 'Maintenance schedule' on your vehicle. Vehicles today have been designed to have minimum maintenance requirements with longer service intervals to save you both time and money. 8
Light condition and operation Windshield glass condition Wiper blade condition Paint condition and corrosion Fluid leaks Door and hood lock condition
 GENERAL CHECKS Engine Compartment The following should be checked regularly: Engine oil level and condition Transmission fluid level and condition Brake fluid level Clutch fluid level Engine coolant level
Fluid level checks ENGINE OIL CHECK
 Fluid level checks ENGINE OIL CHECK Check the engine oil weekly. If any significant or sudden drop in oil level is noted, seek qualified assistance. If the message ENGINE OIL PRESSURE LOW is displayed,
SECTION 8 1 DO IT YOURSELF MAINTENANCE. Introduction
 SECTION 8 1 DO IT YOURSELF MAINTENANCE Introduction Motor compartment overview................................ 176 Fuse locations............................................. 177 Do it yourself service
SECTION 7 1 DO IT YOURSELF MAINTENANCE MR2 U. Introduction
 SECTION 7 1 DO IT YOURSELF MAINTENANCE Introduction Engine compartment overview............................... 160 Trunk room overview........................................ 161 Fuse locations.............................................
Engine oil. Introduction. Warning and indicator lights WARNING
 Engine oil Introduction In this section you ll find information about: Warning and indicator lights Engine oil specifications Engine oil capacities Checking the engine oil level and adding oil Engine oil
Maintenance GENERAL INFORMATION
 GENERAL INFORMATION Protect the environment We must all play our part in protecting the environment. Correct vehicle usage and disposal of waste cleaning and lubrication materials are significant steps
Show me, Tell Me Questions.
 Show me, Tell Me Questions. Ford Fiesta. Below are all the DSA 2014 driving practical test questions and answers for a Ford Fiesta. At the start of the practical driving test, the driving examiner will
Peugeot 208 SHOW ME TELL ME CHECKS DEC Tell me how you d check that the brakes are working before starting a journey.
 Peugeot 208 SHOW ME TELL ME CHECKS DEC 2017 TELL ME 1. Tell me how you d check that the brakes are working before starting a journey. Brakes should not feel spongy or slack. Brakes should be tested as
SECTION 8 1 DO IT YOURSELF MAINTENANCE. Introduction
 SECTION 8 1 DO IT YOURSELF MAINTENANCE Introduction Engine compartment overview............................... 396 Fuse locations............................................. 397 Do it yourself service
1100W PORTABLE GENERATOR
 1100W PORTABLE GENERATOR MODEL NO: G1200 PART NO: 8010110 OPERATION & MAINTENANCE INSTRUCTIONS LS0312 INTRODUCTION Thank you for purchasing this CLARKE 1100W Portable Generator. Before attempting to use
SECTION 8 2 DO IT YOURSELF MAINTENANCE. Chassis
 DO IT YOURSELF MAINTENANCE Chassis SECTION 8 2 Checking the coolant level of the traction motor................ 184 Checking the radiator....................................... 185 Checking brake fluid........................................
1200W INVERTER GENERATOR
 1200W INVERTER GENERATOR MODEL NO: IG1200 PART NO: 8877070 OPERATION & MAINTENANCE INSTRUCTIONS LS0117 INTRODUCTION Thank you for purchasing this CLARKE 1200W Inverter Generator. Before attempting to use
9-2 In case of emergency
 In case of emergency If you park your vehicle in case of an emergency... 9-2 Temporary spare tire... 9-2 Maintenance tools... 9-3 Flat tires... 9-5 Changing a flat tire... 9-5 Tire pressure monitoring
Model: OBD-L On-Board-Diagnostics II Memory Saver Detector
 Model: OBD-L On-Board-Diagnostics II Memory Saver Detector OWNERS MANUAL IMPORTANT SAFETY INSTRUCTIONS SAVE THESE INSTRUCTIONS This manual will show you how to use your memory saver detector safely and
SECTION 6 3 SERVICE PROCEDURES AND SPECIFICATIONS. Chassis
 SERVICE PROCEDURES AND SPECIFICATIONS Chassis SECTION 6 3 Specifications........................................... 208 Checking brake fluid...................................... 210 Checking power steering
SECTION 7 2 DO IT YOURSELF MAINTENANCE MR2 U. Engine and Chassis
 SECTION 7 2 DO IT YOURSELF MAINTENANCE Engine and Chassis Checking the engine oil level................................. 168 Checking the engine coolant level............................ 169 Checking brake
SECTION 6 1 SERVICE PROCEDURES AND SPECIFICATIONS. Introduction
 SERVICE PROCEDURES AND SPECIFICATIONS Introduction SECTION 6 1 Vehicle identification...................................... 192 Engine compartment overview............................. 193 Do it yourself
Part 7 DO IT YOURSELF MAINTENANCE
 Part 7 DO IT YOURSELF MAINTENANCE Chapter 7 2 Engine and Chassis Checking the engine oil level Checking the engine coolant level Checking brake fluid Checking power steering fluid Checking tire pressure
SECTION 6 3 SERVICE PROCEDURES AND SPECIFICATIONS. Chassis
 SECTION 6 3 SERVICE PROCEDURES AND SPECIFICATIONS Chassis Specifications 206 Checking brake fluid 208 Checking power steering fluid 209 Checking tire pressure 210 Rotating tires 211 Checking and replacing
Maintenance GENERAL INFORMATION. Service intervals
 Maintenance GENERAL INFORMATION Regular systematic maintenance is the key to ensuring the continued reliability and efficiency of your vehicle. Maintenance is the owner's responsibility and you must ensure
SECTION 6 1 SERVICE PROCEDURES AND SPECIFICATIONS. Introduction
 SERVICE PROCEDURES AND SPECIFICATIONS Introduction SECTION 6 1 Vehicle identification...................................... 156 Engine compartment overview............................. 157 Do-it-yourself
SECTION 7 3 DO IT YOURSELF MAINTENANCE MR2 U. Electrical components
 DO IT YOURSELF MAINTENANCE Electrical components SECTION 7 3 Checking battery condition.................................. 178 Battery recharging precautions............................... 179 Checking
GENERATOR MODEL NO: FG2500 OPERATION & MAINTENANCE INSTRUCTIONS PART NO: LS0114
 GENERATOR MODEL NO: FG2500 PART NO: 8857727 OPERATION & MAINTENANCE INSTRUCTIONS LS0114 INTRODUCTION Thank you for purchasing this CLARKE Generator. Before attempting to use this product, please read this
Maintenance GENERAL INFORMATION. Owner maintenance. Daily checks. Weekly checks. Service Portfolio
 Maintenance GENERAL INFORMATION CAUTION Severe damage to the electrical system and electronic components can occur, if any attempt is made to diagnose faults in the electrical system using conventional
FSG175 FENCE STAPLE GUN
 Kencove Farm Fence Supplies 344 Kendall Rd Blairsville, PA 15717 1-800-KENCOVE sales@kencove.com www.kencove.com OPERATING MANUAL FSG175 FENCE STAPLE GUN To reduce the risk of possible injury, read the
MTD OHV Series I15 FORM NO I. MTD Products Aktiengesellschaft Saarbrücken Germany
 MTD OHV Series I15 FORM NO. 769-01577I MTD Products Aktiengesellschaft Saarbrücken Germany 8 15 23 31 38 46 54 61 68 75 82 90 99 107 115 122 130 138 145 152 159 166 175 183 193 202 211 218 226 English
GLOVE BOX CHECK IT GUIDE
 GLOVE BOX CHECK IT GUIDE When it comes to road safety, one thing you can control is proper maintenance of your vehicle. Keep this simple guide in your glove box & use it to complete quick, regular checks
GENERATOR MODEL NO: FG3005 OPERATION & MAINTENANCE INSTRUCTIONS PART NO: LS0413
 GENERATOR MODEL NO: FG3005 PART NO: 8857707 OPERATION & MAINTENANCE INSTRUCTIONS LS0413 INTRODUCTION Thank you for purchasing this CLARKE Generator. Before attempting to use this product, please read this
OPERATION & MAINTENANCE INSTRUCTIONS
 WARNING Read the instructions before using the machine PETROL DRIVEN POWER WASHER MODEL NO: TIGER1700 PART NO: 7320054 OPERATION & MAINTENANCE INSTRUCTIONS LS0511 2 INTRODUCTION Thank you for purchasing
Trench Filler for Compact Utility Loaders
 Form No. 3353-608 Rev A Trench Filler for Compact Utility Loaders Model No. 22472 260000001 and Up Operator s Manual Register your product at www.toro.com Original Instructions (EN) Contents Page Introduction................................
3KVA DUAL VOLTAGE GENERATOR MODEL NO: PG3800DV
 3KVA DUAL VOLTAGE GENERATOR MODEL NO: PG3800DV PART NO: 8857815 OPERATION & MAINTENANCE INSTRUCTIONS LS1016 INTRODUCTION Thank you for purchasing this CLARKE 3KVA Dual Voltage Generator. Before attempting
5.5KVA GENERATOR MODEL NO: PG6500DVES OPERATION & MAINTENANCE INSTRUCTIONS PART NO: LS0616
 5.5KVA GENERATOR MODEL NO: PG6500DVES PART NO: 8857810 OPERATION & MAINTENANCE INSTRUCTIONS LS0616 INTRODUCTION Thank you for purchasing this CLARKE 5.5KVA Generator. Before attempting to use this product,
MP V 8A Electronic Smart Charger. Instruction and Information Manual
 MP7428 12V 8A Electronic Smart Charger Instruction and Information Manual In order to ensure correct and safe usage of your battery charger, you should read these instructions carefully. Please retain
Tyres OVERVIEW TYRE PRESSURES
 Tyres OVERVIEW Tyres of the correct type, manufacturer and dimensions, with correct cold inflation pressures are an integral part of every vehicle s design. Regular maintenance of tyres contributes not
GENERATOR MODEL NO: FG3000 OPERATION & MAINTENANCE INSTRUCTIONS PART NO: LS0609
 GENERATOR MODEL NO: FG3000 PART NO: 8857700 OPERATION & MAINTENANCE INSTRUCTIONS LS0609 INTRODUCTION Thank you for purchasing this CLARKE Generator. Before attempting to use this product, please read this
SECTION 6 4 SERVICE PROCEDURES AND SPECIFICATIONS. Electrical components
 SERVICE PROCEDURES AND SPECIFICATIONS Electrical components SECTION 6 4 Specifications........................................... 190 Checking battery condition and fluid level................... 194 Battery
Engine coolant. Introduction WARNING
 Engine coolant Introduction In this section you ll find information about: Warning light and engine coolant temperature gauge Engine coolant specifications Checking engine coolant level and topping off
Vehicle battery BATTERY WARNING SYMBOLS BATTERY CARE
 Vehicle battery BATTERY WARNING SYMBOLS On the battery label, the warning signs are as follows: BATTERY CARE No smoking, no naked flames, no sparks. The battery may emit explosive gas. Keep away from children
SIP Direct Drive Oil-Lube Air Compressors - Operating & Maintenance Instructions
 SIP Direct Drive Oil-Lube Air Compressors - Operating & Maintenance Instructions Please read and fully understand the instructions in this manual before operation. Keep this manual safe for future reference.
WARNING: Read these instructions before using the machine GENERATOR MODEL NO: IG3500F PART NO: OPERATION & MAINTENANCE INSTRUCTIONS
 WARNING: Read these instructions before using the machine GENERATOR MODEL NO: IG3500F PART NO: 8877100 OPERATION & MAINTENANCE INSTRUCTIONS ORIGINAL INSTRUCTIONS LS0217 INTRODUCTION Thank you for purchasing
SECTION 6 4 SERVICE PROCEDURES AND SPECIFICATIONS. Electrical components
 SERVICE PROCEDURES AND SPECIFICATIONS Electrical components SECTION 6 4 Specifications........................................... 214 Checking battery condition and fluid level................... 218 Battery
Car Battery Charger Instructions for Use
 BATTERY CHARGER 12Volt 4Amp FOR INDOOR USE ONLY Power Details: Input: 230-240Vac; 50Hz; 52W Output: 12V DC; 2.8A Maximum Charge Rate: 4A RMS Read these instructions before operating this car battery charger
OPERATOR S MANUAL JUMP STARTER. and DC Power Source. Model No CAUTION: Sears, Roebuck and Co., Hoffman Estates, IL U.S.A.
 OPERATOR S MANUAL JUMP STARTER and DC Power Source Model No. 71489 CAUTION: Read and follow all Safety Rules and Operating Instructions before Every Use of this Product. SAVE THESE INSTRUCTIONS. Sears,
HOT WASHER MODEL NO: KING 125 OPERATION & MAINTENANCE INSTRUCTIONS PART NO: LS1009
 HOT WASHER MODEL NO: KING 125 PART NO: 7320170 OPERATION & MAINTENANCE INSTRUCTIONS LS1009 INTRODUCTION Thank you for purchasing this Hot Washer. This machine is a portable, high pressure power washer,
OWNERS MANUAL Models: XP400, XP500, XP750C INSTANT POWER Jump Starter and DC Power Source
 OWNERS MANUAL Models: XP400, XP500, XP750C INSTANT POWER Jump Starter and DC Power Source XP400 XP500 XP750C PLEASE SAVE THIS OWNER S MANUAL AND READ BEFORE EACH USE. This manual will explain how to use
Page 1 of 6 VAN DAILY VEHICLE PRE CHECKS INFORMATION
 Page 1 of 6 VAN DAILY VEHICLE PRE CHECKS INFORMATION There are approximately 2.5 million vehicles in national fleet in Ireland. As vehicles age they are subject to wear and tear and unless attended to
IMPORTANT SAFETY INSTRUCTIONS
 ASSOCIATED Model 6039 Battery Tester Operator's Manual IMPORTANT SAFETY INSTRUCTIONS 1. SAVE THESE INSTRUCTIONS This manual contains important safety and operating instructions for the battery tester you
IMPORTANT INFORMATION
 Table of Contents IMPORTANT INFORMATION Section 1B - Maintenance MAINTENANCE 1 B Specifications........................... 1B-1 Special Tools........................... 1B-2 Mercury/Quicksilver Lubricants
MOTORINI GP 50. User s Manual.
 MOTORINI GP 50 User s Manual www.motorini.co.uk Dear user: Thank you for choosing to buy a Motorini GP 50 This manual provides the correct operation and maintenance methods for safe riding and maintaining
SECTION 6 2 SERVICE PROCEDURES AND SPECIFICATIONS. Engine. Specifications
 SERVICE PROCEDURES AND SPECIFICATIONS Engine SECTION 6 2 Specifications........................................... 170 Fuel.................................................... 172 Facts about engine oil
AUTOMATIC BATTERY CHARGER AUTOMATISCHES BATTERIELADEGERÄT CHARGEUR DE BATTERIE AUTOMATIQUE AUTOMATISCHE ACCULADER 12A RMS (8A DC) MCH12A
 MCH12A") AUTOMATIC BATTERY CHARGER AUTOMATISCHES BATTERIELADEGERÄT CHARGEUR DE BATTERIE AUTOMATIQUE AUTOMATISCHE ACCULADER 12A RMS (8A DC) MCH12A Suitable for all type of 12V lead acid, sealed, leisure and gel
AUTOMATIC BATTERY CHARGER AUTOMATISCHES BATTERIELADEGERÄT CHARGEUR DE BATTERIE AUTOMATIQUE AUTOMATISCHE ACCULADER 12A RMS (8A DC) MCH12A Suitable for all type of 12V lead acid, sealed, leisure and gel
60V RECHARGEABLE LITHIUM-ION BATTERY
 60V RECHARGEABLE LITHIUM-ION BATTERY LB60A00/LB60A03/LB60A01/LB60A02 Owner s Manual TOLL-FREE HELPLINE: 1-855-345-3934 www.greenworkstools.com Read all safety rules and instructions carefully before operating
SECTION 6 2 SERVICE PROCEDURES AND SPECIFICATIONS. Engine. Specifications
 SERVICE PROCEDURES AND SPECIFICATIONS Engine SECTION 6 2 Specifications........................................... 162 Fuel.................................................... 164 Facts about engine oil
ABSOLUTE EQUIPMENT PTY LTD
 Manual Hydraulic Toe Jack Model DTJ Series ABSOLUTE EQUIPMENT PTY LTD 2/186 Granite Street, GEEBUNG QLD 4034 Australia sales@absoluteequipment.com.au Phone: +61 7 3865 4006 Fax: +61 7 3102 6288 This is
HIGH FREQUENCY AUTOMATIC BATTERY CHARGER
 HIGH FREQUENCY AUTOMATIC BATTERY CHARGER MODEL NO: HFBC12 PART NO: 6267000 OPERATION & MAINTENANCE INSTRUCTIONS LS0814 INTRODUCTION Thank you for purchasing this CLARKE High Frequency Automatic Battery
ABSOLUTE EQUIPMENT PTY LTD
 Manual Hydraulic Toe Jack Model DTJ Series ABSOLUTE EQUIPMENT PTY LTD 2/186 Granite Street, GEEBUNG QLD 4034 Australia sales@absoluteequipment.com.au Phone: +61 7 3865 4006 Fax: +61 7 3102 6288 This is
SECTION 6 5 SERVICE PROCEDURES AND SPECIFICATIONS. Body
 SECTION 6 5 SERVICE PROCEDURES AND SPECIFICATIONS Body Specifications 236 Protecting your vehicle from corrosion 237 Washing and waxing 238 Cleaning the interior 239 235 SPECIFICATIONS DIMENSIONS AND WEIGHT
Regulated Hose Supply Installation, Operation & Maintenance Manual
 Regulated Hose Supply Installation, Operation & Maintenance Manual For Models: BA-MS-320-00 BA-MS-320-05 BA-MS-320-20 BA-MS-325-00 BA-MS-325-05 BA-MS-325-20 BA-SFS-320-000 BA-SFS-320-012 BL-005 1/30/2007
Dress and Appearance
 Shop Safety Information Andover High School Explain how to work safely around these items. List Rules for using each item? Dress and Appearance Loose clothing shirts tucked Sleeves buttoned or rolled Me
720W PORTABLE GENERATOR
 720W PORTABLE GENERATOR MODEL NO: G720 PART NO: 8857800 OPERATION & MAINTENANCE INSTRUCTIONS LS0214 INTRODUCTION Thank you for purchasing this CLARKE 720W Portable Generator Before attempting to use this
Railway Crane Maintenance Manual
 Diesel Engine System 2.4 2.4.1 Diesel Engine 2.4.1.1 Diesel Engine (Different Types) 2.4.1.2 Diesel Engine (Crane wise list) 2.4.2 Exhaust System 2.4.3 Fuel System 2.4.4 Diesel Engine Accelerator 2.4.5
WARNING! Ensure that there are no naked flames around the product! Do not smoke while filling fuel and oil!
 Engine Oil and Fuel Engine Operation This product is equipped with a 4 stroke engine. Before operation you have to add proper fuel and engine oil. DO NOT MIXTURE THEM! 1. Place the product on a stable,
EC DECLARATION OF CONFORMITY
 EC DECLARATION OF CONFORMITY 14 2500W INVERTER GENERATOR IM2500I CERTIFICATE OF GUARANTEE This product is guaranteed for a period of 1 Year, with effect from the date of purchase and applies only to the
PETROL DRIVEN POWER WASHER
 WARNING: Read these instructions before using the machine PETROL DRIVEN POWER WASHER MODEL NO: TIGER 2500/2900 PART NO: 7320055/7320056 OPERATION & MAINTENANCE INSTRUCTIONS LS0513 INTRODUCTION Thank you
Tread depth. Tyre size. Wheel condition. Rotational tyres are on the correct Axles
 m ot test preparation In the UK, vehicles over three years old are subject to an annual Ministry Of Transport (MOT) test. The MOT test is a 'basic' check on the car to ensure that it is in sound condition
PSJ-2212, PSJ-3612, PSJ-4424
 Model: PSJ-2212, PSJ-3612, PSJ-4424 Jump Starter and DC Power Source OWNER S MANUAL PSJ-2212 PLEASE SAVE THIS OWNER S MANUAL AND READ BEFORE EACH USE. This manual will explain how to use your jump starter
3. INSPECTION/ADJUSTMENT
 3 3 INSPECTION/ADJUSTMENT SERVICE INFORMATION -------------------------------------------- 3-1 MAINTENANCE SCHEDULE ---------------------------------------- 3-2 FUEL LINE/FUEL FILTER -------------------------------------------
5 IN 1 JUMP START OPERATION & MAINTENANCE INSTRUCTIONS MODEL NO: JS5IN1 PART NO: LS0810
 5 IN 1 JUMP START MODEL NO: JS5IN1 PART NO: 6240005 OPERATION & MAINTENANCE INSTRUCTIONS LS0810 INTRODUCTION Thank you for purchasing this CLARKE product. Before attempting to use this product, please
ENGINE DRIVEN 3 FULL TRASH PUMP
 ENGINE DRIVEN 3 FULL TRASH PUMP MODEL NO: PF75 PART NO: 7230165 OPERATION & MAINTENANCE INSTRUCTIONS ORIGINAL INSTRUCTIONS LS0117 ISS 2 INTRODUCTION Thank you for choosing this Clarke Pump. The function
Tyres OVERVIEW TYRE PRESSURES TYRE PRESSURES. R performance wheels
 Tyres OVERVIEW Tyres of the correct type, manufacturer and dimensions, with correct cold inflation pressures are an integral part of every vehicle s design. Regular maintenance of tyres contributes not
Fuel Filling SAFETY ON THE FORECOURT WARNING WARNING FUEL FILLER WARNING. Take care not to spill fuel. Do not overfill the tank.
 Fuel Filling SAFETY ON THE FORECOURT Petroleum gases are highly inflammable and, in confined spaces, are also extremely explosive. Petroleum gasses are highly flammable, have a low flash point, and are
RedGum GP160 Splitter. Owner s Manual
 RedGum GP160 Splitter Owner s Manual Product Description & Intended Purpose: This Log Splitter / Wood Splitter is an outdoor product that splits wood logs for use as fuel in a fireplace or a woodstove.
LAWN MOWER OWNER S MANUAL
 LAWN MOWER OWNER S MANUAL Woodies SKU: 1153279 & 1153280 CAUTION: Read and follow all Safety Rules and Instructions before operating this equipment Thank you for choosing our Gasoline Lawnmower. 1 To ensure
Log Splitter. Owner/Operator Manual. Models HCWP1-26
 Log Splitter Owner/Operator Manual Models HCWP1-26 SAFETY..........................2 SAFETY WARNING SYMBOL.........3 SAFETY RULES.................. 4-5 SPECIFICATIONS................. 6 CONTROLS AND FEATURES.......
INTELLIGENT BATTERY CHARGER/MAINTAINER
 INTELLIGENT BATTERY CHARGER/MAINTAINER OWNER S MANUAL Read carefully and understand all ASSEMBLY AND OPERATION INSTRUCTIONS before operating. Failure to follow the safety rules and other basic safety precautions
SECTION 6 4 SERVICE PROCEDURES AND SPECIFICATIONS. Electrical components
 SERVICE PROCEDURES AND SPECIFICATIONS Electrical components SECTION 6 4 Specifications........................................... 214 Checking battery condition................................ 218 Battery
Installation, Operation & Maintenance Manual. For Pro-Fill kits with part numbers beginning in BG
 Installation, Operation & Maintenance Manual For Pro-Fill kits with part numbers beginning in BG BL-175 6/26/2009 General Information & Precautions This publication provides detailed instructions for installing
The Driver s Guide to
 FREE EBOOK The Driver s Guide to Automotive Maintenance 1 The Driver s Guide to Automotive Maintenance Routine automotive maintenance is arguably the most important thing you can do for your car. It may
Essential Mist Diffusers FAQs
 Essential Mist Diffusers FAQs 1. What is included when I buy this product? The Essential Mist starter pack will include the following; Essential Mist device, fragrance refill and X3 AA/ LR6 Batteries together
Produced by: Working in partnership with: Brake. the road safety charity
 1 Direct Line & Brake Reports on Safe Driving 2015-2017 REPORT ONE Produced by: Brake the road safety charity Working in partnership with: INTRODUCTION Julie Townsend, Brake s deputy chief executive, says:
NILFISK BA 500 Service Manual
 NILFISK BA 500 Service Manual Model 66324400 12/94 Form Number 043023 TABLE OF CONTENTS Batteries...21 Brush Drive Belt Adjustment Or Replacement...7 Brush Drive Motor - Carbon brush Inspection... 8 Brush
HOW - TO EMISSION CONTROL BASICS EMISSION CONTROL BASICS
 HOW - TO EMISSION CONTROL BASICS EMISSION CONTROL BASICS Tool And Material Checklist Bore Brush Thermometer Portable Vacuum Pump Screwdriver Combination Wrench Set 3/8 Drive Socket Set Tachometer Rag Service
LDG6000SA DIESEL GENERATOR OWNERS MANUAL
 LDG6000SA DIESEL GENERATOR OWNERS MANUAL BEFORE OPERATING THIS EQUIPMENT PLEASE READ THESE INSTRUCTIONS CAREFULLY Preface Thank-you for purchasing this generator. This operation manual contains information
BATTERY & STARTER ANALYSER (BSA-12) User Manual
 User Manual") BATTERY & STARTER ANALYSER (BSA-12) User Manual Introduction BSA-12 Battery Starter Analyser does not carry internal batteries but is powered up from external DC source ranging from 9V to 15V DC. It is
BATTERY & STARTER ANALYSER (BSA-12) User Manual Introduction BSA-12 Battery Starter Analyser does not carry internal batteries but is powered up from external DC source ranging from 9V to 15V DC. It is
AG-HA-2500N GASOLINE GENERATOR
 AG-HA-2500N GASOLINE GENERATOR OWNER S MANUAL BEFORE OPERATING THIS EQUIPMENT PLEASE READ THESE INSTRUCTIONS CAREFULLY (I)WARNING 1. Read the operator s instruction manual. 2. Attention! Exhaust gases
The Importance of Car Maintenance
 ACDelco The Importance of Car Maintenance Whether you have a trusted technician who works on your vehicles or you prefer to do the work yourself, let ACDelco help you keep your cars and trucks running
Mini Pump Installation, Operation & Maintenance Manual. For Models: BA-MS-633
 Mini Pump Installation, Operation & Maintenance Manual For Models: BA-MS-633 BL-309 6/08/2012 General Information & Precautions This publication provides detailed instructions for installing the single
JOHN DEERE WORLDWIDE COMMERCIAL & CONSUMER EQUIPMENT DIVISION. Lawn Tractors L100, L110, L120, and L130 TM2026 DECEMBER 2002 TECHNICAL MANUAL
 2026 December 2002 JOHN DEERE WORLDWIDE COMMERCIAL & CONSUMER EQUIPMENT DIVISION Lawn Tractors L100, L110, L120, and L130 TM2026 DECEMBER 2002 TECHNICAL MANUAL North American Version Litho in U.S.A. Safety
SECTION 6 4 SERVICE PROCEDURES AND SPECIFICATIONS. Electrical components
 SERVICE PROCEDURES AND SPECIFICATIONS Electrical components SECTION 6 4 Specifications........................................... 206 Checking battery condition................................ 210 Battery
AEROMOTIVE Part # & Stealth Fuel Tank Sump INSTALLATION INSTRUCTIONS
 AEROMOTIVE Part # 18651 & 18652 Stealth Fuel Tank Sump INSTALLATION INSTRUCTIONS CAUTION: Installation of this product requires detailed knowledge of automotive systems and repair procedures. We recommend
Installation, Operation & Maintenance Manual
 Installation, Operation & Maintenance Manual Picture may differ from your specific application For Pro-Fill kits with part numbers beginning in BG BL-175 9-20-13 General Information & Precautions This
CAUTION. Start & Stop Procedures. Section 1-2. Engine Oil Level
 Section 1-2 Start & Stop Procedures Before operating this machine, the operator must have: received operator training, a familiarity with this manual, and a complete understanding of all the procedures
Vehicle Care ! WARNING: CLEANING PRODUCTS CLEANING THE EXTERIOR
 Chapter 8 CLEANING PRODUCTS! WARNING: Dry cleaning fluids may be toxic or flammable. Take adequate precautions when handling these products. Brush and clean the interior regularly. Use a vacuum cleaner
USER MANUAL. Your ZINGO DRIFTA 360 warranty must be registered online within 7 days of purchase.
 USER MANUAL Your ZINGO DRIFTA 360 warranty must be registered online within 7 days of purchase. To activate your warranty visit www.tevo.co.za and click the Register your warranty tab at the top of the
PF-4000, PF-4010, PF-4210 MULTI-PURPOSE ENGINE
 PF-4000, PF-4010, PF-4210 MULTI-PURPOSE ENGINE Date 09-26-01 Supplier To The Outdoor Power Equipment Industry ISM, Inc. 1028 4 th Street SW Auburn, WA 98001 Phone: (253) 333-1200 Fax: (253) 333-1212 WWW.TANAKA-USA.COM
PETROL GENERATOR PGH2200, PGH3000, PGH6500 OWNER S MANUAL FOR YOUR SAFETY PLEASE READ THESE INSTRUCTIONS CAREFULLY AND RETAIN THEM FOR FUTURE USE.
 PETROL GENERATOR OWNER S MANUAL PGH2200, PGH3000, PGH6500 FOR YOUR SAFETY PLEASE READ THESE INSTRUCTIONS CAREFULLY AND RETAIN THEM FOR FUTURE USE. WARRANTY GENERATOR SAFETY This generator is covered by
SECTION 6 3 SERVICE PROCEDURES AND SPECIFICATIONS. Chassis
 SERVICE PROCEDURES AND SPECIFICATIONS Chassis SECTION 6 3 Specifications........................................... 204 Checking brake fluid...................................... 206 Checking brake pedal
Model: SE-4020-CA Automatic Battery Charger
 OWNERS MANUAL Model: SE-4020-CA Automatic Battery Charger PLEASE SAVE THIS OWNERS MANUAL AND READ BEFORE EACH USE. This manual will explain how to use the battery charger safely and effectively. Please
PETROL GENERATOR SPG2200, SPG3000, SPG6500 OWNER S MANUAL FOR YOUR SAFETY PLEASE READ THESE INSTRUCTIONS CAREFULLY AND RETAIN THEM FOR FUTURE USE.
 PETROL GENERATOR OWNER S MANUAL SPG2200, SPG3000, SPG6500 FOR YOUR SAFETY PLEASE READ THESE INSTRUCTIONS CAREFULLY AND RETAIN THEM FOR FUTURE USE. WARRANTY This generator is covered by a 24 month warranty
TP300 INDUSTRIAL TRASH PUMP OPERATOR S MANUAL
 TP300 INDUSTRIAL TRASH PUMP OPERATOR S MANUAL IT IS EXTREMELY IMPORTANT TO READ AND UNDERSTAND THE ENTIRE CONTENTS OF THIS OPERATOR S MANUAL BEFORE ATTEMPTING TO OPERATE THE PRODUCT. THIS EQUIPMENT IS