PLEASE NOTE: A COPY OF THE THERMOSTASIS SPECIFIC DIRECTIONS ARE ATTACHED TO THE LAST PAGE OF THIS DOCUMENT.
|
|
|
- Claude Whitehead
- 5 years ago
- Views:
Transcription


1 Thank you for purchasing your Rotax 912 Thermostasis Install Kit. Please note that these directions are updated periodically as required and the current version will always be located on our website. These instructions are meant to serve as a guide for the installation of the aftermarket thermostasis kit with directions specific to an RV-12 installation. However, we currently have installation kits for multiple aircraft, and pictures are included at the end of this document showing the routing and installation of the kit on other aircraft. However, if you have any questions, please contact us so that we can assist you with your installation. If your aircraft is not listed, this kit is adaptable, and we will be happy to work with you to create a custom kit that fits for you. Let's take a look at the components that make up this kit. 1. Thermostasis Unit (190 degree Thermostasis Unit as recommended for the Rotax 912 engine) 2. AN fittings for the thermostasis unit. There are three -8 Straight Fittings, and degree fitting. (FOR THE RV-12...other aircraft may use other fittings) 3. 4 oil lines for Thermostasis installation (Description of hoses for the RV-12) 1. Hose 1: Thermostasis to oil tank Shortest of the hoses with a 90/str fitting 2. Hose 2: Thermostasis to oil pump- Only hose with two straight fittings 3. Hose 3: Thermostasis to pilot side of oil cooler Medium length hose with 90/str fittings 4. Hose 4: Thermostasis to copilot side of oil cooler Longest hose with 90/str fittings PLEASE NOTE: A COPY OF THE THERMOSTASIS SPECIFIC DIRECTIONS ARE ATTACHED TO THE LAST PAGE OF THIS DOCUMENT.

2 Tools required for installation: 1. Wrench Set Step 1: Please remove all oil hoses except for the existing engine to oil tank hose shown in this picture. Step 2: Please install included blue AN fittings into your thermostasis unit. Please note that the thermostasis unit will take straight fittings in 3 of the 4 ports. The port that utilizes the 90 degree fitting is the port on the copilot side toward the firewall of the aircraft. Please also note that although the thermostasis unit it bi-directional, thermostasis does recommend that the top fitting when viewed from the front is the one that goes to the oil pump. They did tell us verbally that if it is installed incorrectly, it won't affect performance but will make the temperatures off be a few degrees, which is no big deal.


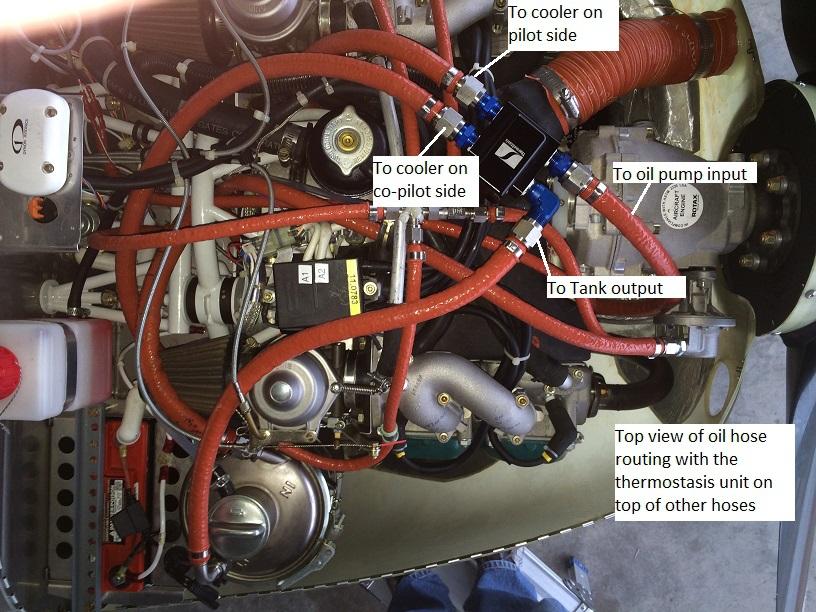
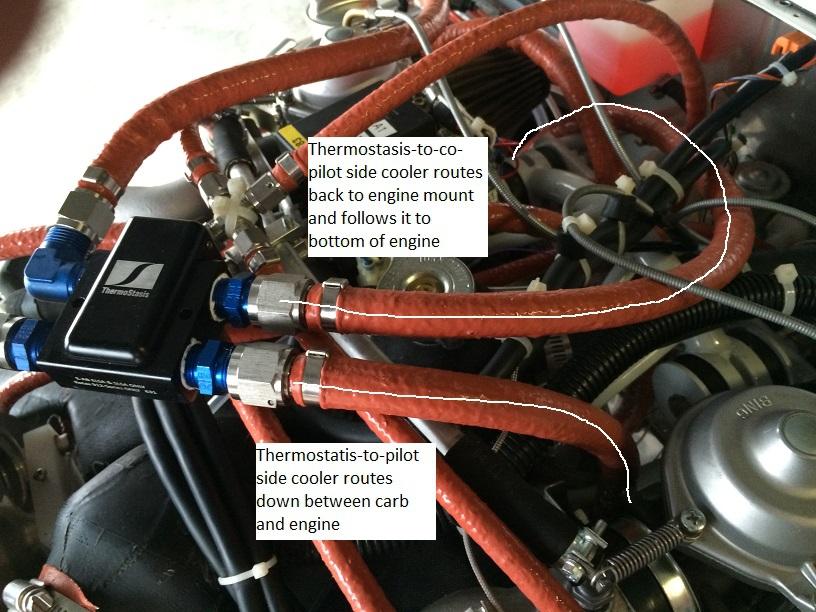
3 Please utilize an oil proof thread sealant such as permatex on the NPT portion only of these fittings. Step 3: Please utilize the following pictures which show the routings of the oil thermostasis lines. Please note that if you have the stock Vans fuel lines, this unit fits best on top of the fuel lines. If you also have the 912 Teflon Fuel Line retrofit kit, this unit will fit either on top of or underneath the fuel lines, although underneath the fuel lines seems to be the preferred routing. Also, please note that the line from the thermostasis to the oil pump has shipped in two different configurations. One configuration has a straight fitting on the thermostasis and a 90 elbow at the pump and drops down next to the gearbox. The other configuration has two straight fittings and makes a large loop. That is the current and final configuration that is shipping. If you have the other configuration it will also work well, but we decided on the loop in order to have a slightly longer hose with more play and to make the install a bit easier. If one of the pictures is unclear and you have questions on the routing, please feel free to contact us and we will be happy to help you.
4

5


6 PLEASE NOTE THAT ON THE PICTURE BELOW THE HOSES HAVE NOT YET BEEN SECURED. PLEASE ENSURE THAT THE HOSES ARE SECURED SO THAT THEY DO NOT COME IN CONTACT WITH THE MUFFLER/EXHAUST SHROUD, OR ANY OTHER ENGINE COMPONENTS THAT THEY SHOULDN'T PLEASE PAY PARTICULAR ATTENTION TO MAKE SURE THAT YOU HAVE HOSE CLEARANCE ON THE ENGINE PUSHRODS WHEN THE COWLING IS SECURED IN PLACE. You may need to pay close attention to the clocking of the fittings and the general fit in this area depending on how your cooler is installed.

7 Step 4: Tighten all fittings and secure all hoses so that they are in safe locations and not touching/rubbing any engine components. Step 5: Please make sure to purge any air out of the oil lines per Rotax Service Instruction SI Step 6: Assemble a group of your closest friends. Have them standby with a fire extinguisher and marshmallows. Make sure you are on good terms with them. Please perform an engine run and a good leak check. Verify that all fittings are secure and torque sealed for verification. (Please note that with an un-cowled engine, your oil thermostat will not help your oil temperatures all that much. Once the cowling is re installed, the unit will be much more effective. (PLEASE SEE INSTALLATION NOTES BELOW FIRST) Step 7: Enjoy your hoses. Please know that they have a 10 year warranty on them. Also, if you choose to do a hose replacement at the 10 yr point or any point thereafter, we will give a 20% discount to you on your second set of hoses. RV-12 SPECIFIC INSTALLATION NOTES AND HELPFUL TIPS: 1. Be very careful when pulling out the old hose that passes by the RPM pickup on the back of the engine, lest the metal band on the hose cut the insulation on the pickup. 2. Loosen the clamp that holds the oil tank in place and lower the tank as far as possible to allow maximum room for the hose that goes from the Tank to the Thermostasis unit. 3. Slightly bend the lip of the carburetor drip pan away from the new hose that goes from the Thermostasis unit to the cooler. This will minimize any chafing that will occur. 4. If doing a cowl off run up to check for leaks, temporarily secure the oil cooler with safety wire GENERAL INSTALLATION NOTES Please read the Thermostasis manufacturer install directions in order to verify that your installation is correct. Please make sure none of your hoses are rubbing on anything and make sure that they are fastened securely and safely. Make sure that none of your hoses were kinked during the installation process. You need to purge the system prior to use per Rotax manual. Leak check your entire system prior to going flying.


8 HIGHLANDER THERMOSTASIS INSTALLATION 1. 4 hoses are included in the standard package, 5 in the optional package if you want to replace every hose in the oil system. Hose 1 45/Str fitting. 45 goes on oil cooler and str on thermostasis. (See Last picture with explanation) Hose 2- Shortest hose with a 90 on one end Thermostasis to oil tank out Hose 3-2nd shortest with a 90 on one end Thermostasis to oil pump Hose 4-3rd shortest with a 90 one one end thermostasis to oil cooler right Hose 5- Longest with a 90 on one end- Bottom of engine to oil tank (Optional hose) Below are some pictures of the Highlander Installation


9 THE PICTURE ABOVE SHOWS THE OPTIONAL 5th HOSE The pictures below shows two important things. The one on the left shows the 45 degree angle adapter at the oil cooler. We have since replaced our hose end with a 45 degree end and leave the original straight adapter in the oil cooler. This is the location where the 45 degree hose end goes. The picture on the right shows the 90 degree fitting on the thermostasis to pump hose.


10 RANS S6 THERMOSTASIS INSTALLATION 4 hoses are included in the standard package. VERY IMPORTANT: IF YOU HAVE A 90 DEGREE RIGID TUBE ASSMEMBLY RANS PART# KSPW0082 (Pictured in the s7 section of this manual), please contact us prior to ordering as the hose length will need to made differently. Hose 1 Straight fitting on each end Oil Pump to Thermostasis Hose 2- Shortest hose with a 90 on one end Thermostasis to cooler right Hose 3-2nd shortest with a 90 on one end Thermostasis to cooler left Hose 4- Longest with a 90 one one end Thermostasis to oil tank Below are some pictures of the S6 Installation


 Hose 4- Longest with a 90 one one")
11 RANS S7 THERMOSTASIS INSTALLATION 4 hoses are included in the standard package. Hose 1 Straight fitting on each end Oil Pump to Thermostasis (Note that this attaches to a Rigid tube assembly that is supplied by RANS as part #KSPW0082. (If you don't have this part that is in the pictures below, let us know and we can adjust the kit for you.) Hose 2- Shortest hose with a 90 on one end Thermostasis to cooler right (inboard) Hose 3-2nd shortest with a 90 on one end Thermostasis to cooler left (Outboard) Hose 4- Longest with a 90 one one end Thermostasis to oil tank Below are some pictures of the S7 Installation


12 BELOW IS THE RANS ELBOW MENTIONED ABOVE...IF YOU DO NOT HAVE ONE, PLEASE CONTACT US SO WE CAN MAKE MODIFICATIONS TO YOUR KIT TO FIT YOUR AIRCRAFT.

. Obtain all required hose fittings, hose, hose clamps, Adel clamps (if used) and fasteners.")
 and also that 90 degree fittings NOT be used UNLESS they are large radius fittings similar to Rotax part number 956 580. We recommend AN840 and AN844 fittings.")

13 ROTAX* OIL THERMOSTAT Installation Instructions P6-H o F / 88 o C PLAN YOUR INSTALLATION Before starting your installation, find a location for your oil thermostat away from moving parts and heat sources and where hoses can be installed with the minimum complexity of fittings and hose routing and without sharp bends. Determine whether you will attach the oil thermostat to a fixed mounting point or whether the oil thermostat can be supported by the oil hoses alone. (Do NOT attach your oil thermostat directly to the engine or gearbox). Obtain all required hose fittings, hose, hose clamps, Adel clamps (if used) and fasteners. HOSE FITTINGS Rotax SL requires that hose fittings have a minimum I.D. of 9.0 mm (.354") and also that 90 degree fittings NOT be used UNLESS they are large radius fittings similar to Rotax part number We recommend AN840 and AN844 fittings. These are aircraft-quality fittings that are not restrictive to oil flow: AN840-8D - straight aluminum fitting, 3/8"-NPT with ½" single hose barb AN844-8D - 45 degree aluminum fitting, 3/8"-NPT with ½" single hose barb AN844-8D FITTING THREAD SEALANT The hose fittings must be installed with a thread sealant. We recommend Permatex 56521, Loctite 565 and Loctite 567, which are all high quality sealants with excellent solvent resistance. OIL HOSE CONNECTIONS The oil thermostat can be installed in any position or orientation, but do NOT bolt the oil thermostat directly to the engine or gearbox. The oil thermostat is bi-directional. i.e. the oil thermostat has no left side or right side and no front or back. The oil hose connections and oil flow can be either left to right or right to left. Connect the oil cooler to one side of the oil thermostat with oil flow TO the cooler connected to the BOTTOM port on one side of the oil thermostat and the return oil flow FROM the oil cooler connected to the TOP port on the SAME side of the oil thermostat. On the other side of the oil thermostat, connect the incoming oil flow FROM the oil tank to the BOTTOM port and the return oil flow TO the oil pump to the TOP port OIL HOSE CONNECTIONS FROM OIL COOLER PURGING THE OIL CIRCUIT After installing the oil thermostat it s essential to purge any air from the oil circuit before starting your engine. Please read and follow the procedure described in Rotax Service Instruction SI Purging Of Lubrication System For Rotax Engine Type 912 And 914 (Series). *Rotax is a registered trademark of BRP-Rotax GmbH & Co. ThermoStasis is not affiliated in any way with BRP-Rotax. ThermoStasis 2012
Let's take a look at the components that make up this retrofit hose kit.
 Thank you for purchasing your Rotax 912 Fuel Hose Kit. Please note that these directions are updated periodically as required and the current version will always be located on our website. These instructions
Let's take a look at the components that make up this retrofit hose kit.
 Thank you for purchasing your Rotax 912 Fuel Hose Kit. Please note that these directions are updated periodically as required and the current version will always be located on our website. These instructions
Standard Duty Oil Filter Relocation Kit (OC-8)
") 3430 Sacramento Dr., Unit D San Luis Obispo, CA 93401 Telephone: 805/544-8748 Fax: 805/544-8645 www.maximummotorsports.com Standard Duty Oil Filter Relocation Kit (OC-8) Filter Mount Installation 4. Remove
3430 Sacramento Dr., Unit D San Luis Obispo, CA 93401 Telephone: 805/544-8748 Fax: 805/544-8645 www.maximummotorsports.com Standard Duty Oil Filter Relocation Kit (OC-8) Filter Mount Installation 4. Remove
Standard Duty Oil Filter Relocation Kit (OC-3)
") 3430 Sacramento Dr., Unit D San Luis Obispo, CA 93401 Telephone: 805/544-8748 Fax: 805/544-8645 www.maximummotorsports.com Standard Duty Oil Filter Relocation Kit (OC-3) Read all of the instructions before
3430 Sacramento Dr., Unit D San Luis Obispo, CA 93401 Telephone: 805/544-8748 Fax: 805/544-8645 www.maximummotorsports.com Standard Duty Oil Filter Relocation Kit (OC-3) Read all of the instructions before
M-TUNED COOLANT RE-ROUTE KIT
 M-TUNED COOLANT RE-ROUTE KIT Part # MC-RR-216, MC-RR-218 Applications: 90-93 Miata 1.6L B6 94-97 Miata 1.8L BP More detailed instructions: http://www.etdracing.com/m-tuned/reroute.pdf 1) Disconnect Negative
Items Included in kit: FOLLOWING ARE THE BRAKE LINE RETROFIT KIT ITEMS
 Thank you for purchasing your RV-14 Brake and Fuel Line Kit. Please note that these directions are updated periodically as required and the current version will always be located on our website. These
OIL COOLER KIT INSTALLATION INSTRUCTIONS PART NUMBER D
 OIL COOLER KIT INSTALLATION INSTRUCTIONS PART NUMBER D570-0904 APPLICATION: 2011-2012 E90 335i/xi (N55 engine) with BMW standard bumper and with stock oil cooler Congratulations for being selective enough
OIL COOLER KIT INSTALLATION INSTRUCTIONS PART NUMBER D
 OIL COOLER KIT INSTALLATION INSTRUCTIONS PART NUMBER D570-0907 APPLICATION: 2011-12 E90 335i/xi (N55 engine) with BMW M-Technic bumper and without stock oil cooler Congratulations for being selective enough
½ DODGE CUMMINS
 15 June 2016 #1050305D 2003-2004½ Dodge Cummins FlowMAX Lift Pump Kit (I-00169) - 1-2003-04½ DODGE CUMMINS BD FLOWMAX LIFT PUMP KIT Installation Instructions P/N# 1050305D PLEASE READ ALL INSTRUCTIONS
(905)
") (905)953-9260 Marc@M-Tuned.com Coolant Reroute Kit *Professional Installation Recommended but not required 1) Disconnect Negative Terminal from Battery in trunk. 2) Drain Coolant from your cooling system.
(905)953-9260 Marc@M-Tuned.com Coolant Reroute Kit *Professional Installation Recommended but not required 1) Disconnect Negative Terminal from Battery in trunk. 2) Drain Coolant from your cooling system.
½ DODGE CUMMINS
 19 October 2012 2003-04½ Dodge Cummins FlowMAX Lift Pump Kit # 1050305B - 1-2003-04½ DODGE CUMMINS BD FlowMax LIFT PUMP KIT Installation Instructions P/N# 1050305B PLEASE READ ALL INSTRUCTIONS CAREFULLY
OIL COOLER KIT INSTALLATION INSTRUCTIONS PART NUMBER D E92 335i/xi (N55 engine) with BMW Standard bumper and with stock oil cooler
 with BMW Standard bumper and with stock oil cooler") OIL COOLER KIT INSTALLATION INSTRUCTIONS PART NUMBER D570-0924 APPLICATION: 2011-12 E92 335i/xi (N55 engine) with BMW Standard bumper and with stock oil cooler Congratulations for being selective enough
OIL COOLER KIT INSTALLATION INSTRUCTIONS PART NUMBER D570-0924 APPLICATION: 2011-12 E92 335i/xi (N55 engine) with BMW Standard bumper and with stock oil cooler Congratulations for being selective enough
OIL COOLER KIT INSTALLATION INSTRUCTIONS PART NUMBER D E92 335i/xi (N55 engine) with M-Technic bumper and without stock oil cooler
 with M-Technic bumper and without stock oil cooler") OIL COOLER KIT INSTALLATION INSTRUCTIONS PART NUMBER D570-0925 APPLICATION 2011-12 E92 335i/xi (N55 engine) with M-Technic bumper and without stock oil cooler Congratulations for being selective enough
OIL COOLER KIT INSTALLATION INSTRUCTIONS PART NUMBER D570-0925 APPLICATION 2011-12 E92 335i/xi (N55 engine) with M-Technic bumper and without stock oil cooler Congratulations for being selective enough
Trackspeed Engineering, LLC 1289 Reamwood Ave #A, Sunnyvale, CA
 Trackspeed Engineering, LLC 1289 Reamwood Ave #A, Sunnyvale, CA 94089 650-701-7223 info@trackspeedengineering.com Trackspeed DIY Turbocharger System Installation Instructions v1.00 (10/12/16) Thanks for
Revision Control Page REPORT PFS Kit PFS REVISION DATE REMOVE PAGES
 Revision Control Page REPORT PFS-0020-00 Kit PFS-13203 REVISION DATE REMOVE PAGES INSERT PAGES IR 06/27/00 N/A N/A A 09/21/00 1,2,4,14 1,2,4,14 B 02/12/01 1,2,4,8,9,13 1,2,4,8,9,13 C 09/14/01 1,2,3,4,5,6,7,8
FRS/BRZ Air Oil Separator (AOS) Installation Manual
 Installation Manual") FRS/BRZ Air Oil Separator (AOS) Installation Manual Eric Hazen Rev. 2 Overview: Detailed instructions on installing the AOS for the FRS/BRZ/GT86. Difficulty: Beginner Time required: 1-3 hours depending
FRS/BRZ Air Oil Separator (AOS) Installation Manual Eric Hazen Rev. 2 Overview: Detailed instructions on installing the AOS for the FRS/BRZ/GT86. Difficulty: Beginner Time required: 1-3 hours depending
33T Braking system - toe brakes
 33T Braking system - toe brakes Overview Two separate brake systems are to be installed, one for each wheel brake. The two master cylinders provided require their operating lever to be substituted by a
UNDERDOG RACING DEVELOPMENT URD Traction Bar Installation
 URD Traction Bar Installation Introduction: UNDERDOG RACING DEVELOPMENT Thank you for choosing the URD Traction Bar for two wheel drive street trucks. More models coming soon! This bar is a true bolt on
OIL COOLER KIT INSTALLATION INSTRUCTIONS PART NUMBER D E92 335is (N54 engine) with BMW M-Technic bumper and with stock oil cooler
 with BMW M-Technic bumper and with stock oil cooler") OIL COOLER KIT INSTALLATION INSTRUCTIONS PART NUMBER D570-0923 APPLICATION: 2011 E92 335is (N54 engine) with BMW M-Technic bumper and with stock oil cooler Congratulations for being selective enough to
OIL COOLER KIT INSTALLATION INSTRUCTIONS PART NUMBER D570-0923 APPLICATION: 2011 E92 335is (N54 engine) with BMW M-Technic bumper and with stock oil cooler Congratulations for being selective enough to
Severe Duty Oil Filter Relocation Kit (OC-9)
") 3430 Sacramento Dr., Unit D San Luis Obispo, CA 93401 Telephone: 805/544-8748 Fax: 805/544-8645 www.maximummotorsports.com Severe Duty Oil Filter Relocation Kit (OC-9) Filter Mount Installation 4. Remove
3430 Sacramento Dr., Unit D San Luis Obispo, CA 93401 Telephone: 805/544-8748 Fax: 805/544-8645 www.maximummotorsports.com Severe Duty Oil Filter Relocation Kit (OC-9) Filter Mount Installation 4. Remove
4.6L Oil Filter Relocation Kit, (OC-7)
") 3430 Sacramento Dr., Unit D San Luis Obispo, CA 93401 Telephone: 805/544-8748 Fax: 805/544-8645 www.maximummotorsports.com 4.6L Oil Filter Relocation Kit, 2003-04 (OC-7) Filter Mount Installation 4. Remove
3430 Sacramento Dr., Unit D San Luis Obispo, CA 93401 Telephone: 805/544-8748 Fax: 805/544-8645 www.maximummotorsports.com 4.6L Oil Filter Relocation Kit, 2003-04 (OC-7) Filter Mount Installation 4. Remove
M-Tuned reroute kit XX
 M-Tuned reroute kit 14-161XX Manufactured and designed by: *Professional Installation Recommended but not required 1) Disconnect the negative terminal from the battery in the trunk. 2) Drain the coolant
TFI 70GAL XB ADJUSTABLE OVER THE BED RAIL TOOL BOX REFUELING SYSTEM
 TFI 70GAL XB ADJUSTABLE OVER THE BED RAIL TOOL BOX REFUELING SYSTEM Installation Instructions 889 IS-889 Page 2 of 12 FOREWORD Thank you for a purchasing a Transfer Flow Inc. 70gal XB adjustable over the
DYNA OIL COOLER AND THERMOSTAT KIT
 INSTRUCTIONS -J000 REV. 07-5-00 Kit Numbers 6985-0 (Chrome) and 6989-0 (Silver) General DYNA OIL COOLER AND THERMOSTAT KIT These oil cooler kits feature a thermostat built-in to the oil filter mount. These
IAG Street Series Air / Oil Separator (AOS) For WRX
 For WRX") P IAG Street Series Air / Oil Separator (AOS) For 2015-16 WRX Part# IAG-ENG-7152 Tools Required: Ratchet, torque wrench, extensions, needle nose pliers, hose cutter, snips/scissors, flat head screw driver,
P IAG Street Series Air / Oil Separator (AOS) For 2015-16 WRX Part# IAG-ENG-7152 Tools Required: Ratchet, torque wrench, extensions, needle nose pliers, hose cutter, snips/scissors, flat head screw driver,
Porsche 928 with 16v LH-Jetronic Fuel System
 Porsche 928 with 16v LH-Jetronic Fuel System Toll-Free Tech Hot Line: 877-FOR-928M 877-367-9286 Please do not copy this manual and give copies to your friends. Our ability to bring you this supercharger
Ford Racing BOSS 302 Engine Oil Cooler (11-14 GT)
") Tools needed: 14mm hex socket 7mm socket/wrench 8mm socket/wrench Ford Racing BOSS 302 Engine Oil Cooler (11-14 GT) 10mm socket (for airbox removal) ¾ inch or 19mm wrench Torque wrench Appropriate ratchets
Tools needed: 14mm hex socket 7mm socket/wrench 8mm socket/wrench Ford Racing BOSS 302 Engine Oil Cooler (11-14 GT) 10mm socket (for airbox removal) ¾ inch or 19mm wrench Torque wrench Appropriate ratchets
Thermo-Bob 1 Installation Manual: Kawasaki Concours
 Thermo-Bob 1 Installation Manual: 1986-2006 Kawasaki Concours This is a basic guide for installing the Thermo-Bob 1 on a Kawasaki ZG-1000 Concours. The bike used in the following photos was a 1995 year
Thompson Automotive Products
 Installation instructions for Quick-Change Oil Filter relocator for NB (1999+) Miatas (MX-5) Before beginning, get your car up where you have access to the undercarriage (Rhino Ramps work well). Tools
OEM BYPASS LIFT PUMP KIT
 6 March 2014 # 1050227 2003-04.5 Dodge Cummins OEM Bypass Lift Pump Kit (I-00164) - 1-2003-04½ DODGE CUMMINS OEM BYPASS LIFT PUMP KIT Installation Instructions Part # 1050227 PLEASE READ ALL INSTRUCTIONS
INSTALLATION INSTRUCTIONS
 INSTALLATION INSTRUCTIONS PERFORMANCE AT THE WHEELS KITS W156-6 & W156-7 1965-74 MOPAR B & E BODY Thank you for choosing STAINLESS STEEL BRAKES CORPORATION for your braking needs. Pleases take the time
Overview of EIS Installation
 Overview of EIS Installation Thank you for purchasing an Electroair Ignition System for your aircraft. We are confident that you will be happy with the performance of your EIS on your aircraft. The next
OIL COOLER KIT INSTALLATION INSTRUCTIONS D Application: , E89 Z4 sdrive 35i without stock oil cooler* PARTS LIST
 OIL COOLER KIT INSTALLATION INSTRUCTIONS D570-0891 Application: 2009-11, E89 Z4 sdrive 35i without stock oil cooler* PARTS LIST Qty Part No. Description 1 D573-0050 Oil Cooler + Frame Assy 1 D573-0044
INSTALLATION INSTRUCTIONS AOS-R (Air Oil Separator-Return) Turbo Subaru and STi Document# Support:
 Turbo Subaru and STi Document# Support:") INSTALLATION INSTRUCTIONS AOS-R (Air Oil Separator-Return) 02-14 Turbo Subaru and 2015+ STi Document# 19-0102 Support: info@radiumauto.com These instructions are based on a vehicle with an OEM turbocharger
INSTALLATION INSTRUCTIONS AOS-R (Air Oil Separator-Return) 02-14 Turbo Subaru and 2015+ STi Document# 19-0102 Support: info@radiumauto.com These instructions are based on a vehicle with an OEM turbocharger
RAM FRONT RADIUS ARM DROP BRACKETS Installation Instructions
 THE INFORMATION CONTAINED IN THIS DRAWING IS THE SOLE PROPERTY OF SYNERGY MFG. ANY REPRODUCTION IN PART OR WHOLE WITHOUT THE WRITTEN PERMISSION OF SYNERGY MFG IS PROHIBITIED. Revisions Rev. Description
Mishimoto Performance Aluminum Radiator w/ Stabilizer - Manual (97-04 GT, Mach 1; Cobra)
") Mishimoto Performance Aluminum Radiator w/ Stabilizer - Manual (97-04 GT, Mach 1; 97-01 Cobra) Installed on: 2000 Mustang GT (manual transmission) Tools: 8mm socket 10mm socket 13mm socket 3/4" wrench
Mishimoto Performance Aluminum Radiator w/ Stabilizer - Manual (97-04 GT, Mach 1; 97-01 Cobra) Installed on: 2000 Mustang GT (manual transmission) Tools: 8mm socket 10mm socket 13mm socket 3/4" wrench
Owner smanual. Banks Techni-Cooler System Dodge 6.7L Cummins (24-valve) ISB Pickup Trucks (2500/3500) USE WITH SYSTEM P/N 25987
 ISB Pickup Trucks (2500/3500) USE WITH SYSTEM P/N 25987") Owner smanual with Installation Instructions Banks Techni-Cooler System 2013-16 Dodge 6.7L Cummins (24-valve) ISB Pickup Trucks (2500/3500) USE WITH SYSTEM P/N 25987 Gale Banks Engineering 546 Duggan Avenue
Owner smanual with Installation Instructions Banks Techni-Cooler System 2013-16 Dodge 6.7L Cummins (24-valve) ISB Pickup Trucks (2500/3500) USE WITH SYSTEM P/N 25987 Gale Banks Engineering 546 Duggan Avenue
Included parts: 1 - BorgWarner SX-E Turbocharger 1 - SX-E 90-Degree Compressor Outlet Elbow 1 - HSM Cast Exhaust Manifold 1 - HSM Downpipe
 TROUBLESHOOTING: Please read and understand all installation instructions before proceeding with the installation. If you have questions during the installation of this product, please email H&S Motorsports
IAG Street Series Air / Oil Separator (AOS) For 2017 WRX
 For 2017 WRX") P IAG Street Series Air / Oil Separator (AOS) For 2017 WRX Part# IAG-ENG-7152 Tools Required: Ratchet, torque wrench, extensions, needle nose pliers, hose cutter, snips/scissors, flathead screwdriver,
P IAG Street Series Air / Oil Separator (AOS) For 2017 WRX Part# IAG-ENG-7152 Tools Required: Ratchet, torque wrench, extensions, needle nose pliers, hose cutter, snips/scissors, flathead screwdriver,
Thermo-Bob 3 Installation Manual: KLR650E (2008 and newer)
") Thermo-Bob 3 Installation Manual: KLR650E (2008 and newer) Thank you for purchasing the Thermo-Bob 3 radiator bypass system for the KLR650. Since the KLR already has a doohickey, it seemed that this thingamabob
Thermo-Bob 3 Installation Manual: KLR650E (2008 and newer) Thank you for purchasing the Thermo-Bob 3 radiator bypass system for the KLR650. Since the KLR already has a doohickey, it seemed that this thingamabob
Included parts: 1 - BorgWarner SX-E Turbocharger 1 - SX-E 90-Degree Compressor Outlet Elbow 1 - HSM Cast Exhaust Manifold 1 - HSM Downpipe
 TROUBLESHOOTING: Please read and understand all installation instructions before proceeding with the installation. If you have questions during the installation of this product, please email H&S Motorsports
v Porsche 928
 1985-86 32v Porsche 928 Toll-Free Tech Hot Line: 877-FOR-928M 877-367-9286 Please do not copy this manual and give copies to your friends. Our ability to bring you this supercharger kit at this price relies
INSTALLATION INSTRUCTIONS AIR/OIL SEPARATOR KIT
 INSTALLATION INSTRUCTIONS AIR/OIL SEPARATOR KIT 2015+ SUBARU WRX (LHD ONLY) Document: 19-0136 Support: info@radiumauto.com This document covers the installation of the Radium brake master cylinder brace
INSTALLATION INSTRUCTIONS. FD3S RX7 Manual Rack Conversion
 INSTALLATION INSTRUCTIONS FD3S RX7 Manual Rack Conversion 1 Removal of Stock Rack 1.1 With your steering wheel centered, remove the pinch bolt from the factory intermediate shaft lower knuckle. If you
2015 WRX Engine Oil Cooler
 2015 WRX Engine Oil Cooler 2014-04-24 Thank you for purchasing this PERRIN product for your car! Installation of this product should only be performed by persons experienced with installation of aftermarket
INSTALLATION INSTRUCTIONS
 INSTALLATION INSTRUCTIONS REAR DISC CONVERSION KIT A126-2 1988-98 C1500 2WD 10" REAR DRUM Thank you for choosing STAINLESS STEEL BRAKES CORPORATION for your braking needs. Pleases take the time to read
IAG Competition Series Air / Oil Separator (AOS) For WRX
 For WRX") P IAG Competition Series Air / Oil Separator (AOS) For 2015-16 WRX Part# IAG-ENG-7252 Tools Required: Ratchet, torque wrench, extensions, needle nose pliers, hose cutter, snips/scissors, flat head screw
P IAG Competition Series Air / Oil Separator (AOS) For 2015-16 WRX Part# IAG-ENG-7252 Tools Required: Ratchet, torque wrench, extensions, needle nose pliers, hose cutter, snips/scissors, flat head screw
Shotgun Single Barrel HPFP install guide
 Shotgun Single Barrel HPFP install guide Thank you for your purchase of the VTT Shotgun Single Barrel HPFP upgrade! First thing to do when you open your box is to make sure all parts are in their respective
INSTALL MANUAL D o d g e 1 2 v 6 B T A PLEASE READ ALL INSTRUCTIONS BEFORE INSTALLATION.
 PN#1045310 12V Dodge Twin Turbo Kit (I-00273) 1 INSTALL MANUAL BD Twin Turbo Kit 1994-1 9 9 8 D o d g e 1 2 v 6 B T A Part# 1045310 PLEASE READ ALL INSTRUCTIONS BEFORE INSTALLATION. * Picture as shown
Thermo-Bob 4 Installation Manual. TB4-KT4A Kit KTM 450 SX-F KTM 450 XC-F Husky FC450
 Thermo-Bob 4 Installation Manual TB4-KT4A Kit 2013-2015 KTM 450 SX-F 2013-2015 KTM 450 XC-F 2013-2015 Husky FC450 Watt-man.com October 2016 Thermo-Bob 4 Installation: TB4-KT4A Kit Proper installation is
4. Remove (4) 10mm and (1) 7mm bolt that holds fascia at front corners, on each side
 10mm and (1) 7mm bolt that holds fascia at front corners, on each side") 2010 Camaro LS3 1. Disconnect battery ground 2. Remove front wheels 3. Remove (5) push pins and (5) #20 torx screws on inner front wheel well liners and remove liners on each side 4. Remove (4) 10mm and
2010 Camaro LS3 1. Disconnect battery ground 2. Remove front wheels 3. Remove (5) push pins and (5) #20 torx screws on inner front wheel well liners and remove liners on each side 4. Remove (4) 10mm and
Installation Instructions
 2011-2013 LML DURAMAX COMPOUND-ADD 2011-2015 LML A Duramax TURBO KIT Add INSTALL A Turbo INSTRUCTIONS Compound Kit Installation Instructions 1-800-955-0476 - www.industrialinjection.com - info@industrialinjection.com
Auxiliary Transmission Filter Kit
 19 July 2012 Dodge Transmission Filter Kit # 1064017-1 - Auxiliary Transmission Filter Kit Part # Vehicle Application 1064017 Dodge 1994-2007 The BD Transmission Filter Kit will provide added security
Dual Remote Filtration System Installation and Servicing Instructions
 IMPORTANT NOTICE Read all instructions completely before attempting to install this unit. Improper installation could result in serious system and/or equipment damage. The installation of this system is
INSTALLATION INSTRUCTIONS
 INSTALLATION INSTRUCTIONS FUEL SURGE TANK INSTALL KIT Honda S2000 Document# 19-0063 Support: info@radiumauto.com WARNING: DO NOT SMOKE WHILE WORKING ON FUEL SYSTEMS. KEEP SPARKS AND OPEN FLAMES AWAY FROM
Procharger Stage II Intercooled Supercharger System (11-14 GT)
") Procharger Stage II Intercooled Supercharger System (11-14 GT) Installation Time: Approximately one day. Installed on 2012 Mustang GT 5.0/Manual Required Tools 3/8 Socket Set (Standard and Metric) 1/2
Procharger Stage II Intercooled Supercharger System (11-14 GT) Installation Time: Approximately one day. Installed on 2012 Mustang GT 5.0/Manual Required Tools 3/8 Socket Set (Standard and Metric) 1/2
Fizzle Intercooler Kit Installation Instructions
 Fizzle Intercooler Kit Installation Instructions Note: The minimum exhaust modification required for the installation of this intercooler is the removal of the OEM black plastic resonator box. It can easily
INSTALLATION MANUAL BULLET PROOF OIL COOLER KIT F-SERIES
 INSTALLATION MANUAL BULLET PROOF OIL COOLER KIT 2003-2007 F-SERIES NEAL TECHNOLOGIES, INC. U.S. PATENT 8,375,917; 8,505,512 and OTHER PATENTS PENDING UPDATED 1/8/2018 2014 BULLET PROOF DIESEL BEFORE You
Z1 Motorsports 300zx 2.5 Upgraded piping & BA SMIC Install Guide
 Z1 Motorsports 300zx 2.5 Upgraded piping & BA SMIC Install Guide Congratulations on your new upgraded piping and intercooler kit, this kit has proven to provide the lowest intake air temps to date on our
SECTION 35iS/U: LANDING GEAR & ENGINE MOUNT
 WD-1221 ENGINE MOUNT STANDOFF SECTION 35iS/U: LANDING GEAR & ENGINE MOUNT U-01203E-1 INBOARD DOUBLER PLATE U-01203B-1 INBOARD WEAR PLATE U-01203C-1 BEARING PLATE U-01203-2 (U-01203-1 SHOWN) INBOARD MAIN
TurboWerx Spartan-series TWX V Electric Scavenge Pump
 TurboWerx Spartan-series TWX-175-12V Electric Scavenge Pump Thank you for purchasing the TurboWerx Base-Model Spartan-series Electric Scavenge Pump. Please read through this entire document before starting
Instant Chat off the main page of Or simply call our tech team at
 FRONT MOUNT INTERCOOLER 2008-13 STI 2014-04- 08 Thank you for purchasing this PERRIN product for your car! Installation of this product should only be performed by persons experienced with installation
OwNErS MaNual with INSTallaTION INSTrucTIONS
 OwNErS MaNual with INSTallaTION INSTrucTIONS EMISSIONS KIT light duty 6.2l chevrolet/gm diesel for use on gm 6.2L diesel trucks equipped with the banks sidewinder turbo system this manual is for use with
Stay-IN-Play with Panic Stop Braking
 INSTALLATION INSTRUCTIONS TOWED VEHICLE BRAKING SYSTEM Stay-IN-Play with Panic Stop Braking SMI Manufacturing, Inc. P.O. Box 14040 Evansville, IN 47728 1-800-893-3763 www.smibrake.com SIP0906 Model SIP0603
BMK-12. Dual-Gard By-Pass Filter Mounting Kit Installation and Servicing Instructions
 BMK-12 Dual-Gard By-Pass Filter Mounting Kit Installation and Servicing Instructions IMPORTANT NOTICE Read all instructions completely before attempting to install this unit. Improper installation could
GW-CRUISE Cruise Control Vanagon [84-91]
![GW-CRUISE Cruise Control Vanagon [84-91]](/thumbs/78/76865696.jpg "GW-CRUISE Cruise Control Vanagon [84-91]") Driving without cruise control on a long trip can be tiring. Update your vehicle with some modern convenience with this easy to install cruise control kit. Tools Needed Phillips screwdriver #2 Electric
Driving without cruise control on a long trip can be tiring. Update your vehicle with some modern convenience with this easy to install cruise control kit. Tools Needed Phillips screwdriver #2 Electric
INSTALLATION INSTRUCTIONS PART NUMBER:
 Equipped with AEM Dryflow Filter No Oil Required! INSTALLATION INSTRUCTIONS PART NUMBER: 21-450B (Blue Finish) 21-450C (Gun Metal Grey Finish) 21-450P (Vacuum Metalized Chrome-VMC) 21-450R (Red Finish)
UNIVERSAL PUMP HANGER INSTALLATION INSTRUCTIONS
 UNIVERSAL PUMP HANGER INSTALLATION INSTRUCTIONS WARNING! THESE INSTRUCTIONS MUST BE READ AND FULLY UNDERSTOOD BEFORE BEGINNING INSTALLATION. FAILURE TO FOLLOW THESE INSTRUCTIONS MAY RESULT IN POOR PERFORMANCE,
ZX-14 Stage I Turbo Kit
 62910 Peerless Ct. Bend, OR 97701 Phone 541.385.0706 Fax 541.382.9406 ZX-14 Stage I Turbo Kit WARNING: This turbo kit is for OFF-ROAD RACING use ONLY. Advisement: These instructions are written to be comprehensive
OIL COOLER KIT INSTALLATION INSTRUCTIONS PART NUMBER D E92/E93 335i/xi with stock oil cooler
 OIL COOLER KIT INSTALLATION INSTRUCTIONS PART NUMBER D570-0920 APPLICATION 2007-10 E92/E93 335i/xi with stock oil cooler Congratulations for being selective enough to use a Dinan Engineering Oil Cooler
Installation Instructions Diesel Nitrous System (#82028)
") Installation Instructions Diesel Nitrous System (#82028) Thank you for choosing ZEX. If at any time you have questions regarding this or any of our products, please call our Nitrous Help support line at
Installation Instructions Diesel Nitrous System (#82028) Thank you for choosing ZEX. If at any time you have questions regarding this or any of our products, please call our Nitrous Help support line at
INSTALLATION INSTRUCTIONS PART NUMBER:
 Equipped with AEM Dryflow Filter No Oil Required! INSTALLATION INSTRUCTIONS PART NUMBER: 21-450B (Blue Finish) 21-450C (Gun Metal Grey Finish) 21-450P (Vacuum Metalized Chrome-VMC) 21-450R (Red Finish)
VW & Audi TDI CR140 ECO KIT Installation Guide
 VW & Audi TDI CR140 ECO KIT Installation Guide This guide is to help you install your new Rawtek DPF, EGR & Adblue Delete Exhaust ECO Kit on your (2009-2014) VW / Audi with 2.0l CR140 Diesel Engine. Note:
Cable Shift Linkage Kit
 Cable Shift Linkage Kit INSTALLATION INSTRUCTIONS ididit column to GM Trans FOR PART NUMBER S: 2801000010, 2802000010 ididit Column to 350 Trans...Pg 1-4 ididit Column to 400 Trans...Pg 5-8 ididit Column
JBR MAZDASPEED
 Page1 james Barone Racing Aftermarket Parts and Accessories JBR 2007 2009 MAZDASPEED 3 Front Mount Intercooler Piping Kit Installation Instructions for TR8 Intercooler Tooling: o Jack, Jack Stands, Ramps
Overview of EIS Installation
 Overview of EIS Installation Thank you for purchasing an Electroair Ignition System for your aircraft. We are confident that you will be happy with the performance of your EIS on your aircraft. The next
Step 6: Remove and save the MAP sensor for later use. Step 7: Remove the passenger side intercooler pipe and the EGR intake manifold.
 LBZ Twin kit Install Step 1: Disconnect both batteries. Step 2: Drain coolant and oil also remove passenger side inner fender. Step 3: Remove intake box and piping. (Remove and save the MAF sensor in the
Thermo-Bob 3 Installation on a 2015-and-newer Versys 650
 Thermo-Bob 3 Installation on a 2015-and-newer Versys 650 Thank you for purchasing the Thermo-Bob 3 radiator bypass system for the Kawasaki Versys 650. Proper installation is critical: if you are not familiar
Single Barrel Shotgun HPFP Install Guide
 Single Barrel Shotgun HPFP Install Guide Thank you for purchasing the VTT Single Barrel Shotgun HPFP upgrade kit! PLEASE READ THE ENTIRE GUIDE BEFORE BEGINNING INSTALLATION! The first thing you should
67-70 Cougar Rack Kit Instructions # &
 67-70 Cougar Rack Kit Instructions # 8011950-01 & 8011940-01 Unisteer offers a limited warranty against all manufacturer defects of their kits and supplied parts. Unisteer will not honor any warranty on
Thermo-Bob Installation Manual: KLR650A ( )
") Thermo-Bob Installation Manual: KLR650A (1987-2007) Thank you for purchasing the Thermo-Bob radiator bypass system for the KLR650. Since the KLR already has a doohickey, it seemed that this thingamabob
Thermo-Bob Installation Manual: KLR650A (1987-2007) Thank you for purchasing the Thermo-Bob radiator bypass system for the KLR650. Since the KLR already has a doohickey, it seemed that this thingamabob
GM 4L80-E, 4L85-E SURE CURE KIT
 GM 4L80-E, 4L85-E SURE CURE KIT PART NUMBER SC-4L80E INSTALLATION GUIDE Parts are labeled here in order of installation. See page 2 for details on Sure Cure kit contents. See Sure Cure instruction booklet
No Modify Power Brake Kit Instructions
 No Modify Power Brake Kit Instructions Above are photos of the kit as shipped. Included is the booster, bracket, master cylinder, master cylinder brake lines, adjustable pushrod with rubber seal and vacuum
Included parts: 1 - New Bosch CP3 Pump 1 - HSM Pulley 1 - Serpentine Belt 1 - Pump Bracket/ Hardware STEP 1
 TROUBLESHOOTING: Please read and understand all installation instructions before proceeding with the installation. If you have questions during the installation of this product, please contact H&S Motorsports
Multistrada (MTS) Tank Installation Notes. Tools Required. Phase 1: Remove Fairings. Phase 2: Remove Fuel Tank
 Tank Installation Notes. Tools Required. Phase 1: Remove Fairings. Phase 2: Remove Fuel Tank") The California Cycleworks MTS tank provides an aftermarket alternative to the OEM nylon fuel tanks as used on aircooled Desmodue Ducati Multistrada 1100, 1000, and 620 models. This fuel tank is NOT for
The California Cycleworks MTS tank provides an aftermarket alternative to the OEM nylon fuel tanks as used on aircooled Desmodue Ducati Multistrada 1100, 1000, and 620 models. This fuel tank is NOT for
JRSC + BBK Install on SVTF. Neil A. Shah medicnas on focaljet September 2006
 JRSC + BBK Install on SVTF Neil A. Shah medicnas on focaljet September 2006 ECU up here. When removing make sure the smaller bundles of wires don t get wrapped around the bottom edge and break - this almost
7C1550 COBB Tuning R35 GT-R Silicone Hose Kit Install Instructions
 7C1550 COBB Tuning R35 GT-R Silicone Hose Kit Install Instructions Nissan GT-R (R35) Silicone Hose Kit Congratulations on your purchase of the COBB GT-R Silicone Hose Kit for your Nissan GT-R. The following
Z06 Corvette Lingenfelter High Flow Air Intake
 2006-2007 Z06 Corvette Lingenfelter High Flow Air Intake LN4233 1557 Winchester Road Decatur, Indiana 46733 260 724 2552 phone 260 724 8761 fax www.lingenfelter.com Parts List # Part number Description
FAX
 INSTALLATION INSTRUCTIONS 6090 Air Suspension Kit (pat. pending) 1999-2006 Tahoe, Suburban, Avalanche, Yukon Thank you for purchasing a quality Hellwig Product. PLEASE READ THIS INSTRUCTION SHEET COMPLETELY
HAYS HYDRAULIC RELEASE BEARING INSTALLATION INSTRUCTIONS
 HAYS HYDRAULIC RELEASE BEARING INSTALLATION INSTRUCTIONS PRELIMINARY INSTALLATION NOTES IMPORTANT! DO NOT RETURN THIS PRODUCT TO YOUR DISTRIBUTOR. If you have questions, please review additional information
INSTALLATION INSTRUCTIONS AOS-R (Air Oil Separator-Return) Turbo Subaru and STi Document# Support:
 Turbo Subaru and STi Document# Support:") INSTALLATION INSTRUCTIONS AOS-R (Air Oil Separator-Return) 02-14 Turbo Subaru and 2015+ STi Document# 19-0102 Support: info@radiumauto.com These instructions are based on a vehicle with an OEM turbocharger
INSTALLATION INSTRUCTIONS AOS-R (Air Oil Separator-Return) 02-14 Turbo Subaru and 2015+ STi Document# 19-0102 Support: info@radiumauto.com These instructions are based on a vehicle with an OEM turbocharger
GT-R Alpha 10/12 Turbo Kit
 GT-R Alpha 10/12 Turbo Kit Instructions V6 The goal of AMS is to provide the highest quality, best performing products available. By utilizing research and development, and rigorous testing programs AMS
M7 R52S & R53 Cold Air Intake Installation Guide 53-3M7301
 M7 R52S & R53 Cold Air Intake Installation Guide 53-3M7301 M7 Speed engineers and manufactures the highest quality MINI COOPER accessories and performance parts available anywhere on Planet Earth! Please
INSTALLATION INSTRUCTIONS Part# , , ,
 INSTALLATION INSTRUCTIONS Part# 20-0218, 22-0318, 20-0118, 22-0219 20-0218 - 4 Tire On Board Air Delivery System and Dual Compressed Air System Includes ARB CKMTA12 Compressor 20-0118 - 2017 FORD RAPTOR
MAZDASPEED3 Intercooler Instructions
 MAZDASPEED3 Intercooler Instructions Congratulations on your purchase of the COBB Tuning Front Mount Intercooler System for your 2007-2009 Mazdaspeed3. The following instructions should assist you through
1501 Industrial Way N., Toms River, NJ Fax: PACKING LIST INSTALLATION INSTRUCTIONS
 1/6/04 1501 Industrial Way N., Toms River, NJ 08755 732-349-2109 Fax:732-244-0867 MODERATE - Installation requires metric tools and possibly cutting and drilling. The ability to closely follow instructions
928 Motorsports Supercharger Installation Copyright 2007, 928 Motorsports, LLC All Rights Reserved
 For Porsche 928 equipped with K-Jetronic (CIS) Fuel System Toll-Free Tech Hot Line: 877-FOR-928M 877-367-9286 Please do not copy this manual and give copies to your friends. Our ability to bring you this
Slingshot Rotrex Supercharger Kit
 Slingshot Rotrex Supercharger Kit This supercharger kit improves on the Slingshot by forcing more dense air into the engine and creating more power. Installation time of the supercharger depends on you
INSTALLATION INSTRUCTIONS MKIV Toyota Supra Manual Rack Conversion
 INSTALLATION INSTRUCTIONS MKIV Toyota Supra Manual Rack Conversion 1 Removal of Stock Rack 1.1 With your steering wheel centered, remove the pinch bolt from the factory intermediate shaft. This is located
Installation Manual v1.0: Force Cool Kit Dodge with NV4500/NV4500HD/NV5600 Manual Transmissions. Please read all instructions before installation.
 Installation Manual v1.0: Force Cool Kit Dodge with NV4500/NV4500HD/NV5600 Manual Transmissions Please read all instructions before installation. Figure 1 - Force Cool Kit Note: Use Teflon sealing tape