OWNER S MANUAL BF
|
|
|
- Reynold Lewis
- 5 years ago
- Views:
Transcription


1 OWNER S MANUAL
2 DEAR CUSTOMERS: Thank you for choosing PGO scooter. It is a fact that the efficiency and sustaining life of each scooter depend heavily on the operating method of each user. Thus this owner s manual will provide you a precise knowledge of easy adjusting, sustaining and precaution for your scooter. We hope you will read and check it carefully. Please recognize your scooter model clearly in order to read the following instruments. If there is any question, please do not hesitate to ask your dealer for assistance. We hope you will enjoy it! Manufactured by: Motive Power Industry Co., Ltd.
3 CONTENT Warranty Card... 1 Fuel...33 Scooter safety... 4 Catalyst...34 Part location... 6 Notation for operation and riding...35 Identification... 8 Starting the engine...35 The function of switch & controller...11 Warming up the engine...36 Main switch...11 Brake operation...37 Speedometer...12 Engine initial run-in...38 Handlebar Controls Parking vehicle...39 Steering Lock...21 Periodical maintenance Seat Lock...21 Periodical maintenance table Fuel Tank Cap...22 Exhaust control system Kick Starter Lever The air cleaner Luggage Compartment...23 The spark plug Pre-riding inspection...24 Brake adjustment Brake...25 Brake fluid check Brake Fluid...26 Front fork check Engine Oil...27 Battery Air Cleaner...29 Fuse replacement Tire...32 Reference Data Throttle Grip...33 Periodical maintenance record Lamp & Signal Light Switches...33
4 Check List before Delivery Name: Tel: Age: Sex: Address: Model: Engine No: VIN No: Delivery date: Year Month day Dealer: NO Check Item Y N NO Check Item Y N 1 Steering of Handle Bar 8 Tire Pressure 2 Gap of Brake Lever 9 Confirm Engine No & Document 3 Lights and Horn 10 Owner s Manual 4 Fuel Tank and Fuel Kind 11 Operating Method Introduction 5 Engine Oil 12 Periodic Maintenance introduction 6 Disk Brake fluid 13 Warranty Introduction 7 Engine Coolant(M2-250) Staff Signature: Customer Signature: Suggestion: Please Sign both customer & service Staff. Mail this chart to agent, and then the Warranty will be effective. 2
5 PGO Warranty Card Name Telephone Registration date Address Model Displacement CC Engine NO. VIN.No. ~1~ Customer Signature Dealer Signature 3
6 LIMITED WARRANTY FOR PGO SCOOTERS This is to be presented by the authorized PGO dealer to the purchaser of PGO scooters. We provide the following services: 1. TO OBTAIN THE WARRANTY SERVICE A. Effectiveness of the warranty a. After completing the warranty card, the PGO selling dealer will give you the warranty card. b. Please bring your scooter back to the original dealer for initial maintenance within 30 days after purchase, then the warranty is effective. B. Warranty period For the detail warranty condition, please check with your dealer. 2. PROCEDURE OF THE WARRANTY a. The customer must maintain scooter periodically according to PGO user s book and keep the complete maintenance record. b. The dealer shall check the warranty card, periodically maintenance record, license card for the customer. c. Only the PGO authorized dealer can accept the warranty application. 3. THINGS NOT COVERED IN THIS WARRANTY A. Any of the followings are not covered: Defects caused by inappropriate maintaining or any artificial damages. Any accidents caused by natural disasters or out of human s control. Did not use fuel or spare parts provided or recommended by the PGO, or made any modification of the scooter. Scooters used for competition, performance or rental vehicle. 5
7 Any re-assembling or dismantling of scooters which violates the rules of PGO service manual. Defects caused by unlicensed rider. Improper storage or transport. Not following the riding rules of Government or PGO Manual Guide. B. The following expenses are not covered: (1) Consumable goods(including battery, bulbs, rubbers, cables, screws, piston rings, spark plugs, gaskets, brake pads, brake linings, clutch lining, springs, V-belt, CVT-rollers, fuses, air filter elements, oil filter, fuel filter) (2) Material of periodic maintenance and inspection, such as fuel, lubricant and fluid. (3) Any costs caused by the break down of the scooter. (including telephone bill, travel fee, transportation fee, rental fee, fines) 4. INTERRUPTION OF THE WARRANTY PERIOD The user should send the scooter to repair immediately after the defects are found. If the defect worsens due to the delay of the repair, the PGO will not be responsible for the damage. IF THERE IS A MAJOR CHANGE IN THE WARRANTY COVERAGE, THE PGO WILL MAKE OFFICIAL ANNOUCEMENT TO ALL DEALERS AND WILL NOT 6
8 SCOOTER SAFETY WARNING.Scooter riding requires special afford on your part to ensure your safety. Know these requirements before you ride: SAFE RIDING RULES 1. Always make a pre-ride inspection(page 13) and perform any needed adjustments or repairs before you ride the scooter. 2. Many accidents involve inexperienced riders. Most countries require a special scooter riding test or license. Make sure you are qualified before your ride. NEVER lend your scooter to an inexperienced rider. 3. Many automobile/scooter accidents happen because the automobile driver does not "see" the motorcyclist. Make yourself conspicuous to help avoid the accident that wasn't your fault: - Wear bright or reflective clothing. - Don't ride in another motorist's "blind spot" 4. Obey all national and local laws and regulations. - Excessive speed is a factor in many accidents. Obey the speed limits, and NEVER travel faster than conditions warrant. - Signal before your make a turn or lane change. Your size and maneuverability can surprise other motorists. - 7
9 5. Don't let other motorists surprise you. Use extra caution at intersections, parking lot entrances and exits, and driveways. 6. Keep both hands on the handlebars and both feet on the floorboards while riding. A passenger should hold on to the scooter or the feet on then passenger foot pegs. 7. Never leave your scooter unattended with the engine running. 8. Moderate your speed when ridding over bumpy roads. Avoid hitting road hazards, such as sharp bumps and holes, in the road surface. These hazards can cause loss of control or structural damage to the vehicle. 8
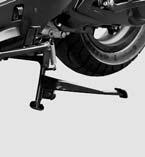
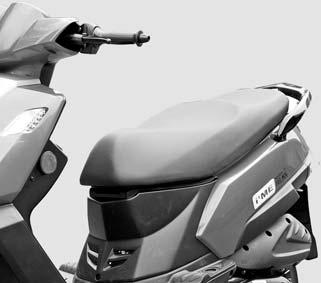
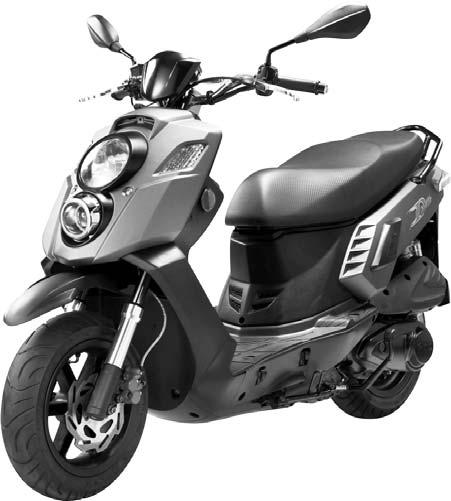
10 2-1 BF-model (B1)Part location: FUEL CAP SEAT REAR RACK THROTTLE GRIP FRT BRAKE LEVER REAR BRAKE LEVER REAR LAMP AIR CLEANER FRT SIGNAL LAMP HEAD LAMP MAIN STAND FRT BRAKE DISK SIDE STAND
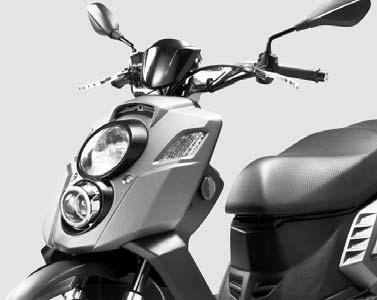
11 2-2 BF2-model(B2) Part location: REAR BRAKE LEVER FUEL CAP SEAT REAR RACK THROTTLE GRIP REAR LAMP FRT BRAKE LEVER AIR CLEANER LOW BEAM HIGH BEAM FRT SIGNAL LAMP MAIN STAND FRT BRAKE DISK SIDE STAND
12 IDENTIFICATION 1. Recognize your vehicle model according to license document or manufacturing document. 2. This manual includes 5 kinds of engine models: I ME-50: abbreviated as BF-50 is 2 stroke (2T) / 50 C.C engine.. I ME-125: abbreviated as BF-125 is 4 stroke(4t) / 125cc/ carburetor or EMS engine. I ME-150: abbreviated as BF-150 is 4 stroke(4t) / 150cc / carburetor or EMS engine. X-HOT 50: abbreviated as BF2-50 is is 2 stroke (2T) / 50 C.C engine. X-HOT 125: abbreviated as BF2-125 is 4 stroke(4t) / 125cc / carburetor or EMS engine. X-HOT 150: abbreviated as BF2-150 is 4 stroke(4t) / 150cc / carburetor or EMS engine. 3. Because this manual is suitable for all I ME & X-HOT serial models, there are many different operations between every model. Once you see a model indication bar appears above the page, for example: The BF-125 model button lights on, and the lower bar is filled, that means this page is suitable for BF-125.


13 IDENTIFICATION 2.Engine No. is located (stamped) on the rear side of the left crankcase. NOTE: The upper row is model type, the lower row is the production serial numbers. Your dealer need this number for ordering the parts, please write down the engine no. for their reference.

 inside the rear")


14 IDENTIFICATION 3.Vehicle Identification Number (VIN) is located (stamped) inside the rear battery cover. NOTE: The first 9 digitals are model type, the last 8 digitals are production serial numbers. Your dealer need this number for ordering the parts, please write down the engine no. for their reference.


15 THE FUNCTION OF SWITCHES MAIN SWITCH The basic functions of M2-200 are same to previous page, the additional futures are: 1. All the power is cut off, the key can be pulled out at this position. 2. The power is ON, engine can be started, the key can not be pulled out at this position 3. The handle bar is locked at this position. 4. Push + turn counterclockwise : to open the seat. 5. When at position #1, Push + turn clockwise to open the fuel cap. 6. For anti-thief purpose, push to close the core of key set, 7. Press the key to get anti-thief key out. 8. Push the anti-thief key into position #8, then the core of key set will open again
 2T model: fill the 2T engine oil ASAP.")
16 LCD SPEEDOMETER A Main items #1.SELECT button: refer to next page #2.ADJUST button: refer to next page #3.EMS check(red) Self-test whenever turn on the key for ~3 seconds. When lights on again during driving, please contact your PGO dealer to check the EMS units. #4.Engine oil warning light (orange) 2T model: fill the 2T engine oil ASAP. 4T model: replace the 4T engine oil, then Reset the counter. #5.Engine speed: * 1000RPM/ unit #6.Signal indicator (green) : when acting the turn lights #7.High beam (blue) : when (high beam) or (PASSING) 5
 or (mile/h) display mode: (ODO) or (TRIP) #9 #8 #10 #11 B.")
 ON TRIP Click 3 sec. Reset TRIP to 0 Forever ON Click 3 sec. twinkle Reset (4T oil indicator) ON twinkle Click 3 sec.")
17 #8.Fuel meter: will twinkle when below 3 grids #9.when reaching to this point, it will twinkle to reminding you to add fuel ASAP. #10.Speedometer can switch from km/h to mile/h #11.Vehicle speed: can change unit by( km/h) or (mile/h) display mode: (ODO) or (TRIP) #9 #8 #10 #11 B. Operating instruments: function key display SELECT ADJUST result mode km Click Mile Vehicle speed ON mile Click Km (ODO) ODO Click TRIP ON (TRIP) switching TRIP Click ODO Reset (TRIP) ON TRIP Click 3 sec. Reset TRIP to 0 Forever ON Click 3 sec. twinkle Reset (4T oil indicator) ON twinkle Click 3 sec. OFF Cancel ON twinkle Click Forever ON Reset (4T oil indicator)
18 LCD SPEEDOMETER #1. SELECT:refer to next page #6 #7 #3 #5 #8 #2.ADJUST :refer to next page #3.EMS check(red) Self-test whenever turn on the key for ~3 seconds. When lights on again during driving, please contact your PGO dealer to check the EMS units. #4.Engine oil warning light (orange) 2T model: fill the 2T engine oil ASAP. 4T model: replace the 4T engine oil, then Reset the counter. #5.Engine speed: * 1000RPM/ unit #6.Signal indicator (green) : when acting the turn lights #1 #2 #4
19 LCD SPEEDOMETER #7.High beam (blue) : when (high beam) or (PASSING) #11 #10 #9 #8 Vehicle speed warning lamp: turn on automatically when reaching the specified vehicle speed. #9.Fuel meter: will twinkle when below 3 grids #10.Vehicle speed: can change unit by( km/h) or (mile/h) display mode: (ODO) or (TRIP) #11.Display mode: display mode: (ODO) or (TRIP) #12 #11
20 B. Operating instruments: function key display SELECT ADJUST result mode km Click Mile Vehicle speed ON mile Click Km (ODO) ODO Click TRIP ON (TRIP) switching TRIP Click ODO Reset (TRIP) ON TRIP Click 3 sec. Reset TRIP to 0 Forever ON Click 3 sec. twinkle Reset (4T oil indicator) ON twinkle Click 3 sec. OFF Cancel ON twinkle Click Forever ON Reset (4T oil indicator) function mode Vehicle speed(#8)setting clock(#12)setting key display SELECT ADJUST result ON normal Click 3 sec. Click 3 sec. Speed twinkle twinkle Click 30~199 increasing twinkle Click 3 sec. Switch setting Hour twinkle Click 0~23 increasing ON Hour twinkle Click Minute twinkle Hour twinkle Click 0~59 increasing Hour twinkle Click normal


21 X-HOT 150 Model Function of Dashboard 1. over speed warning 2. STN LCD 3. tachometer 4. EMS check 5. signal indicator 6. high beam indicator 7. oil warning 8. SELECT button 9. ADJUST button


 & ( ) Speed &")
22 X-HOT 150 Model Basic mode Click SELECT STN LCD speed TRIP ODO : click ADJ to switch Mileage under TRIP, press ADJ to reset TRIP under ODO,press ADJ to switch MPH&KMH Speed & fuel Click SELECT Click SELECT Click SELECT Speed & ambient temperature press ADJ to switch( ) & ( ) Speed & battery voltage Speed & time
23 X-HOT -150 model Setting (system will escape from setting mode when standby longer than 10 seconds) Click SELECT Press SEL&ADJ at the same time for 3 seconds 8.7 POWER TEST mode Time setting mode: Click SEL to switch hour & minute Click ADJ to change digitals Click SELECT to switch Over speed mode: Press ADJ to adjust speed limit Long Press SELECT to main menu Click ADJ & SEL within 3 seconds, Into POWER TEST mode: Click SEL to start test. 0~100 KM/h test: Start test whenever vehicle move Click ADJ to reset 0~400m test: Start test whenever vehicle move Click ADJ to reset


24 HANDLE-BAR CONTROLS 1. HI/LO BEAM SWITCH HI-The high beam is on LO-The low beam is on Press the lower part to make a passing signal. 2. Turn Signal Switch Move to to signal a left turn, to signal a right turn. Press to turn signal off. 3. Horn Button When the horn button is pressed, the horn will sound. 4. HEADLIGHT Switch ON-Headlight, position light, taillight and meter light will be on, when the engine is running. 5. STARTER BUTTON The starter button is below the headlight switch. When the starter button is pressed, the starter motor cranks the engine


25 STEERING LOCK To lock the steering, turn the handle all the way to left and turn the key from to then remove the key. SEATLOCK Push the key and turn counterclockwise to open the seat. NOTE: Do not turn the key to, while riding. The scooter loss of control will occur.


26 FUEL TANK CAP Insert the key into ignition switch, and keep in position. Push the key and turn clockwise to open the fuel cap. Push the cap forward to lock it

27 KICK STARTER LEVER(EXCEPT EMS MODEL) Swing the lever outwardly. Kick the lever down slowly till the gear stop, then kick the lever down strongly to star the engine. LUGGAGE COMPARTMENT The luggage compartment is under the seat. Whenever the seat is opened, there is a lamp inside the luggage will light on. NOTE: 1. The max loading weight is 5 KGS. 2. If engine has been operating over a long time. The luggage compartment become hot. Do not put luggage in the temperature 3. Do not put important or fragile goods for security reason. 4. Raining or wash may cause luggage wet inside. KICK Please use water-resistant material for luggage wrapping. 5. Please lock the cover when leaving the scooter.
28 PRE-RIDING INSPECTION Please do the inspection as following before riding: ITEM PROCEDURE PAGE FRONT BRAKE Check the brake function, clearance, brake oil level, see if it is leaking. If necessary, may refill FMVSS DOT3(4) OR SAEJ 1703 brake oil. REAR BRAKE Check the brake function and clearance, proper adjustment if necessary. 39 THROTTLE GRIP Check if it is smooth, put some lubricant. 25 LUBRICANT Adjustments if necessary. 20 Check the oil level/according to the request to refill oil. TIRE Check the pressure, the wear out situation. 24 CONTROLLER Check if smooth operation. Add lubricant if necessary. /GAUGE CABLE BRAKE LEVER (HANDLE) Check if smooth operation. Add lubricant if necessary. 18 CENTRAL STAND Check if smooth operation. Add lubricant if necessary. ASSEMBLY Check all the assembling parts, fixing & adjusting if necessary. /FITTING FUEL TANK Check the fuel level. Refill up if necessary. 10 LAMP /SIGNAL LIGHTS Check if it is operating good condition ,40
29 BRAKE Adjustment: 1.Measure the distance of the rear brake lever play before the brake starts to take hold. Free play should be:10~20mm. 2.Make free play adjustments by turning the adjusting nut at the brake arm. Make sure the cutout on the adjusting nut is seated on the brake arm pin after making final free play adjustment. 3.Apply the brake several times and check for free wheel rotation when released. FRONT BRAKE The front brake will be on function when hold the handle and pull the right hand lever. NOTE: If the pre-riding inspection is not performed, severe personal injury or vehicle damage may result. Inspect your scooter, and perform any needed adjustments or repairs, Every day before you ride it. The items listed above will only take a few minutes to check and, in the long run, can save time, expense, and possible your life.
30

31 BRAKE (Please refer to page35) 1.Front /Rear brake levers Inspect the free play of levers. Make sure the function is well. Please check the brake at low speed, adjust the free play if it is not correct. BRAKE FLUID LEAKAGE INSPECTION Hold the brake level for few minutes to check if there is any fluid leaks from the hose connector or main cylinder. CAUTION If the brake lever feels soft when operating, Which means the brake system has problem. Do not ride the scooter before the problem is ruled out. 2.BRAKE FLUID (Disk Brake) Check the fluid level. Refill it if necessary. Fluid Spec. FMVSS Dot3 or SAE J DISK BRAKE PAD Please refer to page 36. Please go to the PGO Dealer when this brake needed repairing. CAUTION Go to the PGO dealer immediately when find the brake fluid is leaking. The leakage means the braking system has deadly dangerous problem.
 for about 2 seconds")


32 ENGINE OIL for 2T Engine Oil warning indicator This lamp will make self test (light ON) for about 2 seconds whenever turn on the main key, if it lights on again after self test, that reminds you have to fill the oil as soon as possible. Open the seat, and lift the battery cover. Take off the oil tank cap, and fill the 2T oil carefully

33 ENGINE OIL 1. 4T Engine (125 / 150 CC) Engine oil shall be replaced per 3,000 kilometers. Engine oil volume must be examined after engine warn-up 2~3 minutes. Be sure to execute on flat road. Draw out and examine the oil gauge. Please refill if the volume below the low warning line.

 1.")
34 AIR-CLEANER The air filter will keep dust away from the engine and also protect it against wearing out. Please ask the dealer to check & clean the filter periodically, or by yourself. (ref:page 33) 1. 4T Engine (125 / 150 CC) Wet paper filter element Note: Don t forget to install the element seal!

 2.")
35 AIR-CLEANER The air filter will keep dust away from the engine and also protect it against wearing out. Please ask the dealer to check & clean the filter periodically, or by yourself. (ref:page 33) 2. 2T Engine (50 CC) Sponge filter element
: If the vehicle is stored")


36 Fuel draining device (EMS model only): If the vehicle is stored continually more than 1 month, the fuel inside the hose might be bad for starting the engine, then you have to: 1. Withdraw the rubber cap inside the luggage. 2. Turn ON the main key. (Don t start the engine now!) 3. Press the drain valve by finger to drain the fuel. (Not necessary to dismantle the luggage) 4. After draining the bad fuel inside the hose, then you can start the engine. 1 3
37 TIRE To secure the best performance & extend life-span, please pay your attention to the following: 1.TIRE PRESSURE Be sure that tire pressure in accordance with the standard pressure. NOTE: The inside temperature of tire must be even to outside or else pressure need to be adjusted. Besides the factor of loading, weight even cruising speed should take into consideration before adjusting. The normal tire pressure: Front: 2.0kg/cm 2 Rear: 2.0kg/cm 2 2.SIMPLE CHECK: Check the tire appearance before riding. Please ask your dealer for repairing or replacing if the appearance has been detected significant worn out or stabbed by nails, or glass. 3.INSPECTION FOR THE DEPTH OF THE TIRE GROOVE: The appearance will become slippery due to significant worn out dusty or wet road riding. Please replace the tire if the depth is less than 0.8mm, see the following picture for reference.

38 THROTTLE GRIP Turn the grip and check the clearance & operation situation. Make sure the grip will automatically return to the original position. Ask your dealers for adjusting advice if necessary. LAMPS & SIGNAL LIGHTS Make sure the front lamp, rear lamp, brake lamp, turn signal lamp, tail lamp and all other indicator lights working well. SWITCHES Make sure the switch of head lamp, turn signal lamp, brake lamp, horn, start button, and over take lamp working well. FUEL Be sure sufficient fuel in tank. Tank capacity: about 7.0 L CAUTION: 1. Please fill the unleaded gas if your scooter is equipped with catalyster. 2. Do not fill up the gas over the neck of gas entrance, otherwise it will be spilling out due to the hot temperature. 3. It may cause inflammable if gas is split onto the engine or muffler.

39 CATALYSTER (OPTIONAL DEVICE) Catalyst device is designed for decreasing air pollution from exhaust system and it is mounted inside the muffler. 1. Make sure to park your scooter away from flammable material, pedestrian or child to avoid danger due to yielding hot from muffler cover. 2. Don t try to use any fuel if it is not unleaded gas. 3. Don t try to turn off the main switch when riding. 4. Don t try to ride, idle or stop on the surface of inflammable. 5. Please keep your engine in good function all the time, otherwise high temperature will yield from catalyst device due to short circuit ignition, or fuel system working abnormal. 6.Please periodically maintain your scooter to ensure exhaust control system and catalyst device working well.


40 NOTATION FOR OPERATION & RIDING 1. Please make sure you are familiar with all the operation system & function before riding. Please contact with your dealers if there s any question. 2. Do not start the engine in a closed place due to potential gas, threat from poisonous exhaust amassed. 3. Please be noted the side stand must be withdrawn from the ground before riding, otherwise dangerous situation may occur due to your ignore. STARTING ENGINE 1.Turn the main switch to 2.When the throttle is totally loosed, hold the brake lever and push the start button, or use the kick starter to start the engine. CAUTION: If the engine can t be started, you should loose the start button to avoid losing significant electric power. Please do not push the button over 5 seconds per each time. Try kick starter to start the engine if the start button is not working properly.
: 1.")

41 WARMING UP THE ENGINE To protect the engine, please warm up the engine 1~3 minutes before riding. Do not immediately accelerate when the engine is cold. NOTE: Please read the instruction engine initial run-in page26 before initial riding. Scooter riding (after warning up the engine): 1. Hold the brake lever and push down the central stand. 2. Adjust the angle of rear view mirrors within visible field. 3. Try the function of signal light before riding. 4. Turn the throttle grip gradually then close the signal light during riding. Accelerating (throttling): Use the throttle grip control your cruise turning it to wards your side will speed up, and reversing it will slow down.
42 BRAKE OPERATION 1. Release the throttle grip. 2. Press front and rear brake levers gradually. REAR FRONT NOTE: 1. Sudden stop will cause sliding or falling down. 2. Use the braking carefully while you are turning, improper use of brake may cause sliding. 3. Slow down the speed when riding on the iron plate, railway track, wet road. 4. Braking on the wet road is difficult. 5. Slow down the speed when sloping down.
43 ENGINE INITIAL RUN-IN 0~1,000 km riding will be the critical period regarding scooter life span. The new engine can t afford too much loading during the first 1,000kms. Every part of the engine will be run-in to obtain the correct clearance in this period. Be sure to avoid prolonging the throttling out totally or any operation causing high temperature in the engine. Please read careful the following information. 1.0~150 km Avoid over 1/2 throttling operation. Cool down the engine 5~10 min/ hour. Do not cruise by constant speed for riding ~500 km Avoid over 1/2 throttling operation for long riding ~1,000 km Avoid over 3/4 throttling operation. NOTE: Change gear & engine oil after 300 km. 4. OVER 1,000 KM Avoid full throttling in a long riding. NOTE: Please contact your dealers if any problem takes place during above periods.

44 PARKING: Turn off the engine and pull out the key when parking the scooter. NOTE: 1. Please park your scooter away from the child & pedestrians if the muffler is hot. Do not park your scooter on a slop or soft ground to avoid falling down.

45 2. This scooter is optionally equipped with side stand safety switch, whenever you park it with side stand, then the engine can not be started for your safety. PERIODICAL MAINTENANCE To secure the most safe & effective performance, please check, adjust and lubricate your scooter periodically. Periodical maintenance and lubrication should be acknowledge as an important instruction. Meanwhile, please pay your attention to the environment, climate, geography and riding status in order to set up a proper maintenance interval. NOTE: This scooter is designed to be riding on normal paved road. If under a dirt & wet condition, please clean the air-cleaner frequently, otherwise the engine will be worn out quickly. If you are not familiar with the inspection & maintenance, please contact to your dealers.
46 PERIODICAL MAINTENANCE TABLE In order to achieve safe riding, good performance and reduce pollution, please execute the recommended maintenance accordingly. Item Model 2T or 4T Checking Content 1 or 300 km MONTHS/DISTANCE(IN KM)FOR CHECKING 3 or 6 or 9 or 12 or 15 or 18 or 3000km 6000km 9000km 12000km 15000km 18000km Engine oil 2T Add I According to Oil warning light Engine oil* 4T Replace 800cc, total 1000cc Recommend 15W40 R Replace it initially 300km, and then replace it per 3,000 km Coarse oil filter* (on 4T clean it initially 300km, Clean or replace it if necessary C oil draining bolt) and then replace it per 3,000 km if necessary Oil Filter For 125CC Replace R replace it per 6000km Air cleaner ALL Crack and blockage check. I I I I I I Air filter ALL Clean or replace it if required I R I R I R Gear oil* ALL replace 90cc, total 110 cc Recommend SAE 140 R R R R Disk & drum brake ALL Leaking and function check I I I I I I Clutch shoes* ALL Check or replace it if necessary I R I Rear brake arm ALL Function check and adjustment I I I Tires ALL Worn-out check or replace it if I I I I I I necessary Wheel bearing* ALL Fasten tightly if loosen I I I I I I Front fork* ALL Leaking and function check I I I I
47 Item Model 2T or 4T Checking Content 1 or 300 km MONTHS/DISTANCE(IN KM)FOR CHECKING 3 or 6 or 9 or 12 or 15 or 3000km 6000km 9000km 12000km 15000km Steering head bearing* ALL Check looseness. Adjust it if A A A required Rear absorber* ALL Leaking and function check I I I Main/Side Stand ALL Function check or replace it if I L I L I L required Nuts, bolts, fasteners ALL Tighten it if required I I I I I I Battery ALL Recharge the battery it required. Clear the poles. I C I C I C Valve gap* 4T IN&EX: 0.08mm/ When engine is cold Adjust it when necessary Carbon cleaning * 2T Clean combustion carbon when engine output reduced A A A Spark plug* ALL Clear or replace if required I R I R I R V belt* ALL Worn out check or replace if necessary. A A A Fuel feeding system* EXCEPT Crack and blockage check. EMS Replace it if necessary. I R I Fuel feeding system * EMS ONLY Inspect hose, clamp, and I I R (Injection) replace the filter per 18,000km Engine idle speed* ALL 2T engine: 1900±100 rpm 4T engine: 1700±100 rpm A A A A A A A Carburetor idle A/F ALL Check and adjust referring to Adjustment* CO/HC Percentage. A A A A A A A EMS function check* EMS ONLY Inspect EMS function, and clear I I I I I I (Injection) the defect memory if necessary 18 or 18000km
48 REMARKS: 1. A: adjust C: clean I: inspect, or replace if necessary L: lubricate R: replace 2. Items with * mark indicate our recommendation to have it done by PGO dealer. NOTE 1: For 4T engine, the engine oil shall be changed completely after run-in period 300km or one month later. This can make sure the engine runs smoothly. NOTE 2: The exchange of brake fluid 1. After disassembling of brake main cylinder or caliper, do change the new fluid. 2. Check the fluid level often, Refill if necessary. 3. Change the oil seal of main cylinder and caliper every two years. 4. Change the brake fluid hose every four years.
49 Exhaust control system (only be valid for the bike equipped catalyst): Catalyster will not be possible to be withdrawn individual, the only you have to do is to maintain fuel, ignition, intake/exhaust system periodically. 1. Maintenance procedure of air clearer (see page 33). 2. Spark plug s checking: please repair or replace if spark plug is dirty. 3. Fuel system s checking: please repair or replace if fuel pipe is jammed or broken. 4. Muffler s checking: please fix tightly once or renew a gasket if it is leaking. 5. Idle rpm s checking: please fix tightly once or renew a gasket if throttle cable. 6. Exhaust density checking while idle: please left the job to any service center of anti-pollution inspection for carburetor adjusting.

50 THE AIR-CLEANER 4T Engine 2T Engine (50 cc) If there is too much accumulation of dust inside the air cleaner, it will reduce the output of engine performance and cause abnormal consumption of fuel. Procedures of changing the air element: 1. Take off the cover of filter. 2. Draw the core of filter. 3. Clean and dry by air compressor, or replace it if necessary. 4. Put the cover back carefully to make sure fitted to the cover without leakage. NOTE:Please do not start the engine before the air-cleaner is assembled, otherwise the piston/main case will be badly worn out.

 Spark plug gap : 0.6~0.7mm for general model Torque: 1.2kgf-m When checking the spark plug, please cleaning the surface of the washer and screw, the fasten it.")
51 THE SPARK PLUG Spark plug is one of the important parts of the engine and it is easy to be checked. According to spark plug condition, you may infer the situation of the engine. The ideal color of the electrode should be light brown. If there s any problem, please ask your dealers to check will be corroded & worn out due to the hotness and dirt for the time being. If happened, please change a new spark plug. Standard spark plug: recommend you to use the same or equivalent specification as original PGO manufactured. (refer to Specification Chapter) Spark plug gap : 0.6~0.7mm for general model Torque: 1.2kgf-m When checking the spark plug, please cleaning the surface of the washer and screw, the fasten it. NOTE: If there is no wrench or torque gauge can be used, please wrenching it by your fingers turn 1/4~1/2 and later use the wrench to fix it to the standard torque once available. EXCHANGE OF GEAR OIL Please change the oil after first 300km ride, then it is recommended to change the gear oil every 5,000~6,000 kms. Regular changing oil :SAE 140
 The indicator will help you to easily screen the status of brake function. Please replace the shoe of rear brake if indicator reaches the warning line. 1.")
52 BRAKE ADJUSTMENT The clearance of lever (a) Front brake: 10~20 mm (b) Rear brake: 10~20 mm Adjust the nut if necessary. NOTE: Please contact to PGO dealer if the clearance is incorrect. Rear brake check (only for Drum brake model) The indicator will help you to easily screen the status of brake function. Please replace the shoe of rear brake if indicator reaches the warning line. 1. Brake indicator 2. Warning line

53 BRAKE PAD CHECK Please acting the brake for checking. If the pads almost reach the bottom, please ask your dealers to change it by: 1. visual check if the pad worn out to the bottom of the groove or not. 2. measure the pad thickness, if it is less than 2mm. NOTE: If the brake area is wet(getting water), the brake will be out of order and dangerous to you. BRAKE FLUID CHECK Insufficient brake fluid will make the air into the brake system and may cause the brake out of control. Please check the brake fluid level all the time and refill it if necessary. 1.When checking the oil level, please turn the handle bar assuring the brake oil on the horizontal position. 2.Use correct brake oil, otherwise the oil seal will be defected. This will cause the oil leaking & losing the brake function. Standard brake oil: FMVSS DOT3 or SAE J Refill same kind of brake oil. Mixing with different oils will yield a bad reaction and cause the brake out of order. 4.To avoid the water getting into the main cylinder, otherwise the boiling temperature of the brake oil will be declining make the air be obstructed.

54 5.Brake oil could reode the painting surface and plastic parts. If any oil were spilled out, please clean it immediately. 6.If the brake oil can t be refilled to the standard level, please check with your dealers. FRONT FORK CHECK NOTE: In order to avoid falling down, please park you scooter firmly will be safe. 1.Eyes checking: If any scratched, broken or leaking inside the pipe by vision. 2.Function check: Park the scooter on flat place. (A) Hold the handle and keep the scooter in vertical position, and then hold the front brake lever. (B) Move up & down the front fork for several times. NOTE: If found the front fork is not smooth or broke, please contact your dealers.
pole, Black wire connect to (negative) pole.")
55 BATTERY 1. The battery is in Maintenance-Free type (MF), so it won t be necessary to check or refill the liquid. If the liquid is leaking, please contact with your dealers A.S.A.P. 2. Battery wire connection: Red wire connect to + (positive)pole, Black wire connect to (negative) pole. EMS model: there are 2 black wires shall all connected to battery, otherwise you can t start the engine. Refer to the figure: (+)pole, 1 Red wire (-)pole: Carburetor: 1 Black wire EMS: 2 Black wire NOTE: Please do not try to take off the sealed rubber even when charging the battery, that will damage your battery.

56 FUSE REPLACEMENT 1. The fuse is located beside the battery. 2. Open the battery cover. 3. If the fuse is burned out, turn off the main switch and related switches, replace a correct fuse, then turn on and check the circuit function, please contact with your dealers if the problem remains. NOTE: Do not use a higher ampere fuse than the standard one. A different (abnormal) fuse will damage circuit system and may cause fire.
57 REFERENCE DATA(1) TYPE BF-50 BF-125 BF-150BA DRY WEIGHT ~101KG ~117KG ~124KG ENGINE type model no. cooling cylinder array displacement start system lubrication system lubricant capacity replace 2 stroke P2 forced air cooling single 49 c.c electric and kick separated pump SAE30 (FC class) 1.0 L 4 stroke C1E5 forced air cooling single c.c electric and kick compress spray SAE15W L 0.8L 0.8L 4 stroke F3(carburetor)&F3E(EMS) forced air & oil cooling single c.c electric and kick compress spray SAE15W L spark plug(ngk) BP7HS(NGK) C7HSA(carburetor) or CR7HSA(EMS) C7E(carburetor) or CR7E(EMS) clutch type DRY TYPE DRY TYPE DRY TYPE gear shift type AUTOMATIC (V BELT) AUTOMATIC (V BELT) AUTOMATIC (V BELT) clutch type DRY TYPE DRY TYPE DRY TYPE gear shift type AUTOMATIC (V BELT) AUTOMATIC (V BELT) AUTOMATIC (V BELT) GEAR OIL model min. volume total volume SAE cc 110cc SAE cc 110cc SAE cc 110cc
58 REFERENCE DATA(1) TYPE BF-50 BF-125 BF-150 Valve Q ty IN EX NA 1 1 AIR CLEANER SPONGE PAPER PAPER FUEL: gasoline Tank capacity UNLEADED ~6.0L UNLEADED ~6.0L UNLEADED ~6.0L TIRE size ( front) ( rear) 110/70-12or120/ /70-12or130/ /70-12or120/ /70-12or130/ /70-12or120/ /70-12or130/70-12 ELECTRIC ignition generator BATTERY TYPE capacity BULBS head lamp ( HI /LO) rear lamp/ stop lamp signal lamp(frt) signal lamp(rear) C.D.I AC MAGNET YTX4L-BS 12V 3AH 12V 35/35 W * V-0.41W 13.5V-1.89W 12V-5W * V-1.58W 13.5V-1.45W C.D.I(carburetor) or Transistor(EMS) YTX7L-BS(carburetor) or YTX9-BS(EMS) 12V 35/35 W * V-0.41W 13.5V-1.89W 12V-5W * V-1.58W 13.5V-1.45W 1 1 C.D.I(carburetor) or Transistor(EMS) YTX7L-BS(carburetor) or YTX9-BS(EMS) 12V 35/35 W * V-0.41W 13.5V-1.89W 12V-5W * V-1.58W 13.5V-1.45W
59 REFERENCE DATA(2) TYPE BF2-50 BF2-125 BF2-150 DRY WEIGHT ~101KG ~118KG ~124KG ENGINE type model no. cooling cylinder array displacement start system lubrication system lubricant capacity replace 2 stroke P2 forced air cooling single 49 c.c electric and kick separated pump SAE30 (FC class) 1.0 L 4 stroke C1E5 forced air cooling single c.c electric and kick compress spray SAE15W L 0.8L 0.8L 4 stroke F3(carburetor)&F3E(EMS) forced air & oil cooling single c.c electric and kick compress spray SAE15W L spark plug(ngk) BP7HS(NGK) C7HSA(carburetor) or CR7HSA(EMS) C7E(carburetor) or CR7E(EMS) clutch type DRY TYPE DRY TYPE DRY TYPE gear shift type AUTOMATIC (V BELT) AUTOMATIC (V BELT) AUTOMATIC (V BELT) clutch type DRY TYPE DRY TYPE DRY TYPE gear shift type AUTOMATIC (V BELT) AUTOMATIC (V BELT) AUTOMATIC (V BELT) GEAR OIL model min. volume total volume SAE cc 110cc SAE cc 110cc SAE cc 110cc
60 REFERENCE DATA(2) TYPE BF2-50 BF2-125 BF2-150 Valve Q ty IN EX NA 1 1 AIR CLEANER SPONGE PAPER PAPER FUEL: gasoline Tank capacity UNLEADED ~6.0L UNLEADED ~6.0L UNLEADED ~6.0L TIRE size ( front) ( rear) 110/70-12or120/ /70-12or130/ /70-12or120/ /70-12or130/ /70-12or120/ /70-12or130/70-12 ELECTRIC ignition generator BATTERY TYPE capacity BULBS head lamp ( HI /LO) rear lamp/ stop lamp signal lamp(frt) signal lamp(rear) C.D.I AC MAGNET YTX4L-BS 12V 3AH 12V 55/35 W * V-0.034W 13.5V-0.66W 12V-5W * V-1.58W 13.5V-1.45W C.D.I(carburetor) or Transistor(EMS) YTX7L-BS(carburetor) or YTX9-BS(EMS) 12V 55/35 W * V-0.034W 13.5V-0.66W 12V-5W * V-1.58W 13.5V-1.45W 1 1 C.D.I(carburetor) or Transistor(EMS) YTX7L-BS(carburetor) or YTX9-BS(EMS) 12V 55/35 W * V-0.034W 13.5V-0.66W 12V-5W * V-1.58W 13.5V-1.45W
61 Periodic Maintenance Record Plan km Actual km Date Dealer Sign. Plan km ,000 3,000 45,000 6,000 49,000 9,000 52,000 12,000 55,000 15,000 58,000 18,000 61,000 21,000 64,000 24,000 67,000 27,000 70,000 30,000 73,000 33,000 76,000 36,000 79,000 39,000 82,000 Actual km Date Dealer Sign..Please decrease maintenance period when often driving in dusty areas..copy the blank table to use when odometers is over the above table planned.
62 BF
If there is any question, please do not hesitate to ask your dealer for assistance.
 DEAR CUSTOMERS Thank you for choosing PGO scooter. It is a fact that the efficiency and sustaining life of each scooter depend heavily on the operating method of each user. Thus this owner s manual will
DEAR CUSTOMERS T-rex PGO Tricycle
 DEAR CUSTOMERS: Thank you for buying T-rex of PGO Tricycle. It is a fact that the efficiency and sustaining life of each tricycle depend heavily on the operating method of each user. Thus this owner s
If there is any question, please do not hesitate to ask your dealer for assistance.
 DEAR CUSTOMERS: Thank you for choosing PM-NAKED/PMS/PMX of PGO scooter. It is a fact that the efficiency and sustaining life of each scooter depend heavily on the operating method of each user. Thus this
3. INSPECTION/ADJUSTMENT
 3 SERVICE INFORMATION...3-0 FINAL REDUCTION GEAR OIL...3-7 MAINTENANCE SCHEDULE...3-2 DRIVE BELT...3-7 FUEL FILTER...3-3 BRAKE SHOE...3-8 THROTTLE OPERATION...3-3 BRAKE ADJUSTING NUT...3-8 AIR CLEANER...3-4
Warranty Card... 1 Scooter safety... 2 Part location... 4 Identification... 6 The function of switch & controller... 9 Main switch...9 Speedometer...1
 DEAR CUSTOMERS Thank you for choosing PM-NAKED/PMS/PMX of PGO scooter. It is a fact that the efficiency and sustaining life of each scooter depend heavily on the operating method of each user. Thus this
3. INSPECTION/ADJUSTMENT
 SERVICE INFORMATION...3-0 FINAL REDUCTION GEAR OIL...3-7 MAINTENANCE SCHEDULE...3-2 DRIVE BELT...3-7 FUEL FILTER...3-3 BRAKE SHOE...3-8 THROTTLE OPERATION...3-3 BRAKE ADJUSTING NUT...3-8 AIR CLEANER...3-4
BT49QT-9O3 User s Manual
 BT49QT-9O3 User s Manual Preface Thank you very much for purchasing BAOTIAN brand motorcycle of model BT49QT-9O3, which developed by BAOTIAN MOTORCYCLE INDUSTRIAL CO., LTD. And welcome to join the driver
1.CONTENTS 1. Contents Control location Before riding Safe riding Driving Use genuine spare parts Use
 1.CONTENTS 1. Contents... 1 2. Control location... 3 3. Before riding... 4 4. Safe riding... 4 5. Driving... 5 6. Use genuine spare parts... 5 7. Use of each component... 6 Gauges... 6 Operation of ignition
NOTES FOR SAFETY OPERATOR-ONLY.
 NOTES FOR SAFETY Both the parents and their child must fully understand everything in this manual before riding. This vehicle is for OPERATOR-ONLY. This vehicle is only designed for operation on level,
3. INSPECTION/ADJUSTMENT
 3 3 INSPECTION/ADJUSTMENT SERVICE INFORMATION -------------------------------------------- 3-1 MAINTENANCE SCHEDULE ---------------------------------------- 3-2 FUEL LINE/FUEL FILTER -------------------------------------------
INSPECTION/ADJUSTMENT
 3 3 INSPECTION/ADJUSTMENT SERVICE INFORMATION----------------------------------------------------------------------- 3-1 MAINTENANCE SCHEDULE-------------------------------------------------------------------
ATV-320 R OWNER S MANUAL
 ATV-320 R OWNER S MANUAL FOREWORD May we, the manufacturer, take this opportunity to thank you for choosing our ATV to serve you. This Owner s Manual is prepared for you to properly operate in safety.
ATV-50/90/100 I/II/V OWNER S MANUAL
 1 ATV-50/90/100 I/II/V OWNER S MANUAL FOREWORD May we, the manufacturer, take this opportunity to thank you for choosing our ATV to serve you. This Owner s Manual is prepared for you the details as to
ATV-320 S/U ATV-320SD S/U OWNER S MANUAL V
 ATV-320 S/U ATV-320SD S/U OWNER S MANUAL V1.0 2014.03.01 0 FOREWORD May we, the manufacturer, take this opportunity to thank you for choosing our ATV to serve you. This Owner s Manual is prepared for you
CONTENT. 3. Maintenance
 CONTENT Foreword -------------------------------------------------------------------------------------------- 1 1. The performance, technical parameters and structure of Go Kart--------------------------------------------2
MOTORINI GP 50. User s Manual.
 MOTORINI GP 50 User s Manual www.motorini.co.uk Dear user: Thank you for choosing to buy a Motorini GP 50 This manual provides the correct operation and maintenance methods for safe riding and maintaining
SECTION 8 2 DO IT YOURSELF MAINTENANCE. Chassis
 DO IT YOURSELF MAINTENANCE Chassis SECTION 8 2 Checking the coolant level of the traction motor................ 184 Checking the radiator....................................... 185 Checking brake fluid........................................
2.CONTROL LOCATION MODEL: ORBIT II 125(AE12W1-6)
") 1.CONTENTS 1. Contents... 1 2. Control location... 3 3. Before riding... 4 4. Safe riding... 4 5. Driving... 5 6. Use genuine spare parts... 5 7. Use of each component... 6 Gauges... 6 Operation of ignition
1.CONTENTS 1. Contents... 1 2. Control location... 3 3. Before riding... 4 4. Safe riding... 4 5. Driving... 5 6. Use genuine spare parts... 5 7. Use of each component... 6 Gauges... 6 Operation of ignition
May we, the manufacturer, take this opportunity to thank you for choosing our ATV to serve you.
 FOREWORD May we, the manufacturer, take this opportunity to thank you for choosing our ATV to serve you. This Owner s Manual is prepared for you the details as to operate and maintenance necessarily to
3. INSPECTION/ADJUSTMENT
 3 3 INSPECTION/ADJUSTMENT SERVICE INFORMATION-------------------------------------------------- 3-1 MAINTENANCE SCHEDULE---------------------------------------------- 3-3 FUEL LINE---------------------------------------------------------------------
To be completed by Authorized ETON Dealership. Buyers Agreement Checklist Scooters
 To be completed by Authorized ETON Dealership Buyers Agreement Checklist Scooters As members of the Motor Vehicle industry, our staff and management would like to thank you for your purchase of an E-TON
Part 7 DO IT YOURSELF MAINTENANCE
 Part 7 DO IT YOURSELF MAINTENANCE Chapter 7 2 Engine and Chassis Checking the engine oil level Checking the engine coolant level Checking brake fluid Checking power steering fluid Checking tire pressure
SECTION 6 3 SERVICE PROCEDURES AND SPECIFICATIONS. Chassis
 SERVICE PROCEDURES AND SPECIFICATIONS Chassis SECTION 6 3 Specifications........................................... 208 Checking brake fluid...................................... 210 Checking power steering
Operation and Maintenance Instructions
 X-Treme TM Electric Moped Operation and Maintenance Instructions Electric Moped XM-3100 Revised 11/6/08 Operation and Maintenance Instructions We strongly recommend that you read this entire manual before
Owner s manual Miro 125. Nipponia S.A. ODB001- EN
 Owner s manual Miro 125 Nipponia S.A. ODB001- EN INTRODUCTION This Owner s Manual contains basic instructions on how to operate, inspect and maintain your scooter. Please read it carefully and thoroughly.
Gasoline Inverter Generator
 user manual Gasoline Inverter Generator table of contents Preface Introduction... Safety Information Exhaust fumes are poisonous... Fuel is highly flammable and poisonous... Engine and muffler may be hot...
Light condition and operation Windshield glass condition Wiper blade condition Paint condition and corrosion Fluid leaks Door and hood lock condition
 GENERAL CHECKS Engine Compartment The following should be checked regularly: Engine oil level and condition Transmission fluid level and condition Brake fluid level Clutch fluid level Engine coolant level
2. CONTROL LOCATION MODEL: AY05W-T. Helmet hook Storage box. Rear brake level. Air Cleaner. Kick starter pedal. Engine number.
 1. CONTENTS 1. Contents... 1 2. Control location... 3 3. Before riding... 4 4. Safe riding... 4 5. Driving... 5 6. Use genuine spare parts... 5 7. Use of each component... 6 Gauges... 6 Operation of ignition
SERVICE MANUAL. Manufactured by Motive Power Industry Co., Ltd
 SERVICE MANUAL Manufactured by Motive Power Industry Co., Ltd 4. Electric inspection 1. Operation panel Headlamp switch Main switch Parking button 12V power supply Horn button Signal lamp switch Panel
SECTION 6 3 SERVICE PROCEDURES AND SPECIFICATIONS. Chassis
 SECTION 6 3 SERVICE PROCEDURES AND SPECIFICATIONS Chassis Specifications 206 Checking brake fluid 208 Checking power steering fluid 209 Checking tire pressure 210 Rotating tires 211 Checking and replacing
2.CONTROL LOCATION MODEL: PCH 50 & PCH125 & PCH150. High& Low beam/turn signal/seat open/horn switch. Rear brake level. Helmet hook.
 1 1.CONTENTS 1. Contents... 1 2. Control location... 3 3. Before riding... 4 4. Safe riding... 4 5. Driving... 5 6. Use genuine spare parts... 5 7. Use of each component... 6 Gauges... 6 Operation of ignition
BR-250 / BR-250SS / M2-250 SERVICE MANUAL
 BR-250 / BR-250SS / M2-250 SERVICE MANUAL Manufactured by PGO of Motive Power Industry Co., Ltd 1. INSPECTION/ADJUSTMENT 1 1 INSPECTION/ADJUSTMENT SERVICE INFORMATION -------------------------------------------------
2. CONTROL LOCATION. Oil level HU05 / HU10 SERIES. Fuel tank. Front turn. light. Fuel tank cap. Fuses & C.D.I. & Battery. Helmet hook.
 1. CONTENTS 1. Contents... 1 2. Control Location... 3 3. Before Riding... 4 4. Safe Riding... 4 5. Riding... 5 6. Use Genuine Spare Parts... 5 7. Use of Each Component... 6 Gauges... 6 Operation of Ignition
KING CANADA 950W PORTABLE GENERATOR MODEL: KCG-951G INSTRUCTION MANUAL COPYRIGHT 2011 ALL RIGHTS RESERVED BY KING CANADA TOOLS INC.
 KING CANADA 950W PORTABLE GENERATOR MODEL: KCG-951G INSTRUCTION MANUAL COPYRIGHT 2011 ALL RIGHTS RESERVED BY KING CANADA TOOLS INC. WARRANTY & SERVICE INFORMATION 1-YEAR LIMITED WARRANTY FOR THIS 950W
AIR BRAKES THIS SECTION IS FOR DRIVERS WHO DRIVE VEHICLES WITH AIR BRAKES
 Section 5 AIR BRAKES THIS SECTION IS FOR DRIVERS WHO DRIVE VEHICLES WITH AIR BRAKES AIR BRAKES/Section 5 SECTION 5: AIR BRAKES THIS SECTION COVERS Air Brake System Parts Dual Air Brake Systems Inspecting
LDG6000SA DIESEL GENERATOR OWNERS MANUAL
 LDG6000SA DIESEL GENERATOR OWNERS MANUAL BEFORE OPERATING THIS EQUIPMENT PLEASE READ THESE INSTRUCTIONS CAREFULLY Preface Thank-you for purchasing this generator. This operation manual contains information
rtable Electric Scooter USER MANUAL A new era in urban mobility PLEASE CAREFULLY READ THE USER MANUAL AND WARRANTY BOOK BEFORE USING!
 rtable Electric Scooter USER MANUAL A new era in urban mobility PLEASE CAREFULLY READ THE USER MANUAL AND WARRANTY BOOK BEFORE USING! The most economical vehicle in history User Manual Page 1 / 20 04/2017
Racing NAVODILO ZA UPORABO USER'S MANUAL
 Racing NAVODILO ZA UPORABO USER'S MANUAL TOMOS USER'S MANUAL YOUNGST'R YOUNGST'R FULL RACING 45 1 CONTENTS Warnings 3 Riding Safety Tips 3 Technical Specification 4-5 Technical Description 6-9 Vehicle
CHASSIS CONTENTS EXTERIOR PARTS 7-1 FRONT WHEEL 7-2 FRONT BRAKE 7-6 HANDLEBARS 7-13 FRONT FORK 7-15 STEERING 7-23 REAR WHEEL 7-26 REAR BRAKE 7-30
 CHASSIS CONTENTS EXTERIOR PARTS 7- FRONT WHEEL 7-2 FRONT BRAKE 7-6 HANDLEBARS 7-3 FRONT FORK 7-5 STEERING 7-23 REAR WHEEL 7-26 REAR BRAKE 7-30 REAR SHOCK ABSORBER 7-32 SWING ARM 7-33 7 7- CHASSIS EXTERIOR
2010 INDIAN MOTORCYCLE PRE- DELIVERY AND INSPECTION
 2010 INDIAN MOTORCYCLE PRE- DELIVERY AND INSPECTION Table of Contents Introduction 1 Preparing the motorcycle.... 2 Pre-Delivery Checklist...... 4 Customer Acceptance........ 6 Introduction For your own
I: INSPECT AND CLEAN, ADJUST, LUBRICATE OR REPLACE IF NECESSARY C: CLEAN A: ADJUST R: REPLACE L: LUBRICATE I: INSPECTION D: DIAGNOSE
 2. Periodic Maintenance > Periodic Maintenance Chart XCITING 400i Maintenance Schedule Perform the pre-ride inspection (Owner's Manual) at each scheduled maintenance period. This interval should be judged
2. CONTROL LOCATION MODEL: AJ05W5-6 AJ05W6-6 AJ05W7-D AJ12W2-6. Helmet hook. Front light/ Position light. Seat lock. Air Cleaner. Kick starter pedal
 1. CONTENTS 1. Contents... 1 2. Control location... 3 3. Before riding... 4 4. Safe riding... 4 5. Driving... 5 6. Use genuine spare parts... 5 7. Use of each component... 6 Gauges... 6 Operation of ignition
E-TON. Beamer Scooter OWNER S MANUAL
 E-TON Beamer Scooter OWNER S MANUAL Dear Customer, Thank you for choosing the ETON Beamer. This scooter was made in accordance with the international QS9000 standards and the directives of the European
PERIODIC MAINTENANCE
 PERIODIC MAINTENANCE CONTENTS PERIODIC MAINTENANCE SCHEDULE 2 1 MAINTENANCE PROCEDURES 2 3 2 BATTERY 2 3 CYLINDER HEAD NUTS AND EXHAUST PIPE NUTS 2 4 CYLINDER HEAD AND CYLINDER 2 4 SPARK PLUG 2 4 FUEL
AIR-COOLED DIESEL GENERATOR OWNERʼS MANUAL. This manual contains important safety information. TDG2500E TDGW7000E TDG7000SE TDG4500E
 AIR-COOLED DIESEL GENERATOR OWNERʼS MANUAL This manual contains important safety information. TDG2500E TDGW7000E TDG7000SE TDG4500E TDG8000-3 TDG7000SE-3 TDG7000E TDG8000E TDGW7000SE TDG7000E3 TDGW8000E
If you have any questions, please ask your authorized Genuine dealer for assistance.
 Thank you for purchasing the Buddy Kick from Genuine Scooter Company. The efficiency and longevity of each scooter will depend heavily on the operating method of each user. This owner's manual will provide
OPERATOR S MANUAL CUSTOMER SERVICE CHECKBOOK
 OPERATOR S MANUAL CUSTOMER SERVICE CHECKBOOK Valid for e-max versions: English Status as of January 2008 1 Dear e-max riders, We are pleased that you have chosen one of our brand name vehicles and we welcome
I. VARIOUS PART NAMES: 1 1.L: 7 II: OPERATION DESCRIPTIONS OF SYSTE 3 2.R: 7 A. INSTRUMENT PANEL COMPONENT 3 H. UNDER SEAT STORAGE BOX: 8
 I. VARIOUS PART NAMES: 1 1.L: 7 II: OPERATION DESCRIPTIONS OF SYSTE 3 2.R: 7 A. INSTRUMENT PANEL COMPONENT 3 H. UNDER SEAT STORAGE BOX: 8 1.Speedometer: 3 I. STEERING HANDLE LOCK: 9 2.Odometer: 3 1.Locking:
MODE:JET 50/100 SERIES (BL05WA-6)
") Content/ Subject 1. Contents... 1 2. Control location... 3 3. Before riding... 8 4. Safety riding... 8 5. Driving... 9 6. Use genuine spare parts... 9 7. Use of each component... 10 Gauges... 10 Operation
Content/ Subject 1. Contents... 1 2. Control location... 3 3. Before riding... 8 4. Safety riding... 8 5. Driving... 9 6. Use genuine spare parts... 9 7. Use of each component... 10 Gauges... 10 Operation
Portable Electric Scooter USER MANUAL. A new era in urban mobility PLEASE CAREFULLY READ THE USER MANUAL AND WARRANTY BOOK BEFORE USING!
 Portable Electric Scooter USER MANUAL A new era in urban mobility PLEASE CAREFULLY READ THE USER MANUAL AND WARRANTY BOOK BEFORE USING! The most economical vehicle in history ser Manual Page 1 / 20 04/2017
OWNERS MANUAL. Two Stroke Dirt Bike. Distributed by SSR Motorsports. Address: Alondra Blvd, Norwalk CA
 OWNERS MANUAL Two Stroke Dirt Bike Distributed by SSR Motorsports Address: 12825 Alondra Blvd, Norwalk CA 90650 www.ssrmotorsports.com Please note that this is a general manual. The model of the vehicle
Contents Page General Instruction before riding Page 3 Point Inspection Page 4 Assembly Instructions Page 5 Technical Specifications
 TM Owner's Manual Ride the Future TM Operation and Maintenance Instructions We strongly recommend that you read this entire manual before using your vehicle for the first time Contents Page General Instruction
PLEASE NOTE THE USE OF DEFECTIVE OR NON-EQUIVALENT PARTS MAY RESULT IN YOUR EMISSION PERFORMANCE WARRANTY CLAIM BEING DENIED.
 Service Booklet PLEASE NOTE SERVICE, REPLACEMENT, OR REPAIR OF THE EMISSION CONTROL DEVICES AND SYSTEMS MAY BE PERFORMED BY ANY AUTOMOTIVE REPAIR ESTAB- LISHMENT OR INDIVIDUAL USING CERTIFIED PARTS. WE
SERVICE MANUAL HYOSUNG MOTORS & MACHINERY INC HR8310 SERVICE MANUAL
 HYOSUNG MOTORS & MACHINERY INC. SERVICE MANUAL SERVICE MANUAL 99000HR8310 FOREWORD GROUP INDEX This manual contains an introductory description on HYOSUNG & and procedures for its inspection/service and
SECTION 7 2 DO IT YOURSELF MAINTENANCE MR2 U. Engine and Chassis
 SECTION 7 2 DO IT YOURSELF MAINTENANCE Engine and Chassis Checking the engine oil level................................. 168 Checking the engine coolant level............................ 169 Checking brake
THE ABOVE-MENTIONED GUARANTEE IS NOT VALID UNDER THE FOLLOWING CONDITIONS:
 DEAR USERS : WE WOULD LIKE TO INFORM YOU THAT UNDER OUR STRICT QUALITY CONTROL SYSTEM FOR THE PRODUCTION OF OUR SCOOTERS, WE OFFER A COMPLETE GUARANTEE AS INDICATED IN THE GUARANTEE BOOKLET ISSUED BY OUR
AG-HA-2500N GASOLINE GENERATOR
 AG-HA-2500N GASOLINE GENERATOR OWNER S MANUAL BEFORE OPERATING THIS EQUIPMENT PLEASE READ THESE INSTRUCTIONS CAREFULLY (I)WARNING 1. Read the operator s instruction manual. 2. Attention! Exhaust gases
MOTIVE POWER INDUSTRY CO., LTD
 Dear customers: MOTIVE POWER INDUSTRY CO., LTD acknowledges your purchases of motorcycles manufactured by PGO and particularly reminds you of the absolute relationship between a driver s driving and one
CHASSIS CONTENTS EXTERIOR PARTS 6-1 FRAME COVER 6-2 REAR FRAME COVER 6-4 FRONT WHEEL 6-6 FRONT BRAKE 6-10 HANDLEBARS 6-17 FRONT FORK 6-19
 CHASSIS CONTENTS EXTERIOR PARTS 6- FRAME COVER 6- REAR FRAME COVER 6-4 FRONT WHEEL 6-6 FRONT BRAKE 6-0 HANDLEBARS 6-7 FRONT FORK 6-9 STEERING 6-6 REAR WHEEL 6-3 REAR BRAKE 6-39 6 REAR SHOCK ABSORBER 6-43
GT MAGNETIC POWER BICYCLES (SMART CYCLE)
") GT MAGNETIC POWER BICYCLES (SMART CYCLE) Congratulations on selecting the GT Magnetic Power Bicycle (Smart Cycle in short). In order to use and enjoy your Smart Cycle safely and to get the best performance
GT MAGNETIC POWER BICYCLES (SMART CYCLE) Congratulations on selecting the GT Magnetic Power Bicycle (Smart Cycle in short). In order to use and enjoy your Smart Cycle safely and to get the best performance
SECTION 6 3 SERVICE PROCEDURES AND SPECIFICATIONS. Chassis
 SERVICE PROCEDURES AND SPECIFICATIONS Chassis SECTION 6 3 Specifications........................................... 204 Checking brake fluid...................................... 206 Checking brake pedal
Operator s Manual ACCESS MOTOR
 Operator s Manual ACCESS MOTOR TE-250/300U 250/300 2x4 Dear Customers, Thank you for purchasing TE-250/300U. You will find it easier to start your engine with actuation of the manual choke for 20-30 seconds
User Manual of Bagibike Electric Bicycles
 User Manual of Bagibike Electric Bicycles Model: Bagibike B16. http://www.bagibike.com Page 1 FOREWORD The following operation manual is a guide to assist you. This manual is not a complete document on
Useful Information. About your scooter: Important Notice 2 SCOOTIX. Vehicle Identification Number (VIN) Registration Number: Date of Registration:
 Registration Number: Date of Registration:") Manual SPEED5000 Useful Information About your scooter: Vehicle Identification Number (VIN) Registration Number: Date of Registration: Name of Selling Dealer: Contact Number of Selling Dealer: Please take
Manual SPEED5000 Useful Information About your scooter: Vehicle Identification Number (VIN) Registration Number: Date of Registration: Name of Selling Dealer: Contact Number of Selling Dealer: Please take
RASER R1/ RASER FX OWNER'S MANUAL
 RASER R1/ RASER FX OWNER'S MANUAL IMPORTANT NOTES FOR SAFE OPERATION FAILURE TO FOLLOW THE INSTRUCTIONS CONTAINED HEREIN MAY RESULT IN DAMAGE TO YOUR SCOOTER, DECREASE ENGINE LIFE, CAUSE INJURY TO YOURSELF
Thank you for purchasing the Direct Bikes DB50QT-A scooter.
 Manual-DB50QT-A Dear Customer: Thank you for purchasing the Direct Bikes DB50QT-A scooter. The Direct Bikes DB50QT-A scooter is manufactured using some of the most advanced production techniques in the
Thank you for purchasing the Direct Bikes DB50QT-6 scooter.
 Manual-DB50QT-6 Dear Customer: Thank you for purchasing the Direct Bikes DB50QT-6 scooter. The Direct Bikes DB50QT-6 scooter is manufactured using some of the most advanced production techniques in the
SERIES OFF-ROAD KART USER S MANUAL. Thank you very much for your choice of this Off-road Kart.
 SERIES OFF-ROAD KART USER S MANUAL Dear Sir or Madam, Thank you very much for your choice of this Off-road Kart. This Off-road Kart is manufactured according to the full survey of market demand. We hope
Owner s/operator s Manual
 Water Pump MP2533E2 Owner s/operator s Manual Completely read and understand this manual before using this product. Foreword This Owner s/ Operator s Manual is designed to familiarize the operator with
VENTO PHANTOM R4i USER S MANUAL
 VENTO PHANTOM R4i USER S MANUAL Thank you for choosing Vento Design and Production by Vento North America Phone 858.597.7520 Fax 858.597.7462 E-mail info@vento.com.mx For more information visit us online
User Manuel. Titan Hummer XL
 User Manuel Titan Hummer XL Dear User, Tzora Active Systems Ltd. thanks you for choosing the Titan Hummer-XL and wishes you safe and enjoyable journeys. For proper operation and to maintain the scooter
Thank you for making our e-cycle your product of choice! Your purchase has helped us get one step closer to a greener environment.
 Hello and a hearty welcome to the Being Human e-cycle community! Thank you for making our e-cycle your product of choice! Your purchase has helped us get one step closer to a greener environment. With
User Manual. MB-6000-UD Rev. 1.03
 User Manual MB-6000-UD Rev. 1.03 Table of Contents I. The Controls II. III. IV. Unit Operations A. Folding the Unit B. Folding the Handlebars C. Unlocking and Unfolding D. Precautions and Starting E. Power
USER MANUAL. GASOLINE SCOOTER (4 Stroke engine) OFF ROAD USE ONLY. Read these instruction carefully before using
 OFF ROAD USE ONLY. Read these instruction carefully before using") USER MANUAL GASOLINE SCOOTER (4 Stroke engine) OFF ROAD USE ONLY Read these instruction carefully before using Ⅰ.Safe for use(caution) 1. Don t allow anyone who dose not understand this instruction manual
USER MANUAL GASOLINE SCOOTER (4 Stroke engine) OFF ROAD USE ONLY Read these instruction carefully before using Ⅰ.Safe for use(caution) 1. Don t allow anyone who dose not understand this instruction manual
EW-52. Owner s Manual. (888) Customer Service (888) Service
 Customer Service (888) Service") EW-52 Owner s Manual www.ewheelsdealers.com (888) 305-0881 Customer Service (888) 571-2845 Service 0 Table of Contents 1. Instrument Panel. 2 2. Music system operation. 3 3. Before you operate your scooter....
EW-52 Owner s Manual www.ewheelsdealers.com (888) 305-0881 Customer Service (888) 571-2845 Service 0 Table of Contents 1. Instrument Panel. 2 2. Music system operation. 3 3. Before you operate your scooter....
Operator Manual. The most important component is you. This operator manual. has information for. all models of series. B plus some options and
 Operator Manual This operator manual has information for all models of series B plus some options and accessories. Some of the illustrations and information may not apply to your truck. The most important
EW-54. Owners Manual.
 EW-54 Owners Manual www.electricwheelstore.com Dear consumers, Foreword Welcome to the big family of Electric Wheels, and thank you for your choice of Electric Wheels electric tricycle! The electric tricycle
BLAZER250 OWNER S MANUAL BOOK FORWARD. Sincerely appreciate your choice of our vehicle, we will provide you the best services.
 BLAZER250 OWNER S MANUAL BOOK FORWARD Sincerely appreciate your choice of our vehicle, we will provide you the best services. This Owner s manual contains important safety and maintenance information.
General Knowledge Test A
 1. When the roads are slippery you should: a. Drive along side other vehicles. b. Make turns as gentle as possible. c. Test traction while going uphill. d. Decrease the distance you look ahead. General
The following procedures should be observed to ensure safe driving.
 Driving the vehicle The following procedures should be observed to ensure safe driving. n Starting the hybrid system ( P. 162) n Driving STEP 1 With the brake pedal depressed, shift the shift lever to
SECTION 3 STARTING AND DRIVING MR2 U
 STARTING AND DRIVING SECTION 3 Before starting the engine................................... 122 How to start the engine...................................... 122 Tips for driving in various conditions...........................
Magnesium Clutch Cover Kit Instruction Manual
 Magnesium Clutch Cover Kit Instruction Manual Item No. (Brown) Applied to Ape50 Ape50 (FI) Ape50 (FI Type D) AC18-1000001 Ape100 Ape100 Type D XR50 Motard XR100 Motard Frame Nos AC16-1000001 AC16-1600001
PF-4000, PF-4010, PF-4210 MULTI-PURPOSE ENGINE
 PF-4000, PF-4010, PF-4210 MULTI-PURPOSE ENGINE Date 09-26-01 Supplier To The Outdoor Power Equipment Industry ISM, Inc. 1028 4 th Street SW Auburn, WA 98001 Phone: (253) 333-1200 Fax: (253) 333-1212 WWW.TANAKA-USA.COM
SECTION 6 4 SERVICE PROCEDURES AND SPECIFICATIONS. Electrical components
 SERVICE PROCEDURES AND SPECIFICATIONS Electrical components SECTION 6 4 Specifications........................................... 206 Checking battery condition................................ 210 Battery
EW-09. Owner s Manual. (888) Customer Service. (888) Service
 Customer Service. (888) Service") EW-09 Owner s Manual www.ewheelsdealers.com (888) 305-0881 Customer Service (888) 571-2845 0 Service Table of Contents Page 2 - Feature Guide Page 3 - Product Specifications Page 4 - Operation of Scooter
EW-09 Owner s Manual www.ewheelsdealers.com (888) 305-0881 Customer Service (888) 571-2845 0 Service Table of Contents Page 2 - Feature Guide Page 3 - Product Specifications Page 4 - Operation of Scooter
SECTION 6 2 SERVICE PROCEDURES AND SPECIFICATIONS. Engine. Specifications
 SERVICE PROCEDURES AND SPECIFICATIONS Engine SECTION 6 2 Specifications........................................... 170 Fuel.................................................... 172 Facts about engine oil
OWNER S MANUAL XV125S 5AJ E3
 OWNER S MANUAL XVS AJ--E INTRODUCTION Welcome to the Yamaha world of motorcycling! EAU0000 As the owner of a XVS, you are benefiting from Yamaha s vast experience in and newest technology for the design
Warning Statement Read Before Riding
 Table of Contents Technical Information-----------------------------------1 Warning Statement--------------------------------------2 Read Before Riding------------------------------------- List Of Parts-----------------------------------------------4
Engine oil. Introduction. Warning and indicator lights WARNING
 Engine oil Introduction In this section you ll find information about: Warning and indicator lights Engine oil specifications Engine oil capacities Checking the engine oil level and adding oil Engine oil
3. INSPECTION/ADJUSTMENT
 3 INSPECTION/ADJUSTMENT SERVICE INFORMATION------------------------------------------------ 3-1 MAINTENANCE SCHEDULE-------------------------------------------- 3-3 FUEL LINE/THROTTLE OPERATION---------------------------------
TREAD and TRACTION. Tread- The grooved surface of a tire that grips the road.
 1 NAME: HOUR: DATE: NO: Chapter 5: Natural Laws and Car Control GRAVITY- Is the force that pulls all things to Earth. UPHILL DRIVING- Gravity will decrease your car down when going uphill, unless you use
SECTION 6 3 SERVICE PROCEDURES AND SPECIFICATIONS. Chassis
 SERVICE PROCEDURES AND SPECIFICATIONS Chassis SECTION 6 3 Specifications........................................... 178 Checking clutch pedal freeplay............................ 180 Checking brake and
ELECTRIC FOLDING BIKE OWNERS MANUAL. e-power 36v. Go City-Lite
 P o w e r ELECTRIC FOLDING BIKE OWNERS MANUAL e-power 36v Go City-Lite Thank you for purchasing a Seago electric folding bike. In order to get the best out of your new bike you must read and fully understand
Operator Manual. This operator manual has. information for all models. of series M plus some. options and accessories. Some of the illustrations
 M S E R I E Operator Manual S This operator manual has information for all models of series M plus some options and accessories. Some of the illustrations and information may not The most apply to your
ELECTRIC PALLET TRUCK
 π H-3405 ELECTRIC PALLET TRUCK 1-800-295-5510 uline.com GENERAL SAFETY GUIDELINES WARNING! Do not operate this truck unless you have been trained to use it, authorized to do so and have checked it is in
Kit Instruction Manual
 Kit Instruction Manual Thank you for purchasing one of our products. Please strictly follow the instruction to install and use the products. Before fitting the products, please be sure to check the contents
OWNER S MANUAL Soco TS1200R Soco TS800R
 OWNER S MANUAL Soco TS1200R Soco TS800R Version 1.0 May 2017 Congratulations on purchasing your Soco electric motorcycle. We wish you an enjoyable and safe riding experience. For your safety and comfort,
ELECTRIC PALLET TRUCK
 π H-2302 ELECTRIC PALLET TRUCK 1-800-295-5510 uline.com OPERATING INSTRUCTIONS SAFETY GUIDELINES WARNING! Do not operate this truck unless you have been trained to use it, authorized to do so and have
SECTION 6 3 SERVICE PROCEDURES AND SPECIFICATIONS. Chassis
 SERVICE PROCEDURES AND SPECIFICATIONS Chassis SECTION 6 3 Specifications........................................... 174 Checking brake fluid...................................... 176 Checking brake pedal
OWNER S MANUAL Soco TS1200R Soco TS800R
 OWNER S MANUAL Soco TS1200R Soco TS800R Congratulations on purchasing your Soco electric motorcycle. We wish you an enjoyable and safe riding experience. For your safety and comfort, we recommend that