RANGE ROVER SPORT OEM TV RETROFIT GUIDE
|
|
|
- Jonas Harrington
- 5 years ago
- Views:
Transcription
 EDIT 18 REASSEMBLY 20 COMPLETED INSTALLATION 21 CONNECTOR LOCATIONS V0.")
1 RANGE ROVER SPORT OEM TV RETROFIT GUIDE 2 PARTS LIST 4 LOADSPACE TRIM REMOVAL 5 TUNER INSTALLATION 7 UPPER TRIM REMOVAL 9 AMPLIFIER INSTALLATION D PILLAR 11 HEADLINER REMOVAL 12 AMPLIFIER INSTALLATION HEADLINER 13 POWER, CONTROL & VIDEO CABLE INSTALLATION 17 CAR CONFIGURATION FILE (CCF) EDIT 18 REASSEMBLY 20 COMPLETED INSTALLATION 21 CONNECTOR LOCATIONS V0.1 DECEMBER 2017 RRSPORT.CO.UK

 - XYG500160 M6 Plastic Nut for Tuner Bracket (1 required) -")

 Land Rover Part XUI500010 Cabling List Antenna Cable Land")


 TE Connectivity 60700-2 o 0.")
2 Parts List 2RANGE ROVER SPORT Electrical Components & Hardware Hybrid TV Tuner Build Nr AH42-19C063-AC - Land Rover Part LR010997, superseded by LR024779, superseded by LR TV Tuner Bracket - LR M6 x 12mm Torx Bolts for Tuner Bracket (2 required) - XYG M6 Plastic Nut for Tuner Bracket (1 required) - KTQ M6 x 14mm Torx Bolts for Mounting Tuner to Bracket (4 required) Land Rover Part EHV Isolator Amplifier TV (3 required for 2010 RRS with DAB, otherwise 4 required) Land Rover Part XUC M6 x 16mm Torx Bolts for Amplifier (3 Required) Land Rover Part XUI Cabling List Antenna Cable Land Rover Discovery Part YMQ Antenna Cable Lard Rover Discovery Part YMQ M.O.S.T Fibre Optic Extension Cable Self Source TV Tuner Supply, Earth & Video Self Source / Assembly o TV Tuner Connector Housing Land Rover Part YPC or Molex o Connector Inserts for above (4 required) TE Connectivity o M6 Ring Connector (1 required) TE Connectivity o 0.5mm Cable in Blue, Black & White Self Source o Snap N Lock S-Video Connector (1 required - for vehicles with RSE) Kycon KMDLAX-4P
 VAG Part 00098652A Other Parts 4.")
3 3 RANGE ROVER SPORT Video Cable (1 required - for vehicles without existing RSE) Land Rover Discovery Part YMQ m FAKRA Video Cable to Touch Screen (1 required - only for vehicles without existing RSE) VAG Part A Other Parts 4.5mm Split Convoluted Conduit Sleeving 19mm Wiring Loom Tape

4 4 RANGE ROVER SPORT Trim Removal Remove Loadspace Rear Quarter Trim Panel See TOPIX Workshop Manual section (G421016) for full details. 1. If installed, remove the loadspace lamp unit. a. Carefully release the lamp. b. Disconnect the electrical connector. 2. Release the liftgate seal from edge of trim panel. 3. Remove retractable parcel shelf unit. 4. Fold the seat assembly forwards. 5. Release the door aperture weatherstrip from edge of trim panel. 6. Remove the Lower Trim Panel a. Release the 2 window clips using a firm grip on the vent grilles. b. Release the remaining 8 clips (3 on rear edge and 5 on edge within passenger area) using a suitable trim removal tool. 7. Put panel safely to one side to avoid damage.
 to vehicle body. a. Position lower fixing point over stub b. Secure top edge to pre drilled holes in body using the two self tapping M6 x 12mm Torx Bolts (XYG500160) c.")
5 Tuner Installation Install Tuner Bracket 5RANGE ROVER SPORT 1. Carefully pull plastic Loom clip retainer free from locating stub (stub location can be easily identified by offering up bracket). 2. Fit Bracket (LR029167) to vehicle body. a. Position lower fixing point over stub b. Secure top edge to pre drilled holes in body using the two self tapping M6 x 12mm Torx Bolts (XYG500160) c. Secure bottom edge to stub using the M6 Plastic Nut (KTQ100020) d. Reposition plastic loom retaining clip on new stub located on the bracket assembly.


6 6 RANGE ROVER SPORT Install Hybrid TV Tuner 1. Lower Tuner into the bracket assemble (with connectors located to the left and cooling fan inlet/outlet facing you) 2. Secure Tuner to bracket using the four self tapping M6 x 14mm Torx Bolts (EHV500010).
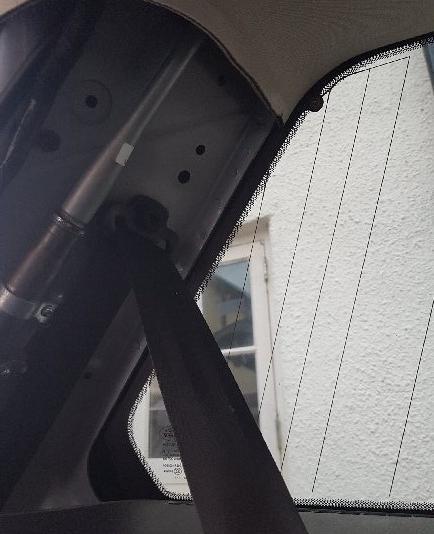
7 RANGE ROVER SPORT Upper Trim Removal Remove C-Pillar Upper Trim Panels See TOPIX Workshop Manual section (G421013) for full details. 1. Release the door aperture weatherstrip from edge of trim panel. 2. Release the front edge of the lower trim panel. 3. Release the upper trim access cover. 4. Remove the C-Pillar upper trim panel. a. Remove the Torx screw. b. Release the 2 clips using a suitable trim removal tool. 5. Put panel safely to one side to avoid damage. Note. For removal of the C-Pillar upper trim panel from the passenger side of the vehicle the corresponding rear quarter trim panel (as removed from the driver s side to install the Hybrid TV Tuner / Bracket) should be partially released follow steps 1-5 as described earlier, but only release the upper 2 window clips / clips along the edge of the C-Pillar Upper Trim Panel. Remove D-Pillar Trim Panels See TOPIX Workshop Manual section (G421015) for full details. 1. Release the liftgate seal from edge of trim panel. 2. Release the rear edge of the trim panel. 3. Remove the D-Pillar trim panel. a. Release the 4 clips using a suitable trim removal tool. 4. Lower trim panel and move safely to one side (note safety belt still attached so full removal not possible). Note. For removal of the D-Pillar trim panel from the passenger side of the vehicle the corresponding rear quarter trim panel (as removed from the driver s side to install the Hybrid TV Tuner / Bracket) should be partially released follow steps 1-5 as described earlier, but only release the upper 2 window clips / clips along the edge of the D-Pillar Trim Panel. 7

8 RANGE ROVER SPORT 8
 2.")
9 RANGE ROVER SPORT TV Amplifier Installation (D Pillar) Install TV Isolator Amplifiers D Pillars 1. Fit Isolator Amplifier TV (XUC000080) to vehicle body. a. Position unit so that holes align. b. Secure to body using a single self tapping M6 x 16mm Torx Bolt (XUI500010) 2. Press antennae connector onto adjacent stud on rear quarter window glass. 3. Repeat for other side. 9

10 10RANGE ROVER SPORT
11 Headliner Removal 11RANGE ROVER SPORT See TOPIX Workshop Manual section (G421017) for full details. 1. Ensure both C-pillar Upper trim panels and D-pillar trim panels remain removed as described earlier 2. Remove the 2 rear passenger assist handles. a. Release the 2 screw covers. b. Remove the 2 screws. c. Repeat the above for the other handle. 3. Remove the rear speaker grilles using a suitable trim removal tool. 4. Release the door aperture weatherstrip from the edge of the headliner. 5. Release the liftgate seal from the rear edge of the headliner. 6. Release the edges of the headliner. 7. Carefully lower headliner to allow access for cable installation (providing support to headliner as necessary to avoid damage).
12 TV Amplifier Installation (Headliner) 12RANGE ROVER SPORT Install remaining TV Isolator Amplifier(s) and Antenna Cables 1. Fit Isolator Amplifier TV (XUC000080) to vehicle body (Drivers side). a. Position unit in install location (void between headliner and vehicle body, to the front of the rear quarter window glass) so that holes align. b. Secure to body using a single self tapping M6 x 16mm Torx Bolt (XUI500010) 2. Press antennae connector onto adjacent stud on rear quarter window glass. 3. Connect antenna cable (with green TV tuner end connector) to corresponding isolator amplifiers. a. Connect antenna cable to isolator amplifier (XUC000080) located on the passenger s side D-pillar connector C1602. b. Connect antenna cable to spare outlet on existing FM antenna amplifier located in void between headliner and vehicle body, to the front of the passenger s side rear quarter window glass connector C1603. c. Route cable through headliner to driver s side (taking care to secure and ensure curtain airbags are not obstructed) and down C-pillar to TV Tuner. 4. Connect antenna cable (with brown TV tuner end connector) to corresponding isolator amplifiers. a. Connect antenna cable to isolator amplifier (XUC000080) located on the driver s side D-pillar connector C1601. b. Connect antenna cable to isolator amplifier (XUC000080) located in void between headliner and vehicle body, to the front of the driver s side rear quarter window glass connector C1600. c. Route cable through headliner (taking care to secure and ensure curtain airbags are not obstructed) and down drivers side D-pillar to TV Tuner.

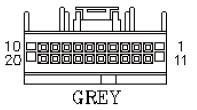
13 Power, Control and Video Cable Installation 13RANGE ROVER SPORT Install Power, Control (MOST) and Video Cables 1. M.O.S.T. Cable Installation a. Cut the 4.5mm split convoluted conduit sleeving to size and fit to MOST extension cable, securing with insulation tape. b. Disconnect existing MOST cable from RSE module connector C2109. c. Connect male connector C2109 to corresponding female socket on MOST extension cable. d. Connect the remaining two male extension cable connectors the RSE Module and Hybrid TV Tuner. Note. Ensure the extended MOST circuit follows the correct ring order (See TOPIX Workshop Manual section ) as ring order will vary based on your vehicles specification and option fitted; for the installation outlined the ring order is Audio head unit (1), Touch screen display (2), Portable audio interface module (3), Television receiver (4), Rear seat entertainment module (5), DAB tuner module (6), Telephone module (7), Power amplifier (8) & Audio head unit (1). 2. Power Cable Installation a. Makeup Power / Video Cable as per OEM Wiring diagram i. Cut Cable to length (Power - Blue 760mm, GND Black 1450mm, CVBS Out White 630mm & CVBS GND Black 630mm) ii. Strip wire ends and crimp connector inserts onto ends using suitable tool. iii. Insert connector inserts into corresponding location on MOLEX 20 way connector housing (Power 1, GND 2, CVBS Out 4 and CVBS GND 5) iv. Strip other ends of wire and crimp M6 ring connector to GND.


. e.")
14 14RANGE ROVER SPORT c. Isolate Supply source by removing fuse 68P located in passenger compartment fuse box. d. Route wires within existing loom assemble and make Power and GRD connections (Power to Solder Joint SJ530 located in drivers site rear passenger compartment, GND Connector C2646 to ground point by DVD Changer). e. Connect the MOLEX connector C2117 to the Hybrid TV Tuner.
15 15RANGE ROVER SPORT 3. Video Cable Installation a. Release the S-Video connector C2957 from the rear seat entertainment module RSE (this will require sliding back the forward lock housing assembly to release the connector). b. Remove the forward housing I by splitting (as will not pull off) new housing required for reassembly. c. Partially disassemble the connector by pulling backwards the rear housing C & B & the coil spring D. d. Remove the upper body F and pull the plastic guide G backwards. e. Release the crimp U section from lower body H and remove the pin block G. f. Feed the new wires (CVBS Out white & CVBS GND black) through assemblies B, C, D & E. g. Insert heat shrink sleeving over wires a solder new wires to solder caps i. CVBS Out (now TV Comp I/P on C2957) white to terminal 1. ii. CVBS GND (now TV GND on C2957) - black to terminal 2). iii. Insert the heat shrink sleeving over the terminal and apply heat to seal in place. h. Reassemble the connector i. Push Pin Block G forward into the lower body H until it locks into place; ensuring the 4 semi-circular notches line up with the metal tabs inside the lower body H. ii. Crimp U section of lower body onto existing and new cables. iii. Fit plastic Guide E into lower body H by placing plastic arm into the appropriate slot on the top of the metal body. iv. Attach upper body F onto lower body H aligning all tabs and slots. v. Push coil spring D onto the upper body F / lower body H. vi. Push strain relief B / rear housing C assembly onto the upper body F / lower body H assembly vii. Align the assembly with new forward housing I (From Kycon KMDLAX-4P connector), push assembly twisting rear housing C into forward housing I until it locks. i. Reconnect completed S-Video connector C2957 to rear seat


 to TSD Output 4. Tidy up wiring and secure to existing loom using loom tape / insulation tape. 5.")
16 entertainment module RSE (this will require sliding back the forward lock housing assembly). Note. Wiring Diagram shows the CVBS Out & CVBS GND from connector C2117 as also connecting to C2727 (within the centre console area) which in turn connects to the touch screen; these further connections are NOT required as the video source to the touch screen display is managed through the RSE module and existing output terminal 3 & 4 on the S- Video connector C RANGE ROVER SPORT 1 TV tuner composite input 2 TV tuner GND (ground) input 3 DVD / TV tuner composite output to TSD 4 DVD / TV tuner GND (ground) to TSD Output 4. Tidy up wiring and secure to existing loom using loom tape / insulation tape. 5. Replace fuse 68P located in passenger compartment fuse box.
. 2. Television Receiver Type Receiver variant 1 fitted. 3.")
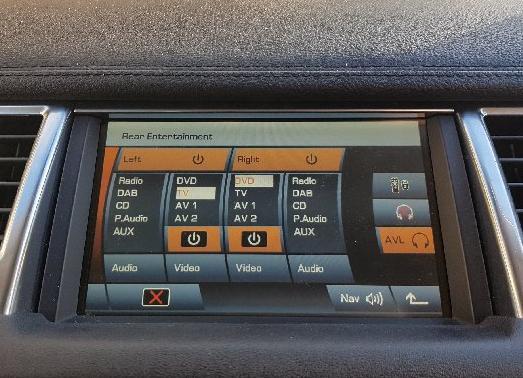
17 Car Configuration File Edit Recoding CCF (Car Configuration File): In order to activate the TV menu on the touch screen it is necessary to edit the cars CCF; The CCF settings changed within the infotainment section for this installation are shown in red. 17RANGE ROVER SPORT 1. TV Tuner TV tuner (hybrid DVB- T and analogue). 2. Television Receiver Type Receiver variant 1 fitted. 3. Television Type Analogue/Digital hybrid.
18 Reassembly 18RANGE ROVER SPORT 1. Refit Headliner - See TOPIX Workshop Manual section (G421017) for full details. a. Carefully move headliner into required position b. Realign the door aperture weatherstrip with the edge of the headliner. c. Install the 2 rear passenger assist handles. i. Install the screws ii. Install the screw covers. iii. Repeat the above for the other handle. d. Install the rear speaker grilles e. Realign the liftgate seal with the rear edge of the headliner. 2. Refit C-Pillar Upper Trim Panels - See TOPIX Workshop Manual section (G421013) for full details. a. Ensure clips are installed to the C-pillar upper trim panel. b. Install the C-pillar upper trim panel. c. Secure the clips. d. Tighten the Torx screw to 6 Nm (4 ib.ft). e. Install the upper trim access cover. f. Install the door aperture weatherstrip with edge of the trim panel. g. Repeat the above for the other C-pillar upper trim panel. 3. Refit D-Pillar Trim Panels - See TOPIX Workshop Manual section (G421015) for full details. a. Ensure clips are installed to the D-pillar trim panel. b. Install the D-pillar trim panel. c. Secure the clips. d. Install the liftgate seal with the edge of the trim panel. e. Repeat the above for the other D-pillar trim panel.
19 19RANGE ROVER SPORT 4. Refit Rear Quarter Trim Panels - See TOPIX Workshop Manual section (G421016) for full details. a. Ensure clips are installed to the rear quarter trim panel. b. Install the lower quarter trim panel i. Align to the position noted on removal. ii. Secure the clips c. Install the door aperture weatherstrip with the edge of the trim panel. d. Install the liftgate seal with the edge of the trim panel. e. If installed, install the loadspace lamp unit. i. Connect the electrical connector to the load space lamp unit. ii. Push the lamp unit into position f. Repeat the above for the other rear quarter trim panel. 5. Fold the seat assembly rearwards. 6. Refit retractable parcel shelf.


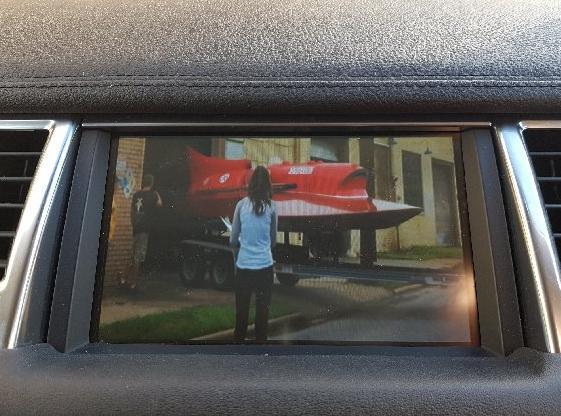
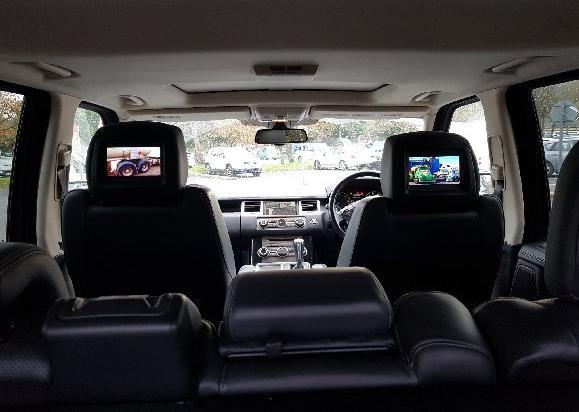
20 20RANGE ROVER SPORT Completed Installation


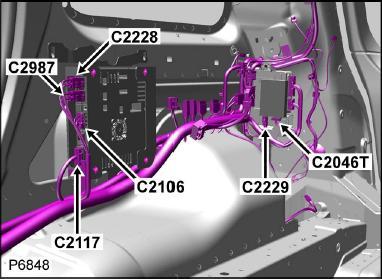
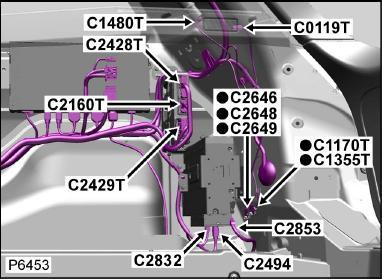
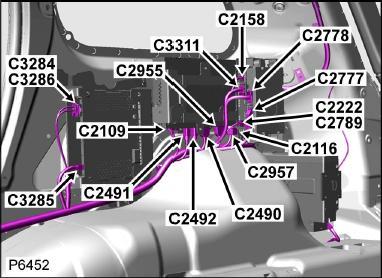
21 21RANGE ROVER SPORT Connector Locations
22 RANGE ROVER SPORT The information contained within this document should not be used for any purpose other than as a general guide. No assurance or warranty as to its correctness or accuracy is given or should be inferred. Anyone attempting any aspect of this installation does so at their own risk. RRSPORT.CO.UK USER: [jhoneywil] 22
DISCO3.CO.UK. A Guide to Retro-fitting the OEM Factory Supplied Rear Screen Entertainment System to a Discovery 3 HSE
 A Guide to Retro-fitting the OEM Factory Supplied Rear Screen Entertainment System to a Discovery 3 HSE Since 2008 model year Land Rover finally made the RSE system available to order for the Discovery
Installation instructions, accessories - Volvo Navigation System, widescreen
 S60 Section Group Weight(Kg/Pounds) Year Month 3 39 2001 04 S60 2001, S60 2002 Page 1 of 21 Page 2 of 21 Required tools A0000162 A0000161 A0801178 M8802509 M3903563 Page 3 of 21 M3903565 M8503983 Page
Installation instructions, accessories RTI S80
 Installation instructions, accessories Instruction No 8685714 Version 1.0 5 Part. No. RTI S80 Volvo Car Corporation RTI S80-8685714 - V1.0 Page 1 / 25 Equipment A0000161 A0000162 A0801178 D8802049 Page
TOYOTA LAND CRUISER 2003 DVD VES
 LEXUS LX470 Section I Installation Preparation Part Number: PT296 6002D 03/16 (LC) PT296 6002L 03/16 (LX) Section I Installation Preparation Kit Contents Item # Quantity Reqd. Description 1 1 FPD Assembly
PROCEDURE STEPS: WARNING:
 WI-FI ROUTER 1 DODGE NITRO, JEEP LIBERTY PROCEDURE STEPS: WARNING: Disable the airbag system before attempting any steering wheel, steering column, or instrument panel component diagnosis or service. Disconnect
Installation manual: CK3100 range C3 PICASSO
 Installation manual: Parrot C3 PICASSO MKi + Parrot CK3100 range C3 PICASSO This The brand sheet name is designed CITROËN to help C3 PICASSO you with and the the installation CITROËN logo of a are Parrot
Please read thoroughly before starting installation and check that kit contents are complete.
 Rear Vision System Mirror Display 2013-Current Ram (Kit part number 1009-9518) Please read thoroughly before starting installation and check that kit contents are complete. Items Included in the Kit: Rear
Date: Order No.: Supersedes: Group:
 Install Date: January 2004 Order No.: Supersedes: Group: 82 P-I-82.70/286 5 SUBJECT: MODEL 220.170/174/175/176/183/184 MODEL YEAR 2004 VOICE ACTIVATED CELLULAR TELEPHONE INSTALLATION We are interested
INSTALLATION INSTRUCTIONS
 OEM Recessed Lip Camera with Harness and Slimline Mirror (Kit part number 9002-8724) Please read thoroughly before starting installation and check that kit contents are complete. Items Included in the
 Page 1 of 33 SPECIFICATIONS 2013 Ford Edge 3.5L Eng Limited Print Date: TORQUE SPECIFICATIONS Description Nm lb-ft lb-in Assist handle bolts 9-80 B-pillar upper trim panel screw 9-80 C-pillar trim panel
BEN-HUR Bentley head unit replacement kit (INSTALLATION MANUAL)
") JH (rev 1.4) 31-03-17 BEN-HUR Bentley head unit replacement kit (INSTALLATION MANUAL) DO NOT ATTEMPT TO FIT THE BEN-HUR UNTIL YOU HAVE READ THE INSTALL MANUAL Overview The BEN-HUR allows you to install
JH (rev 1.4) 31-03-17 BEN-HUR Bentley head unit replacement kit (INSTALLATION MANUAL) DO NOT ATTEMPT TO FIT THE BEN-HUR UNTIL YOU HAVE READ THE INSTALL MANUAL Overview The BEN-HUR allows you to install
DVD REAR SEAT VIDEO SYSTEM
 Read entire instructions thoroughly before starting. TOOLS REQUIRED: DVD REAR SEAT VIDEO SYSTEM MINIVANS WITH ROOF RAILS INSTALLATION INSTRUCTIONS Non-metal trim stick Phillips screwdriver T15, T20, T25
Conflicts: Vehicles without a sunroof Vehicles with a single sunroof
 Toyota Sienna (Dual Sunroof) 2011-10.2 Overhead Video Part Number: 00016-00110 00016-00110-17 Fit Kit 00016-00120 00016-00120-17 Fit Kit Accessory Code: ED5 Conflicts: Vehicles without a sunroof Vehicles
ETA. Corolla Verso RHD ELECTRONIC TRAFFIC AVOIDANCE. INSTALLATION INSTRUCTIONS for ETA ANTENNA (*) MAIN KIT ETA PZ445-T ANTENNA KIT
 MAIN KIT ETA PZ445-T ANTENNA KIT") ETA ELECTRONIC TRAFFIC AVOIANCE INSTALLATION INSTRUCTIONS for Corolla Verso REQUIRE PARTS ALREAY PREWIRE ETA ANTENNA (*) NOT PREWIRE MAIN KIT ETA PZ445-T933-00 ANTENNA KIT - PZ445-T928-00 ETA BRACKET -
ETA ELECTRONIC TRAFFIC AVOIANCE INSTALLATION INSTRUCTIONS for Corolla Verso REQUIRE PARTS ALREAY PREWIRE ETA ANTENNA (*) NOT PREWIRE MAIN KIT ETA PZ445-T933-00 ANTENNA KIT - PZ445-T928-00 ETA BRACKET -
INSTALLATION INSTRUCTIONS
 INSTALLATION INSTRUCTIONS Accessory Application Publications No. in- ENTERTAINMENT SYSTEM 2004 TSX BII 24811 Issue Date APRIL 2003 PARTS LIST Attachment Kit P/N 08B23-SDA-101A Monitor bracket harness FM
Conflicts: Vehicles with no sunroof or dual sunroof
 Toyota Sienna (Single Sunroof) 2012-8.5 Overhead Video Part Number: 00016-00125 -11 Accessory Code: ED9 Conflicts: Vehicles with no sunroof or dual sunroof General Applicability: 2011 Sienna SMR Kit Contents:
RAV4 TNS310 (Traffic) Plus
 Plus") TNS310 (Traffic) Plus RHD installation instructions Model year: 005 Vehicle code: **A3***-*****W Part number TNS310 Plus: Sub wire harness No 1: 08673-64801 Sub wire harness No : 08673-64800 Part number
TNS310 (Traffic) Plus RHD installation instructions Model year: 005 Vehicle code: **A3***-*****W Part number TNS310 Plus: Sub wire harness No 1: 08673-64801 Sub wire harness No : 08673-64800 Part number
KJ JEEP COMBINATION BULL BAR WARNING
 KJ JEEP COMBINATION BULL BAR PRODUCT NUMBER FITTING KIT NUMBER 3450120 6171962 WARNING FOR VEHICLES EQUIPPED WITH SRS AIRBAG WHEN INSTALLED IN ACCORDANCE WITH THESE INSTRUCTIONS, THE FRONT PROTECTION BAR
Installation instructions, accessories TV NTSC/PAL
 Instruction No Version Part. No. 8637033 1.0 5 TV NTSC/PAL Page 1 / 17 Page 2 / 17 INTRODUCTION Read through all of the instructions before starting installation. Notifications and warning texts are for
BMW Parts and Accessories Installation Instructions
 1 4 BMW Parts and Accessories Installation Instructions INFO 2 5 3 6 TONE SELET FM AM MODE MENU F 38 0393 B Retrofit Kit Onboard Monitor and Navigation System BMW 7 Series (E38) The installation instructions
INSTALLATION INSTRUCTIONS
 INSTALLATION INSTRUCTIONS Accessory Application Publications No. XM SATELLITE RADIO SYSTEM (EX) 2008 PILOT All 37110 Issue Date JUN 2007 PARTS LIST XM Radio Attachment (sold separately) P/N 08B15-S9V-100A
* * Inside Toyota Avalon. Tools Required IMPORTANT
 Revision 08/02/16 2013- Toyota Avalon IMPORTANT Before starting, compare items on your invoice with items received. Carefully check through packaging material. If any item is missing, please call Crutchfield
VRX938R 1. BEFORE STARTING 2. PACKAGE CONTENTS. English. Contents
 VRX938R Installation and Wire Contents 1. BEFORE STARTING... 57 2. PACKAGE CONTENTS... 57 3. GENERAL CAUTIONS... 58 4. CAUTIONS ON INSTALLATION... 58 5. INSTALLING THE MAIN UNIT... 59 6. REMOVING THE MAIN
Previa (RHD) - MMC PZ425-R PART NUMBER INSTALLATION INSTRUCTIONS TOYOTA NAVIGATION SYSTEM. (Production date 05/03)
 - MMC PZ425-R PART NUMBER INSTALLATION INSTRUCTIONS TOYOTA NAVIGATION SYSTEM. (Production date 05/03)") TOYOTA NAVIGATION SYSTEM Previa (RHD) - MMC INSTALLATION INSTRUCTIONS PART NUMBER NAVIGATION KIT 08545-52800 MOUNTING BRACKET FOR **R*R (Production date 05/0) PZ425-R0261-60 Manual ref. n NRR/W-0-0 TOYOTA
TOYOTA NAVIGATION SYSTEM Previa (RHD) - MMC INSTALLATION INSTRUCTIONS PART NUMBER NAVIGATION KIT 08545-52800 MOUNTING BRACKET FOR **R*R (Production date 05/0) PZ425-R0261-60 Manual ref. n NRR/W-0-0 TOYOTA
INSTALLATION GUIDE. AV8900H Dual Multimedia Headrest Replacement System
 INSTALLATION GUIDE AV8900H Dual Multimedia Headrest Replacement System NOTICE OF INTENDED INSTALLATION AND USE AV8900H VIDEO PRODUCTS ARE NOT INTENDED FOR VIEWING BY THE DRIVER, AND ARE TO BE INSTALLED
SCION xb HEADREST DVD RSE Section I Installation Preparation. Part Number: PT
 Section I Installation Preparation Part Number: PT900-52080 Kit Contents Item # Quantity Reqd. Description 1 2 DVD Headrest Unit 2 2 Headrest Extension Cables 3 1 Audio Interface Module 4 1 Audio Interface
Hiace TNS600. LHD installation instructions. Model year: 2006 Vehicle code: KLH**L-**M**W
 Hiace TNS600 LHD installation instructions Model year: 2006 Vehicle code: KLH**L-**M**W Part number: Navigationssystem PZ 445-00331-00 W2DIN Conversion Kit PZ 425-H0211-60 Manual ref. no: AIM 000 759-0
PRELIMINARY INSTALLATION INSTRUCTIONS. PARTS LIST Attachment Kit(sold separately): P/N 08B23-S9V-100B. Display bracket.
: P/N 08B23-S9V-100B. Display bracket.") INSTALLATION INSTRUCTIONS Accessory Application Publications No. in- ENTERTAINMENT SYSTEM 2006 PILOT All 30502 Issue Date SEP 2005 PARTS LIST Attachment Kit(sold separately): P/N 08B23-S9V-100B Display
INSTALLATION INSTRUCTIONS Accessory Application Publications No. in- ENTERTAINMENT SYSTEM 2006 PILOT All 30502 Issue Date SEP 2005 PARTS LIST Attachment Kit(sold separately): P/N 08B23-S9V-100B Display
Conflicts: Vehicles with a sunroof
 Toyota 4Runner Non/MR 2010-10.2 Overhead Video Part Number: 00016-00110; Fit Kit -00110-15, Beige 00016-00120; Fit Kit -00120-15, Gray Accessory Code: ED6 Conflicts: Vehicles with a sunroof Kit Contents:
900 Installation instructions. SCdefault
 SCdefault 900 Installation instructions SITdefault Parking assistance (SPA) MONTERINGSANVISNING INSTALLATION INSTRUCTIONS MONTAGEANLEITUNG INSTRUCTIONS DE MONTAGE Accessories Part No. Group Date Instruction
VRX925VD 1. BEFORE STARTING 2. PACKAGE CONTENTS. English. Contents
 VRX925VD Installation and Wire Contents 1. BEFORE STARTING... 65 2. PACKAGE CONTENTS... 65 3. GENERAL CAUTIONS... 66 4. CAUTIONS ON INSTALLATION... 66 5. INSTALLING THE MAIN UNIT... 67 6. REMOVING THE
 INSTALLATION INSTRUCTIONS Accessory Application Publications No. XM RADIO SYSTEM 2006-2008 CIVIC 2- AND 4-DOOR (Si) AII 37662 Issue Date AUG 2007 PARTS LIST XM Radio Attachment (sold separately): P/N 08B15-SNA-100B
(1) Remote Control with (2) AAA Batteries
 Remote Control with (2) AAA Batteries") TOOLS REQUIRED: KIT CONTENTS: E14 Torx (1) Remote Control with (2) AAA Batteries (2) Wireless Headphones with (4) AAA Batteries (2) DVD Headrest Units Owner s Manual (1) Owner s Manual (1) Power / Audio
TOOLS REQUIRED: KIT CONTENTS: E14 Torx (1) Remote Control with (2) AAA Batteries (2) Wireless Headphones with (4) AAA Batteries (2) DVD Headrest Units Owner s Manual (1) Owner s Manual (1) Power / Audio
INSTALLATION GUIDE AV7900 Dual Multimedia Headrest Replacement System
 INSTALLATION GUIDE AV7900 Dual Multimedia Headrest Replacement System NOTICE OF INTENDED INSTALLATION AND USE AV7900 VIDEO PRODUCTS ARE NOT INTENDED FOR VIEWING BY THE DRIVER, AND ARE TO BE INSTALLED ONLY
INSTALLATION INSTRUCTIONS
 Rear Vision System Mirror Display Dodge Ram Kit Contents: Instruction Sheets Template Chassis Harness Endgate Handle with Camera Wire Ties (Qty: 17) Bottle of ZTech Plug for Non-Locking Endgates (Optional)
Toyota Prius Dual Player Headrest Video ATTENTION: SECURITY COVERS ARE NO LONGER INCLUDED IN THE HEADREST KITS AS OF 01/17/2011
 Toyota Prius 2011 - Dual Player Headrest Video Part Number: 00016-47210-01; 04; 11 Code : EH5 ATTENTION: SECURITY COVERS ARE NO LONGER INCLUDED IN THE HEADREST KITS AS OF 01/17/2011 Conflicts Kit Contents
INSTALLATION GUIDE Car Show Dual DVD Headrest Replacement System
 INSTALLATION GUIDE Car Show Dual DVD Headrest Replacement System NOTICE OF INTENDED INSTALLATION AND USE CAR SHOW VIDEO PRODUCTS ARE NOT INTENDED FOR VIEWING BY THE DRIVER, AND ARE TO BE INSTALLED ONLY
TOYOTA SOLARA EC REARVIEW MIRROR Section I - Installation Preparation
 Section I - Installation Preparation Part Number: PT374-33020 Section I - Installation Preparation Kit Contents Item # Quantity Reqd. Description 1 1 AD Mirror Assembly w/compass 2 1 Hardware Bag 3 1 Installation
FULL SIZE RANGE ROVER REMOTE STARTER INSTALLATION INSTRUCTIONS
 2010-2012 FULL SIZE RANGE ROVER REMOTE STARTER INSTALLATION INSTRUCTIONS During your first installation of this product, you will benefit from these complete instructions. After performing two or three,
INSTALLATION INSTRUCTIONS
 INSTALLATION INSTRUCTIONS Accessory Application Publications No. XM RADIO SYSTEM 2006 CIVIC 4 DOOR (EX) AII 30852 Issue Date JAN 2006 PARTS LIST XM Radio Attachment (sold separately): P/N 08B15-SNA-100A
Conflicts: Toyota Tundra CrewMax w/non Sunroof Overhead Video. Part Number: Accessory Code: ED80.
 Toyota Tundra CrewMax w/non Sunroof 2011-8.5 Overhead Video Part Number: 00016-00125-07 Accessory Code: ED80 Conflicts: 1.) Third Passenger Front Seating 2.) Sunroof General Applicability: Non Sunroof
Conflicts: Highlander without sunroof
 Toyota Highlander (Sunroof) 2011-8.5 Overhead Video Part Number: 00016-00125; Fit Kit-00016-00125-02 Accessory Code: ED9 Conflicts: Highlander without sunroof Kit Contents: Item # Qty. Component Description
If technical support is required, please contact Advent Technical Support at
 Document 128-9015A Created 12/12/11 Kit Contents: Item # Qty. Component Description 1 2 Headrest Assembly 2 2 Cables # 3 3 1 Power Cord # 9 4 1 FM Antenna 5 1 Control Box 6 2 IR Headphones 7 2 Remote Control
2006 MINI Cooper ACCESSORIES & EQUIPMENT Audio, Navigation & Anti-Theft Systems - Repair Instructions - Cooper (1.6L) R50/W10 & Cooper S
 R50/W10 & Cooper S") Fig. 1: Locating Radio Receiver Retaining Screws 2006 MINI Cooper 2002-05 ACCESSORIES & EQUIPMENT Audio, Navigation & Anti-Theft Systems - Repair Instructions - Cooper (1.6L) R50/W10 & Cooper S MONO RADIO
Fig. 1: Locating Radio Receiver Retaining Screws 2006 MINI Cooper 2002-05 ACCESSORIES & EQUIPMENT Audio, Navigation & Anti-Theft Systems - Repair Instructions - Cooper (1.6L) R50/W10 & Cooper S MONO RADIO
A7 DVD Entertainment System Installation Guide
 A7 DVD Entertainment System Installation Guide BEFORE YOU START THE INSTALLATION, READ THIS GUIDE! The Rosen A7 is the easiest-to-install DVD entertainment system available today. Even though it is very
INSTALLATION INSTRUCTIONS
 INSTALLATION INSTRUCTIONS Accessory Application Publications No. (Trunk Mount) 2009 CIVIC 4-DOOR AII 40184 Issue Date AUG 2008 PARTS LIST 8 Cushion tapes Changer Attachment (Sold Separately) P/N 08B26-SNA-101
INSTALLATION INSTRUCTIONS
 OEM Recessed Lip Camera with Harness and OnStar Mirror for GM Vehicles with 10-pin Mirror Connector (Kit part number 9002-8722) Please read thoroughly before starting installation and check that kit contents
Corolla TNS600. RHD installation instructions. Model year: 2004 Vehicle code: **E12*R-****W
 Corolla RHD installation instructions Model year: 2004 Vehicle code: **E12*R-****W Part number: Navigation System PZ 445-00331-00 Clusterpanel 55406-02070-B0 Manual ref. no: AIM 000 767-0 PRECAUTIONS PLEASE
Rear Vision System Liftgate Emblem Camera for Aftermarket Display Ford Flex (Kit part number )
") Rear Vision System Liftgate Emblem Camera for Aftermarket Display 2009-2012 Ford Flex (Kit part number 1008-6509) Kit Contents: Liftgate Emblem Mount with Camera Chassis Harness with RCA (Note: In some
Rear Vision System Liftgate Emblem Camera for Aftermarket Display 2009-2012 Ford Flex (Kit part number 1008-6509) Kit Contents: Liftgate Emblem Mount with Camera Chassis Harness with RCA (Note: In some
INSTALLATION GUIDE PHANTOM TM SUBWOOFER SYSTEM. FOR BMW 3-SERIES SEDAN (F30) ver. 10/2016 DO-IT-YOURSELF 2 OUT OF HOURS F30 SEDAN
 ver. 10/2016 DO-IT-YOURSELF 2 OUT OF HOURS F30 SEDAN") INSTALLATION GUIDE PHANTOM TM SUBWOOFER SYSTEM FOR 2012+ BMW 3-SERIES SEDAN (F30) ver. 10/2016 SKILL LEVEL REQUIRED DO-IT-YOURSELF INSTALLATION DIFFICULTY 2 OUT OF 5 INSTALLATION TIME 1.5 HOURS APPLIES
INSTALLATION GUIDE PHANTOM TM SUBWOOFER SYSTEM FOR 2012+ BMW 3-SERIES SEDAN (F30) ver. 10/2016 SKILL LEVEL REQUIRED DO-IT-YOURSELF INSTALLATION DIFFICULTY 2 OUT OF 5 INSTALLATION TIME 1.5 HOURS APPLIES
INSTALLATION INSTRUCTIONS
 INSTALLATION INSTRUCTIONS Accessory XM RADIO SYSTEM Application 2009 CIVIC 2-AND 4-DOOR (Si) Publications No. AII 40186 Issue Date AUG 2008 PARTS LIST XM Radio Attachment (sold separately): P/N 08B15-SNA-100B
2005+ Mustang Trunk Lid Release and Trunk Lights Installation
 There is no warranty expressed or implied by this document, you follow these instructions at your own risk. These instructions worked for me, but your experience may vary. The final product of these instructions
Installation instructions, accessories
 Volvo Car Corporation Göteborg, Sweden Installation instructions, accessories S60/V70 (00-)/V70XC (01-)/S80/XC90 Section Group Weight (Kg/Pounds) Year Month 8 89 2002 06 Tow bar wiring, 13-pin M3702161
ROOF HEADLINING ASSY EXTERIOR/INTERIOR TRIM 760VC 02 REPLACEMENT
 REPLACEMENT 7627 The installation is in the reverse order of the removal. However, when there is a special point concerning the installation, it is indicated. On the LH side, use the same procedures as
Accessory Kit Estimated Fitting Time: 120 Minutes (Prado) Estimated Fitting Time: 140 Minutes (Kluger)
 Estimated Fitting Time: 140 Minutes (Kluger)") Tow-Pro Wiring Kit - Toyota Kluger / Prado Accessory Kit Estimated Fitting Time: 0 Minutes (Prado) Estimated Fitting Time: 0 Minutes (Kluger) FI99 Page 0 of Issue: Date: 0/0/0 0 General Notes Read through
Tow-Pro Wiring Kit - Toyota Kluger / Prado Accessory Kit Estimated Fitting Time: 0 Minutes (Prado) Estimated Fitting Time: 0 Minutes (Kluger) FI99 Page 0 of Issue: Date: 0/0/0 0 General Notes Read through
Tri-Spark Ignition System Installation Triple Cylinder TRI-0001
 Tri-Spark Ignition System Installation Triple Cylinder TRI-0001 There are potentially lethal high voltages produced at the ignition coils and spark plugs, therefore every precaution must be taken to prevent
INSTALLATION INSTRUCTIONS
 OEM Recessed Lip Camera with Harness and Auto Dimming Mirror (Kit part number 9002-8721) Please read thoroughly before starting installation and check that kit contents are complete. Items Included in
INSTALLATION INSTRUCTIONS
 INSTALLATION INSTRUCTIONS Accessory Accessory Hands Free Link Application 2008 ACCORD 2 AND 4-DOOR Publications No. AII 38281 Issue Date NOV 2007 PARTS LIST Attachment Kit P/N 08E02-TA0-100 trim retainer
Wiper motor bolt and spacer. 3. Place relays as shown in picture so you can route the wires.
 TSB Fan Relay Kit Please refer to a factory repair manual when working on your car. 1. Disconnect battery cables from the battery. 2. Remove bolt and spacer from wiper motor as shown in the picture. Wiper
5 Mechanisms and accessories
 5 Mechanisms and accessories 51A SIDE OPENING ELEMENT MECHANISMS 52A NON-SIDE OPENING ELEMENT MECHANISMS 54A WINDOWS 55A EXTERIOR PROTECTION 56A EXTERIOR EQUIPMENT 57A INTERIOR EQUIPMENT 59A SAFETY ACCESSORIES
GENUINE PARTS INSTALLATION INSTRUCTIONS
 GENUINE PARTS INSTALLATION INSTRUCTIONS 1. 2. 3. 4. DESCRIPTION: Illuminated Kick Plate Kit APPLICATION: Murano PART NUMBER: 999G6 C2000, 999G6 C2100, 999G6 C2200 999Q9 AY001 - Accessory Service Connector
PART NUMBER: H630SXC001. Kit Contents: A. Amplifier with Bracket (1) D. Badge (2) with push nuts (4)
 D. Badge (2) with push nuts (4)") Kit Contents: A. Amplifier with Bracket (1) D. Badge (2) with push nuts (4) E. Clip B. Interface / Power Harness (1) C. Cable tie (8) F. Mounting Nuts (2) G. Replacement Front Speaker (2) H. Badge mounting
Kit Contents: A. Amplifier with Bracket (1) D. Badge (2) with push nuts (4) E. Clip B. Interface / Power Harness (1) C. Cable tie (8) F. Mounting Nuts (2) G. Replacement Front Speaker (2) H. Badge mounting
Installation instructions, accessories. Subwoofer
 Installation instructions, accessories Instruction No 9162298 Version 1.0 5 Part. No. Subwoofer Volvo Car Corporation Subwoofer - 9162298 - V1.0 Page 1 / 24 Equipment A0000162 A0801178 A0000161 R8802817
INSTALLATION INSTRUCTIONS
 INSTALLATION INSTRUCTIONS Accessory Application Publications No. CHANGER ATTACHMENT (TRUNK MOUNT) 2005 CIVIC 4-DOOR AII 27890 Issue Date AUG 2004 PARTS LIST Changer Attachment (sold separately) P/N 08B26-S5D-100
Parts and Accessories Installation Instructions
 Parts and Accessories Installation Instructions R 1 3 5 2 4 F 38 0213 B Basic retrofit kit for hands-free facility for upgrading various mobile phones BMW 7 Series (E38) LHD without telephone preparation
Fuses FUSE BOX LOCATIONS. Engine compartment fuse box
 Fuses FUSE BOX LOCATIONS Engine compartment fuse box 1 2 E90971 Remove the plastic cover by pressing the tabs. The fuse values and locations and the circuits protected are shown on the plastic cover. 3
General Applicability Note: Recommended Tools. Personal & Vehicle Protection Safety Goggles Seat Covers Floor Covers Special Tools. Installation Tools
 TOYOTA HIGHLANDER/HIGHLANDER HV 2008- Preparation Part #: PT923-00111 Conflicts: JBL Audio, Factory Navigation NOTE: Part number of this accessory may not be the same as the part number shown. Kit Contents:
2013 Road King CVO FLHRSE5 Detachable Fairing w/ Garmin Zumo 665 Installation Instructions
 2013 Road King CVO FLHRSE5 Detachable Fairing w/ Garmin Zumo 665 Installation Instructions 1 1. Turn ignition switch to on position and leave there. This will prevent alarm from going off when you disconnect
For additional technical tips, please visit
 NOTICE OF INTENDED INSTALLATION AND USE THE ROSEN MULTI-MEDIA NAVIGATION SYSTEMS CONTAIN AN INTERNAL VIDEO PLAYER, WHICH IS NOT INTENDED FOR VIEWING BY THE DRIVER. THE VIDEO PLAYER IS DISABLED WHEN THE
Toyota 4RUNNER With/MR Overhead Video
 Toyota 4RUNNER With/MR 2010-10.2 Overhead Video Part Number: 00016-00110; Fit Kit-00110-14, Beige 00016-00120; Fit Kit-00120-14, Gray Accessory Code: ED7 Conflicts: Vehicles without a sunroof Kit Contents:
INSTALLATION INSTRUCTIONS
 INSTALLATION INSTRUCTIONS Accessory NIGHT Application 2007 CR-V Publications No. Issue Date SEP. 2006 PARTS LIST Automatic Day/Night Mirror Attachment Kit P/N 08V03-SWA-300 Harness cover set Automatic
INSTALLATION INSTRUCTIONS
 INSTALLATION INSTRUCTIONS FUEL SURGE TANK INSTALL KIT Honda S2000 Document# 19-0063 Support: info@radiumauto.com WARNING: DO NOT SMOKE WHILE WORKING ON FUEL SYSTEMS. KEEP SPARKS AND OPEN FLAMES AWAY FROM
Installation manual: Parrot MKi + Parrot CK3100 range C4 PICASSO C4 PICASSO
 Installation manual: Parrot MKi + Parrot CK3100 range C4 PICASSO C4 PICASSO This The brand sheet name is designed CITROËN to help C4 PICASSO you with and the the installation CITROËN logo of a are Parrot
BMW Parts and Accessories Installation Instructions
 BMW Parts and Accessories Installation Instructions 46 77 B BMW subwoofer module retrofit kit BMW 3 Series compact (E 46/5) LHD Technical and electrical knowledge required Installation time approx. 1.5-2.5
Parts and Accessories. Installation Instructions.
 Parts and Accessories. Installation Instructions. Universal charger/hands-free kit retrofit BMW 3 Series Saloon (E 90) These installation instructions are only valid for cars with SA 606 (Business navigation
FITTING OF (WESTFALIA) REMOVABLE TOWBAR ON SKODA OCTAVIA WITHOUT TOWBAR PREPARATION (04/11/16 CJ v1.0)
 REMOVABLE TOWBAR ON SKODA OCTAVIA WITHOUT TOWBAR PREPARATION (04/11/16 CJ v1.0)") FITTING OF (WESTFALIA) REMOVABLE TOWBAR ON SKODA OCTAVIA 2013+ WITHOUT TOWBAR PREPARATION (04/11/16 CJ v1.0) A. INTRO ALL STEPS COMPLETED AT YOUR OWN RISK! I AM NOT LIABLE FOR ANY LOSS OR DAMAGE! These
FITTING OF (WESTFALIA) REMOVABLE TOWBAR ON SKODA OCTAVIA 2013+ WITHOUT TOWBAR PREPARATION (04/11/16 CJ v1.0) A. INTRO ALL STEPS COMPLETED AT YOUR OWN RISK! I AM NOT LIABLE FOR ANY LOSS OR DAMAGE! These
5 Mechanisms and accessories
 5 Mechanisms and accessories 51A SIDE OPENING ELEMENT MECHANISMS 52A NON-SIDE OPENING ELEMENT MECHANISMS 54A WINDOWS 55A EXTERIOR PROTECTION 56A EXTERIOR ACCESSORIES 57A INTERIOR ACCESSORIES 59A SAFETY
 Page 1 of 12 BATTERY CHARGE WARNING LAMP ON WITH DTC B11DB-87 STORED TECHNICAL SERVICE BULLETIN Reference Number(s): LTB00643NAS1, Date of Issue: February 25, 2014 2010 Onwards LR4 (LA); 2010-2012 Range
INSTALLATION GUIDE AV7000 Dual DVD Headrest Replacement System
 INSTALLATION GUIDE AV7000 Dual DVD Headrest Replacement System NOTICE OF INTENDED INSTALLATION AND USE ROSEN ENTERTAINMENT SYSTEMS VIDEO PRODUCTS ARE NOT INTENDED FOR VIEWING BY THE DRIVER, AND ARE TO
APVLR11. Rear View Camera Input and Video In Motion.
 APVLR11 Rear View Camera Input and Video In Motion ABOUT THIS PRODUCT... APVLR11 Reverse Camera Add On Interface with Video In Motion. For Land Rover 2010-2011 vehicles with touch screen navigation systems.
Installation Instructions LamboStyleDoors (The instruction are to be used as a reference. Please repeat for both doors)
") Installation Instructions LamboStyleDoors (The instruction are to be used as a reference. Please repeat for both doors) Pre installation check list: - Double check vehicles data with TUV certificate -
Installation Instructions LamboStyleDoors (The instruction are to be used as a reference. Please repeat for both doors) Pre installation check list: - Double check vehicles data with TUV certificate -
Scion xa SATELLITE RADIO TUNER Preparation
 Preparation Part Number: PTS31-00051 Kit Contents Item # Quantity Reqd. Description 1 1 Antenna, Interior 2 1 Antenna Tape Pad 3 1 Wire Harness 4 1 Bracket, Floor 5 3 Hardware Bags 6 3 Templates 7 1 SIRIUS
INSTALLATION INSTRUCTIONS FRONT PARTITION W/FILLER PANEL MOUNTING KIT
 INSTALLATION INSTRUCTIONS FRONT PARTITION W/FILLER PANEL MOUNTING KIT P FRONT 1 with MFK 4 for 2008 2019 CHEVROLET PASSENGER VANS W/DUAL SIDE SWING OUT DOORS P FRONT 2 with MFK 8 for 2008 2019 CHEVROLET
7 Trim and upholstery
 7 Trim and upholstery 71A BODY INTERNAL TRIM 72A SIDE OPENING ELEMENT TRIM 73A NON-SIDE OPENING ELEMENTS TRIM 75A FRONT SEAT FRAMES AND MECHANISMS X79 NOVEMBER 2009 EDITION ANGLAISE "The repair procedures
Trim and Hardware (TRM01)
") Module 1 Hardware Trim and Hardware (TRM01) A. Bolts, Screws, And Nuts 2. Fastener (Screw And Bolt) Head Types 3. Sheet Metal Screws 4. Machine Screws 5. Cap Screws And Bolts 6. Bolt Grade And Class Identification
Module 1 Hardware Trim and Hardware (TRM01) A. Bolts, Screws, And Nuts 2. Fastener (Screw And Bolt) Head Types 3. Sheet Metal Screws 4. Machine Screws 5. Cap Screws And Bolts 6. Bolt Grade And Class Identification
2015 Mustang Lightbar (All Models) CDC#
 CDC#") 2015 Mustang Lightbar (All Models) CDC# 1511-7000-01 Components: 1 CDC Lightbar Note: READ instructions before starting installation!!! CDC Part# Driver side bracket 0511-6001-05 Passenger side bracket
2015 Mustang Lightbar (All Models) CDC# 1511-7000-01 Components: 1 CDC Lightbar Note: READ instructions before starting installation!!! CDC Part# Driver side bracket 0511-6001-05 Passenger side bracket
Hyundai EXCEL Remote Immobiliser System Installation Manual Revision 1 10/12/99 Part No
 Hyundai EXCEL Remote Immobiliser System Installation Manual Part No. 00243-22500 The Excel remote immobiliser system is central locking compatible. For vehicle's already fitted with Factory central locking,
XM Adapter Cable (P/N: ) MUST be used for this vehicle.
 MUST be used for this vehicle.") TOYOTA 2013 - Part Number:00016-00076 Code: RX30 XM Adapter Cable (P/N: 00016-00076-10) MUST be used for this vehicle. Conflicts 1. Entune 2. Vehicle s with factory XM radio Kit Contents Item # Qty Description
TOYOTA 2013 - Part Number:00016-00076 Code: RX30 XM Adapter Cable (P/N: 00016-00076-10) MUST be used for this vehicle. Conflicts 1. Entune 2. Vehicle s with factory XM radio Kit Contents Item # Qty Description
 INSTALLATION INSTRUCTIONS Accessory Application Publications No. AII 38143-40201 S 2008 ODYSSEY Issue Date AUG 2008 PARTS LIST Backup Sensor Attachment Kit P/N 08V67-SHJ-100B Backup sensor control unit
CONTENTS: TOOLS REQUIRED:
 CONTENTS: 1EA. FIVE CHANNEL AMPLIFIER/BRACKET ASSEMBLY P/N RBI77KICK37 1EA. POWER HARNESS P/N RH41PMP 1EA. OVERLAY HARNESS P/N RH41PM 3EA. NUT P/N RFM6NUT 6EA. WIRE TIE P/N RFZIP6 1EA. FUSE 30 AMP P/N
HOW TO FIT A KEYLESS ENTRY SYSTEM
 HOW TO FIT A KEYLESS ENTRY SYSTEM THE KITS ARE WIDELY AVAILABLE TO BUY FROM THE INTERNET AND OTHER GOOD STOCKISTS HERE IS AN IDEA OF WHAT YOU SHOULD RECIEVE IN YOUR KIT. PLUS WIRING DIAGRAM PLUS WIRING
Installation manual: CK3100 range TRANSPORTER T5
 Installation manual: TRANSPORTER Parrot MKi + T5 Parrot CK3100 range TRANSPORTER T5 This The VOLKSWAGEN sheet is designed TRANSPORTER to help you T5 with marque the and installation VOLKSWAGEN of a Parrot
INSTALLATION INSTRUCTIONS
 OEM Lip Mount Camera with Harness and OnStar Mirror for GM Vehicles with 10-pin Mirror Connector (Kit part number 9002-8723) Items Included in the Kit: Bubble bag containing: Camera with Mount Mirror Mirror
MGB Alternator Conversion Installation Instructions For MGA & 1962 to 1967 MGB
 MGB Alternator Conversion Installation Instructions For MGA & 1962 to 1967 MGB PART# 130-078, 130-088, 130-098 440 Rutherford St. Goleta, CA 93117 1-800-642-8295 FAX 805-692-2525 www.mossmotors.com Scan
INSTALLATION INSTRUCTIONS
 9002-6513 Rear Vision System W/ Zoom Aftermarket and Factory 8.4 Touch Screen Display (Factory Display requires Chrysler/Dodge dealer to activate) 2009 2012 RAM (Part B) 2013 Current RAM (Part A) NOTE:
VISOR AUDIO KIT P/N , APPLICATION BEFORE YOU BEGIN KIT CONTENTS. Verify accessory fitment at Polaris.com.
 VISOR AUDIO KIT P/N 2882888, 2882891 APPLICATION Verify accessory fitment at Polaris.com. BEFORE YOU BEGIN Read these instructions and check to be sure all parts and tools are accounted for. Please retain
DDX7039 INSTALLATION MANUAL
 MONITOR WITH DVD RECEIVER DDX7039 INSTALLATION MANUAL B54-4527-00/00 (MV/XV) Accessories 1...1 2...1 3...1 4...2 5...1 6...1 7...6 8...6 9...1 2 DDX7039 Installation Procedure 1. To prevent a short circuit,
Installation instructions for the TriVision Car Docking Station
 Contents 1. Symbols used in this installation guide......................................... 30 2. Prior to installation......................................................... 31 3. Safety instructions.........................................................
For additional technical tips, please visit
 NOTICE OF INTENDED INSTALLATION AND USE THE ROSEN MULTI-MEDIA NAVIGATION SYSTEMS CONTAIN AN INTERNAL VIDEO PLAYER, WHICH IS NOT INTENDED FOR VIEWING BY THE DRIVER. THE VIDEO PLAYER IS DISABLED WHEN THE
Backside License Plate Mount for Jeep JK Wrangler
 REQUIRED TOOLS 10mm SOCKET 13mm SOCKET 4mm HEX KEY WIRE CRIMPS WIRE STRIPPERS ELECTICAL TAPE SCREW DRIVER KIT CONTAINS BACKSIDE MOUNT LICENSE PLATE BRACKET WITH LEDS PLASTIC PASS-THROUGH GROMMET STAINLESS