IMPORTANT SAFETY INSTRUCTIONS
|
|
|
- Jack Sherman
- 5 years ago
- Views:
Transcription


1
2 IMPORTANT SAFETY INSTRUCTIONS 1. Read all instructions All the safety and operating instructions should be read carefully before this Hover Hockey table can be operated or played. 2. Caution This is not a toy and is intended for use by or under the supervision of adults. Adults should review safety guidelines with children to avoid possible risk of electric shock or other injuries. 3. Caution This table rotates on a central axis and can pose a small risk of a pinch hazard. Keep hands clear when swivel cabinet is in motion. 4. Power Sources This Hover Hockey game should be operated only from V A.C., 50/60 cycle current consult your appliance dealer or local power company. 5. Power Cord Protection Power cord should be routed so that it is not likely to be walked on or pinched by items placed upon or against it. Pay particular attention to cords at plugs, convenience receptacles, and the point of exit from the game. 6. Overloading electric shock. 7. Object and Liquid Entry Never push objects of any kind into this game through openings as they may liquid of any kind on the game. If cleaning the surface, follow the recommended manufacturer instructions or call technical support for guidance. 8. Ventilation The openings on the air blower are for the intake air. Keep clear of the air blower during operation. Do not allow hand, hair, or any other objects near the intake openings. To ensure reliable operation of the game and protect it from overheating, these openings must not be blocked or covered. 9. Damage Requiring Service Unplug the game from the wall outlet/receptacle. Do not attempt to service the blower yourself as while opening and/or removing covers may expose you/others to dangerous voltage a. When the power supply cord is damaged. b. If liquid has spilled, or objects have fallen into the blower. c. When the air blower exhibits a distinct change in performance i.e. abnormal noise, 10. Grounding or Polarization This game is equipped with a polarized alternating current line plug (a plug feature. If you are unable to insert the plug fully into the outlet, try reversing the plug. If the plug should the polarized plug. 11. CAUTION ELECTRICALLY OPERATED PRODUCT Not recommended for children under 8 years of age. As with all electrical products, precautions should be observed during handling and use to reduce the risk of electric shock. 12. We recommend electrical shock, or injury to persons. In the event such conditions exist, the game should not be used until properly repaired. 13. Storage Conditions This product is made from wood based components and is sensitive to extreme and longevity. Save These INSTRUCTIONS Warning: To Reduce The Risk Of Fire Or Electric Shock, Do Not Use This Fan With Any Solid-State Speed Control Device 1
3 IMPORTANT - Lay out all parts before you begin If any questions or issues, please contact us at BEFORE returning the product to the original place of purchase. Please keep your original sales receipt. Staple it on the adjacent page in the space provided for future reference/use. It will be required to receive service help or parts under warranty. CONTACT INFO Hours Monday to Friday (9:00am to 5pm EST) Technical Support or Replacement Parts us at: consumerservice@eastpointsports.com Visit us at: Call:
4 BEFORE BUILDING - returned to the original place of purchase for an exchange. NOT replaceable. Any damage that exists to Please attach RECEIPT HERE It will be required to receive service help or parts under warranty. 3
5 TOOLS Required 1 - Phillips Head Screwdriver (Standard Size) Not Included 1 Hex Wrench Included 1 Allen Wrench - Included Recommended (Not Required): Electric Screwdriver or Power Driver CAUTION DO NOT OVER TIGHTEN. Over Tightening will result in irreparable damage to the product. If using, please make sure that the tool is set to a very low torque to prevent damage to the product. Socket Wrench Set How to use the: PARTS IDENTIFIER 1 Before you begin assembly, please make sure that you have all the parts listed and in the correct quantities. This will ensure the quickest and most organized assembly. Be sure to work on the assembly on a soft non-marring surface such as carpet or the inside of the corrugate box top to prevent causing damage to the table surface during assembly. Item # Instructions Parts ID # Part Name Part Name # QT FOR USE WITH STEP # 1 Step Used In Part Image Part Quantity PARTS IDENTIFIER Components 98 Cabinet - Hockey 99 Cabinet - Billiards 2 Apron - End Board # S FOR USE WITH STEP # 1 # S # S x4 FOR USE WITH STEP # 1 FOR USE WITH STEP # 2 1 Apron - Long Side 4 Leg - Right 3 Leg - Left # S FOR USE WITH STEP # 2 # S # S FOR USE WITH STEP # 3 FOR USE WITH STEP # 3 4
6 Components cont. 33 Leg Leveler 32 Lock Pin 5 End Panel - Inner - Return End # S FOR USE WITH STEP # 3 x4 # S x4 # S FOR USE WITH STEP # 4 FOR USE WITH STEP # 4A 6 End Panel - Inner - Non-Return End 7 Ball Channel - End 8 End Panel - Outer - Return End # S FOR USE WITH STEP # 4B # S # S FOR USE WITH STEP # 5 FOR USE WITH STEP # 6A 9 End Panel - Outer - Non-Return End 10 Goal Panel - Left 11 Goal Panel - Right # S FOR USE WITH STEP # 6B # S # S FOR USE WITH STEP # 6 FOR USE WITH STEP # 6 12 Goal Panel - Bottom 13 Apron - Cabinet Side 14 End Rail - Top # S FOR USE WITH STEP # 6 # S # S FOR USE WITH STEP # 12 FOR USE WITH STEP # Cup Holder 20 Pusher - Felt 21 Pusher - Sombrero # S x4 # S # S FOR USE WITH STEP # 14 FOR USE WITH STEP # 15 FOR USE WITH STEP # 15 5
7 Components cont. 15 Tennis Top - 3pc - Center 16 Tennis Top - 3pc - End 17 Tennis Top - Support # S # S # S FOR USE WITH STEP # 16 FOR USE WITH STEP # 16 FOR USE WITH STEP # Post - TT 19 Net - TT 31 Tennis Top - Cushion # S # S # S x6 FOR USE WITH STEP # 16 FOR USE WITH STEP # 16 FOR USE WITH STEP # 16 Accessories Billiard Balls Brush Triangle - Molded # S # S # S Billiard Cue Billiard Chalk Hockey Puck # S # S # S Paddle - TT Ball -TT # S # S 6
8 Hardware 60 Screw - Wood - 4 x 44.5mm 61 Bolt - Allen - 8 x 44.5mm 62 Wrench - Allen Style 63 Screw - Wood - 4 x 18mm # S 6 # S x8 # S FOR USE WITH STEP # 2 FOR USE WITH STEP # 3 # S 6 FOR USE WITH STEP # 4 64 Screw - Wood - 4 x 44.5mm 65 Screw - Wood - 4 x 44.5mm 66 Bolt - Allen x 32mm 67 Screw - Wood - 4 x 44.5mm # S x8 # S x4 # S x8 FOR USE WITH STEP # 5 FOR USE WITH STEP # 6 # S x8 FOR USE WITH STEP # 7 68 Bolt - Allen - 8 x 44.5mm 69 Screw - Wood - 4 x 32mm # S 0 # S 8 FOR USE WITH STEP # 8 FOR USE WITH STEP # 9 70 Bolt - Hex - 20mm (1 pc pre-assembled) 71 Washer - Metal - 20mm (1 pc pre-assembled) 72 Washer - Molded - 20mm (1 pc pre-assembled) 73 Wrench - Hex # S # S # S # S FOR USE WITH STEP # Screw - Wood - 4 x 18mm # S 2 FOR USE WITH STEP # 13 7
9 ASSEMBLY INSTRUCTIONS BEFORE NOTE: BEFORE BUILDING - and layout all your parts Your Cabinet (holds Billiard table and Hockey game must be returned to the original place of purchase for an exchange. STEP 1 NOTE: Cabinet - Hockey Cabinet - Billiards Open cabinet. Take out all parts and remove brace / Table Tennis Top. 98 STEP 2 NOTES Apron - Long Side Apron - End Board x4 Repeat for both sides Screw - Wood - 4 x 44.5mm 6 Outside Inside 8
10 STEP Leg - Left 4 Leg - Right NOTE: Repeat for Both Sides Leg Leveler Step 2 Assembly x4 4 Step 2 Assembly 61 Bolt - Allen - 8 x 44.5mm 62 Wrench - Allen Style x8 STEP 4A STEP 4B Ball Return End Non-Ball Return End End Panel - Inner - Return End End Panel - Inner - Non-Return End NOTE: Do Not Over Tighten Lock Pin x Screw - Wood - 4 x 18mm 6 STEP 5A Ball Return End STEP 5B Non-Ball Return End 7 Ball Channel - End Step 4A Assembly Step 4B Assembly Step 4A Assembly Step 4B Assembly Screw - Wood - 4 x 44.5mm x
11 STEP 6A Ball Return End STEP 6B Non-Ball Return End End Panel - Outer - Return End 9 End Panel - Outer - Non-Return End 10 Goal Panel - Left NOTES Install parts 10 and 11 before installing part Goal Panel - Right Goal Panel - Bottom Screw - Wood - 4 x 44.5mm 66 Bolt - Allen x 32mm x4 x8 STEP 7A 67 Step 5A Assembly Step 6A Assembly Completed View Step 5A Assembly Step 5B Assembly Step 6A Assembly STEP 7B 67 Step 5B Assembly Step 6B Assembly Step 7A Assembly Step 6B Assembly Completed View 67 Screw - Wood - 4 x 44.5mm x8 Step 7B Assembly STEP 8 Step 7A Assembly 68 Step 3 Assembly Step 7A Assembly NOTES Be Sure To Install 5 Bolts Into Each Leg. Step 7B Assembly Step 3 Assembly Step 7B Assembly 68 Bolt - Allen - 8 x 44.5mm 0 10
12 STEP 9 NOTE: Cabinet - Hockey Cabinet - Billiards Make sure that Billiard Cabinet is completely seated and Screw - Wood - 4 x 32mm 8 installing Screws. 98 STEP 10 Non-Ball Return Side NOTE: This Side PRE-ASSEMBLED Ball Return Side NOTE: Step 9 Assembly Side with Electrical Cord pre-assembled. Bolt - Hex - 20mm 70 (1 pc pre-assembled) 71 Washer - Metal - 20mm (1 pc pre-assembled) Washer - Molded - 20mm (1 pc pre-assembled) Wrench - Hex STEP 11 NOTE: THIS STEP IS VERY IMPORTANT NOTES Step 8 Assembly 1. Using Two Strong Adults, Step 10 Assembly Cabinet in proper direction as per drawing. Goal Panel - Bottom - Hole IMPORTANT: Thread Electrical Cord through Step 6B Assembly. NOTE - This is on the Non-Ball return side of the Table 98 OR OR Top View of Proper Swivel Bolt and Washer Placement. 2. Gently set Cabinet into frame being careful not to damage electrical cord. 3. Thread Cord as per Drawing 11
13 STEP Apron - Cabinet Side Step 11 Assembly 13 STEP NOTE: End Rail - Top Step 12 Assembly You will use 6 Screws per end (4 inside and 2 outside) Screw - Wood - 4 x 18mm 2 Shows View from Inside STEP Cup Holder x4 12
14 STEP Pusher - Felt Pusher - Sombrero 21 STEP 16 NOTE: Tennis Top - 3pc - Center Tennis Top - 3pc - End Tennis Top - Support Post - TT Net - TT Tennis Top - Cushion x6 Do Not apply the Make sure that they align properly with the top aprons before application. STEP 16A Table Tennis Top should only be set in place when Hover Hockey playfield is facing up
15 Limited Warranty As described in and as limited by this Limited Warranty, EastPoint Sports, Ltd. (the Company ) warrants this Swivel Table (the Product ) to be free from defects in workmanship and materials for a period of 90 days from the date of original purchase. The term defects shall mean any imperfections that impair the use of the product. What is Covered: Except as provided herein, this Limited Warranty covers all defects in materials and workmanship. This Limited Warranty is void if the Product is: Damaged through improper usage or storage, negligence, misuse, abuse, transportation damage, acts of nature, or accident (including failure to follow the instructions supplied with the product) Used in commercial applications, rentals or a commercial environment What is Not Covered: The Limited Warranty does not cover: Expendable items such as cosmetic parts, game playing accessories, and any other items that may show signs of wear due to normal usage Any transportation/delivery/installation costs incurred by the Consumer (either home from the original place of purchase or back to the original place of purchase) What the Company Will Pay For: If any part or component of the Product which is covered by this Limited Warranty is found by the Company to be defective, the Company will provide replacement parts without charge. The Company s obligation to repair or replace the Product or any portion thereof, shall be limited to the original purchase price of the product. If during the Limited Warranty period, the product is found to be defective, the Company will, at the Company s option, repair, replace, or make remuneration for the Product (either the same or equivalent value) without charge. How to Obtain Warranty Service: In order to enforce your rights under this Limited Warranty, you must follow these procedures: You must return the ORIGINAL COPY OF YOUR SALES RECEIPT to the Company. You must call the Company s Consumer Service Department at or toll free at on Monday through Friday between the hours of 9:00 A.M. and 5:00 P.M (EST) to notify the Company of the nature of the problem. At the Company s option, replacement parts or a new Product (either the same or equivalent value) will be sent to you at no charge. If you are instructed to return the Product to the Company for servicing, you are responsible for shipping the Product, at your expense, to the address designated by the Company in packaging that will protect against further damage. You must also include your name, address, daytime telephone number, Product model number, and a description of the problem. The Company will pay for any shipping charges to return the repaired of replaced Product to you. THIS LIMITED WARRANTY IS AVAILABLE ONLY TO THE ORIGINAL PURCHASER OF THE PRODUCT AND IS VALID ONLY IN THE UNITED STATES. THE COMPANY S LIABILITY IS LIMITED TO THE REPAIR, REPLACEMENT, OR REMUNERATION, AT ITS OPTION, OF ANY DEFECTIVE PRODUCT AND SHALL NOT INCLUDE ANY LIABILITY FOR INDIRECT, INCIDENTAL, OR CONSEQUENTIAL DAMAGES OF ANY KIND. THIS WARRANTY IS EXPRESSLY MADE IN LIEU OF ALL OTHER WARRANTIES, EXPRESSED OR IMPLIED, INCLUDING BUT NOT LIMITED TO THE IMPLIED WARRANTY OF MERCHANTABILITY AND THE IMPLIED WARRANTY OF FITNESS FOR A PARTICULAR PURPOSE. SOME STATES DO NOT ALLOW LIMITATIONS ON HOW LONG AN IMPLIED WARRANTY LASTS OR DO NOT ALLOW FOR EXCLUSION OF INCIDENTAL OR CONSEQUENTIAL DAMAGES. TO THAT EXTENT, THE ABOVE LIMITATIONS MAY NOT APPLY TO YOU. If you have any questions regarding this Limited Warranty or the operation of the Product, you may call or write us. ALL WARRANTY CLAIMS MUST BE ACCOMPANIED BY A COPY OF THE SALES RECEIPT/PROOF OF PURCHASE. REPORT ANY DEFECTS TO: 628 ROUTE 10, SUITE #5 WHIPPANY, NEW JERSEY
16 TABLE MAINTENANCE AND CARE Table Top It is OK to gently vacuum the felt side of the billiard table with any standard handheld vacuum brush attachment. If Hockey or Table Tennis side needs to be cleaned, you can use any gentle surface cleaner (no bleach or ammonia) with a lint free cloth. NOTE: DO NOT spray the cleaning product directly on the table surface. It must be applied to the cloth directly. Then the table top can be wiped in a lengthwise direction Pucks - If a puck is rough or not gliding smoothly on top of the table surface, gently sand off the scuff marks with Speed - If faster puck speed is desired, it is OK to use a wax or oil based cleaner to slicken the surface. NOTE: DO NOT OVER APPLY. A little goes a long way. NOTE: DO NOT spray the cleaning product directly on the table surface. It must be applied to the cloth directly and then the table top can be wiped in a lengthwise direction ROUTE 10, SUITE #5 WHIPPANY, NEW JERSEY
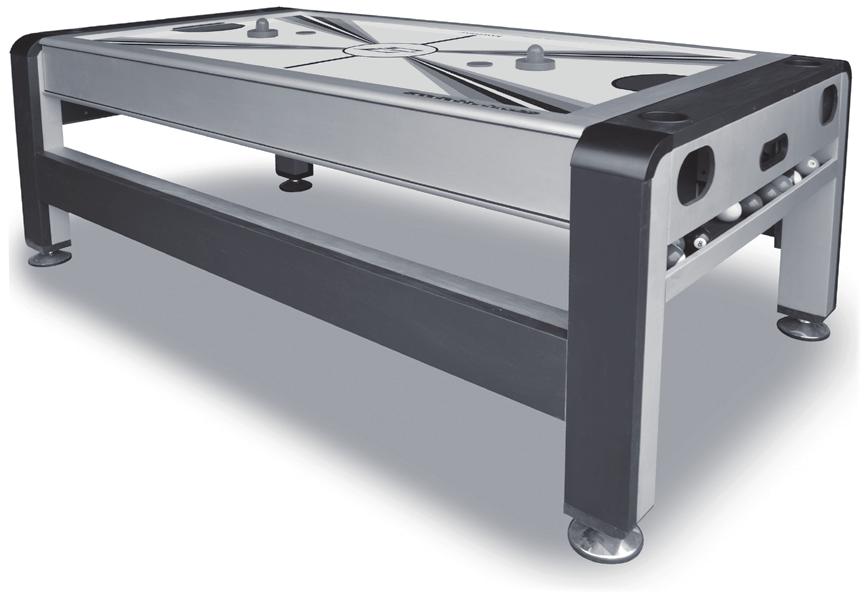
72 in / 1,83 m SWIVEL TABLE
 ITEM# 1-1-37001 72 in / 1,83 m SWIVEL TABLE 4 Great Games in 1-4 gran opciones de juego Assembly Instructions Model # 37001 www.eastpointsports.com TWO OR MORE ADULTS REQUIRED FOR ASSEMBLY IMPORTANT SAFETY
FOLD N STORE. Table Tennis Table. Assembly Instructions Model DS, DS CONTACT INFO Hours.
 FOLD N STORE TM PATENT - www.eastpointsports.com Table Tennis Table Assembly Instructions Model 1-1-33525-DS, 1-1-33536-DS CONTACT INFO Hours Technical Support Monday to Friday (9am to 5pm EST) Email us
FOLD N STORE. Table Tennis Table. Assembly Instructions Model , DS, DS CONTACT INFO Hours.
 FOLD N STORE TM PATENT - www.eastpointsports.com Table Tennis Table TWO OR MORE ADULTS REQUIRED FOR ASSEMBLY Assembly Instructions Model 1-1-33410, 1-1-33410-DS, 1-1-33421-DS CONTACT INFO Hours Technical
Table Tennis Table. Assembly Instructions Model CONTACT INFO. Hours
 FOLD N STORE PATENT - www.eastpointsports.com Table Tennis Table TWO OR MORE ADULTS REQUIRED FOR ASSEMBLY Assembly Instructions Model 1-1-33610 CONTACT INFO WARNING: CHOKING HAZARD - Small balls. Not for
Harvil 4 Foot Air Hockey Table
 Harvil 4 Foot Air Hockey Table Thank you for your purchase of this Harvil product! We work around the clock and around the globe to ensure that Harvil products maintain the highest possible quality. However,
MAVERICK 7' POOL TABLE WITH TABLE TENNIS ASSEMBLY INSTRUCTIONS
 MAVERICK 7' POOL TABLE WITH ASSEMBLY INSTRUCTIONS NG1023 THANK YOU! Thank you for purchasing this product. We work around the clock and around the globe to ensure that our products maintain the highest
Harvil 4 Foot Air Hockey Table
 AH48-2 Harvil 4 Foot Air Hockey Table Thank you for your purchase of this Harvil product! We work around the clock and around the globe to ensure that Harvil products maintain the highest possible quality.
HUSTLER 7' & 8' POOL TABLE ASSEMBLY INSTRUCTIONS
 HUSTLER 7' & 8' POOL TABLE ASSEMBLY INSTRUCTIONS NG2515PB/NG2520PB THANK YOU! Thank you for purchasing this product. We work around the clock and around the globe to ensure that our products maintain the
AURORA TABLE TENNIS. Replacement Parts
 AURORA TABLE TENNIS Replacement Parts Order direct at or call our Customer Service department at (800) 225-7593 8 am to 4:30 pm Central Standard Time July 2014 UPC Code 7-19265-51826-6 Staple your receipt
MLS DEFENDER SOCCER TABLE ASSEMBLY INSTRUCTIONS
 MLS DEFENDER SOCCER TABLE ASSEMBLY INSTRUCTIONS NGD1032 THANK YOU! Thank you for your purchase of this Harvil product. We work around the clock and around the globe to ensure that Harvil products maintain
9' & 12' CHALLENGER SHUFFLEBOARD TABLE ASSEMBLY INSTRUCTIONS
 9' & 12' CHALLENGER SHUFFLEBOARD TABLE ASSEMBLY INSTRUCTIONS NG1205 / NG1210 / NG1212 / NG1214 THANK YOU! Thank you for purchasing this product. We work around the clock and around the globe to ensure
HURRICANE 54-IN FOOSBALL TABLE ASSEMBLY INSTRUCTIONS
 HURRICANE 54-IN FOOSBALL TABLE ASSEMBLY INSTRUCTIONS Please Do Not Hesitate to Contact Our Consumer Hotline at 800-759-0977 with Any Questions That May Arise During Assembly or Use of This Product! NG1033F
RENEGADE SLATE BUMPER POOL TABLE ASSEMBLY INSTRUCTIONS
 RENEGADE SLATE BUMPER POOL TABLE ASSEMBLY INSTRUCTIONS NG2404PG THANK YOU! Thank you for purchasing this product. We work around the clock and around the globe to ensure that our products maintain the
OUTDOOR TABLE TENNIS TABLE ASSEMBLY INSTRUCTIONS
 OUTDOOR TABLE TENNIS TABLE ASSEMBLY INSTRUCTIONS Please Do Not Hesitate to Contact Our Consumer Hotline at 800-759-0977 with Any Questions That May Arise During Assembly or Use of This Product! NG2336P
5 FOOT AIR HOCKEY TABLE ASSEMBLY INSTRUCTIONS
 5 FOOT AIR HOCKEY TABLE ASSEMBLY INSTRUCTIONS NG1009 H THANK YOU! Thank you for your purchase of our product. We work around the clock and around the globe to ensure that our products maintain the highest
Harvil 5 Foot Air Hockey Table
 ASSEMBLY INSTRUCTIONS Harvil 5 Foot Air Hockey Table Thank you for your purchase of this Harvil product! We work around the clock and around the globe to ensure that Harvil products maintain the highest
SIDEKICK TABLETOP SOCCER ASSEMBLY INSTRUCTIONS
 SIDEKICK TABLETOP SOCCER ASSEMBLY INSTRUCTIONS NG1028T3 THANK YOU! Thank you for purchasing this product. We work around the clock and around the globe to ensure that our products maintain the highest
VICTORY TABLE TENNIS TABLE ASSEMBLY INSTRUCTIONS
 VICTORY TABLE TENNIS TABLE ASSEMBLY INSTRUCTIONS NG2322 THANK YOU! Thank you for your purchase of our product. We work around the clock and around the globe to ensure that our products maintain the highest
MLS KICK-OFF TABLETOP SOCCER TABLE ASSEMBLY INSTRUCTIONS
 MLS KICK-OFF TABLETOP SOCCER TABLE ASSEMBLY INSTRUCTIONS NGD1028 1 THANK YOU! Thank you for your purchase of this Harvil product. We work around the clock and around the globe to ensure that Harvil products
PLAYOFF 48" FOOSBALL TABLE ASSEMBLY INSTRUCTIONS
 PLAYOFF 48" FOOSBALL TABLE ASSEMBLY INSTRUCTIONS NG1031F THANK YOU! Thank you for purchasing this product. We work around the clock and around the globe to ensure that our products maintain the highest
5 FOOT SOCCER TABLE ASSEMBLY INSTRUCTIONS
 5 FOOT SOCCER TABLE ASSEMBLY INSTRUCTIONS NG1035 THANK YOU! Thank you for your purchase of our product. We work around the clock and around the globe to ensure that our products maintain the highest possible
DWS404 DWS524 DWS654 DWS684 DWS694. DWS SERIES INSTALLATION/OWNER'S MANUAL Car Audio Speakers
 DWS404 DWS524 DWS654 DWS684 DWS694 DWS SERIES INSTALLATION/OWNER'S MANUAL Car Audio Speakers PREPARATION Safety Guidelines Thank you for purchasing the DWS Series car speakers. Although Dual has attempted
Assembly Instructions
 Assembly Instructions Aluminum Padded Sling Chaise Lounge Questions, problems, or missing parts? Before returning to the store, call Customer Service. -866-988-3300 8 a.m. -5 p.m., PST Monday - Friday
LOUDSPEAKER OWNER'S MANUAL
 CDT ARCHITECTURAL LOUDSPEAKER OWNER'S MANUAL ARCHITECTURAL SPEAKERS IMPORTANT SAFETY INSTRUCTIONS 1. READ these instructions. 2. KEEP these instructions. 3. HEED all warnings. 4. FOLLOW all instructions.
Cordless Make Up Mirror WITH ILLUMINATED 1X AND 10X MAGNIFICATION PLUS NIGHT LIGHT
 Cordless Make Up Mirror WITH ILLUMINATED 1X AND 10X MAGNIFICATION PLUS NIGHT LIGHT TABLE OF CONTENTS Warnings and Cautions....1 Location of Parts and Controls....6 Installing the Batteries...8 Using the
INSTALLATION INSTRUCTIONS SINGLE HORIZONTAL ACCESS DOOR PANTRY INSERT MANUAL
 INSTALLATION INSTRUCTIONS MODEL #88972 SINGLE HORIZONTAL ACCESS DOOR PANTRY INSERT MANUAL TABLE OF CONTENTS PAGE # INSTALLATION INSTRUCTIONS...................2 CABINET LOCATION GUIDELINES...2 REGULAR
3-IN-1 POKER TABLE ASSEMBLY INSTRUCTIONS
 3-IN-1 POKER TABLE ASSEMBLY INSTRUCTIONS NG2351/NG2366 THANK YOU! Thank you for your purchase of our product. We work around the clock and around the globe to ensure that our products maintain the highest
TWO YEAR LIMITED WARRANTY MOMENT NOW PLEASE TAKE A INSTRUCTION MANUAL AND WARRANTY INFORMATION MP-15-THP
 #1 BRAND IN MASSAGE* PLEASE TAKE A MOMENT NOW REGISTER YOUR PRODUCT AT: www.homedics.com/register Your valuable input regarding this product will help us create the products you will want in the future.
Linear Actuator. Installation Manual. warranty installation parts list. Linear Actuator Installation Manual Page 1
 Linear Actuator Installation Manual warranty installation parts list January 2004 Linear Actuator Installation Manual Page 1 MA1221B12 Warranty Information Chore-Time Equipment ( Chore-Time ) warrants
A S S E M B L Y I N S T R U C T I O N S
 A S S E M B L Y I N S T R U C T I O N S Please Do Not Return This Product to the Store! Contact Escalade Sports customer service department at: Phone: 1-888-USA-GOAL Toll-Free! Fax: 1-866-873-3536 Toll-Free!
OWNER S MANUAL. Dick s Sporting Goods 345 Court Street Coraopolis, PA Tools Required: Allen Wrench
 Tools Required: Adjustable Wrench Allen Wrench OWNER S MANUAL Retain This Manual For Reference Dick s Sporting Goods 345 Court Street Coraopolis, PA 15108 TABLE OF CONTENTS BEFORE YOU BEGIN..... 1 IMPORTANT
AXS609 AXS612 AXS514 AXS SERIES. INSTALLATION/OWNER'S MANUAL Car Audio
 AXS609 AXS612 AXS514 AXS SERIES INSTALLATION/OWNER'S MANUAL Car Audio PREPARATION Safety Guidelines Thank you for purchasing the AXS Series car speakers. Although Axxera has attempted to make sure all
ONE AND TWO STEP STEP STOOLS
 INSTRUCTION MANUAL ONE AND TWO STEP STEP STOOLS Usage and Maintenance Read and understand all of the instructions and safety information in this manual before operating this product. MAN-049 REV A 2018
Copy OWNER S MANUAL MODEL N Keep this Identification Number in case you must contact our Customer Service Department.
 MODEL N 8093 OWNER S MANUAL Copy Keep this Identification Number in case you must contact our Customer Service Department. REGISTER YOUR PRODUCT ONLINE AT WWW.LIFETIME.COM At Lifetime, we are committed
PACIFICA Shower Cabin Installation Instructions
 PACIFICA Shower Cabin Installation Instructions IMPORTANT Please read carefully the following instructions before installing your shower cabin. If you have any questions on this shower cabin installation
INSTALLATION. Note: Not all of the included parts will be used during this installation. -cont.-
 Driving Lights for Road Glide 5007 Fits: 98-up Road Glide PartS Included 1 Right Light Assembly 1 Left Light Assembly 1 Right Mounting Bracket 1 Left Mounting Bracket 1 Hardware Kit Including: 2 Narrow
Instruction Sheet. CFRD Series. High CFM Split Rear Doors
 Instruction Sheet CFRD Series High CFM Split Rear Doors C UL R US LISTED NEW THANK YOU Thank you for purchasing the CFRD Seires High CFM Split Rear Doors. Please read these instructions thoroughly before
Assembly Instructions
 Assembly Instructions Questions, problems, or missing parts? Before returning to the store, call Royal Garden Customer Service. 866-988-3300 8 a.m. -5 p.m., PST Monday - Friday Retain this manual for future
PC-085 Use and Care Manual
 PC-085 Use and Care Manual w w w. i n t e r h e a l t h. c o m Interactive Health, 2006 The Perfect Chair is a registered trademark of Interactive Health, Inc. No medical claims warranted or implied by
Model:M5B/M5W/M5N. Installation Guide. Specifications Desktop Weight Capacity Keyboard Tray Weight Capacity Height Adjustable Range
 Model:M5B/M5W/M5N Installation Guide Website: www.flexispot.com Tel: 1-855-421-2808 Specifications Desktop Weight Capacity Keyboard Tray Weight Capacity Height Adjustable Range 33 Ibs (15 KG) 4.4 Ibs (2
8 Light Controller. Instruction Manual. With Light Timer 240 Volts. Product # INNOVATING SINCE 1995
 8 Light Controller With Light Timer 240 Volts Product #703008 Instruction Manual INNOVATING SINCE 1995 1 www.titancontrols.net 8 Light Controller This manual covers the following: Warnings & Cautions 8
USER'S GUIDE 9151 SERIES V
 USER'S GUIDE 9151 SERIES 220-240 V 2 Thank You 3 Safety Instructions 4 Product View 4-5 Assembly 5 Operations 6 Maintenance and Care 7 Troubleshooting 7 Replacement Parts 8 Warranty 8 Consumer Care Thanks
CAUTION: Read all safety precautions and instructions in this owner s manual before using this equipment. Save this manual for future reference.
 RACATAC OWNERS MANUAL CONGRATULATIONS on choosing the RACATAC. With proper use, care, and maintenance, this tool will increase speed, safety, and comfort on those tedious kneeling jobs for years to come.
Audi R8. Ride-on Car 5F62630 OWNER S MANUAL. Keep instructions for future reference
 Audi R8 Ride-on Car 5F62630 OWNER S MANUAL Keep instructions for future reference 1 Safety The owner s manual contains assembly, use and maintenance instructions. The vehicle must be assembled by an adult
BP1204 INSTALLATION/OWNER'S MANUAL
 BP1204 INSTALLATION/OWNER'S MANUAL BP1204 PREPARATION Getting Started Thank you for purchasing the Dual Electronics BP1204 Bandpass Subwoofer System. Although Dual has attempted to ensure the information
DM1016S INSTALLATION/OWNER'S MANUAL 10" Marine DVC Subwoofer
 DM1016S INSTALLATION/OWNER'S MANUAL 10" Marine DVC Subwoofer DM1016S INSTALLATION Preparation/Installation Please read entire manual before installation. Before You Start Disconnect negative battery terminal.
INSTALLATION TRUE DUAL HEADPIPES 497
 TRUE DUAL HEADPIPES 497 PARTS INCLUDED 1 Front Head Pipe 1 Rear Head Pipe 1 Front Heat Shield 1 Rear Heat Shield 1 Bracket (stamped 422-P) 1 Bracket (stamped 423-P) 2 1/2 x 1-1/4 Socket Head Cap Screw
User Manual. Posture+ Adjustable Base. For customer service call:
 User Manual Posture+ Adjustable Base For customer service call: 1-877-707-7533 1 IMPORTANT INFORMATION PLEASE READ THESE INSTRUCTIONS THOROUGHLY BEFORE USING THIS PRODUCT. PROPER OPERATION OF YOUR ADJUSTABLE
POWER GEAR SLIDE-OUT MANUAL
 POWER GEAR SLIDE-OUT MANUAL Operation Guide FLUSH FLOOR SLIDE-OUT SYSTEM FOR AMERICAN COACH PRODUCTS 82-S0220-01 Rev. 1 AMERICAN COACH SLIDE-OUT MANUAL FLUSH FLOOR SYSTEM TABLE OF CONTENTS SECTION PAGE
PVI 60KW, PVI 82KW, PVI 95KW
 PVI 60KW PVI 82KW PVI 95KW WARRANTY MANUAL Commercial, Grid-Tied Photovoltaic Inverters 2008, Solectria Renewables LLC Subject to Change DOC-020099 rev 024 1 1 Product Warranty & RMA Policy Warranty Policy
INSTALLATION INSTRUCTIONS FOR MOUNTING HARDWARE KIT F-105K2.5
 MY SAFE T PLUS UNIT INSTALLATION INSTRUCTIONS FOR MOUNTING HARDWARE KIT F-105K2.5 This kit supports installation of SAFE T PLUS : MODEL # 41-140 (RED) MODEL # 41-180 (WHITE) MODEL #41-230 (BLUE) KEEP INSTRUCTIONS
c EDR /11. ShipShape OWNERS MANUAL. [ power foundations ]
![c EDR /11. ShipShape OWNERS MANUAL. [ power foundations ]](/thumbs/87/96491649.jpg "c EDR /11. ShipShape OWNERS MANUAL. [ power foundations ]") 99301115-c EDR11746 4/11 ShipShape OWNERS MANUAL [ power foundations ] contents Advisory... 4 Assembly... 6 Hand Control Function... 15 Accessories... 16 Troubleshooting... 17 1-2-Lifetime Warranty...
99301115-c EDR11746 4/11 ShipShape OWNERS MANUAL [ power foundations ] contents Advisory... 4 Assembly... 6 Hand Control Function... 15 Accessories... 16 Troubleshooting... 17 1-2-Lifetime Warranty...
Portable Speaker System for Tablets/eReaders/Smartphones
 Portable Speaker System for Tablets/eReaders/Smartphones USER MANUAL SMPS-222 PLEASE READ THIS USER MANUAL COMPLETELY BEFORE OPERATING THIS UNIT AND RETAIN THIS BOOKLET FOR FUTURE REFERENCE. IMPORTANT
Installation Instructions
 Installation Instructions To ensure that your installation proceeds smoothly--please read these instructions carefully before you begin. P r o d u c t s Luxury Faucets and Accessories Contemporary Floor
ValveSentry USER S MANUAL REVISED 8/6/16 IMPORTANT! PLEASE READ CAREFULLY AND SAVE
 ValveSentry USER S MANUAL REVISED 8/6/16 IMPORTANT! PLEASE READ CAREFULLY AND SAVE This user s manual contains important information about your ValveSentry device s operation. If you are installing this
Car Vacuum Cleaner #CarVac
 Car Vacuum Cleaner #CarVac Instruction Manual & Warranty Card Instruction Manual This product has been carefully engineered and manufactured to give you dependable operation. Please read this manual thoroughly
2019-ON RAM 1500 INSTALLATION INSTRUCTIONS
 2019-ON RAM 1500 INSTALLATION INSTRUCTIONS Thank you for purchasing ROCKSTARTM Splash Guard Mud Flaps. Agri-Cover, Inc. proudly manufactured these mud flaps using superior quality materials and workmanship.
INSTALLATION GUIDE. Tenino Retro Pot Filler Hi-Rise Kitchen Faucet PB-K05
 INSTALLATION GUIDE Tenino Retro Pot Filler Hi-Rise Kitchen Faucet PB-K05 RECOMMENDED TOOLS AND MATERIALS Sink Hole Cover (Optional) Allen Wrench Set Plumbers Putty Adjustable Wrench Tape Measure Basin
Blue Air. Commercial Refrigeration Inc. Installation & Operation Manual Chef Bases
 Blue Air Commercial Refrigeration Inc. Installation & Operation Manual Chef Bases Please read this manual completely before installing or operating this unit! BACB53 BACB71 BACB74 BACB83 BACB86 BACB96
INSTALLATION/OWNERS MANUAL
 INSTALLATION/OWNERS MANUAL XOBP12D PREPARATION Getting Started Thank you for purchasing the Dual Electronics XOBP12D Bandpass Subwoofer System. Although Dual has attempted to make sure all of the information
IV STANDS. Assembly, Usage and Maintenance INSTRUCTION MANUAL
 INSTRUCTION MANUAL IV STANDS Assembly, Usage and Maintenance Read and understand all of the instructions and safety information in this manual before operating this product. MAN-045 REV A 2018 MAC Medical,
Instruction Sheet SRSR SERIES. Rotating Sliding Rail System
 Instruction Sheet SRSR SERIES Rotating Sliding Rail System THANK YOU Thank you for purchasing the SRSR Series Rotating Sliding Rail System. Please read these instructions thoroughly before assembling this
Assembly Instructions & User s Manual 3PC Oversized Rocker Set
 & User s Manual 3PC Oversized Rocker Set 155426 Please keep this instruction manual for future reference Customer Service: (888) 922-2336 7:00 am to 12:00 am CST (daily) Live Chat at: www.academy.com Email:
INSTALLATION GUIDE. Rainier Coil Pull Down Kitchen Faucet PB-K01
 INSTALLATION GUIDE Rainier Coil Pull Down Kitchen Faucet PB-K01 RECOMMENDED TOOLS AND MATERIALS Plumbers Putty Adjustable Wrench Tape Measure Basin Wrench Phillips Screwdriver Pencil Masking Tape BEFORE
HARVIL 4 FOOT AIR HOCKEY TABLE ASSEMBLY INSTRUCTIONS
 HARVIL 4 FOOT AIR HOCKEY TABLE ASSEMBLY INSTRUCTIONS CONTACT INFORMATION We work around the clock and around the globe to ensure that Harvil products maintain the highest possible quality. However, in
User s Manual and Operating Instructions
 User s Manual and Operating Instructions Model Numbers: MAC-36-BDF, MAC-42-BDF, MAC-48-BDF PT-36-BDF, PT-42-BDF, PT-48-BDF CONSUMER: READ AND SAVE THESE INSTRUCTIONS IMPORTANT: Read and understand all
User s Guide. Oreck Air Purifier with HEPA Filtration. Important! Read this manual carefully, and keep for future reference.
 User s Guide Oreck Air Purifier with HEPA Filtration Important! Read this manual carefully, and keep for future reference. Enjoy Congratulations on your purchase of the Oreck Air Purifier with HEPA Filtration.
WEIGHT BENCH MSS-7500
 NOTE: Please read all instructions carefully before using this product Table of Contents Safety Notice WEIGHT BENCH MSS-7500 Hardware Pack Assembly Instruction Exploded Diagram Parts List Warranty Ordering
Gym Dandy TEETER TOTTER TT-320. Model TT-320. Retain This Manual for Reference OWNER'S MANUAL
 NOTE: Please read all instructions carefully before using this product Gym Dandy Table of Contents Safety Notice Hardware Pack TEETER TOTTER TT-320 Assembly Instruction Parts List Operation Tips Warranty
Battery Back-up BBM Owner's Manual. Please read this manual BEFORE installing your inverter
 Battery Back-up BBM-1225 Owner's Manual Please read this manual BEFORE installing your inverter owner's MAnUAL index section 1 Safety Instructions... 3 section 2 Layout and Dimensions... 4 section 3 Description
ROPE LIGHT ITEM # MODEL #UCL48L. Français p. 8. Español p. 15 ATTACH YOUR RECEIPT HERE. Purchase Date
 ITEM #0879887 ROPE LIGHT MODEL #UCL48L Français p. 8 Español p. 15 TTCH YOUR RECEIPT HERE E237798 Purchase Date Questions, problems, missing parts? efore returning to your retailer, call our customer service
SAVE FOR CONSUMER INSTALLATION / OWNER S MANUAL. Includes: Tools: Mystic - Pull-Out Kitchen Faucet LKMY1041CR LKMY1041NK LKLFMY1041CR LKLFMY1041NK D 1
 INSTALLATION / OWNER S MANUAL Mystic - Pull-Out Kitchen Faucet LKMY1041CR LKMY1041NK LKLFMY1041CR LKLFMY1041NK Includes: D D 1 D 2 E D 3 B 1 C C 2 C 1 B B 2 B 3 A NOTE: these washers are not used on this
Model FM2642 Wall Mount. Full Motion Television Wall Mount
 Model FM2642 Wall Mount Full Motion Television Wall Mount Getting Started Introduction Congratulations on the purchase of your new Audio Solutions FM2642 Television Wall Mount. For maximum benefit, please
Gym Dandy TEETER TOTTER TT-360. Model TT-360. Retain This Manual for Reference OWNER'S MANUAL
 NOTE: Please read all instructions carefully before using this product Table of Contents Safety Notice Gym Dandy TEETER TOTTER TT-360 Important Assembly Information Care and Maintenance Parts List Warranty
DC-AC Power Inverter SAM Manual. Please read this manual before installing your inverter
 DC-AC Power Inverter SAM-100-12 Owner's Manual Please read this manual before installing your inverter WARNINGS TO REDUCE THE RISK OF FIRE, ELECTRIC SHOCK, EXPLOSION OR INJURY 1. Do not connect to AC distribution
MARCY WEIGHT BENCH MWB 715B. Model MWB 715B. Retain This Manual for Reference OWNER'S MANUAL
 NOTE: Please read all instructions carefully before using this product Safety Notice Hardware Identifier Assembly Instruction MARCY WEIGHT BENCH MWB 715B Parts List Warranty Ordering Parts Model MWB 715B
OWNER'S MANUAL. Please Do Not Return This Product To The Store!
 TABLE TENNIS TABLE MODEL NO. T87 OWNER'S MANUAL 1. Read this manual carefully before starting assembly. Read each step completely before beginning each step. 2. Some smaller parts may be shipped inside
AAA Ultrasound training Model. Instructions and User Guide
 AAA Ultrasound training Model Instructions and User Guide 1/13/2009 Blue Phantom True Anatomy Series Use and Care Instructions Page 1/5 V1.0a Giving you the confidence only experience can offer Congratulations
Installation & Operation Manual Chef Base
 Installation & Operation Manual Chef Base Please read this manual completely before installing or operating this unit! BACB53 BACB53M BACB71 BACB71M BACB74 BACB74M BACB83 BACB83M BACB86 BACB86M BACB96
PVI 1800/PVI Residential/Commercial Grid-Tied Photovoltaic Inverter WARRANTY MANUAL. Subject to Change REV , Solectria Renewables
 PVI 1800/PVI 2500 WARRANTY MANUAL Residential/Commercial Grid-Tied Photovoltaic Inverter 2009, Solectria Renewables Subject to Change REV 10.09 1 Product Warranty & RMA Policy 1.1 Warranty Policy The Solectria
QUESTIONS? PATENT PENDING. Model No. WESY85100 Serial No. Write the serial number in the space above for future reference.
 PATENT PENDING Model No. WESY85100 Serial No. Write the serial number in the space above for future reference. Serial Number Decal-- QUESTIONS? As a manufacturer, we are commiffed to providing complete
INSTALLATION TURN SIGNAL MIRRORS 1432
 1432 PARTS INCLUDED 1 Left Side Turn Signal Mirror Assembly with Convex Glass 1 Right Side Turn Signal Mirror Assembly with Convex Glass 1 Hardware Kit, Including: 2 5/16-18 X 1-1/2 Socket Head Cap Screws
Zap 5LX-S. Model No.: BH9938U-5-2. Questions or Concerns? (855)
") Zap 5LX-S Model No.: BH9938U-5-2 Questions or Concerns? (855) 686-3835 support@etekcity.com Thank You. Thank you for purchasing the Zap 5LX-S Remote Outlet Switch by Etekcity. We are dedicated to providing
Zap 5LX-S Model No.: BH9938U-5-2 Questions or Concerns? (855) 686-3835 support@etekcity.com Thank You. Thank you for purchasing the Zap 5LX-S Remote Outlet Switch by Etekcity. We are dedicated to providing
Style Number: PRD00005 PRIMED 3-in-1 Soccer Trainer
 To avoid injury during assembly, disassembly, use, adjustment and/or movement of the PRIMED 3-in-1 Soccer Trainer, the following warnings MUST be observed at all times: Adult assembly (2 adults) required
Model Numbers: MAC-36-BDF, MAC-42-BDF, MAC-48-BDF CONSUMER: READ AND SAVE THESE INSTRUCTIONS
 Model Numbers: MAC-36-BDF, MAC-42-BDF, MAC-48-BDF CONSUMER: READ AND SAVE THESE INSTRUCTIONS IMPORTANT: Read and understand all of the instructions in this manual before assembling, starting, or servicing
INSTALLATION/OWNER'S MANUAL DP " Woofer in Enclosure
 INSTALLATION/OWNER'S MANUAL DP1000 10" Woofer in Enclosure Installation Thank you for purchasing the DP1000 10" Woofer with enclosure. Although Dual has attempted to make sure all of the information contained
Adjustable Base. CONTENTS Advisory Setup and Installation Innova Wired Hand Control year Warranty 1-10
 Adjustable Base #201 Wired Owner Manual CONTENTS Advisory Setup and Installation Innova Wired Hand Control 1-2-10 year Warranty 1-10 WARNING Attention: Read the following information before using this
Copy OWNER S MANUAL MODEL N Keep this Identification Number in case you must contact our Customer Service Department.
 MODEL N 9044 OWNER S MANUAL Copy Keep this Identification Number in case you must contact our Customer Service Department. Safety Glasses BEFORE BEGINNING ASSEMBLY Keep the hardware bags and their contents
Innovation in Mobility. R1208 Six-Way Power Seat Base. Operator Manual. 03/25/02 32DSB01.A RICON CORPORATION All Rights Reserved
 Innovation in Mobility R1208 Six-Way Power Seat Base Operator Manual 03/25/02 32DSB01.A 92-2002 RICON CORPORATION All Rights Reserved Printed in the United States of America This RICON product must be
Digital Body Weight Scale Model No. EB4074C. Questions or Concerns? (855)
") Digital Body Weight Scale Model No. EB4074C Questions or Concerns? (855) 686-3835 support@etekcity.com Thank you for purchasing the Digital Body Weight Scale by Etekcity. This device can help you reach
Digital Body Weight Scale Model No. EB4074C Questions or Concerns? (855) 686-3835 support@etekcity.com Thank you for purchasing the Digital Body Weight Scale by Etekcity. This device can help you reach
4-Ton Electric Log Splitter
 4-Ton Electric Log Splitter Questions: Support@Powrkraft.com PK65556 2 18ga. @ 20ft, 16ga. @ 50ft, 14 ga. @ 75ft. 12ga @ 100ft, 10ga @ 200ft These are minimum cord requirements. 13-16 Model Number 65556
110 Volt/12 Volt Portable Inflator
 110 Volt/12 Volt Portable Inflator Owner s Manual WARNING: Read carefully and understand all ASSEMBLY AND OPERATION INSTRUCTIONS before operating. Failure to follow the safety rules and other basic safety
Installation Instructions BULL BAR (Part # 51033&51034) SIERRA 1500 / SILVERADO 1500
 SIERRA 1500 / SILVERADO 1500") PARTS LIST: 1 Bull Bar 2 12-1.75mm x 140mm Hex Head Bolts 1 Driver/Left Mounting Bracket 3 s 1 Passenger/Right Mounting Bracket 5 12m ID x 29mm OD x 3mm Flat Washers 1 12-1.75mm x 35mm Bolt Plate 3 s 4
PARTS LIST: 1 Bull Bar 2 12-1.75mm x 140mm Hex Head Bolts 1 Driver/Left Mounting Bracket 3 s 1 Passenger/Right Mounting Bracket 5 12m ID x 29mm OD x 3mm Flat Washers 1 12-1.75mm x 35mm Bolt Plate 3 s 4
PUSH BUTTON KEY CABINET
 PUSH BUTTON KEY CABINET Model 95689 INSTALLATION And Operation Instructions Due to continuing improvements, actual product may differ slightly from the product described herein. 3491 Mission Oaks Blvd.,
Model AS-FM64 Wall Mount. Full Motion Television Wall Mount
 Model AS-FM64 Wall Mount Full Motion Television Wall Mount Getting Started Introduction Congratulations on the purchase of your new Audio Solutions AS-FM64 Television Wall Mount. For maximum benefit, please
I N S TA L L AT I O N
 I N S TA L L AT I O N 5008 fits: H-D: '80-Up Electra glide, tour glide, road king, road glide or street glide PartS Included 1 Right Fork Mount Assembly 1 Left Fork Mount Assembly 2 H3 Driving Light Assemblies
Installation & Operators Manual
 Installation & Operators Manual Model Serial Number Purchase Date 2007-2008 SegVator, LLC Patent Pending All Rights Reserved Important Safety Information Make sure the vehicle has a properly installed
Digital Body Weight Scale
 Digital Body Weight Scale Model No.: EB4410B Questions or Concerns? Please contact us: (855) 686-3835 support@etekcity.com Thank You. Thank you for purchasing the Digital Body Weight Scale by Etekcity.
VANGUARD Series 36" Slant Wall and Cone Direct Drive Fans Installation & Operator s Instruction Manual
 VANGUARD Series 36" Slant Wall and Cone Direct Drive Fans Installation & Operator s Instruction Manual MV1600-1C 9/99 1625-003 2/2000 March 200 Chore-Time Warranty VANGUARD Series 36" Slant Wall and Cone
Owner's Manual. 120 Watt DC-AC Inverter Pure Sine Wave PST-12S-12A. Please read this manual before using your inverter
 120 Watt DC-AC Inverter Pure Sine Wave PST-12S-12A Owner's Manual Please read this manual before using your inverter 1INTRODUCTION Thank you for choosing to purchase our inverters. Our power inverter series