On the following pages you will find the user manual for the TGA Eclipse mobility scooter.
|
|
|
- Andra Underwood
- 6 years ago
- Views:
Transcription
1 On the following pages you will find the user manual for the TGA Eclipse mobility scooter. In our store we have a range of TGA mobility scooters available to purchase.


2 Operating Instructions and Owner s Handbook 1
3 CONTENTS 1. PREFACE SAFETY NOTICE Before Driving 2.2 While Driving 2.3 Labeling 3 3. PARTS INTRODUCTION... Parts Description OPERATION How to Operate Your Scooter 4.2 How to Set to Freewheel Mode 4.3 Tiller Adjustment BATTERIES & CHARGER Charging the Battery Pack 5.2 Charger 5.3 Battery INSPECTION AND MAINTENANCE. 6.1 Daily Checks 6.2 Regular Check Record 6.3 Battery, Circuit Breaker and Tyres 6.4 Maintenance 6.5 Storage BASIC TROUBLESHOOTING SPECIFICATION WARRANTY SAFE DRIVING TIPS FOR SCOOTER USERS. 21 2
4 1. P R E F A C E Please read this owner s manual before using the scooter. Improper use of the scooter could result in harm, injury or traffic accidents. This owner s manual includes operating instructions for every aspect of the scooter, assembly instructions, as well as guidelines and suggestions for safe use. This owner s manual is written only for the TGA Eclipse. The symbols used in this manual are explained below. Read carefully, especially the parts marked with these symbols: Warning Improper usage could lead to serious injury Caution Improper usage could lead to injury and/or damage to you scooter. Suggestion Follow these instructions to keep the status of the scooter working well and ease your operation. Please keep this manual in a safe place for future reference. If someone else uses the scooter, please be sure to provide the instruction manual for reference. As designs change, some illustrations and pictures in the manual may not correspond to the scooter that you purchased. TGA reserve the right to make design modifications without prior notification. 2. S A F E T Y N O T I C E 2.1 BEFORE DRIVING The user should be familiar with the operation of this scooter before driving, therefore, keep these safety notices in mind. The same traffic rules for pedestrians apply to the use of this scooter For your safety and that of others, please abide by the rules that apply to pedestrians. 1. Ride on the pavement, park way or pedestrian areas. Only ride your scooter on the road when crossing or if there are no existing pavements. 2. At the end of a pavement, be aware of traffic on the road. 3. Be extremely cautious when driving your scooter around heavy traffic and busy pedestrian areas. 4. Do not drive your scooter after taking alcohol, when feeling tired or on medication 5. Do not drive your scooter at night. 6. Always follow pedestrian traffic lights. Practice operating your scooter Until you are familiar with the operation of your scooter, please practice in a wide and open area, like a park. To prevent the possibility of falling off your scooter while driving, be aware of your motion and exercise extreme caution when accelerating, stopping, turning, reversing and moving up-and-down slopes 3
5 1. Please set the speed dial to the lowest speed setting during initial practice. 2. Be sure someone is accompanying you and watches for traffic when driving for the first time. 3. Be sure you are able to control and operate your scooter safely and confidently before changing to a higher speed. The TGA Eclipse is strictly limited to one passenger only: Do not carry any passengers on your scooter - Including children Do not use this scooter to carry or transport goods of excessive weight: The maximum weight to be carried is (including goods) 113kg/250lbs. Maximum loading weight for the basket is 3kg/6lbs. 2.2 WHILE DRIVING Please carry out daily inspections. Refer to page 15 of DAILY CHECKING. Do not stretch your body out of the scooter Such action may cause you to lose your balance or be injured. Pay attention to loose clothing, it could get tangled in the wheels. Exercise extreme caution in the following circumstances and do not use your scooter where conditions are too dangerous: Uneven or loose terrain for example mud, loose gravel, bumpy, narrow, snow covered, or a canal or waterway near by. Avoid holes where your wheels may get stuck. Do not drive at night and or during unfavorable weather conditions Do not make sudden turns. Do not ride on an escalator. Mobile Phones and other electrical equipment: Do not use a mobile phone or other wireless communication device while driving but it is always useful to carry one with you incase of emergency. Do not charge a mobile phone or other electrical devices from your scooter. Ramps, inclines and drops: Be careful while driving up a steep ramp or slope. Refer to page 19 CLIMBING ANGLE in 8. SPECIFICATION When climbing up an inclined road please drive slowly and carefully. When going down an incline never reverse your scooter, set the speed dial to a low speed setting. Do not drive through any holes in the road. Refer to page 19 MAX. GROUND CLEARANCE Avoid all water deeper than surface water. Please drive slowly when driving on roads with drops or dips. Do not make sudden turns when driving on gravel roads or ramps. 4
6 WARNING! Do not set the scooter in freewheel mode when driving on an incline or decline. Maximum User Weight Limit Refer to page 19 MAX. LOAD WEIGHT in section 8. Over loading your scooter will lead to damage to your scooter or a malfunction and is a safety hazard. The warranty does not cover over-loading damage. 2.3 LABELING Please read all the labeling on the scooter before driving it. For your future reference, do not remove them. WARNING! 1. Do not operate the scooter unless the tiller (handlebar column) is up and the retaining handwheel is tightened and locked in place 2. Do not lean against or pull forward on the handle bar while mounting or dismounting from the scooter. Serious harm or injury may occur. Rotate the seat and mount and dismount in a controlled manner. 3. The manufacturer disclaims responsibilities for any personal injury or property damage which may occur as a result of improper and unsafe use of its products. IMPORTANT NOTICE 1. Make sure the speed control lever is not engaged before turning on your scooter. 2. In order to avoid injury or damage to the scooter the driver should not lean against or pull on the speed control lever while going up or down an incline. 5


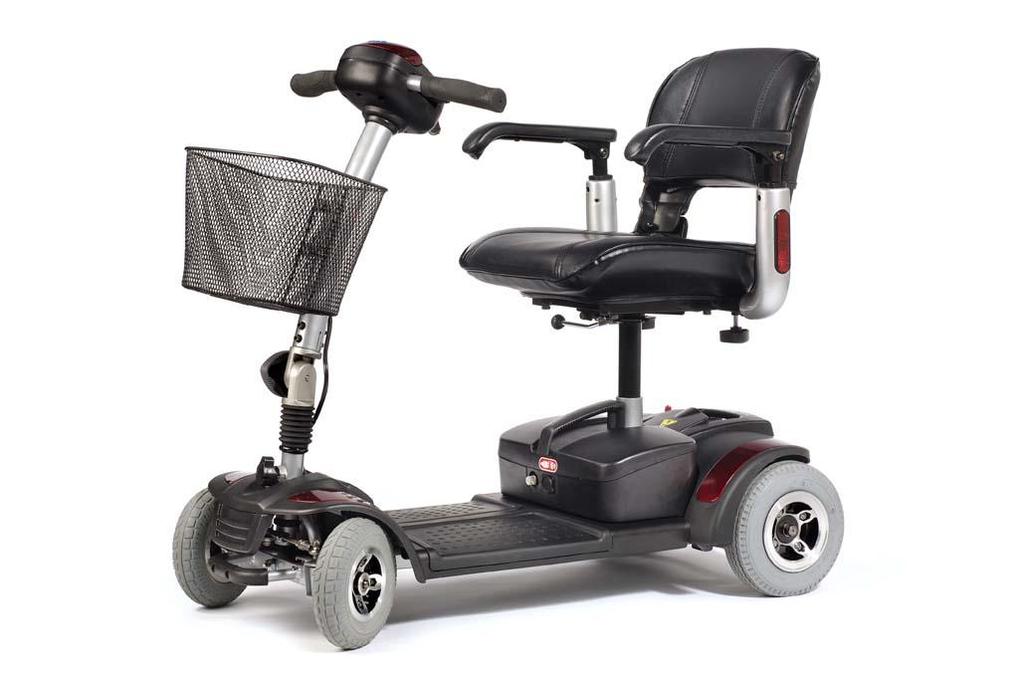
7 3. PA R T S I N T R O D U C T I O N Control panel 10. Tiller lock 2. Basket 11. Battery gauge 3. Tiller adjustment handwheel 12. Horn button 4. Lifting handle 13. Speed dial 5. Removable flip-up arm rest 14. Speed control levers 6. Detachable swivel seat with folding backrest 15. Diagnostic & on/off light 7. Connecting device 16. Key switch 8. Battery pack 17. Freewheel mode lever 9. Charging socket 18. Anti-tip wheels 6
8 4. O P E R AT I O N 4.1 HOW TO OPERATE YOUR SCOOTER Power switch Turn the key switch to power ON or OFF ON :Power is turned on OFF :Power is turned off Forward, Reverse, and Braking 1. Push the RH speed control lever forward with your right thumb and the scooter will move forward. 2. Push the LH speed control lever forward with your left thumb and the scooter will move backward. 3. The horn will beep when the scooter is in reverse. 4. Release the speed control lever while in either forward or reverse direction, the electromagnetic brake in the motor will be activated and the scooter stops. 5. Your scooter can be converted to allow for predominantly left hand drive. If this has been done, ignore points 1 & 2 above, your left thumb will control forward movement and right thumb reverse movement. Horn Button The warning horn will be activated when you push the horn button, release the button and the horn will stop. Braking Electro-magnetic brake: Release the throttle lever completely, the electro-magnetic brake will be activated. WARNING! Never try to drive, or even sit on your vehicle while it is in freewheel. electronic brake will be disengaged and the vehicle could run away with you. The Seat The seat can be turned 90 degrees. Pull swivel seat lever to rotate the seat. The seat has 4 height adjustments. After adjusting the height to the desired seat position, secure the locking pin. CAUTION! Ensure the seat is locked in the forward/straight ahead position before driving. 7


9 Tiller lock The scooter has a tiller lock function, press and twist the tiller lock button to lock the tiller, see Fig Twist the button anti-clockwise to unlock the tiller, see Fig This is only to be used when the scooter is dismantled, either for transportation, or storage. Fig Locking mode Fig Unlocking mode CAUTION! Never drive the scooter with the tiller in the locked position. Parts You can disassemble the scooter into five pieces: the seat, the front section, the basket, the battery pack, and the rear section. 1. Place the scooter in an area where you have sufficient space to move the parts around. You may need assistance to lift some of the scooter components. 2. See Specifications for individual component weights. 3. No tools are required to disassemble or assemble your scooter. Always disassemble or assemble your scooter on a level, dry surface with sufficient space for you to work and move around your scooter. Keep in mind that the disassembled sections of the scooter take up more floor space than the assembled scooter. 8
 4.")
 7. After pulling the connecting device upward, pull the front section forward. (Fig. 4.1.4 and Fig. 4.1.5) Fig. 4.1.3 Fig. 4.1.4 Fig. 4.1.5 ASSEMBLY Note: Raise the tiller before reassembling the scooter.")
 3. Put down the front and rear sections until the scooter is level. (See Fig 4.1.7) 4. Set down the battery pack on the scooter, and make sure it is in the correct position. 5.")
10 CAUTION! Lifting weight beyond your physical capability may result in personal injury. Ask for assistance when necessary while disassembling or assembling your scooter. Disassemble: 1. Turn the key switch to OFF. 2. Turn the tiller lock to locked position. 3. The tiller can then be laid flat by releasing the handwheel and folding the tiller down (See Fig ) 4. Ensure the free wheel mode lever is in the drive position. 5. Pull upward on the swivel-release lever to remove the seat from seat post. 6. Pick up the battery pack and remove it from the scooter. (See Fig ) 7. After pulling the connecting device upward, pull the front section forward. (Fig and Fig ) Fig Fig Fig ASSEMBLY Note: Raise the tiller before reassembling the scooter. 1. Ensure the freewheel mode lever is in the drive position. 2. Set the rear section in the up position and make sure the hook for the front section is connected to the axle of the rear section. (See Fig 4.1.6) 3. Put down the front and rear sections until the scooter is level. (See Fig 4.1.7) 4. Set down the battery pack on the scooter, and make sure it is in the correct position. 5. Set down the seat on the seat post until the swivel lock engages and you hear a click. 6. Turn key switch to ON, make sure battery gauge has sufficient power. 9

11 Fig Fig Caution:Ensure all pieces are engaged and fitted together properly and fully. Caution:Turn off the key switch of your scooter and remove key to prevent accident before disassembly or assembly. Caution:Take great care and exercise caution to avoid finger entrapment while assembling. Caution:Ensure all parts are fully and correctly fitted together before driving. Battery Gauge When the key is switched ON, the battery gauge will display the battery power capacity by indicating red, yellow and green areas respectively. Green area indicates a full charge from the battery. Red area indicates low power. The remaining power indicated by the battery gauge will be varied by the actual driving time and how you drive. Repeated starting, stopping or climbing will consume the power more quickly. SUGGESTION 1. It is recommended that you charge the battery immediately when the battery gauge is in the red area. 2. After charging or replacing a new battery, drive the scooter for 2-3 minutes to make sure the battery capacity is enough. 3. In the Winter the battery may take longer to charge and the distance you can travel may also be reduced 4. When driving on an incline, the battery gauge light might move from green to red, this is normal, please do not worry. 5. Even if the battery is used properly, it is natural that the battery capability will decay as time passes, which results in a shortening of travel distance compared to a brand new battery. Therefore, when you find the travel distance is about only 50% of a brand new battery s traveling distance, it is time for a replacement. Please go to your dealer and ask for replacement. If you continue to use the old battery when its lifetime is ending, it could lead to a decrease in travel distance. Travel distances will be shortened when driving frequently on an incline or slope, as this leads to a larger consumption of the power. 10
. 2.")

12 4.2 HOW TO SET THE FREE WHEEL MODE Drive Mode:Push the free wheel mode lever on the scooter towards the rear of the scooter, and the scooter will be driven by the motor. Free wheel Mode (Fig 4.2.2): Push the free wheel mode lever on the scooter forwards towards the front of the scooter and the scooter can be pushed manually. Fig Drive Mode Fig Freewheel Mode 4.3 TILLER ADJUSTMENT The Tiller can be adjusted by the following steps. 1. Turn the handwheel anti-clockwise to loosen (Fig 4.3.1). 2. Adjust the tiller angle to the desired position; turn the handwheel clockwise to tighten. Fig 5.4 Driving your Scooter 1. Ensure the seat is installed properly and locked in the straight ahead position. 2. Ensure the tiller is in a comfortable position and secured by the handwheel as described above. 3. Ensure the electromagnetic brake is in drive mode as described above. 4. Ensure the speed control lever is not accidentally being depressed and turn the key switch to ON. 5. Check battery gauge to see whether there is enough power for your journey. If you have doubts about the remaining power, please charge the battery before departure. 6. Set to a safe speed on the speed dial. 7. Be aware of traffic and pedestrians and make sure it is safe before setting off. 11
13 CAUTION! 1. Do not push both right hand & left hand side speed control levers together, this may lead to a loss of control of your scooter. 2. Do not set to the highest speed in enclosed areas. 3. Do not adjust the speed dial while driving, the sudden change in speed may endanger you and cause your scooter to malfunction. 4. Do not place magnetic devices near the area of the operation handle, this could affect the safe operation of your scooter. 5. While reversing the scooter, be aware of people or objects behind you. About driving speed The speed scale is printed on the speed dial label, ranging from 1 to 10. Scale 10 means maximum speed; please refer to page MAX. SPEED in section 8 Speed Scale Over 7 Circumstances for Recommended speed Speed equivalent to walking slowly Use when negotiating a difficult incline or decline Use when driving indoors or in a narrow space Speed equivalent to walking normally Use when driving outdoors on flat ground Speed equivalent to walking quickly Use when driving in an open space without hazards Stopping 1. Release the speed control lever completely and the scooter will naturally brake and stop. 2. Turn the key switch to OFF. Then pull out the key (only after stopping). CAUTION! The stopping distance will vary according to your speed, user weight and gradient, please begin braking as early as possible. While parking your scooter, be sure to park on a flat ground and then turn the power to OFF. 12

14 5. B AT T E R I E S & C H A R G E R There are two battery options on the Eclipse, the standard which has 12A/H batteries and the heavy duty which has 21A/H batteries, giving a longer range. All of the references relate to both battery sizes and the only difference physically is that the Heavy Duty battery pack is slightly larger and slightly heavier. 5.1 CHARGING THE BATTERY PACK Be sure to follow the procedures shown below accordingly. 1. Turn the scooter key switch to OFF. 2. Open the charging socket cap on the scooter s cover then connect the charger s plug to the charging socket. 3. Connect the charger cord to the power outlet. 4. The charger s LED light will be orange at the beginning of a charge. The charging duration is at least 6-8 hours but this will vary based on the status of the battery and factors such as temperature. 5. The orange LED will turn to green when the charging is complete. 6. Disconnect the cord and remove the round plug from the charge socket. SUGGESTION 1. Do not disconnect the charger cord if the charging is not complete. The battery life will be shortened if the battery is repeatedly used without being fully charged. Therefore, be sure to charge the battery fully every time. 2. Continue to charge until the green LED light is on. NEVER stop charging before it is complete. 3. Disconnect the power cord when charging is complete. 4. If your scooter is left unused for a long period of time, it should be charged at least every 3 months to keep the battery at full status. 5. Charging time will be affected by the ambient temperature so it takes longer in the wintertime. CAUTION! Please follow the rules below to avoid accidents while charging. 1. Please only use the charger supplied and charge the battery completely every time. The battery might be damaged if you use a charger which is not compatible. 2. Never disassemble or modify the charger. 3. Do not charge in a space that is directly exposed to the sunlight. Do not charge in a space where it is humid or under rainfall and morning dew. 4. Do not cover the scooter with any waterproof cloth or other objects while charging. 5. Do not charge in temperatures less than -10 or higher than +50,the charger may not work properly and the battery may be damaged 13
15 WARNING! 1. Keep away from flammable objects while charging. 2. Do not smoke while charging. Always charge your battery in a well-ventilated space. 3. Never connect or disconnect the plug or cord with wet hands. 5.2 CHARGER The charger s red LED will be ON when you plug it into the power outlet. The orange LED will change to green when the charging is complete. 5.3 BATTERY Do not expose the battery to temperatures below -10 or above 50 when charging or storing the scooter. Exceeding the specified temperature ranges can lead to freezing or over heating of the battery. This will possibly damage the batteries and shorten their lifetime. The battery type used on your scooter is sealed and maintenance-free. SUGGESTION 1. Do not use the battery to charge any other equipment. 2. Battery capability will vary with outside conditions; the driving distances will be shorter in the winter. 3. If the scooter is not to be used for a long time please charge the battery every three months and always charge fully before putting into storage. 4. There are two batteries within the battery pack, always replace both batteries at the same time, with batteries of the same make and specification. 5. For the best results and to prolong battery life, try to run the battery down by at least 50% before recharging and in addition it always best to go through a complete charge cycle each time. 6. For the best results your batteries really need to be cycled for their first charges. This means run them down as much as you safely can in use and then give them a full charge. They will not work at their best until this process has been carried out. You will find that the distance that your Eclipse can travel will gradually increase over the first few weeks of use as the batteries reach their optimum efficiency after approximately 12 cycles of discharge and recharge. 14
16 6. I N S P E C T I O N A N D M A I N T E N A N C E 6.1 DAILY CHECKS Check the following items before driving. If you find any thing abnormal, go or call your authorised TGA dealer for further inspection before using it. Item Inspection Content Handle bar Speed Dial Speed Control Lever Motor Freewheel Mode Lever Battery Gauge Horn Button Seat Tyres Other Is it tight? Can it be turned left or right smoothly? Can it be adjusted freely and function well? Does the scooter move when the lever is engaged? Does the scooter stop when the lever is released completely? Is there any abnormal noise from the motor? Does the electromagnetic brake work properly? Does the free wheel mode lever work properly? Does the gauge move to green when switched ON after a full charge? Is the remaining power enough for your trip? Does the horn work? Is the seat on properly? Can the seat be turned smoothly? Are there any cracks or other damage to the tyres? Check the tread on the tyres. Is there any abnormal noise? Is there an oil leakage from the transmission box? 6.2 REGULAR CHECK RECORD To make sure your scooter is in good condition, go to your dealer regularly for maintenance and keep a record. It is always wise to have your machine serviced at least once a year. SUGGESTION Even if you don t use the scooter for a long time, the scooter should still be maintained regularly. 15
17 6.3 BATTERY, CIRCUIT BREAKER AND TYRES Battery Refer to section 5 BATTERIES AND CHARGER. Fuse There are two fuses on your scooter. One is located inside the operation panel; another is on the battery pack. SUGGESTION Ask for help from your dealer for inspecting or replacing the fuse, (since battery pack has to be disassembled first for replacement of fuse). Circuit Breaker There is one button for the circuit breaker (located on the Battery pack), if the power switch is ON and the battery gauge does not move, it is possible an electric current has overloaded the scooter, reset the circuit breaker by pressing the button. If it will not reset, leave it for a few minutes and try again. Never hold the button in or use any other means to hold it in. If it will not reset, contact your TGA dealer. Tyres The condition of the tyres depends on how you drive and use your scooter. Inspecting Tyre Tread Please check the tread depth regularly. Replace the tyres when the tread depth is less than 0.5 mm. Regularly inspect your scooter s tyres for signs of wear. 6.4 MAINTENANCE CAUTION! When the tread depth is below 0.5mm, it can easily lead to loss of grip, making braking distances longer. Replace tyres as soon as necessay. 1. You must maintain and clean the scooter frequently. 2. Do not use water, oil or other chemical solutions to clean your scooter. Be sure NOT to spray the scooter with the water hose to prevent damaging the electronic components and printed circuit board. Please clean the scooter by wiping it with either a dry or moist cloth. 3. Please take the scooter to an authorised dealer for repairs and adjustments. Improper adjustments could lead to accidents and scooter malfunction. 4. Please use moderate or mild detergent to clean the scooter and only a soft cloth to wipe it over with. CAUTION! When conducting maintenance of your scooter, please turn the key switch OFF and remove the charger cord. 6.5 STORAGE Make sure the scooter is stored under the following conditions: Make sure the seat is set in the straight ahead locked position Make sure the key switch is turned to OFF and the key removed. 16
18 SUGGESTION Please store the scooter in a location where it is out of direct sunlight, rain, or moisture. When storing for long periods of time, please charge the battery every 3 months. For further details, contact your dealer. 7. B A S I C T R O U B L E S H O O T I N G This table is only a guide to aid you in getting your scooter operating, should you have any problems. If you are unable to get your scooter operating, please contact your Authorized Service Centre. Table1 Basic troubleshooting Symptom Possible Cause Solution Scooter does not move Scooter feels wobbly when driven Range less than expected Erratic behavior when speed control lever operated 1. Key switch is not ON 2. Main circuit breaker tripped 3. Brake release lever in Freewheel Mode 4. Charger connected to scooter 5. Battery power low 6. Scooter shuts down to conserve battery 7. Controller error 1. Seat is loose 2. Bearing in tiller worn 1. Charging too infrequently 2. Defective or worn out battery 3. Cold weather reduces battery life 4. Defective charger 1. Turn key switch to ON 2. Reset circuit breaker in battery pack area 3. Place lever to Drive Mode 4. Disconnect charger 5. Recharge battery 6. Turn key switch OFF, then ON 7. Check diagnostic light for Flash Code (See Table 2 to get solution) 1. Check seat for loose hardware or damage. Ensure seat is in locked position. 2. Replace bearings. 1. Charge scooter more often 2. Load test batteries. If necessary replace. 3. Allow batteries to reach room temperature and then fully recharge 4. Contact your Authorised Service Centre 1. Faulty speed control 1. Contact your Authorised Service Centre Brake squeals 1. Dirt in brake pad 1. Clean Brake - Contact dealer. Brake release 1. Rust and corrosion 1. Spray ball detent area with lubrication oil. lever sticks 2. Lubricate freewheel lever Stiff steering 1. Possible grime build-up 1. Lubricate rod end joints 17
19 Table 2: Scooter Controller Internal diagnostics The diagnostic flash codes for your scooter are designed to help you perform basic troubleshooting quickly and easily. A diagnostic flash code flashes from the diagnostic light in the event one of the conditions listed below develops. Number of Flashes Possible Solution 1 The battery needs charging or there is a bad connection to the battery. Check the connections to the battery. If the connections are good, try charging the battery. 2 There is a bad connection to the motor. Check all connections between the motor and the controller. 3 The motor has a short circuit to a battery connection. Please contact your Authorized Service Center. 4 Not available 5 Not available 6 The controller is being inhibited from driving. Check the battery charger connector. Remove the battery charger from the scooter. 7 A speed control lever fault is indicated. Make sure that the speed control lever is in the rest position before switching on the scooter. 8 A controller fault is indicated. Make sure that all connections are secure. 9 The parking brake has a bad connection. Check the parking brake and motor connections. Make sure the controller connections are secure. 10 Excessive voltage has been applied to the controller. Check the battery connections. This is usually caused by a poor battery connection. If you are in any doubt about carrying out any of the previous suggestions please contact your dealer or TGA. 18
20 8. S P E C I F I C AT I O N Overall length 1000mm /39" Overall width Overall height Total: Weight with battery Total: Weight without battery 480mm/19" 900mm/35.4" 50kg/110lbs 42kg/ 92lbs Min. turning radius 1150mm/45" Drive motor 24V/270W/4700rpm Battery DC12Vx12AHx2 or Heavy Duty DC12Vx21A/Hx2 Charger 24V 1.8A Front Tyre 190x50mm/7.5"x2" solid pu tire Rear Tyre 215x72mm/8.5"x2.8" solid pu tire Driving System Direct drive to the rear wheel Brake System Automatic Electromagnetic brake Control Method By throttle lever; Dynamic R-series 50A Speed (Maximum) 6.4kph/4mph Climbing angle lb Range (Approx) 15 km/9.5miles or Heavy Duty 22km/14miles Ground clearance 75mm/3" Weight Capacity 113kg/250lb TGA reserve the right to modify the specification if necessary without prior notification. The final specification is subject to the individual scooter you purchase from your dealer. Note: Maximum driving distance is based on the conditions of ambient temperature at 20, a 165lb driver and a brand-new fully charged battery. 19
21 9. W A R R A N T Y This is to certify that your TGA product is warranted by TGA for a period of twelve months from the date of purchase subject to the following conditions: 1. This warranty is extended only to the original purchaser/user of the TGA product identified by the product serial number located on the frame. This warranty is not transferable. 2. TGA will repair or replace free of charge any part found upon inspection by an authorised representative of TGA to be defective in material and/or workmanship. 3. If a defect or fault is discovered, the dealer from where the product was purchased should be notified immediately. Warranty Exclusions Tyres and the rear anti-tip wheels (these are normal wear components and replacement is not warranted) TGA will not be responsible for defects caused by abuse in return transit, vandalism, misuse, abuse, accident, negligence, alteration or misuse caused by non-observance of instructions set out in the Operators Manual This warranty does not cover commercial or rental use of the Eclipse or any use other than normal. Upholstery and seating (these are normal wear components and replacement is not warranted) Returns are only accepted when the product is shipped in the original carton with original protective packing materials installed. Returned goods to be sent to TGA carriage paid. If a successful warranty claim is found TGA will pay return carriage. There is no other express warranty. Any and all other implied warranties are excluded. Your rights as a consumer are not affected. Service Information: Only genuine TGA Spares should be used. An authorised TGA dealer will service your Eclipse under the terms of the above stated warranty. Servicing dealership personnel are trained professionals. They should be able to answer any question you may have. If you encounter a problem that a dealer does not solve to your satisfaction, please discuss it with the dealership's management. The Service Manager or General Manager can help. Almost all problems can be solved in this way. If you are dissatisfied with the decision made by the dealership's management, contact: 20
22 10. SAFE DRIVING TIPS FOR SCOOTER USERS Scooters fall into two categories, Class 2 which is essentially a 4mph pavement vehicle and can only legally be used on the road when either crossing over or because there are no footpaths. A Class 3 vehicle is capable of 4 and up to 8 mph and provided it is fitted with front and rear lights, flashing indicators, horn and rear view mirror it is legal for use on the road. It can also be used on the footpaths but must not exceed 4 mph. Class 2 & 3 vehicles must not be driven on Dual Carriageways, Motorways, Bus Lanes or Cycle Tracks. Your Eclipse is a class 2 vehicle capable of 4mph. INSURANCE - There is no legal requirement for insurance but it is a very good idea to have cover for fire and theft, accidental and malicious damage, and also third party damages. Just phone Karen at TGA ( ) and she will talk you through it. BREAKDOWN & GET YOU HOME SERVICE - Again a very good idea and can take a load of worry off your mind. Just talk to Karen. MOBILE PHONE - An essential item if you are out there alone. You never know, breakdown, accident, health - communication is a must. Please take notice of laws regarding the use of mobile phones when driving. CARRYING LOADS Do not overload. It may make the vehicle unstable and reduce its range. Place heavy loads inboard in the middle not behind the back wheel which can lighten the steering or can cause the front end to lift off the road on a bump, and not at the front which might make steering heavy. WATCH YOUR BRAKES Never try to drive, or even sit on your vehicle while it is in free wheel. The electronic brake will be out of action and the vehicle could run away with you. MAINTENANCE Do carry out the checks listed in this manual regularly and also have the machine serviced at least once a year. TYRES Regularly check condition and replace when they become worn. SENSIBLE GUIDELINES FOR SAFETY When using the footpath Just because you are on the footpath or pedestrian precinct does not make you a pedestrian. If you are on a motorized vehicle you are no longer a pedestrian. So take care. Remember pedestrians always have right of way! - Many people on foot will be kind and helpful to the drivers of a wheelchair or scooter, but not everyone! In a crowded precinct, market area, or footpath - It is your responsibility to ensure you do not run into anyone or do any harm with your vehicle. While many people will make way for you, you cannot expect everyone to do so. Some will appear to not even realize you are there. They will climb round and even over your vehicle rather than allow you room to move. Also be very aware of people s feet. When climbing or descending kerbs Always approach at right angles, with your front wheels straight on to the kerb. Do not climb or descend kerbs higher than the manufacturer recommends. Move carefully, to avoid traumatic bumps to yourself or the vehicle. 21
23 Watch out for: Children They may well run in front of you without warning. You may only be moving very slowly, but you could still injure a child. Elderly People They may be unable to quickly move aside to let you pass. Give way to them Disabled people on foot they too may be unable to dodge you People with visual problems or impaired hearing Give them space and time Other motorised vehicle users You may be doing all the right things. This does not guarantee they will do likewise When you need help: You may need to ask people to open doors for you. Most people are willing to help, if asked politely. Don t struggle to do the impossible, or even the very difficult things when there are people around who would help if asked. Driving inside shops and buildings This is where you have the advantage over car users! Not many supermarkets would welcome a car driving round their store. But most bigger shops and even some quite small ones, are accessible to wheelchairs and scooters. Once inside the store it is your responsibility to drive slowly and safely and not damage the fittings or the stock, or hurt other shoppers or store workers. You may need to ask for help. Again in most cases people are willing if asked properly. Don t risk pulling down a whole display to reach the top shelf. ASK FOR HELP. Speed in shops and buildings Reduce it! It is a good idea to set the speed control to a lower level to avoid any accident. Be especially careful if you need to reverse, that your way is clear of shop fittings and people. Three wheeled scooters with their maneuverability and lightness of steering are more suited to shopping. On the Road Remember you are not driving a car, but a very small and slow vehicle, which is therefore more vulnerable. If it is possible, use the footpath. It is wise to avoid using roads, particularly busy ones. WHEN DRIVING YOUR VEHICLE ON THE ROAD: Remember although this is legal for all Class 3 vehicles it is not always safe or sensible to do so. You are responsible for your own safety and that of other road users. The normal rules of the road apply and you must observe the law about: Driving on the left side of the road. Never drive against the traffic. One way streets Never drive against the traffic Giving way where cars would give way (details in the Highway Code) Obeying traffic lights and all other road signals and instructions Giving way to pedestrians on crossings. 22
24 But always remember your vehicle is not a car and is small and vulnerable If you need to turn right across traffic, try to get on to the footpath before the turn and then use a safe pedestrian crossing or traffic light control crossing. Only try to turn right if you are completely sure it is safe to do so. Do not rely only on your mirror. It may give a false impression of distance. Always give clear indication of intention to turn left or right. Remember the car you can see when you look behind may appear a long way away, but it is almost certainly moving faster than you are, often deceptively so. It could well be upon you before you complete your maneuver. And it may not be able to stop in time. When passing a parked vehicle take great care you are not moving into the path of a faster moving vehicle coming behind you, or towards you. Always signal your intention to pull out. In the event of a difficult or dangerous situation Use your hazard lights But do not drive with them on unnecessarily 23


25 TGA Customer Service. TGA Electric Leisure Ltd, Woodhall Business Park, Sudbury, Suffolk, CO10 1WH Tel: Fax: TGA Electric Leisure Ltd reserves the right to change specification and/or prices without prior notification or waning. Eclipse Handbook 11/11/
26 If you need any help with this manual, or if you are looking for a mobility scooter and parts please contact us and we will be delighted to help. Free on If you wish to call from a mobile then the call may not be free and you may be charged. Landline Alternatively, us at sales@discountscooters.co.uk service@discountscooters.co.uk
Operating Instructions and Owner s Handbook
 Operating Instructions and Owner s Handbook Contents Page Introduction 3 Your Minimo Plus Controls & Instrument Panel 4 Adjusting Your Minimo Plus Tiller 5 Removing Your Minimo Plus Battery Pack 6 Folding
Operating Instructions and Owner s Handbook
 Operating Instructions and Owner s Handbook Contents Page Introduction 3 Your Vita Lite Controls & Instrument Panel 4 Adjusting Your Vita Lite Tiller 5 Adjusting & Removing Your Vita Lite Seat 6 Charging
Airlite 3. Owner s Manual. CareCo (UK) Ltd Hubert Road Brentwood Essex CM14 4JE
 Ltd Hubert Road Brentwood Essex CM14 4JE") Airlite 3 Owner s Manual CareCo (UK) Ltd Hubert Road Brentwood Essex CM14 4JE Thank you for purchasing your AIRLITE 3 Scooter. We are delighted you have chosen CareCo (UK) Ltd for your mobility needs Standard
Airlite 3 Owner s Manual CareCo (UK) Ltd Hubert Road Brentwood Essex CM14 4JE Thank you for purchasing your AIRLITE 3 Scooter. We are delighted you have chosen CareCo (UK) Ltd for your mobility needs Standard
Spitfire EX 1320/1420 Mobility Scooter Owner's Manual
 Spitfire EX 1320/1420 Mobility Scooter Owner's Manual Table of Contents 1. Preface...2 2. Safety Notices...3 3. Electromagnetic Interference (EMI)...5 Electromagnetic Interference (EMI) From Radio Wave
Model S-777NA USER MANUAL. Please ensure this manual is read and understood before using the scooter.
 Model S-777NA USER MANUAL Please ensure this manual is read and understood before using the scooter. CONTENTS Introduction 3 Feature Guide 3 Safety Advice 4 Adjustments 5 Tiller Angle Adjustment Seat Swivel
Breeze 3 & Breeze 4 Operating Instructions and Owner s Handbook
 Breeze 3 & Breeze 4 Operating Instructions and Owner s Handbook CONTENTS CHAPTER INTRODUCTION 1 ASSEMBLY 2 PREPARE THE BREEZE FOR FIRST USE 3 THE CONTROLS AND INSTRUMENT PANEL 4 SEAT ADJUSTMENT 5 DRIVING
User Manuel. Titan Hummer XL
 User Manuel Titan Hummer XL Dear User, Tzora Active Systems Ltd. thanks you for choosing the Titan Hummer-XL and wishes you safe and enjoyable journeys. For proper operation and to maintain the scooter
GLADIATOR GT GT807, GT808 OWNER S MANUAL
 GLADI ATOR GT GT807, GT808 OWNER S MANUAL TABLE OF CONTENTS 1. PREFACE AND INTRODUCTION.. 3 2. SAFETY NOTICE.... 2.1 Before driving 2.2 While driving 2.3 Labeling 4 3. PARTS INTRODUCTION... Parts description
Mobility Scooters. Owners Manual
 Mobility Scooters Owners Manual 1 Electromagnetic Interference ( EMI ) It is very important that you read this manual before using the scooter for the first time including the following information regarding
USER S MANUAL & WARRANTY
 USER S MANUAL & WARRANTY Salute 3-Wheel / Prestige 4-Wheel 1 TABLE OF CONTENTS 1. PREFACE AND INTRODUCTION.. 3 2. SAFETY NOTICE..... 2.1 Before driving 2.2 While driving 2.3 Labeling 4 3. PARTS INTRODUCTION...
Maximo Operating Instructions and Owner s Handbook
 Maximo Operating Instructions and Owner s Handbook CONTENTS PAGE INTRODUCTION 3 ASSEMBLY 4 OPENING & FOLDING THE MAXIMO 4 THE CONTROLS AND INSTRUMENT PANEL 6 DRIVING 7 TRANSPORTING 8 PARKING BRAKE RELEASE
TABLE OF CONTENTS. 1. PREFACE AND INTRODUCTION SAFETY NOTICE Before driving 2.2 While driving 2.3 Labeling
 ODYSSEYY LX OWNER S MANUAL TABLE OF CONTENTS 1. PREFACE AND INTRODUCTION.. 2 2. SAFETY NOTICE..... 2.1 Before driving 2.2 While driving 2.3 Labeling 3. PARTS INTRODUCTION... Parts description 4. OPERATION...
SCOOTCASE. Owner s Manual. CareCo (UK) Ltd Hubert Road Brentwood Essex CM14 4JE
 Ltd Hubert Road Brentwood Essex CM14 4JE") SCOOTCASE Owner s Manual CareCo (UK) Ltd Hubert Road Brentwood Essex CM14 4JE Thank you for purchasing your Scootcase scooter. We are delighted you have chosen CareCo (UK) Ltd for your mobility needs Standard
SCOOTCASE Owner s Manual CareCo (UK) Ltd Hubert Road Brentwood Essex CM14 4JE Thank you for purchasing your Scootcase scooter. We are delighted you have chosen CareCo (UK) Ltd for your mobility needs Standard
Introduction A mobility scooter could cause considerable damage to the user or to other people if it collided with someone or something.
 2 Introduction A mobility scooter could cause considerable damage to the user or to other people if it collided with someone or something. We have written this highway code to protect the safety of people
USER S MANUAL & WARRANTY
 Commander Series USER S MANUAL & WARRANTY Commander / Commander Heavy Duty 1 TABLE OF CONTENTS 1. PREFACE AND INTRODUCTION.. 3 2. SAFETY NOTICE..... 2.1 Before driving 2.2 While driving 2.3 Labeling 4
Model S888NR & Model S889NR USER MANUAL. Please ensure this manual is read and understood before using the scooter.
 Model S888NR & Model S889NR USER MANUAL Please ensure this manual is read and understood before using the scooter. CONTENTS Introduction 3 Feature Guide 3 Safety Advice 4 Adjustments 4 Tiller angle Seat
Operating Instructions and Owner s Handbook
 Operating Instructions and Owner s Handbook CONTENTS 1. INTRODUCTION... 3 2. THE CONTROLS AND INSTRUMENT PANEL... 4 3. SEAT ADJUSTMENT... 6 4. DRIVING... 7 5. ASSEMBLY... 7 6. DISMANTLING... 8 7. PARKING
On the following pages you will find the user manual for the Breeze mobility scooter. In stock we have a big range of mobility scooters available.
 On the following pages you will find the user manual for the Breeze mobility scooter. In stock we have a big range of mobility scooters available. Breeze3 & Breeze4 Operating Instructions and Owner s Handbook
Folding Scooter. User Manual
 Folding Scooter User Manual CONTENTS 1. Safety Instructions 2. Electromagnetic Interference (EMI) 3. Transporting the Scooter 4. Specification 5. Folding Out the Scooter 6. Folding Up the Scooter 7. Scooter
Vita Midi 4 Operating Instructions and Owner s Handbook
 Vita Midi 4 Operating Instructions and Owner s Handbook CONTENTS PAGE INTRODUCTION TO YOUR VITA MIDI 4 3 ASSEMBLY 4 THE CONTROLS 4 THE DISPLAY 5 SEAT ADJUSTMENT 6 DRIVING YOUR VITA MIDI 4 7 TRANSPORTING
Produced with support from The Welsh Assembly Government
 Produced with support from The Welsh Assembly Government 2 Introduction A mobility scooter could cause considerable damage to the user or to other people if it collided with someone or something. We have
USER MANUAL MS C a r eco ( U K ) Lt d, H u b er t Road, Brentwood, Essex, CM1 4 4 JE P A GE 1
 Lt d, H u b er t Road, Brentwood, Essex, CM1 4 4 JE P A GE 1") USER MANUAL P ROD U C T C OD E MS01051 C a r eco ( U K ) Lt d, H u b er t Road, Brentwood, Essex, CM1 4 4 JE P A GE 1 CONTENTS 1. INTRODUCTION 1 2.1 SAFETY PRECAUTIONS 2 2.2 BEFORE DRIVING 3 2.3 WHILE
USER MANUAL P ROD U C T C OD E MS01051 C a r eco ( U K ) Lt d, H u b er t Road, Brentwood, Essex, CM1 4 4 JE P A GE 1 CONTENTS 1. INTRODUCTION 1 2.1 SAFETY PRECAUTIONS 2 2.2 BEFORE DRIVING 3 2.3 WHILE
Mobility Scooter Owner's Manual
 Spitfire TM EX 1420 Mobility Scooter Owner's Manual Table of Contents 1. Preface...2 2. Safety Notices...3 3. Electromagnetic Interference (EMI)...5 Electromagnetic Interference (EMI) From Radio Wave Sources...5
Skippa Mobility Scooter Owner Manual
 Skippa Mobility Scooter Owner Manual Page 1 CATALOGUE I. SAFETY GUIDELINES...3 II. SPECIFICATION... 5 III. YOUR TRAVEL SCOOTER...6 IV. OPERATION...9 V. DISASSEMBLY AND ASSEMBLY... 11 VI. BATTERY AND CHARGING...14
On the following pages you will find the user manual for the TGA Vita mobility scooter. In stock we have a big range of mobility scooters available.
 On the following pages you will find the user manual for the TGA Vita mobility scooter. In stock we have a big range of mobility scooters available. Operating Instructions and Owner s Handbook CONTENTS
USER S S MANUAL. Prestige OWNER S MANUAL. WU S Tech Electric Scooter Range - User Manual (Page 1 of 24)
") USER S S MANUAL Prestige OWNER S MANUAL WU S Tech Electric Scooter Range - User Manual (Page 1 of 24) TABLE OF CONTENTS 1. PREFACE AND INTRODUCTION.. 3 2. SAFETY NOTICE..... 2.1 Before driving 2.2 While
USER S S MANUAL Prestige OWNER S MANUAL WU S Tech Electric Scooter Range - User Manual (Page 1 of 24) TABLE OF CONTENTS 1. PREFACE AND INTRODUCTION.. 3 2. SAFETY NOTICE..... 2.1 Before driving 2.2 While
OWNERS MANUAL For The Gecko MODEL No SL3 & SL4
 OWNERS MANUAL For The Gecko MODEL No SL3 & SL4 IMPORTANT NOTE; This scooter has been designed to climb angles up to 8 degrees. When driving the Gecko scooter as with all scooters the driver should lean
User Guide. Always abide by this User Guide
 User Guide This User Guide and all the safety instructions must be read and adhered to before use of the StrideOn. For questions, please contact the place of purchase/rental or call StrideOn Australia
Go Yonder D-Lite Owner s Manual
 Go Yonder D-Lite Owner s Manual Marketed in Australia and New Zealand by Bzooma Pty Ltd ABN 37 640 907 507 TABLE OF CONTENTS Table of Contents... 1 Bzooma Pty Ltd... 1 Introduction... 1 Operation... 1
1. PREFACE 2. SAFETY NOTICE. 2.1 Before Driving. 2.2 Whilst Driving. 2.3 Labelling. 2.4 Electromagnetic Interference 3. PARTS INTRODUCTION
 QUICK REFERENCE GUIDE Problem: Scooter will not switch on Batteries not connected Check batteries connected Circuit breaker has tripped Push circuit breaker to reset Rear and front sections not Check connection
PCBL 1600/1800 POWER WHEELCHAIR MODERN USER'S MANUAL Edition
 PCBL 1600/1800 POWER WHEELCHAIR MODERN USER'S MANUAL Edition 09.2013 mdh sp. z o.o. 90-349 Łódź, ul. Tymienieckiego 22/24 tel. (+48) 42 212 32 08 fax: (+48) 42 674 04 99 www.mdh.pl viteacare@mdh.pl 1 TABLE
USER MANUAL. CareCo (UK) Ltd, Hubert Road, Brentwood, Essex, CM14 4JE PAGE 1
 Ltd, Hubert Road, Brentwood, Essex, CM14 4JE PAGE 1") by USER MANUAL CareCo (UK) Ltd, Hubert Road, Brentwood, Essex, CM14 4JE PAGE 1 Thank you for purchasing your I-GO product. We are delighted you have chosen I-GO for your mobility needs. CONTENTS Introduction
by USER MANUAL CareCo (UK) Ltd, Hubert Road, Brentwood, Essex, CM14 4JE PAGE 1 Thank you for purchasing your I-GO product. We are delighted you have chosen I-GO for your mobility needs. CONTENTS Introduction
Owner s Manual for the Travelite Electric Wheelchair
 Tel: 083 284 2973 Fax:086 232 5223 Email:ruan@cheapest-wheelchairs.co.za OR rosslyn@adpwheelchairs.co.za Web: www.cheapest-wheelchairs.co.za ORwww.adpwheelchairs.co.za Owner s Manual for the Travelite
1. PREFACE 2. SAFETY NOTICE. 2.1 Before Driving. 2.2 Whilst Driving. 2.3 Labelling. 2.4 Electromagnetic Interference 3. PARTS INTRODUCTION
 QUICK REFERENCE GUIDE Problem: Scooter will not switch on Batteries not connected Check batteries connected Circuit breaker has tripped Push circuit breaker to reset Rear and front sections not Check connection
MOBILITY SCOOTER SAFETY GUIDE
 Information Guides SEPTEMBER 2016 MOBILITY SCOOTER SAFETY GUIDE INTRODUCTION Mobility scooters and powered wheelchairs can provide more freedom and independence to many disabled and older people. They
EASI GO. Owner s Manual. CareCo (UK) Ltd Hubert Road Brentwood Essex CM14 4JE
 Ltd Hubert Road Brentwood Essex CM14 4JE") EASI GO Owner s Manual CareCo (UK) Ltd Hubert Road Brentwood Essex CM14 4JE Thank you for purchasing your CareCo Easi Go power chair. We are delighted you have chosen CareCo (UK) Ltd for your mobility
EASI GO Owner s Manual CareCo (UK) Ltd Hubert Road Brentwood Essex CM14 4JE Thank you for purchasing your CareCo Easi Go power chair. We are delighted you have chosen CareCo (UK) Ltd for your mobility
VICTORY Owner s Manual
 VICTORY Owner s Manual CareCo (UK) Ltd Hubert Road Brentwood Essex CM14 4JE Thank you for purchasing your VICTORY Scooter. We are delighted you have chosen CareCo (UK) Ltd for your mobility needs Standard
Owner s Manual. Transport / Companion Wheelchairs M4TV M2TF M2TC M2TL HEALTH PRODUCTS, INC.
 Owner s Manual M4TV M2TF Transport / Companion Wheelchairs M2TL M2TC HEALTH PRODUCTS, INC. INTRODUCTION Congratulations on the purchase of your new companion chair. Please read this introduction with your
PCBL 1610/ 1810 DE LUXE POWER WHEELCHAIR USER'S MANUAL Edition
 PCBL 1610/ 1810 DE LUXE POWER WHEELCHAIR USER'S MANUAL Edition 08.2010 mdh sp. z o.o. 90-349 Łódź, ul tymienieckiego 22/24 tel. (+48) 42 212 32 08 fax: (+48) 42 674 04 99 www.mdh.pl export@mdh.pl 1 TABLE
EW-04. Owner s Manual. ewheels Service (888)
") EW-04 Owner s Manual ewheels Service (888) 571-2845 0 Table of Contents Page 2 - Feature Guide Page 3 - Technical Specifications Page 4 - Operation of Scooter Page 8 - Folding Instructions Page 9 - Charging
EW-04 Owner s Manual ewheels Service (888) 571-2845 0 Table of Contents Page 2 - Feature Guide Page 3 - Technical Specifications Page 4 - Operation of Scooter Page 8 - Folding Instructions Page 9 - Charging
Breezy EC Transport Wheelchair
 B r e e z y E C Tr a n s p o r t W h e e l c h a i r Breezy EC Transport Wheelchair O w n e r s M a n u a l READ BEFORE USE REVIEW THIS MANUAL Before using this chair you, and each person who may assist
Triaxe Sport. By Enhance Mobility
 Triaxe Sport By Enhance Mobility User Manual April 2016 Thank you for choosing the Triaxe Sport Folding Scooter. Please read this manual carefully before operating the the Triaxe Sport. If you have any
TABLE OF CONTENTS 1. INTRODUCTION. 2. SAFETY NOTICE Safety Precautions 2.2 Before driving 2.3 While driving 2.4 Labeling 3. EMI...
 TABLE OF CONTENTS 1. INTRODUCTION. 2 2. SAFETY NOTICE.. 3-5 2.1 Safety Precautions 2.2 Before driving 2.3 While driving 2.4 Labeling 3. EMI... 6-7 4. 5. 6. PARTS INTRODUCTION. 8 Parts description OPERATION..
USER MANUAL PRODUCT CODE: WC CareCo (UK) Ltd, Hubert Road, Brentwood, Essex, CM14 4JE PAGE 1
 Ltd, Hubert Road, Brentwood, Essex, CM14 4JE PAGE 1") by USER MANUAL PRODUCT CODE: WC01059 CareCo (UK) Ltd, Hubert Road, Brentwood, Essex, CM14 4JE PAGE 1 CONTENTS 1. INTRODUCTION 2. IDENTIFICATION OF PARTS 3. SAFETY REGULATIONS 4. SAFETY WARNINGS 5. USER
by USER MANUAL PRODUCT CODE: WC01059 CareCo (UK) Ltd, Hubert Road, Brentwood, Essex, CM14 4JE PAGE 1 CONTENTS 1. INTRODUCTION 2. IDENTIFICATION OF PARTS 3. SAFETY REGULATIONS 4. SAFETY WARNINGS 5. USER
EW-20 Black. Owner s Manual. (888) Sales (888) Service
 Sales (888) Service") EW-20 Black Owner s Manual www.ewheelsdealers.com (888) 305-0881 Sales 0 (888) 571-2845 Service Table of Contents Page 2 - Feature Guide Page 3 - Product Specifications Page 4 - Operation of Scooter Page
EW-20 Black Owner s Manual www.ewheelsdealers.com (888) 305-0881 Sales 0 (888) 571-2845 Service Table of Contents Page 2 - Feature Guide Page 3 - Product Specifications Page 4 - Operation of Scooter Page
USER MANUAL. CareCo (UK) Ltd, Hubert Road, Brentwood, Essex, CM14 4JE PAGE 1 PRODUCT CODE WC01060.BLU
 Ltd, Hubert Road, Brentwood, Essex, CM14 4JE PAGE 1 PRODUCT CODE WC01060.BLU") by USER MANUAL PRODUCT CODE WC01060.BLU PAGE 1 CareCo (UK) Ltd, Hubert Road, Brentwood, Essex, CM14 4JE INFORMATION Thank you for purchasing a wheelchair from I-GO. This I-GO wheelchair has been designed
by USER MANUAL PRODUCT CODE WC01060.BLU PAGE 1 CareCo (UK) Ltd, Hubert Road, Brentwood, Essex, CM14 4JE INFORMATION Thank you for purchasing a wheelchair from I-GO. This I-GO wheelchair has been designed
PHOENIX SCOOTER OWNER S MANUAL.
 PHOENIX SCOOTER S35010 / S35015 OWNER S MANUAL 1 TABLE OF CONTENTS 1. PREFACE AND INTRODUCTION.. 3 2. SAFETY NOTICE.... 2.1 Before driving 2.2 While driving 2.3 Labeling 2.4 EMI 4 3. 4. PARTS INTRODUCTION.....
Osprey 4410 Mobility Scooter Owner's Manual
 TM Osprey 4410 Mobility Scooter Owner's Manual Table of Contents 1. Preface...2 2. Safety Notices...3 3. Electromagnetic Interference (EMI)...5 Electromagnetic Interference (EMI) From Radio Wave Sources...5
EW-09. Owner s Manual. (888) Customer Service. (888) Service
 Customer Service. (888) Service") EW-09 Owner s Manual www.ewheelsdealers.com (888) 305-0881 Customer Service (888) 571-2845 0 Service Table of Contents Page 2 - Feature Guide Page 3 - Product Specifications Page 4 - Operation of Scooter
EW-09 Owner s Manual www.ewheelsdealers.com (888) 305-0881 Customer Service (888) 571-2845 0 Service Table of Contents Page 2 - Feature Guide Page 3 - Product Specifications Page 4 - Operation of Scooter
User Manual of Bagibike Electric Bicycles
 User Manual of Bagibike Electric Bicycles Model: Bagibike B16. http://www.bagibike.com Page 1 FOREWORD The following operation manual is a guide to assist you. This manual is not a complete document on
The safety warning sign: or a suggestion for a dangerous operation that may hurt you or others.
 Q Chair Manual Signs and Technical Parameters 2-4 Operating Environment 4-5 Load Capacity 5 Safety Belt Installation 6 Joystick Installation 6-7 Joystick Operation 8 Brakes 9 Battery 10-12 Fold and Unfold
Table of Contents. Technical Information Warning Statement
 Table of Contents Technical Information-----------------------------------1 Warning Statement--------------------------------------2 Read Before Riding-------------------------------------3 List of Parts-----------------------------------------------4
SPORT RIDER OWNER S HANDBOOK 1. PREFACE AND INTRODUCTION
 SPORT RIDER OWNER S HANDBOOK 1. PREFACE AND INTRODUCTION 2. SAFETY NOTICE 3. PARTS INTRODUCTION 4. OPERATION 5. BATTERY CHARGING AND CARE 6. INSPECTION AND MAINTENANCE 7. 8. TROUBLE SHOOTING SPECIFICATION
US Patent 0540, 400 Other Patents Pending. Read this manual completely before assembling and riding our PET PRO-FLEX 500. Always wear a Helmet!
 US Patent 0540, 400 Other Patents Pending Read this manual completely before assembling and riding our 500 Always wear a Helmet! Priority Electric Transportation, LLC. 1007 West College Ave. #293 Santa
OWNER S MANUAL Soco TS1200R Soco TS800R
 OWNER S MANUAL Soco TS1200R Soco TS800R Version 1.0 May 2017 Congratulations on purchasing your Soco electric motorcycle. We wish you an enjoyable and safe riding experience. For your safety and comfort,
OWNER S MANUAL Soco TS1200R Soco TS800R
 OWNER S MANUAL Soco TS1200R Soco TS800R Congratulations on purchasing your Soco electric motorcycle. We wish you an enjoyable and safe riding experience. For your safety and comfort, we recommend that
USER MANUAL PRODUCT CODE MS CareCo (UK) Ltd, Hubert Road, Brentwood, Essex, CM14 4JE PAGE 1
 Ltd, Hubert Road, Brentwood, Essex, CM14 4JE PAGE 1") by USER MANUAL PRODUCT CODE MS01077 CareCo (UK) Ltd, Hubert Road, Brentwood, Essex, CM14 4JE PAGE 1 CONTENTS 1.PREFACE AND INTRODUCTION 2. SAFETY NOTICE 2.1 Before driving 2.2 While driving 2.3 Labelling
by USER MANUAL PRODUCT CODE MS01077 CareCo (UK) Ltd, Hubert Road, Brentwood, Essex, CM14 4JE PAGE 1 CONTENTS 1.PREFACE AND INTRODUCTION 2. SAFETY NOTICE 2.1 Before driving 2.2 While driving 2.3 Labelling
Mighty Mack Wheeled Walker
 Mighty Mack Wheeled Walker Handle with lever brake Backrest Handle height adjustment knob Brake cable Extra wide padded seat Shopping basket Side brace 7 inch (180 mm) wheels user guide Prior to use please
Fiesta One OWNER S MANUAL
 Fiesta One OWNER S MANUAL 1 TABLE OF CONTENT 1. PREFACE.. 3 2. SAFETY NOTICE 4 2.1 Before Driving 2.2 While Driving 3 EMI 7 4. ASSEMBLY AND DISASSEMBLY 9 5. PARTS INTRODUCTION... 10 Parts Description 6.
QUICKIE 5 R Quick Guide. IMPORTANT! Read all Warnings and Instructions contained in the complete Owner s Manual prior to using this product.
 QUICKIE 5 R Quick Guide IMPORTANT! Read all Warnings and Instructions contained in the complete Owner s Manual prior to using this product. Backrest Upholstery Back Canes Tire Seat Sling Handrim Angle-Adjustable
P R E F A C E A N D I N T R O D U C T I O N
 CityCruzer SCOOTER T4SC W T - OWNER S MANUAL TABLE OF CONTENTS 1. P R E F A C E A N D I N T R O D U C T I O N.. 2 2. SAFETY NOTICE..... 2.1 Before driving 2.2 While driving 2.3 Labeling 2.4 EMI 3. PARTS
Euro Lightweight Wheeled Walker
 Euro Lightweight Wheeled Walker Handle with lever brake Backrest Brake cable Handle height adjustment button Removable shopping bag 8 inch (200 mm) wheels Cane holder user guide Prior to use please read
ASK FOR THE BRAND SHOPRIDER OWNER S MANUAL. MODELS QT3, QT4 and GK9 ASK FOR THE BRAND SHOPRIDER
 ASK FOR THE BRAND SHOPRIDER OWNER S MANUAL MODELS QT3, QT4 and GK9 ASK FOR THE BRAND SHOPRIDER Charging GK9 To charge the Dual portable battery pack on board the scooter refer to the pictures below. Mounting
WheelieSafe. WheelieSafe. User Manual. Motorized Trolley. Distributor:
 WheelieSafe Motorized Trolley WheelieSafe Distributor: User Manual You must read this manual before using your WheelieSafe trolley P/N: 9023100 Rev. 01/16 Table of contents Contents Pages Safety Symbols,
Prowler 3310/3410 Scooter Owner's Manual
 866.621.4933 activecaremed.com TM Prowler 3310/3410 Scooter Owner's Manual Table of Contents 1. Preface...2 2. Safety Notices...3 Before the First Use of Your Scooter... 3 Regular Use of Your Scooter...
OWNERS MANUAL FOR THE 4-WEEL HD SCOOTER
 Tel: 083 284 2973 Fax:086 232 5223 Email:rosslyn@adpwheelchairs.co.za OR sales1@adpwheelchairs.co.za Web: www.cheapest-wheelchairs.co.za OR www.adpwheelchairs.co.za OWNERS MANUAL FOR THE 4-WEEL HD SCOOTER
EW-27 Crossover Pre-Mobility Scooter
 EW-27 Crossover Pre-Mobility Scooter Owner s Manual www.ewheelsdealers.com Before (888) 305-0881 you operate Customer the Service scooter (888) 571-2845 Service 0 Locate the below listed materials in rear
The Grasshopper. Golf Buggy. Owners Manual Classic - Cobra - Junior (Twin Motor)
") The Grasshopper Golf Buggy Owners Manual Classic - Cobra - Junior (Twin Motor) Grasshopper Golf Buggies Ltd 86-88 Mason Street Sutton-in-Ashfield Nottinghamshire NG17 4HP Tel: (+44) 01623 404730 email:
The Grasshopper Golf Buggy Owners Manual Classic - Cobra - Junior (Twin Motor) Grasshopper Golf Buggies Ltd 86-88 Mason Street Sutton-in-Ashfield Nottinghamshire NG17 4HP Tel: (+44) 01623 404730 email:
POWER ASSISTHD OWNERS MANUAL Apollo Drive Hallam VIC 3803 PH: (03) FAX: (03)
 FAX: (03)") POWER ASSISTHD OWNERS MANUAL 20-24 Apollo Drive Hallam VIC 3803 PH: (03) 8770 9600 FAX: (03) 9703 2720 www.pridemobility.com.au ACN 088 609 661 ABN 66 088 609 6611 CONTENTS Introduction...pg 1 Safety Procedures...pg
POWER ASSISTHD OWNERS MANUAL 20-24 Apollo Drive Hallam VIC 3803 PH: (03) 8770 9600 FAX: (03) 9703 2720 www.pridemobility.com.au ACN 088 609 661 ABN 66 088 609 6611 CONTENTS Introduction...pg 1 Safety Procedures...pg
NEO SCOOTER. Ro Ro Jr OWNER S MANUAL
 NEO SCOOTER Ro Ro Jr OWNER S MANUAL 1 TABLE OF CONTENTS 1. PREFACE AND INTRODUCTION.. 3 2. SAFETY NOTICE.... 2.1 Before driving 2.2 While driving 2.3 Labeling 2.4 EMI 4 3. 4. PARTS INTRODUCTION..... OPERATION...
Warning Statement Read Before Riding
 Table of Contents Technical Information-----------------------------------1 Warning Statement--------------------------------------2 Read Before Riding------------------------------------- List Of Parts-----------------------------------------------4
Apollo Tilt Wheelchair 18" and 20" Instruction Manual
 Apollo Tilt Wheelchair 18" and 20" Instruction Manual Table of Contents Contents Table of Contents... 2 Introduction... 3 Warning... 4 Safety Guidelines... 5 Parts of the Tilt Wheelchair... 6 Setup & Operation...
Heavy Duty Four Wheeled Walker
 Heavy Duty Four Wheeled Walker Weight Capacity: 500 lbs. ITEM # W1802 Made in China 2011 ESSENTIAL MEDICAL SUPPLY, INC. Manufactured for Orlando, FL 32822 -- SAVE THESE INSTRUCTIONS -- Do not attempt to
USER AND SAFETY MANUAL
 USER AND SAFETY MANUAL HANDLE- BARS STEM COLLAR ROD SADDLE SAFETY HOOK- STRIP BRAKE SUPPORT BARS AFT TUBE FRONT TUBE SAFETY RULES SECURE THE ROD AND ATTACH SAFETY HOOK-STRIP before every ride. RIDE WHEELA
TABLE OF CONTENTS PARTS INTRODUCTION...
 TABLE OF CONTENTS 1. PREFACE AND INTRODUCTION.. 2 2. SAFETY NOTICE.... 2.1 Before driving 2.2 While driving 2.3 Labeling 2.4 EMI 3 3. 4. PARTS INTRODUCTION..... OPERATION... 4.1 Control panel 4.2 How to
USER GUIDE. electric skateboard. Your ZINGO BLAZE warranty must be registered online within 7 days of purchase.
 electric skateboard USER GUIDE Your ZINGO BLAZE warranty must be registered online within 7 days of purchase. To activate your warranty visit www.tevo.co.za and click the Register your warranty tab at
User Guide MDS86850E MDS86850EB Rollator
 Supplying Hospitals for Over 90 Years User Guide MDS86850E MDS86850EB Rollator Revised: May 06, 2009 Safety Instructions To ensure your safety in using the Medline rollator, the following safety information
Giselle OWNER S MANUAL
 Mobility Works. Giselle OWNER S MANUAL TABLE OF CONTENTS 1) PREFACE 2 2. SAFETY NOTICE 4 2.1 Before Driving 2.2 Whilst Driving 2.3 Labeling 2.4 Electromagnetic Interference 3. PARTS INTRODUCTION 10 4.
1.CONTENTS 1. Contents Control location Before riding Safe riding Driving Use genuine spare parts Use
 1.CONTENTS 1. Contents... 1 2. Control location... 3 3. Before riding... 4 4. Safe riding... 4 5. Driving... 5 6. Use genuine spare parts... 5 7. Use of each component... 6 Gauges... 6 Operation of ignition
Cobalt Powerchair. User Manual
 Cobalt Powerchair User Manual Table of Contents 1. Preface... 2 2. Safety Notices... 3 3. Electromagnetic Interference... 4 4. Parts... 5 5. Assembly... 6 Initial Assembly... 6 Disassembly for Transport...
Cargo Truck. Owners Manual
 .. Cargo Truck Owners Manual 1 Preface Thank you for choosing PET Cargo Truck manufactured by Wooking Electric Vehicles Co., Ltd. Please read this manual carefully before using the product to enjoy optimized
USER GUIDE. electric skateboard. Your ZINGO CRUZE warranty must be registered online within 7 days of purchase.
 electric skateboard USER GUIDE Your ZINGO CRUZE warranty must be registered online within 7 days of purchase. To activate your warranty visit www.tevo.co.za and click the Register your warranty tab at
PHOENIX HD SCOOTER OWNER S MANUAL
 PHOENIX HD SCOOTER PHOENIXHD3 / PHOENIXHD4 OWNER S MANUAL 1 TABLE OF CONTENTS 1. PREFACE AND INTRODUCTION.. 3 2. SAFETY NOTICE.... 2.1 Before driving 2.2 While driving 2.3 Labeling 2.4 EMI 4 3. PARTS INTRODUCTION.....
Riding Your Halo Go Before You Begin Safety Alerts
 HALO GOTM Before You Begin---------------------01 Riding Your Halo Go-----------07-10 Main Components-------------------02 Safety Alerts--------------------------11 Charging Your Batteries------------03
FUZION V1000 LITHIUM POWERED owner s manual. 500 W of Power 18 MPH Full Suspension Disc Brake
 FUZION V1000 LITHIUM POWERED 500 W of Power 18 MPH Full Suspension Disc Brake Maximum Weight: 220 lbs (100 kilograms) Manual Version 1A-2015 CONTENTS WELCOME / Before You Start page 1 Components & Parts
rtable Electric Scooter USER MANUAL A new era in urban mobility PLEASE CAREFULLY READ THE USER MANUAL AND WARRANTY BOOK BEFORE USING!
 rtable Electric Scooter USER MANUAL A new era in urban mobility PLEASE CAREFULLY READ THE USER MANUAL AND WARRANTY BOOK BEFORE USING! The most economical vehicle in history User Manual Page 1 / 20 04/2017
Operator Manual. The most important component is you. This operator manual. has information for. all models of series. B plus some options and
 Operator Manual This operator manual has information for all models of series B plus some options and accessories. Some of the illustrations and information may not apply to your truck. The most important
Instruction manual DENVER DBO
 Instruction manual DENVER DBO-6500 www.facebook.dk/denver-electronics Before operating this vehicle, read all the instructions for safe assembly and operations. User s manual can guide you through the
USER MANUAL. Your ZINGO DRIFTA 360 warranty must be registered online within 7 days of purchase.
 USER MANUAL Your ZINGO DRIFTA 360 warranty must be registered online within 7 days of purchase. To activate your warranty visit www.tevo.co.za and click the Register your warranty tab at the top of the
EW-52. Owner s Manual. (888) Customer Service (888) Service
 Customer Service (888) Service") EW-52 Owner s Manual www.ewheelsdealers.com (888) 305-0881 Customer Service (888) 571-2845 Service 0 Table of Contents 1. Instrument Panel. 2 2. Music system operation. 3 3. Before you operate your scooter....
EW-52 Owner s Manual www.ewheelsdealers.com (888) 305-0881 Customer Service (888) 571-2845 Service 0 Table of Contents 1. Instrument Panel. 2 2. Music system operation. 3 3. Before you operate your scooter....
Operator Manual. This operator manual has. information for all models. of series M plus some. options and accessories. Some of the illustrations
 M S E R I E Operator Manual S This operator manual has information for all models of series M plus some options and accessories. Some of the illustrations and information may not The most apply to your
What s in the Box 1. Features & Specs 2. Charging the Battery 3. Indicator Lights 4. How to Recalibrate 5. Riding the Rogue 6. Care and Maintenance 7
 ROGUE HOVERBOARD TABLE OF CONTENTS What s in the Box 1 Features & Specs 2 Charging the Battery 3 Indicator Lights 4 How to Recalibrate 5 Riding the Rogue 6 Care and Maintenance 7 Safety Warnings 8 1. WHAT
The following procedures should be observed to ensure safe driving.
 Driving the vehicle The following procedures should be observed to ensure safe driving. n Starting the hybrid system ( P. 162) n Driving STEP 1 With the brake pedal depressed, shift the shift lever to
1. Contents 1. CONTENTS INTRODUCTION SAFETY WARNINGS POWER TILT STANDARD OPERATING INSTRUCTIONS... 5.
 1. Contents 1. CONTENTS..... 2. INTRODUCTION..... 3. SAFETY WARNINGS..... 4. POWER TILT STANDARD OPERATING INSTRUCTIONS....... 5. POWER SEAT LIFT STANDARD OPERATING INSTRUCTIONS...... 6. POWER TILT / SEAT
Outsource Practices & Policies OPP
 Outsource Practices & Policies OPP 0900-300.2 SAFE OPERATION OF VEHICLES Introduction The purpose of this practice is to provide procedures for all employees of Outsource who drive on company business
POD. Assembly Instructions.
 POD Assembly Instructions Read these instructions carefully before use and keep them for future reference. Your child s safety may be affected if you do not follow these instructions. www.babyjogger.com
EW-66. Owner s Manual. (888) Customer Service Table of Contents (888) Service
 Customer Service Table of Contents (888) Service") EW-66 Owner s Manual www.ewheelsdealers.com (888) 305-0881 Customer Service Table of Contents (888) 571-2845 Service 0 Table of Contents 1. Before you operate your scooter...... 2 2. Scooter initial operation......
EW-66 Owner s Manual www.ewheelsdealers.com (888) 305-0881 Customer Service Table of Contents (888) 571-2845 Service 0 Table of Contents 1. Before you operate your scooter...... 2 2. Scooter initial operation......
Push Down Wheeled Walker
 Push Down Wheeled Walker Push down hand grip Handle height adjustment knob Backrest Padded seat with concealed pouch Side brace Bag with shopping basket inside Push down brake stopper 6 inch (150 mm) wheels
Co-pilot Owner s manual
 Attendant controller Co-pilot Owner s manual US How to contact Permobil Permobil Inc. USA 6961 Eastgate Blvd. Lebanon, TN 37090 USA Phone: 800-736-0925 Fax: 800-231-3256 Email: info@permobilus.com Head
Shoprider new zealand
 Shoprider new zealand mobility scooter user s guide TE-9 TE-888iX Mid size Shoprider scooters with suspension Contents page page 1 Introduction...1 2 Features...1 3 Safety Precautions... 3 4 Adjustments...