Towed Vehicle Lube Pump and Plumbing Installation Instructions
|
|
|
- Alexis Rice
- 5 years ago
- Views:
Transcription

1 The following make/model transmissions are approved and warranted for towing when equipped with - HARDWARE PACK # LP-HP009 Toyota Corolla (A245E) Chevrolet Prizm (A245E) Towed Vehicle Lube Pump and Plumbing Installation Instructions LP-HP009 INSTALLER: GIVE THESE INSTRUCTIONS TO THE OWNER AFTER INSTALLATION FOR THEIR FUTURE REFERENCE NO WARRANTY IS EXPRESSED OR IMPLIED FOR LUBE PUMP COMPONENTS OR VEHICLE S TRANSMISSION UNLESS WARRANTY CARD IS FILLED OUT, DATED, AND SUBMITTED TO REMCO See Warranty Card in the General Information Manual Page5 1
2 TO COMPLETE THE PLUMBING OF YOUR TRANSMISSION WITH THE LUBE PUMP KIT YOU WILL NEED TO LOCATE THE FOLLOWING ITEMS FROM YOUR BASE KIT (LP-BK01) AND USE THEM IN CONJUNTION WITH THE LP-HP009 HARDWARE PACK TO COMPLETE THE INSTALLATION. USE FOLLOWING PARTS FROM BASE KIT (LP-BK01) Part # Description Quantity PUMP ASSEMBLY LP, PUMP MOUNT BRACKET ASSEMBLY /8" HOSE 16 USE FOLLOWING PARTS FROM HARDWARE PACK (LP-HP009) Part # Description Quantity PRESSURE SWITCH ASSEMBLY, with CHECK VALVE LP-8 TRANSPORT ASSY PAN CONNECTOR HOSE 5/ S AUX COOLER S SILICONE SEALANT (BLACK) 3 OZ CLAMP HOSE 5/16 X 7/8 2 AFTER INSTALLING THIS LUBE PUMP AND PLUMBING, FIND THE WIRING INSTRUCTIONS IN THE GENERAL INFORMATION & MOTORCOACH WIRING INSTRUCTION MANUAL 2
3 INSTALLATION OF THE PAN CONNECTOR: It is necessary to remove the transmission pan to install the regular pan fitting (see picture on page 5). You will need a large container to catch the fluid when the pan is removed. NOTE 1: NOTE 2: Step 1. Step 2. NOTE 3: Transmission fluid becomes contaminated during usage, and therefore should not be re-used after it is drained from the pan. Similarly, the transmission s oil filter should be changed every 25,000 to 40,000 driven miles. Use manufacturer s recommendation. Dispose of used transmission fluid properly. Remove the pan and discard the gasket if one is present. If RTV sealant was used, it must be removed from both the transmission and transmission pan. (Some auto manufacturers use an RTV sealant instead of a gasket.) Carefully examine the underside of the exposed transmission and the manner in which the pan fits around valve body and filter before deciding on a suitable location for the pan connector. Precautions to consider when determining the best location for the pan connector. a. It is NOT advisable to locate the connector on the bottom or the front surfaces of the pan because of the strong possibility of damage from road hazards. b. The connector should be located away from any exposed gears, which tend to cause fluid to foam when in motion. c. It is desirable to have the connector located as far as possible below the transmission fluid level, taking into consideration the changes in fluid level, which will occur. d. Generally, the connector can best be located in the right or left sidewalls or the rear portion of the pan, keeping in mind the above situations. 3


4 e. Make certain the location of the connector will not interfere with reinstalling the pan bolts and that it allows for an easy bend of the 3/8 hose, which will extend from this connector up to the lube pump. f. Finally, be sure the connector location provides sufficient flat surface area to permit tightening the hex nut on the inside of the pan. (See picture on page 5. Use this picture as a reference only. Determine the best location for your car) Step 3. Step 4. Step 5. When you have determined the best location for the pan connector, locate the hole vertically by holding the hex connector nut on a vertical surface of the pan and marking its location. Drill a 17/32 diameter hole in the side of the pan. Clean off the drilled area with a lacquer thinner or other suitable cleaner/degreaser. Apply a small amount of the silicone sealant (provided in the kit) to the back (grooved) side of the hex nut (which is already mounted on the connector) and to the threads on the connector, and also to the back (grooved) side of the separate hex nut. Then insert the connector into the 17/32 hole and secure on the inside of the pan with the separate hex nut. Before re-installing the transmission fluid pan, make sure the mating surfaces on both the pan and transmission housing are absolutely clean of all gasket material, oil or dirt. If the transmission was originally equipped with a gasket, replace with a new gasket. If silicone was originally used then carefully apply a 1/8 bead of silicone sealant (provided) around the bottom perimeter of the transmission housing using plastic nozzle provided. Make sure to encircle each bolt hole as shown (Refer to DIAGRAM 2, below). Allow the sealant to set up for about 1 hour. Assemble the pan to the transmission, installing the bolts finger tight only. Allow to set 45 more minutes. This allows the sealant to conform to two surfaces without squeezing it out. Tighten the bolts to the required torque specification. Do not over tighten. Refer to the vehicle service manual for torque specifications. 4

5 Diagram 2 PAN WITH SEALANT APPLIED Use this picture as a reference only 5
6 LUBE PUMP INSTALLATION: (Refer to DIAGRAM 1, page 7) WARNING: LOCATION: Failure to follow the procedures listed below will void the warranty on your pump. It is important to determine a desirable place on the vehicle to locate the lube pump. The best location may vary from vehicle to vehicle. NOTE: NOTE: Step 1. Step 2. Step 3. Locate the pump in the upper part of the engine compartment, under the hood. Mount the pump vertical or horizontal. It is important to keep the pump from being exposed to the weather and other harsh elements. Failure to do the above mentioned will void the warranty When routing the 3/8 hoses to the pump, check valve and pan connector, be sure to route them where road hazards, moving parts, sharp edges, or hot exhaust parts will not damage them. The pump is to be mounted in the engine compartment to any suitable flat metal surface. The pump mounting bracket may be used. Use the four ¼ x 1 ¼ selftapping metal screws (provided) to mount the pump. Using one of the hose clamps (provided), connect one end of the 8-ft. length of the 3/8 hose to the input side of the lube pump. Carefully route 3/8 hose to the pan connector on the transmission pan. Cut the hose to a suitable length. Using one of the hose clamps connect the 3/8 hose to the pan connector. Make sure hose clamps are securely tightened on all connections. AUX COOLER INSTALLATION Note: Step 4. Place the Aux Cooler in a location that allows for plenty of air to pass through. Somewhere in front of the radiator would be preferred. Using a suitable length of 3/8 hose and one of the hose clamps, connect one end of the hose to the output port of the pump. Route the other end of the 3/8 hose from the Pump to either port of the Aux Cooler. (Refer to diagram, page 7). Using 1 hose clamp, connect the hose to the Aux Cooler. 6


7 Step 5. Using a suitable length of 3/8 hose and one of the hose clamps, connect one end of the hose to the other side of the Aux Cooler. Route the other end of the 3/8 hose from the Aux Cooler to the Pressure Switch & Check Valve assembly. (refer to diagram, page 7). Using 1 hose clamp, connect the hose to the Pressure Switch & Check Valve assembly. WARNING: THE LINE FROM THE PUMP MUST BE CONNECTED TO THE PRESSURE SWITCH & CHECK VALVE ASSEMBLY WITH THE FLOW ARROW ON THE CHECK VALVE POINTING TOWARD THE TRANSMISSION. 7
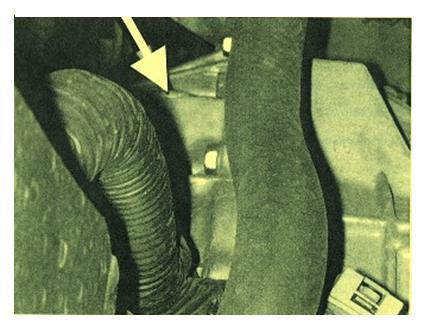
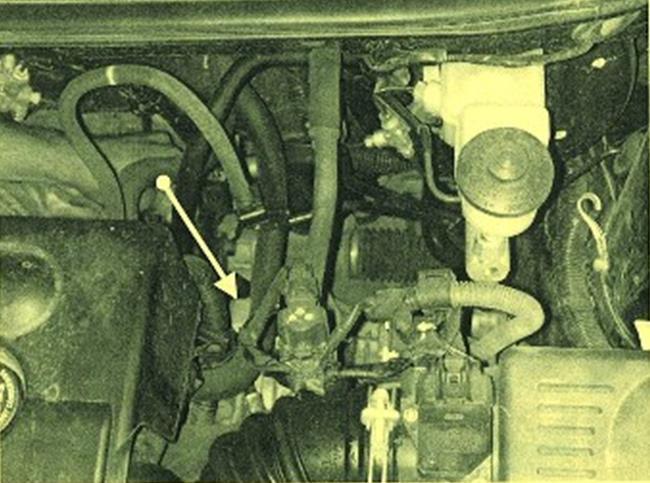
8 Step 7. Step 8. Step 9. Step 10. Using one of the hose clamps connect the 3/8 hose to the input of the Pressure Switch & Check Valve Assembly. Make sure hose clamps are securely tightened on all connections. Using a suitable length of 5/16 hose and one of the hose clamps, connect one end of the hose to the output of the Pressure Switch & Check Valve Assembly. Remove the transmission plug from the transmission port needed for this installation. The plug is close to the motor on the backside of the transmission and points towards the firewall. Remove the plug with a T55 torx bit. (see picture on page 9) Add teflon and install the LP-8 trans-port fitting (see picture) into the port were the plug was just removed. WARNING: DO NOT OVER-TIGHTEN THE PIECES OR YOU WILL DEFINITELY STRIP THE THREADS IN THE TRANSMISSION CASE. IT IS UNREACHABLE TO REPAIR. Step 11. Step 12. Take the other end of the 5/16 hose coming from the pressure switch assembly and one of the hose clamps, and connect it to the LP-8 trans-port assembly. When all connections are completed and all hose clamps securely tightened, refill the transmission with new transmission fluid through the filler tube. Consult the vehicle Owner s Manual for the proper type of fluid to use and for the recommended procedures to make sure the proper fluid level is restored. Proper fluid level is essential for trouble-free operation of the transmission as well as the lube pump. RETURN TO THE THE GENERAL INFORMATION MANUAL PG. 3 TO INSTALL THE WIRING HARNESS ON THIS TOWED VEHICLE. 8
9 9


10 REMCO HAS THESE PRODUCTS FOR YOUR TOWING CONVENIENCE REMCO S Lube-Pump lubricates and cools the Front Wheel Drive, Select rear Wheel Drive, Four-Wheel Drive, and All Wheel Drive vehicles while towing. REMCO S Tail Light Wiring Kit is for easy hook up of your tail lights and turn signals for towing. REMCO S 12 VDC RV Water System Pumps 4605 County Road 82 SE Alexandria, MN Fax:
Towed Vehicle Lube Pump and Plumbing Installation Instructions
 The following make/model transmissions are approved and warranted for towing when equipped with - HARDWARE PACK # LP-HP018 U660E transmission Toyota Camry (2006-2017) V6 3.5L Toyota Highlander (2009-2016)
Towed Vehicle Lube Pump and Plumbing Installation Instructions
 The following make/model transmissions are approved and warranted for towing when equipped with - HARDWARE PACK # LP-HP021 Ford 6R80 Ford F150 (RWD) 2009-2017 Ford F150 (4WD) 2009-2011 Ford Expedition/XL
Towed Vehicle Lube Pump and Plumbing Installation Instructions
 The following make/model transmissions are approved and warranted for towing when equipped with - HARDWARE PACK # LP-HP013 GENERAL MOTORS Cadillac CTS (5L40E) Cadilliac SRX (5L50E) Saturn Sky (5L40E) Pontiac
Towed Vehicle Lube Pump and Plumbing Installation Instructions
 The following make/model transmissions are approved and warranted for towing when equipped with - HARDWARE PACK # LP-HP006 GENERAL MOTORS Chevrolet Silverado's/ GMC Sierra's (4L60E/4L65E/4L80E) Cheverolet
Towed Vehicle Lube Pump and Plumbing Installation Instructions
 The following make/model transmissions are approved and warranted for towing when equipped with - HARDWARE PACK # LP-HP001 CHEVROLET Chevette (T-180) Chevette (T-180C) Nova (T-200) Impala / Corvette (T-350)
LP-HP022. Towed Vehicle Lube Pump and Plumbing Installation Instructions INSTALLER: GIVE THESE INSTRUCTIONS TO THE END USER AFTER INSTALLATION
 / The following make/model transmissions are approved and warranted for towing when equipped with - HARDWARE PACK # LP-HP022 62TE Transmission Chrysler Sebring, 2007-2010 Town & Country, 2007-2016 Pacifica,
Towed Vehicle Lube Pump and Plumbing Installation Instructions
 General Motor 6T40 The following Chevrolet Cruse 2011-2015 (FWD, L4 1.4L, 1.8L) make/model Buick Regal 2011-2013 (FWD, L4 2.0L, 2.4L) transmissions are approved and warranted for towing when equipped with
LP-HP023. Towed Vehicle Lube Pump and Plumbing Installations Instructions
 The following make/model transmissions are approved and warranted for towing when equipped with - HARDWARE PACK # LP-HP023 Toyota Tacoma, RWD, V6 4.0L (A750E) 2005-2013 Toyota Tacoma, 4WD, V6 4.0L (A750F)
LP-HP001. Towed Vehicle Lube Pump and Plumbing Installation Instructions
 The following make/model transmissions are approved and warranted for towing when equipped with - HARDWARE PACK # LP-HP001 CHEVROLET Chevette (T-180) Chevette (T-180C) Nova (T-200) Impala / Corvette (T-350)
Instruction Booklet INSTALLER: GIVE THESE INSTRUCTIONS TO THE OWNER AFTER INSTALLATION FOR THEIR FUTURE REFERENCE
 Instruction Booklet LP-1 INSTALLER: GIVE THESE INSTRUCTIONS TO THE OWNER AFTER INSTALLATION FOR THEIR FUTURE REFERENCE NO WARRANTY IS EXPRESSED OR IMPLIED FOR LUBE PUMP COMPONENTS OR VEHICLE S TRANSMISSION
Keeping You Cool Under Pressure
 Installation Instruction for 92-93 GM 6.5L Turbo Diesel Series 3500-4 Wheel Drive Pickup and Series 1500, 2500, 3500 4 Wheel Drive Suburban Intercooler System (Part No. 2-436) TOOLS REQUIRED: 1.) Normal
BMK-12. Dual-Gard By-Pass Filter Mounting Kit Installation and Servicing Instructions
 BMK-12 Dual-Gard By-Pass Filter Mounting Kit Installation and Servicing Instructions IMPORTANT NOTICE Read all instructions completely before attempting to install this unit. Improper installation could
PERFECT FIT SERIES IN-DASH HEAT/ COOL/ DEFROST 1969 CHEVROLET CAMARO/ FIREBIRD NOTE: INSTRUCTIONS DEPICT CAMARO
 specializing in AIR CONDITIONING, PARTS AND SYSTEMS for your classic vehicle PERFECT FIT SERIES IN-DASH HEAT/ COOL/ DEFROST 1969 CHEVROLET CAMARO/ FIREBIRD NOTE: INSTRUCTIONS DEPICT CAMARO CONTROL & OPERATING
Mag-Hytec. Installation Recommendations FORD 4R100 / E4OD TRANSMISSION PAN
 Mag-Hytec Installation Recommendations FORD 4R100 / E4OD TRANSMISSION PAN 07/08/17 Please read these instructions and parts list completely before installing this new transmission pan. Consult your owner
FREEDOM FILL AUXILIARY SYSTEM Gauge & Switch Console
 2018 Aluminum Tank & Tank Accessories, Inc. 2702-B N. Nichols, Fort Worth, TX 76106 800-773-3047 * 817-378-8455 www.attatank.com attatank@gmail.com FREEDOM FILL AUXILIARY SYSTEM Gauge & Switch Console
baseplate Chevrolet Equinox
 , Rev 3 06/16 baseplate 9518316 Chevrolet Equinox Pin height - 14-3/4 Centers - 24-1/4 25. ITEM PART # QTY DESCRIPTION 1 00057 2.25 LOCKWASHER 2 00059 8.375 FLATWASHER 3 00060 24.375 LOCKWASHER 4 00061
DUAL REMOTE OIL FILTER MODIFICATION 4 TH GENERATION FIREBIRDS
 Written by Dave Dorey (lonetechie) Copyright FirebirdNation.com The following article details how I installed a dual remote oil filter system on my 2001 Formula Firebird. If you decide to tackle this project,
2010+ Audi B8 S4/S5 3.0T S-FLO Intake Kit INSTALLATION GUIDE FOR RACING USE ONLY
 INSTALLATION GUIDE 2010+ Audi B8 S4/S5 3.0T S-FLO Intake Kit FOR RACING USE ONLY Congratulations on your purchase of the AWE Tuning S-FLO Intake for the 2010+ Audi B8 S4 and B8 S5 3.0T. Exquisite build
7 th Gen. Celica GTS Turbo Kit Installation Guide This kit has not been CARB approved and is intended for racing / offroad purposes only.
 7 th Gen. Celica GTS Turbo Kit Installation Guide This kit has not been CARB approved and is intended for racing / offroad purposes only. The purpose of this guide is to serve as a reference for use when
baseplate TP20266, Rev 3 07/16 Pin Height - 15 Pin Centers /16
 , Rev 3 07/16 baseplate 9518266 Cadillac SRX Pin Height - 15 Pin Centers - 27-7/16 6 2 4 12 11 3 7 1 5 10 8 9 ITEM PART # QTY DESCRIPTION 1 00057 2 WASHER,.25 SPRING LOCK 2 00059 12 WASHER, FLAT.375 3
BMK-30. Heavy-Duty By-Pass Filtration System Installation and Servicing Instructions
 BMK-30 Heavy-Duty By-Pass Filtration System Installation and Servicing Instructions IMPORTANT NOTICE Read all instructions completely before attempting to install this unit. Improper installation could
Installation Manual. Bullet Proof Oil Cooler Kit. Neal Technologies, Inc. (patent pending) Updated 12/23/09
 Updated 12/23/09") Bullet Proof Oil Cooler Kit Neal Technologies, Inc. (patent pending) Updated 12/23/09 Installation Manual 1 Installation Overview These are the parts included in your kit. Please locate and identify each
Bullet Proof Oil Cooler Kit Neal Technologies, Inc. (patent pending) Updated 12/23/09 Installation Manual 1 Installation Overview These are the parts included in your kit. Please locate and identify each
Doing Our Best to Provide You the Best. Chrysler PT Cruiser. Page 1. 7/16 TP20098,Rev.11. Pin Height /2 Center /2
 Chrysler PT Cruiser 7/16 TP20098,Rev.11 Pin Height - 14-1/2 Center - 21-1/2 4 10 5 13 8 3 7 9 11 12 2 6 14 1 9518098 parts list Ref. Part No. No. Qty. Description 1. 00059 2 3/8 Flat Washer 2. 00060 12
Doing Our Best to Provide You the Best. Ford Focus
 Ford Focus /6 TP0088,Rev.8 Pin Height - 5 Pin Centers - 4 5 8 6 5 3 4 3 3 7 957088 parts list Ref. Part No. No. Qty. Description. 0053 0 3/8"-6UNC x -/4" Hex Bolt Gr.5. 00060 0 3/8" Lockwasher 3. 0006
baseplate Hyundai Tucson & Kia Sportage
 , Rev 3 08/16 baseplate 9518277 Hyundai Tucson & Kia Sportage Pin height - 17-1/4 Centers - 20 4 8 3 15. 13 5 2 14 11 1 6 12 7 9 10 ITEM PART # QTY DESCRIPTION 1 00007 4.3125NC HEX NUT 2 00059 4.375 FLATWASHER
TOYOTA RAV TRAILER WIRE HARNESS Preparation
 Preparation Part Number: PU322-42013-UW Kit Contents Item # Qty Description 1 1 Trailer Module Harness 2 1 Trailer 4-Flat Harness 3 1 Trailer Power Wire Harness 4 1 Mounting Bracket, 4-Flat 5 2 Screw #10-24
PERFECT FIT IN-DASH HEAT/ COOL/ DEFROST FORD FAIRLANE & CROWN VICTORIA
 PERFECT FIT IN-DASH HEAT/ COOL/ DEFROST 1955-56 FORD FAIRLANE & CROWN VICTORIA CONTROL & OPERATING INSTRUCTIONS The controls on your new Perfect Fit system, offer complete comfort capabilities in virtually
Includes: 1. Silicone Hose 2. EGR Block Off Plates 1. Exhaust Block Off Plate 2. Hose Clamps 1. Spacer/Washer 8. Bolts 2. Nuts
 Includes: 1. Silicone Hose 2. EGR Block Off Plates 1. Exhaust Block Off Plate 2. Hose Clamps 1. Spacer/Washer 8. Bolts 2. Nuts WARNING: This product is not legal for sale or use on pollution controlled
FREE $15 Gift Card for every $100 spent on Ship To Home orders. Find Out How
 1 of 29 10/12/2011 5:05 PM FREE $15 Gift Card for every $100 spent on Ship To Home orders. Find Out How Ford Ranger/Explorer/Mountaineer 1991-1999 Intake Manifold REMOVAL & INSTALLATION Print The engines
& 76 CHEVROLET NOVA HEATER ONLY
 specializing in AIR CONDITIONING, PARTS AND SYSTEMS for your classic hi l PERFECT FIT IN-DASH HEAT/ COOL/ DEFROST 1969-74 & 76 CHEVROLET NOVA HEATER ONLY CONTROL & OPERATING INSTRUCTIONS The controls on
INSTALLATION INSTRUCTIONS TRAILER HITCH MAIN HARNESS KIT
 PART NUMBER: 0000-89-N30 GENUINE ACCESSORIES INSTALLATION INSTRUCTIONS TRAILER HITCH MAIN HARNESS KIT APPLICABLE MODELS: 2016 > CX-9 PACKAGE CONTENTS: INSTALLATION INSTRUCTIONS QTY 1 CABLE TIE MOUNT QTY
TOYOTA TACOMA Part Number: TTA-BGB16-DRL TTA-BGP16-DRL
 TOYOTA TACOMA 2016-17 Date: 10.29.2016 Billet Grille w/led DRL Part Number: TTA-BGB16-DRL TTA-BGP16-DRL Kit Contents Item # Quantity Reqd. Description 1 2 LED DRL 2 1 Driver Box 3 1 Switch 4 1 User Card
Doing Our Best to Provide You the Best. GMC Terrain Chevy Equinox. BolT ToRQuE specifications. 12/15 TP20315,Rev.3
 GMC Terrain Chevy Equinox 12/15 TP20315,Rev.3 Pin height - 14-3/4 Centers - 22-1/4 BolT ToRQuE specifications standard BolTs: METRiC BolTs: size Grade Torque size Torque 5/16 5 20 ft/lbs. 8mm 22 ft/lbs.
ONBOARD AIR SYSTEM FOR ALL VEHICLES APPLICATIONS
 ONBOARD SYSTEM FOR ALL VEHICLES APPLICATIONS Thank you and congratulations on the purchase of a Pacbrake onboard air system. Please read the manual prior to starting to ensure you can complete the installation
Dual Remote Filtration System Installation and Servicing Instructions
 IMPORTANT NOTICE Read all instructions completely before attempting to install this unit. Improper installation could result in serious system and/or equipment damage. The installation of this system is
2-row and All-row systems included.
 Ag Leader Technology Cotton Picker Installation Installation Instructions for John Deere cotton picker models: 2-row and All-row systems included. IMPORTANT: Ensure the model numbers shown above correspond
Rzr Heater System Part #
 Rzr Heater System Part # 2878135 NOTE: This heater unit installs below the center of the dash. If you have a radio mount kit (Polaris Part # 2876897) you may need to cut the top front corner off the mount
R O A D M A S T E R, I N C.
 R O A D M A S T E R, I N C. 11 7 6 1 2 10 13 8 ITEM QTY NAME PART # 1...2...1/2 x 5 1/2 BOLT...350108-00 2...4...1/2 x 1 3/4 BOLT...350096-00 3...6...1/2 LOCK WASHER...350309-00 4...6...1/2 HEX NUT...350258-00
Installation Instructions for John Deere cotton picker models: 9986 & 2-row and All-row systems included.
 Ag Leader Technology Cotton Picker Installation Installation Instructions for John Deere cotton picker models: 9986 & 9996 2-row and All-row systems included. IMPORTANT: Ensure the model numbers shown
1988 Ford F-350 PICKUP
 1988 Ford F-350 PICKUP Submodel: Engine Type: V8 Liters: 7.5 Fuel Delivery: FI Fuel: GAS 1987 93 4.9L Engine The intake and exhaust manifolds on these engines are known as combination manifolds and are
(2) 12mm x 35mm Single Bolt Plates. (2) 12mm x 30mm Double Bolt Plates
 12mm x 35mm Single Bolt Plates. (2) 12mm x 30mm Double Bolt Plates") PARTS LIST: 1 Bull Bar 6 12mm x 24mm OD x 2.5mm Flat Washers 1 Driver/Left Mounting Bracket 6 12-1.75mm Nylon Lock Nuts 1 Passenger/Right Mounting Bracket 4 10-1.50mm x 30mm Hex Bolts 2 12mm x 30mm Double
PARTS LIST: 1 Bull Bar 6 12mm x 24mm OD x 2.5mm Flat Washers 1 Driver/Left Mounting Bracket 6 12-1.75mm Nylon Lock Nuts 1 Passenger/Right Mounting Bracket 4 10-1.50mm x 30mm Hex Bolts 2 12mm x 30mm Double
WOC-364 Installation Instructions Ranger XP Heater System
 WOC-364 Installation Instructions Ranger 2011-12 XP Heater System Order of installation for a Complete Enclosure Always install the Heater System first if possible NOTE: If installing the Heater System
Doing Our Best to Provide You the Best. Ford Taurus and Taurus X TP20223,Rev.3. Pin height /2 Centers model /8
 Ford Taurus and Taurus X 10-16 TP20223,Rev.3 Pin height - 14-1/2 Centers - 29 2010 model - 15-5/8 2 1 4 9. 7 6 8 5 3 9518223 parts list Ref. Part No. No. Qty. Description 1. 00060 8 3/8 Lock Washer 2.
Installation Instructions
 2011-2013 LML DURAMAX COMPOUND-ADD 2011-2015 LML A Duramax TURBO KIT Add INSTALL A Turbo INSTRUCTIONS Compound Kit Installation Instructions 1-800-955-0476 - www.industrialinjection.com - info@industrialinjection.com
Doing Our Best to Provide You the Best. Dodge Caliber Jeep Compass. 4/16 TP20221,Rev 7. Centers Pin height Caliber- 14-1/4 Compass- 15-1/4
 Dodge Caliber Jeep Compass 4/16 TP20221,Rev 7 Centers - 24 Pin height Caliber- 14-1/4 Compass- 15-1/4 Please order replacement parts by PART NO. and DESCRIPTION. 5954 Retro fit kit 9517221 parts list Ref.
INSTALLATION INSTRUCTIONS ELEVATION FRONT BUMPER DODGE RAM
 INSTALLATION INSTRUCTIONS PARTS LIST: 1 Elevation Bumper Assembly 24 12mm x 37mm OD x 3mm Flat Washers 2 Frame Mounting Brackets 12 12mm Nylon Lock Nuts 8 12-1.75mm x 50mm Hex Bolts 2 License Plate Mounting
INSTALLATION INSTRUCTIONS
 INSTALLATION INSTRUCTIONS For 63600 and 64040 Front Bumper and Winch Mount For Ford Super Duty Trucks As you read these instructions, you may see NOTES, CAUTIONS and WARNINGS. Each message has a specific
Instructions for 2-row monitoring only
 Installation Instructions for CaseIH cotton picker models: Instructions for 2-row monitoring only Ensure the model numbers shown above correspond to the machine model. If you receive the incorrect installation
BASEPLATE Toyota Tacoma
 , Rev 8 06/16 BASEPLATE 9517190 Toyota Tacoma Pin height: 17 Centers: 30-1/2 ITEM PART # QTY DESCRIPTION 1 00084 6 WASHER.50 LOCK 2 00085 6 WASHER.50 FLAT 3 01254 6 BOLT,.50 X 1.50 HEX GR.5 4 12130-76
INSTALLATION INSTRUCTIONS PART NUMBER:
 Equipped with AEM Dryflow Filter No Oil Required! INSTALLATION INSTRUCTIONS PART NUMBER: 21-450B (Blue Finish) 21-450C (Gun Metal Grey Finish) 21-450P (Vacuum Metalized Chrome-VMC) 21-450R (Red Finish)
Model 377, 379, 386, 388, Sleeper no window
 Installation Manual Model 377, 379, 386, 388, 389 63 Sleeper no window 2390 Blackhawk Road P.O. Box 6007 Rockford, IL 61125 www.nitesystem.com 1-866-204-8570 NITE Plus Installation Procedures 1-2 Table
Owner smanual. Banks Ram-Air Intake System Chevrolet 6.6L (LML) Duramax Turbo-Diesel Pickups. with Installation Instructions
 Duramax Turbo-Diesel Pickups. with Installation Instructions") with Installation Instructions Owner smanual Banks Ram-Air Intake System 2015 Chevrolet 6.6L (LML) Duramax Turbo-Diesel Pickups THIS MANUAL IS FOR USE WITH KIT 42250 & 42250-D Gale Banks Engineering 546
with Installation Instructions Owner smanual Banks Ram-Air Intake System 2015 Chevrolet 6.6L (LML) Duramax Turbo-Diesel Pickups THIS MANUAL IS FOR USE WITH KIT 42250 & 42250-D Gale Banks Engineering 546
INSTALLATION MANUAL BULLET PROOF OIL COOLER KIT F-SERIES
 INSTALLATION MANUAL BULLET PROOF OIL COOLER KIT 2003-2007 F-SERIES NEAL TECHNOLOGIES, INC. U.S. PATENT 8,375,917; 8,505,512 and OTHER PATENTS PENDING UPDATED 1/8/2018 2014 BULLET PROOF DIESEL BEFORE You
baseplate Pontiac G6 GT
 TP088, Rev 07/7 baseplate 95788 Pontiac G6 GT Pin height: 3-/ Centers: 3 3 6 6 8 9 8 5 5 3 7 3 ITEM PART # QTY DESCRIPTION 00060 0 WASHER, LOCK.375 0006 8 NUT, HEX.375 3 0053 BOLT,.375 X.5 HEX GR.5 06
UNIVERSAL PUMP HANGER INSTALLATION INSTRUCTIONS
 UNIVERSAL PUMP HANGER INSTALLATION INSTRUCTIONS WARNING! THESE INSTRUCTIONS MUST BE READ AND FULLY UNDERSTOOD BEFORE BEGINNING INSTALLATION. FAILURE TO FOLLOW THESE INSTRUCTIONS MAY RESULT IN POOR PERFORMANCE,
INSTRUCTION, HALDEX PUMP LVS KIT P/N
 LIFT CORPORATION Sht. 1 of 11 DSG# M-06-33 Rev. - Date: 12/17/07 INSTRUCTION, HALDEX PUMP LVS KIT P/N 267923-01 MALE BULLET LVS WIRE HARNESS P/N 267924-01 QTY. 1 LOW VOLTAGE SWITCH (LVS MODULE) P/N 906530-01
Installation Manual v1.0: Force Cool Kit Dodge with NV4500/NV4500HD/NV5600 Manual Transmissions. Please read all instructions before installation.
 Installation Manual v1.0: Force Cool Kit Dodge with NV4500/NV4500HD/NV5600 Manual Transmissions Please read all instructions before installation. Figure 1 - Force Cool Kit Note: Use Teflon sealing tape
SKID MARK GARAGE. Axillary Fuel Supply
 1 SKID MARK GARAGE Axillary Fuel Supply *Disclaimer: Our Axillary Fuel kits are designed to fit most late model GM vehicles with minimum modifications. While not quite a universal kit for all, it has been
INSTALLATION INSTRUCTIONS
 INSTALLATION INSTRUCTIONS HDX LED GRILLE APPLICATION: 013-017 Dodge Ram 1500 PART NUMBER: 34-1035 ITEM QUANTITY DESCRIPTION TOOLS NEEDED 1 1 HDX LED GRILLE 10MM SOCKET,3 UPPER BRACKET A, DRIVER () AND
Front aero bumper Lower grille Right air spoiler. Left air spoiler Bolts (15) Self-tapping screws (8)
 Self-tapping screws (8)") INSTALLATION INSTRUCTIONS Parts List AERO ACCORD FEB. 2008 Front aero bumper Lower grille Right air spoiler Left air spoiler Bolts (15) Self-tapping screws (8) Nuts (10) Tools and Supplies Required Phillips
INSTALLATION INSTRUCTIONS Parts List AERO ACCORD FEB. 2008 Front aero bumper Lower grille Right air spoiler Left air spoiler Bolts (15) Self-tapping screws (8) Nuts (10) Tools and Supplies Required Phillips
Main Fuel Tank #9668 Date 3/17/18 rev. 0. Pic #1 Pic #2. Pic #3. Pic #4. Pic #5 Pic #6
 1045 S. Cherokee Lane Lodi CA 95240 Phone (209)400-7200 Fax (209)943-7923 www.wildhorses4x4.com Note: To assure a completely clean tank, use the large hole to inspect tank for any debris. It is highly
TOYOTA VENZA 2009 TRAILER WIRE HARNESS Procedure
 Part Number: PT791-0T099 Kit Contents Item # Quantity Reqd. Description 1 1 Trailer Wire Harness Module 2 1 4-Flat Harness 3 1 Battery Power Wire Harness 4 1 Mounting Bracket, 4-Flat 5 2 Screw #10-24 6
Speed Manual Transmission Oil Change How Often Should You
 Speed Manual Transmission Oil Change How Often Should You Refer to your service manual to find out what transmission fluid your gearbox requires and how frequently it should be changed. The manual will
Pro Series SVHO Engine Cooling Upgrade Kit
 Pro Series SVHO Engine Cooling Upgrade Kit PART# - RY10080-ECUK-PC-1 APPLICATION(S): Yamaha FZ & FX SVHO using RIVA Power Cooler Kit (part # RY17080-PC) We strongly recommend the use of a service manual
Doing Our Best to Provide You the Best. 4/16 TP20291,Rev.4. Jeep Grand Cherokee Dodge Durango. Pin height /2 Centers /4
 4/16 TP20291,Rev.4 Jeep Grand Cherokee Dodge Durango Pin height - 18-1/2 Centers - 28-3/4 7. 9518291 parts list Ref. Part No. No. Qty. Description 1. 07284 4 10mm Lock Washer 2. 07291 4 10mm-1.50 x 35mm
Doing Our Best to Provide You the Best. JEEP Wrangler. 3/17 TP29292,Rev. 3. Pin Height: 18-3/4 Centers: 22-1/4
 3/17 TP29292,Rev. 3 JEEP Wrangler Pin Height: 18-3/4 Centers: 22-1/4 9519292 parts list ITEM PART # QTY DESCRIPTION ITEM PART # QTY DESCRIPTION 1 00057 2 WASHER,.25 SPRING LOCK 15 15041 2 PULL BLOCK 2
INSTALLATION INSTRUCTIONS
 AUTOMOTIVE PRODUCTS, INSTALLATION INSTRUCTIONS SURE-GRIP & MOLDED RUNNING BOARDS APPLICATION: 2007-2013 Chevrolet Silverado / GMC Sierra 1500 Extended Cab 2008-2014 Chevrolet Silverado / GMC Sierra 2500/3500HD
Automatic Electronic Sport Mode Shifter Installation Instructions
 Automatic Electronic Sport Mode Installation Instructions Building American Quality With A Lifetime Warranty! TOLL FREE 1-877-469-7440 tech@lokar.com www.lokar.com Release Automatic Electronic Sport Mode
Thank you for purchasing the Dezod Motorsports Return Fuel System for your Scion tc.
 Thank you for purchasing the Dezod Motorsports Return Fuel System for your Scion tc. We took much pride in putting together a fuel system that would deliver a maximum amount of fuel as simply as possible
2-DOOR LAUNDRY CABINET KIT
 2-DOOR LAUNDRY CABINET KIT OWNER S MANUAL QL055 # 6725161 Table of Contents Table of Contents...2 Safety Information...2 Warranty...3 Warranty Claim Procedure...3 Pre-Installation...4 Tools/Materials Required...4
Not Included. Rear Half Harness
 Basic Light Kit 60102 Caution! Wear appropriate eye protection! Disconnect the battery or batteries. Place run/tow switch in tow position before disconnecting the batteries on models using that feature.
JEEP JK4 STEP SLIDER INSTALLATION BD-SS-100-JK4
 JEEP JK4 STEP SLIDER INSTALLATION BD-SS-100-JK4 PARTS LIST QTY DESCRIPTION 1 Drivers Side Slider Assembly 1 Passenger Side Slider Assembly 1 Wiring Harness and Fuse 1 Double Sided Sticky Squares and Alcohol
INSTALLATION INSTRUCTIONS
 INSTALLATION INSTRUCTIONS ULTIMATE BULL BAR APPLICATION: 2016-2018 Chevrolet Silverado 1500 2016-2018 GMC Sierra 1500 PART NUMBER: 32-3870, 32-3875, 32-3870L, 32-3875L, 32-3920, 32-3925. ITEM QUANTITY
baseplate Jeep Commander
 , Rev 5 05/17 baseplate 9518195 Jeep Commander Pin height - 18-1/2 Centers - 22 21/32 1 2 6 4 3 ITEM PART # QTY DESCRIPTION 1 13085-76 1 CROSSMEMBER 2 12037-76 2 NUT STRIP 3 01254 6.50NC X 1-1/2 HEX BOLT
Please read all instructions before installation.
 Installation Manual v1.0: Sterling 12 Bolt 10.25 & 10.5 ATS Protector Differential Cover Ford 1986-2007 F250, F350, E250, E350 w/ Single Rear Wheel, 2x4 & 4x4 Applications Please read all instructions
TOYOTA COROLLA FOG LIGHT
 Doc. 03.69.00 PIO / DIO Rev. C 10/11/12 TOYOTA COROLLA 2012 - FOG LIGHT Part Number: 00016-32118 Accessory Code: LF10 Conflicts - Factory code PM on model 1838 Kit Contents Item # Quantity Reqd. Description
TURBO KIT INSTRUCTIONS
 Revision 12/20/10 TURBO KIT INSTRUCTIONS This turbo kit consists of the necessary parts to upgrade or add a turbo to your 22R/RE/RET. This kit may require some fabrication to address your particular application
Installation Instructions
 Installation Instructions Automatic Retracting Running Board Vehicle Application Ford F150 Supercrew 2001-2003 (2004 Heritage) Part Number: 75111-01 www.bestop.com - We re here to help! Visit our web site
07/ parts list. Page 1. Chevrolet Equinox. Pin height - 18 Center - 22
 TP29332, Rev 0 07/17 BASEPLATE Chevrolet Equinox Pin height - 18 Center - 22 ITEM PART # QTY DESCRIPTION 1 00057 2 WASHER,.25 SPRING LOCK 2 00059 4 WASHER, FLAT.375 3 00062 2 NUT.25NC HEX 4 00907 10 BOLT,.375NC
R O A D M A S T E R, I N C.
 R O A D M A S T E R, I N C. 22 9 8 7 10 17 26 20 15 Cable Tab 21 1 16 Cable Tab 6 5 25 ITEM QTY NAME PART # 1...2...#10 x 3/4 SELF DRILLING SCREW...350247-35 2...6...1/2 FLAT WASHER...350308-00 3...6...1/2
TURBOCHARGER L INSTALLATION GUIDE
 1 TURBOCHARGER INSTALLATION GUIDE TABLE OF CONTENTS Chapter Page 1 Intake and Cooling System Preparation 04 2 Intake Plenum and Manifold 08 3 Turbocharger Lubrication 11 4 Fuel Injectors 13 5 Re-installing
2-DOOR LAUNDRY CABINET KIT
 2-DOOR LAUNDRY CABINET KIT OWNER S MANUAL QL054 # 6725159 Table of Contents Table of Contents....2 Safety Information....2 Warranty....3 Warranty Claim Procedure....3 Pre-Installation....4 Tools/Materials
CSA CERTIFIED Conforms to UL 507
 Installation tion Instructions Please read and save these instructions! TURBO/MAXX12 Volt All Weather RV Ventilator Fans P/N 00-965001 Deluxe Model 1200T WITH THERMOSTAT P/N 00-965007 Standard Model 3550
STEALTH. The MOST Versatile and Easiest To Use Towed Vehicle Braking System available! NEED HELP? Call WARNING
 0 STEALTH The MOST Versatile and Easiest To Use Towed Vehicle Braking System available! INSTALLATION manual NEED HELP? Call - -00-0- Read all instructions before installing or operating the Stealth. Failure
CHEVROLET CORVETTE
 Suggested Installation Instructions for: 658-133 and 658-134 1968-1976 Air Conditioning Retro-Fit System 1968-76 CHEVROLET CORVETTE CONTROL & OPERATING INSTRUCTIONS The controls on your new Perfect Fit
FRONT MOUNT INTERCOOLER GOLF / JETTA IV 1.8T PART # & P INSTALATION INSTRUCTIONS
 FRONT MOUNT INTERCOOLER GOLF / JETTA IV 1.8T PART # 48.10.90 & 48.10.90P INSTALATION INSTRUCTIONS PART LIST: 1 INTERCOOLER CORE 1 U-BENT TUBE 1 L-SHAPED TUBE 1 INTERCOOLER INLET TUBE 4 M6 NYLOC NUT 3 M6
Installation Instructions for John Deere cotton picker models:
 Cotton Picker Installation Installation Instructions for John Deere cotton picker models: Two row and all row systems included. IMPORTANT: Ensure the instructions you use for the installation correspond
INSTALLATION INSTRUCTIONS
 AUTOMOTIVE PRODUCTS, INSTALLATION INSTRUCTIONS ULTIMATE BULL BAR APPLICATION: 2009-2018 Dodge Ram 1500 (Excl. Rebel Model) 2019 Dodge Ram 1500 Classic PART NUMBER: 32-1960, 32-1965, 32-1960L, 32-1965L
Doing Our Best to Provide You the Best. Subaru Legacy Outback Baja (Not Sport)
") Subaru Legacy Outback Baja (Not Sport) 7/16 TP20170,Rev.4 Pin Height - 15.5 Pin Centers - 23 1 2 9517170 parts list Ref. Part No. No. Qty. Description 1. 11746-76 1 Base Plate 2. 07594 2 3/8 NC x 1 Hex
Subaru Legacy Outback Baja (Not Sport) 7/16 TP20170,Rev.4 Pin Height - 15.5 Pin Centers - 23 1 2 9517170 parts list Ref. Part No. No. Qty. Description 1. 11746-76 1 Base Plate 2. 07594 2 3/8 NC x 1 Hex
R O A D M A S T E R, I N C.
 R O A D M A S T E R, I N C. ROADMASTER, Inc. 6110 NE 127th Ave. Vancouver, WA 98682 10 15 9 BASEPLATE KIT 4 5 14 360-896-0407 fax 360-735-9300 www.roadmasterinc.com 6 7 Special Tools Required Plastic rivet
Instructions for 2-row monitoring only
 Installation Instructions for CaseIH cotton picker models: Instructions for 2-row monitoring only CAUTION: Ensure the model numbers shown above correspond to the machine model. If you receive the incorrect
ZX-14 Stage I Turbo Kit
 62910 Peerless Ct. Bend, OR 97701 Phone 541.385.0706 Fax 541.382.9406 ZX-14 Stage I Turbo Kit WARNING: This turbo kit is for OFF-ROAD RACING use ONLY. Advisement: These instructions are written to be comprehensive
INSTALLATION INSTRUCTIONS
 INSTALLATION INSTRUCTIONS Part# 22-7810 Jeep JK/JKU ARB Mounting Kit 2007-2018.5 For the most up to date instructions please visit www.updownair.com www.updownair.com 833 226 4863 IMPORTANT INFORMATION
SDHQ F-150 Winch Mount System Installation
 SDHQ 2015+ F-150 Winch Mount System Installation Recommended Tools: Door panel removal tool Needle Nose Pliers 10mm Socket or Wrench 13 mm or ½ Socket (⅜ Drive) 14 mm or 9/16 Socket (⅜ Drive) 21 mm or
INSTALLATION INSTRUCTIONS PART NUMBER:
 Equipped with AEM Dryflow Filter No Oil Required! INSTALLATION INSTRUCTIONS PART NUMBER: 21-450B (Blue Finish) 21-450C (Gun Metal Grey Finish) 21-450P (Vacuum Metalized Chrome-VMC) 21-450R (Red Finish)
KIT CONTINUES ON NEXT PAGE
 1 Copyright This document contains technical information the property of FORD RANGER 2011-PRESENT - ALL MODELS 145lt REPLACEMENT TANK LONG RANGE FUEL TANK PARTS LIST AND FITTING INSTRUCTIONS PART NUMBER:
Installation Instructions
 Installation Instructions RedRock 4x4 3 in. Bull Bar w/ Skid Plate & 20 in. Single Row LED Light Bar Black (Polished) () Part# T531165 (T531166) PARTS LIST: 1 Bull Bar 8 12mm x 32mm OD x 3mm Flat Washers
TOYOTA VENZA 2009 TRAILER WIRE HARNESS Procedure
 Part Number: PT791-0T099 Kit Contents Item # Quantity Reqd. Description 1 1 Trailer Wire Harness Module 2 1 4-Flat Harness 3 1 Battery Power Wire Harness 4 1 Mounting Bracket, 4-Flat 5 2 Screw #10-24 6
INSTALLATION INSTRUCTIONS
 APPLICATION(S): Kawasaki Ultra 250X Pro-Series Power Filter Kit PART# - RK13096 We strongly recommend the use of a service manual to familiarize yourself with the various components and procedures involved
INSTALLATION INSTRUCTIONS
 AUTOMOTIVE PRODUCTS, INSTALLATION INSTRUCTIONS SURE-GRIP BOARD MOUNT KIT APPLICATION: 2014+ Chevrolet Silverado / GMC Sierra 1500 Regular Cab 2015+ Chevrolet Silverado / GMC Sierra 2500/3500 Regular Cab