SLP Single Pipe Set for Arctic Cat 900 Mountain Cat Carb and EFI with Transfer Outlet Tube P.N CP/09-914CP
|
|
|
- Jason Manning
- 5 years ago
- Views:
Transcription
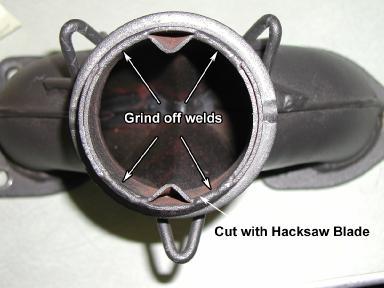
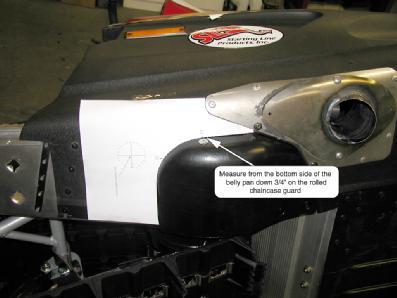
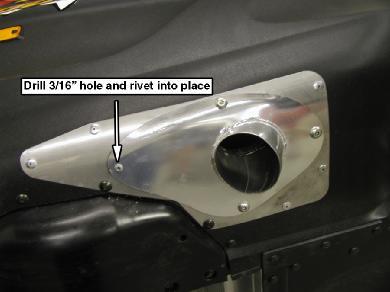
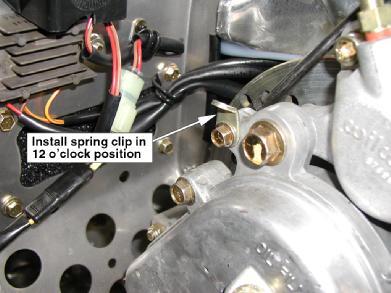
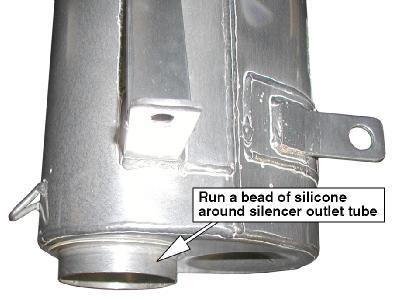
1 Setting the Wld s Perfmance Standards SLP Single Pipe Set f Arctic Cat 900 Mountain Cat Carb and EFI with Transfer Outlet Tube P.N CP/09-914CP Read instructions carefully and completely befe attempting installation. 1- Remove stock pipe, silencer, Y-pipe and outlet deflect. (Retain stock mounting hardware f pipe installation.) NOTE: This pipe will use the stock Y-pipe. 2- If theres is a diffuser ring in the end of the Y-pipe it will need to be removed. Grind the 4 small welds at the exit end of the Y-pipe and use a hacksaw blade to cut a hizontal line in the ring so it can be removed (see illustration #1). Reinstall the stock Y-pipe. 3- Remove stock silencer bracket from the chaincase (this bracket will not be used in installation). 4- Roll the sled onto its left side place the template provided onto the belly pan to mark the transfer tube outlet hole (see illustration #2). 5- Using a 1 3/4 hole saw drill the transfer tube outlet hole and debur the hole. 6- Install transfer tube outlet plate from the bottom of the sled up. The angle ption of the plate should be on the bottom with the long side toward the front of the sled. Using the plate as a template mark the two holes and drill using a 3/16 drill bit. Rivet the plate into place with 2 steel rivets provided and place rivet washers on the inside of the belly pan. 7- From the spring tab locat hole on the pattern measure 3/4 down the chaincase guard (see illustration #2) Drill a 3/16 hole and rivet the spring tab provided onto the inside of the belly pan with a rivet washer on the inside (the spring tab needs to be pointing up). 8- The center of the raised ption on the OEM outlet plate inside the bellypan will need to be flattened f transfer tube clearance. 9- Run a bead of silicone around the outside edge of the SLP outlet deflect plate and install to belly pan from the bottom of the sled and bolt into place using stock bolts (see illustration ). Using the plate as a guide drill a 3/16 hole in the back of the plate and rivet into place. 10- Install the transfer tube and spring to the spring tab. 11- Remove the stock vibro suppt from the silencer suppt bracket located in front of the chaincase. Install SLP vibro suppt into the large hole in the suppt bracket secure with the 1/4 flat washer, 5/16 flat washer and 1/4 nylock nut. NOTE: The 1/4 flat washer will center the vibro-insulat on the suppt bracket (see Illustration #4). 12- Install spring tab (provided) using the upper rear hole in the chain case that holds the recoil rope guide in place with the spring tab in the 12 o clock position (see Illustration #5). 13- Run a bead of silicone (Permatex 598 Ultra Black) around the bottom edge of the silencer outlet tube (see Illustration #6). Set SLP Silencer into place and bolt to the vibro suppt with flat washer and 1/4 nut. Place one of the stock vibro suppts in the bracket at the rear of the silencer. the rear of the silencer to the spring tab and the bottom front of the silencer to the outlet plate. Optional Deflect Installation: Stock snow deflect can be reinstalled just fward of the exhaust outlet by drilling new holes and riveting into place. 14- Set the SLP single pipe into place. Looking under the pipe, locate the areas around the mag shock tower that are closest to the pipe and silencer. Remove the pipe and cover the shock tower with reflective heat tape in those areas closest to the pipe and silencer. 15- Install SLP single pipe using stock gaskets and springs (on EFI models use grafoil seal provided f sealing pipe to silencer). 1
2 Note: Check tightness of pipe clamps approximately every 100 miles f the first 300 miles then periodically after that. Tension Adjustment: loop adjustment is suggested f proper spring tension to prevent leakage and wear (low tension), allow adequate flex (proper tension) and prevent spring breakage (excessive tension). When system is installed the spring can be judged f proper tension. The winding spacing at the center of the spring will indicate tension. When proper the two center windings will have.040" to.050" clearance between them. This is easily tested with a feeler gage. If tension is increct, the loop on the pipe silencer can be bent in the direction needed to increase decrease tension. Attach a vise grip firmly to the loop and bend. Air Box Recommendation: SLP recommends the use of an SLP High Flow Outside Draw Airbox Conversion Kit. This effectively transfms your stock intake and system will allow me cold air to reach the engine which translates into an increase in hsepower. This system also is less likely to plug when riding in deep snow. Also recommended is the use of SLP Tque Arm #23-57 to harness the tque load and eliminate clutch mis-alignment under acceleration. This reduction of engine movement in the chassis results in optimum clutch efficiency f maximum transfer of hsepower to the ground. Caring f your ceramic coated pipes and/ silencer: Ceramic Coating is an aluminum matrix applied to your exhaust system to provide a thermal barrier f me consistent perfmance. It is a coating which requires little maintenance to keep your pipes and/ silencer looking like new. Upon completion of new installation, wipe the ceramic coated parts of the exhaust system down with brake cleaner. This will prevent oils and grease (usually in the fm of fingerprints) from burning on and staining the exhaust during first initial startup. To maintain your ceramic coated system, wash it with soap and water periodically (especially necessary after trailering it to and from your riding area on roads that have been treated with salt and other ice removing chemicals). Salt and other ice removing chemicals will attack and eat away at the ceramic coating. This will result in rust coming through the coating. Typically you will notice this rusting after your snowmobile has set f a period of time without the exhaust system being brought up to running temperature. Periodically polish your ceramic coated pipes and/ silencer after each washing with an aluminum polish such as Mothers, Maas Blue Magic aluminum polish that can be found at any automotive parts ste. Do not use any acidic cleaners! F stubbn stains use fine 000 steel wool, then use a soft cloth with polish. Failure to maintain your ceramic coated pipes silencer can result in damage to the ceramic coating f which there is no warranty coverage. A little care will insure that your pipes and/ silencer will continue looking like new f many years. Note: In areas of the ceramic coated system where skin temperatures exceed 1300 degrees F, it is nmal f the coating to turn dull gray. These areas should also be washed and polished periodically. 2
3 Illustration 1 Illustration 2 Illustration 3 3

4 Illustration 4 Illustration 5 Illustration 6 4
5 IMPORTANT NOTE: CARB TUNING SPECIFICATIONS INCLUDED IN THIS SECTION ARE A BASE LINE AND SHOULD BE ADJUSTED AS NEEDED FOR YOUR PARTICULAR ATMO- SPHERE. USE EXHAUST GAS TEMPERATURE GAUGES OR MONITORING PLUG AND PISTON COLOR FOR TUNING GUIDE. Imptant Note: Fuels containing ethanol, alcohol based fuel compounds, clean air additives will require larger main jets, usually 2 sizes me than the SLP jetting chart. Jet Needle must be raised one E clip position. FUEL REQUIREMENT: Minimum 91 Octane fuel Spark Plug Recommendation: BR9EYA Jetting f 2004 Arctic Cat 900 Mountain Cat w/slp Single Pipe and Stock Air Box Temperature -40 to -20 F (-40 to -29 C) -20 to 0 F (-29 to -18 C) 0 to 20 F (-18 to -7 C) 20 to 40 F (-7 to 4 C) Altitude PTO/MAG PTO/MAG PTO/MAG PTO/MAG 0' (0m) 480/ / / / ' (610m) 450/ / / / ' (1219m) 430/ / / / ' (1829m) 410/ / / / ' (2438m) 390/ / / /370 10,000' (3048m) 380/ / / / ,000' (+3658m) 360/ / / /340 Note: If shelf is removed from airbox if using an SLP Air Intake Kit, increase main jet one size from chart Altitude Pilot Screw Pilot Jet Needle Jet Jet Needle (Mountain Cat) Jet Needle (ZR) ' (0-915m) ' ( m) ' ( m) +9000' (+2743m) 1 ½ Turns 50 Fixed 9DFH DFH ½ Turns 50 Fixed 9DFH DFH ½ Turns 50 Fixed 9DFH DFH ½ Turns 50 Fixed 9DFH DFH
6 2/17/ (CP) Page 6 Arctic Cat 900 Mountain Cat with SLP Single Pipe and SLP Air Box using BoonDocker Perfmance Control Box Imptant Note: The following infmation is given as a guideline only. The fuel map listed was attained using an Arctic Cat 900 Mountain Cat with SLP Single Pipe and SLP air box. Fuel used was premium 91 octane non oxygenated. SLP recommends that you start at a richer setting than what is listed below and lean down as needed f best perfmance using plug col and piston wash as a guideline. Exhaust temperature gauges can also be used as a tuning aid, but due to differences in gauges, probes, probe position as well as many other engine variables you must first establish a relationship between plug col / piston wash and exhaust gas temperature. Fuel: Minimum 91 octane pump fuel. Fuels containing ethanol oxygen carrying additives will require me fuel than non oxygen carrying fuels. Fuel Map f Arctic Cat 900 Mountain Cat RPM Low Mid High Trim
7 Clutching f ALL Arctic Cat 900 w/slp Single Pipe Using 9 Tower Drive Clutch (9 bolts in clutch cap) and Stock Secondary Clutch DRIVE DRIVEN ALTITUDE Cam Arm SLP MTX Weight Tque Bracket SLP Overdrive Helix Gear Ratio METERS (FEET) (0-3000) SLP #40-87* 74 g #40-87* 74 g #52-62/55 #53-62/55 ZR-26/41 MC- 20/ (3-6000) g #40-84* 71 g #52-60/55 #53-60/ (6-9000) g #40-84* 71 g no rivets #52-60/55 #53-60/ ( ) g #40-83* 68 g no rivets #52-58/53 #53-58/53 * Clutch spyder must be reshimmed f proper belt to sheave clearance (.020 belt to sheeve clearance). Running RPM Clutching f ALL Arctic Cat 900 w/slp Single Pipe Using 6 Tower Drive Clutch (6 bolts in clutch cap) and Stock Secondary Clutch DRIVE DRIVEN ALTITUDE SLP MTX Weight Tque Bracket SLP Overdrive Helix Gear Ratio METERS (FEET) (0-3000) #40-97* 74 g #52-62/55 #53-62/55 ZR-26/41 MC- 20/ (3-6000) #40-96* 71 g #52-60/55 #53-60/ (6-9000) #40-96* 71 g no rivets #52-60/55 #53-60/ ( ) #40-95* 68 g no rivets #52-58/53 #53-58/53 * Clutch spyder must be reshimmed f proper belt to sheave clearance (.020 belt to sheeve clearance). Running RPM
8 Clutching f Arctic Cat 900 w/slp Single Pipe Using 9 Tower Drive Clutch (9 bolts in clutch cap) and Team Industries Driven Pulley DRIVE TEAM INDUSTRIES DRIVEN ALTITUDE Clutch Cam Arm Clutch Driven Helix METERS (FEET) (0-3000) TBA TBA TBA TBA (3-6000) 70.5 g Red/Black P.N P.N Set at 70/ (6-9000) 67 g Red/Black P.N P.N Set at 70/ ( ) 64 g Red/Black P.N P.N Set at 70/46 Running RPM
3- Remove stock silencer bracket from the bulkhead located above brake assembly (this bracket will not be used in installation).
.") SLP Single Pipe Set for 2004 ZR 900 P.N. 09-904CP Kit Contents: 2 1/4 Flat Washer 2 Large Head Rivets 2 1/4 Nylock Nuts 2 Rivet Washers 1 Stem Vibro Support 1 Medium Sping 1 pc 30 Reflective Heat Tape
SLP Single Pipe Set for 2004 ZR 900 P.N. 09-904CP Kit Contents: 2 1/4 Flat Washer 2 Large Head Rivets 2 1/4 Nylock Nuts 2 Rivet Washers 1 Stem Vibro Support 1 Medium Sping 1 pc 30 Reflective Heat Tape
SLP Twin Pipes for 2004 Arctic Cat 900 Mountain Cat Twin P.N (CP)
") Setting the World s Performance Standards Twin Pipes for 2004 Arctic Cat 900 Mountain Cat Twin P.N. 09-907(CP) Contents of Pipe Set 1 - Plastic Zip tie 3 - Large Head Rivets 4 - Short s 1 - Red Silicone
Setting the World s Performance Standards Twin Pipes for 2004 Arctic Cat 900 Mountain Cat Twin P.N. 09-907(CP) Contents of Pipe Set 1 - Plastic Zip tie 3 - Large Head Rivets 4 - Short s 1 - Red Silicone
SLP Twin Pipes for 2003 Arctic Cat 900 Twin
 Setting the World s Performance Standards SLP Twin Pipes for 2003 Arctic Cat 900 Twin P.N. 09-902(CP) and 09-903(CP) IMPORTANT: Read instructions carefully before installation. 1. Remove stock exhaust,
SLP Single Pipe Set for 2007 Arctic Cat M1000
 Single Pipe Set for 2007 Arctic Cat M1000 P.N. 09-876 Kit Contents: 1 - Silencer 1 - Spring Tab 1 - Large Head Rivet 1 - Short Spring 1 - Zip Tie 1-30 Reflective Heat Tape 1 - Y-Pipe 1 - Single Pipe Read
POLARIS 700/800 PRO X SINGLE PIPE P.N
 2003-04 POLARIS 700/800 PRO X SINGLE PIPE P.N. 09-839 Important: Read instructions carefully before installation. Note: Do not remove banding placed on the mid section of the pipe. It has been placed there
SLP PART # ATTENTION DEALER
 SLP PART #09-872 ATTENTION DEALER PLEASE PROVIDE YOUR CUSTOMER WITH THE INSTALLATION AND INSTRUCTION DATA THAT IS SUPPLIED IN THIS PACKET FOR THIS PRODUCT. Before you begin, please read the following:
SLP Single Pipe for Polaris 600 H.O. Fusion/RMK/Switchback/Shift (Carb Models)
") SLP Single Pipe for 2006-09 Polaris 600 H.O. Fusion/RMK/Switchback/Shift (Carb Models) Part # 09-634 Kit Contents: 2-7 Insulated Heat Tape 1-1/8 Pipe Adjustment Washer 4-30 Reflective Heat Tape 1 - Wire
SLP Single Pipe for 2006-09 Polaris 600 H.O. Fusion/RMK/Switchback/Shift (Carb Models) Part # 09-634 Kit Contents: 2-7 Insulated Heat Tape 1-1/8 Pipe Adjustment Washer 4-30 Reflective Heat Tape 1 - Wire
Sinlge Pipe for /800 Pro-X/Pro-X2/Pro-XR P.N
 Sinlge Pipe for 2003-04 700/800 Pro-X/Pro-X2/Pro-XR P.N. 09-9 Important: Read instructions carefully before installation. Note: Do not remove banding placed on the mid section of the pipe. It has been
1-Remove stock exhaust, Y-Pipe, and silencer (Retain OEM springs and exhaust gaskets for pipe installation).
.") Single Pipe Set for use with Performance Edition Kit for 2003-04 POLARIS 800 Pro X P.N. 09-848 Important: Read instructions carefully before installation. Note: Do not remove banding placed on the mid
Single Pipe Set for use with Performance Edition Kit for 2003-04 POLARIS 800 Pro X P.N. 09-848 Important: Read instructions carefully before installation. Note: Do not remove banding placed on the mid
SLP PART # ATTENTION DEALER
 PART #09-8000 ATTENTION DEALER PLEASE PROVIDE YOUR CUSTOMER WITH THE INSTALLATION AND INSTRUCTION DATA THAT IS SUPPLIED IN THIS PACKET FOR THIS PRODUCT. Before you begin, please read the following: The
Single Pipe for Ski-Doo REV H.O. (For use with ported engines only) #09-870
 #09-870") the World s Performance Standards Single Pipe for 200-2006 Ski-Doo REV H.O. (For use with ported engines only) #09-870 Important: Read instructions carefully before installation. 1. Remove stock pipe and
the World s Performance Standards Single Pipe for 200-2006 Ski-Doo REV H.O. (For use with ported engines only) #09-870 Important: Read instructions carefully before installation. 1. Remove stock pipe and
Part # SLP Silencer for G4 Ski Doo 850
 Part # 09-867 SLP Silencer for 2017-18 G4 Ski Doo 850 Parts List: 7-7 Insulated Heat Tape (Part #090-29) 5-30 Reflective Heat Tape (Part #090-31) 1 - Inner Aluminum Heat Shield (Part #091-6057) 3-3/16
Part # SLP Single Pipe Set for G4 Ski Doo 850
 Setting the World s Performance Standards 743 East Iona Road, Idaho Falls, ID 83401, (208) 529-0244 Fax (208) 529-9000 Part # 09-867 SLP Single Pipe Set for 2017-18 G4 Ski Doo 850 Parts List: 7-7 Insulated
Stock rubber isolator must remain in this location
 *015-09319* Setting the World s Performance Standards 743 East Iona Road, Idaho Falls, ID 83401, (208) 529-0244 Fax (208) 529-9000 Lightweight Silencer for Polaris: 2015-18 800 Axys Models & 2016-18 600
Setting the World s Performance Standards
 Setting the World s Performance Standards 743 East Iona Road, Idaho Falls, ID 83401, (208) 529-0244 Fax (208) 529-9000 Lightweight Silencer for Polaris: 2016-17 800 Axys Models & 2017 600 Pro-RMK P/N 09-322
Single Pipe Set with OEM Silencer for /800 RMK/XC, /800 SKS, /800 Switchback and Switchback
 Single Pipe Set with OEM Silencer for 2002-05 700/800 RMK/XC, 2003 700/800 SKS, 2004 700/800 Switchback and 2005 800 Switchback P.N. 09-836 Important: Read instructions carefully before installation. Note:
SLP PART# ATTENTION DEALER
 *015-09866* Setting the World s Performance Standards 743 East Iona Road, Idaho Falls, ID 83401, (208) 529-0244 Fax (208) 529-9000 PART# 09-866 ATTENTION DEALER PLEASE PROVIDE YOUR CUSTOMER WITH THE INSTALLATION
SLP PART # ATTENTION DEALER
 SLP PART #09-883 ATTENTION DEALER PLEASE PROVIDE YOUR CUSTOMER WITH THE INSTALLATION AND INSTRUCTION DATA THAT IS SUPPLIED IN THIS PACKET FOR THIS PRODUCT. Before you begin, please read the following:
POLARIS XLT-SPECIAL TRIPLE PIPE SET P.N
 1998-99 POLARIS XLT-SPECIAL TRIPLE PIPE SET P.N. 09-596 Important: Read instructions carefully before installation. 1-Remove stock exhaust, Y-pipe, and rear muffler support. 2-Install three exhaust flanges,
Single Pipe Set for Big Block: /700 XC/SKS/RMK and /700 RMK/SKS For use with Stock Silencer P.N
 Single Pipe Set for Big Block: 2000 600/700 XC/SKS/RMK and 2001 600/700 RMK/SKS For use with Stock Silencer P.N. 09-732 Important: Read instruction carefully before installation. Note: Removal of pipe
XLT SPECIAL TRIPLE PIPE SET P.N Installation Instructions
 1995-97 XLT SPECIAL TRIPLE PIPE SET P.N. 09-598 Installation Instructions Revised 8/20/02 Read instructions carefully before installation 1 - Remove stock exhaust, Y-Pipe, front and rear muffler support.
POLARIS 700 XC/SKS/RMK SLP TWIN PIPE SET P.N
 POLARIS 700 XC/SKS/RMK SLP TWIN PIPE SET P.N. 09-710 IMPORTANT: Read instruction carefully before installation. For engines with stock porting use either 09-700 glass pack pipe set or 09-710 canister pipe
XCR 600/ XLT TRIPLE PIPE SET P.N Installation Instructions
 1994-97 XCR 600/1993-97 XLT TRIPLE PIPE SET P.N. 09-5970 Installation Instructions Read instructions carefully before installation 1-Remove stock exhaust, Y-pipe, and rear muffler support. 2-Install three
SLP PIPE INSTALLATION INSTRUCTIONS #09-9 & # & NEWER POLARIS INDY 650 & RXL PIPE SET EFFECTIVE 6-92
 Page 1 of 5 SLP PIPE INSTALLATION INSTRUCTIONS #09-9 & #09-10 1988 & NEWER POLARIS INDY 650 & RXL PIPE SET EFFECTIVE 6-92 READ INSTRUCTIONS CAREFULLY BEFORE ATTEMPTING TO INSTALL PIPE SET #09-9 (For stock
SLP PIPE INSTALLATION INSTRUCTIONS POLARIS ULTRA 680 SP SKS & RMK P.N (Read instructions carefully before installation.
 SLP PIPE INSTALLATION INSTRUCTIONS POLARIS 1996-97 ULTRA 680 SP SKS & RMK P.N. 09-6801 (Read instructions carefully before installation.) NOTE: The Ultra has proven to exhibit distinct personalities from
SLP PIPE INSTALLATION INSTRUCTIONS POLARIS ULTRA 680 SP SKS & RMK P.N (Read instructions carefully before installation.
 SLP PIPE INSTALLATION INSTRUCTIONS POLARIS 1996-97 ULTRA 680 SP SKS & RMK P.N. 09-6802 (Read instructions carefully before installation.) NOTE: The Ultra has proven to exhibit distinct personalities from
POLARIS XLT 580/600 INSTALLATION INSTRUCTIONS PART # READ INSTRUCTIONS CAREFULLY BEFORE ATTEMPTING TO INSTALL PIPE SET
 Page 1 of 6 POLARIS 1993-97 XLT 580/600 INSTALLATION INSTRUCTIONS PART #09-595 READ INSTRUCTIONS CAREFULLY BEFORE ATTEMPTING TO INSTALL PIPE SET 1. Remove stock exhaust, y-pipe, front and rear muffler
POLARIS Twin 600/700 SINGLE PIPE SET P.N
 1997-1998 POLARIS Twin 600/700 SINGLE PIPE SET P.N. 09-718 Important: Read instruction carefully before installation. Note: Do not remove banding placed on the mid section of the pipe. It has been placed
Performance Edition Kit (SLP Stage 4)
") Performance Edition Kit ( Stage 4) for 2011-15 Polaris 800 RMK, Pro-RMK, Switchback Assault, RMK Assault & Indy 2011-14 800 Rush & Switchback Congratulations! You have just purchased one of the best modifications
Performance Edition Kit ( Stage 4) for 2011-15 Polaris 800 RMK, Pro-RMK, Switchback Assault, RMK Assault & Indy 2011-14 800 Rush & Switchback Congratulations! You have just purchased one of the best modifications
Arctic Cat 800 F/XF/M SPI Single Pipe Polished Ceramic Operating RPM 8300
 2012-14 Arctic Cat 800 F/XF/M SPI Single Pipe 131-153 Polished Ceramic Operating RPM 8300 The 131-153 Arctic Cat Single Pipe Looses 3.2 lbs of weight! Straightline also offers a lightweight muffler that
C3 Syncro Drive Proclimb 1100 Installation Instructions
 Revision 4 Nov 8-2013 201A Old Town Road, Sicamous, BC. V0E 2V4 Ph 250-833 3538 Fax 888-716 5903 www.c3powersports.com Thank you for purchasing a ProClimb M, ProCross F & XF SyncroDrive Note: This modification
Sno Pro 120. Model Number S2012ACAAAUSG SHARE OUR PASSION.
 2012Snowmobile Illustrated Parts Manual Sno Pro 120 Model Number S2012ACAAAUSG TM SHARE OUR PASSION. TABLE OF CONTENTS 2012 Sno Pro 120 (Model No. S2012ACAAAUSG) SKI AND SPINDLE ASSEMBLY... 1 A-ARM ASSEMBLY...
BA /02/03/04/06/07/08/13/13B/15 BIG AIR KIT (BAK) - Yamaha Road Star (99-07)
 - Yamaha Road Star (99-07)") BA-2020-00/02/03/04/06/07/08/13/13B/15 BIG AIR KIT (BAK) - Yamaha Road Star (99-07) Page: 1 Revision: 6.2-02/23/2011 Install Time: 1.5 Hours We recommend a qualified Yamaha technician install this kit
BA-2020-00/02/03/04/06/07/08/13/13B/15 BIG AIR KIT (BAK) - Yamaha Road Star (99-07) Page: 1 Revision: 6.2-02/23/2011 Install Time: 1.5 Hours We recommend a qualified Yamaha technician install this kit
AC 120 MODEL NUMBER S2008ACAAAUSG MODEL NUMBER S2008ACAAAUSP
 2008 AC 120 Illustrated Parts Manual MODEL NUMBER S2008ACAAAUSG MODEL NUMBER S2008ACAAAUSP TABLE OF CONTENTS (Model No. S2008ACAAAUSG) (Model No. S2008ACAAAUSP) SKI AND SPINDLE ASSEMBLY... 1 A-ARM ASSEMBLY...
Keeping You Cool Under Pressure
 Installation Instruction for 92-93 GM 6.5L Turbo Diesel Series 3500-4 Wheel Drive Pickup and Series 1500, 2500, 3500 4 Wheel Drive Suburban Intercooler System (Part No. 2-436) TOOLS REQUIRED: 1.) Normal
Illustrated Parts Manual. ZR 120 Model Number S2005ZRAAAUSG Model Number S2005ZRAAAUSR
 Illustrated Parts Manual ZR 120 Model Number S2005ZRAAAUSG Model Number S2005ZRAAAUSR 2 00 5 TABLE OF CONTENTS 2005 ZR 120 (Model No. S2005ZRAAAUSG) (Model No. S2005ZRAAAUSR) SKI AND SPINDLE ASSEMBLY.................................................
Lexus ES Fine Mesh and Adaptive Cruise Control Fine Mesh Grilles Upper and Lower Replacements
 IMPORTANT: PLEASE KEEP THIS INSTRUCTION MANUAL FOR FUTURE REFERENCE! 2013-15 Lexus ES Fine Mesh and Adaptive Cruise Control Fine Mesh Grilles Upper and Lower Replacements Part #1372-0102-13 / Black Ice
Classes INC. Northeast Snowmobile Racing INC SNOW DRAG RACING. Classes. Amateur: ( $15 Entry Fee + $5 Insurance Fee) Stock: 500, 600, 700, 800, Open
 Stock: 500, 600, 700, 800, Open") INC Northeast Snowmobile Racing INC Classes SNOW DRAG RACING Classes Amateur: ( $15 Entry Fee + $5 Insurance Fee) Stock: 500, 600, 700, 800, Open Improved Trail: 500, 600, 700, 800, Open Pro: ( $25 Entry
INC Northeast Snowmobile Racing INC Classes SNOW DRAG RACING Classes Amateur: ( $15 Entry Fee + $5 Insurance Fee) Stock: 500, 600, 700, 800, Open Improved Trail: 500, 600, 700, 800, Open Pro: ( $25 Entry
ZR 120 Model NumberS2003ZRAAAUSG
 ARCTIC CAT ZR 120 Model NumberS2003ZRAAAUSG TABLE OF CONTENTS 2003 ZR 120 - Revised (Model No. S2003ZRAAAUSG) SKI AND SPINDLE ASSEMBLY................................................. 1 A-ARM ASSEMBLY..........................................................
Installation Instructions For Part Number: Scoop and Snorkel Kit
 Installation Instructions For Part Number: 883-275 Scoop and Snorkel Kit 2008-14 Polaris Ranger RZR 800 800 E.F.I. Tools Required For Installation: 7/16 and 1/2 Wrenches. 10mm, 7/16, and 1/2 Sockets. T-25
Exhaust Heat Shield Instructions ND
 Exhaust Heat Shield Instructions ND 2016 + Thank you for purchasing the Track Dog Racing Exhaust Heat Shield for the 2016 to Present Mazda MX-5. Our TDR Heat Shield is designed to help maintain lower temperatures
Model No. S2002ZRAAAUSG ILLUSTRATED PARTS MANUAL
 A RC TI C C A T 2002 ZR 120 Model No. S2002ZRAAAUSG ILLUSTRATED PARTS MANUAL TABLE OF CONTENTS 2002 ZR 120 (Model No. S2002ZRAAAUSG) SKI AND SPINDLE ASSEMBLY.................................................
Illustrated Parts Manual
 2010 Illustrated Parts Manual 120 Sno Pro Model Number S2010ACAAAUSG SHARE OUR PASSION ṬM TABLE OF CONTENTS 2010 120 Sno Pro (Model No. S2010ACAAAUSG) SKI AND SPINDLE ASSEMBLY... 1 A-ARM ASSEMBLY... 2
BLACKBIRD INSTALLATION SUPPLEMENT
 BLACKBIRD INSTALLATION SUPPLEMENT FOR 2003-7 FORD 6.0 LITER DIESEL F-SERIES DUAL ALTERNATOR VERSION 10/07 Blackbird Installation Supplement for Ford 6.0. Liter Dual Alternator Parts included in the 6.0
Arctic Cat ProClimb Sidekick Installation Instructions
 2013-2017 Arctic Cat ProClimb Sidekick Installation Instructions 1.Remove side panels, front bumper, and hood 2. Remove pipe, muffler, heat shield and ECU 3. Remove cross brace. Unplug the servo motor
Illustrated Parts Manual
 ARCTIC CAT SHARE OUR PASSION. TM Illustrated Parts Manual AC 120 Model Number S2007ACAAAUSG Model Number S2007ACAAAUSO 2007 TABLE OF CONTENTS 2007 AC 120 (Model No. S2007ACAAAUSG) (Model No. S2007ACAAAUSO)
Equipped with AEM Dryflow Filter No Oil Required! INSTALLATION INSTRUCTIONS PART NUMBER: C
 Equipped with AEM Dryflow Filter No Oil Required! INSTALLATION INSTRUCTIONS PART NUMBER: 21-721C 2011-2013 MINI Cooper S L4-1.6L SEE NOTE* 2011-2013 MINI Clubman S L4-1.6L SEE NOTE* 2011-2013 MINI Cooper
BLACKBIRD INSTALLATION SUPPLEMENT
 BLACKBIRD INSTALLATION SUPPLEMENT FOR 2003-7 FORD 6.0 LITER DIESEL SINGLE ALTERNATOR F-350, F-450, F-550, EXCURSION VERSION 7-07 Parts Description Blackbird Wiring Manual Installation Supplement 6.0 Liter
Header P/N: TTi HEADER INSTALLATION. Parts List
 Header P/N: TTi 440-178 HEADER INSTALLATION Page 1 of 3 Parts List (1) Driver side header (1) Passenger side header (2) Header gaskets (12) 3/8"-16x1 Header bolts (2) Header reducer adapters w/ 3" 3-bolt
Skidoo XM Etec Installation Instructions
 Thank you for purchasing your Silber Turbo kit. This product was designed to give you endless amounts of power and satisfaction. During the installation feel free to call us with any question or concerns
LUBRICATION AND MAINTENANCE CHART 0
 LUBRICATION AND MAINTENANCE CHART 0 SYSTEM PART/TASK 10-HOUR OR 500 km (300 mi) INSPECTION WEEKLY OR EVERY 240 km (150 mi) MONTHLY OR EVERY 800 km (500 mi) ONCE A YEAR OR EVERY 3200 km (2000 mi) STORAGE
Polaris Axys Sidekick Installation Instructions
 2016-2017 Polaris Axys Sidekick Installation Instructions 1. Remove hood and side panels. 2. Remove fasteners and slide console back. 3. Remove belt and driven clutch. 4. Remove clutch cover/ oil-tank
Installation instructions
 Installation instructions Akrapovič Exhaust System: Slip-On for the Laborghini Gallardo 550-2 Coupe Laborghini Gallardo 560-4 Coupe / Spyder Laborghini Gallardo 570-4 Coupe / Spyder Congratulations on
HW Prowler Carburetor Installation Instructions
 HW Prowler Carburetor Installation Instructions Page 1 of 6 Carb Kit Contains: HW modified Mikuni 36mm pumper style carb Custom choke cable Fuel Line Clamp Instructions (2) Leaner and (2) richer main jets
Super Duty Front Air Bag Installation Instructions
 2005-2010 Super Duty Front Air Bag Installation Instructions Congratulations! You have just purchased the best engineered, highest quality front air suspension kit available on the market for your 2005-2010
Installation Instructions. Original Bar Grille
 Installation Instructions Part Number 84137 I-sheet Rev. A5 Contents Original Bar Grille For proper installation and best possible fit, please read all instructions BEFORE you begin. For technical assistance
2008 Arctic Cat 600 Sno Pro. Race School November 8, 2007 General Chassis Information Presented by Brian Dick
 2008 Arctic Cat 600 Sno Pro Race School November 8, 2007 General Chassis Information Presented by Brian Dick Chassis Self Pierce Riveted (SPR) tunnel assembly Engine/Lower Arm Frame assembly Upper Spar
Backwater Performance Systems Large Vanguard Mikuni Twin Carburetor Kit
 Backwater Performance Systems Large Vanguard Mikuni Twin Carburetor Kit 1. Throttle Cable Twin (CKC-41) 2. Carburetor VM30mm (CKC-40) 3. Loctite 242.5mL (A-210) 4. Air Cleaner Filter 6000 (EC-86) 5. Rev
<THESE INSTRUCTIONS MUST BE GIVEN TO THE END USER> B&W
 B&W Trailer Hitches 1216 Hawaii Rd / PO Box 186 Humboldt, KS 66748 Turnoverball Gooseneck Hitch Installation Instructions MODEL 1314 2013 2014 RAM 3500
INSTALLATION INSTRUCTIONS
 COLD AIR INTAKE INSTALLATION INSTRUCTIONS PART NUMBER D760-0390C APPLICATION: 1999-2003 E39 M5 PARTS LIST 1 Left Aluminum Intake Tube 1 Air Pump Bracket (A) 1 Right Aluminum Intake Tube 1 Air Pump Bracket
B. B. 4. Remove the bed bolts A.) Using a 1/2 socket, remove the four inner bed bolts. B.) Using a T-25 Torx driver, remove the four outer bed bolts
 Using a 1/2 socket, remove the four inner bed bolts. B.) Using a T-25 Torx driver, remove the four outer bed bolts") Installation Instructions Part Number 883-275 Scoop and Snorkel Kit 2008-11 Polaris Ranger RZR 800 800 E.F.I. Thank you for purchasing the iraid Intake System. Contact iraid @ (800) 498-6951 8:00 M - 5:00
Installation Instructions Part Number 883-275 Scoop and Snorkel Kit 2008-11 Polaris Ranger RZR 800 800 E.F.I. Thank you for purchasing the iraid Intake System. Contact iraid @ (800) 498-6951 8:00 M - 5:00
Installation Instructions For Part Number: Scoop and Snorkel Kit
 Installation Instructions For Part Number: 883-275 Scoop and Snorkel Kit 2008-14 Polaris Ranger RZR 800 800 E.F.I. Thank you for purchasing the iraid Intake System. Contact iraid @ (800) 498-6951 8:00
WK2 SNORKEL. Installation Instructions PLEASE READ AND UNDERSTAND ALL INSTRUCTIONS BEFORE YOU START
 WK2 SNORKEL Installation Instructions PLEASE READ AND UNDERSTAND ALL INSTRUCTIONS BEFORE YOU START Please note: This kit is specifically for diesel models only. WK2 Snorkel Installation Instructions Rev.
RZR 800 SLP Clutch Kit Installation Instructions
 RZR 800 SLP Clutch Kit Installation Instructions Clutch Removal A-1. Remove seats and seat retaining bar from RZR. (Rear seats and seat retaining bar in RZR-4) Illustration #1 A-2. Loosen hose clamp located
Toyota Tundra Tow Kit Installation Instructions
 2007-2013 Toyota Tundra Tow Kit Installation Instructions Congratulations! You have just purchased the best engineered, highest quality air suspension kit available on the market for your 07-14 Toyota
DFAC 72 or DFAC 95. U.S. Patent # 6,346,056
 Congratulations! You have purchased the finest clutch kit available. This patented "dual quadrant" technology is revolutionary to the industry! This technology is ONLY AVAILABLE from Super Torquer Systems,
Revised 10/22/2014 Page 2 of?
 1.Remove side panels, hood, seat, fuel tank, and 2.Remove stock air box, remove fuel line muffler. Save exhaust springs and rubber muffler mounts for turbo bracket. Sand back surface flat for mounting.
Baby Grands Water Cooling Installation Instructions
 Baby Grands Water Cooling Installation Instructions These instructions are designed to help an average racer install a water cooled engine in their Baby Grand racecar. This assumes that the engine is already
Exhaust Heat Shield Instructions NC 06-15
 Exhaust Heat Shield Instructions NC 06-15 Thank you for purchasing the Track Dog Racing Exhaust Heat Shield for the 2006-2015 Mazda MX-5. Our TDR Heat Shield is designed to help maintain lower temperatures
LUBRICATION AND MAINTENANCE CHART 0
 LUBRICATION AND MAINTENANCE CHART 0 SYSTEM PART/TASK 0-HOUR OR 500 km (300 mi) INSPECTION WEEKLY OR EVERY 240 km (50 mi) MONTHLY OR EVERY 800 km (500 mi) ONCE A YEAR OR EVERY 3200 km (2000 mi) STORAGE
V1 Truck Manifold Turbo Kit for F-body
 V1 Truck Manifold Turbo Kit for 98-02 F-body Prep: -Remove all A/C Components, Alternator and brackets, tensioner, front bumper, front bumper foam, and front bumper support. Remove radiator and cooling
BRUTE FORCE AIR INTAKE SYSTEM
 BRUTE FORCE AIR INTAKE SYSTEM Installation Instructions for: Part Number 21-8108 1997-2000 Ford Ranger 4.0L V6 With O.E. panel style air filter ADVANCED ENGINE MANAGEMENT INC. 2205 126 TH Street, Unit
AUXILIARY BATTERY BOX INSTALLATION INSTRUCTIONS
 AUXILIARY BATTERY BOX INSTALLATION INSTRUCTIONS The original TOMMY GATE hydraulic lift Assembling the Auxiliary Battery Box 1. Remove the cover from the auxiliary battery box by removing the two nuts and
Installation instructions
 Installation instructions Akrapovič Exhaust System: Rear Carbon Fiber Diffuser for the Porsche 911 GT3 (type 991) Installation instructions Akrapovič Exhaust System: Rear Carbon Fiber Diffuser for the
CSS-C SUSPENSION LIFT KIT
 115 W. La Cadena Dr. Ste 100 Riverside, CA 92501 (951) 328-9902 phone (951) 328-9908 fax 2000-2006 CHEVROLET SILVERADO 1500 4WD CSS-C3-2 6-8 SUSPENSION LIFT KIT WARNING: CALIFORNIA SUPERTRUCKS RECOMMENDS
Installation Manual v1.0: Aurora Plus Turbo Kit ( ) 5.9L Dodge. Please read all instructions before installation.
 5.9L Dodge. Please read all instructions before installation.") Installation Manual v1.0: Aurora Plus - 4000 Turbo Kit (2003-2007) 5.9L Dodge Please read all instructions before installation. Figure 1: Aurora Plus - 4000 Kit Contents 1 Figure 2: Aurora Plus Hardware
Installation Manual v1.0: Aurora Plus - 4000 Turbo Kit (2003-2007) 5.9L Dodge Please read all instructions before installation. Figure 1: Aurora Plus - 4000 Kit Contents 1 Figure 2: Aurora Plus Hardware
TURBO KIT INSTRUCTIONS
 Revision 12/20/10 TURBO KIT INSTRUCTIONS This turbo kit consists of the necessary parts to upgrade or add a turbo to your 22R/RE/RET. This kit may require some fabrication to address your particular application
INSTALLATION TRUE DUAL HEADPIPES 497
 TRUE DUAL HEADPIPES 497 PARTS INCLUDED 1 Front Head Pipe 1 Rear Head Pipe 1 Front Heat Shield 1 Rear Heat Shield 1 Bracket (stamped 422-P) 1 Bracket (stamped 423-P) 2 1/2 x 1-1/4 Socket Head Cap Screw
INSTRUCTIONS. High Boost Upgrade Polaris PRO-RMK Polaris SKS 850 (155) 2019 Polaris ASSAULT 850. Page Number: 1 INSTRUCTIONS MODEL:
 2019 Polaris ASSAULT 850. Page Number: 1 INSTRUCTIONS MODEL:") INSTRUCTIONS MODEL: FITS: High Boost Upgrade 2019 Polaris PRO-RMK 850 2019 Polaris SKS 850 (155) 2019 Polaris ASSAULT 850 Page Number: 1 INSTRUCTIONS Table of Contents Contents INSTRUCTIONS...1 Contents
INSTRUCTIONS MODEL: FITS: High Boost Upgrade 2019 Polaris PRO-RMK 850 2019 Polaris SKS 850 (155) 2019 Polaris ASSAULT 850 Page Number: 1 INSTRUCTIONS Table of Contents Contents INSTRUCTIONS...1 Contents
49663, 49664, Wiring Conversion Kits. Parts List and Installation Instructions CAUTION. Read this document before installing the snowplow.
 December 1, 2014 Lit. No. 49666, Rev. 01 49663, 49664, 49665 Wiring Conversion Kits Parts List and Installation Instructions Read this document before installing the snowplow. See your sales outlet/web
Installation instructions
 Installation instructions Akrapovič Exhaust System: Rear Carbon Fiber Diffuser for the Porsche 911 Turbo (type 991) Porsche 911 Turbo S (type 991) www.akrapovic.com Installation instructions Akrapovič
BoonDocker Nitrous System Installation Instructions for Kawasaki KFX-700 ATV
 BoonDocker Nitrous System Installation Instructions for Kawasaki KFX-700 ATV Before you begin, please read the instructions below and check kit contents Nitrous Kit Contents: 1 Nitrous Manifold with fittings
Tools Required. Metric Wrench Set Screwdriver Set Metric Socket Set Pliers Heavy duty hydraulic Jack and Car Stands Box knife or similar Hacksaw WD40
 Subaru 2004+ Legacy GT & Outback XT For JDM 2.0 twinscroll turbo and USDM 2.5 turbo models Front Mount Intercooler Fitting Instructions PN# LEG-1348-000 You are now the proud owner of a highly tested and
INSTALLATION INSTRUCTIONS
 INSTALLATION INSTRUCTIONS PART NUMBER: 21-426B (Blue Finish) 21-426P (Vacuum Metalized Chrome-VMC) 21-426R (Red Finish) 2003-2005 DODGE Neon SRT-4 L4-2.4L Turbo C.A.R.B. E.O. # D-670-15 Part Number 21-426
GrilleGuy.com, LLC. Installation Instructions and Care guide : Scion tc : Honda S2000 : Honda Civic
 Installation Instructions and Care guide : 2005 2009 Scion tc : 2000 2003 Honda S2000 : 2004 2005 Honda Civic Thanks again for purchasing your custom grille insert from the GrilleGuy. The following are
SLP Stage 2 Performance Kit for Polaris 800 Axys
 Setting the World s Performance Standards 743 E. Iona Road, Idaho Falls, ID 83401, (208) 529-0244 Fax (208) 529-9000 Stage 2 Performance Kit for 2015-17 Polaris 800 Axys The following tuning specification
2010 Mustang V6 Shaker CDC #
 - - Incomplete 2010 Mustang V6 Shaker CDC # 1011-7002-01 Component Check List: Quantity/Description Part # Engine Cover Assembly 1011-6000-01 1 Engine Cover w/ Upper Air Tube 0511-2100-01 1 Aluminum Shaker
MC Xpress AB Norra Altervägen ALTERSBRUK Sweden Tel:
 Installation manual power upgrade kit Yamaha Sidewinder / Arctic Cat ZR 9000 Stage 1 / 225 hp and stage 2 / 250 hp MC Xpress AB Norra Altervägen 821 945 92 ALTERSBRUK Sweden Tel: +46 911 202005 www.mcx.se
For JBA Headers 641/2 to /302/5.0L EFI Ford Mustang & Mercury Cougar
 Corporate Office: PerTronix Inc. 440 E. Arrow Highway, San Dimas, California 91773 * Phone 909.599.5955 FAX 909.599.6424 Installation Instructions and Warranty Information For JBA Headers 641/2 to 73 289/302/5.0L
2003 Taurus/Sable Workshop Manual
 Page 1 of 24 SECTION 303-01A: Engine 3.0L (2V) ASSEMBLY 2003 Taurus/Sable Workshop Manual Engine Special Tool(s) Piston Ring Compressor 303- D032 (D81L-6002-C) Camshaft Bearing Set 303-017 (T65L-6250-A)
WARNING. When installed in accordance with these instructions, the front protection bar does not affect operation of the SRS airbag.
 Part Number: 343870 F/Kit 17557 Product Deluxe Combination Winch and Non Winch Bull Bar Description: Suited to Nissan XTERRA 05ON USA Only vehicle/s: WARNING REGARDING VEHICLES EQUIPPED WITH SRS AIRBAG;
Kit No Please read these instructions completely before proceeding with installation. Air Spring Kit Parts List. Bracket Attaching Hardware
 Kit No. 59532 MN-572 (021108) ECR 7136 Please read these instructions completely before proceeding with installation Air Spring Kit Parts List A Item Description Quantity A Air Sleeves 2 B Upper Brackets
Installation Instructions and Warranty Information
 Corporate Office: PerTronix Inc. 440 E. Arrow Highway, San Dimas, California 91773 * Phone 909.599.5955 FAX 909.599.6424 Installation Instructions and Warranty Information 1695S 2007-14 Mustang GT500 5.4/5.8L
AKRAPOVIC SLIP-ON EXHAUST SYSTEM for the YAMAHA MT 03 ( )
") Installation instructions: *501570* AKRAPOVIC SLIP-ON EXHAUST SYSTEM for the YAMAHA MT 03 (2007-2008) Congratulations on purchasing an Akrapovic exhaust system. Please read these installation instructions
Installation instructions: *501570* AKRAPOVIC SLIP-ON EXHAUST SYSTEM for the YAMAHA MT 03 (2007-2008) Congratulations on purchasing an Akrapovic exhaust system. Please read these installation instructions
INSTALLATION INSTRUCTIONS
 AUTOMOTIVE PRODUCTS, INSTALLATION INSTRUCTIONS ULTIMATE BULL BAR APPLICATION: 2009-2018 Dodge Ram 1500 (Excl. Rebel Model) 2019 Dodge Ram 1500 Classic PART NUMBER: 32-1960, 32-1965, 32-1960L, 32-1965L
Header P/N: TTi 636A HEADER INSTALLATION. Parts List
 Phone (951) 371-4878 www.ttiexhaust.com Header P/N: TTi 636A HEADER INSTALLATION Page 1 of 3 Parts List (1) Driver side header (1) Passenger side header (2) Header gaskets (12) 5/16"-18x1 Header bolts
TAKE TIME TO READ THE INSTALLATION PROCEDURES BEFORE STARTING
 INSTALLATION INSTRUCTIONS for TTi Small Block Header Part No.: TTI340BE17835 TAKE TIME TO READ THE INSTALLATION PROCEDURES BEFORE STARTING WARNING!!! We strongly suggest that you use an old set of headers
INSTALLATION INSTRUCTIONS CHEVY C-10 4-Link Rear End
 INSTALLATION INSTRUCTIONS 73-87 CHEVY C-10 4-Link Rear End Please read these instructions completely before starting your installation. Assemble suspension on vehicle before powder-coating to ensure proper
NOVICE 1, 2 & JUNIOR 1 & 2 DIVISIONS
 NOVICE 1, 2 & JUNIOR 1 & 2 DIVISIONS 708 BRIGGS LOCAL OPTION 206 Briggs & Stratton (B&S) Model 124332 Type 8201 only. The intent of this class is to provide a sealed, simple-to-operate, ultra dependable
STS2HC 45,50,55-7&65-11
 Congratulations! You have purchased the finest clutch kit available. This patented "dual quadrant" technology is revolutionary to the industry! This technology is ONLY AVAILABLE from Super Torquer Systems,