GS5 GYM MULTI STATION USER MANUAL
|
|
|
- Esmond Gallagher
- 5 years ago
- Views:
Transcription


1 GS5 GYM MULTI STATION USER MANUAL Product may vary slightly from the item pictured due to model upgrades Read all instructions carefully before using this product. Retain this owner s manual for future reference. NOTE: This manual may be subject to updates or changes. Up to date manuals are available through our website at
2 TABLE OF CONTENTS 1. IMPORTANT SAFETY INSTRUCTIONS 3 2. ASSEMBLY INSTRUCTIONS 4 3. PARTS LIST WARRANTY 34 2
3 1. IMPORTANT SAFETY INSTRUCTIONS WARNING - Read all instructions before using this machine. Install the product on a flat level surface Place your unit on a solid, level surface when in use Never allow children on or near the machine. Keep hands away from all moving parts. Never drop or insert any object into any openings. Care must be taken when lifting or moving the equipment so as not to injure your back. Always use proper lifting techniques and/or seek assistance if necessary. Keep children and pets away from the machine at all times. DO NOT leave children unattended in the same room with the machine. Only one person at a time should use the machine. If the user experiences dizziness, nausea, chest pain, or any other abnormal symptoms, STOP the workout at once. CONSULT A PHYSICIAN IMMEDIATELY Do not use the machine near water or outdoors. Keep hands away from all moving parts. Always wear appropriate workout clothing when exercising. DO NOT wear robes or other clothing that could become caught in the machine. Running or aerobic shoes are also required when using the machine. Use the machine only for its intended use as described in this manual. DO NOT use attachments not recommended by the manufacturer. Do not place any sharp objects around the machine. Disabled person should not use the machine without a qualified person or physician in attendance. Never operate the machine if the machine is not functioning properly. A spotter is recommended during exercise. 3

4 2. ASSEMBLY INSTRUCTIONS 4

5 5
6 6
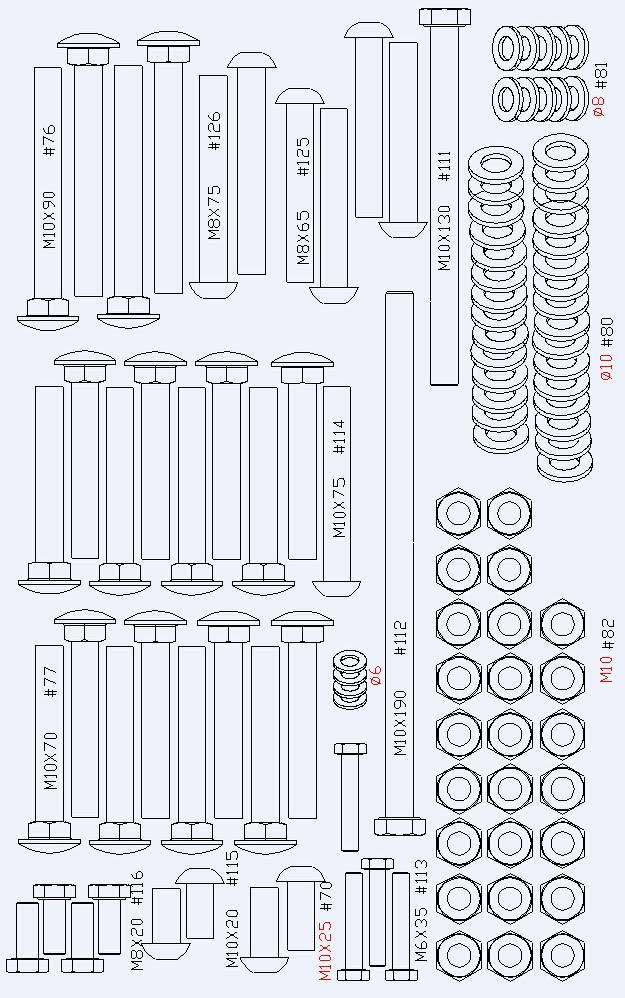
7 Tools required for assembling the machine: Two Adjustable Wrenches, two Allen Wrenches, and one Philips Screwdriver. Note: It is strongly recommended this machine to be assembled by two or more people to reduce chance of injury. STEP 1 1. Attach the Front Vertical Frame (#3) to the Main Base Frame (#8).Secure it with two M10x70mm Carriage Bolts(#77), one 140x51mm bracket (#25), two φ10 washers (#80), and two M10 Aircraft Nuts (#82). DO NOT tighten all the nuts and bolts yet. 2. Push two φ2 ½ Guide Rod Rubber Bumpers (#62) onto the Guide Rods (#20).Secure it with two M10x25mm Allen Bolts (#70) and two φ10 Washers (#80) from the bottom of the Rear Base Frame (#2). 3. Connect the Main Base Frame (#8) to the Rear Base frame (#2). Secure it with two M10x70mm carriage bolts (#77), one rear base frame bracket (#26), two φ10washers (#80). And two M10 Aircraft Nuts (#82). 7
8 8
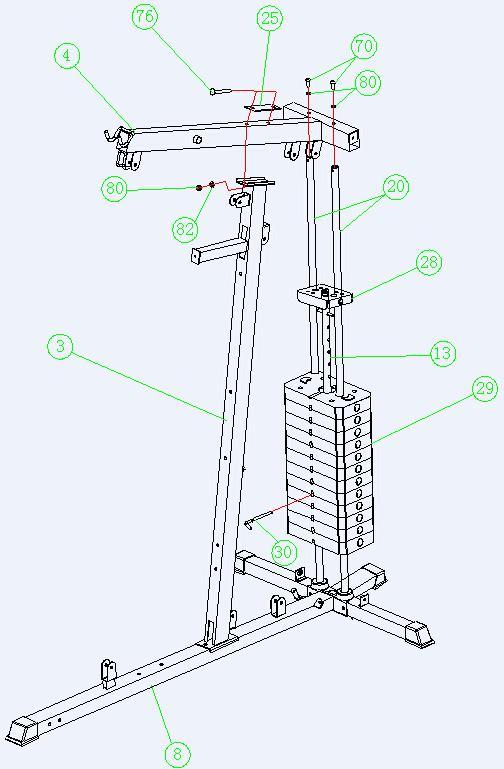
9 STEP 2 1. Slide the 14 Weight Plates (#29) onto the Guide Rods (#20). Align the holes of the Weight Plates. Insert the Selector Rod (#13) through the centre hole. Use the L-shaped Pin (#30) to select the number of plates. 2. Slide the Selector Stem (#28) onto the Guide Rods (#20). 3. Attach the Upper Frame (#4) onto the Guide Rods (#20). Place the Upper Frame (#4) onto the Front Vertical Frame (#3). 4. Secure the Upper Frame to the Guide Rods with two M10x25mm Allen Bolts (#70) and two φ10washers (#80). 5. Secure the Upper Frame (#4) to the Front Vertical Frame (#3) with two M10x90mm Carriage Bolts (#76), one 140x51mm Bracket (#25), two φ10washers (#80), and two M10 Aircraft Nuts (#82). Tighten all bolts and nuts previously installed. 9
10 10
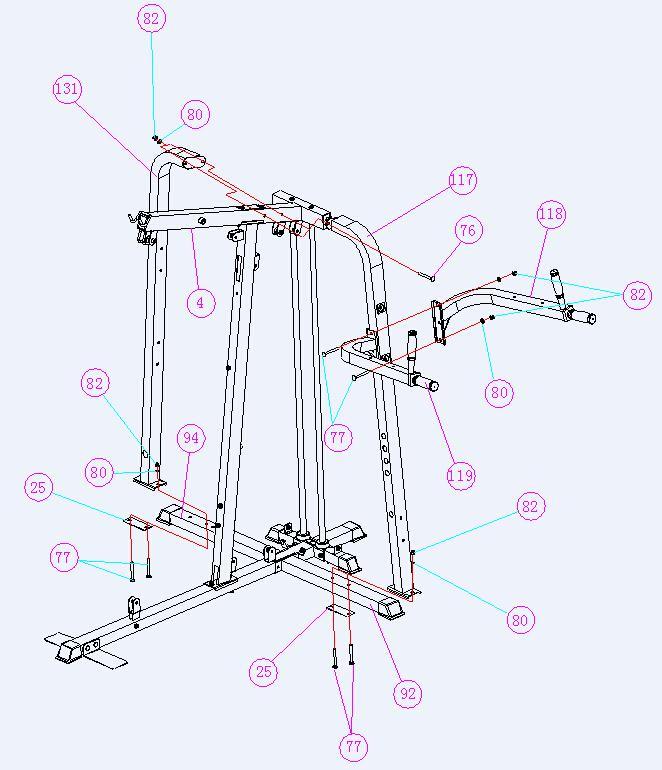
11 STEP 3 1. Attach the Right Upright (#117) and Left Upright (#131), to the Upper Frame (#4). Secure with two Carriage Bolts M10x90mm (#76), two Aircraft Nuts (#82) and two φ10 washers (#80). 2. Attach the Right Upright (#117) and Left Upright (#116) to the two lower tubes (#92) and (#94). Four Carriage Bolts M10x70mm (#77), two Brackets (#25), four Aircraft Nuts (#82) and four φ10washers (#80). 3. Attach the two Handles (#118, #119) to the Right Upright (#117), secured with two M10x70mm Carriage Bolts (#77). 11
12 12
13 STEP 4 1. Attach the Front Press Base (#11) to the Upper Frame (#4). Secure it with one Long Axle (#43), two φ10 Washers (#80), and two M10 Aircraft Nuts (#82). 2. Attach the Right Butterfly (#6) to the Front Press Base (#11). Secure it with one M6x33mm Hex Bolt (#75), Lock Ring (#37), and M6 Aircraft Nut (#83). 3. Slide a Butterfly Foam Roam Roll (#59) onto the Right Butterfly arm (#6). Attach a Front Press Handle (#12) to the Right Butterfly (#6). Secure it with one M10x85mm Allen Bolt (#67). 4. Repeat the Step B&C above to install the Left Butterfly (#5). 5. Attach the Butterfly Pulley Bracket (#9) to the Front Vertical Frame (#3). Secure it with one M10x110mm Allen Bolt (#66), two φ10 Washers (#80), and one M10 Aircraft Nut (#82). 6. Attach Swivel Pulley Brackets (#18) to each end of the Butterfly Pulley Bracket (#9). Secure each Bracket with one M10x65mm Allen Bolt (#68), two φ10 Washers (#80), and one M10 Aircraft Nut (#82). Do not over tighten; make sure the bracket (#18) is able to swivel freely. 7. Attach the Backrest Board (#35) to the Front Vertical Frame (#3). Secure it with two M8x85mm Allen Bolts (#72) and two φ8washers (#81). 13
14 14
15 STEP 5 1. Attach the Main Seat Support (#1) to the Front Vertical Frame (#3).Secure it with two M10x90mm Carriage Bolts (#76), one 120x50mm Bracket (#24), two φ10 Washers (#80), and two M10 Aircraft Nuts (#82). 2. Attach the Leg Developer (#7) to the bracket on the Main Seat Support (#1). Secure it with a Leg Developer Axle (#44), two M10x15mm Allen Bolts (#71), and two φ10 Washers (#80). 3. Insert two Foam Tubes (#23) halfway through the holes on the Leg Developer (#7) and Main Seat Support (#1). Insert the Foam Roils (#58) into the two foam tubes (#23) from both ends. Plug four Foam Roll End Caps (#57) onto the ends. 4. Place the Seat (#34) onto the Main Seat Support (#1). Secure it with two M8x65mm Allen Bolts (#73) and two φ8washers (#81). 5. Attach the Arm Curl Pad (#36) to the Arm Curl Stand (#40). Secure it with two M8x15mm Allen bolts (#74) and two φ8washers (#81). 6. Insert the Arm Curl Stand (#10) into the front opening on the Main Seat Support (#1). Secure it with a Lock Knob (#10). 7. Attach two Foot Plates (#27) to the Main Base Frame (#8). Secure them with two M10x90 Carriage Bolts (#76), two φ10 Washers (#80) and two M10 Aircraft Nuts (#82). 8. Attach the Tube (#90) to the Main Seat Support (#1) and Main Base Frame (#8), secured with one 120x50mm Bracket (#24), two M10X70mm Carriage Bolts (#77), two φ10 Washers (#80) and two M10 Aircraft Nuts (#82). 15
16 16
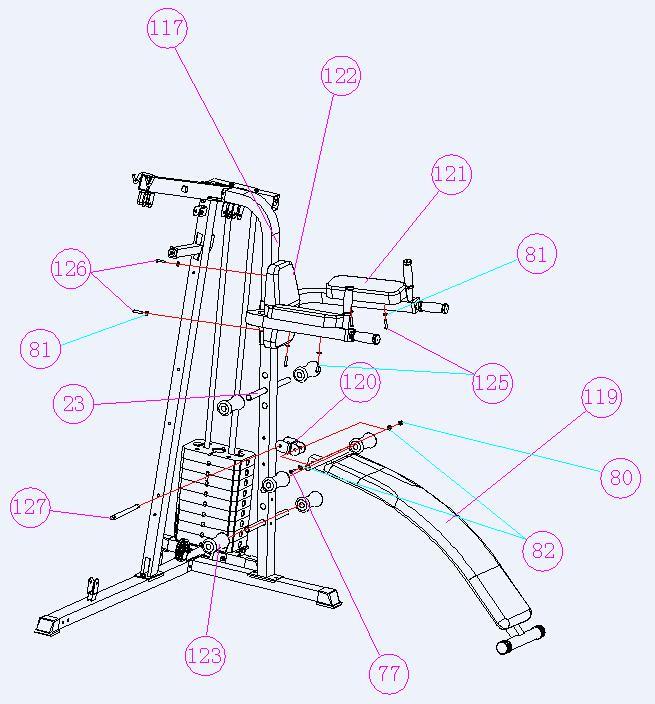
17 STEP 6 1. Attach the Board (#119) to U-tube (#120), secured with one M10X70mm (#77), two φ¾ Washer (#80) and one M10 Aircraft Nut (#82). 2. The board (#119) can then be attached to the right Upright (#117), secured with Pin (#127). 3. Attach the two Elbow Pads (#121) to the handles. Secure with four M8x65mm (#125) and four φ8washers (#81). 4. Attach Back Cushion (#122) to the right Upright (#117), secure with two M8x75mm (#126) and two φ8washers (#81). 5. Put the four Foams (#123) onto the two Foam Tubes (#23). 17
18 18
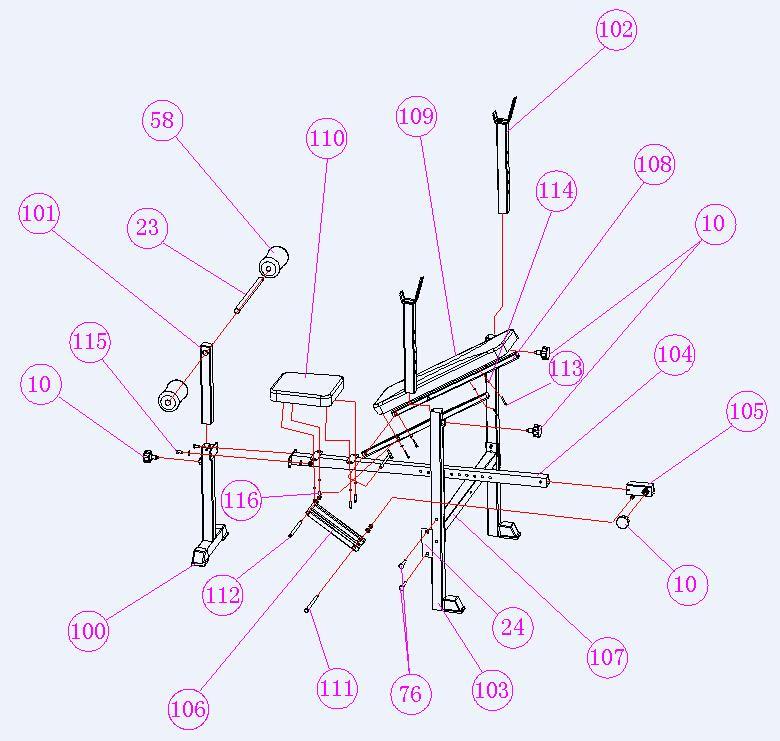
19 STEP 7 1. Attach the two Back Uprights (#103) the Tube (#107), secured with four M10x90mm Carriage Bolts (#76), two120x50mm Bracket (#24), four M10 Aircraft Nuts (#82) and four φ10 Washers (#80). 2. Slide the Adjustable Tube (#105) onto the tube (#104). Secure to the Front Upright (#100) with two M10X20mm (#115) and two φ10 Washers (#80). 3. a) Attach the Tube pair (#106) to the two Back Pad Tubes (#108) using with one M10X190mm Carriage Bolt (#112), one M10 Aircraft Nut (#82) and one φ10 Washer (#80). b) Secure the Back Pad (#109) onto the two Back Pad Tubes (#108) with four M6X35mm Carriage Bolts (#113) and four Ø6 Washers (#114). c) Attach the Tube pair (#106) to the Adjustable Tube (#105). Secure with Carriage Bolt M10X130mm (#111). 4. Attach the Seat Pad (#110) to the Tube (#104) with four M8x20mm (#116). 5. Attach the Adjustable Foam Tube (#101) onto the Front Upright (#100) using Lock Knob (#10). Insert the Foam Tube (#23) through the Adjustable Foam Tube (#101) and attach the two Foam Rolls (#58). 6. Insert the two tubes (#102) into the two Back Uprights (#103). Secure with Lock Knob (#10). 19
20 20
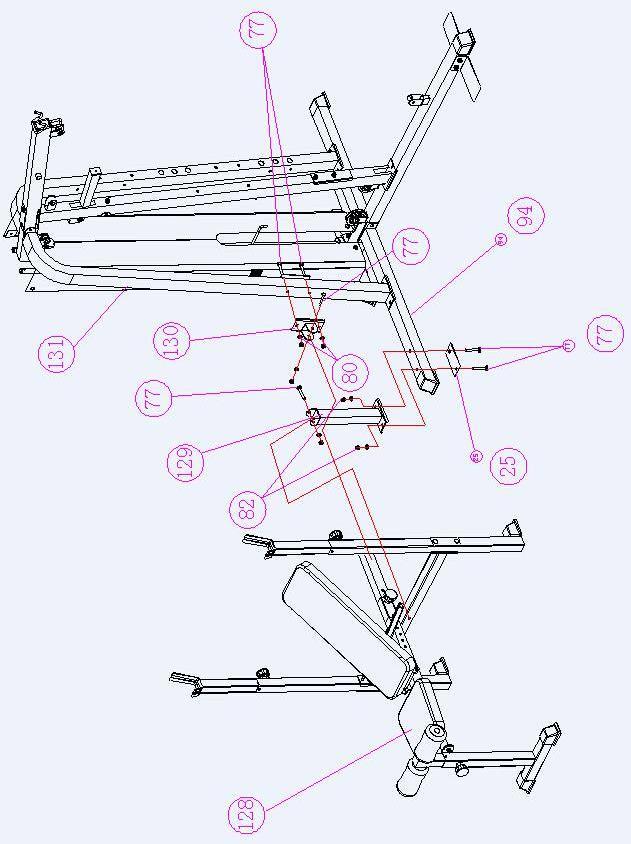
21 STEP 8 1. Secure the Weight Bench (#128) to the tube (#130) with two M10x70mm Carriage Bolts (#77), two Aircraft Nuts (#82) and two φ10 Washers (#80). 2. Attach the assembly to the Left Upright (#116). Secure with two M10x70mm Carriage Bolts (#77), two Aircraft Nuts (#82) and two φ10 Washers (#80). 3. Attach the Beam support tube (#129) to the Left lower tube (#94), secured with two M10x70mm Carriage Bolts (#77), two Aircraft Nuts (#82) and two φ10washers (#80). 4. Connect the Weight Bench to the tube (#129) with one M10x70mm Carriage Bolt (#77), one Aircraft Nut (#82) and one φ10 Washer (#80). 21
22 22
23 STEP 9 1. Attach the 333cm Upper Cable (#31) to the opening at the front of the Upper Frame (#4). Note: The Ball Stopper on the cable should be underneath the Frame. 2. Attach a Pulley (#60) to the open bracket as per the diagram. The cable should sit between the Pulley (#60) and the opening. Secure it with one M10x45mm Allen Bolt (#69), two φ10 Washers (#80), and one M10 Aircraft Nut (#82). 3. Draw the 333cm Upper Cable (#31) through towards the back of the machine to the open bracket on the Front Vertical Frame (#3). Repeat step 2 above to install a Pulley (#60). 4. Draw the 333cm Upper Cable (#31) around the Pulley (#60) then pull back towards the opening on the Front Press Base (#11). Attach a Pulley to the opening on the Front Press Base. Secure the Pulley with one M10x175mm Allen Bolt (#65) and one M10 Aircraft Nut (#82). 5. Draw the 333cm Upper Cable (#31) around the Pulley (#60) and through the opening to the open bracket on the Front Vertical Beam (#3). Repeat step B above to install another Pulley (#60). 6. Draw the 333cm Upper Cable (#31) around the Pulley (#60) then pull the 333cm Upper Cable (#31) downwards. Attach the 3327mm Upper Cable (#31) to a Double Floating Pulley Bracket (#16). Install another Pulley (#60) following Step 2. Leave the bracket hanging for now. 7. Pull the 333cm Upper Cable (#31) through the two open brackets at the rear of the Upper Frame (#4). Install two pulleys to the bracket following Step Pull the 333cm Upper Cable (#31) downward between the two Guide Rods to the Selector Rod (#13) to secure the Cable. 23
24 24
25 STEP Attach one end of the 302cm Butterfly Cable (#33) to the hook on the Right Butterfly (#6). 2. Draw the 302cm Butterfly Cable (#33) through the right Swivel Pulley Bracket (#18). 3. Attach a Pulley (#60) to the bracket. Secure it with one M10x45mm Allen Bolt (#69), two φ10 Washers (#80), and one M10 Aircraft Nut (#82). 4. Draw the 302cm Butterfly Cable (#33) around the Pulley (#60) then downward. Attach the Cable to the Crossed Double Floating Pulley Bracket (#17). 5. Install another Pulley. (#60) as per step 3. Leave the Crossed Double Floating Pulley Bracket (#17) hanging for now. 6. Pull the 302cm Butterfly Cable (#33) around the Pulley (#60) then upward to the left Swivel Pulley Bracket (#18). Repeat Step 3 above to install a Pulley (#60). 7. Draw the 302cm Butterfly Cable (#33) to the left Butterfly (#5). Attach the end of the cable to the hook on the Left Butterfly (#5). 25
26 26
27 STEP Attach the 325cm Lower Cable (#32) to the open bracket at the bottom of the Leg Developer (#7). 2. Attach a Pulley (#60) to the bracket. Secure it with one M10x45mm Allen Bolt (#69), two φ10 Washers (#80), and one M10 Aircraft Nut (#82). 3. Draw the 325cm Lower Cable (#32) underneath the Pulley (#60) to the open bracket on the Main Base Frame (#8). Repeat Step 2 above to install a Pulley (#60). 4. Draw the 325cm Lower Cable (#32) underneath the Pulley (#60) along the top of the Main Base Frame through the hole at the bottom of the Front Vertical Frame (#3) to the open bracket. Install another Pulley (#60) as per Step Pull the 325cm Lower Cable (#32) upward and through the Crossed Double Floating Pulley Bracket (#17) previously installed in Part 10. Install another Pulley (#60) as per Step Draw the 325cm Lower Cable (#32) around the Pulley (#60) then downward to the open bracket on the Main Base Frame (#8). Install another Pulley (#60) as per Step Pull the 325cm Lower Cable (#32) around the Pulley (#60)then upward to the Double Floating Pulley Bracket (#16) previously installed in Part 9. Install another (#60) as per Step Draw the 325cm Lower Cable (#32) around the Pulley (#60) then pull downward. Connect the Cable to a C-clip (#50) then connect the C-clip (#50) to the Short Chain (#46). 9. Connect the Short Chain (#46) to the bracket located at the rear of the Front Vertical Frame (#3). Secure with one M10x25mm Allen Bolt (#70), two φ10 Washers (#80), and one M10 Aircraft Nut (#82). 10. Adjust the tension of the Cable by adjusting the length of the Short Chain (#46). For best performance of the machine, adjust the Chain so the Selector Stem (Top Plate) on the weight stack is 54mm above the first plate. While adjusting the weight stack, push down on the Selector Stem (#28) to close up the gap then pin the plates. This will remove the slack in the cable system so the range of motion is smooth and tight. 27
28 28
29 STEP 12 A.) Attach a Short Chain (#46) to the 333cm Upper Cable (#31) using a C-clip (#50). The chain length can be freely adjusted depending on the desired exercise. B.) Attach a Long Chain (#45) to the 325cm Lower Cable (#32) using a C-clip (#50). Attach the Arm Curl Handle (#15) to the Long Chain (#45) using another C-clip. The chain length can be freely adjusted depending on the desired exercise. Remove the Chain and the Handle when using the Leg Developer (#7). C.) Attach Left & Right Weight Stack Covers (#21, #22) to the Upper Frame (#4), Main Base Frame (#8), and Rear Base Frame (#2). Secure with six M10x15mm Allen Bolts (#71) and six φ10 Washers (#80). D.) From the back of the Covers, secure the two covers together with four M5x10mm (#79) Philips Screws and four M5 Aircraft Nuts (#38). 29
30 30
31 31
32 3. PARTS LIST NO. DESCRIPTION QTY NO. DESCRIPTION QTY 1 Main Seat Support 1 43 Long Axle 1 2 Rear Base Frame 1 44 Leg Developer Axle 1 3 Front Vertical Frame 1 45 Long Chain 1 4 Upper Frame 1 46 Short Chain 2 5 Left Butterfly 1 47 Sliding Sleeve 1 6 Right Butterfly 1 48 Handle Grip 4 7 Leg Developer 1 49 Lat Bar Grip 2 8 Main Base Frame 1 50 C-clip 5 9 Butterfly Pulley Bracket 1 51 Front Base Frame End Cap 1 10 Lock Knob 5 52 Rear Base Frame End Cap 2 11 Front Press Base x1 End Cap 2 12 Front Press Handle /4 x 2 End Cap 3 13 Selector Rod Square End Cap 2 14 Lat Bar 1 56 φ1 Cone-shaped End Cap 3 15 Arm Curl Handle 1 57 Foam Roll End Cap 4 16 Double Floating Pulley Bracket 1 58 Foam Roll 4 17 Crossed Double Floating Pulley Bracket 1 59 Butterfly Foam Roll 2 18 Swivel Pulley Bracket 2 60 Pulley Arm Curl Handle Tube 1 61 φ11/2 Rubber Bumper 1 20 Guide Rod 2 62 φ21/2 Guide Rod Rubber Bumper 2 21 Left Weight Stack Cover 1 63 φ13/4 Rubber Bumper 1 22 Right Weight Stack Cover 1 64 φ1 Bushing 8 23 Foam Tube 2 65 M10x175mm Allen Bolt x50mm Bracket 1 66 M10x110mm Allen Bolt x51mm Bracket 2 67 M10x85mm Allen Bolt 2 26 Rear Base Frame Bracket 1 68 M10x65mm Allen Bolt 2 27 Foot Plate 2 69 M10x45mm Allen Bolt Selector Stem 1 70 M10x25mmAllen Bolt 5 29 Weight Plate 9 71 M10x15mm Allen Bolt 8 30 L-shaped Pin 1 72 M8x85mm Allen Bolt cm Upper Cable 1 73 M8x65mm 1/2 Allen Bolt cm Lower Cable 1 74 M8x15mm Allen Bolt cm Butterfly Cable 1 75 M6x33mm Hex Bolt 2 34 Seat 1 76 M10x90mmCarriage Bolt 6 35 Backrest Board 1 77 M10x70mm Carriage Bolt 4 36 Arm Curl Pad 1 78 M6x5/8 Philips Screw 2 37 Lock Ring 2 79 M5x10 Philips Screw 4 38 M5 Aircraft Nut 4 80 φ10 Washer Ankle Strap 1 81 φ8 Washer 6 40 Arm Curl Stand 1 82 M10 Aircraft Nut φ1 1/8, Bushing 2 83 M6 Aircraft Nut 2 42 φ1 ½ Bushing 2 92 Right lower tube 1 94 Left lower tube 1 32
33 NO. DESCRIPTION QTY NO. DESCRIPTION QTY 100 Front Upright Weight Bench Foam Tube Beam support tube Bar support tube Tube bracket Back Upright Left upright Main Tube Adjustable Tube Seat tube Beam tube Back Pad Tube Back Pad Seat Pad M10x130mm Carriage Bolts M10x190mm Carriage Bolts M6x35mm Carriage Bolts φ6 washes M10x20mm Bolts M8x20 Allen Bolts Right Upright Handles Board U-tube Elbow Pad Back Cushion Foams Bolts for pads M8x75mm Bolts Pin 1 33
34 4. WARRANTY AUSTRALIAN CONSUMER LAW Many of our products come with a guarantee or warranty from the manufacturer. In addition, they come with guarantees that cannot be excluded under the Australian Consumer Law. You are entitled to a replacement or refund for a major failure and compensation for any other reasonably foreseeable loss or damage. You are entitled to have the goods repaired or replaced if the goods fail to be of acceptable quality and the failure does not amount to a major failure. Full details of your consumer rights may be found at Please visit our website to view our full warranty terms and conditions: Warranty and Support: Please us at support@lifespanfitness.com.au for all warranty or support issues. For all warranty or support related enquiries an must be sent before contacting us via any other means. 34
SMITH MACHINE F-SM. Model F-SM. Retain This Manual for Reference OWNER'S MANUAL
 -- NOTE: Please read all instructions carefully before using this product Table of Contents Safety Notice SMITH MACHINE F-SM Hardware Identifier Assembly Instruction Parts List Model F-SM Retain This Manual
POWERHOUSE CORNER GYM GS 9
 NOTE: Please read all instructions carefully before using this product Table of Contents Safety Notice Hardware Pack Assembly Instruction Parts List POWERHOUSE CORNER GYM GS 9 Resistance Chart Warranty
Marcy Diamond Home Gym
 NOTE: Please read all instructions carefully before using this product Table of Contents Safety Notice Hardware Identifier Assembly Instruction Marcy Diamond Home Gym MD-2109 Parts List Resistance Chart
MARCY PLATINUM MP 1105 HOME GYM
 NOTE: Please read all instructions carefully before using this product Table of Contents Safety Notice Hardware Pack MARCY PLATINUM MP 1105 HOME GYM Assembly Instruction Parts List Resistance Chart Warranty
MARCY PREMIER HOME GYM
 NOTE: Please read all instructions carefully before using this product Table of Contents Safety Notice Hardware Identifier Assembly Instruction MARCY PREMIER HOME GYM Parts List Resistance Chart Warranty
IVK-2155 HOME GYM. Model IVK Retain This Manual for Reference OWNER'S MANUAL
 NOTE: Please read all instructions carefully before using this product Table of Contents Safety Notice Hardware Identifier IVK-2155 HOME GYM Assembly Instruction Parts List Warranty Ordering Parts Model
IRON GRIP STRENGTH SMITH MACHINE
 NOTE: Please read all instructions carefully before using this product Table of Contents Safety Notice Hardware Identifier Assembly Instruction IRON GRIP STRENGTH SMITH MACHINE IGS-4350 Parts List Warranty
MD-3401 HOME GYM MARCY DIAMOND ELITE. Model MD Retain This Manual for Reference OWNER'S MANUAL
 NOTE: Please read all instructions carefully before using this product Table of Contents Safety Notice Hardware Identifier MARCY DIAMOND ELITE MD-3401 HOME GYM Assembly Instruction Parts List Warranty
DELUXE OLYMPIC BENCH EVE Model EVE Retain This Manual for Reference OWNER'S MANUAL
 NOTE: Please read all instructions carefully before using this product Table of Contents Safety Notice Hardware Identifier Assembly Instruction Parts List Warranty DELUXE OLYMPIC BENCH EVE-1000 Ordering
MARCY SMITH MACHINE MWB Model MWB Retain This Manual for Reference OWNER'S MANUAL
 NOTE: Please read all instructions carefully before using this product Table of Contents Safety Notice Hardware Identifier Assembly Instruction MARCY SMITH MACHINE MWB-4360 Parts List Warranty Ordering
MARCY PLATINUM MP-3500 HOME GYM
 NOTE: Please read all instructions carefully before using this product Table of Contents Safety Notice Hardware Identifier MARCY PLATINUM MP-3500 HOME GYM Assembly Instruction Parts List Warranty Ordering
MARCY SMITH MACHINE SM Model SM Retain This Manual for Reference OWNER'S MANUAL
 NOTE: Please read all instructions carefully before using this product Table of Contents Safety Notice Hardware Pack Assembly Instruction MARCY SMITH MACHINE SM-4008 Parts List Warranty Ordering Parts
DELUXE SMITH MACHINE MSS Model MSS Retain This Manual for Reference
 NOTE: Please read all instructions carefully before using this product Table of Contents Safety Notice DELUXE SMITH MACHINE MSS-1280 Hardware Identifier Assembly Instruction Parts List Warranty Ordering
GS5 MULTI STATION OWNER S MANUAL
 GS5 MULTI STATION OWNER S MANUAL Product may vary slightly from the item pictured due to model upgrades Read all instructions carefully before using this product. Retain this owner s manual for future
BODYFLEX GYM WM Model WM Retain This Manual for Reference OWNER'S MANUAL
 NOTE: Please read all instructions carefully before using this product Table of Contents Safety Notice Hardware Identifier Assembly Instruction BODYFLEX GYM WM 1407 Parts List Resistance Chart Warranty
MARCY DIAMOND WEIGHT BENCH MD-844
 NOTE: Please read all instructions carefully before using this product Table of Contents Safety Notice Hardware Pack Assembly Instruction MARCY DIAMOND WEIGHT BENCH MD-844 Exploded Diagram Parts List Warranty
EVERLAST EVE-840 WEIGHT BENCH
 NOTE: Please read all instructions carefully before using this product Table of Contents Safety Notice Hardware Pack Assembly Instruction EVERLAST EVE-840 WEIGHT BENCH Exploded Diagram Parts List Warranty
MARCY DIAMOND ELITE SMITH MACHINE
 NOTE: Please read all instructions carefully before using this product Table of Contents Safety Notice Hardware Identifier Assembly Instruction MARCY DIAMOND ELITE SMITH MACHINE SM-1050 Parts List Warranty
MARCY WEIGHT BENCH WM-367. Model WM-367. Retain This Manual for Reference OWNER'S MANUAL
 NOTE: Please read all instructions carefully before using this product Table of Contents Safety Notice Hardware Identifier Assembly Instruction Parts List MARCY WEIGHT BENCH WM-367 Warranty Ordering Parts
MARCY DIAMOND ELITE OLYMPIC BENCH MD-857. Model MD-857. Retain This Manual for Reference OWNER'S MANUAL
 NOTE: Please read all instructions carefully before using this product Table of Contents Safety Notice Hardware Identifier Assembly Instruction MARCY DIAMOND ELITE OLYMPIC BENCH MD-857 Parts List Warranty
OWNER S MANUAL. Dick s Sporting Goods 345 Court Street Coraopolis, PA Tools Required: Allen Wrench
 Tools Required: Adjustable Wrench Allen Wrench OWNER S MANUAL Retain This Manual For Reference Dick s Sporting Goods 345 Court Street Coraopolis, PA 15108 TABLE OF CONTENTS BEFORE YOU BEGIN..... 1 IMPORTANT
MARCY WEIGHT BENCH MWB 715B. Model MWB 715B. Retain This Manual for Reference OWNER'S MANUAL
 NOTE: Please read all instructions carefully before using this product Safety Notice Hardware Identifier Assembly Instruction MARCY WEIGHT BENCH MWB 715B Parts List Warranty Ordering Parts Model MWB 715B
EVERLAST SMITH BENCH EVE-890. Model EVE-890. Retain This Manual for Reference OWNER'S MANUAL
 NOTE: Please read all instructions carefully before using this product Table of Contents Safety Notice Hardware Pack Assembly Instruction Parts List Warranty Ordering Parts EVERLAST SMITH BENCH EVE-890
WEIGHT BENCH MSS-7500
 NOTE: Please read all instructions carefully before using this product Table of Contents Safety Notice WEIGHT BENCH MSS-7500 Hardware Pack Assembly Instruction Exploded Diagram Parts List Warranty Ordering
MARCY WEIGHT BENCH WM PRO. Model WM PRO. Retain This Manual for Reference OWNER'S MANUAL
 NOTE: Please read all instructions carefully before using this product Table of Contents Safety Notice Hardware Identifier Assembly Instruction MARCY WEIGHT BENCH WM PRO Parts List Warranty Ordering Parts
MARCY SMITH MACHINE SM Model SM Retain This Manual for Reference OWNER'S MANUAL
 NOTE: Please read all instructions carefully before using this product Table of Contents Safety Notice Important Assembly Information MARCY SMITH MACHINE SM-4008 Care and Maintenance Parts List Warranty
TABLE OF CONTENTS 1. IMPORTANT SAFETY INSTRUCTIONS 3 2. CARE INSTRUCTIONS 4 3. ASSEMBLY INSTRUCTIONS 5 4. COMPUTER OPERATION 12 5.
 E-1 OWNER S MANUAL Product may vary slightly from the item pictured due to model upgrades Read all instructions carefully before using this product. Retain this owner s manual for future reference. NOTE:
WMGG-224. GOLD S GYM Multi Purpose Bench. Model WMGG-224. Retain This Manual for Reference OWNER'S MANUAL
 NOTE: Please read all instructions carefully before using this product Table of Content Safety Notice Hardware Identifier Assembly Instruction Parts List Warranty Ordering Parts GOLD S GYM Multi Purpose
APEX JD-3.1 HYPER EXTENSION BENCH
 NOTE: Please read all instructions carefully before using this product Safety Notice Hardware Identifier Assembly Instruction APEX JD-3.1 HYPER EXTENSION BENCH Parts List Warranty Ordering Parts Model
MARCY Elliptical Machine PL-21930
 NOTE: Please read all instructions carefully before using this product Table of Contents Safety Notice Hardware Identifier MARCY Elliptical Machine PL-21930 Assembly Instruction Parts List Computer Warranty
MARCY Recumbent Bike PL-960
 NOTE: Please read all instructions carefully before using this product Table of Contents Safety Notice Hardware Identifier MARCY Recumbent Bike PL-960 Assembly Instruction Parts List Computer Warranty
USER S MANUAL CAUTION. Visit our website at. new products, prizes, fitness tips, and much more!
 Patent Pending Model No. 831.159730 Serial No. The serial number is found in the location shown below. Write the serial number in the space above. USER S MANUAL Serial Number Decal SEARS, ROEBUCK AND CO.
ORDERING REPLACEMENT PARTS
 ORDERING REPLACEMENT PARTS If you encounter any difficulties or problems with this product, contact the ICON Fitness Lifestyle Ltd. office, or write: ICON Fitness Lifestyle Ltd. Greenwich House North Street
USER'S MANUAL ORDERING REPLACEMENT PARTS QUESTIONS? CAUTION. Visit our website at.
 ORDERING REPLACEMENT PARTS If you encounter any difficulties or problems with this product, contact the ICON Fitness Lifestyle Ltd. office, or write: ICON Fitness Lifestyle Ltd. Greenwich House North Street
ASSEMBLY MANUAL 9GU - COMMERCIAL UPRIGHT BIKE
 ASSEMBLY MANUAL 9GU - COMMERCIAL UPRIGHT BIKE IMPORTANT SAFETY INSTRUCTIONS Read this Owner s Manual and follow it s instructions carefully before using the machine. Make sure that it is properly assembled
USER'S MANUAL QUESTIONS? TABLE OF CONTENTS CAUTION. Model No. GGSY49230 Serial No. Serial Number Decal (Under Seat)
") Model No. GGSY4920 Serial No. Write the serial number in the space above for reference. USER'S MANUAL Serial Number Decal (Under Seat) QUESTIONS? As a manufacturer, we are committed to providing complete
Model No. GGSY4920 Serial No. Write the serial number in the space above for reference. USER'S MANUAL Serial Number Decal (Under Seat) QUESTIONS? As a manufacturer, we are committed to providing complete
XM-4424 INTERNATIONAL OLYMPIC BENCH with LEG & PREACHER
 XM-4424 INTERNATIONAL OLYMPIC BENCH with LEG & PREACHER Owner s Manual 8/09 Read all precautions and instructions in this manual before using this equipment. Table of Contents Before You Begin Important
USER S MANUAL CAUTION. Visit our website at. new products, prizes, fitness tips, and much more! Model No Serial No.
 Model No. 831.19832 Serial No. The serial number is found in the location shown below. Write the serial number in the space above. USER S MANUAL Serial Number Decal SEARS, ROEBUCK AND CO. HOFFMAN ESTATES,
USER MANUAL. Homegym IN 133 EASY
 USER MANUAL Homegym IN 133 EASY Safety please be sure to consult with your doctor. Frequent strenuous exercise should be approved your doctor and proper use of your multi gym product is essential. Please
Be Strong. NS 200X. Assembly Manual. Model: NS 200X. P/N: Rev A (10/04/2006)
") Be Strong. Assembly Manual NS 00X Model: NS 00X P/N: 00-700 Rev A (0/0/00) TABLE OF CONTENTS Before You Assemble... 3 Product Specifications... Product Features... Parts List / Box Contents... 5 Exploded
Be Strong. Assembly Manual NS 00X Model: NS 00X P/N: 00-700 Rev A (0/0/00) TABLE OF CONTENTS Before You Assemble... 3 Product Specifications... Product Features... Parts List / Box Contents... 5 Exploded
FIT SERIES FIT-3 W/ LEG PRESS
 FIT SERIES FIT-3 W/ LEG PRESS ASSEMBLY INSTRUCTIONS Part # 734820 Rev C. Revision:4/04/03 KEY 2 3 4 5 6 7 8 9 0 2 3 4 5 6 7 8 9 20 2 22 23 24 25 26 27 28 29 30 3 32 33 34 35 36 37 38 39 40 4 42 PART #
USER'S MANUAL QUESTIONS?
 Model No. WESY19510 Serial No. (Write the serial number in the space above for reference.) USER'S MANUAL Serial Number Decal QUESTIONS? As a manufacturer, we are committed to providing complete customer
MAGNETIC RECUMBENT BIKE
 MAGNETIC RECUMBENT BIKE SF-RB4417 USER MANUAL IMPORTANT: Please read this manual carefully before using the product. Retain owner s manual for future reference. For Customer Service, please contact: support@sunnyhealthfitness.com
HOME GYM with Leg Press
 HOME GYM with Leg Press Model no. L7900LP OWNER S MANUAL -1- PART LIST PART NO: DESCRIPTION Q TY 1. MAIN BASE 1 2. GUIDE ROD 2 3. LEFT BASE 1 4. RIGHT BASE 1 5. SELECTOR SHAFT 1 6. TOP PLATE 1 7. WEIGHT
MARCY BODY CYCLE MCPL-105
 NOTE: Please read all instructions carefully before using this product Safety Notice Hardware Identifier MARCY BODY CYCLE MCPL-105 Assembly Instruction Parts List Warranty Ordering Parts Model MCPL 105
OWNER S MANUAL F-G3-BASE CAUTION!
 OWNER S MANUAL F-G3-BASE CAUTION! ASSEMBLY MANUAL BEFORE YOU START Remove all parts from the packaging and separate and count each various component to ensure everything has been correctly provided. Follow
WARNING DECAL PLACEMENT
 I: EF/ 89 O0 Model No. 831.14923.0 Serial No. Write the serial number in the space above for reference. WEIGHT SYSTEM EXERCISER User's Manual _mber Decal Assembly Operation Maintenance Part List and Drawing
G1 STRENGTH 3-STACK MULTI-GYM
 G STRENGTH 3-STACK MULTI-GYM IMPORTANT SAFETY INFORMATION It is the sole responsibility of the purchaser of MATRIX Fitness Systems products to instruct all individuals, whether they are the end user or
USERÕS MANUAL QUESTIONS?
 Model No. WESY8501 Serial No. Write the serial number in the space above for reference. USERÕS MANUAL Serial Number Decal (Under Seat) QUESTIONS? As a manufacturer, we are committed to providing complete
Confidence. Fitness. Weight Lifting Bench
 Confidence Fitness Weight Lifting Bench General Information Confidence Weight Lifting Bench has been designed and manufactured to comply with the latest British and European Safety Standards (BS EN 957)
Magnetic Rowing Machine with Aluminum Slide Rail User Manual RW026 USER MANUAL
 Magnetic Rowing Machine with Aluminum Slide Rail User Manual MODEL NO.: RW026 IMPORTANT! Read all instructions carefully before using this product. Save this manual for future reference. EXERCISE EQUIPMENT
Invert Extend N Go SF-BH6719 USER MANUAL
 Invert Extend N Go SF-BH6719 USER MANUAL IMPORTANT! Read all instructions carefully before using this product. Retain owner s manual for future reference. For customer service, please contact: support@sunnyhealthfitness.com
CS1 CARDIOSTRIDER USER MANUAL
 CS1 CARDIOSTRIDER USER MANUAL 2 TABLE OF CONTENTS BEFORE YOU BEGIN..... 3 IMPORTANT SAFETY NOTICES. 4 WARNING LABEL PLACEMENT.. 5 CONTENTS OF PACKAGING.... 6 HARDWARE PACK 7 ASSEMBLY INSTRUCTIONS 8 18
USER'S MANUAL ORDERING REPLACEMENT PARTS QUESTIONS? CAUTION. Visit our website at.
 ORDERING REPLACEMENT PARTS To order replacement parts, contact the ICON Health & Fitness, Ltd. office, or write: Unit Revie Road Industrial Estate Revie Road Beeston Leeds, LSJG UK Tel: 0 0 00 Outside
QUESTIONS? PATENT PENDING. Model No. WESY85100 Serial No. Write the serial number in the space above for future reference.
 PATENT PENDING Model No. WESY85100 Serial No. Write the serial number in the space above for future reference. Serial Number Decal-- QUESTIONS? As a manufacturer, we are commiffed to providing complete
ASSEMBLY INSTRUCTIONS. Magne c Resistance Rowing Machine
 ASSEMBLY INSTRUCTIONS Magne c Resistance Rowing Machine Thank you for your purchase of this Harvil Product! We work around the clock and around the globe to ensure that Harvil products maintain the highest
USER'S MANUAL ORDERING REPLACEMENT PARTS QUESTIONS? CAUTION. Visit our website at.
 ORDERING REPLACEMENT PARTS To order replacement parts, contact the ICON Health & Fitness, Ltd. office, or write: Unit Revie Road Industrial Estate Revie Road Beeston Leeds, LSJG UK Tel: 0 0 00 Outside
PT1 Power Trainer ASSEMBLY & OPERATION MANUAL RECORD SERIAL NUMBER HERE
 PT1 Power Trainer ASSEMBLY & OPERATION MANUAL RECORD SERIAL NUMBER HERE www.inspirefitness.net by Health In Motion LLC Dec. 2010 TABLE OF CONTENTS Section Description.. Page Instructions.. 1 Tools Required
EASY ADJUSTABLE SEAT RECUMBENT BIKE
 EASY ADJUSTABLE SEAT RECUMBENT BIKE SF-RB4616 USER MANUAL IMPORTANT! Please retain owner s manual for maintenance and adjustment instructions. Your satisfaction is very important to us, PLEASE DO NOT RETURN
HG-6 Owners Manual. Table of Contents. Assembly Instructions Use and Operation of Your PROSPOTfitness Product
 HG-6 Owners Manual Table of Contents Assembly Instructions......2-17 Use and Operation of Your PROSPOTfitness Product...18-22 Periodic Maintenance of your PROSPOTfitness Product. 23 Parts List...24-25
Magnetic Elliptical Trainer
 Magnetic Elliptical Trainer ITEM NO.: 400 OWNER S MANUAL IMPORTANT: Read all instructions carefully before using this product. Retain this owner s manual for future reference. The specifications of this
FULL MOTION ROWING MACHINE SF-RW5639 USER MANUAL
 FULL MOTION ROWING MACHINE SF-RW5639 USER MANUAL IMPORTANT! Please retain owner s manual for maintenance and adjustment instructions. Your satisfaction is very important to us, PLEASE DO NOT RETURN UNTIL
Toll-Free Customer Service Number Mon. - Fri. 8 a.m. - 5 p.m. PST
 TABLE OF CONTENTS BEFORE YOU BEGIN.... 2 IMPORTANT SAFETY NOTICES...3 WARNING LABEL PLACEMENT...4 HARDWARE PACK... 5 ASSEMBLY INSTRUCTIONS...6-16 COMPUTER OPERATION GUIDELINE.....17-18 PARTS LIST..........19-21
USERÕS MANUAL QUESTIONS? CAUTION. Model No. PFSY92080 Serial No.
 Model No. PFSY92080 Serial No. The serial number is found in the location shown below. Write the serial number in the space above. USERÕS MANUAL QUESTIONS? Serial Number Decal As a manufacturer, we are
ASSEMBLY & OPERATION MANUAL. CDVK2 Power Tower RECORD SERIAL NUMBER HERE
 ASSEMBLY & OPERATION MANUAL CDVK2 Power Tower RECORD SERIAL NUMBER HERE www.inspirefitness.net by Health In Motion LLC Feb. 2011 TABLE OF CONTENTS Section Description.. Page Instructions.. 1 Tools Required
USER'S MANUAL QUESTIONS?
 Model No. WESY86303 Serial No. Write the serial number in the space above for future reference. USER'S MANUAL Visit our website at Serial Number Decal (Under Seat) QUESTIONS? As a manufacturer, we are
RECUMBENT BIKE WITH ARM EXERCISER
 RECUMBENT BIKE WITH ARM EXERCISER SF-RB4631 USER MANUAL IMPORTANT! Please retain owner s manual for maintenance and adjustment instructions. Your satisfaction is very important to us, PLEASE DO NOT RETURN
XINGGUI Elliptical Cross Trainer
 XINGGUI Elliptical Cross Trainer ITEM NO.: 93040 OWNER S MANUAL IMPORTANT: Read all instructions carefully before using this product. Retain this owner s manual for future reference. The specifications
SPM MAGNETIC ROWING MACHINE
 SPM MAGNETIC ROWING MACHINE SF-RW5801 USER MANUAL IMPORTANT! Please retain owner s manual for maintenance and adjustment instructions. Your satisfaction is very important to us, PLEASE DO NOT RETURN UNTIL
(PACIFIC BLUE) HUGO ROLLATOR 8 x1.5 WHEELS AND CURVED BACKREST
 HUGO ROLLATOR 8 x1.5 WHEELS AND CURVED BACKREST") REV 5.1 HUGO ROLLATOR 8 x1.5 WHEELS AND CURVED BACKREST Update: Dec.10.2014-1 - REV 5.1 HUGO ROLLATOR 8 x1.5 WHEELS AND CURVED BACKREST Update: Dec.10.2014 Item # AMG Part # Item Description 1. B01-206BK
REV 5.1 HUGO ROLLATOR 8 x1.5 WHEELS AND CURVED BACKREST Update: Dec.10.2014-1 - REV 5.1 HUGO ROLLATOR 8 x1.5 WHEELS AND CURVED BACKREST Update: Dec.10.2014 Item # AMG Part # Item Description 1. B01-206BK
XM Owner s Manual. FID BENCH with LEG & PREACHER. Read all precautions and instructions in this manual before using this equipment.
 XM-49 FID BENCH with LEG & PREACHER Owner s Manual 8/09 Read all precautions and instructions in this manual before using this equipment. Table of Contents Important Safety Information Assembly Parts List
ACCORD ELLIPTICAL TRAINER ITEM NO: 93470
 ACCORD ELLIPTICAL TRAINER ITEM NO: 93470 OWNER S MANUAL IMPORTANT: Read all instructions carefully before using this product. Retain this owner s manual for future reference. The specifications of this
RECUMBENT BIKE IMPORTANT: Read all instructions carefully before using this product. Retain this
 RECUMBENT BIKE IMPORTANT: Read all instructions carefully before using this product. Retain this owner s manual for future reference. The specifications of this product may vary from this photo, subject
USER'S MANUAL QUESTIONS?
 Model No. WESY9100 Serial No. Write the serial number in the space above for future reference. USER'S MANUAL Serial Number Decal (Under Seat) QUESTIONS? As a manufacturer, we are committed to providing
USER MANUAL EN IN Rowing Machine insportline Power Master X
 USER MANUAL EN IN 16636 Rowing Machine insportline Power Master X CONTENTS SAFETY PRECAUTIONS... 3 PRODUCT DESCRIPTION... 4 HARDWARE IDENTIFICATION CHART... 5 ASSEMBLY STEPS... 6 OPERATIONAL INSTRUCTIONS...
USER'S MANUAL QUESTIONS? CAUTION. Model No. GGSY Serial No. Write the serial number in the space above for reference.
 Æ Model No. GGSY91.0 Serial No. Write the serial number in the space above for reference. USER'S MANUAL Serial Number Decal QUESTIONS? As a manufacturer, we are committed to providing complete customer
PaceMaster Bronze XRC
 PaceMaster Bronze XRC OWNER S MANUAL Aerobics Inc., 34 Fairfield Place West Caldwell, NJ 07006, (973) 276-9700 www.pacemaster.com Part # BRONZE XRC Rev. 11/13/07 1 TABLE OF CONTENTS INTRODUCTION 3 IMPORTANT
PE51 HURLEY 3 STATION METAL SWING SET OWNER'S MANUAL
 PE51 HURLEY 3 STATION METAL SWING SET OWNER'S MANUAL WARNING! The disassembled product may contain small parts which pose a choking hazard to children under 3. IMPORTANT: This product may contain sharp
PERFORM THE FOLLOWING SAFETY CHECK DAILY:
 FITNESS Introduction We at Vectra Fitness appreciate your selection of our product for your fitness program, and invite your questions and comments. We're sure that you ll be pleased with your new Vectra
FitBike 1 DBT. Instructions / Manual / Maintenance
 FitBike 1 DBT Instructions / Manual / Maintenance SAFETY PRECAUTIONS Please read all instructions carefully before using this product. Retain this manual for future reference. The specifications of this
BBL DESCRIPTION QTY PART # BBL DESCRIPTION QTY PART
 DF-103 Page 1 of 2 11/29/2010 BBL DESCRIPTION QTY PART # BBL DESCRIPTION QTY PART # 1 TOP REAR COVER 1 DF-100-001 80 FLAT WASHER 14 003-301-043 2 COVER CONNECTOR-LEFT 1 DF-103-002 81 SPRING WASHER 14 003-302-011
Heavy Duty Deluxe Inversion Therapy Table Model ITX9600/IT9600
 Heavy Duty Deluxe Inversion Therapy Table Model ITX9600/IT9600 WARNING: DO NOT USE this equipment without a licensed physician s approval. READ ALL INSTRUCTIONS carefully before using. Misuse of this equipment
A935 OWNER'S MANUAL ASSEMBLY INSTRUCTIONS
 2013.02 A935 OWNER'S MANUAL ASSEMBLY INSTRUCTIONS A. SAFETY INSTRUCTIONS Read all cautions/warnings and obtain proper instruction on use of the machines prior to using. Use appropriate positioning and
CROSS TRAINING MAGNETIC RECUMBENT BIKE
 CROSS TRAINING MAGNETIC RECUMBENT BIKE SF-RB4708 USER MANUAL IMPORTANT! Please retain owner s manual for maintenance and adjustment instructions. Your satisfaction is very important to us, PLEASE DO NOT
G3-MS20 G3-MS40 G3-MS24 G3-MS51 G3-MS52 G3-MS53 G3-MS50 G3-MS80 AURA SERIES
 AURA SERIES G3-MS G3-MS5 G3-MS5 G3-MS53 G3-MS0 G3-MS0 G3-MS50 G3-MS80 IMPORTANT SAFETY INFORMATION It is the sole responsibility of the purchaser of MATRIX products to instruct all individuals, whether
Owners Manual E820/E920
 Owners Manual E820/E920 Wheelchair Accessible Training with E820/E920 2 Contents 1. Contents of E820/920 Box. 2. E820/E920 assembly instructions. 3. E820/E920 Control arm. 4. E920 Adjustable crank arms.
M5.2 ASSEMBLY & OPERATION MANUAL
 M5.2 ASSEMBLY & OPERATION MANUAL RECORD SERIAL NUMBER HERE www.inspirefitness.net by Health In Motion LLC Mar. 2015 CONGRATULATIONS You ve just taken the first step to a healthier and stronger body. This
AIR MAGNETIC ROWER SF-RW5623 USER MANUAL
 AIR MAGNETIC ROWER SF-RW5623 USER MANUAL IMPORTANT: Read all instructions carefully before using this product. Retain owner s manual for future reference. For customer service, please contact: support@sunnyhealthfitness.com
Inversion Table OWNER S MANUAL. Item
 Inversion Table OWNER S MANUAL Item TABLE OF SERVICE ------------------------------------------------------------------------- 2 IMPORTANT LABELS --------------------------------------------------------
WALKING TREADMILL SF-T1407M USER MANUAL
 WALKING TREADMILL SF-T1407M USER MANUAL IMPORTANT! Please retain owner s manual for maintenance and adjustment instructions. Your satisfaction is very important to us, PLEASE DO NOT RETURN UNTIL YOU HAVE
AIR ELLIPTICAL OWNER S MANUAL. Item #1308
 AIR ELLIPTICAL IMPORTANT: Read all instructions carefully before using this product. Retain this owner s manual for future reference. The specifications of this product may vary from this photo and, subject
TABLE OF CONTENTS CHAPTER 1: SAFETY PRECAUTIONS. 2.3 COMPONENTS in the Hardwars Kit COMPONENTS on the Product SETP SETP2...
 TABLE OF CONTENTS CHAPTER : SAFETY PRECAUTIONS. SAFETY PRECAUTIONS... CHAPTER 2: INSTRUCTIONS 2. DIMENSIONS... 2.2 LIST OF PARTS... 2.3 COMPONENTS in the Hardwars Kit.... 2.4 COMPONENTS on the Product...
PRO INDOOR CYCLING BIKE
 PRO INDOOR CYCLING BIKE SF-B901 USER MANUAL IMPORTANT! Please retain owner s manual for maintenance and adjustment instructions. Your satisfaction is very important to us, PLEASE DO NOT RETURN UNTIL YOU
Gun 300 Handpiece INSTRUCTION MANUAL. Ph: (02) Refer to instruction book before use.
 Refer to instruction book before use.") INSTRUCTION MANUAL Gun 300 Handpiece Refer to instruction book before use. PO BOX 260 BOTANY NSW 1455 Email: info@shearmagic.net.au Ph: (02) 9700 0800 Website: www.shearmagic.net.au Fax: (02) 9700 1171
INSTRUCTION MANUAL Gun 300 Handpiece Refer to instruction book before use. PO BOX 260 BOTANY NSW 1455 Email: info@shearmagic.net.au Ph: (02) 9700 0800 Website: www.shearmagic.net.au Fax: (02) 9700 1171
Foldable Semi-Recumbent Bike
 Foldable Semi-Recumbent Bike IMPORTANT: Read all instructions carefully before using this product. Retain this owner s manual for future reference. The specifications of this product may vary from this
3 Owner s Manual P E R S O N A L G Y M. Serial Number Here. Date of Purchase
 Revision 5 FEB 2016 P E R S O N A L G Y M Owner s Manual Serial Number Here Date of Purchase www.batcafitness.com 1207 New Hope Road, Raleigh, NC - 919.255.1233 - Fusion www.batcafitness.com 3 Owner s
SF-T7610 TREADMILL USER MANUAL
 SF-T7610 TREADMILL USER MANUAL IMPORTANT: Read all instructions carefully before using this product. Retain owner s manual for future reference. For customer service, please contact: support@sunnyhealthfitness.com
BELT DRIVE INDOOR CYCLING BIKE
 BELT DRIVE INDOOR CYCLING BIKE SF-B1002 USER MANUAL IMPORTANT: Read all instructions carefully before using this product. Retain owner s manual for future reference. For customer service, please contact:
Deluxe Folding Bike XRB271 / XRB261. * This item is for consumer use only and it is not meant for commercial use. OWNER S MANUAL
 Deluxe Folding Bike XRB271 / XRB261 * This item is for consumer use only and it is not meant for commercial use. OWNER S MANUAL General Information Safety Before you undertake any exercise program, please
OWNERS MANUAL. ULTRA Single-Station Strength G7-S13 Chest Press
 OWNERS MANUAL ULTRA Single-Station Strength G7-S13 Chest Press Table Of Contents Safety, General Care & Maintenence...3 Getting Started (Product Specifications)...5 Assembly Information...6 Markings...7