BRL CLASS 66 LOCOMOTIVE. Building Instructions
|
|
|
- Jonas Holt
- 5 years ago
- Views:
Transcription


1 Tel BRL CLASS 66 LOCOMOTIVE Building Instructions SCALE MODEL PRODUCT FOR ADULT MODELLERS ONLY. WHITE METAL CONTAINS LEAD WASH HANDS AFTER USE. MAY CONTAIN SMALL PARTS. ETCHED BRASS HAS FUNCTIONAL SHARP EDGES - HANDLE WITH EXTREME CARE
2 Thank you for purchasing this kit. This instruction pack should provide an easy to follow guide for building this model given some experience of soldering and the basics of etched kit construction. Please read all the pack before starting to build. Drawings and photos are essential for builders to acquaint themselves with the loco they wish to model. For builders of modern image in 7mm, consider joining MIGO+1, the Modern Image Gauge 0/1 organisation. For more details see the MIGO+1 website at Wheels gears and motors are required to complete the locomotive. We also recommend the use of Delrin chain, which will allow 4 axles to be driven to increase pulling power. The correct wheel size for the Class 66 is 3 7. Transfers are available from Fox Transfers. 2
3 Locomotive History This locomotive is a derivative of the Class 59 which has been in the UK for some years. Deliveries of the Class 66 started in 1998 to the English, Welsh and Scottish Railways (EWS). Their order was for 250 vehicles. Since then Freightliner have ordered over 20 locomotives and GB Railways have ordered 10. This will thus become the most numerous class of main line locomotives in the UK. Locomotives are numbered: (EWS) x (Freightliner) Please note : On diesel locomotives the No 1 end (often referred to as the free end ) is where the power unit sits and can usually be identified by air intake grills, radiator grills and roof mounted circular exhaust fan grills. No 2 end is generally where the alternator or generator sits and would house a lot of the electrical control gear. 3
4 Identification of Parts White Metal Castings 1 x Radio telephone roof box 66/01 2 x Upper headlight 66/02 2 x M.u. socket 66/03 4 x Sandbox centre 66/05 2 x Right hand sandbox 66/06 8 x Airpipes 2 x Left hand sandbox 66/07 2 x Bogie rear beam 66/08 2 x Left hand bogie sideframe 66/09 2 x Right hand bogie sideframe 66/10 12 x Axleboxes 66/11 4 x Left hand bogie damper 66/12 4 x Right hand bogie damper 66/13 2 x Left hand guard irons 66/14 2 x Right hand guard irons 66/15 8 x Brake solenoid assembly 66/16 12 x Axlebox strip 66/17 8 x Sandpipe support 66/18 1 x ATC pick up(bogie rear) 66/20 1 x Chassis solebar filter casing(on body side with only one grill on it) 66/21 1 x Silencer feedpipe 2 x Roof front fillets 4 x Lamp plate wedges 4 x Cab seat supports 1 x Fuel tank overflow pipe 2 x Fuel gauges 2 x Fuel caps 1 x Water cap 20 x Short solbar struts 10 x Long solebar struts 2 x Coupling hook sockets 4 x Double headlights 1 x End solebar pipe assembly 1 x Main solebar pipe 1 x Multi-way solebar pipes Lost Wax Castings 4 x Buffer shanks and heads Miscellaneous Parts Flex hose for air pipes Glazing 2 x Solder tags 10 x 6BA nuts and bolts 2 x Plastic screws and nuts 2 x Insulation sheet 12 x frame bushes 6 x Fibre washers Required To Complete 2 x Motors GEN x Gear sets GEN x 3 7 loco wheel sets For optional additional adhesion use Delrin drive GEN-082 4
5 Class 66 - Body Assembly We recommend that you assemble the body in the order set out below: 1. Solder body side grill outer to body side grill. Then solder grill assembly into body side from inside with riveted panel to bottom. 2. Solder cab side infills which go behind cab windows. 3. Add small roof grill. This goes over hole on outside of body. 4. Solder on the cab handrail backing plates and the cab door handle back plates (note these are handed). 5. You can fold the body to final shape. 6. Fit the centre and cab bulkhead plates to inside of body. 7. Fit cab ends (Note: before you fit scribe the window size onto the plastic glazing to be cut and fitted later). 8. At this stage fit body side strengthening strips to inside of body shell between the bulkheads, level with the base of the bulk heads. 9. Bend up roof detail, solder up and fit radio telephone base plate in the recess. 10. Make up the exhaust box. This will have to be cut down to 35mm in length, then fit and add pipe casting. 11. Fit roof grill frames from inside. 12. Fit 4 roof hatches. 13. Add door handles and grab rails made from wire, and cab door rain strips which go above doors. 14. Add horn grill above cab fronts and infill which go behind. 15. Add cab front handrails and windscreen wipers. 16. Now make up chassis assembly as per Class 59 sheet, but remove the outside small lip which would have turned up from the top chassis etch. Do not fit end triangle infills, as this is where the sand boxes go, and where the infill were to go cut back 10mm away from behind buffer beam so as to take the sand boxes. 17. Fuel tank. Take the one from the 59 and remove by cutting off the ends. Take ends and fit to new tank wrapper. When soldered add castings. When fitting the tank it lines up with the etched lines at No 2 end and the overflow pipe goes towards the No 1 end. 18. Battery boxes. Make up as shown ensuring you place next to tank but the switch box is on the other end of the battery box and goes at No 1 end. 19. Add solebar detail from castings supplied and from square tube or make up all pipe work and cable runs from.7mm and.9mm dia. Wire, refer to photos as both sides are different. 20. Make up bogies as from drawings on page 9. 5
6 MOTOR BOGIES Introduction The motor bogies in this range of models are of a standard type with an inner U section chassis and outer cosmetic sideframes. The steel wheels have a small nylon bush at one end of the axle to allow pick up via the live chassis. The model will run on one motor but for increased traction and better adhesion, the use of two motors plus a Delrin chain set is recommended. When assembling the bogies remember the following points: Although the motors as supplied have fixing screws, the motor body may not be tapped to take them. See Motors, Gears and Delrin. Ensure that the insulated wheels on bogie one are opposite those on bogie two. Although the bogie centre to centre measurement is 315mm and the wheelbase is 47.25mm, check the wheel centres against the bogie sideframes. The chassis and sideframes have to be the same length to couple with the crossbraces but the sideframe castings when put back to back will be found unequal in length. File square, and place the sideframe upper c1 against the chassis e41 before cutting it to length. Construction The Chassis Bearings and Wheels Motors, Gears and Delrin Sideframes and Castings The Chassis When happy with the sideframe to chassis length cut e41 as marked. The chassis can now be folded along with the saddles e39 & e40 which determine the wheelbase. Solder in the saddles followed by the bulkheads e36 ensuring the cut-outs for Delrin are in line. The pivot overlay e45 can now be folded and soldered on the top as shown, however it may be necessary to omit this item from the assembly if the body sits too high. The key to deciding this is that the buffers are at the correct height above rail. Bearings and Wheels For the wheels to be true and level, the top hat bearings must be soldered in on a flat surface such as a piece of plate glass. The bearing holes may need enlarging and a tapered reamer is ideal for this. Whilst the outer bearings are soldered to the chassis, the middle ones are left to float and the etched washers e37 are soldered on the inside of the bearing instead. 6
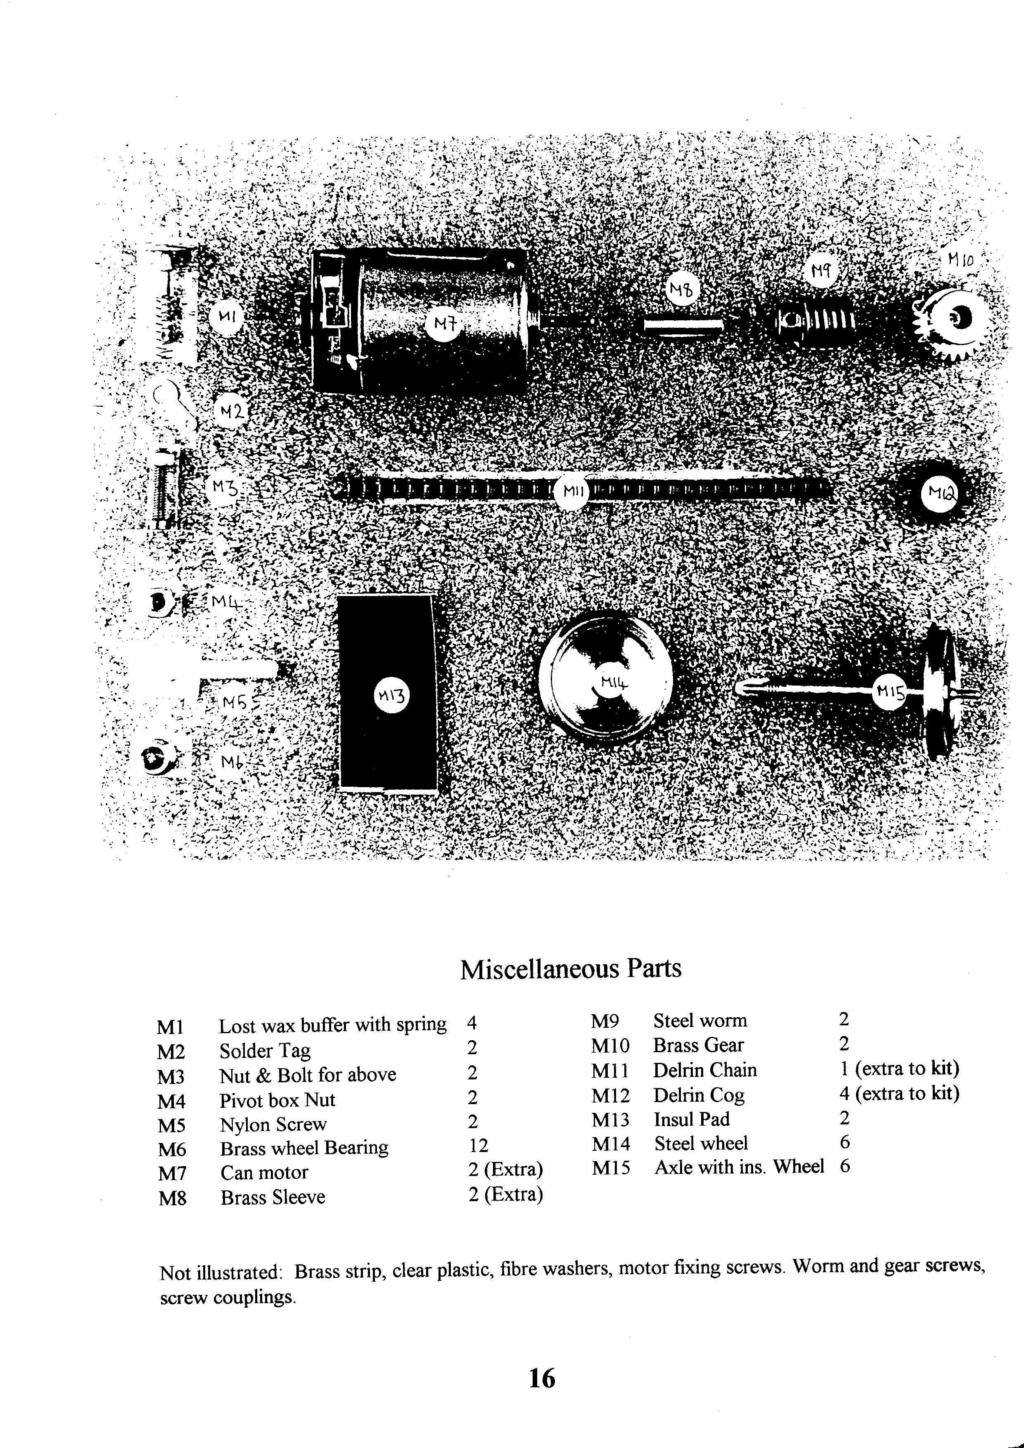
7 Chassis Etch 35. Pivot box 40. Saddle, outer end 36. Bulkhead 41. Chassis 37. Centre axle washer 42. Crossbrace, outer 38. Folding bogie mtg. Stretcher 43. Crossbrace, inner 39. Saddle, motor end 44. Bogie mounting plate 45. Bogie pivot overlay Miscellaneous Parts M1 buffer with spring 4 M9 Steel worm 2 M2 Solder Tag 2 M10 Brass Gear 2 M3 Nut & Bolt for above 2 M11 Delrin Chain 1 (extra to kit) M4 Pivot box Nut 2 M12 Delrin Cog 4 (extra to kit) M5 Nylon Screw 2 M13 Insul Pad 2 M6 Brass wheel Bearing 12 M14 Steel wheel 6 M7 Can motor 2 (Extra) M15 Axle with ins. Wheel 6 M8 Brass Sleeve 2 (Extra) Not illustrated: Brass strip, clear plastic, fibre washers, motor fixing screws. Worm and gear screws, screw couplings. Bearings and Wheels (cont.) Fit the bearings and wheels and when happy that everything is true and square, solder the outer bearings in place followed by the middle ones noting that the pin points on the axles have to be removed until they are flush with the wheels. Motors, Gears and Delrin. (Not supplied in kit) The can motors as supplied have fixing screws but the motor body may not be tapped to take them. Dismantling them is an easy task as described below. Simply remove the brushes and springs from top of motor and prise back the two securing lugs. Pull up the motor top and remove the armature noting the number of packing washers under it. Tap the holes 2.5mm and be sure to remove all the swarf. Re-assembly is the reverse of above. Now check that the fixing holes in chassis top line up with motor and enlarge if necessary. The brass sleeve m9 fits inside the steel worm m10 ensuring that it is proud by 2.5mm at the shouldered end. For the worm to grip onto the motor shaft, use a 3/32 drill and bore a hole through the brass sleeve in the side of the worm and tap 6BA. By enlarging the hole in the chassis top, the motor complete with worm can be fitted or removed with ease. Fit the motor followed by driving axle and brass gear m11 adjusting as necessary to produce a good mesh. Sometimes, inserting a shim of scrap brass between one end of the motor and saddle can improve this. Fix solder tags m2 to inside ends of chassis. Before continuing it is advisable to test the bogies. 7
8 Fit wheels, attach wires and couple up to a nylon terminal block. If the motors turn in different directions swap the motor wires on one bogie. Note : Do not fix the Delrin cogs at this stage as once in place they are not easily removed. The chassis can now be dismantled and along with the wheels, painted before final assembly. If fitting Delrin note: - that the cogs are in line with the bulkhead cut-outs - they are fitted to the outer axles - you may have to file the shank of the cog if there is insufficient room on the driving axle. The bogies can now be reassembled. Useful Tip : Use Loctite Lock n seal to prevent the wheels unscrewing. Sideframes and Bogie Castings. Solder sideframe upper c1 and sideframe lower c2 together. Fit the bogie air cylinders c9 noting their position before soldering. Finally carefully fold and solder the two parts of the etched bogie step e26 & e31 together and fit ensuring that it lines up with the cab door. There are several ways of fixing the side frames: - Build up with the crossbraces and solder in as one unit - As above, solder an additional brace to the ends of the chassis, drill and secure with nuts and bolts - Fix crossbraces to ends of chassis then couple to the side frames. Note: Before spraying, add a spot of maskol where you intend to solder to keep that area clean. Ensure the side frames are horizontally and vertically central before fixing. Finally fit the life guard irons c6 at the front of the bogies Now the completed bogies can be laid to one side until the body construction is complete. When they are fitted, the following points should be noted: - Before fitting the nylon bogie attachment screws m5, it may be necessary to enlarge the hole in the top of the chassis. To ensure the thread in the pivot nut is clear you may need to run a 4BA tap through. Ensure the bogies do not foul on the fuel tanks, if so, you may have to remove a section at the top and rear of each chassis with a cutting disc on a mini-drill. You can also avoid shorting out by shaping and sticking pieces of black insulating tape to the ends of the tanks after painting. It may be necessary to omit the pivot overlay e44 if the body sits too high. The key to deciding this is that the buffers are at the correct height above the rail. 8
9 9
10 10
11 11
12 12
13 13
14 14
15 15
16 16
17 17
18 18
19 19
BRL-007 Detailing and Conversion Kit for NOVO/Triang Class 35 Hymek. Building Instructions
 Peter Besant Tel 07807225801 prmrp@fsmail.net www.prmrp.com BRL-007 Detailing and Conversion Kit for NOVO/Triang Class 35 Hymek Building Instructions SCALE MODEL PRODUCT FOR ADULT MODELLERS ONLY. WHITE
BRL-142/143 Class 142/143. Building Instructions
 Peter Besant Tel 07807225801 prmrp@fsmail.net www.prmrp.com BRL-142/143 Class 142/143 Building Instructions SCALE MODEL PRODUCT FOR ADULT MODELLERS ONLY. WHITE METAL CONTAINS LEAD WASH HANDS AFTER USE.
Finney7 BEYER PEACOCK BUILT LOCOMOTIVE
 BEYER PEACOCK BUILT LOCOMOTIVE Fig 1. Beyer, Peacock Built Locomotive Nos. 415-426 Depicted as built with short tanks, blower valve on the left, small dome, low tank front, 3 0 trailing wheels, snap head
Welcome Wagons WW ton Mineral (2 & 4 shoe brake)
") Welcome Wagons WW13 16 ton Mineral (2 & 4 shoe brake) HISTORY The 16T open mineral wagon was the most numerous type built by BR from 1950 to 1957, the first diagram being 108, although there was 16T steel
Welcome Wagons WW13 16 ton Mineral (2 & 4 shoe brake) HISTORY The 16T open mineral wagon was the most numerous type built by BR from 1950 to 1957, the first diagram being 108, although there was 16T steel
Brassmasters Scale Models
 Brassmasters Scale Models www.brassmasters.co.uk Cleminson 6-wheel underframe kit PO Box 1137 Sutton Coldfield B76 1FU Copyright Brassmasters 2016 1 Introduction 1.1 The purpose of this booklet is to guide
MKD 08 BR 21.5 TON FLYASH HOPPER. Wagon Kit To cover Vacuum (CSV) and air braked types (CSA)
 and air braked types (CSA)") 1 MKD 08 BR 21.5 TON FLYASH HOPPER. Wagon Kit To cover Vacuum (CSV) and air braked types (CSA) History. Pulverised fuel ash (PFA), know as fly ash which is a by-product from the combustion process in coal
1 MKD 08 BR 21.5 TON FLYASH HOPPER. Wagon Kit To cover Vacuum (CSV) and air braked types (CSA) History. Pulverised fuel ash (PFA), know as fly ash which is a by-product from the combustion process in coal
FINNEY7. 24 Jul 18 A3-4 LNER A3. Fig 1. General Arrangement
 Fig 1. General Arrangement - 4 COUPLING RODS. The coupling rods are now made so that they can be used as a jig to align the hornguides accurately. First drill out all the crankpin holes to a convenient
FINNEY7. 24 Jul 18 4 LNER A4. Fig 1. A4 GA Drawing
 Fig 1. A4 GA Drawing 24 Jul 18 4 COUPLING RODS & FRAME PREPARATION Coupling rods. The coupling rods are made so that they can be used as a jig to align the horn blocks accurately. First drill out all the
ALAN GIBSON, THE BUNGALOW CHURCH ROAD, LINGWOOD, NORWICH, NORFOLK. MIDLAND/L.M.S. Class 4F.
 ALAN GIBSON, THE BUNGALOW CHURCH ROAD, LINGWOOD, NORWICH, NORFOLK MIDLAND/L.M.S. Class 4F. These instructions and history should be carefully studied BEFORE starting on any assembly. The standard kit is
Furness Railway Wagon Co.
 Furness Railway Wagon Co. The Parts. S&DJR/LMS/BR 20ton 6-Wheel Brake van Wheels, paint and transfers required to complete. Parts 13/15 Bolts/nuts/ washers Part 22 Part 5 Parts 10/19/20/21/ 23/24/25 Part
- 0 Gauge - Southern Railway Class 02 Chassis Construction & Parts Identification
 - 0 Gauge - Southern Railway Class 02 Chassis Construction & Parts Identification I would recommend constructing the body to the fitting of parts 42 before starting chassis construction. As the basic body
NSWGR C LOCOMOTIVE AND TENDER KIT
 Australian Railway Kits ABN: 27 416 246 418 Incorporating Main West Models Manufacturers, Wholesalers and Retailers of Quality Australian Model Railways PO Box 252 Warwick, Queensland, 4370 Australia Phone/Fax:
Wheels, paint and transfers required to complete. Please note that to aid the folding of the various parts score all the halfetched fold lines.
 Furness Railway Wagon Co. Furness Railway/LMS 45ton All Steel Bogie Iron Ore Hopper Wagon Built by The Pressed Steel Car Co. Pittsburgh, Pennsylvania, USA Circ. 1899 Wheels, paint and transfers required
Finney7 PC May17 PRINCESS CORONATION. Fig 1. GA Curved Footplate
 Fig 1. GA Curved Footplate PC - 5 Fig 2. GA Utility Footplate PC - 6 COUPLING RODS & FRAME ASSEMBLY COUPLING RODS. The coupling rods are now made so that they can be used as a jig to align the remaining
PYRTE. Building The Front Axle, Fork and Steering
 PYRTE Building The Front Axle, Fork and Steering The front axle on this traction engine is a very simple affair, in that it is a rectangular steel rod, sat on edge, with a pivot in the centre, which is
Caley Coaches True Line kits in etched brass
 Caley Coaches True Line kits in etched brass 0141-772 37 Jim Smellie, 1 Tay Crescent, Bishopbriggs, Glasgow, G64 1EU. Jim Smellie Nov. 1992 10' Building Instructions for kit CC20 Caledonian Railway 1 Ton
Mamod SL1K Locomotive Assembly Instructions
 Mamod SL1K Locomotive Assembly Instructions LOCOMOTIVE ASSEMBLY INSTRUCTIONS To ensure ease of construction reference to these instructions are essential. All the major parts are in the front of the box
4mm scale 009 gauge Lodge Hill & Upnor railway Chattenden Drewry loco body kit.
 RT Models 4mm scale 009 gauge Lodge Hill & Upnor railway Chattenden Drewry loco body kit. HISTORY The loco was supplied by the Drewry car co. to the Lodge Hill & Upnor Railway in 1949, works number 2263.
MANNING WARDLE ex-penrhyn Quarry Railway Narrow Gauge `Jubilee mm Scale kit for 16.5mm or 14mm Gauge
 EDM Models 19 Briar Avenue, Acomb, York. Y026 5BX MANNING WARDLE ex-penrhyn Quarry Railway Narrow Gauge 0-4-0 `Jubilee 1897 7mm Scale kit for 16.5mm or 14mm Gauge Introduction This kit, which was researched
RT Models. 4mm scale, 00/EM/P4 Manning Wardle, class K 0-6-0ST loco kit
 1 RT Models 4mm scale, 00/EM/P4 Manning Wardle, class K 0-6-0ST loco kit History The first of Manning Wardle s Class K was built in 1864. Many of these locos were mainly built for contractors with only
The 2mm Scale Association etched replacement chassis for RTR loco bodies
 The 2mm Scale Association etched replacement chassis for RTR loco bodies Required Parts List Chassis etch (supplied) Motor - for all designs the Association can motor is suitable, alternatives are shown
Furness Railway Wagon Co.
 Furness Railway Wagon Co. The Parts. S&DJR/LMS/BR 10ton 4-Wheel Brake van Wheels, paint and transfers required to complete. Part 3 Part 2a Part 2b Part 5 Parts 8/9/10 Part 15 Part 15 Part 6 Part 4 Part
WW03e Welcome Wagons 8 Shoe Brake Pipe Wagon
 WW03e Welcome Wagons 8 Shoe Brake Pipe Wagon History The pipe wagons were built to four basic diagrams sharing the same basic dimensions. The first 300 pipe wagons were built at Derby works to diagram
Dinorwic Quarry Hunslet `Alice Class with cab 7mm Scale kit for 16.5mm or 14mm Gauge
 EDM Models 19 Briar Avenue, Acomb, York. Y026 5BX Dinorwic Quarry Hunslet `Alice Class with cab 7mm Scale kit for 16.5mm or 14mm Gauge Introduction This kit, which has been researched by Jonathan Matthews
Furness Railway Wagon Co. NBR/LNER 8ton 3PLK General Merchandise Wagon
 Furness Railway Wagon Co. General Merchandise Wagon Wheels, paint and transfers required to complete. Please note that to aid the folding of the various parts score all the halfetched foldlines that are
Owner s Manual: Standard Gauge Diesel shunter Locomotive in Gauge 3 scale. PLine. Built in Brass. Standard Gauge Shunter Locomotive Model (G3 scale)
") PLine Built in Brass Standard Gauge Shunter Locomotive Model (G3 scale) PLEASE READ THIS OWNERS MANUAL CAREFULLY BEFORE OPERATING THE MODEL Prototype Information: Not many Standard gauge locomotives operated
PLine Built in Brass Standard Gauge Shunter Locomotive Model (G3 scale) PLEASE READ THIS OWNERS MANUAL CAREFULLY BEFORE OPERATING THE MODEL Prototype Information: Not many Standard gauge locomotives operated
Motorising Set for Corgi Feltham Tram BEC-KITS) Fitting instructions
 Fitting instructions") Motorising Set for Corgi Feltham Tram The KW Trams (ex BEC-KITS) motorising set for the Corgi Feltham tram contains 2 motorised maximum traction bogies, with link wiring, and 2 bolsters. The following
Motorising Set for Corgi Feltham Tram The KW Trams (ex BEC-KITS) motorising set for the Corgi Feltham tram contains 2 motorised maximum traction bogies, with link wiring, and 2 bolsters. The following
Furness Railway Wagon Co. NER/LNER/BR Cattle Van
 NER/LNER/BR Medium Cattle Van Wheels, paint and transfers required to complete. Part 1 The Parts. Part 4 Part 3 Part 2 Part 17 Part 5 Part 12/16 Part 11 Part 13/14/15 Part 6/7 Parts 8/9/10 not shown Assembly
NSWGR Z Tank Locomotive
 Australian Railway Kits ABN: 27 416 246 418 Incorporating Main West Models Manufacturers, Wholesalers and Retailers of Quality Australian Model Railways PO Box 252 Warwick, Queensland, 4370 Australia Phone/Fax:
Houstoun Gate Locomotive Works Gordon 4-Wheel Drive Chassis Assembly Instructions
 Houstoun Gate Locomotive Works Gordon 4-Wheel Drive Chassis Assembly Instructions It is suggested that you read these instructions through before commencing construction. A minimum of tools are needed
Furness Railway Wagon Co. NER/LNER/BR Box Van
 Furness Railway Wagon Co. NER/LNER/BR G1 Box Van Wheels, paint and transfers required to complete. The Parts. Parts 8/9/10 12/13/15/16 Part Part 11 Part 6 Part 2 Part 3 Part 14 Part 1 Part 4 Parts 5/7
Brassmasters Scale Models
 Brassmasters Scale Models www.brassmasters.co.uk L&SWR/SOUTHERN RAILWAY DRUMMOND M7 0-4-4T LOCOMOTIVE KIT Designed by Martin Finney 4MM SCALE OO - EM - P4 INSTRUCTIONS AND PROTOTYPE NOTES PO Box 1137 Sutton
Furness Railway Wagon Co.
 Furness Railway Wagon Co. Great Eastern Railway/LNER/BR 1900 Diagram 7 10ton Cattle Van Steel Under-Frame Wheels, paint and transfers required to complete. Please note that to aid the folding of the various
Hornby GWR Star Class EM Finescale Conversion.
 Hornby GWR Star Class EM Finescale Conversion. Before you start, it is a good idea to have some small containers or snap top poly bags to put screws and components in for safe keeping...much better than
Furness Railway Wagon Co. Great Eastern Railway/LNER/BR Diagram 18 10ton 3 Plank General Merchandise Wagon Steel Under-Frame
 Furness Railway Wagon Co. Great Eastern Railway/LNER/BR Diagram 18 10ton 3 Plank General Merchandise Wagon Steel Under-Frame Wheels, paint and transfers required to complete. The Parts. Part 1 Part 5 Part
Furness Railway Wagon Co. Glasgow & South Western Railway/LMS/BR 12ton Mineral Steel Under-Frame
 Furness Railway Wagon Co. Glasgow & South Western Railway/LMS/BR 12ton Mineral Steel Under-Frame Wheels, paint and transfers required to complete. Please note that to aid the folding of the various parts
Bachmann GWR Earl (Dukedog) EM Finescale Conversion
 EM Finescale Conversion") Bachmann GWR Earl (Dukedog) EM Finescale Conversion Before you start, it is a good idea to have some small containers or snap top poly bags to put screws and components in for safe keeping...much better
Bachmann GWR Earl (Dukedog) EM Finescale Conversion Before you start, it is a good idea to have some small containers or snap top poly bags to put screws and components in for safe keeping...much better
Chopper Couplings. Assembly. Fitting
 Chopper Couplings Unlike most model chopper couplings, these will work with two opposing hooks, which looks so much better and allows you to turn stock at will. They are still compatible with most other
(WW03f) BR PIPE WAGON 4 shoe brake
 BR PIPE WAGON 4 shoe brake") (WW03f) BR PIPE WAGON 4 shoe brake History. The pipe wagons were built to four basic diagrams sharing the same basic dimensions. The first 300 pipe wagons were built at Derby works to diagram 460, and
(WW03f) BR PIPE WAGON 4 shoe brake History. The pipe wagons were built to four basic diagrams sharing the same basic dimensions. The first 300 pipe wagons were built at Derby works to diagram 460, and
AIRCRAFT LANDING GEAR CONSTRUCTION MANUAL
 APPENDIX AI KITPLANES FOR AFRICA AIRCRAFT LANDING GEAR CONSTRUCTION MANUAL Revision: C September 2008 Page L1 of 20 NOTE: Please read the General Manual before proceeding. Please read through the entire
Gear change & shift cables Gearchange balljoints and bushes. Globes 12 and 24 volt Grilles
 A Accessories Air Bags Air compressor assembly and components Air conditioner idler pulleys and condensers Air dryer assemblies and repair kits Air filter elements Air master assembly and repair kits Air
Heljan EM Finescale Conversion.
 Heljan 02 2-8-0 EM Finescale Conversion. Before you start, it is a good idea to have some small containers or snap top poly bags to put screws and components in for safe keeping...much better than crawling
Instructions for Assembling Driving Wheels, Axles and Crankpins
 Instructions for Assembling Driving Wheels, Axles and Crankpins (Version 1; October 2008) Introduction These instructions explain how to assemble Exactoscale 4mm scale driving wheels, axles and crankpins
1. Invert the tender, and hold in a suitable device. We use a foam cradle the Peco loco service cradle being ideal.
 Bachmann J11 EM Finescale Conversion Before you start, it is a good idea to have some small containers or snap top poly bags to put screws and components in for safe keeping...much better than crawling
Stephenson's Valve Gear: 7mm cast white-metal kit 19 th Century swing-link version - non-working, cosmetic only. Instructions
 SER-Kits Stephenson's Valve Gear: 7mm cast white-metal kit 19 th Century swing-link version - non-working, cosmetic only Page 1 of 5 Instructions HEALTH & SAFETY: The castings contain some lead. Dispose
MGB V8 Roadster restoration project Report 128
 20th March 2017. Sorry to keep you in suspenders between report 127 and report 128, with regards to the indicator stalk switch. INDICATOR & HORN STALK SWITCH - continued After removing all the internal
9 Locomotive Compensation
 Part 3 Section 9 Locomotive Compensation August 2008 9 Locomotive Compensation Introduction Traditionally, model locomotives have been built with a rigid chassis. Some builders looking for more realism
Bowaters cab. Rear half of tropical cab frame. Cab door 82. Bend tags and solder to cab rear in open or closed position.
 Bowaters cab 29 32 44 31 Rear half of tropical cab frame 22 27 Cab door 82. Bend tags and solder to cab rear in open or closed position. 20 21 33 Side rod fitting and valve gear - Stephensons 44 0.7mm
CAE PERFORMANCE PRODUCTS A.B.N MAIN ROAD, CASTLEMAINE, VIC Ford Zephyr Cable Wiper Kit Component List
 Ford Zephyr Cable Wiper Kit Component List Wiper Motor Assembly with Flexible Drive Cable (125 Deg Sweep, x 1200 mm Flexible Cable) Wiper Mounting Bracket, U Clamp, and Rubber Two Wheel boxes, Spacers,
NSWGR C30T LOCOMOTIVE AND TENDER KIT
 Australian Railway Kits ABN: 27 416 246 418 Incorporating Main West Models Manufacturers, Wholesalers and Retailers of Quality Australian Model Railways PO Box 252 Warwick, Queensland, 4370 Australia Phone/Fax:
Bachmann D11 EM/S4 Finescale Conversion
 Bachmann D11 EM/S4 Finescale Conversion Before you start, it is a good idea to have some small containers or snap top poly bags to put screws and components in for safe keeping...much better than crawling
Hornby Railroad Crosti 9F EM Finescale Conversion.
 Hornby Railroad Crosti 9F EM Finescale Conversion. Before you start, it is a good idea to have some small containers or snap top poly bags to put screws and components in for safe keeping...much better
THE MOTOR. Page 1 of 9
 Page 1 of 9 The Bachmann HO Old Time 4-4-0 has been around a long time and suffers from two problems: the latest motor will burnout with a frying of the added DCC decoder and the pickup system is very
Double Hanger Only. Sheave Diameter " 3" Double Hanger Only
 32000 Series Fiber Optic s & Quadrants For pulling fiber optic cable, DCD has a special series of sheaves and quadrants that will allow the maximum possible bend radius for the application. All the sheaves
Furness Railway Coach Co.
 Furness Railway Coach Co. Outside Framed Coaches Paint and transfers required to complete. Part 32 Part 7/8 Part 9 Part 6 Part 31 Part 14 The Parts. Part 19 Parts 20/21/22 Part 5 Part 4 Part 1 Part 3 Part
TCI E4OD/4R100 Valve Body Performance Improver Kit
 151 INDUSTRIAL DRIVE ASHLAND, MISSISSIPPI 38603 http://www.tciauto.com TCI 496500 E4OD/4R100 Valve Body Performance Improver Kit TELEPHONE: 662-224-8972 FAX LINE: 662-224-8255 E-MAIL: tech@tciauto.com
MYLOCOSOUND LARGE SCALE DIESEL LOCOMOTIVE KIT
 1 MYLOCOSOUND LARGE SCALE DIESEL LOCOMOTIVE KIT 1.OVERVIEW 16mm to the foot scale model of an 0-4-0 Sugar Cane locomotive. Easy glued assembly. Heavy, high quality motor, gears and steel chassis for a
GWR 4 Wheel Parcel Van, Diagram W1
 GWR 4 Wheel Parcel Van, Diagram W1 From a Colin Waite bodyline kit with a scratch built underframe April 2013. While recovering from a very nasty cold and not feeling much like doing anything I was idly
Hornby Railroad Hall EM Finescale Conversion.
 Hornby Railroad Hall EM Finescale Conversion. The subject of this sheet is the new (2015) Hornby Railroad Hall. There are several specification and livery variants, but all have a common chassis and as
7mm Axleguards AX1_7 RCH/MR Standard Axleguards
 AX1_7 RCH/MR Standard Axleguards Exhibitions, or through selected retailers. GX1_7 GWR Standard 4 bolt Axleguards Exhibitions, or through selected retailers. AX2/7 Pre Group General Axleguards (Includes
Class BR Class 03/04 Shunter. Foldup
 Crank overlays The 2mm Scale Association BR Class 03/04 Shunter Bachmann replacement chassis Inside frames gearbox 3-680 Class 03 Class 04 coupling rods Bachmann etched replacement 03/04 chassis etch 30:1
Furness Railway Wagon Co.
 Furness Railway Wagon Co. The Parts. SE&CR/LB&SCR/W^D/GNR/SR/LNER/BR 1909 RCH 12ton 7 Plank Coal Wagon Wheels, paint and transfers required to complete. Part 1 Part 2 Part 9 Part 5 Part 12 Part 10 Part
Building Tips by PMD For Wedico Trucks
 Building Tips by PMD For Wedico Trucks These are in no particular order but will help you with building! Below are some methods we have found to ease the assembly of these models. If you have any ideas
INSTRUCTIONS FOR F.C. HIBBERD 11-TON PLANET 4W DIESEL MECHANICAL LOCOMOTIVE
 NONNEMINSTRE MODELS INSTRUCTIONS FOR F.C. HIBBERD 11-TON PLANET 4W DIESEL MECHANICAL LOCOMOTIVE Requires Hanazono (formerly Tenshodo) WB24.5 SPUD unit to motorise, or build non-working PRELIMINARY: This
Build your own THUNDERBIRD 2
 PACK 01 STAGE PAGE 01 Nose assembly and Elevator Car rear wheels 3 02 Cockpit interior and Elevator Car 1 completion 7 03 Missile launcher and Thunderbird 4 11 04 Nose assembly and the Tracy brothers 15
BOWSER - PARTS Air compresser mounting brkt Air compressor Back plate for LEAD Cast K Air tank.
 A 70044 Air compressor 70111 Air compressor 70192 Air compresser mounting brkt. B 15011 Bearing, driver 1/8" hole 15012 Bearing, driver, square, 1/8" hole, for.040 side rails on underframe 908 Brass bearing,
Front Hub and Disc (4WD Model)
") 4C 8 DRIVE SHAFT SYSTEM Disassembled View Front Hub and Disc (4WD Model) 411RW001 Legend (1) Bolt (2) Cap (3) Snap Ring and Shim (4) Hub Flange (5) Lock Washer and Lock Screw (6) Hub Nut (7) Outer Bearing
4C 8 DRIVE SHAFT SYSTEM Disassembled View Front Hub and Disc (4WD Model) 411RW001 Legend (1) Bolt (2) Cap (3) Snap Ring and Shim (4) Hub Flange (5) Lock Washer and Lock Screw (6) Hub Nut (7) Outer Bearing
v Porsche 928
 1985-86 32v Porsche 928 Toll-Free Tech Hot Line: 877-FOR-928M 877-367-9286 Please do not copy this manual and give copies to your friends. Our ability to bring you this supercharger kit at this price relies
Another Shay Steam Brake Valve Nelson Riedel Initial: 1/30/2004 Last Revised: 02/26/2006
 Page 1 of 5 Another Shay Steam Brake Valve Nelson Riedel NARiedel@Adelphia.net Initial: 1/30/2004 Last Revised: 0 I was not happy with the valve described in the brake valve section Shay Steam Brake Valve
Mikuni RS Carburetor Conversion
 Mikuni RS Carburetor Conversion After putting your carbies on the bench or the kitchen table if the wife is out, you will see that the linkages may be in different positions depending on which brand of
Engine Dismantle and Assemble ( )
") Engine Dismantle and Assemble (21 134 8) Special Tools 15-030A Universal flange-holding wrench 21147 21-147 Vibration damper remover 15030A 16-067 Locator for clutch disc 21-167 Wrench for cylinder head
Engine Dismantle and Assemble (21 134 8) Special Tools 15-030A Universal flange-holding wrench 21147 21-147 Vibration damper remover 15030A 16-067 Locator for clutch disc 21-167 Wrench for cylinder head
INTERCOOLER UPGRADE INSTALLATION INSTRUCTIONS PART NUMBER D
 INTERCOOLER UPGRADE INSTALLATION INSTRUCTIONS PART NUMBER D330-0021 APPLICATION: 2014-16 F22 228i & xdrive coupe (see restrictions below) 2015-16 F23 228i & xdrive convertible 2012-16 F30 328i & xdrive
This advice was put together by Roger Butterfield for SJSC in June 2003 following the installation of a Walzendynamo 9501.
 This advice was put together by Roger Butterfield for SJSC in June 2003 following the installation of a Walzendynamo 9501. It consists of: advice about the selection of a dynamo advice on fitting the Walzendynamo
Micro-Trains #1021/#1022 Low short profile coupler
 1 Micro-Trains #1021/#1022 Low short profile coupler Low short profile coupler, for locomotives and cars with limited mounting area, makes 2 pair of either (1021) Life-Like E8A Pilot or Bachmann 4-8-4
P:\INVENTORY\SLOW\fendt\Fendt surplus stock 28May2013.xlsFendt surplus stock 28May2013.xls28/05/2013
 0066155100000 BALL 1 0066288000000 BALL BUSH 2 016861011020 GASKET 3 117000000013 309 CI OPR MANUAL 1 119102070050 BRAKE DISC 1 152109040020 ROD 1 170200260011 HOLDER 2 175000000011 FENDT 305 OPR MANUAL
A S S E M B L Y G U I D E
 MODEL SOLAR ELECTRIC POWER BOAT PLUGGING into the sun! SEND US YOUR COMMENTS A S S E M B L Y G U I D E Flexible solar cell turns sunlight into electricity resulting in a forwards force on the boat allowing
EMD DD35 Powered & Dummy Units. Assembly Instructions
 EMD DD35 Powered & Dummy Units Assembly Instructions Main Shell Side Handrail End Handrails Fuel Tank (Loose Part, Powered Unit Only) Side Handrail End Handrails 2 No. MT N Scale Body Mount Coupler Shorten
SCdefault. 900 Installation instructions
 SCdefault 900 Installation instructions SITdefault Sports chassis MONTERINGSANVISNING INSTALLATION INSTRUCTIONS MONTAGEANLEITUNG INSTRUCTIONS DE MONTAGE Accessories Part No. Group Date Instruction Part
Application Note. Athearn RTR SW-1000/SW-1500 Tsunami Digital Sound Decoder Installation Notes
 Application Note Athearn RTR SW-1000/SW-1500 Tsunami Digital Sound Decoder Installation Notes Overview This application note describes how to install a TSU-AT1000 Digital Sound Decoder into the HO Athearn
INTERCOOLER UPGRADE INSTALLATION INSTRUCTIONS PART NUMBER D
 INTERCOOLER UPGRADE INSTALLATION INSTRUCTIONS PART NUMBER D330-0021 APPLICATION: 2014-16 F22 228i & xdrive coupe (see restrictions below) 2012-16 F30 328i & xdrive sedan 2014-16 F31 328i xdrive wagon 2014-16
Installation Instructions Camaro/Firebird Raingear Windshield Wiper System
 Installation Instructions 1970-78 Camaro/Firebird Raingear Windshield Wiper System A-2 A A-1 A-5 A-3 A-4 B Photo O The Raingear 1970-78 Camaro/Firebird wiper system is designed for ease of installation
Next, chase the threads in the lower A-arm mounts with the 5/8-18 tap and blowout any remaining particles.
 Next, chase the threads in the lower A-arm mounts with the 5/8-18 tap and blowout any remaining particles. Now, apply some anti-seize to the threads of the pivot stud. Also put anti-seize inside the bore
Numatic International Spare Parts Model No: Numatic International Spare Parts Model No: NB: FOR WIRING SEE DRAWING: DRW-7279
 TTB 0 BASE ASSEMBLY EXPLODED DRAWING NB: FOR WIRING SEE DRAWING: DRW- 0 0 0 0 0 0 0 0 0 0 0 DRAWING: DRW-0 ISS:A0 /0/0 0 TTB 0 BASE ASSEMBLY EXPLODED DRAWING TTB 0 CHASSIS WELDED ASSEMBLY 0 TTB 0 HANDLE
ARTICLE BEGINNING DESCRIPTION ADJUSTMENTS & INSPECTION SUSPENSION Rear. Golf III
 Article Text ARTICLE BEGINNING 1995-96 SUSPENSION Rear Golf III DESCRIPTION Suspension uses control arms and axle beam for stabilization. Control arms and axle beam are combined as one unit. Brake drums
The H-MAC Heavy Metal Articulating Chassis Construction Guide
 The H-MAC Heavy Metal Articulating Chassis Construction Guide The Heavy Metal Chassis is constructed with two identical drive modules built using 10 mechanical sub-assemblies. The drive modules are integrated
ARV43M Instruction Manual
 ARV43M Instruction Manual In terms of the wiring of the camera system, the Gator ARV43M can be electrically installed in 2 different ways, wired or wireless. We call this versatility Dual Tech. WIRELESS
60-65 Falcon, Comet & Ranchero Coil Spring IFS
 60-65 Falcon, 62-65 Comet & 62-65 Ranchero Coil Spring IFS All engine installations with this front end will require a rear sump oil pan. 289-302 Small Block Ford Motors Milodon rear sump pan holds 7 quarts
COLD AIR INTAKE INSTALLATION INSTRUCTIONS
 COLD AIR INTAKE INSTALLATION INSTRUCTIONS # D760-0030 Fits: 2007-10 135i (E82, E88; with N54 engine) 2007-08 335i/xi (E90) 2007-10 335i (E92, E93; with N54 engine) Congratulations for being selective enough
Locomotive parts April 2018
 Locomotive parts April 2018 CONTENTS Page GNR Detail parts 3 LBSC Detail parts 4 GWR Detail parts 5 LMS Detail parts 10 LNER Detail parts 13 GER Details Parts 13 BR castings 14 Tooling & spares 15 2 GNR
Assembly Manual. 1/10th Formula 1 Car
 Assembly Manual 1/10th Formula 1 Car Center Pivot Bag 1 3374 - Center Pivot Socket 40194 - Hard Anodized Alum Pivot ball 3254-2-56 *Note - Sometimes it is helpful to slightly over-tighten the top clamp
10.0 GRP Dash panel and fascia Fuse box and Relay block
 10.0 GRP Dash panel and fascia 10.1 Fuse box and Relay block Decide the fixing point for the fuse boxes and relay blocks, check that the under dash section of the wiring loom can reach all the instruments,
5 Mechanisms and accessories
 5 Mechanisms and accessories 51A SIDE OPENING ELEMENT MECHANISMS 52A NON-SIDE OPENING ELEMENT MECHANISMS 54A WINDOWS 55A EXTERIOR PROTECTION 56A EXTERIOR EQUIPMENT 57A INTERIOR EQUIPMENT 59A SAFETY ACCESSORIES
Furness Railway Wagon Co. NER/LNER/BR C1 5ton Fitted Open Fish
 Furness Railway Wagon Co. NER/LNER/BR C1 5ton Fitted Open Fish Wheels, paint and transfers required to complete. Please note that to aid the folding of the various parts score all the halfetched foldlines
BBCD063 SUZUKI JIMNY Ironman 4x4 BBCD063 Bull Bars fit to a Suzuki Jimny It will take about 3.5 hours to install.
 INSTALLATION GUIDE BBCD063 SUZUKI JIMNY 2012+ Ironman 4x4 BBCD063 Bull Bars fit to a Suzuki Jimny 2012+ It will take about 3.5 hours to install. NOTE: ALL DRILLED HOLES MUST HAVE ANTI-CORROSION TREATMENT
1993 SUSPENSION Volkswagen Rear. EuroVan
 Article Text ARTICLE BEGINNING 1993 SUSPENSION Volkswagen Rear EuroVan DESCRIPTION Suspension uses control arms and axle beam for stabilization. Control arms and axle beam are combined as one unit. Brake
PARTS LIST WRANGLER 2625 DB
 PARTS LIST WRANGLER 2625 DB 1 NOTES 2 BRUSH GEAR MOTOR ITEM PART NO. PART DESCRIPTION QTY. 2393001 COMPLETE MOTOR ASSEMBLY 1 101 3391221 NEGATIVE LEAD 1 102 3391201 1/4-20 X 7 3/4THRU BOLT 2 103 10-24
Many thanks for purchasing these assembly instructions. We believe that they
 Almac Cars Dear customer Many thanks for purchasing these assembly instructions. We believe that they set new industry standards for clarity, content and presentation. We hope that after reading them you
PARTS LIST WRANGLER 2625 DB
 PARTS LIST WRANGLER 2625 DB 1 NOTES 2 BRUSH GEAR MOTOR ITEM PART NO. PART DESCRIPTION QTY. 2393501 COMPLETE MOTOR ASSEMBLY 1 101 3391221 NEGATIVE LEAD 1 102 3391201 1/4-20 X 7 3/4THRU BOLT 2 103 10-24
5 Amp Dual Mode Sound Decoder by Frank T.Verrico
 5 Amp Dual Mode Sound Decoder by Frank T.Verrico Model Rectifier Corp. s latest venture into O scale is a 5 amp. dual mode, [DC/DCC], sound decoder. This full featured N.M.R.A. compatible sound decoder
Upgrading Proto axle Geeps with Stewart Trucks. November 27, 2010 Mark Schutzer
 Upgrading Proto 2000 4 axle Geeps with Stewart Trucks November 27, 2010 Mark Schutzer Introduction Several years ago Proto 2000 made a bunch of 4 axle locomotives that used trucks that were a copy of an