Table of Contents Introduction 3 Chapter 2: Operation 4 Chapter 3: Components 5 Chapter 4: Specifications 8
|
|
|
- Victor Fowler
- 5 years ago
- Views:
Transcription
1
2
3 Table of Contents Introduction 3 Application 3 Chapter 2: Operation 4 Manifold Function 4 Chapter 3: Components 5 Required Parts 5 Manifold without Actuators without Pressure Bypass Kit 5 Pump Kit (QHMPK_) 5 Accu Preassembled Manifold (QHAF-_) 5 Thermostatic Control for Pump Kit (QHMTCK) " Air Vent Kit with Drain(QHM_VKIT5) 6 Manifold Adapters (QHMMC_) 6 Manifold with Actuators Pressure Bypass Kit 6 Pressure Bypass Kit (QHMBPK) 6 Manifold Adapters (QHMMC_) 7 Actuators (QHMBMVDS) 7 Chapter 4: Specifications 8 Overall Dimensions 8 Chapter 5: Supply Line Sizing 10 Example 10 Chapter 6: Getting Started 17 Setup Actuator Assembly 17 Thermostatic Control Positioning 17 Actuator Assembly 17 Pressure Bypass Kit 18 Circuit Balancing 18 Thermostatic Locking Mechanism 19 Chapter 7: Wiring 22 Electrical Connection Example 22 QHMZ1P One Thermostat 22 QHMZ4P Multiple Thermostats 23 QHMZ4A Multiple Thermostats 24 Appendix A 25 Charts 25 Appendix B 27 Pressure Loss Charts
4

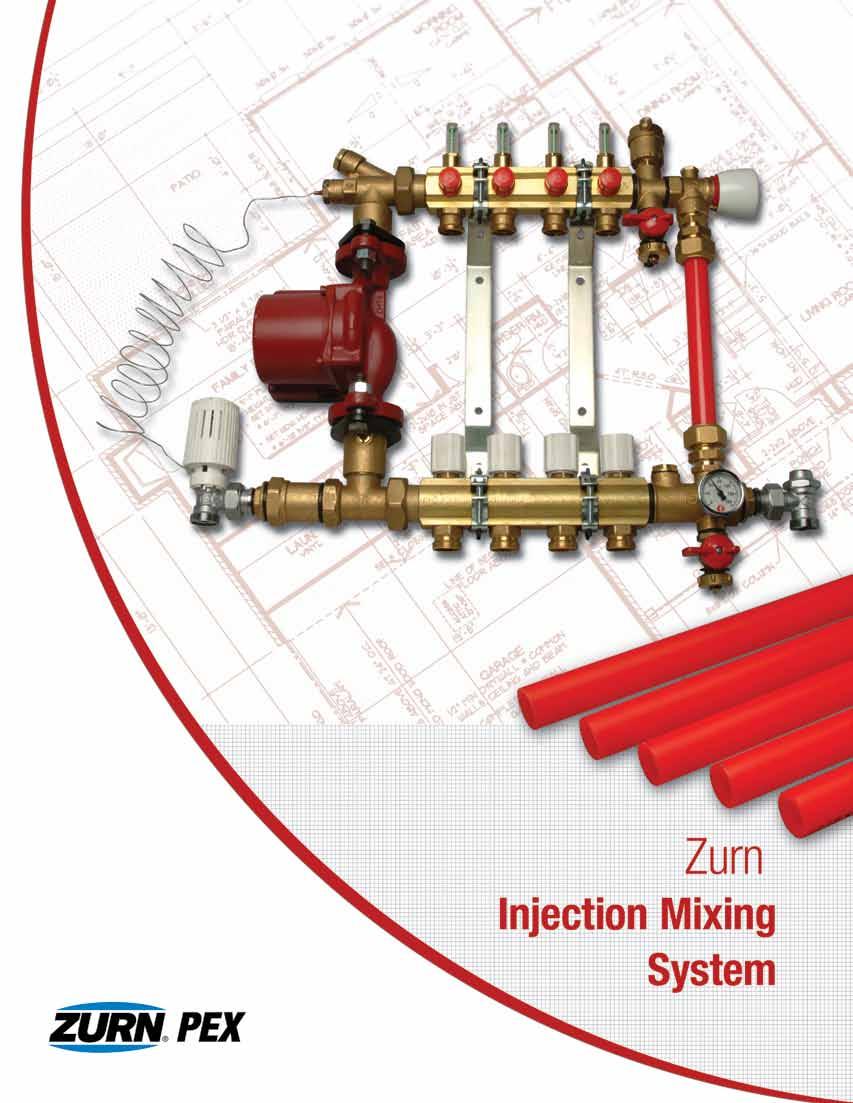
5 Introduction Application Radiant heating systems supported by Zurn have gone through many technological advances in the past several years. One of the new revolutionary ideas in the radiant heating industry is integrating a system to supply fluid to radiant heaters like cast iron radiators, towel warmers, fin tube baseboard, etc. at a higher fluid temperature, while simultaneously providing Zurn tubing circuits underneath the floor with a cooler fluid temperature. Using the Zurn Mixing System with a preassembled manifold can help incorporate this latest technology into everyday life. The Zurn Mixing System functions by receiving fluid from the primary loop through the built-in injection valve feeding the fluid into the secondary loop through the built-in pump for the lower temperature in floor applications by mixing the supply return fluid at the manifold rather than in the boiler room as it has historically been done. The Zurn Mixing System can be very beneficial if used in one of the following applications: The system dimensions are limited. This manifold design enables the pump to be positioned in between the supply return header. If manifolds are located a significant distance from the heat source. 3
6 Chapter 2: Operation Manifold Function This section will help provide a basic understing of how the Mixing System works. This diagram demonstrates the flow through the Mixing System. FLOW FROM PRIMARY LOOP PUMP SUPPLY HEADER RETURN HEADER FLOW BACK TO PRIMARY LOOP When the injection manifold pump is turned off, the primary loop pump pushes fluid through the injection valve, return header, return valve, back to the primary loop without ever entering the Zurn Tubing in the radiant panel. This gives the primary pump the ability to supply fluid to multiple injection manifolds. The hot fluid from the primary loop enters into the Mixing System by way of the injection valve leaves through the return valve. These are the only two points in the manifold that are connected to the primary loop. Once the fluid comes to the injection valve at temperatures between ºF from the primary loop, it begins to flow through the system. The fluid first must flow through an injection valve, which limits the temperature of the fluid to travel through the heated floor system to a range of ºF. The thermostatic head (QHMTCK), which attaches to the injection valve, is supplied with a probe that connects to the supply header to ensure a more precise radiant panel supply fluid temperature. Then, the fluid flows through the pump is distributed to the heated loops via Zurn tubing through the supply header. Once the fluid returns from the heating loops goes through the return header, it can flow to two places. The majority of the flow is drawn up through the pump again becomes mixed with the hotter fluid coming from the injection valve to go through the radiant panel again. The minority of the flow goes toward the return valve, where it will essentially become integrated back into the primary loop to be reheated at the heat source. The injection valve has the ability to be set to a temperature that is ideal for radiant floor heating. Once this temperature is set, the valve will restrict the flow of excessive heat to the supply header in order to maintain the set temperature into the manifold. Actuators can control the flow of individual circuits in a radiant floor heating application. Actuators can be easily fitted onto the manifold. If actuators are used for multiple zones, installing the optional pressure bypass kit (QHMBPK) is recommended. It will help maintain a constant pressure throughout the system by relieving any excess pressure during the opening closing of the actuators. 4
7 Chapter 3: Components Required Parts There are two different configurations for the Mixing System. The configuration is dependent upon whether the Mixing System is zoned with actuators or not. If no actuators are being used in the Mixing System, then there is no need for the Pressure Bypass Kit. Manifold without Actuators without Pressure Bypass Kit The following kits parts are needed to assemble the Mixing System shown in Figure 1 (with no actuators or Bypass Kit) (feet) Figure 1 PUMP KIT (QHMPK - _ ) Figure Pump Performance MANIFOLD KIT (QHAF - _ ) AIR VENT KIT AUTOMATIC (QHMAAVKIT5) MANUAK (QHMAVKIT5) RETURN VALVE INCLUDED WITH THERMOSTATIC CONTRL QHMPK - _ (QHMTCK) (U.S. GMP) UP26-69 UP26-64 UP15-42 Use the pump curves to determine the correct pump kit to use for the manifold. The manifolds flow rate head loss is determined during the design phase of the radiant system. Pump Kit (QHMPK_) The pump kit is available in three different options: QHMPK-L is a low head pump injection mixing system that is recommended for systems with a flow rate of feet of head pressure. QHMPK-M is a medium head pump injection mixing system that is recommended for systems with a flow rate of feet of head pressure. QHMPK-H is a high head pump injection mixing system that is recommended for systems with a flow rate of feet of head pressure. All pump kits come with the following: Y connector with self-sealing tailpiece Pump isolating valve (2) valve with thermostatic option Self-sealing reducer (2) Straight connector T connector with self-sealing tailpiece Pump valve Accu Preassembled Manifold (QHAF-_) The following items are included with purchase of the manifold assembly. Supply header with balancing valves flow meters header with built-in on/off valves Vertical mounting bracket Available in 2-12 ports Thermostatic Control for Pump Kit (QHMTCK) The following items are included with the thermostatic control: Thermostatic head with sensor probe 5
8 Figure 3 1" Air Vent Kit with Drain (QHM_VKIT5) There is a choice of two different air vents - an automatic air vent (shown in Figure 1) a manual air vent. Both come with a drain. The following accessories must be added to the Mixing System to complete the assembly MANIFOLD CONNECTORS (QHMMC _ ) Manifold Connectors (QHMMC_) (See Figure 3) The manifold connectors must be purchased separately to connect the tubing to the headers. One pair of manifold connectors must also be purchased to connect the supply return tubing to the injection return valve. The size of the connector will depend upon the tubing size required for the supply return to the manifold (see Chapter 5). The manifold connectors are sold in pairs include: Figure 4 MANIFOLD CONNECTORS (QHMMC _ ) Compression nut Compression crimp ring Barbed fitting PUMP KIT (QHMPK - _ ) MANIFOLD KIT (QHAF - _ ) PRESSURE BYPASS KIT (QHMPBK) Manifold with Actuators Pressure Bypass Kit The following kits parts are needed to assemble the Mixing System shown in Figure 4. Use this configuration when actuators are being used for zone control. This configuration also uses QHMPK (Pump Kit), QHAF (Accu Manifold), QHMTCK (Thermostatic Control Kit). Pressure Bypass Kit (QHMBPK) The following items are included with the Pressure Bypass Kit. THERMOSTATIC CONTRL (QHMTCK) RETURN VALVE INCLUDED WITH QHMPK - _ Four way connection piece including drain valve automatic air vent Pressure bypass valve 1/2" straight fitting 3/4" straight fitting 3/4" Zurn barrier tubing Five way connector piece with drain valve temperature gauge 3/4" manifold connectors (2) 6
9 Figure 5 The following accessories must be added to the Mixing System when zoning with actuators utilizing the Pressure Bypass Kit. MANIFOLD CONNECTORS (QHMMC _ ) ACTUATORS (QHMBMVDS ) Manifold Connectors (QHMMC_) (See Figure 5) The manifold connectors must be purchased separately to connect the tubing to the headers. One pair of manifold connectors must also be purchased to connect the supply return tubing to the injection return valve. The size of the connector will depend upon the tubing size required for the supply return to the manifold (see Chapter 5). The manifold connectors are sold in pairs include: MANIFOLD CONNECTORS (QHMMC _ ) Compression nut Compression crimp ring Barb fitting Actuators (QHMBMVDS) (See Figure 5) Actuators are sold individually. They are used to start stop the flow through a loop. Actuators are grouped together by zone. The following items are included with the purchase of the actuator. Actuator Manifold adapter 7
10 Chapter 4: Specifications Overall Dimensions The diagram below the corresponding chart show the dimensions of the Mixing System with the Pressure Bypass Kit. It should be noted that the height of the Mixing System will remain the same, despite what pump has been purchased with the system. 17-3/8" [441] 6-1/4" [159] A Number of Loops Description A (inches) 2 2 Port Manifold (QHAF-2 ), QHMPK Manifold Pump Kit, QHMTCK Thermostatic Control Kit, QHMBPK By-pass Kit 17-3/4 3 3 Port Manifold (QHAF-3 ), QHMPK Manifold Pump Kit, QHMTCK Thermostatic Control Kit, QHMBPK By-pass Kit 19-3/4 4 4 Port Manifold (QHAF-4 ), QHMPK Manifold Pump Kit, QHMTCK Thermostatic Control Kit, QHMBPK By-pass Kit 21-3/4 5 5 Port Manifold (QHAF-5 ), QHMPK Manifold Pump Kit, QHMTCK Thermostatic Control Kit, QHMBPK By-pass Kit 23-3/4 6 6 Port Manifold (QHAF-6 ), QHMPK Manifold Pump Kit, QHMTCK Thermostatic Control Kit, QHMBPK By-pass Kit 25-3/4 7 7 Port Manifold (QHAF-7 ), QHMPK Manifold Pump Kit, QHMTCK Thermostatic Control Kit, QHMBPK By-pass Kit 27-3/4 8 8 Port Manifold (QHAF-8 ), QHMPK Manifold Pump Kit, QHMTCK Thermostatic Control Kit, QHMBPK By-pass Kit 29-3/4 9 9 Port Manifold (QHAF-9 ), QHMPK Manifold Pump Kit, QHMTCK Thermostatic Control Kit, QHMBPK By-pass Kit 31-3/ Port Manifold (QHAF-10 ), QHMPK Manifold Pump Kit, QHMTCK Thermostatic Control Kit, QHMBPK By-pass Kit 33-3/ Port Manifold (QHAF-11 ), QHMPK Manifold Pump Kit, QHMTCK Thermostatic Control Kit, QHMBPK By-pass Kit 35-3/ Port Manifold (QHAF-12 ), QHMPK Manifold Pump Kit, QHMTCK Thermostatic Control Kit, QHMBPK By-pass Kit 37-3/4 8
11 The diagram below the corresponding chart show the dimensions of the Mixing System without the Pressure Bypass Kit. It should be noted that the height of the Mixing System will remain the same, despite what pump has been purchased with the system. 15-1/2" [394] 6-1/4" [159] A Number of Loops Description A (inches) 2 2 Port Manifold (QHAF-2 ), Automatic or Manual Air Vent, QHMPK Manifold Pump Kit, QHMTCK Thermostatic Control Kit 14-7/8 3 3 Port Manifold (QHAF-3 ), Automatic or Manual Air Vent, QHMPK Manifold Pump Kit, QHMTCK Thermostatic Control Kit 16-7/8 4 4 Port Manifold (QHAF-4 ), Automatic or Manual Air Vent, QHMPK Manifold Pump Kit, QHMTCK Thermostatic Control Kit 18-7/8 5 5 Port Manifold (QHAF-5 ), Automatic or Manual Air Vent, QHMPK Manifold Pump Kit, QHMTCK Thermostatic Control Kit 20-7/8 6 6 Port Manifold (QHAF-6 ), Automatic or Manual Air Vent, QHMPK Manifold Pump Kit, QHMTCK Thermostatic Control Kit 22-7/8 7 7 Port Manifold (QHAF-7 ), Automatic or Manual Air Vent, QHMPK Manifold Pump Kit, QHMTCK Thermostatic Control Kit 24-7/8 8 8 Port Manifold (QHAF-8 ), Automatic or Manual Air Vent, QHMPK Manifold Pump Kit, QHMTCK Thermostatic Control Kit 26-7/8 9 9 Port Manifold (QHAF-9 ), Automatic or Manual Air Vent, QHMPK Manifold Pump Kit, QHMTCK Thermostatic Control Kit 28-7/ Port Manifold (QHAF-10 ), Automatic or Manual Air Vent, QHMPK Manifold Pump Kit, QHMTCK Thermostatic Control Kit 30-7/ Port Manifold (QHAF-11 ), Automatic or Manual Air Vent, QHMPK Manifold Pump Kit, QHMTCK Thermostatic Control Kit 32-7/ Port Manifold (QHAF-12 ), Automatic or Manual Air Vent, QHMPK Manifold Pump Kit, QHMTCK Thermostatic Control 34-7/8 9
12 SUPPLY PIPING FROM PRIMARY LOOP RETURN PIPING TO PRIMARY LOOP MS = MS MR MR = PS = PR = Chapter 5: Supply Line Sizing Example Use the worksheet below the diagram to the left to determine the diameter of the tubing to use for the supply return of the Manifold. Because the fluid temperature of the supply to the Manifold can be much higher than the fluid temperature going to the Radiant Panel the flow rate needed to supply the hotter fluid to the manifold is much less than the flow rate required from the Manifold to the Radiant Panel. This lower flow requirement enables the diameter of the tubing used for the supply return of the Manifold to be much smaller than what would be required for a conventional Manifold. This chapter explains each step of the worksheet below by walking through an example. Worksheet for Piping to Manifold (A) Total Rate of Manifold to Radiant Panel (A) = (B) Rate Needed. (See Chart, Appendix A) (B) = (C) Loss (FT-H 2 O). (See Chart, Appendix A) (C) = (D) Total Feet of Needed for Supply from the Primary Loop to the Manifold. (D) = (E) Number of Barbed 90º Elbows Branches of a Tee in Supply to the Manifold. (E) = (F) Number of Barbed Straight Fittings Runs of a Tee in Supply to the Manifold. (F) = (G) 1/2" = (D)+ [(E) X 8]+[(F) X 2.8], so ( ) + [( ) X 8] + [( ) X 2.8] = Ft. Of 1/2" (G) 5/8" = (D)+ [(E) X 8.5]+[(F) X 3.1], so ( ) + [( ) X 8.5] + [( ) X 3.1] = Ft. Of 5/8" (G) 3/4" = (D)+ [(E) X 9.2]+[(F) X 3.5], so ( ) + [( ) X 9.2] + [( ) X 3.5] = Ft. Of 3/4" (H) Loss (FT-H 2 O) Per Linear Foot of Each Diameter of at (B) (PR) Fluid Temperature( From Appendix B ) (I) Loss through (FT-H 2 O) for Supply to Manifold (I) = (G) X (H) (J) Loss (FT-H 2 O) Other Components in Supply to Manifold (K) Total Loss (FT-H 2 O) for Supply to Manifold (K) = (C)+(I)+(J) (L) Choose the Tubing Diameter That You are Going to Use for the Supply of This Manifold. Fill in the Values for (PS), (C), (K). (G) = (H) = (I)= (J)= (K)= (L)= Equivalent Tube Length Dia. 1/2" 1/2" 1/2" 1/2" (PS) 5/8" 5/8" 5/8" 5/8" (C) 3/4" 3/4 3/4" 3/4" (K) (FT-H 2 O) 10
13 When using the Accu manifold, there is a flow limit of 8. Figure 1 (A) Total Rate of Manifold to Radiant Panel This value is calculated during the design of the Radiant Heat system. The design can be done using Zurn Radiant Heat Design Software or by following the steps in chapters 9 through 11 in the Zurn Radiant Heating Design Application Guide. For this example we will use a flow rate of 6. (A) Total Rate of Manifold to Radiant Panel (A) = 6 PS Figure 1-A PS = 180ºF MS MR MS = 113ºF MR = 103ºF PR PR = 103ºF (B) Rate Needed This value is determined by calculating the four fluid temperatures located on Figure 1 then applying this data the flow rate in Step A to one of the two Charts in Appendix A. The fluid temperature at location (PS) is the temperature of the supply fluid coming from the primary loop of the Heat source before entering the injection valve. For this example we will use 180ºF. The fluid temperature at location (MS) is the temperature of the fluid going to the supply header of the manifold before entering the radiant panel. (This temperature requirement is determined during the design phase of the Radiant System.) This temperature is dialed in at the thermostatic head of the injection valve. Position * Full Open T(ºF) For this example, we will use position 3, 113ºF. The fluid temperature at location (MR) is the fluid temperature returning from the Radiant Panel entering the return header of the manifold. (This temperature is determined during the design phase of the Radiant System.) This temperature is typically 10ºF or 20ºF lower than the (MS) temperature. For this example we will use an (MR) temperature of 103ºF. The fluid temperature at location (PR) is equal to the fluid temperature at (MR) so for this example we will use a (PR) temperature of 103ºF. Figure 1-A: Example manifold with temperatures filled in at four locations. * Now you can write in the values for (PS), (MS), (MR), (PR) on the diagram located on page 10. Now we need to choose one of the two Charts in Appendix A. One chart is for a 10ºF Radiant Panel T the other is for a 20ºF Radiant Panel T. (This T is determined during the design phase of the Radiant Heat system.) It equals the fluid temperature at (MS) minus the fluid temperature at (MR). For this example, it is (113ºF - 103ºF = 10ºF). So, we will use the Chart at 10ºF Manifold T. See Appendix A: Chart at 10ºF Manifold T Now we need to determine which Temperature Difference column to use. This value is the fluid temperature at location (PS) minus the fluid temperature at location (PR). For this example, it is (180ºF - 103ºF = 77ºF). To be conservative we will round down use the 70ºF Temperature Difference column. Now we can find the value to use for the required through the injection valve by 11
14 Chart 1 Chart at 10ºF Manifold T Total Rate of Manifold 60ºF Temp. Difference 70ºF Temp. Difference Required Required locating the Step A value of 6 in the Total Rate of Manifold column following that row to the right until it intersects the 70ºF Temperature Difference column. So for this example the required through injection valve is (See Chart 1) See Appendix A: Chart at 10ºF Manifold T (B) Rate Needed. (See Chart) (B) = (C) Loss This value is located to the right of the value that was found in Part (B) (See Chart 2). For this example, the head loss through the injection return valve is feet of head. (NOTE: When applying this chart to the actual data, if the head loss value determined here is to high for a common pump, raise the temperature, if possible, at location PS, then recalculate). (C) loss (FT-H2O) through valve. (See Chart) For Parts D-F, see Figure 2: (C) = Chart 2 Figure 2 BASE- BOARD ZONE Chart at 10ºF Manifold T Total Rate of Manifold 60ºF Temp. Difference 70ºF Temp. Difference Required Required HEAT SOURCE BRANCH TEE FLOW CONTROL STRAIGHT FITTING 1' (D) Total Feet of Needed for Supply From the Primary Loop to the Manifold See Figure 2 above. The lengths for this example are marked by the dimension lines. For this example, the total length of the supply return is (1'+2'+13'+9') cumulated to 25'. (D) Total Feet of Needed for Supply from the Primary Loop to the Manifold. 2' ELBOW BRANCH TEE FLOW CONTROL: ADJUST TO CONTROL FLOW RATE INTO INJECTION VALVE 13' ELBOW (D) = 25 STRAIGHT FITTING 9' 12
15 (E) Number of Barbed 90º Elbows/Branches of a Tee in Supply to the Manifold This is simply the number of barbed elbows branches of a tee in the supply return to the manifold. This value will be used to determine the equivalent tubing length of the fitting. For this example, there are two elbows two tee branches. (See figure 2) (E) = = 4 (E) Number of Barbed 90º Elbows Branches of a Tee in Supply to the Manifold. (E) = 4 (F) Number of Barbed Straight Fittings/Runs of a Tee in Supply to the Manifold This is simply the number of straight barbed fittings runs of a tee in the supply return to the manifold. This value will be used to determine the equivalent tubing length of the fitting. For this example, there are two straight barbed fittings, indicated in Figure 2. These are the compression fittings that connect the tubing to the injection valve the return valve. They are indicated by squares in Figure 2. There are no tee runs in this example. (F) Number of Barbed Straight Fittings Runs of a Tee in Supply to the Manifold. (F) = 2 (G) Total Equivalent Tube Length of Supply to Manifold This part will determine the total equivalent tubing length in the supply return loop for the Mixing System. It will take into account the actual length of tubing, plus the equivalent length of any fittings in the loop. This can be found by using the equations shown in the table. Part G is completed below: (G) 1/2" = (D)+ [(E) X 8]+[(F) X 2.8], so (25) + [(4) X 8] + [(2) X 2.8] = 62.6 Ft Of 1/2" (G) 5/8" = (D)+ [(E) X 8.5]+[(F) X 3.1], so (25) + [(4) X 8.5] + [(2) X 3.1] = 65.2 Ft Of 5/8" (G) 3/4" = (D)+ [(E) X 9.2]+[(F) X 3.5], so (25) + [(4) X 9.2] + [(2) X 3.5] = 68.8 Ft Of 3/4" Equivalent Tube Length 1/2" 5/8" 3/4" (G) = Pressure Loss per Linear Foot - 1/2" - 80% Water/ 20% Propylene Glycol 40ºF. 80ºF. 100ºF. 120ºF. ft ft ft ft (H) Loss per Linear Foot of each Diameter of at (B) (from Appendix B) In order to determine this value, the charts from Appendix B must be examined. Go to the appropriate size tubing glycol percentage chart in Appendix B, for each tubing diameter. For this example, assume a 20% propylene glycol, 80% water mixture. Scroll down the flow rate column until you reach the value from Part B on worksheet. For this example, the flow rate is (from Part B) (round up to use the 0.9 row on the charts). Then go across the chart to the appropriate fluid temperature. To be conservative use the fluid temperature at the return valve which is location (PR) on Figure 1 (from Part B). For this example, (PR) = 103ºF, round down to use the 100ºF column on the charts. To determine the head loss per foot, scroll across the 0.9 flow rate row to the fluid temperature of 100ºF. They intersect at FT-H 2 O (see example to left). For this example, (H) = for 1/2". 13
16 Now apply the same flow rate fluid temperature used for 1/2" to the 5/8" 3/4" charts to determine their head loss per foot values. (For this example, 0.9 flow at 100ºF fluid temperature is used). The appropriate head loss per linear foot for each tubing diameter is shown below in the completed chart section of Part H. (H) Loss (FT-H 2 O) Per Linear Foot of Each Diameter of at (B) (PR) Fluid Temperature( From Appendix B ) 1/2" 5/8" 3/4 (H) = (I) Loss through for Supply to Manifold This step will determine the total head loss through the supply return tubing to the manifold. In order to do this, follow the equation below: By multiplying (G) x (H), the total head loss of the different tubing diameters can be determined. For this example: 1/2" = 62.6' x FT-H2O = FT-H2O 5/8" = 65.2' x FT-H2O = FT-H2O 3/4" = 68.8' x FT-H2O = FT-H2O (I) Loss through (FT-H2O) for Supply to Manifold (I) = (G) X (H) 1/2" 5/8" 3/4" (I)= (J) Loss any Other Components in the Supply to Manifold This part will take into account any head loss contributed by any other component not mentioned in this chart. In this example, there are no extra components that will contribute any extra head loss to the supply return to the manifold. (J) Loss any Other Components in the Supply to Manifold (J)= 0 14
17 (K) Total Loss (FT-H 2 O) for Supply to Manifold This is the total head loss of the supply return loop to the manifold. It will include the head loss through the injection return valve (Part C), total head loss of the fittings (Part I), any head loss through any other components (Part J). The total head loss can be found by using the following equation: Total Loss (K) = Loss (C) + Total Loss of (I) + Loss any Other Component in the Loop (J) For this example: 1/2" = = FT-H2O 5/8" = = FT-H2O 3/4" = = FT-H2O The chart below shows the example of the Total Loss of the supply return to the manifold for three diameters of Zurn tubing. (K) Total Loss (FT-H2O) for Supply to Manifold (K) = (C)+(I)+(J) 1/2" 5/8" 3/4" (K)= Figure 3 HEAT SOURCE BASEBOARD ZONE PRIMARY PUMP PRIMARY LOOP SECONDARY LOOP FLOW CONTROL FLOW CONTROL SECONDARY LOOP (L) Choose the Tubing Diameter That You are Going to Use for the Supply of this Manifold The primary pump is responsible for supplying the total flow rate required by the entire system. It must overcome the head loss of all the components in the primary loop plus the highest secondary loop (that it supplies) head loss (see figure 3). In the example, the head loss using 1/2" is not significantly higher than using 5/8" or even 3/4". In this case, the use of 1/2" for the supply return of this Manifold makes sense because it probably won t make a difference when sizing the primary pump. This is only an example. The installer's actual Manifold may calculate much higher differences in the head loss between 1/2", 5/8", 3/4" for the supply return to the manifold, thus affecting the size of the primary pump. Use the data in the chart to choose the diameter that makes the most sense. The chart below shows the diameter of the tubing chosen for this manifold with the values of (PS), (C), (K) next to it. So, the manifold in this example will use 1/2" for its supply return. The injection valve requires a minimum of at 180ºF fluid temperature. The Loss through the supply return to the manifold is 4.18 feet. (L) Choose the Tubing Diameter That You Are Going to Use for the Supply of This Manifold. Fill in the Values for (PS), (C), (K). (L)= Dia. 1/2" (PS) (C) (K) (FT-H 2 O) 180ºF
18 MS = 113ºF MS The entire chart diagram are now complete. Make copies of the blank chart diagram at the beginning of this chapter to use for sizing the supply return piping for multiple manifolds. SUPPLY PIPING FROM PRIMARY LOOP MR MR = 103ºF PS = 180ºF PR = 103ºF RETURN PIPING TO PRIMARY LOOP Worksheet for Piping to Manifold (A) Total Rate of Manifold to Radiant Panel (A) = 6 (B) Rate Needed. (See Chart, Appendix A) (B) = (C) Loss (FT-H 2 O). (See Chart, Appendix A) (C) = (D) Total Feet of Needed for Supply from the Primary Loop to the Manifold. (D) = 25 (E) Number of Barbed 90º Elbows Branches of a Tee in Supply to the Manifold. (E) = 4 (F) Number of Barbed Straight Fittings Runs of a Tee in Supply to the Manifold. (F) = 2 (G) 1/2" = (D)+ [(E) X 8]+[(F) X 2.8], so (25) + [(4) X 8] + [(2) X 2.8] = 62.6 ft. Of 1/2" (G) 5/8" = (D)+ [(E) X 8.5]+[(F) X 3.1], so (25) + [(4) X 8.5] + [(2) X 3.1] = 65.2 ft. Of 5/8" (G) 3/4" = (D)+ [(E) X 9.2]+[(F) X 3.5], so (25) + [(4) X 9.2] + [(2) X 3.5] = 68.8 ft. Of 3/4" (H) Loss (FT-H 2 O) Per Linear Foot of Each Diameter of at (B) (PR) Fluid Temperature ( From Appendix B ) (I) Loss through (FT-H 2 O) for Supply to Manifold (I) = (G) X (H) Equivalent Tube Length 1/2" 5/8" 3/4" (G) = /2" 5/8" 3/4 (H) = (I)= (J) Loss (FT-H 2 O) Other Components in Loop in Supply to Manifold (J)= (K) Total Loss (FT-H 2 O) for Supply to Manifold (K) = (C)+(I)+(J) (L) Choose the Tubing Diameter That You Are Going to Use for the Supply of This Manifold. Fill in the Values for (PS), (C), (K). 1/2" 1/2" 5/8" 5/8" 3/4" 3/4" (K)= Dia. (PS) (C) (K) (FT-H 2 O) (L)= 1/2" 180ºF
 on one of the numbers on the top of the head.")
19 Chapter 6: Getting Started Circuit Balancing Setup Actuator Assembly Thermostatic Control Positioning The inlet temperature for the Mixing System can be easily controlled by positioning the thermostatic head (QHMTCK) on one of the numbers on the top of the head. Each number on the top of the thermostatic control is associated with a temperature, which is shown in the chart below: Position * Full Open T(ºF) Individual Circuit Actuator Assembly The thermostatic control has very accurate control over the temperature. The temperature of the fluid going into the system will only fluctuate as much as 1.8ºF. Actuator Assembly Zurn actuators (QHMBMVDS) should be installed onto the return header if the manifold is supplying multiple zones. Actuators can simply be installed on the return manifold by following these steps: 1. Remove the white valve shut-off caps. 2. Place the plastic adapter supplied with the actuator where the white valve shut-off cap was. 3. Push the actuator down on the plastic piece so that the chord is facing the back the actuator is rotated about 15º off from the center. 4. Rotate the actuator clockwise to lock in place. 5. Push the red button on the actuator. QHMBMVDS (Actuators) should be installed when one manifold is supplying multiple zones. 17
20 Pressure Bypass Kit If utilizing Zurn actuators in the Mixing System, the Pressure Bypass Kit (QHMBPK) should be purchased. Utilizing this kit will help relieve any excess pressure in the system. The injection manifold pump is sized according to the highest head flow rate that the Mixing System will encounter, meaning all of the actuators are in the open position. However, when one of the actuators closes, the fluid that would typically flow through that loop needs to go somewhere, it will end up flowing through the remaining open loops. This creates excess head flow through the zones, possibly resulting in noise throughout the system sending extra flow down loops. Installing the Pressure Bypass Kit (QHMBPK) will absorb the excess head pressure in the system caused by actuators constantly turning on off, therefore, maintaining consistent flow through the circuits. Below are steps on how to initially adjust the Pressure Bypass Kit (QHMBPK). 1. Turn on the system pump manifold pump. 2. Open all zone valve actuators by making the thermostats call for heat. 3. Close the Pressure Bypass by turning the white knob clockwise. 4. Adjust the flow rates to settings required by the design. This may take multiple adjustments (see circuit balancing). 5. Slowly open the Pressure Bypass counter clockwise until the flow meter readings change (it should indicate a decrease in flow). 6. Close the Pressure Bypass until the original flow settings are shown on the flow meters. A QHMBPK should be installed when actuators are being utilized in the Mixing System. Circuit Balancing The supply header has built-in mechanisms that allows the user to balance the flow throughout each individual circuit. Balancing is achieved by following the steps below. Be sure fluid is flowing through the system while attempting to balance the flow. 1. Remove the red cap over the balancing valve. 2. Turn the system pump on. 3. Then starting with the balancing valve fully open, close the allen screw the appropriate amount of turns until the proper flow rate is displayed on the flow meter. 4. Tighten outer lockshield against the allen screw. 5. Place the red cap back over the balancing valve. 6. Repeat for all circuits. 18
21 Step 1-a Thermostatic Locking Mechanism Once the proper head position has been set on the thermostatic head, it can either be locked so the head position does not move, or a maximum head position can be set. By setting the maximum head position the thermostatic head may be closed to reduce the temperature setting, but the temperature setting can not be increased. Continue to Step 1-a to lock the head or go to step 1-b to set the maximum head position. Step 1-a Put a mark on the removable cap that corresponds to the position that the head is to be locked. This enables the cap to be positioned properly when removed. The figure below will be locked at three. Proceed to Step 2. Step 1-b Step 2 Step 1-b Put a mark on the removable cap that corresponds to the maximum radiant panel fluid supply temperature setting another mark that corresponds to the set position (if different from the maximum position). This enables the cap to be positioned properly when removed. The figure below shows a maximum head position of three, a set position of two. Step 2 Remove the number cover with a small screwdriver. It is critical not to move the head position, or else the calibration could be lost the head would need to be positioned again. For this example, the head is positioned to number three. 19
22 Step 3 Step 3) The toothed metal ring must be removed from the inside of the thermostatic head. Remove the toothed metal ring by prying it s outer edge upward with a small screw driver. Continue to Step 4-a to lock the head or go to Step 4-b to set the maximum head position. Step 4-a Locking the Thermostatic. Confirm that the head is in the desired position place the toothed metal ring back inside the thermostatic head, with the tab situated inside the slotted area, below the arrow. The thermostatic head will now be locked in position. Proceed to Step 4. Step 4-a Step 4-b Setting the Maximum Position. Confirm that the head is positioned to the maximum radiant panel fluid supply temperature setting place the toothed metal ring back inside the thermostatic head, with the tab located to the left of the slotted area, below the arrow. This will stop the thermostatic head from turning past this set point. Step 5 Reassemble the number cover by snapping it back onto the thermostatic head. Make sure that it is replaced in the exact position that it was removed. Step 4-b Step 5 Cover snapped back into position that it was in as shown in Step 1-a when locking head. Cover snapped back into position that it was in as shown in Step 1-b when setting the maximum head position. 20
23 Chapter 7: Wiring Electrical Connection Example An integrated radiant floor heating system offers multiple options for controlling the system. The following diagrams shows some basic solutions to wiring options that may be encountered when wiring this type of heating system. The following wiring diagrams depict different ways of wiring the Mixing System with multiple accessories such as zone pumps actuators. QHMZ1P One Thermostat This diagram shows how to connect a one zone switching relay (QHMZ1P) with a thermostat the Mixing System. THERMOSTAT (QHSTH0) T1 DRAWING IS CONCEPTUAL. ALL LOCAL CODES MUST BE MET DURING INSTALLATION. QHMZ1P 1 ZONE SWITCHING RELAY POWER T. STAT ZP1 TO: 120 VAC POWER HEAT SOURCE TO: TT ON HEAT SOURCE POWER VENT (QHBPV ) SP1 EXPANSION TANK (QHWET ) PRESSURE REDUCING VALVE (QHWPRV3) BACKFLOW PREVENTER (QHWBP3) 21
24 QHMZ4P Multiple Thermostats This diagram shows how to connect a four zone switching relay to multiple thermostats the Mixing System. THERMOSTAT (QHSTH0) T1 THERMOSTAT (QHSTH0) T2 DRAWING IS CONCEPTUAL. ALL LOCAL CODES MUST BE MET DURING INSTALLATION. QHMZ4P FOUR ZONE SWITCHING RELAY WITH OPTIONAL PRIORITY HEAT SOURCE POWER VENT (QHBPV ) EXPANSION TANK (QHWET ) PRESSURE REDUCING VALVE (QHWPRV3) BACKFLOW PREVENTER (QHWBP3) 22
25 QHMZ4A Multiple Thermostats This diagram shows how to connect a four zone actuator control valve to multiple thermostats the Mixing System. THERMOSTAT (QHSTH0) T1 THERMOSTAT (QHSTH0) T1 QHMZ4A FOUR ZONE VALVE CONTROL DRAWING IS CONCEPTUAL. ALL LOCAL CODES MUST BE MET DURING INSTALLATION. TO CONTROL BOARD ZONE 1 TO CONTROL BOARD ZONE 2 HEAT SOURCE POWER VENT (QHBPV ) EXPANSION TANK (QHWET ) PRESSURE REDUCING VALVE (QHWPRV3) BACKFLOW PREVENTER (QHWBP3) 23
26 Appendix A Charts Chart at 10ºF Manifold T 10ºF Temp. Diff. 20ºF Temp. Diff. 30ºF Temp. Diff. 40ºF Temp. Diff. 50ºF Temp. Diff. 60ºF Temp. Diff. 70ºF Temp. Diff. 80ºF Temp. Diff. 90ºF Temp. Diff. 100ºF Temp. Diff. Total Rate of Manifold Req. Req. Req. Req. Req. Req. Req. Req. Req. Req
27 Appendix A Charts Chart at 20ºF Manifold T 20ºF Temp. Diff. 30ºF Temp. Diff. 40ºF Temp. Diff. 50ºF Temp. Diff. 60ºF Temp. Diff. 70ºF Temp. Diff. 80ºF Temp. Diff. 90ºF Temp. Diff. 100ºF Temp. Diff. 110º Temp. Diff. Total Rate of Manifold Req. Req. Req. Req. Req. Req. Req. Req. Req. Req
28 Appendix B Pressure Loss Charts Pressure Loss per Linear Foot - 1/2" - 100% Water/0% Propylene Glycol (ft (ft) (ft) (ft) (ft) (ft) (ft) Pressure Loss per Linear Foot - 1/2" - 100% Water/0% Propylene Glycol
29 Appendix B Pressure Loss Charts Pressure Loss per Linear Foot - 1/2" - 80% Water/20% Propylene Glycol Pressure Loss per Linear Foot - 1/2" - 80% Water/20% Propylene Glycol
TC62D Installation Instructions
 TC62D Installation Instructions January 2007 This TC62D has a return water low temperature limit option. Using the low limit precludes using a room sensor because both sensors plug into the same port.
Product Instructions. Mixing Station. Features. Specifications. Materials
 Mixing Station The Viega Mixing Station provides supply water temperature modulation when connected to a variety of heat sources such as conventional or condensing boilers, water heaters, or geothermal
MANIFOLDS & WATER TEMPERATURE CONTROL
 MANIFOLDS & WATER TEMPERATURE CONTROL Overview Water based underfloor heating (UFH) systems work by turning the entire floor into one large low temperature radiator which is heated via a network of pipes
M-8100EP. Installation Guide ENGINEERED PLASTIC MANIFOLD SERIES. Introduction. A. Assemble Manifold Components
 Introduction The Pro Manifolds with Integrated adaptor are designed for use in Hydronic radiant panel heating and cooling applications. They are available in various sizes, configurations, and options
NAME OF PAGE. Opening paragraph. header. header. header. header PAGE 1
 NAME OF PAGE PAGE 1 Opening paragraph header header header header 1 1 1 1 2 2 2 2 3 3 3 3 4 4 4 4 5 5 5 5 6 6 6 6 7 7 7 7 8 8 8 8 TABLE OF CONTENTS PAGE 1 PAGE 2-4 Infloor Bpex, Pex Al Pex Tubing and Potable
M Installation Guide. PRECISION Manifold Series. Introduction. A. Assemble Manifold Components
 Page 1 Introduction The M-8200 Precision Manifolds are designed for use in Hydronic radiant panel heating and cooling applications. They are available in various sizes, configurations, and options with
Manifold Isolation Valves
 300 N. Opdyke Rd. Introduction The Stainless Manifolds are designed for use in Hydronic radiant panel heating and cooling applications. They are available in various sizes, configurations, and options
Series 20 Installation Instructions
 Series 20 Installation Instructions Installation Instructions and field service checklist Read these instructions carefully. Failure to follow them could result in a fire or explosion causing property
Product Catalog. Just because it s in the floor doesn t mean it s INFLOOR.
 Product Catalog Just because it s in the floor doesn t mean it s INFLOOR www.infloor.com TABLE OF CONTENTS Tubing New Style Brass Manifolds & Related Components Current Brass Manifolds & Related Components
Ballorex Venturi 3.1 Introduction
 3.1 Introduction Venturi Fixed Orifice Double Regulating Valve (FODRV) DN 15-600 1/2-24 Venturi description The Venturi is a range of manual balancing valves used in water-based heating and cooling systems
PEX Plumbing & Radiant Heating Systems
 PEX Plumbing & Radiant Heating Systems PEX0118 Customer Guide Effective January 1, 2018 Replaces All Previous Price Lists TABLE OF CONTENTS BY SECTION ZURN PEX PLUMBING PRODUCTS HOT/COLD POTABLE (NON-BARRIER)
1" QickZone Modular Brass Manifold Installation Instructions Parts List
 Parts List QHCMKIT5 1" Manifold Supply End Modules with Lock Shield and Flow Meter QHMODAK: Adjustment Key QHMAVKIT5: Manual Air Vent 1" Manifold Return End Modules with Manual Shut Off QHLABELS: Labels
COOLING SYSTEM - V8. Cooling system component layout DESCRIPTION AND OPERATION
 Cooling system component layout 26-2-2 DESCRIPTION AND OPERATION 1 Heater matrix 2 Heater return hose 3 Heater inlet hose 4 Heater inlet pipe 5 Throttle housing 6 Connecting hose 7 Throttle housing inlet
Product Instructions. Diverting Valve. Valve Cross Section. Features. Specifications. Operations
 Diverting Valve Three-Way Diverting Valves can be used for temperature control in many heating and snowmelting applications. Valve Cross Section Features Includes solder tailpieces (1-1/4" and 1-1/2" models
Product Information. Brass Manifolds. Version A
 Product Information Brass Manifolds Version A Introduction Infloor offers a complete line of brass manifolds for radiant heating applications. This guide explains the how the manifolds work, the setup
Automatic balancing valves ASV-PV DN (3rd gen.)
") Automatic balancing valves ASV-PV DN 50-100 (3rd gen.) Description / Application Partner valve ASV-PV DN 50 ASV-PV DN 65-100 MSV-F2 DN 50-100 ASV balancing valves are used for dynamic hydronic balance
Automatic balancing valves ASV-PV DN 50-100 (3rd gen.) Description / Application Partner valve ASV-PV DN 50 ASV-PV DN 65-100 MSV-F2 DN 50-100 ASV balancing valves are used for dynamic hydronic balance
Secondary Coolant 301
 Secondary Coolant 301 Instructor Rusty Walker Hill PHOENIX Learning Center Secondary Coolant 301 Start-Up Procedures Secondary Coolant 301 Objectives Describe the initial startup procedures for a medium
SLP Camaro ZL1 STAGE 3 (650 HP)
") SLP - 2012 Camaro ZL1 STAGE 3 (650 HP) PART #26002 PACKING LIST Before installation, use this check list to make sure all necessary parts have been included. ITEM QTY CHECK PART NUMBER DESCRIPTION 1. 1
SLP - 2012 Camaro ZL1 STAGE 3 (650 HP) PART #26002 PACKING LIST Before installation, use this check list to make sure all necessary parts have been included. ITEM QTY CHECK PART NUMBER DESCRIPTION 1. 1
FCU Floor Control Unit
 Fully assembled with integrated M3V Control Group including mixing valve and circulating pump and in-line high and low temperature Topway T2 FM manifold options with high and low temperature manifold options
SINGLE MANIFOLDS TECHNICAL DATA SHEET10/ ENG
 FUNCTION ICMA distribution manifolds are manufactured starting from a special profile of brass bar drawn into CW617-N. They can be divided into: Distribution manifolds with or without connection fittings
W91/W94 Series TEMPERATURE REGULATORS. Self-Operated Temperature Regulators. Design & Operation W91 Non-Indicating W94 Dial Thermometer
 Design & Operation W91 Non-Indicating W94 Dial Thermometer Watson McDaniel reserves the right to change the designs and/or materials of its products without notice. 2010 Watson McDaniel Company CAPILLARY
Introduction. System Components
 The Selectra SERIES 94 is for use with either direct or indirect gas fired units (furnaces, ovens, etc.). The system may be field installed on existing equipment or specified for new equipment installation.
E1.x Instruction Manual Supplement for Model 32 and 40
 E1.x Instruction Manual Supplement for Model 32 and 40 Installation Note: When a hub is used with conduit connections to the panel, they are to be connected to the conduit before the hub is connected to
PACIFIC Recumbent Height-Adjustable Bath System Parts Breakdown and Assembly Manual
 PACIFIC Recumbent Height-Adjustable Bath System 9700 Parts Breakdown and Assembly Manual Panel 390010-1 Tubs 390011-1 or 390022-1 390748 Revision H 4/1/2014 PENNER PATIENT CARE, INC Box 523 / 101 Grant
Laboratory Exercise 12 THERMAL EFFICIENCY
 Laboratory Exercise 12 THERMAL EFFICIENCY In part A of this experiment you will be calculating the actual efficiency of an engine and comparing the values to the Carnot efficiency (the maximum efficiency
Chapter 13: Application of Proportional Flow Control
 Chapter 13: Application of Proportional Flow Control Objectives The objectives for this chapter are as follows: Review the benefits of compensation. Learn about the cost to add compensation to a hydraulic
Composite PEX-AL-PEX Tubing
 04/01/11 page 1.1 Composite PEX-AL-PEX Tubing List Per Foot 40190F ½ Composite Tubing x 200.62 40190 ½ Composite Tubing x 250.62 40190A ½ Composite Tubing x 300.62 40190B ½ Composite Tubing x 1000.62 40192
INSTALLATION/OPERATING INSTRUCTIONS VSP. A Variable Speed Pump Control
 INSTALLATION/OPERATING INSTRUCTIONS VSP A Variable Speed Pump Control The VSP is a hydronic heating control. The temperature of the heating water is controlled by regulating the speed of a pump which injects
Combined Ventilation Controller RVWS-T-113HA
 Combined Ventilation Controller RVWS-T-113HA 5-stage Control for Power/Natural Applications 1 variable speed stage, 1 curtain winch stage, 1 fixed speed ventilation stage, 1 thermo/mister cycle stage and
To ensure proper installation, digital pictures with contact information to before startup.
 Check List for Optimal Filter Performance? There should be no back-pressure on the flush line. A 1 valve should have a 2 waste line, and 2 valve should have a 3 waste line. Do not use rubber hosing or
Tools Needed for Mounting Cleá Filling Station
 ALWAYS OBSERVE PRODUCT SAFETY AND HANDLING INSTRUCTIONS. ALWAYS DIRECT DISCHARGE AWAY FROM YOU or other persons. ALWAYS DISPENSE CLEANERS AND CHEMICALS AS DIRECTED ON THE LABEL. ALWAYS DISPENSE INTO APPROVED
IsoTherm FlowGuards Mini Ball Valves Gauges Aquastats Unions
 82 IsoTherm FlowGuards Mini Ball Valves Gauges Aquastats Unions 83 Adjustment knob (sets supply temperature) Mixing Valve 1 Male BSP Threads Mixing Point Supply Inlet from Boiler Temperature Gauge (indicates
T2 Wall Hung Radiator & UFH Manifolds
 T Wall Hung Radiator & UFH Manifolds T Topway LS Pre-Assembled Heating Manifold A range of nickel plated extruded brass manifolds pre-assembled for immediate installation for both radiator and underfloor
CALEFFI. Differential pressure by-pass valve. 519 series 01007/14 NA. Replaces 01007/12 NA
 ifferential pressure by-pass valve RIT LFFI series / N ISO FM ISO No. Replaces / N Function The differential pressure by-pass valve is used in systems with a fixed speed circulating pump supplying several
Wirsbo Radiant Heating System
 January 1, 2009 PAGE 413-1 Wirsbo Radiant Heating System A1180313 WIRSBO hepex Barrier Tube Cross Linked Polyethylene Heat Transfer tubing with EVOH Oxygen Diffusion Barrier 413-0150 5/16" Nominal hepex:
SRC. An Outdoor Reset Control for Sub-Atmosphere Steam Systems OUTDOOR TEMPERATURE
 SRC STEAM RESET CONTROL An Outdoor Reset Control for Sub-Atmosphere Steam Systems Heat-Timer s theory of steam reset heating is as follows: Pulse the valve open to a limited valve position, very slowly
Maintenance & Repair Manual
 SM64055 November 2012 Aerospace Group Conveyance Systems Division Applicable additional manuals: None Carter Brand Ground Fueling Equipment Maintenance & Repair Manual 4 Inch Internal/Bottom Loading Valves
MAINTENANCE MANUAL DI 16
 MAINTENANCE MANUAL DI 16 0.2-1.6% Press Ctrl + L for full screen 1 STANDARD INSTALLATION Inlet Outlet Optional accessories: Pressure regulator Solenoid valves Water meter Flow restrictor 200 Mesh/ 80 micron
LEAK TEST PROCEDURE APPLICABLE TO DC3 INTELLI-GRIP LIFTERS MODELS MRT4-DC3, MRTA8-DC3, MRTALP8-DC3 AND PC/P1-DC3 SERIES
 LEAK TEST PROCEDURE APPLICABLE TO DC3 INTELLI-GRIP LIFTERS MODELS MRT4-DC3, MRTA8-DC3, MRTALP8-DC3 AND PC/P1-DC3 SERIES TESTING AND MAINTENANCE MUST BE DONE BY A QUALIFIED PERSON KEEP FOR FUTURE REFERENCE
SECTION METERS AND GAGES FOR PLUMBING PIPING
 PART 1 GENERAL 1.01 SECTION INCLUDES A. Positive displacement meters. B. Flow meters. SECTION 22 0519 METERS AND GAGES FOR C. Pressure gages and pressure gage taps. D. Thermometers and thermometer wells.
Hydraulic energy control, conductive part
 Chapter 2 2 Hydraulic energy control, conductive part Chapter 2 Hydraulic energy control, conductive part To get the hydraulic energy generated by the hydraulic pump to the actuator, cylinder or hydraulic
Thank you for choosing the Techlusion Electronic Jet Kit, the TFI. The TFI is usable for sequential fuel injection 2 cylinder Suzuki motorcycles **.
 Rev 1.1.1 2055ST TFI TFI Patent Numbers: 7,000,599 & 7,124,742 TFI Instructions Suzuki Thank you for choosing the Techlusion Electronic Jet Kit, the TFI. The TFI is usable for sequential fuel injection
BLOWER VACUUM SWITCH FAILED OPEN
 F1 F1 AC BLOWER VACUUM SWITCH FAILED CLOSED AC BLOWER VACUUM SWITCH FAILED CLOSED UHS If the blower vacuum switch is closed before blower start-up, the control module will not start the blower. Pre-check
Instruction Sheet. Variable Speed - Setpoint (00-VS) 00 and Load Match Cartridge Circulators
 00 and Load Match Cartridge Circulators") Instruction Sheet Variable Speed - Setpoint (00-VS) 00 and Load Match Cartridge Circulators 02-3 SUPERSEDES: May, 200 EFFECTIVE: October, 200 Plant ID# 00-38 The Variable Speed - Setpoint 00 Cartridge
Instruction Sheet Variable Speed - Setpoint (00-VS) 00 and Load Match Cartridge Circulators 02-3 SUPERSEDES: May, 200 EFFECTIVE: October, 200 Plant ID# 00-38 The Variable Speed - Setpoint 00 Cartridge
Series 14R. Installation Instructions and Field Service Checklist
 Series 14R Installation Instructions and Field Service Checklist Read these instructions carefully. Failure to follow them could result in a fire or explosion causing property damage, personal injury,
iseries-s (Setpoint) Mixing Valve
 Mixing Valve") Taco Radiant ade Easy pplication Guide (Setpoint) ixing Valve Products & pplications P06 EFFECTIVE:ugust 15, 2005 SUPERSEDES: arch 1, 2004 OVERVIEW (Setpoint) ixing Valve Use the Taco Setpoint ixing Valves
Taco Radiant ade Easy pplication Guide (Setpoint) ixing Valve Products & pplications P06 EFFECTIVE:ugust 15, 2005 SUPERSEDES: arch 1, 2004 OVERVIEW (Setpoint) ixing Valve Use the Taco Setpoint ixing Valves
HKV 1 1/4 in. Brass Manifold Product instructions. Construction Automotive Industry
 HKV 1 1/4 in. Brass Manifold Product instructions www.rehau.com Construction Automotive Industry SCOPE This guide provides instruction regarding HKV 1 1/4 in. manifold installation and operation. Manifolds
JConn Inv. PID Controller Instruction Manual
 JConn Inv. PID Controller Instruction Manual This information is specific to the Mypin TA4 based controller sold by JConn Inv. but it should work for most TA4 types - within limits. Table of Contents 1.
Thermo-Bob 1 Installation Manual: Kawasaki Concours
 Thermo-Bob 1 Installation Manual: 1986-2006 Kawasaki Concours This is a basic guide for installing the Thermo-Bob 1 on a Kawasaki ZG-1000 Concours. The bike used in the following photos was a 1995 year
CALEFFI. Mixing valves and actuators series 01169/17 GB. replaces dp 01169/09. Function
 Mixing valves and actuators 610-611 - 612-63 series RIT ISO 01 M 214 LI 01169/17 replaces dp 01169/09 unction The mixing valves allow the centralisation heating system to be regulated by mixing the boiler
LEAK TEST PROCEDURE MRTALPCH611LDC REMOTE READY LIFTERS W/ 3 BUTTON CONTROL APPLICABLE TO LIFTERS WITH SERIAL NUMBERS GREATER THAN #
 LEAK TEST PROCEDURE MRTALPCH611LDC REMOTE READY LIFTERS W/ 3 BUTTON CONTROL APPLICABLE TO LIFTERS WITH SERIAL NUMBERS GREATER THAN # 20100742 TESTING AND MAINTENANCE MUST BE DONE BY A QUALIFIED PERSON
Components of Hydronic Systems
 Valve and Actuator Manual 977 Hydronic System Basics Section Engineering Bulletin H111 Issue Date 0789 Components of Hydronic Systems The performance of a hydronic system depends upon many factors. Because
* T Temperature-Indicating Dial (Must be field set and calibrated to an actual thermometer)
") 175/153 Series Watson McDaniel reserves the right to change the designs and/or materials of its products without notice. 2006 Watson McDaniel Company 175 HEATING 153 COOLING 175 / 153 Screwed Connection
175/153 Series Watson McDaniel reserves the right to change the designs and/or materials of its products without notice. 2006 Watson McDaniel Company 175 HEATING 153 COOLING 175 / 153 Screwed Connection
Cooling System Description and Operation
 Page 1 of 5 2008 Holden VE Sedan VE, WM, Caprice, Statesman, Lumina, Omega, VXR8 Service Manual Engine Engine Cooling Description and Operation Document ID: 1990377 Cooling System Description and Operation
2, 3 and 4 - way valves VZL
 2, 3 and 4 - way valves VZL Description VZL 2 VZL 3 VZL 4 VZL valves provide a high quality, cost effective solution for the control of hot and/or chilled water for fan coil units, small reheaters, and
C-5230 Pneumatic Signal Limiter
 24-4221- 9, Rev. B Product Bulletin C-5230 Issue Date February 2016 C-5230 Pneumatic Signal Limiter Features Independently Adjustable High/Low Limits Integral Hypodermic Needle Test Points Field Chosen
TOURING Models
 P/N FI-1252HPST Patent Numbers: 7,000,599 & 7,124,742 Electronic Jet Kit Instructions Thank you for choosing the Techlusion Electronic Jet Kit, the TFI. This TFI model is ONLY usable for the following
Tests & Adjustments - General Machine. General Safety Hydraulic Tank Turbo Boost Regulator
 Section 8.1 Tests & Adjustments - General Machine General Safety......................................... 8.1.2 Hydraulic Tank Turbo Boost Regulator........................ 8.1.2 Hydraulic Tank Safety
Manifolds series 73A and 77A. Instruction manual
 KAN-therm System Manifolds series 73A and 77A Instruction manual Manifolds 73A and 77A description and principles of operation................. 18 Manifolds series 73A and 77A valves adjustment............................
POWERS CONTROL RC 195 Multiple Input Receiver- Controller
 POWERS CONTROL RC 195 Multiple Input Receiver- Controller Document No. 155-036P25 RC 195-1 Description Features Application The RC 195 Multiple lnput Receiver-Controller is a pneumatic instrument which
Always wear safety glasses when working on your vehicle.
 90-93 MAZDA MIATA SUPERCHARGER KIT The KraftWerks 90-93 Mazda Miata Supercharger Kit was designed for easy installation. Competent mechanics with the appropriate tools will find the process to be relatively
OPERATOR'S MANUAL AND MAINTENANCE INFORMATION MODEL T-2000 TEXTURE TEST SYSTEM
 OPERATOR'S MANUAL AND MAINTENANCE INFORMATION MODEL T-2000 TEXTURE TEST SYSTEM This Publication contains information proprietary To Food Technology Corporation The contents of this publication may not
PRO-BALANCE 1 1/4 IN. BRASS MANIFOLD. Product Instructions
 PRO-BALANCE 1 1/4 IN. BRASS MANIFOLD Product Instructions CONTENTS 1. Scope 3 2. Product Overview 3 3. Technical Data 5 4. Mounting the Manifold 7 5. Installing RAUPEX Pipes 8 6. Flushing and Filling Radiant
Hydraulics in building systems. siemens.com/buildingtechnologies
 Hydraulics in building systems siemens.com/buildingtechnologies Contents 1 Hydraulic circuits... 6 1.1. Key components of a hydraulic plant... 6 1.2. Different hydraulic circuits... 7 1.3. Consumers with
IndustrialPartFinder.com
 2SFX Pumps Service Sheet: Valve Repair This sheet covers replacing the valves on a 2SFX pump. Most of the information here was taken from the CAT Pumps Service Manual for this pump. We have included some
Installation Manual TWM Performance Short Shifter Cobalt SS/SC, SS/TC, HHR SS, Ion Redline and Saab 9-3
 Page 1 Installation Manual TWM Performance Short Shifter Cobalt SS/SC, SS/TC, HHR SS, Ion Redline and Saab 9-3 Please Note: It is preferable to park on a flat surface, as you will have to engage and disengage
MMR25. Instruction Manual for Operation & Maintenance. IB International. Ph:
 MMR25 Instruction Manual for Operation & Maintenance IB International www.ibinternational.com.au Ph: 07 3348 8300 Contents Introduction... 2 Identification Data... 3 Machine Controls & Components... 3
2) Mark wall at 5 10 for center line of bottom bolt-hole in wall brackets on transition box side of floor.
 Mark wall at 5 10 for center line of bottom bolt-hole in wall brackets on transition box side of floor.") IN-BAY INSTALLATION 1) Set up transit or level to determine highest point on the floor. From this point establish a level line from which to mark the bracket height on the walls. 2) Mark wall at 5 10 for
IN-BAY INSTALLATION 1) Set up transit or level to determine highest point on the floor. From this point establish a level line from which to mark the bracket height on the walls. 2) Mark wall at 5 10 for
599 Series Zone Valve Bodies:
 599 Series Zone Bodies: Two-Way and Three-Way VE VV-1 Description Features The 599 Series two-way and three-way Zone s with a 1/10-inch (2.5 mm) stroke. Direct-coupled, universal bonnet Application Ordering
3.1 DISPENSER BLACK SHADOW SERIES. Tools Needed for Mounting SCS Dispenser Hammer
 SCS 2 BLACK SHADOW SERIES 3.1 DISPENSER ALWAYS OBSERVE PRODUCT SAFETY AND HANDLING INSTRUCTIONS. ALWAYS DIRECT DISCHARGE AWAY FROM YOU or other persons. ALWAYS DISPENSE CLEANERS AND CHEMICALS AS DIRECTED
Stop Lamp Switch. STP or BRK. Stop Lamps
 WORKSHEET 2 1 Position/Mode Switches and Circuits (Instructor Copy) Vehicle Year/Prod. Date Engine Transmission Technician Objectives With this worksheet, you will learn to test position/mode circuits
ASSEMBLY INSTRUCTIONS ZONE MODULE 2 1 THERMOSTAT DESCRIPTION POWER SUPPLY AIRZONE CONTROLLER
 ZONE MODULE 2 1 ASSEMBLY INSTRUCTIONS AIRZONE CONTROLLER THERMOSTAT DESCRIPTION The Touch Thermostat, is the access panel for the installer to configure the Zone Module, and also, for the user to change
Hamilton 3VO Submittal
 Job RESET FORM Engineer Hamilton 3VO Submittal BOILER s H3H 750 WATER HEATER s H3D 750 Contractor Prepared By Date Input 100% factory fire tested Efficiency: up to 99.8% (based on incoming water) Maximum
Welker Sampler. Installation, Operation, & Maintenance Manual. Model GSS-4HP
 Installation, Operation, & Maintenance Manual Welker Sampler Model GSS-4HP The information in this manual has been carefully checked for accuracy and is intended to be used as a guide to operations. Correct
Model INTERNAL/BOTTOM LOADING VALVES SM Maintenance & Repair Manual. July Applicable addition manuals: None
 SM64128 July 2010 Eaton Aerospace Group Conveyance Systems Division Carter Brand Ground Fueling Equipment Applicable addition manuals: None Maintenance & Repair Manual 6 INTERNAL/BOTTOM LOADING VALVES
CALEFFI. Modulating temperature regulating unit with distribution kit for primary circuit. 171 series 01153/15 GB. replaces 01153/07 GB
 ACCREDITED Modulating temperature regulating unit with distribution kit for primary circuit 7 series ISO 9 FM 6 / GB replaces /7 GB Function The temperature regulating unit with the distribution kit for
GENERAL INFORMATION MECHANICAL INSTALLATION PRESSURE INDEPENDENT VALVES 2-1/2"-10" MVP INSTALLATION & OPERATION INSTRUCTIONS UNION CONNECTIONS
 GENERAL INFORMATION INSTALLATION & OPERATION INSTRUCTIONS 1. Clean the lines upstream of valve particles larger than 1/16" diameter (welding slag, pipe scale and other contaminants). Griswold Controls
Preassembled fixed-point control, distribution and pumping unit for radiant panel heating systems DOMORADIANT Series
 95-0055-UK-Rev1.qxd 4-09-2007 10:31 Pagina 1 Preassembled fixed-point control, distribution and pumping unit for radiant panel heating systems DOMORADIANT Series Main features DOMORADIANT, is a preassembled
Eco-Propel TM Variable Speed Pump Kit Instruction and Operation Manual, P/N: , Revision 1
 Eco-Propel TM Variable Speed Pump Kit Instruction and Operation Manual, P/N: 107065-01, Revision 1 March 03, 2017 Contents Introduction 2 Installation Pre-installation 3 Installation Procedure 4 Electrical
180 Lake Ave North Paynesville, MN Phone: MASTER MANUFACTURING MASTER GARDNER
 180 Lake Ave North Paynesville, MN 56362 Phone: 1-800-864-1649 www.master-mfg.com MASTER MANUFACTURING MASTER GARDNER Part Number PCD-E3-009B-MM Rev 2 Dec. 2012 Note: Do not return product to the distributor/dealer
THERMOSTATIC CONTROL HEADS:
 Thermostatic radiator valves for towel warmer style radiators 338 33, 00 series REDITED LEFFI 0009/3 N ISO 900 FM 6 ISO 900 No. 0003 Function onvertible radiator valves are typically used in North merica
Eco-Propel TM Variable Speed Pump Kit Instruction and Operation Manual, p/n Revision 0
 Eco-Propel TM Variable Speed Pump Kit Instruction and Operation Manual, p/n 107065-01 Revision 0 May 20, 2016 Contents Introduction 2 Installation Pre-installation 3 Installation Procedure 4 Electrical
Section 3 Technical Information
 Section 3 Technical Information In this Module: Engine identification Modes of operation Battery charging and heat manage operation Service and repair procedures Maintenance requirements Engine Identification
MAGNETIC MOTOR STARTERS
 Chapter 6 MAGNETIC MOTOR STARTERS 1 The basic use for the magnetic contactor is for switching power in resistance heating elements, lighting, magnetic brakes, or heavy industrial solenoids. Contactors
Fisher 657 Diaphragm Actuator Sizes and 87
 Instruction Manual 657 Actuator (30-70 and 87) Fisher 657 Diaphragm Actuator Sizes 30 70 and 87 Contents Introduction... 1 Scope of Manual... 1 Description... 2 Specifications... 2 Installation... 3 Mounting
RUN ACCUM. TOTAL STOP BAT LOW HIGH
 TURBOPULSE TURBINE FLOWMETER INSTRUCTION MANUAL gal RUN ACCUM. TOTAL STOP BAT LOW HIGH RESET > PROGRAM ENTER ACCUM TOTAL ^ RATE TOTAL TP050 TABLE OF CONTENTS 1. INTRODUCTION Overview 1 1.1 Model number
KEES, INC. BALANCING MANUAL
 KEES, INC. Products for Sheet Metal HVAC, Food Service, & Architectural Construction Industries 400 S. INDUSTRIAL DRIVE ELKHART LAKE, WISCONSIN 53020 920 876-3391 FAX 920 876-3065 FORWARD: BALANCING MANUAL
 Page 1 of 18 2004 PCED On Board Diagnostics SECTION 5: Pinpoint Tests Procedure revision date: 10/26/2007 H: Fuel Control H: Introduction H1 PERFORM THE KOER SELF-TEST Engine at normal operating temperature.
Low fuel pressure will damage injectors 6.0 POWERSTROKE FUEL PRESSURE TESTING AND TIPS
 Low fuel pressure will damage injectors 6.0 POWERSTROKE FUEL PRESSURE TESTING AND TIPS WHAT CAUSES INJECTOR FAILURE This chart is from FORD. As you can see, we need to do our part to ensure the customer
5000TOC Sensor Service Manual
 Part No. 84449 5000TOC Sensor Service Manual This document contains proprietary information, which is protected by copyright. All rights are reserved. No part of this document may be photocopied (other
Model No. DFC-X Support DIRECT FIRED DIGITAL TEMPERATURE CONTROL INSTALLATION, OPERATION, AND MAINTENANCE MANUAL
 Model No. DFC-X Support 877-351-4702 DIRECT FIRED DIGITAL TEMPERATURE CONTROL INSTALLATION, OPERATION, AND MAINTENANCE MANUAL This manual covers the following products: DFC-X TS-01 DFTD RDU DAT-12 PWM-10V
Fisher 4194HS Differential Pressure Indicating Controllers
 Instruction Manual Fisher 4194HS Differential Pressure Indicating Controllers Contents Introduction... 2 Scope of Manual... 2 Description... 2 Specifications... 5 Educational Services... 5 Installation,
CALEFFI. Pre-assembled distribution manifolds for radiant panel systems. series 663 & /05 NA. Function
 Pre-assembled distribution manifolds for radiant panel systems series & / NA Function Distribution manifolds for radiant panel systems are used to optimally distribute the heating fluid in floor heating
IMPORTANT NOTE! Please take the time to read this instruction sheet. Disregarding these guidelines may adversely affect your piping components
 IMPORTANT NOTE! Please take the time to read this instruction sheet. Disregarding these guidelines may adversely affect your piping components GENERAL INFORMATION... Error! Bookmark not defined. O-RING
2006 Honda Civic SI Supercharger Kit Installation Instruction Kit #
 2006 Honda Civic SI Supercharger Kit Installation Instruction Kit #350-091 3239 MONIER CIRCLE, STE.5 RANCHO CORDOVA, CA 95742 916.635.4550 FAX 916.635.4632 www.ct-engineering.com INS-157 VERSION: 3.25.2009
R81EAA-2 Economizer Circuit Board
 FAN 121, 628.1 Motor Actuators Section M Technical Bulletin R81E Issue Date 0993 R81EAA-2 Economizer Circuit Board Applications Setpoint Adjustment Temp T1 T2 S2 1O S 1 8 9 Changeover Relay Refrigeration
EGR MASS FLOW SYSTEM CONVERSION KIT (FROM TWO-PIECE TUBE WITH BELLOWS-TYPE CONNECTIONS TO ONE-PIECE TUBE WITH HOSE CONNECTIONS) ASET AC ENGINES
 ASET AC ENGINES") SERVICE BULLETIN REV (Not applicable to Mack Trucks Australia) (Supersedes SB-214-026 dated 2/2/04) NUMBER: SB-214-026 DATE: 7/30/04 MODEL: ASET AC EGR MASS FLOW SYSTEM CONVERSION KIT (FROM TWO-PIECE TUBE
SERVICE BULLETIN REV (Not applicable to Mack Trucks Australia) (Supersedes SB-214-026 dated 2/2/04) NUMBER: SB-214-026 DATE: 7/30/04 MODEL: ASET AC EGR MASS FLOW SYSTEM CONVERSION KIT (FROM TWO-PIECE TUBE
Ford 6.7 EGR Delete Kit
 Fits: 2011 12 Powerstroke 6.7L Read instructions thoroughly before proceeding! ***This kit may void factory warranty please check with manufacturer.*** ***This kit is intended for off road use only.***
A10VO. Variable Displacement Piston Pump Technical Information Manual Module 3A
 A10VO Variable Displacement Piston Pump Technical Information Manual Module 3A 2/22 Table of Contents 1 Features 3 2 Functional Purpose 3 3 Description 5 4 Specifications 6 4.1 Pressure 6 4.2 RPM 6 4.3
OIL PRESSURE SAFETY CONTROLS
 8-1095 Application Engineering Bulletin AE-1095-R9 Revised September 1, 1981 OIL PRESSURE SAFETY CONTROLS A major percentage of all compressor failures are caused by lack of proper lubrication. Improper